

Honda HRB215SDA, HRM215PDA, HRM215SDA Owner's Manual


INTRODUCTIONI
. A FEW WORDS ABOUT SAFETY
Your safety, and the safety of others, are very important. And using
this lawn mower safely is an important responsibility.
To help you make informed decisions about safety, we have provided
operating procedures and other information on labels and in this
manual. This information alerts you to potential hazards that could
hurt you or others.
Of course, it is not practical or possible to warn you about all the
hazards associated with operating or maintaining a lawn mower. You
must use your own good judgment.
You will find important safety information in a variety of forms,
including:
l Safety Labels - on the lawn mower.
0 Safety Messages -
preceded by a safety alert symbol m and
one of three words: DANGER, WARNING, or CAUTION.
These signal words mean:
You WILL be KILLED or SERIOUSLY
HURT if you don’t follow instructions.
You CAN be KILLED or SERIOUSLY
HURT if you don’t follow instructions.
You CAN be HURT if you don’t follow
instructions.
l Safety Headings -
such as Important Safety Reminders or
Important Safety Precautions.
l Safety Chapter -
0 Instructions
such as MOWER SAFETY.
- how to use this mower correctly and safely.
This entire book is filled with important safety information - please
read it carefully.
2
Turn to the beginning of each chapter for a complete list of subjects.
MOWER SAFETY.. . . . . . . . . . . . . . . . . . . . . . . . . . . . . . .
Important information about some specific hazards,
and what you can do to prevent injury.
CONTROLS . . . . . . . . . . . . . . . . . . . . . . . . . . . . . . . . . . . .
Identification of components and information about how
the controls work.
BEFORE OPERATION
How to fuel and check your mower to be sure it is
ready. How to prepare your lawn and yourself before
you begin mowing.
OPERATION
Starting and stopping the engine, safe mowing
practices, and mowing tips.
TRANSPORTING
How to load and carry your mower safely.
MAINTENANCE . . . . . . . . . . . . . . . . . . . . . . . . . . . . . . . . . 39
When and how to perform routine inspection, service,
and adjustments to keep your mower in good operating
condition.
TROUBLESHOOTING . .
What to check if you have a problem with your mower.
. . . . . . . . . . . . . . . . . . . . . . . . . . . . . . . . . . . .
. . . . . . . . . . . . . . . . . . . . . . . . . . . . 15
25
. . . . . . . . . . . . . . . . . . . . . . . . . . . . . . . . 37
. . . . . . . . . . . . . . . . . . . . . . . . . . 59
5
9
STORAGE . . . . . . . . . . . . . . . . . . . . . . . . . . . . . . . . . . . . . .
How to protect your mower from rust and corrosion,
and ensure that it will start easily when you want to use
it again.
SPECIFICATIONS.. . . . . . . . . . . . . . . . m . . . . . . . . . . . . . . 71
Dimensions, capacities, and other technical information.
ADDITIONAL INFORMATION . . . . . . . . . . . . . . . . . . . . . . 75
Additional information, Honda publications available to
you, warranty, and how to contact us if you have a
question or a warranty repair problem.
INDEX......................................... 87
QUICK REFERENCE INFORMATION . . . inside back cover
63
3


MOWER SAFETY
This chapter explains what you need to know to operate your mower
safely.
IMPORTANT SAFETY INFORMATION
Avoid Rotating Blades.
Clear Mowing Area
Keep Shields in Place
Refuel with Care
Wear Protective Clothing.
Turn Engine Off When Not Mowing.
IMPORTANT MESSAGE TO PARENTS
SAFETY LABEL LOCATIONS.
...............................
..........................
.............................
...........................
........................
.....................
...............
................
..............
6
6
6
6
6
6
6
7
8
5
MOWER SAFETY
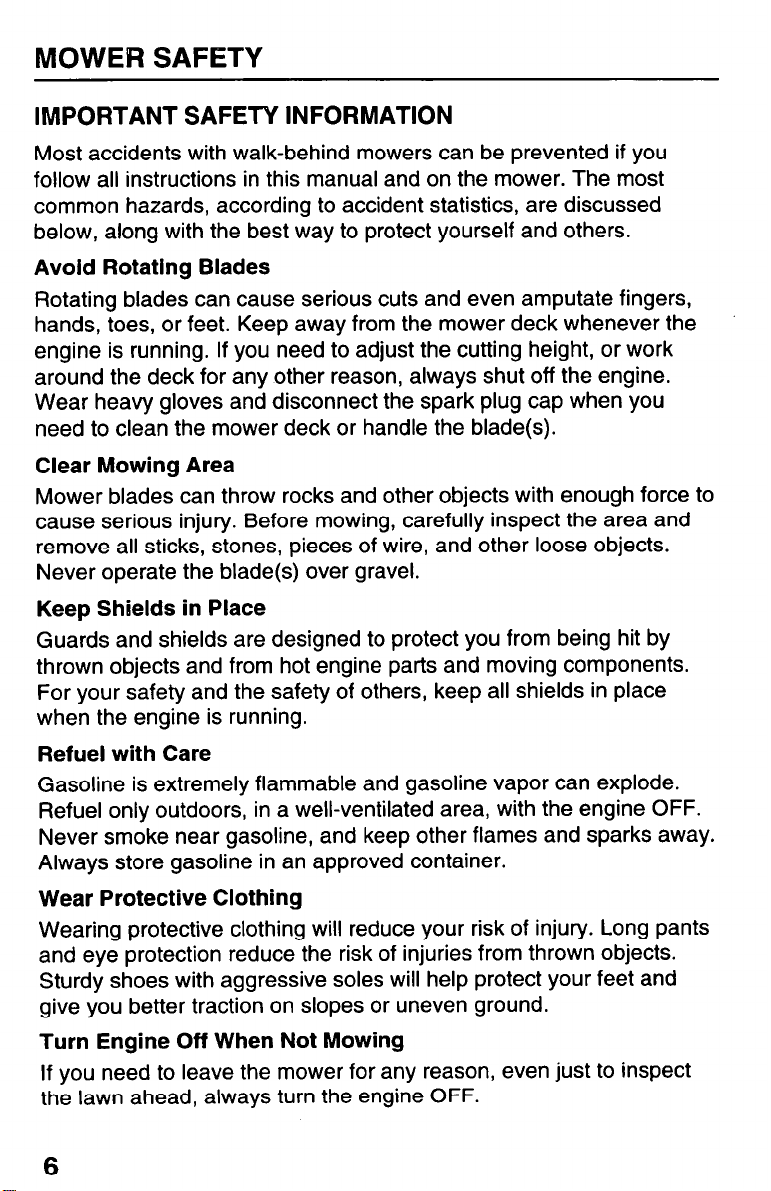
IMPORTANT SAFETY INFORMATION
Most accidents with walk-behind mowers can be prevented if you
follow all instructions in this manual and on the mower. The most
common hazards, according to accident statistics, are discussed
below, along with the best way to protect yourself and others.
Avoid Rotating Blades
Rotating blades can cause serious cuts and even amputate fingers,
hands, toes, or feet. Keep away from the mower deck whenever the
engine is running. If you need to adjust the cutting height, or work
around the deck for any other reason, always shut off the engine.
Wear heavy gloves and disconnect the spark plug cap when you
need to clean the mower deck or handle the blade(s).
Clear Mowing Area
Mower blades can throw rocks and other objects with enough force to
cause serious injury. Before mowing, carefully inspect the area and
remove all sticks, stones, pieces of wire, and other loose objects.
Never operate the blade(s) over gravel.
Keep Shields in Place
Guards and shields are designed to protect you from being hit by
thrown objects and from hot engine parts and moving components.
For your safety and the safety of others, keep all shields in place
when the engine is running.
Refuel with Care
Gasoline is extremely flammable and gasoline vapor can explode.
Refuel only outdoors, in a well-ventilated area, with the engine OFF.
Never smoke near gasoline, and keep other flames and sparks away.
Always store gasoline in an approved container.
Wear Protective Clothing
Wearing protective clothing will reduce your risk of injury. Long pants
and eye protection reduce the risk of injuries from thrown objects.
Sturdy shoes with aggressive soles will help protect your feet and
give you better traction on slopes or uneven ground.
Turn Engine Off When Not Mowing
If you need to leave the mower for any reason, even just to inspect
the lawn ahead, always turn the engine OFF.
6

MOWER SAFETY
IMPORTANT MESSAGE TO PARENTS
YOUR CHILDREN’S SAFETY IS VERY IMPORTANT to Honda.
That’s why we urge you to read this message before letting your
youngster operate this lawn mower. Lawn mowers are tools, not toys.
As with any equipment, bad judgments can result in serious injuries.
You can help prevent accidents by making good decisions about if,
when, and how your youngster operates this equipment.
The first question you’ll need to ask is whether your youngster is
capable of operating this mower safely. Remember, young people
vary widely, and AGE IS NOT THE ONLY FACTOR.
Physically, a youngster must be LARGE ENOUGH AND STRONG
ENOUGH to easily start the mower and control its direction. The
youngster also needs enough size, strength, and coordination to
comfortably reach and operate the controls.
Another, tougher question you need to ask is if your youngster has
enough MATURITY AND RESPONSIBILITY to safely operate this
mower. Does the young person think through problems and come to
logical solutions? Be honest! Anyone who takes unnecessary risks
and doesn’t obey rules should not operate this lawn mower.
If you decide that your son or daughter can handle the mower safely,
CAREFULLY READ THE OWNER’S MANUAL with your youngster.
Make sure you both understand all instructions and safety
information. Also, be sure your youngster wears sturdy shoes and
other protective clothing when operating or handling the mower.
SUPERVISION is also very important. Walk with your youngster
during the first few minutes of mowing. Even after the youngster has
become confident with the mower, do not let the young person use
the mower without good adult supervision. An adult should also be
present during refueling and maintenance. In fact, it’s up to parents to
make sure that the mower is properly maintained and kept in safe
operating condition.
By always placing safety first, your youngster will acquire useful skills
and a sense of accomplishment. And you’ll both get the best results
from your lawn mower.
7
MOWER SAFETY
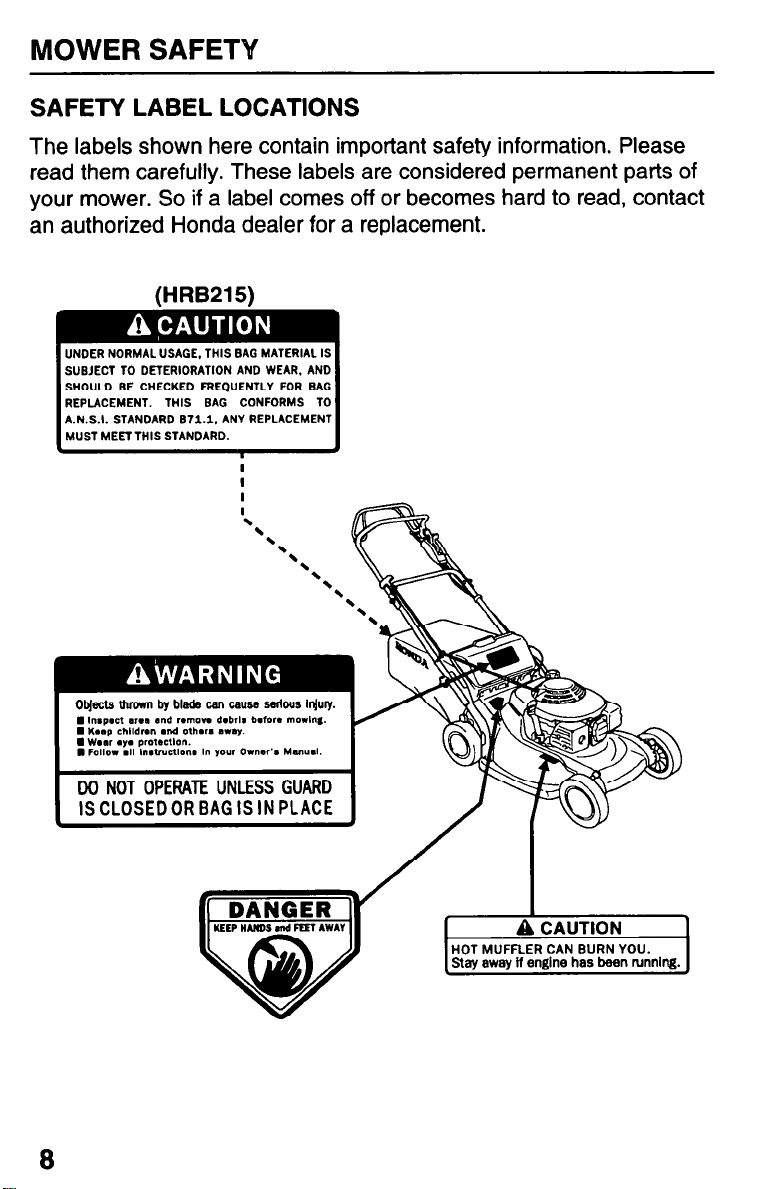
SAFETY LABEL LOCATIONS
The labels shown here contain important safety information. Please
read them carefully. These labels are considered permanent parts of
your mower. So if a label comes off or becomes hard to read, contact
an authorized Honda dealer for a replacement.
(HRB215)
UNDER NORMAL USAGE, THIS GAG MATERIAL IS
SHOULD BE CHECKED FREQUENTLY FOR BAG
REPLACEMENT. THIS BAG CONFORMS TO
A.N.S.I. STANDARD 671.1. ANY REPLACEMENT
a

CONTROLS
This chapter shows the locations of controls and other important parts
of your mower, and it tells you how the controls work.
COMPONENT iDENTiFiCATiON
DESCRIPTION OF CONTROLS.
FuelValve ....................................
ThrottleLever .................................
Flywheel Brake Lever
Drive Clutch Lever (SDA).
Shift Lever (SDA).
Cutting Height Adjustment Levers.
.......................... 13
.......................
.............................
...................
...................
................
10
12
12
12
13
14
14

CONTROLS
COMPONENT IDENTIFICATION
DRIVE CLUTCH
LEVER (SIDA)
/ ’
J-N -\
GRIP
GRASS BAG
(HRB215)
FLYWHEEL BRAKE LEVER
/
, HANDLEBAR
SHIFT LEVER
THROlTLE LEVER
DISCHARGE GUARD
/ FUEL TANK CAP
REAR CUlTING
HEIGHT ADJUSTMENT
LEVER
OIL FILLER CAP
MUFFLER’
MOWER DECK
/
HRB215K3PDA: Manually propelled, high-lift blade, and grass bag.
HRB215K3SDA: Self-propelled, high-lift blade, and grass bag.
HRM215K3PDA: Manually propelled, mulching blades, and mulching plug.
HRM215K3SDA: Self-propelled, mulching blades, and mulching plug.
FRONT CUlTlNG HEIGHT
ADJUSTMENT LEVERS
V
10

ENGINE SERIAL NUMBER
(on back of engine)
SPARK PLUG CAP
FLYWHEEL BRAKE
LEVER
FRAME
SERIAL
NUMBER
\
CONTROLS
\
REAR
CUlTlNG
HEIGHT
ADJUSTMENT
LEVER
FRONT &iNG HEIGHT
ADJUSTMENT LEVERS
CARBURETOR
Record the frame and engine serial numbers in the space below. You
will need these serial numbers when ordering parts and when making
technical or warranty inquiries (see page 84).
Frame serial number: MZB- Engine serial number: GJAB -

CONTROLS
DESCRIPTION OF CONTROLS
Fuel Valve
The fuel valve opens and closes the fuel passage from the fuel tank
to the carburetor.
Throttle Lever
N
I I
b
+ SLOW - - - For idling the engine.
CHOKE --
FAST- - - -
For starting a cold engine.
For restarting a warm engine and for mowing.

CONTROLS
Flywheel Brake Lever
This lever is connected to the engine flywheel brake and the ignition
switch. The engine will not start unless this lever is pushed forward.
FLYWHEEL BRAKE LEVER
Drive Clutch Lever (SDA)
The drive clutch lever engages and disengages the transmission that
drives the rear wheels.
(SW
13

CONTROLS
Shift Lever (SDA)
The shift lever selects and controls the mower’s drive speed.
1 (slow) -For mowing thick grass or maneuvering in small areas.
2 (medium) -For intermediate self-propelled mowing speed.
3 (fast)
-For maximum self-propelled transport speed.
Cuttlng Height Adjustment Levers
There are six settings to choose from, as shown in the illustration.
The cutting height figures are approximate. The actual height of cut
grass will vary with lawn and soil conditions. There is an adjustment
lever on each wheel.
ADJUSTMENT
LEVER
\
HRB215
14

BEFORE OPERATION
This chapter explains how to fuel and check your mower to be sure it
is ready, and it tells you how to prepare your lawn and yourself before
you begin mowing.
ARE YOU READY TO MOW?
CHECK YOUR LAWN
Objects .......................................
PeopleandPets
Lawn..
CHECK YOUR MOWER
Blade(s) ......................................
Engine Oil Level
Fuel .........................................
Air Cleaner Inspection
Handlebar Height Adjustment
Grass Bag (HRB215).
Inspection ...................................
Installation
Removal ....................................
Mulching Plug (l-fRM215).
Cutting Height
......................................
.............................
...............................
..........................
................................
........................... 20
........................... 22
.................................. 22
................................. 23
......................
..................... 21
........................
16
16
16
16
16
17
17
18
19
22
22
23
15

BEFORE OPERATION
ARE YOU READY TO MOW?
Be sure to wear protective clothing. Long pants and eye protection
can lower your risk of injury from thrown objects. Wear footwear that
protects your feet and won’t let you slip if you mow on slopes or
uneven ground.
CHECK YOUR LAWN
For your safety and for the safety of others, always inspect the area
before mowing.
Objects
Anything which can be picked up by the blade(s) and thrown is a
potential hazard to you and others. Look for things like stones, sticks,
bones, and wire. Remove them from the mowing area.
People and Pets
People and animals near the mowing area can move into your path or
into a position where they could be struck by thrown objects. Clear
the area of people and pets, especially children. Their safety is your
responsibility.
Lawn
Check the length and condition of the grass, so you will know what
cutting height and mowing speed to use.
Avoid mowing wet grass. Not only will wet grass clog your mower
deck and collect in clumps on the lawn, it also gives poor traction,
increasing your risk of losing your footing.
16
CHECK YOUR MOWER
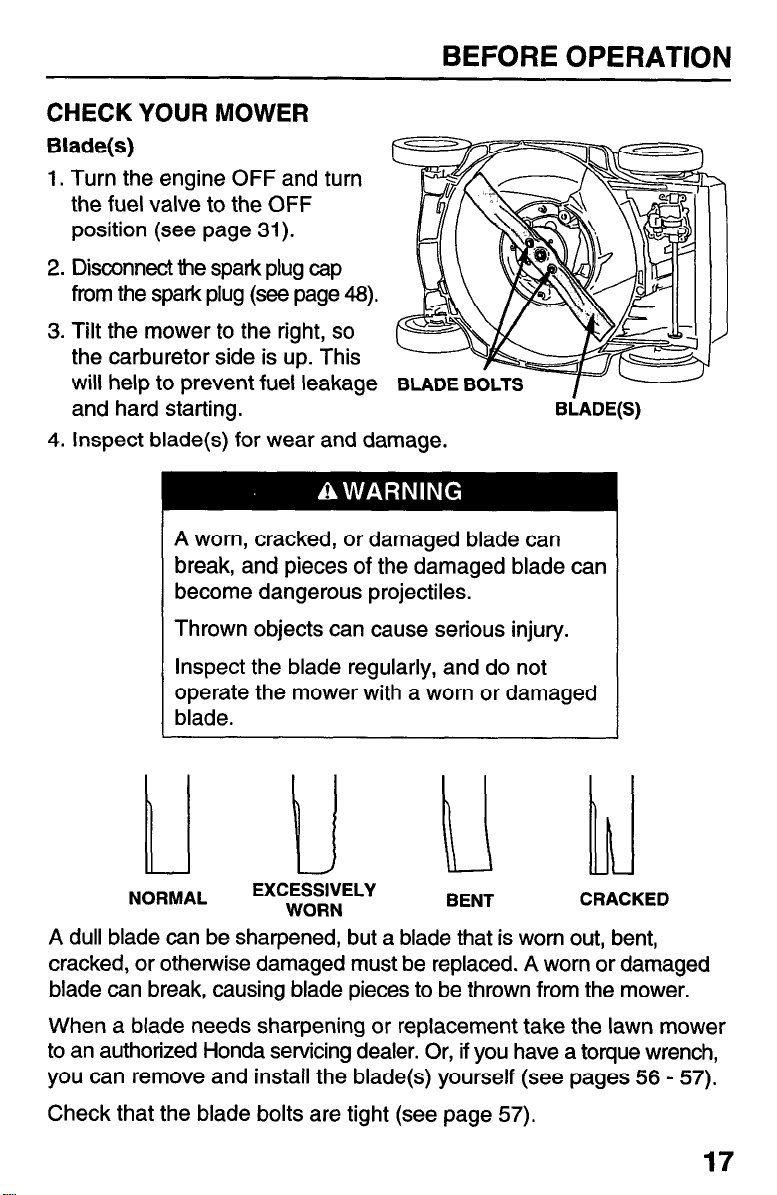
Blade(s)
1. Turn the engine OFF and turn
the fuel valve to the OFF
position (see page 31).
2. Disconnect the spark plug cap
from the spark plug (see page 46).
3. Tilt the mower to the right, so
the carburetor side is up. This
will help to prevent fuel leakage
and hard starting.
4. Inspect blade(s) for wear and damage.
A worn, cracked, or damaged blade can
break, and pieces of the damaged blade can
become dangerous projectiles.
Thrown objects can cause serious injury.
BLADE
BEFORE OPERATION
BLADE(S)
Inspect the blade regularly, and do not
operate the mower with a worn or damaged
blade.
i-l I u w
NORMAL
A dull blade can be sharpened, but a blade that is worn out, bent,
cracked, or otherwise damaged must be replaced. A worn or damaged
blade can break, causing blade pieces to be thrown from the mower.
When a blade needs sharpening or replacement take the lawn mower
to an authorized Honda servicing dealer. Or, if you have a torque wrench,
you can remove and install the blade(s) yourself (see pages 56 - 57).
Check that the blade bolts are tight (see page 57).
EXCESSIVELY
WORN
BENT
CRACKED

Englne Oil Level
Check the engine oil level with the engine stopped and the mower on
a level surface.
1. Remove the oil filler cap, and
wipe the dipstick clean.
2. Insert and remove the dipstick
without screwing it into the filler
neck. Check the oil level shown
on the dipstick.
FILLER CAP/DIPSTICK
3. If the oil level is low, add the
recommended oil (see page
46) to reach the upper limit
mark on the dipstick. Do not
overfill.
4. After checking the engine oil
level, screw in the filler
cap/dipstick securely.
UPPER LIMIT
LOWER LIMIT
BEFORE OPERATION
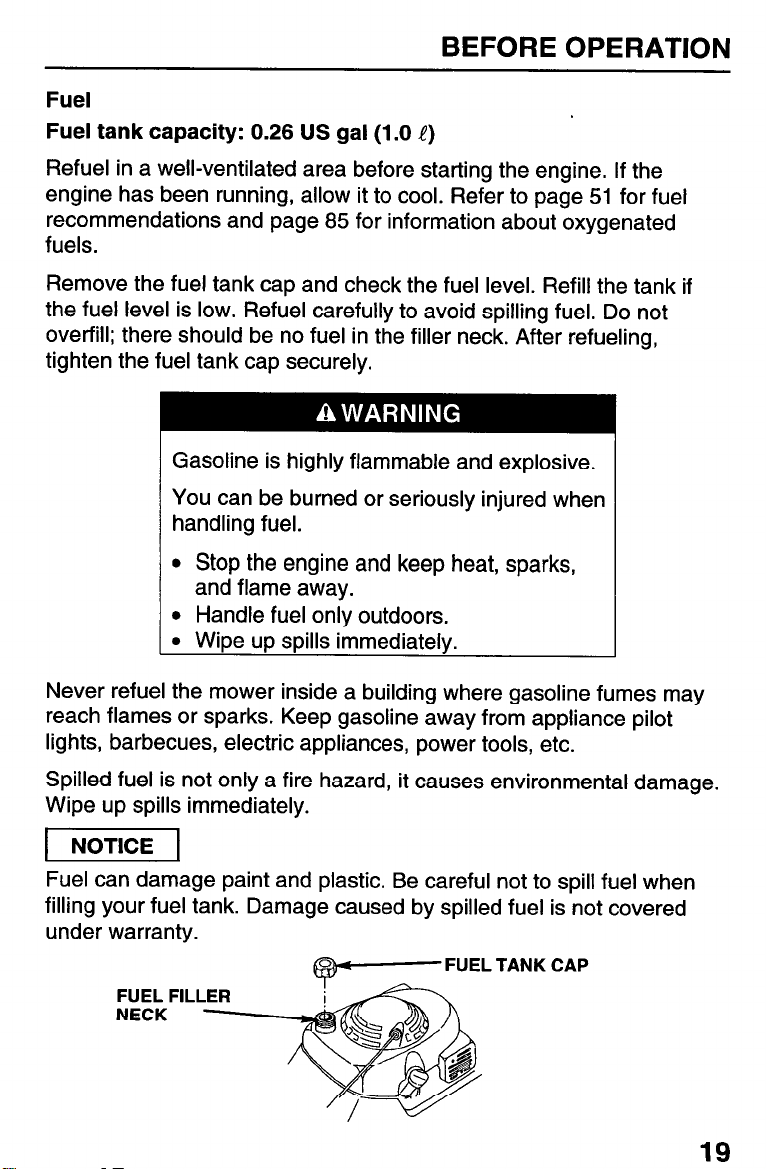
Fuel
Fuel tank capacity: 0.26 US gal (1.0 a)
Refuel in a well-ventilated area before starting the engine. If the
engine has been running, allow it to cool. Refer to page 51 for fuel
recommendations and page 85 for information about oxygenated
fuels.
Remove the fuel tank cap and check the fuel level. Refill the tank if
the fuel level is low. Refuel carefully to avoid spilling fuel. Do not
overfill; there should be no fuel in the filler neck. After refueling,
tighten the fuel tank cap securely.
Gasoline is highly flammable and explosive.
You can be burned or seriously injured when
handling fuel.
l Stop the engine and keep heat, sparks,
and flame away.
l Handle fuel only outdoors.
l Wipe up spills immediately.
Never refuel the mower inside a building where gasoline fumes may
reach flames or sparks. Keep gasoline away from appliance pilot
lights, barbecues, electric appliances, power tools, etc.
Spilled fuel is not only a fire hazard, it causes environmental damage.
Wipe up spills immediately.
pGiEq
Fuel can damage paint and plastic. Be careful not to spill fuel when
filling your fuel tank. Damage caused by spilled fuel is not covered
under warranty.
FUEL TANK CAP
FUEL FIL
NECK
19
BEFORE OPERATION
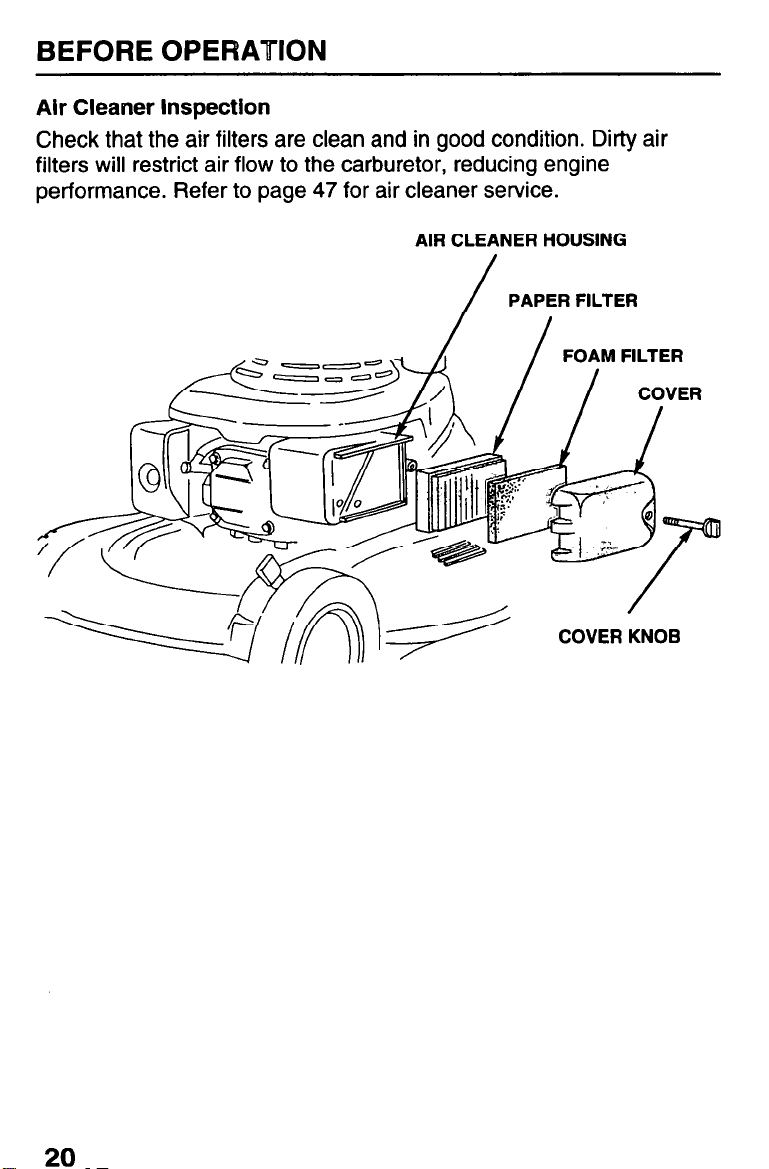
Air Cleaner Inspection
Check that the air filters are clean and in good condition. Dirty air
filters will restrict air flow to the carburetor, reducing engine
performance. Refer to page 47 for air cleaner service.
AIR CLEANER HOUSING
PAPER FILTER
/
=a--
FOAM FILTER
COVER
COVER KNOB
20
BEFORE OPERATION
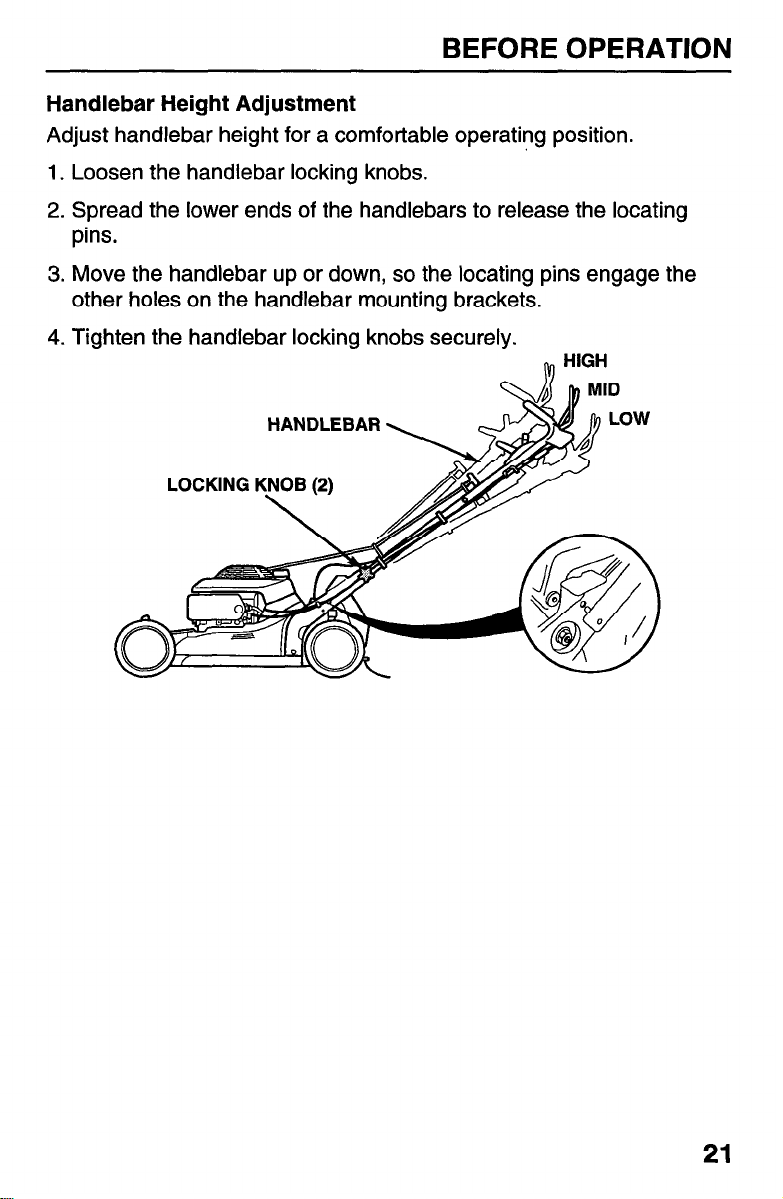
Handlebar Height Adjustment
Adjust handlebar height for a comfortable operating position.
1. Loosen the handlebar locking knobs.
2. Spread the lower ends of the handlebars to release the locating
pins.
3. Move the handlebar up or down, so the locating pins engage the
other holes on the handlebar mounting brackets.
4. Tighten the handlebar locking knobs securely.
HANDLEBAR
LOCKING KNOB (2)
I
d
HIGH
MID
LOW
21
BEFORE OPERATION
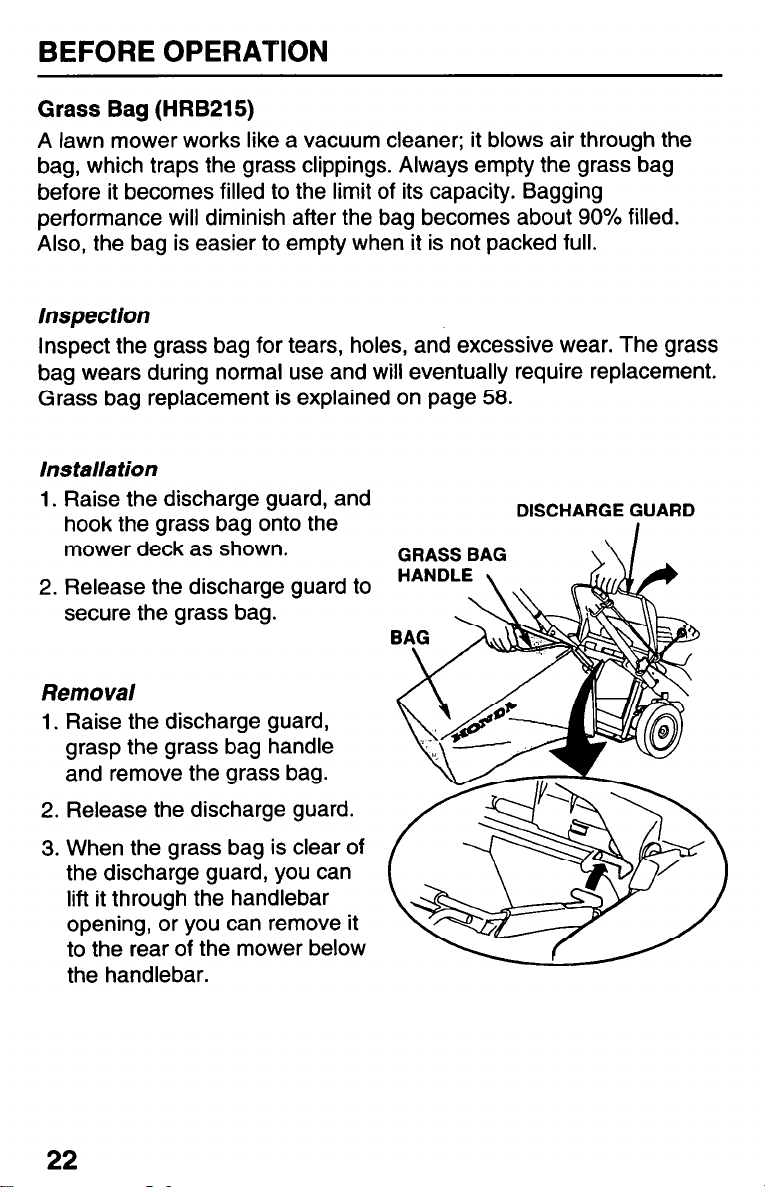
Grass Bag (HRB215)
A lawn mower works like a vacuum cleaner; it blows air through the
bag, which traps the grass clippings. Always empty the grass bag
before it becomes filled to the limit of its capacity. Bagging
performance will diminish after the bag becomes about 90% filled.
Also, the bag is easier to empty when it is not packed full.
Inspection
Inspect the grass bag for tears, holes, and excessive wear. The grass
bag wears during normal use and will eventually require replacement.
Grass bag replacement is explained on page 58.
Installation
1. Raise the discharge guard, and
hook the grass bag onto the
mower deck as shown.
2. Release the discharge guard to HANDLE
secure the grass bag.
GRASS BAG
DISCHARGE GUARD
Removal
1. Raise the discharge guard,
grasp the grass bag handle
and remove the grass bag.
2. Release the discharge guard.
3. When the grass bag is clear of
the discharge guard, you can
lift it through the handlebar
opening, or you can remove it
to the rear of the mower below
the handlebar.
22
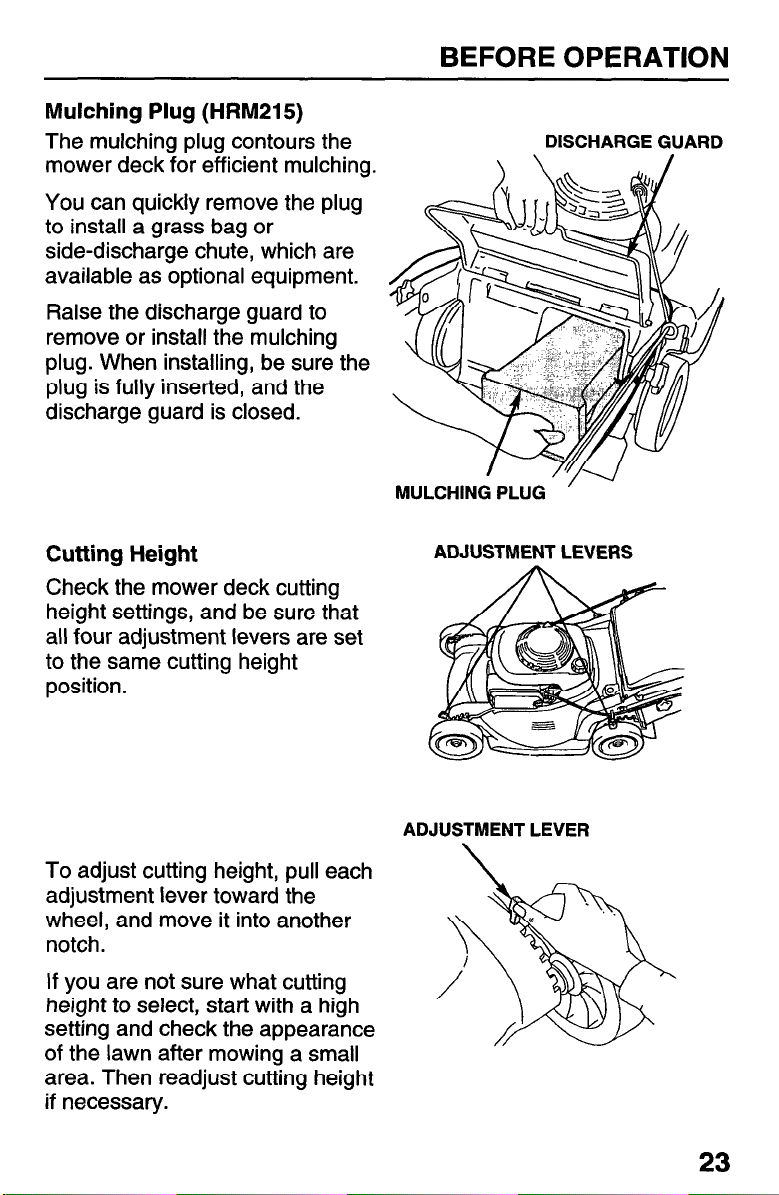
Mulching Plug (HRM215)
The mulching plug contours the
mower deck for efficient mulching.
You can quickly remove the plug
to install a grass bag or
side-discharge chute, which are
available as optional equipment.
Raise the discharge guard to
remove or install the mulching
plug. When installing, be sure the
plug is fully inserted, and the
discharge guard is closed.
BEFORE OPERATION
DISCHARGE GUARD
Cutting Height
Check the mower deck cutting
height settings, and be sure that
all four adjustment levers are set
to the same cutting height
position.
To adjust cutting height, pull each
adjustment lever toward the
wheel, and move it into another
notch.
If you are not sure what cutting
height to select, start with a high
setting and check the appearance
of the lawn after mowing a small
area. Then readjust cutting height
if necessary.
ADJUSTMENT LEVERS
ADJUSTMENT LEVER
23

24
This chapter tells you how to operate the mower safely and effectively.
MOWING PRECAUTIONS
STARTING THE ENGINE
OPERATING THE CONTROLS FOR MOWING.
Throttle Lever
Flywheel Brake Lever
Drive Clutch Lever (SDA).
Shift Lever (SDA).
STOPPING THE ENGINE.
SAFE MOWING PRACTICES
Slopes..
Obstacles .....................................
Gravel and Loose Objects.
MOWING TIPS
WhentoMow ..................................
Cutting Height
Cutting Width.
Blade Speed
Blade Sharpness
DryGrass .....................................
WetGrass..
Fallen Leaves
Clogged Mower Deck
Mowing Patterns
Mulching ....................................
Bagging ....................................
Side-Discharge Mowing.
I
..................................
.....................................
..................................
.................................
.................................
..................................
...............................
..................................
.................................
...............................
......................... 26
..........................
........ 29
........................... 29
........................ 30
..............................
.........................
....................... 32
....................... 33
...........................
.......................
27
29
30
31
32
33
34
34
34
34
35
35
35
35
35
35
36
36
36
36
25

OPERATION
MOWING PRECAUTIONS
Before operating the mower for the first time, please review the
IMPORTANT SAFETY INFORMATION beginning on page 6 and the
previous chapter, titled BEFORE OPERA T/ON.
Even if you have operated other mowers, take time to become
familiar with how this mower works and practice in a safe area until
you build up your skills.
For your safety, avoid starting or operating the engine in an enclosed
area such as a garage. Your mower’s exhaust contains poisonous
carbon monoxide gas which can collect rapidly in an enclosed area
and cause illness or death.
26
 Loading...