

Hobart HCG1 Installation Manual

N
S
T
R
U
C
T
I
O
N
S
I
HCG CONVENIENT GRILL SERIES
MODEL
HCG1 ML-132000
HCG2 ML-132001
HCG3 ML-132002
HCG2
701 S. RIDGE AVENUE
TROY, OHIO 45374-0001
937 332-3000
www.hobartcorp.com
FORM 34388 Rev. A (11-99)

– 2 –© HOBART CORPORATION, 1999

TABLE OF CONTENTS
GENERAL............................................................................................................................................. 4
INSTALLATION .................................................................................................................................... 4
Unpacking ................................................................................................................................. 4
Codes and Standards .............................................................................................................. 5
Assembly .................................................................................................................................. 5
Electrical Connections ............................................................................................................. 6
OPERATION ........................................................................................................................................ 6
Before First Use ....................................................................................................................... 6
Initial Seasoning ....................................................................................................................... 7
Controls .................................................................................................................................... 7
Preheating ................................................................................................................................7
Using the Convenient Grill ....................................................................................................... 8
Reseasoning............................................................................................................................. 8
Adjusting Tension Setting ........................................................................................................ 9
Cleaning.................................................................................................................................. 10
TROUBLESHOOTING GUIDE .......................................................................................................... 11
RECIPES ............................................................................................................................................ 12
Grilled Chicken, Roasted Pepper & Fresh Mozzarella Panini ............................................. 13
Grilled Chicken & Pepperonata ............................................................................................. 14
Smoked Turkey, Gruyere & Roasted Pepper Panini ........................................................... 15
Olive Mayonnaise................................................................................................................... 15
Portabella and Spinach Panini .............................................................................................. 16
Grilled Vegetables & Fresh Mozzarella Baguette ................................................................ 17
Black Olive Pesto ................................................................................................................... 17
Reuben Panini ........................................................................................................................ 18
Fontina Toast ......................................................................................................................... 19
Garlic Oil ................................................................................................................................. 19
Panini Club ............................................................................................................................. 20
Pepperonata ........................................................................................................................... 21
"BBT" Bocconcini, Basil and Tomato Panini ........................................................................ 22
Mozzarella and Prosciutto Panini.......................................................................................... 23
Your Own Recipes ............................................................................................................................. 24
– 3 –

INSTALLATION, OPERATION AND CARE OF
HCG SERIES CONVENIENT GRILL
PLEASE KEEP THIS MANUAL FOR FUTURE USE
GENERAL
The Hobart Convenient Grill is designed to be a multi-usage grill capable of cooking a wide range of
foods. Cast iron cooking surfaces promote even heat distribution and the grill's stainless steel
construction provides durability.
Model HCG1 is a 13" grill equipped with a 5 minute timer and an adjustable spring counter balanced
top. A front drip tray and cleaning scraper are also included.
The HCG2 model is a 24" dual grill with individual temperature controls and timers. It is equipped with
two adjustable spring counter balanced tops. A front drip tray and cleaning scraper are also included.
The HCG3 is a 15" grill equipped with a 5 minute timer and an adjustable spring counterbalanced top.
A cleaning scraper and front drip tray are included.
The Hobart Convenient Grill is produced with quality workmanship and material. Proper installation,
usage and maintenance of your grill will result in many years of satisfactory performance.
It is suggested that you thoroughly read this entire manual and carefully follow all of the instructions
provided.
INSTALLATION
Before installing, verify that the electrical service agrees with the specifications on the rating plate
located on the body of the grill. If the supply and equipment requirements do not agree, do not
proceed with the installation. Contact Hobart Corporation immediately.
UNPACKING
This Convenient Grill was inspected before leaving the factory. The transportation company assumes
full responsibility for safe delivery upon acceptance of the shipment. Immediately after unpacking,
check for possible shipping damage. If the grill is found to be damaged, save the packaging material
and contact the carrier within 15 days of delivery.
Carefully unpack the grill and place in a work-accessible area as near to its final installed position
as possible.
– 4 –

INSTALLATION CODES AND STANDARDS
The Hobart Convenient Grill must be installed in accordance with:
In the United States of America:
1. State and local codes.
2. National Electrical Code, ANSI/NFPA-70 (latest edition). Copies may be obtained from The
National Fire Protection Association, Batterymarch Park, Quincy, MA 02269.
In Canada:
1. Local codes.
2. Canadian Electric Code, CSA C22.1 (latest edition). Copies may be obtained from The Canadian
Standard Association, 178 Rexdale Blvd., Etobicoke, Ontario, Canada M9W 1R3.
ASSEMBLY
It may be necessary to install the following items.
Drip Tray
Grasp the tray by the black knobs on both ends and ensure the side with the higher lip is to the back.
Rotate the tray a quarter turn toward the grill and set the tray into place. Then return the tray to an
upright position.
PL-53449
Fig. 1
Spring Protection Cover
Place the cover onto the spring housing and press down until securely in place.
Scraper
Make sure you remove the scraper prior to turning the grill ON. Store the scraper in a convenient
location near the grill.
Any shipping paper should be removed and discarded.
– 5 –

ELECTRICAL CONNECTIONS
WARNING: ELECTRICAL AND GROUNDING CONNECTIONS MUST COMPLY WITH THE
APPLICABLE PORTIONS OF THE NATIONAL ELECTRICAL CODE AND/OR OTHER LOCAL
ELECTRICAL CODES.
WARNING: APPLIANCES EQUIPPED WITH A FLEXIBLE ELECTRIC SUPPLY CORD ARE
PROVIDED WITH A THREE-PRONG GROUNDING PLUG. THIS PLUG MUST BE CONNECTED
INTO A PROPERLY GROUNDED THREE-PRONG RECEPTACLE. IF THE RECEPTACLE IS NOT
THE PROPER GROUNDING TYPE, CONTACT AN ELECTRICIAN. DO NOT REMOVE THE
GROUNDING PRONG FROM THIS PLUG.
LEDOM STLOV STTAWOLIK ESAHP
1GCH 02157.1151
2GCH 0224103
0215.1151
3GCH
0223151
TIUCRIC
)SPMA(
NOTE: The grill must be connected to a separate circuit. No other appliances must share the circuit
with the grill. If shared the grill may heat more slowly than expected or blow the fuse.
OPERATION
WARNING: THE GRILL AND ITS PARTS ARE HOT. BE VERY CAREFUL WHEN OPERATING,
CLEANING OR SERVICING THE GRILL.
BEFORE FIRST USE
GRILL PLATES
The grill is shipped with an application of machine oil on the upper and lower grill plates. This oil will
need to be removed prior to the seasoning process (See page 7).
Machine Oil Removal
1. Turn the grill ON (green light will light up) and turn the temperature control knob to 150°F for one
minute.
2. Apply a solution of dishwashing liquid and water and wipe the grill plates with a clean, lint free
cloth. Be careful water does not drip onto the grill components.
– 6 –
Initial Seasoning
It is important to season this grill to provide a nonstick surface on the cast iron plates.
1. Using a clean, lint free cloth, wipe vegetable oil or shortening onto the upper and lower grill plates.
2. Turn the grill ON and set the temperature to 100°F.
3. After the red indicator light turns off, allow the grill to season for an additional 30 - 45 minutes.
4. Turn the grill OFF and allow the grill to cool. Wipe off the excess oil using a clean, lint free cloth.
5. Repeat steps 1 through 4, increasing the temperature by 100 F° each time, ending after the
400°F cycle.
The grill is now seasoned and ready for use.
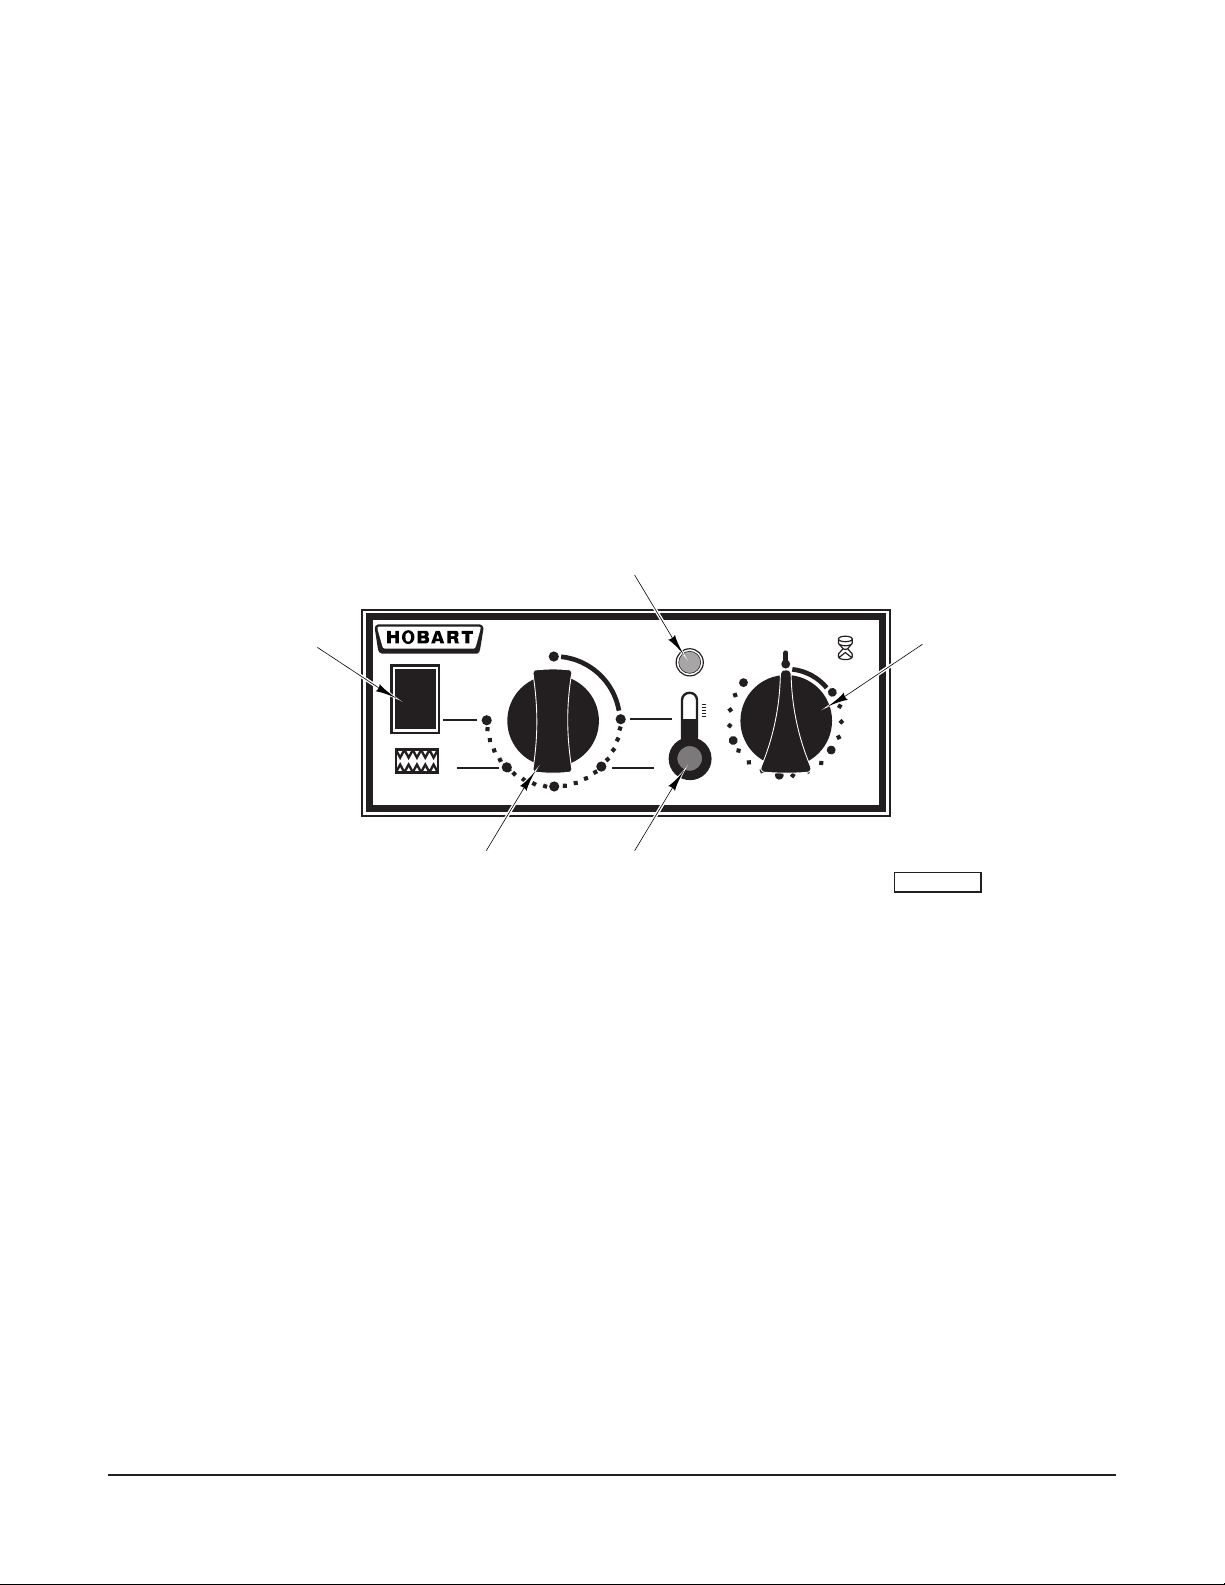
CONTROLS (Fig. 2 )
Green
Light
On/Off
Switch
o
600 C
o
570 F
250 C
500 F
Temp.
Control
o
o
200 C
00
5
o
C
o
F
o
100 C
o
200 F
o
150 C
o
300 F
400 F
o
o
4
3
1
2
Red
Light
Fig. 2
Timer
PL-53450
ON/OFF SWITCH - Press switch up to turn the grill ON.
- Press switch down to turn the grill OFF.
GREEN LIGHT - Lights when the grill is turned ON.
RED LIGHT - Light cycles with heating.
TEMP. CONTROL - Turn this knob to the desired temperature.
TIMER - Can be set for up to 5 minutes. Does not control power to grill.
PREHEATING
Turn on the grill (the green light will be lit) and turn the temperature control knob to the desired
temperature. The red light will stay on until the grill reaches the indicated temperature. The red light
will go out to indicate the grill has achieved the desired temperature. Allow 7 to 12 minutes for the
preheating process.
– 7 –

USING THE CONVENIENT GRILL
1. Preheat the grill to the desired temperature.
2. Grasp the upper grill handle and lower the upper
grill onto the product.
• Use the upper grill guide to adjust the angle
or position of the upper grill until the grill lies
squarely over the product.
3. Open the upper grill only to check the product.
4. Use the scraper provided to clean the upper and
lower surfaces after each use.
• Always keep grill clean when not in use.
The Hobart Convenient Grill can be used for a wide
variety of foods. Following are some suggested
guidelines for foods frequently cooked on this grill.
Cooking times will vary depending on food products,
temperature settings and desired results.
LEDOM TCUDORP ERUTAREPMET
LLAhciwdnaSF°054-0043-2
1GCH
)noitpOV021(3GCH
2GCH
)noitpOV022(3GCH
1GCH
)noitpOV021(3GCH
)noitpOV022(3GCH
tsaerBnekcihC
kaetSfeeB
HANDLE
GUIDE
PL-41398-1
Fig. 3
)setunim(
F°005-0545.3
F°005-0545.2
F°055-5745.4
F°055-5743-5.2
RESEASONING
It may be necessary to reseason the grill after cleaning and extended use.
1. Clean both plates of the grill with a clean, damp cloth (lint-free).
2. Apply vegetable oil or shortening onto both plates with a lint free cloth or coat the plates with a
cooking oil spray. Wipe off the excess spray with a dry, clean cloth.
3. Turn the grill ON and set the thermostat to 400°F.
• Some smoking may occur during the seasoning process.
When the grill reaches the desired temperature, the red light will go out. Turn the grill off and repeat
Steps 1 through 3.
The grill is now reseasoned and ready for use.
– 8 –
 Loading...