


INSTRUCTION MANUAL
with Replacement Parts
MODELS 510
MEAT
SLICERS
and
512
THE HOBART MANUFACTURING COMPANY, TROY. OHIO
FORM
11416
(11-73)
45374

510/512 INSTRUCTIONS
Instructions
for
Operation and Care
MODELS 510 AND 512 MEAT SLICERS
1. INSTALLATION:
When the machine is packed for shipment, the
three rubber feet (6, Fig. 1) and the one helper
foot (7, Fig. 1) are removed and sent along in a
cloth bag. The feet can be readily reassembled.
Install the helper foot to the end of its thread at
the comer of the base as shown (7, Fig.
helper foot does not touch the counter or table
and prevents the slicer from tipping.
In ordinary service, it will not be necessary to
fasten the slicer down; the cup-shaped rubber feet
will prevent it from slipping on the table. For
1.
The
Fig.
1
of
mounting on shipboard, discard the feet, and bolt
slicer to the table with 5116"-18 cap screws.
If cord and plug is not used with this machine,
electrical connections should be made by qualified
workmen who will observe all applicable Safety
Codes and the National
Before making electrical connections, CHECK
THE SPECIFICATIONS ON THE NAME
(3,
Fig.
l),
TO MAKE SURE THEY
WITH THOSE OF YOUR ELECTRlCAL
SERVICE.
EIectrical Code.
PLATE
AGREE

INSTRUCTIONS 5101512
2. THICKNESS OF SLICE:
The
knob or dial (4, Fig. 1) adjusts the
thickness of the slices cut. The numbers on the
dial indicate actual measurements in
example when setting dial at
.25, slice would be
.lo". For
114" thick.
3. SAFETY PRECAUTIONS:
When not actually slicing, turn the slice ad-
justment knob clockwise as far as it will go. The
gage plate will cover the edge of the cutting knife
and guard it.
4. SLICING FOOD:
This machine has been designed so a minimum
effort is required to hold and slice, pieces of
various shapes and sizes. The shape of the carriage
and inclined position make it unnecessary to use
holding devices for large items of regular shape,
such as cold boiled ham, loaf meats and picnic
cuts. For holding odd shapes or short end pieces,
use the meat grip (1, Fig. 1). Hold the handle in
your right hand, and press the grip down on the
meat at a convenient location. The carriage can
then be moved back and forth with the same hand
that holds the grip. The left hand is then free to
receive the slices as they come from the knife. The
slices may be stacked on the tray surface which is
easily kept clean. Other trays or platters may be
used if so desired. The slicer is turned
"ON"
and
"OFF" by the switch (5, Fig. 1) (pull to start,
push to stop).
After a few slices have been cut
and the end of the
piece is squared off, the meat will usually feed
without help from the grip. For safety reasons
when cutting a short end piece, ALWAYS place
the grip behind the item being sliced. This method
also allows cutting down to the last slice. The grip,
when not in use, may be stored to its
in-operative
position in the rear and underneath the carriage
tray.
5. CLEANING
&
SANITIZING:
UNPLUG ELECTRICAL POWER CORD and
clean the surface of the machine daily. Make sure
the knife guard is in place and the slice adjusting
knob is turned clockwise as far as it will go when
performing this operation.
WARNING: Observe the same care while working
around the knife that you would use with any
razor sharp-edged tool.
PROCEDURE:
5.1 Materials required:
.I
5.1
Small plastic two compartment pail.
5.1.2 Clean cloths.
5.1.3 Cleaner ("Soilax" All Purpose Cleaner).
5.1.4 Sanitizer ("Mikro-Klene" iodophor
sani-
tizer).
Fig.
5.2 Cleaning (using
5.2.1 Add two ounces of
"Soilax" and "Mikro-Klene"):
"Soilax" All Purpose
Cleaner to a gallon of hot water in wash side
of two compartment pail.
5.2.2 Mix rinse solution by adding two
teaspoons of "Mikro-Klene" in one gallon of
cool water in rinse side of pail.
5.2.3 Wipe off large scraps of meat soil.
5.2.4 Dip cloth into cleaning solution, then
wring out cloth. Wipe the entire outside of
slicer with cloth. Be sure to CAREFULLY
wipe the gage plate.
5.2.5 Loosen knife guard locking screw
(1, Fig.
2), pull knife guard (2, Fig. 2) straight away
from knife (3, Fig. 2) until center stud clears
mounting hole.
2
5.2.6 CAREFULLY wash the front and rear of
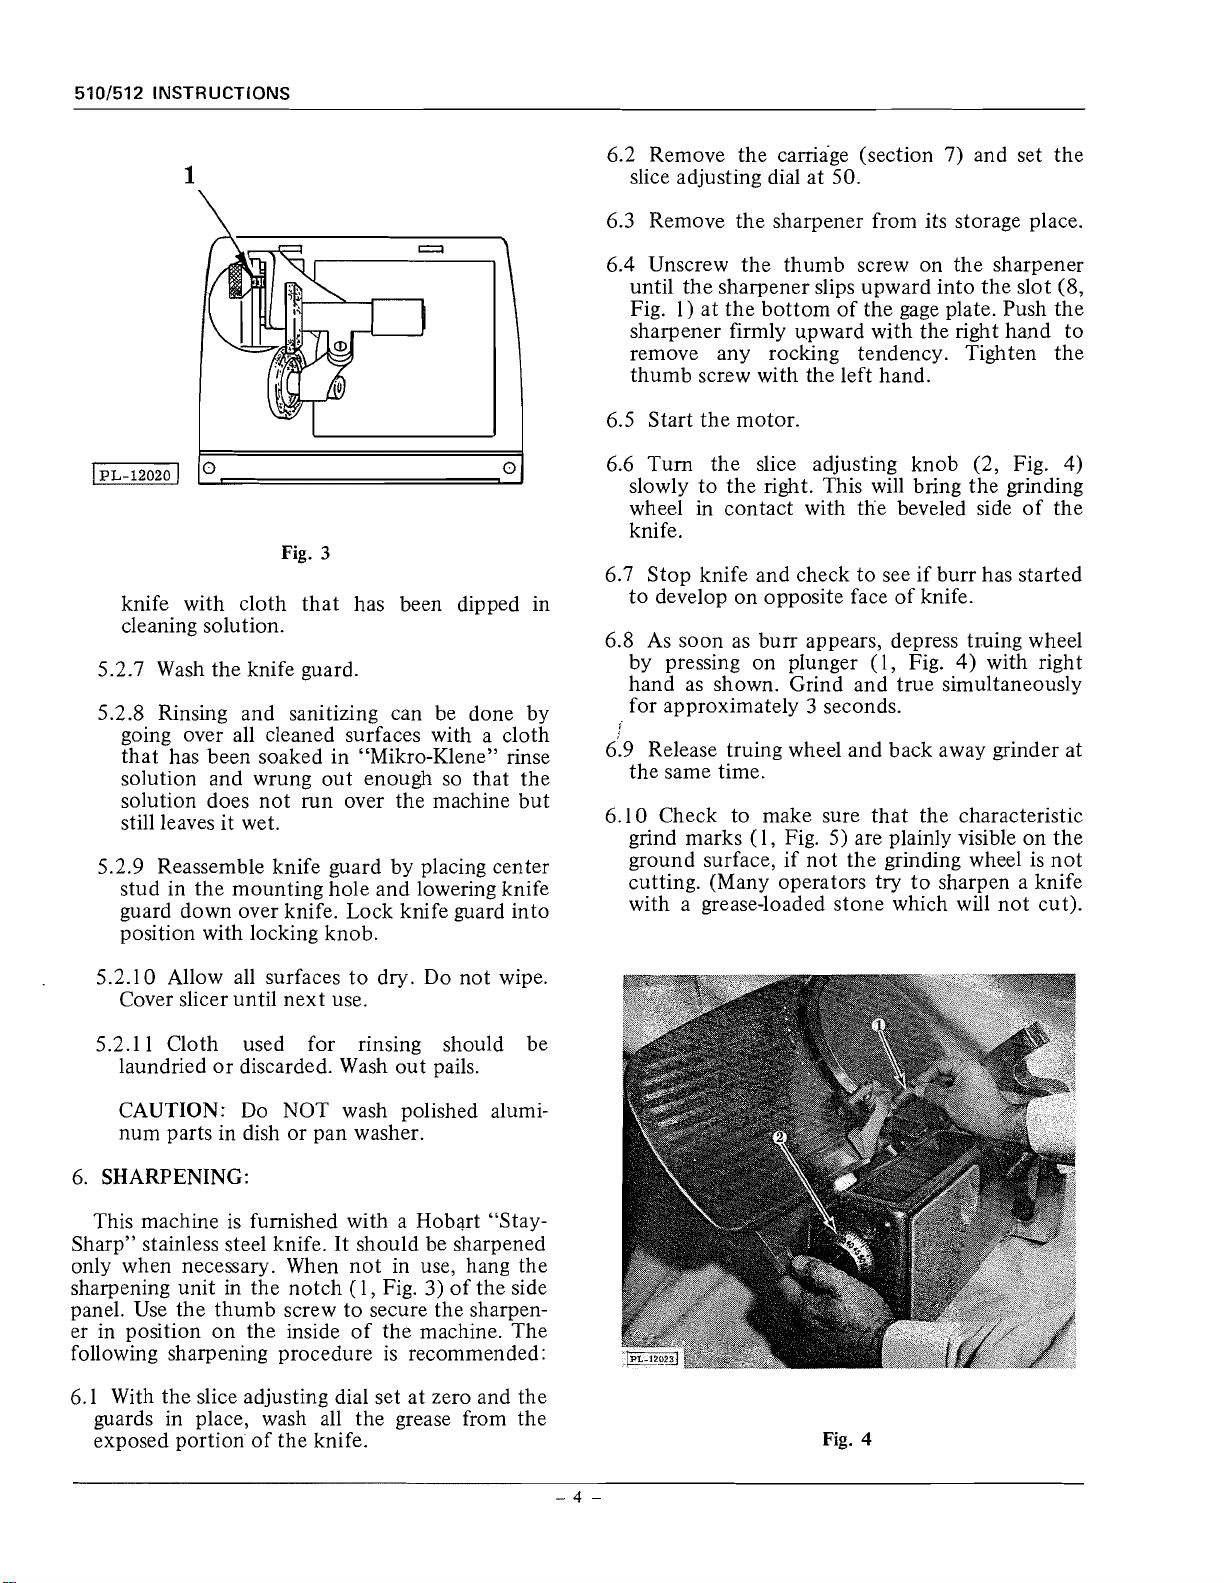
Fig.
3
knife with cloth that has been dipped in
cleaning solution.
5.2.7 Wash the knife guard.
5.2.8 Rinsing and sanitizing can be done by
going over all cleaned surfaces with a cloth
that has been soaked in "Mikro-Klene" rinse
solution and wrung out enough so that the
solution does not run over the machine but
still leaves it wet.
5.2.9 Reassemble knife guard by placing center
stud in the mounting hole and lowering knife
guard down over knife. Lock knife guard into
position with locking knob.
6.2 Remove the camage (section 7) and set the
slice adjusting dial at 50.
6.3 Remove the sharpener from its storage place.
6.4 Unscrew the thumb screw on the sharpener
until the sharpener slips upward into the slot (8,
Fig. 1) at the bottom of the gage plate. Push the
sharpener firmly upward with the right hand to
remove any rocking tendency. Tighten the
thumb screw with the left hand.
6.5 Start the motor.
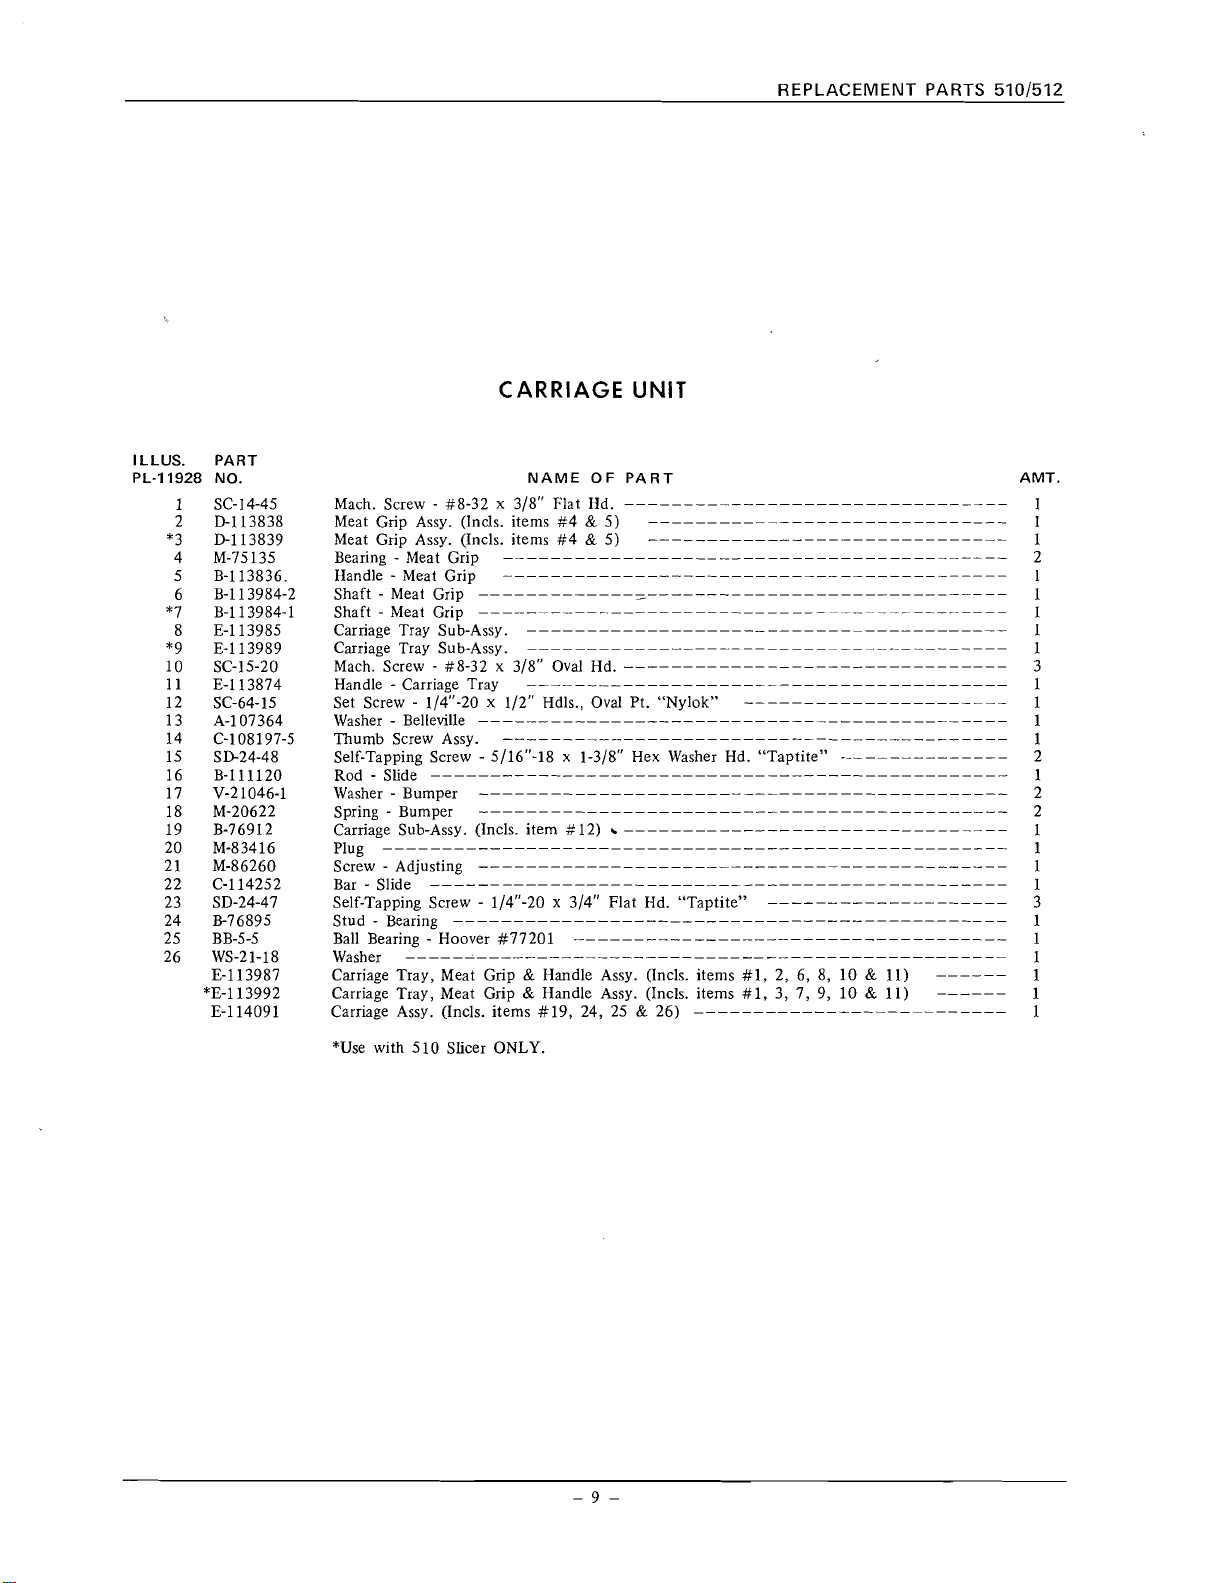
6.6 Turn the slice adjusting knob (2, Fig. 4)
slowly to the right. This will bring the grinding
wheel in contact with
the beveled side of the
knife.
6.7 Stop knife and check to see if burr has started
to develop on opposite face of knife.
6.8 As soon as burr appears, depress truing wheel
by pressing on plunger (1, Fig. 4) with right
hand as shown. Grind and true simultaneously
for approximately 3 seconds.
6.9 Release truing wheel and back away grinder at
the same time.
6.1 0 Check to make sure that the characteristic
grind marks (1, Fig. 5) are plainly visible on the
ground surface, if not the grinding wheel is not
cutting. (Many operators try to sharpen a knife
with a grease-loaded stone which will not cut).
5.2.10 Allow all surfaces to dry. Do not wipe.
Cover slicer until next use.
5.2.1 1 Cloth used for rinsing should be
laundried or discarded. Wash out pails.
CAUTION: Do NOT wash polished alumi-
num parts in dish or pan washer.
6. SHARPENING:
This machine is furnished with a Hobart
"StaySharp" stainless steel knife. It should be sharpened
only when necessary. When not in use, hang the
sharpening unit in the notch (1, Fig.
3)
of the side
panel. Use the thumb screw to secure the sharpener in position on the inside of the machine. The
following sharpening procedure is recommended:
6.1 With the slice adjusting dial set at zero and the
guards in place, wash all the grease from the
exposed portion of the knife.
Fig.
4

6.1 1 Stop the motor, remove the sharpener, turn
the slice adjusting dial back to zero, and return
the sharpener to its place on the inside of the
side plate.
6.1 2 After sharpening; the slicer should again be
cleaned to remove any dust, or dirt as a direct
result of sharpening.
NOTE: The adjustments on the sharpening unit
are factory-set for best operation on the
machine.
7.
CARRIAGE REMOVAL & ADJUSTMENT:
The carriage tray assembly can be taken off as a
unit by loosening the thumb screw (2; Fig. 6) and
sliding off the assembly out of the
"V" support.
Care should be used in order to prevent the tray
from striking and damaging the knife edge. The
carriage tray knife clearance may be changed by
adjusting the self-locking set screw
(1, Fig. 6) to
suit.
8.
WEAR ADJUSTMENT:
INSTRUCTIONS
Fig.
6
5101512
Fig.
After long service and many sharpenings of the
knife, it may be necessary to adjust the gage plate
closer to the knife. The gage plate may be moved
forward by loosening two screws at the back side
of gage plate, moving gage plate forward to within
1/32" of the knife cutting edge and re-tightening
screws. The bevel on the worn knife also may be
changed. This work should be done by a Hobart
Service Technician.
9.
LUBRICATION:
Very little lubrication is needed. Carriage slide
rod and bar (3
&
4,
Fig. 6) are to be lubricated.
Use a few drops of oil (Texaco "Havoline" or
equiv.) weekly on these parts.
Keep the two gage plate slide rods lubricated with
a drop or two of tasteless oil when required.
Keep the meat grip slide rod (2, Fig. 1) clean but
do NOT lubricate it.
10. MOTOR:
5
No periodic service is required for the motor.

510l512
REPLACEMENT PARTS
BASE
UNIT

REPLACEMENT PARTS
5101512
PART
NO.
B-114297
FE-8-14
A-69375-1
B-114584-1
B-1145 84-3
C-111141
SD14-21
B-76911
M-18682
E-114219
Dl
14452
SD24-1
D-114236
---
M-7 04 12
BASE
NAME
Knob - Locking
Strain Relief (900)
Cord & Plug Assy. (3 Cond. under 150 V.)
Pilot Light (with nut) (115 V.) (Incls. item #5)
Push Nut (Pilot Light)
Panel-Side
Self-Tapping Screw - #8-32 x 112" Pan Hd., Type 1
Base & Logo Plate Ass~.
-
Receiving
Tray
Tray - Receiving (SST)
Self-Tapping Screw - #lo-24 x 318" Pan Hd. "Taptite"
Cover-Bottom---------------------------------------------
Motor (see separate Motor Parts Sheet)
Foot-Helper
............................................
............................................
........................................
------------------------------------------------
--------------
------
..............................................
UNIT
OF
PART
............................
..............................
L
.................................
..............................
........................
AMT.
......................
....................

5101512
REPLACEMENT PARTS
CARRIAGE
UNIT
REPLACEMENT
PARTS
5101512
ILLUS. PART
PL-11928 NO.
1 SC-14-45
Dl13838
2
*3 Dl13839
4 M-75135
5 B-113836.
6 B-113984-2
*7 B-113984-1
8 E-113985
*9 E-113989
10 SC-15-20
11 E-113874
12 SC-64-15
13 A-107364
14
C-108197-5
15 SD24-48
16 B-111120
17 V-21046-1
18 M-20622
19 B-76912
20 M-83416
21 M-86260
22 C-114252
23 SD-24-47
24
E-76895
25 BB-5-5
26 WS-21-18
E-113987
*E-113992
E-114091
CARRIAGE
NAME OF PART AMT.
Mach, Screw - #8-32 x 318" Flat Hd
Meat Grip Ass~. (Incls, items
Meat Grip ASS~.
Bearing - Meat Grip
('~CIS.
Handle - Meat Grip
Shaft - Meat Grip
Shaft - Meat Grip
............................................
............................................
Carriage Tray Sub-Ass~.
Carriage Tray Sub-Assy.
Mach, Screw - #8-32 x 3/8" Oval Hd
Handle - Carriage Tray
Set Screw - 114"-20 x 112" Hdls., Oval Pt. "Nylok"
Washer - Belleville
............................
numb Screw Ass~.
Self-Tapping Screw - 5/16"-18 x 1-318'' Hex Washer Hd. "Taptite"
Rod
-
Slide
................................................
.
Bar -Slide
Self-Tapping Screw
Stud - Bearing
Ball Bearine - Hoover #77201
Washer
-
................................................
-
114"-20 x 314" Flat Hd. "Taptite"
..............................................
-
..................................................
Carriage Tray, Meat Grip
Carriage Tray, Meat Grip
Carriage Assy. (Incls. items
#4
items #4 & 5)
------------------------------------------
-
.........................................
........................................
----------------------------------------
........................................
..........................................
....................................
&
Handle Assy. (Incls. items #1, 2, 6, 8, 10 & 11)
&
Handle Assy. (Incls. items #1,
#19, 24, 25 & 26)
UNIT
---
.............................
--
&
5)
............................
---
/
................................
----------
......................
....................
..........................
3,
-----------------
7, 9, 10 & 11)
----------------
------
------
1
3
1
1
1
1
1
1
*Use with 510 Slicer ONLY.

5101512
REPLACEMENT PARTS
KNIFE UNIT

REPLACEMENT PARTS
5101512
ILLUS. PART
PL-11929 NO.
1 RP-2-25
2 C-114190
3 RR-7-22
4 SL-3-6
5 C-114189
6
El11152
7 B-114137
8
SD24-45
9 C-114603-1
10
R-12430-47
11 B-111152
El14141
12
13 El11154
14 E-109749
*15
Dl11108
16 SC-22-18
17 B-114289
18 E-113825
*19 E-113829
20 B-109756
21
(2-114527-2
*22 C-114527-1
23
C-114603-1
24 SD24-46
C-114277
KNIFE
NAME OF PART AMT.
Retaining Ring
Washer - Wavy Spring
Gear-Driven (31T)
Bearing - must
Hub Sub-Assy.
Self-Tapping Screw - 114"-20 x 314" Soc. Flat Hd. "Taptite"
Caplug
Bearing-must
Knife Shaft Ass~.
Ring - Knife Shaft
Knife
....................................................
Knife
....................................................
Mach. Screw - #10-24 x 7/16" Flat Hd.
Spacer
Knife Guard & Shaft Assy. (Incls. items.#17 & 20)
Knife Guard & Shaft Assy. (Incls. items #17 & 20)
Scraper-Knife
Drip Cup Assy
Drip Cup Ass~
caI;lug
-.
Self-Tapping Screw - 114"-20 x 314" Soc. Fil. Hd. "Taptite"
Knife Shaft Assy. Oncls. items #3, 4, 5, 6, 7, 10, 11 & 12)
..............................................
..........................................
..........................................
............................................
..............................................
..................................................
............................................
............................................
............................................
-------------------------------------------------
..............................................
..............................................
..............................................
..................................................
UNIT
..............................
......................
......................
------------------
------------------
------------------
*Use with 510 Slicer ONLY.

5101512 REPLACEMENT PARTS
GAGE PLATE AND INDEXING MECH.

REPLACEMENT PARTS
5101512
ILLUS. PART
PL-11930 NO.
1 B-111117
2 B-113903
3 B-111116
4 B-113906
5 B-114146
6
SC-93-25
7 B-114114
8 B-113994
9 B-114122
10 B-109762
11 B-109767
12 SD24-49
13 C-114238
14 SC-23-49
15 C-114214
16 C-114212
17 B-114213
18 RP-2-40
19 SC-12-49
20 M-88887
21 M-88298
22 SC-63-14
23 B-111144
24 B-114101
25 B-109770
26 RP-2-40
27 B-114107
28
Dl14067
*29 Dl14068
30 B-114112
31 SC-41-10
B-114103
GAGE PLATE AND INDEXING
NAME OF PART AMT.
Rod - Gage Plate Slide
Sleeve - Slide Rod
Rod - Gage Plate Slide (Jndex)
Spring (Slide Rod)
Plug-Cap
Mach. Screw - 1/4"-20 x 1" Pan Hd.
Roller - Index
Washer - Thrust (.010" mk,)
Sleeve - Index
Index Gear Ass~ (207')
................................................
..............................................
--------------
Washer (-089'' Thk.)
........................................
............................................
....................................
............................................
....................................
........................................
..........................................
................................
---
.............................
MECH.
Self-Tapping Screw - 5/16"-18 x 1-314'' Hex Washer Hd. "Taptite"
Insert - Index Knob
Mach. Screw - #lo-24 x 718" Oval Hd.
Cap -Index
................................................
..........................................
..............................
Disc-Index-----------------------------------------------Rollpin - 3/32" Dia x 314" Lg.
Mach. Screw - #8-32 x 318" Fil. Hd.
Retaining Nut & Screw Assy. (Incls. item #19)
Washer - Belleville
Set Screw - #8-32 x 114" Soc. Hdls., Flat Pt.
Bushing - Eccentric
Shaft-Index
Worm-Index
---------
--------------
..............................................
..............................................
Rollpin - 3/32" Dia. x 314" Lg.
Spacer - Slide Rod
Gage Plate Ass~.
Gage Plate ASS~,
Spacer - Gage Plate
----------------
............................................
--------
..........................................
Fin. Bolt - 5/16"-18 x 518" Hex Hd.
Index Assy. (Incls. items #24, 25 & 26)
--
-----
--------
----
-
............................
----
............................
..........................
---------------
..........................
----
------
................................
............................
....................................
................................
..............................
----
--------------
----------
--
--
------
--
----
*Use with 510 Slicer ONLY.

510/512
REPLACEMENT PARTS
PART
NO.
B-76893
B-877 11 -1 29-1
B-76913
C-114243
B-114267
RP-4-26
B-114261
NS-17-3
C-114580
WL-7-12
SD-24-1
SD-24-1
B-76914
ELECTRICAL UNIT
NAME OF PART AMT.
Knob Assy.
Lock Washer - #lo
Self-Tapping Screw - #lo-24 x 318" Pan
Self-Tapping Screw
Clip - Cable
.................................................
Ext.
Shakeproof
-
........................................
#lo-24 x 318" Pan
.................................
Hd.
Hd.
"Taptite"
'"Taptite"
.....................
.....................
1
1
1
3
5

REPLACEMENT PARTS 5101512
ILLUS. PART
PL-11932 NO.
1 M-74833
2 M-73851
3 M-74900
4 P-22670
5 WS-2-18
6 sc-8-10
7 WS-3-40
8 BA-2-1
9 V-13199
10 PG3-7
11 M-72801
12 M-69585-1
13 M-83089
14 M-73974
15 WS-2-18
16 BA-2-1
17 WS-4-39
18 M-70313
19 SC-8-10
20 WS-2-18
21 M-73975
22 M-83092
23 M-13201
24
hI-3404-7
25 B-109702
R-74023
M-73979
M-74007
.
KNIFE SHARPENER UNIT
NAME OF PART AMT.
Screw - Retaining
Wheel -Grinding
Shaft - Grinding Wheel
Carrier - Grinding Wheel
Washer
Mach. Screw - #lo-24 x 112" Rd. Hd.
Washer
Ball - 1/8" Dia
Collar - Thrust
Groov-Pin - Type #1, 3/32" x 7/16"
Sharpener Support & Slice Indicator Plate Sub-Assy.
plug Button
Retaining Ring
Cap - Truing Wheel
Carrier - Truing Wheel
Shaft - Truing Wheel
Wheel - Truing
Screw - Retaining
Thumb Screw - Sharpener Attaching
Knife Sharpener Assy. (Incls. items #1 thru 25)
Truing Wheel Sub-Assy. (Incls. items #12, 13, 14, 15, 16, 17, 18, 21, 22, 23 & 24)
Grinding Wheel Sub-Assy. (Incls. items
..................................................
..................................................
............................................
............................................
........................................
........................................
..............................................
..............................................
................................
................................................
..............................................
..........................................
........................................
..........................................
..............................................
............................................
................................
#l,
--
............................
........................
2,
3,
4, 7, 8, 9 & 10)
......................
--------------
--

5101512
INSTALLATION
FORM
11416
INSTALLA'TION
NOV.
1973
DIAGRAM
PRINTED IN
U.S.A.
 Loading...