

Page 1
Page 2

Table of Contents
Before Connection ..................................................................................................................2
For your safety ......................................................................................................................................... 2
Precautions .............................................................................................................................................. 2
Connection ..............................................................................................................................3
Connect to the TV ................................................................................................................................... 3
Connecting the Speakers ....................................................................................................................... 3
Connecting the Antenna......................................................................................................................... 3
Connecting Control Cable ..................................................................................................................... 4
Connect to the amplifier with digital signal input terminal ................................................................ 4
Connect to the VCR ................................................................................................................................4
Connecting the AC Power Cord ............................................................................................................. 4
Connect the Headphone ........................................................................................................................ 4
Control Locations ...................................................................................................................5
The DVD Player ...................................................................................................................................... 5
The DAB .................................................................................................................................................. 5
The MP3 Player ...................................................................................................................................... 5
The Amplifier ........................................................................................................................................... 6
Remote control ........................................................................................................................................ 6
Turning the Power On and Off ................................................................................................7
Normal playing ........................................................................................................................8
Use the discs ............................................................................................................................................ 8
Play picture CD disc .............................................................................................................................. 12
Listening to Radio Broadcasts ............................................................................................................. 12
Listening to MP3 Player ....................................................................................................................... 17
Setting the Clock ................................................................................................................................... 19
Setting the Daily Timer ........................................................................................................................ 19
Setting the Sleep Timer ....................................................................................................................... 20
Function Menu Setting List .................................................................................................. 21
Menu function setup ............................................................................................................................. 21
General Setup Page ............................................................................................................................. 21
Audio Setup Page ................................................................................................................................21
Video Setup Page ................................................................................................................................22
Preference Page ................................................................................................................................... 23
Password Setup Page ........................................................................................................................... 23
Protect the Disc .................................................................................................................... 24
Troubleshooting ................................................................................................................... 24
Specification ......................................................................................................................... 25
Manufactured under license from Dolby Laboratories.
“Dolby”, “Pro Logic” and the double-D symbol are trademarks of Dolby Laboratories.
- 1 -
Page 3
Before Connection
Thank you for purchasing this hi-fi component system, in order to fully utilize this system, please read
this instruction book carefully before use it.
For your safety
CAUTION
RISK OF ELECTRIC SHOCK
DO NOT OPEN
CAUTION:
TO REDUCE THE RISK OF ELECTRIC SHOCK, DO
NOT REMOVE COVER. NO USER SERVICEABLE
PARTS INSIDE, REFER SERVICING TO QUALIFIED
SERVICE PERSONNEL.
This symbol indicates that dangerous voltage constituting a risk of electric shock is present within
this unit.
This symbol indicates that there are important
operating and maintenance instructions in the literature accompanying this unit.
Caution:
To prevent fire or shock hazard, do not expose this
equipment to rain or moisture.
Power Requirement
Because the power requirement of electrical products is different in various places, before you use
this product, make sure that the power requirement
of the product matches your household power.
Laser Product
This product is equipped with low power laser equipment inside. For your safety, don’t take apart any
covers or try to take apart the product inside. Please
contact an authorized service person for repairing.
CLASS 1
LASER PRODUCT
Caution:
This product is equipped with low power
laser equipment inside, for your safety,
don’t open the laser radiation protective
equipment. Don’t look at the laser radiation
district when the equipment is operating.
Precautions
1. Before operating this system, check the voltage of
this system to see if it is identical with the voltage
of your local power supply.
2. Unplug the system from the wall outlet if it is not
used for a long time. To disconnect the cord, pull it
out by grasping the plug
3. To avoid electric shock, do not open the cabinet.
4. There are no user serviceable parts inside. In case
of system failure, unplug the power cord and
consult your dealer
5. Do not place this unit on an unstable or sloping
surface. Ensure good ventilation surrounding the
product. To prevent fire, do not cover the ventilation of the apparatus with news papers, tablecloths, curtains, etc.
6. To prevent fire or shock hazard, do not place
objects filled with liquids, such as vases, or
lighted candles on the apparatus.
7. To prevent fire or shock hazard, do not expose this
equipment to hot places, rain, moisture or dust.
8. Do not use this product near water, for example
near a bath tub, wash bowl, kitchen sink, or laundry tub; in a wet basement; or near a swimming
pool .
9. Do not place this unit close to strong magnetic field.
10. Don’t place this unit close to dampness, or the
moisture will affect the life of the laser head.
11. If the system is brought directly from a cold to a
warm location, or is placed in a very damp room,
moisture may condense on the lens inside the
player. Should this occur, the system will not
operate properly. Remove the disc and leave the
system turned on for about an hour until the
moisture evaporates.
12. Should any solid object or liquid fall into the system,
unplug the system and have it checked by qualified
personnel before operating it again.
13. Unplug this product from the wall outlet before
cleaning. Do not use liquid cleaners or aerosol
cleaners. Use a damp cloth for cleaning.
14. Do not use attachments not recommended by the
product manufacturer as they may cause hazards.
- 2 -
Page 4
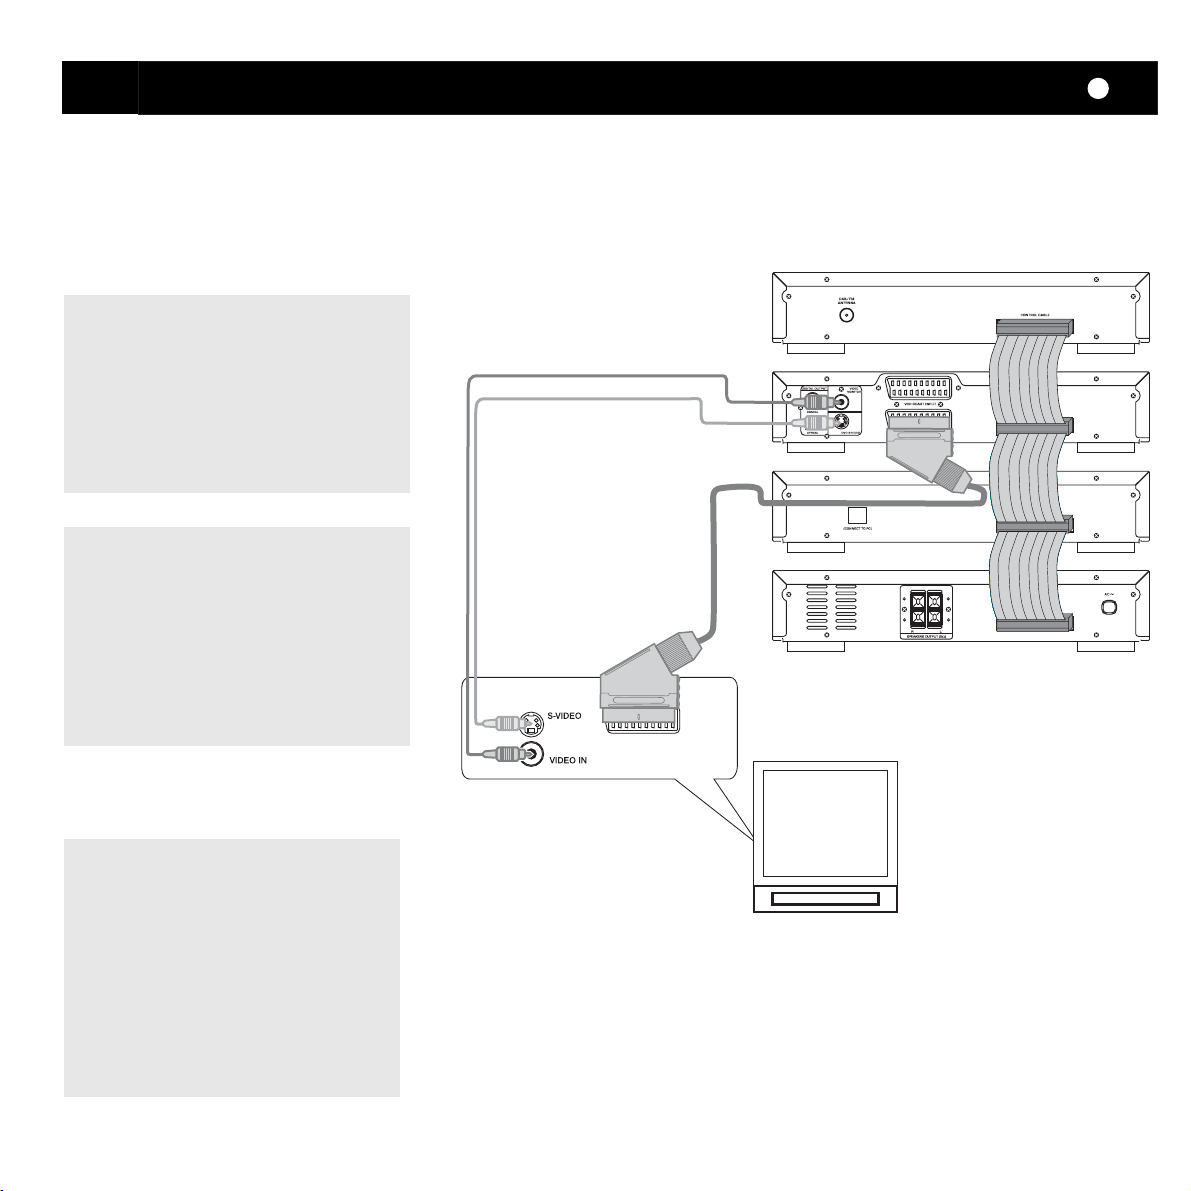
Connection
Caution: Please turn off all the equipment power before connecting.
Connect to the TV
Connecting diagram
Terminal board for the DVD player
VIDEO
DIGITALOUTPUT
MONITOR
COAXIAL
OPTICAL
VCRSCART INPUT
DVDS-VIDEO
TVSCART OUTPUT
Connections to TV
Connecting the Speakers
Connecting the Antenna
CONTROLCABLE
TV
Safety precautions
Some settings should be made for the unit
according to the TV connection.
* According to the color system setting of TV,
select the color system in the “TV Display”
function setting.
* If the unit is connected to wide screen TV, then
set “TV display” to “Wide” in the function setting
item.
* If the unit is connected to normal TV, then set “TV
display” to “Normal/PS” or “Normal/LB” in the
function setting item.
Connect the speaker cords between the terminals
as shown below.
Connect the cords with a silver line to the (+) (L) (R)
terminals and cords with a gold line to the (-) (G)
terminals.
Connection precautions
1. This unit has a high power output and wide
dynamic range. If speakers other than those
supplied are used, they must be chosen
according to speaker specification, or the
speakers may be damaged.
2. Before connecting or removing mains power,
please turn off the power on the unit and turn
the volume to minimum or it may damage the
speakers.
Tighten the antenna rod
clockwise on the base of
the antenna.
* The antenna should be connected to the antenna socket, tighten the
antenna by hand or tool. (Please note: Do not overtighten, this could
damage the antenna or it’s fittings.)
* Put the antenna until you have the best reception.
Note: The antenna gets magnetism. Please don't put the antenna to
get colse to the object which is easy to be magnetized, such as
TV, computer ect.
- 3 -
Page 5
Connecting Control Cable
With the unit unplugged from the mains connect
the power control cable to the DVD player, MP3
player, the amplifier and the radio via the connections on the rear of the units as shown .
Connect to the amplifier with digital signal input terminal
DVD player connections
VIDEO
DIGITALOUTPUT
MONITOR
COAXIAL
OPTICAL
With digital signal input terminal’s DTS, Dolby
Digital signal decode amplifier terminal board
VCRSCARTINPUT
DVDS-VIDEO
TVSCARTOUTPUT
With digital signal input terminal’s DTS,
Dolby Digital signal decode amplifier
CONTROLCABLE
Connection precautions
Please note: You can only use coaxial or optical,
they can not be used at the same time.
Connect to the VCR
Terminal board for the DVD player
VIDEO
DIGITALOUTPUT
MONITOR
COAXIAL
OPTICAL
VCRSCART INPUT
DVDS-VIDEO
TVSCART OUTPUT
CONTROLCABLE
With VCR signal input
terminal’s amplifier
With VCR signal input terminal’s
amplifier terminal board
Connecting the AC Power Cord
Insert the AC power cord into a wall outlet, and your system is ready for use.
Caution: Be sure to unplug the power cord from the outlet when going away or when the system is not
in use for an extended period of time.
Connect the Headphone
Connect a pair of headphones to the phone jacks. No sound comes out of the speakers.
Note: Be sure to turn down the volume before connecting or putting on headphones.
- 4 -
Page 6
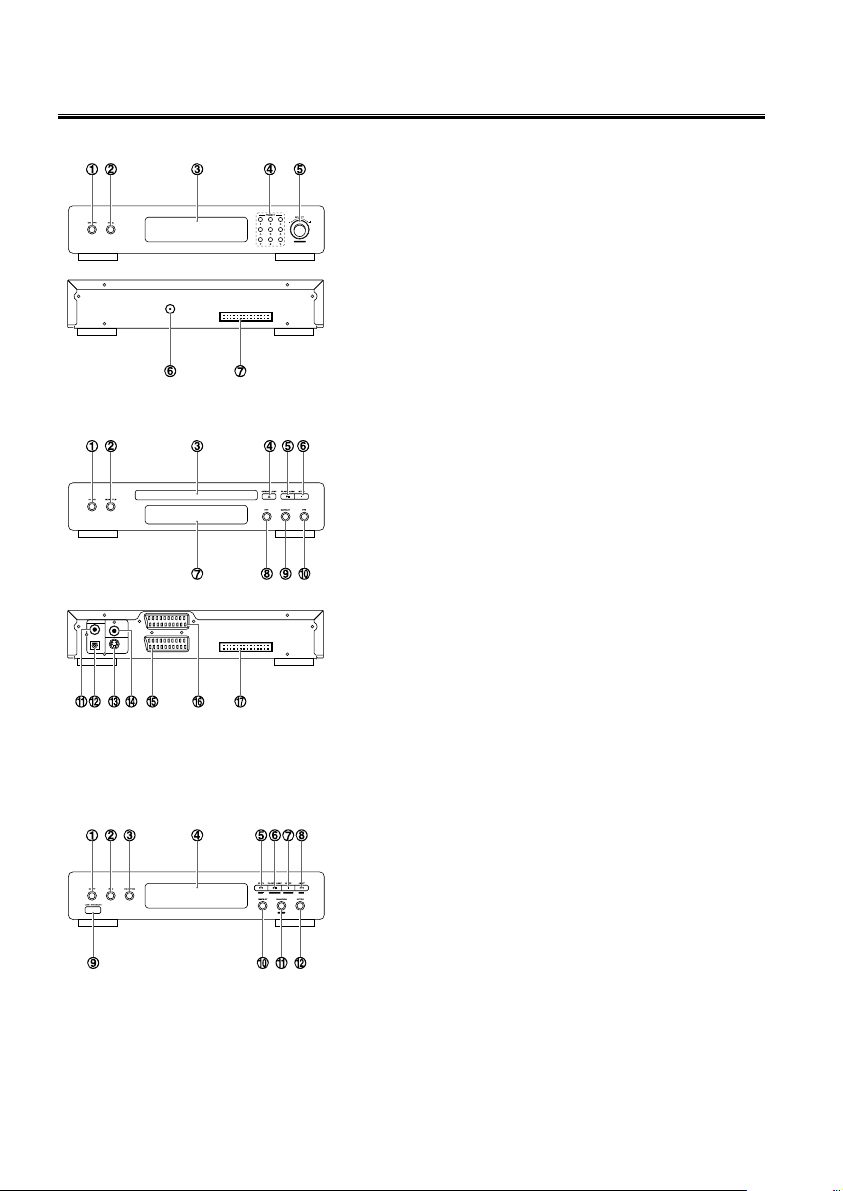
Control Locations
The DAB / FM RADIO
DAB/FM
ANTENNA
The DVD Player
VIDEO
DIGITALOUTPUT
MONITOR
COAXIAL
OPTICAL
VCRSCARTINPUT
DVDS-VIDEO
TVSCARTOUTPUT
The MP3 Player
CONTROLCABLE
CONTROLCABLE
1. DAB/FM Switch
2. Information
3. VFD Display Lens
4. Number Buttons
5. MENU
Select Down
Select Up
6. DAB/FM Antenna Jack
7. Control Cable Connector
1. Vocal Mode Select / Language Select
2. Subtitle
3. Disc Tray
4. Open/Close
5. Play/Pause
6. Stop
7. VFD Display Lens
8. Previous
9. Repeat
10. Next
11. Digital Audio Out Coaxial
12. Digital Audio Out Optical
13. S-Video Output Terminal
14. Video Monitor Terminal
15. TV Scart Output
16. VCR Scart Input
17. Control Cable Connector
1. File Copy
2. Record
3. CD-SYNC Record
4. VFD Display Lens
5. Previous
CANCELSEL SEL
MENU
Menu Select Down
6. Play/Pause
Menu Confirm
7. Stop
Menu Cancel
8. Next
Menu Select Up
9. USB Storage Port
10. Repeat
11. Random
Menu
12. Intro
- 5 -
Page 7
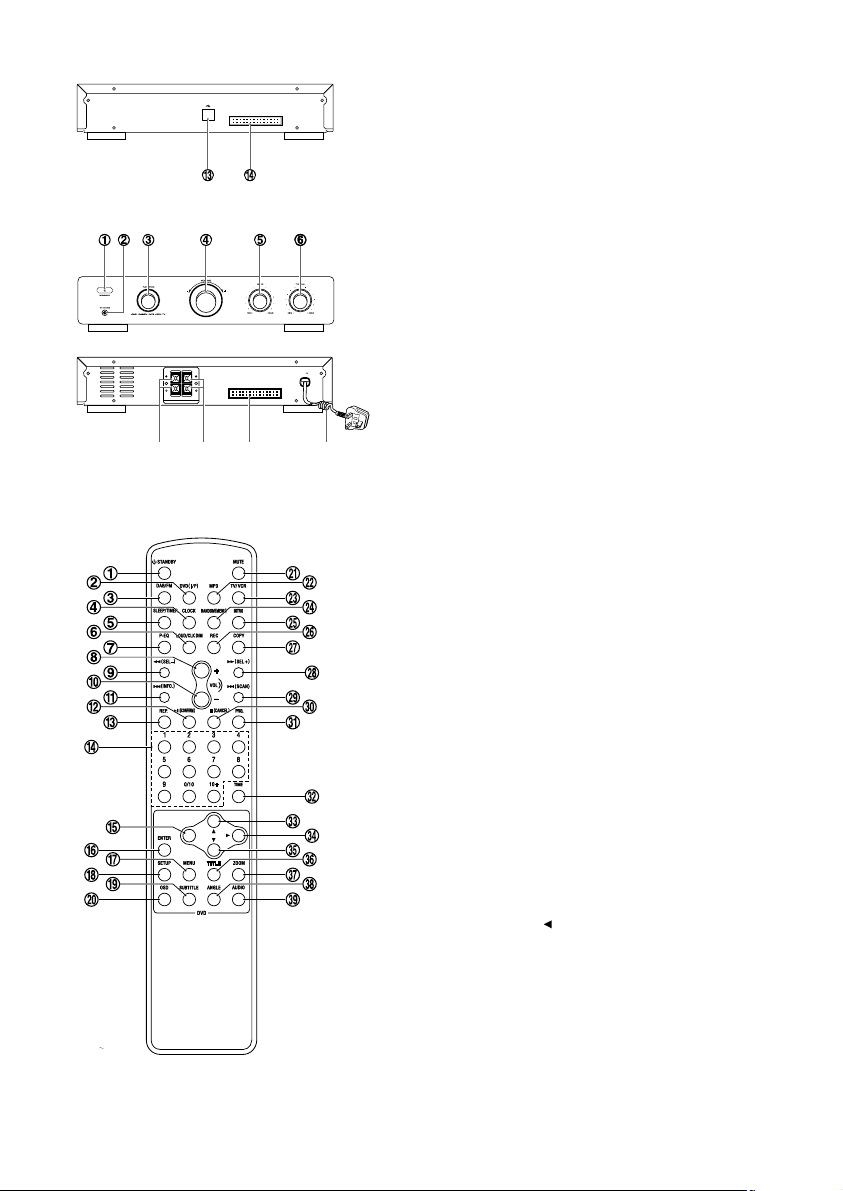
(CONNECTTOPC)
The Amplifier
RL
SPEAKERSOUTPUT (8 )W
&* ( a
Remote control
CONTROLCABLE
CONTROLCABLE
13. USB Port (PC Connection )
14. Control Cable Connector
1. Standby
2. Headphone Jack
3. Function
4. Volume Control Knob
5. Bass Control Knob
AC
6. Treble Control Knob
7. Right Speaker Output Terminals
8. Left Speaker Output Terminals
9. Control Cable Connector
10. AC Power Cord
1. Standby
2. DVD Function
Interlace/P-SCAN Switch
3. DAB/FM Function
4. Clock
5. Sleep
Timer
6. Clock Dimmer (In standby mode)
Loudness
7. Preset Equalizer
8. Volume Up
9. Fast Reverse
Menu Select Down
10. Volume Down
11. Previous
Information
12. Play/Pause
Menu Confirm
13. Repeat
14. Number
15. Direction (
)
16. Enter Button
17. PBC
Menu
18. Function Setting
19. Subtitle
20. OSD
- 6 -
Page 8

21. Mute
22. MP3 Function
23. TV/VCR Function
24. Random
Menu Setting
25. Intro
26. Record
27. File Copy
28. Fast Forward
Menu Select Up
29. Next
Scan
30. Stop
Menu Cancel
31. Program
32. Time Search
33. Direction (
34. Direction (
35. Direction (
36. Title
37. Zoom
38. Angle Select
39. Vocal Mode Select
Language Select
Installation of Batteries in the Remote Control
1. Remove the battery compartment cover.
2. Insert two batteries (size AAA) correctly, so that the + and - polarities match the polarity diagrams in
the battery compartment.
* About half a year of normal operation can be expected when using standard batteries.
* When the batteries are exhausted, the remote will not function. Replace both batteries at the same
time with new ones.
* Don’t mix old and new batteries.
* Don’t mix different types of batteries.
* When the unit is not used for a long period of time, remove the batteries to avoid damage caused by
battery leakage and corrosion.
)
)
)
Turning the Power On and Off
Turning the System On
Press the standby button (STANDBY) to turn the system on from standby mode.
Caution: When turning the system on, the system will continue in the mode it was in when it was turned
Turning the System Off
Press the standby button (STANDBY) again to turn the system off (called Standby Mode), the clock will
not be displayed.
Caution: Be sure to unplug the power cord from the outlet when going away or when the system is not
off last time.
in use for an extended period of time.
- 7 -
Page 9
Normal playing
Note:
* When the unit is in VCR mode, the VCR connected with the unit by the scart cable is for playing only.
If you want to record, the unit must be in standby mode.
Use the discs
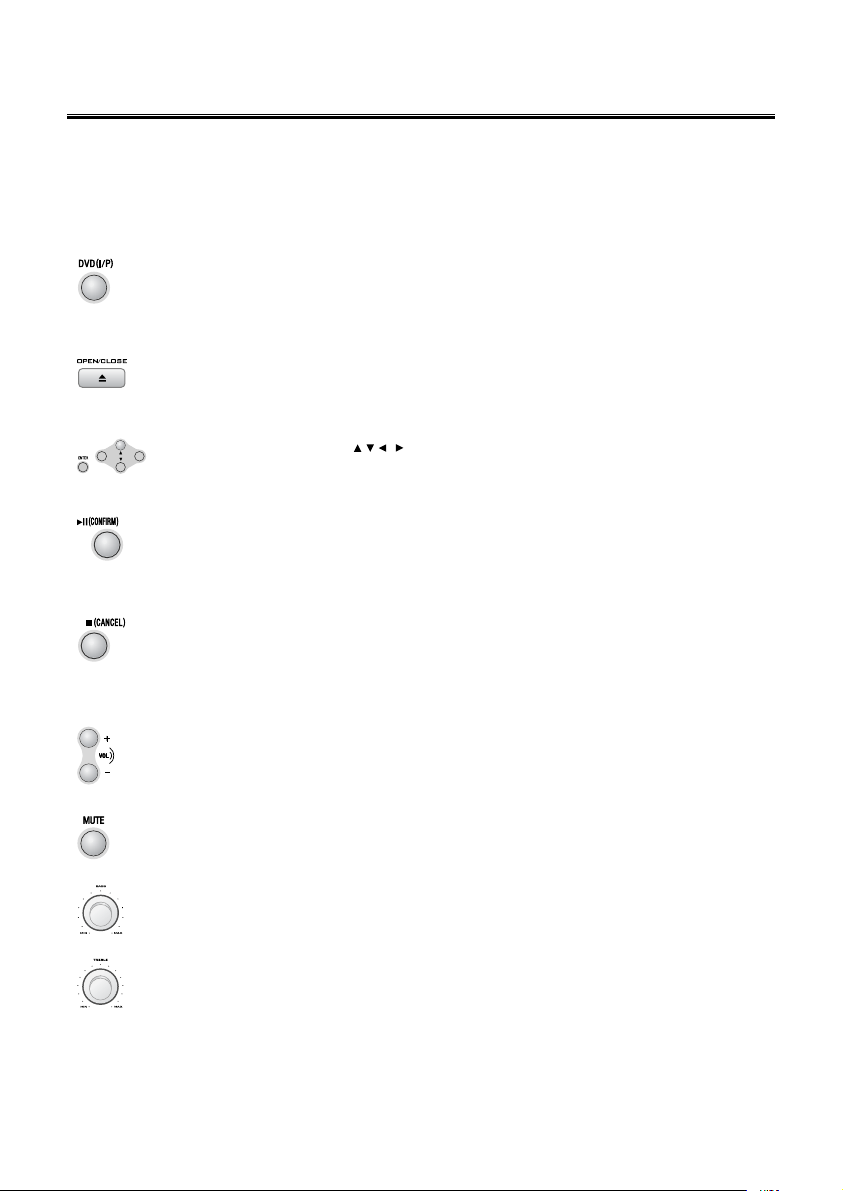
In power on mode, press the DVD function button (DVD) to select DVD function.
In DVD function mode, press the Interlace/P-SCAN switch button (
P-SCAN TV output mode.
I/P) to select Interlace or
Press the open/close button (
K) on the unit to open the disc tray then place the disc on the
disc tray (with the printed side up). Press this button again to close the disc tray, the unit will
read the disc and the disc type will display on the TV screen. The disc should play
automatically.
Press the direction buttons (
Press the confirmation button (
In stop mode, press the play/pause button (
When playing disc, press the play/pause button (
, , , ) to move the cursor to illuminate the desired selection.
ENTER) to confirm the menu selection.
BF) to start playing the disc.
BF) to temporarily stop the playing,
press the button again, it will continue to play.
(You can also operate the key “
Press the stop/return button (
memory automatically, then press the play/pause button (
BF” on the panel of unit.)
L) to stop playing, the unit will store the last playing time in the
BF), the unit will resume to last
memory time and continue playback automatically.
If you press the stop/return button (
(You can also operate the key “
L) twice to stop the disc playing.
L” on the panel of unit.)
Press the volume up button to increase the volume. Press the volume down button to
decrease the volume.
(You can also operate the volume knob “
- CONTROL +” on the front panel of unit.)
Press the mute button in playing mode, all sound will erase, press the button again to
resume sound. (Note: The mute function applies to amplifier unit only, it is not available for
optical fiber output.)
Rotate the bass knob (
BASS) on the unit clockwise or anticlockwise to increase/decrease
the bass.
Rotate the treble control (
crease the treble.
TREBLE) on the unit clockwise or anticlockwise to increase/de-
- 8 -
Page 10
z
This unit has a loudness function, it can automatically increase bass sound effect at low
volume (the higher the volume, the smaller bass increase), which improves the output
sound. You only need to press the loudness button (
LOUD) to obtain the loudness
function when it is playing.
z
This unit has three brightness levels for adjusting the display brightness.
In standby mode, press the clock dimmer button (
CLK DIM), for the desired brightness
level.
You can adjust the sound reproduced simply by choosing from different preset equalizations.
Press the preset equalizer button (
P-EQ) once by once to select cyclically one of the follow-
ing different preset equalizations:
POPS : Vocal sound is intensified
JAZZ : For jazz
CLASSIC : For classic
ROCK : For rock
USER : Tuned (Bass and Treble) by user
No display : Normal sound
Press the OSD button to display the playing information of the disc on the TV screen.
Load a general disc, upon finishing reading the disc in PBC OFF mode, you can select
tracks or chapters by number buttons (0/10,1-9,10+) and play.
* If the track or chapter number is less than 10, press the number buttons 0/10,1-9.
* If the track or chapter number is over 10, press 10+ button and press the one of the
number buttons 0/10,1-9. (Note: If the track or chapter number over 20, press 10+ button
twice and press the one of the number buttons 0/10,1-9.)
z
If the general disc is recorded in menu, you can set the playback control function to “PBC
ON” mode by pressing the PBC button (
MENU). The unit reads the disc and the menu will
display on the TV screen, then use the number buttons to select the desired track.
z
When playing DVD disc, press the root button (MENU) to return to the root menu for
previous layer.
z
If your DVD disc has one or more music chapters or titles, you can setup playing order for
the disc by this button. Press the program button, TV set display is as following:
01 TT:__ CH : 06 TT:__ CH :
02 TT:__ CH : 07 TT:__ CH :
03 TT:__ CH : 08 TT:__ CH :
04 TT:__ CH : 09 TT:__ CH :
05 TT:__ CH : 10 TT:__ CH :
Exit Start
G
Note: TT: Title
CH: Chapter
* Use the 0/10,1-9,10+ buttons to input the sequence number which you want to
program playing (the first selection is title and the second selection is chapter of the
programs menu.). After finishing program, Press the
then press the
over 10, press the “
ENTER button to start programmed play. (If you setup disc playing order
G” to setup.)
- 9 -
, , , buttons to select “Start”
Page 11
z
If you are playing the general disc, the TV display is as following:
01 -- 06 --
02 -- 07 --
03 -- 08 --
04 -- 09 --
05 -- 10 --
Exit Start
G
* Use the 0/10,1-9,10+ buttons to input the sequence number you want to program
playing. After the program is finished, Press the
press the
10, press the “
ENTER button to start programmed play. (If you setup disc playing order over
G” to setup.)
, , , buttons to select “Start” then
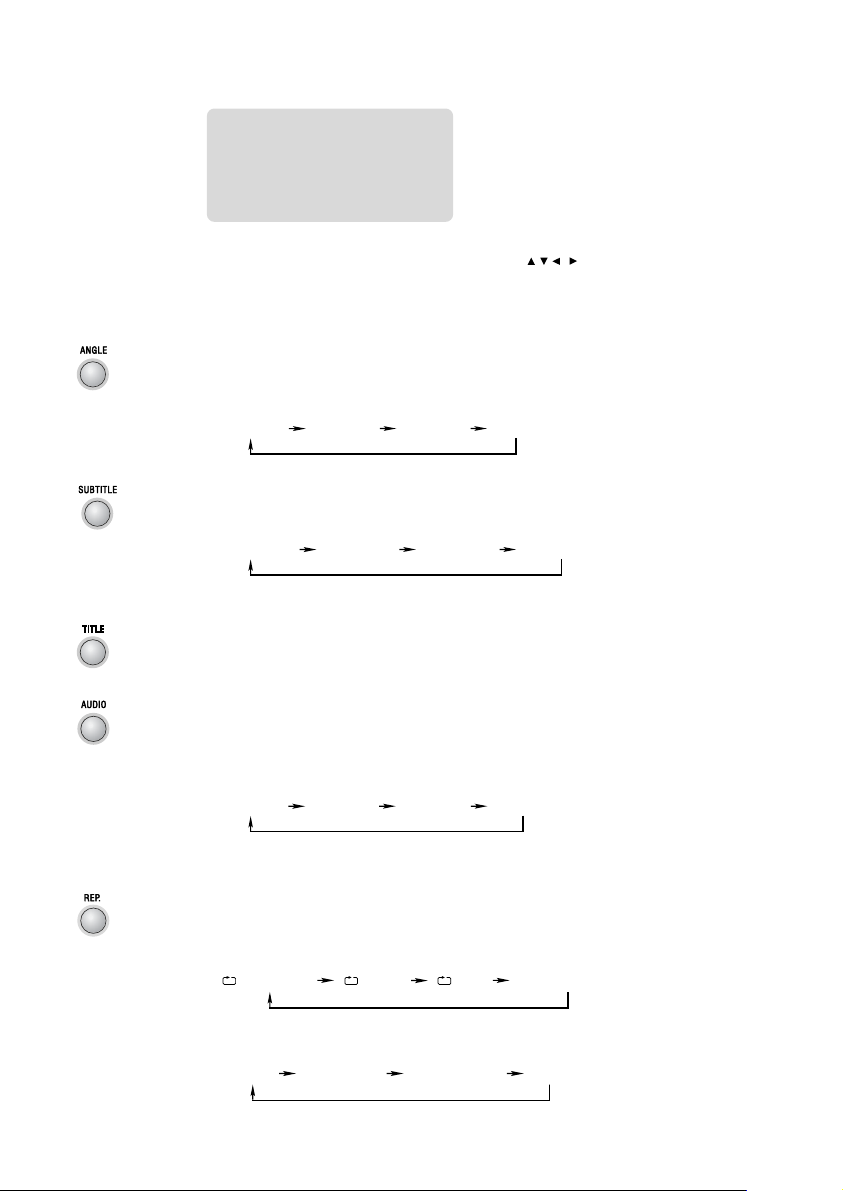
You can use this function to view a DVD in different angles, if it has been recorded with this
function.
If the DVD disc which you are playing is recorded by four angles, then you can repeatedly
press the angle select button (
Angle 1/4 Angle 2/4 Angle 3/4 Angle 4/4
ANGLE) to select one angle to watch.
When you are playing the DVD disc which are recorded with several subtitles, you can
repeatedly press the subtitle button (
SUBTITLE) to select one of subtitle to display on the TV
screen.
Subtitle 1/3 Subtitle 2/3 Subtitle 3/3 Subtitle Off
(You can also operate the key “
In the disc normal playing mode, press the title button (
SUBTITLE” on the panel of unit.)
TITLE), this system will stop playing
and enter the display mode of title menu.
z
You can use channel function when you playing the general disc, you can choose MONO
(Mono Left, Mono Right), “STEREO” or “Mix-Mono” audio output by pressing vocal mode
select button (
z
When playing DVD disc recorded with several languages, you can repeatedly press the
language select button (
(You can also operate the key “
AUDIO).
AUDIO) to select one of language to play.
Audio 1/4 Audio 2/4 Audio 3/4 Audio 4/4
AUDIO” on the panel of unit.)
One title, one chapter, one track or all the disc repeat play can be set by pressing the repeat
REP).
button (
z
When playing a DVD disc, this function can be used to play a title, chapter or disc
repeatedly. Repeatedly press the repeat button (
CHAPTER TITLE ALL Cancel Repeat
z
When playing MP3 disc, this function can be used to play a track or folder repeatedly.
Repeatedly press the repeat button (
Single Repeat One Repeat Folder Folder
REP), the screen shows :
- 10 -
REP), the screen shows :
Page 12

z
You may repeat a track or disc according to the following steps. Repeatedly press the
repeat button (
REP), the screen shows :
Track ALL Cancel Repeat
(You can also operate the key “
REPEAT” on the panel of unit.)
You may directly enter a time, title or chapter number to search quickly on a disc. The unit
will play from this point.
Note: If the search time exceeds the total time on the disc or the item set falls short of the
disc recorded, the “
INPUT INVALID” will display on TV screen, indicating the
operation is invalid or incorrect.
Press the fast forward button (
C) repeatedly to select one of the variety different speed to
fast forward play or select normal speed to play. Each time you press the button, the screen
shows .
2X 4X 8X 16X 32X PLAY
Note: Press the
Press the fast reverse button (
BF button to resume normal playback.
D) once by once to select one of the variety different speed
to fast backward play or select normal speed to play. Each time you press the button, the
screen shows .
2X 4X 8X 16X 32X PLAY
Note: Press the
BF button to resume normal playback.
You can have the selections played in a random order.
Random play begins from the current selection by pressing the random button (RANDOM)
on the remote control.
Press the intro button (
the TV screen. Use the
interval), then press the
INTRO) to inter the 9-view picture function, the menu will displayed on
, buttons to select digest type (track digest, disc interval or track
ENTER button to confirm your choice (the TV screen will display the
many picture).
z
Turn the H/G buttons to select the previous/next 6 tracks picture.
z
Press the 0/10,1-9,10+ buttons to select the desired picture number on the 9-view picture,
then press the
z
Press the , , , buttons to move the cursor to illuminate the “Exit” (exit the 9-view
picture function) or “Menu” (return to “select digest type” menu list), then press the
ENTER button to play.
ENTER
button to confirm your choice.
z
When playing DVD disc, press the next button (G) to skip the next chapter or title.
z
When playing general disc, press the next button (G) to skip the next track.
(You can also operate the key “
z
When playing DVD disc, press the previous button (H) to skip the previous chapter or
G” on the panel of unit.)
title.
z
When playing general disc, press the previous button (H) to skip the previous track.
(You can also operate the key “
H” on the panel of unit.)
- 11 -
Page 13

This function can be used to enjoy a motion or motionless picture.
Press the zoom button (
2X 3X 4X 1/2X 1/3X 1/4X B
ZOOM) when playing, the screen shows :
* Use the
, , , buttons to move the enlarged picture.
Note: This function is not available for CD or MP3 playback.
Play picture CD disc
z
Place the picture CD on the disc tray properly, the unit will read the disc and play it automatically.
Picture CD: The disc is recorded in picture
z
When the picture is displayed on the TV screen, you can press the 0/10,1-9 buttons on the remote
control to select the desired picture in the disc to start playing.
Note: Play will continue until the final picture or when the selected pictures have been played.
z
When playing, press program button (PRG) to select one of the transition effect to playing the picture.
z
When playing, use the MENU button or L button to select different play mode. These play modes list
as the following:
Note:
Slide Show : Selections played in a random order
Menu : Display “Remote Key Function” list
Slide Show Menu <<Prev Next>>
Note: When playback the picture CD, press the
, , , buttons to move the cursor to illuminate the “MENU” then press the ENTER button to
enter the “Remote Key Function” list.
PROGRAM : Transition Effect
STOP : Thumbnail Mode
G : Next Picture
H : Previous Picture
PLAY : Picture Mode
ZOOM : Switch Zoom Mode
C : Zoom In
D : Zoom Out
: Invert
: Mirror
: Contrarotate
: Rotate Clockwise
, , , : PAN IN Zoom Mode
z
When playing, you may need use the K button on the unit to stop playing and open the disc tray.
Prev : Display previous 12 pictures of disc
Next : Display next 12 pictures of disc
L button to enter the “Thumbnail Mode”, use the
Listening to Radio Broadcasts
DAB/FM
The DAB/FM button is used to select between the DAB and FM Tuners.
When in DAB mode the following message is displayed until the new code has been loaded.
Switching to
DAB
- 12 -
Page 14

DAB Radio
Power on
The receiver will remember whether the tuner was last used in DAB or FM mode and start up in that
mode. In the case of DAB mode (or if it is the first time the unit has been powered on) the following
message will be displayed for 2 seconds.
Hitachi DAB Radio
System Reset
If the MENU button is held down whilst the unit is powered on, then this is used to initiate a full system
reset.
The purpose of the system reset is to clear (both DAB & FM) station databases and reset all persistent variables to their default state.
Another use for this function is if the user travels to another location with the unit and wishes only the
stations for that location to be displayed.
The following message will be displayed for at least 1 seconds.
System Reset
The unit will automatically enter the Station Search /Auto Tune sequence, searching all of Band for
active ensembles.
‘Auto’Tune
This button on the remote activates the ‘Auto’ Tune function which searches for available DAB ensembles and when it locates a valid ensemble it enters the details into the database.
If the button is held down for over 2 seconds then a Full scan is initiated, instead of the usual Quick
scan.
Up/Down Buttons (or SEL-/SEL+ on remote)
These buttons are used to select new stations/services.
Menu Button (DAB Mode)
This button (on the unit and remote) is used to confirm new station/service selection. If the button is
held down for more than 2 seconds then manual tuning is activated.
Scrolling Text
The bottom line displays transmitted text giving information regarding the tuned station transmission.
Storing Stations on Preset Buttons 0-9
If a preset button is pressed and held for at least 2 seconds, then that assigns the current station to
the selected preset.
After 3 seconds the display reverts to the current display mode.
Planet Rock DAB
Preset 04 Stored
Recalling Station
If a preset button is pressed and released, then that initiates tuning to the station previously stored
under that preset.
Classic DAB
Tuning...
- 13 -
Page 15

If tuning is successful then the display reverts to the tuned state
Classic DAB
Air on a G String by
If tuning is not successful, then the ‘not available’ message is displayed.
If no preset has previously been stored then the following message is displayed for 3 seconds…
Planet Rock DAB
Preset 01 Empty
Then reverts to the current station display.
Planet Rock DAB
Quick Scan
If the user presses the Auto Tune button briefly, then only a (Quick) scan of channels 11A – 12D is
undertaken (unless a previous full scan has detected an ensemble outside this range, in which case
a persistent flag has been set and a Full scan is undertaken instead.
Auto Tune
Quick Scan
The above message is displayed on the screen for at least 2 seconds.
Full Scan
If the user holds the Auto Tune button down for at least 2 seconds, then a (Full) scan of all channels
in Band III is undertaken. The following message is displayed on the screen for at least 2 seconds.
If any ensembles are found during the full scan that lie outside the normal UK Band III range, then a
persistent flag is set to indicate the fact, to ensure that even a short press of the Auto Tune button will
initiate a full scan next time.
Auto Tune
Full Scan
INFO Button (Unit and Remote)
If the INFO button is held down for more than 2 seconds, then this causes the advanced information
display to be shown. When the info button is clicked or held subsequently, then the info display
returns to the start of the cycle.
Pressing INFO once will give you the following option:
Program Type
The bottom line displays the static PTY information centred (in the long name format, max. 16
characters).
Planet Rock DAB
Pop Music
Pressing INFO twice will give you the following option:
- 14 -
Page 16

Multiplex Name
The bottom line displays the Ensemble/Multiplex name centred (in the long name format, max. 16
characters).
Planet Rock DAB
CE London
Pressing INFO three times will give you the following option:
Signal Quality
The bottom line displays a graphical representation of the signal quality of the ensemble currently
being decoded and shows an indication of the minimum signal quality necessary for successful
decoding.
Poor signal quality…
Planet Rock DAB
Good signal quality…
Planet Rock DAB
The solid block is used to denote the point at which signal quality (hence audio quality) becomes
acceptable. Below this point audio may still decode, but audio artefacts (first burbling, then
muting) will be heard.
This display will be continuously updated so that the user can use it to position the radio to obtain the
best reception.
Pressing INFO four times will give you the following option:
Time and Date
The bottom line displays the time and the date in the following format.
Planet Rock DAB
17:23 06.08.2003
FM Radio
Power on
If the tuner was last used in FM mode, then the tuner will start up in that mode.
Switching to
FM
This message will be displayed for 2 seconds.
System Reset
If the Menu button is held down whilst the unit is powered on, then this is used to initiate a full system
reset.
The following message will be displayed for at least 3 seconds.
System Reset
- 15 -
Page 17

State Display (Tuned)
When a user has tuned to a station, the station details are recorded in persistent storage so that if the
radio is turned off and then on again, or an invalid preset or offair station is chosen, then the radio can
revert to the last station.
The standard tuned display is as follows…
Classic FM
Currently Playing
The ‘FM in the top left corner, indicates that the radio is in FM mode.
AutoTune Button
This button (on the remote) activates the ‘Auto Tune’ function which searches for the next available FM
station.
Menu Button
This button is used to enter the receiver configuration mode, AUTO or MONO. (AUTO will select
STEREO if available).
Select Up/Down Buttons (SEL-/SEL+)
These buttons are used to manually select new stations.
Storing Stations on Preset Buttons 0-9
If a preset button is pressed and held for at least 2 seconds, then that assigns the current station to
the selected preset (in this example preset 4 is selected).
92.6MHz FM
Preset 04 Stored
After 3 seconds the display reverts to the current display mode.
92.6MHz FM
The bottom line of the display will show transmitted text if the station chosen transmits RTS.
Recalling Station
If a preset button is pressed and released, then that initiates tuning to the station previously stored
under that preset.
If no preset has previously been stored then the following message is displayed for 3 seconds…
FM
Preset 01 Empty
Then reverts to the current station display
92.6MHz FM
Scan
Pressing AUTO, scans up the frequencys until a transmission is detected.
- 16 -
Page 18

Signal Quality
The bottom line displays a graphical representation of the signal quality of the station currently being
demodulated.
Poor signal quality…
Classic FM
Good signal quality…
Classic FM
This display will be continuously updated so that the user can use it to position the radio to obtain the
best reception.
Time and Date
The bottom line displays the time and the date in the following format (requires RTS transmission).
If the hours field can be represented by a single digit, then there is a leading zero thus…
Classic FM
17:23 06.08.2003
Listening to MP3 Player
Press the MP3 function button (MP3) to select MP3 function.
If without USB device, the unit will display total file no. from built-in hard disk.
If inserted the USB device, the unit will display total file no. from USB device.
z
In stop mode, press the BF button to start playing.
z
During playing, press the BF button to temporarily stop the playing, press the button
again, it will continue to play.
z
In menu setting mode, press the menu confirm button (CONFIRM) to confirm menu
setting.
(You can also operate the key “
BF(CONFIRM)” on the panel of MP3 player.)
z
Press the L button to stop the disc playing.
z
In menu setting mode, press the menu cancel button (CANCEL) to cancel menu setting.
(You can also operate the key “
In menu setting mode, press the menu select down button (
(You can also operate the key “
In menu setting mode, press the menu select up button (
(You can also operate the key “
Press the
H button once or more to skip previous one or more tracks.
(You can also operate the key “
Press the
G button once or more to skip forward one or more tracks.
(You can also operate the key “
L(CANCEL)” on the panel of MP3 player.)
SEL-) to select menu to setting.
SEL-” on the panel of MP3 player.)
SEL+) to select menu to setting.
SEL+” on the panel of MP3 player.)
H” on the panel of MP3 player.)
G” on the panel of MP3 player.)
- 17 -
Page 19

z
You can have the hard disk or USB device played in a random order by pressing the
RANDOM button.
z
In stop mode, press the menu setting button (MENU) to inter the menu setting mode.
(You can also operate the key “
RANDOM(MENU)” on the panel of MP3 player.)
On the unit
CANCELSEL SEL
RANDOMREPEAT INTRO
MENU
Press the
INTRO button to play the beginning of each track consecutively. The playing time
of each track is 10 seconds.
(You can also operate the key “
ONE and ALL repeat play can be set by pressing the
INTRO” on the panel of MP3 player.)
REP button.
First press : To repeat the same track.
Second press : To repeat all tracks on a disc.
Third press : To cancel the repeat playing.
(You can also operate the key “
1. If inserted the USB device, press the copy button (
2. Use the
SEL- or SEL+ button to select from USB device to hard disk or from hard disk to
USB device of copy and press
3. Press the
SEL- or SEL+ button to select one file or all files, then press CONFIRM button to
REPEAT” on the panel of MP3 player.)
COPY).
CONFIRM button to confirm your select.
confirm your selection.
4. If one file for copy, please use the
SEL- or SEL+ button to select file and press CONFIRM
button to start copy.
Press the menu setting button (
VFD, then you can use
kbps for recording from external equipment and press
MENU) repeatedly until “REC. BIT-RATE” is displayed on the
SEL- or SEL + button to select the 5 levels of bitrate (64 kbps to 196
CONFIRM button to confirm your
selection. (The highter the bitrate, the better the sound quality.)
Press the menu setting button (
the VFD, then you can use
record songs from external equipment and press
MENU) repeatedly until “AUTO-TRACK REC” is displayed on
SEL- or SEL + button to select the OFF, ALL or ONCE mode to
CONFIRM button to confirm your selection.
* Off : Turns record synchronization off
* ALL : Synchronized record all tracks of a disc. Each track will be saved as a separate
MP3 file.
* Once : Synchronized record one track of a disc. Only the first track played will be recorded.
Press the menu setting button (
then you can use the
CONFIRM button to confirm your selection. Use SEL- or SEL+ button to select the file that you
SEL- or SEL + button to select hard disk or USB device and press
want to delete and press
MENU) repeatedly until “DELETE” is displayed on the VFD,
CONFIRM button to confirm the delete or press CANCEL button to
cancel.
Press the menu setting button (MENU) repeatedly until “MEM SIZE CHECK” is displayed on
the VFD, then you can use the
CONFIRM button to confirm your selection. Use SEL- or SEL + button to check the hard
press
SEL- or SEL + button to select hard disk or USB device and
disk total memory and remaining memory, then the USB device memory if inserted.
Press the menu setting button (
VFD, then you can use the
MENU) repeatedly until “BROWSE DIR” is displayed on the
SEL- or SEL + button select DIR to play first track.
- 18 -
Page 20

Press and hold the menu setting button (MENU) until “1.FORMAT, 2.FDISK & FORMAT” are
displayed on the VFD, use the
between hard disk and USB device. Then press
” will be displayed. Press
SEL- or SEL+ button to select the memory to be formatted
CONFIRM button “ARE YOU SURE FORMAT?
CONFIRM button to confirm to format memory or press CANCEL
button to cancel.
1. Before recording, please first confirm whether the menu setting is setup to the record
setting you need.
2. Press the REC button (
3. If inserted the USB device, use the
4. Press the
CONFIRM button to start recording or press the CANCEL button to cancel
REC) to inter the record mode.
SEL- or SEL + button to select hard disk or USB device.
recording and return to stop mode.
5. Press the
CANCEL button to stop recording anytime.
CD-S YNC
1. Before recording, please first confirm whether the menu setting is setup to the record
setting you need.
2. Press the CD SYNC button to record songs from DVD function.
3. If inserted the USB device, use the
4. Press the
CONFIRM button to start recording or press the CANCEL button to cancel
SEL- or SEL+ button to select hard disk or USB device.
recording and return to stop mode.
5. Press the
CANCEL button to stop recording anytime.
Note:
DRM-protected files will only play if you copy them to the player through Windows Media
Player or through the music management software provided by the online music store
where you purchased the files.
WMA files “can” have DRM protection. In this case the file content is encrypted with a key. For
playback and decoding it is necessary to have DRM license files on your computer. DRM
license can limit your rights for using these functions. For instance, it can allow only playback and prohibit conversion into other formats. When you download music from the internet
sites that require you to pay per song, these licenses may be included with the download.
In order to play these encrypted WMA files in your MP3 player, you will need to use the
Windows Media player to copy them to your MP3 player. The traditional “Drag & Drop”
method will not work. Here is what you have to do:
- Open your WMA file using your Windows Media Player.
- Click “Copy to CD or Device”
- Select the MP3 player as your device.
If you don’t have a windows media player or if your version of windows media player is
outdated, you can download the latest Version for free from microsoft’s website:
http://www.microsoft.com/windows/windowsmedia/download/
Setting the Clock
The built-in clock shows the correct time in the display.
- Press the clock button (
blink.
- Set the hour with the
- Press the clock button (
- Set the minute with the
CLOCK) twice (press once in standby mode), hour indicator will
C button or D button.
CLOCK), minute indicator will blink.
C button or D button.
- 19 -
Page 21

- Press the clock button (CLOCK), the built-in clock starts operating and the seconds start
counting from 0.
Note:
* The operating time of every step shouldn’t be longer than 3 seconds or it will return to the
original display.
* If there is a power failure or the power system is turned off, the clock will lose its setting.
To confirm the clock time
When you press the clock button (
seconds until the display returns to the original display.
Setting the Daily Timer
z
In standby mode, you can use the daily timer setting to turn the unit on automatically at a
certain time everyday under standby mode. When the setting timer is on, the timer
indictor “
function to work.
- In standby mode, press the timer button (
- Set the hour with the
- Press the timer button (
- Set the minute with the
- Press the timer button (
(daily timer set is in effect) or “OFF” (daily timer set is to cancel) by pressing the
button or D button.
Note:
* You can only set the daily timer only in standby mode.
* The operating time of every step shouldn’t be longer than 3 seconds or it will return to
time display.
* The sound source of the “timer on” mode is the same as the sound source when the unit
was turned off by the standby switch.
To confirm the daily time
Press the timer button (
second until the display returns to the time display.
To cancel the daily timer setting
In standby mode, repeatedly press the timer button (
VFD, then you can set the daily timer to “OFF” by pressing the
daily timer will be cancelled).
Turning off the system also cancels the daily timer.
” will display on the VFD, however the clock must be set correctly for the timer
CLOCK), the clock time is displayed. Wait for a few
SLEEP) twice, hour indicator will blink.
C button or D button.
SLEEP), minute indicator will blink.
C button or D button.
SLEEP), the selected time is set. Then set the daily timer to “ON”
C
SLEEP) in standby mode, the daily time is displayed. Wait for a
SLEEP) until the “ON” will display on the
C button or D button (the
Setting the Sleep Timer
z
Use the sleep timer to turn the system off after a some time when playing. By setting the
sleep timer, you can fall asleep and know that your system will turn off by itself rather than
playing all night.
- Play a disc or tune in to the desired station.
- If you set the sleep timer first, each time you press the sleep button (
the number of minutes shown on the VFD in this sequence:
- -
10 20
...
- 20 -
SLEEP), it changes
80 90 00
Page 22

If you change the sleep timer, each time you press the sleep button (SLEEP), it changes
the number of minutes shown on the VFD in this sequence:
- -
15 10 20
After setting the number of minutes for the sleep timer, the display will return to the
display as before setting the sleep timer.
The system is now set to turn off after the number of minutes you set.
To confirm the sleep time
When pressing the sleep button (
seconds the display returns to the original display.
To cancel the sleep timer setting
Repeatedly press the sleep button (
It can also cancel the sleep timer by restart set the clock or turning off the system.
Function Menu Setting List
...
80 90 00
SLEEP), the remaining sleep time is displayed. After a few
SLEEP) until the “00” displays on the VFD.
Caution:The content of this chart is for reference only. If something has changed, please take the actual
display for standard.
Menu function setup
* If you want to set the function of this unit, please press the function setting button (SETUP)
to display the DVD function setting main menu, then use the
, , , buttons and ENTER
button. Press the function setting button (SETUP) again to exit the function setting main
menu.
(Note: If the item displays in gray, that means that it can’t be setup and there isn’t this
function in the disc.)
General Setup Page
TV Display
This menu allows the user to select the aspect ratio of
the TV to be connected.
Angle Mark
Available only when the disc is with angle marks, you
can set the angle mark to show on TV screen or not.
OSD Language
This menu allows the user to select the language for
the on-screen.
Captions
Set the captions to display or not.
Screen Saver
Set the screen saver to activate or not.
Last Memory
Set the last memory state to on or off.
- 21 -
Page 23

Audio Setup Page
Video Setup Page
Speaker Setup
When the disc has Dolby Pro Logic stereo, you can
choose LT/RT or Stereo or V SURR mode to play this
disc.
SPDIF Setup
For optic and coax output, this system is only used for
simulation mode. If set for Manual, you can choose
output mode when playing different disc.
Equalizer
It has 7 modes for you choice. For instance, if you choose
“Reverb mode”, the unit will be imitating the theater
effect. When turn off this function, system will automatically playing that disc which has modes.
HDCD
When playing the HDCD disc, it can set the audio output width degree.
Component
You can setup this according to TV video output type.
TV Mode
When RGB video output type is selected, you can select DVD Interlace or P-SCAN output mode (please first
confirm your TV has P-SCAN function and set to that
function).
Quality
You can according to the color of picture ,adjust it to be
light or dark.
- 22 -
Page 24

Preference Page
Password Setup Page
Audio, Subtitle, Disc Menu
When disc has subtitle, audio, disc menu support. Playing type was default. You can setup language. If not,
this function is invalidated.
Parental
Setup this system when playing disc which had age
control, you can through this function.
Default
Restore to factory setting.
Password Mode
Select this item to set new password for this unit, follow the screen’s indication and enter a password.
Password
The original password is 136900.
- 23 -
Page 25

Protect the Disc
1. To keep the disc clean, please don’t touch the disc’s surface when you are holding it. You should hold
the edge.
2. If the disc is dirty, it will affect the sound quality. Please use the clean and soft cloth to wipe the disc
from inside to outside. Don’t wipe the disc in circular motion.
3. Don’t stick paper on the disc.
4. Don’t place discs in direct sunlight or near or on heat sources.
5. After you have finished with the disc, please place it back in its original case. To avoid warping or
damage, do not stack discs.
6. Don’t play the disc which has flaw or deformation, in case of damaging this player.
7. Clean your discs using only a soft dry cloth. Do not use any chemicals such as benzine, thinner,
antistatic or record sprays as these can damage the disc surface.
Troubleshooting
If you are having a problem with your system, check this list for a possible solution before calling for
service.
If you can not solve the problem from the hints give here, or the system has been physically damaged,
call a qualified person, such as your dealer, for service.
Symptom
No sound is heard
No picture
Bad sound quality
Picture roll or abnormality
The disc does not play
Poor radio reception
Unable to operate
the remote control
Operations are disabled
Connections are incorrect, or loose
Possible Cause
TV or power amplifier operates wrong
The amplifier’s receiving signal position is
wrong
Volume setting to minimum
Connect wrong or loose
TV Operation and setting is wrong
Audio connect wrong
Audio output mode setting wrong
DVD Player doesn’t match the TV system
No disc in the tray
The disc is upside down
The disc is dirty or scratched
The unit is foggy inside
The antenna is disconnected
The path between the remote control and the
sensor on the unit is blocked
The batteries have lost their charge
The built-in microprocessor has malfunctioned
due to external electrical interference
- 24 -
Check all connections and make corrections
Action
Check whether the operation is right
Check the position of receive signal
Adjust volume
Check all connection and correct it
Check whether operation and setting is right
Check whether audio connection is right
Check whether audio output setting is right
Use interlace/P-SCAN switch button to select suitable system
Place a disc
Place the disc in with the printed side up
Clean or replace the disc
Take out the disc, turn on the unit for about
an hour
Reconnect the antenna securely
Remove the obstruction
Replace the batteries
Unplug the system then plug it back in
Page 26

Specification
System
Power supply ............................................................. ~230V / 50 Hz
Rated working power consumption .......................... ≤ 130W
Channel ..................................................................... ≥ 40dB
Distortion ................................................................... ≤ 0.7%
Dimensions ............................................................... DAB: 280(W) x 65(H) x 300(D) mm
DVD: 280(W) x 65(H) x 280(D) mm
MP3: 280(W) x 65(H) x 280(D) mm
AMP: 280(W) x 65(H) x 300(D) mm
DVD
Frequency response ................................................. 20Hz-20kHz (±3dB)
Video output ............................................................... 1 V
Horizontal definition ................................................... ≥ 500 (TV)
TUNER
FM Frequency range .................................................. 87.5-108 MHz
FM Noise limit sensitivity ........................................... ≤ 20µV
FM S/N ....................................................................... ≥ 46dB
DAB Frequency Range (band III) ............................... 174 - 240 MHz
Usable Sens.............................................................. - 95 dBm
MP3
Internal Memory ......................................................... 40GB
Data File Type ............................................................ MP3 & WMA
Amplifier
Output power ............................................................. 40W x 2
Frequency response ................................................. 20Hz - 20kHz (+1/-3dB)
S/N Ratio ................................................................... ≥ 65dB
Speaker
Impedance ................................................................ 8 Ω
Input power ................................................................ 40W
Dimensions ............................................................... 200(W) x 325(H) x 270(D) mm
Remote
Distance .................................................................... 6 m
Angle .......................................................................... ± 30
Accessories
Antenna ...................................................................... 1
Speaker connect line ................................................. 2
Power control cable ................................................... 1
Spanner ..................................................................... 1
Remote control .......................................................... 1
Instruction manual .................................................... 1
P-P
O
Note: Design and specifications are subject to change without prior notice.
- 25 -
1204WD12HDRE401-01
Page 27

Partmaster Direct can provide accessories, spares, batteries and replacement parts with
Next Day Delivery available upon request.
Please call:
0870 600 1338
(UK customers only)
Calls charged at National Rate
…or visit our website at www.partmaster.co.uk
- 26 -
Page 28

Your hi-fi should include...
Your hi-fi should include...
Remote
con tr o l
SLEEP/TIMER
CLKDIM
DIGITALRADIOAX-M140
DAB/FM
INFO.
M
DTSYSTE
DIO
CONFIRM
REPEAT
SEL SEL
AX-M140 SYSTEM
1
DAB
(FM r a dio )
DV D pla y er
MP3 player
M a in Instruction b o ok
DAB(FM ae r ia l
)x1
Ribbon cable x 1
DIGITALRADIOAX-M140
DTSYSTE
M
DIO
Speak er leads x 2Aeria l adjustment tool x 1
A m p lifie r
Speak ers x 2
Page 29

Insert batteries in the remote control
When inserting batteries make sure they are the correct way around as shown below.
Remove battery cover
Carefully slide then lift the battery cover
from the back of your remote control.
Insert batteries
Insert two AAA size batteries into the
battery compartment.
Make sure they are inserted as shown.
2
Replace battery cover
Slide the battery cover back into place.
Page 30

Fitting the system connection leads
IMPORTANT: The separate parts of your hi-fi MUST be connected together before the unit is plugged into the mains.
Make sure that all connections are made with your hi-fi system unplugged from the mains.
3
Position your hi-fi
Stack the parts of your
hi-fi as shown. Position
your hi-fi so that you have
easy access to the back.
Connect together
Using the ribbon cable
supplied, connect the four
separate units together in
the order shown in the
illustration
DAB(FM RADIO
DVD PLAYER
MP3 PLAYER
AMPLIFIER
)
Page 31
Connecting to a TV
NOTE: Some settings might need to be made to your Hitachi AX-M140 to make it compatible with
the settings on your TV
TV Display Settings
A)
If the unit is connected to a
16:9 wide screen TV, then
set "TV display" to "Wide" in
the function setting menu.
(See page 21 of the instruction
manual)
B)
If the unit is connected to 4:3
normal TV, then set "TV
display" to "Normal/PS
"or "Normal/LB" in the
function setting menu.
(see page 21 of the instruction
manual)
connections to TV
Teminal board for the DVD player
4
TV System Settings
If you use your Hitachi AX-M140
outside the UK you will need to
change the television system
settings in the 'TV Type' menu to
either 'multi' for Europe or 'NTSC'
for USA. (PAL for the UK is the
default setting).
See page23 of the instruction
manual.
TV
Page 32

Connecting the speakers
Connect the speaker leads between the terminals as shown below.
IMPORTANT NOTE:
Before connecting or removing
mains power, please turn off
the power on the unit and turn
the volume to minimum or it
may damage the speaker
This unit has a high power
output and wide dynamic
range . If speakers other
than those supplied are used,
they must be chosen according
to speaker specification, or the
speakers may be damaged.
5
Connect the leads with a silver
line to the (+) (L) (R) terminals
and leads with a gold line to
the (-) (G) terminals.
Page 33

Ditital audio output Connections
6
Connecting to a surround sound amplifier
Please note: You can only
use coaxial OR optical-they
cannot be used at the same
time.
With digital signal input terminal's DTS, Dolby
Digital signal decode amplifier terminal board
Aux in Connections
DVD player connections
With digital signal input terminal's DTS,
Dolby Digital signal decode amplifier
Connecting a VCR audio output to your unit
VCR Output Scart socket
VCR Scart Input Socket
Page 34

Connecting the Antenna
Screw the antenna (aerial) rod
clockwise onto the antenna
base.
Screw the antenna cable into the
DAB/FM antenna socket Tighten
the antenna by hand or using the
tool provided.
(Note: Do not overtighten, this could
damage the antenna or it's fittings.)
7
Position the antenna for best reception.
Optional
Page 35

Connecting to the mains Power
Insert the mains plug into a
wall outlet, switch on and
your system is ready for use.
Caution: Be sure to unplug the
power cord from the outlet when
going away or when the system
is not in use for an extended
period of time.
8
Note: This product is exclusively available through Dixons Stores Group. In the unlikely event of a
problem with your product please return to the store where your purchase was made.
 Loading...