

Page 1
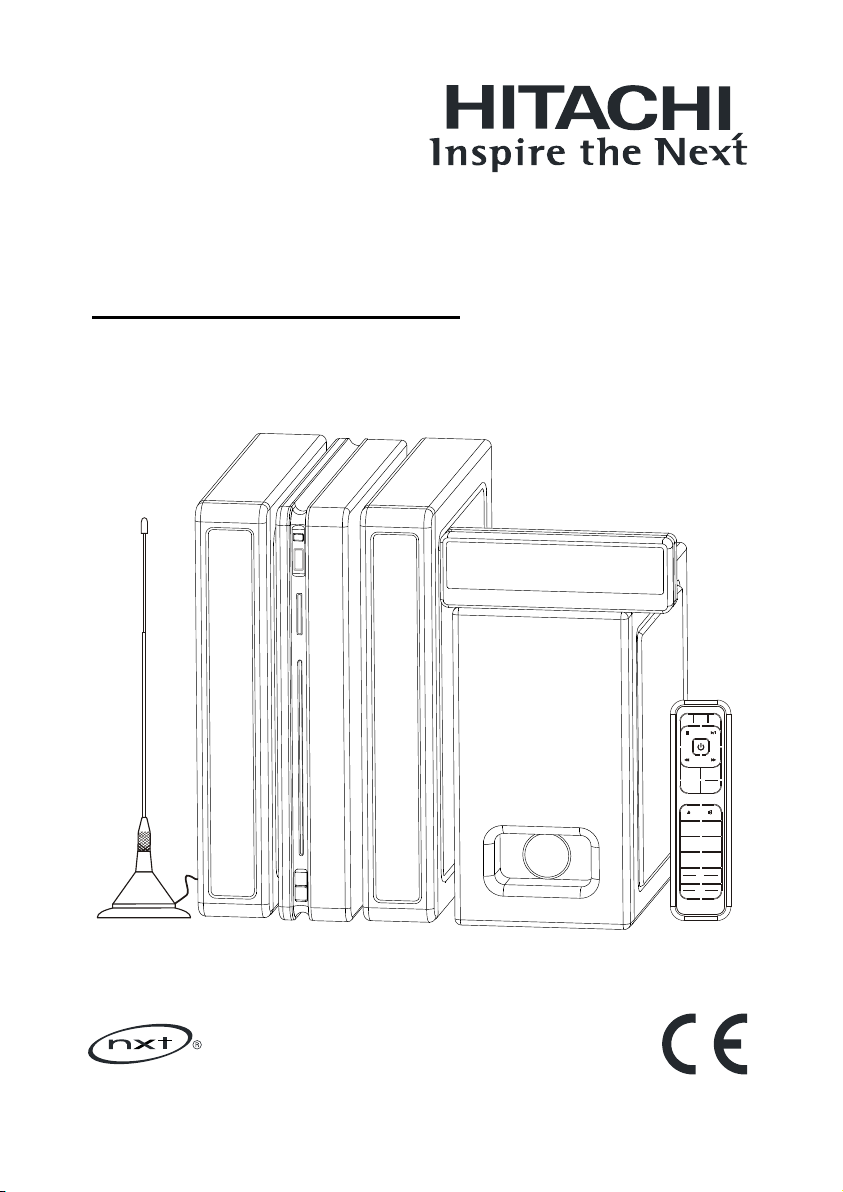
Instruction Manuals
Model No: AX-M133 Model No: AX-M133
Input
Radio
CD
DAB/FM & CD/MP3/WMA Music Centre
with USB+SD MP3/WMA Playback & MP3 Encode
+ +
Volume
EQ
Random
Sleep
Select
Program
Menu
Setup
Preset
Folder
--
X-Bass
Intro
Timer
Repeat
Autotun e
Info
Display
Page 2

SAFETY PRECAUTIONSSAFETY PRECAUTIONS
To achieve the utmost in enjoyment and performan ce, and in or der to beco me familiar wi th its feat ure s,
please read t his m anu al carefully befo re at tem pting to operate th e uni t.
This safety a nd op era ting instructio n sho uld b e retained for fu tur e reference.
Im po rt an t No te s
*
The appa rat us shal l not be expo sed to drippin g or spla shi ng and no obj ect s filled with liqu ids , suc h as
*
vases, s hal l be pl aced on appara tus .
Avo id in sta lli ng the unit in loc ati ons d escribed below:
*
- Places expo sed t o dir ect sunlight or clo se to h eat r adiating applia nce s suc h as electric he ate rs.
- On top of other s ter eo eq uipment that radi ate t oo mu ch heat.
- Places bloc kin g ven tilation or dusty p lac es.
- Places subj ect t o con stant vibration .
- Humid or mois t pla ces .
No naked flam e sou rce s such as lighted can dle s sho uld be placed on the un it.
*
Attention s hou ld be d rawn to the environ men tal a spects of battery d isp osa l.
*
Make sure not t o obs truct the vent ila tio n openings, a mi nim um of 10cm should be ke pt ar ound the
*
apparatus f or ve nti lation.
The ventilatio n sho uld n ot be impeded b y coveri ng th e ven til ati on op eni ngs w ith i tems such as ne wsp aper,
*
table-clo ths , cur tains, etc.
Use apparat us in m ode rate climates onl y.
*
Operate tun ing c ont rols and switches a s ins tru cted in the manual.
*
Before turn ing o n the p ower for the first ti me, m ake s ure the power cord is p rop erl y installed.
*
Store your CD i n a coo l are a to avoid damage fro m hea t.
*
The main s plug is use d as the d isconnect de vice and it must re mai n readily o perable. To co mpletely
*
discon nec t the p ower input, th e mai ns pl ug of the appara tus m ust be disconn ect ed fr om the mains.
For safety r eas ons, do n ot re mov e any cov ers or at tempt to gain acc ess to th e inside of the pr oduct. R efe r any
servicing t o qua lif ied personnel.
o not attempt to remove any screw s, or o pen t he ca sin g of th e uni t; th ere a re no u ser s erv iceable parts inside,
D
refer all ser vic ing t o qualified servi ce pe rso nnel.
CA UT IO N :
TO R ED UCE THE RIS K OF E LECTR IC S HOCK DO NOT R EM OVE C OVER (O R BA CK), NO US ER
SE RVICE ABLE PAR TS I NSI DE , REFER S ER VIC IN G TO QUAL IFI ED S ERVIC E PERSO NNEL.
DA NG ER OUS VOLTAG E
Conductor d ang ero us voltage, that ma y be of s uff icient magnitud e to co nst itute a risk of e le ct ri c
shock to pers ons i s pre sent within this pr odu ct' s enclosure.
The owner's m anu al co ntains importan t ope rat ing and maintenan ce in str uctions, for y our safety,
it is necessa ry to r efe r to the manual.
WA RNI NG :T O PRE VEN T FIR E OR SHOCK HAZAR D, DO NOT EXP OSE T HIS A PPL IANCE TO D R I P P I N G O R
No te:
This unit will become warm when used for a l ong p eriod of t ime. This is no rma l and d oes n ot in dic ate a p rob lem
with the unit .
In c ase of d isp lay s how s unr ead abl e sym bol s due to electrost ati c dis cha rge , swi tch ing O FF/ ON may be
necess ary f or re set.
This Hi-Fi i ncl ude s m icro-processo rs whi ch may malf unc tion as a result of externa l e lec tri cal inte rference or
noise. If the H i-F i is no t working properl y, disconnect t he po wer s ource and then reco nne ct it .
SPLASHING .
1
ATTENTION
Page 3

IM PO RTANT
The mains l ead on t his equipment m ay b e supplied with a mo uld ed plug incorpo rat ing a fuse, the v alu e of
which is indica ted on th e pin face of the plu g. Sho uld the fuse need to be re pla ced , an ASTA or BSI
approved B S 1362 fu se mu st be use d of t he same rating. I f the fus e cov er is det ach able nev er use th e plu g
with the cover omi tte d. If a r epl ace ment fuse cover is requi red , ens ure i t is of t he sa me colour as that visibl e
on the pin face o f the p lug . Fuse covers ar e ava ila ble f rom your dealer.
DO NOT c ut o ff the ma ins plug from th is e quipment. I f th e plug fitte d is not suit abl e fo r the pow er p oin ts in
your home o r t he cab le is too s hort t o r eac h a power point, then obta in an appropria te safety approved
extension l ead o r con sul t you r dealer.
Should it be necessary to cha nge the mains pl ug, this must be c arried out by a competent pers on,
preferably a qua lif ied e lec trician.
If t her e is no alternative to c utt ing o ff the mains p lug, ens ure t hat you dispose of it immed iat ely, h avi ng fi rst
removed the f use , to av oid a p oss ible shock hazard b y ina dve rte nt connection to th e mai ns su ppl y.
IMPORTANT
The wires in th is ma ins l ead a re co loured in accorda nce w ith t he fo llowing code:
Blue : NEUTRAL
Brown : LIVE
As the se colours may not cor respond to the col our ed markings iden tif ying the terminals in your plug,
proceed as follo ws:
The wi re c olo ure d BLUE must be con nec ted to the ter min al m ark ed with the le tte r N or c olo ure d BL UE o r
BLACK . The wire col our ed BROWN mus t be c onn ected to the term ina l marked wit h the let ter L or colou red
BROWN or RED.
On no acco unt conne ct ei ther of the se wires to t he te rminal ma rked E or by the ear th sy mbol E or colour ed
green or g reen and ye llow.
Alternati vel y, thi s equipment may b e suppli ed with a rewi rea ble plug already fit ted, whi ch may be r emo ved
if not suitab le an d an al ter nat ive fitted in accor dan ce wi th th e preceding instr uct ion s.
2
Page 4

SOME DO'S AND D ON'TS ON THE SA FE USE OF EQUIP MENT
This equipmen t ha s been designe d and manuf act ured to mee t in ter nationa l safet y stand ards bu t, l ike
any elect rical equipment, care must be t aken if y ou are to obtain the best results and saf ety is to b e
assure d.
DO read th e operating in structions b efore you atte mpt to use the equ ipment.
DO ensu re th at all electric al co nne ctions (in clu din g the mains pl ug, e xte nsion lead s and
interc onnections betwee n the pieces of equi pment) are pro perly made and in accordance with the
manufa cturer's in structi ons . Switch off and withdr aw the ma ins pl ug befor e making or cha nging
connec tions.
DO consul t your deal er if you are ev er in doubt abou t the ins tal lation, op eration or saf ety of you r
equipm ent .
DON'T re mov e any fixed c ove r as this may e xpo se danger ous v oltages .
DON'T obstruct the ventilat ion o penings of th e equ ipm ent w ith i tem s suc h as newspape rs, t ablecloths ,
curtai ns, etc. Overh eating will ca use damage and s horten the lif e of the equipme nt.
DON'T a llow ele ctrical equ ipment t o be e xpo sed to dripping o r splash ing, or o bjects f illed wi th liqui ds,
such as va ses, to be place d on the equipme nt.
DON'T plac e ho t objects or nak ed flame source s such as lighte d ca ndles or nig htlights on, or clo se to
equipm ent. High temp eratures can m elt plastic an d lead to fires.
DON'T li ste n to headph one s at high vol ume , as such use c an pe rmanent ly damage your h earing.
DON'T leave equi pment swit ched on when it is unat tended unl ess it is specifi cally stat ed that it is
design ed for unatten ded operat ion. Sw itch of f using the sw itch on the eq uipment and ma ke sure that
your fa mily k nows h ow to do t his. S pecial arrang ements may need to be ma de for infir m o r
handic apped people .
DON'T con tinue to oper ate the eq uip ment if yo u a re in any dou bt about i t w orking nor mally, o r i f it is
damage d in any way -swit ch off, wit hdraw the main s plug and consu lt your dealer.
ABOVE ALL
NEVER let any one e special ly ch ildren push anyth ing into holes , slo ts or a ny other openi ng in t he ca se -
this cou ld result in a fat al electric sh ock
NEVER gu ess o r take chan ces w ith elect ric al equipm ent of any kind… it is b etter to be s afe than sorry !
No te: This p rod uct is e xcl usi vel y a vai lab le through Dixons S tor es Gro up. In the unlik ely event of a
problem with yo ur pr odu ct pl eas e return to the store where your purc has e was m ade .
3
Page 5
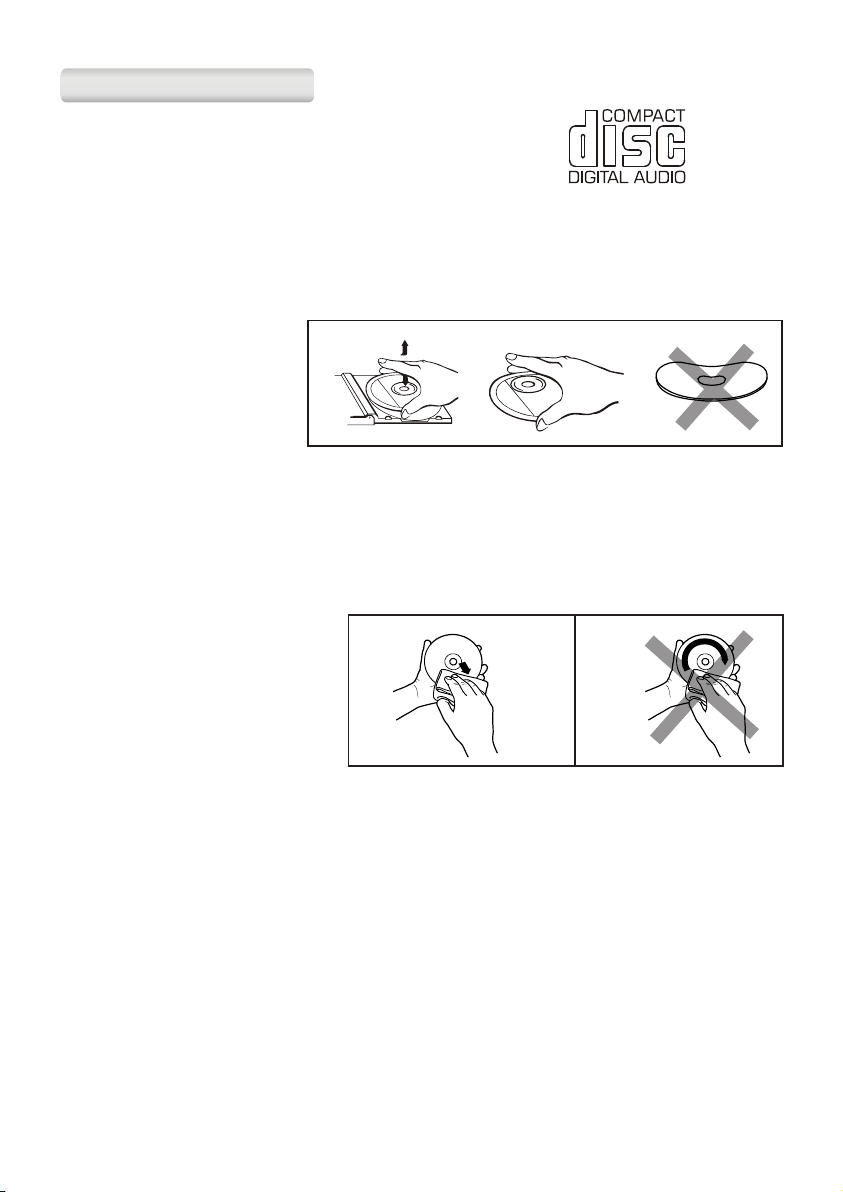
CO MPACT DIS CCO MPACT DIS C
1. Always use compact d isc s bea rin g the m ark a s shown.
2. Notes on handling di scs
Removing the disc fro m its s tor age c ase .
* Do not touch the ref lec tiv e
recorded surface.
* Do not stick paper or wri te
anything on the surfa ce.
* Do not bend the disc.
3. Storage
* Store the disc in its cas e.
* Do not expose discs to di rec t sun lig ht or h igh t emperatures, high humid ity o r dus ty
places.
FROM THE CENTRE TO THE EDGE
4. Cleaning a disc
* Should the disc becom e soi led ,
wipe off dust, dirt and fingerprints
with a soft cloth.
* The disc should be clea ned f rom
the centre to the ed ge.
CORRECT
INCORRECT
* Never use benzene, th inn ers , rec ord c leaner fluid or anti static spra y.
* Be sure to close the CD doo r so th e len s is no t con taminated by dust.
* Do not touch the len s.
4
Page 6
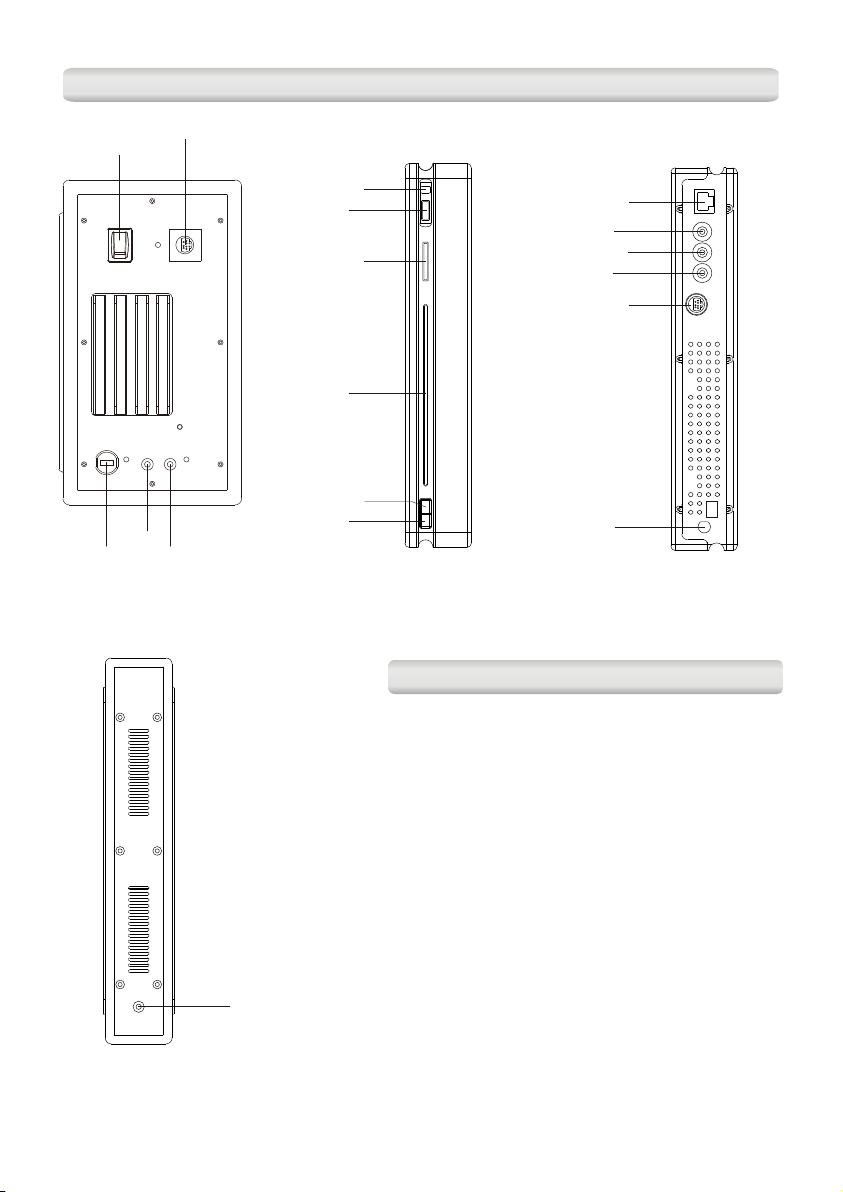
FEATURES AND CONTROLSFEATURES AND CONTROLS
AX-M133AX-M133
1
2
7
8
9
10
11
12
4
5
3
WOOFER (B ACK) MAIN UNIT (FRONT)
FEATURE S AND C ON TRO LS FEATURE S AND C ON TRO LS
13
14
15
16
17
18
MAIN UNIT (BACK)
SPEAKER ( BACK)
1. AC Power On/Off Sw itc h
2. 13 Pin Socket (to Main U nit )
3. Speaker Out Jack (Le ft)
4. Speaker Out Jack (Ri ght )
5. AC Power Cord
6. Speaker In Jack
7. IR Sensor
8. USB Port
9. Memory Card Slot
10. CD Slot
11. CD E jec t But ton
12. Standby Button
13. Display Socket
14. AU X In Ja ck
6
15. Speaker Out Jack (L eft )
16. Speaker Out Jack (R igh t)
17. 13 Pin Socket (to Woo fer )
18. An ten na So cke t
5
Page 7

REMOT E CON TR OLREMOT E CON TR OL
1. CD Button
2. Stop Button
3. Standby Button
4. Skip - /Search FR Butt on
5. Volume + Button
6. Volume - Button
7. CD Eject Button
8. EQ Button
9. Random Button
10. Sleep Button
11. Se lec t/ Pr ogr am Bu tto n
12. Menu/ Setup Butto n
13. Radio Button (DAB /FM )
14. Input Button (USB /SD /AU X)
15. Play/ Pause Butto n
16. Skip + / Search FF Butt on
17. Preset/ Folder + Bu tto n
18. Preset/ Folder - Bu tto n
19. Mute Button
20. X-Bass Button
21. Intro Button
22. Timer Button
23. Repeat/ Au tot une Button
24. Info/ Display But ton
PUT TING TH E BATTE RY IN TO
PUT TING TH E BATTE RY IN TO
THE REM OTE
THE REM OTE
10
12
CD
1
2
3
4
6
8
11
+ +
5
7
9
Program
Volume
Random
Sleep
Select
Menu
Setup
Preset
Folder
--
X-Bass
EQ
Intro
Timer
Repeat
Autotu ne
Info
Display
14
15
16
17
18
19
20
21
22
23
24
13
Input
Radio
1. Pu sh in the batt ery c ompar tment a nd r eleas e, t he
co mpart me nt will s lide ou t.
2. Fully s lide out the battery compartm ent, pla ce the battery
(1 x CR 2032 or simi lar type ) on to i t. E nsure it is plac ed i n
the c orrect polarity - with th e – side f acing upward.
3. Pu sh the c ompartment back insid e unti l it cli cks.
Not e: If the remo te control is not going to be used for a long
per iod of time, then remove the batt ery.
6
**B ATTER Y INCLUD ED**
PLE ASE REM OVE SAF ETY STR IP
BEF ORE USI NG THE UN IT
CHAN GE OF BAT TERY
1
CR2 032
2
BATT ERY COM PARTME NT
3
OPEN /CLOS E
Page 8

IN STALLING THE SYSTEMIN STALLING THE SYSTEM
This s ystem c onsists of 6 units that need to b e in sta lle d – The main un it, the woo fer uni t, the display unit,
the externa l DAB /FM r od an tenna and the two spe ake rs.
ANT ENNA
1. Lin k th e woofer and the main unit w ith t he 13 p in ca ble; insert the cab le en ds to t he co nnectors located
at the back of th e uni ts wi th th e “ar row marks” aligne d.
2. Con nect one end of the speak er ca ble s to th e speakers.
3. Conn ect the ot her end of the sp eaker cables to the spea ker sock ets on the main u nit or o n the woofer
whi chever yo u pref er.
4. Connect th e dis pla y cab le to the display socket l oca ted a t the b ack of the main unit.
5. Install ( scr ew in) the rod ante nna into the ant enn a b ase and connect the cable t o t he RF con nec tor
located at th e bac k of th e mai n unit.
6. The instal lat ion i s com ple ted and you can now plu g the w oof er in to the AC mains outle t.
7. To p owe r up the system, set the Pow er S wit ch ( at t he b ack of t he w oof er) to on; the system will be in
standby mod e, th e dis pla y wil l first show the gree tin g and t hen t he clock.
8. the St and by button to swi tch on the syst em and now you ca n u se the rem ote control t o s tart
Press
your operat ion .
No te: D ue to the u niq ue de sig n of this system, you ne ed to u se the remote control for m ost of the functions;
to ens ure the full ope rat ion of the sys tem , the remote uni t mus t alw ays be acc ess ibl e and in goo d
working condit ion .
IM POR TANT N OTE : Eve ry ti me you need to p owe r off the unit via th e Pow er Sw itc h, yo u must first s witch th e
unit to standby mo de, t his i s to pr event unavoidab le po p sou nd fr om th e speakers.
7
Page 9

SE TTING THE CLOCKSE TTING THE CLOCK
When the s ystem i s co nne cted to the pow er a nd s wit che d on for the first time, it will b e in sta ndb y. P res s
the St and by button onc e t o switc h o n the u nit , i t will aut oma tically en ter into the DA B mode and perf orm
DAB ser vic es full s can functio n, a fter the scan has fin ished, t he f irst alp han ume ric ally fou nd s tation w ill be
automatic all y sel ect ed. T he clock will then be s ync hro niz ed to the current loc al ti me.
Ma nual cloc k se tting
You can ma nua lly set t he cl ock in st and by mode. Sin ce the cl ock will be au tom ati cal ly synch ron ize d to t he
DAB cloc k, so y ou sh oul d onl y set the clock manua lly i f you c ann ot receive a DAB s ign al.
W hen t he is firs t p owe red up, it will be in sta ndby mode, th e d isp lay will show “0 0:0 0:0 0” and
flash. Pre ss a nd h old the Menu/Setup button unt il t he h our digits flash in the dis pla y, press t he
butto n to set t o th e correct ho ur, and then pre ss the Me nu/ Set up b utt on again to confirm. The n th e
▶▶
minute di git s will fla sh, press the
button again to confi rm, t he ma nua l clo ck se tti ng
is n ow com ple ted. (F. 1) (F. 2) (F. 3)
No te: you will have 5 sec ond s to ma ke ad justments.
unit
◀ ◀ or
◀
o r b utt on to s et to t he cor rect mi nut e.
◀ ▶ ▶ Press the Menu/Setup
F 1
F2
F3
Sy nchroni se t he clock to t he DAB loca l ti me
1. Switch on th e uni t and s ele ct DAB mode, ensure t hat a D AB st ation is received .
2. The cloc k will be automatica lly synchro niz ed to the DAB local time. To che ck the clock, repeatedl y
press the Info/Display butt on un til t he ti me and date appear in t he di spl ay.
LI ST EN IN G TO YOUR RADIOLI ST EN IN G TO YOUR RADIO
Hi nts for bet te r recepti on
This sy ste m is supplied wi th a n external D AB/ FM rod anten na, to obtain the be st p erformance, yo u sh ould
ensure the ante nna is installed properly, have it fully ex tended an d locate it s posi tio n as wel l as the
direction f or th e bes t rec ept ion. For id eal D AB reception, alw ays m ain tai n the a ntenna in a vertica l pos iti on.
DA B Mode
When the system is powered up for the first time, it will be in standby mode. Press the Stand by bu tto n onc e
to switch t he u nit on, it wi ll a uto matically ente r in to the DAB mo de a nd perform s erv ice s fu ll scan func tio n.
During the s can , the disp lay will show a sli de ba r that indicates the p rogress of th e sca n. After the s can h as
finished, the nu mber of servic es found will be d isp lay ed a nd then the fi rst alp han ume rically fo und sta tio n
will be autom ati cal ly se lec ted. (F. 4) ( F. 5)
DAB
F5
F4
Unlike normal radio , the s epa rat e sig nal s fro m a num ber of DAB stations are group ed to get her a nd
transmitt ed in a singl e frequen cy; these groups are referr ed to as mult ipl exe s o r ensembl es. Every time
one of these gr oup s has b een f oun d, the name of that gro up wi ll be d isp layed.
DAB
8
Page 10

Au to servic es s can modes
There a re t wo s can modes, o ne i s quick s can and the other is ful l scan. Q uic k sc an will only sea rch for the
UK DAB Band III cha nne ls a nd full scan will se arc h al l DA B Band III channels . On ce t he s can has finished,
the radio wil l sel ect t he fi rst a lphanumerical ly fo und s tat ion.
1. To ac tivate the quick scan, press the Autotune button once, the display will show “ Quick Scan” and then
a prog ressing slide bar.(F. 6)
2. To activa te fu ll sc an, p ress and hold the Autotune butto n unt il th e dis play shows “ Ful l Sca n”. (F. 7)
3. To explor e the s tat ion s that have been found, pr ess t he ◀◀ o r ▶▶ bu tto n.
DAB
DAB
F6
F7
Ma nual tuni ng
1. To select manual tuning, press and hold the Info/Display button until the displa y sho ws “M anual Tune”,
then press th e Selec t button once and the display wil l show the DAB channel and f reque ncy.(F. 8)
2. Press the ◀◀ or ▶▶ button to move through the DAB channels, the display will show “ 5A to 13F” and their
associated frequenc ies. (F. 9) If there is an ensemble/multiplex on that channel, its name will be displayed
after a short delay.
3. To enter the e nse mbl e/m ultiplex, p ress the S ele ct button once, t he di spl ay will show t he fi rst stat ion in
the ensemble/mult ipl ex.
4. Pre ss th e ◀◀ o r ▶▶ b utt on to s ee what stations are p resent o n the f oun d ensemb le/ m ultipl ex, p ress the
Select butt on when you hav e located y our des ire d station ( if Auto sel ect is on you will not nee d to
press Select), and at the sa me ti me, y ou wi ll al so ex it fr om the manual tuning mode.
DAB
F8
F9
DAB
Au to select o n/ off
You ca n exp lor e the f oun d sta tions by p ressing the ◀ ◀ or ▶▶ b utton, if the auto select is “ON”, th e sta tio n wil l
be automatically sel ect ed w hen the but ton is r eleased, and the name of th e st ati on w ill be d isp lay ed. If the
auto s ele ct i s “ OFF” , y ou h ave to press t he Select button to switch to t hat sta tio n when the dis pla y shows
your desir ed s tat ion , otherwise it w ill rev ert back in a few sec onds. To tog gle bet wee n the auto se lec t “O N”
and “OFF”, p res s and h old t he Se lec t but ton u nti l the d isp lay s how s the “A uto E nte r ON” or “A uto E nte r OFF”
.(F.10) (F.11)
DAB
DAB
F10
F11
Se condary S er vices
On some occasio ns you will see a “>” sym bol afte r t he nam e o f t he sta tion, this indicate s t hat ther e a re
secondary services av ailable to th at station. These se condary ser vic es co nta in ex tra service s that re late to
the pri mar y sta tio n. E.g. a spor ts station may wa nt to add e xtr a commen tar ies . The secondary s ervices are
inserted di rec tly a fte r the p rimary station in t he st ati on li st.
To select t he sec ond ary stat ion, press the Select but ton when the “>” appe ars in t he dis pla y b efore the
station name. Whe n t he secondary service e nds , t he radio will aut omatically s witch bac k t o the prim ary
station.
9
Page 11

FM m ode
1. To select F M, pr ess t he Ra dio b utton, the display wil l sho w the f req uency and the audio m ode .
2. To activate fre quency auto sear ch up, press the Autotune button once, it wil l star t scannin g up the
fre quency ba nd and s top automatic ally once a stati on has been found .
3. To activate freq uency auto search down, press an d hold the Autotune b utton until it s tarts to scan down
the frequen cy band.
4. To activa te ma nua l sea rch, press the ◀◀ or ▶▶ butt on.
5. The ra dio will auto matic ally s wi tch betwee n s tereo an d mono mo de, but y ou can over ride t hi s and
sw itch t his func tion m anual ly whi ch is hel pf ul for po or sig nal re cepti on. Pres s t he Sel ect bu tt on to
se lect au dio mod e, you ca n to ggl e to s ele ct b etwee n “Auto” or “M ono”.
ST OR IN G AN D RE CA LL IN G STORED STATIONSST OR IN G AN D RE CA LL IN G STORED STATIONS
In eit her DAB or FM m ode , yo u can s tor e up to 20 s tat ion s to the fa vou rit e pr ese ts; thi s will enable you to
get direct ac ces s to yo ur fa vou rite stations.
1. To st ore a pr ese t, f irs t tu ne to your desired statio n, then press and hold the butto n until the displa y
shows flash “Pre set # ”.
2. Pr ess the P res et + or Preset - but ton to sel ect your d esired stat ion preset numb er, the n pres s the
button to con fir m you r sel ection, the display wi ll sh ow “P res et # Saved”.
3. To r eca ll a pre set station, press the Pre set +/- but ton to s ele ct the stations tha t yo u ha ve s tor ed. The
display will sho w “Pr ese t # Loa ded”. If the pre set has n’t bee n allocated a station, the displa y wil l
show “Prese t # Fre e”.
DA B DI SP LAY M OD ESDA B DI SP LAY M OD ES
In DAB mode, every time you press the Info/Display butt on, the dis pla y w ill cycl e t hro ugh the fol low ing
display modes:
Ensemb le/ Mul tiplex
(Group n ame )
Tim e/D ate
DLS(Sc rol lin g text)
Audio bit rate
Progra mme Typ e
Signal s tre ngt h
En sembl e/Mul ti plex (G roup na me)
The Ensembl e/M ult ipl ex is a collection of rad io stat ion s tha t are bun dled and transmitted tog eth er in a
single frequency. The re a re nati ona l an d local multip lex es, loc al o nes con tai n st ati ons tha t ar e sp eci fic to
that area.
Time and da te
The time and date will be automatica lly u pda ted b y the b roa dca ste d inf ormation; there is no need to set the
clock manua lly.
DL S
DLS stands for Dynamic Label Segment which is a sc rolling message that the broadcaster may include in
their trans mis sio ns. T he me ssage usually inc lud es in for mation such as program me de tai ls …e tc.
Si gnal st rengt h
The displa y wi ll s how a slide bar to in dic ate the signal strength, t he s tro nge r the signal, th e lo nge r th e bar
will be from left to r igh t.
10
Page 12

Pr ogram me type
This describes t he st yle o f the p rogramme that is be ing b roa dca st.
Au dio bit r ate
The display will s how t he di git al audio bit rate bei ng re cei ved .
AD VANCED DAB DISPLAY MODESAD VANCED DAB DISPLAY MODES
In norm al ope rat ion , p res s and hold the Info /Di spl ay button for long er tha n 2 s econds to ente r into the
advanced display mode. When the display shows “Manual Tune”, re peatedly press the Info/Display
button, the d isp lay w ill c ycl e through the follo win g mod es:
Press Info/ Dis pla y >2s
Normal
Manual Tun e
System Rese t
Software Version
FACTORY RESETFACTORY RESET
When yo u mo ve the sy ste m to a not her part of t he country, your p re- tun ed and st ore d DAB sta tio ns may no
longer b e available. I f thi s is the cas e then y ou will nee d to res et your radio bac k to its orig ina l factory
settings; t o per for m a fac tor y reset, please do th e fol low ing :
1. Switch on th e sys tem a nd se lect DAB mode.
2. Press and ho ld the In fo/ Dis pla y button for longer t han t wo seconds, whe n the dis play sho ws “Manual
Tune ”, repeatedly pre ss th e Inf o/D isp lay b utt on until “System Reset ” is di spl aye d.
3. Press the Select button to confir m, the display first show “Sys tem Res et” and the n fin all y per form
services full sca n func tio n. If you pres s the Select/Program but ton when “ Pre ss Prog for defaults”
appears, DA B pre set s 1-4 w ill automatical ly be s et to d efa ult stations if availa ble .
4. When the scan has finished , the radio will automatically select the first alphanumerically found station.
No te: All of your store d DAB & F M pre set s will be lost once the rese t has t ake n pla ce.
LI ST EN IN G TO YOUR COMPACT DISCSLI ST EN IN G TO YOUR COMPACT DISCS
NO TE : Although this CD/M P3/ WMA pla yer can rea d CD -R a nd C D-R W di scs in a ddi tio n to nor mal CDs, the
playabili ty of CD-R an d CD-R W discs may be a ffe cte d by th e type of software t hat was used to cre ate
the discs, as well as the quality a nd co ndi tio n of th e bla nk me dia y ou are using, 100% playabil ity c ann ot
be guarante ed. T his i s not a n ind ication of a proble m wit h the p lay er.
Pl aying the e nt ire CD
1. Press the CD b utt on to s ele ct CD function. The disp lay w ill s how “ CD READY...” and t he “C D” ic on.
2. Insert the disc with the pri nte d lab el sid e ali gne d with prin ted artwork. The display will first sho w
“ Reading” and the n fin all y the t otal track/fold er nu mbe r and t ime.(F. 12)
3. To start pl ayb ack f rom t he beginning, press th e but ton o nce .
4. T o int errupt playback, press the button again, the display wil l sho w “PAU SE” an d the e lap sed t ime i n
the display will flas h.( F. 13 )
5. To resume playback , pre ss th e but ton a gai n.
6. To stop pla yba ck, p res s the button, the displa y wil l sho w “ST OP” .
CD
F13
F12
CD
11
Page 13

Se lecting a d if ferent tr ack
1. Press t he or button un til the desired track number app ears in the display, th en press the butt on,
playback will beg in from t his track.
2. To play the n ext t rac k, pr ess the button once .
3. To play the p rev iou s tra ck, press the button twi ce.
4. Press the bu tto n onc e, th e current playing trac k wil l be st art ed again from the beg inn ing .
Re peat play
During norm al pl ayb ack , you c an press the Repeat butt on to s ele ct th e repeat play function :
1. To repeat t he sa me tr ack , press Repeat button once, t he di spl ay wi ll show “REPEAT ONE”. (F.14 )
2. I f you are p laying a M P3/WMA d isc o n add iti onal “REPEAT A LB” o pti on wi ll ap pea r. This will repeat the
current fol der.
3. To repeat t he en tir e dis c, press the Repeat button ag ain , the d isp lay will show “REPEAT ALL”. ( F.1 5)
4. To cancel r epe at pl ay, press the Repeat b utt on un til “ NOR MAL” ap pea rs in t he display.
CD
F15
F14
CD
Ra ndom play
During norm al pl ayb ack , you c an press the Random butt on to s ele ct th e random play function :
1. To select r and om pl ay, press the Random butt on on ce, t he di splay will show “RA NDO M”.
2. To star t rand om play, press the or button, one tra ck wil l be randomly selected and star ted pl aying.
3. To resume n orm al pl ayb ack, press the Random butto n aga in, t he di splay will show “NORMA L” .
4. To canc el random play, press the button, playb ack wi ll be stopped and the display wil l show “ STOP ”.
In tro play
1. Press th e Intro but ton to star t intro play. The display wil l show “INTRO” and will sta rt playing the first 1 0
sec onds of each track.
2. To resume no rmal playback , pres s the Intro b utton again, th e disp lay will sh ow “NO RMAL”.
3. To cancel i ntr o pla y, press the butt on, p lay bac k will be stopped and the di spl ay wi ll sh ow “STOP ”.
Pr ogram pla y
You c an use the program play feature to p lay up t o 20 tracks on a di sc i n an y de sir ed o rde r. You m ay also
program a partic ula r tra ck to p lay several times w ith in a pr ogr ammed sequence.
1. Load your di sc as u sua l and w ait u ntil the display sh ows t he to tal n umber of tracks on th e dis c.
2. Pres s the Pro gra m bu tton onc e in CD st op mode, the display wil l show th e track n umb e or f ile name if
MP3/WMA and “ P- 01” will flash.(F.16)
3. Press th e or butto n to se lec t the f irs t track number to be pro gra mmed. W hen the de sir ed trac k
number app ears in the displa y, press the Program butt on to conf irm an d the fi rst track to play is
programme d. Th e pro gra m mem ory number will adv anc e to “P- 02” and r ead y for t he ne xt entry.
4. R epeat the above steps to p rog ram o the r tra cks, a maximum number of 20 tra cks c an be p rog ram med.
When you have completed program min g, p res s th e bu tto n to beg in p rog ram pla y, the display will
show “PROGRAM”; it will star t pl ayb ack on t he f irs t tr ack you pro grammed and will continue unt il t he
last programme d tra ck ha s pla yed. (F. 17 )
5. When th e pr ogram play is com plet ed, the player st ops. “STOP” and “PROG.” will be d isplayed in turn.
The play er re mains in t he program play mode. Press the b utto n wil l pla y the prog rammed sequence
aga in.
6. To erase the pr ogr am, i n CD s top mode, pr ess t he but ton once ; in C D play mo de, p res s the butto n
twice. The di spl ay wi ll sh ow “S TOP ” and “ PROGRAM” will disapp ear.
No te: You will have 5 seco nds t o sel ect a t rack otherwise the uni t wil l ent er pr ogram play mode.
CD
F17
F16
CD
12
Page 14

Re peat Prog ra m play
You ma y use the p rog ram p lay a nd the repeat pla y fea tur es to get her t o contin uou sly r epe at a programmed
sequence. Fir st pro gra m t he desire d playback sequence, when pro gram p lay begins, press the Repeat
button to se lect repeating the current tr ack or the entire progr amm ed s equ enc e, “PROGRAM” and
“REPEAT ONE” or “PROGRAM” a nd “R EPE AT ALL” will b e dis pla yed i n turn.
US B & SD /M MC C AR D MP 3/ WMA PLAYB AC KUS B & SD /M MC C AR D MP 3/ WMA PLAYB AC K
Au tomatic p la yback
1. To sel ect USB or S D/M MC f unc tio n, r epe atedly press the I npu t bu tton until the display shows “Insert
USB” or “Insert SD ”. (F.18 ) (F.19)
2. Insert you r USB d evi ce to t he USB port or your SD/MMC c ard t o the m emo ry card slot.
3. It will st art to pl ayb ack fr om the fi rst fo lde r/track found on the dev ice . The dis pla y will sh ow the
folder/tr ack n o, an d the t ime together with the ta g inf orm ati on (Title-Ar tis t-A lbum).
4. To i nte rrupt playback, press the bu tto n, t he d isp lay will show “PAUSE ” an d the elapsed time in the
display will fla sh.
5. To resume p lay bac k, pr ess the button again.
6. To play the n ext t rac k, pr ess the button once .
7. To play the c urr ent p lay ing track from the begin nin g, pr ess t he button once.
8. To play the p rev iou s tra ck, press the button twi ce.
9. To stop pla yba ck, p res s the button, the displa y wil l sho w “ST OP” .
10. To select different fo lde r in th e dev ice, press the Fold er + or Folde r - but ton .
No te: The uni t wi ll read MP3/ WMA fil es created on a d isc /memory card/U SB d evi ce in the ord er t hey were
recorded then in a lph anu mer ical order.
US B
SD
F18
F19
Se arching t he s ongs
You ca n search and select the so ngs b y the ir fi lenames .
Press
1. th e Men u/S etu p but ton once to enter int o the C har act er Input Menu for charac ter s ear ch.
2. Press th e Folder + or Folder - but ton to select the char act er set and the n press the or button to
select the first le tte r/n umber of the file nam e that yo u want to search. Pre ss the or but ton to se e
the file stan din g wit h tha t let ter/number, pr ess t he Se lec t button to play the fi le.
3. To ac tivat e dir ect sea rch , repeated ly pr ess the M enu/S etu p butto n unt il the di spl ay shows the n ames
of t he fi les in the mem ory d evice /CD.
Press
4. th e Fol der + or Folder - button to select a differe nt folder an d press t he or b utton to select
the file, finall y pre ss th e Sel ect b utton to play the fil e.
MP 3 EN CO DI NG & F IL E CO PYINGMP 3 EN CO DI NG & F IL E CO PYING
The MP3 fi le encodin g and copying fun cti on is done by so ngs or by ind ivi dual MP3 /WM A files. In the
targeted me mor y dev ice , there will be 5 differen t fil e dir ect ories created for d iff ere nt so urc es:
1. <FCO PY> for the c opy ing files fr om d isc, SD/MMC and USB devi ces . Filename f orm at – same as t he
original and rem ain u nch ang ed.
2. <AUDI O> f or the en coding f ile s from th e normal CD songs. Fi len ame format – AUDI O00 0.M P3 where
000 is the accu mul ati ve nu mber.
3. <DAB> for the en cod ing fi les fr om DAB ra dio. Filena me for mat – DAB 000 .MP 3 where 000 is the
accumulat ive n umb er.
4. <FM> for t he en coding files fr om FM r adio. F ile nam e forma t – F M000.MP3 w her e 000 i s the
accumulat ive n umb er.
5. <AUX > for the encoding files fr om AUX in put. File nam e form at – AUX0 00. MP3 wh ere 00 0 is the
accumulat ive n umb er.
13
Page 15

En coding an d st oring fro m a normal CD
You can encode your fav our ite C D songs i nto M P3 forma t and sto re th em into your m emo ry de vic e thr oug h
the USB port or S D/M MC ca rd sl ot.
1. Insert the C D dis c and p res s the C D button to select CD f unc tio n.
2. Insert you r USB d evi ce to t he USB port or insert your S D/M MC ca rd to t he memory card slot .
3. Press the or b utt on to s ele ct the track to be encoded .
4. Press the Menu/Set up bu tto n to en ter i nto the set up menu, th e dis pla y wil l show “Enc Mode”.
5. P res s the or b utt on to s ele ct “One” – the se lec ted track or “All” – the en tir e CD, then pre ss the
Select but ton to con fir m. The dis pla y will show “Target ?”. If both SD/M MC and USB devices are
connected .
6. P ress the or button to select USB or S D/MMC, again press the Select bu tton to conf irm. The
display will show “USB ?” or “SD/MMC ?” .
7. If only one device is conne cted “USB ?” or “SC/MMC ?” will be displ ayed.
8. Press the o r button to s elec t “Yes”, th en pr ess the S elec t button agai n to confirm, the display w ill
fin ally show “Encoding…” and start playing your selec ted t rack or fr om th e fir st tr ack i f the entire CD is
sel ecte d. .
9. I t wil l sto p aut oma tic ally when the t racks have played and finished. The s ele cte d tra ck or t he wh ole C D
will be encod ed an d sto red a s new M P3 files in your desi red m emo ry de vice (USB or SD/MMC).
Pr ogram Enc od ing and sto ring from C D
1. To en cod e the son gs in a pr ogr ammable seq uen ce, first pe rform CD pro gram pla y setting, t hen press
the Menu/Setup button to e nte r int o the s et up menu. The displ ay wi ll sh ow “E nc Mode”.
2. Press the or butt on to select “PGM ”, the n press the Selec t butt on to confirm. The disp lay will show
“Target ?”. If both SD/MMC and USB devices ar e conn ecte d.
3. Press th e or button to select USB or S D/MMC , again press the Select button to confirm. T he display
will show “US B ?” or “SD/MMC ?”.
4. If only one de vice is connected “USB ?” or “SC/ MMC ?” wi ll be displayed.
5. P res s the o r button to select “ Yes”, then press the Select butto n aga in to c onf irm , the d isp lay will
finally sho w “En cod ing …” an d start playing the t rac ks in y our p rogrammed sequence .
6. It wil l s top aut omatically when the tracks have played and finished. The tracks programmed will be
encoded and s tor ed as n ew MP 3 fil es in your desired me mor y dev ice ( USB or SD/MMC).
En coding an d st oring fro m Radio (DA B/ FM)
You can e ncode you r favouri te radio prog ram into M P3 for mat and stor e them i nto your m emo ry dev ice
through the U SB po rt or S D/M MC ca rd slot.
1. Press the Radio butt on to s ele ct DAB or FM function a nd tu ne to y our d esired radio stat ion .
2. Insert you r USB d evi ce to t he USB port or insert your S D/M MC ca rd to t he memory card slot .
Press
3. the Menu/Setup button to ente r i nto the set up m enu , the display wi ll sho w “ Tar get ?”.I f b oth
SD/MMC and US B dev ice s are c onn ected.
4. Press the or b utton to select USB or SD/MMC, ag ain press the Select button to confirm .
5. Th e display will show “Encode ?”.
6. P res s the or b utt on to s ele ct “Yes ”, th en pr ess t he Se lec t but ton t o confir m, th e dis pla y wil l sho w
“Encoding…” and the recei ved radio prog ram will be encoded and stored in your desi red memory
device ( USB o r SD/ MMC).
7. To stop e nco ding, press the but ton .
14
Page 16

En coding an d st oring fro m AUX inp ut
You can encode th e a nal ogu e audio signa l f rom the AUX input int o M P3 format and st ore them into your
memory devi ce th rou gh th e USB p ort or SD/MMC card sl ot.
1. Connect th e AUX i nput to other analo gue a udi o sou rce v ia the supplied lin e-i n cab le.
2. Press the Input butt on to s ele ct AUX input fun cti on. T he di splay will show “AUX” .
3. Insert you r USB d evi ce to t he USB port or insert your S D/M MC ca rd to t he memory card slot .
4. P ress the M enu /Se tup butt on to e nter in to the set up men u, the dis pla y will sho w “Target ?”. If both
SD/MMC and US B dev ice s are c onn ected.
5. P ress the but ton to select USB or SD/MMC , agai n pres s the Select button to conf irm.
6. Th e display will show “Enco de ?”.
7. P res s the o r button t o sel ect “ Yes”, then p res s the S ele ct bu tto n to co nfirm, the display will show
“Encoding…” and the AUX input audio will be encoded and stored in your d esired memo ry dev ice
(USB or SD/MM C).
8. To stop enc odi ng, p res s the button.
or
Co pying fro m MP 3/WMA dis c
You ca n cop y the f ile s from a MP3/WMA disc and store th em in to yo ur me mor y dev ice t hro ugh t he US B por t
or SD/MMC car d slo t.
1. L oad t he MP3/WMA disc and press the CD button to s elect CD f unction, then press the ◀◀ o r ▶▶ b utt on
to select the track tha t you w ant t o cop y.
2. Insert your USB devi ce to t he US B por t or in ser t you r SD/MMC card to the memor y car d slo t.
3. Repeatedly press t he Me nu/ Set up bu tto n unt il th e dis play shows “Copy Mode”.
4. P res s the or b utt on to s ele ct “On e” – the selected track or “Al l” – th e ent ire C D/M P3, t hen p res s the
Select but ton to confir m. The display will sh ow “Target ?”. If both SD/ MMC and USB devices are
connected ..
5. Press the o r button t o sele ct USB or SD/ MMC, a gain p ress the Se lect b utto n to confirm. The d ispl ay
wil l show “U SB ?” or “SD/MMC ?”.
6. If o nly one device is connect ed “US B ?” or “S D/MMC ?” will be displaye d.
7. Press the or button to sel ect “Yes”, th en press the Sel ect button again to con firm, the di spl ay w ill
first sho w “ Reading Checking Sys tem” , then “ … . 000% Copying” and start processing, whe n it is
finished, the d isp lay w ill show “…. 100%”. T he track is no w copied and s tor ed as a new M P3 fi le in you r
desired memory devi ce (U SB or S D/M MC) .
8. If “All” was selected eac h tra ck wi ll sh ow “...000% Copyi ng” t o “.. .10 0%” .
Co pying fro m US B or SD/MMC
You ca n also do the MP3/WMA file c opy ing f rom t he USB to SD/MMC or vic e ver sa.
1. Insert yo ur USB d evi ce to t he USB port and the SD/MMC c ard t o the m emo ry card slot.
2. Pr es s th e In put button to sel ec t US B or S D/ MM C, f irst pres s th e b ut ton to s top the auto play ba ck ,
an d th en press th e ◀ o r ▶▶ b ut ton to se le ct t he t rack/ fi le t ha t you wan t to c op y.
3. P res s the Menu/Setup butto n unt il th e dis pla y sho ws “Co py Mode”.
4. Pr ess the or ▶▶ bu tto n to se lect U SB or S D/M MC, ag ain pr ess th e Se lect b utton to con fir m. The
di spl ay wi ll show “USB ?” or “S D/M MC ?”.
5. Press the ◀ or b utt on to s ele ct “Ye s”, then press the Select button again t o confir m, th e dis pla y wil l
first show “…. 0 00% C opy ing” a nd start proce ssi ng, w hen it is finished, t he di spl ay will show “…. 100%”.
The trac k/f ile i s now copie d and s tor ed in your de sir ed me mory device (U SB or S D/MMC).
◀
◀
◀ ▶
▶
◀
15
Page 17

Pr ogram cop yi ng
This fe atu re en abl es you to program copy the file fro m a MP3/WMA di sc, USB o r SD/ MMC into you desired
memory devi ce, u p to 32 t rac ks/files can be progra mme d.
1. Loa d t he MP3/WMA di sc or ins ert the USB/S D m emo ry device that c ont ain s the MP3/WMA file s y ou
want to progr am co py. Press the CD button or th e Inp ut bu tto n to se lect the copying so urc e.
2. Press the but ton to ensu re it is i n stop mode , then press the Pr ogram but ton to s tart the pr ogramming
pro cedure wh ich is same a s the CD program play - first p ress t he ◀◀ or ▶▶ butto n to select t he track/ file,
and th en pr ess the Program bu tton to co nfirm. A max imum numbe r o f 3 2 t racks/files ca n b e
pro grammed
3. When you have com plete d pro gramm ing, pr ess the but ton onc e. “ST OP” and “PR OG.” will be
di spl ayed in t urn.
4. Repeated ly pr ess t he Me nu/Setup button unti l the d isp lay s hows “Copy Mode”.
5. th e
P res s
show “Target ?”. If bot h SD/ MMC c ard a nd US B device connecte d.
6. Pres s th e
display will show “USB ?” o r “SD/ MMC ?”.
7. If only one de vic e is co nne cted “USB ?” or “SD/MMC ?” w ill b e dis pla yed.
8. Pr ess th e
show “ …. 000% Co pyi ng” an d st art processing, when it has fi nis hed cop yin g a tra ck, the display w ill
show “ … . 100%” . The tracks/files programmed wil l be copied and stored in your de sir ed memo ry
device (USB or SD/MMC ).
◀ ◀ or ▶▶ bu tto n to se lec t “ PGM” , then pr ess the Se lec t button t o confirm. The display wi ll
◀ ◀ or ▶ ▶ button to s ele ct USB or SD/MMC, agai n p res s t he Sel ect button to co nfi rm. The
◀◀ or ▶▶ but ton t o select “Yes”, the n pre ss the Se lec t but ton again to c onf irm , the display wil l
Formatt in g your memo ry device ( US B or SD/MMC )
You c an use this func tio n to format your mem ory dev ice . All the mem ori es i n th e device wil l be com ple tely
erased.
1. Insert you r mem ory d evi ce that you want to format t o the U SB po rt or t he memory card slot .
2. Press the Input butt on to s ele ct US B or SD/MMC. The corr esp ond ing i con will be displayed.
3. press the Men u/S etu p button unt il t he display show s “Format ?” , th en press the or
Repeatedl y
button to select “Yes”. Pr ess s ele ct bu tto n to start formatting th e sel ect ed de vice.
4. The m em ory de vi ce w il l be fo rm atted and th e disp la y will fi nally show “ FORMA T C OMPLE TE” th en
“NO F il e”.
▶▶
AUX INPUTAUX INPUT
The AUX inp ut i s lo cat ed a t th e ba ck o f th e un it; ana logue audio sound signals from ot her sou rce s ca n be
input to the sy ste m thr oug h this input. A stereo lin e-i n cab le is s upplied for this funct ion .
1. Use the line -in c abl e to li nk th e AUX input t o oth er an alo gue audio source.
2. To sele ct the AUX inpu t f unction, repe ate dly pres s t he Input butt on unt il “AUX” is disp lay ed. Duri ng
AUX , the clock wil l be di spl aye d.
3. Press the Volume + or Volume - button for your d esi red s oun d output level.
SL EE P FU NC TI ON SL EE P FU NC TI ON
This functi on al low s you t o pro gram the system to sw itc h off i tse lf after a set period of tim e.
1. To activate the sleep fun cti on, p res s the Sleep button, the di spl ay wi ll sh ow “S LEEP 90”.
2. To sele ct the sleep t ime, rep eatedly pre ss th e Sle ep button, the sleep t ime w ill c han ge in sequence on
every press :
90
80
70 50 40 3 0 10
60
20
OFF
3. W hen your desi red sle ep tim e appears in the display, relea se the b utton, the sleep function is now
activated a nd th e “SL EEP ” ico n wil l be di splayed.
4. When the sle ep ti me is a rri ved , the system will be sw itc hed i nto s tandby.
5. To cancel t he sl eep f unc tion, press the Sleep butto n unt il th e dis play shows “SLEEP O FF”.
16
Page 18

TI ME R FU NC TI ONTI ME R FU NC TI ON
This functi on al low s you t o swi tch on the system at yo ur de sir ed ti me and mode:
1. Pre ss the Time r butto n to toggle the timer function between on and off, the display will show “TIMER
ON” or “TIMER OFF”. The “TIM ER” i con w ill b e on to indicate timer fun cti on on .(F.20 )
2. Wh en the ti me r fu nc ti on i s on and t he t im e se le cte d has a rr iv ed , th e sy st em will sw it ch ed o n to the
mo de a s set .( F.21)
3. To s et t he timer, pr ess and ho ld t he Timer b utton u nti l the display sho ws t he timer s tat us, the “hour”
digit of the ti mer c loc k wil l fla sh.
4. Pr ess the ◀◀ or ▶▶ button t o set to the de sir ed ho ur and pr ess the T ime r but ton to co nfi rm, first se t the
hour and then finally t he mi nut e.
h
5. T en you w ill enter in to th e timer m ode setting, pr ess t he ◀◀ or ▶▶ b utt on to sel ect y our desired mod e CD, USB, SD/MMC or RAD IO, fi nal ly pre ss the Timer button to con fir m. The ti mer se tti ng is now
completed.
No te: Set the Radio to th e des ire d mod e FM/DAB and station bef ore p lac ing u nit into standby.
6. Press the stand by bu tto n to pl ace t he unit into standb y mod e.
TI MER
DAB
F20
F21
TI MER
DAB
PR ES ET E QPR ES ET E Q
Repeatedl y press the EQ button to sele ct dif fer ent preset EQ mode s, the display will sho w i n sequenc e
with each pre ss: “ NOR MAL > P OP > RO CK > CLASS IC > JAZZ > NORMAL > ……”.
MU TE F UN CT IO NMU TE F UN CT IO N
To stop the s oun d fro m the speakers temporarily, pr ess the Mute b utton, t he di spl ay wi ll show “MUTE” and
flash. The so und s top s and t he un it remains on.
To cancel mut e, p res s th e Mu te b utt on a gain or the Volu me + /- b utt on, “MUTE” disappears in t he d isp lay
and the sound i s res tor ed.
X-BASS FUNCTIONX-BASS FUNCTION
Press the X-Ba ss button t o t ogg le this function bet ween o n and off. The display will s how “BB S O N” or
“BBS OFF”. W hen t he X-Ba ss is o n, th e bass sound is enhanced .
DISPLAY DIMMERDISPLAY DIMMER
The brig htn ess of the d isp lay is automaticall y adj usted for t he room light condit ion s. It will be red uce d
when th e room l igh ting is turned o ff so as to ma tch yo ur en vir onment. The di splay wi ll br igh ten
automatic all y in th e day lig ht or when the room lig hts a re tu rne d on again for better v isi bil ity.
No te: Th e d imm er sen sor is located at the top of t he dis pla y u nit , to obtain the best performan ce of the
dimmer functio n, th e sen sor m ust not be obstructed.
17
Page 19

SPECIFICATIONSPECIFICATION
POWER SUPPLY: 230V ~ 50Hz
POWER CONSU MPT ION: MAX: 6 8W STANDBY: 3.7W
OUTPUT POWE R: 12 .5W x 2 + S UBWOOFER 25W
MAIN UNIT DIM ENS ION: 45m m (W) x 2 60m m (H) x 220mm (D)
SPEAKER BOX D IME NSI ON:
SUBWOO FER D IME NSION: 11 0 (W) x 2 15 (D ) x 200 ( H) mm
DISPLAY UNIT D IME NSI ON: 144 (W) x 25 (D) x 4 6 (H) m m
TOTAL WE IGHT: 7. 988 Kg
RADIO SECTION
FREQUENCY RANG E: DA B 174 - 2 40 MHz
FM 87.5 – 108 MHz
COMPACT DISC SECTION
CD MEDIA: CD -DA , CD- ROM , CD-R, CD -RW
DISC FORMATS: CD -DA Digital Audio , ISO 966 0 (CD -R) , ISO 13346UDF (CD-RW)
Mixed mode an d Enh anc ed CD
MP3/WMA SECTION
BIT RATE : MP3: 32-128bps, W MA: 32, 48 -19 2bp s,
Constant & VB R (Variab le Bi t Rat e)
DISPLAY: MP 3/W MA Tag (V1.0, V1.1& V2. 3) – Ti tle, Artist, Albu m
(Up to 32 chara cte rs di spl aye d for each tag)
TOTAL NO. O F TRA CKS / ALBUM: 999
AUX INPU T
INPUT VOLTAGE R ANG E: 70 0-1 000mV
IMPEDA NCE : 47K Ω
** SPECIFIC ATION SUBJEC T TO CH ANG E WIT HOUT FURTHER NOTICE
In t he un lik ely e vent of a problem develo pin g, pl eas e contact the store w her e you p urc hased set.
*
We c ontinually strive to i mpr ove o ur pr oducts, specifi cat ion s may c hange with out prior not ice .
*
45mm (W) x 260m m (H) x 2 20m m (D)
This symbol on t he pro duc t o r in the inst ruc tion s mean s that you r e lec trical and ele ctronic equ ipment shou ld be
dispos ed at the end of its life sep ara tely f rom your h ous ehold waste. Ther e a re sepa rate c oll ecti on syst ems for
recycl ing i n the EU.
For more i nfo rmation , ple ase conta ct th e local aut hor ity o r your r eta ile r where you p urc hased the p rod uct.
Tra demark of N ew Tra nsducer s Lim ited.
All Pate nt Ri ghts Rese rve d.
18
Page 20

Visit Pa rtmas ter.co.uk to day for the ea siest way to b uy elec tri cal spa res
and acc essories.
With ov er 1 million s pares a nd ac cesso rie s in stoc k we can deliv er direct
to your d oor the ver y next day.
Visit
ww w.par tmas te r.co.uk
or call
08 70 6 001 338
(UK cus tomers onl y)
Calls c harged at Na tional Rat e.
 Loading...