

Harman kardon DRIVE + PLAY Owner’s Manual

Owner’s Manual
INTRODUCTION
Thank you for purchasing Harman Kardon’s Drive + Play™,
an elegant mobile audio solution that provides the driver with
easy iPod
®
control, including full music browsing capability.
We’ve organized this manual to make installation and operation
as simple and trouble-free as possible. Please read it thoroughly
before you begin installing Drive + Play. For the answers to many
commonly-asked questions regarding installation and use of
Drive + Play, please visit us at: www.harmankardon.com
Warranty
Drive + Play is warranted against defects. The duration of
Drive + Play’s warranty depends on the laws in the country in
which it was purchased. Your local Harman Kardon retailer can
help you determine the length of your warranty. To register
your product, please visit us at: www.harmankardon.com
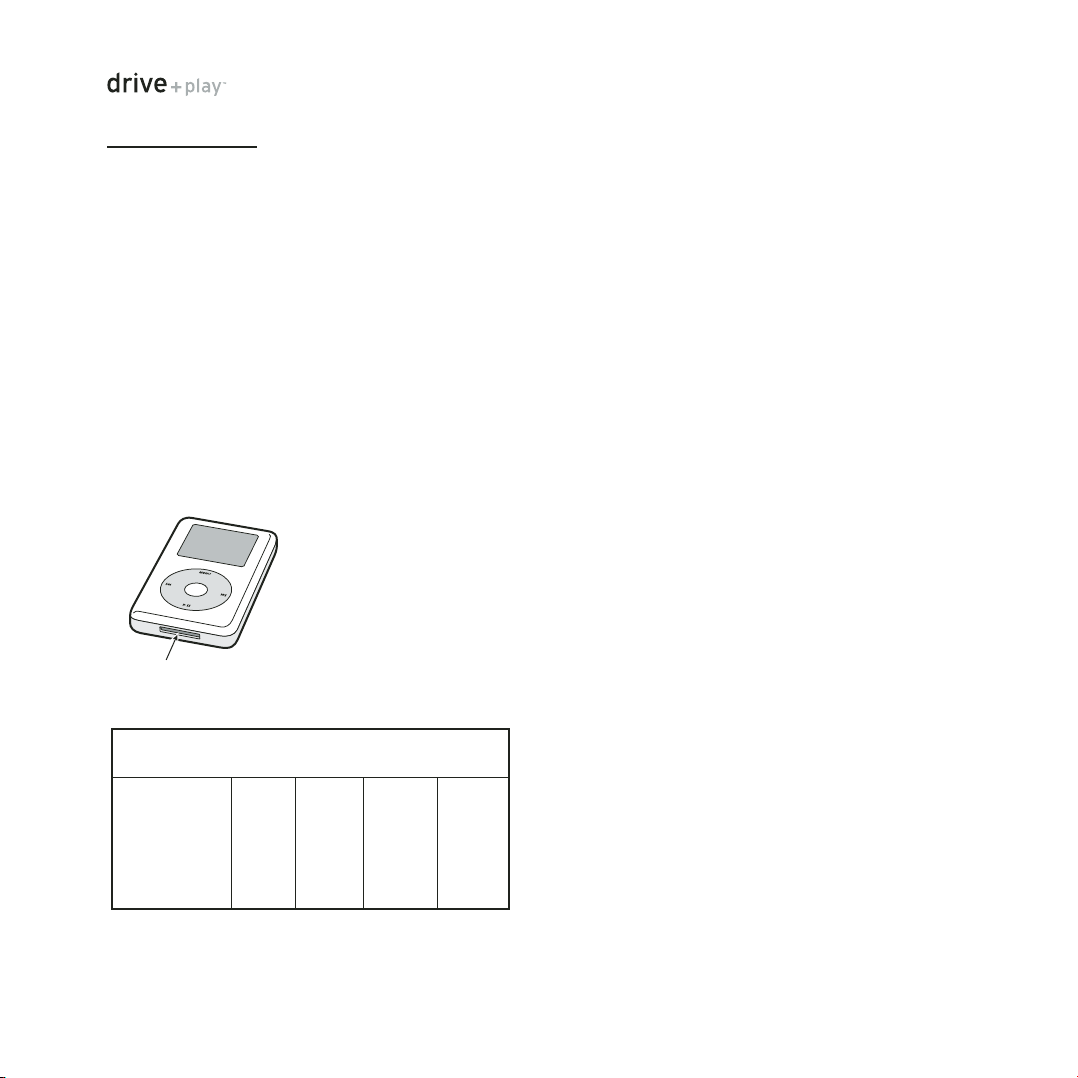
iPod®Requirements
Drive + Play is designed to work with all iPods equipped with
the following Apple
®
hardware and software:
1. iPod dock port
2. iPod software
As long as both of these requirements are met, Drive + Play
can be easily added to virtually any mobile audio system for
total control of your iPod.
Drive + Play Warnings
Distraction Warning
Do not connect or disconnect your iPod or program Drive + Play
while driving. Always be careful and attentive to your vehicle
and the traffic around you. Always obey all traffic laws while
driving. Always pull off the road and park in a position you are
sure presents absolutely no risk before browsing your iPod or
adjusting the settings on your Drive + Play.
Connecting the iPod
Always hold the Drive + Play’s iPod dock connector by its sides
and gently insert (or remove) the dock connector. Never use
excessive force to insert or remove the connector, or damage
to your iPod may occur.
Lost Data
Harman/Kardon is not responsible for any lost data on your
iPod when using the Drive + Play. Be sure to back up the audio
data files on your computer.
Loud Music and Hearing
Playing loud music in a vehicle can permanently damage your
hearing, as well as hinder your ability to hear traffic. The
maximum volume levels achievable with this product,
combined with high power amplification, may exceed safe
levels for extended listening. We recommend using low volume
levels when driving. Harman/Kardon accepts no liability for
hearing loss, bodily injury, or property damage as a result of
use or misuse of this product.
Headphones and Driving
Do not use headphones while operating a vehicle. This practice
is illegal in some areas. Always be careful and attentive to your
vehicle and the traffic around you. Always obey all traffic laws
while driving. Drive + Play’s audio output is not suitable for
driving headphones and is intended to output a signal
appropriate for an audio system’s line-level input jack.
About Installation
Although we recommend professional installation for your
Harman/Kardon Drive + Play, this product is designed for
do-it-yourself installation as well, especially when using the
wireless FM transmission method (see page 4). Although the
enclosed instructions explain how to install the Drive + Play in a
general sense, they do not show the exact methods for your
particular vehicle. After reading the manual, if you feel
uncomfortable in performing the necessary steps to install the
product, consider asking your authorized Harman Kardon caraudio dealer about professional installation options.
iPod
Dock Port
2 INTRODUCTION
Model Description and
Minimum Software Version/Date
3G Mini 4G Photo 5G
Buttons above All Click Color Color
touch wheel Wheel Screen Screen
v2.2 v1.1 v3.0 v1.0 v1.0
2/04 3/04 7/04 10/04 6/05
INSTALLATION
Parts List
Drive + Play includes the following components and parts:
• Text Display With Universal Mounting Base and Attached
Cable (3m)
• Control Knob With 30° Mounting Base and Attached
Cable (3m)
• Electronics Enclosure (the Brain)
• Wired FM Adapter
• Removable 12-Volt Accessory Power Cable (2m) with
Cigarette Lighter Adapter and In-Line Fuse Holder
• Line Out Cable (1.6m): Stereo 3.5mm (M) Plug to L/R RCA
(M) Plugs
• iPod Cable (3m): 8-Pin Mini DIN (M) Plug to iPod Dock
Connector
• 0° Control Knob Base
• (2) Mounting Plates for Knob Base and Display Base
• (10) Mounting Screws: (3) Knob Base, (3) Display Base and
(4) Electronics Enclosure
• (6) Cable Ties, Black
• (2) Hex Keys: 3mm and 1.5mm
• (2) Adhesive Mounting Pads
• (2) Alcohol Prep Pads
Tools and Precautions
To install Drive + Play components, we recommend using the
following tools:
• Electric or cordless drill with drill bit set
• Phillips screwdriver set
• Pencil
• Protective eyewear
Before starting the installation, please observe the following
precautions:
• Turn off all audio system power, including the iPod, before
making any connections.
• Always wear protective eyewear when using tools.
Choosing Installation Locations
IMPORTANT: Drive + Play should be installed according to
these instructions and relevant regulations. No part of this
system should obstruct the driver’s view of the road or vehicle
controls or information displays necessary for safely operating
the vehicle. The text display should be positioned to eliminate
glare and reflections, and should be as close as possible to the
driver’s normal line of sight.
Drive + Play Components
Drive + Play consists of three main components: Text Display,
Control Knob and Electronics Enclosure. They operate together
as a system to make controlling your iPod easy, and to route the
audio signal to your mobile audio system. All three components
must be installed. You can choose wireless FM transmission,
wired FM transmission, or direct connection of the line-output
audio signal for the audio interface.
Text Display Location
The Text Display shows current iPod information and is similar
to the display on your iPod. It comes with a three-position
pivot arm for almost limitless viewing adjustment. You can
install the unit in a variety of locations, as long as the
proposed site offers a direct view of the display. For easiest
viewing, mount the unit near other instrument-panel gauges
or on top of the dashboard.
Control Knob Location
The Control Knob allows you to control the iPod much like the
iPod Click Wheel. The unit comes with interchangeable bases so
you can choose the most comfortable operation angle. Ideally,
you should install the Control Knob in a location that provides
comfortable access while driving where you can easily locate and
operate it without taking your eyes off the road.
continued on next page...
INSTALLATION 3
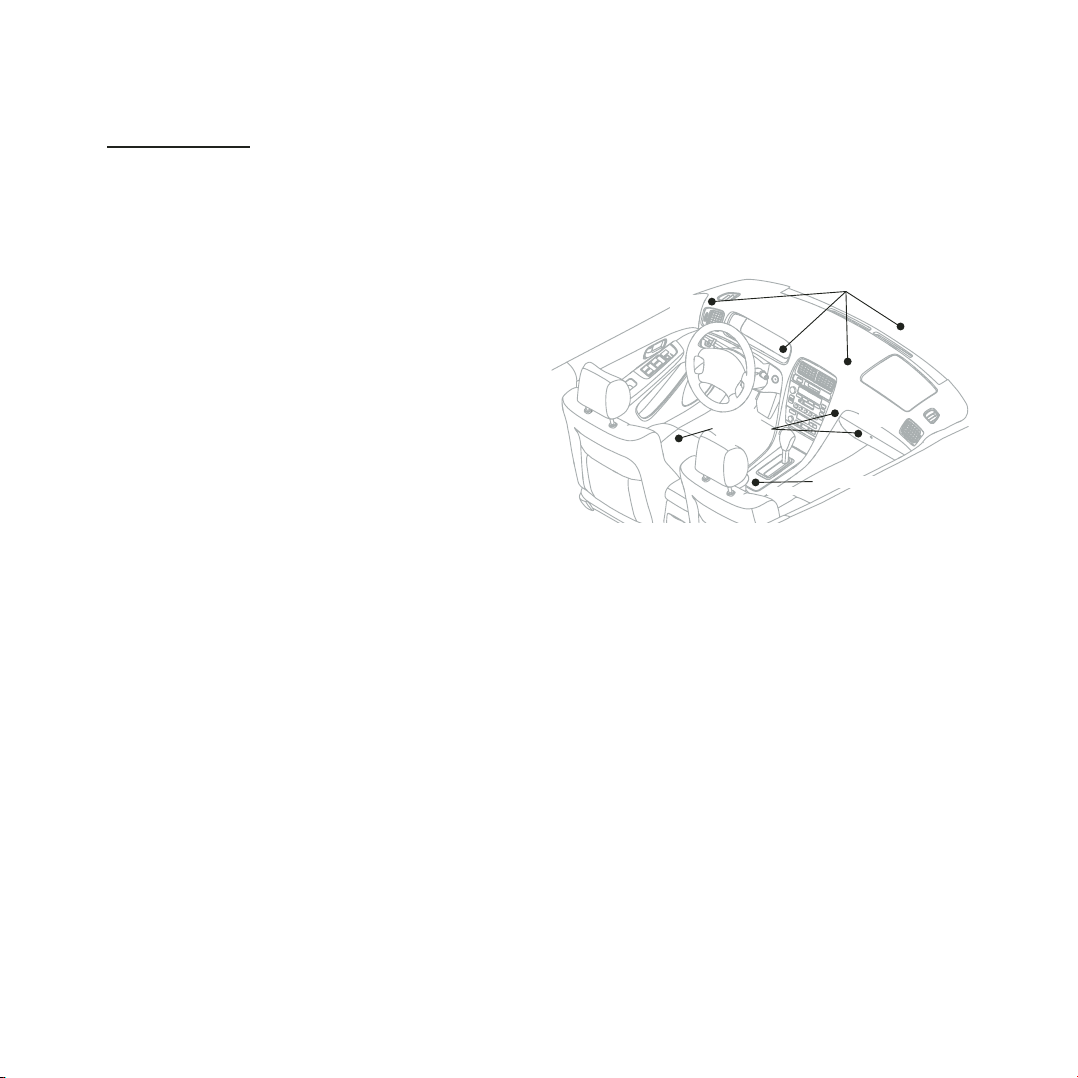
INSTALLATION
Install Text Display
Install Control Knob
Install
Electronics
Enclosure
(on windshield
glass)
(on gauges
panel)
(on dash)
(on dash)
(on console)
(under
seat)
(behind
radio)
(in glove
box)

Electronics Enclosure Location
The Electronics Enclosure contains the wireless FM transmitter
and the power supply for the three components. You can install
it under a seat, in the center console compartment, in the glove
box or behind the radio. If possible, select a site that provides
convenient access to the enclosure and easy cable routing.
Also, the performance of the wireless FM transmitter depends
on the location and length of the pigtail antenna.
Drive + Play also provides an audio interface to a cell phone,
satellite radio, or any other device that outputs a low-level
audio signal using the Aux In jack. When using the Auxiliary
Input feature, select a mounting site for the electronics
enclosure that provides easy access to the Aux In jack. Otherwise, you will need to purchase a 3.5mm stereo extension
cable for a longer cable run (see Wiring Diagram on page 5).
Wired FM Adapter
The Wired FM adapter must be plugged into the cable that
connects your vehicle’s antenna to the radio, and is usually
located at the back of the in-dash radio. However, in some
vehicles, it may be located elsewhere. If you are unsure about
the antenna plug’s location, or if your vehicle includes an
amplified or non-standard antenna, consider having your
Drive + Play professionally installed.
iPod Location
With this system, you can place your iPod in any location that
allows you to conveniently connect it to the Drive + Play iPod
cable. Since you don’t have to view the iPod or use its controls,
you can place it inside the center console compartment, the
glove box, or another hidden site.
NOTE: Since an iPod can get hot during operation, avoid tightly
enclosed areas. Review “About Operating and Storage
Temperatures” in your iPod’s User’s Guide.
Planning the Installation
IMPORTANT: When routing wires from any of the components
to the electronics enclosure, be sure to route them away from
any moving parts such as the gear-shift levers, pedals, parking
brake and steering column.
Temporarily place the main components at their proposed sites
and lay out their interconnect cables to judge the cable routes
(see Wiring Diagram on page 5 for wiring options). If a cable
comes up short, try moving one or more components to find a
better run. Next, inspect the vehicle’s interior assembly and
locate areas where cables can be hidden or tucked into seams
(e.g., under the center console housing, along body panel, etc.).
Once you have found the ideal cable runs and component
locations, mark the sites with a pencil and continue with the
installation.
Choosing an Audio Interface
Referring to the Wiring Diagram on the next page, you can
interface the Drive + Play’s audio output to your mobile audio
system in three ways:
Wireless FM Transmission
Only available in selected countries
This method is the most convenient and requires the least
wiring. After setup, you simply tune your radio to the assigned
FM frequency to listen to your iPod. Drive + Play has a built-in
FM transmitter and its software provides a choice of five fixed
FM frequencies or a tunable frequency for areas where none
of the fixed frequency selections are available. See Initial
Setup on page 9 for details about locating an optimum
frequency for best performance of the FM transmitter.
Wired FM Transmission
For better quality FM transmission performance, use the Wired
FM Adaptor for direct connection (via the Antenna jack on the
Electronics Enclosure) to your radio’s antenna input (see Wiring
Diagram on the next page).
NOTE: Depending on your vehicle model, antenna plug
adaptors may be required to connect the Wired FM Adaptor to
your radio and antenna.
Connecting to Audio Out
This method provides the best sound quality, but involves more
wiring. After making the connections and setup, you will select
Auxiliary Input or CD Changer on your audio system to listen to
your iPod. See Initial Setup on page 9 for details.
NOTE: In order to use the Audio Out, your audio system must
have an auxiliary input jack or a CD changer input. A thirdparty interface is required for a CD changer input. If your
system has neither feature, FM transmission is the only choice
for the audio interface.
Choosing a Power Interface
Referring to the Wiring Diagram on the next page, you can
connect Drive + Play’s power connections to your vehicle’s
electrical system in one of two ways:
Removable 12-Volt Accessory Power Cable With
Cigarette Lighter Adaptor and In-Line Fuse Holder
This power interface is the most convenient, since the power
cable can be simply plugged into the vehicle’s cigarette lighter
outlet. No additional wiring is required.
NOTE: If your cigarette
lighter works even when the car’s ignition switch is in the “off”
position, you’ll have to turn Drive + Play on manually.
4 INSTALLATION
 Loading...