


READ BEFORE USE
LIRE AVANT UTILISATION LEA ANTES DE USAR
Visit www.hamiltonbeach.com for our complete line of products and Use and Care Guides – as well as delicious recipes, tips, and to register your product online!
Rendez-vous sur www.hamiltonbeach.ca pour notre liste complète de produits et de nos manuels utilisateur – ainsi que nos délicieuses recettes et nos conseils !
¡Visite www.hamiltonbeach.com (EE. UU.) o www.hamiltonbeach.com.mx (México) para ver otros productos de Hamilton Beach o para contactarnos!
Questions?
Please call us – our friendly associates are ready to help.
USA: 1.800.851.8900
Questions ?
N’hésitez pas à nous appeler – nos associés s’empresseront de vous aider.
CAN : 1.800.267.2826
¿Preguntas?
Por favor llámenos – nuestros amables representantes están listos para ayudar.
EE. UU.: 1.800.851.8900
MEX: 01 800 71 16 100
Le invitamos a leer cuidadosamente este instructivo antes de usar su aparato.
840275202 ENv06.indd 1
Coffee Maker
Cafetière
Cafetera
English........................ |
2 |
Français.................... |
10 |
Español..................... |
19 |
1/27/2017 |
11:22:41 AM |
IMPORTANT SAFEGUARDS
When using electrical appliances, basic safety precautions should always be followed to reduce the risk of fire, electric shock, and/or injury to persons, including the following:
1. |
Read all instructions. |
9. |
The use of accessory attachments not recommended by the |
2. |
This appliance is not intended for use by persons (including children) with |
|
appliance manufacturer may result in fire, electrical shock, or personal |
|
reduced physical, sensory, or mental capabilities, or lack of experience |
|
injury. |
|
and knowledge, unless they are closely supervised and instructed |
10. |
Use only the carafe provided with the appliance. |
|
concerning use of the appliance by a person responsible for their safety. |
11. |
Do not use outdoors. |
3. |
Close supervision is necessary when any appliance is used by or near |
12. |
Do not let cord hang over edge of table or counter or touch hot |
|
children. Children should be supervised to ensure that they do not |
|
surfaces, including stove. |
|
play with the appliance. |
13. |
The carafe is designed for use with this coffee maker. It must never be |
4. |
Do not touch hot surfaces. Use handles or knobs. Care must be taken |
|
used on a range top or in a microwave oven. |
|
as burns can occur from touching hot parts or from spilled, hot liquid. |
14. |
Do not set a hot carafe on a wet or cold surface. |
5. |
To protect against electric shock, do not place cord, plug, or coffee |
15. |
Do not use a cracked carafe or one with a loose or weakened handle. |
|
maker in water or other liquid. |
16. |
Do not clean carafe with cleansers, steel wool pads, or other abrasive |
6. |
Unplug from outlet when either the coffee maker or clock is not in use |
|
materials. |
|
and before cleaning. Allow to cool before putting on or taking off parts |
17. |
Be certain carafe lid is securely in place during brew cycle and when |
|
and before cleaning the appliance. |
|
pouring coffee. Do not use force when placing lid on carafe. |
7. |
Coffee maker must be operated on a flat surface away from the edge |
18. |
Do not place coffee maker on or near a hot gas or electric burner or in |
|
of counter to prevent accidental tipping. |
|
a heated oven. |
8. |
Do not operate any appliance with a damaged supply cord or plug, or |
19. |
To disconnect coffee maker, turn controls to OFF ( ) and then remove |
|
after the appliance malfunctions or has been dropped or damaged in |
|
plug from wall outlet. |
|
any manner. Supply cord replacement and repairs must be conducted |
20. |
WARNING! To reduce the risk of fire or electric shock, do not remove |
|
by the manufacturer, its service agent, or similarly qualified persons in |
|
the bottom cover. No user-serviceable parts are inside. Repair should |
|
order to avoid a hazard. Call the provided customer service number |
|
be done by authorized service personnel only. |
|
for information on examination, repair, or adjustment. |
21. |
Do not use appliance for other than intended use. |
|
SAVE THESE INSTRUCTIONS |
||
Other Consumer Safety Information
This appliance is intended for household use only.
w WARNING Electrical Shock Hazard: This appliance is provided with a polarized plug (one wide blade) to reduce the risk of electric shock. The plug fits only one way into a polarized outlet. Do not defeat the safety purpose of the plug by modifying the plug in any way or by using an adapter. If the plug does not fit fully into the outlet, reverse the plug. If it still does not fit, have an electrician replace the outlet.
2
The length of the cord used on this appliance was selected to reduce the hazards of becoming tangled in or tripping over a longer cord. If a longer cord is necessary, an approved extension cord may be used.
The electrical rating of the extension cord must be equal to or greater than the rating of the appliance. Care must be taken to arrange the extension cord so that it will not drape over the countertop or tabletop where it can be pulled on by children or accidentally tripped over.
To avoid an electrical circuit overload, do not use another high-wattage appliance on the same circuit with this appliance.
840275202 ENv06.indd 2 |
|
|
1/27/2017 11:22:41 AM |
|
|
||
|
|
|
|

Parts and Features
*To order parts: |
Lid to Access Water Reservoir Filter |
|
US: 1.800.851.8900 |
Water Reservoir Lid |
|
www.hamiltonbeach.com |
||
|
||
Canada: 1.800.267.2826 |
|
|
Mexico: 01 800 71 16 100 |
|
|
|
Cone Filter |
|
|
Basket With |
|
|
Handle* |
Swivel Filter
Basket Holder
1 Package Melitta®*
#4 Cone
Coffee Filters
*Melitta® is the registered trademark of Melitta Professional Coffee Solutions GMHB & Co. Use of the Melitta trademark does not imply any affiliation with or endorsement by Melitta Professional Coffee Solutions.
Carafe*
Keep-Warm
Plate
BEFORE FIRST USE: Wash all removable parts in hot, soapy water. Rinse and dry. Brew one cycle with water and discard water.
Control Panel
With Clock and
Time Since Brew
HOUR/MIN Buttons
PROGRAM Button
BREW OPTIONS
 Button
ON/OFF
 Button (I/ )
Power Light
Water Filter* (with one pod)
 Pod*
Pod*
3
840275202 ENv06.indd 3 |
|
|
1/27/2017 11:22:41 AM |
|
|
||
|
|
|
|

How to Make Coffee
w WARNING Burn Hazard.
To avoid hot coffee overflowing from the filter basket:
•When using decaffeinated coffee, do not exceed the coffee manufacturer’s recommended serving amount.
•Ensure swivel filter basket is completely closed.
If filter basket overflow occurs, unplug coffee maker and allow coffee in filter basket to cool before removing filter basket.
w WARNING Shock Hazard.
Do not immerse cord, plug, or coffee maker in any liquid.
1.Plug into outlet.
2.Press and release HOUR button. Time will
flash in display. Press and hold or pulse HOUR button to set current hour in AM or PM.
3.Press and hold or pulse MINUTE button within 3 seconds to set current minutes.
Set time will display constant in 3 seconds.
4. Fill carafe with water; lift lid to add water.
5. Pull swivel filter basket holder to open.
6. Add a #4 paper cone filter.
4
7.For each cup of coffee being made, place one level tablespoon (15 ml) of ground coffee into filter.
8.Close swivel filter basket holder before brewing, and do not open until brewing
cycle is complete and unit is cool.
9. Select brew option. Default is REGULAR. Choose BOLD for stronger coffee or 1–4 CUPS for smaller quantity.
10. Press I/ (ON/OFF) button once to turn on the coffee maker and button will illuminate. The TIME SINCE BREW Freshness Timer will illuminate once the brew cycle begins. It will continue to count up after the brewing is complete
and keep your coffee warm until the
auto shutoff at 2 hours. When finished,
press I/ (ON/OFF) button once and unplug. NOTE: If the coffee maker is not turned off manually, it will automatically shut off in 2 hours and the light will turn off.
840275202 ENv06.indd 4 |
1/27/2017 11:22:42 AM |

To Program
Automatic Brew
NOTE: White LED comes on to indicate PROGRAM is activated. White LED light goes off when the unit begins to brew at the preprogrammed time.
1. Choose a brew option.
2.Press and hold the PROGRAM button until the PROGRAM light flashes.
3. With PROGRAM light flashing and start time displayed, press HOUR and MIN buttons to set the desired brew time.
4. After 2 seconds, the light will stop flashing. Programmed time will be stored and the current time will be displayed.
5.Press and release PROGRAM button again to activate automatic brew. PROGRAM
light comes on.
Tips for Best-Tasting Coffee
•All coffees are made from either arabica beans or robusta beans, or some combination of both. Arabica beans are slightly more expensive, but tend to produce better-tasting coffee.
•Ground coffee will become stale much faster than whole beans. If buying preground coffee, chose a package with the latest expiration date or a smaller quantity.
•If grinding whole beans, set your coffee grinder on a fine/medium grind. This will yield the best-tasting grounds. Try to use freshly ground coffee within about a week of grinding.
•Using a water filter, filtered water, or bottled water will yield bettertasting coffee than tap water.
•Use approximately 1 tablespoon (15 ml) of grounds for each cup of coffee being made. To avoid overflow, use about 1/3 less grounds when brewing decaf or flavored coffees.
•Make sure your coffee maker is clean. See “Care and Cleaning” section.
5
840275202 ENv06.indd 5 |
1/27/2017 11:22:42 AM |
Care and Cleaning
w WARNING Shock Hazard.
Do not immerse cord, plug, or coffee maker in any liquid.
All coffee makers should be cleaned at least once a month (once a week for areas with hard water).
1.Unplug. (This resets brew counter for cleaning mode notification.)
2.Wipe coffee maker with a damp cloth or sponge. Dry.
3.Remove water filter and water filter base (see “How to Replace the Water Filter”).
4.Pour a minimum of 1 pint (2 cups/473 ml) white vinegar into water reservoir.
5.Press the I/ (ON/OFF) button once. After 30 seconds, turn OFF. Wait 30 minutes to allow vinegar to clean. Then turn ON again. When brew cycle is finished, wait for unit to cool.
6.Empty carafe and rinse. Run 2–3 more brew cycles with CLEAN WATER only. Allow to cool between cycles.
7.Wash in warm, soapy water. Rinse and dry. The carafe and filter basket are dishwasher-safe to wash and dry in the TOP RACK only.
Clean Notification
If unit is always plugged in, after 30 cycles CLEAN will scroll across the display. Follow the directions for “Care and Cleaning.”
NOTES:
•Performing the cleaning procedure will clear the display.
•The brew cycle counter resets every time the coffee maker is unplugged.
If you do not want to perform the cleaning procedure, press the I/ (ON/OFF) button two times to clear the display.
6
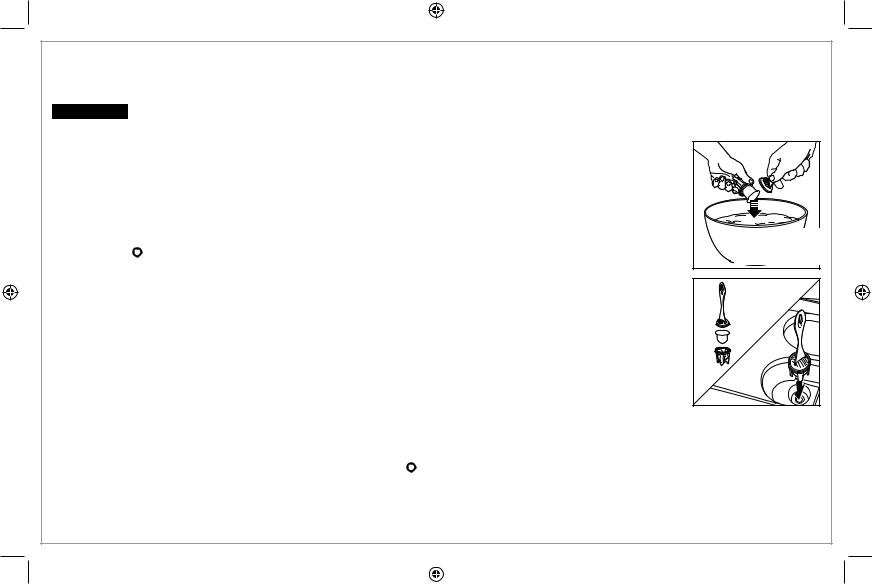
How to Replace the Water Filter
1. Soak filter pod for 15 minutes in water.
15 min.
2.Add pod to bottom of water filter and snap on filter handle.
3.Place assembly into right side of water
reservoir.
For better-tasting coffee, use a water filter.
Filter replacement is recommended every 30 cycles.
840275202 ENv06.indd 6 |
|
|
1/27/2017 11:22:42 AM |
|
|
||
|
|
|
|
Carafe Safety
Precautions
•Do not use a cracked carafe or a carafe having a loose or weakened handle.
•This carafe is designed to be used only on the keep-warm plate of your coffee maker. Do not use on a gas or electric rangetop, or in a microwave or conventional oven.
•To avoid breakage, handle carafe with care. Avoid impact. Glass will break as a result of impact. Use care when filling with water to avoid hitting faucet.
•Do not place hot carafe on cool or wet surface. Allow to cool before washing or adding liquids.
•Do not set empty carafe on a hot heating surface.
•Do not clean with steel wool pads, abrasive cleanser, or any other materials that may scratch.
This symbol alerts you to the potential danger for personal injury if you fail to read and follow these safety precautions.
This symbol reminds you that glass is fragile and can break which could result in personal injury.
•Do not place hands inside carafe. When handling, be careful if wearing any hand jewelry, especially diamond rings. Jewelry can scratch the glass, which increases possibility of breakage.
•Do not bump, scratch, or boil dry.
•Discard carafe if it is cracked, scratched, or heated while empty for an extended period of time.
•To avoid accidents, do not pour in the direction of people.
•If stirring in the carafe, use only wooden, plastic, or rubber utensils. Do not use metal utensils.
•Follow the above safety precautions carefully to avoid serious burn injuries which may result if breakage occurs while carafe holds heated liquids.
7
840275202 ENv06.indd 7 |
|
|
1/27/2017 11:22:42 AM |
|
|
||
|
|
|
|

Troubleshooting
Filter basket overflows or coffee brews slowly.
•The BOLD or 1–4 CUPS brew option is recommended for brewing decaffeinated coffee.
•Excessive amounts of coffee.
•Coffee ground too finely (not automatic drip grind).
•Carafe not securely placed on keep-warm plate or swivel filter basket holder not closed completely.
•Carafe removed during brewing for more than 20 seconds and not placed securely back on keep-warm plate.
•Coffee maker needs cleaning.
•Coffee grounds between paper filter and filter basket.
•Paper filter not open and in proper position.
•Press the seamed edges of paper filter before inserting into basket.
•Rinse filter basket before inserting paper filter so the edges will remain pressed against the sides of the basket.
•Poor-quality paper filter.
•Carafe removed during brewing for more than 20 seconds and not placed securely back on keep-warm plate.
Coffee not brewing/unit will not turn on.
•Water reservoir is empty.
•Unit is unplugged.
•Power outage.
•Power surge. Unplug; then plug the unit back in.
•Clock requires reset after power outage.
8
840275202 ENv06.indd 8 |
|
|
1/27/2017 11:22:42 AM |
|
|
||
|
|
|
|

Limited Warranty
This warranty applies to products purchased and used in the U.S. and Canada. This is the only express warranty for this product and is in lieu of any other warranty or condition.
This product is warranted to be free from defects in material and workmanship for a period of five (5) years from the date of original purchase in Canada and one (1) year from the date of original purchase in the U.S. During this period, your exclusive remedy is repair or replacement of this product or any component found to be defective, at our option; however, you are responsible for all costs associated with returning the product to us and our returning a product or component under this warranty to you. If the product or component is no longer available, we will replace with a similar one of equal or greater value.
This warranty does not cover glass, filters, wear from normal use, use not in conformity with the printed directions, or damage to the product resulting from accident, alteration, abuse, or misuse. This warranty extends only to the original consumer purchaser or gift recipient. Keep the original sales receipt, as proof of purchase is required to make a warranty claim. This warranty is void if the product is used for other than single-family household use or subjected to any voltage and waveform other than as specified on the rating label (e.g., 120V ~ 60 Hz).
We exclude all claims for special, incidental, and consequential damages caused by breach of express or implied warranty. All liability is limited to the amount of the purchase price. Every implied warranty, including any statutory warranty or condition of merchantability or fitness for a particular purpose, is disclaimed except to the extent prohibited by law, in which case such
warranty or condition is limited to the duration of this written warranty. This warranty gives you specific legal rights. You may have other legal rights that vary depending on where you live. Some states or provinces do not allow limitations on implied warranties or special, incidental, or consequential damages, so the foregoing limitations may not apply to you.
To make a warranty claim, do not return this appliance to the store. Please call 1.800.851.8900 in the U.S. or 1.800.267.2826 in Canada or visit hamiltonbeach.com in the U.S. or hamiltonbeach.ca in Canada. For faster service, locate the model, type, and series numbers on your appliance.
9
840275202 ENv06.indd 9 |
|
|
1/27/2017 11:22:42 AM |
|
|
||
|
|
|
|
 Loading...