


ELECTRONIC CLOCK RADIO
Sonoclock 13 / 13 L

NOTES
©Important notes for users in the U.K.
Mains plug
This apparatus is fitted with an approved moulded 13 Amp plug. To change a fuse in this type of plug proceed as follows:
•Remove fuse cover and fuse.
•Fix new fuse which should be a BS1362 5 Amp, A.S.T.A. or BSI approved type.
•Refit the fuse cover.
If the fitted plug is not suitable for your socket outlets, it should be cut off and an appropriate plug fitted in its place.
If the mains plug contains a fuse, this should have a value of 5 Amp. If a plug without a fuse is used, the fuse at the distribution board should not be greater than 5 Amp.
Note: The severed plug must be disposed to avoid a possible shock hazard should it be inserted into a 13 Amp socket elsewhere.
How to connect a plug
The wires in the mains lead are coloured with the following code: blue = neutral (N), brown = live (L).
As these colours may not correspond with the colour markings identifying the terminals in your plug, proceed as follows:
•Connect the blue wire to the terminal marked N or coloured black.
•Connect the brown wire to the terminal marked L or coloured red.
•Do not connect either wire to the earth terminal in the plug, marked E (or e) or coloured green (or green and yellow).
Before replacing the plug cover, make certain that the cord grip is clamped over the sheath of the lead – not simply over the two wires.
i
Dichiarazione di conformità ai sensi del D.M. 28.08.95, n. 548
Si dichiara che gli apparecchi illustrati nel presente libretto di istruzioni per l'uso rispondono alle prescrizioni dell'articolo 2, comma 1, del Decreto Ministeriale 28 Agosto 1995, n. 548.
Fatto a Fürth il 01/03/1999
GRUNDIG Fernseh-Video Produkte und Systeme GmbH
Kurgartenstraße 37 D-90762 FUERTH
GRUNDIG A.G. Kurgartenstraße, 37 90762 FUERTH GERMANIA
2

Deutsch |
Seite |
Bedienelemente.......................................... |
4 |
Stromversorgung......................................... |
5 |
Uhr .......................................................... |
5 |
Radio ....................................................... |
5 |
Wecken.................................................... |
6 |
Allgemeines............................................... |
6 |
English |
Page |
Controls .................................................... |
7 |
Power supply ............................................. |
8 |
Clock ...................................................... |
8 |
Radio ....................................................... |
8 |
Alarm ....................................................... |
9 |
General .................................................... |
9 |
Français |
Page |
Contrôles ................................................ |
10 |
Alimentation............................................. |
11 |
Horloge ................................................. |
11 |
Radio ..................................................... |
11 |
Réveil ..................................................... |
12 |
Général .................................................. |
12 |
Italiano |
Pagina |
Controlli.................................................. |
13 |
Alimentazione .......................................... |
14 |
Orologio................................................. |
14 |
Radio ..................................................... |
14 |
Sveglia ................................................... |
15 |
Generalità............................................... |
15 |
INDEX |
|
Português |
Página |
Controlos ................................................ |
16 |
Alimentação ............................................ |
17 |
Relógio .................................................. |
17 |
Rádio ..................................................... |
17 |
Despertador............................................. |
18 |
Generalidades ......................................... |
18 |
Español |
Página |
Controles ................................................ |
19 |
Alimentación............................................ |
20 |
Reloj ..................................................... |
20 |
Radio ..................................................... |
20 |
Despertador............................................. |
21 |
General .................................................. |
21 |
Nederlands |
Pagina |
Bediening ............................................... |
22 |
Stroomvoorziening .................................... |
23 |
Klok ....................................................... |
23 |
Radio ..................................................... |
23 |
Wekken.................................................. |
24 |
Algemeen ............................................... |
24 |
Dansk |
Side |
|
D |
Kontroller................................................. |
25 |
|
|
Forsyning ................................................ |
26 |
|
|
Ur |
26 |
|
|
|
|
||
Radio ..................................................... |
26 |
|
GB |
Vækning ................................................. |
27 |
|
|
Generelt ................................................. |
27 |
|
|
|
|
||
Svenska |
Sida |
|
F |
Kontroller................................................. |
28 |
|
|
Strömförsörjning |
29 |
|
|
|
I |
||
Klocka .................................................... |
29 |
|
|
Radio ..................................................... |
29 |
|
|
Väckning................................................. |
30 |
|
|
|
|
||
...................................................Allmänt |
30 |
|
P |
Suomi |
Sivu |
|
|
|
|
||
Säätimet |
31 |
|
|
|
E |
||
Käyttöjännite............................................ |
32 |
|
|
Kello ...................................................... |
32 |
|
|
Radio ..................................................... |
32 |
|
|
|
|
||
...................................................Herätys |
33 |
|
NL |
Yleistä .................................................... |
33 |
|
|
|
|
|
|
STETS FÜR SIE DA! |
DK |
|
montags |
|
|
||
von |
8. |
bis |
freitags |
||
00 – |
|||||
|
|
|
|
||
|
|
19.00 |
Uhr |
||
*Gebührenpflichtig – in Deutschland und
Österreich |
möglich |
DEUTSCHLAND 01 80/5 30 21 22*
ÖSTERREICH 06 60/66 99*
- KUNDENBERATUNGSGRUNDIGZENTRUM
S
FIN
3

D |
Funktionsschalter ALARM/RADIO |
= Wecken mit Signalton |
§= Wecken mit Rundfunkprogramm
y= Radio aus (keine Weckfunktion)
0= Radio ein
TIME |
– zum Einstellen mit HOUR/MIN |
|
der Uhrzeit |
ALARM |
– kurzes Drücken dieser Taste zeigt |
|
Ihnen die aktuelle Weckzeit an |
|
– Drücken der Taste schaltet |
|
außerdem Radio oder Alarm- |
|
signal wieder aus, wenn es |
|
zuvor durch die Weckfunktion |
|
aktiviert wurde. |
|
– zum Einstellen mit HOUR/MIN |
|
der Weckzeit |
SLEEP |
– schaltet das Radio für max. |
|
1 Stunde und 59 Minuten ein |
SNOOZE |
– zum Unterbrechen des Weckens |
|
für ca.9 Minuten |
|
– vorzeitiges Beenden des |
|
Schlummerbetriebs |
HOUR |
– zum Einstellen der Stunden (Uhrzeit, |
|
Weckzeit und Schlummerzeit) |
MIN |
– zum Einstellen der Minuten (Uhrzeit, |
|
Weckzeit und Schlummerzeit) |
VOLUME |
– zum Regulieren der Lautstärke |
BAND FM·MW – zum Wählen zwischen FM und MW (Sonoclock 13)
FM·LW – zum Wählen zwischen FM und LW (Sonoclock 13 L)
TUNING – zum Abstimmen auf einen Radiosender
ALARM 6 – zeigt an, daß die Weckfunktion aktiviert wurde
BEDIENELEMENTE
|
|
ALARM SLEEP SNOOZE |
|
|
TIME |
|
HOUR |
|
|
MIN |
|
|
|
|
|
. . . . |
|
|
VOLUME |
ALARM § y 0 RADIO |
|
|
BAND |
TUNING
ALARM 6
Battery
Geräterückseite: Geräteunterseite
– |
Netzkabel |
Battery |
– Fach für Stützbatterie |
– |
Wurfantenne für FM-Empfang |
|
|
4
STROMVERSORGUNG
Netzanschluß
Schließen Sie das Gerät an Wechselspannung 230 V~, 50 Hz an.
Nach dem ersten Anschließen und nach Stromausfall (ohne Stützbatterie) blinkt das Display, um Sie auf das Einstellen der Uhrzeit bzw. Weckzeit hinzuweisen.
Hinweis:
Das Gerät bleibt, auch wenn es ausgeschaltet ist, mit dem Wechselspannungsnetz verbunden. Nur durch Ziehen des Netzsteckers wird das Gerät vom Netz getrennt.
Stützbatterie – Stromausfall
Ist eine Stützbatterie eingesetzt, läuft die Uhr auch bei Stromausfall weiter. Das Wecken entfällt allerdings, das Radio funktioniert nicht und das Display ist nicht beleuchtet. Unter einer Voraussetzung wird das Wecken aber nachgeholt: Normalerweise schaltet sich das Gerät, gerechnet ab dem eingestellten Weckzeitpunkt, eine Stunde und 59 Minuten lang ein. Endet der Stromausfall innerhalb dieser Zeitspanne, weckt Sie das Gerät mit Rundfunkprogramm oder Signalton.
•Setzen Sie in das Batteriefach (in der Geräteunterseite) eine 9 V-Alkali-Batterie ein (IEC6 LF22).
•Batterie erst einsetzen, wenn das Gerät ans Netz angeschlossen ist, um sie nicht unnötig zu belasten.
•Wir empfehlen, die Stützbatterie nach ca. 1 Jahr auszutauschen.
•Wird das Gerät längere Zeit vom Netz getrennt, muß die Stützbatterie herausgenommen werden.
Umwelt-Hinweis
Verbrauchte Batterien nicht in den Hausmüll werfen!
Geben Sie bei Neukauf die alten Batterien bei Ihrem Händler oder an den öffentlichen Sammelstellen ab.
UHR
Einstellen der Uhrzeit
•Drücken und halten Sie die Taste TIME.
•Stellen Sie mit Taste HOUR die Stunden, mit Taste MIN die Minuten ein.
–Einmal drücken der jeweiligen Taste schaltet auf die nächste Stunde bzw. Minute, anhaltend drücken schaltet zügig weiter.
–Die Minuten werden nicht auf Stunden übertragen, wenn z.B. die Minuten-Anzeige von '59' auf '00' wechselt.
• TIME Taste loslassen.
Einstellen der Weckzeit
• Drücken Sie die Taste ALARM.
–Im Display wird die aktuelle Weckzeit angezeigt.
•Drücken Sie die Taste ALARM und halten Sie diese gedrückt. Stellen Sie nun mit den Tasten HOUR/MIN die Weckzeit ein (wie beim Einstellen der Uhrzeit).
–Der Leuchtpunkt ALARM 6, links unten im Display, läßt erkennen, daß sich die Uhr in Weckbereitschaft befindet; Funktionsschalter (  § y 0) in Position § oder
  .
.
ALARM 


 RADIO
RADIO
ALARM 


 RADIO
RADIO
RADIO
Radioempfang
• Einund Ausschalten mit dem |
D |
|
Funktionsschalter § y 0: |
|
|
Stellung y |
|
|
= aus. |
ALARM |
RADIO |
Stellung 0 |
|
|
= ein. |
ALARM |
RADIO |
•Den Wellenbereich mit dem BAND-Schalter wählen.
FM = UKW
MW |
= Mittelwelle (Sonoclock 13) |
LW |
= Langwelle (Sonoclock 13 L) |
•Den gewünschten Radiosender mit dem Rändel TUNING einstellen.
•Lautstärke einstellen mit dem Rändel
VOLUME.
Antennen
–Für MW/LW-Empfang ist eine FerritstabAntenne eingebaut.
•Langsames Ausrichten des Geräts kann den Empfang verbessern.
–Für FM-Empfang dient die Wurfantenne (Geräterückseite).
•Legen Sie die Wurfantenne so aus, daß bester Empfang erzielt wird.
5

WECKEN
Wecken mit Rundfunkprogramm
D • Stellen Sie den Funktionsschalter  § y 0 auf 0 (Ein).
•Wählen Sie den Sender, dessen Programm Sie wecken soll und stellen Sie die zum Wecken gewünschte Lautstärke ein.
• |
Stellen Sie den |
|
|
Funktionsschalter |
|
|
auf Position §. ALARM |
RADIO |
– |
Das Gerät |
|
|
schaltet sich zur |
|
|
eingestellten |
|
|
Weckzeit ein und |
|
1 Stunde und 59 Minuten später automatisch wieder aus.
Wecken mit Signalton
• |
Stellen Sie den |
|
|
Funktionsschalter |
|
|
auf Position . ALARM |
RADIO |
– |
Der Signalton |
|
|
schaltet sich zur |
|
|
eingestellten |
|
|
Weckzeit ein und |
|
1 Stunde und 59 Minuten später automatisch wieder aus.
Unterbrechen und Wiederholen des Weckens
•Unabhängig davon wie Sie geweckt wurden (Rundfunkprogramm oder Signalton), können Sie das Wecken mit der Taste SNOOZE unterbrechen.
– Nach ca. 9 Minuten weckt das Gerät erneut.
•Sie können das Wecken innerhalb der Einschaltdauer mehrmals unterbrechen.
–Die Weckbereitschaft für den nächsten Tag bleibt erhalten.
Abstellen des Weckens
•Möchten Sie den Weckbetrieb beenden, so drücken Sie die Taste ALARM. Sie können auch die Taste SLEEP, dann SNOOZE drücken.
–Die Weckbereitschaft für den nächsten Tag bleibt erhalten.
•Wollen Sie den Weckbetrieb ganz beenden, stellen Sie den Funktionsschalter auf aus y.
– Die betreffende Anzeige erlischt.
Einschlafen mit Musik
• Drücken Sie die Taste SLEEP.
–Das Radio wird angeschaltet und im Display erscheint die 'Schlummerzeit' (59 Minuten).
•Diese Einschaltdauer können Sie bei gedrückt gehaltener Taste SLEEP mit den Tasten HOUR/MIN zwischen 0 und 1 Stunde und 59 Minuten beliebig variieren.
•Nach erneutem Drücken der Schlummertaste SLEEP wird wieder eine Einschaltdauer von 59 Minuten angezeigt.
–Nach Ablauf der programmierten Dauer schaltet das Gerät ab.
•Einschaltdauer vorzeitig löschen: Taste SNOOZE drücken.
ALLGEMEINES
Aufstellen des Gerätes
Bitte beachten Sie beim Aufstellen des Gerätes, daß Oberflächen von Möbeln mit den verschiedensten Lacken und Kunststoffen beschichtet sind, welche meistens chemische Zusätze enthalten. Diese Zusätze können u.a. das Material der Gerätefüße angreifen, wodurch Rückstände auf der Möbeloberfläche entstehen, die sich nur schwer oder nicht mehr entfernen lassen.
Sonstige Hinweise
•Gehäuse nur mit weichem, staubbindendem Lappen reinigen. Keine scharfen Polieroder Reinigungsmittel verwenden.
•Schützen Sie das Gerät vor jeder Feuchtigkeit (z.B. Tropfund Spritzwasser).
•Typenangaben finden Sie auf der Geräteunterseite.
Technische Daten
Wellenbereich: |
|
|
FM ................................ |
87,5 – 108 MHz |
|
MW ... |
526,5 – 1606,5 kHz |
(Sonoclock 13) |
LW ...... |
148,5 – 283,5 kHz (Sonoclock 13 L) |
|
Ausgangsleistung: ........................... |
400 mW |
|
Dieses Gerät ist funkentstört entsprechend den geltenden EG-Richtlinien.
Dieses Produkt erfüllt die europäischen Richtlinien 89/336/EEC, 73/23/EEC und 93/68/EEC.
Der 'Regulierungsbehörde für Telekommunikation und Post' wurde angezeigt, daß das Gerät in Verkehr gebracht wurde. Ihm wurde auch die Berechtigung eingeräumt, die Serie auf Einhaltung der Bestimmungen zu überprüfen.
Dieses Gerät entspricht der Sicherheitsbestimmung VDE 0860 und somit der internationalen Sicherheitsvorschrift IEC 65.
Technische und optische Änderungen vorbehalten!
6

Function Selection Switch ALARM/RADIO:
 = alarm sounds at preset time § = radio comes on at alarm time
y= radio off (no alarm function)
0= radio on
TIME – used with HOUR/MIN to set the clock time
ALARM – press briefly to display the present alarm time
–to switch off the alarm tone (or radio) when alarm function is activated
–used with HOUR/MIN to set the alarm time
SLEEP – to switch on the radio for max.1 hour and 59 minutes
SNOOZE – to interrupt radio or buzzer alarm for approximately 9 minutes
–to switch off the radio before the preset 'sleep' time has elapsed
HOUR – for setting the hours (clock time, alarm time and ‘sleep’ time).
MIN – for setting the minutes (clock time, alarm time and ‘sleep’ time).
VOLUME – to adjust the volume
BAND FM·MW – to select between FM and MW (Sonoclock 13)
FM·LW – to select between FM and LW (Sonoclock 13 L)
TUNING – to tune to radio stations
ALARM 6 – indicates that the alarm function is activated
CONTROLS
. . . .
ALARM  § y 0 RADIO
ALARM 6
Back of the set:
ALARM SLEEP SNOOZE
TIME |
HOUR |
|
MIN |
||
|
VOLUME
BAND GB
TUNING
Battery
Base of the set:
– |
AC mains cable |
Battery |
– back-up battery compartment |
– |
Wire antenna for FM reception |
|
|
7

POWER SUPPLY
Connecting the unit
Important note for users in the U.K.:
When fitting a mains plug, follow the instructions on page 2.
GB The unit is designed to operate from a mains supply of 230 V~, 50 Hz.
When the set is connected for the first time or after a power failure (without standby battery fitted), the display flashes to indicate that the clock and, if necessary, the alarm time should be set.
Note: The unit remains connected to the mains even when it is switched off.
The unit is only fully isolated from the mains if the mains plug is removed from the wall socket.
Standby-battery – mains failure
If a standby battery is fitted, the clock will continue to operate during mains failure. However, the display will not be illuminated, the radio does not work and the alarm will not sound unless the mains supply is restored within 1 hour and 59 minutes of the preset alarm time (if so, the radio will switch on or the alarm tone will sound).
•Insert a 9 V alkaline battery (IEC 6 LF 22) into the battery compartment on the bottom of the unit.
•Insert the battery only after the unit has been connected to the mains in order to prevent unnecessary drain.
•We recommend that the battery is replaced after approx. 1 year.
•If the clock radio is to be disconnected for a long period, the standby battery should be removed, as it would otherwise discharge too quickly and may leak.
Note on Environmental Protection
Do not throw exhausted batteries in the household refuse.
Hand over the old batteries to your dealer or public collecting points when buying new ones.
CLOCK
Setting the clock time
•Press the TIME button and hold it pressed.
•Use the HOUR button to set the hours and the MIN button to set the minutes.
–A single press of the HOUR or MIN button advances the setting by 1 hour or 1 minute respectively. If the button is held pressed, the setting advances continuously.
–The minutes will not be carried over to the hours if, for example, the minutes indication changes from '59' to '00'.
• Release the TIME button.
Setting the alarm time
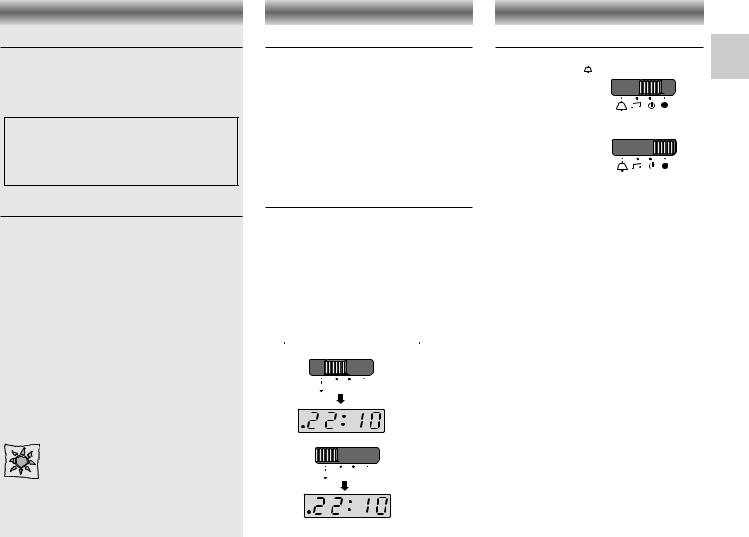
• Press the ALARM button.
– The display shows the preset alarm time.
•Press and hold down the ALARM button and set the alarm time with the HOUR/MIN buttons (in the same way as the clock time).
–The light dot ALARM 6 in the bottom left of the display shows that the alarm is ready to operate; function selection switch ( § y 0) in position § or
  .
.
ALARM 


 RADIO
RADIO
ALARM 


 RADIO
RADIO
RADIO
Radio Reception
•Switch on and off with the function selection switch  § y 0:
y = radio off
ALARM 


 RADIO
RADIO
0 = radio on
ALARM 


 RADIO
RADIO
• Select the waveband with the BAND switch:
FM |
= VHF |
MW = Medium Wave (Sonoclock 13) |
|
LW |
= Long Wave (Sonoclock 13 L) |
•Tune to stations with the rotary control
TUNING.
•Adjust the volume with the rotary control
VOLUME.
Aerials
–For receiving MW/LW stations there is a ferrite rod aerial inside the set.
•Rotating the unit slightly can improve reception.
–The wire aerial at the back of the set is used for VHF (FM) reception.
•Position the wire aerial so that optimum reception is obtained.
8

ALARM
Wake-up by radio
•Set the function selection switch  § y 0 to position 0 (on).
•Select a station which will be broadcasting at the alarm time and adjust the volume to the required level.
• |
Set the function |
|
|
|
selection switch to |
|
|
|
position §. |
ALARM |
RADIO |
– |
At the preselected |
|
|
|
alarm time the |
|
|
|
radio will switch |
|
|
|
on and switch off |
|
|
again automatically 1 hour and 59 minutes later.
Wake-up by sound signal
• |
Set the function |
|
|
|
selection switch to |
|
|
|
position . |
ALARM |
RADIO |
– |
At the preselected |
|
|
|
alarm time the |
|
|
|
sound signal will |
|
|
|
switch on and |
|
|
switch off again automatically 1 hour and 59 minutes later.
Interrupting and repeating the alarm
•The radio alarm or electronic sound alarm can be interrupted with the SNOOZE button.
– After 9 minutes, the alarm comes on again.
•It is possible to interrupt the alarm function several times during the switch-on period.
– The alarm remains set to operate the next day.
Switching off the alarm
•The alarm function can be switched off by pressing ALARM once. You can also press the SLEEP and then the SNOOZE button.
– The alarm remains set to operate the next day.
•If you wish to switch off the alarm completely, set the function selection switch to position y.
– The light dot ALARM goes out.
Going to sleep while listening to the radio
• Press the SLEEP button briefly.
–The unit switches on the radio and the display will show a switch-on period of 59 minutes.
•The 'sleep' time can be adjusted between 0 minutes and 1 hour and 59 minutes by keeping the SLEEP button pressed and then pressing the HOUR/MIN buttons.
•If you press the SLEEP button again, the 'sleep' time will go back to 59 minutes.
–After the preset sleep time has elapsed, the radio will switch off automatically.
•The SLEEP function can be terminated prematurely by pressing the SNOOZE button.
GENERAL
Positioning the set
Caution should be exercised if the set is placed on furniture as surfaces are often coated with lacquers and plastic finishes containing additives which attack the material of which the feet of the
set are made, leaving stains which can only be GB removed with difficulty or not at all.
Further notes:
•Only a soft cloth which picks up dust should be used to clean the cabinet. Do not use aggresive polishes or cleaning agents.
•Do not expose the unit to moisture (e.g. dripping or splashing).
•The type label is on the bottom of the unit.
Technical specifications
Wavebands: |
|
|
FM ................................ |
87.5 – 108 MHz |
|
MW ... |
526.5 – 1606.5 kHz |
(Sonoclock 13) |
LW ...... |
148.5 – 283.5 kHz (Sonoclock 13 L) |
|
Power output: ................................. |
400 mW |
|
The unit meets the CEE regulations concerning interference radiation.
This product fulfills European directives 89/336/EEC, 73/23/EEC and 93/68/EEC.
This set complies with the safety regulations according to VDE 0860 / BS 415 and thus with the international safety regulations according to IEC 65.
Subject to technical alterations and alterations in styling. E & O.E.
9

Commutateur de fonctions ALARM/RADIO :
= réveil par alarme
§= réveil par programme radio
y |
= radio arrêt (pas de fonction réveil) |
0= radio marche
TIME – s'utilise avec HOUR/MIN pour régler l'heure
ALARM – appuyez brièvement pour faire apparaître l'heure de réveil réglée
F – pour annuler la fonction réveil quand la fonction est activée
–s'utilise avec HOUR/MIN pour régler l'heure de réveil
SLEEP – met la radio en marche pour une durée maxi. de 1 heure et 59 minutes.
SNOOZE – pour l'interruption de réveil pendant environ 9 minutes
–pour l'arrêt précoce du mode sommeil
HOUR – pour le réglage des heures (heure actuelle et de réveil et periode ‘sleep’)
MIN – pour le réglage des minutes VOLUME – pour le réglage du volume
BAND FM·MW – pour sélectionner FM ou MW (PO) (Sonoclock 13)
FM·LW – pour sélectionner FM ou LW (GO) (Sonoclock 13 L)
TUNING – pour le réglage d'une station radio
ALARM 6 – indique que la fonction de réveil est activée
CONTRÔLES
|
|
ALARM SLEEP SNOOZE |
|
|
TIME |
|
HOUR |
|
|
MIN |
|
|
|
|
|
. . . . |
|
|
VOLUME |
ALARM § y 0 RADIO |
|
|
BAND |
TUNING
ALARM 6
Battery
A l'arrière de l'appareil : |
|
Sous l'appareil : |
||
– |
Cordon secteur |
|
Battery |
– logement pour la batterie |
– |
Cable antenne pour la réception FM |
|
|
d'appoint |
|
|
|
||
10
ALIMENTATION
Raccordement au réseau électrique
Raccordez l'appareil au courant alternatif 230 V~, 50 Hz.
Après la prémiere mise en service, ou après une panne de secteur (sans batterie d'appoint), le cadran clignote pour vous indiquer qu'il faut régler à nouveau l'heure actuelle.
Note: L'appareil reste en liaison avec le secteur, même lorsqu'il se trouve à l'arrêt. L'appareil est coupé du secteur uniquement lorsque vous retirez le cordon de raccordement secteur de la prise.
Batterie d'appoint – Panne de courant
Lorsque la batterie d'appoint est en place, la montre fonctionne même pendant une panne de courant. Par contre le réveil et la radio ne fonctionnent pas et l'afficheur reste éteint. Un seul cas est possible où le réveil se produit : en temps normal, l'appareil se met en marche pendant une heure et 59 minutes après l'heure de réveil programmée. Si la panne de courant se termine pendant cette durée, le réveil sera activé.
•Mettez une batterie de 9V-Alkali (IEC6 LF22) dans le logement de batterie (sous l'appareil).
•N'introduire la batterie que lorsque l'appareil est relié au secteur afin d'éviter décharger la batterie sans raison.
•Nous recommandons un échange de la batterie après une année de fonctionnement.
•Si l'appareil reste pendant longtemps débranché du secteur, il est préférable de retirer la batterie d'appoint. Elle se déchargerait rapidement et pourrait couler.
Indication pour la protection de l'environnement
Ne jetez pas vos batteries usagées dans votre poubelle!
Rapportez-les chez votre revendeur lors de l'achat de batteries neuves ou encore portezles dans un dépôt public prévu à cet usage.
HORLOGE
Réglage de l'heure
•Maintenez appuyée la touche TIME.
•Réglez les heures à l'aide de la touche HOUR, et les minutes avec la touche MIN.
–En appuyant une fois sur la touche, vous passez à l'heure ou la minute suivante, une pression plus longue vous permet une avance continue.
–Les minutes ne sont pas ajoutées aux heures, lorsque par ex., l'affichage des minutes passe de '59' à '00'.
• Relâchez la touche TIME.
Réglage de l'heure de réveil
• Appuyez sur la touche ALARM.
– L'afficheur indique l'heure de réveil actuelle.
•Maintenez la touche ALARM appuyée et réglez l'heure de réveil avec les touches HOUR/MIN (même procédure que pour le réglage de l'heure).
–Le point luminieux ALARM 6, en bas à gauche sur le cadran, indique que la fonction de réveil est activée; le commutateur de fonction (  § y 0) se trouve alors en position § ou
  .
.
ALARM 


 RADIO
RADIO
ALARM 


 RADIO
RADIO
RADIO
Réception radio
•Mise en marche et arrêt avec le commutateur de fonction  § y 0 :
Position y =
arrêt |
ALARM |
RADIO |
Position 0 = |
|
RADIO F |
en marche |
ALARM |
•Choisissez la gamme d'ondes à l'aide du sélecteur BAND:
FM |
= modulation de fréquence |
MW |
= (PO) petites ondes (Sonoclock 13) |
LW |
= (GO) grandes ondes (Sonoclock 13 L) |
•Choisissez la station à l'aide du bouton
TUNING.
•Réglez le volume avec le bouton VOLUME.
Antennes
–Pour la réception MW/LW une antenne en ferrite est integrée dans l’appareil.
•Vous pouvez améliorer la réception en tournant légèrement la radio.
–Le cable antenne sert à la réception FM (à l'arrière de l'appareil).
•Orientez l'antenne de manière à obtenir une réception optimale.
11
 Loading...