


55 VLX 8582 SP
EN

TABLE OF CONTENTS---------------------------------------------------------------------------------
5SET-UP AND SAFETY
7GENERAL INFORMATION
7Special features of your television set 8 Receiving digital stations
8 GRUNDIG SCR System
8 Important notes on environmental protection
8 Notes on still images
9PACKING CONTENTS
9Standart accessory
9Optional accessory
10 CONNECTION/PREPARATION
10Connecting the antenna and power corda
11Setting up or hanging
12Inserting batteries in the remote control
13OVERVIEW
13 Connections on the television set
15Control buttons on the TV
15Multi-function switch
16Remote control - main functions
17Remote control - all functions
18INITIAL SET-UP
18Settings for connecting to the home network
18Tuning channels
19Initial set-up – overview
20Arrange Initial set-up
24Changing the Channel Editor for the digital channels
28PICTURE /SOUND SETTINGS
28Picture settings
29Restore default settings
29Concluding the settings
30Sound settings
31Restore default settings
31Concluding the settings
32TV OPERATION – BASIC FUNCTIONS
32Switching on and off
32Selecting channels
32Selecting stations from lists
32Selecting AV channels
32Adjusting the volume
32Muting
32Displaying information
33Audio language
33Subtitles
33Zap function
33PIP mode
34TV OPERATION – ADDITIONAL FUNCTIONS
34Sleep timer
34Zoom function
34Changing the picture format
35Audio settings
35Picture settings
36ELECTRONIC TV GUIDE
36Log on to the “RoviGuide™“
36The Electronic TV guide in Offline mode
37The Electronic TV guide in Online mode
383D FUNCTION
38Important information about 3D Function
38Prepare 3D Function
38Watching 3D content
393D Settings
41HBBTV MODE
41What is HbbTV?
42Using HbbTV
42Additional functions for video indexes
42Deactivate and activate HbbTV
42Deactivate and activate digital teletext
43TELETEXT MODE
43 TOP text or FLOF text mode
43 Normal text mode
43 Additional functions
2 ENGLISH
TABLE OF CONTENTS---------------------------------------------------------------------------------
44 |
USB RECORDING |
67 |
LANGUAGE SETTINGS |
44 |
Information on recording and playing |
67 |
Changing the menu language |
|
television programmes |
67 |
Changing the audio language |
44 |
Possible limitations when using an exter- |
67 |
Changing the subtitle language |
|
nal data medium |
67 |
Changing the keyboard |
45 |
Connecting external data media |
|
language |
46 |
USB recording settings |
68 |
ACCESSIBLE FUNCTIONS |
47 |
Time shift – ″ Pausing” programmes |
||
48 |
Recording TV programmes |
68 |
Subtitle Mode |
48 |
One-touch programme recording |
68 |
Audio description (audio subtitles) |
48 |
Recording a programme from the channel list |
69 |
ADVANCED SETTINGS |
49 |
Programme setting for recording |
||
50 |
Editing the timer |
69 |
Auto sleep |
50 |
Deleting a timer |
69 |
Store logo view |
51 |
Playback |
69 |
Power LED brightness |
51 |
Deleting programmes from the recorded |
70 |
Power save mode |
|
files menu |
70 |
Switching on/off weather information |
52 |
USB OPERATION |
71 |
TIMER FUNCTIONS |
52 |
File formats for USB operating |
71 |
Sleep timer |
53 |
Connecting external data media |
71 |
On timer (Auto On) |
53 |
Removing the external data media |
72 |
Off timer (Auto Off) |
54 |
The file browser |
73 |
PARENTAL SETTINGS |
54 |
Settings in the USB setup menu |
||
56 |
Playback basic functions |
73 |
Parental Guidance |
57 |
Additional playback functions |
73 |
Locking the menus |
58 |
Playing the video, music and image files |
74 |
Blocking the multifunction switch |
|
with home network connection |
74 |
Changing the PIN code |
58 |
Selecting the digital media server |
74 |
Blocking a television channel |
59 |
Playback |
75 |
Watching a blocked television channel |
59 |
Other playback options |
75 |
Resetting PIN code |
60 SMART INTER@CTIVE TV 4.0 FEATURE |
76 |
DATE AND TIME SETTINGS |
|
60 |
SMART Inter@ctive TV 4.0 internet ap- |
76 |
Auto tuning |
|
plications |
76 |
Manual tuning |
60 |
USB keyboard and mouse |
77 SOFTWARE OF THE DEVICE |
|
60 |
Starting Smart Inter@ctive TV |
||
61 |
Navigation and enetering text during |
77 |
Product information |
|
registration |
77 |
Software update (OAD) |
61 |
Creating a Grundig Application Store account |
77 |
Software update (Internet) |
62 |
Logging in with Grundig Application |
77 |
Software update (USB) |
|
Store account |
78 |
ACCESSORIES |
63 |
Grundig Application Store |
||
65 |
Navigation in the main menu |
|
|
65Playback and other options in the applications
66Web browser menu
66 Web browser applications |
ENGLISH 3 |
|
|
|
|

TABLE OF CONTENTS---------------------------------------------------------------------------------
79 RESET FUNCTIONS
79Resetting the television to its original state
79Deleting channel history
80USING EXTERNAL DEVICES
80 DIGI LINK
80The Digi Link functions of the television
81Device Control
82High definition – HD ready
82Connection options
83Connecting an external device
84Using a DVD recorder, DVD player, video recorder or set-top box
84Headphones
85Hi-fi system
86Playing the audio signal via the HiFi system
87Cable screen share (MHL)
88Wireless screen share (Liveshare)
89OPERATION WITH COMMON INTERFACE
89What is common interface?
89Inserting the CA module
89Access control for CA module and smart cards
90NETWORK SETUP
90Network connection
90Wired network
91Wired network settings
93Wireless network
93Wireless network settings
97Change TV Name
98Connecting the TV to a “hidden” network
99 SETTING FURTHER CHANNELS
99Searching for all digital channels from a satellite automatically
100Searching for digital channels from a satellite manually on a transponder
101Antenna settings and searching for digital channels from a satellite automatically
102Antenna settings, SCR system and searching for digital channels from a satellite automatically
103Antenna settings for DiSEqC 1.0/1.1 and searching digital channels from a satellite
automatically
105Motor antenna setup (DiSEqC 1.2)
106Searching for digital channels from the cable provider automatically
107Searching for digital channels from the
cable provider manually
107Searching for digital terrestrial TV channels automatically
108Searching for digital terrestrial TV channels manually
109Automatic service update
109 Tuning analogue television channels
111Changing stored analogue channels
112Displaying signal information
113INFORMATION
113Additional information
114Service information for dealers
114Notes for WLAN reception
115Network interfaces
115Disposing of the packaging
115Environmental note
115Explanation of the symbols which may be present on back side of the television set
116Troubleshooting
118 GLOSSARY
123 INDEX
4 ENGLISH

SET-UP AND SAFETY------------------------------------------------------------------------------------
About your TV set
7With your TV set, you can receive and watch digital TV programmes over DVB-S, DVB-T and DVB-C, along with analogue TV.
7Many features of the TV set require an Internet connection. The TV set is equipped with WLAN and a LAN port.
7The TV set can record programmes. For this feature you need a USB storage device, such as an external hard drive (not included). Recorded programmes can only be played on the same TV set. After the TV st is repaired, it is possible that recorded programmes may no longer be able to be played back.
Intended use
7 The TV set is designed for use in dry rooms.
7Use the TV set with the supplied stand or a suitable VESA bracket.
7The TV set is primarily intended for the playback of TV programmes, streaming content and audio/video material from external devices. Any other use is strictly prohibited.
It is not intended as an information display or for predominant use as a computer monitor. If a still image or a non-full-format image is displayed for an extended period, visible traces may remain on the screen for some time.
This is not a defect that can be used as the basis for a warranty claim.
Safety

 WARNING
Risk of electrical accident
7Do not open the TV set. Safety risk may arise and also the guarantee of the product can be void if the television set is opened.
7The TV set can only be operated with the power cable or the AC/DC adapter supplied with the product.
7Do not operate the TV set with a damaged power cord/AC/DC adaptor (if supplied).
7If the plug on the TV set has an earthing contact, only insert the plug into a socket with an earthing contact.
7Plug the TV set into the mains socket only after you have connected the external devices and the antenna.
7Protect the TV set from moisture. Do not place any vessels filled with water (such as vases) on the TV.
Fire hazard
7To prevent the spread of fire, keep candles or other open flames away from this product at all times.
7Do not cover the ventilation slots on the TV set.
7Always unplug the power plug and antenna plug during a thunderstorm.
7Keep candles or other open flames away from the TV set.
7Do not expose the batteries to extreme heat such as sunshine, fire or the like.
7Only use batteries of the same type (brand, size, properties). Do not use used and new batteries together.
ENGLISH 5

SET-UP AND SAFETY------------------------------------------------------------------------------------

 WARNING
Injuries caused by falling TV set
Never place the TV set on an unstable surface. The TV set may fall, causing serious injury, possibly leading to death in isolated cases.
Observe the following precautions:
7Only use the manufacturer’s recommended cabinets or stands.
7Only use furniture that can safely support the TV set.
7Make sure that the TV set does not protrude beyond the dimensions of the furniture on which it is resting.
7Do not place the TV set on tall furniture (such as kitchen cabinets, bookshelves) without securely anchoring the furniture and TV set.
7Do not place the TV set on fabric or other materials located between the TV set and furniture.
7Instruct children that there is danger associated with climbing on furniture when the TV set is to be reached.
NOTICE
Shortened service life due to high operating temperature
7Do not place the TV set next to heating units or in direct sunlight.
7To ensure adequate ventilation, maintain clearance of at least 10 cm around the TV set.
Discolouration of furniture due to rubber feet
7Some furniture surfaces may discolour when they come in contact with rubber. To protect furniture, you can place a sheet made of glass or plastic under the stand. Do not use textile underlays or mats such as doilies.
Environmental information
7 |
|
|
|
Do not dispose of batteries in |
|
|
|
||
|
|
|
|
the household waste. Used bat- |
|
|
|
|
|
|
|
|
|
teries must be returned to retail |
|
stores or public collection points. You help to |
|||
|
protect the environment in this way. |
|||
7Be sure to dispose of packaging materials for your product separately according to the guidelines of local authorities so that they can be recycled in an environmentally safe manner.
7If you are not using your TV set for a while, turn it to standby mode. In standby mode, the TV set uses very little energy (≤ 0.5 W).
If you do not use the TV set for an extended period, turn it off with the power switch or unplug the power cord from the socket. If you turn off the device or disconnect it from the power supply, the switch-on timer and programmed recordings will not work.
7Select a location for the TV set so that no direct sunlight falls on the screen. This allows a lower backlight to be selected, which saves energy.
7 |
|
|
|
|
|
|
Do not dispose of the product |
|
|
|
|
|
|
||
|
|
|
|
|
|
along with normal household |
|
|
|
|
|
|
|
|
|
|
|
|
|
|
|
|
|
|
|
|
|
|
|
|
waste at the end of its service |
|
|
|
|
|
|
||
|
|
|
|
|
|
|
life. Take it to a recycling centre |
|
|
|
|
|
|
|
|
|
for electrical and electronic equipment. |
||||||
6 ENGLISH

GENERAL INFORMATION--------------------------------------------------------------------
Special features of your television set
7Your television set enables you to receive and watch digital stations (via DVB-S, DVB-T and DVB-C), including the High Definition (HD) ones. At present, reception for these digital television stations in High Definition is only possible in some countries in Europe.
7Although this television meets the current DVB- S, DVB-T and DVB-C standards as of August 2012, its compatibility with future DVB-S digital satellite broadcasts, DVB-T digital terrestrial broadcasts and DVB-C digital cable broadcasts is not guaranteed.
7This television can receive and process all analogue and all unencrypted digital stations. This television set has an integrated digital and analogue receiver. The digital receiver unit converts the signals from digital stations to provide outstanding audio and picture quality.
7The twin-triple tuner enables PIP function so you can view one TV programme in the main picture and another in an inset picture.
You can now also view one TV programme while recording another programme.
7The TV guide (only for digital stations) tells you of any schedule changes at short notice, and provides an overview of all the stations’ schedules for the next few days.
Quite a lot of content such as programme data, channel logos, players, images, fragments, etc. can be reached via the internet through internet connection thanks to the online feature of the TV guide.
Detailed information for each channel - if provided by the broadcasting channel - is included in the electronic programme guide.
7You can connect various data media, for example, an external hard drive, a USB memory stick or a digital camera to the USB sockets. Using the file browser, you can then select and play the file formats you want (for example, MP4, MP3 or JPEG data).
7With the Time Shift function, you can easily stop and resume a programme with the remote control in a fast and simple way.
Programme is recorded to the external data medium.
7You can record any digital TV channel you have chosen, if no limitation has been imposed by the broadcaster.
TV channel is transformed by your television and saved to a USB external data medium. You can recall and play saved programs from the archive.
While a recording is in progress, you can select and watch another recording from the archive.
For detailed information about saving and playing TV programs, please see page 44.
7With the 3D function and 3D glasses of your TV, you can watch 3D movies in the comfort of your home with the reality of a theater.
LED technology has been used in this television to provide you with the best experience in 3D feature. To join the 3D world, just put on the Grundig 3D glasses.
7SMART inter@ctive TV 4.0 feature provides your TV with Internet applications when your TV is connected to Internet. You can surf through the web pages, visit popular video and photo sharing sites as well as social networks with these applications.
7Wireless USB keyboard and mouse support in the Web browsing of your television facilitates surfing through the internet pages for the user.
7DLNA feature allows you to use a wired or wireless (with wireless USN network device) local network to access your content that were recorded with DLNA compatible devices we use at our daily lives such as a PC, mobile phone or NAS (Network Attached Storage) which are operated as DMS (Digital Medial Server). While watching TV, you can play any content you like at any time by using DMC applications on your mobile device or PC without starting DLNA application.
7A DLNA compatible device such as a PC, mobile phone, NAS or a NAS-like (Network attached storage) device which operates as a DMS (Digital Media Server) is required in order to use home network.
ENGLISH 7

GENERAL INFORMATION--------------------------------------------------------------------
Receiving digital stations
7To receive digital satellite stations (DVB-S) you need a satellite antenna.
7To receive digital stations (DVB-T) you need a digital rooftop or indoor antenna (passive or active indoor antenna with its own power supply).
7The antenna cable of the cable TV network that broadcast in DVB-C must be plugged into TV in order to receive the DVB-C broadcasts.
7Unlike analogue broadcasting, not every station has its own transmission frequency. Instead, several stations are grouped into what are known as bouquets on a regional or national level.
7You can find the current transmission information on teletext from various broadcasters, or look in a TV guide or on the Internet.
7Various digital television stations from private broadcasters are encrypted (DVB-S, DVB-T and DVB-C). Watching these stations and the recording and playback functions are only possible with the appropriate CI module and a SmartCard. Ask your specialist dealer.
GRUNDIG SCR System
Your TV supports SCR system (Single Channel Router). With SCR satellite system, several users can individually receive all signals from the satellite simultaneously.
Important notes on environmental protection
Those items mentioned below will help you reduce the consumption of natural resources as well as save your money by reducing electricity bills.
7If you will not be using the TV set for several days, it should be disconnected from the mains for environmental and safety reasons. TV will not consume energy in this condition.
7If the TV set has main switch, it will be enough to turn the TV off via main switch. TV will reduce energy consumption almost to Zero Watt.
7TV consumes less energy on stand by mode. However, some TV sets may have features such as on timer, that require the TV set to be left in standby to work correctly.
7TV consumes less energy when brightness is reduced.
Notes on still images
Watching the same image for a long time on the screen may cause a still image remain feebly on the background. Feeble image(s) on the background is originated from LCD/LED technology and does not require any action under guarantee. To avoid such cases and/or minimize the impact, you may observe the tips below.
7Do not allow the same TV channel to stay on the screen for a very long time. Channel logos may cause this situation.
7Do not allow the images, which are not full screen, to constantly stay on the screen; if not streamed in full screen format by the broadcaster, you can convert the images to full screen by changing picture formats.
7Higher brightness and/or contrast values will lead this impact to appear faster; therefore, you are recommended to watch your TV in the lowest brightness and contrast levels.
8 ENGLISH
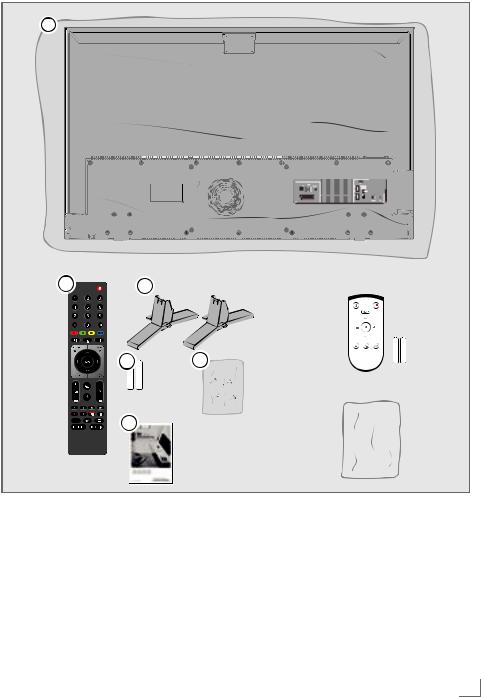
PACKINGCONTENTS------------------------------------------------------------------------------- |
|
1 |
|
3 |
2 |
4 |
5 |
6 |
|
Standartaccessory |
Optionalaccessory |
1 TV
2 Stand
3 Remote control
4 Batteries for remote controls
5 Screws and mounting instructions for stand 6 Brief Instruction
Easy-Use Remote Control
Batteries for Easy-Use remote controls Cleaning cloth
ENGLISH 9

CONNECTION/PREPARATION-----------------------------------------------------
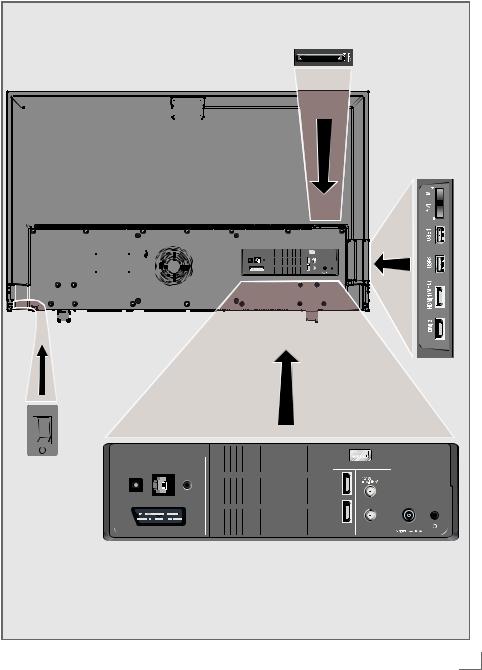
Connecting theantennaandpowercorda
3 |
1a |
|
|
1b |
2 |
|
1a To receive digital satellite channels (DVB-S), connect the satellite antenna cable to the antenna socket SATELLITEMAINon the television set;
1b To receive digital satellite programmes (DVB-S) for the PIP function and the advanced recording function for TV programmes, two cables with the satellite signals are needed. Connect the second cable to the SATELLITESUB antenna socket on the TV.
and / or
2a To receive terrestrial digital broadcasters (DVB-T) connect the cable for the rooftop or indoor antenna (passive or active indoor antenna with its own power supply) to the antenna socket ANTIN on the television set;
or
2b To receive digital cable channels (DVB-C) connect the cable for the rooftop antenna to the antenna socket ANTIN on the television set;
or
2c To receive analogue TV channels, connect the cable for the rooftop antenna to the antenna socket ANTIN on the television set.
Note:
7When connecting an indoor antenna you may have to try it out at different positions until you get the best reception.
3 Plug the power cord into the wall socket.
Note:
7Only plug the device into the mains socket after you have connected the external devices and the antenna.
7Do not use an adapter plug or extension cable which does not meet the applicable safety standards. Do not make changes on the power cord.
10 ENGLISH
CONNECTION/PREPARATION-----------------------------------------------------
Setting uporhanging
7Select a location so that no direct sunlight falls on the screen.
Setting upwithstand
7To mount the stand, refer to the installation instructions included.
7Place the television set on a hard, level surface.
PreparingformountingontheVESA bracket
You will need:
7 A pair of scissors,
7 A crosstip screwdriver.
Follow the installation instructions for the VESA bracket.Place the television set in the film on a smooth surface with the screen facing down.
1 Cut open the film on the back side using the scissors.
2 Connect the required cables to the connectors on the television set. See the “Connection/Preparation” section in this manual.
3 Tie the cables so they do not hang down onto the floor.
4 Screw the VESA bracket onto the television set and mount it according to its installation instructions.
VESA |
ENGLISH 11

CONNECTION/PREPARATION------------------------------------------------------
Inserting batteries in the remote control
1Open the battery compartment by removing the lid.
2Insert the batteries (2 x 1.5 V micro; for example R03 or AAA). Observe the polarity (marked on the base of the battery compartment).
3 Close the battery compartment.
Note:
Environmental note
7 |
This symbol on the battery |
|
or on the packaging |
|
indicates that the battery |
|
provided with this product |
shall not be treated as household waste. On certain batteries this symbol might be used in combination with a chemical symbol. The chemical symbols for mercury (Hg) or lead (Pb) are added if the battery contains more than 0.0005% mercury or 0.004% lead.
Batteries, including those which contain no heavy metal, may not be disposed of with household waste. Please dispose of used batteries in an environmentally sound manner.
Find out about the legal regulations which apply in your area.
7If the television set no longer reacts properly to remote control commands, the batteries may be flat. Be sure to remove the exhausted batteries from the battery compartment.
7The manufacturer accepts no liability for damage resulting from used batteries.
12 ENGLISH
OVERVIEW --------------------------------------------------------------------------------------------------------------
Connections onthetelevisionset
|
|
|
|
|
|
|
|
|
|
|
|
|
|
|
|
|
|
|
|
|
|
|
|
|
|
|
|
|
|
|
|
|
|
|
|
|
|
|
|
|
|
|
|
|
|
|
|
|
|
|
|
|
|
|
|
|
|
|
|
|
|
|
|
|
|
|
|
|
|
|
|
|
|
|
|
|
|
|
|
|
|
|
|
|
|
|
|
|
|
|
|
|
|
|
|
|
|
|
|
|
|
|
|
|
|
|
|
|
|
|
|
|
|
|
|
|
|
|
|
|
|
|
|
|
|
|
|
|
|
|
|
|
|
|
|
|
|
|
|
|
|
|
|
|
|
|
|
|
|
|
|
|
|
|
|
|
|
|
|
|
|
|
|
|
|
|
|
|
|
|
|
|
|
|
|
|
|
|
|
|
|
|
|
|
|
|
|
|
|
|
|
|
|
|
|
|
|
|
|
|
|
|
|
|
|
|
|
|
|
|
|
|
|
|
|
|
|
|
|
|
|
|
|
|
|
|
|
|
|
|
|
|
|
|
|
|
|
|
|
|
|
|
|
|
|
|
|
|
|
|
|
|
|
|
|
|
|
|
|
|
|
|
|
|
|
|
|
|
|
|
|
|
|
|
|
|
|
|
|
|
|
|
|
|
|
|
|
|
|
|
|
|
|
|
|
|
|
|
|
|
|
|
|
|
|
|
|
|
Optic Out |
LAN |
|
|
|
|
|
|
|||||
|
|
|
|
|
|
|
|
|
|
|
|
|
|
|
|
|||||||
|
|
|
|
|
|
|
|
|
|
|
|
|
|
|
|
|||||||
|
|
|
|
|
|
|
|
|
|
|
|
|
|
|
|
|||||||
|
|
|
|
|
|
|
|
|
|
|
|
|
|
|
|
|||||||
|
|
|
|
|
|
|
|
|
|
|
|
|
|
|
|
|||||||
|
|
|
|
|
|
|
|
|
|
|
|
|
|
|
|
|||||||
|
|
|
|
|
|
|
|
|
|
|
|
|
|
|
|
|||||||
|
|
|
|
|
|
|
|
|
|
|
|
|
|
|
|
|||||||
|
|
|
|
|
|
|
|
|
|
|
|
|
|
|
|
|||||||
|
|
|
|
|
|
|
|
|
|
|
|
|
|
|
|
|||||||
|
|
|
|
|
|
|
|
|
|
|
|
|
|
|
|
|||||||
|
|
|
|
|
|
|
|
|
|
|
|
SERVICE |
|
|
|
|
|
|
||||
|
|
|
|
|
|
|
|
|
|
|
|
|
|
|
ONLY |
|
|
|
|
|
|
|
|
|
|
|
|
|
|
|
|
|
|
|
|
|
|
|
|
|
|
|
|
|
|
|
|
|
|
|
|
|
|
|
|
|
|
|
|
|
|
|
|
|
|
|
|
|
|
|
|
|
USB 3 |
|
| <![if ! IE]> <![endif]>HDMI4 (ARC) |
|
MAIN |
| <![if ! IE]> <![endif]>HDMI3 |
|
SUB |
ANT IN
ENGLISH 13

OVERVIEW---------------------------------------------------------------------------------------------------------------
Optic Out |
Audio output sockets (opti- |
|
cal) for PCM/Dolby Digital |
|
signals. |
|
It is for digital multichannel |
|
audio/video amplifier or |
|
AV receiver connections. |
LAN |
Network cable connection |
|
socket. |
Service Only |
Service only. |
SCART / S-VHS / COMPONENT |
|
|
Euro/AV socket (CVBS |
|
signal, RGB signal); |
|
video signal input for |
|
S-Video camera (with Scart- |
|
S-VHS converter). |
|
Video signal input (YUV |
|
signal with Scart-YUV |
|
converter). |
USB 3 |
USB Harddisk socket for |
|
external data medium and |
|
PVR function; |
|
connection for wireless |
|
keyboard, mouse. |
HDMI4 (ARC) |
HDMI socket, audio/video |
|
signal input (HDMI). |
HDMI3 |
HDMI socket, audio/video |
|
signal input (HDMI). |
SATELLITE MAIN |
Satellite antenna socket. |
SATELLITE SUB |
Antenna socket for the sec- |
|
ond satellite signal (DVB-S). |
ANT IN |
Antenna socket. |
U |
Headphone connection |
|
(3.5 mm jack); |
|
external audio output (with |
|
headphone-RCA con- |
|
verter). |
CI1 |
Common interface slot. |
CI2 |
Common interface slot. |
USB1 |
USB Harddisk socket for |
|
external data medium and |
|
PVR function; |
|
connection for wireless |
|
keyboard, mouse. |
USB2 |
USB socket for external |
|
data medium and PVR func- |
|
tion; |
|
connection for wireless |
|
keyboard, mouse. |
HDMI1 (MHL) HDMI socket, audio/video
|
signal input (HDMI). |
HDMI2 |
HDMI socket, audio/video |
|
signal input (HDMI). |
14 ENGLISH

OVERVIEW--------------------------------------------------------------------------------------------------------------
Control buttonsontheTV
O/I Power switch, switches the television into standby mode and off.
Note:
7There shall not be any obstacle around Power switch and shall remain readiliy operable.
Multi-functionswitch
SwitchingontheTV
1 Press or rock the multi-function switch.
FernsehgerätinBereitschaftschalten
1 Turning the TV to standby.
2 Rock until “Switch to standby” is selected. 3 Press.
Adjustingthevolumeorchangingthe station
1 Press the multi-function switch.
2 Rock to select the required function. 3 Press.
4 Rocking now performs the selected function.
ENGLISH 15
OVERVIEW---------------------------------------------------------------------------------------------------------------
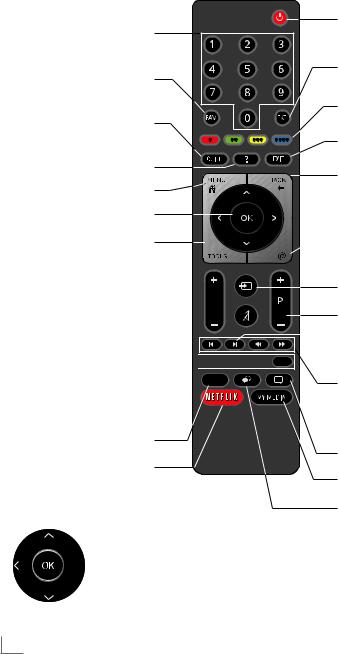
Remote control - main functions
Switches on from standby |
Turns on and off the television |
|
set (stand-by). |
||
mode; |
|
|
selects channels directly. |
Switches between teletext |
|
Selects the channel list |
||
and TV modes. |
||
(»ALL«, »FAV 1« to |
||
|
||
»FAV 4«). |
Functions according to |
|
Opens the electronic TV |
the screen help, HbbTV. |
|
guide. |
Exits menu and applications. |
|
|
||
Displays information. |
Zapping function; |
|
|
||
Opens the menu. |
switches the menus back one |
|
Opens the channel list. |
menu level. |
|
|
Opens the Tools menu.
Adjusts the volume. 


Turns volume on/off (mute). 

Record, playback, pause or 


 stop (only digital television

channels); teletext on half screen.
Opens 3D menu.
Opens Netflix applications
Cursor Control
 Opens MyApps menu.
Signal source
Switches on from standby; selects stations step by step
 PIP function on/off.
Next/previous image/ chapter, next/previous track.
Select subtitle
Opens Media Player menu.
Select audio channel
Moves the cursor up and down in the menus.
 Moves the cursor left/right in menus.
Opens channel list; activates various functions.
16 ENGLISH

OVERVIEW---------------------------------------------------------------------------------------------------------------
Remote control - all functions
(red) |
Selects a page in teletext mode; |
(green) |
selects/activates various functions |
(yellow) in menus.
(blue)
5Switches to double character size in teletext mode;
selects the previous track/previous picture in the Media Player.
6Updates a page in teletext mode; selects the next track/next picture in the Media Player.
3Page hold in teletext mode; starts the reverse picture search in the Media Player.
4Show answers in teletext mode; starts the forward picture search in the Media Player.
Starts recording (in digital TV operation, recording only via external data media).
8Starts playback in the external data media;
Starts playback in the DLNA menu.
!Time shift during live signal (in digital TV operation, only via external data media);
pauses the file executed on the external data media;
pauses the file executed on the DLNA menu.
7Selects the split screen function in teletext mode;
ends playback in the file browser; ends recording or playback in the PVR mode;
stops the file executed on the DLNA menu.
Selects different audio language (in digital TV operation).
Selects different subtitles (in digital TV operation).
Note:
7Your TV supports remote control feature for Apple iPhones, Windows mobile phones and Android phones.
Depending on the features of your TV, you may control your TV by your phone after downloading the free »GRUNDIG TV Remote« application from Apple App. Store or Google Play (Android Market).
ENGLISH 17

INITIAL SET-UP----------------------------------------------------------------------------------------------------
The television set is fitted with an “installation assistant”, which guides you step by step through the basic settings.
Using the screen dialogue, the user guide enables supposedly complex settings and data entries to be presented simply and clearly for everybody.
Pages and dialogue items appear on the screen, which identify the subsequent and likely operating steps.
To support this, you will also see the required button symbols of the remote control.
The basic settings in detail:
–language selection
–country selection;
–choice of user mode;
–location selection;
–accessories selection;
–network settings (if desired);
–Station settings (DVB-S, DVB-T, DVB-C and analogue channels).
The detailed settings can be found on pages 20 and 23.
Settings for connecting to the home network
Depending on the connection to the home network, you connect your television to the home network:
–via a LAN connection or
–without cable via WLAN
There are two options with the LAN-connection:
Automatic connection
all data regarding connection settings (»IP Address«, »Netmask«, »Gateway« and »DNS«) are obtained from modem automatically.
Manual connection
all data regarding connection settings (»IP Address«, »Netmask«, »Gateway« and »DNS«) must be configured manually.
There are various options when using WLAN:
Automatic connection
all data regarding connection settings (»IP Address«, »Netmask«, »Gateway« and »DNS«) are obtained from modem automatically.
Depending on the router, you can use the following options:
–Option “WPS-PBC” (Push Button Configuration);
–Connecting with a WPS PIN;
–Connecting by entering the network password.
Manual connection
all data regarding connection settings (»IP Address«, »Netmask«, »Gateway« and »DNS«) must be configured manually.
Tuning channels
Depending on the type of antenna connected, you can decide which channels you would like the television to search for.
DVB-S – Tunes digital channels from the satellite, from page 22.
You have two options for this search:
–the basic installation which presets a standard selection, e.g. the satellite Astra 19.2° East; you need only start the search;
–the professional installation, which allows you to make all required settings and set parameters for your receiver system.
DVB-C – For setting up digital cable channels see page 22.
DVB-T – For setting up digital terrestrial channels see page 23.
Searching for Analog television channels,
see "Setting further channels" section on page 109 .
Note:
7See “Setting further channels”" section starting from page 99 for more information
on digital television channel settings.
18 ENGLISH

INITIAL SET-UP----------------------------------------------------------------------------------------------------
Initial set-up – overview
Select language (page 20, step 3)
Select country (page 20, step 5)
Select mode (page 20, step 6)
Select location and accessories (page 20, step 7 - 10)
Network setup (page 21, step 12)
Wired |
|
|
|
|
Wireless |
|
|
|
|
Wireless WPS |
|||||||
(page 21, step 12) |
|
(page 21, step 17) |
|
(chapter page 94) |
|||||||||||||
|
|
|
|
|
|
|
|
|
|
|
|
|
|
|
|
|
|
|
|
|
|
|
|
|
|
|
|
|
|
|
|
|
|
|
|
Auto |
|
Manually |
|
Auto |
|
Manually |
|
Button |
|
PIN |
|||||||
(page 21, |
|
(chapter |
|
(page 21, |
|
(Chapter |
|
(Chapter |
|
(Chapter |
|||||||
step 12) |
|
page 92) |
|
step 17) |
|
page 96) |
|
page 94) |
|
page 94) |
|||||||
|
|
|
|
|
|
|
|
|
|
|
|
|
|
|
|
|
|
|
|
|
|
|
|
|
|
|
|
|
|
|
|
|
|
|
|
|
|
|
|
|
|
|
|
|
|
|
|
|
|
|
|
|
|
Setting TV channels (page 22, step 26)
|
DVB-T |
|
|
|
|
DVB-C |
|
|
|
|
DVB-S |
|
|
|
||||
|
(page 23, step 35) |
|
(page 22, step 30) |
|
(page 22, step 26) |
|||||||||||||
|
|
|
|
|
|
|
|
|
|
|
|
|
|
|
|
|
|
|
|
|
|
|
|
|
|
|
|
|
|
|
|
|
|
|
|
|
|
|
Auto |
|
Manually |
|
Auto |
|
Manually |
|
Auto |
|
Manually |
|||||||
|
(page 22, |
|
(chapter |
|
(page 22, |
|
(chapter |
|
(page 22 |
|
(chapter |
|||||||
|
step 35) |
|
page 108) |
|
step 30) |
|
page 107) |
|
step 26) |
|
page 100) |
|||||||
|
|
|
|
|
|
|
|
|
|
|
|
|
|
|
|
|
|
|
|
|
|
|
|
|
|
|
|
|
|
|
|
|
|
|
|
|
|
|
|
|
|
|
|
|
|
|
|
|
|
|
|
|
|
|
|
|
Channel Editor (page 24)
ENGLISH 19

INITIAL SET-UP----------------------------------------------------------------------------------------------------
Arrange Initial set-up
1Switch the television set to standby with the power switch »O/I«.
2Switch on the television set from standby with »8«, »1…0«, »P+« or »P–«.
–Menu Language menu appears when the device is switched on for the first time.
Smart Inter@ctive 4.0
Please select your desired language
Menu Language
Česky |
Dansk |
Deutsch |
English |
Espanol |
Eλληvıκά |
Français |
|
|
|
|
|
|
|
Hrvatski |
Italiano |
Magyar |
Nederlands |
Norsk |
Polski |
Português |
|
|
|
|
|
|
|
Pyccкий |
Româneşte |
Slovenščina |
Eesti |
Suomi |
Svenska |
Бългaрски |
|
|
|
|
|
|
|
Slovenčina |
Lietuviu |
Türkçe |
|
|
|
|
|
|
|
|
|
|
|
Navigation Between Items |
Select |
Help: |
|
7If the »Menu Language« menu does not appear on the screen, make the setting by following the instructions on returning the television to its factory settings on page 79.
3Select the menu language with »<«, »>«, »V« or »Λ« and press »OK« to confirm.
– »Welcome« menu appears.
4Step-by-step installation will be made to be able to use the television. Press »OK« to start the installation.
5Select the country in which the television set is operated with »<«, »>«, »V« or »Λ« and press »OK« to confirm.
–»User Mode« menu appears, the option »Home Mode« is selected.
6Confirm the option »Home Mode« with »OK«;
or
select the option »Enhanced« with »V« or »Λ« and press »OK« to confirm.
–»Home Mode« contains preconfigured TV settings that provide energy savings conforming EUP.
–»Enhanced« – if you will use the television for a demo presentation, increased image and volume settings are used in this mode. Increased mode consumes more energy.
7Select the required option »Stand« or »Wallmounted« with »V« or »Λ«.
Note:
7The information how to place the television set is important for the automatic audio settings.
8Confirm setting with »OK«.
– The »Summary« menu will be displayed.
9Select the next operating step with »« (blue).
–The »Accessories« menu will be displayed.
10If an accessory is used for the television and it has already been connected, carry out the required settings in this menu.
Select accessory with »V« or »Λ« and select setting with »<« or »>«.
11Select the next operating step with »« (blue).
Note:
7 If you want to connect your television to the home network,
–continue at point 12 for an automatic LAN connection, or
–continue at point 17 for an automatic WLAN connection.
Note:
7If connecting to a home network is not nec-
essary, skip the setting using »« (blue). Continue settings at point. 26, 30 or 35.
20 ENGLISH
INITIAL SET-UP----------------------------------------------------------------------------------------------------
Connecting to a home network with a LAN cable
12Confirm »Change Connection Type« with »OK«.
13Select the option »Wired« with »V« or »Λ« and press »OK« to confirm.
Note:
7The settings for a manual LAN connection are on page 92.
14Press »« (red) to select »Connect« option to establish modem connection.
–»Connecting ... Please wait« message will be displayed, and if the connection is established »Connection To Gateway: Success« messages will be displayed.
15Press »« (green) to check the performed settings and also if the local network and internet connection has been established.
–»Testing ... Please wait« message will be displayed, and if the connection is established »Connection To Gateway:
Success«, »Internet Connection: Success« messages will be displayed.
16To switch to »Source« menu press »« (blue).
Note:
7Continue searching for TV channels with:
–point 26 for DVB-S reception;
–point 30 for DVB-C reception;
–point 35 for DVB-T reception.
Connecting automatically by entering the network password
17Confirm »Change Connection Type« with »OK«.
18Select the option »Wireless« with »V« or »Λ« and press »OK« to confirm.
19Confirm the message »Do you want to turn on Wi-Fi?« select »Yes« with »<« or »>« and press »OK« to confirm.
20Select the line »Select Access Point« with »V« or »Λ« and press »OK« to confirm.
–»Select Access Point« menu appears and available wireless networks are scanned and displayed in the menu.
21Select the network that you want to connect with »V« or »Λ« and press »OK« to confirm.
–Wireless connection password screen is displayed.
22Select the required character with »V«, »Λ«, »<« or »>« and move to the next character with »OK«.
–Using »Shift« »OK«, you can switch between uppercase letters / numbers and lowercase letters / special characters.
–Select »Del« to delete the character entered and press »OK« to confirm.
23Confirm the password with »« (green).
–»Connecting ... Please wait« message will be displayed, and if the connection is established »Connection To Gateway: Success« messages will be displayed.
24Press »« (green) to check the performed settings and also if the local network and internet connection has been established.
–»Testing ... Please wait« message will be displayed, and if the connection is established »Connection To Gateway:
Success«, »Internet Connection: Success« messages will be displayed.
25To switch to »Source Setup« menu press »« (blue).
Note:
7Continue searching for TV channels with:
–point 26 for DVB-S reception;
–point 30 for DVB-C reception;
–point 35 for DVB-T reception.
ENGLISH 21

INITIAL SET-UP----------------------------------------------------------------------------------------------------
Searching television channels with satellite signal (DVB-S)
26Select the option »Satellite (DVB-S/S2)« with »V« or »Λ« and press »OK« to confirm.
– The satellite Astra 19.2° East is preset.
27Confirm the push button »Continue« with »« (blue).
Notes:
7If a second digital satellite signal is connected to SATELLITE SUB input then »Satellite Input« option should be selected as »Dual«.
7 Select the Channel Type.
Press »V« or »Λ« to select whether you want to search for only digital channels (Digital) or only radio channels (Radio) or both (Digital + Radio) and press »OK« to select and mark or unmark the »Digital« and/or »Radio« items.
7 Select Scan Mode.
To select whether you want to search for only free digital television channels (Free), only scrambled digital television channels (Scrambled) or both (Free + Scrambled), press »V« or »Λ« and press »OK« to select and mark or unmark the »Free« and/ or »Scrambled« items.
28Press »« (red) to start searching.
–»Digital Searching« menu appears and the scan for TV channels begins.
–The scan is complete as soon as the message »Search is completed!« appears.
29Select the »Channel Editor« with »OK«.
Tuning cable digital television channels (DVB-C)
Note:
7No additional setting is necessary for the “second tuner”.
30Select the option »Cable (DVB-C)« with »V« or »Λ« and press »OK« to confirm.
31Select the line »Scan Type« with »V« or
»Λ«.
Select the option »Quick« or »Full« with »<« or »>«.
–»Quick« scanning function sets the channels according to the cable operator information in the broadcasting signal.
–»Full« scan function scans the entire frequency range selected. With this search option, search can take a long time. This search type is recommended. Some cable providers do not support »Quick« scan.
Note:
7You can speed up the search. To do this, frequency and network ID information are required. You may get this data from your cable operator or find it in the Internet forums.
32Confirm the push button »Continue« with »« (blue).
Note:
7Perform Channel Type selection. Press »V« or »Λ« to select whether you want to search for only digital channels (Digital), only Analog channels (Analog) or both (Digital + Analog) and press »OK« to select and mark or unmark the »Digital« and »Analog« items.
33Press »« (red) to start searching.
–The »Digital or Analog Searching« menu appears, and the search for TV channels begins.
–The scan is complete as soon as the »Search is completed!« appears.
34Select the »Channel Editor« with »OK«.
22 ENGLISH

INITIAL SET-UP----------------------------------------------------------------------------------------------------
Tuning terrestrial digital television channels (DVB-T)
Note:
7No additional setting is necessary for the “second tuner”.
35Select the option »Air (DVB-T/T2)« with »V« or »Λ« and press »OK« to confirm.
Important:
7The antenna power supply (5V  ) may only be switched on if the antenna is an active indoor antenna with a signal amplifier and it is not already supplied with a voltage via a mains plug (or similar supply). Otherwise you may cause a short circuit and irreparably damage your antenna.
36Select the line »Active Antenna Power« with »V« or »Λ«.
Switch on the antenna power supply for the antenna with »<« or »>« (»On«).
37Select the line »Next Page« with »V« or »Λ« and press »OK« to confirm.
Note:
7Perform Channel Type selection. Press »V« or »Λ« to select whether you want to search for only digital channels (Digital), only Analog channels (Analog) or both (Digital + Analog) and press »OK« to select and mark or unmark the »Digital« and »Analog« items.
38Press »« (red) to start searching.
–The »Digital or Analog Searching« menu appears, and the search for TV channels begins.
–The scan is complete as soon as the »Search is completed!« appears.
39Select the »Channel Editor« with »OK«.
ENGLISH 23
INITIALSET-UP---------------------------------------------------------------------------------------------------
ChangingtheChannelEditorfor thedigitalchannels
Channels found at the end of the search are stored in the »Channel Editor«.
You can delete channels which are not required from the programe table, you can change the order of channels within the programe table and lock individual channels (Parental control).
You can also add channels to the favourites list; in addition, you can change the order of channels within the favourites list.
In Channel Editor, press »P+« to switch the channel list to the next page, press »P–« to switch it back to the previous page.
To perform searching in the Channel Editor menu by Channel names, press »« (red).
To display the channels in the Channel Editor menu by Antenna Type, press »« (green), »V« or »Λ« and »OK«.
To use filters and tools in the Channel Editor menu, press »« (yellow).
Opening theProgrammeTable
1 Open the menu with »MENU«.
2 Select the »Settings« menu with »V«, »Λ«, »<« or »>« and press »OK« to confirm.
3 Select the option »Source« with »>« or »<« and press »V« to confirm.
4 Select the line »Channel Editor« with »V« and press »OK« to confirm.
– »Channel Editor« menu is displayed.
Important:
7Programme table and favourite lists are stored separately for all sources (satellite, cable and air).
7Programme table of the current source will be displayed when you select programme table.
Notes:
7A Cl module and smart card is required to watch the channel if there is a » « sign next to the channel name in Programme Table.
7As the recorded data channels are not displayed in the channel list, number of channels displayed in the Channel list may be less than 6000
1 Das Erste |
|
|
|
Tuesday |
|
|
|
|
xx xxx xxxx |
|
|
Channel Editor |
|
|
|
Satellite |
All |
1 Das Erste |
2 ZDF |
|
3 SAT1 |
4 N24 |
5 SAT3 |
DTV |
DTV |
|
DTV |
DTV |
DTV |
6 24 |
7 HD Sports |
|
8 HD Test |
8 SAT |
10 RTL |
DTV |
DTV |
|
DTV |
DTV |
DTV |
11 HD1 |
12 Life |
|
13 Film |
12 Promo |
15 Sport1 |
DTV |
DTV |
|
DTV |
DTV |
DTV |
16 TV Sport |
17 SAT8 |
|
18 SKY |
19 TV6 |
20 TV5 |
DTV |
DTV |
|
DTV |
DTV |
DTV |
Search for Channels |
Antenna Type |
Tools |
Tune Channel |
Select |
|
24 ENGLISH

INITIAL SET-UP----------------------------------------------------------------------------------------------------
Searching channels by name in the Channel Editor
While arranging the channels in the Channel Editor, you can search and select the channel name by the first three characters.
1In the »Channel Editor« menu, select the search mode by pressing »« (red).
2Select the first character of the channel
name you want to search with »V«, »Λ«, »<« or »>« and press »OK« to confirm. Repeat the entry for the next characters.
–Channels found will be listed on the right side of the screen.
3With »>« switch to result section, select the channel you are searching with »V« or »Λ«, and highlight this with »OK«.
Note:
7To change the place of, delete or add the channels to favorites lists, continue reading the relevant section.
4To return to the previous menu, press »BACK <«.
5To exit the »Channel Editor« menu, press »EXIT«.
Deleting channels in the Channel Editor
1In the »Channel Editor« menu, select the
channel(s) you want to delete with »V«, »Λ«, »<« or »>«, and highlight the channel by pressing »OK«.
– Channel is marked with » «.
2Press »« (yellow).
– »Tools« menu is displayed.
3Select the line »Delete« with »V « or »Λ« and press »OK« to confirm.
4To confirm deletion process, select the option »OK« with »<« or »>«;
or
to cancel deletion process, select the option »No« with »<« or »>« and press »OK« to confirm.
5To exit the »Channel Editor« menu, press »EXIT«.
Moving the channels in the channel organizer to different channel positions
1In the »Channel Editor« menu, select the
channel(s) you want to move with »V«, »Λ«, »<« or »>«, and highlight the television channel by pressing »OK«.
– Channel is marked with » «.
2Press »« (yellow).
– »Tools« menu is displayed.
3Select the line »Move« with »V« or »Λ« and press »OK« to confirm.
Notes:
7In case of changing the order of the channels, channel numbers sent by the broadcaster will be changed.
7If more than one channel is selected for moving, channels will be moved one after the other according to the selection order of channels.
4Select the new place of the channel with »V«, »Λ«, »<« or »>« and press »OK« to confirm.
5To exit the »Channel Editor« menu, press »EXIT«.
Displaying channels in the Channel Editor by antenna type
If you have more than one antenna type, you can display channels in the Channel Editor by antenna type.
1To display the channels in the »Channel
Editor« menu by antenna type, press »« (green).
2Select »Air«, »Cable« or »Satellite« with »V« or »Λ« and press »OK«.
–Television will switch to the antenna system you have selected and channels will be displayed.
3To exit the »Channel Editor« menu, press »EXIT«.
ENGLISH 25

INITIAL SET-UP----------------------------------------------------------------------------------------------------
Sequencing channels in the Channel Editor
You can sequence the channels in the Channel Editor according to different criteria such as TV, radio or scrambled / unscrambled.
1To sequence the channels according to different criteria in the »Channel Editor« menu, press »« (yellow).
2Select the sequencing criteria you want with »V« or »Λ« and press »OK« to confirm.
–Channels will be displayed in the »Channel Editor« menu by the criteria you have selected.
3To exit the »Channel Editor« menu, press »EXIT«.
Creating a list of favourites
You can select your favourite channels and save them in up to four lists (FAV1 to FAV4).
Note:
7Favourite lists must be created separately for all sources (satellite, cable and air).
7After created the favourite list, press »FAV« to select the favorite list.
1 In the »Channel Editor« menu, select the
channel(s) you want to add in the favorites list with »V«, »Λ«, »<« or »>«, and highlight the television channel by pressing »OK«.
– Channel is marked with » «.
2Press »« (yellow).
– »Tools« menu is displayed.
3Select the line »Add to Fav.« with »V « or »Λ« and press »OK« to confirm.
–»Add to Fav.« menu is displayed.
4Select the favorite list you want to add the selected channels with »V « or »Λ« and store with »OK«.
–The channels are marked in the Channel Editor with » «, » «, » « or » «.
–You can add the same channel in more than one favourites list.
–Each favourite list can contain maximum 255 channels.
Notes:
7You can delete channels from the favourites list.
Press »« (yellow), select the favorites list the channel is in with »V« or »Λ« and press »OK« to confirm.
Select the channel(s) you want to delete with »V«, »Λ«, »<« or »>«, and highlight the channel by pressing »OK«.
Press »« (yellow) and select the line »Remove from Fav.« with »V«, »Λ« and confirm with »OK«.
7When a channel stored in the favourite channel list is deleted channel order in the favourite list is updated.
5To exit the »Channel Editor« menu, press »EXIT«.
Sorting channels in the favorites list
You can change the channel sorting in the favorites list.
1To select favorites list in the »Channel Editor« press »« (yellow).
2Select the favorites list you want to sort with »V« or »Λ« and press »OK« to confirm.
3Select the channel(s) you want to move with »V«, »Λ«, »<« or »>«, and highlight the television channel by pressing »OK«.
– Channel is marked with » «.
4Press »« (yellow).
– »Tools« menu is displayed.
5Select the line »Move« with »V« or »Λ« and press »OK« to confirm.
Note:
7If more than one channel is selected for moving, channels will be moved one after the other according to the selection order of channels.
6Select the new place of the channel with »V«, »Λ«, »<« or »>« and press »OK« to confirm.
7To exit the »Channel Editor« menu, press »EXIT«.
26 ENGLISH

INITIAL SET-UP----------------------------------------------------------------------------------------------------
Enter own names for the favourites lists (max. 6 characters)
You can rename all favorites lists.
1To recall favorites list menu when no menu is opened on the screen, press »FAV«.
2Select the favorites list you want to rename
with »V« or »Λ« and press »« (blue) button.
– Virtual keyboard will be displayed.
3To delete the current name step by step, press »« (red).
4Select the required character/number with »V«, »Λ«, »<« or »>« and move to the next character with »OK«.
Repeat the same process for all characters/ numbers.
Note:
7Using »Shift« »OK«, you can switch between uppercase letters / numbers and lowercase letters / special characters.
5 To save the new name with »« (green). 6 Press »EXIT« to end the setting.
Renaming AV channels
You can rename AV channels according to the device you have connected. For example, for a PC which you have connected to HDMI1 source of TV with HDMI cable, you can name the source as PC.
1 Open »Input Source« menu with » «.
«.
2Select the AV source you will rename with »<« or »>« and press »« (blue).
– Rename menu is displayed.
3Press »OK« and delete the “old” name step by step with »« (red).
4Select the required character/number with »V«, »Λ«, »<« or »>« and move to the next character with »OK«.
Repeat the same process for all characters/ numbers.
Note:
7Using »Shift« »OK«, you can switch between uppercase letters / numbers and lowercase letters / special characters.
5 To save the new name with »« (green).
6Select the icon appropriate for the device type with »<« or »>« and press »OK« to confirm
7To save the setting, press »« (blue).
– Source name and icon will change.
8 Press »EXIT« to end the setting.
ENGLISH 27

PICTURE /SOUND SETTINGS-----------------------------------------------------------
Picture settings
1 Open the menu with »MENU«.
2Select menu item »Settings« with »V«, »Λ«, »<« or »>« and press »OK« to confirm.
3Select menu item »Picture« with »<« or »>« and press »V« to confirm.
– »Picture Settings« menu is active.
Settings > Picture |
|
|
|
|
|
Tuesday |
|
|
|
||
|
|
|
|
|
|
|
xx xxx xxxx |
|
|
|
|
|
Picture |
Sound |
Source |
TV |
Network |
Timer |
Parental |
|
|
|
|
|
|
|
|
|
|
|
|
|
|
|
|
|
3D Settings |
|
|
|
|
|
|
> |
|
|
|
|
|
|
|
|
|
|
|
|
|
|
|
|
Picture Format |
|
|
|
|
|
16:9 |
|
|
|
|
|
|
|
|
|
|
|
|
|
|
|
|
|
Picture Mode |
|
|
|
|
Natural |
|
|
|
||
|
|
|
|
|
|
|
|
|
|
|
|
|
Backlight |
|
|
|
|
|
|
Ec0 |
|
|
|
|
Advanced |
|
|
|
|
|
|
|
|
|
|
|
|
|
|
|
|
|
|
|
|
||
|
Restore default display settings |
|
|
|
|
|
|
|
|
||
|
|
|
|
|
|
|
|
|
|
|
|
|
|
|
|
|
|
|
|
|
|
|
|
Change Area |
Select |
|
|
|
|
BACK |
Back |
|
EXIT |
Exit |
|
4Select the required line »Picture Format«, »Picture Mode« or »Backlight« with »V« or
»Λ« and press »OK« to confirm. Select the option with »<« or »>«. Press »BACK <« to return to »Picture« menu.
Note:
7Other settings are available under »Advanced«.
5Select the line »Advanced« with »V« or »Λ« and press »OK« to confirm.
6Select the required line/function with »V«
or »Λ« and press »OK« to confirm. Select the value/option with »<« or »>« and press »OK« to confirm.
Press »BACK <« to return to »Picture« menu.
7 Press »EXIT« to end the setting.
Advanced picture settings
The “advanced picture settings” are in principal digital image improvements which, however, should be only used when necessary when picture quality and transmission is excellent. They may well improve the display with poor material, but may adversely affect the display where transmission and picture quality are excellent.
7»Backlight« – Manual setting for back lighting (only active if dynamic back lighting is switched to “OFF”). This setting also directly impacts power consumption.
»Dynamic Backlight« – Here the device optimally adjusts the back lighting for the picture content by regulating the back lighting depending on the average picture brightness. If a picture has predominately dark areas, then the black level displayed is improved by downward adjustment of the back lighting (in this case the display of the dark areas is improved), and with predominantly bright picture material the back lighting is maximised in order to display these areas more brightly.
7»Vibrant Colour« – Increases the colour contrast and the contrast adjustment. This setting is mostly too strong for use with normal pictures and should only be used where necessary (low or off) otherwise nuances in the image can be suppressed.
7»Gamma« – This setting establishes which brightness value should be displayed for which digital transmission value. Most recordings are transmitted with a gamma value of 2.2 (all Windows PCs and newer PCs with a MAC operating system work with this, older MAC systems and transmissions without colour profile mostly operate with a gamma value of 1.8).
7»Dynamic Contrast« – The function dynamically and optimally adjusts the contrast for the respective picture content by analysing images and then altering this depending in a change in contrast. This increase the contract, however may also reduce the visible brightness levels in the picture.
28 ENGLISH

PICTURE /SOUND SETTINGS-----------------------------------------------------------
7»Perfect Clear« – Improves the general image by means of a gentle blue hue (giving the appearance of greater sharpness) and improves the black level by setting this entirely to black from specific shade of back. This reduces the visible grey values in the dark areas of the picture.
7»Film mode« detects and processes feature films automatically for all channel sources. This means you will always receive an optimal picture.
This functions in the modi 480i, 576i and 1080i in TV playback and for other channel sources.
If the »Film mode« is switched on for programmes without a feature film signal, minor problems such as picture freeze, defective subtitles or fine lines in the picture could occur.
7»MEMC« – Improves the display of moving images through the additional computation of intermediate pictures and is only available for devices from 32”. It is displayed with a PPR of 400 (Picture Perfection Rate). If the adjustment value is too high, this may result in ghosting with poor transmission due to the incorrect computation of the intermediate pictures.
7»Nois Reduction« – Reduces the visible snow by displaying the picture a little less sharply and creating a slight blurring. Should therefore be used minimally with good picture material.
7»Block Noise Reduction« – This function can only be selected with digital reception sources and AV presets. It reduces any interference from artefacts (pixel blocks) from digital programmes due to MPEG compression (such as from DVB-T receivers and lower transmission rates or DVD players).
Restore default settings
1In the menu »Picture« select the line »Restore default display settings« with »V« or »Λ« and press »OK« to confirm.
2Select push button »Yes« with »<« or »>« to confirm the security query;
or
select push button »No« with »<« or »>« to to cancel the function.
3 Press »EXIT« to end the setting.
Concluding the settings
1 Press »EXIT« to end the setting.
ENGLISH 29

PICTURE /SOUND SETTINGS-----------------------------------------------------------
Sound settings
1 Open the menu with »MENU«.
2Select menu item »Settings« with »V«, »Λ«, »<« or »>« and press »OK« to confirm.
3Select menu item »Sound« with »<« or »>« and press »V« to confirm.
– »Sound« menu is active.
Settings > Sound |
|
|
|
|
|
Tuesday |
|
|
|
||
|
|
|
|
|
|
|
xx xxx xxxx |
|
|
|
|
|
Picture |
Sound |
Source |
TV |
Network |
Timer |
Parental |
|
|
|
|
|
|
|
|
|
|
|
|
|
|
|
|
|
Sound Mode |
|
|
|
|
|
|
User |
|
|
|
|
|
|
|
|
|
|
|
|
|
|
|
|
Night Mode |
|
|
|
|
|
|
Off |
|
|
|
|
|
|
|
|
|
|
|
|
|
|
|
|
Bluetooth |
|
|
|
|
|
|
Off |
|
|
|
|
|
|
|
|
|
|
|
|
|
|
|
|
Select Bluetooth Device |
|
|
|
|
|
- - - - |
|
|
|
|
|
Advanced |
|
|
|
|
|
|
|
|
|
|
|
|
|
|
|
|
|
|
|
|
||
|
Restore Default Sound Settings |
|
|
|
|
|
|
|
|
||
|
|
|
|
|
|
|
|
|
|
|
|
|
|
|
|
|
|
|
|
|
|
|
|
Change Area |
|
|
|
|
|
BACK |
Back |
|
EXIT |
Exit |
|
Note:
7Additional operations are explained in the following sections.
Sound Mode
1Select the line »Sound Mode« with »V« or »Λ«.
2 Presstion. »<« or »>« to select the desired op-
DTS Studio Sound™
DTS Studio Sound is an advanced surround sound solution suite that accurately extracts and places audio cues for an immersive surround experience over the TVs built-in speakers. To complete the audio experience, post processing and psychoacoustic techniques are implemented to provide 3D audio rendering to match 3D video content, for bass and dialog enhancement and to deliver consistent and level volume across content.
DTS Studio Sound Technology is supported in Film, Natural, Speech and Music settings.
1Select the line »Sound Mode« with »V« or »Λ«.
2Select the option »Movie«, »Natural«, »Speech« or »Music« with »<« or »>«.
Night Mode
Night Mode prevents sound fluctuations and volume increases.
1Select the line »Advanced« from the Sound menu with »V« or »Λ« and press »OK« to confirm.
2Select the line »Night Mode« with »V« or »Λ«.
3Activate (»On«) or deactivate the night mode by pressing »<« or »>«.
Notes:
7»Night Mode« appears in menu if »DTS« has been selected in »Sound Mode«.
7Other settings are available under »Advanced«. Select the line »Advanced« with »V« or »Λ« and press »OK« to confirm.
Switching bluetooth on / off and registering an external BT device
Bluetooth enables the television‘s audio signal wireless to be sent to a registered BT device (e.g. subwoofer).
The signal transmission is possible from the television set to a Bluetooth-enabled device, only.
1Switch on the appropriate subwoofer and start the registration on the subwoofer (see subwoofer operating manual).
2Select the line »Bluetooth« with »V« or »Λ« and switch on with »<« or »>« (»On«).
–The subwoofer is being searched for. After a short time the subwoofer is displayed in the menu.
3When the subwoofer has been found confirm with »OK« .
–The name of the subwoofer is displayed in the »Sound« menu.
For DTS patents, see http://patents.dts.com. Manufactured under license from DTS Licensing Limited. DTS, the Symbol, & DTS and the Symbol together are registered trademarks and DTS Studio Sound is a trademark of DTS, Inc. © DTS, Inc. All Rights Reserved.
For DTS patents, see http://patents.dts.com. Manufactured under license from DTS Licensing Limited.
DTS, the Symbol, & DTS and the Symbol together are registered trademarks, and DTS 2.0+Digital Out is a
trademark of DTS, Inc. © DTS, Inc. All Rights Reserved.
30 ENGLISH
 Loading...