

Page 1
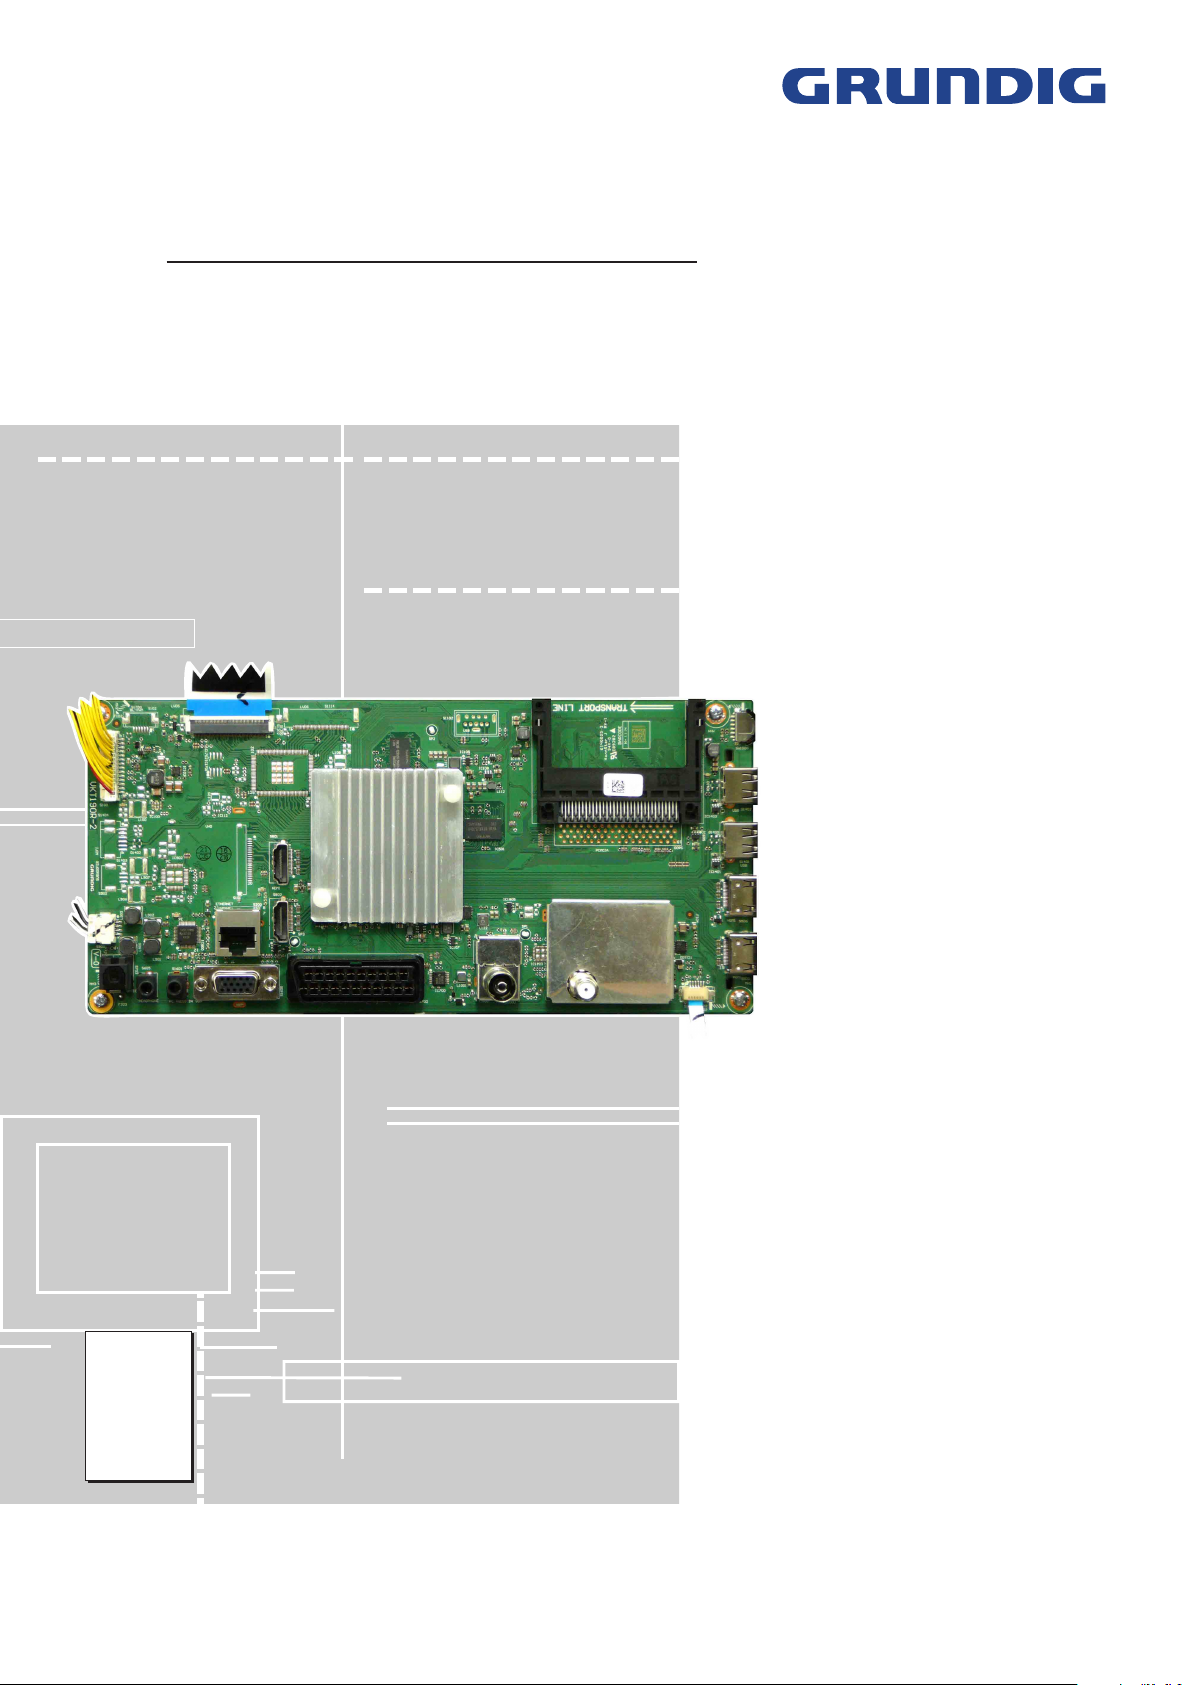
TV Service Manual
Chassis MK
42 VLE 8500 B0
49 VLE 8500 B0
55 VLE 8500 B0
PAM000
PAL000
PAK000
Zusätzlich erforderliche Unterlagen für den Komplettservice
Additionally required Service Documents for the Complete Service
Service
Manual
Sicherheit
Safety
Materialnr./Part No.
720108000001
Materialnummer / Part Number 720100569500
Änderungen vorbehalten / Subject to alteration
TCC 0616…0915 MP • Prepared in Germany
http://www.grundig.com
Page 2
GRUNDIG Service Chassis MK
Es gelten die Vorschriften und Sicherheitshinweise
gemäß dem Service Manual "Sicherheit", Materialnummer 720108000001, sowie zusätzlich die eventuell abweichenden, landesspezifischen Vorschriften!
Inhaltsverzeichnis
Allgemeiner Teil
Allgemeine Hinweise .....................................................................1-2
Spezial-Funktionen
Geräte- und Display-Varianten
Servicehinweise
Technische Daten ..........................................................................1-5
Bedienhinweise
Service- und Sonderfunktionen
.................................. 1-2…1-26
........................................................................1-3
......................................................1-3
............................................................................1-4
.............................................................................1-7
...................................................1-25
Seite
Platinenabbildungen
und Schaltpläne
Chassisplatte VKT190R-6 .............................................................2-1
– Blockschaltplan ..........................................................................2-9
– Netzteil .....................................................................................2-10
– HDMI........................................................................................2-11
– SCART, SPDIF ........................................................................2-12
– VGA, YUV ................................................................................2-12
– USB .........................................................................................2-13
– Tuner / DVB-T2 ........................................................................2-13
– DVB-S ......................................................................................2-14
– Multi-Tuner ...............................................................................2-16
– PCMCIA-Interface ....................................................................2-17
– Scaler-SOC / LAN....................................................................2-18
– FLASH .....................................................................................2-20
– RAM .........................................................................................2-21
– FRC .........................................................................................2-22
– LVDS ........................................................................................2-23
– Keyboard..................................................................................2-23
– Verstärker ................................................................................. 2-24
Netzteil DPS-126BP A / DPS-136BP A
Docking-Platten
IR/LED-Platte...............................................................................2-30
.................................. 2-1…2-30
.......................................2-26
...........................................................................2-29
The regulations and safety instructions shall be valid
as provided by the "Safety" Service Manual, part
number 720108000001, as well as the respective
national deviations.
Table of Contents
General Section
General Notes ...............................................................................1-2
Special Functions
Product and Display Variants
Service Hints
Technical Data
Operating Hints
Service and Special Functions
.................................................................................1-4
...............................................................................1-5
.................................. 1-2…1-26
..........................................................................1-3
.........................................................1-3
............................................................................1-16
....................................................1-25
Page
Layout of the PCBs
and Circuit Diagrams
Chassis Board VKT190R-6 ...........................................................2-1
– Block Circuit Diagram ................................................................2-9
– Power Supply ...........................................................................2-10
– HDMI........................................................................................2-11
– SCART, SPDIF ........................................................................2-12
– VGA, YUV ................................................................................2-12
– USB .........................................................................................2-13
– Tuner / DVB-T2 ........................................................................2-13
– DVB-S ......................................................................................2-14
– Multi Tuner ...............................................................................2-16
– PCMCIA Interface .................................................................... 2-17
– Scaler SOC / LAN ....................................................................2-18
– FLASH .....................................................................................2-20
– RAM .........................................................................................2-21
– FRC .........................................................................................2-22
– LVDS ........................................................................................2-23
– Keyboard..................................................................................2-23
– Amplifier ...................................................................................2-24
Power Supply DPS-126BP A / DPS-136BP A
Docking Boards
IR/LED Boards.............................................................................2-30
...........................................................................2-29
......................... 2-1…2-30
.............................2-26
Ersatzteillisten ...................................... 3-1…3-3
Allgemeiner Teil
Allgemeine Hinweise
Vor dem Öffnen des Gehäuses den Netzstecker ziehen!
Achtung: ESD-Vorschriften beachten
Leitungsverlegung
Bevor Sie die Leitungen und insbesondere die Masseleitungen lösen,
ist die Leitungs ver legung zu den einzelnen Baugruppen zu beachten.
Nach erfolgter Reparatur ist es notwendig, die Leitungsführung wieder
in den werkseitigen Zustand zu versetzen um evtl. spätere Ausfälle
oder Störungen zu vermeiden.
Durchführen von Messungen
Bei Messungen mit dem Oszilloskop an Halb leitern sollten Sie nur
Tast köpfe mit 10:1 - Tei ler verwen den. Außerdem ist zu beachten, dass
nach vorheriger Messung mit AC-Kopp lung der Koppelkondensator
des Oszillo skops auf geladen sein kann. Durch die Ent ladung über das
Messobjekt können Bau teile beschä digt werden.
Messwerte und Oszillogramme
Bei den in den Schaltplänen und Oszillogrammen angegebenen
Messwerten handelt es sich um Näherungswerte!
Austausch der Chassisplatte
Nach Austausch der Chassisplatte müssen alle Einstellungen im
Service Mode nach Tabelle "Grundeinstellwerte" (Punkt 1 im Kapitel
"Service- und Sonderfunktionen" auf Seite 1-25) eingestellt werden.
Spare Parts Lists .................................. 3-1…3-3
General Section
General Notes
Before opening the cabinet disconnect the mains plug!
Attention: Observe the ESD safety regulations
Wiring
Before disconnecting any leads and especially the earth connecting
leads observe the way they are routed to the individual assemblies.
On completion of the repairs the leads must be laid out as originally
fitted at the factory to avoid later failures or disturbances.
Carrying out Measurements
When making measurements on semi-con duc tors with an oscillo scope,
ensure that the test probe is set to 10:1 dividing factor. If the previous
measurement was made on AC input, please note that the coupling
capacitor in the oscilloscope will be charged. Discharge via the item
being checked can damage the components.
Measured Values and Oscillograms
The measured values given in the circuit diagrams and oscillograms
are approximates!
Change of the Chassis Board
After changing the chassis board all settings in the service mode must
be done according to the table "Basic Settings" (point 1 in chapter
"Service and Special Functions" on page 1-25).
1 - 2
Page 3
GRUNDIG Service Chassis MK
Spezial-Funktionen
Kindersicherung
Mit der Master-Pin 2356 kann der persönliche Pin geändert werden.
Hotel-Mode
Bei aktiviertem Hotel-Mode ist die maximale Lautstärke begrenzt
und das Menü "
denspezifischen Einstellungen (z.B. Signalquelle, Sprache) werden
beim Einschalten des Gerätes auf die eingestellten Werte bei der
Aktivierung des Hotel-Modes zurückgesetzt.
Aufruf: MENU –> 8500 –> 4 "
Hotel
" –> 1 2 "Ein".
"
Hotel-Mode temporär ausschalten
Bei dieser Funktion ist der Hotel-Mode bis zum nächsten Ausschalten
(Standby) des Gerätes deaktiviert.
Aufruf: MENU –> 4658 –> MENU –> MENU –> OK –> 1 2 "
TV-EINSTELLUNGEN
In dem zusätzlich erscheinenden Menü
sind folgende Einstellungen möglich:
– Maximale Lautstärke
– Einschaltlautstärke
– Erstes Einschalten (Standby / Einschalten)
Cloning-Funktion
Mit dieser Funktion können folgende Daten auf den extern angeschlossenen USB-Speicher gesichert und zurück kopiert werden:
–
Channel Set.
–
Service Einstellungen
–
User Set.
–
Alle(s)
Für den Servicefall: sollte die defekte Chassis-
–
Meine Programmliste
• Daten auf USB-Stick kopieren:
Leeren USB-Speicher anschließen (Formatierung FAT32) –> MENU
–>
"Einstellungen" OK
–> 4658 –> "
Channel Set., Service Einstellungen., User Set, Alle(s)
grammliste
• Daten von USB-Stick in das Gerät zurück speichern:
USB-Stick anschließen –> MENU –>
stallation" OK –> 43 "
USB to TV
User Set, Alle(s)
Ende wird "
INSTALLATION
" –> OK
Programmtabellen und Einstellungen der Si-
Kundenspezifische Einstellungen.
–> starten mit –> am Ende wird "
–> "
gnalquellen - diese sind auch übertragbar auf
weitere Geräte gleicher Serie und Software.
Geräte-Einstellwerte der Service- und Sonder-
Funktionen ohne Display-Einstellwerte.
platte noch so weit funktionieren, können alle
Einstellwerte gespeichert werden um diese
dann in die neue Chassisplatte zu übertragen.
Programmtabellen sind mit dem
Editor
weitere Geräte, die
stützen.
–> 1 2 "Installation" OK –> 43 "
Kopieren
Copy Item
oder
Erfolgreich
" ist nicht mehr vorhanden. Alle kun-
System Configuration
HOTEL-TV-EINSTELLUNGEN
am PC editierbar und übertragbar auf
" –> 1 2
Programmtabelle
Meine Programmliste
" angezeigt.
TV to USB
" –> 1 2
Meine Programmliste
–> 4 "
"Einstellungen" OK
" –> 4658 –> "
Channel Set., Service Einstellungen
–> starten mit –> am
" –> OK –> 43
Programmlisten-
Programmtabelle
Copy Item
oder
Erfolgreich
" angezeigt.
–> 1 2 "In-
Kopieren
" –> 1 2
Meine Pro-
" –> 1 2
HOTEL-
unter-
Special Functions
Parental Control
The personal pin can be changed with master pin 2356.
Hotel Mode
Maximum volume is limited and Menu "
at activated hotel mode. After switch on the TV set, all user settings
(e.g. signal source, language) are set back to values by activation of
the Hotel Mode.
Call up: MENU –> 8500 –> 4 "
"
Hotel
" –> 1 2 "On".
Switching off the Hotel Mode temporarily
At this function the activated hotel mode is deactivated until the set
is switched off (standby).
Call up: MENU –> 4658 –> MENU –> MENU –> OK –> 1 2 "
TV SETTINGS
Following adjustment are available in the additionally menu
TV SETTINGS
– Maximum Volume
– Start-Up Volume
– First Power (Standby / Power On)
Cloning Function
It is possible to copy following data to an external USB stick and back
to TV set:
– Channel Set.
– Service Set.
– User Set.
– All
In case of service: If the defective chassis board
– My Channel List
• Copy data to USB stick:
Connect empty USB memory (format FAT32) –> MENU –>
OK
–> 1 2 "Source Setup" OK –> 43 "
"
Copy
"
,
Set., User Set, All
showing at the end.
• Copy data from USB stick into TV set:
Connect USB memory –> MENU –>
Setup" OK –> 43 "
–> 4 "
Channel List
"–> OK
:
Programme tables and settings of signal sourc-
TV adjustments of service and special functions
User settings.
" –> 1 2
Copy Item
–> start with –> "
es - they are transferable into further TV sets of
same version and software.
without panel values.
are still operate, it is possible to save all adjustments / settings and copy into new chassis
board.
Programme tables are editable with
List Editor
TV sets that support
TV to USB
–> 4 "
or
My Channel List
Channel Editor
" –> 1 2
Channel Set., Service Set., User Set, All
SOURCE SETUP
System Configuration
on the PC and transferable into further
Copy Item
" –> 4658 –> "
My Channel List
Channel Editor
" –> 1 2
–> start with –> "
"Settings" OK
Success
" is showing at the end.
" is no available
" –> OK –> 43
HOTEL
HOTEL
Programme
.
"Settings"
" –> 4658 –>
Channel Set., Service
Copy
Success
–> 1 2 "Source
" –> 1 2
USB to TV
or
" is
My
Geräte- und Display-Varianten
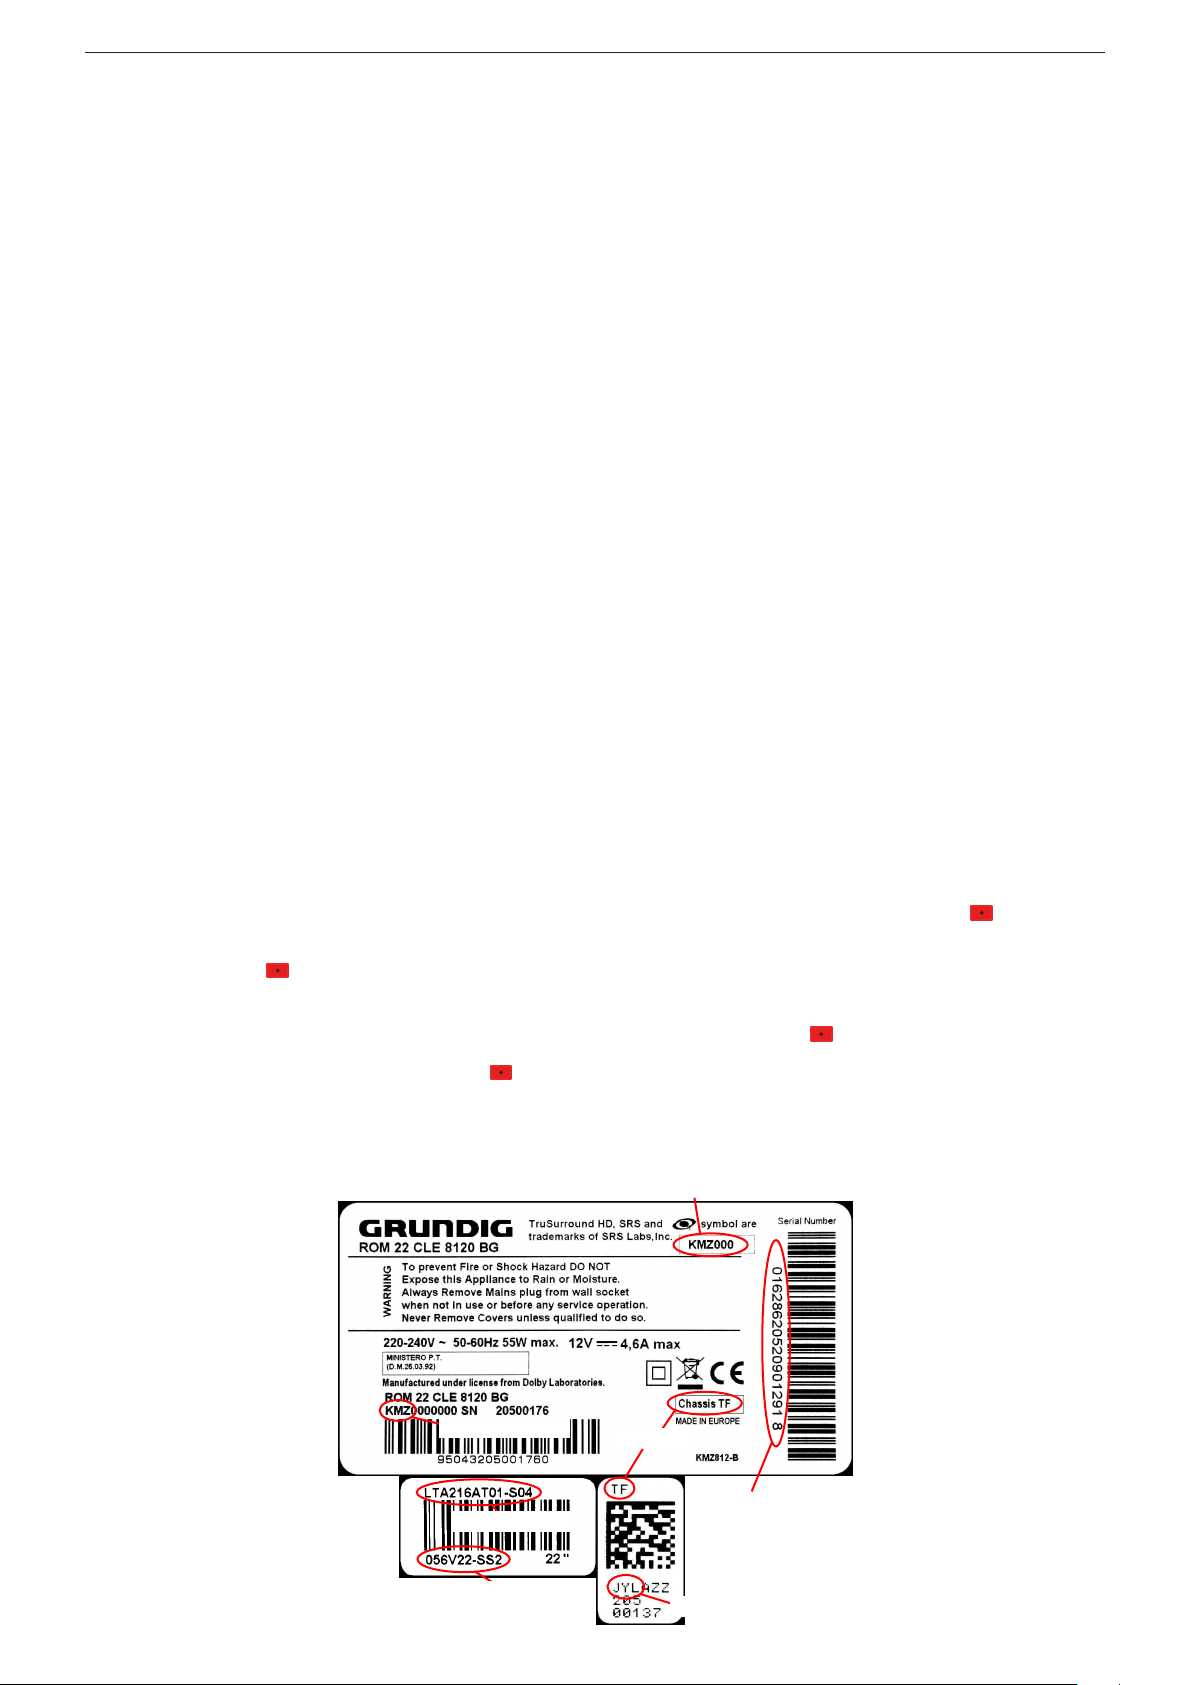
Display- und Product Code
Je nach Verfügbarkeit werden Displays verschiedener Hersteller eingebaut. Dies führt zu unterschiedlichen Chassis-Bestückungen, sowie zu Änderungen in der Software.
Bei Ersatzteilbestellungen und
Software-Updates achten Sie bitte
auf das eingebaute Display, sowie
auf den "Product Code". Angaben
dazu finden Sie auf der Geräterückseite. Sollte in der Ersatzteilliste
des Service Manuals Ihr "Product
Code" oder Ihre Display-Variante
nicht aufgeführt sein, können
Sie eine aktualisierte Version auf
dem GRUNDIG Service-Portal
"http://service.grundig.de" finden.
Überprüfen Sie vor PlatinenTausch, ob die Aufkleber der Platinen identisch sind (z.B. PCB Code).
Product Code
Display Type
Display Code
Product and Display Variants
Bestellnummer / Order Number
Chassis
Serialnummer /
Serial Number
PCB Code
1 - 3
Display- und Product Code
Depending on availability displays
of different manufacturer are built
in. This results in different chassis
mountings as well as a different
software. On spare parts orders as
well as software updates take care
of the fitted display as well as of the
"Product Code". Therefore you can
find information on the labels on the
rear side. If your "Product Code" or
display variant is not mentioned in
the spare parts list of the service
manual, please look for a current
version at the GRUNDIG service
portal "http://service.grundig.de".
Before changing any board please
check whether the labels on the
boards are identical (eg. PCB Code).
Page 4
GRUNDIG Service Chassis MK
Servicehinweise
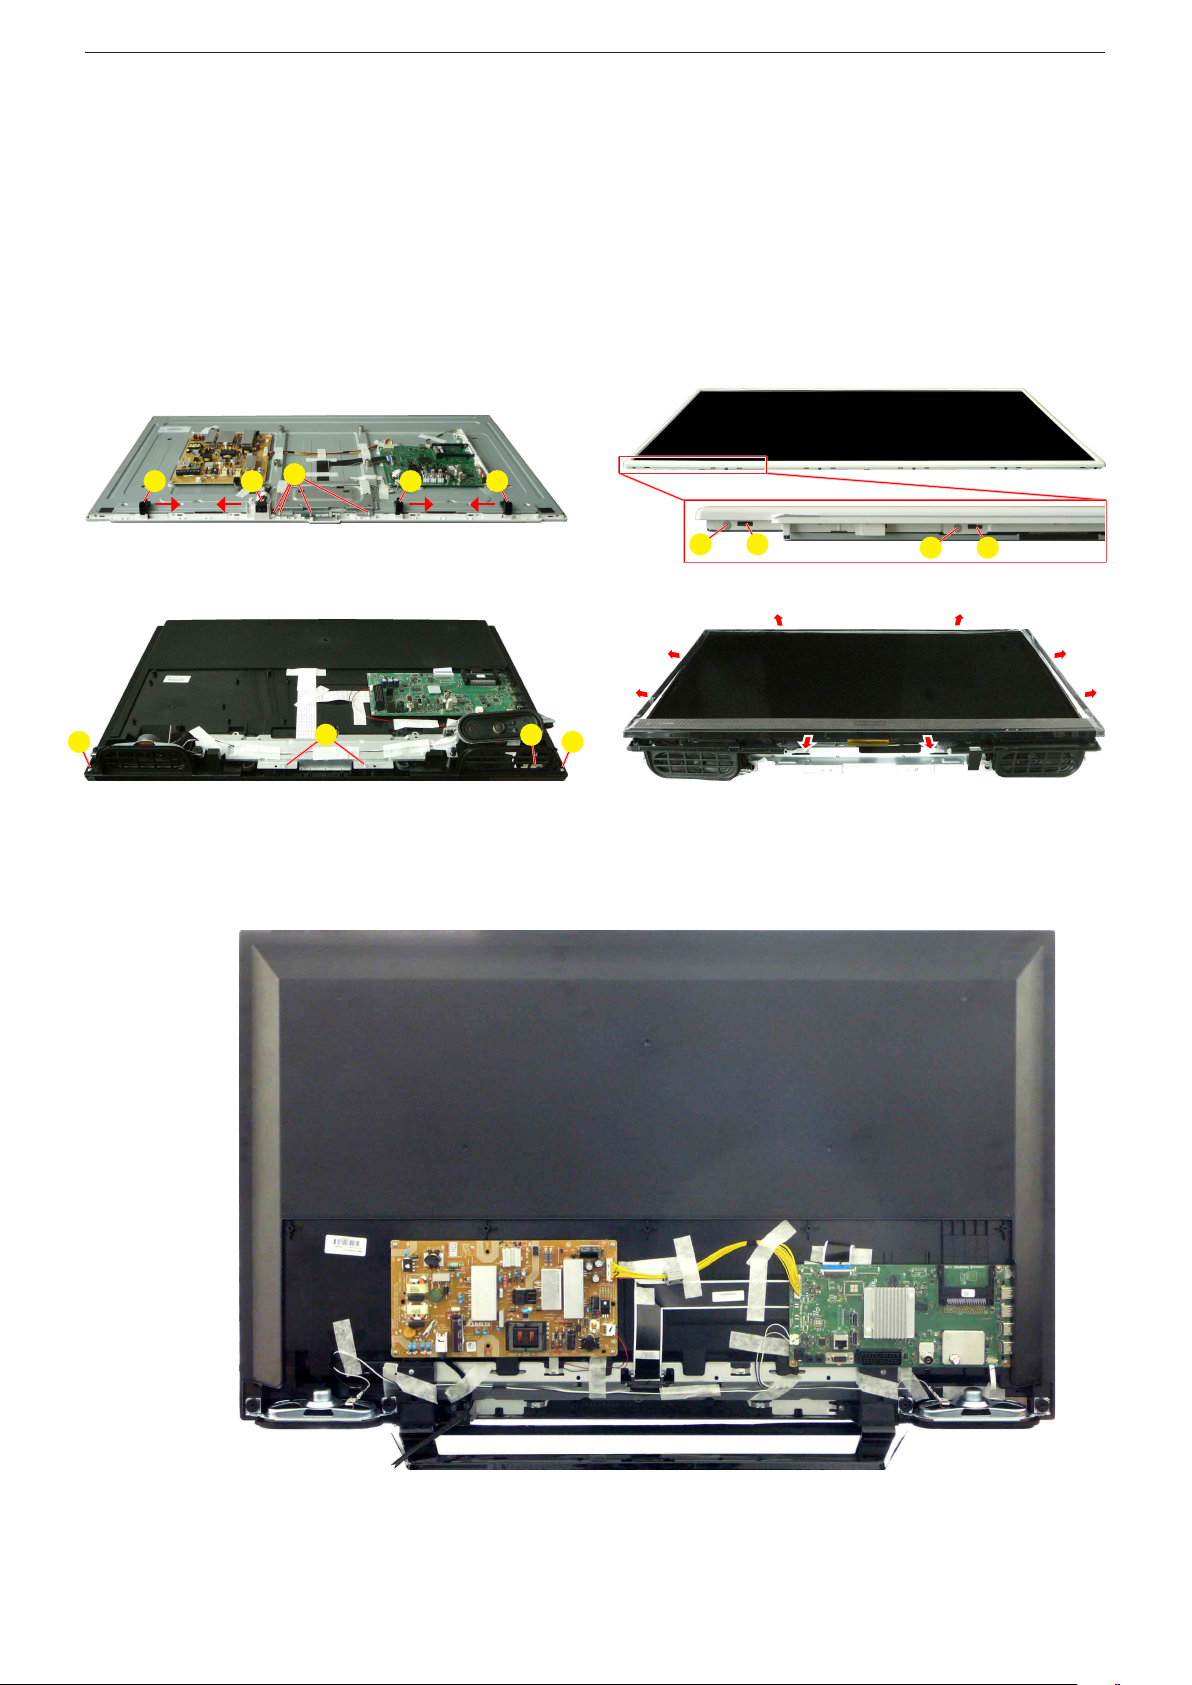
Abnehmen des BMS-Gehäusevorderteils (Backlight Modul System)
– Lautsprecher abnehmen.
– Fig. 1/3: Schrauben A herausdrehen.
– IR-LED-Baustein und Linse abnehmen.
– Fig. 1: Halter B in Pfeilrichtung schieben und abnehmen.
– Fig. 2/4: Gerät wie abgebildet auf eine weiche Unterlage legen.
– Fig. 2: Alle seitlichen Schrauben C herausdrehen.
– Fig. 2: Alle seitlichen Rasthaken D lösen und Gehäusevorderteil
abnehmen.
Fig. 4: Gehäusevorderteil beginnend an der Geräteunterseite vor-
sichtig so nach außen drücken, dass sich alle seitlichen Rasthaken
lösen. Gehäusevorderteil abnehmen.
Hinweis: Gerät nicht ohne Gehäusevorderteil umdrehen!
B B BB
Fig. 1 Fig. 2
A
Service Hints
Remove the BMS Front Cabinet (Backlight Modul System)
– Remove the speakers.
– Fig. 1/3: Undo screws A.
– Remove IR/LED Board and Lens.
– Fig. 1: Push the holders B in arrow direction and remove it.
– Fig. 2/4: Lay device as shown on a soft pad.
– Fig. 2: Undo all screws at the side C.
– Fig. 2: Unlock all locking catches D and remove the front cabinet.
Fig. 4: Begins at below side to push front cabinet to outside, so that
unlock all locking catches. Remove front cabinet.
Note: Do not return the TV set without front cabinet!
C
CDD
A A
Fig. 3 Fig. 4
A
A
40"
1 - 4
Page 5
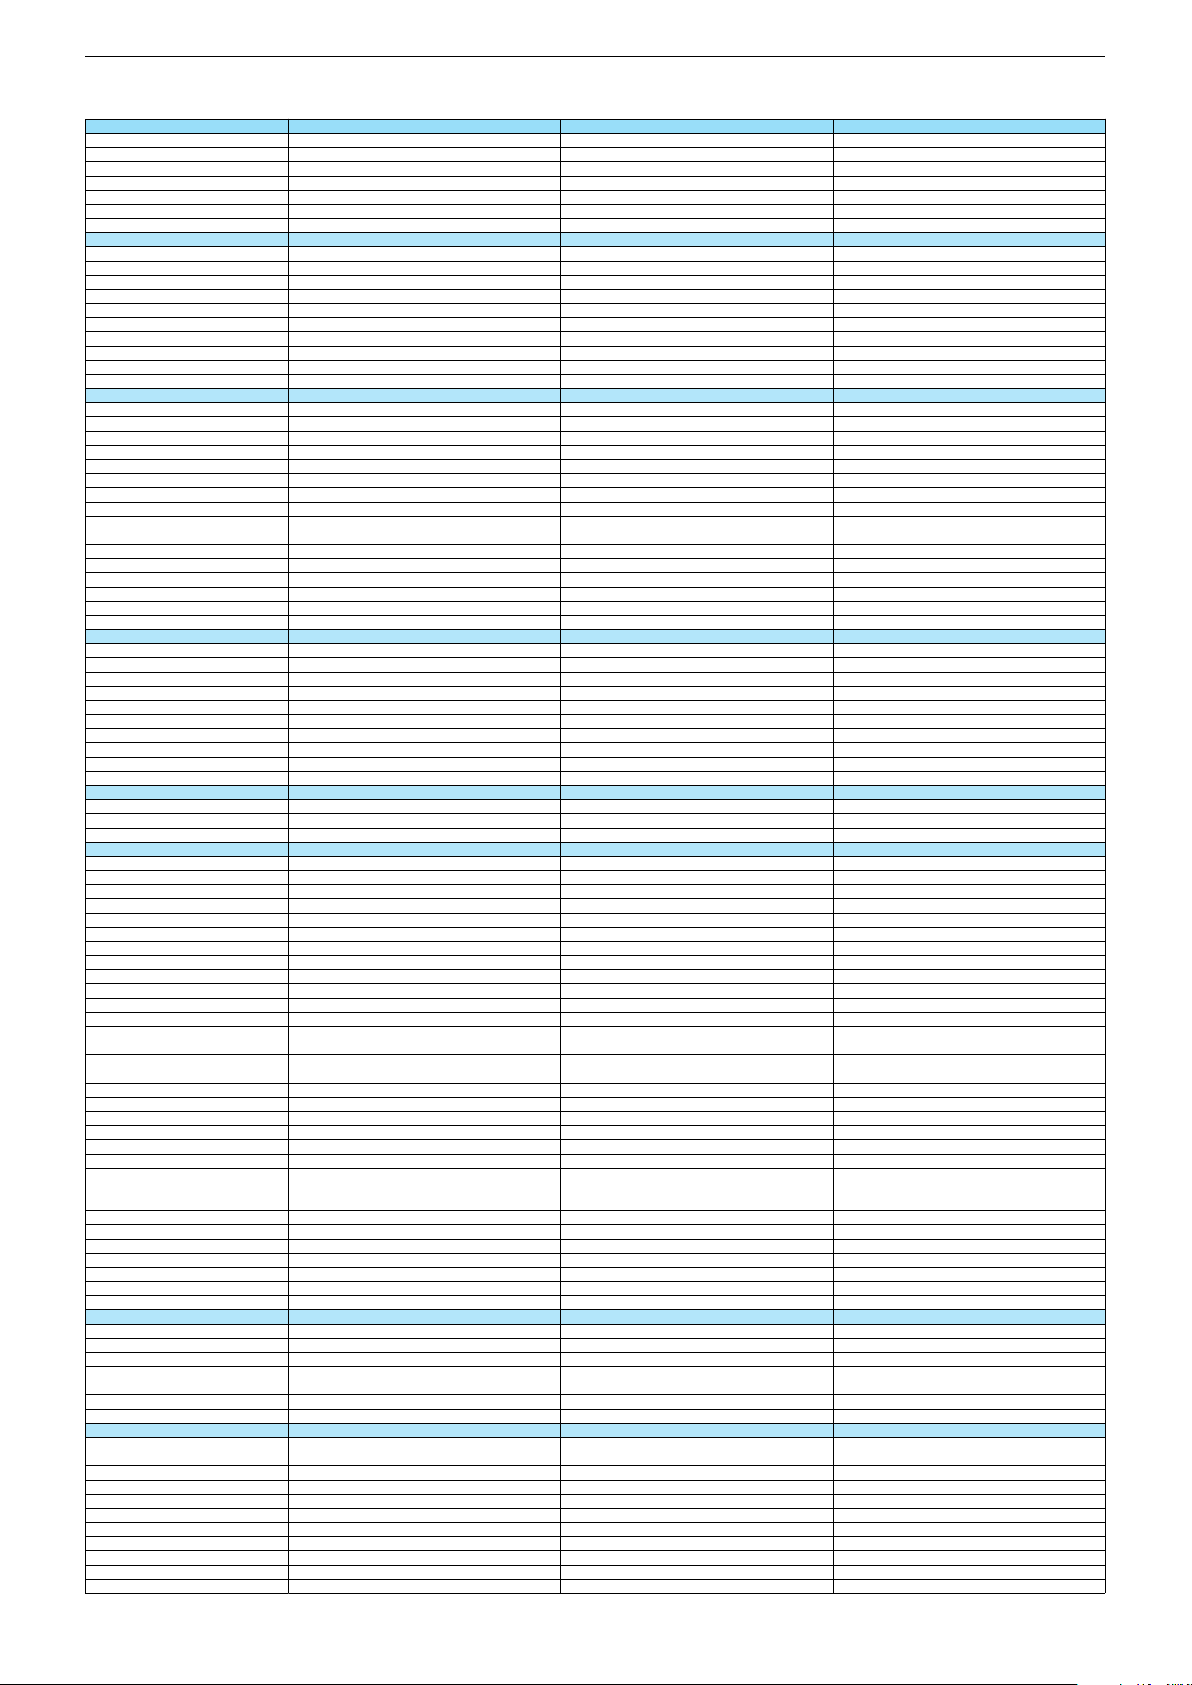
Technische Daten / Technical Data
42 VLE 8500 B0 49 VLE 8500 B0 55 VLE 8500 B0
Order No.
Product Code
Country
Approbations
Remote control
EAN
Color
DISPLAY
Panel
Backlight
Wide-screen format
3D
2D/3D Converter
Local / Micro Dimming
Dynamic contrast
HDR / Wide Color Gamut
Panel Frequency
Physical display resolution max. pixel
PICTURE
Motion Picture Improvement (MEMC)
Motion Adaptive Deinterlacing
Line Flicker Reduction
Digital Color Transition Improv. (DCTI)
Digital Combfilter
Digital Luminance Trans. Improv. (DLTI)
Picture Noise Reduction
Preset picture modes
Aspect ratios (Format switching)
PIP
PAT: Split screen (PICTURE + TEXT)
PAP: Double Window (PICT. + PICT.)
Picture freezing
Zoom with point function
Blue Background
AUDIO
Mono/Stereo/Nicam
Loudspeaker
SRS
Dolby digital
Subwoofer
AVL (Audio Volume Level)
Equalizer
Space Sound Effect
Sound preset
Audio amplifier
CHASSIS
TV-Chassis
Scaler
Keyboard
ELECTRONIC
Stand by indicator
Programmable off timer
Programmable on timer
Zap / Swap
Programme Edit
Auto switch off
Programme memory TV/AV (opt.)
Teletext/Fasttext/Toptext
Teletext options
Hbb TV
HEVC/H.265
Childlock
Menue languages OSD
Game mode
Hotel mode
Digi Link
Miracast
Special feature
Wifi
DLNA
DLNA Supported Format
Internet Applications
Netflix
Smart Inter@ctive TV 3.0
Online SW Update
RC over IP
Bluetooth (TV)
Easy use remote control compatible
TUNING
Autom. Tuning System w. country select.
Manual fine tuning
Direct channel selection
Direct frequency selection
PAL/SECAM/BG/DK/I/L'/L
NTSC-Playback via Scart (3,58/4,43)
DVB reception
Fully compliant to
Autmatic/manual channel search
EPG (SI based)
EPG (Electronic Programme Guide)
- now/next
- scheduled
- Exdended Event Info
- Short Event Info
VPS - VBI insertion
Programme table
PAM000
PA M
PAL000
PA L
PAK000
PA K
SE; DK; FI; NO
CE
SE; DK; FI; NO
CE
TS3
40 13833-00969 6
TS3
40 13833-00968 9
NO; SE; FI; DK
CE
TS3
40 13833-00965 8
Black Black
42"/107 cm
DIRECT LED (BMS)
49"/123 cm
DIRECT LED (BMS)
/
/
Black
55"/139 cm
DIRECT LED (BMS)
/
DCR PLUS
/
DCR PLUS
/
100Hz
FHD (1.920x1.080)
100Hz
FHD (1.920x1.080)
3D DeInterlacer
3D DeInterlacer
DCR PLUS
/
100Hz
FHD (1.920x1.080)
3D DeInterlacer
3D
3D
User, Vivid, Natural, Movie, Sports
uto (WSS), 4:3 / 16:9 / 14:9 / Letterbox / Subtitle /
Panorama
User, Vivid, Natural, Movie, Sports
Auto (WSS), 4:3 / 16:9 / 14:9 / Letterbox / Subtitle /
Panorama
3D
User, Vivid, Natural, Movie, Sports
Auto (WSS), 4:3 / 16:9 / 14:9 / Letterbox / Subtitle /
Panorama
Possible via service adjustment
Possible via service adjustment
/ /
/ /
2 wide band at the front side
2 wide band at the front side
Possible via service adjustment
/ /
2 wide band at the front side
5 Band
5 Band
natural, music, speech, user
natural, music, speech, user
2 x 10/20W nominal/music power (R/L)
2 x 10/20W nominal/music power (R/L)
5 Band
natural, music, speech, user
2 x 15/30W nominal/music power (R/L)
MK
MONITOR KT
MK
MONITOR KT
Joystick Joystick
Blue Led
Blue Led
/
/
MK
MONITOR KT
Joystick
Blue Led
/
/ /
/ /
/ /
24 languages, D, GB, F, I, E, P, NL, DK, S, FIN, N, TR,
GR, PL, CZ, SK, SLO, H, RUS, RO, BG, HR, LT,EE
presets (user changeable) for sound and picture
in HDMI-, Component- and PC-mode
24 languages, D, GB, F, I, E, P, NL, DK, S, FIN, N, TR,
GR, PL, CZ, SK, SLO, H, RUS, RO, BG, HR, LT,EE
presets (user changeable) for sound and picture
in HDMI-, Component- and PC-mode
Simple hotel mode possible via service adjustment Simple hotel mode possible via service adjustment
One Way
One Way
Internal
Internal
24 languages, D, GB, F, I, E, P, NL, DK, S, FIN, N, TR,
GR, PL, CZ, SK, SLO, H, RUS, RO, BG, HR, LT,EE
presets (user changeable) for sound and picture
in HDMI-, Component- and PC-mode
Simple hotel mode possible via service adjustment
One Way
Internal
PCM, WMA, MP3, AAC/ WMV, MPEG, MPEG4-ASP,
MPEG4-AVC, MPE-4, WMV3 / JPEG, GIF, BMP, PNG
PCM, WMA, MP3, AAC/ WMV, MPEG, MPEG4-ASP,
MPEG4-AVC, MPE-4, WMV3 / JPEG, GIF, BMP, PNG
smart phones/tablets
smart phones/tablets
with headphone output and gyro function
with headphone output and gyro function
PCM, WMA, MP3, AAC/ WMV, MPEG, MPEG4-ASP,
MPEG4-AVC, MPE-4, WMV3 / JPEG, GIF, BMP, PNG
smart phones/tablets
with headphone output and gyro function
Chassis MKGRUNDIG Service
1 - 5
Page 6
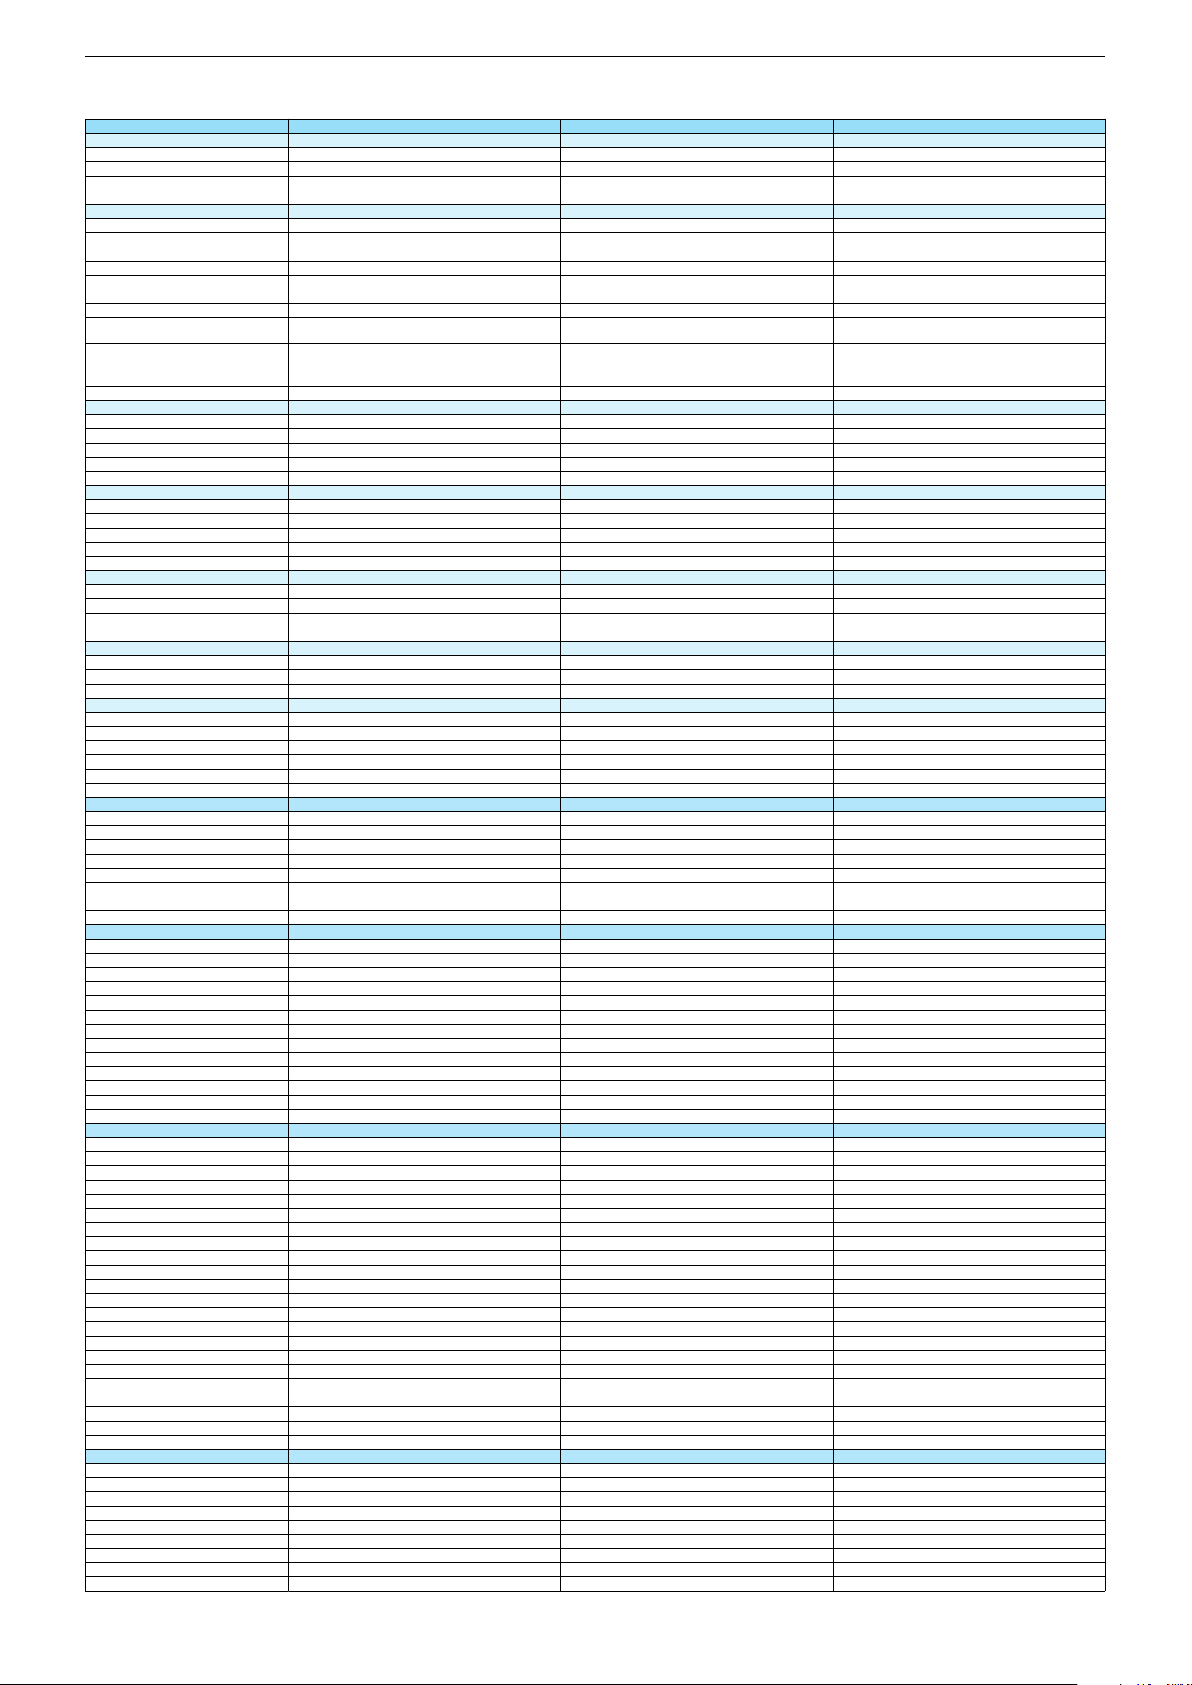
42 VLE 8500 B0 49 VLE 8500 B0 55 VLE 8500 B0
DVB-C Front end
Input frequency (MHz)
Imput level / Impedance
Demodulation / Symbol rate Ms/s
DVB-S2 Front end
Input frequency range
Signal level
Demodulation
Input symbol rate
DiseqC 1.2 support
LNB power & Polarization
FEC MODE
Unicable
DVB-T Front end
Input frequency (MHz) / Loop through
Input level / Impedance
Modulation
FEC Mode
Activ antenna support
DVB-T2 Front end
Input frequency range
Input level / Impedance
Modulation
FEC Mode
Activ antenna support
Video Decoder
MPEG profiles
Resolution
Picture formats
Audio Decoder
Profiles
AC 3 Output
Modes
Software
Service information processing
DVB subtitling
Over air download (OTA)
Last station memory
Favourite mode
Mute function
USB part
Recording
Divx + HD
Repeat
File browser
Video file resolution (max.)
Supported files
Supported subtitles
POWER SUPPLY / CABINET
Power voltage
Range of regulation
Power frequency
Power switch
Integrated supply
Plug-in AC adaptor
Energy class
Nominal Power Consumption
Stand-by Power Consumption
Annual On-Mode Energy Consumption
Cabinet without stand (WxHxD)
Cabinet with stand (WxHxD)
Weight - Unpacked
REAR PANEL CONNECTIONS
Euro-AV-Socket AV1
S-Video
Camera-AV
LAN
YUV input / progressive
PC-input
PC-Audio in
HDMI 1.4 / 2.0
- MHL 2.0
- ARC
- 4k2k
- HD ready including HDCP
Common Interface
Headphones
Digital Audio out optical (SPDIF)
Audio out
USB 2.0 / 3.0
Antenna for terrestrial reception
Antenna for satellite reception
DC-connector
Power supply plug
SUPPLIED ACCESSORIES
Wi-Fi Dongle
Remote control (incl. battery)
3D Glasses
Power cord
Instruction manual
Wall fixture (mm)
Stand
Stand Foot Distance
Cleaning tissue
from stand-by, as TV
from stand-by, as TV
from stand-by, as TV
1920 x 1080
1920 x 1080
1920 x 1080
.m4a, .aac, .jpg, .jpe, . bmp, .png, .mov, .mpg, .mpe,
,vob, .dat, .trp, .ts, .avi, .mp4, .mkv, .div, H264
SRT, SSA, ASS, SMI, Video SUB
.m4a, .aac, .jpg, .jpe, . bmp, .png, .mov, .mpg, .mpe,
,vob, .dat, .trp, .ts, .avi, .mp4, .mkv, .div, H264
SRT, SSA, ASS, SMI, Video SUB
220-240V 220-240V
50-60Hz 50-60Hz
Hard switch
Hard switch
.m4a, .aac, .jpg, .jpe, . bmp, .png, .mov, .mpg, .mpe,
,vob, .dat, .trp, .ts, .avi, .mp4, .mkv, .div, H264
SRT, SSA, ASS, SMI, Video SUB
220-240V
50-60Hz
Hard switch
A+
A+
51,1W
0,3W
67,1W
0,3W
74kWh
961 x 592 x 62mm
98kWh
1105 x 678 x 62,5mm
961 x 625 x 235mm
ca. 8,8kg
1105 x 706 x 235mm
ca. 11,2kg
A
110W
0,3W
161kWh
1242 x 750 x 62mm
1242 x 785 x 235mm
ca. 14,5kg
Full wired Full wired
Via Scart
Via Scart
Via Scart
Via Scart
via VGA
via VGA
VGA
VGA
Full wired
Via Scart
Via Scart
via VGA
VGA
4 / 0
via HDMI1
4 / 0
via HDMI1
via HDMI4
via HDMI4
via HDMI
via HDMI
3.5mm jack
optical
3.5mm jack
optical
4 / 0
via HDMI1
via HDMI4
via HDMI
3.5mm jack
optical
2 / 1
2 / 1
2 / 1
TS3
TS3
Prepared for VESA standard adaptor 300 x 200Prepared for VESA standard adaptor 300 x 200
TS3
Prepared for VESA standard adaptor 400 x 200
Chassis MKGRUNDIG Service
1 - 6
Page 7
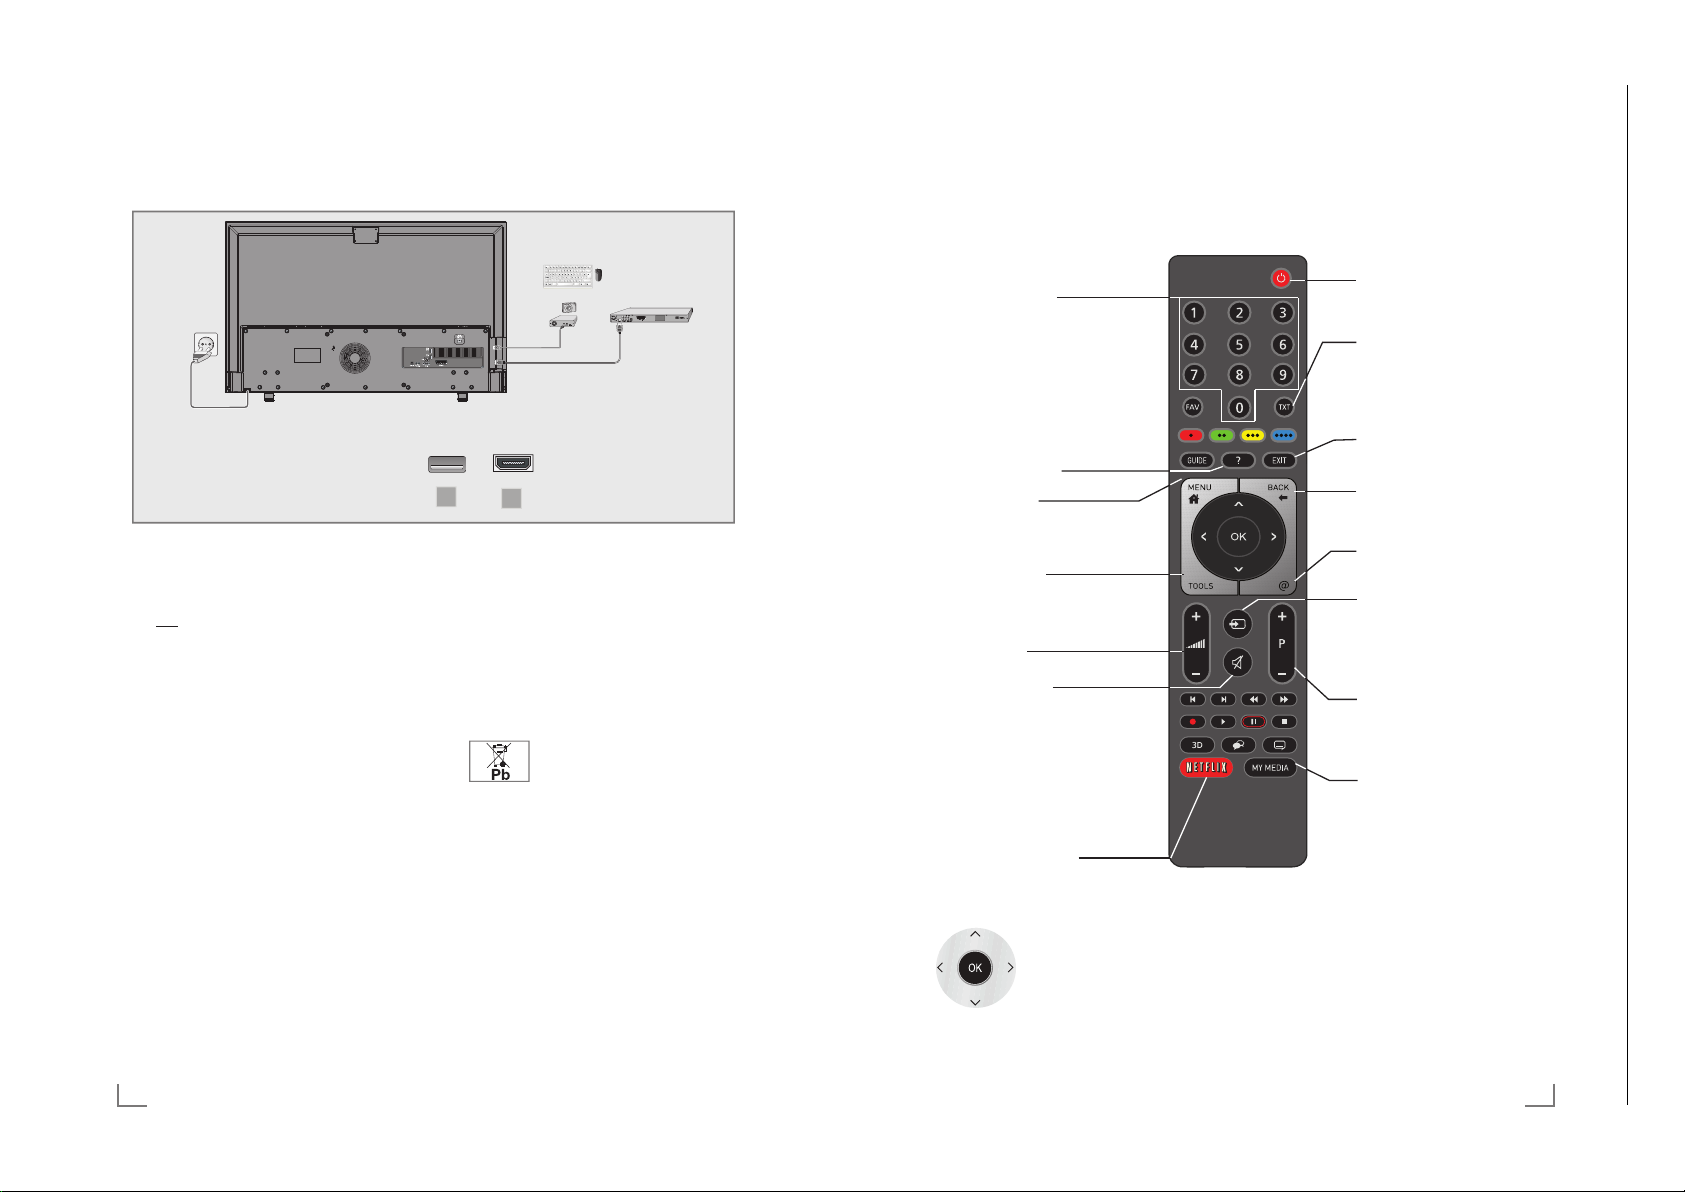
Bedienhinweise Dieses Kapitel enthält Auszüge aus der Bedienungsanleitung. Weitergehende Informationen entnehmen Sie bitte der gerätespezifischen Bedienungsanleitung, die Sie unter www.grundig.de, Menüpunkt Downloads/Bedienungsanlei-
tungen herunterladen können.
Chassis MKGRUNDIG Service
1 - 7
ANSCHLIESSEN/VORBEREITEN
A
Externe Datenträger anschließen
(Buchsen A)
1 Buchse »USB 3.0« des Internet TV und entsprechende
Buchse des Datenträgers (externe Festplatte) mit einem
USB-Kabel verbinden;
oder
USB-Stecker des USB-Memory Sticks in eine der Buchsen
»USB1« oder »USB2 (HDD)« des Internet TV stecken.
Hinweise:
7
Die Buchsen »USB1« oder »USB2 (HDD)« des Internet
TV liefern gemäß USB-Spezifikationen maximal 500 mA
Strom. Externe Festplatten, die mehr Strom benötigen, dür-
fen daher nur an die Buchse »USB 3.0« des Internet TV
angeschlossen w
7
An den Buchsen »USB« kann auch eine USB-Tastatur mit
Maus für die Bedienung des WebBrowsers angeschlossen
werden.
erden.
BluRay-Player oder Spielekonsole
anschließen (Buchsen B)
1 Buchsen »HDMI1 (MHL)«, »HDMI2« , »HDMI3«,
oder »HDMI4 (ARC)« des Internet TV und die entspre-
chenden HDMI-Buchse des BluR
Spielekonsole mit einem handelsüblichen HDMI-Kabel
verbinden.
ay-Players oder der
Netzkabel anschließen
1 Stecker des Netzkabels in eine Steckdose stecken.
Hinweis:
7
Stecken Sie den Netzstecker des Ge rätes erst dann in die
Steckdose, wenn Sie die externen Geräte und die Anten-
ne an geschlossen haben!
7
Verwenden Sie keine Adapterstecker und Verlängerungs-
kabel, die nicht den geltenden Sicherheitsnormen ent-
sprechen und nehmen Sie auch keinen Eingriff an dem
Netzkabel vor.
6
DEUTSCH
Batterien in die Fernbedienung einlegen
1 Batteriefach öffnen, dazu Deckel abnehmen.
2 Batterien einlegen (2 x Typ Micro, bzw. R03 oder AAA,
,5 V). Dabei Polung beachten, im Batteriefachboden
1
markiert.
3 Batteriefach schließen.
Hinweis:
7
Wenn das Internet TV auf die Fernbedienbefehle nicht
mehr richtig reagiert, können die Batterien verbraucht
sein. Verbrauchte Batterien unbedingt entfernen.
7
Für Schäden, die durch ausgelaufene Batterien entstehen,
kann nicht gehaftet werden.
Umwelthinweis:
7
Dieses Symbol auf Akkus/Batterien oder an
stimmten Akku/ Batterien kann dieses Symbol durch ein
chemisches Symbol ergänzt werden. Symbole für Quecksilber (Hg) oder Blei (Pb) werden angegeben, wenn Akkus/Batterien mehr als 0,0005 % Quecksilber oder mehr
als 0,004 % Blei enthalten.
Die Akkus/Batterien – auch schwermetallfreie – dür-
fen nicht im Hausmüll entsorgt werden. Verbrauchte
Batterien müssen in die Altbatteriesammelgefäße bei
Handel und öffentlich-rechtlichen Entsorgungs trägern gegeben werden. Erkundigen Sie sich nach den jeweiligen
Entsorgungsvorschriften an Ihrem Wohnort.
--------------------------------------------------------------
B
der Verpackung weist darauf hin, dass der
Akku/die Batterie nicht mit dem regulären
Hausmüll entsorgt werden darf. Bei be-
AUF EINEN BLICK
-------------------------------------------------------------------------------------------------------------
Die Fernbedienung – Hauptfunktionen
Einschalten aus Stand-by.
Informationen einblenden.
Hauptmenü aufrufen.
TOOLS Menü aufrufen.
Lautstärke ändern.
Ton ein und ausschalten.
Netflix Applikationen aufrufen.
Navigieren in den Menüs
Bewegen den Cursor in den Menüs nach
oben und unten.
Bewegen den Cursor in den Menüs nach
links und rechts.
Aktiviert verschiedene Funktionen und speichert Funktionen/Einstellungen.
Ein- und Ausschalten (Stand-by).
Umschalten zwischen
Videote
xt- und TV-Betrieb.
Menüs und Applikationen beenden.
In den Menüs eine Menüebene zurück
schalten.
Quick Apps Menü aufrufen und
wieder abschalten.
Menü für AV-Programmplätze.
Anschließend mit »
len und mit »OK« bestätigen.
Einschalten aus S
Menü »Medienplayer« aufrufen.
« oder »>« wäh-
<
tand-by.
DEUTSCH
7
Page 8
AUF EINEN BLICK
Chassis MKGRUNDIG Service
1 - 8
-------------------------------------------------------------------------------------------------------------
MONITOR-BETRIEB
--------------------------------------------------------------------------------------------------------
Die Navigation in den Menüs
Mit dem Haupt- und den Untermenüs Ihres Internet TV können
Sie viele Funktionen wählen und alle notwendigen Einstellung
durchführen.
Aufgerufen wird das Hauptmenü mit »MENU«, die verschiedenen Menüpunkte wählen Sie mit »
wird der jeweilige Menüpunkt aktiviert.
Die notwendigen Einstellungen wählen Sie mit »
mit »OK« wird die jeweilige Einstellung aktiviert.
Eine Menüebene zurück schalten Sie mit »BACK <«, das
Menü oder die Funktion schalten Sie mit »EXIT« ab.
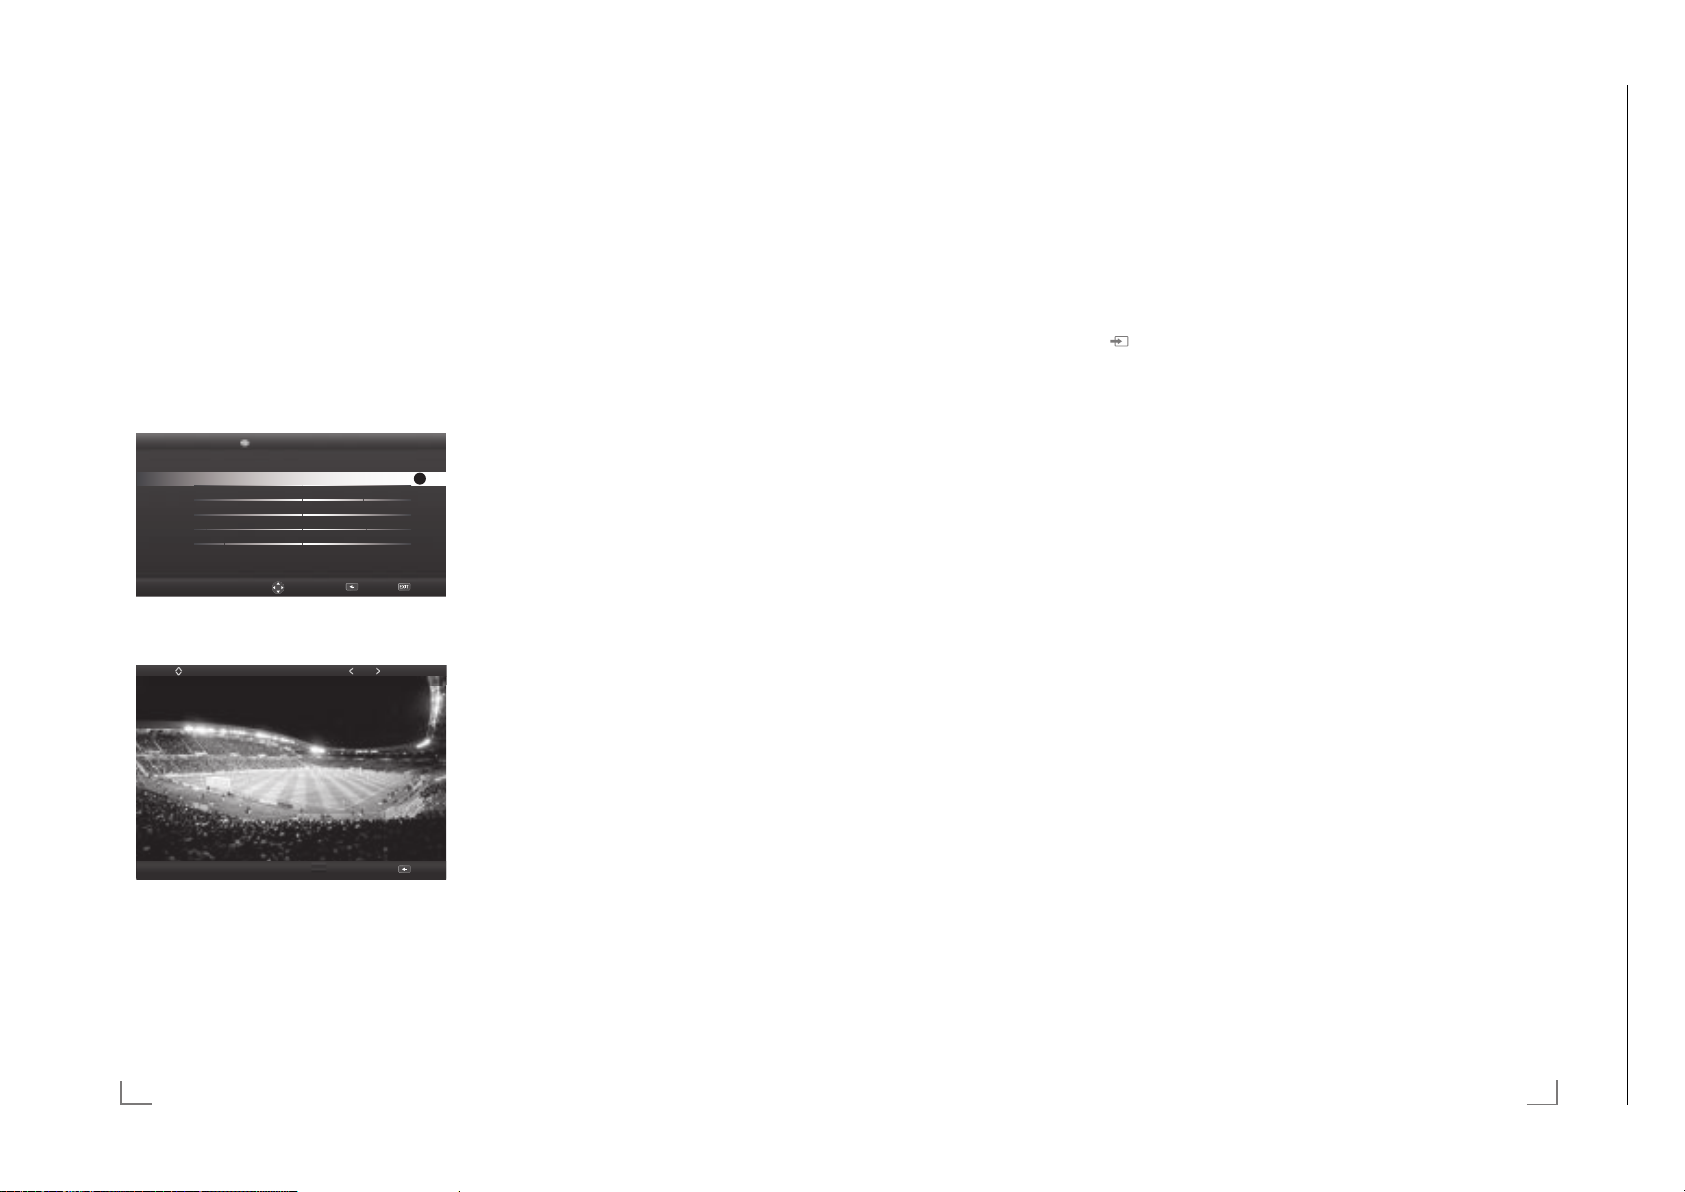
Beispiel, Bildmodus einstellen
1 Menü mit »MENU« aufrufen.
– Das Hauptmenü wird eingeblendet.
2 Menüpunkt »Einstellungen« mit »OK« aktivieren.
3 Menüpunkt »Bildeinstellungen« mit »OK« aktivieren.
– Das Menü »Bildeinstellungen« wird eingeblendet.
< TV-Einstellungen Toneinstellungen >
4 Benötigte Zeile »Bildmodus« mit »
und mit »OK« bestätigen.
5 Bildmodus mit »
Bildmodus
6 Eine Menüebene zurückschalten mit »BACK <« oder
Einstellung mit »EXIT« beenden.
Bildeinstellungen
Bildformat 16:9
Bildmodus Natürlich
Hintergrundbeleuchtung Eco
Erweitert
Bild-Standardeinstellungen wählen
« oder »>« ein stellen.
<
« oder »<«, mit »OK«
>
V
« oder »Λ«,
OK
Zurück BeendenWählen
V
« oder »Λ« wählen
Scharf
Zurück
Die Bedienelemente des Internet TV
ON • OFF Netzschalter, schaltet das Internet TV in
Multifunktionsschalter
Mit dem Multifunktionsschalter »
nen Sie verschiedene Einstellungen durchführen.
Es dürfen keine Menüeinblendungen am Bildschirm sichtbar
sein.
Schalter eindrücken, schaltet das Internet TV aus Stand-
by ein.
Im Betrieb: Schalter eindrücken, blendet das Navigati-
onsmenü ein.
Schalter nach oben/unten bewegen, wählt die ge-
wünschte Menüzeile:
– Lautstärkeeinstellung.
– AV-Programmplätze wählen.
– In Stand-by schalten.
Funktion/Einstellung durch Eindrücken aufrufen.
Schalter nach oben/unten bewegen, wählt die Funktion/
Einstellung.
Bereitschaft (Stand-by) oder aus.
8/I/SEL« am Internet TV kön-
Grundfunktionen
Ein- und Ausschalten
1 Internet TV mit dem Netzschalter »ON • OFF« in
Bereitschaft (Stand-by) schalten.
2 Internet TV mit »
Bereitschaft (Stand-by) einschalten.
3 Internet TV mit »
4 Internet TV mit dem Netzschalter »ON
schalten.
AV-Programmplätze wählen
1 Menü »Signalquelle auswählen« mit » « aufrufen.
2 Gewünschten AV-Programmplatz mit »
wählen und mit »OK« bestätigen.
Hinweis:
7
Die Bezeichnung der AV-Programmplätze können geändert werden (siehe „Langanleitung”).
Lautstärke ändern
1 Lautstärke mit »
Ton aus- und einschalten
1 Ton mit »p« stummschalten und wieder ein- schalten.
Informationen einblenden
Informationen zum Programm werden bei jedem Umschalten
automatisch eingeblendet.
1 Informationen manuell einblenden, dazu »?« wiederholt
drück
– Die Einblendung erlischt nach kurzer Zeit automatisch.
Bildeinstellungen
1 Menü mit »TOOLS« aufrufen.
2 Zeile »Bildmodus« mit »
3 Gewünschte Bildeinstellung mit »
Hinweis:
7
Die Bildeinstellung »Spiel« kann nur in den Modi »HDMI«,
»COMPONENT« und »PC« ausgewählt werden.
4 Menü mit »EXIT« abschalten.
Toneinstellungen
1 Menü mit »TOOLS« aufrufen.
2 Zeile »Klangeffekt« mit »
3 Gewünschte Toneinstellung mit »
4 Menü mit »EXIT« abschalten.
8«, »1…0« oder »P+« oder »P-« aus
8« in Bereitschaft (Stand-by) schalten
« ändern.
o –
+
en.
V
« oder »Λ« wählen.
V
« oder »Λ« wählen.
• OFF« aus-
« oder »>«
<
«, »>« wählen.
<
« oder »>« wählen.
<
Zoomfunktion
Mit dieser Funktion können Sie das Bild nach Wunsch vergrößern.
1 Menü mit »TOOLS« aufrufen.
2 Zeile »Zoom« mit »
be stätigen.
3 Den Zoomfaktor mit »
be stätigen.
4 Zum Verschieben des Bildes »
Bild mit »
5 Zurückschalten zum Menü »Zoom« mit »BACK <«.
6 Menü mit »EXIT« abschalten.
Abschaltzeit eingeben
Im Menü »Abschalttimer« kann für das Internet TV eine Abschaltzeit eingegeben werden. Das Internet TV schaltet nach
Ablauf der eingestellten Zeit in Bereitschaft (Stand-by).
1 Menü mit »TOOLS« aufrufen.
2 Zeile »Abschalttimer« mit »
3 Gewünschte Ausschaltzeit mit »
Hinweis:
7
Funktion abschalten, dazu die Ausschaltzeit mit »<« oder
« auf »Aus« stellen.
»
>
4 Menü mit »EXIT« abschalten.
V
« oder »Λ« wählen und mit »OK«
« oder »>« wählen und mit »OK«
<
« (rot) drücken und das
V
«, »Λ«, »<« oder »>« verschieben.
y
V
« oder »Λ« wählen.
« oder »>« eingeben.
<
8
DEUTSCH
DEUTSCH
9
Page 9
NETZWERK INSTALLATION
Chassis MKGRUNDIG Service
1 - 9
--------------------------------------------------------------------------------
NETZWERK INSTALLATION
--------------------------------------------------------------------------------
Um die Funktionen „GRUNDIG AppLICATION store“ und
„Betrieb mit Digitalen Medien Server“ anzuwenden, müssen
Sie das Internet TV an Ihrem Heimnetzwerk mit Internetzugang
anschließen und anmelden.
Wenn Sie das Internet TV am Heimnetzwerk angemeldet
haben, können Sie es auch von einem Apple iPhone oder
einem Android Smartphone fernbedient werden. Die Möglichkeiten sind abhängig vom Funktionsumfang des Internet
TV. Voraussetzung dafür ist, Sie laden die kostenlose Applikation »GRUNDIG TV Remote« vom Apple App Store oder vom
Google Play (Android Market) und installieren diese auf Ihrem
Apple iPhone/Smartphone.
Internet TV am Heimnetzwerk anschließen und anmelden
Sie können Ihr Internet TV über eine LAN-Verbindung oder
ohne Kabel über WLAN mit dem Heimnetzwerk verbinden.
Wenn Sie eine LAN-Verbindung verwenden, lesen Sie im Kapitel „LAN-Verbindung zum Heimnetzwerk” auf dieser Seite
weiter;
wenn Sie WLAN benutzen wollen, folgen Sie der Beschreibung im Kapitel „Betrieb über WLAN” ab Seite 11.
Hinweis:
7
Die folgenden Kapitel beschreiben die Anmeldung am
Heimnetzwerk, wenn Sie diese noch nicht bei der „Erstinstallation“ durchgeführt haben.
LAN-Verbindung zum Heimnetzwerk
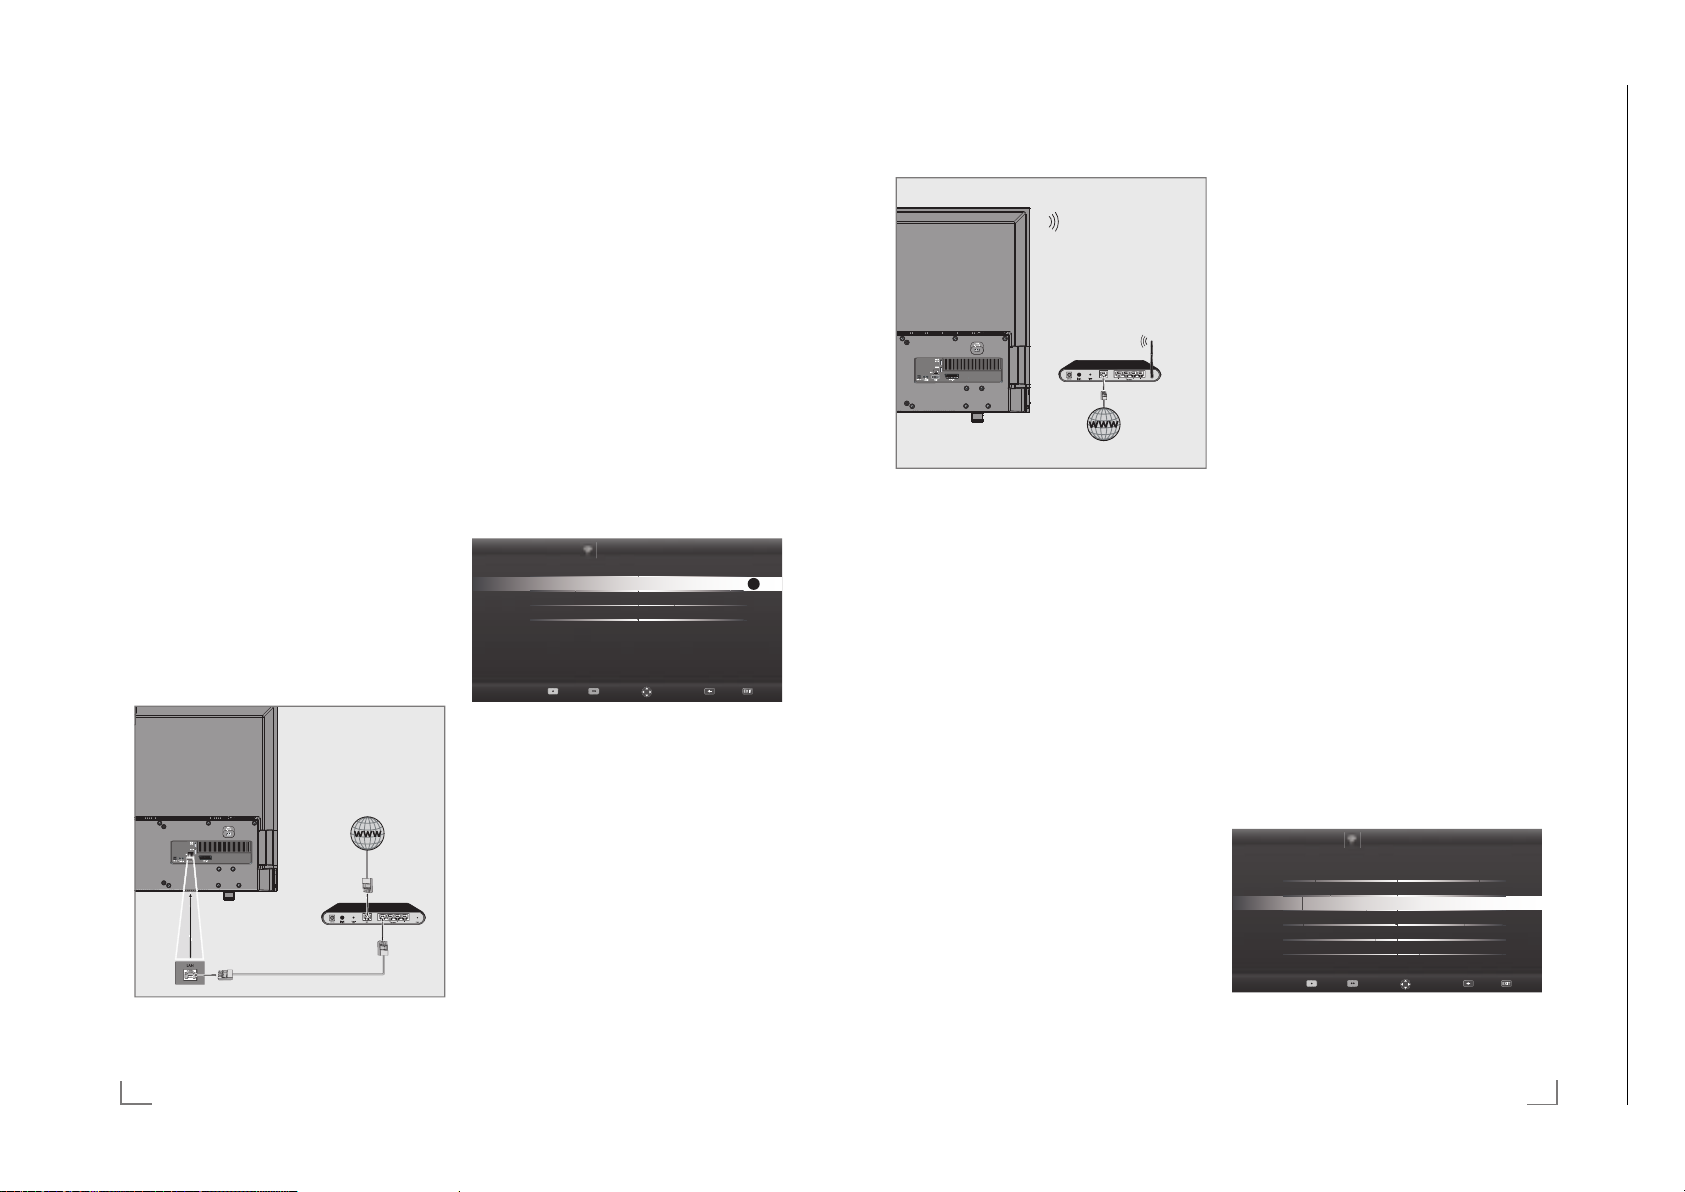
LAN-Kabel anschließen
1 Ausgangsbuchse des Routers mit handelsüblichen LAN-
Kabel an die Buchse »LAN« des Internet TV anschließen.
Hinweis:
7
Das LAN-Kabel ist nicht im Lieferumfang enthalten.
Anmeldung am Router für den LAN-Betrieb
Sie haben zwei Möglichkeiten, Ihr Internet TV am Heimnetzwerk anzumelden.
A Die automatische Anmeldung,
dabei werden alle notwendigen Einstellungen (»IP Ad-
resse«, »DNS«, »Netzmaske« und »Gateway«) vom Rou-
ter automatisch vergeben.
B Die manuelle Anmeldung,
hier müssen alle notwendigen Einstellungen (»IP Ad-
resse«, »DNS«, »Netzmaske« und »Gateway«) von Hand
eingegeben werden.
Die automatische Anmeldung
Die meisten Heimnetze sind dynamisch. Wenn Sie ein dynamisches Netzwerk verwenden, benötigen Sie einen DSL Router,
der DHCP unterstützt.
Bei dynamischen Heimnetzen werden die Daten für IP Adresse, Netzwerkmaske und Gateway vom Router automatisch
zugewiesen. Manuelle Einstellungen sind nicht notwendig.
1 Menü mit »MENU« aufrufen.
2 Menüpunkt »Einstellungen« mit »OK« aktivieren.
3 Menüpunkt »Netzwerkkonfiguration« mit »
wählen und mit »OK« bestätigen.
– Das Menü »Netzwerkkonfiguration« wird eingeblen-
det.
Timeranwendungen Einstellungen
Verbindungstyp ändern Kabel
Netzwerkkonfiguration Auto
Erweitert
4 Zeile »Verbindungstyp ändern« mit »V« oder »Λ«
wählen und mit »OK« bestätigen.
5 Die Option »Kabel« mit »
»OK« bestätigen.
6 Zeile »Netzwerkkonfiguration« mit »
len und die Option »Auto« mit »
7 Anmeldung an das Heimnetzwerk mit »
– Die Meldung »Verbinde... Bitte warten« wird einge-
blendet.
8 Wenn die Meldung erlischt, mit »
dung zum Netzwerk prüfen.
– Anzeige: »Testen ... Bitte warten«, nach erfolgreicher
Anmeldung: »Verbindung mit Gateway: Erfolgreich«
und »Internetverbindung: Erfolgreich«.
Netzwerkkonfiguration
« oder »>« wählen und mit
<
<
9 Einstellung mit »EXIT« beenden.
Hinweis:
7
Wenn die IP Adresse nicht automatisch vergeben wird,
setzen Sie die Einstellung im Kapitel „Die manuelle Anmeldung“ fort, siehe „Langanleitung“.
« oder »<«
>
Zurück BeendenVerbinden Testen Wählen
V
« oder »Λ« wäh-
« oder »>« wählen.
« (rot) starten.
y
« (grün) die Verbin-
yy
OK
Betrieb über WLAN
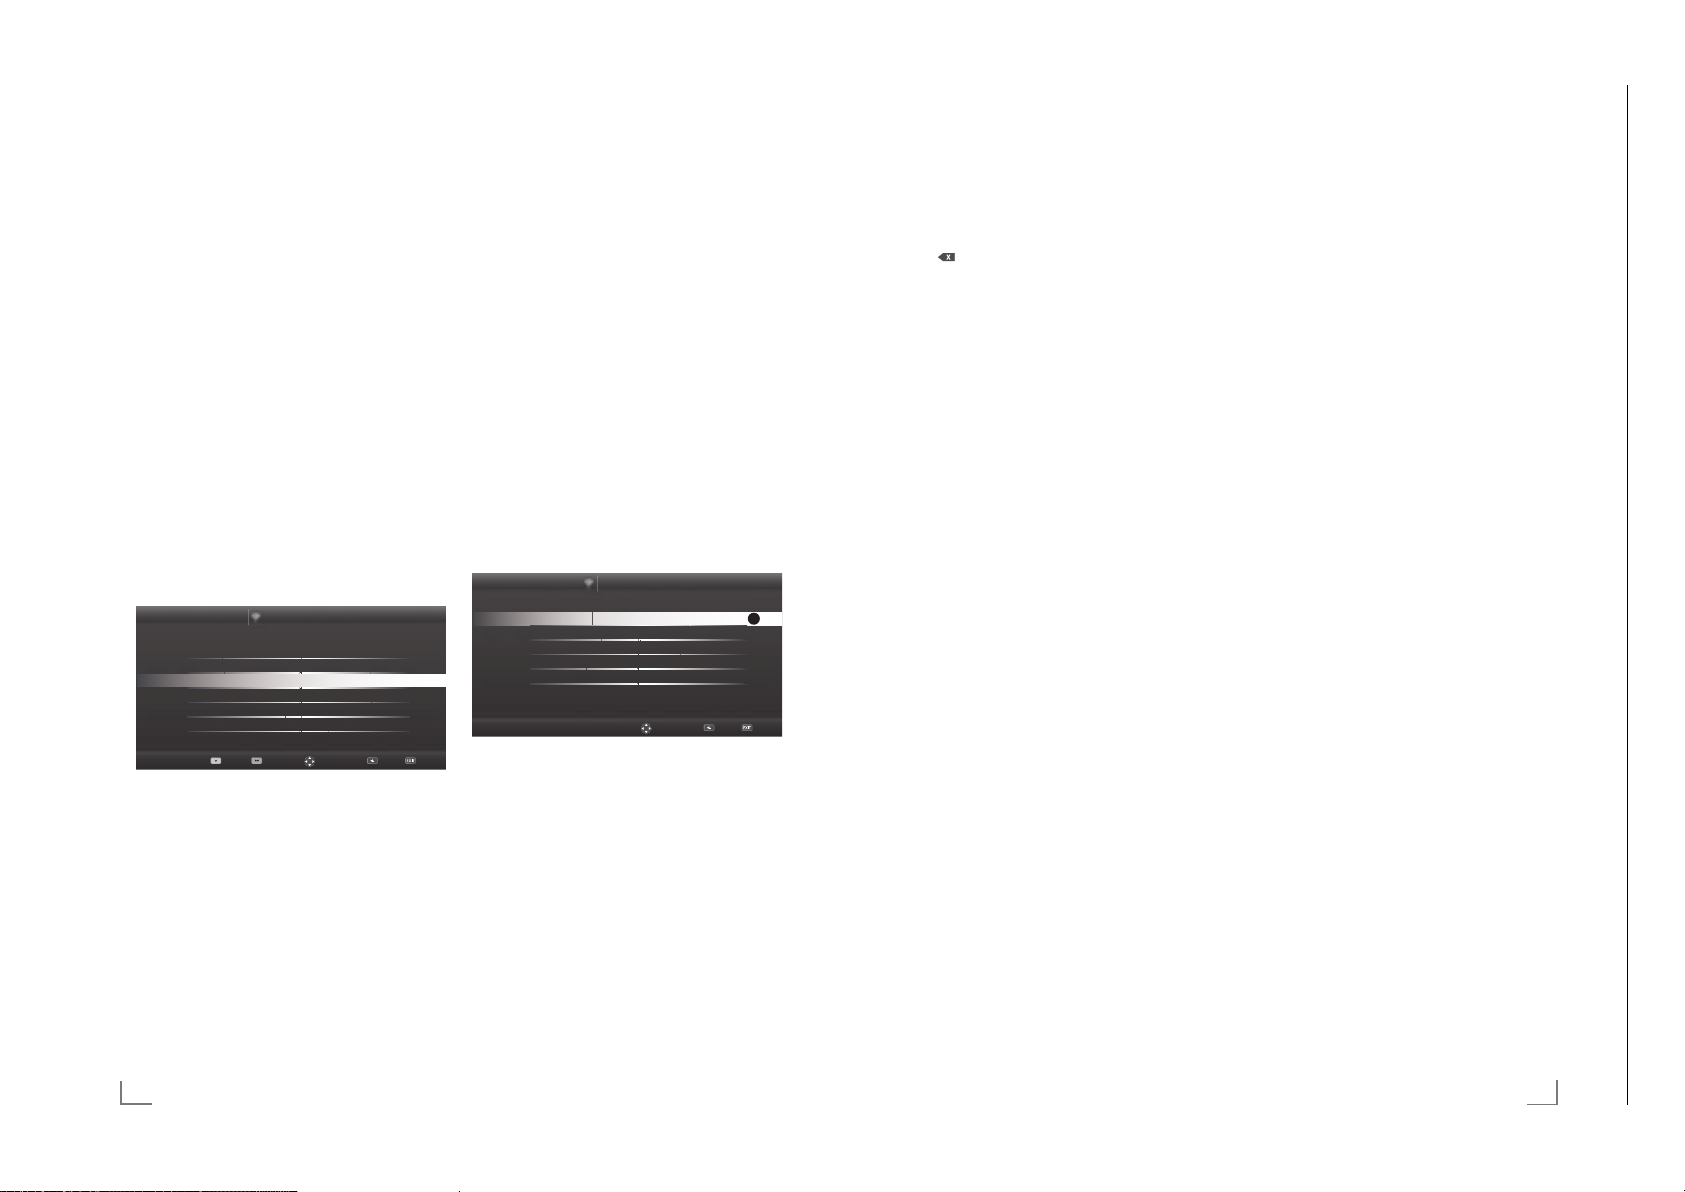
1 Das Gerät ist mit einem eingebautem WLAN Modul für
die Verbindung zum Heimnetzwerk ausgestattet.
Hinweise:
7
Das WLAN Modul unterstützt das Datenübertragungsprotokoll nach IEEE 802.11B/G und N.
Um Videostörungen zu vermeiden, empfehlen wir – wenn
vom Router unterstützt – den Standard IEEE 802.11N zu
verwenden.
Die beste Bildqualität bei HD Videowiedergabe erhalten
Sie nur über eine LAN-Verbindung.
7
Wenn Sie einen Router verwenden, der den Standard
IEEE 802.11B/G unterstützt, kann die Qualität der Videowiedergabe, verglichen zum Standard IEEE 802.11N,
geringer sein. Die Ursache ist die geringere Datentransferrate des Standards IEEE 802.11B/G.
7
Die Wiedergabequalität beim Betrieb mit einer DLNAApplikation und mit der Smart Inter@ctive 3.0 Funktion ist
davon abhängig, wieviele Benutzer das kabellose Heimnetz gleichzeitig nutzen.
7
Wir empfehlen, während des Betriebes mit der Smart
Inter@active TV 3.0 Funktion andere Geräte im Heimnetzwerk abzuschalten, um unnötigen Datenverkehr zu
vermeiden.
7
Stellen Sie den Router an einer erhöhten Position auf, um
die Empfangsqualität des WLAN Moduls zu verbessern.
7
Die Empfangsqualität beim drahtlosen Betrieb ist abhängig vom Router und dem Abstand zwischen Router und
Internet TV sowie dem Digitalen Media Server (DMS).
Anmeldung am Router für den WLANBetrieb
Sie haben verschiedene Möglichkeiten, Ihr Internet TV am
Heimnetzwerk anzumelden.
A Die automatische Anmeldung,
dabei werden alle notwendigen Einstellungen (»IP Adresse«, »DNS«, »Netzmaske« und »Gateway«) vom Router
automatisch vergeben.
Abhängig vom Router verwenden Sie:
– die Option „WPS-PBC“ (Push Button Configuration);
– die Anmeldung mittels WPS-PIN;
– die Anmeldung mit Eingabe des Netzwerk-Kennwortes.
B Die manuelle Anmeldung,
hier müssen alle notwendigen Einstellungen (»IP Ad-
resse«, »DNS«, »Netzmaske« und »Gateway«) von Hand
eingegeben werden.
Voraussetzungen
Die meisten Heimnetze sind dynamisch, d.h. die Daten für IP
Adresse, Netzwerkmaske und Gateway wird vom Router automatisch zugewiesen.
Wenn Sie ein dynamisches Netzwerk verwenden, benötigen
Sie einen DSL Router, der DHCP unterstützt.
Die automatische Anmeldung mit „WPSPBC“ (Push Button Configuration)
Verwenden Sie diese Art der Anmeldung, wenn Ihr Router
„WPS-PBC“ unterstützt. Alle Sicherheitseinstellungen werden
automatisch übernommen.
1 Menü mit »MENU« aufrufen.
2 Menüpunkt »Einstellungen« mit »OK« aktivieren.
3 Menüpunkt »Netzwerkkonfiguration« mit »
wählen und mit »OK« bestätigen.
– Das Menü »Netzwerkkonfiguration« wird eingeblen-
det.
4 Zeile »Verbindungstyp ändern« mit »
wählen und mit »OK« bestätigen.
5 Die Option »Kabellos WPS« mit »
und mit »OK« bestätigen.
– Eine Abfrage wird eingeblendet.
6 Die Funktion »WLAN« mit »
7 Zeile »WPS-Typ« mit »
Option »Taste« mit »
Timeranwendungen Einstellungen
Verbindungstyp ändern Kabellos WPS
WiFi Ein
WPS-Typ
Netzwerk auswählen N/A
Netzwerkkonfiguration Auto
Erweitert
8 Anmeldung an das Heimnetzwerk mit »y« (rot) starten.
– Die Meldung »WPS-Taste an ...« wird eingeblendet.
« (grün) aktivieren.
yy
V
« oder »Λ« wählen und die
« oder »>« wählen.
<
Netzwerkkonfiguration
9 Am Router die WPS-Taste drücken.
« oder »<«
>
V
« oder »Λ«
« oder »>« wählen
<
Taste
Zurück BeendenVerbinden Testen Wählen
< >
10
DEUTSCH
DEUTSCH
11
Page 10
NETZWERK INSTALLATION
Chassis MKGRUNDIG Service
1 - 10
--------------------------------------------------------------------------------
NETZWERK INSTALLATION
--------------------------------------------------------------------------------
10 Die Meldung mit »yy« (grün) bestätigen.
– Die Meldung »Verbindung mit Gateway: Erfolgreich«
wird eingeblendet.
11 Wenn die Meldung erlischt, mit »
dung zum Netzwerk prüfen.
– Anzeige: »Testen ... Bitte warten«, nach erfolgreicher
Anmeldung »Verbindung mit Gateway: Erfolgreich«
und »Internetverbindung: Erfolgreich«.
« (grün) die Verbin-
yy
12 Einstellung mit »EXIT« beenden.
Die automatische Anmeldung mit WPS-PINEingabe
Verwenden Sie diese Art der Anmeldung, wenn Ihr Router die
WPS-PIN-Eingabe unterstützt. Alle Sicherheitseinstellungen
werden automatisch übernommen.
1 Menü mit »MENU« aufrufen.
2 Menüpunkt »Einstellungen« mit »OK« aktivieren.
3 Menüpunkt »Netzwerkkonfiguration« mit »
wählen und mit »OK« bestätigen.
– Das Menü »Netzwerkkonfiguration« wird eingeblen-
det.
4 Zeile »Verbindungstyp ändern« mit »
wählen und mit »OK« bestätigen.
5 Die Option »Kabellos WPS« mit »
und mit »OK« bestätigen.
– Eine Abfrage wird eingeblendet.
6 Die Funktion »WLAN« mit »
7 Zeile »WPS-Typ« mit »
Option »PIN« mit »
Timeranwendungen Einstellungen
Verbindungstyp ändern Kabellos WPS
WiFi Ein
WPS-Typ
Netzwerk auswählen N/A
Netzwerkkonfiguration Auto
Erweitert
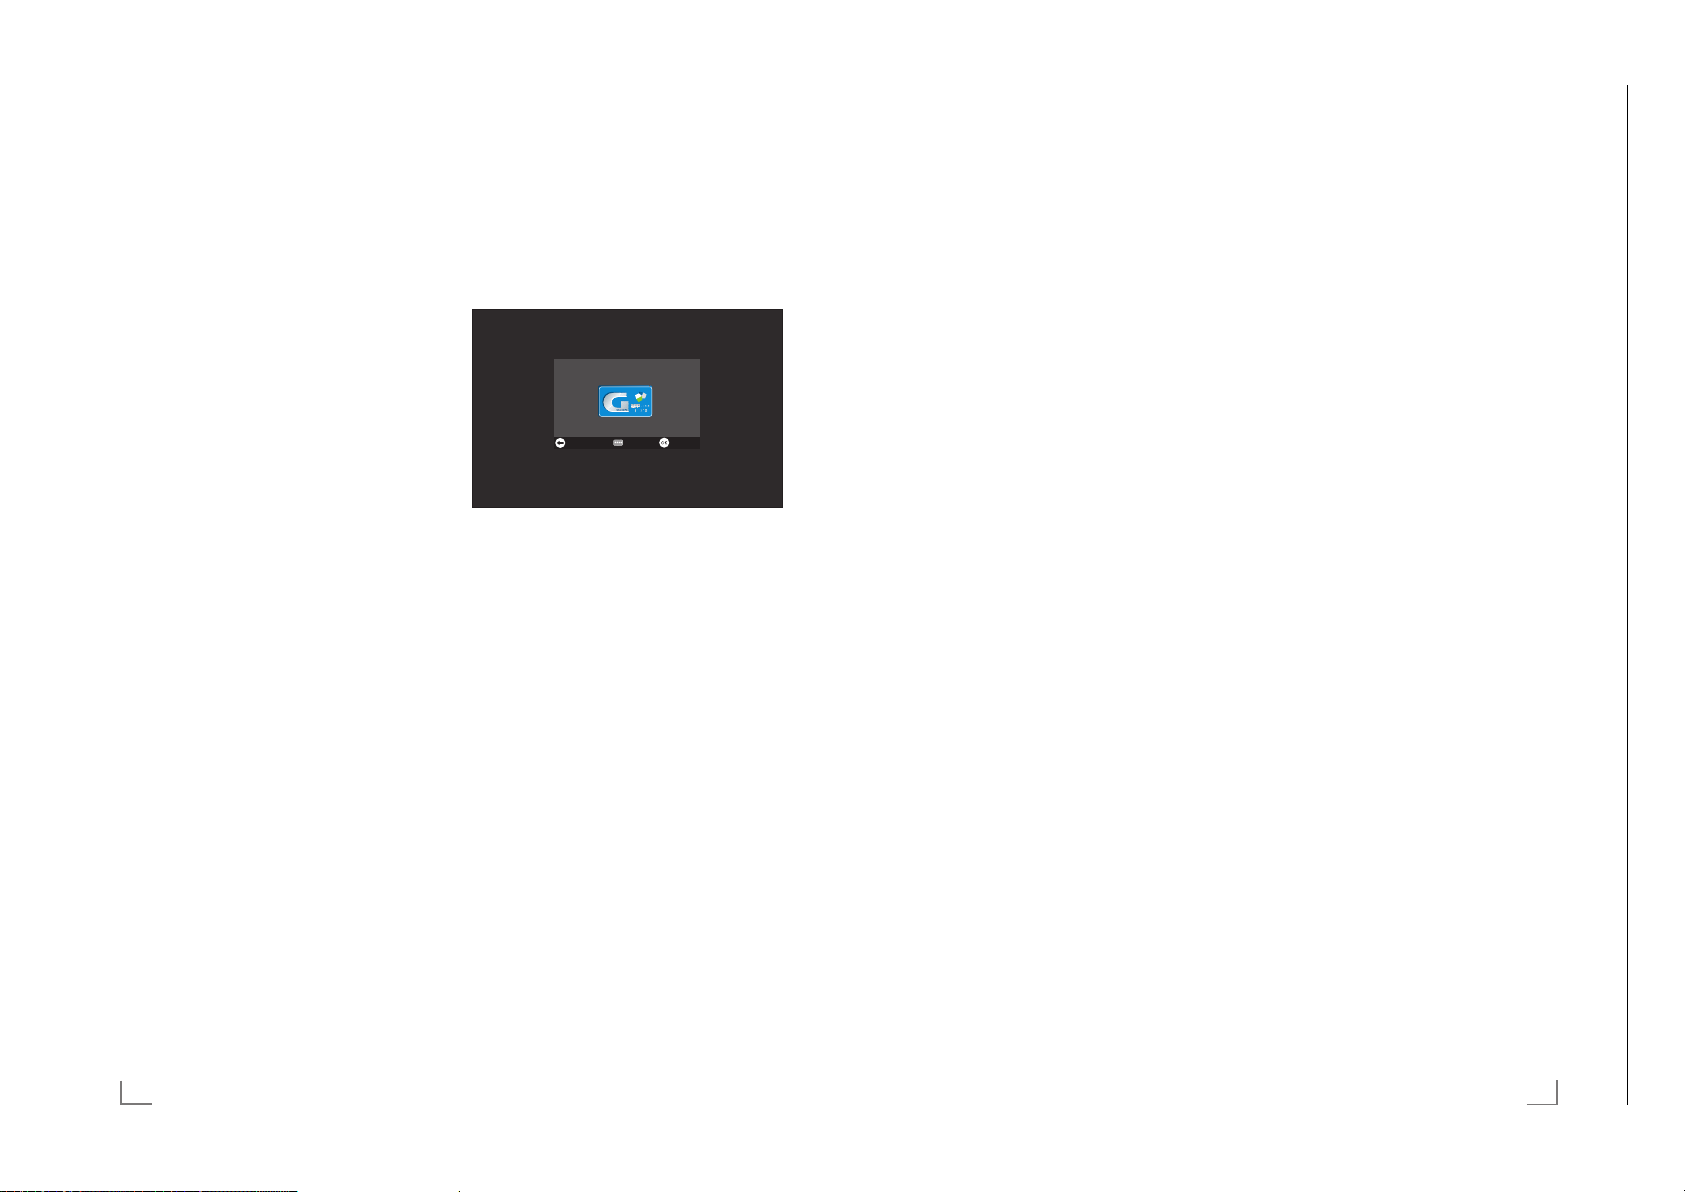
8 Zeile »Netzwerk auswählen« mit »V« oder »Λ« wählen
und mit »OK« bestätigen.
– Das Menü »Netzwerk auswählen« wird eingeblendet,
die vorhandenen Netzwerke werden gesucht und
angezeigt.
9 Das gewünschte Netzwerk mit »
wählen und mit »OK« bestätigen.
– Die zur Anmeldung am Router benötigte PIN wird
angezeigt (8 Stellen).
Hinweis:
7
Entnehmen Sie der Bedienungsanleitung des Routers, wie
die PIN mittels PC eingegeben wird.
10 Die PIN mit dem PC am Router eingeben (z.B. AVM
x: Menüpunkt WLAN-Einstellungen … WPS)
FRITZ!Bo
und speichern.
« (grün) aktivieren.
yy
V
« oder »Λ« wählen und die
« oder »>« wählen.
<
Netzwerkkonfiguration
« oder »<«
>
V
« oder »Λ«
« oder »>« wählen
<
PIN
Zurück BeendenVerbinden Testen Wählen
V
«, »Λ«, »<« oder »>«
< >
Hinweis:
7
Die PIN muss innerhalb von 2 Minuten eingegeben werden. Ist dies nicht der Fall, wird die Verbindung zwischen
Internet TV und Router abgebrochen.
11 Anmeldung an das Heimnetzwerk mit »
starten.
– Die Meldung »Verbindung mit Gateway: Erfolgreich«
wird eingeblendet.
12 Wenn die Meldung erlischt, mit »
dung zum Netzwerk prüfen.
– Anzeige: »Testen ... Bitte warten«, nach erfolgreicher
Anmeldung »Verbindung mit Gateway: Erfolgreich«
und »Internetverbindung: Erfolgreich«.
« (grün)
yy
« (grün) die Verbin-
yy
13 Einstellung mit »EXIT« beenden.
Die automatische Anmeldung mit Eingabe
des Netzwerk-Kennwortes
Verwenden Sie diese Art der Anmeldung, wenn Ihr Router
„WPS-PBC“ oder die WPS-PIN-Eingabe nicht unterstützt.
1 Menü mit »MENU« aufrufen.
2 Menüpunkt »Einstellungen« mit »OK« aktivieren.
3 Menüpunkt »Netzwerkkonfiguration« mit »
wählen und mit »OK« bestätigen.
– Das Menü »Netzwerkkonfiguration« wird eingeblen-
det.
4 Zeile »Verbindungstyp ändern« mit »
wählen und mit »OK« bestätigen.
Timeranwendungen Einstellungen
Verbindungstyp ändern Kabellos
WLAN Aus
Netzwerk auswählen
Netzwerkkonfiguration Auto
Erweitert
5 Die Option »Kabellos« mit »<« oder »>« wählen und mit
»OK« bestätigen.
– Eine Abfrage wird eingeblendet.
6 Die Funktion »WLAN« mit »
7 Zeile »Netzwerkkonfiguration« mit »
len und die Option »Auto« mit »
8 Die Zeile »Netzwerk auswählen« mit »
wählen und mit »OK« bestätigen.
– Das Menü »Netzwerk auswählen« wird eingeblendet,
die vorhandenen Netzwerke werden gesucht und
angezeigt.
9 Das gewünschte Netzwerk mit »
wählen und mit »OK« bestätigen.
– Das »Kennwort« Menü wird eingeblendet.
Hinweis:
7
Damit sich das Internet TV am Heimnetzwerk anmelden
kann, muss der Netzwerkname (SSID) ausschließlich
ASCII Zeichen beinhalten.
Netzwerkkonfiguration
« (grün) aktivieren.
yy
<
« oder »<«
>
V
« oder »Λ«
N/A
Zurück BeendenWählen
V
« oder »Λ« wäh-
« oder »>« wählen.
V
« oder »Λ«
V
«, »Λ«, »<« oder »>«
OK
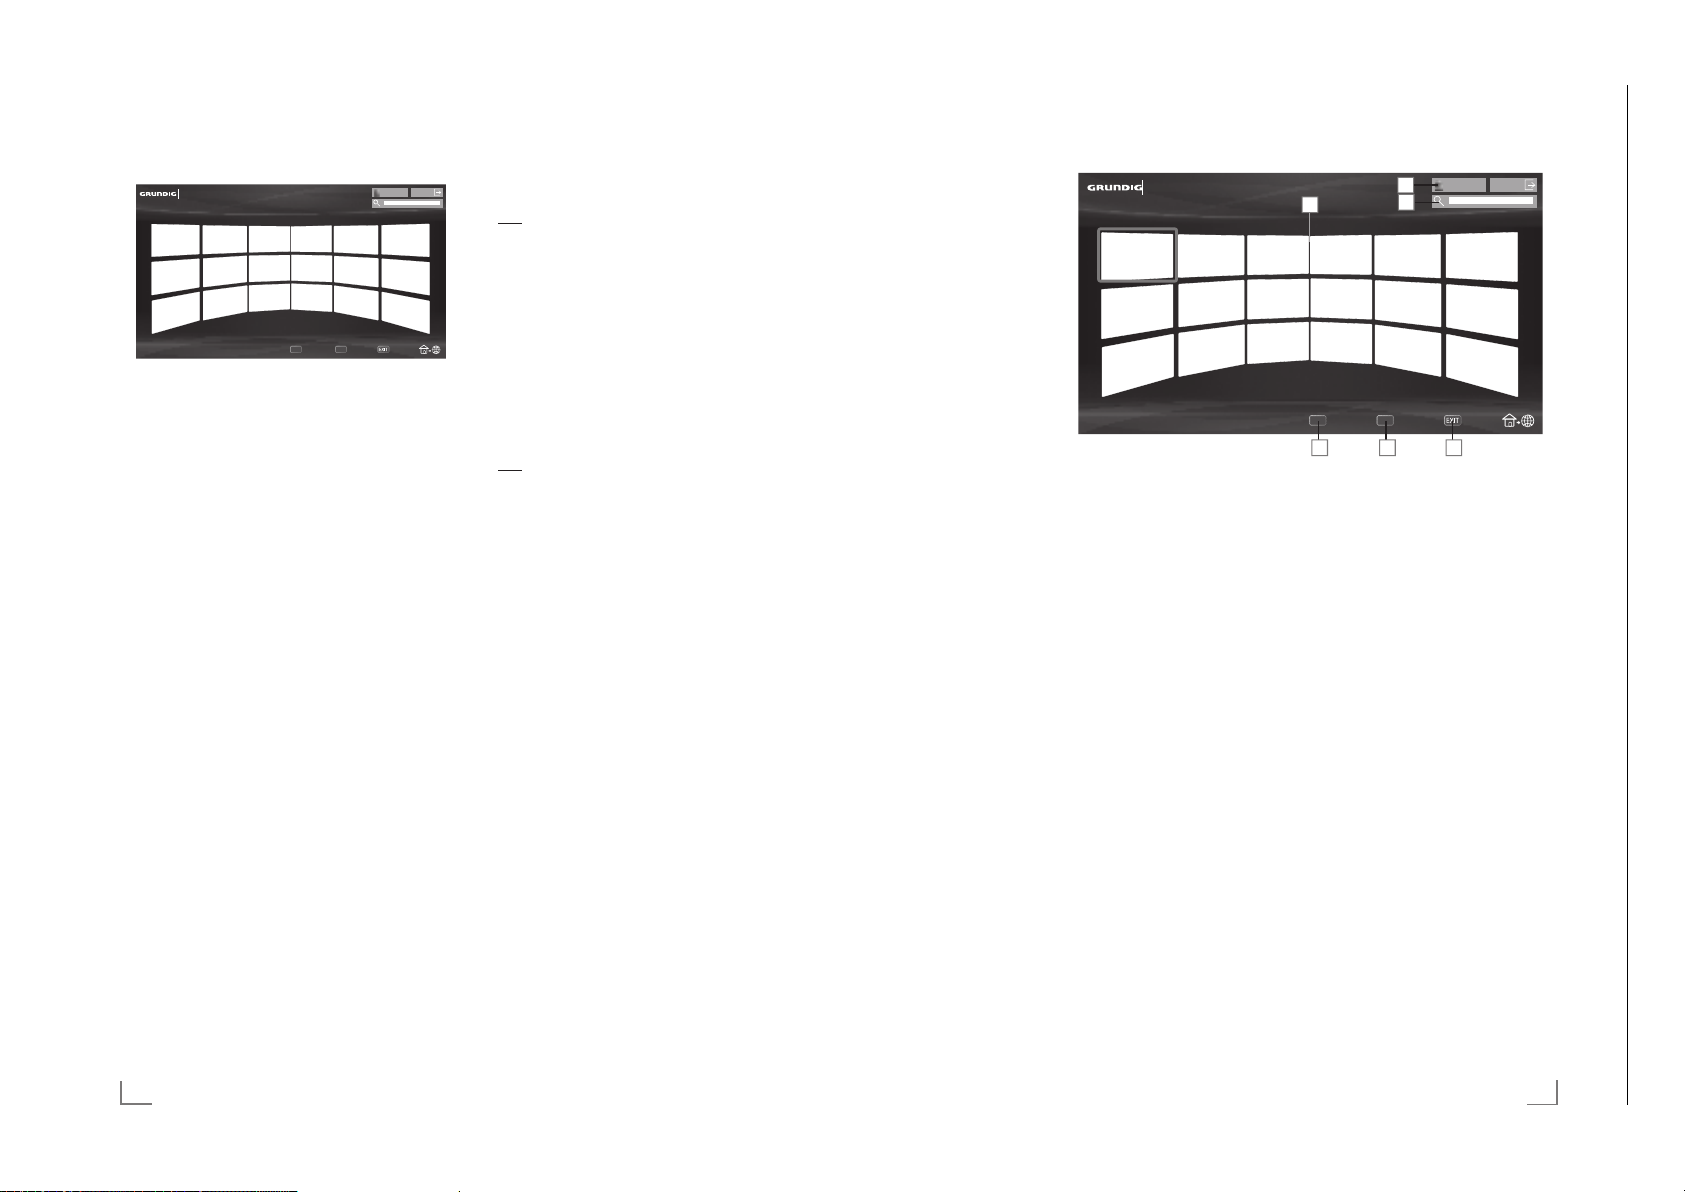
10 Das erste Zeichen/Ziffer des benötigten Kennworts mit
V
«, »Λ«, »<« und »>« wählen und mit »OK« zur
»
nächsten Eingabestelle schalten.
– Mit »Shift« ° »OK« kann zwischen Großbuchsta-
ben/Nummer
umgeschaltet werden.
– Zum Löschen von Zeichen/Ziffern die Schaltfläche
»
11 Kennwort mit »
– Die Meldung »Verbinde... Bitte warten« wird einge-
blendet.
12 Wenn die Meldung erlischt, mit »
dung zum Netzwerk prüfen.
– Anzeige: »Testen ... Bitte warten«, nach erfolgreicher
Anmeldung »Verbindung mit Gateway: Erfolgreich«
und »Internetverbindung: Erfolgreich«.
n und Kleinbuchstaben/Sonderzeichen
« wählen und mit »OK« bestätigen.
« (grün) bestätigen.
yy
« (grün) die Verbin-
yy
13 Einstellung mit »EXIT« beenden.
Hinweis:
7
Wenn die IP Adresse nicht automatisch vergeben wird,
setzen Sie die Einstellung im Kapitel „Die manuelle Anmeldung“ fort, siehe „Langanleitung“.
12
DEUTSCH
DEUTSCH
13
Page 11
SMART INTER@ACTIVE TV 3.0 FUNKTIONEN
Chassis MKGRUNDIG Service
1 - 11
----------------------
SMART INTER@ACTIVE TV 3.0 FUNKTIONEN
----------------------
Smart Inter@active TV 3.0 Applikationen
Die Option „Smart Inter@active TV 3.0” Ihres Internet TV bietet Ihnen den Zugang zum Internet, wenn das Internet TV an
Ihrem Heimnetzwerk mit Internetzugang angeschlossen ist.
Sie können die verschiedensten Applikationen aus dem Internet oder dem GRUNDIG AppLICATION store abrufen, über
das Internet telefonieren, Videos betrachten, Bilder ansehen
und soziale Netzwerke besuchen. Des Weiteren können Sie
z. B. nach Sportmeldungen suchen, den Wetterbericht abrufen
und nach Ärzten und Apotheken suchen.
Hinweise:
7
Die Verfügbarkeit der Applikationen und ihr Inhalt kann
von Land zu Land unterschiedlich sein.
7
Mit „Smart Inter@active TV 3.0” können keine Dateien
heruntergeladen und gespeichert werden. Ein „Upload“
von Dateien auf eine Web-Seite wird nicht unterstützt.
„Add-ons“ können nachträglich nicht installiert werden,
mit Ausnahme der Applikationen aus dem GRUNDIG AppLICATION store.
7
Grundig ist nicht für den Inhalt und die Qualität des Inhaltes der Applikationen verantwortlich. Dies unterliegt der
Verantwortung des jeweiligen Anbieters.
7
Lokale und Globale Applikationen unterliegen einem begrenzten Anwendungszeitraum durch die Diensteanbieter.
Die Diensteanbieter können Ihre Applikationen uneingeschränkt ändern, einschränken, erweitern und entfernen.
Grundig hat auf diese Änderungen keinen Einfluss.
7
Grundig behält sich alle Rechte zum Ändern, Einschränken,
Erweitern und Entfernen der Internet Applikationen vor.
7
Bei verschiedenen Applikationen kann es notwendig sein,
über die Homepage der Applikationen einen separaten
Zugangscode anzufordern. Wenn Sie mit Ihrem Internet
TV diese Homepage anwählen, kann es sein, dass der
Inhalt nicht durch das Internet TV unterstützt wird.
Das Menü »SMART INTER@CTIVE 3.0« anwählen
1 Menü mit »MENU« aufrufen.
2 Menüpunkt »Applications Store« mit »
wählen und mit »OK« bestätigen.
– Das Anmeldemenü wird eingeblendet.
Hinweise:
7
Im „normalen“ Internet TV-Betrieb kann das Menü »Meine
Apps« mit »@« aufgerufen und wieder abgeschaltet werden.
7
Wenn Sie eine Applikation starten und das Internet TV
ist nicht mit dem Internet verbunden, wird eine Meldung
eingeblendet.
Ist eine Internetverbindung eingerichtet, jedoch keine »IP
Adresse« vergeben, kann die Applikation auch nicht angezeigt werden.
Überprüfen Sie in diesem Fall die Netzwerkverbindung,
siehe Kapitel auf den Seiten 10 oder 11.
7
Das Navigieren in den Menüs und wie Sie den Zugang zu
den Applikationen einrichten, finden Sie in den nächsten
Kapitel.
« oder »<«
>
USB Tastatur und Maus
An beiden Buchsen »USB« und an Buchse »USB3.0« kann
eine USB-Tastatur mit Maus für die Bedienung des WebBrowsers angeschlossen werden.
Die Tastatur muss dem USB-Standard entsprechen. Eine Tasta-
tur, die einen Treiber benötigt, kann nicht verwendet werden.
Navigieren und Texteingabe bei der Anmeldung
1 Menü »Meine Apps« mit »@« aufrufen.
– Das Anmeldemenü wird eingeblendet.
Willkommen bei
Um Smart Apps vollständig nutzen zu
können, müssen Sie sich registrieren.
hEHUVSULQJHQ $QPHOGHQ 5HJLVWULHUHQ
2 Registrierung mit »OK« starten.
3 Benötigtes Textfeld mit »
und mit »OK« bestätigen.
– Die virtuelle Tastatur wird eingeblendet.
Hinweise zur Dateneingabe:
7
Benötigte Tastenbelegung (Sprache) der Tastatur mit »yy«
(grün) wählen.
7
Die Daten werden mit der virtuellen Tastatur eingeben.
Den benötigten Buchstaben/die Ziffer jeweils mit »
Λ
«, »<« und »>« wählen und mit »OK« bestätigen.
»
7
Zum Umschalten von Großbuchstaben auf Kleinbuchstaben die Schaltfläche »Shift« wählen und mit »OK«
tätigen.
bes
7
Mit »y« (rot) kann eine „Handytastatur“ eingeblendet
werden.
7
Das letzte Zeichen/die letzte Ziffer kann mit »
(blau) gelöscht werden. Mit »
te Eintrag gelöscht.
7
Ist die Eingabe für die Zeile komplett, muss sie „gesendet“
werden, dazu mit »
che »<« wählen und mit »OK« bestätigen.
Die Tastatur wird ausgeblendet.
V
«, »Λ«, »<« und »>« wählen
« (gelb) wird der gesam-
yyy
V
«, »Λ«, »<« und »>« die Schaltflä-
V
yyyy
Zugang zu GRUNDIG AppLICATION store
einrichten
Wenn Sie die Function »GRUNDIG appLICATION store« zum
ersten Male benutzen, sollten Sie einen persönlichen Zugang
einrichten. Durch diese Registrierung erhalten Sie vielfältige Informationen zu den Grundig Applikationen.
1 Menü »Meine Apps« mit »@« aufrufen.
– Das Anmeldemenü wird eingeblendet.
2 Registrierung mit »OK« starten.
3 Name und Vorname eingeben:
Textfeld mit »
»OK« bestätigen. Daten eingeben, nach der Eingabe
mit »
wählen und mit »OK« bestätigen.
Zur nächsten Eingabezeile im gleichen „Reiter“ mit »
schalten und Tastatur mit »OK« einblenden.
Zum nächsten „Reiter“ mit »
Tastatur mit »OK« einblenden.
Hinweis:
7
Zum vorherigen „Reiter“ kann mit »y« (rot) geschaltet
werden.
4 E-Mail Adresse eingeben:
Daten eingeben, nach der Eingabe mit »
und »
bestätigen.
Zum nächsten „Reiter“ mit »
Tastatur mit »OK« einblenden.
5 Kennwort eingeben und Kennwort bestätigen:
Daten eingeben, nach der Eingabe mit »
und »
bestätigen.
«,
Zur nächsten Eingabezeile im gleichen „Reiter“ mit »
schalten und Tastatur mit »OK« einblenden.
Zum nächsten „Reiter“ mit »
Tastatur mit »OK« einblenden.
V
«, »Λ«, »<« und »>« wählen und mit
V
«, »Λ«, »<« und »>« die Schaltfläche »<«
« (blau) schalten und
yyyy
V
« die Schaltfläche »<« wählen und mit »OK«
>
yyyy
« die Schaltfläche »<« wählen und mit »OK«
>
yyyy
«, »Λ«, »<«
« (blau) schalten und
V
«, »Λ«, »<«
« (blau) schalten und
Bei GRUNDIG AppLICATION store anmelden
Wenn Sie das Internet TV auf die Werkseinstellung zurückgesetzen und bei diesem Reset das „Häkchen“ im Feld »Installierte Anwendungen speichern« nicht gesetzt haben, werden
alle Applikationen die zuvor installiert wurden wieder gelöscht.
Bei der Anwahl des Menüs »GRUNDIG appLICATION store«
wird das „Anmeldemenü“ eingeblendet. Melden Sie sich bitte
mit Ihrer E-Mail Adresse und Ihrem Passwort wieder an.
1 Menü »GRUNDIG appLICATION store« mit »@« aufrufen.
– Das Anmeldemenü wird eingeblendet.
2 Anmeldevorgang mit »
3 E-Mail Adresse eingeben:
V
«
Daten eingeben und Tastatur mit »<«. schließen.
Zur nächsten Eingabezeile mit »
mit »OK« einblenden.
4 Kennwort eingeben:
Daten eingeben und Tastatur mit »<«. schließen.
Hinweis:
7
Wurde das Kennwort vergessen »
Ein neues Kennwort wird nach kurzer Zeit an Ihre E-Mail
Adresse gesendet. Dieses Kennwort eingeben.
5 Eingaben mit »
6 Nutzungsbedingungen lesen und mit »OK« akzeptieren.
– Eine Information wird eingeblendet. Wählen Sie, ob
Ihre Applikationen wieder hergestellt werden sollen
oder nur die vorgegebenen Applikationen geladen
werden sollen.
7 Die gewünschte Zeile mit »
mit »OK« bestätigen
– Das Menü »GRUNDIG appLICATION store« wird
V
«
eingeblendet und die Standardapplikationen werden
geladen.
8 Nach kurzer Zeit wird eine Information angezeigt, diese
mit »OK« bestätigen.
yyyy
« (blau) starten.
yyyy
V
« schalten und Tastatur
« (blau) bestätigen.
V
« oder »Λ«, wählen und
« (gelb) drücken.
yyy
6 Aufstellort eingeben:
Daten eingeben, nach der Eingabe mit »
und »
« die Schaltfläche »<« wählen und mit »OK«
>
«
bestätigen.
– Die Meldung »Sie wurden ....« wird eingeblendet, die
Anmeldung war erfolgreich.
V
«, »Λ«, »<«
7 Telefonnummer eingeben (optional):
Daten eingeben, nach der Eingabe mit »
« die Schaltfläche »<« wählen und mit »OK«
und »
>
bestätigen.
8 Eingaben mit »
9 Nutzungsbedingungen lesen und mit »OK« akzeptieren.
– Das Menü »GRUNDIG appLICATION store« wird
eingeblendet und die Standardapplikationen werden
geladen.
« (blau) bestätigen.
yyyy
V
«, »Λ«, »<«
14
DEUTSCH
DEUTSCH
15
Page 12
SMART INTER@ACTIVE TV 3.0 FUNKTIONEN
Chassis MKGRUNDIG Service
1 - 12
----------------------
SMART INTER@ACTIVE TV 3.0 FUNKTIONEN
----------------------
Applikationen auswählen
1 Menü »Meine Apps« mit »@« anwählen.
Meine Apps
Kategorien Werkzeuge Beenden
2 Gewünschte Applikation mit »V«, »Λ«, »<« und »>«
wählen und mit »OK« bestätigen.
– Das Hauptmenü der gewählten Applikation wird nach
kurzer Zeit eingeblendet.
Hinweise:
7
Wird die Funktion »GRUNDIG appLICATION store«
gewählt und das Internet TV hat keine Verbindung zum
Internet, wird ein Hinweis eingeblendet.
7
Besteht eine Netzwerkverbindung über LAN oder WLAN,
es wird jedoch keine IP-Adresse empfangen oder die Internetverbindung wird nicht hergestellt, kann die Funktion
»GRUNDIG appLICATION store« nicht gestartet weren.
Bitte die Netzwerkanschlüsse überprüfen, siehe Seite 10
oder 11.
Der GRUNDIG Online Store
Im GRUNDIG Online Store, der Ihnen Online angeboten
wird, finden Sie zahlreiche Applikationen, die Sie auf Ihrem
Internet TV installieren können.
Im Menü »GRUNDIG appLICATION Store« sind ab Werk einige Applikationen installiert.
Im GRUNDIG Online Store finden Sie eine große Auswahl
weiterer Applikationen, die Sie herunterladen können.
1 Menü »Meine Apps« mit »@« anwählen.
2 Den Grundig Online Store anwählen, dazu die Schaltflä-
che »Online S
und mit »OK« bestätigen.
– Der »Grundig Online Store« wird eingeblendet.
tore« mit »
V
«, »Λ«, »<« und »>« wählen
2QOLQH6WRUH
Applikationen herunterladen und installieren
1 Im Menü »Online Applikationen« die gewünschte Kate-
gorie der Applikationen mit »
« zu den Applikationen schalten;
mit »
>
oder
gewünschte Applikation mit den Ziffertasten wählen:
– »1« – »Sehr beliebt«,
– »2« – »Höchst bewertet«,
– »3« – »Veröffentlichungsdatum«;
oder
wenn gezielt nach einer Applikation gesucht werden soll,
»
« (grün) drücken und Suchbegriff über die virtuelle
yy
Tastatur eingeben.
2 Gewünschte Applikation mit »
wählen und mit »OK« bestätigen.
– Informationen zur Applikation werden eingeblendet.
3 Download mit »
– Die Applikation wird heruntergeladen und installiert.
4 Die Applikation mit »OK« starten;
oder
zum Download weiterer Applikationen »BACK <«
drück
yyyy
en.
V
« oder »Λ« wählen und
V
«, »Λ«, »<« und »>«
« (blau) starten.
Das Hauptmenü
1 Die Applikationen.
2 Schaltfläche zum Online
S
tore.
3 Suchleiste.
4 Wählt die Kategorien.
5 Wählt weitere Funktionen.
6 Beendet die Funktion.
Navigation im Hauptmenü
1 Mit »
« (rot) die Übersicht der Kategorien einblenden.
y
Gewünschte Kategorie mit »
2 Gewünschte Applikation mit »
wählen und mit »OK« bestätigen.
– Das Hauptmenü der gewählten Applikation wird nach
kurzer Zeit eingeblendet.
3 Die weitere Bedienung und mögliche Anwendungen
sind abhängig v
jeweiligen Applikation. Beachten Sie auch die Hinweise
in den Menüs.
on der Struktur in den Untermenüs der
« oder »>« wählen.
<
V
«, »Λ«, »<« und »>«
Meine Apps
2QOLQH6WRUH
Kategorien Werkzeuge Beenden
Wiedergabe und Zusatzfunktionen beim
Abspielen der Applikationen
Hinweis:
7
Einige Applikationen unterstützen nicht alle WiedergabeFunktionen, die Anwahl der Wiedergabe-Funktionen kann
voneinander abweichen.
1 Wiedergabe mit »
2 Wiedergabe-Pause mit »
3 Wiedergabe mit »
4 Während der Wiedergabe Bildsuchlauf mit »
4
« wählen.
»
5 Während der Wiedergabe das vorherige/nächste
Thema mit »
6 Bildinhalt anwählen oder Schreibmarke (Cursor) in der
tuellen Tastatur mit »
vir
ben.
7 Anwahl/Eingabe in den Applikationen oder in der
vir
tuellen Tastatur mit »OK« bestätigen.
8 Verschiedene Untermenüs und Funktionen in den
Applik
« (gelb) und »
»
yyy
9 Die jeweilige Applikation mit »@« abschalten.
10 Die Funktion „Smart Inter@active TV 3.0” mit »EXIT«
abschalten.
8« starten.
!« wählen.
7« beenden.
5« oder »6« wählen.
V
«, »Λ«, »<« und »>« verschie-
ationen können mit »1…0«, »
« (blau) gewählt werden.
yyyy
3
« und
« (rot), »yy« (grün),
y
16
DEUTSCH
DEUTSCH
17
Page 13
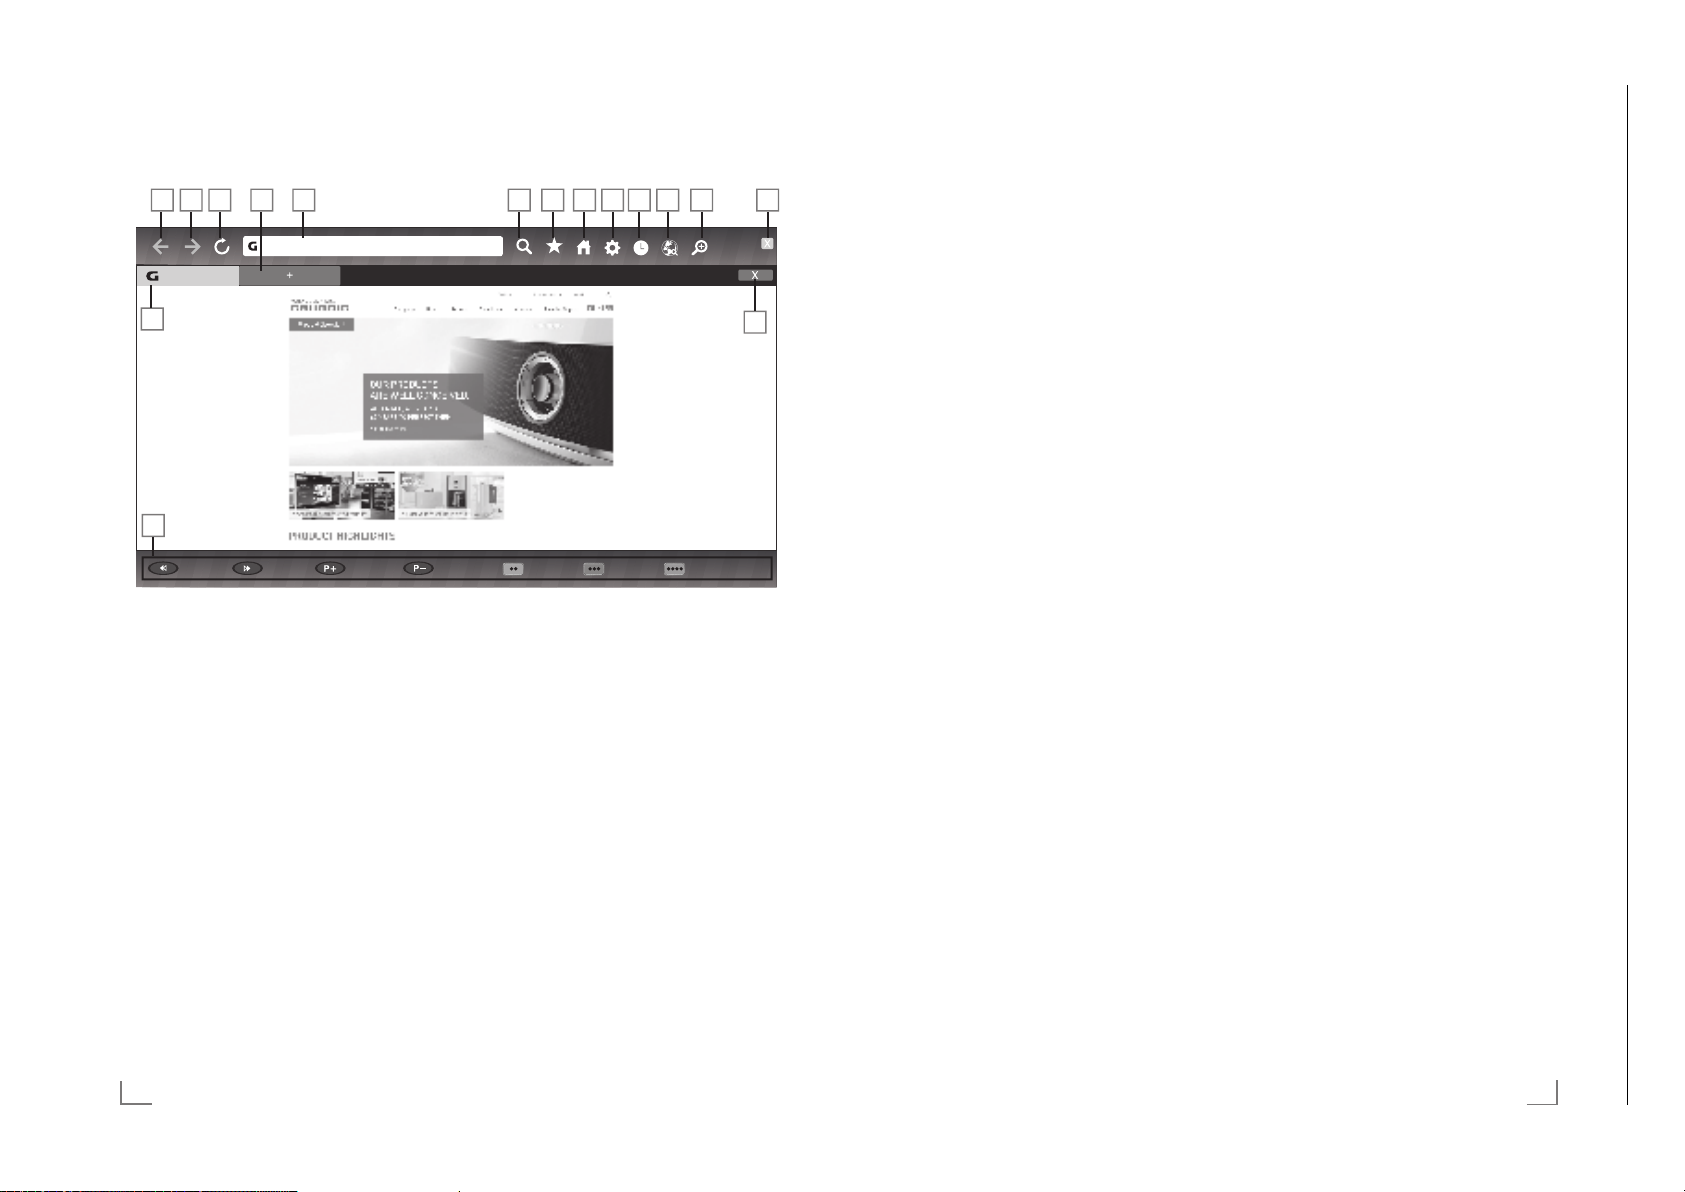
DER WEB BROWSER
Chassis MKGRUNDIG Service
1 - 13
--------------------------------------------------------------------------------------------------------
BETRIEB MIT MULTI MEDIA SERVER
------------------------------------------------------
Das Hauptmenü des WEB Browsers
KWWSZZZJUXQGLJGH
grundig.
Zoom Out Zoom In Page Up Page Down Navigation 3URcess Menu Tool BDr
1 Tasten für die Navigation im WebBrowser.
2 Aufgerufene Seite.
3 Eine Seite zurück.
4 Eine Seite vor.
5 Aktualisieren.
6 Neuen Tab erstellen.
7 Adressfeld.
8 Suchfunktion.
9 Favoriten.
10 Startseite.
11 Einstellungen
12 Chronik.
13 Suche im Web.
14 Zoom.
15 WebBrowser schließen.
16 Tab schließen.
WebBrowser Applikation
Die Applikation WebBrowser bietet Ihnen den bequemen Zugang zum Internet.
1 Menü mit »MENU« aufrufen.
2 Menüpunkt »Webbrowser« mit »
und mit »OK« bestätigen.
– Der Webbrowser wird eingeblendet.
3 Adressfeld mit »
bestätigen.
– Die virtuelle Tastatur wird eingeblendet.
4 Suchbegriff/Adresse eingeben und mit »
bestätigen
Hinweise:
7
Weitere Funktionen und Bedienmöglichkeiten werden un-
ten am Bildschirm angezeigt.
7
Wir empfehlen für das einfache Navigieren im WebBrow-
ser den Gebrauch einer Tastatur und einer Maus. Diese
können an den Buchsen »USB« oder »USB3.0« ange-
schlossen w
benötigen, werden nicht unterstützt.
Λ
« oder »V« anwählen und mit »OK«
erden. Tastaturen die einen speziellen Treiber
« oder »<« wählen
>
« (blau)
yyyy
Wiedergabe von Video-/ Musik-/ und
Bilddaten vom Heimnetz
Sie können die Video-/ Musik-/ und Bilddateien, die auf dem
Digitalen Medien Server gespeichert sind im DLNA Menü
Ihres Internet TV auswählen und wiedergeben.
Hinweise:
7
Sie können auf Videos, Musik oder Fotos von z.B. einem
PC, Smartphone oder NAS (Network Attached Storage)
zugreifen, die kompatibel zum DLNA-Standard sind und
als Digital Media Server (DMS) dienen.
7
Wenn der Digitale Medienserver und das Internet TV
gleichzeitig mit dem Heimnetzwerk drahtlos verbunden
sind, kann es bei der Videowiedergabe zu Bildstörungen
kommen.
7
Ihr Internet TV kann auch auf einen PC zugreifen, der über
Software als Digital Media Server eingerichtet wurde. Ein
problemloser Zugriff bei nicht DMS-zertifizierter Software
kann nicht garantiert werden.
7
Wenn Sie einen PC mit einem Windows Betriebssystem
verwenden, können Sie den Windows Media Player so
konfigurierern, dass er als Digital Media Server verwendet werden kann (ab Version 11).
Die notwendigen Einstellungen sind abhängig von der
jeweiligen Softwareversion.
Digitalen Medien Server anwählen
1 Menü mit »MENU« aufrufen.
2 Menüpunkt »DLNA« mit »
»OK« aktivieren.
Hinweis:
7
Wenn kein Digitaler Media Server angezeigt wird, überprüfen Sie bitte den Anschluß und die Anmeldung an das
Heimnetzwerk.
3 Den gewünschten Digitalen Media Server mit »
« wählen und mit »OK« bestätigen.
»
>
– Der Inhalt wird angezeigt.
« oder »<« wählen und mit
>
<
« oder
Hinweise:
7
Die Struktur der Dateien und der Ordner des Digitalen
Media Servers im Menü ist abhängig vom Media Server,
den Sie verwenden.
7
Werden vom Digitalen Media Server Filme mit Untertiteln
angeboten, so können diese Untertitel nicht angezeigt
werden.
7
Nur Video-Dateiformate mit einem DLNA Zertifikat
(»MPEG_PS_NTSC«, »MPEG_PS_PAL«, »MPEG_TS_
SD_EU« und »MPEG_TS_EU_ ISO«) werden unterstützt.
7
Bei der Wiedergabe von Videos mit hoher Bitrate können
Bildstörungen auftreten.
7
Ordner, die in der DLNA-Anwendung als unbekannt angezeigt werden, können nicht mit dem Internet TV wiedergegeben werden. Dieses Problem lässt sich eventuell durch
Installation eines entsprechenden Codec im Computer
korrigieren.
7
Nur die Audio-Dateiformate mit einem DLNA Zertifikat
(»AAC_ADTS_320«, »LPCM«, »MP3«, »WMABASE« und
»WMAFULL«) werden unterstützt.
7
Nur die Bild-Dateiformate mit einem DLNA Zertifikat
(»JPEG_LRG«, »JPEG_MED« und »JPEG_SM«) werden
unterstützt.
Wiedergabe
1 Im Inhaltsverzeichnis den gewünschten Ordner mit »V«,
Λ
«, »<« oder »>« wählen und mit »OK« bestätigen.
»
– Die vorhandenen Titel werden angezeigt.
2 Gewünschten Titel mit »
3 Wiedergabe mit »
4 Wiedergabe Pause mit »
Wiedergabe mit »
5 Vorhergehenden Titel mit »
6« anwählen.
mit »
6 Wiedergabe mit »
7 Zurückschalten zur Übersicht mit »BACK <«.
8 DLNA Funktion mit »EXIT« beenden.
V
«, »Λ«, »<« oder »>« wählen.
8« starten.
!« wählen.
8« fortsetzen.
5« anwählen, nächsten Titel
7« beenden.
18
DEUTSCH
DEUTSCH
19
Page 14
USB-BETRIEB
Chassis MKGRUNDIG Service
1 - 14
-------------------------------------------------------------------------------------------------------------------------------
USB-BETRIEB
-------------------------------------------------------------------------------------------------------------------------------
Dateiformate
Ihr Internet TV kann folgende Dateiformate verarbeiten, die
über die USB-Buchsen zugeführt werden.
Videodaten
Spezielle Codecs zur Videokomprimierung und – dekomprimierung sorgen für mehr Speicherplatz, ohne die Bildqualität
übermäßig zu be einträchtigen.
Ihr Internet TV gibt Videodateien in den Formaten XVID,
H.264/MPEG-4 AVC(L4.1, 4 Referenzbilder), MPEG-4,
MPEG-2, MPEG-1, MJPEG und MOV wieder.
Dabei werden die folgenden Dateinamener weiterungen unterstützt: “.avi”, “mkv”, “.mp4”, “.ts”, “.mov”, “.mpg”, “.dat”,
“.vob”,”.divx”.
Formatierungsinformationen (Codec) sind in den Dateiinhalt
eingebettet und können je nach Dateiendung variieren. „.avi“,
„.mvk“ oder „.divx“-Dateien mit Divx-Codec werden nicht wiedergegeben.
Solche Dateien können auch per MP3, AAC, DTS 2.0 oder
Dolby Digital komprimierte Audiodateien enthalten.
DTS 2.0+Digital Out kennzeichnet die duale Fähigkeit zur
Weitergabe des DTS-enkodierten digitalen Bitstreams an einen
externen DTS-Decoder zur Wiedergabe sowie zum Downsampling des digitalen Surround-Soundtracks zur Wiedergabe in
einer 2-Kanal-Umgebung über analoge Ausgänge.
Audiodaten
Ihr Internet TV spielt Audiodaten in den For maten MP3, AAC
ab.
MP3 ist eine Abkürzung für MPEG-1 Level 3 und basiert auf
dem MPEG-1-Standard, der von der MPEG (Motion Picture
Expert Group) entwickelt wurde.
AAC steht für Advanced Audio Coding und wurde ebenfalls
von der MPEG entwickelt. AAC liefert eine bessere Tonqualität
bei identischer Datenrate.
WMA (Windows Media Audio) ist ein von Microsoft entwickelter Komprimierungsstandard für Audiodaten.
Solche Formate ermöglichen Aufzeichnung und Wiedergabe
von Audiodateien, die so gut wie eine CD klingen, jedoch nur
einen Bruchteil des Speicherplatzes belegen.
Unterstützte Dateinamenerweiterungen: MP3, MP2, WMA,
M4A, AAC.
MP3-Dateien können wie vom Computer gewohnt in Ordnern
und Unterordnern organisiert werden.
Informationen zu DTS-Patenten finden Sie unter http://patents.
dts.com. Hergestellt unter Lizenz von DTS Licensing Limited.
DTS, das Symbol und DTS und das Symbol gemeinsam sind
eingetragene Marken und DTS Studio Sound ist eine Marke der
DTS, Inc. © DTS, Inc. Alle Rechte vorbehalten.
Bilddaten
Ihr Internet TV gibt Bilder in den Formaten JPEG, PNG und
BMP wieder.
JPEG ist eine Abkürzung für Joint Picture Experts Group. Es
bezeichnet ein Verfahren zur Kom primierung von Bilddateien.
PNG und BMP sind Verfahren zum Speichern von Bilddaten
mit keinen oder nur geringen Verlusten.
Bilddateien können gemeinsam mit Dateien anderer Typen auf
einem Medium gespeichert werden.
Diese Dateien lassen sich in Ordnern und Unterordnern organisieren.
Der Dateimanager
Der Dateimanager zeigt Video-, Audio- und Bilddateien auf
externen Datenträgern an.
Falls ein externer Datenträger Dateien unterschiedlicher Formate enthält, können Sie nicht benötigte Formate bei Bedarf
ausfiltern.
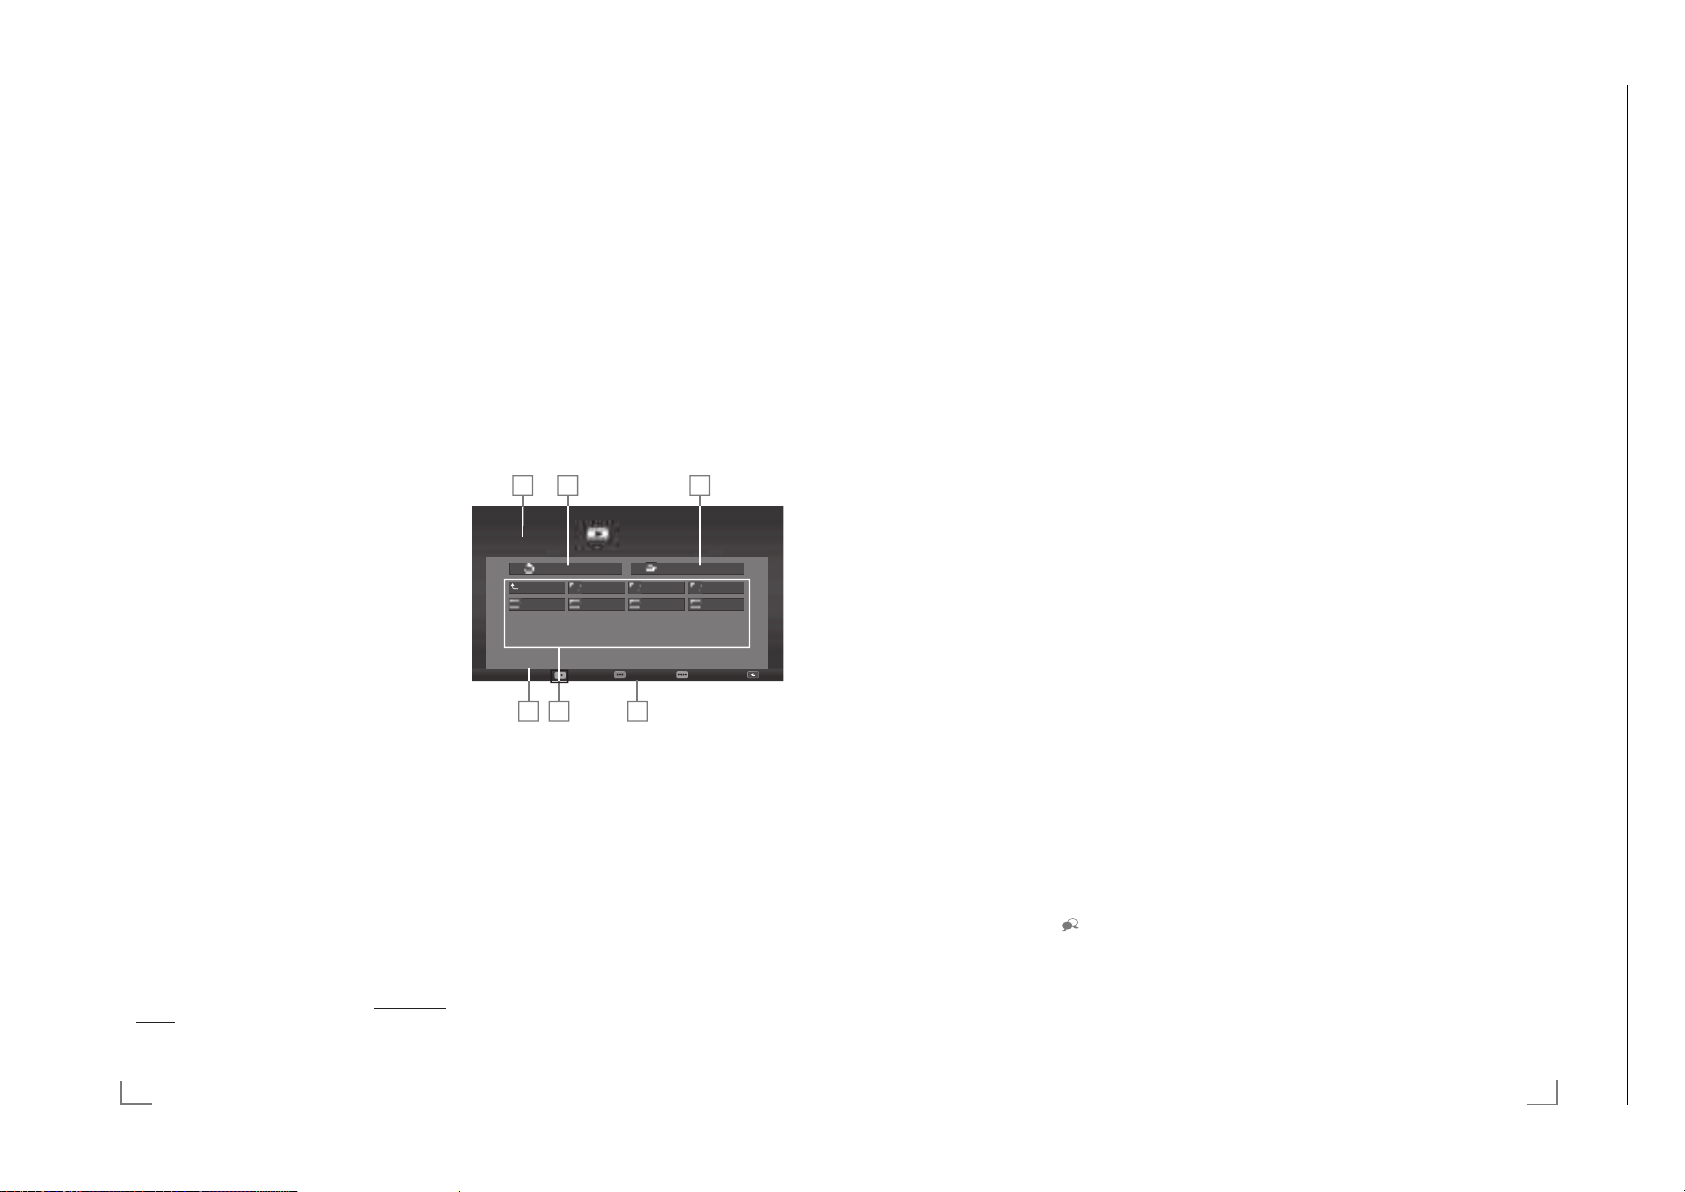
Das Menü des Dateimanagers
Medienplayer
Geräteauswahl Typ: Foto
Ordner aufwärts
Urlaub 4
No Name/
Urlaub 1 Urlaub 2 Urlaub 3
Urlaub 5
1 Vorschau der ausgewählten Datei.
2 Auswahl des Datenträgers.
3 Gewähltes Datenformat.
4 Name des Datenträgers.
5 Ordner des Datenträgers.
6 Menünavigation.
Urlaub 6 Urlaub 7
ZurückEinstellungenZur Wiedergabel.Mediaoptionen
Wiedergabe – Grundfunktionen
1 Menü mit »MENU« aufrufen.
2 Menüpunkt »Medienplayer« mit »
und mit »OK« aktivieren.
– Das Menü »Medienplayer« wird eingeblendet.
3 Die Option »USB« mit »
»OK« bestätigen.
– Der Inhalt wird angezeigt.
Hinweis:
7
Wenn der Datenträger noch nicht angezeigt wird, mit
« (gelb) die Übersicht aktualisieren.
»
yyy
4 Die Schaltfläche »Typ« mit »
»OK« bestätigen.
5 Gewünschten Dateityp (Spielfilm, Musik, Foto) mit »
6 Gewünschten Ordner oder gewünschte Datei mit »
– Eine Liste der Unterordner (Subdirectory) wird einge-
« wählen und mit »OK« bestätigen.
oder »
>
Λ
«, »<« oder »>« wählen und mit »OK« öffnen.
»
blendet.
Hinweis:
7
Zurückschalten zum Hauptordner mit »BACK <«.
7 Gewünschten Titel oder gewünschtes Bild mit »
Λ
«, »<« oder »>« wählen und Wiedergabe mit »8«
»
starten.
Hinweise:
7
Informationen zu den Film-Daten können mit »?« aufge-
rufen werden.
7
Bei der Wiedergabe von MP3- oder WMA-Dateien wer-
den Informationen zum Albumund Titel angezeigt.
7
Bei der Wiedergabe von Bilddateien kann mit »?« ein
„Bedienfeld“ eingeblendet werden.
7
Bei der Wiedergabe von Bild-Daten schaltet sich der Da-
teimanager ab. Mit »
eingeblendet werden.
8 Wiedergabe mit »
9 Wiedergabe mit »
10 Wiedergabe mit »
– Der Dateimanager wird angezeigt.
Hinweise:
7
Mit »Λ« wählen Sie »Ordner aufwärts«, wenn Sie wieder
zum letzten Ordner zurück-kehren möchten.
7
Es kann vorkommen, dass auch eigentlich unterstützte Da-
teien im USB-Betrieb nicht richtig funktionieren. Dies liegt
daran, dass bestimmte Dateien mit nicht standardisierten
Komprimierungsverfahren aufgezeichnet wurden, obwohl
sie die „richtige“ Dateiendung tragen.
7
Wenn eine Videodatei über mehrere Tonspuren (Audio-
streams) verfügt, können Sie diese bei laufender Wiedergabe im Vollbildmodus mit »
7
Bei Filmen werden lediglich Untertitel im Format .SRT,
.SUB, .ASS, .SSA, .SMI unterstützt. Dabei müssen die Namen der Untertitel- und Filmdatei identisch sein. Andernfalls werden keine Untertitel angezeigt.
7« kann der Dateimanager wieder
!« unterbrechen (Pause).
8« fortsetzen.
7« beenden.
« oder »<« wählen
>
« oder »>« wählen und mit
<
Λ
« und »>« wählen und mit
« umschalten.
<
V
V
«,
«
«,
20
DEUTSCH
DEUTSCH
21
Page 15
LIVESHARE
Chassis MKGRUNDIG Service
1 - 15
Hinweis – Kindersicherung:
Mit dem PIN-Code 2356 können Sie die
Einstellungen ändern.
-BETRIEB
-------------------------------------------------------------------------------------------------------
KOMFORTFUNKTIONEN
----------------------------------------------------------------------
Die Liveshare-Funktion
Mit Liveshare können Full-HD Filme bis zur Blu-ray Qualität
oder Online-Inhalte drahtlos vom Mobilgerät auf Ihr Internet
TV übertragen werden.
Liveshare-Funktion anwählen
1 Mobilgerät einschalten.
2 Menü mit »MENU« aufrufen.
3 Menüpunkt »Ansicht teilen« mit »
und mit »OK« bestätigen.
– Das Menü »Live Share« wird eingeblendet.
4 Am Mobilgerät die Medienausgabe starten.
– Die Verbindung wird hergestellt. Der Desktop-Inhalt
des Mobilgerätes wird am Internet TV dargestellt.
Hinweis:
7
Informieren Sie sich auf der WEB Seite des Herstellers ob
Ihr Mobilgerät die LiveshareFunktion unterstützt.
5 Live Share mit »EXIT« beenden.
22
DEUTSCH
« oder »<« wählen
>
Menüs sperren
Mit dieser Funktion können Sie folgende Menüs
des Fernsehgerätes sperren: »Automatischer
Suchlauf«, »Manuelle Abstimmung« und »Programmtabelle«. Diese Menüs sind nur durch Eingabe des PIN-Codes zugänglich.
1 Im Menü »Jugendschutz« die Zeile »Menü
ren« mit »
sper
»
« oder »>« bestätigen.
<
V
« oder »Λ« wählen und mit
2 PIN-Code »1234« mit »1...0« eingeben.
3 Sperre mit »
« oder »>« aktivieren (»Ein«).
<
Hinweis:
7
Menüsperre abschalten dazu mit »<« oder
»
« die Einstellung »Aus« wählen.
>
4 Eine Menüebene zurückschalten mit »BACK
« oder Einstellung mit »EXIT« beenden.
<
Multifunktionsschalter sperren
Bei aktiver Tastensperre ist der Mulifunktionsschalter am Fernsehgerät ohne Funktion.
1 Im Menü »Jugendschutz« die Zeile »Tasten-
V
sper
re« mit »
»
« oder »>« bestätigen.
<
« oder »Λ« wählen und mit
2 PIN-Code »1234« mit »1 ... 0« eingeben.
3 Tastensperre mit »
(Ein) oder abschalten (Aus).
« oder »>« aktivieren
<
4 Eine Menüebene zurückschalten mit »BACK
« oder Einstellung mit »EXIT« beenden.
<
PIN-Code ändern
Sie können statt des Werkscodes »1234« einen
persönlichen PIN-Code eingeben. Notieren Sie
sich bitte Ihren persönlichen PIN-Code.
1 Im Menü »Jugendschutz« die Zeile »PIN
änder
»OK« bestätigen.
2 Aktuellen PIN-Code 1 2 3 4 mit »1...0«
eingeben.
3 Persönlichen neuen PIN-Code mit »1...0«
viers
4 Persönlichen neuen PIN-Code mit »1...0«
noch einmal eingeben.
5 Eine Menüebene zurückschalten mit »BACK
« oder Einstellung mit »EXIT« beenden.
<
V
n« mit »
« oder »Λ« wählen und mit
tellig eingeben.
Fernseh-Programme sperren
Sie können einzelne Fernseh-Programme mit
einem persönlichen PIN-Code sperren, zum
Beispiel Programme, die sich nicht für Kinder
eignen.
1 Menü mit »MENU« aufrufen.
2 Menüpunkt »Einstellungen« mit »OK« akti-
en.
vier
3 Menüpunkt »Installation« mit »
wählen und mit »OK« aktivieren.
4 Die Zeile »Programmtabelle« mit »
»
Λ
« wählen und mit »OK« bestätigen.
5 Das zu sperrende Programm mit »
»
« oder »>« markieren.
<
– Das Programm wird mit »« markiert.
6 Den Bearbeitungsmodus mit »
aktivier
en.
7 Die Zeile »Programmsperre« mit »
»
Λ
« wählen und mit »OK« bestätigen.
6 Mit »
« oder »>« die Spalte »Sperre«
<
anwählen und mit »OK« bestätigen.
« oder »<«
>
V
« oder
V
«, »Λ«,
« (gelb)
yyy
V
« oder
7 PIN-Code »1234« mit »1 ... 0« eingeben.
8 Funktion mit »OK« bestätigen.
– Das Programm wird mit »
« markiert.
Hinweis:
7
Zum Aufheben der Sperre das Programm mit
»
V
«, »Λ«, »<« oder »>« wieder anwählen,
den Bearbeitungsmodus mit »
aktivier
en, die Zeile »Programm freigeben«
mit »
V
« oder »Λ« wählen und mit »OK«
« (gelb)
yyy
bestätigen.
9 Einstellung mit »EXIT« beenden.
Ein gesperrtes Fernseh-Programm
ansehen
Sie können ein durch den PIN-Code gesperrtes
Fernseh-Programm freigeben.
1 Das gesperrte Fernseh-Programm mit
»1…0« oder »P+«, »P–« anwählen.
2 PIN-Code »1234« mit »1 ... 0« eingeben.
Hinweis:
7
Das Fernseh-Programm wird nach einem
Wechsel des Programmplatzes wieder ge-
sperrt.
DEUTSCH
71
Page 16
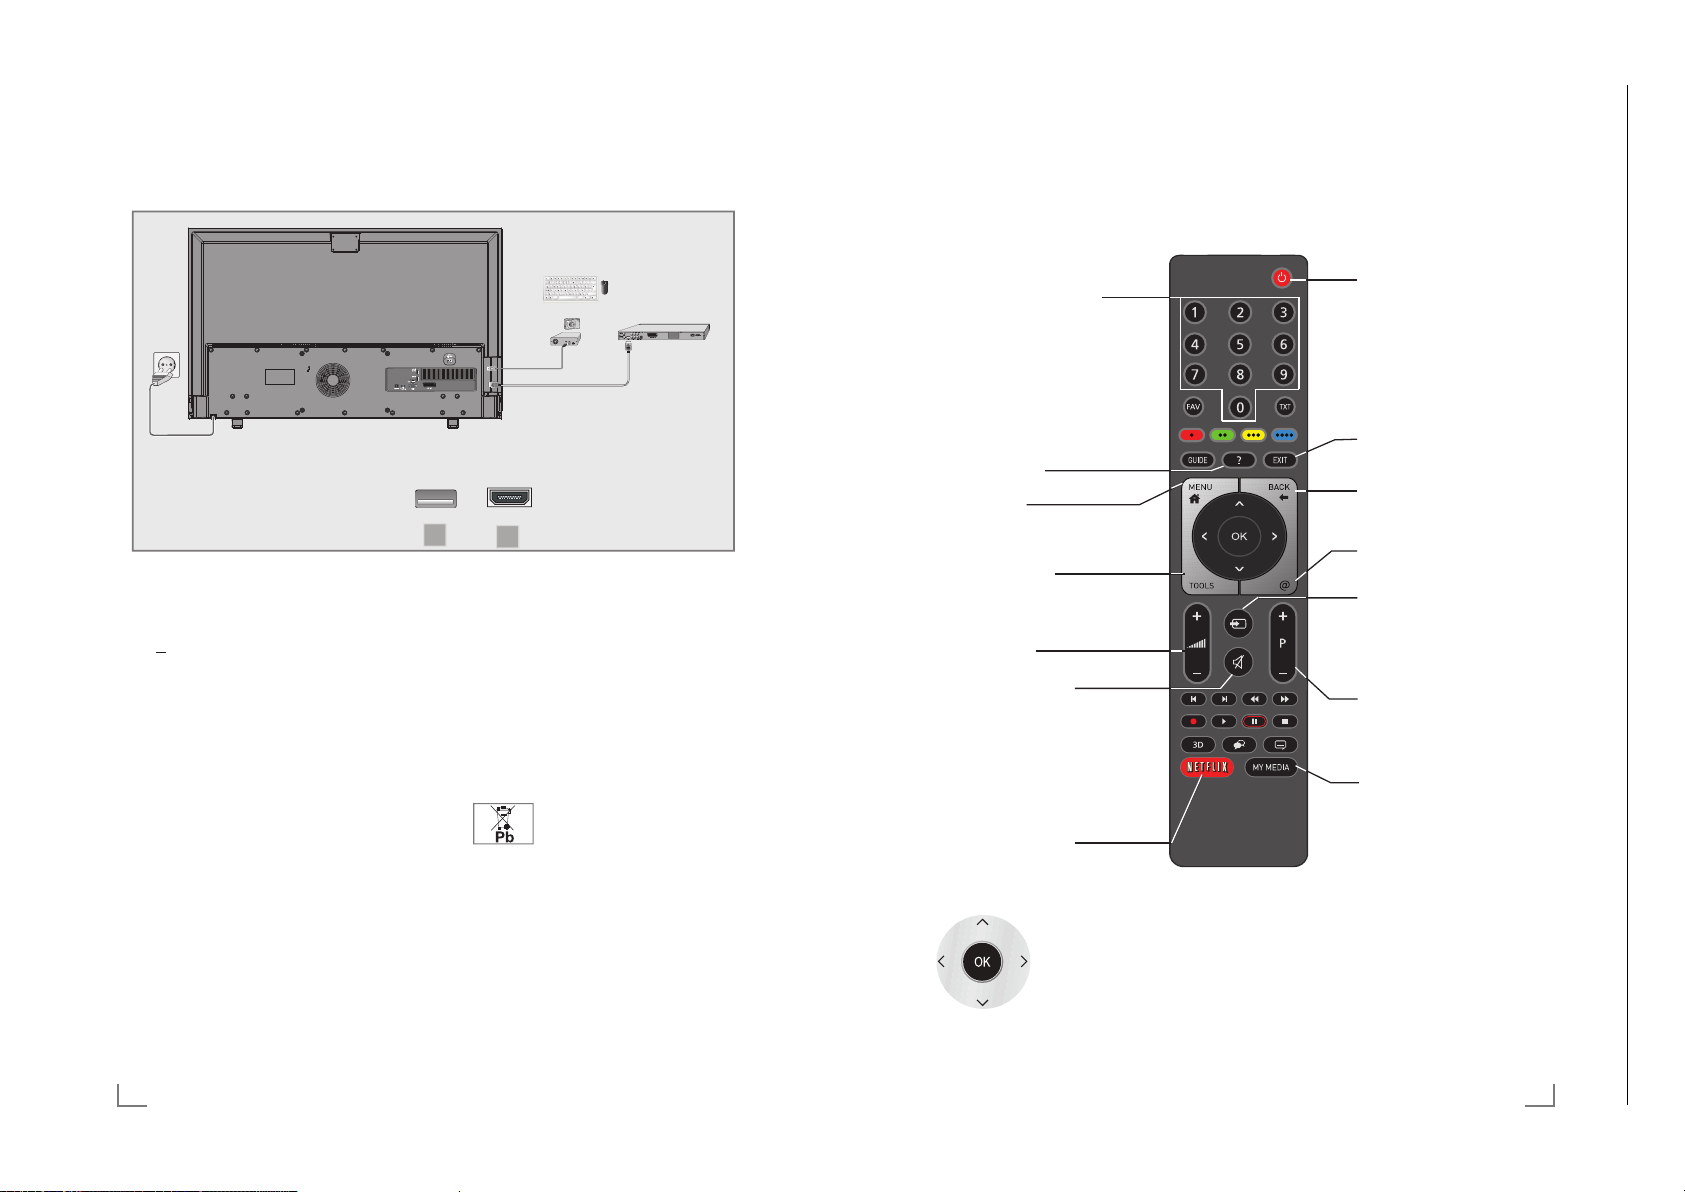
Operating Hints This chapter contains excerpts from the operating instructions. For further particulars please refer to the appropriate user instructions which can be downloaded by www.grundig.com, submenu Downloads/Manuals.
Chassis MKGRUNDIG Service
1 - 16
CONNECTION/PREPARATION
A
Connecting external data media
(socket A)
1 Plug the external hard disk to the »USB 3.0« USB
interface of the Internet TV;
or
plug the memory stick in one of the »USB1« or »USB2
(HDD)« sockets of the Internet TV.
Notes:
7
Both sockets »USB1« or »USB2 (HDD)« of the Internet
TV supports 500 mA current according to the USB
standard. Devices such as external hard disk and etc. that
consume more power can only be connected to the »USB
3.0« USB interface of the Internet TV.
7
You can also connect a USB keyboard with mouse to the
sockets »USB«.
Connecting a BluRay player or a game
pad (socket B)
1 Connect the »HDMI1 (MHL)«, »HDMI2«, »HDMI3«
or »HDMI4 (ARC)« socket on the Internet TV and the
cor
responding HDMI socket on the BluRay player or the
game pad using a standard HDMI cable.
Connecting the power cord
1 Plug the power cord into the wall socket.
Note:
7
Only plug the device into the mains socket after you have
connected the external devices and the antenna.
7
Do not use an adapter plug or extension cable which
does not meet the applicable safety standards. Do not
make changes on the power cord.
Inserting batteries in the remote control
1 Open the battery compartment by removing the lid.
2 Insert the batteries (2 x 1.5 V micro; for example R03 or
AAA). Obser
battery compartment).
3 Close the battery compartment.
Note:
7
If the Internet TV no longer reacts properly to remote
control commands, the batteries may be flat. Be sure
to remove the exhausted batteries from the battery
compartment.
7
The manufacturer accepts no liability for damage resulting
from used batteries.
Environmental note
7
batteries this symbol might be used in combination with a
chemical symbol. The chemical symbols for mercury (Hg)
or lead (Pb) are added if the battery contains more than
0.0005% mercury or 0.004% lead.
Batteries, including those which contain no heavy metal,
may not be disposed of with household waste. Please
dispose of used batteries in an environmentally sound
manner. Find out about the legal regulations which apply
in your area.
----------------------------------------------------------------
B
ve the polarity (marked on the base of the
This symbol on the battery or on the
packaging indicates that the battery
provided with this product shall not be
treated as household waste. On certain
OVERVIEW
------------------------------------------------------------------------------------------------------------------------------------
Remote control - main functions
Switches on from standby mode.
Displays information.
Opens the menu.
Opens the Tools menu.
Adjusts the volume.
Turns volume on/off (mute).
etflix applications.
Opens N
Cursor Control
Mo
ves the cursor up and down in the
menus.
Moves the cursor left/right in menus.
Activates various functions.
Turns on and off the Internet TV set
(stand-by).
Exits menu and applications.
Switches the menus back one menu
level.
Opens MyApps menu.
Opens the pre-selection menu for AV
channels.
Then mak
e the selection with »
« and press »OK« to accept.
»
>
Switches on fr
Opens Media Play
om standby.
er menu.
« or
<
6
ENGLISH
ENGLISH
7
Page 17
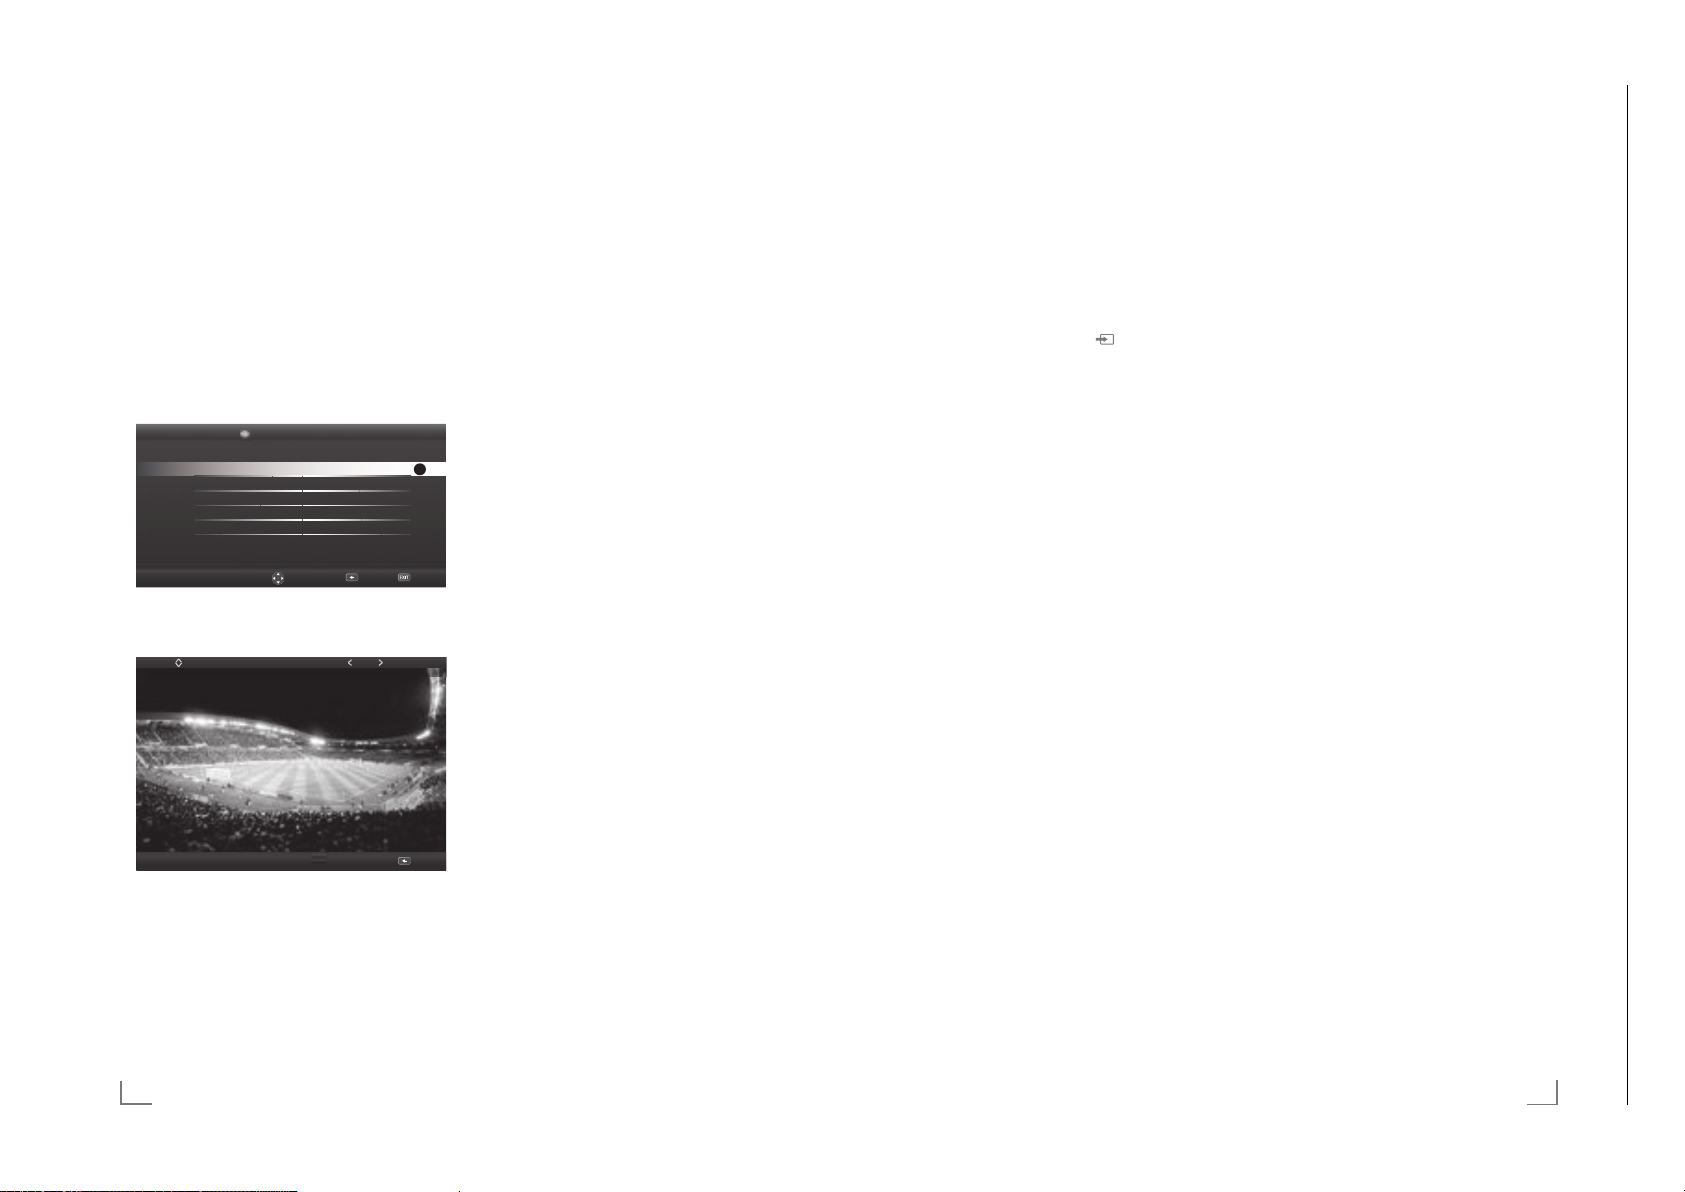
OVERVIEW
Chassis MKGRUNDIG Service
1 - 17
------------------------------------------------------------------------------------------------------------------------------------
MONITOR OPERATION
-----------------------------------------------------------------------------------------
Navigation in the menus
The main menu and submenus for your Internet TV enable you
to select many functions and carry out all required settings.
You access the main menu with »MENU« and select the
submenus using »
press »OK«.
Select the settings using »
setting, press »OK«.
To return to the previous menu level, press »BACK <« and to
hide the menu, press »EXIT« again.
Example, setting the Picture Mode
1 Open the menu with »MENU«.
– The main menu appears.
2 Activate the menu item »Settings« with »OK«.
3 Activate the menu item »Picture Settings« with »OK«.
– »Picture Settings« menu is displayed.
< Settings Sound Settings >
4 Select the required line »Picture Mode« with »V« or
Λ
»
5 Select Picture Mode with »
6 Press »BACK <« to return to »Picture Settings« menu,
or press »EXIT« to end the setting.
« or »<«. To activate the required submenu,
>
V
« oder »Λ«. To activate the
Picture Settings
Picture Format 16:9
Picture Mode Vivid
BackliJKt User
AdYanFHG
Restore default display settings
« and press »OK« to confirm.
Picture Mode
« or »>«.
<
Natural
OK
Back ExiWChDQJe Area
Back
Control buttons on the Internet TV
ON • OFF – Power switch, switches the Internet TV into
standby mode and off.
Multi function switch
Using the multi function switch »
different settings can be made.
There may be no menus visible on the screen.
Pressing the switch, switches in the Internet TV from
standby mode.
In operation: Pressing the switch displays the navigation
menu.
Moving the switch up or down selects the desired menu
item:
– Set to Volume Navigation;
– Open Input Source Menu;
– Go to Standby.
Access function/setting by pressing.
Moving the switch up/down selects the function/setting.
8/I/SEL« on the Internet TV
Basic functions
Switching on and off
1 Switch the Internet TV to standby with the power switch
»ON • OFF«.
2 Press »
8«, »1…0« or »P+« or »P-« to switch on the
Internet TV from standby mode.
3 Press »
8« to switch the Internet TV to standby.
4 Switch the Internet TV to standby with the power switch
»ON • OFF«.
Selecting AV channels
1 Open »Select Source« menu with » «.
2 Select the desired AV channel position with »
and confirm with »OK«.
Note:
7
The AV preset descriptions can be changed. See
“Settings” section on “Detailed Manual”.
Adjusting the volume
1 Adjust the volume with »
+
o –
«.
Muting
1 Use »p« to switch the sound off (mute) and to switch it
on again.
Displaying information
1 Display information, press »?« repeatedly.
– The display disappears automatically after a short
while.
Picture settings
1 Open the Tools menu with »TOOLS«.
2 Select the line »Picture Mode« with »
3 Select the picture setting by pressing »
Note:
7
Picture setting “Game” can only be selected in »HDMI«,
»Component« or »PC« modes.
4 Press »EXIT« to end the settings.
Audio settings
1 Open the Tools menu with »TOOLS«.
2 Select the line »Sound Presetting« with »
3 Select the audio setting by pressing »
4 Press »EXIT« to end the settings.
V
« or »Λ«.
« or »>«.
<
V
« or »>«.
<
« or »>«
<
« or »Λ«.
Zoom function
With this function, you can enlarge the picture on the Internet
TV.
1 Open the Tools menu with »TOOLS«.
2 Select the line »Zoom« with »
3 Select zoom setting with »
»OK«.
– Image is enlarged as center-focused.
4 To navigate in the enlarged picture, press »
move the screen with »
5 To return to the zoom menu, press »BACK <«.
6 Press »EXIT« to end the settings.
Sleep timer
In the »Sleep Timer« menu you can enter a time for the Internet
TV to switch off. After this time has elapsed, the Internet TV
switches to standby mode.
1 Open the Tools menu with »TOOLS«.
2 Select the line »Sleep Timer« with »
3 Select the switch-off time with »
Note:
7
Set the function to »Off« with »<« or »>« to switch it off.
4 Press »EXIT« to end the settings.
V
« or »Λ«.
« or »>« and confirm with
<
«, »>«, »V« or »Λ«.
<
V
« or »Λ«.
« or »>«.
<
« (red) and
y
8
ENGLISH
ENGLISH
9
Page 18
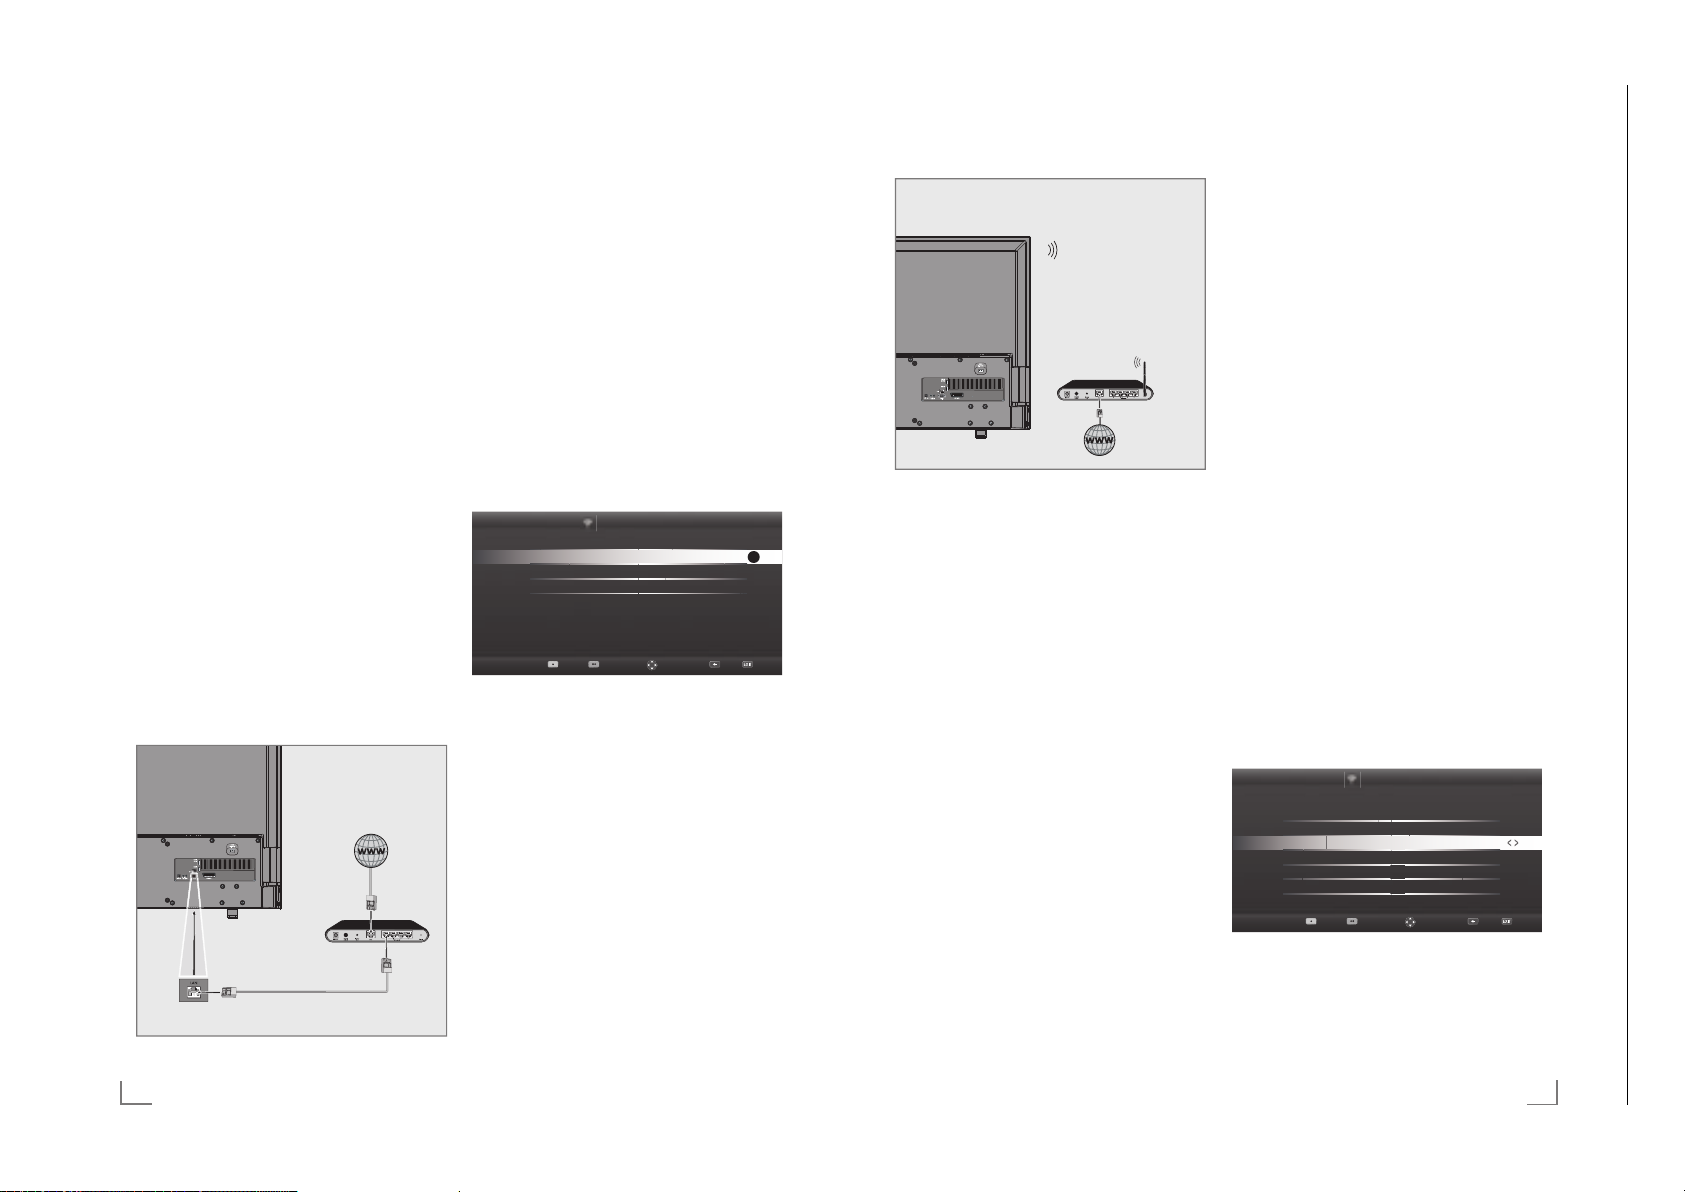
NETWORK SETUP
Chassis MKGRUNDIG Service
1 - 18
-------------------------------------------------------------------------------------------------------------
NETWORK SETUP
-------------------------------------------------------------------------------------------------------------
To use the functions “GRUNDIG AppLICATION store” and
“Operation with Digital Media Server”, you must connect the
Internet TV to your home network with internet access and log
on.
Grundig Application Store is a depot where you can find
various applications that you may use on your Grundig
Internet TV. You can download many applications from
Grundig Application Store. These applications include video,
picture, music, social networking applications, news and sports
applications, weather forecast applications and some specific
applications.
Your Internet TV supports remote control feature for Apple
iPhones, Android. Depending on the features of your phone,
you may control your Internet TV by your phone after
downloading the free »GRUNDIG TV Remote« application
from Apple App Store, Google Play (Android Market).
Network connection
You can establish a wired or wireless connection between
your Internet TV and the local network.
If you want to use a wired network connection, please start
with the instructions here:
If you use a wireless network connection, please follow the
instructions in the "Wireless network connection" section on
page 11.
Note:
7
The following section describes connecting to the home
network if you did not carry this out during the “initial setup”.
Wired network
Wired network connection
1 Connect the output of external modem to »LAN« socket
with Cat 5 cable.
Note:
7
Connection cables are not supplied.
Wired network settings
There are two ways of making the wired network settings.
A Automatic connection,
All data regarding connection settings (»IP Address«,
»Netmask«, »Gateway« and »DNS«) are obtained from
modem automatically.
B Manual connection,
all data regarding connection settings (»IP Address«,
»Netmask«, »Gateway« and »DNS«) must be configured
manually.
Automatic connection
Most of the home networks are Dynamic. If you have a
dynamic network, you must use a DSL modem that supports
DHCP. Modems and IP sharers that support DHCP obtain the
»IP Address«, »Netmask«, »Gateway« and »DNS« values
required for internet access automatically, and thus you are
not required to enter those values manually.
1 Open the menu with »MENU«.
2 Activate the menu item »Settings« with »OK«.
3 Select the menu item »Network Configuration« with »
« and press »OK« to confirm.
or »
<
– »Network configuration« menu is displayed.
Timer Applications Settings
ChDnge Connection T\pH Wired
Network Configuration Auto
AdYanFHG
4 Select the line »Change Connection Type« »V« or »Λ«
and press »OK« to confirm.
5 Select the option »Wired« with »
»OK« to confirm.
6 Select the line »Network Configuration« with »
Λ
« and use »<« or »>« to select »AUTO«.
»
7 With »
y
connection.
– »Connecting ... Please wait« message will be
displayed, and if the connection is established
»Connection To Gateway: Success« message will be
displayed.
8 Press »
yy
also if the local network and internet connection has
been established.
– »Testing ... Please wait« message will be displayed,
and if the connection is established »Connection To
Gateway: Success«, »Internet Connection: Success«
message will be displayed.
Network Configuration
Test ConQection
ChDQJe Area
« or »>« and press
<
« (red) select »Connect« to establish modem
« (green) to check the performed settings and
9 Press »EXIT« to end the settings.
Note:
7
If you do not have a dynamic network, follow the
instructions in manual connection section (see “Detailed
Manual”).
«
>
OK
Back ExLWConQect
V
« or
Wireless network
Wireless network connection
There are different ways of making the wireless network
settings. »Wireless« and »Wireless WPS« (WiFi Protected
Setup).
1 Internet TV includes a built-in Wireless WiFi Adapter to
connect it to wir
Notes:
7
Wireless LAN adapter supports IEEE 802.11B/G and
N communication protocols. We recommend you to use
IEEE 802.11N protocol to obtain the best performance in
wireless HD video playback.
7
If you use a modem that supports IEEE 802.11B/G, video
playback performance may be poor when compared
to a modem that supports IEEE 802.11N since the data
transfer rate of IEEE 802.11B/G protocol is lower.
7
Please note that video playback performance in a DLNA
application on a wireless local network and in a Smart
Inter@active TV 3.0 application on a network with internet
connection depends on the number of users on the
network as it is the case in every wireless network.
7
It is recommended to switch off the equipment that are
not in use in home network in order to avoid unnecessary
network traffic.
7
Placing the modem or wireless network sharer on an
elevated location will increase the wireless connection
reception strength.
7
Wireless connection reception strength may vary
depending on the type of the modem and the distance
between the modem and Internet TV.
eless network.
Wireless network settings
You have several ways to connect your Internet TV to your
home network.
A Automatic connection,
all data regarding connection settings (»IP Address«,
»Netmask«, »Gateway« and »DNS«) are obtained from
modem automatically.
Depending on the router, you can use the following
options:
– Option “WPS-PBC” (Push Button Configuration);
– Connecting with a WPS PIN;
– Connecting by entering the network password.
B Manual connection,
all data regarding connection settings (»IP Address«,
»Netmask«, »Gateway« and »DNS«) must be configured
manually.
Technical requirements
Most of the home networks are Dynamic. If you have a
dynamic network, you must use a DSL modem that supports
DHCP. Modems and IP sharers that support DHCP obtain the
»IP Address«, »Netmask«, »Gateway« and »DNS« values
required for internet access automatically, and thus you are
not required to enter those values manually.
Wireless WPS network connection through
by pressing a button
1 Open the menu with »MENU«.
2 Activate the menu item »Settings« with »OK«.
3 Select the menu item »Network Configuration« with »
« and press »OK« to confirm.
or »
<
– »Network configuration« menu is displayed.
4 Select the line »Change Connection Type« with »
Λ
« and press »OK« to confirm.
»
5 Select the option »Wireless WPS« with »
press »OK« to confirm.
– WiFi warning screen will be displayed.
6 Activate WiFi with »
7 Select the line »WPS Type« with »
the option »Push Button« with »
Timer Applications Settings
ChDQge Connection T\pH Wireless WPS
WiFi On
WPS Type
Select AcFess Point
Network Configuration AUTO
AdYanFHG
8 With »y« (red) select »Connect« to establish modem
connection.
– »Push the WPS button on your Access Point« message
is displayed.
« (green).
yy
Network Configuration
Test ConQection
« or »>« and
<
V
« or »Λ« and select
« or »>«.
<
Push Button
ChDQJe Area
9 Press the WPS button on the router.
«
>
V
« or
N/A
Back ExLWConQect
10
ENGLISH
ENGLISH
11
Page 19
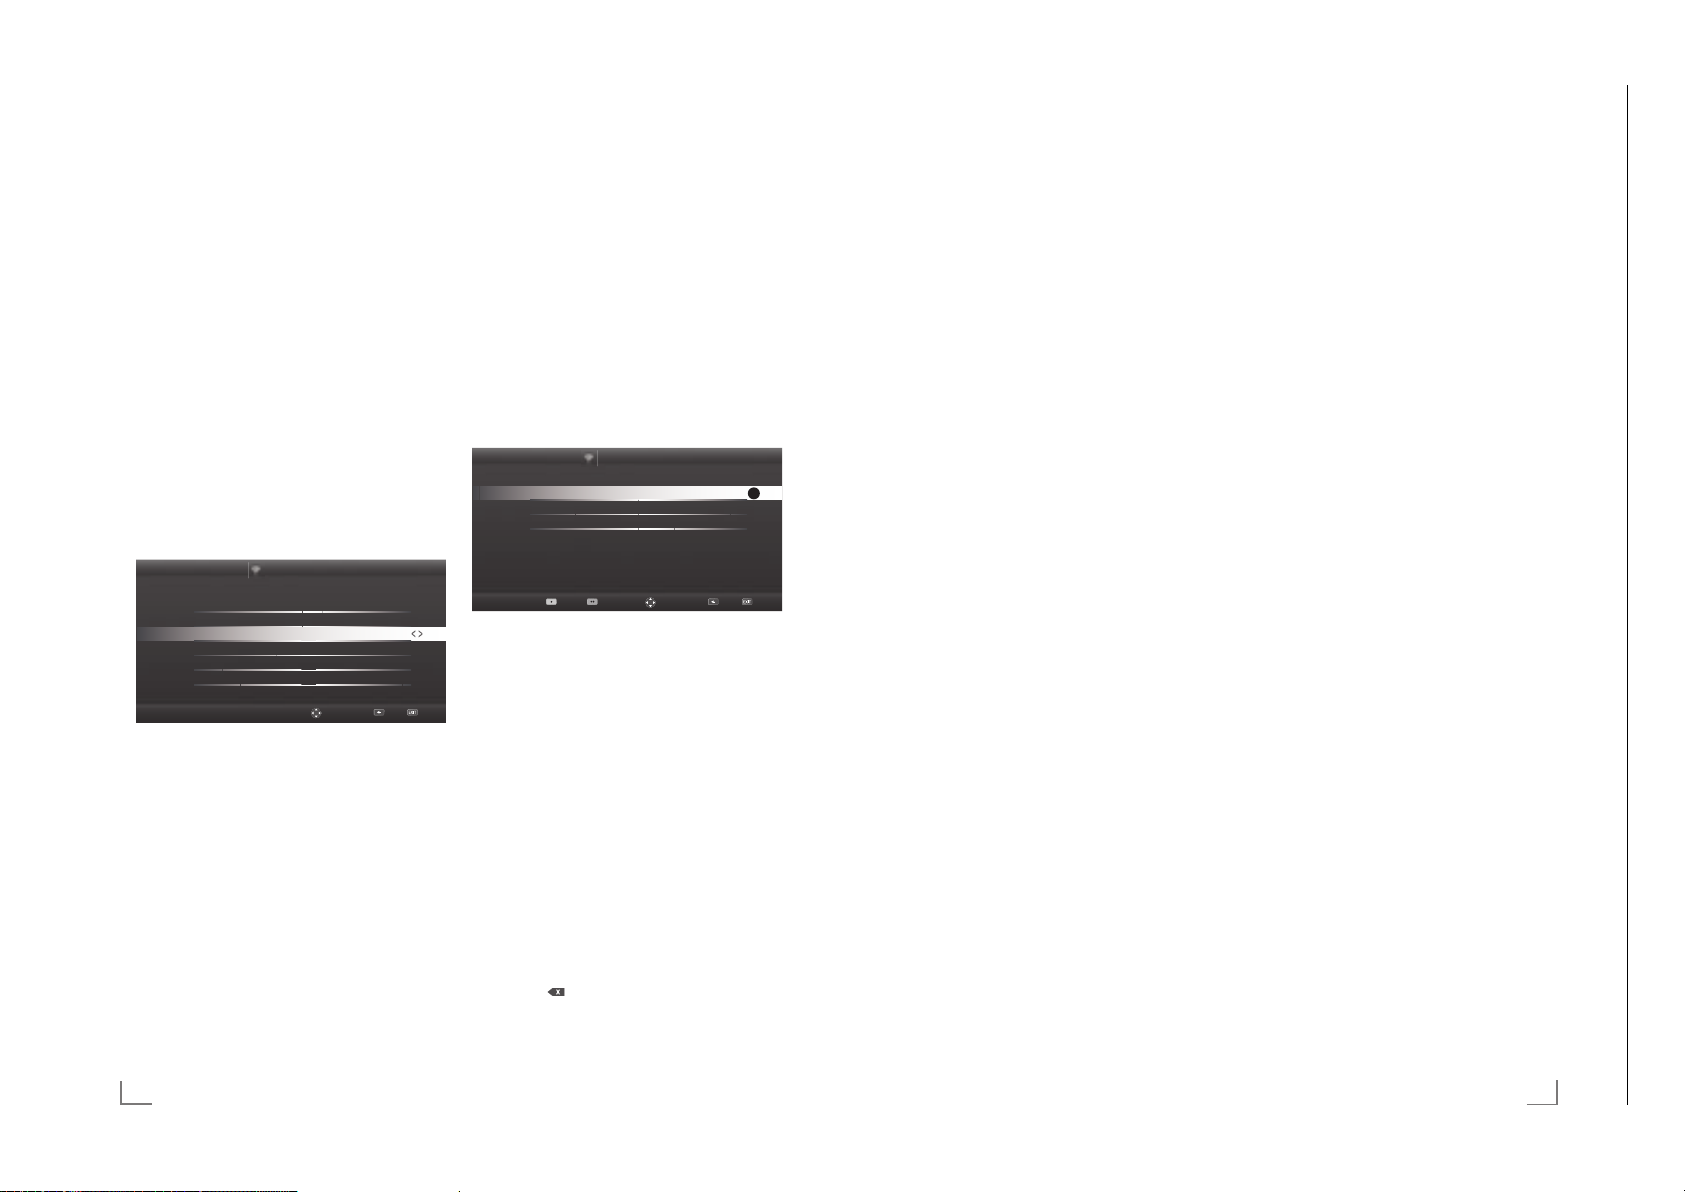
NETWORK SETUP
Chassis MKGRUNDIG Service
1 - 19
-------------------------------------------------------------------------------------------------------------
NETWORK SETUP
-------------------------------------------------------------------------------------------------------------
10 To continue after pressing the WPS button on the access
point, press »
– The “Connection to Gateway: Success” message will
be displayed.
11 Press »
connection is established with the current settings.
– »Testing ... Please wait« message will be displayed,
and if the connection is established »Connection To
Gateway: Success«, »Internet Connection: Success«
messages will be displayed.
« (green).
yy
« (green) to make sure that the network
yy
12 Press »EXIT« to end the setting.
Wireless WPS network connection with PIN
1 Open the menu with »MENU«.
2 Activate the menu item »Settings« with »OK«.
3 Select the menu item »Network Configuration« with »
« and press »OK« to confirm.
or »
<
– »Network configuration« menu is displayed.
4 Select the line »Change Connection Type« with »
Λ
« and press »OK« to confirm.
»
5 Select the option »Wireless WPS« with »
press »OK« to confirm.
– WiFi warning screen will be displayed.
6 Activate WiFi with »
7 Select the line »WPS Type« with »
the option »PIN« with »
Timer Applications Settings
ChDQge Connection T\pH Wireless WPS
WiFi On
WPS Type
Select AcFess Point
Network Configuration AUTO
AdYanFHG
8 Select the line »Select Access Point« with »V« or »Λ«
and press »OK« to confirm.
– Present WPS-supported wireless networks are scanned
to display in the »Select Access Point« menu.
9 Select the network that you want to connect with »
Λ
«, »<« or »>« and press »OK« to confirm.
»
– 8-digit pin code is displayed in the wireless WPS
menu.
Note:
7
Refer to the manual of your router to find out how the PIN
is entered via a PC.
10 Use a PC to enter the pin on the router (e.g. AVM
FRITZ!Bo
x: menu item WLAN Settings... WPS) and save.
Note:
7
The 8-digit PIN code must be entered in the modem
interface in 2 minutes; otherwise, connection of Internet
TV with the modem is cut.
11 Press »
– The message “Connection to Gateway: Success”
« (green) to confirm the registration.
yy
appears.
« (green).
yy
« or »>«.
<
Network Configuration
<
V
« or »Λ« and select
V
« or
« or »>« and
PIN
N/A
Back ExLWChDQJe Area
V
«,
>
12 Press »yy« (green) to check the performed settings and
also if the local network and internet connection has
been established.
– »Testing ... Please wait« message will be displayed,
and if the connection is established »Connection
To Gateway: Successfull«, »Internet Connection:
Successfull« messages and MAC address will be
displayed.
13 Press »EXIT« to end the setting.
Connecting automatically by entering the
network password
Use this method for establishing a connection if your router
does not support “WPS-PBC” or WPS PIN entry.
1 Open the menu with »MENU«.
«
2 Activate the menu item »Settings« with »OK«.
3 Select the menu item »Network Configuration« with »
« and press »OK« to confirm.
or »
<
– »Network configuration« menu is displayed.
Timer Applications Settings
ChDnge Connection T\pH Wired
Network Configuration AUTO
AdYanFHG
4 Select the line »Change Connection Type« with »V« or
Λ
« and press »OK« to confirm.
»
5 Select the option »Wireless« with »
»OK« to confirm.
– WiFi warning screen will be displayed.
6 Activate WiFi with »
7 Select the line »Network Configuration« with »
Λ
« and select the option »AUTO« with »<« or »>«.
»
8 Select the line »Select Access Point« with »
and press »OK« to confirm.
– »Select Access Point« menu is displayed by scanning
available wireless networks.
9 Select the network that you want to connect with »
Λ
«, »<« or »>« and press »OK« to confirm.
»
– Wireless connection password screen is displayed.
Note:
7
For device to discover the wireless modem on the network,
the network name should support ASCII characters.
10 Select the required character with »
« and move to the next character with »OK«.
»
>
– Using »Shift« ° »OK«, you can switch between
upper
case letters / numbers and lowercase letters /
special characters.
– Select »
»OK« to confirm.
Network Configuration
Test ConQection
ChDQJe Area
« or »>« and press
<
« (green).
yy
V
«, »Λ«, »<« or
« to delete the character entered and press
Back ExLWConQect
V
V
« or »Λ«
« or
V
11 Confirm the password with »yy« (green).
– »Connecting ... Please wait« message will be
displayed, and if the connection is established
»Connection To Gateway: Success« messages will be
displayed.
12 Press »
– »Testing ... Please wait« message will be displayed,
« (green) to check the performed settings and
yy
also if the local network and internet connection has
been established.
and if the connection is established »Connection To
Gateway: Success«, »Internet Connection: Success«
messages will be displayed.
13 Press »EXIT« to end the setting.
Note:
7
If you do not have a dynamic network, follow the
«
>
OK
instructions in manual connection section (see “Detailed
Manual”).
«,
12
ENGLISH
ENGLISH
13
Page 20
SMART INTER@ACTIVe TV 3.0 FEATURE
Chassis MKGRUNDIG Service
1 - 20
----------------------------------
SMART INTER@ACTIVe TV 3.0 FEATURE
----------------------------------
Smart Inter@active TV 3.0 internet
applications
Smart Inter@active TV 3.0 interactive applications provide
your Internet TV with Internet services and pages.
These applications are designed according to your Internet TV.
With Smart Inter@active TV 3.0 feature you can run many
local and global internet applications. Thanks to Grundig
Application Store, you can find many applications that you
may use on your Grundig Internet TV. You can download
many applications from Grundig Application Store. These
applications include video, picture, music, social networking
applications, news and sports applications, weather forecast
applications and some specific applications.
Notes:
7
Availability of Smart Inter@active TV 3.0, inter@ctive
applications may vary from one country to the other.
7
Smart Inter@active TV 3.0 cannot download and save
files, cannot upload files to a web site and cannot install
add-ins except Login pages of some applications for
applications other than the ones in Grundig Smart Apps.
7
Grundig is not responsible for the content and the quality
of content offered by the content providers.
7
Local and global internet applications provided through
your Smart Inter@active TV 3.0 comes with your Internet
TV within the framework of special limited duration
agreements entered into with the application owners.
Application owners may update, modify, restrict or
entirely remove those applications with their own decision.
Grundig cannot be held responsible for such changes.
7
Grundig reserves the right to make all changes such
as modifications, restrictions, extensions, transfers and
removals on internet applications provided through your
Smart Inter@active TV 3.0.
7
In Login process of some applications, it may be required
to connect to the web page of the related application.
Subject web pages may contain links not related to
Login process. When connecting those links, Internet
TV may access open web and view contents that are
not supported by your Internet TV. As you are on open
web, your Internet TV cannot control those unsupported
contents or cannot be held responsible for them.
Starting Smart Inter@ctive Internet TV
1 Open the menu with »MENU«.
2 Select the menu item »Applications Store« with »
« and press »OK« to confirm
»
>
– »Inter@ctive Applications« menu will be displayed.
During initial login, registration screen for GRUNDIG
Application Store will be displayed.
Notes:
7
If you press »@« when no menu is open, you can access
»Quick Apps« menu.
7
If you attempt to start Inter@ctive applications without a
cable or wireless adapter connected, the related warning
is displayed on the screen. If your wired or wireless
adapter is connected but you cannot receive IP or internet
is not connected, the Inter@ctive applications cannot be
started. In this case, check Network connection settings.
see. page 10 or 11.
14
ENGLISH
« or
<
USB keyboard and mouse
You may connect a keyboard or mouse to both sockets »USB«
or socket »USB3.0« to use in the Web browser. Keyboards
and mice requiring special drive are not supported.
Navigation and entering text during registration
1 Press »@« to open »MyApps« menu.
– Grundig Smart Apps registry screen is displayed.
Welcome to
You need to register in order to use smart
apps fully functional.
6.,3 /2*,1 5(*,67(5
2 Press »OK« to start registration.
3 Select necessary text areas with »
and press »OK« to confirm.
– Virtual keyboard will be displayed.
Notes on data entry:
7
Press »yy« (green) for keyboard language.
7
Data will be entered through virtual keyboard. Select
necessary letters/numbers and press »OK« to confirm.
7
For upper/lower case, select »Shift« and and press
»OK« to confirm.
7
Press »y« (red) to switch to mobile keyboard.
7
Press »
« (blue) to delete last character/number. Press
yyyy
« (yellow) to delete all characters.
»
yyy
7
When entry is complete, use »V«, »Λ«, »<« or »>« to
select »<« option and press »OK« to confirm.
Virtual keyboard will disappear.
V
«, »Λ«, »<« or »>«
Creating a Grundig Application Store
account
You must register to access all applications in Grundig
Application Store.
1 Press »@« to open »MyApps« menu.
– Grundig Smart App registry screen is displayed.
2 Press »OK« to start registration.
3 Enter your »Name« and »Surname«:
Select the letters for the information with »
« and confirm with »OK«. After you’ve entered the
or »
>
V
data, use »
press »OK« to confirm.
Pr
the keyboard.
To pass to next screen press »
keyboard press »OK«.
Note:
7
Press »y« (red) to display the previous screen.
«, »Λ«, »<« and »>« to select »<« and
ess »
V
« for the next line and press »OK« to display
yyyy
4 Enter your E-mail address:
Enter the data, use »
»<« and press »OK« to confirm.
To pass to next screen press »
keyboard press »OK«.
V
«, »Λ«, »<« and »>« to select
yyyy
5 Enter password and accept:
Select the letters for the information with »
« and confirm with »OK«. After you’ve entered the
or »
>
V
data, use »
confirm with »OK«.
Pr
the keyboard.
To pass to next screen press »
keyboard press »OK«.
«, »Λ«, »<« and »>« to select »<« and
ess »
V
« for the next line and press »OK« to display
yyyy
6 Enter location:
Enter the data, use »
»<« and press »OK« to confirm. To pass to the next
scr
een press »
the keyboard.
V
«, »Λ«, »<« and »>« to select
« (blue), and press »OK« to display
yyyy
7 Enter telephone number (optional):
Enter the data, use »
»<« and press »OK« to confirm.
V
«, »Λ«, »<« and »>« to select
8 To complete registration process press »
9 Press »OK« to read and accept conditions of use.
– »Inter@ctive Applications« menu will be displayed,
and standard applications will be downloaded and
installed to your Internet TV.
V
«, »Λ«, »<«
« (blue), to display
« (blue), to display
V
«, »Λ«, »<«
« (blue), to display
« (blue).
yyyy
Logging in with Grundig Application
Store account
If you reset your Internet TV to factory settings for any reason
with »Save installed applications« unselected, all applications
you have downloaded will be deleted, and when you access
»Inter@ctive Applications« menu, the registration screen will be
displayed again.
You can log-in again with the e-mail and password you
have provided during Grundig Application Store registration
without the need for re-registration.
1 Press »@« to open »MyApps« menu.
– Grundig Smart App registry screen is displayed.
2 To login press »
3 Enter your E-mail address:
Enter the data, use »
»<« and press »OK« to confirm.
4 Enter your Password:
Enter the data, use »
»<« and press »OK« to confirm.
Note:
7
Press »
yyy
new password will be e-mailed to you. Enter the new
password.
5 To login press »
– » Conditions of Use« shall be displayed.
6 Press »OK« to accept conditions of use.
– An information is displayed. You can choose, if
you want restore your applications or if you want
download the default applications.
7 Select the desired line with »
»OK« to confirm.
– The »GRUNDIG appLICATION store« menu is
displayed and the standard applications are loaded.
8 An information message will be displayed in a short
while, accept wit
« (blue).
yyyy
V
«, »Λ«, »<« and »>« to select
V
«, »Λ«, »<« and »>« to select
« (yellow) if you forget your password. Your
« (blue).
yyyy
V
« or »Λ« and press
h »OK«.
ENGLISH
15
Page 21
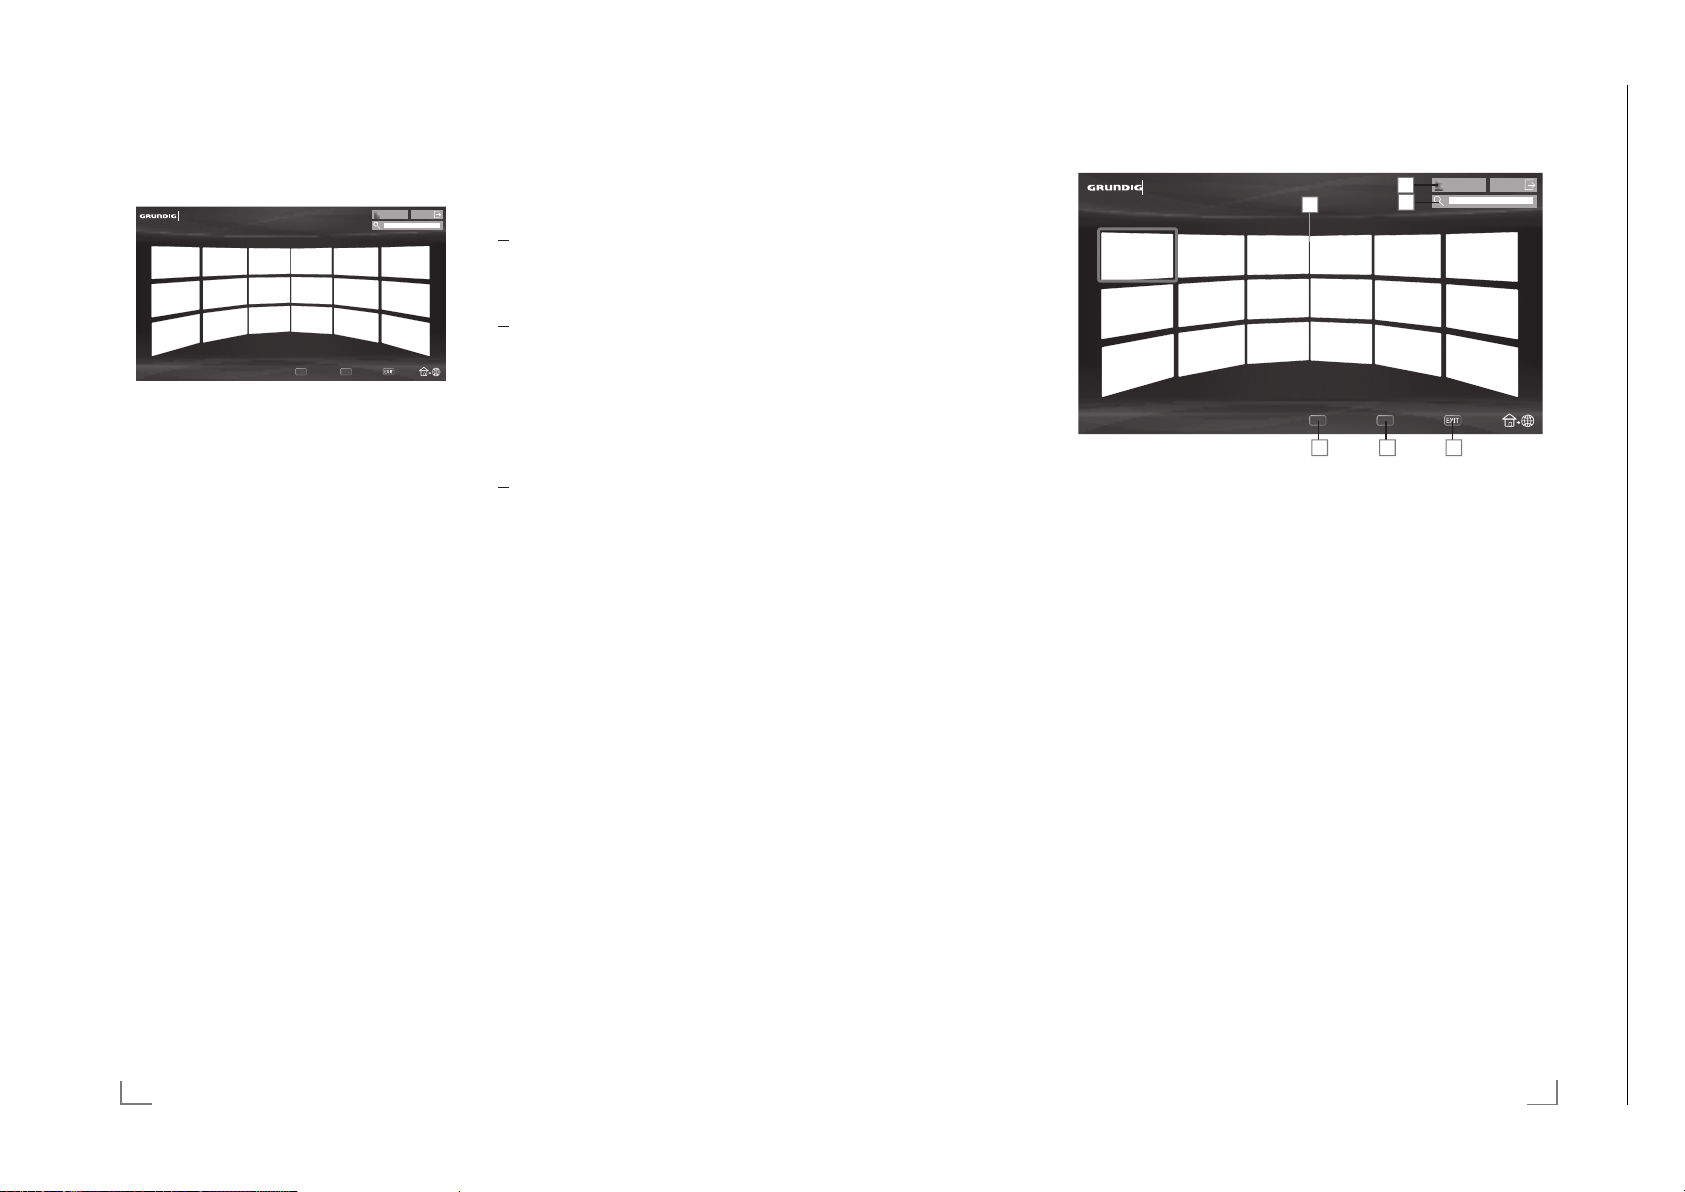
SMART INTER@ACTIVe TV 3.0 FEATURE
Chassis MKGRUNDIG Service
1 - 21
----------------------------------
SMART INTER@ACTIVe TV 3.0 FEATURE
----------------------------------
Selecting internet applications
1 Press »@« to open »MyApps« menu.
– My Apps menu will be displayed.
8VHU
My App
Categories Tools Exit
2 Select the required application with »V«, »Λ«, »<« or
« and press »OK« to confirm.
»
>
– Main menu of the application will be displayed after a
short while.
Notes:
7
When you attempt to start any application without a cable
or wireless network connection, the related warning is
displayed on the screen.
7
Applications will not start if your cable is disconnected
or you do not have an IP even if you’re connected to a
network or you do not have internet access. In this case,
check Network connection settings. See. page 10 or 11.
$SS6WRUH
Grundig Application Store
Grundig Application Store is an online depot where you
can download many applications that you may use on your
Internet TV.
Some applications in the »MyApps« menu are loaded in your
device as factory settings.
You can download a wide array or applications from Grundig
Application Store.
1 Press »@« to open »MyApps« menu.
2 To enter »Grundig Application Store«, select the push
button »Online S
press »OK« to confirm.
– »Grundig Application Store« menu is displayed.
tore« with »
V
«, »Λ«, »<« or »>« and
Downloading and installing internet
applications
1 Select the desired category in Grundig Online
Applications with »
application field;
or
select the application you want with numeric buttons.
– »1« – »Most Popular«,
– »2« – »Highest Rated«,
– »3« – »Release Date«;
or
press »
yy
the application by name.
2 Select the application you want to download with »
Λ
«, »<« or »>« and press »OK« to confirm
»
– Information on the application will be displayed.
3 To download and install application press »
(blue).
– Application will be downloaded and installed.
4 To start application press »OK«;
or
to continue installing application press »BACK <«.
V
« or »Λ« and press »>« to pass to
« (green) to select the application by searching
«
yyyy
Smart Inter@active TV 3.0 browser main menu
1 Applications.
2 Push button to the
Application s
3 Search bar.
4 Categories menu.
5 Tools menu.
6 Exit.
V
«,
Navigating in the main menu
1 Press »
categories with »
2 Select the required application with »
»
– Main menu of the application will be displayed after a
3 Usage of application mostly depends on application’s
o
tore.
« (red) button in »My apps« menu and select
y
« or »>«.
<
« and press »OK« to confirm.
>
short while.
wn structure. Follow the notes on the screen.
My apps
V
«, »Λ«, »<« or
Categories Tools Exit
Playback and other options in the
applications
Note:
7
Some applications do not support all playing options, and
playing options may vary among different applications.
1 »
8« starts playing in the applications;
1 »
!« pauses playing in the applications;
3 »
7« stops playing in the applications;
4 In the applications, press »
search.
5 In the applications, press »
backward.
6 »
V
«, »Λ«, »<«, »>« allows sliding of the navigation
keys in the applications and virtual keyboard.
7 Press »OK« to confirm the selections in virtual keyboard
and applications.
8 »1…0« »
9 »@« switches off the application and goes back to »My
10 »EXIT« switches off the application and goes back to the
« (red), »yy« (green), »
y
(blue) selects/activates various functions in applications.
apps« menu.
las
t broadcast source you were in.
2QOLQH6WRUH
3
« or »4« to start picture
5« or »6« to skip forward/
« (yellow), »
yyy
yyyy
«
16
ENGLISH
ENGLISH
17
Page 22
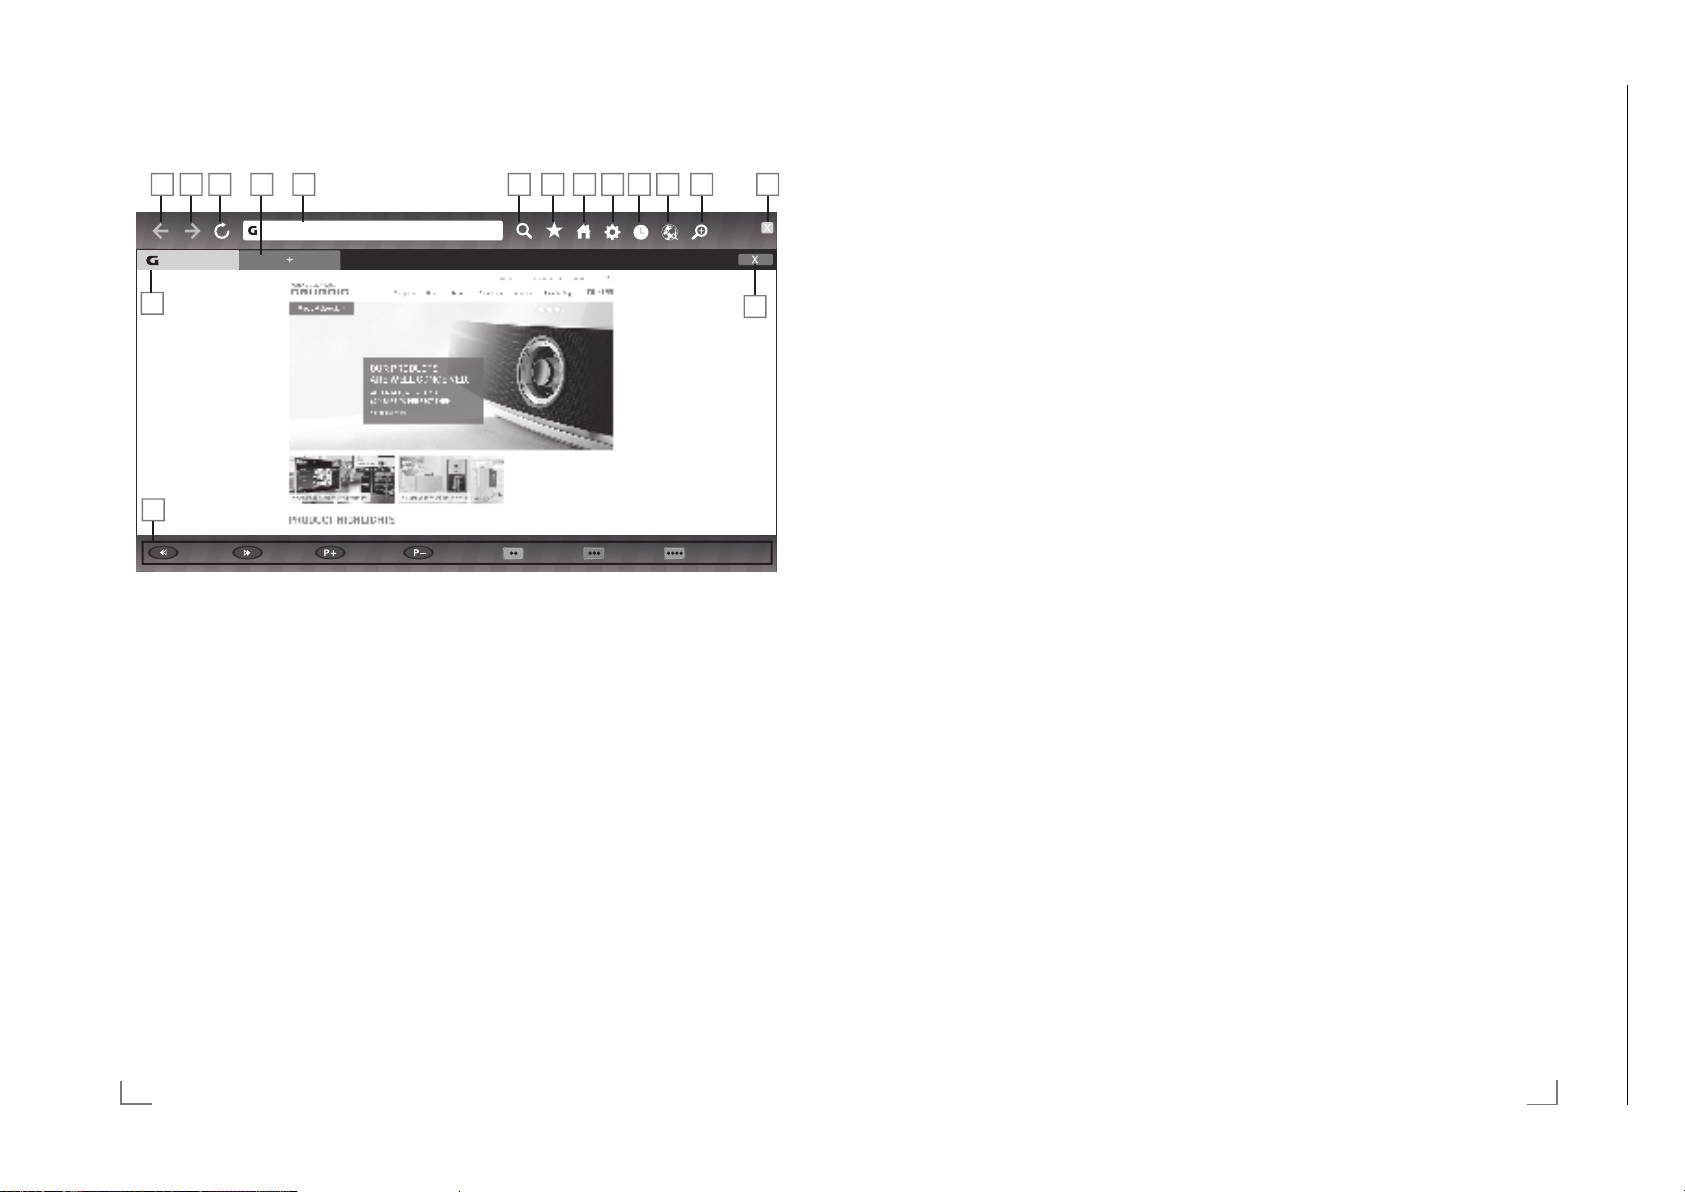
WEB BROWSER
Chassis MKGRUNDIG Service
1 - 22
---------------------------------------------------------------------------------------------------------------------
MULTIMEDIA SERVER MODE
-----------------------------------------------------------------------
Web browser menu
KWWSZZZJUXQGLJGH
grundig.
Zoom Out Zoom In Page Up Page Down Navigation 3URcess Menu Tool BDr
1 Menu controls.
2 Active tab.
3 Previous page.
4 Next page.
5 Refresh.
6 New tab.
7 Address bar.
8 Search in site.
9 Favorites.
10 Home page
11 Settings
12 History.
13 Search in Web.
14 Zoom.
15 Close Web browser.
16 Close tab.
Web browser
Web browser allows you to navigate in the Internet.
1 Open the menu with »MENU«.
2 Select the menu item »Web Browser« with »
and press »OK« to confirm.
– Web Browser is displayed.
3 Select URL entry area with »
to confirm.
– Virtual keyboard will be displayed.
4 Enter the address and confirm with »
Notes:
7
Other functions are explained on the screen.
7
You may connect a keyboard or mouse to both sockets
»USB« or socket »USB3.0« socket to use in the Web
owser. Keyboards requiring special driver are not
br
supported.
« or »<«
>
Λ
« or »V« and press »OK«
« (blue).
yyyy
Playing the video, music and image
files with home network connection
With DLNA menu of your Internet TV, you can easily access
Video, music and photo files on server; and thanks to DMR
feature, you can automatically start and stop media playing on
devices with DMC feature.
Notes:
7
You can share your video, music and image files through
devices such as PC, mobile phone or NAS (Network
Attached Storage) that function as DMS (Digital Media
Server) compatible with DLNA.
7
If the DMS device and the Internet TV are connected to
the wireless network at the same time, there may be lags
and freezings during video playback.
7
Internet TV can also operate with DMS software that can
be installed on a computer but, it is not guaranteed that it
will run in full compatibility with software without a DMS
certificate.
7
Perform the following steps for a sample DMS setup.
Open Windows Media Player11 on a PC with Windows
operating system installed. In »Library« tab, select »Media
Sharing«, tick on the »Share my media« box on the
window that appears and then select »OK«. The new
windo
w displays the IP numbers of connected devices. To
enable the Internet TV to detect the computer, you need
to select the Internet TV's IP number. If IP is not listed in
the window; from »Media Sharing« menu's »Settings«
option, you can select the option »Allow new devices
and computers automatically« in the pop-up menu. After
completing these processes, the Internet TV can only view
the supported file formats in the Library.
In order not to encounter any problems with media
sharing, check the Firewall settings of your modem and
computer.
Selecting the digital media server
1 Open the menu with »MENU«.
2 Select the menu item »DLNA« with »
»OK« to confirm.
– »Media Player« menu is displayed.
Note:
7
If no DMS device appears, check the network connection.
See page 10 or 11.
3 Select any DMS device with »
»OK« to confirm.
– DMS device content is displayed.
« or »<« and press
>
« or »>« and press
<
Notes:
7
File and folder structure of the DMS device in menu may
vary depending on the Digital Media Server software in
use.
7
Subtitles are not supported on video files that are played
through the DMS device.
7
Video files played through DMS device support following
formats that have obtained DLNA certificate: »MPEG_
PS_NTSC«, »MPEG_PS_PAL«, »MPEG_TS_SD_EU« and
»MPEG_TS_EU_ISO«.
7
In videos with high bit rate, lag problem might be seen.
7
Folders that appear as unknown in DLNA application
cannot be played by the Internet TV. Installing the codec
to your computer can solve this problem.
7
Audio files played through DMS device support
following formats that have obtained DLNA certificate:
»AAC_ADTS_320«, »LPCM«, »MP3«, »WMABASE« and
»WMAFULL«.
7
Image files played through DMS device support following
formats that have obtained DLNA certificate: »JPEG_
LRG«, »JPEG_MED« and »JPEG_SM«.
Playback
1 Select the content folder on DMS device with »V«, »Λ«,
« or »>« and press »OK«.
»
<
– All titles are displayed. to confirm.
2 Select the desired title with »
3 Press »
8« to start playback.
4 Press »
!« to pause playback.
To resume playback press »
5 Press »
5« or »6« until you reach the desired file.
6 Press »
7« to stop playback.
7 Switch back to the content with »BACK <«.
8 To exit DLNA feature press »EXIT«.
V
«, »Λ«, »<« or »>«.
8«.
18
ENGLISH
ENGLISH
19
Page 23
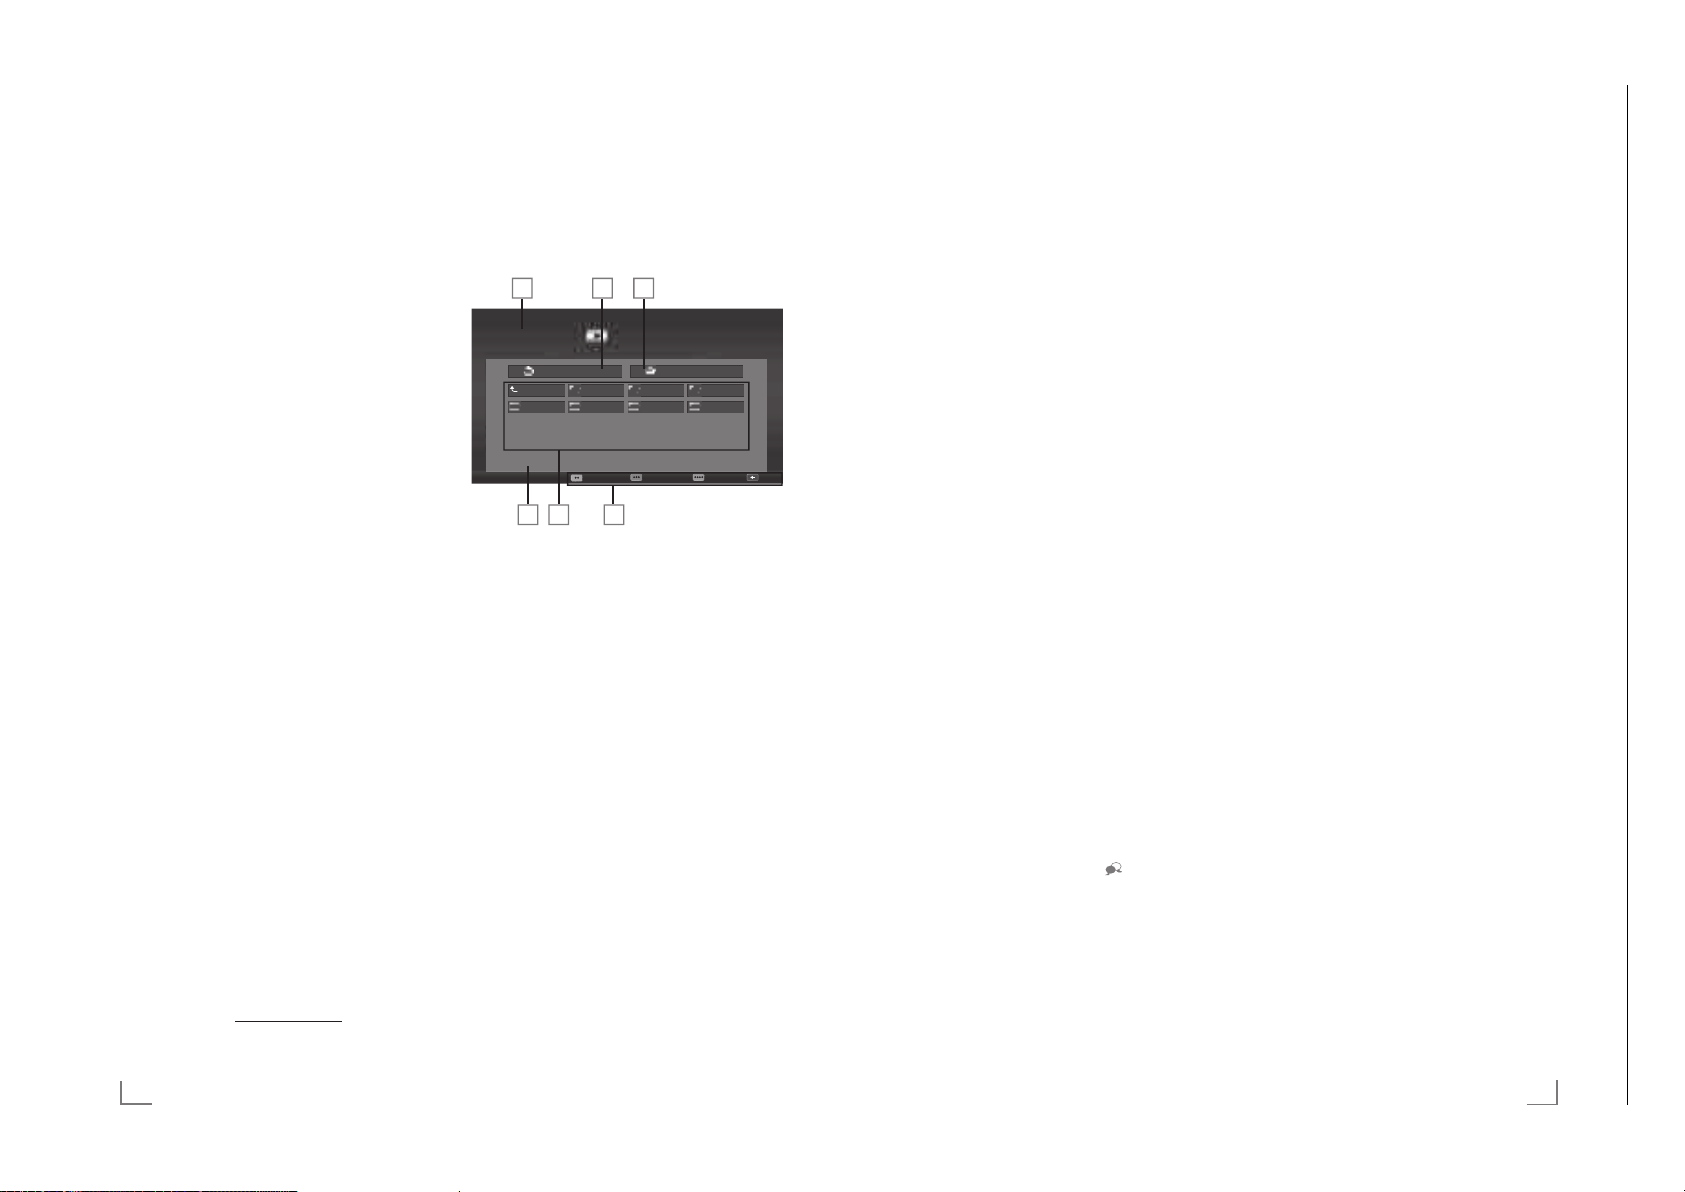
USB OPERATION
Chassis MKGRUNDIG Service
1 - 23
---------------------------------------------------------------------------------------------------------------
USB OPERATION
---------------------------------------------------------------------------------------------------------------
File formats
Your Internet TV can be operated via the USB input with the
following file formats:
Video data
Special codecs for video compression and decompression
provide more memory space without compromising the picture
quality excessively.
Your Internet TV plays video files in the formats XVID, H.264/
MPEG-4 AVC (L4.1, 4 reference pictures), MPEG-4, MPEG-2,
MPEG-1, MJPEG and MOV.
The following file name extensions are also supported: “.avi”,
“mkv”, “.mp4”, “.ts”, “.mov”, “.mpg”, “.dat”, “.vob”,”.divx”.
In addition to video data, these files also contain audio data
compressed and "packaged" by using MP3, AAC, DTS 2.0
or Dolby Digital.
DTS 2.0+Digital Out denotes the dual ability to pass the DTS
encoded digital bistream to an external DTS decoder for
playback as well as fold down the digital surround soundtrack
for playback in a 2-channel environment through analog
outputs.
Format (codec) information is embedded within the file
content and may differ depending on the file extension. “.avi”,
“.mkv” or “.divx” files containing divx codec within are not
playbacked.
Audio data
Your Internet TV can play audio data coded with MP3, AAC
standards.
MP3 stands for MPEG-1 Volume Level 3 and is based on
the MPEG-1 standard developed by MPEG (Motion Picture
Expert Group).
AAC indicates the Advanced Audio Coding and is developed
by MPEG. AAC provides higher audio quality with the same
data rate (bit rate).
WMA (Windows Media Audio) is a compression standard
developed by Microsoft for audio data.
These formats enable audio files to be saved on storage
devices with a sound quality similar to that of a CD.
File extensions supported by your device: “.mp3”, “.mp2”,
“.wma”, “.m4a”, “.aac”, ".wav"
MP3 files can be organised into folders and subfolders similar
to the files on a computer.
Image data
Your Internet TV can display picture data in JPEG, PNG and
BMP formats.
JPEG stands for Joint Picture Experts Group. This process is
intended to compress picture files.
PNG and BMP standards are intended to compress picture
data without loss.
Picture files can be saved in a data storage medium together
with other file types.
Such files can be organized as folders and subfolders.
The file browser
The file browser displays the video, audio and picture data
that the external data medium provides.
If a data medium contains different file formats, you can
deactivate data (Video file, Audio file, Picture file) you do not
need for the playback using a filter function.
The main menu of the file browser
Media Player
Device selection Type : Photo
Up Folder
New Folder
No Name/
1 Preview.
2 Data medium selection.
3 Data type.
4 Name of the data medium.
5 Folders on the data medium.
6 Menu navigation.
Movie Music Picture
New Folder
New Folder New Folder
BackSettingAdd to Play ListMedia Options
Playback basic functions
1 Open the menu with »MENU«.
2 Select the menu item »Media Player« with »
and press »OK« to confirm.
– »Media Player« menu is displayed.
3 Select the external data medium with »
press »OK« to confirm.
– Media Player menu of the selected external data
medium is displayed.
Note:
7
If the content of the external data medium is not displayed,
« (yellow) to refresh.
press »
yyy
4 Select the push button »Type« with »
press »OK« to confirm.
5 Select the desired type (Movie, Music or Photo) with »
« and press »OK« to confirm.
or »
>
6 Select the folder with »
open it.
– A list of sub-directories appears.
Note:
7
Go back to the previous folder with »BACK <«.
7 Select the track or picture with »
and press »
Notes:
7
When playing picture data, press »?« to view information
about the resolution and the size.
7
For playing MP3 or WMA data, information on the album,
track and singer is displayed at the left of the menu.
7
When playing picture data, press »?« to switch on a
control panel.
8 Press »
!« to pause playback.
9 To resume playback press »
10 Press »
7« to end playback.
– The file browser appears.
Notes:
7
Use »Λ« to select »Up Folder«, when you would like to
return to the last folder.
7
It is possible that some files that are supported in USB
mode do not operate due to some problems that may arise
depending on how such files are created (compression)
although they contain the supported file extension.
7
If there are more then one audio sources (audio stream) in
the video files that are being played, then you can switch
between the audio sources with the »
played in full screen mode.
7
Movies you will be watching from the movie file only
supports subtitles with .srt, .sub, .ass, .ssa, .smi format.
Names of the subtitle and movie files must be the same.
Otherwise, subtitle can not be displayed.
V
« or »Λ« and press »OK« to
8« to start playing.
8«.
V
« or »<«
>
« or »>« and
<
Λ
« and »>« and
«, »Λ«, »<« or »>«
« while the file is
«
<
For DTS patents, see http://patents.dts.com. Manufactured under
license from DTS Licensing Limited. DTS, the Symbol, & DTS and
the Symbol together are registered trademarks and DTS Studio
Sound is a trademark of DTS, Inc. © DTS, Inc. All Rights Reserved.
20
ENGLISH
ENGLISH
21
Page 24
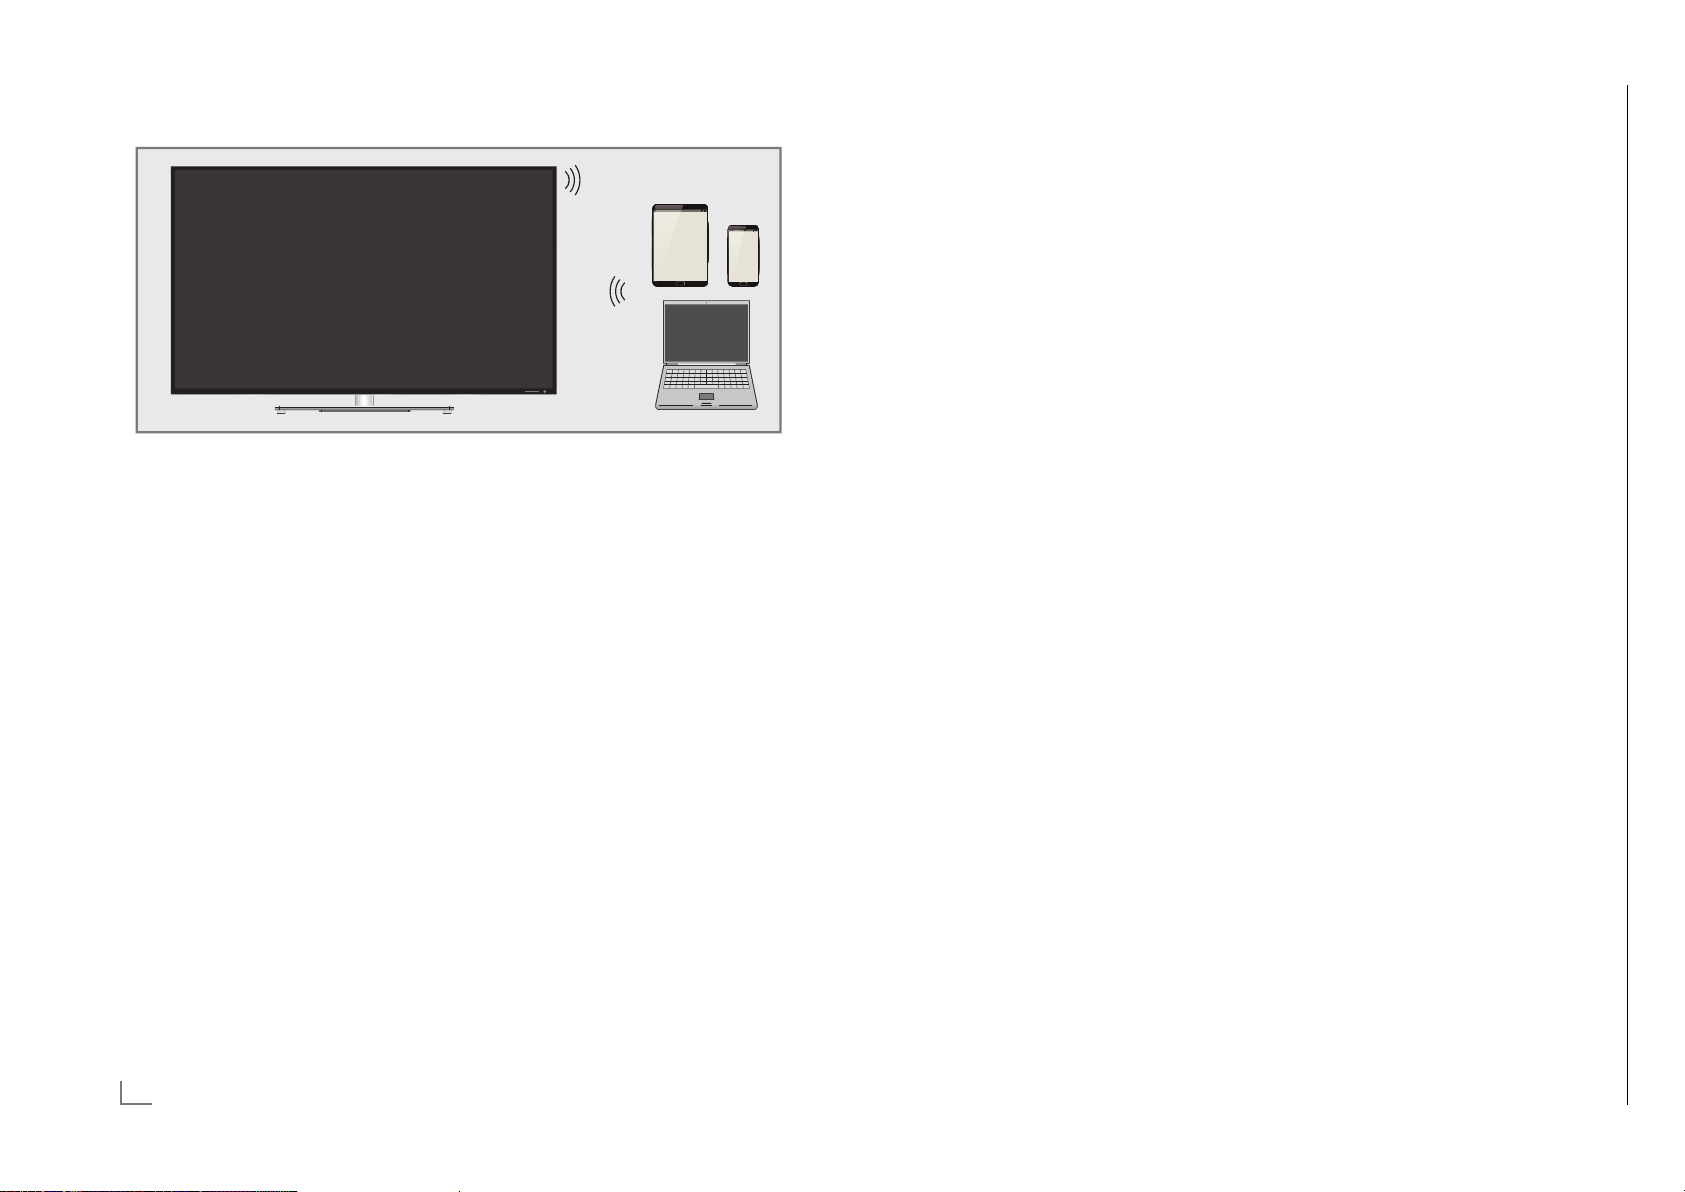
WIRELESS SCREEN SHARE (LIVESHARE)
Chassis MKGRUNDIG Service
1 - 24
Note – Parental control:
Instead of the PIN Code 2356, you can enter a
new personal code.
Changing the PIN code
Instead of the default code »1234«, you can
enter a personal code.
Please take note of your personal code.
1 From the »Parental Guidance« menu use
»
V
« or »Λ« to select the line »Change PIN«
and press »
<
« or »>« to confirm.
2 Enter the current PIN code »1234« with
»1...0«.
3 Enter your new four-digit personal PIN code
wit
h »1...0«.
4 Reenter your personal PIN code with
»1...0«.
5 Press »BACK <« to go back one menu
le
vel or press »EXIT« to end the setting.
--------------------------------
CONVENIENCE FUNCTIONS
------------------------------------------------------------
What is LIVESHARE?
Liveshare is a wireless technology featured with Android
operating system and used to reflect the screen of your
mobile device which supports this feature to your Internet TV
supporting Liveshare. By using this technology you can share
your device’s content, present a slide show or play your
favorite game on a larger screen.
Screen share with Liveshare connection
1 Open the menu with »MENU«.
2 Select the menu item »Screen Share« with »
and press »OK« to confirm.
– »Liveshare« menu is displayed.
3 Start Liveshare application from your laptop PC or
– Liveshare will begin in a short while and the screen
4 Press »EXIT« to end Liveshare.
Note:
7
vice and select your Internet TV.
mobile de
image of your laptop PC or mobile device will be
reflected on the Internet TV.
To find out if your laptop PC or mobile device supports
Liveshare feature or not, please visit the Website of the
manufacturer.
22
ENGLISH
« or »<«
>
3 Activate (On) or deactivate (Off) the panel
lock with »
« or »>«.
<
4 Press »BACK <« to go back one menu
le
vel or press »EXIT« to end the setting.
Changing the PIN code
Instead of the default code »1234«, you can
enter a personal code.
Please take note of your personal code.
1 From the »Parental Guidance« menu use
V
« or »Λ« to select the line »Change PIN«
»
and press »
« or »>« to confirm.
<
2 Enter the current PIN code »1234« with
»1...0«.
3 Enter your new four-digit personal PIN code
wit
h »1...0«.
4 Reenter your personal PIN code with
»1...0«.
5 Press »BACK <« to go back one menu
vel or press »EXIT« to end the setting.
le
Blocking a television channel
You can block individual television channels
which are not suitable for children using a per-
sonal PIN code.
1 Open menu with »MENU« button.
2 Activate the menu item »Settings« with
»OK«.
3 Select the menu item »Source Setup« with
« or »<« and press »OK« to confirm.
»
>
4 Select the line »Channel Editor« with »
»
Λ
« and press »OK« to confirm.
5 Select the channel to be blocked with »
»
Λ
«, »<« or »>« and highlight with »OK«.
–Channel is marked with »«.
6 Activade the »Tools« menu with »
lo
w).
7 Select the line »Channel Lock« with »
»
Λ
« and press »OK« to confirm.
8 Enter the PIN code »1234« with »1...0« in
t
he password prompt.
9 Confirm the entry with »OK«.
–Channel is marked with »
70
ENGLISH
V
V
« (yel-
yyy
V
« or
«.
Note:
7
To remove the lock, select the channel again
with »
V
«, »Λ«, »<« or »>«, activade the
»Tools« menu with »
line »Unlock Channel« wit
« (yellow), select the
yyy
h »
press »OK« to confirm
10 Press »EXIT« to end the setting.
Watching a blocked television chan-
nel
You can watch a TV channel blocked with PIN
code by selecting the TV channel and entering
the PIN code.
1 Select the blocked channel with »1…0« or
»P+«, »P–«.
2 Enter the PIN code »1234« with »1...0« in
he password prompt.
t
– Blocked channel can be viewed.
Note:
7
Channel will be blocked again when you
change the channel.
« or
«,
V
« or »Λ« and
Page 25
Service- und Sonderfunktionen
Tastenfunktionen
MENU
Aufrufen/Beenden des Menüs / Beenden des Service Modes
3333 4444Menü-Zeile (Menüpunkt) wählen
OK
Aufrufen der Menüs
1111 2222Wert ändern
@@@@Untermenü: Zurück zum Hauptmenü
Service-Mode aktivieren
– Taste
MENU
drücken, dann Zahlenfolge 8500 eingeben.
Service-Mode beenden
– Taste
MENU
drücken.
1. Grundeinstellwerte
Service and Special Functions
Functions of the buttons
MENU
Call up/exit the Menu / exit the Service Mode
3333 4444Call up the dialogue line (point of menu)
OK
Call up the Menus
1111 2222 Changing the settings
@@@@Submenu: Back to main menu
Calling up the Service Mode
– Press button
MENU
, than enter the code number 8500.
Exit the Service Mode
– Press button
MENU
.
1. Basic Settings
Chassis MKGRUNDIG Service
1 - 25
Alle weiteren Menüs werden über die Gerätesoftware programmiert und dürfen nicht verstellt werden.
All other menus are programmed by the software of the set and must not be adjusted.
42 VLE 8500 B0
49 VLE 8500 B0
55 VLE 8500 B0
System Configuration
TV Mode
HDCP Verify
Customer/Factory
Debug Mode
Plug Play
On/Off
On
Blue Back
Off
On/Off
Hotel
CI Key Verify
On/Off
Panel Energy Class
Recovery Mode
A…D, Default
On/Off
Source Configuration
Code 2356
ATV
Air
Avail/Navail
Avail/Navail
Cable
Satellite
Avail/Navail
Avail/Navail
USBPCAvail/Navail
Avail/Navail
HDMI1
HDMI2
Avail/Navail
Avail/Navail
HDMI3
HDMI4
Avail/Navail
Avail/Navail
AV1 (Scart)
Component
Avail/Navail
Avail/Navail
TV Configuration
Code 2356
S-VHS (Hosiden/Scart)
OSD Selection
Avail/Navail
Grundig
GRFSet1/USB Recording
Remote Control
On/Off
Keypad
7 Segment Display
Joystick
On/Off
CEC
Speaker Output Power
On/Off
3…15W@8/16ohm
Subwoofer Output Power
Hidev Mono
10/15W@8/16Ω, Off
On/Off
Optic Out
Sports Mode
On/Off
On/Off
EPG Padding Time
BISS Key
On/Off
On/Off
GRFSet2
Voice Recognition RC
On/Off
On/Off
HbbTV
Power LED Brightness Low
On/Off
Power LED Brightness High
Check Source Availability
On/Off
Permanent Timeshift
WiDi
On/Off
On/Off
Product Type
Jitter Immunity
Digi900/Digi9000
On/Off
Dual CI
Uart Enable
On/Off
On/Off
Gesture Control
Fransat
On/Off
On/Off
Fast Boot
Twin Mode Recording
On/Off
On/Off
Dual Watch
APP PIP
On/Off
On/Off
Turksat Fast
Screen Capture
On/Off
On/Off
DTS Cert Mode
KocSistem Mode
On/Off
On/Off
Language Selection
Bluetooth
0…255
On/Off
D-Smart
Miracast TX
On/Off
On/Off
Netflix
Divx
On/Off
On/Off
Menü
Menu
3333 44
44
Menüpunkt
Point of Menu
OK
Einstellung
Adjustment
1111 22
22
Customer
prüft HDCP im EEPROM / verifies HDCP in EEPROM
Customer
Customer
Off
ATS Reset: Netz ein –> Automatischer Sendersuchlauf / Power on –> automatic programme search
Off
XOnX
On
Off
X
On
Off
prüft CI Key / verifies CI Key
Off
Class A+
On
Class A+
On
Off
Class A
On
Navail
Navail
Navail
Navail
Navail
Navail
Navail
Navail
Navail
Navail
Navail
Navail
Avail
Avail
Avail
Avail
Avail
Avail
Avail
Avail
Avail
Avail
Avail
Avail
Avail
Avail
Avail
Avail
Avail
Avail
Avail
Avail
Avail
Avail
Avail
Avail
Avail
Grundig
Avail
Grundig
Off
Fernbedienung wählen / Select used remote control
Off
Avail
Grundig
Off
Joystick
Off
Joystick
Off
On
10W@8ohm
On
10W@8ohm
Joystick
Off
On
15W@16ohm
Off
Off
Off
Off
On
OffOnOff
Off
Off
On
Off
Off
Off
Off
Off
OffOnOff
On
Off
Off
Off
On
On4On
4
9On9
On
On
4
9
On
Off
Off
Off
Off
Digi9000
Off
Digi9000
Off
Off
Off
Digi9000
Off
Off
Off
Off
Off
Off
Off
Off
Off
Off
Off
Off
Off
On
OffOnOff
Off
Off
Off
Off
On
Off
Off
Off
OffOnOff
On
Off
Off
Off
Off
Off
On
Off
Off
0On0
On
Off
Off
Off
Off
0
On
Off
Off
On
OffOnOffOnOff
Page 26

Chassis MKGRUNDIG Service
1 - 26
2. Software-Versionsnummer
Die Software-Versionsnummer wird unten im Menü Einstellungen
und im Service Menü angezeigt. z.B.: KYGRMR.-.-.-.-.V07.034.00
2. Software Version Number
The software version number is shown on the lower part of the options menu and the service menu. e.g.: KYGRMR.-.-.-.-.V07.034.00
Page 27
GRUNDIG Service Chassis MK
Platinenabbildungen und Schaltpläne / Layout of PCBs and Circuit Diagrams
Chassisplatte / Chassis Board VKT190R-6
T: Bestückungsseite / Component Side
B: Lötseite / Solder Side
POS. X Y POS. X Y POS. X Y POS. X Y POS. X Y POS. X Y POS. X Y POS. X Y
C100 T 23 74
C101 T 13 73
C102 T 13 75
C103 T 141 89
C104 T 13 76
C105 T 28 106
C106 T 140 90
C107 T 32 109
C108 B 29 75
C109 B 30 75
C110 T 15 92
C111 T 30 86
C112 T 27 92
C113 T 30 83
C114 B 13 99
C115 T 26 81
C116 T 38 91
C117 T 38 88
C118 B 13 100
C119 T 20 81
C120 T 22 80
C121 B 13 97
C122 T 96 86
C123 T 141 95
C124 T 94 85
C125 T 89 90
C126 T 34 83
C127 T 96 98
C128 T 96 96
C129 T 143 92
C130 B 143 35
C131 T 14 70
C132 T 132 95
C133 T 130 95
C134 T 151 83
C135 T 137 27
C136 T 132 27
C137 T 151 89
C138 T 146 83
C139 T 145 83
C140 T 123 33
C141 T 228 88
C142 B 223 95
C143 T 230 90
C144 T 30 92
C145 T 118 27
C146 T 123 28
C147 T 115 34
C148 T 119 33
C149 T 119 35
C150 T 230 93
C151 T 230 92
C152 B 224 93
C153 B 227 87
C154 T 50 75
C155 B 225 87
C156 T 162 99
C157 B 161 100
C158 T 52 75
C159 T 44 75
C160 T 19 93
C161 T 50 78
C162 T 45 77
C163 T 140 31
C164 T 161 109
C165 T 145 88
C166 B 137 34
C167 T 151 36
C168 T 149 36
C169 T 129 29
C170 T 128 32
C171 T 149 39
C172 B 142 40
C173 B 137 40
C174 T 128 95
C175 T 158 108
C176 T 158 107
C177 B 162 98
C178 T 165 6
C179 T 165 10
C180 T 159 92
C181 T 160 90
C182 T 90 88
C183 T 152 87
C184 T 121 28
C185 T 115 32
C200 T 77 41
C201 T 74 41
C202 T 65 40
C203 T 65 44
C204 T 65 43
C205 T 63 44
C206 T 56 41
C207 T 65 41
C208 T 130 90
C209 T 137 86
C211 T 98 34
C212 T 113 38
C213 T 116 39
C214 T 102 40
C215 T 103 40
C216 B 90 43
C400 B 104 58
C401 B 105 62
C402 B 107 56
C403 B 104 59
C404 B 105 61
C405 B 105 56
C406 B 106 59
C407 B 103 55
C408 B 105 60
C409 T 82 46
C410 T 77 46
C411 B 109 56
C412 T 142 83
C413 B 114 67
C414 B 111 100
C415 B 112 93
C416 B 109 67
C417 B 107 64
C418 T 127 95
C419 B 107 66
C420 B 112 57
C421 B 106 65
C422 B 111 64
C423 B 109 60
C424 B 105 63
C425 B 111 60
C426 T 64 45
C427 B 108 57
C428 B 113 61
C429 T 131 39
C430 B 115 58
C431 B 114 57
C432 B 115 62
C433 T 82 50
C500 B 108 93
C501 B 115 98
C502 T 122 94
C503 B 145 74
C504 B 151 68
C505 T 147 61
C506 B 112 88
C507 B 109 98
C508 B 118 93
C509 B 143 71
C510 B 146 72
C511 B 116 95
C512 B 151 65
C513 B 120 99
C514 B 139 65
C515 B 144 65
C516 B 113 95
C517 B 112 91
C518 B 145 64
C519 B 145 66
C520 B 150 63
C521 B 144 72
C522 T 140 83
C523 B 149 71
C524 B 118 88
C525 B 118 100
C526 B 110 92
C527 B 117 94
C528 B 112 67
C529 B 114 65
C530 B 110 90
C531 T 141 80
C532 B 118 90
C533 B 151 72
C534 B 142 71
C535 B 141 65
C536 B 139 70
C537 B 141 71
C538 B 116 91
C539 B 114 92
C600 B 187 85
C601 B 180 84
C602 B 180 99
C603 B 203 81
C604 B 196 81
C605 B 163 72
C606 T 224 62
C607 T 224 68
C608 T 158 67
C609 B 223 56
C610 B 227 60
C611 B 175 83
C612 B 186 100
C614 B 210 82
C700 B 130 15
C701 B 128 15
C702 T 135 11
C703 T 130 18
C704 T 128 18
C705 B 128 10
C706 B 130 10
C713 B 103 23
C714 T 80 25
C715 B 99 23
C716 T 81 23
C717 B 81 25
C719 B 91 23
C720 B 93 21
C721 B 83 25
C722 B 101 21
C724 B 86 25
C725 B 109 22
C726 T 85 23
C727 B 106 21
C728 B 98 23
C729 B 97 23
C730 B 113 26
C731 B 96 23
C732 B 111 26
C733 B 111 21
C734 B 113 21
C735 B 111 25
C736 B 113 25
C737 T 10 24
C738 T 7 23
C739 T 127 9
C740 T 129 9
C742 T 126 20
C744 T 126 21
C746 T 105 33
C747 T 107 32
C800 B 224 48
C801 B 229 50
C802 B 237 44
C803 B 74 36
C804 B 229 46
C805 B 65 48
C806 B 229 21
C900 T 40 22
C901 T 41 22
C902 T 30 21
C903 T 37 21
C904 T 36 21
C905 T 34 21
C906 T 43 22
C907 T 39 21
C908 T 43 20
C909 B 20 20
C910 B 30 23
C911 B 20 25
C912 B 20 23
C913 B 22 27
C914 B 40 24
C915 B 40 26
C916 B 32 27
C917 B 40 27
C918 B 41 29
C919 B 22 32
C920 T 29 29
C921 B 20 35
C922 B 20 34
C923 B 32 31
C924 T 29 35
C925 B 17 34
C926 B 34 31
C927 B 34 25
C928 T 44 31
C929 B 44 27
C930 T 44 29
C931 T 44 25
C932 B 32 40
C933 B 28 37
C934 B 27 40
C935 B 32 37
C936 T 33 36
C937 B 38 33
C938 B 28 29
C939 B 36 32
C940 B 29 19
C941 B 29 21
C942 T 40 36
C943 T 44 40
C944 T 102 30
C945 T 101 30
C946 T 103 33
C947 T 100 32
C948 T 38 43
C949 T 37 43
C950 T 33 43
C951 T 32 42
C952 B 38 44
C953 T 35 42
C954 B 38 43
C955 T 29 43
C956 T 24 41
C957 B 35 46
C958 B 36 47
C959 T 14 46
C960 T 24 46
C961 T 25 50
C962 T 17 49
C963 T 18 49
C964 B 35 49
C965 B 36 50
C966 T 25 53
C967 T 14 54
C968 B 28 51
C969 B 29 54
C970 B 30 47
C971 T 39 52
C972 B 40 51
C973 T 40 50
C974 T 40 47
C975 T 28 61
C976 T 32 64
C977 T 23 59
C978 T 31 60
C979 T 28 58
C980 B 31 53
C981 B 34 54
C1003 T 146 24
C1004 T 146 22
C1005 T 146 26
C1006 T 140 11
C1007 T 140 14
C1008 T 146 19
C1009 T 156 19
C1010 T 146 10
C1011 T 153 16
C1012 T 152 16
C1013 T 146 25
C1014 T 157 17
C1015 T 156 10
C1016 T 157 13
C1018 T 111 39
C1019 T 158 17
C1022 T 112 39
C1024 T 155 13
C1026 T 138 6
C1027 T 139 6
C1028 T 148 26
C1029 T 154 29
C1030 T 140 17
C1031 T 140 6
C1032 T 149 26
C1033 T 138 17
C1034 T 133 5
C1035 T 134 9
C1036 T 140 28
C1037 T 152 31
C1100 T 187 27
C1101 T 177 27
C1102 T 177 28
C1103 T 187 28
C1104 T 171 24
C1105 T 177 26
C1106 T 177 30
C1107 T 172 26
C1108 T 176 24
C1109 T 176 31
C1110 T 190 34
C1112 T 181 19
C1113 T 183 32
C1114 T 179 36
C1115 T 181 23
C1119 T 187 33
C1120 T 185 33
C1122 T 184 19
C1123 T 185 19
C1124 T 189 31
C1125 T 187 29
C1127 T 190 30
C1128 T 215 15
C1129 T 211 15
C1130 T 208 15
C1132 T 190 28
C1133 T 189 27
C1134 T 187 26
C1135 T 217 16
C1136 T 187 23
C1141 T 209 20
C1143 T 216 31
C1144 T 219 32
C1145 T 197 39
C1146 T 206 26
C1148 T 200 23
C1149 T 206 30
C1150 T 206 36
C1151 T 206 32
C1152 T 190 27
C1153 T 190 31
C1154 T 195 23
C1155 T 197 23
C1156 T 202 23
C1157 T 199 23
C1158 T 195 39
C1159 T 194 39
C1160 T 221 19
C1163 T 223 32
C1200 B 193 104
C1201 B 219 105
C1202 B 215 96
C1400 B 156 106
C1401 B 158 109
C1402 T 231 58
C1403 T 234 54
C1404 T 146 100
C1405 T 147 100
C1407 T 19 66
C1408 T 231 78
C1409 T 234 75
C1500 T 224 17
C1501 B 227 97
C1502 B 229 97
C1503 B 230 12
C1600 B 56 21
C1601 B 60 21
C1602 B 58 21
C1603 B 54 21
C1604 B 78 23
C1605 B 74 23
C1606 B 76 23
C1607 T 72 21
C1608 B 44 20
C1609 T 41 19
C1610 B 40 20
C1611 T 37 17
C1612 B 42 20
C1613 T 39 19
C1701 T 52 78
C1702 B 80 99
C1703 B 85 82
C1704 B 83 85
C1705 B 81 85
C1706 T 57 77
C1707 T 63 77
C1708 B 71 83
C1709 T 73 103
C1710 B 87 86
C1711 T 72 99
C1712 B 83 86
C1713 T 57 86
C1714 T 83 77
C1715 B 72 81
C1716 T 58 87
C1717 B 82 95
C1718 B 82 96
C1719 T 58 89
C1720 B 82 88
C1721 T 58 90
C1722 B 81 86
C1723 B 83 87
C1724 T 86 80
C1725 T 88 84
C1726 T 86 89
C1727 T 55 80
C1730 B 48 82
C1874 T 158 39
C1875 T 160 39
C1876 T 154 37
D100 B 22 101
D101 T 16 102
D705 B 106 20
D706 B 111 20
D707 B 113 20
D708 T 85 22
D709 T 83 23
D710 B 89 20
D711 B 91 20
D712 B 103 20
D713 B 109 20
D714 B 124 8
D715 B 124 9
D800 T 77 38
D801 T 77 35
D802 T 77 32
D803 T 232 44
D804 T 232 34
D805 T 232 47
D806 T 232 40
D807 T 77 59
D808 T 77 55
D809 B 77 59
D810 T 77 52
D811 T 232 19
D812 T 232 23
D813 T 232 26
D814 B 227 46
D900 T 44 37
D901 B 40 37
D902 B 28 21
D903 B 28 19
D1002 T 137 5
D1100 T 213 24
D1101 T 181 21
D1102 T 216 19
D1104 T 209 23
D1400 T 231 64
D1401 T 231 84
D1402 T 18 62
D1500 T 222 13
D1501 T 224 13
D1502 T 225 13
D1600 T 53 19
D1601 B 52 18
D1602 B 54 18
D1603 B 58 18
D1604 B 60 18
D1605 T 51 19
D1606 T 68 19
D1607 T 66 19
D1608 T 64 19
D1609 T 69 19
D1610 T 73 24
D1611 T 36 17
D1612 B 39 20
F900 T 31 70
IC100 T 26 76
IC101 B 19 102
IC102 T 19 99
IC103 T 33 89
IC104 T 93 88
IC105 T 140 93
IC106 T 19 87
IC107 T 134 27
IC108 T 148 87
IC109 T 123 31
IC110 B 227 92
IC112 T 48 76
IC113 T 139 37
IC114 T 165 8
IC115 T 158 96
IC200 T 109 62
IC201 B 93 44
IC500 T 115 95
IC501 T 146 68
IC600 B 189 92
IC601 B 175 100
IC602 B 175 85
IC603 B 200 81
IC604 B 193 81
IC605 T 224 65
IC606 B 226 57
IC700 T 129 13
IC800 B 226 51
IC801 B 76 35
IC802 B 226 42
IC803 B 77 55
IC804 B 227 24
IC900 T 37 29
IC901 B 43 43
IC902 T 32 50
IC1001 T 151 21
IC1002 T 135 7
IC1100 T 182 28
IC1101 T 198 31
IC1102 T 218 25
IC1200 B 207 103
IC1400 B 155 109
IC1401 T 231 55
IC1403 T 231 74
IC1500 B 228 8
IC1600 T 69 24
IC1700 T 72 88
IC1701 T 47 92
IC1702 T 47 91
IC1705 B 47 84
IC1805 T 155 39
L100 T 19 75
L101 T 17 80
L102 T 14 79
L103 T 28 103
L104 T 25 86
L105 T 25 92
L106 T 90 93
L107 T 229 100
L108 T 93 93
L109 T 142 87
L110 T 135 92
L111 T 151 91
L112 T 149 84
L113 T 230 97
L114 T 161 103
L115 T 123 27
L116 T 119 30
L117 B 225 99
L118 B 157 101
L119 T 44 74
L120 T 47 79
L121 T 138 31
L122 T 146 34
L123 T 132 31
L124 B 87 66
L127 B 159 35
L128 B 49 52
L129 T 35 105
L130 B 192 22
L132 B 241 64
L133 T 129 82
L200 T 100 40
L400 T 90 38
L401 T 78 48
L402 T 94 38
L403 T 79 45
L404 T 78 47
L405 T 91 38
L406 T 92 38
L407 T 79 46
L408 B 114 38
L409 B 111 66
L410 B 111 59
L411 B 107 59
L412 T 130 36
L413 T 129 36
L414 T 128 36
L415 T 132 36
L500 T 144 81
L600 T 224 61
L601 B 223 58
L700 B 81 26
L701 B 86 24
L702 T 7 24
L800 B 230 51
L900 T 15 25
L901 T 24 25
L902 T 24 32
L903 T 17 36
L904 B 27 42
L906 T 18 44
L907 T 19 54
L908 T 31 67
L1001 T 138 13
L1002 T 156 20
L1003 T 156 21
L1004 T 151 8
L1006 T 156 11
L1007 T 156 23
L1008 T 156 24
L1009 T 147 29
L1010 T 148 29
L1100 T 171 22
L1101 T 182 22
L1102 T 182 18
L1103 T 212 29
L1104 T 221 32
L1106 T 198 39
L1107 T 192 39
L1108 T 190 32
L1200 B 216 95
L1400 T 18 68
L1401 T 20 68
L1500 T 226 15
L1700 B 82 98
L1701 B 85 80
L1702 T 63 74
L1703 T 74 102
L1704 B 87 85
L1705 T 55 86
L1706 T 81 77
L1707 T 55 88
L1708 B 82 94
L1709 B 84 96
L1710 T 55 90
L1711 B 81 89
L1712 T 55 91
L1713 B 83 80
L1714 B 84 89
L1820 T 160 36
R100 T 29 73
R101 T 28 73
R102 T 27 73
R103 B 25 101
R104 T 30 76
R105 B 28 79
R106 T 28 79
R107 T 30 106
R109 B 18 104
R110 T 31 101
R111 T 33 99
R112 B 15 102
R113 T 34 99
R115 T 38 87
R116 T 15 99
R117 T 34 86
R118 T 36 86
R119 T 15 97
R120 T 38 89
R122 T 23 97
R123 T 36 92
R124 B 13 98
R125 T 94 84
R126 T 92 84
R127 T 96 84
R128 T 17 88
R129 T 15 88
R130 B 144 92
R131 B 143 92
R132 T 17 86
R133 T 15 86
R134 T 143 93
R135 T 143 94
R137 B 152 86
R138 T 17 85
R139 T 146 94
R140 T 146 92
R141 T 152 84
R142 T 152 94
R143 T 152 83
R144 T 147 94
R145 T 147 92
R146 T 126 30
R147 T 119 28
R149 T 118 28
R154 B 228 86
R155 B 229 87
R156 T 231 88
R157 T 134 39
R158 B 226 87
R159 T 133 37
R160 T 17 93
R161 T 17 94
R162 T 47 73
R163 T 52 74
R164 T 19 90
R165 T 18 93
R166 T 53 75
R167 T 17 91
R168 T 35 92
R169 B 21 110
R170 T 150 39
R171 T 145 39
R172 T 147 39
R173 T 134 38
R174 B 224 90
R175 B 224 89
R176 B 135 37
R177 T 157 90
R178 T 157 92
R179 T 156 92
R180 T 160 92
R181 T 161 95
R182 T 161 93
R200 T 75 41
R201 B 59 43
R202 B 55 43
R204 B 62 43
R205 B 52 43
R207 T 115 38
R208 T 115 39
R209 T 125 36
R210 T 122 36
R211 T 124 36
R212 B 94 42
R213 T 126 36
R214 B 94 47
R215 B 43 95
R300 B 95 79
R301 B 25 105
R302 B 95 77
R303 B 96 77
R304 B 105 75
R305 T 93 79
R306 B 88 78
2 - 1
Page 28
GRUNDIG Service Chassis MK
POS. X Y POS. X Y POS. X Y POS. X Y POS. X Y POS. X Y POS. X Y POS. X Y
R307 B 19 105
R308 T 87 80
R309 B 89 78
R310 T 152 102
R311 T 40 42
R312 T 154 102
R313 T 154 104
R314 T 46 19
R315 T 47 19
R316 T 152 104
R317 B 96 75
R323 T 44 19
R324 B 174 107
R325 B 47 20
R326 B 46 22
R336 B 24 110
R400 T 143 95
R401 T 99 77
R500 B 107 84
R501 T 122 91
R502 B 104 84
R503 T 121 84
R504 B 116 82
R505 T 121 89
R506 B 120 84
R507 T 115 85
R508 B 122 82
R509 T 119 83
R510 T 119 83
R511 T 111 85
R512 B 124 85
R513 T 112 85
R514 T 117 85
R515 T 109 85
R516 B 118 83
R517 B 120 83
R518 T 108 93
R519 T 106 93
R520 T 106 96
R521 T 107 91
R522 T 108 91
R523 T 109 97
R524 B 115 100
R525 T 142 75
R526 B 115 99
R527 B 135 74
R528 T 145 74
R529 T 142 74
R530 T 145 76
R531 B 132 77
R532 T 138 61
R533 T 122 97
R534 T 122 95
R535 B 133 68
R536 T 136 64
R537 B 152 68
R538 B 132 65
R539 T 135 62
R540 B 150 68
R541 B 133 63
R542 T 136 74
R543 T 148 61
R544 T 146 61
R545 T 136 67
R546 B 133 60
R547 T 136 66
R548 T 135 72
R549 T 135 71
R550 B 132 66
R551 T 133 67
R552 B 121 101
R553 B 153 65
R554 B 134 65
R555 T 147 76
R556 T 136 69
R557 T 107 96
R558 T 147 74
R559 T 148 73
R600 B 167 101
R601 B 170 93
R602 B 184 86
R603 B 185 85
R604 B 175 91
R605 B 175 88
R606 B 175 86
R607 B 163 70
R608 T 158 73
R609 T 161 77
R610 B 181 84
R611 B 182 86
R612 T 204 60
R613 B 203 59
R614 B 204 59
R615 T 203 60
R616 T 157 70
R617 B 205 95
R618 B 211 89
R620 T 196 60
R621 B 198 60
R622 B 166 77
R623 B 209 94
R624 B 211 87
R626 B 164 74
R627 B 208 91
R628 B 211 84
R630 B 197 81
R631 B 190 81
R632 T 226 68
R633 B 225 60
R634 T 198 60
R635 B 195 83
R636 B 190 103
R637 B 183 100
R638 T 215 60
R639 T 221 64
R640 T 221 62
R641 B 229 55
R642 B 229 57
R643 T 170 67
R644 T 206 60
R645 B 175 97
R646 B 210 59
R647 B 212 59
R648 T 202 60
R649 B 185 103
R650 B 187 56
R651 T 210 60
R652 B 219 107
R653 T 169 60
R654 B 168 70
R655 B 210 81
R656 B 190 56
R657 B 220 101
R658 B 175 94
R659 T 213 60
R660 T 167 62
R661 B 185 56
R662 T 167 65
R700 T 130 17
R701 T 129 17
R714 T 80 23
R715 B 103 22
R716 T 82 23
R717 B 79 24
R718 B 99 21
R719 B 81 24
R720 B 91 22
R721 B 93 22
R722 B 83 21
R723 B 83 22
R724 B 85 21
R725 B 83 20
R726 B 101 22
R727 B 106 22
R728 B 109 23
R729 B 89 21
R730 B 89 22
R731 B 109 21
R732 B 103 21
R733 B 91 21
R734 B 106 23
R735 B 98 21
R736 B 97 21
R737 B 112 23
R738 B 96 21
R739 B 111 24
R740 B 113 24
R741 T 9 24
R742 T 125 17
R743 B 129 13
R744 T 129 21
R745 T 106 34
R746 B 129 17
R747 T 107 33
R748 B 130 17
R749 T 105 32
R800 B 80 41
R801 B 82 42
R802 B 226 53
R803 B 228 53
R804 B 81 42
R805 B 239 43
R806 T 65 51
R807 B 239 46
R808 B 77 31
R809 B 228 13
R810 T 92 31
R811 T 90 33
R812 T 232 37
R813 T 93 36
R814 T 230 35
R815 B 231 43
R816 B 229 41
R817 B 80 59
R818 B 66 48
R819 B 80 61
R820 B 65 50
R821 B 231 22
R822 B 230 21
R823 B 230 19
R824 B 227 21
R825 B 80 56
R826 T 64 57
R827 T 64 60
R829 B 61 52
R900 T 41 20
R901 T 42 22
R902 T 44 24
R903 B 32 19
R904 T 46 21
R905 T 44 30
R906 B 44 26
R907 T 44 28
R908 B 44 25
R909 T 44 26
R910 T 44 33
R911 B 32 21
R912 T 41 36
R913 B 30 21
R914 B 30 19
R915 T 42 36
R916 B 38 40
R917 T 39 36
R918 B 46 43
R919 B 39 40
R920 B 45 41
R921 B 40 40
R922 T 101 34
R923 T 100 33
R924 T 103 32
R925 T 38 41
R926 B 37 43
R927 T 40 44
R929 T 42 51
R930 T 40 51
R931 B 40 49
R932 T 40 49
R933 B 40 48
R934 T 40 46
R935 T 37 58
R1000 T 142 7
R1002 T 154 9
R1003 T 157 15
R1009 T 154 26
R1011 T 156 25
R1012 T 153 26
R1013 T 156 26
R1014 T 140 26
R1015 T 142 16
R1016 T 157 30
R1017 T 140 27
R1018 T 140 25
R1019 T 139 17
R1020 T 154 30
R1021 T 151 31
R1100 T 221 17
R1101 T 181 32
R1102 T 190 36
R1104 T 186 35
R1106 T 199 21
R1107 T 187 31
R1109 T 188 23
R1110 T 222 19
R1111 T 223 19
R1113 T 206 34
R1115 T 206 28
R1116 T 222 17
R1118 T 206 27
R1119 T 224 27
R1121 T 224 25
R1122 T 224 29
R1123 T 206 31
R1124 T 206 35
R1127 T 224 30
R1200 B 193 100
R1201 B 219 104
R1202 B 219 103
R1203 B 194 108
R1300 T 38 100
R1301 T 37 100
R1302 T 42 98
R1303 T 44 98
R1304 B 52 99
R1305 T 84 101
R1306 B 53 100
R1307 T 85 100
R1308 T 70 100
R1309 T 46 98
R1310 T 94 101
R1311 T 71 100
R1312 T 44 100
R1313 T 95 100
R1314 T 29 110
R1315 B 58 81
R1316 T 42 100
R1317 T 20 101
R1318 T 40 98
R1402 T 139 100
R1403 T 229 61
R1404 T 228 61
R1409 T 228 81
R1411 T 229 81
R1500 T 224 16
R1501 B 226 97
R1502 T 213 6
R1503 T 219 13
R1504 T 214 8
R1505 T 221 14
R1506 B 228 100
R1507 B 227 99
R1508 B 229 99
R1509 B 226 99
R1510 B 225 9
R1511 B 225 8
R1512 B 225 7
R1513 T 228 12
R1514 T 228 14
R1600 B 56 20
R1601 B 60 20
R1602 B 58 20
R1603 B 54 20
R1604 B 54 19
R1605 B 58 19
R1606 B 60 19
R1607 B 77 23
R1608 B 73 23
R1609 B 75 23
R1610 T 64 21
R1611 T 70 21
R1612 T 67 21
R1613 B 41 20
R1614 T 38 17
R1615 T 51 21
R1616 B 43 20
R1617 T 38 19
R1700 T 55 93
R1702 T 61 77
R1703 T 55 82
R1705 T 58 80
R1717 T 82 77
R1720 T 85 77
R1721 B 83 83
R1722 T 86 82
R1727 T 90 85
R1728 T 86 84
R1729 T 51 89
R1732 B 46 89
R1733 B 47 89
R1734 B 48 89
RP300 B 65 77
RP301 B 68 77
RP302 B 71 77
RP303 B 74 77
RP304 B 76 77
RP305 B 79 77
RP600 B 175 99
RP900 T 32 21
RP901 B 32 24
RP902 T 29 33
RP903 B 30 29
RP904 T 26 42
RP905 T 23 48
RP1200 B 193 106
RP1201 B 193 102
S100 T 9 91
S101 T 58 56
S102 T 20 108
S200 T 56 32
S600 T 216 63
S605 T 23 11
S702 T 98 13
S703 T 11 16
S800 T 241 23
S801 T 70 55
S802 T 70 35
S900 T 7 31
S902 T 9 50
S906 T 241 44
S1000 T 151 11
S1100 T 181 11
S1102 T 143 107
S1114 T 86 107
S1300 T 53 107
S1302 T 53 104
S1401 T 235 64
S1402 T 235 84
S1403 T 9 62
S1404 T 9 64
S1500 T 223 9
S1501 T 224 8
S1502 T 223 9
S1503 T 224 9
S1600 T 55 12
S1601 T 33 11
S1700 T 20 106
SW1500 T 241 110
T100 T 26 97
T101 T 32 106
T102 T 34 101
T103 T 20 96
T104 T 149 94
T600 B 168 91
T700 B 80 22
T800 B 79 43
T801 T 85 33
T802 T 87 33
T803 T 93 33
T804 B 227 16
T900 B 42 40
T1000 T 146 7
T1500 T 216 9
TP1 B 96 108
TP2 B 39 100
TP3 B 112 13
TP4 B 205 8
TP5 B 78 108
TP6 B 202 86
TP7 B 196 86
TP8 B 226 64
TP9 B 226 70
TP10 B 224 54
TP11 B 224 63
TP12 B 228 58
TP13 B 41 102
TP14 B 40 99
TP15 B 43 100
TP16 B 45 102
TP17 B 80 108
TP18 B 48 102
TP19 B 82 109
TP20 B 47 99
TP21 B 76 102
TP22 B 52 104
TP23 B 79 102
TP24 B 57 105
TP25 B 76 97
TP26 B 55 105
TP27 B 228 49
TP28 B 77 40
TP29 B 82 30
TP30 B 229 54
TP31 B 242 58
TP32 B 64 61
TP33 B 240 44
TP34 B 82 39
TP35 B 68 64
TP36 B 97 65
TP37 B 43 75
TP38 B 98 54
TP39 B 77 38
TP40 B 226 11
TP41 B 80 33
TP42 B 229 34
TP43 B 230 46
TP44 B 242 84
TP45 B 90 31
TP46 B 70 47
TP47 B 223 43
TP48 B 228 39
TP49 B 236 41
TP50 B 229 43
TP51 B 75 62
TP52 B 84 107
TP53 B 53 96
TP54 B 72 54
TP55 B 85 58
TP56 B 84 56
TP57 B 82 44
TP58 B 229 16
TP59 B 229 23
TP60 B 83 104
TP61 B 232 20
TP62 B 228 27
TP63 B 237 21
TP64 B 100 10
TP65 B 52 98
TP66 B 46 16
TP67 B 81 56
TP68 B 18 23
TP69 B 18 28
TP70 B 18 32
TP71 B 21 30
TP72 B 40 47
TP73 B 30 42
TP74 B 27 13
TP75 B 26 17
TP76 B 39 38
TP77 B 14 46
TP78 B 15 53
TP79 B 28 46
TP80 B 51 34
TP81 B 51 39
TP82 B 54 34
TP83 B 60 48
TP84 B 56 34
TP85 B 242 23
TP86 B 96 70
TP87 B 92 74
TP88 B 8 63
TP89 B 13 102
TP90 B 35 79
TP91 B 94 96
TP92 B 127 91
TP93 B 146 80
TP94 B 9 69
TP95 B 162 41
TP96 B 138 79
TP97 B 131 39
TP98 B 129 39
TP99 B 127 37
TP100 B 133 37
TP101 B 114 101
TP102 B 122 99
TP103 B 149 68
TP104 B 148 21
TP105 B 139 18
TP106 B 135 17
TP107 B 172 27
TP108 B 214 25
TP109 B 207 32
TP110 B 202 23
TP111 B 191 29
TP112 B 85 102
TP113 B 42 7
TP114 B 223 11
TP115 B 220 12
TP116 B 230 31
TP117 B 232 12
TP118 B 229 10
TP119 B 230 5
TP120 B 227 5
TP121 B 51 20
TP122 B 60 15
TP123 B 57 17
TP124 B 55 16
TP125 B 52 16
TP126 B 63 17
TP127 B 59 99
TP128 B 70 21
TP129 B 67 16
TP130 B 62 19
TP131 B 66 21
TP132 B 63 21
TP133 B 71 23
TP134 B 35 9
TP135 B 38 13
TP136 B 86 107
TP137 B 152 110
TP138 B 232 58
TP139 B 145 111
TP140 B 231 62
TP141 B 141 110
TP142 B 231 66
TP143 B 8 89
TP144 B 16 66
TP145 B 11 64
TP146 B 233 78
TP147 B 230 82
TP148 B 230 85
TP149 B 10 62
TP150 B 232 75
TP151 B 59 91
TP152 B 81 84
TP153 B 62 81
TP154 B 74 105
TP155 B 86 83
TP156 B 84 75
TP157 B 70 81
TP158 B 58 87
TP159 B 56 94
TP160 B 80 95
TP161 B 57 89
TP162 B 82 89
TP163 B 55 90
TP164 B 82 81
TP165 B 85 88
TP166 B 33 97
TP167 B 81 77
TP168 B 85 77
TP169 B 50 86
TP170 B 50 89
TP171 B 54 85
TP172 B 54 88
TP179 B 21 93
TP180 B 61 103
TP181 B 86 105
TP182 B 63 96
TP183 B 78 99
TP184 B 31 99
TP185 B 11 98
TP186 B 15 98
TP187 B 131 30
TP188 B 17 86
TP189 B 167 9
TP190 B 41 109
TP191 B 64 65
TP192 B 68 84
TP193 B 92 42
TP194 B 85 99
TP195 B 31 109
TP196 B 39 103
TP197 B 69 94
TP198 B 88 102
TP199 B 67 92
TP200 B 88 100
TP201 B 76 85
TP202 B 89 108
TP203 B 54 101
TP204 B 90 106
TP205 B 76 81
TP206 B 90 104
TP207 B 76 83
TP208 B 87 97
TP209 B 70 96
TP210 B 90 101
TP211 B 68 97
TP212 B 93 101
TP213 B 70 99
TP214 B 93 107
TP215 B 73 97
TP216 B 94 106
TP217 B 80 92
TP218 B 86 93
TP219 B 71 102
TP220 B 89 92
TP221 B 11 22
TP222 B 80 14
TP223 B 83 13
TP224 B 88 14
TP225 B 91 13
TP226 B 100 12
TP227 B 103 14
TP228 B 106 13
TP229 B 108 14
TP230 B 115 14
TP231 B 14 17
TP232 B 119 10
TP233 B 115 10
TP234 B 223 59
TP235 B 98 74
TP236 B 92 46
TP237 B 154 93
TP238 B 163 110
TP239 B 52 82
TP240 B 136 31
TP241 B 65 103
TP242 B 225 14
TP243 B 128 32
TP244 B 230 100
TP245 B 230 98
TP246 B 153 99
TP247 B 138 104
TP248 B 140 104
TP249 B 146 105
TP250 B 148 105
TP251 B 137 14
TP254 B 27 105
TP255 B 142 89
TP256 B 9 92
TP257 B 154 104
TP259 B 170 106
TP260 B 173 92
TP261 B 182 108
TP262 B 46 82
TP263 B 25 108
TP264 B 57 78
TP265 B 56 81
TP266 B 60 83
X200 T 118 38
X1000 T 145 16
X1100 T 182 35
X1700 T 87 86
2 - 2
Page 29
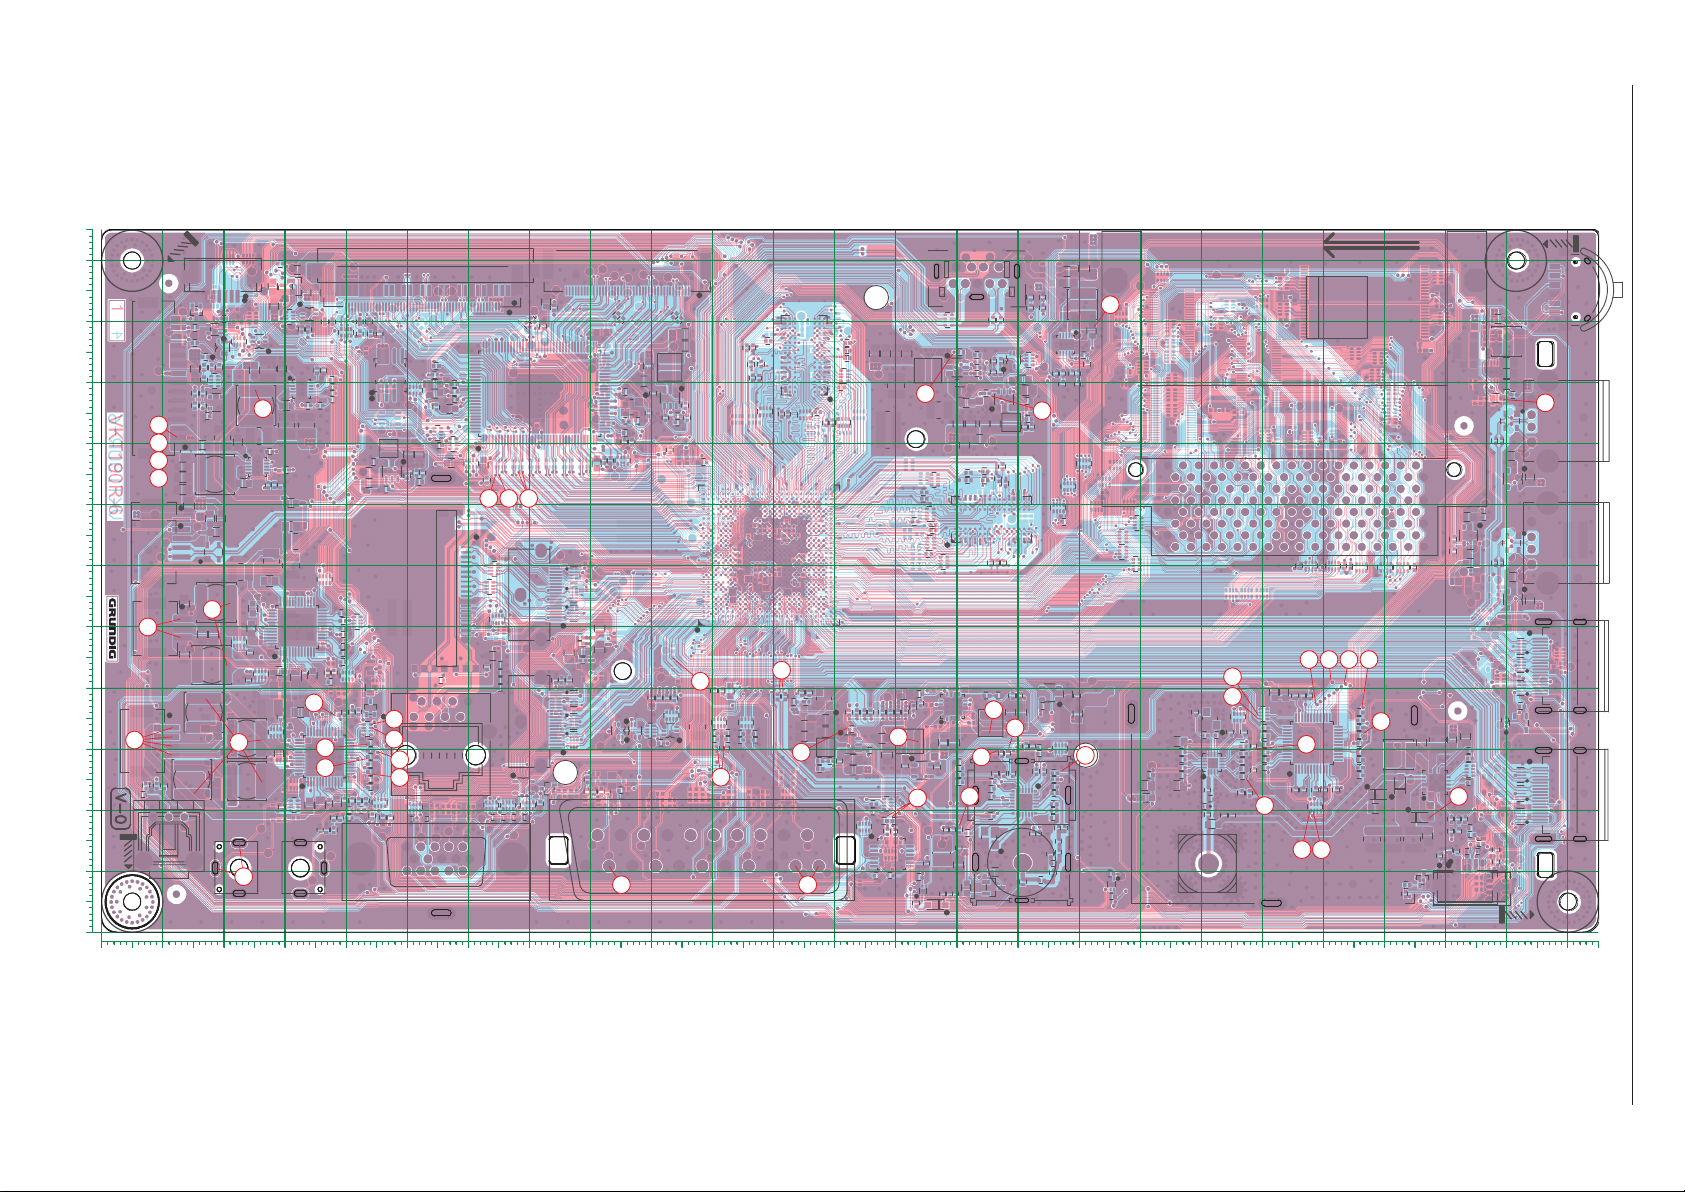
Chassisplatte / Chassis Board VTY190R-6
100
110
0102030405060708090 100 110 120 130 140 150 160 170 180 190 200 210 220 230 240
X
Ansicht von der Bestückungsseite / View of Component Side
GRUNDIG Service Chassis MK
R122
L104
RP905
L902
40
C100
C977
43
S102
C120
1
1
IC100
1
C956
L901
C115
C961
C960
RP904
R1314
T100
1
C112
L105
1
R106
R102
C975
C979
C966
48
C955
RP902
LVDS
C107
T101
C105
R107
1
L103
T102
R110
R113
R111
C144
1
R117
C111
R118
C113
C126
R104
R100
R101
F900
L908
C976
C978
IC902
36
1
12
C950
C953
C951
13
C936
36
C924
C920
48
1
RP900
C905
C902
S1601
PC AUDIO IN VGA
C203
C204
C202
8
7
D1607
1
R1612
1
D1606
S801
IC1600
D1609
1
HDMI
S802
HDMI
R1611
41
S1302
S1300
C1709
R1311
L1703
R1308
C1711
19
D807
D808
D810
1
L401
L404
C410
C200
R200
C201
19
D800
D801
D802
1
SP3
D1610
C1607
S1600
L129
30
51
R1312
R1316R1302
R1300
R1301
R1318
R1309
R1303
R168
R123
C116
IC1702
R120
IC1701
C117
IC103
R115
R1729
1
1
L120
1
C161
C162
C159
C154
R163
L119
R162
IC112
UHD
102
R1700
L1712
C1721
L1710
C1719
L1707
C1716
C1713
L1705
R1703
128
R1705
C1727
C1701
C158
1
C1706
R1702
C1707
SH6
R166
L1702
33 34 35
1
R935
C971
24
R930
R929
C973
R932
C974
R934
R927
R311
C948
C949
R925
39
37
C904
D1611
C1611
ETHERNET
C943
2
D900
1
R915
C942C900
R912
R917
30
R910
21
C928
24
R905
C930
38
R907
R909
C931
36
R902
IC900
12
R904
C906
R1615
C901
R901
C903
C907
C908
R900
R1617
R1614
C1609
C1613
D1600
D1605
R323
R315
R314
R826
20
S101
C206 C207
S200
R1610
D1608
SH4
R827
R806
C426
C205
S1700
MH2
BL-PWM
FID2
14
D101
R1317
R116
1
IC10 2
R119
T103
R161
1
R160
C160
R165
C110
90
POWER
Trigger
VKT190R-6
80
S100
2 - 3
S1404
70
60
WIFI
50
41
SUBWOOFER
S902
40
41
30
AUDIO
S900
20
10
Y
C738
MH3
0
R164
R167
R128
R129
IC106
R132
R133
R138
10
11
12
13
C119
L101
1
L102
C104
C102
C101
L100
C131
1
L1401
L1400
C1407
1
1
6
D1402
4
S1403
C967
40
1
L907
C963
C962
3
C959
L906
L903
1
4
L702
R741
C737
L900
S605
S703
OPTIC
HEADPHONE
FID3
S1114
LVDS
1
R1310
R1305
64
38
R1720
C1714
R1717
L1706
C433
L407
C409
L403
T801
C714
C726
D708
D709
R716
C716
R714
R1307
C1726
X1700
R1728
R1722
IC1700
R1313
C127
C128
L108
L106
C125
1
1
C182
IC104
C122
C124
R1727
R125
R126
R127
C1725
R308
C1724
R305
R401
1
10
L400
1
R811
T802
R810
1
L200
L402
L406
L405
R813
R922
C211
T803
R923
C946
1
R924
C947
C945
42
30 32
S1102
USB
SP2
R523
R520
R557
R518
R519
R522
R521
R515
R533
R534
C502
C418
R501
R505
1
IC500
R514
R507
R513
R511
R503
R509
R510
L133
R1402
C1404
IC105
C123
L110
R400
1
R135
R139
R134
C129
R140
C106
IC108
C103
C165
4
L109
C209
R542
R548
R549
R556
R545
R547
R536
R539
R532
1
C138
C522
C412
C139
L500
C531
R530
R525
R528
R529
1
C505
R544
C132
C133
C174
C208
R551
IC200
22
C429
R211
IC109
R742
R157
R159
L412
L415
L413
L414
R209
R213
L123
C170
8
R146
C169
1
C136
IC107
31
R744
C744
C742
C704
C703
R700
R701
1
C739
C740
C1035
IC700
C1034
C215
C214
R745
C746
R749
C944
R747
C747
SCART
R208
C213
C212
R207
C1018
C1022
1
X200
R210
C149
C147
C140
C148
C185
1
L116
3
C146
R147
R149
C184
C145
L115
S702
R171
IC113
L1001
IC1002
R172
7
1
L122
L121
C163
15
C1036
R1017
C135
R1014
C1005
R1018
C1013
C1003
C1004
23
C1008
R1015
C1030
R1019
C1033
1
C1007
C1006
C1010
R1000
C1026
C1027
C1031
T1000
R173
C702
1
D1002
C175
C164
C176
R316
R310
R312R313
C1405
R142
R144
T104
1
R145
L111
C137
C183
2
R141
C134
R143
L112
R555
R558
R559
IC501
R543
6
L114
1
C156
R181
IC115
R182
R180C181
R178R177
C180
R179
R609
R608
R616
C608
R643
R662
R660
R653
PCMCIA
BARCODE
R634
R620
B1
1A
1B
R648
R644
R615
R612
S600
R659
R651
R638
26 2728 29
IC1805
1
C1874
R170
C171
C168
14
L1010
L1009
C1028
C1032
IC1001
8
15
X1000
C1875
C1876
C167
R1020
R1016
C1037
R1021
C1029
R1013
R1009
R1012
R1011
L1008
1
L1007
28
L1003
L1002
C1009
22
C1014
C1012
C1011
C1024
L1006
R1002
C1015
L100 4
S1000
SH3
L1820
SP1
11
C1107
C1104
L1100
C1019
R1003
C1016
C179
1
IC114
C178
C1109
C1108
C1106
C1102
C1101
C1105
R1101
C1114
D1101
S1100
IC1100
L1101
L110 2
1
C1112
C1113
C1115
1
X1100
17
16
L1107
C1159
L1106
C1145
C1158
36
R1104
R1102
C1110
L1108
C1120
C1119
C1153
R1107
C1127
C1124
C1125
C1132
C1103
48
C1152
C1100
C1134
C1133
R1109
C1136
25
C1123
C1122
SH1
C1150
R1124
R1113
24
C1151
R1123
24
C1149
R1115
IC1101
R1118
C1146
1
12
C1154
C1156
C1148
C1157
C1155
R1106
19
18
C1141
D1104
SH2
12
C1143
L1103
IC1102
D1100
1
D1102
C1135
C1129
C1130
C1128
T1500
R1504
R1502
C1144
R1503
1
1
S1500
S1501
MH4
L107
C141
FID1
C607
R632
1
IC605
R639
C606
R640
L600
FID4
C1163
L1104
R1127
R1122
R1119
R1121
9
R1110
C1160
R1111
C1500
R1500
R1100
R1116
L1500
D1501
D1502
R1505
4
D1500
1
1
3D
S1502
S1503
C151
R1409R1404
R1513
L113
C150
C143
R156
R1411R1403
C1408
IC1403
D1400
C1402
IC1401
R814
R1514
SW1500
5
1
D1401
1
S1402
USB
C1409
1
1
S1401
USB
C1403
1
D805
D803
D806
19
R812
HDMI
D804
S906
1
1
D813
D812
D811
19
HDMI
S800
MH1
TRANSPORT LINE
Page 30
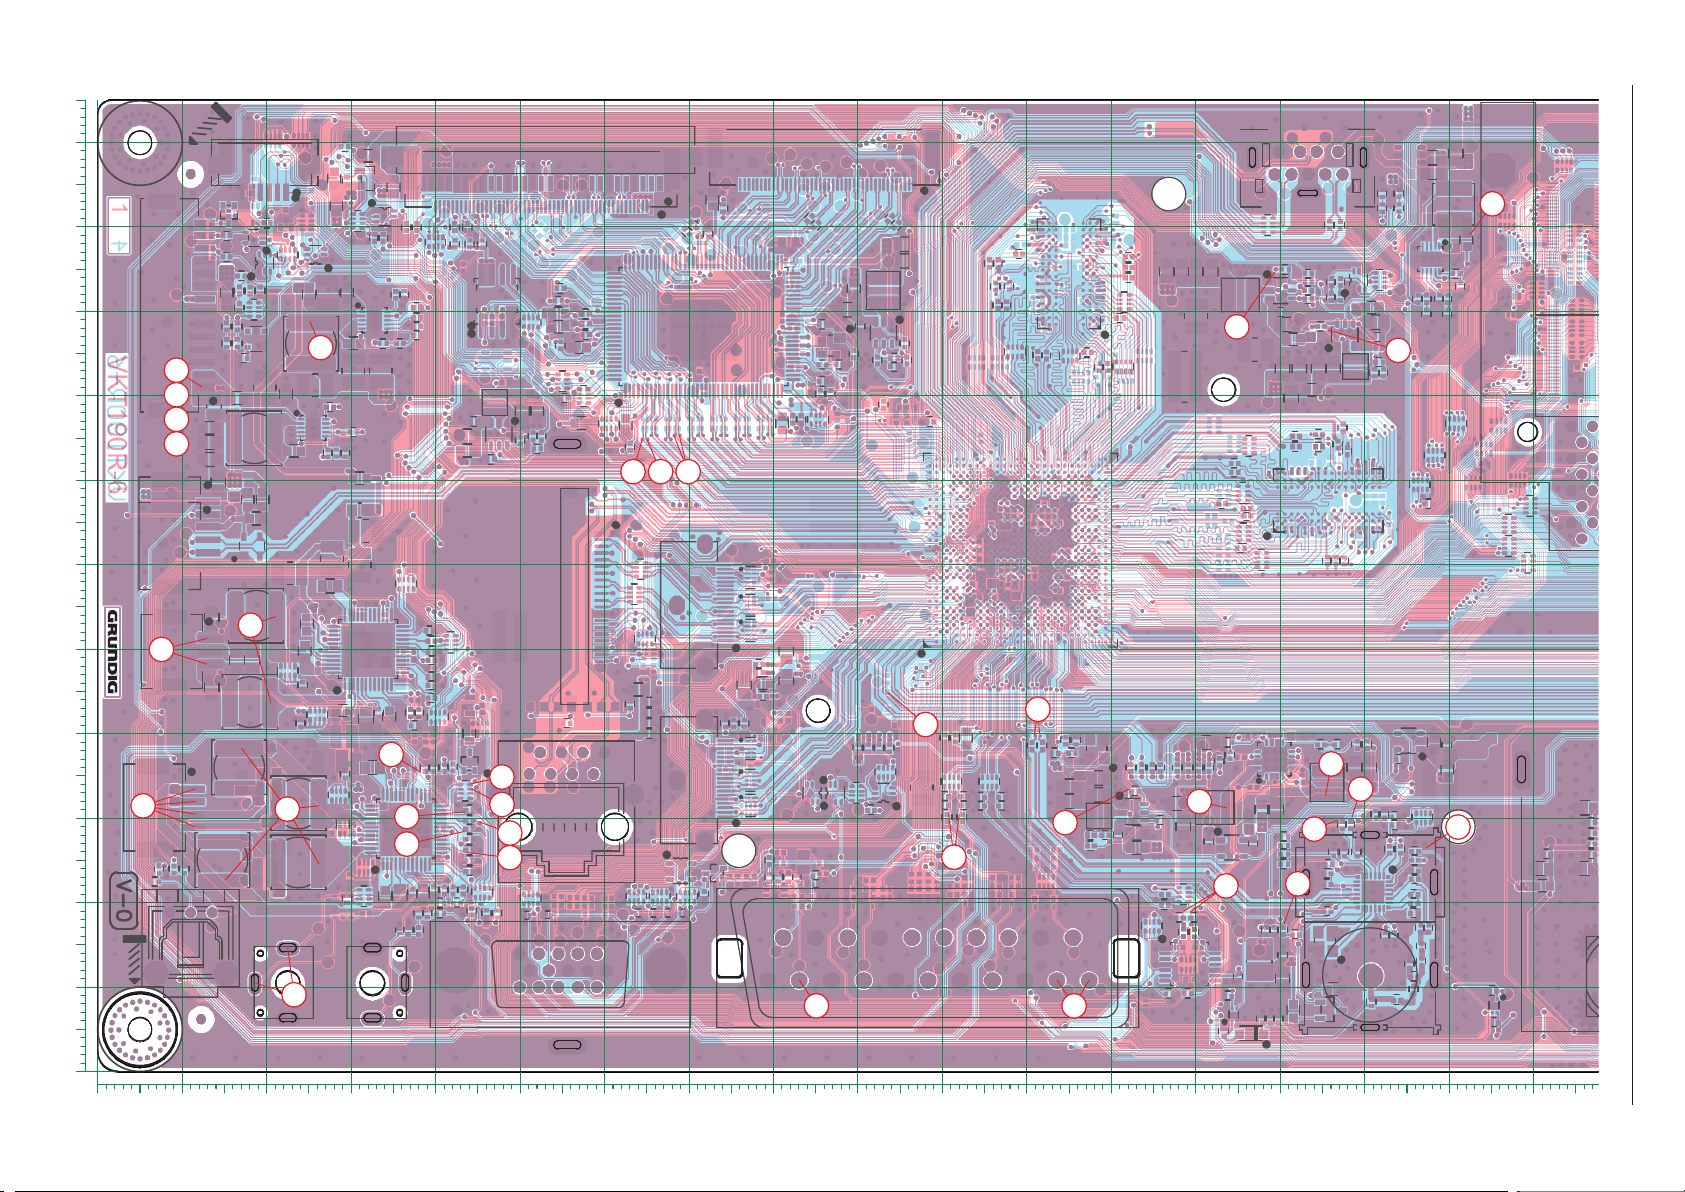
100
110
0102030405060708090 100 110 120 130 140 150 160 170 180 190 200 210 220 230 240
X
48
C1153
C1132
C1127
C1124
C1125
R1107
C1113
C1106
C1101
C1152
C1133
C1134
C1100
105
R1104
R110 2
C1110
L1108
SH1
1
R1101
C1115
C1112
S1100
2
PCMCIA
L1107
R1109
C1114
IC1100
C1120
1
C1123
C1122
L110 1
L110 2
X1100
C1103
C1159
C1119
C1136
D1101
TRANSPORT LINE
16
17
25
Chassisplatte / Chassis Board VTY190R-6 Ansicht von der Bestückungsseite / View of Component Side
2 - 4
C115
C956
L901
T100
L105
C966
C961
C960
RP904
1
R106
C975
C979
48
RP902
LVDS
R1314
C107
T101
C105
R107
1
L103
T102
R110
R113
R111
1
C144
C112
1
R117
C111
C113
C126
R104
R100
R102
R101
F900
L908
C976
C978
IC902
36
1
12
C955
C950
C951
13
C936
36
C924
C920
48
1
RP900
C905
C902
S1601
PC AUDIO IN VGA
R118
C953
L129
R168
R935
39
37
30
51
R1312
R1316R1302
R1300
R1301
R1318
R123
C116
R120
C117
IC103
R115
IC1702
C162
C159
L119
R1303
IC1701
1
R1309
L120
R162
R170 0
L1712
C1721
L1710
R1729
C1719
L1707
1
1
IC112
C1716
C1713
L1705
R1703
128
R1705
C1727
C161
C1701
C1706
R1702
SH6
R166
C158
C154
R163
1
102
1
C1707
L1702
33 34 35
1
S1302
R1311
R1308
UHD
S801
1
R827
R826
C971
24
R930
R929
C973
R932
C974
R934
R927
R311
C948
C949
R925
C904
D1611
C1611
C903
R917
12
C907
R900
C1609
C1613
R1617
R1614
C943
D900
R915
C942C900
R912
R910
C928
24
R905
C930
R907
R909
C931
R902
IC900
R904
C906
C901
R901
C908
R323
ETHERNET
2
1
30
21
38
36
D1605
R315
R314
S101
C206 C207
R161 5
D1600
SH4
R806
20
S200
C426
C205
C203
C204
C202
8
HDMI
S802
7
HDMI
1
IC1600
R1 611
R1610
R1612
D1606
D1608
D1607
D1609
S1700
BL-PWM
S102
MH2
FID2
1
R161
R160
R164
R167
R128
IC106
R132
R138
C1407
1
D1402
R1317
IC10 2
T1 03
R165
L100
L1400
1
C160
C119
L1401
1
1
R122
L104
C120
1
C100
IC100
C977
14
D101
R116
R119
90
VKT190R-6
POWER
Tr igger
C110
R129
R133
10
80
70
60
S100
S1404
WIFI
11
12
13
1
C104
C102
C101
L101
L102
C131
1
1
6
4
S1403
C967
40
50
SUBWOOFER
S902
41
1
L907
C963
C962
3
C959
RP905
L906
40
L903
1
30
41
C738
4
L702
R741
C737
AUDIO
S900
L902
40
L900
20
S605
S703
MH3
10
OPTI C
FID3
43
HEADPHONE
S1300
C1709
C1711
D1610
C1607
S1600
41
L1703
19
1
C201
1
R200
D801
D807
D808
D810
19
D800
D802
LVDS
38
L401
L404
L407
C410
L403
C200
SP3
C714
R714
0
S1114
1
C1725
R308
C125
R1310
R1313
C127
C128
L108
L106
1
1
C182
IC104
C122
C124
R1727
R125
R126
R127
R305
R401
R523
R557
R520
R518
R519
R522
R521
R515
1
R1305
R1307
64
C1726
X1700
R1728
R1722
IC1700
C1724
R1720
C1714
R1717
L1706
C433
C409
10
L200
C215
L406
L405
L400
L402
R813
1
T801
R811
T8 03
T802
1
C726
D708
D709
R716
C716
R810
1
C214
R745
R922
C211
R923
C946
R747
C746
R924
C947
C747
R749
C944
C945
42
30 32
SCART
22
S1102
USB
SP2
R533
R534
C502
R501
R505
1
R514
R507
R513
R511
R503
R509
R510
IC500
C418
L133
C174
R1402
IC105
C132
C133
C208
R551
L110
R548
R549
4
R556
R536
R5 39
R542
R545
R547
1
C106
C209
R532
C123
C103
L109
C522
1
R525
R529
C1404
C1405
R400
R135
R139
R144
T104
R134
1
C129
R145
R140
IC108
C165
1
C138
C412
C139
L112
L500
C531
R530
R555
R528
R558
R559
R544
C505
R543
L111
C137
C183
R141
IC501
R142
C175
C164
C176
R316
R310
R312 R313
IC115
R179
R178R177
6
L114
1
R181
R180C181
C180
C156
R182
2
C134
R143
R6 09
R608
R616
C608
R643
R662
R660
R653
IC200
IC1805
C429
R213
C170
L414
C169
L413
R157
R173
R159
L412
L415
L123
IC113
8
1
C136
R208
C213
C212
R207
C1018
C1022
C147
C185
3
R149
C145
L116
C149
C148
R147
1
X200
R209
R210
R211
C140
IC109
1
R146
C146
C184
L115
IC107
31
R744
C744
C742
C704
C703
R742
R700
R701
1
C702
C1035
L1001
IC1002
1
D1002
C1034
S702
C739
C740
IC700
R171
R172
C171
7
R1000
15
L122
C1013
C1003
C1004
C1008
C1010
T1000
C168
14
L1010
L1009
C1005
C1028
C1032
IC1001
8
15
1
X1000
1
L121
C163
C1036
R1017
C135
R1014
R1018
23
R1015
C1030
R1019
C1033
C1007
C1006
C1026
C1027
C1031
1
R170
C167
L100 4
C1874
C1876
R1020
C1037
R1021
C1029
1
22
C1012
R1002
C1875
SH3
L182 0
SP1
R1 016
11
R1013
R1009
R1012
R1011
L1008
L1007
28
L1003
L1002
C1009
C1019
C1014
C1011
R1003
C1024
C1016
L1006
C1015
C179
IC114
C178
1
S1000
Y
C1107
C1104
L1100
GRUNDIG Service Chassis MK
C1109
C110
C1
C1108
Page 31
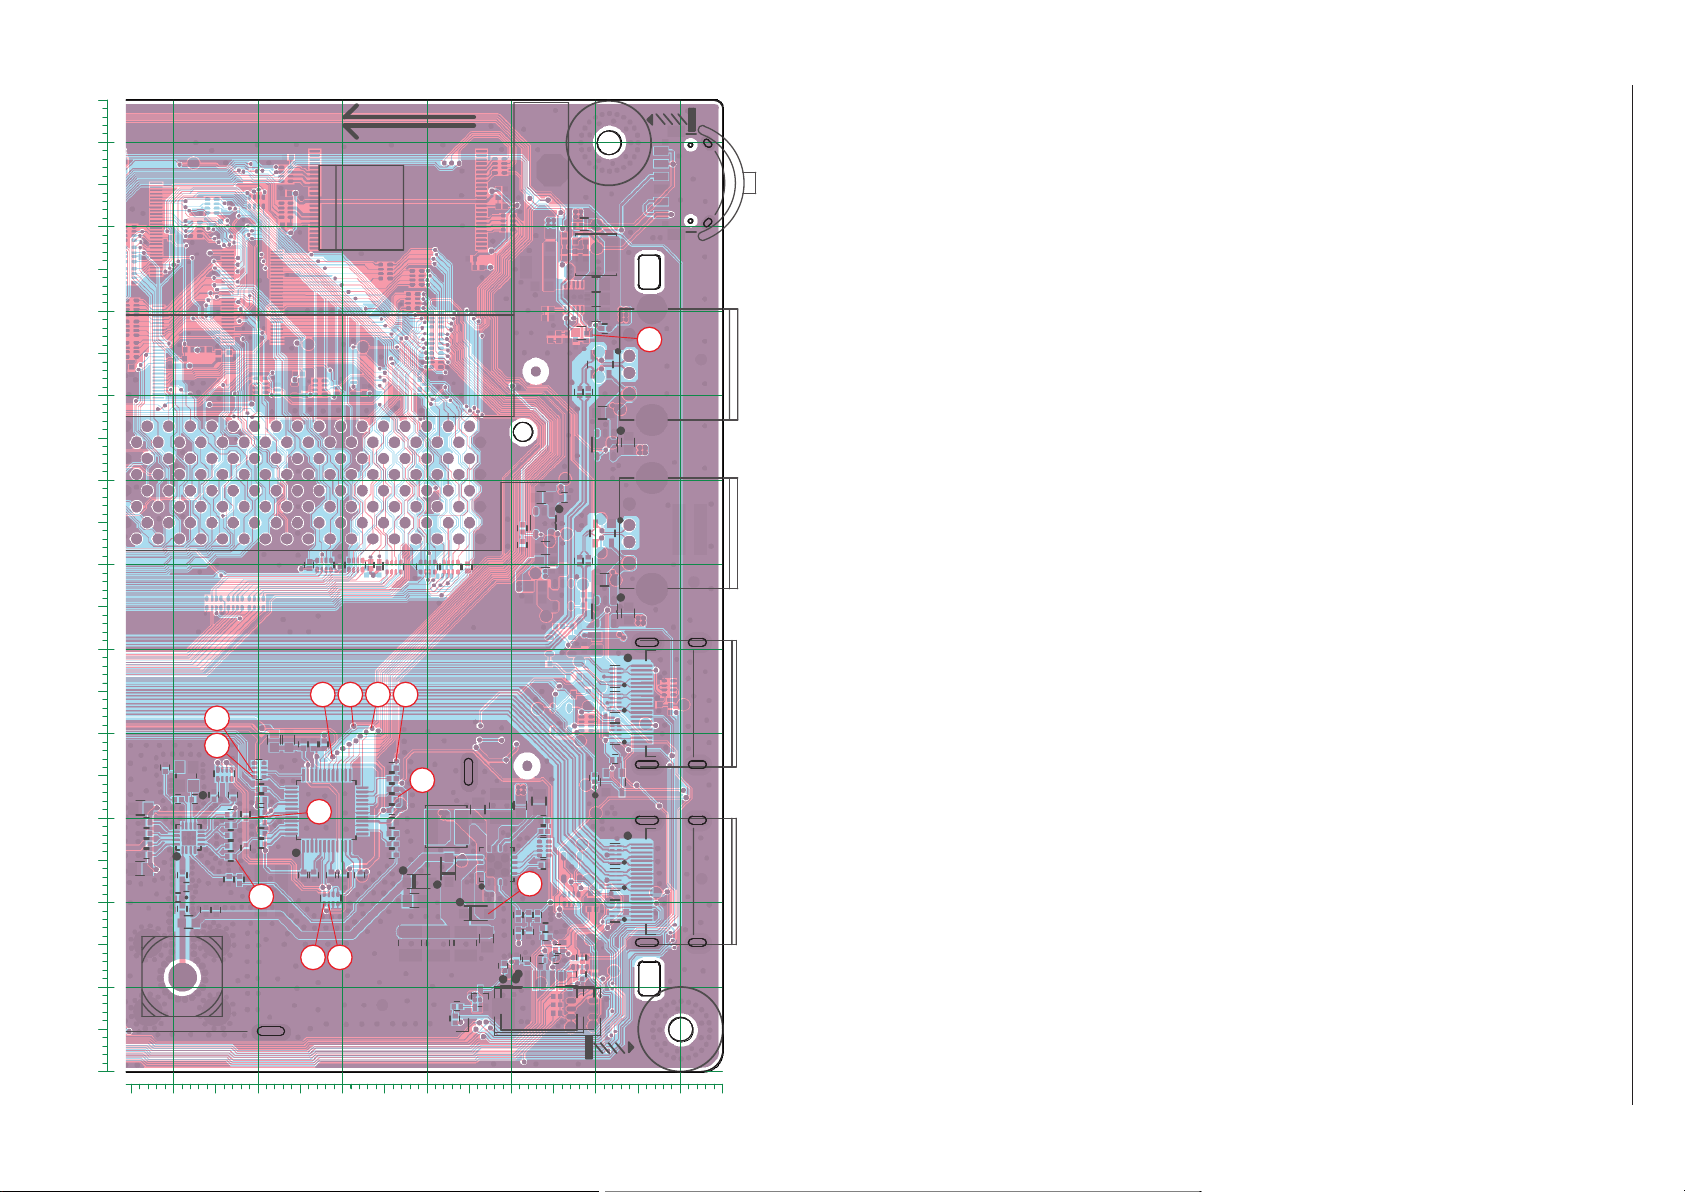
Chassisplatte / Chassis Board VTY190R-6 Ansicht von der Bestückungsseite / View of Component Side
C110
TR
100
110
0102030405060708090 100 110 120 130 140 150 160 170 180 190 200 210 220 230 240
X
48
1
1
1
1
1
1
1
1
SH4
C161
1
R311
1
C1153
C1132
C1127
C1124
C1125
R1107
C1113
C1106
C1101
C180
R180C181
R182
R178R177
C1875
28
C1011
C1037
C1012
R144
R555
R559
R543
L1009
L1010
15
1
C1404
R544
R170
R173
C1007
C1031
1
L121
D1002
C1026
C1034
L412
1
C135
L413
R701
R700
1
R210
X200
C184
C213
R513
C1022
R518
R519
R520
C214
C945
1
IC104
C122
R126
L406
C182
L405
R1727
R308
1
R716
C1714
R1717
C714
41
S1302
1
1
8
7
C205
102
L1705
R901
2
1
L120
R323
R912
24
C901
C908
C942C900
24
IC103
R113
C107
1
1
R100
C902
1
R102
1
C960
C160
IC10 2
R160
R128
R132
S703
R129
R133
C1152
C1133
C1134
C1100
C1105
C1019
C1015
C1014
R1009
C134
R145
C1028
X1000
C1005
C106
C1030
R1019
C1033
IC113
L110
R521
R522
R127
C200
R200
C1711
S1600
L1702
C158
R1312
R1303
R1316R1302
IC900
R915
R1300
C948
R1617
R1614
R168
R1301
36
C956
R167
POWER
WIFI
SUBWOOFER
R1104
R110 2
C1110
L1108
SH1
1
R1101
C1115
C1112
S1100
C1102
L114
R181
R662
R660
SH3
C179
1
R6 09
R608
L182 0
SP1
R1 016
R1013
L1008
L1002
L1006
C164
T104
L111
C137
C183
IC501
8
C123
R400
R135
R134
C103
L109
L500
C522
C139
C412
R525
R528
R529
R172
1
R157
C1036
R1014
R1015
C1006
R1000
C132
L133
R542
R548
R549
R556
R545
R547
R5 39
L123
IC107
C1035
1
SP2
C174
C418
R146
C146
C742
C704
C739
R514
R507
R207
C147
C185
1
L116
R147
R149
C170
C145
R523
R515
C747
R747
R401
C215
R922
R924
C947
R1310
R305
R1720
D1610
R813
T8 03
IC1600
R1305
64
C1726
D802
T802
C726
D708
D810
D808
C410
1
L407
L403
19
D801
D800
1
R1610
R1308
R1311
R1702
S801
HDMI
C1719
C1716
128
C1707
1
S200
R170 0
L1712
L1707
C1701
S101
R161 5
1
C162
C159
R162
UHD
R929
C943
R905
R907
R909
R902
L129
T102
C116
R120
C117
R118
R117
R115
R935
12
C953
C931
R904
1
L103
R110
T100
C111
C113
C115
R106
C975
1
RP904
BL-PWM
R1317
R122
T1 03
1
R164
IC106
R138
C119
C120
L100
1
C977
L907
C963
FID2
L102
C104
C102
C101
1
4
S1403
C967
1
L906
1
4
R741
C737
FID3
S902
PCMCIA
L1107
R1109
C1114
IC1100
C1120
1
C1123
C1122
L110 1
L110 2
R179
IC115
R616
C608
C167
C1874
C1009
L1003
L1007
R1011
C1016
C1024
R1003
C175
C176
C1405
R310
R316
1
R142
R139
R141
L112
C505
C168
R1021
L100 4
C129
C165
C531
R530
C171
R159
R1017
R1018
C1027
S1102
R551
R536
L415
C429
R742
C702
IC1002
C133
IC500
R213
R211
L414
R209
L115
IC109
R744
C136
C744
S702
C149
R208
1
C148
C169
R557
R511
C1018
SCART
L200
C944
C946
R923
R1313
C128
C127
L108
R125
C124
1
L400
L402
R810
R1307
R1728
1
X1700
C1724
R1722
1
T801
R1 611
C716
D709
L1703
19
L404
C201
SP3
R714
S1300
1
S802
C1607
D1609
D1606
C1721
R827
20
R1729
L1710
R1703
R163
R826
D1600
D1605
IC1702
L119
D900
R910
C928
C930
C906
R315
R314
30
51
R111
R917
R925
C903
C904
C905
C907
D1611
R1314
R107
C105
C144
C112
L105
R104
R101
C979
36
C955
48
C924
RP902
C920
S1700
1
R165
R161
L104
1
L1401
L1400
C1407
RP905
S605
MH2
14
1
C131
1
6
C959
3
L903
AUDIO
S900
MH3
C1109
C1107
X1100
IC114
R140
R143
R558
C1032
R1012
USB
R510
R509
IC1700
HDMI
R166
C154
IC1701
R1309
R123
C949
C950
C1611
C1613
48
L900
VKT190R-6
C1103
C156
R643
R653
IC1805
R1020
C1104
L1100
C178
S1000
R533
R534
R501
R505
1
C138
R532
R171
C163
C1003
C1004
C703
C1010
C740
L1001
S1114
L106
C125
C212
R745
C211
C746
R749
C1709
38
C1706
L1706
SH6
D807
C409
C203
C204
C202
C126
IC100
IC112
F900
L908
C976
C978
C971
C961
C973
R932
C974
R934
R927
C951
C936
L902
L901
R900
D101
R116
R119
S100
S1404
C962
L702
C1159
C1119
C1136
R312 R313
C1876
C1029
22
C1108
R1002
R1402
C502
IC105
R503
C208
C209
IC108
IC200
C140
L122
C1008
C1013
IC700
T1000
C1725
R811
LVDS
C1713
C1727
R1705
R806
L401
C426
C433
R1612
C206 C207
D1608
D1607
LVDS
S102
T101
R1318
1
C100
C966
IC902
R930
12
C1609
RP900
S1601
PC AUDIO IN VGA
C110
L101
C738
OPTI C
D1402
D1101
ETHERNET
TRANSPORT LINE
IC1001
HEADPHONE
1
2
4
6
3
7
8
11
13
14
15
16
17
30
21
22
23
25
30 32
31
33 34 35
36
38
37
39
40
40
41
41
42
43
10
11
12
13
Tr igger
10
ANSPORT LINE
GRUNDIG Service Chassis MK
2 - 5
90
80
70
60
50
40
30
20
10
0
Y
C1109
C1106
C1102
C1101
C1105
8
C1114
R1101
D1101
S1100
C1113
IC1100
1
C1115
L110 1
C1112
L110 2
17
16
R1104
1
X1100
C1120
R1107
C1125
C1103
C1100
C1134
C1123
C1122
C1136
C1119
PCMCIA
C1110
L1108
C1153
C1127
C1124
C1132
C1152
C1133
R1109
25
L1107
C1159
36
R110 2
48
SH1
BARCODE
R634
R620
C1145
C1158
24
1
C1154
18
C1155
B1
R6 48
26 2728 29
L1106
12
C1148
C1157
R1106
19
MH4
L107
L113
C150
L600
C1163
R1111
4
3D
R632
1
FID4
L1500
D1502
S1502
S1503
C151
C143
R156
C141
D1401
FID1
R1409R1404
R1411R1403
C1408
IC1403
D1400
IC605
C1402
IC1401
D804
R814
R1514
R1513
D805
D803
D806
R812
1
D813
D812
D811
1
1
1
1
1
19
1
19
C1409
C1403
5
HDMI
R659
SH2
D1100
D1102
C1129
R150 4
R1502
1A
1B
S600
R638
C1144
C1143
IC1102
1
C1135
C1128
R1505
R1503
1
1
1
1
T1500
S1500
S1501
R639
R640
L1104
9
C1160
R1100
D1501
C607
C606
R1127
R1122
R111 9
R1121
R1110
C1500
R1500
R1116
D1500
R644
R651
R615
R612
C1150
R1124
12
R1113
24
C1151
R1123
C1149
L1103
R1115
IC1101
R1118
C1146
D1104
C1156
C1141
C1130
SW1500
USB
HDMI
S1401
USB
S906
S1402
S800
MH1
Page 32
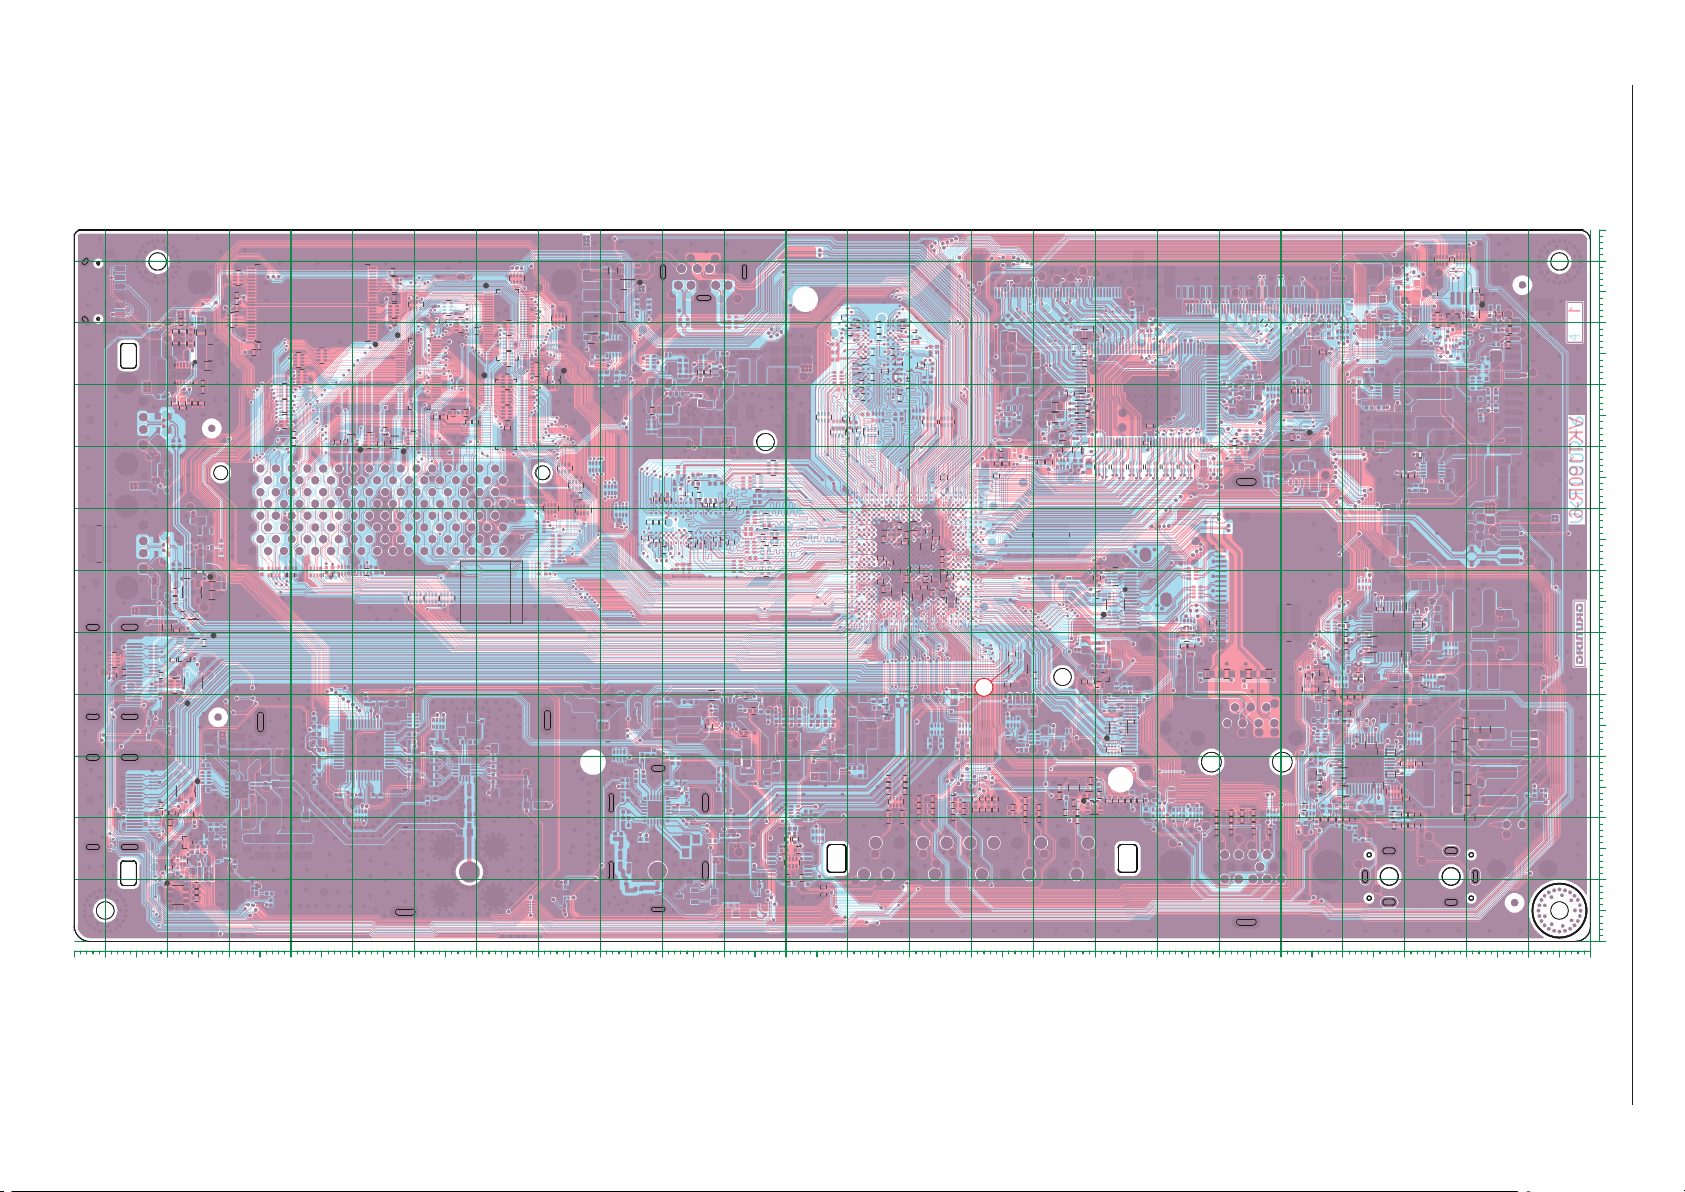
Chassisplatte / Chassis Board VTY190R-6
100
110
0102030405060708090100110120130140150160170180190200210220230240
X
Ansicht von der Lötseite / View of Solder Side
GRUNDIG Service Chassis MK
2 - 6
25
R652
C1201
R1201
R1202
TP244
TP245
TP44
L132
TP31
TP33
TP85
TP148
TP147
TP146
TP150
TP142
TP140
TP138
TP30
TP43
R807
C802
R815
R805
TP49
TP116
R821
TP63
TP61
R823
TP58
TP117
TP118
1
TP119
IC1500
R657
R1506
L117
R1507
R1508
R1509
48
C1202
C142
C1501
R154
TP9
TP40
R1510
R1511
R1512
C153
R802
1
TP242
R1501
1
R174
R175
R158
TP11
TP10
C800
IC802
1
C152
IC110
R633
1
TP114
C155
FID5
TP234
L601
C609
1
TP47
IC804
IC800
TP115
FID8
L1200
TP108
R623
R627
R618
R624
R628
C614
R655
R647
R646
TP109
C1502
R155
TP8
C610
TP12
R642
R641
IC606
R803
L800
C801
TP27
D814
C804
TP50
R816
TP48
TP42
TP62
TP59
R824
C806
R822
T804
R809
C1503
TP120
24
R1203
RP1200
C1200
RP1201
R1200
1
R617
1
IC1200
TP7
TP6
IC604
IC603
R635
R630
1
C603
C604
R621
R613
R614
TP261
R324
TP259
R636
28
IC600
R631
1
R656
1
R649
R637
C612
C602
56
28
IC601
1
29
R602
R611
C600
R603
C601
R610
R650
R661
56
RP600
R645
29
R658
R601
TP260
R604
5629
T600
R605
R606
C611
28
IC602
R654
B2
BARCODE
TP111
TP110
TP4
L130
TP107
TP189
IC1400
TP238
C1401
C1400
R600
L118
C157
C177
1
R622
R626
C605
R607
TP95
L127
TP257
TP237
TP246
TP139
TP137
1
R137
R553
TP141
TP250
TP249
TP247
TP248
R131
R130
TP255
TP93
TP96
C503
C521
C510
C533
C523
C509
C534
C537
TP103
R537
R540
C504
C512
C520
TP104
C536
C519
C535
C514
C515
C518
C172
C130
TP105
TP251
TP92
R531
R527
R535
R550
R554
R538
R541
R546
C173
TP97
TP98
R176
TP100
TP99
C166
TP243
TP240
TP187
TP106
R748
R746
C700
C701
R743
C705
C706
TP101
R552
C525
R524
C414
R526
C513
TP102
R512
R506
R508
TP232
D715
D714
C507
C501
C516
C511
C527
C508
C415
C500
C526
C538
C539
C517
C532
C530
C524
C506
R500
R504
R517
R516
C416
C528
C413
L409
C529
C422
C417
C432
C428
C423
C425
L410
L411
C430
C431
C427
C420
C402
C411
L408
C732
C730
C736
C735
R739
R740
R728
R734
R737
C725
R727
R731
C727
C733
C734
D713
D705
D706
D707
TP229
TP230
TP233
TP228
TP3
TP1
TP214
TP216
TP212
TP91
R502
R300
R303
R302
TP235
R317
R304
TP86
C419
TP36
C421
C424
C401
C404
C403
C408
C406
C400
C405
C407
TP38
TP236
R214
IC201
10
R212
C713
C731
C715
C728
C729
R726
R715
D712
TP227
R721
C722
R732
C720
R718
R735
R738
R736
TP226
TP64
TP87
TP193
C719
R720
R733
D711
TP204
TP210
TP225
TP45
TP206
TP19
TP17
TP202
TP198
TP200
TP208
TP220
R309
C216
R730
R729
D710
TP224
TP136
TP181
TP218
TP165
C1710
L1704
TP155
TP5
TP52
TP154
TP60
TP112
TP21TP23
TP194
TP183
L1700
C1702
TP25
C1718
L1709
TP160
C1717
L1708
TP217
TP162
L1711
C1720
L1714
C1723
C1722
C1712
TP201
C1705
C1704
TP152
R1721
TP207
C1703
TP164
TP205
L1701
L1713
TP168
TP167
R306
TP156
L124
TP51
R819
D809
R817
TP55
R825
TP56
TP67
IC803
1
TP57
T800
R801
R804
R800
TP28
TP34
TP39
IC801
TP41
1
R808
TP29
L700
C724
C717
C721
R717
L701
R719
R723
T700
C1604
R1607
1
R722
R724
R725
TP222
TP223
TP241
TP219
TP213
TP211
TP215
TP209
TP197
TP199
TP192
C1708
TP157
C1715
TP35
1
TP54
R820
TP46
C803
TP133
R1609
R1608
C1605
C1606
TP128
TP131
TP129
TP191
R818
TP32
TP132
TP130
TP126
TP182
TP153
C805
TP180
C1601
R1601
R1606
D1604
TP266
TP122
TP127
TP151
R829
TP83
TP26
TP24
TP22
TP203
R1306
R1304
TP65
TP53
TP159
TP163
TP161
TP172
TP158
TP171
TP239
TP265
R1315
TP264
R201R204
R205
R202
TP82
TP84
C1600
R1600
C1603
C1602
TP121
R1603
R1602
R1604
R1605
D1602
D1601
D1603
TP123
TP125
TP124
TP190
TP196
TP16
TP18
TP13
TP2
TP15
TP20
TP14
R215
TP170
R1734
R1733
R1732
TP169
IC1705
1
TP262
C1730
L128
R920
TP81
TP80
R326
R325
TP66
TP90
TP37
C972
C965
R931
C964
R933
C958
TP72
C957
C952
IC901
R918
C954
R926
T900
R921
R919
R916
TP76
D901
C937
C939
C918
C917
C929
C915
R906
R908
C914
D1612
C1608
C1612
R1613
R1616
C1610
TP135
TP134
TP113
TP166
R336
TP195
TP184
C981
C932
C935
C926
C923
C916
C927
RP901
R911
R903
R169
TP263
TP254
R105
C109
C108
C969
C980
TP79
C970
TP73
L904
C934
C933
RP903
C910
C941
R913
R914
C940
TP74
R307
R301
R109
1
TP188
TP186
FID6
TP89
R112
C118
C114
TP185
R124
C121
TP256
TP143
90
IC101
D100
R103
TP179
80
TP94
TP144
TP145
TP88
TP149
C968
TP78
TP77
70
60
50
40
C921
C922
C925
TP70
C919
TP71
TP69
C938
C913
C911
TP68C912
D902
D903
TP75
TP221
C909
TP231
30
20
10
FID7
0
Y
Page 33
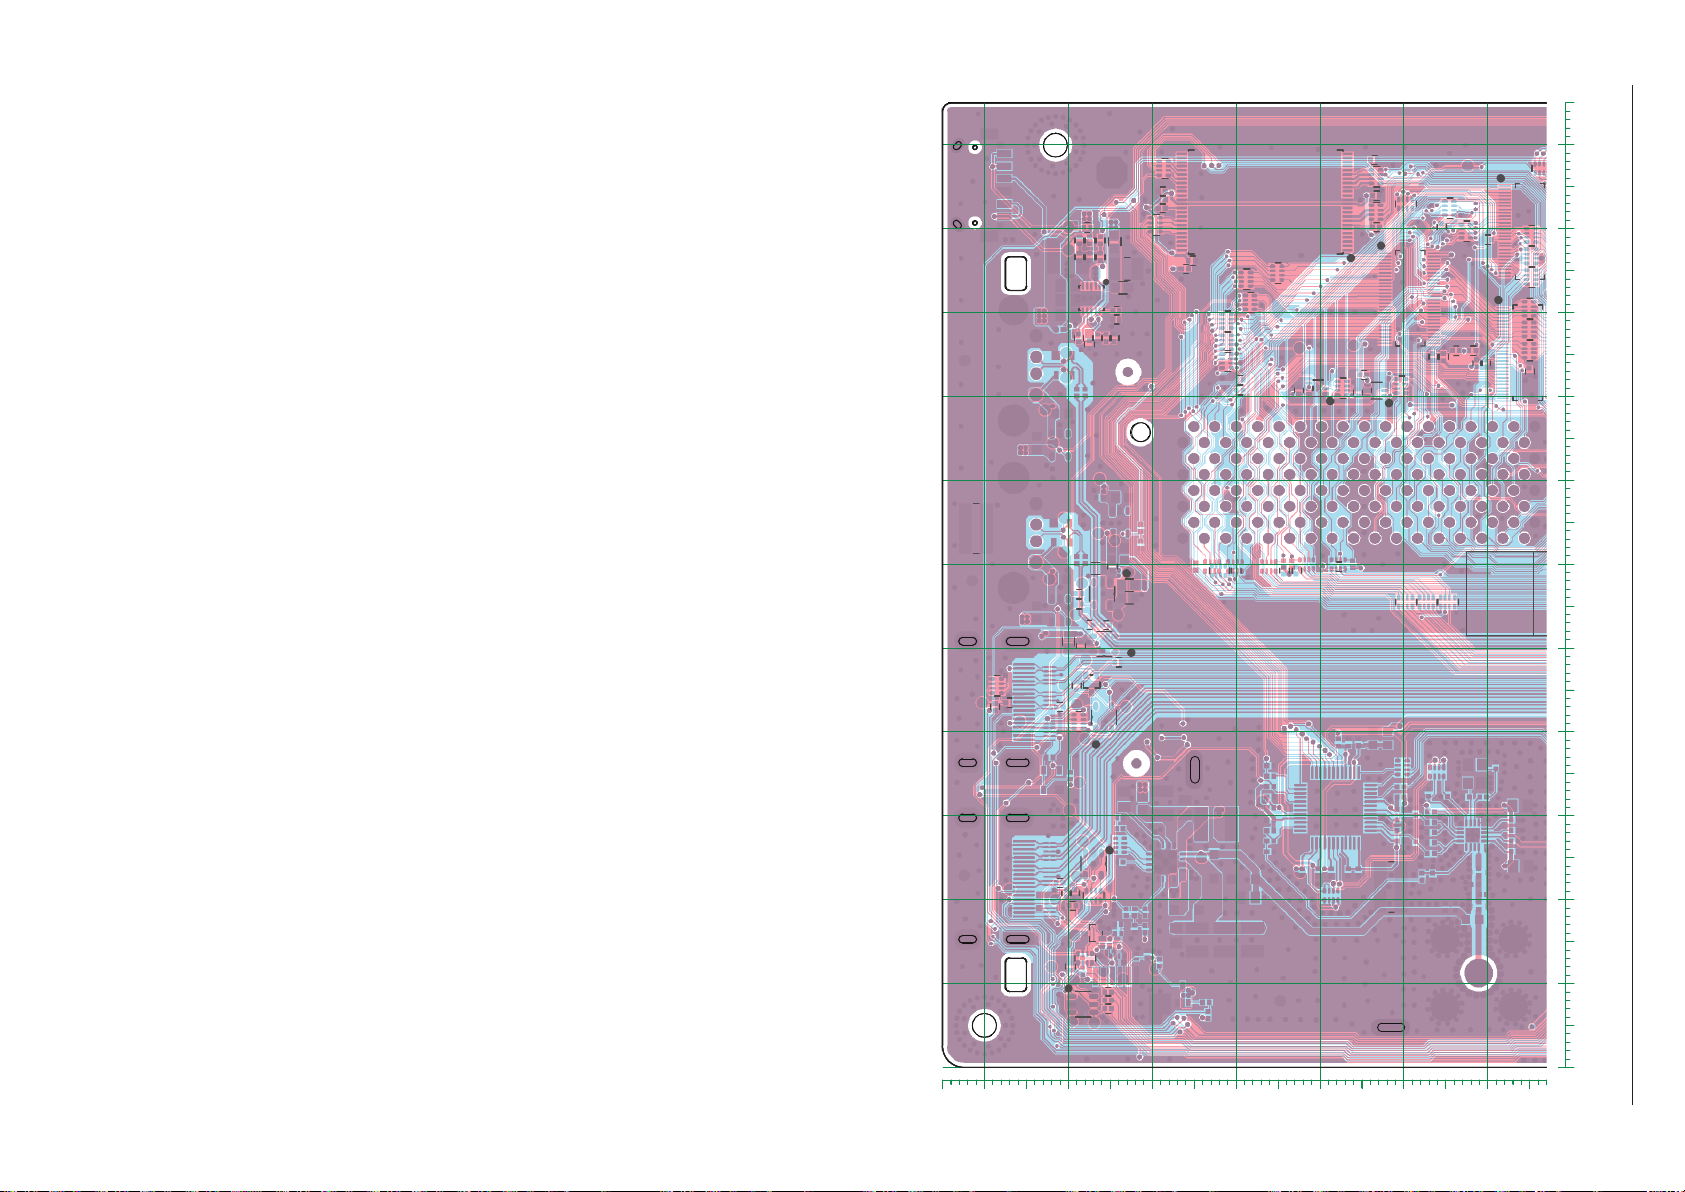
Chassisplatte / Chassis Board VTY190R-6 Ansicht von der Lötseite / View of Solder Side
100
110
X
29
R601
C719
1
56
R537
R540
R131
C534
C537
C535
C130
R748
C432
C428
C415
C422
C425
C427
C424
R718
C715
R214
R736
C729
R302
R309
R306
L1711
R801
R817
R1607
1
R1609
R1608
C805
R1732
R918
C512
C514
R517
R516
C430
C421
C403
R804
IC801
R324
TP107
R600
1
T600
R622
C605
TP189
IC1400
C1400
1
TP250
TP104
TP255
C503
C521
R531
R550
R538
R541
R546
TP97
C173
TP187
TP240
TP92
R512
D714
C513
R526
C511
C508
C538
C431
TP230
TP232
TP233
C517
C417
C423
L411
L410
C402
C420
C732
C735
R739
R727
C725
D705
D706
D713
TP229
C400
R726
D712
TP226
TP64
TP214
TP210
TP212
R300
TP87
TP236
TP193
R720
D711
R721
L701
TP19
TP52
TP136
TP181
TP112
TP194
TP208
TP218
TP162
C1710
C1723
L1704
C1704
R1721
TP155
TP156
TP56
TP57
R717
1
R719
C717
R723
R725
C721
TP5
TP154
C1702
TP183
TP25
TP201
TP207
TP205
R819
D809
1
T800
TP28
TP39
C803
1
TP41
TP213
TP211
C1708
TP157
TP54
R820
TP46
TP133
TP129
TP180
TP127
TP151
TP158
TP266
TP153
TP83
R1601
R1602
D1603
D1604
TP122
TP26
TP22
TP203
R1304
TP163
TP170
TP169
TP171
TP81
TP80
TP82
R1603
D1601
D1602
TP124
TP125
R1733
TP262
IC1705
R906
R326
R325
TP66
TP260
R626
L118
C1401
L127
TP137
C504
C523
C533
TP103
C520
R553
TP141
TP248
R130
C510
C509
C536
C518
R535
R527
R554
TP100
R176
R743
TP106
R508
C166
TP99
C701
R746
C705
D715
C525
R524
R552
C501
C527
C539
C524
C532
R506
R504
C414
C500
C507
C526
R500
C506
C530
C416
C528
C401
L409
C411
R737
C727
R731
C733
R734
R728
TP3
C408
C407
C731
R715
C722
C728
R732
R735
TP227
TP1
TP204
TP216
TP91
R303
IC201
R212
TP45
R733
C720
R738
TP225
TP60
L1709
C1712
C1720
L1714
TP165
C1703
L1713
L1701
TP168
L124
TP55
C724
R722
R724
TP223
TP17
TP21TP23
TP51
IC803
T700
C1604
C1605
C1606
TP219
TP209
TP197
TP199
TP192
C1715
TP35
R818
R808
TP128
TP182
R829
R201R204
C1601
C1602
R1605
R1606
TP130
R1306
TP53
TP65
TP172
TP239
R205
C1603
R1604
TP121
TP16
R920
R908
C515
C419
R317
C216
BARCODE
TP238
C177
TP246
TP237
R137
IC602
TP139
TP249
TP102
TP93
TP96
TP98
TP243
TP105
TP202
TP198
TP101
C516
TP220
TP235
R304
TP86
C529
TP36
C404
C406
C405
TP38
L408
C730
C736
R740
R730
D707
D710
TP224
TP24
TP241
TP215
C1717
TP160
L1708
TP217
TP161
C1722
C1705
R1315
TP164
TP167
TP191
R825
TP67
R202
R800
TP84
TP29
L700
R1600
TP222
TP20
R1734
C157
TP257
TP259
5629
R607
R654
TP95
TP247
C519
C172
C700
TP251
C706
TP200
TP206
R502
C413
C713
C734
R729
TP228
L1700
C1718
TP159
TP152
TP265
TP264
TP32
TP34
C1600
TP131
TP132
TP123
TP126
TP18
C1730
L128
10
GRUNDIG Service Chassis MK
2 - 7
TP44
TP85
L132
TP31
TP33
R807
C802
R805
TP63
TP49
TP146
TP138
TP117
TP244
TP245
TP150
TP43
R815
R821
TP61
TP148
TP147
TP142
TP140
TP116
R823
TP118
1
TP119
R1506
TP12
R642
R641
IC606
TP30
L800
TP27
TP50
R816
TP48
TP42
TP62
TP59
R822
TP58
R809
C1503
IC1500
R1508
R155
R803
C801
D814
C804
C806
TP120
R1507
C1502
R154
TP9
TP8
C610
R824
T804
R1509
R1501
C1501
C153
R802
1
TP242
TP40
R1510
R1511
R1512
1
C152
IC110
R174
R175
R158
TP11
1
TP10
C800
IC802
1
TP114
L117
C142
C155
FID5
TP234
R633
L601
C609
1
TP47
IC804
IC800
R657
TP115
R652
C1201
R1201
R1202
48
FID8
25
C1202
L1200
TP108
R647
R618
R624
R628
C614
R655
R623
R646
R627
TP109
R617
TP4
TP6
R614
TP110
IC603
C603
R613
1
R621
24
IC1200
TP7
R630
1
R635
R1203
RP1200
C1200
RP1201
R1200
IC604
C604
1
28
R631
1
TP111
L130
R636
IC600
R656
R650
TP261
1
R649
R637
C600
C612
R602
R603
56
29
R611
C602
28
R610
IC601
1
C601
28
RP600
R645
R658
R604
R605
R606
C611
90
80
70
60
B2
50
R661
40
30
20
10
0
180190200210220230240
Y
Page 34
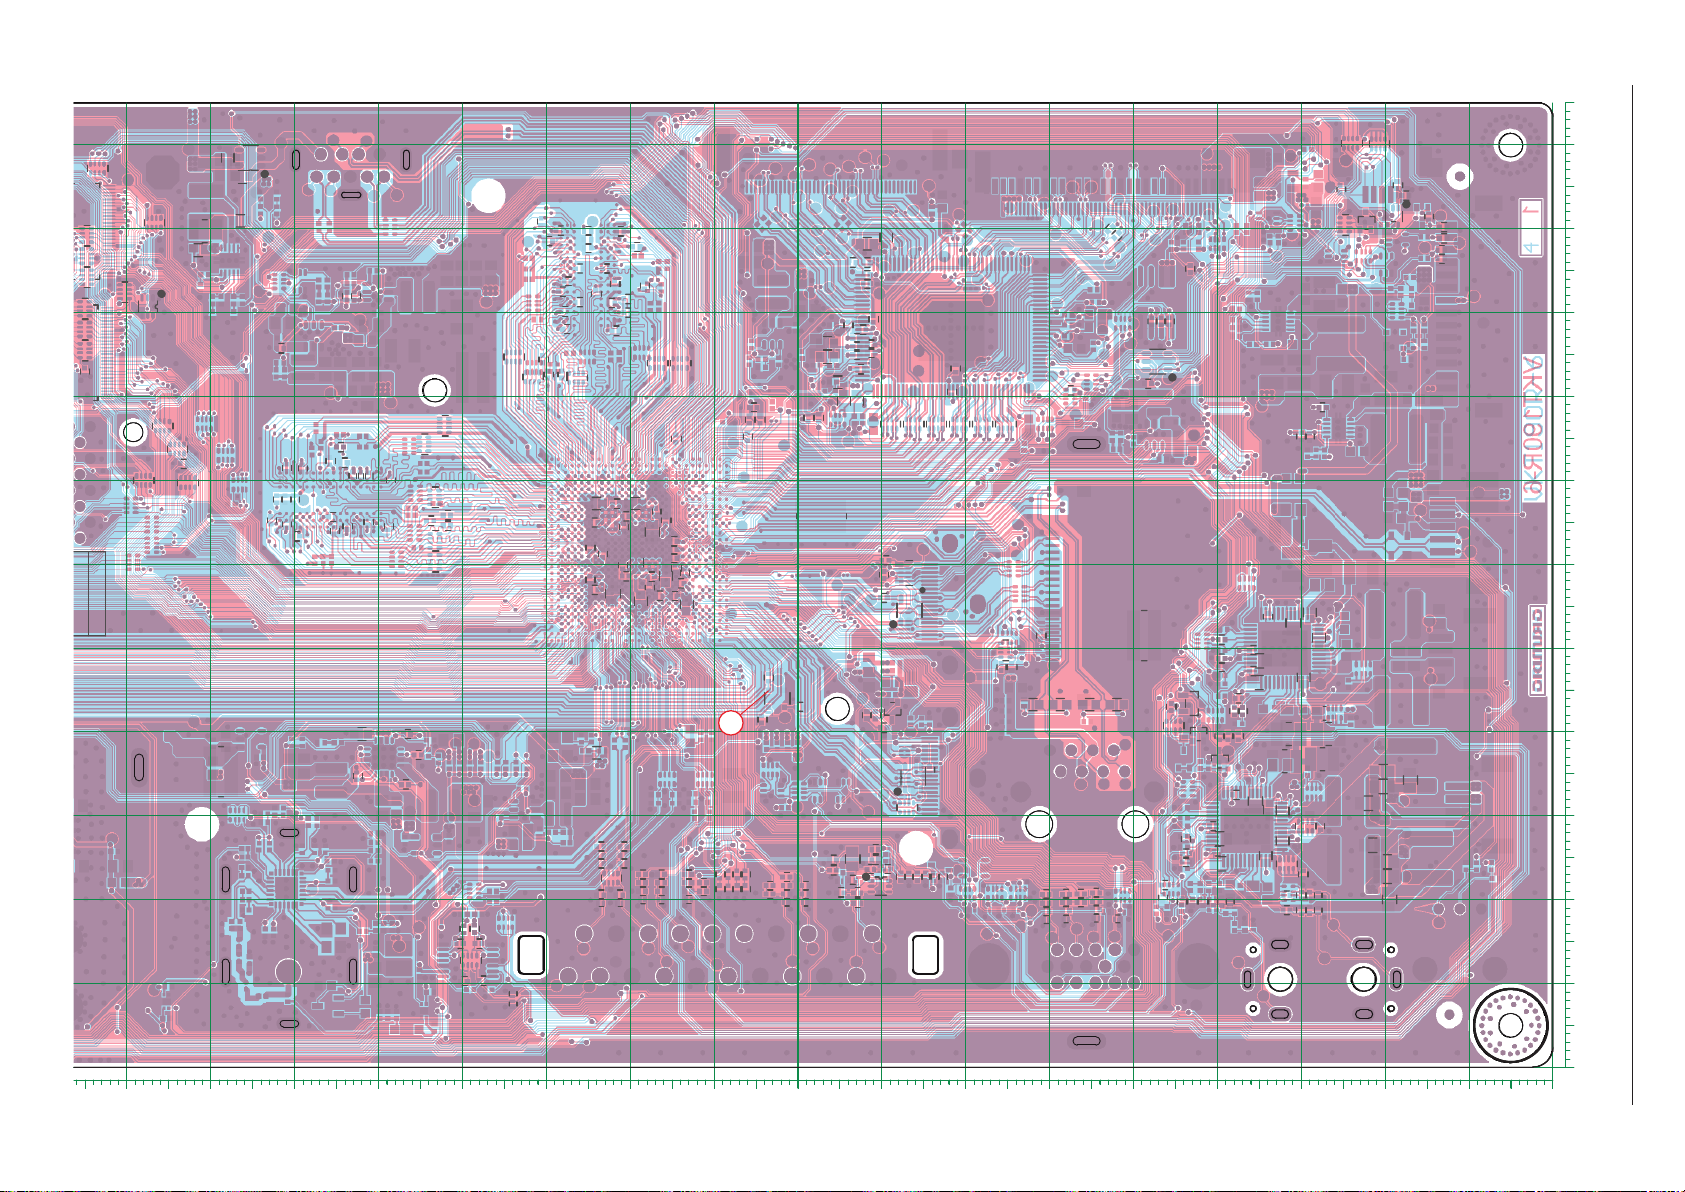
Chassisplatte / Chassis Board VTY190R-6 Ansicht von der Lötseite / View of Solder Side
100
110
X
GRUNDIG Service Chassis MK
2 - 8
RP600
R645
R658
R604
R605
R606
R324
TP260
C611
IC602
TP107
TP259
56
R600
29
1
R601
5629
T600
R622
R654
BARCODE
TP189
R626
C605
TP238
R607
TP95
C177
C157
L127
IC1400
C1401
C1400
L118
TP257
TP237
1
TP246
TP137
R137
R537
R553
C533
C504
C512
C520
TP250
C523
TP103
R540
TP104
TP139
TP249
TP93
C519
C503
C521
C510
C518
TP141
R131
R130
TP255
C509
C515
C172
TP248
C534
C130
C537
C535
TP247
TP96
TP105
TP251
C536
C514
C166
C173
TP240
R527
R176
TP106
R535
R554
R541
R546
R531
TP100
R550
R538
TP97
TP187
C700
C706
TP98
TP243
R748
R743
C701
C705
TP92
TP99
R746
R512
TP102
D715
D714
R508
C513
R552
C525
C508
R506
R517
TP232
C527
C532
C524
C511
R504
R516
C501
C538
TP230
TP101
R524
R526
C413
C529
C431
TP233
C432
C430
L408
C730
C736
R740
C734
D707
C516
C539
C517
R737
C506
C416
C428
C414
C733
D706
TP3
C415
C526
C530
L409
L410
C420
C732
C735
R739
C507
C528
C422
C425
R728
C725
R731
D713
TP229
C423
L411
C411
C500
R500
C402
C417
C427
R734
R727
C727
D705
TP228
C419
C401
C405
C421
C424
C404
C406
R502
C400
R304
C408
C713
R715
R732
D712
TP227
C403
C407
R726
C722
TP226
TP64
TP235
TP38
10
C715
R718
TP86
TP36
C728
R735
TP1
R300
C729
R736
TP216
R303
R317
C731
R738
TP91
R302
R721
C720
TP214
TP212
TP236
R214
IC201
TP193
R212
TP87
C719
R720
R733
D711
TP204
TP206
TP210
TP45
TP225
C216
R730
R729
D710
TP202
TP198
TP220
TP224
TP200
TP208
R309
TP136
TP181
TP218
TP165
C1710
L1704
TP155
R306
L124
C724
TP112
TP194
C1703
TP168
TP55
L701
R724
TP52
TP60
L1709
C1723
C1712
C1704
L1701
TP156
TP56
R723
TP223
TP19
L1700
C1717
L1708
C1720
L1714
R1721
TP164
TP167
TP57
C721
R722
R725
C1718
L1713
TP67
TP34
TP29
R719
1
TP162
C717
TP17
TP21TP23
TP160
TP217
L1711
C1722
C1705
TP152
R819
R825
T800
R801
R804
R800
TP41
L700
R717
T700
TP222
TP183
C1702
R817
TP5
TP25
TP205
D809
IC803
1
TP28
TP39
IC801
R808
C1604
TP201
TP207
TP51
1
R1607
TP154
1
C1606
TP215
C803
R1609
R336
TP254
R105
C108
C969
TP79
L904
C933
C941
C940
TP74
C968
C934
C938
D902
D903
TP75
TP263
R301
R103
IC101
D100
TP179
C919
C913
R169
C921
C922
TP71
C911
TP70
TP69
TP68C912
C909
R307
R109
1
TP188
TP186
TP144
C925
TP78
TP77
TP89
R112
C118
C114
R124
C121
TP231
TP185
TP145
TP221
FID6
TP149
TP256
TP94
TP143
TP88
90
80
70
60
50
40
30
20
10
TP190
TP26
TP24
TP161
TP158
R1315
TP264
C1602
R1602
R1605
D1603
TP159
TP84
C1600
R1600
TP123
TP203
TP163
TP265
R202
C1603
R1603
R1604
D1602
TP124
TP172
TP171
TP82
R1306
TP53
TP239
R205
D1601
TP125
TP22
R1304
TP65
TP81
TP80
TP121
TP170
TP169
L128
TP18
C1730
TP20
R1734
R326
TP16
R1733
TP262
R920
R325
TP66
TP15
R1732
IC1705
1
IC901
R918
R906
R908
C1608
TP113
TP37
C929
R215
T900
R1616
TP13
TP14
C918
C1612
C972
R931
R933
TP72
D901
C917
C915
C914
TP196
TP2
TP76
R1613
TP219
TP213
TP211
TP209
TP197
TP199
TP192
C1708
TP157
C1715
TP35
TP54
TP46
TP133
R1608
C1605
TP128
TP131
TP129
R820
TP191
TP32
R818
TP132
TP126
TP182
TP153
C805
TP130
C1601
R1601
R1606
D1604
TP122
TP127
TP151
TP266
R829
TP83
R201R204
TP180
TP241
R921
C937
C1610
TP135
C952
R919
D1612
C958
C954
R916
C965
R926
TP90
C964
C957
TP134
C939
TP166
C981
C926
C927
TP195
C932
C935
R911
R903
TP184
C923
C916
RP901
C109
C980
C970
TP73
RP903
C910
R913
R914
FID7
0
Y
0102030405060708090100110120130140150160170
Page 35
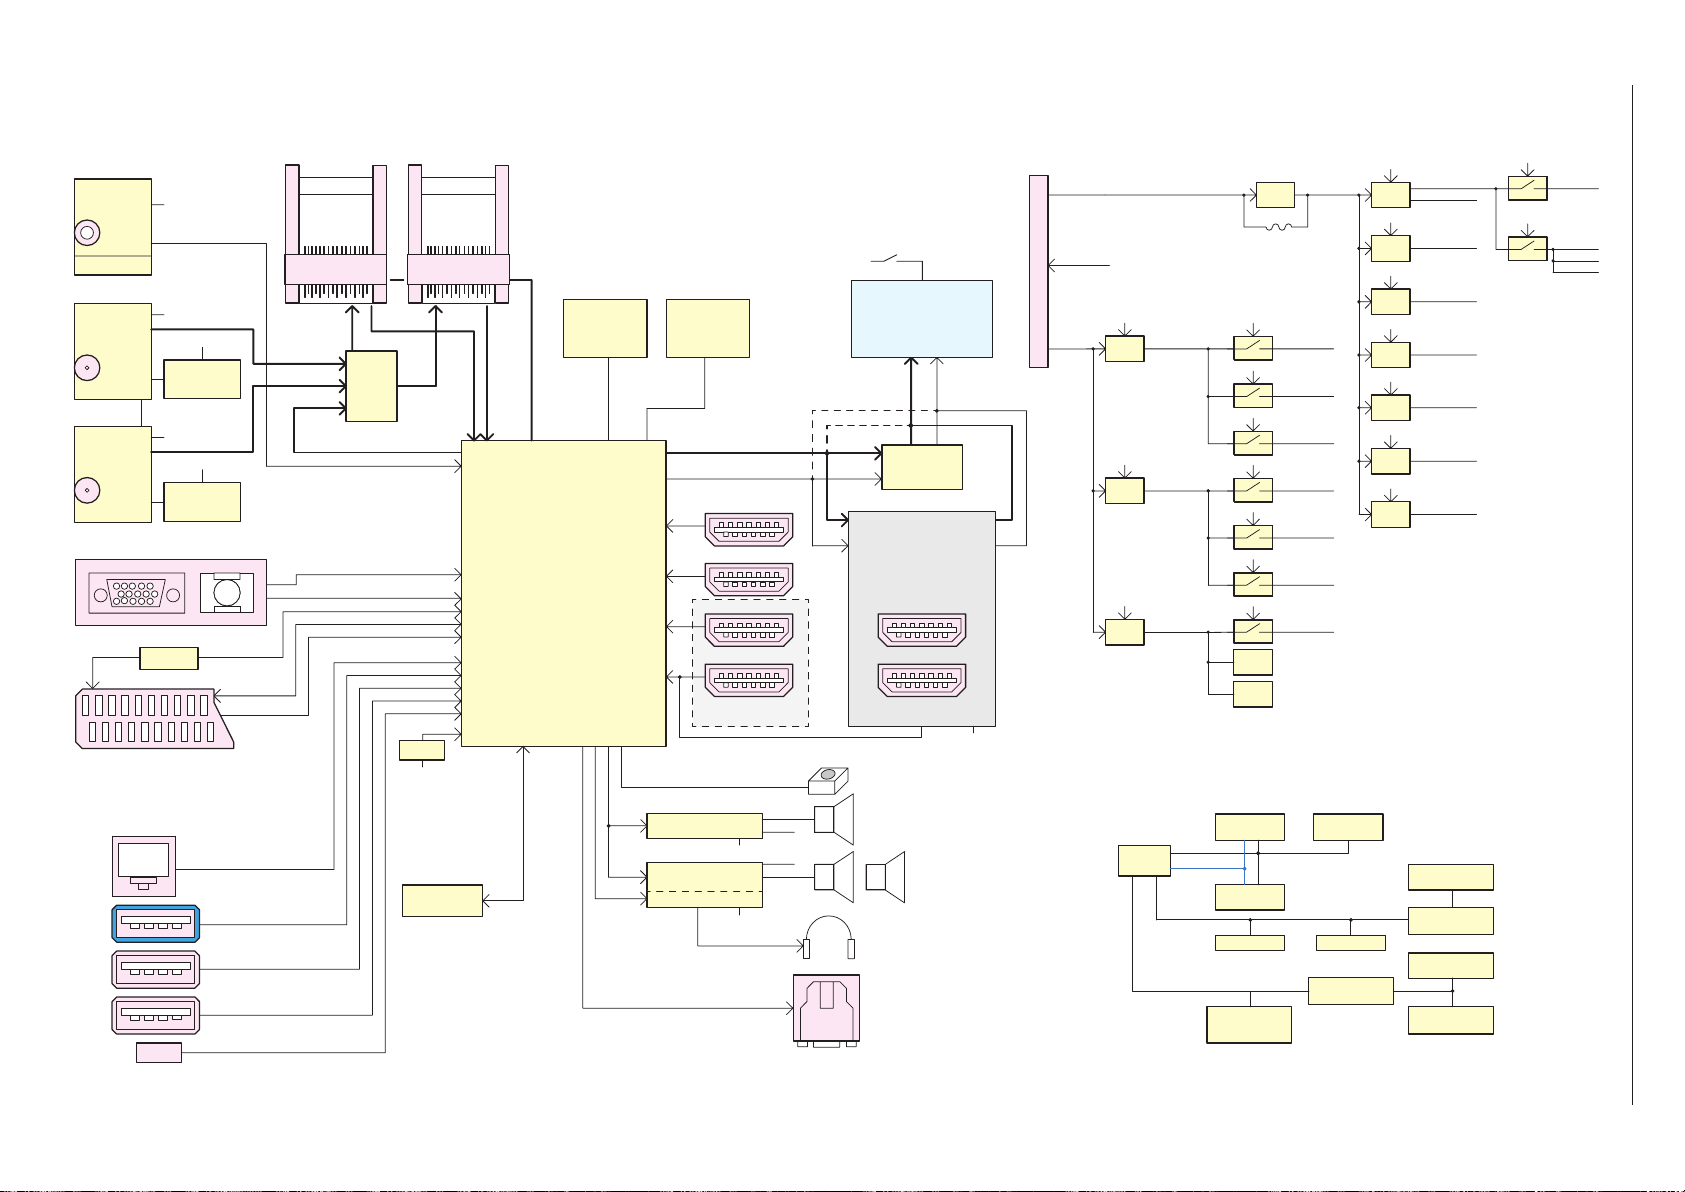
Chassisplatte – Blockschaltplan / Chassis Board – Block Circuit Diagram
internal WiFi
POWER_SW
3.3V_SAT2
3.3V_TUN2
GRUNDIG Service Chassis MK
2 - 9
IC1001
Tuner
Analog
DVB-T/T2/C
SI2158
IC1100/IC1101
Tuner
DVB-S/S2
AV2012
IC1800…IC1804
Multi-Tuner
Analog
DVB-T/T2/C
DVB-S/S2
CXD28…
PC-RGB & AUDIO
USB1
USB3.0
USB2
USB2.0
USB3
USB2.0
USB4
I2C
I2C
RFLP
I2C
IC700
Audio Amp.
I2C
IC1102
LNB Power1
LNBH29L
I2C address:14h
I2C
IC1103
LNB Power1
LNBH29L
I2C address:14h
LAN Jack
CI 1 CI 2
TS_SAT
TS_SAT2
TS_1
Analog / Digital IF
TS_0
IC600…602
Logic
IC201
RESET
VCC3.3V-ST
IC1200
Parallel Flash
up to 4Gbit NAND
TS_2
IC500IC501
DDR3
256M x 16bit x 2
IC200
MSD8361
I2S
I2S
HP_Audio
DDR3
256M x 16bit x 2
8/10bit LVDS/ 8bit TTL
I2C
HDMI1 - MHL
HDMI2
HDMI3
HDMI4 - ARC
Option NON UHD
IC902
DSP Audio Amp.
TAS5739MD
IC900
DSP Audio Amp.
TAS5739MD
Pop Free HP Audio Amp.
VCC_AUDIO
VCC_AUDIO
+5V2_ST
FRC
ENABLE
DC/DC
IC113
POWER_SW
ENABLE
DC/DC
IC104
POWER_SW
ENABLE
DC/DC
IC108
POWER_SW
ENABLE
DC/DC
IC109
POWER_SW
ENABLE
DC/DC
IC112
POWER_SW
ENABLE
DC/DC
IC105
POWER_SW
ENABLE
LDO
IC114
VCC3V3-ST
VCC1V17
VCC1.18V
VCC1.5V
VCC1.22V
VCC1.8V
VDDC_CPU
VCC5V
IC1100
TUNER DVB-S2
AV2012
IC1101
DVB-S2 DEMOD
MSB1310
IC1801
Multi-TUNER
CXD2832
IC1803
Multi-TUNER
CXD2871
IC107
POWER_SW
IC1805
S_TUN_SCL/SDA
CDX2843_SCL/SDA
VCC3V3
3.3V_FE
+5V2_19V
PANEL-VCC
URSA6
50/60Hz
100/120Hz
CCFL / LED
IC1700
FRC
Option
UHD-Modul
Option
HDMI3
HDMI4 - ARC
VCC19V
IR, LED, Keyboard
Woofer
I2C
I2C
8/16 Ohm 10W
Headphone
OPTIC
L/R Speaker
8 Ohm 10W
POWER_SW2
POWER Connector S100
POWER_SW2
VCC_19V
DC/DC
IC115
POWER_SW2
DC/DC
IC110
POWER_SW2
DC/DC
IC103
I2C/I2S Block Diagram
IC200
Scaler/SOC
MSD8361
ENABLE
+5V_USB
ENABLE
VCC5V_CI_WIFI_MHL
ENABLE
VCC12V
I2CS-SCL/SDA
I2CT-SCL/SDA
SINGLE 19V PSU OPTION
IC902
I2C-SCL/SDA
I2S_OUT-SD
IC900
STEREO AMP.
IC1103
LNBH29EQTR
IC1001
Analog, DVB-C/T/T2
IC1403
IC1401
IC1400
IC800
IC605
IC606
T101
LNB
IC1102
LNB
IC1103
WOOFER
TAS5739MD
TAS5739MD
TUNER
Si2158
DC/DC
IC100
L102
USB_EN
USB1 POWER
USB_CHRG
USB2 POWER
USB3_EN
USB3 POWER
MHL_VBUS_EN
HDMIC-5V
PCM_PWR_EN1
VCC-CIA
PCM_PWR_EN2
VCC-CIB
TCON_ON
PANEL-VCC
IC1700
IC1102
IC1800
+5V2_ST
MST7438BB
LNBH29EQTR
Multi-DEMOD
CXD2842
Page 36
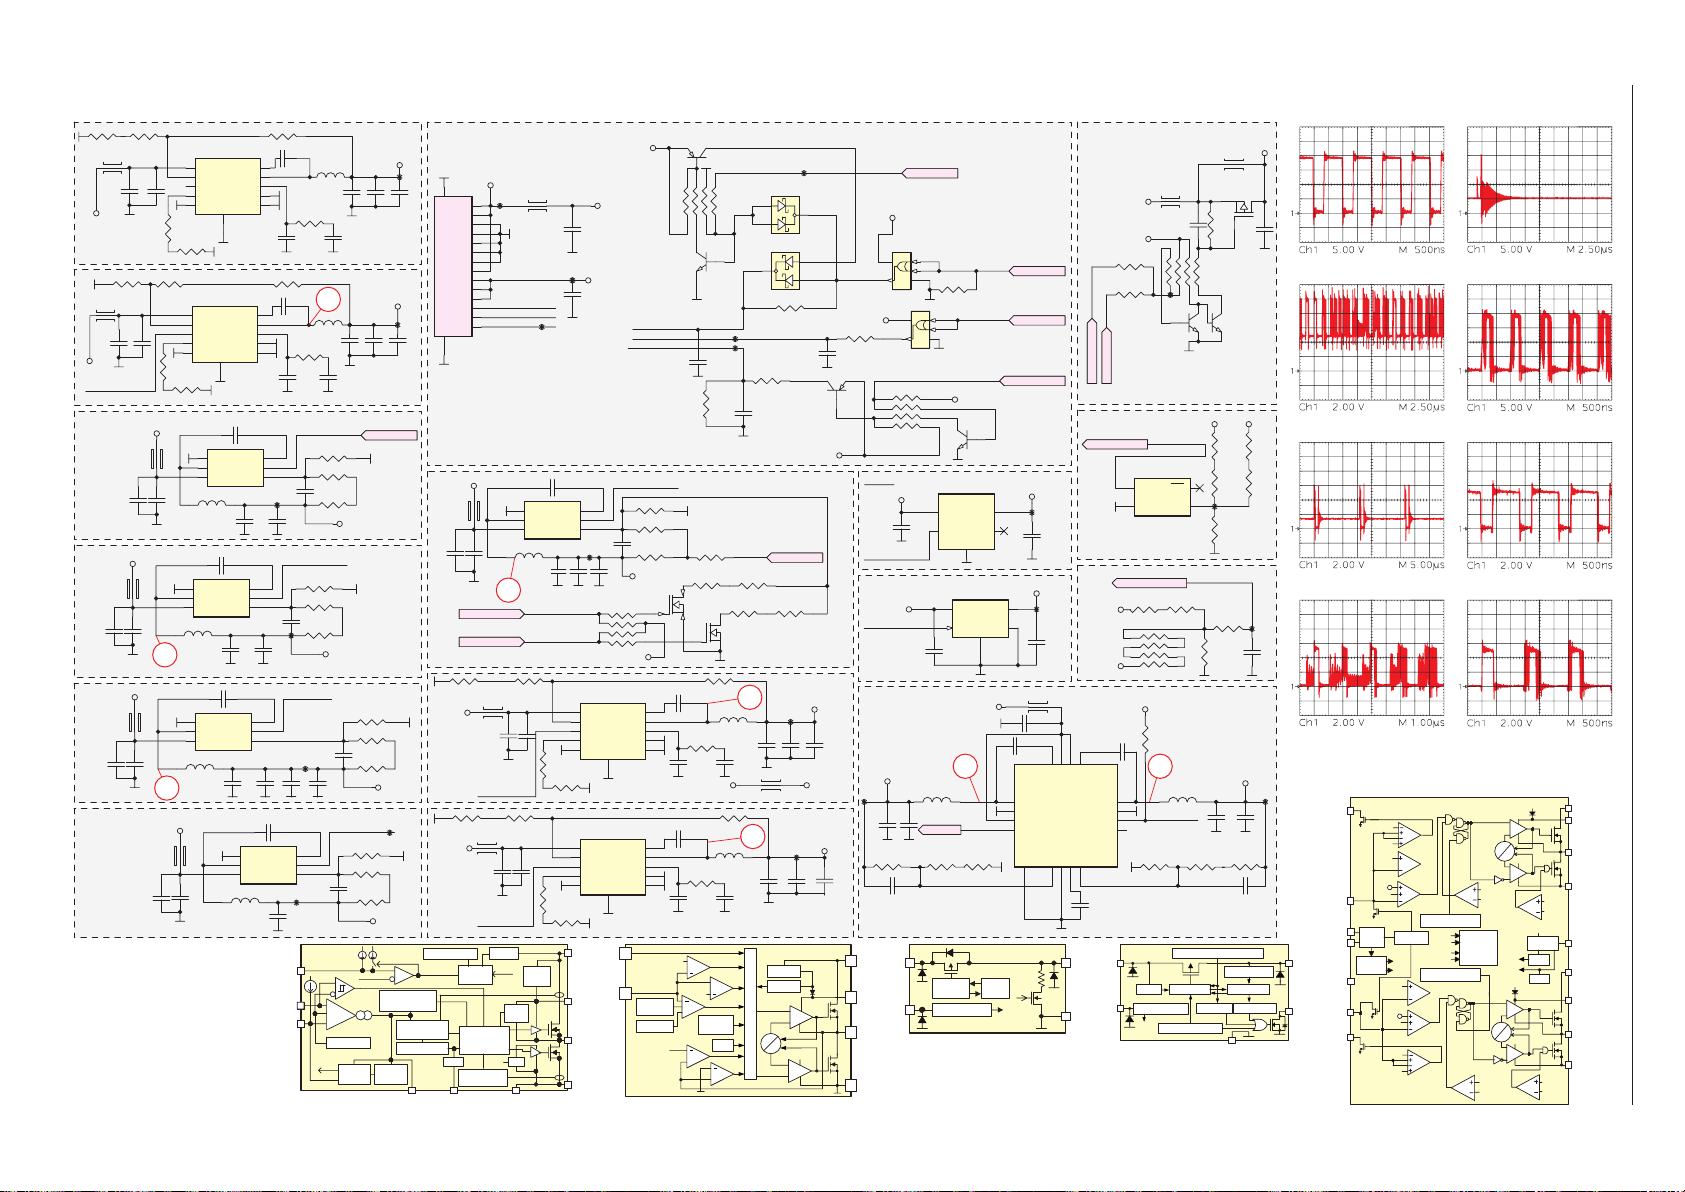
5
1
6
2
7
3
8
4
1
Imax=230mA
8.2K
R3
VSENSE
TPS54335
BOOT
T
VFB
V
T
VFB2
VFB1
5
1
2
OCP2 ZC2
ss
V
OUT
Chassisplatte – Netzteil / Chassis Board – Power Supply
+5V2_19V
SINGLE 19V OPTION
VCC19V
FRC or
DUAL FE OPTION
2 - 10
DDR
T2 & S2 DEMOD
FRC
R100
2K
L101
60R
C119
10UF
R115
1.2K
L105
60R
C144
C112
100nF
10UF
POWER_SW2
C182
100NF
+5V2_ST
C183
100NF
+5V2_ST
C184
100NF
R101
C120
100nF
L111
C137
10UF
C146
10UF
100NF
10K
+5V2_ST
L115
C162
R118
1.5K
R168
39K
L106
C125
10UF
2
3
+5V2_ST
R106
39K
IC100
TPS54335DRCR
1
VIN
6
VSENSE
8
EN
10
RT
4
GND
R105
8.2K
TPS54335DRCR
1
VIN
6
VSENSE
8
EN
10
RT
4
GND
R123
8.2K
IC104
1
2
TPS562200DDCR
L108
3.3UH
100NFC165
IC108
1
GND
2
SW
VIN3VFB
TPS562200DDCR
C138
L112
2.2UH
22UF
C140 100NF
IC109
1
GND
2
SW
VIN3VFB
TPS562200DDCR
L116
2.2UH
L119
C159
10UF
BOOT
PH
COMP
GND
EPAD
GND
11
IC103
BOOT
PH
COMP
GND
GND
EPAD
11
C122 100NF
GND
VBST
SW
EN
VIN3VFB
C127
22UF
VBST
EN
C139
22UF
VBST
EN
C148
10UF
IC112
1
2
TPS562200DDCR
L120
2.2UH
R102
66.5K
9
2
7
3
5
C108
100PF
R117
15.4K
9
2
7
3
5
6
5
4
TP91
C128
22UF
6
5
4
22PF
C134
TP93
6
5
4
C149
10UF
C154 100NF
GND
VBST
SW
EN
VIN3VFB
C161
22UF
TPS54336
C100
100nF
L100
6.3UH
R104
6.2K
C111
1
100nF
L104
6.3UH
R120
12K
C116
47PF
POWER_SW
R125
R126
C124
22PF
R127
POWER_SW
R137 15.4k %1
R141 15.4k %1
R143
0R
POWER_SW
TP95
C147
C185
10UF
10UF
6
5
4
TP239
TPS54335
TPS54336
EN
SS
Hiccup
Shutdown
Imax=2900mA
C101
10UF
C109
3.3NF
C113
10UF
C117
temporary case!!!
Inb max=950mA
1.5NF
panel max=1200mA
30.9K
Imax=1480mA
PDmax=255mW
1.8K
VCC1.18V
Imax=760mA
PDmax=170mW
VCC1V5
Imax=850mA
PDmax=150mW
R146 15.4k %1
R147
C145
22PF
R149
POWER_SW
R162 15.4k%1
R163 15.4k%1
C158
22PF
R166
Ip Ih
Enable
Threshold
OV
ERROR AMP.
Voltage Ref.
Overload
Recovery
+5V2_ST
TP255
C102
C131
10UF
10UF
VCC12V
TP90
C126
C115
10UF
10UF
POWER_SW
9.1K
100R
VCC1.22V
TP237
6.2K
VCC1.8V
Enable
Comp.
Minimum Clamp
Pulse Skip
HS MOSFET
Current Comp.
Slope Comp.
Maximum
Clamp
COMP RT
Power
16
S100
P2
GND
P3
P4
P5
P6
P7
P8
P9
P10
P11
P12
P13
GND
P14
15
MOLEX_5025841460
+5V2_ST
L109
C106
100NF
R154 15.4k%1
VCC19V
R177 15.4k %1
VCC19V
Thermal Hiccup
Shutdown
Power Stage
& Deadtime
Control Logic
Osc.
LS MOSFET
Current Limit
+5V2_19V
30R
TP256
1
2
L102
3
4
4A
5
6
7
8
9
10
11
12
POWER_SWX
13
BRI_ADJX
14
BL_CTRLX
TP89
C123 100NF
IC105
1
GND
2
SW
VIN3VFB
TPS562200DDCR
L110
C103
3.3UH
10UF
4
L117
60R
C142
10UF
VIN
UVLO
Hiccup
Shutdown
R178
680R
UVLO
Reg.
R155
C152
100nF
C177
100nF
Boot
680R
Boot
Charge
Curr.
Sense
Curr.
Sense
GPIO_VID_0
GPIO_VID_1
GPIO_VID_0
GPIO_VID_1
POWER_SW2
L118
60R
C157
10UF
POWER_SW2
Logic
EXPOSED THERMAL PAD
VBST
R174
39K
R181
39K
C132
22UF
R175
8.2K
R182
C104
100nF
TP257
C110
100nF
EN
TP92
C174
22UF
TPS54335DRCR
1
VIN
6
VSENSE
8
EN
10
RT
4
GND
TPS54335DRCR
1
VIN
6
VSENSE
8
EN
10
RT
4
GND
VIN
PH
GND
+5V2_STP1
VCC19V
6
5
4
22PF
C129
C133
22UF
R142
NC
VCC3V3-ST
11
11
T100B
+5V2_ST
COMP
EPAD
COMP
EPAD
4 3
BC847BPDW1T1
5
6
8
5
72
R103
10K
1
3
4
61
2
T100A
BC847BPDW1T1
BL_CTRLX
BRI_ADJX
POWER_SWX
POWER_SW
R130 15.4k %1
R131
R134
VDDC_CPU
4.7K*4
IC110
BOOT
PH
GND
GND
100PF
C153
VCC5V_CI_WIFI_MHL +5V_USB
IC115
BOOT
PH
GND
GND
100PF
C180
5EN
4
Voltage
Reference
Soft Start
OCL
threshold
TPS562200
TPS562209
9
2
7
3
5
9
2
7
3
5
6.2K%1
2K
2
V
UVP
TP185
TP186
C118
1nF
R124
47K
Imax=650mA
PDmax=110mW
VCORE_FB
NC
R135
R139
61
47K
R144
T104A
34
T104B
5
R156
84.5K
C141
100nF
L113
NRS5040T4R7NMGK
R158
C155
6.2K
3.3NF
R179
84.5K
C156
100nF
L114
NRS5040T4R7NMGK
R180
6.2K
+
Hiccup
UVP
+
OVP
V
OVP
PWM
+
+
Ton
One-Shot
TSD
OCL
+
ZC
+
R140
47K
NC
5
L107NC
6
3.3NF
C181
D100
2
1
BAT54CW
D101
3
BAT54CW
R112
100R
R119
1K
BC847BPDW1T1
C121
1nF
VCORE_FB
R145
NC
VCC5V_CI_WIFI_MHL
TP94
C150
C143
10UF
10UF
60R
C164
10UF
Regulator
UVLO
HS
Control Logic
XCON
VREG5
LS
TP254
+5V2_ST
TP238
C175
10UF
VREG5
3
1
2
T103B
C151
10UF
+5V_USB
VCC3V3-ST
C114
NC
5
C176
10UF
R116
100R
43
VCC3V3
C135
1UF
POWER_SW
POWER_SW
VCC3V3-ST
TP240
C168
22UF
C171
22PF
3 VIN
VBS
6
2SW
1GND
3D_EN
VCC3V3-ST
IC101
5
VCC
4 3
GND
NC7SZ32
5
4 3
R122
1
3
4
10K
VCC3V3-ST
+5V2_ST
L122
NRS4018T2R2MDGJ
C167
22UF
R170
6.2K
IN
CE
3D_EN
1
2
BL_CTRL
PWM-100Hz/100KHz
Hi:Max Lum
Lo: Min Lum
BRI_ADJ
Hi: Off
Lo: On
PWM: Special aplications
POWER_SW2
2
T103A
BC847BPDW1T1
1
VOUT
3
FLG
VSS
2
Vout
EPAD
GND
5
+5V2_ST
C163
BL_CTRL
BRI_ADJ
Hi: ON
Lo: OFF
VCC3V3
VCC5V
1
2
L121
10UF
100NF
C130
TP187
C136
1UF
C179
100nF
R109
4.7K
IC102
1
VCC
2
GND
NC7SZ32
POWER_SW2
8
72
6
5
IC107
XC8107AC10MR-GW
5
4
4
3
VCC3V3-ST
61
VIN
CE
IC114
XC8102AA01GR-G
Vin
CE
C178
100nF
7 8
5
SW1
6
PGND1
7
EN1
TPS542941RSAR
8
MR_POW
MR_POW
R171
0R
GATE
CONTROL
ON/OFF Control
R172
1.8K
XC8102
Current
Limit
each
circuit
PG1
EPAD
17
Rdischg
CE/
60R
3
4
VBST1
IC113
VFB19GND10VREG511VFB2
Hi: Off
Lo: On
FRC_TCON_ON
FRC_TCON_ON
POWER_DROP
VCC19V
+5V2_ST
3A
C166
1
100NF
VIN22VIN1
VBST2
PGND2
12
C172
1UF
V
OU
V
SS
60R3A
L103
VCC12V
C105
VCC3V3-ST
SW2
EN2
PG2
CE
1uF 16V
8
R113
0R
R111
1
0R
TP184
TCON_ON
TCON_ON
POWER_DROP
IC106
NC
RST2MR
1
VCC
GND
POWER_SENSE
R161
100K
R164
1
3
4
NC/10K
VCC3V3-ST
R176
10K
NRS4018T2R2MDGJ
16
15
14
POWER_SW
13
R157
15.4k %1
XC8107
IN
UVLO Control Current Lim.
ON/OFF Control
each
Thermal Shutdown
circuit
PANEL-VCC
L129
60
T101
PMV65XP
R107
22K
C107
1
72
6
5
R110
22K
3
4
3
T102B
2
5
BC847BDW1T
1 6
4
T102A
BC847BDW1T1
+5V2_ST VCC19V
R128
NC
R132
3
NC
4
TP188
R138
NC
POWER_SENSE
84.5KR160
R165
8
1K
72
R167
6
10K
5
VCC1V17
L123
C169
C170
22UF
22UF
R159
R173
6.2K%1
2K
Reverse Current Prevention
Current Sense
7.5ms Delay4ms Delay
V
22PFC173
A
32
NC
R129
NC
R133
NC
TP190
C160
NC/
10nF
TP243
GRUNDIG Service Chassis MK
Mode: with HDD
Protection
Logic
Ref_OCL
XCON
Ref_OCL
SW1
XCON
SW2
Ref1
Ref2
VREG5
VREG5
ZC1
5VREG
UVLO
VIN1
REF
PGND1
SW1
PGND2
SW2
VIN1
VBST1
SW1
PGND
VREG
VIN2
VBST2
SW2
PGND
-32%
Ref2
SS2
-16%
+16%
EN Logic
SS1
SS2
Control logic
PG
Comp
UV1
Err
Comp
OCP1
CH1Min-off timer
UV1
UV2
UVLO
TSD
CH2Min-off timer
Control logic
UV2
Err
Comp
PG
Comp
PG1
-16%
PGND
+16%
-32%
Ref1
SS1
PGND
EN1
EN
Logic
EN2
GND
PG2
Fixed
SoftStart
PGND
PGND
V
FLG
TPS542941
Page 37
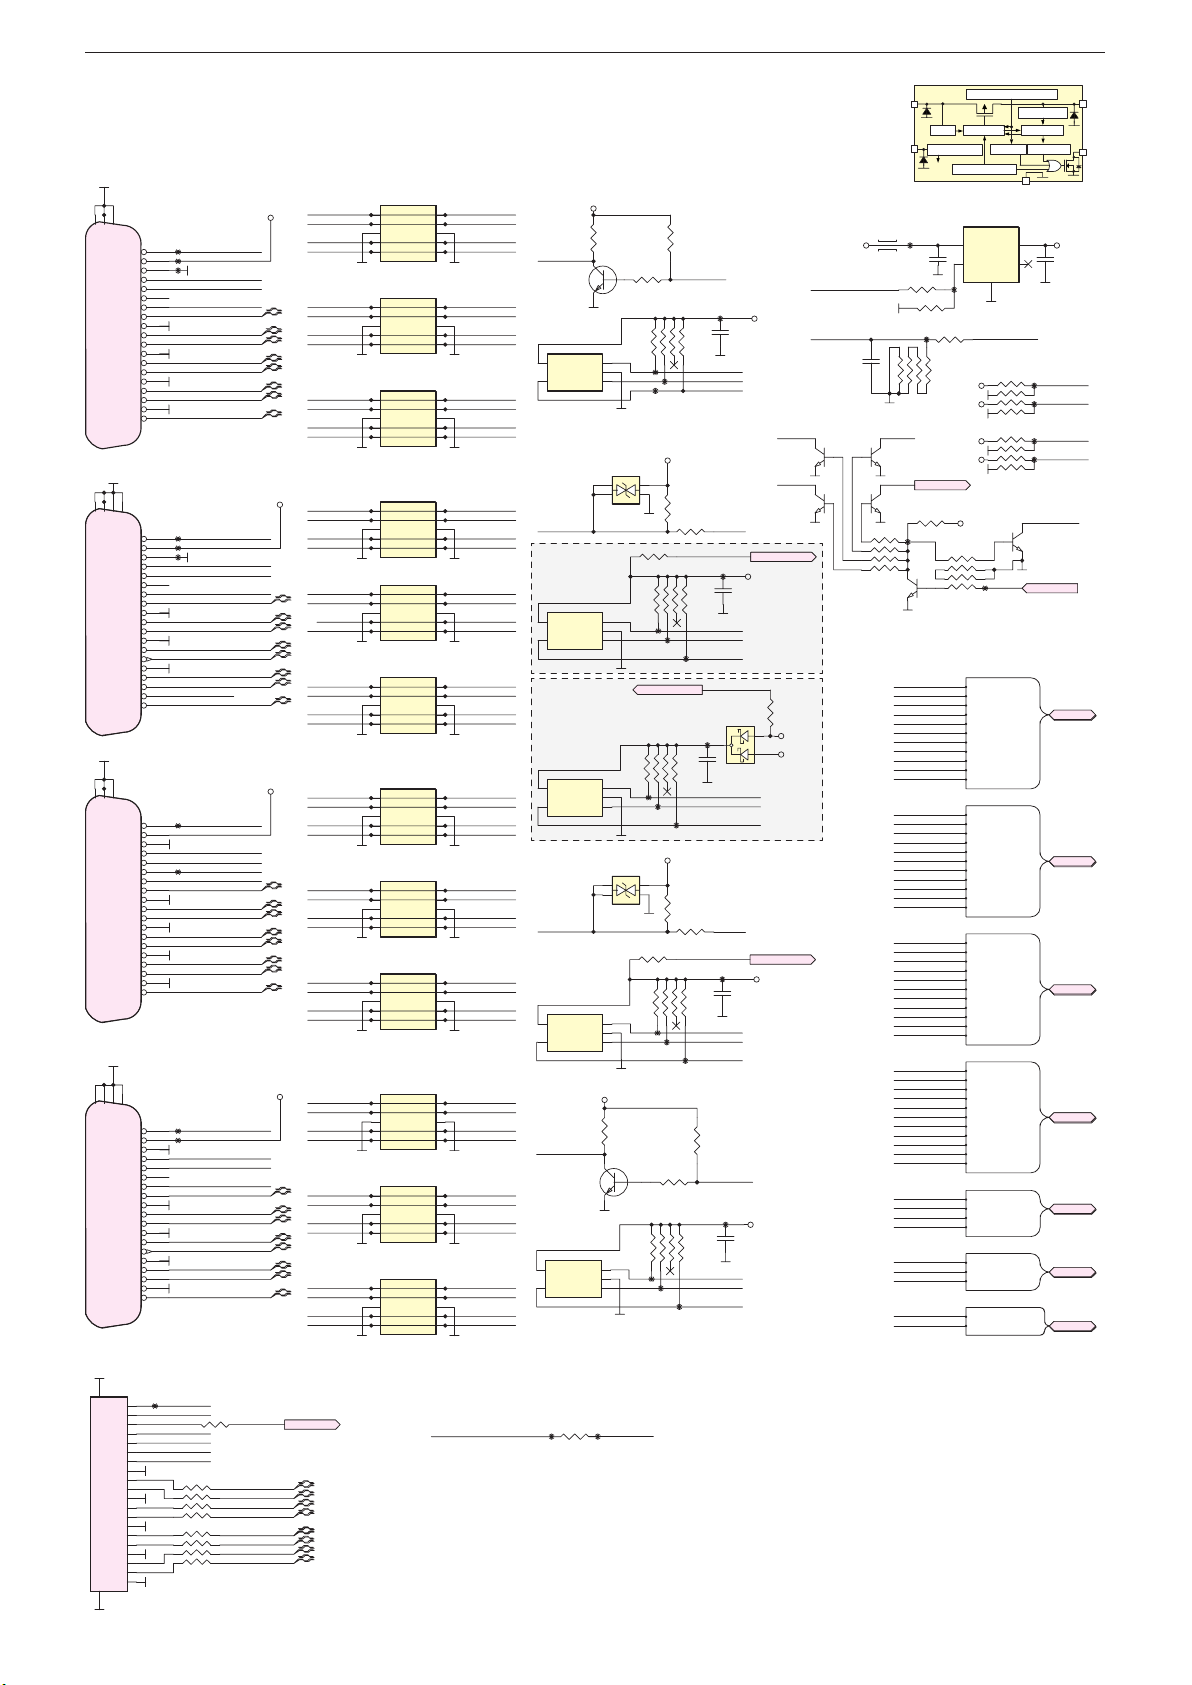
GRUNDIG Service Chassis MK
20
HDMIC-5V
ss
V
OUT
CE
XC8107
Chassisplatte / Chassis Board – HDMI
S802
21
22
HDMI-ARC
GND20GND
GND
19
5V
S806
HDMI-MHL
GND
5V
S801
5V
S800
GND
5V
TP28
18
TP29
17
16
TP31
15
14
13
12
11
10
9
8
7
6
5
4
3
2
1
19
TP42
18
TP43
17
16
TP44
15
14
13
12
11
10
9
8
7
6
5
4
3
2
MHL-CABLE-DET
1
19
TP51
18
17
16
15
14
TP32
13
12
11
10
9
8
7
6
5
4
3
2
1
19
TP58
18
TP59
17
16
15
14
13
12
11
10
9
8
7
6
5
4
3
2
1
HP_DETECT
CEC_GND
SDA
SCL
N.C.
CEC
CLK-
GND_CLK
CLK+
RX0GND0
RX0+
RX1GND1
RX1+
RX2GND2
RX2+
23
22
GND20GND21GND
HP_DETECT
CEC_GND
SDA
SCL
N.C.
CEC
CLK-
GND_CLK
CLK+
RX0GND0
RX0+
RX1GND1
RX1+
RX2GND2
RX2+
22
21
GND
GND20GND
HP_DETECT
CEC_GND
SDA
SCL
N.C.
CEC
CLK-
GND_CLK
CLK+
RX0GND0
RX0+
RX1GND1
RX1+
RX2GND2
RX2+
22
21
23
GND
GND
GND
HP_DETECT
CEC_GND
GND_CLK
CLK+
GND0
RX0+
GND1
RX1+
GND2
RX2+
SDA
CLK-
RX0-
RX1-
RX2-
SCL
N.C.
CEC
HDMIB_HPDIN
HDMIB-5V
HDMIB-SDA
HDMIB-SCL
HDMIB_CEC
HDMIB-CLK_N
HDMIB-CLK_P
HDMIB-RX0_N
HDMIB-RX0_P
HDMIB-RX1_N
HDMIB-RX1_P
HDMIB-RX2_N
HDMIB-RX2_P
HDMIC_HPDIN
HDMIC-5V
HDMIC-SDA
HDMIC-SCL
HDMIB_CEC
HDMIC-CLK_N
HDMIC-CLK_P
HDMIC-RX0_N
HDMIC-RX0_P
HDMIC-RX1_N
HDMIC-RX1_P
HDMIC-RX2_N
HDMIC-RX2_P
HDMID_HPDIN
HDMID-5V
HDMID-SDA
HDMID-SCL
HDMI-ARC
HDMIB_CEC
HDMID-CLK_N
HDMID-CLK_P
HDMID-RX0_N
HDMID-RX0_P
HDMID-RX1_N
HDMID-RX1_P
HDMID-RX2_N
HDMID-RX2_P
HDMIA_HPDIN
HDMIA-5V
HDMIA-SDA
HDMIA-SCL
HDMIB_CEC
HDMIA-CLK_N
HDMIA-CLK_P
HDMIA-RX0_N
HDMIA-RX0_P
HDMIA-RX1_N
HDMIA-RX1_P
HDMIA-RX2_N
HDMIA-RX2_P
HDMIB-5V
HDMIC-5V
HDMID-5V
HDMIA-5V
HDMIB-5V
HDMIB-SDA
HDMIB-SCL
HDMIB-CLK_N
HDMIB-CLK_P
HDMIB-RX0_N
HDMIB-RX0_P
HDMIB-RX1_N
HDMIB-RX1_P
HDMIB-RX2_N
HDMIC-CLK_N
HDMIC-CLK_P
HDMIC-RX0_N
HDMIC-RX0_P
HDMIC-RX1_N
HDMIC-RX1_P
HDMIC-RX2_N
HDMIC-RX2_P
HDMIC_HPDIN
HDMIC-5V
HDMIC-SDA
HDMIC-SCL
HDMIA_HPDIN
HDMIA-5V
HDMIA-SDA
HDMIA-SCL
HDMIA-CLK_N
HDMIA-CLK_P
HDMIA-RX0_N
HDMIA-RX0_P
HDMIA-RX1_N
HDMIA-RX1_P
HDMIA-RX2_N
HDMIA-RX2_P
D800
1
CH1-
2
CH1+
3
GND
4
CH2CH1+5NC
NC
D801
1
CH1-
2
CH1+
3
GND
4
CH2CH1+5NC
NC
D802
1
CH1-
2
CH1+
3
GND
4
CH2CH1+5NC
NC
D803
1
CH1-
2
CH1+
3
GND
4
CH2CH1+5NC
NC
D805
1
CH1-
2
CH1+
3
GND
4
CH2CH1+5NC
NC
D806
1
CH1-
2
CH1+
3
GND
4
CH2CH1+5NC
NC
D807
1
CH1-
2
CH1+
3
GND
4
CH2CH1+5NC
NC
D808
1
CH1-
2
CH1+
3
GND
4
CH2CH1+5NC
NC
D810
1
CH1-
2
CH1+
3
GND
4
CH2CH1+5NC
NC
D811
1
CH1-
2
CH1+
3
GND
4
CH2CH1+5NC
NC
D812
1
CH1-
2
CH1+
3
GND
4
CH2CH1+5NC
NC
D813
1
CH1-
2
CH1+
3
GND
4
CH2CH1+5NC
NC
GND
GND
GND
GND
GND
GND
GND
GND
GND
GND
GND
GND
10
HDMIB_HPDINHDMIB_HPDIN
NC
9
HDMIB-5V
NC
8
7
HDMIB-SDA
NC
6
HDMIB-SCL
10
HDMIB-CLK_N
NC
9
HDMIB-CLK_P
NC
8
7
HDMIB-RX0_N
NC
6
HDMIB-RX0_P
10
HDMIB-RX1_N
NC
9
HDMIB-RX1_P
NC
8
7
HDMIB-RX2_N
NC
6
HDMIB-RX2_PHDMIB-RX2_P
10
HDMIC-CLK_N
NC
9
HDMIC-CLK_P
NC
8
7
HDMIC-RX0_N
NC
6
HDMIC-RX0_P
10
HDMIC-RX1_N
NC
9
HDMIC-RX1_P
NC
8
7
HDMIC-RX2_N
NC
6
HDMIC-RX2_P
10
HDMIC_HPDIN
NC
9
HDMIC-5V
NC
8
7
HDMIC-SDA
NC
6
HDMIC-SCL
10
HDMID_HPDINHDMID_HPDIN
NC
9
HDMID-5VHDMID-5V
NC
8
7
HDMID-SDAHDMID-SDA
NC
6
HDMID-SCLHDMID-SCL
10
HDMID-CLK_NHDMID-CLK_N
NC
9
HDMID-CLK_PHDMID-CLK_P
NC
8
7
HDMID-RX0_NHDMID-RX0_N
NC
6
HDMID-RX0_PHDMID-RX0_P
10
HDMID-RX1_NHDMID-RX1_N
NC
9
HDMID-RX1_PHDMID-RX1_P
NC
8
7
HDMID-RX2_NHDMID-RX2_N
NC
6
HDMID-RX2_PHDMID-RX2_P
10
HDMIA_HPDIN
NC
9
HDMIA-5V
NC
8
7
HDMIA-SDA
NC
6
HDMIA-SCL
10
HDMIA-CLK_N
NC
9
HDMIA-CLK_P
NC
8
7
HDMIA-RX0_N
NC
6
HDMIA-RX0_P
10
HDMIA-RX1_N
NC
9
HDMIA-RX1_P
NC
8
7
HDMIA-RX2_N
NC
6
HDMIA-RX2_P
HDMIB-5V
HDMIB_HPDIN
IC801
4
SDA
VCC
GND
5
SCL
WP
CAT24C02TDI-GT3A
VKT190R-2
IC802
4
SDA
VCC
GND
5
SCL
WP
CAT24C02TDI-GT3A
I2CaddressatA0
VKT190R-6
IC802
4
SDA
VCC
GND
5
SCL
WP
CAT24C02TDI-GT3A
I2CaddressatA0
HDMID_HPDIN
IC803
4
SDA
VCC
GND
5
SCL
WP
CAT24C02TDI-GT3A
I2C address at A0
HDMIA-5V
HDMIA_HPDIN
IC804
4
SDA
VCC
GND
5
SCL
WP
CAT24C02TDI-GT3A
R804 47K
1
T800
R808
4.7K
R815
R816
4.7K
TP48
AVDD5V_HDMIC
R816
4.7K
TP48
R818
TP55
1
T804
BC847BWT1 G
TP62
R801
10K
HDMIB-HPDIN
8
7246
3
1
TP38
TP39
TP41
HDMIC-5V
4
1
R812
100K
R814
10R
6
7
8
1
3
2
TP49
5
7
8
6
C804
100nF
1
2
3
4
TP49
TP50
HDMID-5V
4
1
R817
100K
R819
10R
R820 4.7K
7
6
8
1
3
2
TP56
R823
47K
5
6
7
8
1
4
3
2
TP63
TP64
TP34
5
C803
100nF
HDMIB-SDA
HDMIB-SCL
EE_WP0
33R
AVDD5V_HDMIC
TP47
5
C804
100nF
4
HDMIC-SDA
HDMIC-SCL
EE_WP1
TP50
AVDD5V_HDMIC
TP47
3
HDMIC-SDA
HDMIC-SCL
EE_WP1
33R
AVDD5V_HDMID
TP54
5
C805
100nF
4
HDMID-SDA
HDMID-SCL
EE_WP3
TP57
R822
10K
HDMIA-HPDIN
TP61
R824
4.7K
HDMIA-SDA
HDMIA-SCL
EE_WP2
HDMIB-5V
BC847BDW1T1
HDMIC-HPDIN
AVDD5V_HDMIC
HDMIC-5V
D814
1
2
BAT54CW
HDMID-HPDIN
AVDD5V_HDMID
HDMID-5V
HDMIA-5V
C806
100nF
VCC5V_CI_WIFI_MHL
MHL_VBUS_EN
BC847BDW1T1
EE_WP0
4 3
EE_WP1
T802B
1 6
R815
10R
HDMIC-5V
VCC5V
T801A
5
2
R800
1K
32
BC847B
3
2
1
D804
3
2
3
2
1
3
2
1
D809
3
2
3
2
1
R821
1K
32
3
2
1
C802
47nF
L800
2
5
R811
1
3
100K
IN
TP27
R802 100R
3
5
EE_WP3
6
T801B
1
EE_WP5
T802A
4 3
8
6
5724
6
T803B
1
HDMIB-RX0_N
HDMIB-RX0_P
HDMIB-RX1_N
HDMIB-RX1_P
HDMIB-RX2_N
HDMIB-RX2_P
HDMIB-CLK_N
HDMIB-CLK_P
HDMIB-SDA
HDMIB-SCL
HDMIB-HPDIN
HDMIC-RX0_N
HDMIC-RX0_P
HDMIC-RX1_N
HDMIC-RX1_P
HDMIC-RX2_N
HDMIC-RX2_P
HDMIC-CLK_N
HDMIC-CLK_P
HDMIC-SDA
HDMIC-SCL
HDMIC-HPDIN
HDMIA-RX0_N
HDMIA-RX0_P
HDMIA-RX1_N
HDMIA-RX1_P
HDMIA-RX2_N
HDMIA-RX2_P
HDMIA-CLK_N
HDMIA-CLK_P
HDMIA-SDA
HDMIA-SCL
HDMIA-HPDIN
HDMID-RX0_N
HDMID-RX0_P
HDMID-RX1_N
HDMID-RX1_P
HDMID-RX2_N
HDMID-RX2_P
HDMID-CLK_N
HDMID-CLK_P
HDMID-SDA
HDMID-SCL
HDMID-HPDIN
HDMIA-DET
HDMIB-DET
HDMIC-DET
HDMID-DET
MHL_VBUS_EN
AVDD5V_HDMIC
MHL_CABLE_DET
HDMI-CEC
HDMI-ARC
Reverse Current Prevention
UVLO Control Current Lim.
ON/OFF Control
each
Thermal Shutdown
circuit
IC800
XC8107AC05MR-GW
5
VOUT
VIN
C801
4
FLG
CE
TP33
TP45
R803
10K
7 246
R810
10K
1UF
2
1
R807
100K
8
EE_WP5
TP30
R805
0R
HDMIB-5V
HDMID-5V
HDMIC-5V
HDMIA-5V
R813
1
3
4
100K
VSS
2
MHL_CABLE_DETMHL-CABLE-DET
R806
8
7 2
6
5
10K
R809
8
7 2
6
5
10K
VCC3V3
5
8
72
6
5
EDID_WP
TP46
HDMIB
HDMIB-RX0_N
HDMIB-RX0_P
HDMIB-RX1_N
HDMIB-RX1_P
HDMIB-RX2_N
HDMIB-RX2_P
HDMIB-CLK_N
HDMIB-CLK_P
HDMIB-SDA
HDMIB-SCL
HDMIB-HPDIN
HDMIC
HDMIC-RX0_N
HDMIC-RX0_P
HDMIC-RX1_N
HDMIC-RX1_P
HDMIC-RX2_N
HDMIC-RX2_P
HDMIC-CLK_N
HDMIC-CLK_P
HDMIC-SDA
HDMIC-SCL
HDMIC-HPDIN
HDMIA
HDMIA-RX0_N
HDMIA-RX0_P
HDMIA-RX1_N
HDMIA-RX1_P
HDMIA-RX2_N
HDMIA-RX2_P
HDMIA-CLK_N
HDMIA-CLK_P
HDMIA-SDA
HDMIA-SCL
HDMIA-HPDIN
HDMID
HDMID-RX0_N
HDMID-RX0_P
HDMID-RX1_N
HDMID-RX1_P
HDMID-RX2_N
HDMID-RX2_P
HDMID-CLK_N
HDMID-CLK_P
HDMID-SDA
HDMID-SCL
HDMID-HPDIN
HDMI_DET
HDMIA-DET
HDMIB-DET
HDMIC-DET
HDMID-DET
MHL
MHL_VBUS_EN
AVDD5V_HDMIC
MHL_CABLE_DET
ARC_CEC
HDMI-CEC
HDMI-ARC
Current Sense
7.5ms Delay4ms Delay
V
1
3
1
3
4
1
3
4
EE_WP2
T803A
BC847BDW1T1
4 3
EDID_WP
C800
1UF
HDMIB-DET
TP35
HDMID-DET
TP36
HDMIC-DET
TP37
HDMIA-DET
TP40
HDMIB
HDMIC
HDMIA
HDMID
HDMI_DET
MHL
ARC_CEC
V
FLG
22
TP191
S101
20
HDMID_HPDIN
P20
19
HDMID-5V
P19
GND
18
R829
4*0R
R826
4*0R R827
NC
5
6
72
8
5
6
72
8
UHD_SPDIF
HDMID-RX2_P
HDMID-RX2_N
HDMID-RX1_P
HDMID-RX1_N
HDMID-RX0_P
HDMID-RX0_N
HDMID-CLK_P
HDMID-CLK_N
UHD_SPDIF
TP66
R825
220R
TP67
2 - 11
CEC-IMDHCEC_BIMDH
P18
17
HDMID-SDA
P17
16
HDMID-SCL
P16
15
HDMI-ARC
P15
14
HDMIB_CEC
P14
13
P13
12
P12
P11
P10
GND
21
4
11
3
10
9
P9
1
8
P8
7
P7
6
4
P6
3
5
P5
4
P4
1
3
P3
2
P2
1
P1
Page 38
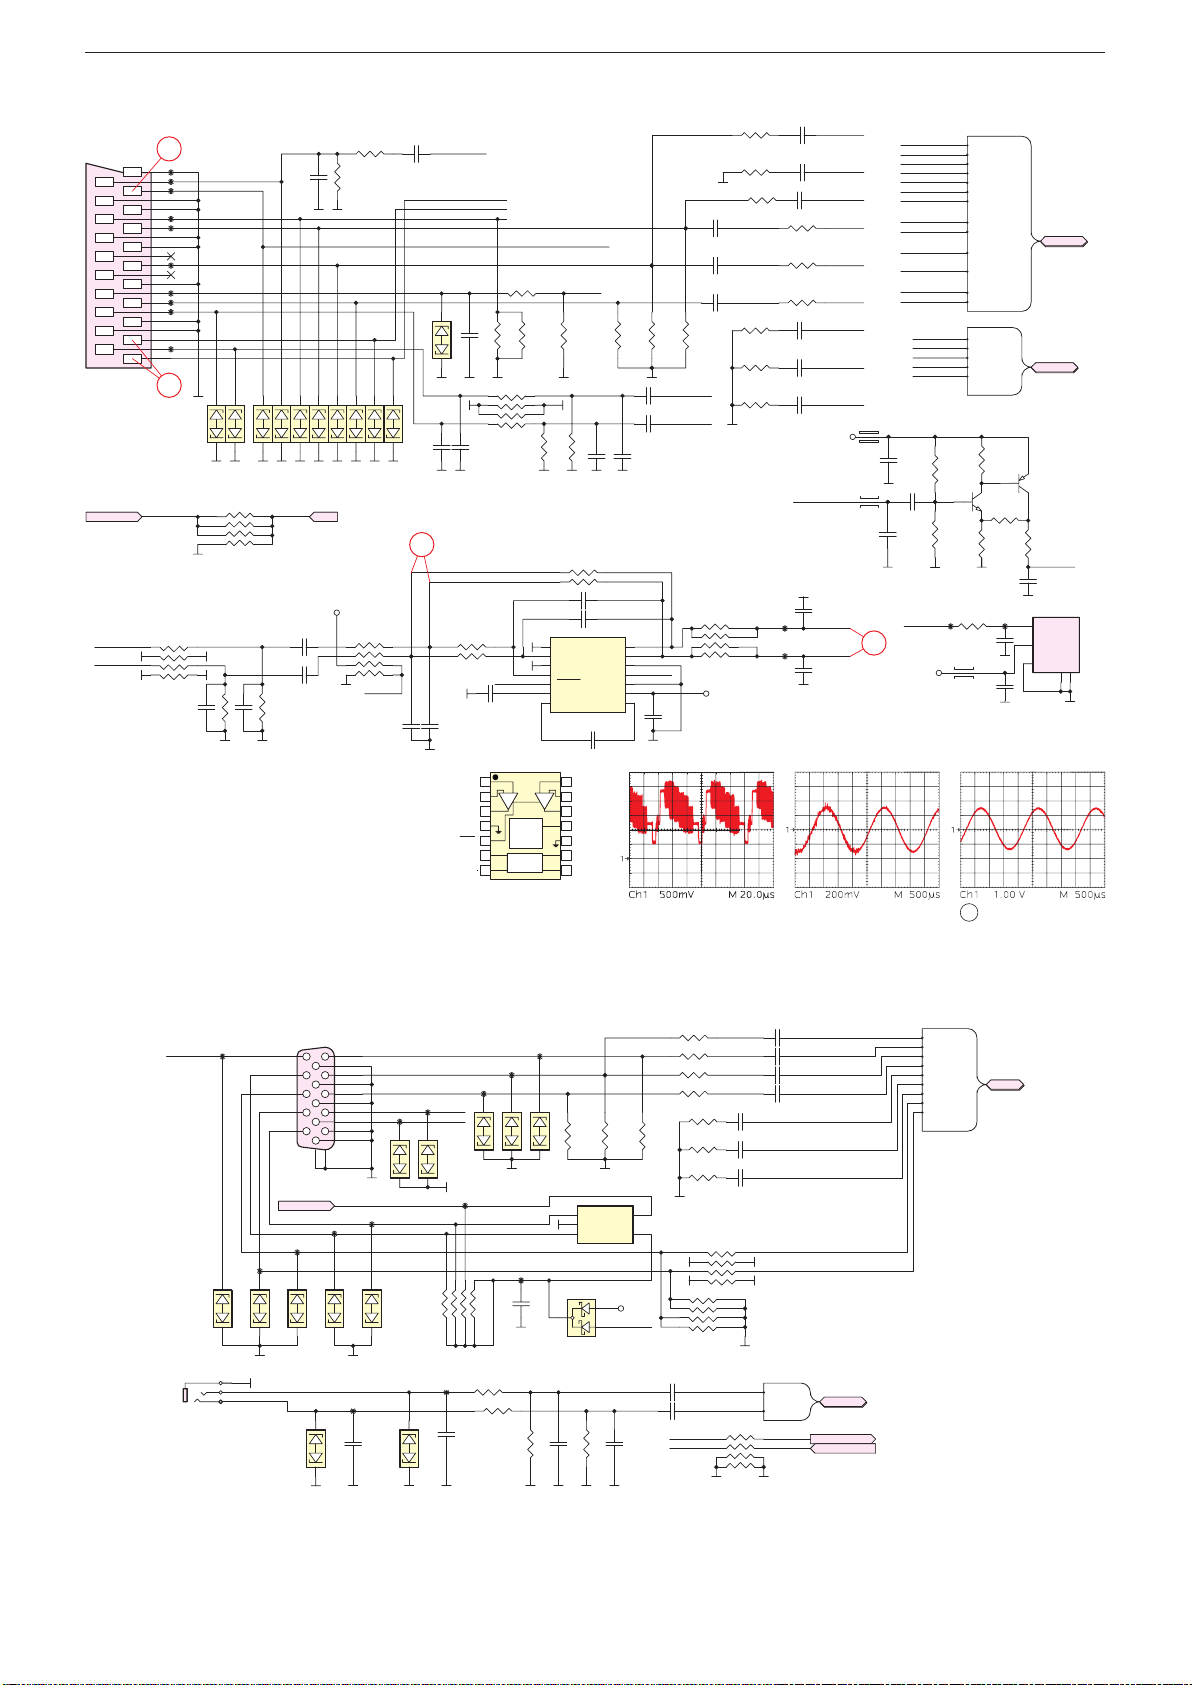
GRUNDIG Service Chassis MK
S702
SCAR
SCART_SOG
C7131nF
R749
3.3NF
SCART
D
1UF
OUTR
OUTL
DRV632
VGACONN
º
⁄
32
Chassisplatte / Chassis Board – SCART, SPDIF
Full SCART
T
MUTE_SC
AU-DAC2-L
AU-DAC2-R
30
21
TP221
20
TP222
19
TP223
18
17
16
TP224
15
TP225
14
13
12
11
TP226
10
9
8
TP227
7
TP228
6
TP229
5
4
3
2
TP230
1
32
MUTE_SC
R745
0R
SCART1-CVBS_IN
SCART1_RED
SCART1_GREEN
SCART1_BLUE
SCART1-Lin
SCART1-Rin
D707
D706
2
2
1
1
R742
1
3
4
10K
220K
C747
D708
2
1
8
72
6
5
2
1
D709
PD
C716
100pF
2
1
C742
R747C746
220K
D710
C744
1UF
1UF
D711
2
1
PD
VCC3V3
R71433R
R716
75R%1
D713
D712
2
2
1
1
R744
7 2
8
6
5
10K
D714
2
1
uvp
1
3
4
C704
470PF
D715
2
1
C714
47nF
SC-Rout
SC-Lout
SC-VSYNC
C733
100pF
31
SC_CVBS-IN
2
D705
1
C734
100pF
R700
R701
C703
470PF
C727
47pF
5
6
7 2
8
39K
39K
1UF
C739
R727 10K
R729
150R%1
R737
10K
R730
150R%1
PD
R734
2.7K%1
4
3
1
R739
12K
R74647K
R74847K
IC700
1
+INR
2
-INR
14
+INL
13
-INL
5
MUTE
6
PVSS
CN7CP
DRV632PWR
SC_CVBSO
SC-HSYNC
R740
12K
C735
100pF
33PFC700
33PFC701
OUTR
OUTL
SGND
UVP
PGND
PVDD
C740
R732
R731
75R%1
75R%1
C7301uF 6.3V
C7321uF 6.3V
C736
100pF
3
12
4
11
uvp
10
9
8
C702
1UF
R733
75R%1
SC-Rin
SC-Lin
R743
1
3
4
1K
C720
47nF
C722
47nF
C725
47nF
VCC3V3
R7150R
R72033R
8
72
6
5
C715 47nF
68RR718
C719 47nF
R72133R
R72633R
R72833R
R735
68R
R736
68R
R738
C731 47nF
68R
TP232
TP233
CVBS-
SCART_C
SCART_RIN+
SCART_GIN+
SCART_BIN+
SCART_RIN-C728 47nF
SCART_GIN-C729 47nF
SCART_BIN-
VCC5V
SC_CVBS_OUT
C705
47pF
SC-Rout
SC-Lout
C706
47pF
L700
L701
32
SCART_RINSCART_RIN+
SCART_GINSCART_GIN+
SCART_BINSCART_BIN+
SCART_SOG
SC_CVBS-IN
SCART_C
SC_CVBS_OUT
CVBS-
SC-VSYNC
SC-HSYNC
AU-DAC2-L
AU-DAC2-R
SC-Lin
SC-Rin
SPDIF-OUT
C717
1UF
C721
22uF 6.3V
C724
NC
SPDIF-OUT
VCC3V3
R719
56K
R723
22K
TP235
SCART_RINSCART_RIN+
SCART_GINSCART_GIN+
SCART_BINSCART_BIN+
SCART_SOG
SC_CVBS-IN
SCART_C
SC_CVBS_OUT
CVBS-
SC-VSYNC
SC-HSYNC
AUDIO
AU-DAC2-L
AU-DAC2-R
SC-Lin
SC-Rin
SPDIF-OUT
BC847BPDW1T1
61
2
R741
100R
C737
NC/10pF
L702
100nF
R717
470R
T700A
R722
R724
68R
C738
T700B
5
75R%1
TP231
SCART
AUDIO
4
BC847BPDW1T1
3
R725
75R%1
SC_CVBSO
C726
47pF
S703
1
IN
2
Vcc
3
GND
4
416NESP414T5
SHIELD
SHIELD
5
1
+INR
2
–INR
3
4
GND
5
Mute
6
VSS
7 8
CN
Chassisplatte / Chassis Board – VGA, YUV
S1600
1
VGA-TX
TP121
2
D1605
1
TP132
2
D1606
1
11
12
13
14
15
DSUB-15
EE_WP5
TP131
2
D1607
1
16
17
TP130
2
D1608
1
6
2
7
3
8
4
9
5
10
EE_WP5
TP129
D1609
1 2
R
G
B
TP126
2
D1600
1
TP125
R1611
4.7K
D1601
1 2
VGA-RX
VGA5V
1
8
TP123
TP124
D1602
1 2
TP128
3
4
6
5
7 2
External
Under
Voltage
Detector
Charge
Pump
D1603
1 2
TP133
TP122
C1607
100nF
D1604
1 2
14
+INL
13
–INL
12
11
UVP
10
GND
9
VDD
CP
R1604
75R %1
IC1600
1
SCL
2
GND
SDA3VCC
CAT24C02TDI-GT3A
D1610
3
BAT54CW
R1605
75R %1
1
2
WP
VCC5V
VGA5V
R160133R
R160233R
R160333R
R1606
75R %1
5
4
4
3
1
R1607
68R
R1608
68R
R1609
68R
R1610 100R
4
3
1
R1612 10K
5
6
72
8
C1601 47nF
C1602 47nF
C1603 47nF
47nF
C1605
47nF
C1606
47nF
5
6
72
8
VGA.VGA_SOGR16000R C1600 1nF
VGA.VGA_RIN+
VGA.VGA_GIN+
VGA.VGA_BIN+
VGA.VGA_RIN-C1604
VGA.VGA_GIN-
VGA.VGA_BIN-
VGA.VGA_HSYNC
VGA.VGA_VSYNC
VGA_SOG
VGA_RIN+
VGA_GIN+
VGA_BIN+
VGA_RINVGA_GINVGA_BINVGA_HSYNC
VGA_VSYNC
VGA
S1601
1
2
3
12
D1611
TP135
C1611
47pF
12
D1612
TP134
C1610
47pF
R1613
R1614
22K
R1616
27K
R1617
27K
C1608 1uF 6.3V
C1609 1uF 6.3V
C1613
47pF
VGA-RX
VGA-TX
8
7 2
6
5
22K
C1612
47pF
2 - 12
VGA-AUL1
VGA-AUR1
R1615
100R
VGA-AUL1
VGA-AUR1
1
3
4
VGA-AU
UART-RX
UART-TX
VGA-AU
UART-RX
UART-TX
Page 39
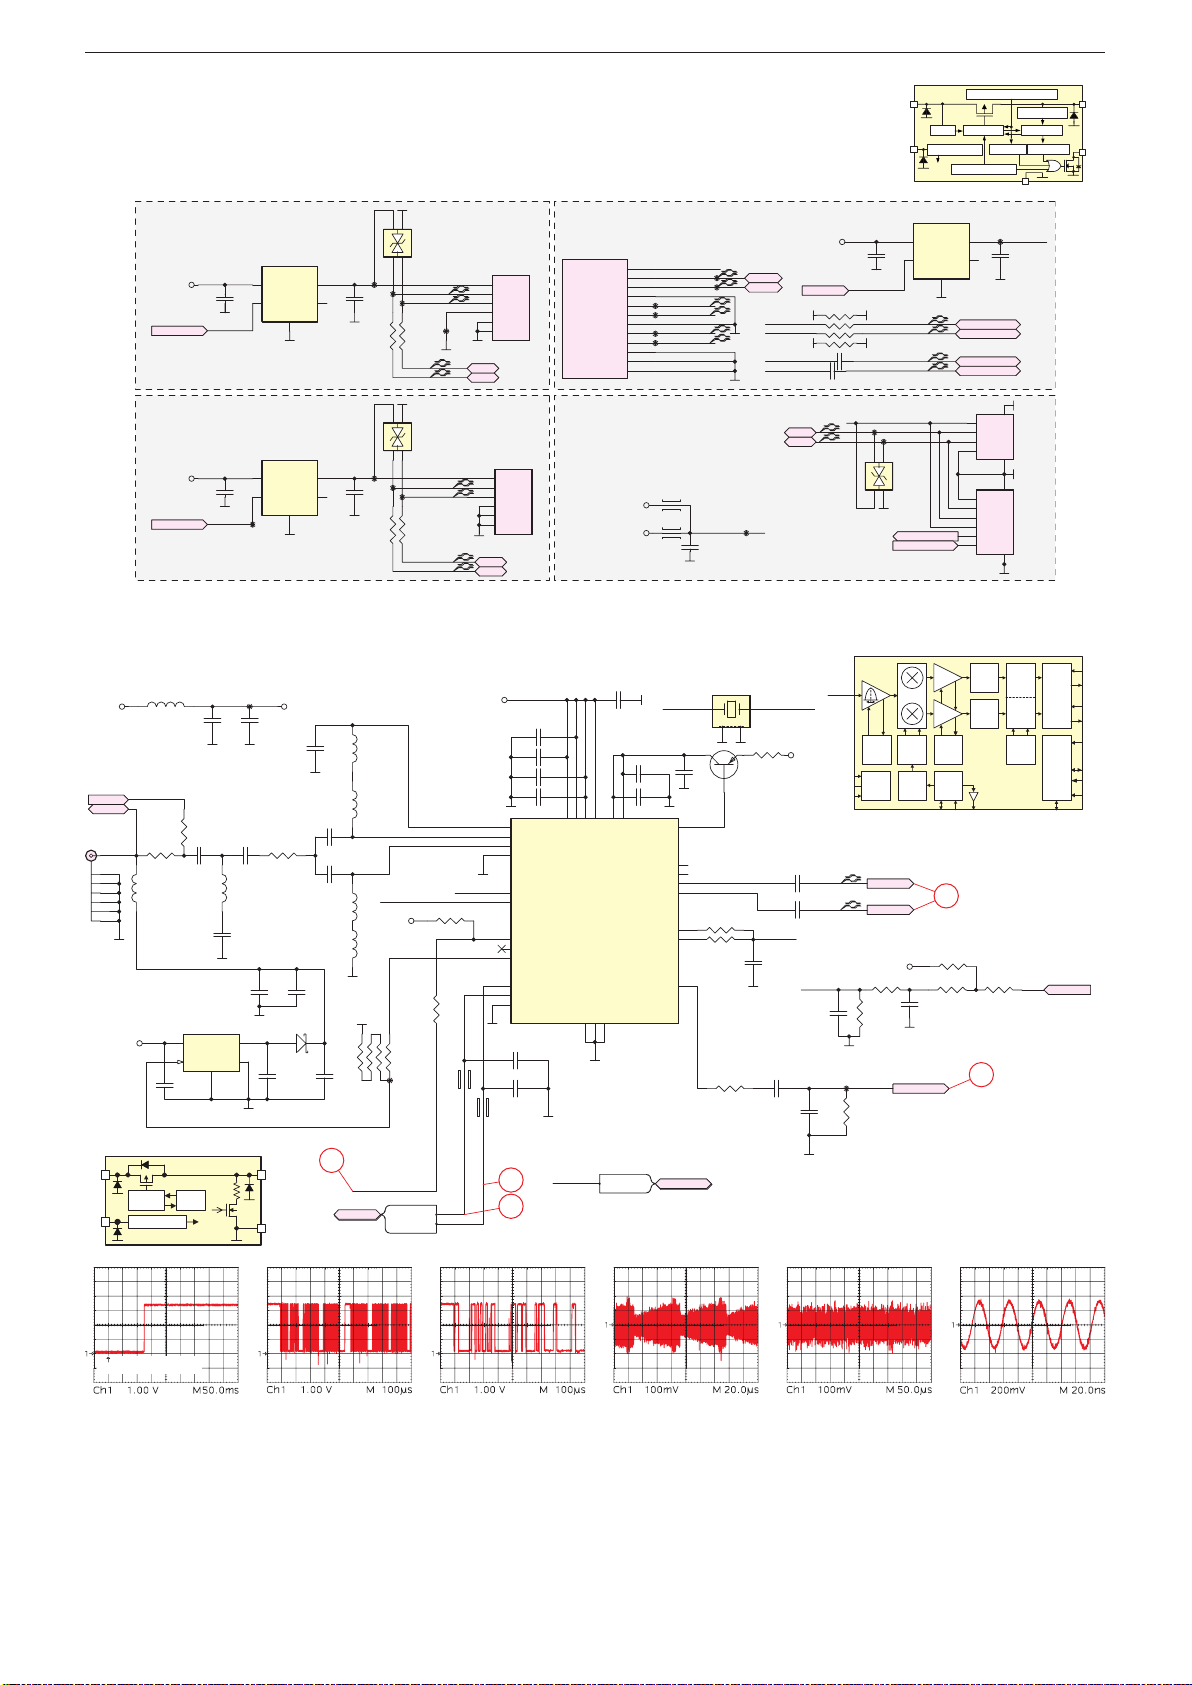
GRUNDIG Service Chassis MK
XTAL_O
ANTENN
RSTB
ADDR
V
T
X1000
ss
V
OUT
CE
!
$
%
™
™
£
XC8107
Chassisplatte / Chassis Board – USB
1
4
D1400
+5V_USB
USB_CHRG
+5V_USB
USB_EN
C1403
10UF
USB_CHRG
Hi: ON
Lo: OFF
C1409
10UF
Hi: ON
Lo: OFF
USB_EN
IC1401
XC8107AC05MR-GW
5
VOUT
VIN
4
FLG
CE
VSS
2
IC1403
XC8107AC05MR-GW
5
VOUT
VIN
4
FLG
CE
VSS
2
TP150
1
3
C1402
10UF
1
3
C1408
10UF
TP138
TP146
2
3
USB1C_N
TP140
USB1C_P
TP142
R14030RR1404
0R
P2_P
P2_N
1
4
3
2
USB0C_N
TP147
USB0C_P
TP148
R1409
R1411
0R
0R
P1_P
P1_N
NC
NC
D1401
TP143
VCC
GND
VCC
GND
D-
D+
P2_P
P2_N
D+
5
6
D-
P1_N
5
6
P1_P
S1401
VBUS
DD+
GND
SHLD
SHLD
SST081016-01
S1402
VBUS
DD+
GND
SHLD
SHLD
SST081016-01
S1102
VBUS
D-
D+
GND
STDA_SSRX-
STDA_SSRX+
GND_DRAIN
STDA_SSTX-
STDA_SSTX+
SHELL
SHELL
SHELL
+5V2_ST
VCC5V_CI_WIFI_MHL
1
2
3
4
5
6
7
8
9
10
11
12
TP247
TP248
TP249
TP250
USB_N
USB_P
USB3RX_N
USB3RX_P
USB3TX_N
USB3TX_P
NC
L1401
L1400
V_BUS5
TP139
TP141
V_BUS_WIFI
C1407
10UF
TP144
USB_N
USB_P
USB3RX_N
USB3RX_P
USB3TX_P
P0_N
P0_P
+5V_USB
Hi: ON
Lo: OFF
USB3_EN
C1405
R1402
C1404 100nF
100nF
C1401
10UF
USB3_EN
0R
TP145
IN
5
4
USB_SSRX_N
USB_SSRX_P
USB_SSTX_NUSB3TX_N
USB_SSTX_P
V_BUS_WIFI
P0_N
P0_P
TP149
3
2
NC
D1402
4
1
3D_SYNC_OUT
Reverse Current Prevention
UVLO Control Current Lim.
ON/OFF Control
each
Thermal Shutdown
circuit
IC1400
XC8107AC10MR-GW
VIN
CE
WOWL
VOUT
VSS
2
FLG
TP137
1
3
USB_SSRX_N
USB_SSRX_P
USB_SSTX_N
USB_SSTX_P
1
P1
2
P2
3
P3
4
P4
6
P6
5
P5
4
P4
3
P3
2
P2
1
P1
C1400
10UF
5
GND
GND
6
8
GND
GND
7
Current Sense
7.5ms Delay4ms Delay
V
V_BUS5
4PIN
S1403
MOLEX CLICK MATE
S1404
V
FLG
Chassisplatte / Chassis Board – Tuner / DVB-T2
3.3V_FE
RFOUT1
RFIN
S1000
AJ-32
IN
CE
1
2
3
4
5
6
7
+5V2_ST
L1001
NR3015T220M
RFOUT1
R1002
RFIN
0R
L1004
LQG15HSR27J02D
GATE
CONTROL
ON/OFF Control
C1006
22UF
R1001
0R
C1015
47pF
L1006
LQG15HSR18J02D
IC1002
XC8102AA01GR-G
4
Vout
Vin
3
GND
CE
EPAD
5
C1035
100NF
ANTPOWER: L- OFF, H- ON
XC8102
Rdischg
Current
CE/
Limit
each
circuit
TP104
C1024
180PF
C1026
100NF
C1016
1
2
82PF
C1007
100NF
V
V
3.3V_Tun
R1003
0R
C1027
47pF
D1002
PMEG4010EH
C1031
C1034
NC
100NF
OU
SS
C1009
1NF
C1014
180PF
C1019
180PF
11
L1007
L1008
L1002
L1003
LQG15HSR27J02D
LQG15HSR27J02D
TUNER_RST
I2CT
LQG15HSR27J02D
LQG15HSR27J02D
3.3V_Tun
R1016
10K*4
TP106
I2CT
I2C_T_SDA
I2C_T_SCL
XOUT_2158
10K
R1011
R1013
100R
L1009
3.3V_Tun
X_2158
BK1005LL241-T
I2C_T_SDA
1NF
C1004
1NF
C1005
1NFC1011
100NFC1012
22
RF_REF
23
RF_IP
24
RF_IN
25
RF_SHLD
18
XTAL_O
17
XTAL_I
27
RSTB
1
GPIO1
2
GPIO2
4
SCL
5
SDA
26
ADDR
C1028
22PF
C1032
22PF
L1010
BK1005LL241-T
TUNER_RST
14
I2C_T_SCL
15
20
10
21
6
VDD_H
VDD_H
VDD_H
VDD_IO
GND
7
19
address=0xC0
FE-RST
C1003
1NF
14
8
LDO_ADJ
VDD_L
VDD_D
EPAD29GND
IC1001
Si2158-A20-GMR
TUNER_RST
C1008
C1013
1NF
DLIF_P
DLIF_N
ALIF_P
ALIF_N
AGC1
AGC2
XOUT
X_2158
FE-RST
NC/24MHz
1 3
3 2
C1010
10UF
15
11
9
13
12
28
3
R1012
16
R1015
330R
8PF
2
4
R1000
2.2R
T10001NF
1
BC807-40LT1G
0RR1009
NC
10NF
XOUT_2158
C1018
100NF
C1022
100NF
IF_AGC_1
C1029
100NF
C1030
3.3V_Tun
C1033
10PF
NC
LDO_ADJ
DIF_P
DIF_N
IF_AGC_1
C1037
100NF
INPUT
3.3 V
1.8 V
TP105
Si2158
A
RF
0 / 90 LOW-IF
AGC
FREQ
LDO
SYNTH
DIF_P
DIF_N
3.3V_Tun
R1021
100R
R1020
22K
XTALO_S2
XTALO_S2
R1019
1K
R1014
10K
C1036
22NF
PGA
PGA
22
IF
AGC
XOSC
R1017
OUTPUT
CONTROL
GPIO
IFAGC
AGC
DLIF
AGC
INTERFACE
ALIF
SDA
SCL
INTERFACE
I
DSP
ADC
Q
FILTER
ADC
XOUT
XTAL_I
R1018
0R
IFAGC
0R
23
Power on (trigger: +5V2_ST)
Mode: ATV
2 - 13
Mode: DTV
Page 40
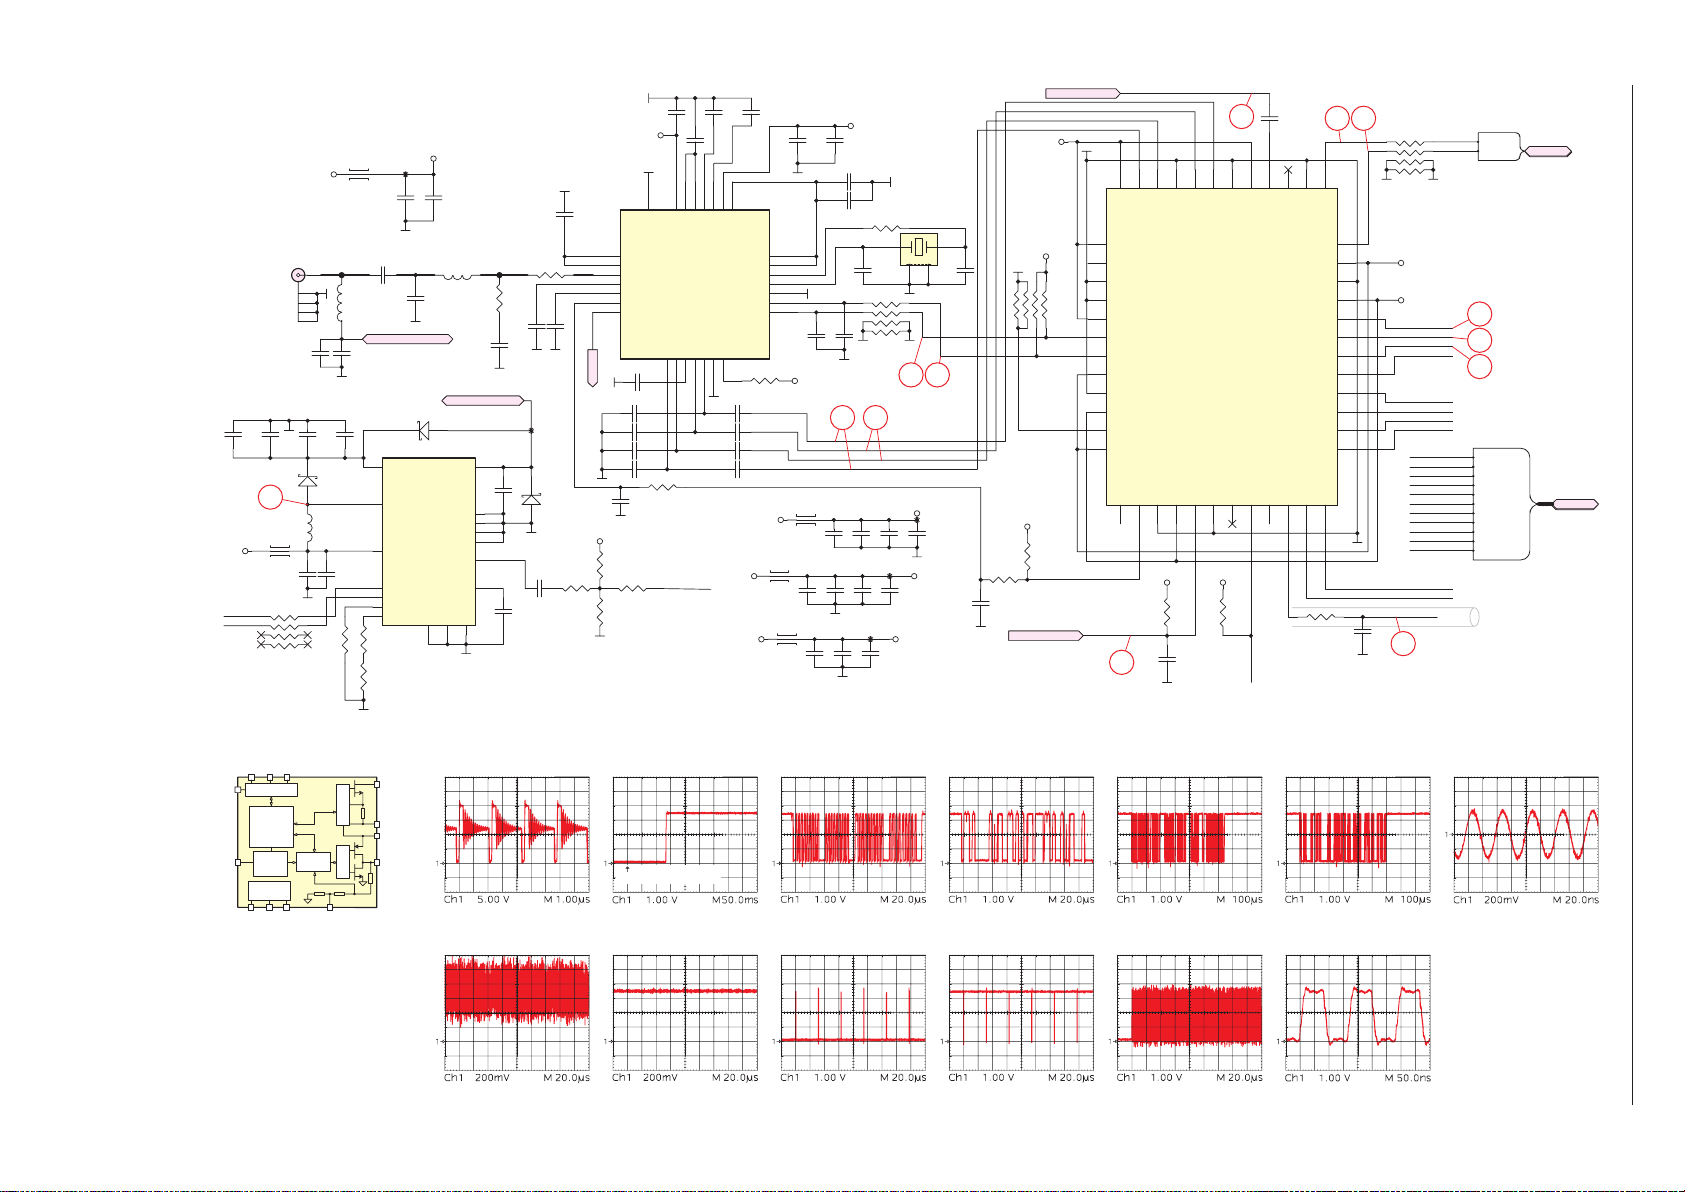
Chassisplatte / Chassis Board – DVB-S VKT190R-2
SDASCL
ADDR
VCCBYPGND
EXTM
DSQIN
XTALO_S2
VCC12V
9
@
^ & * ( £
≤
∞ § ≥
•
ª
TUNER_3V3_MA
2 - 14
C1128
NC
I2CS_SCL
I2CS_SDA
C1130
10uF 35V
L1104
60R3A
S1100
9
C1144
10uF 35V
R1119 100R
VCC3V3
2
3
4
5
COAX_F
C1122
1nF
C1129
10uF 35V
60R3A
75 ohm Line
1
L1102
27nH
0.59A
C1123
100pF
C1135
470nF 25V
D1102
PMEG4010EH
L1103
6.8uH
C1143
220nF 50V
R1121
10K
L1100
10uF
14
16
12
6
7
5
8
R1127
2.2K
TP107
C1104
6.3V
C1112
47pF
SAT_LNB_POWER
D1100
PMEG4010EH
IC1102
LNBH29EQTR
VUP
LX
VCC
DSQIN/EXTM
SCL
SDA
ADDR
ISEL
R1122
15.4k %1
130mA
C1107
100nF
L1101
3.3nH
C1115
NC
SAT_LNB_POWER
SAT_LNB_POWER
VOUT
EPAD
NC
NC
NC
BYP
GND
PGND
9
2
R1105
NC
C1117
22pF
C1118
NC
C1141
220nF 50V
13
17
15
11
1
3
10
C1163
NC
4
220nF50V
C1111
100nF
C1116
10nF
TP108
D1104
PMEG4010EH
TUNER_3V3_MA
C1160
R1110
15.4K
1uF
TUNER_3V3_MA
IC1100
AV2012-S85QEGQ0
regout
1
REG2OUT
2
VCCRF1
3
RFIN+
4
RFIN-
regout
5
VCCRF2
6
RFAGC
7
RFLP
RFLP
C1121
RFLP
10nF
C1124 10pF
C1126 10pF
C1131 10pF
C1133 10pF
C1136
100nF
R1100
4.7K
R1111
0R
R1116
4.7K
C1102
100nF
1uF
29
28
27
EPAD
VCCREG2
RXQP8RXQN9VCCZIF
10
R1109
100R
DISEQC_OUT_A
C1100
22pF
C1103
24
25
26
VCCCP
REGCAP1
REGCAP2
RXIN11RXIP
12
13
C1125 100nF
C1127 100nF
C1132 100nF
C1134 100nF
22
23
CP
REG1OUT
VCCREG1
VDDD
VCCXO
XTAL1
XTAL2
ADDR1
SDA
SCL
PD
ADDR0
14
R1107 10K
VCC1.22V
VCC3V3
VCC3V3
70mA
C1101
1nF
L1108
240R
0.25A
21
20
19
18
17
16
15
L1106
240R
0.25A
C1105
100nF
C1108 100nF
C1109 1nF
C1119
C1120
10pF
10pF
TUNER_3V3_MA
L1107
60R
3A
C1152
100nF
C1145
100nF
TUNER_3V3_MA
C1106
47pF
C1113
22pF
24 25
C1159
C1156
100nF
1UF
C1153
C1154
100nF
100nF
TP109
C1148
100nF
X1100
27MHZ12PF-30/30PPM
R1101
0R
1 3
2
R1104
100R
18 19
381mA
1.2VD_MA
TP110
C1157
C1158
100nF
100nF
TP111
SAT_3V3_MA
C1155
100nF
3.3VD_MA
C1149
100nF
XTALO_S2
SAT_3V3_MA
48
45
47
46
44
IP
IM
QM
GND
AVDD_33
1
AVDD_33
2
SAR_RSSI
3
GND
4
GND
5
AVDD_33
6
I2CM_SCL
7
I2CM_SDA
8
VDDC
9
GND
10
VDDP
11
TS_ERR
12
VDDC
GPIO13IF_AGC14GND15VDDP16RESETn
DVB_RST
12
3.3VD_MA
R1123
10K
C1151
100nF
17
3.3VD_MA
R1118
10K
C1146
22nF
3.3VD_MA
3.3VD_MA
DVB_RST
R1115
1K
R1106
10K*4
C1114
22pF
4
43
42
QP
IC1101
MSB1310
GND18DISEQC_IN
19
R1113
10K
23
GND
C1110
100nF
40
41
XIN
AVDD_33
DISEQC_OUT
DISEQC_HV21TS_CLK22TS_[D7]
20
DISEQC_OUT_A
39
XOUT
I2CS_SDA
TS_SYNC
TS_VLD
TS_[D0]
TS_[D1]
TS_[D2]
TS_[D3]
TS_[D4]
TS_[D5]
38
GND
VDDC
VDDP
23
R1124
33R
37
GND
24
C1150
16 17
I2CS_SCL
36
35
34
33
32
31
30
29
28
27
26
25
TS_[D6]
NC
R1102
100R
1.2VD_MA
3.3VD_MA
TS_SAT_SYNC
TS_SAT_VLD
TS_SAT_D0
TS_SAT_D1
TS_SAT_D2
TS_SAT_D3
TS_SAT_D4
TS_SAT_D5
TS_SAT_D0
TS_SAT_D1
TS_SAT_D2
TS_SAT_D3
TS_SAT_D4
TS_SAT_D5
TS_SAT_D6
TS_SAT_D7
TS_SAT_CLK
TS_SAT_VLD
TS_SAT_SYNC
TS_SAT_D6
TS_SAT_D7
TS_SAT_CLK
29
I2CS_SCL
I2CS_SDA
I2CS
I2CS_SCL
I2CS_SDA
26
27
28
TS_SAT
TS_SAT_D0
TS_SAT_D1
TS_SAT_D2
TS_SAT_D3
TS_SAT_D4
TS_SAT_D5
TS_SAT_D6
TS_SAT_D7
TS_SAT_CLK
TS_SAT_VLD
TS_SAT_SYNC
I2CS
TS_SAT
GRUNDIG Service Chassis MK
(1)
I²C Digital core
LNBH29
DAC
Drop control
Tone ctrl
Diagnostics
Protections
Current
Limit
selection
Voltage
reference
Linear
Regulator
R3
ISEL
LX
Isense
PWMCTRL
PGND
VUP
VOUT
Gate ctrl
R2
(2)
Power on (trigger: +5V2_ST)
Page 41
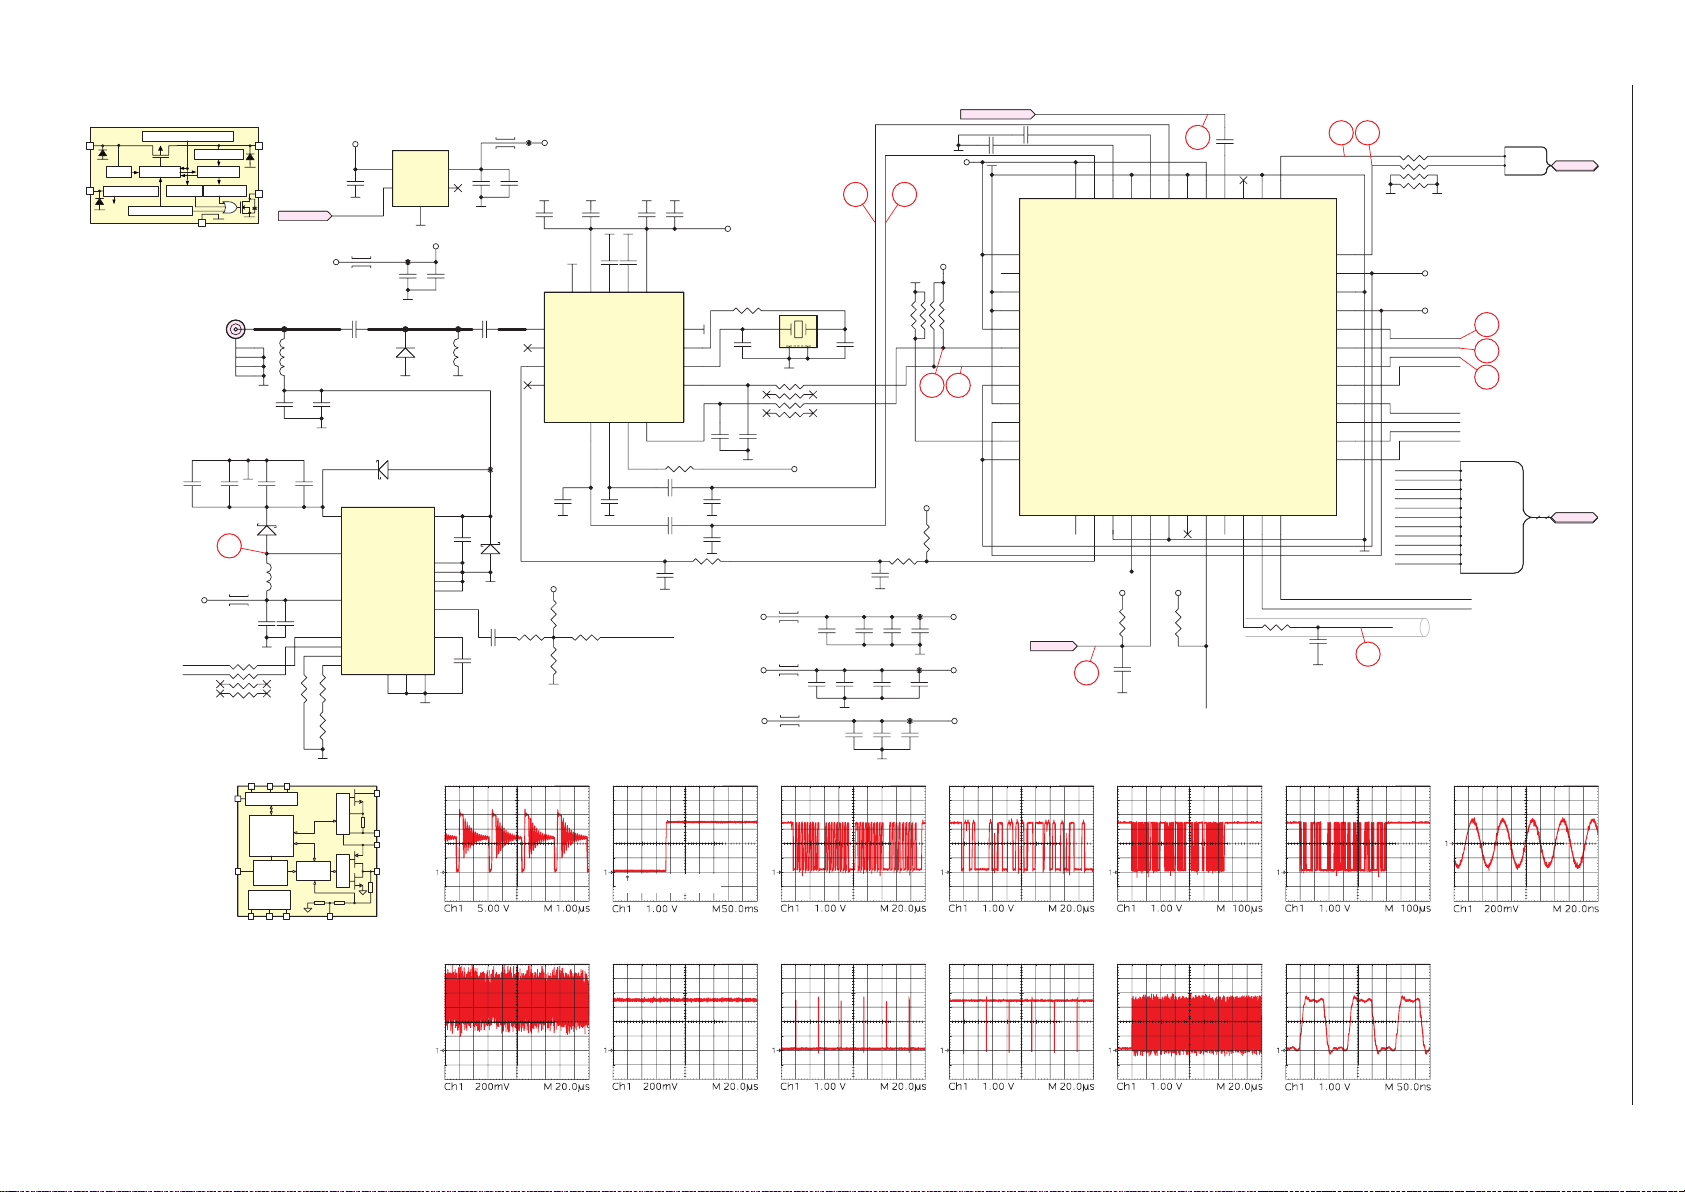
Chassisplatte / Chassis Board – DVB-S VKT190R-6
SDASCL
ADDR
VCCBYPGND
EXTM
DSQIN
VCC12V
XTALO_S2
9
@
^ & * ( £
≤
∞ § ≥
•
ª
ss
V
OUT
CE
130mA
C1107
100nF
13
17
15
11
1
3
10
1
3
L1101
7.5nH
C1141
220nF 50V
C1163
220nF50V
L1820
60R
3A
C1874
10UF
C1115
12PF
TP108
D1104
PMEG4010EH
C1160
C1875
100nF
R1110
1uF
15.4K
TP251
TUNER_3V3_MA
2 - 15
XC8107
IN
Reverse Current Prevention
UVLO Control Current Lim.
ON/OFF Control
each
Thermal Shutdown
circuit
Current Sense
V
C1128
NC
I2CS_SCL
I2CS_SDA
7.5ms Delay4ms Delay
C1130
10uF35V
S1100
COAX_F
9
L1104
60R3A
10uF 35V
R1119 100R
C1144
V
FLG
1
2
3
4
5
C1122
1nF
C1129
10uF 35V
POWER_SW
VCC3V3
75 ohmLine
L1102
27nH
0.59A
C1135
470nF 25V
D1102
PMEG4010EH
L1103
6.8uH
C1143
220nF 50V
R1121
10K
VCC3V3-ST
C1876
1UF
POWER_SW
L1100
60R3A
C1112
12PF
SAT_LNB_POWER
C1123
100pF
PMEG4010EH
IC1102
LNBH29EQTR
14
VUP
16
LX
12
VCC
6
SCL
7
SDA
5
ADDR
8
ISEL
R1122
15.4k %1
R1127
2.2K
IC1805
XC8107AC10MR-GW
5
VIN
4
CE
TUNER_3V3_MA
TP107
C1104
6.3V
10uF
D1100
SAT_LNB_POWER
DSQIN/EXTM
PGND
9
2
VOUT
EPAD
BYP
VOUT
VSS
2
D1101
DIODE
NC
NC
NC
FLG
NC4GND
GRUNDIG Service Chassis MK
XTALO_S2
C1127100nF
3.3V_FE
X1100
2
4
TUNER_3V3_MA
24 25
S_TUN_SDA
S_TUN_SCL
C1159
1UF
C1152
100nF
C1114
27pF
C1153
100nF
C1145
100nF
C1156
100nF
R1118
10K
C1146
22nF
C1157
100nF
C1154
100nF
C1148
100nF
TP109
C1108
C1105
100nF
10UF
C1101
1uF
15
16
17
EPAD
1
RFIN
2
NC
3
RFAGC
4
RFLP
R1100
4.7K
R1116
4.7K
C1100
10pF
VCCREG2
RXQP5RXIP6ADDR07SCL
R1111
0R
REGCAP2
C1103
10pF
DISEQC_OUT_A
C1109
C1106
100nF
10UF
C1102
1nF
IC1100
13CP14
AV2018
GND
VCCREG1
XTAL1
XTAL2
SDA
8
R1107 10K
C1125 100nF
C1134 100nF
C1136
100nF
12
11
10
9
R1109
100R
XO
C1124
10pF
C1133
10pF
TUNER_3V3_MA
27MHZ 12PF-30/30PPM
R1101
0R
13
XI
C1113
27pF
R1104
100R
C1119
C1120
10pF
10pF
BBIP
BBQP
RFAGC_S
L1107
VCC1.22V
60R3A
L1108
VCC3V3
240R
0.25A
L1106
VCC3V3
240R
70mA
0.25A
SAT_3V3_MA
3.3VD_MA
18 19
3.3VD_MA
R1115
1K
TP110
C1158
100nF
TP111
C1155
100nF
C1149
100nF
C1132100nF
R1106
10K*4
S_TUN_SCL
S_TUN_SDA
381mA
1.2VD_MA
SAT_3V3_MA
3.3VD_MA
1
2
3
4
5
6
7
8
9
10
11
12
BBIP
BBIN
BBQN
BBQP
IC1101
MSB1310
AVDD_33
SAR_RSSI
GND
GND
AVDD_33
I2CM_SCL
I2CM_SDA
VDDC
GND
VDDP
TS_ERR
VDDC
DVB_RST
45IP46
47
48
IM
AVDD_33
GPIO13IF_AGC14GND15VDDP16RESETn17GND18DISEQC_IN19DISEQC_OUT20DISEQC_HV
3.3VD_MA
R1123
10K
DVB_RST
C1151
100nF
12
GND
44
QM
3.3VD_MA
C1110
23
100nF
39
40
41
42
43
QP
GND
R1113
10K
AVDD_33
DISEQC_OUT_A
38
XIN
GND
XOUT
TS_CLK
TS_[D7]23TS_[D6]
21
22
R1124
33R
37
I2CS_SCL
24
C1150
NC
I2CS_SDA
VDDC
GND
VDDP
TS_SYNC
TS_VLD
TS_[D0]
TS_[D1]
TS_[D2]
TS_[D3]
TS_[D4]
TS_[D5]
16 17
36
35
34
33
32
31
30
29
28
27
26
25
TS_SAT_CLK
29
R1102
100R
1.2VD_MA
3.3VD_MA
TS_SAT_SYNC
TS_SAT_VLD
TS_SAT_D0
TS_SAT_D1
TS_SAT_D2
TS_SAT_D3
TS_SAT_D4
TS_SAT_D5
TS_SAT_D0
TS_SAT_D1
TS_SAT_D2
TS_SAT_D3
TS_SAT_D4
TS_SAT_D5
TS_SAT_D6
TS_SAT_D7
TS_SAT_CLK
TS_SAT_VLD
TS_SAT_SYNC
TS_SAT_D6
TS_SAT_D7
I2CS_SCL
I2CS_SDA
26
27
28
TS_SAT
TS_SAT_D0
TS_SAT_D1
TS_SAT_D2
TS_SAT_D3
TS_SAT_D4
TS_SAT_D5
TS_SAT_D6
TS_SAT_D7
TS_SAT_CLK
TS_SAT_VLD
TS_SAT_SYNC
I2CS
I2CS_SCL
I2CS_SDA
I2CS
TS_SAT
(1)
I²C Digital core
LNBH29
DAC
Drop control
Tone ctrl
Diagnostics
Protections
Current
Limit
selection
Voltage
reference
Linear
Regulator
R3
ISEL
LX
Isense
PWMCTRL
PGND
VUP
VOUT
Gate ctrl
R2
(2)
Power on (trigger: +5V2_ST)
Page 42
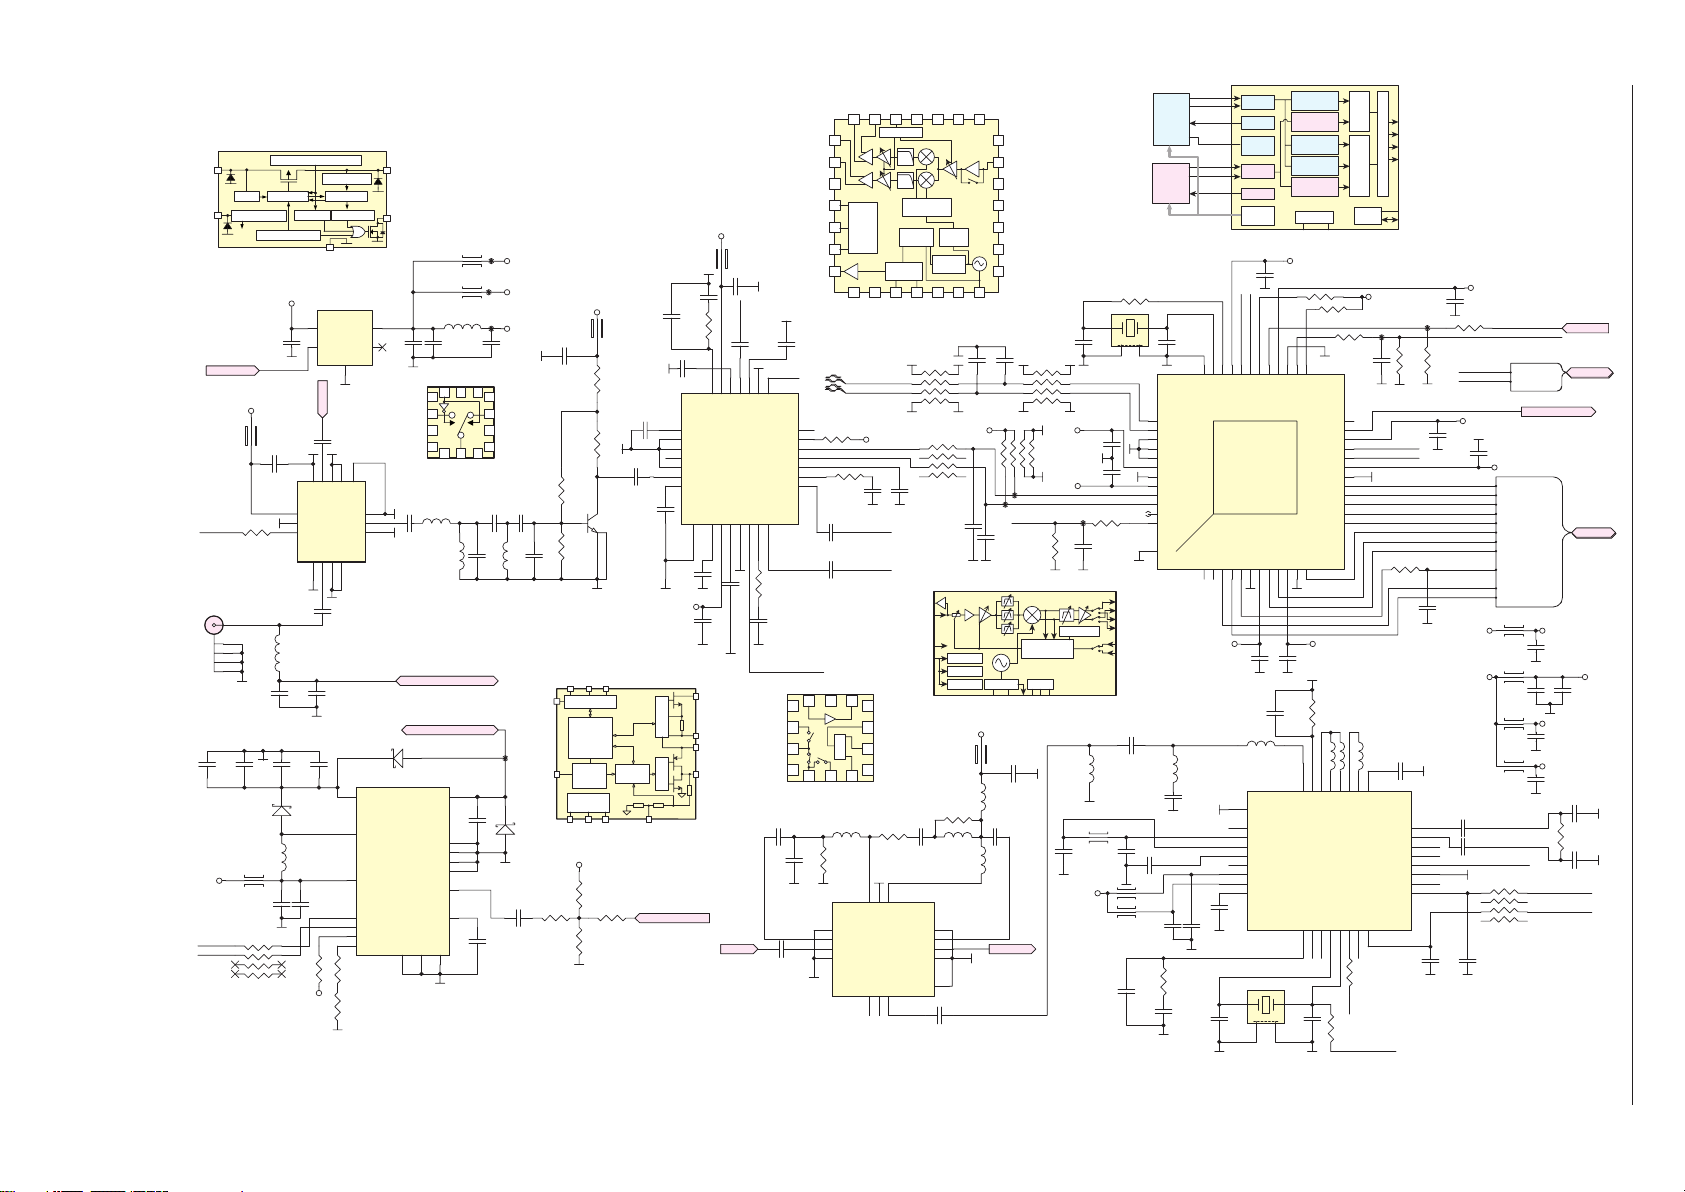
XOUT2871
3.3V_SAT2
VCC12V
ss
V
OUT
CE
NJG1666MD7
GND
GND
GND
GND
GND
GND
GNDCTL
VDD
E
REFOUT
PLLREG
QOUTP
QOUTN
G
XTALI XTALO
]
NJG1151MD7
LNAIN LNAOUT
1
OUT1
GND
SDASCL
ADDR
VCCBYPGND
EXTM
DSQIN
Chassisplatte / Chassis Board – Multi-Tuner VKT190R-2
XC8107
2 - 16
IN
UVLO Control Current Lim.
ON/OFF Control
each
circuit
POWER_SW
3.3V_SAT2
L1807
BLM15AG102SN1D
R1817
sat_rf_ctl
10K
J1800
1
2
3
4
5
COAX_F
C1139
C1137
NC
10uF 35V
PMEG4010EH
L1109
60R3A
10uF 35V
I2CS_SCL
I2CS_SDA
R1120 100R
Reverse Current Prevention
Thermal Shutdown
VCC3V3-ST
5
C1876
4
1UF
POWER_SW
C1822
1nF
12
VDD
13
GND
14
CTL
C1842
1nF
L1811
27nH
0.59A
C1847
1nF
C1138
470nF25V
10uF 35V
D1103
L1105
6.8uH
C1161
R1125
10K
3.3VD_MA
Current Sense
V
IC1805
XC8107AC10MR-GW
VIN
CE
RFLP
RFLP
10
9
11
P1
GND
P2
GND
2
1
CXD2832_LNB_POWER
C1848
100pF
C1140
C1147
220nF50V
7.5ms Delay4ms Delay
VOUT
FLG
VSS
2
C1818
1nF
15
GND8GND
EPAD
GND
PC
GND
GND3GND
4
IC1802
NJG1666MD7
IC1103
LNBH29EQTR
14
16
12
6
7
5
8
R1126
15.4k%1
R1128
2.2K
D1101
VUP
LX
VCC
SCL
SDA
ADDR
ISEL
1
3
7
6
5
V
FLG
C1874
10UF
DSQIN/EXTM
L1820
60R
L1826
60R
L1802
22UH 0.47A
C1875
C1807
100nF
1
P2 P1
2
3
4
65
PC
75 ohm Line
8.2PF
C1828
L0808
1.8NH
8.2NH
L1809
CXD2832_LNB_POWER
CXD2832_LNB_POWER
CXD2832_LNB_POWER
PMEG4010EH
C1142
13
VOUT
17
EPAD
15
NC
11
NC
1
NC
3
10
BYP
GND
PGND
NC
9
2
4
TP251
3A
TP252
3A
TP253
10UF
121314
11
10
9
8
7
GNDGND
C1829
2.2PF
C1835
NC
xxxxx
220nF50V
C1164
220nF50V
3.3V_FE
3.3V_SAT2
3.3V_Tun2
C1830
3.3PF
L1810
3.3NH
TP258
D1105
PMEG4010EH
C1162
1uF
1NFC1815
C1836
1.8PF
(1)
ISEL
R1112
15.4K
3.3V_SAT2
50V
R1815
1.5K
4
R1819
2.2K
I²C Digital core
DAC
Drop control
Tone ctrl
Diagnostics
Protections
Current
Limit
selection
Voltage
reference
3.3V_SAT2
R1108
4.7K
R1117
4.7K
L1806
BLM15AG102SN1D
R1810
33R
C1819 1uF
R1811
0R
C1824
1.8PF
C1827
21
1uF
T1800
3
LNBH29
Linear
Regulator
R3
R1114
0R
C1804
1.5NF
C1806
150PF
R1803
6.8K
1uF
C1816
8
9
10
11
12
13
14
C1838
1uF
3.3V_SAT2
C1843
PWMCTRL
Gate ctrl
R2
(2)
DISEQC_OUT_B
L1803
60R
3A
7
5
6
CP
DVDD
VCOREG
VCOGND
POWER_SAVE
LTOUT
RFGND
RFIN
VREF18
RFREG15AVDD16AREG17AGND18AGCIN19QOUTN20QOUTP
EPAD
29
C1840
50V
1NF
LX
Isense
PGND
VUP
VOUT
C1802
1NF
XOUT2871
4
PLLREG
1uF
XTI
C1873
1nF
3
sat_rf_ctl
2
1
XTO
GPIO
DGND
REFOUT
ADSL
SDA
SCL
RSTX
IOUTN
IOUTP
21
R1821
120R
C1844
50V
47PF
CXD2832_AGC
GND
IN1
GND
C1855
10NF
C1865
RFIN
10NF
21 20 19 18 17 16 15
22
IOUTP
23
IOUTN
24
RSTX
25
SCL
Serial
26
SDA
BUS I/F
27
ADSL
28
1234567
C1808
1nF
CXD2871_IF_P
CXD2871_IF_N
IC1801
CXD2832AER
28
R1813
27
26
68K
25
24
R1814
23
22
120R
C1837
CXD2832_IFI
1uF
C1841
CXD2832_IFQ
1uF
121314
1
2
3
splitter
4 8
576
OUT2
SOUT2IN2
L1821
8.2NH
C1859
R1825
1.2PF
56K
1
GND
2
SWOUT1
3
SWIN1
4
GND
VGA
Buffer
GPIO
DGND
3.3V_SAT2
DVB_RST
C1831
47PF
11
GND
10
SIN
9
SOUT
GND
R1824
470R
14
13
LNAIN
SWOUT5SWIN6SPLOUT2
AGCIN
VGA control
LPF
IQ Generator
Reference
OSC
XTO
C1826
1NF
L1812
BLM15AG102SN1D
12
GND
LNAOUT
SPLIN
SPLOUT1
7
RFOUT2
IQ Mixer
PLL
RFIN
VDD
C1856
10NF
GND
GND
EPAD
1
3
AGND
1/2
XTI
R1808
47R
(2)
RF VGA
Prescaler
RP1800
100R*4
R1823
1K
C1866
10NF
AREG
1/1 1/2
11
10
9
8
15
AVDDRFRE
CXD2832
LNA
Driver
VCO
1/2
DD
DV
C1811
82PF
8
6
5724
VCC3V3
C1833
33PF
RFVGA
Balun
VREG15
PLLREG
VCOREG
VCC5V
L1822
27NH
IC1804
NJG1151MD7
RFOUT1
14
13
12
11
10
9
8
CP
C1812
82PF
TP176
C1834
33PF
OSC/PLL
XTALI
L1818
470NH
C1857
10NF
L1823
2.2NH
RFOUT1RFIN
VREF18
RFIN
RFGND
TEST
POWER_SAV
VCOGND
VCOREG
R1809
1
3
4
47R
5
7246
8
R1812
4.7K
1
3
TP175
AGC_CXD2871
R1818
22K
AGC including
IFOVLD, RSSI
I2C I/F
XRST
XTALO
C1849
10NF
8
6
72
5
CXD2843_AVDD
100nF
CXD2843_CVDD
CXD2843_SDA
CXD2843_SCL
TP178
IFBPF IFVGAMixer
Logic/NVM
CXD2871 TV (1)
CXD2872 STB (2)
SCL
SDA
BK1005LL241-T
C1861
1uF
3.3V_Tun2
X1800
1 3
C1813
8.2pF
20.5MHZ
C1821
C1825
100nF
R1816
10K
C1832
220n
L1817
220NH
L1824
C1863
100NF
C1869
47NF
TAINP
ADC
TAINM
TUNER
TIFAGC
Terrestrial
Cable
TUNER
Satellite
R1800
470R
C1814
8.2pF
4
2
37
TAINP
38
TAINM
39
AVSS
40
TESTMODE
41
RFAIN
42
AVDD
43
VSS
44
CVDD
45
TTUSDA
46
TTUSCL
47
TP177
GPIO1
48
TIFAGC
49
EP
IFOUTP1(1)
IFOUTN1(1)
IFOUTP2
IFOUTN2
AGC1(1)
CXD2843_DVDD CXD2843_CVDD
AGC2
C1851
47PF
L1819
270NH
12NF
C1853
C1862
L1825
L1815
C1879
100NF
R1827
1K
C1870
100NF
RFAIN
SIAIN
SQAIN
SAGC
TTUSCL
TTUSDA
XI_D2
35
36
XVSS
XTALI
GPIO0
GPIO22TSSYNC
1
C1880
100NF
AGC
RF Level
Monitor
ADC
AGC
Tuner
I2C I/F
XO_D2
CXD2832_IFQ
CXD2832_IFI
32
33
31
34
XVDD
SQAIN
XTALO
IC1800
CXD2842ER-T4
TSVALID
TSCLK5VSS6DVDD7TSDATA08TSDATA19CVDD
4
3
C1846
100nF
C1850
2.2UF
L1816
5.6NH
IC1803
CXD2871ER
33
17
18
19
20
21
22
23
24
C1864
1uF
X1802
1 3
C1871
NC
C1803
100nF
30
29
SIAIN
SLVADR3
EPAD
RFEXT
VREG15IN
VREG15
VREF15
GPIO1
VDD
VDDIO
VCOREG
2
DVB-T2
Demodulator
DVB-S2
Demodulator
Demodulator
Demodulator
Demodulator
CXD2842ER
OSC/PLL
CXD2843_XVDD
R1801 47K
R180247K
28
26
27
VSS
CVDD
SAGC
RST_X
VSS
10
11
C1845
100nF
R1822
4.7M
16
25
C1872
4
10PF
DVB-T
DVB-C
DVB-S
R180510K
25
SLVADR0
DSQIN
DSQOUT
CVDD
SDA
SCL
DVDD
VSS
TSDATA7
TSDATA6
TSDATA5
TSDATA4
TSDATA3
TSDATA2
12
L1813
150NH
L1814
150NH
13
14
12
15
RFIN
DETOL
VLOUTP1
VREG15VLOUT
GPIO0
CP
ADSL27XI28XO29XRST30REFOUT31SCL
26
R1828
0R
LDPC/BCH
Viterbi/RS
I2C I/F
C1817
2.2NF
24
23
22
21
20
19
18
17
16
15
14
13
11
10
VLOUTP2
VLOUTN2
VLOUTN1
R1826
1K
DVB_RST
Decoder
TS I/F
Decoder
CXD2843_DVDD
TP174
I2C_T_SDA
I2C_T_SCL
R1820
33R
L1808
270NH
C1852
9
10NF
RFAGC
IFOUTP1
IFOUTN1
IFOUTP2
IFOUTN2
AGC1
AGC2
DNC
SDA
32
TSCLK
TSSYNC
TSVALID
TSDATA[7:0
SCL
SDA
CXD2843_CVDD
C1809
100nF
TP173
R1804 100R
R1806
R1807
10K
NC
TS_SAT2_D7
TS_SAT2_D6
TS_SAT2_D5
TS_SAT2_D4
TS_SAT2_D3
TS_SAT2_D2
TS_SAT2_D1
TS_SAT2_D0
TS_SAT2_CLK
TS_SAT2_SYNC
TS_SAT2_VLD
C1839
NC
VCC1.18V CXD2843_CVDD
3.3V_SAT2
I2C_T_SDA
I2C_T_SCL
DISEQC_OUT_B
CXD2843_CVDD
C1820
100nF
DVB_RST
CXD2832_AGC
I2CT
I2C_T_SDA
I2C_T_SCL
C1823
100nF
CXD2843_DVDD
TS_SAT2_D7
TS_SAT2_D6
TS_SAT2_D5
TS_SAT2_D4
TS_SAT2_D3
TS_SAT2_D2
TS_SAT2_D1
TS_SAT2_D0
TS_SAT2_CLK
TS_SAT2_SYNC
TS_SAT2_VLD
L1800
60R 3A
L1801
L1804
L1805
C1858
1uF
8
7
6
5
4
3
2
1
CXD2871_IF_P
C1860
1uF
CXD2871_IF_N
AGC_CXD2871
RP1801
100R*4
C1867
C1868
10PF
10PF
DVB_RST
I2CT
DISEQC_OUT_B
TS_SAT2
C1800
10UF
CXD2843_XVDD
C1801
C1854
22UF
22UF
CXD2843_DVDD
10UF
C1805
CXD2843_AVDD
10UF
C1810
C1877
R1829
2K
C1878
CXD2843_SDA
CXD2843_SCL
GRUNDIG Service Chassis MK
TS_SAT2
10PF
10PF
Page 43
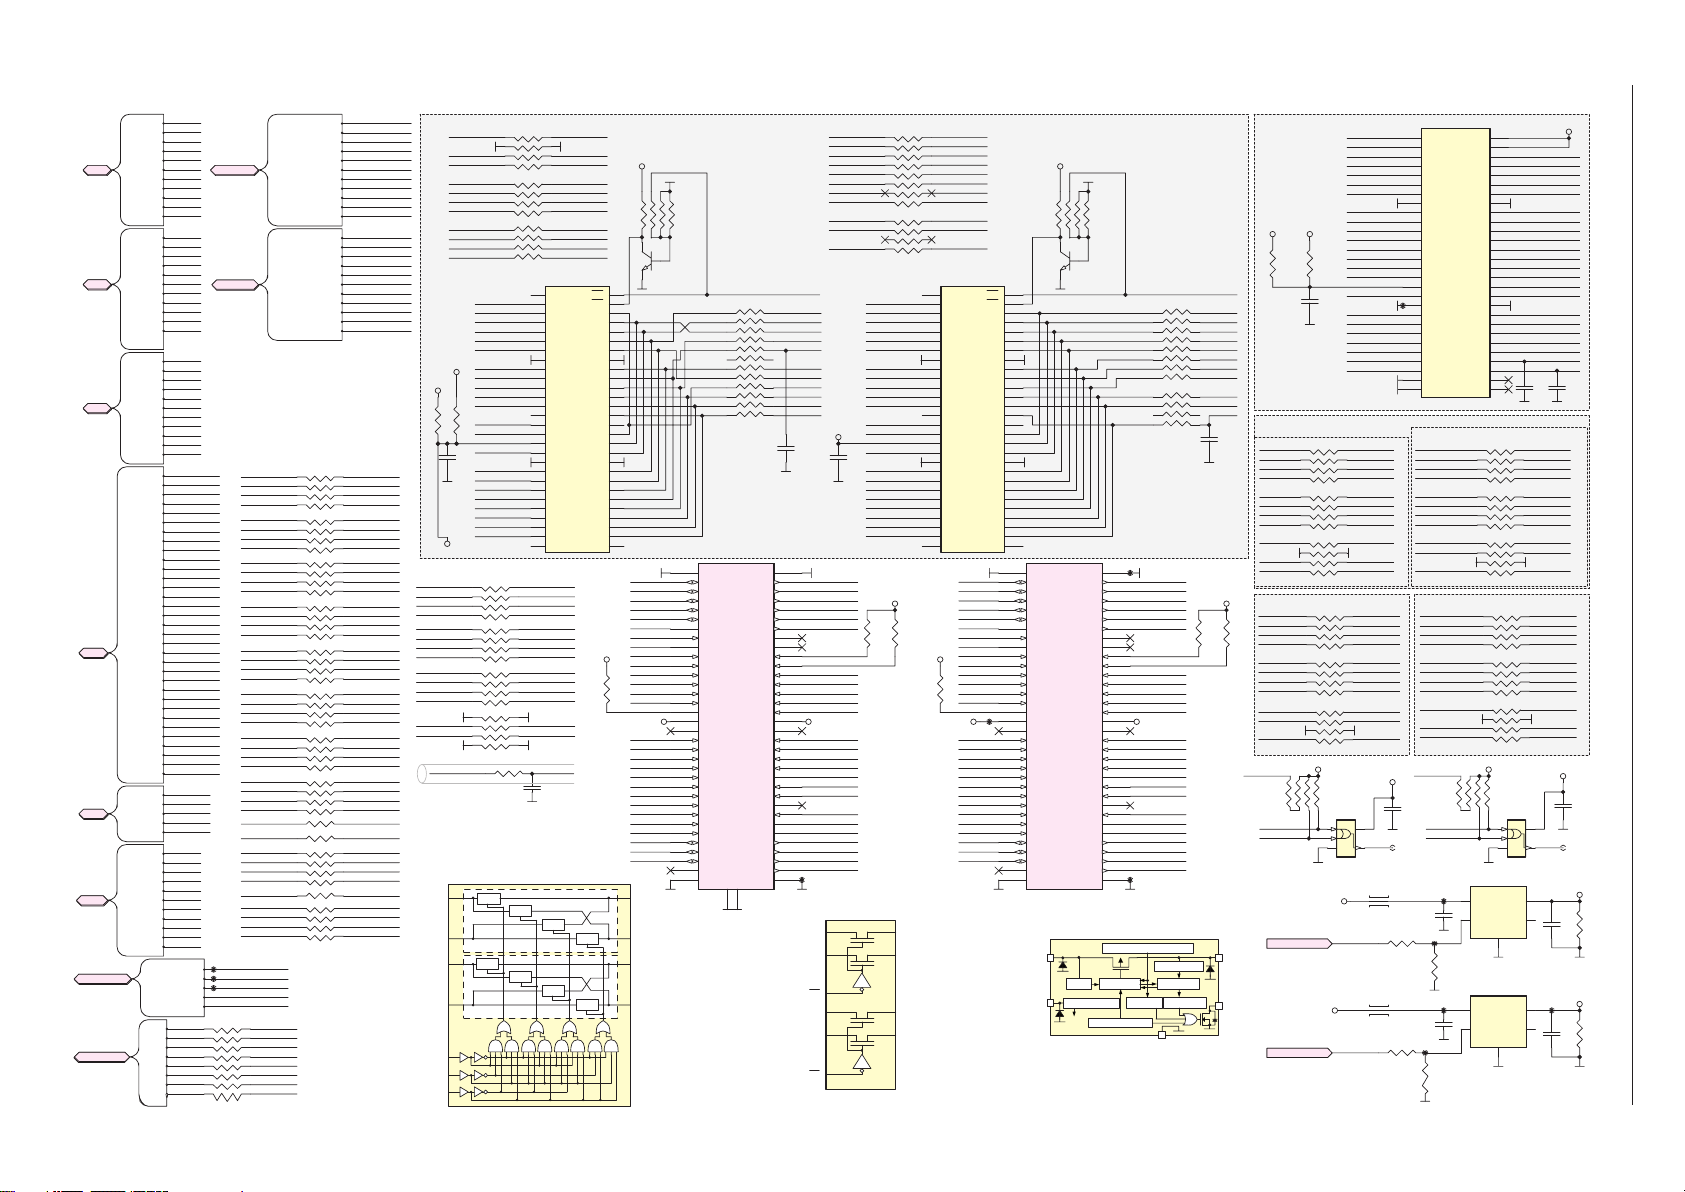
R632
R633
SN74CBT16211
1A12
1B12
2A12
2B12
12B2
12B1
12A2
12A1
V
OUT
Chassisplatte / Chassis Board – PCMCIA-Interface
2 - 17
TS2
TS2
TS1
TS1
TS0
TS0
CI
CI
CI2
CI2
TS_1
TS_1
BYPS_CTRL
BYPS_CTRL
FLASHDATA
FLASHDATA
TS2-D0
TS2-D1
TS2-D2
TS2-D3
TS2-D4
TS2-D5
TS2-D6
TS2-D7
TS2-CLK
TS2-VLD
TS2-SYNC
TS1-D0
TS1-D1
TS1-D2
TS1-D3
TS1-D4
TS1-D5
TS1-D6
TS1-D7
TS1-CLK
TS1-VLD
TS1-SYNC
TS0-D0
TS0-D1
TS0-D2
TS0-D3
TS0-D4
TS0-D5
TS0-D6
TS0-D7
TS0-CLK
TS0-VLD
TS0-SYNC
PCM-D0
PCM-D1
PCM-D2
PCM-D3
PCM-D4
PCM-D5
PCM-D6
PCM-D7
PCM-A0
PCM-A1
PCM-A2
PCM-A3
PCM-A4
PCM-A5
PCM-A6
PCM-A7
PCM-A8
PCM-A9
PCM-A10
PCM-A11
PCM-A12
PCM-A13
PCM-A14
PCM-IORD
PCM-REG
PCM-WE
PCM-IRQA
PCM-CE
PCM-CD
PCM-IOWR
PCM-RST
PCM-OE
PCM-WAIT
PCM2-IRQA
PCM2-RST
PCM2-WAIT
PCM2-CD
PCM2-CE
TS1_D7
TS1_D6
TS1_D5
TS1_D4
TS1_D3
TS1_D2
TS1_D1
TS1_D0
TS1_CLK
TS1_VLD
TS1_SYNC
TSP_SELECT_1
TSP_SELECT_2
F_D0
F_D1
F_D2
F_D3
F_D4
F_D5
F_D6
F_D7
BYPASS1_EN
BYPASS2_EN
TSP_SELECT
TS2-D0
TS2-D1
TS2-D2
TS2-D3
TS2-D4
TS2-D5
TS2-D6
TS2-D7
TS2-CLK
TS2-VLD
TS2-SYNC
TS1-D0
TS1-D1
TS1-D2
TS1-D3
TS1-D4
TS1-D5
TS1-D6
TS1-D7
TS1-CLK
TS1-VLD
TS1-SYNC
TS0-D0
TS0-D1
TS0-D2
TS0-D3
TS0-D4
TS0-D5
TS0-D6
TS0-D7
TS0-CLK
TS0-VLD
TS0-SYNC
PCM-D0
PCM-D1
PCM-D2
PCM-D3
PCM-D4
PCM-D5
PCM-D6
PCM-D7
PCM-A0
PCM-A1
PCM-A2
PCM-A3
PCM-A4
PCM-A5
PCM-A6
PCM-A7
PCM-A8
PCM-A9
PCM-A10
PCM-A11
PCM-A12
PCM-A13
PCM-A14
PCM-IORD
PCM-REG
PCM-WE
PCM-IRQA
PCM-CE
PCM-CD
PCM-IOWR
PCM-RST
PCM-OE
PCM-WAIT
PCM2-IRQA
PCM2-RST
PCM2-WAIT
PCM2-CD
PCM2-CE
TS1_D7
TS1_D6
TS1_D5
TS1_D4
TS1_D3
TS1_D2
TS1_D1
TS1_D0
TS1_CLK
TS1_VLD
TS1_SYNC
F_D0
F_D1
F_D2
F_D3
F_D4
22R
F_D5
F_D6
F_D7
TS_SAT2
TS_SAT2
TS_SAT2_CLK
TS_SAT2_VLD
TS_SAT2_SYNC
TS_SAT
TS_SAT
TS_SAT_CLK
TS_SAT_VLD
TS_SAT_SYNC
R654 22R
PCM-RST
PCM-D0
PCM-D1
PCM-D2
R659 22R
PCM-D6
PCM-D5
PCM-D4
PCM-A14
R634 22R
PCM-WE
PCM2-IRQA
PCM-IRQA
R644 22R
PCM-A10
PCM-OE
PCM-A11
PCM-IORD
R648
PCM-A13
PCM-A8
PCM-A9
PCM-IOWR
R653
PCM-A5
PCM-A6
PCM-A7
PCM-A12
R660 22R
PCM2-WAIT
PCM2-RST
PCM-A4
PCM-A3
R662 22R
PCM-REG
PCM-A2
PCM-A1
PCM-A0
PCM-CD
R643 22R
PCM-WAIT
PCM-D0
PCM-D1
PCM-D2
PCM-D3
PCM-D4
R647
PCM-D5
PCM-D6
PCM-D7
BYPASS1_EN
TP259
BYPASS2_EN
TP260
TSP_SELECT
TP261
TSP_SELECT_1
TSP_SELECT_2
R652
R657
PCM-D0
PCM-D1
PCM-D2
PCM-D3
PCM-D4
PCM-D5
PCM-D6
PCM-D7
22R
TS_SAT2_D0
TS_SAT2_D1
TS_SAT2_D2
TS_SAT2_D3
TS_SAT2_D4
TS_SAT2_D5
TS_SAT2_D6
TS_SAT2_D7
TS_SAT_D0
TS_SAT_D1
TS_SAT_D2
TS_SAT_D3
TS_SAT_D4
TS_SAT_D5
TS_SAT_D6
TS_SAT_D7
8
TS_SAT2_D0
TS_SAT2_D1
TS_SAT2_D2
TS_SAT2_D3
TS_SAT2_D4
TS_SAT2_D5
TS_SAT2_D6
TS_SAT2_D7
TS_SAT2_CLK
TS_SAT2_VLD
TS_SAT2_SYNC
TS_SAT_D0
TS_SAT_D1
TS_SAT_D2
TS_SAT_D3
TS_SAT_D4
TS_SAT_D5
TS_SAT_D6
TS_SAT_D7
TS_SAT_CLK
TS_SAT_VLD
TS_SAT_SYNC
PCM_RST
PCM_A_D0
PCM_A_D1
PCM_A_D2
PCM_B_D6
PCM_B_D5
PCM_B_D4
PCM_B_D3PCM-D3
PCM_A14
PCM_WE
PCM2_IRQA
PCM_IRQA
PCM_A10
PCM_OE
PCM_A11
PCM_IORD
22R
PCM_A13
PCM_A8
PCM_A9
PCM_IOWR
22R
PCM_A5
PCM_A6
PCM_A7
PCM_A12
PCM2_WAIT
PCM2_RST
PCM_A4
PCM_A3
PCM_REG
PCM_A2
PCM_A1
PCM_A0
22RR635
22RR638
PCM_WAIT
PCM_B_D0
PCM_B_D1
PCM_B_D2
22RR646
PCM_A_D3
PCM_A_D4
22R
PCM_A_D5
PCM_A_D6
PCM_A_D7
1
PCM2_CDPCM2-CD
PCM_CD
*IC601 bypass resistors
TS2X-VLD
TS2X-SYNC
TS2X-D4
TS2X-D5
TS2X-D6
TS2X-D7
TS2X-D3
TS2X-D2
TS2X-D1
TS2X-D0
BYPASS1/2_EN
LOW: BYPASS
HIGH: CI MODULE ACTIVE
TS_CI1_D3
TS_CI1_D2
TS_CI1_D1
TS_CI1_D0
TS_CI1_SYNC
TS_CI1_VLD
VCC5V
TS_CI1_CLK
R610NCR611
VCC_TSSW
TS1-CLK
2
1A1
3
1A2
…
27
28
1
S0
56
S1
55
S2
0R
C601
100nF
R651
R650
R656
R661
TS_CI1_D7
TS_CI1_D6
TS_CI1_D5
TS_CI1_D4
TS2_D3
TS2_D2
TS2_D1
TS2_D0
TS2_SYNC
TS2_VLD
TS2_CLK
TS2_D7
TS2_D6
TS2_D5
TS2_D4
SW
SW
VCC3V3
PCM2-CE
PCM-CE
TS1-D3
TS1-D2
TS1-D1
TS1-D0
TS1-D7
TS1-D6
TS1-D5
TS1-D4
TS1-VLD
TS1-SYNC
R645
R658
5
6
7 2
8
RP600
NC
22R
22R
22R
22R
22RR655
SW
SW
TS2_CLKTS2X-CLK
TS2X_VLD
TS2X_SYNC
22R
4
TS2_D4
3
TS2_D5
TS2_D6
1
TS2_D7
NC
TS2_D3
TS2_D2
TS2_D1
TS2_D0
IC601
SN74CBT16211
1
NC
1OE
2
1A1
2OE
3
1A2
1B1
4
1A3
1B2
5
1A4
1B3
6
1A5
1B4
7
1A6
1B5
8
GND
GND
9
1A7
1B6
10
1A8
1B7
11
1A9
1B8
12
1A10
1B9
13
1A11
1B10
14
1A12
1B11
15
2A1
1B12
16
2A2
2B1
17
VCC
2B2
18
2A3
2B3
19
GND
GND
20
2A4
2B4
21
2A5
2B5
22
2A6
2B6
23
2A7
2B7
24
2A8
2B8
25
2A9
2B9
26
2A10
2B10
27
2A11
2B11
2A12282B12
PCM2_CE
PCM_CE
PCM_A_D3PCM-D3
PCM_B_D7PCM-D7
TS1_D3
TS1_D2
TS1_D1
TS1_D0
TS1_D7
TS1_D6
TS1_D5
TS1_D4
TS1_VLD
TS1_SYNC
TS1_CLK
C614
nc
VCC3V3
SN74CBTLV16212
SW
SW
SW
SW
35A
36A
37A
38A
39A
40A
41A
42A
43A
44A
45A
46A
47A
48A
49A
50A
51A
52A
53A
54A
55A
56A
57A
58A
59A
60A
61A
62A
63A
64A
65A
66A
67A
68A
TS2-D0
TS2-D1
TS2-D2
TS2-D7
TS2-CLK
TS2-VLD
TS2-SYNC
TS2-D3
TS2-D6
TS2-D5
TS2-D4
C608
NC
PCM_CD1
TS2_D3
TS2_D4
TS2_D5
TS2_D6
TS2_D7
PCM_IORD
PCM_IOWR
TS_CI1_SYNC
TS_CI1_D0
TS_CI1_D1
TS_CI1_D2
TS_CI1_D3
TS_CI1_D4
TS_CI1_D5
TS_CI1_D6
TS_CI1_D7
TS2_CLK
PCM_RST
PCM_WAIT
PCM_REG
TS2_VLD
TS2_SYNC
TS2_D0
TS2_D1
TS2_D2
PCM_CD2
TP4
1A1
…
1OE
2A1
…
2OE
*IC602 bypass resistors
TS_CI2_D0
TS_CI2_D1
TS_CI2_D2
TS_CI2_D3
TS_CI2_D4
TS_CI2_D5
TS_CI2_D6
TS_CI2_D7
TS_CI2_VLD
TS_CI2_SYNC
TS_CI2_CLK
VCC_TSSW
C602
100nF
2
14
56
15
28
55
R604 NC/0R
R605 NC/0R
R606 NC/0R
TS_CI2_D0
TS_CI2_D1
TS_CI2_D2
TS_CI2_D3
TS_CI2_D4
TS_CI2_D5
TS_CI2_D6
TS_CI2_D7
TS_CI2_VLD
TS_CI2_SYNC
TS_CI2_CLK
TS0_D0
TS0_D1
TS0_D2
TS0_D3
TS0_D4
TS0_D5
TS0_D6
TS0_D7
TS0_VLD
TS0_SYNC
TS0_CLK
VCC3V3
R612
R613
NC/
NC/
4.7K
4.7K
54
42
41
29
1B1
2B1
VCC3V3
R621
4.7K
…
…
TS0X-D0
TS0X-D1
TS0X-D2
TS0X-D3
TS0X-D4
TS0X-D5
TS0X-D6
TS0X-D7
TS0X-VLD
TS0X-SYNC
TS0X-CLK
IC602
SN74CBT16211
1
NC
2
1A1
3
1A2
4
1A3
5
1A4
6
1A5
7
1A6
8
GND
9
1A7
10
1A8
11
1A9
12
1A10
13
1A11
14
1A12
15
2A1
16
2A2
17
VCC
18
2A3
19
GND
20
2A4
21
2A5
22
2A6
23
2A7
24
2A8
25
2A9
26
2A10
27
2A11
2A12282B12
1OE
2OE
1B1
1B2
1B3
1B4
1B5
GND
1B6
1B7
1B8
1B9
1B10
1B11
1B12
2B1
2B2
2B3
GND
2B4
2B5
2B6
2B7
2B8
2B9
2B10
2B11
PCM_B_D3
PCM_B_D4
PCM_B_D5
PCM_B_D6
PCM_B_D7
PCM2_CE
PCM_A10
PCM_OE
PCM_A11
PCM_A9
PCM_A8
PCM_A13
PCM_A14
PCM_WE
PCM2_IRQA
TP234
TS_CI2_VLD
TS_CI2_CLK
PCM_A12
PCM_A7
PCM_A6
PCM_A5
PCM_A4
PCM_A3
PCM_A2
PCM_A1
PCM_A0
PCM_B_D0
PCM_B_D1
PCM_B_D2
R601
10K
2
T600B
1 6
BC847BDW1T1
56
55
54
53
52
51
50
49
48
47
46
45
44
43
42
41
40
39
38
37
36
35
34
33
32
31
30
29
1B
GND
2B
D3
3B
D4
4B
D5
5B
D6
6B
D7
7B
CE1#
8B
A10
9B
OE#
10B
A11
11B
A9
12B
A8
13B
A13
14B
A14
15B
WE#
16B
READY
17B
VCC
18B
VPP1
19B
MIVAL
20B
MICLK
21B
A12
22B
A7
23B
A6
24B
A5
25B
A4
26B
A3
27B
A2
28B
A1
29B
A0
30B
D0
31B
D1
32B
D2
33B
WP
34B
GND
S600B
IN
CE
TS0X-D0
TS0X-D1
TS0X-D2
TS0X-D3
TS0X-D4
TS0X-D5
TS0X-D6
TS0X-D7
TS0X-VLD
TS0X-SYNC
TS0X-CLK
35B
GND
36B
CD1#
37B
MDO3
38B
MDO4
39B
MDO5
40B
MDO6
41B
MDO7
42B
CE2#
43B
VS1#
44B
IORD#
45B
IOWR#
46B
MISTRT
47B
MDI0
48B
MDI1
49B
MDI2
50B
MDI3
51B
VCC
52B
VPP2
53B
MDI4
54B
MDI5
55B
MDI6
56B
MDI7
57B
MOCLK
58B
RESET
59B
WAIT#
60B
INPACK
61B
REG#
62B
MOVAL
63B
MOSTART
64B
MDO0
65B
MDO1
66B
MDO2
67B
CD2#
68B
TP5
GND
XC8107
Reverse Current Prevention
UVLO Control Current Lim.
ON/OFF Control
each
Thermal Shutdown
circuit
TS BY-PASS BLOCK
VCC3V3 VCC3V3
R600
10K
5
T600A
4 3
BC847BDW1T1
56
55
54
53
52
51
50
49
48
47
46
45
44
43
42
41
40
39
38
37
36
35
34
33
32
31
30
29
PCM_A_D3
PCM_A_D4
PCM_A_D5
PCM_A_D6
PCM_A_D7
PCM_CE
PCM_A10
PCM_OE
PCM_A11
PCM_A9
PCM_A8
R620
PCM_A13
PCM_A14
PCM_WE
4.7K
PCM_IRQA
VCC-CIA VCC-CIA VCC-CIB VCC-CIB
TS_CI1_VLD
TS_CI1_CLK
PCM_A12
PCM_A7
PCM_A6
PCM_A5
PCM_A4
PCM_A3
PCM_A2
PCM_A1
PCM_A0
PCM_A_D0
PCM_A_D1
PCM_A_D2
54
1B1
53
1B2
30
29
TS2X-D0
TS2X-D1
TS2X-D2
TS2X-D7
TS2X-CLK
TS2X-VLD
TS2X-SYNC
TS2X-D3
TS2X-D6
TS2X-D5
TS2X-D4
1A
GND
2A
D3
3A
D4
4A
D5
5A
D6
6A
D7
7A
CE1#
8A
A10
9A
OE#
10A
A11
11A
A9
12A
A8
13A
A13
14A
A14
15A
WE#
16A
READY
17A
VCC
18A
VPP1
19A
MIVAL
20A
MICLK
21A
A12
22A
A7
23A
A6
24A
A5
25A
A4
26A
A3
27A
A2
28A
A1
29A
A0
30A
D0
31A
D1
32A
D2
33A
WP
34A
GND
S600A
…
BYPASS1_EN BYPASS2_EN
R608
47R*4
R616 47R*4
1
8
5724
3
6
47R*4R609
GND
CD1#
MDO3
MDO4
MDO5
MDO6
MDO7
CE2#
VS1#
IORD#
IOWR#
MISTRT
MDI0
MDI1
MDI2
MDI3
VCC
VPP2
MDI4
MDI5
MDI6
MDI7
MOCLK
RESET
WAIT#
INPACK
REG#
MOVAL
MOSTART
MDO0
MDO1
MDO2
CD2#
SHIELD
SHIELD
GND
70
69
3
4
1
3
1
4
47R*4 R622
4
3
1
47R*4
R626
TP3
PCM2_CD1
TS0_D3
TS0_D4
TS0_D5
TS0_D6
TS0_D7
PCM_IORD
PCM_IOWR
TS_CI2_SYNC
TS_CI2_D0
TS_CI2_D1
TS_CI2_D2
TS_CI2_D3
TS_CI2_D4
TS_CI2_D5
TS_CI2_D6
TS_CI2_D7
TS0_CLK
PCM2_RST
PCM2_WAIT
PCM_REG
TS0_VLD
TS0_SYNC
TS0_D0
TS0_D1
TS0_D2
PCM2_CD2
Current Sense
7.5ms Delay4ms Delay
V
ss
47R*4R607
72
6
5
8
72
6
8
5
5
6
72
8
NC/
4.7K
TS0-D0
TS0-D1
TS0-D2
TS0-D3
TS0-D4
TS0-D5
TS0-D6
TS0-D7
TS0-VLD
TS0-SYNC
TS0-CLK
C605
NC
VCC3V3
R614
VCC5V
TS1_D3
TS1_D2
TS1_D1
TS1_D0
TS1_D7
TS1_D6
TS1_D5
TS1_D4
TS1_CLK
TS1_SYNC
TS1_VLD
TS1_D3
R615
TS1_D2
TS1_D1
TS1_D0
NC/
TS1_D7
4.7K
TS1_D6
TS1_D5
TS1_D4
TS1_SYNC
TS1_VLD
TS1_CLK
PCM_WAIT
VCC5V_CI_WIFI_MHL
V
FLG
VCC5V_CI_WIFI_MHL
TS MUX BLOCK
TSP_SELECT
LOW: TU1 to TS1
HIGH: TU2 to TS1
VCC3V3
R602NCR603
MUX BYPASS
R618 NC/0R
R624 NC/0R
R628 NC/0R
MUX BYPASS
R636 NC/0R
R637 NC/0R
5
6
7 2
8
R649 NC/0R
VCC3V3
PCM_CD2
PCM_CD1
LOW: OFF
HIGH:ON
PCM_PWR_EN2
LOW: OFF
HIGH:ON
PCM_PWR_EN1
0R
C600
100nF
R630
10K
1
2
IC600
TSP_SELECT
TS1_D0
TS_DUAL_D0
TS1_D1
TS_DUAL_D1
TS1_D2
TS_DUAL_D2
TS1_D3
TS_DUAL_D3
TS1_D4
TS_DUAL_D4
TS1_D5
TS_DUAL_D5
TS1_D6
TS_DUAL_D6
TS1_D7
TS_DUAL_D7
TS1_VLD
TS_DUAL_VLD
TS1_SYNC
TS_DUAL_SYNC
TS1_CLK
TS_DUAL_CLK
4
3
1
IC603
VCC
GND
NC7SZ08P5X
1
S0
2
1A1
3
1A2
4
2A1
5
2A2
6
3A1
7
3A2
8
GND
9
4A1
10
4A2
11
5A1
12
5A2
13
6A1
14
6A2
15
7A1
16
7A2
17
VCC
18
8A1
19
TP1
GND
20
8A2
21
9A1
22
9A2
23
10A1
24
10A2
25
11A1
26
11A2
27
12A1
12A22812B2
SN74CBTLV16212
DUAL TUNER
VKT190R-2
TS_SAT_D3
TS_SAT_D2
TS_SAT_D1
TS_SAT_D0
TS_SAT_D7
TS_SAT_D6
TS_SAT_D5
TS_SAT_D4
TS_SAT_CLK
TS_SAT_SYNC
TS_SAT_VLD
TS_DUAL_D0
TS_DUAL_D1
TS_DUAL_D2
TS_DUAL_D3
TS_DUAL_D4
TS_DUAL_D5
TS_DUAL_D6
TS_DUAL_D7
TS_DUAL_SYNC
TS_DUAL_VLD
TS_DUAL_CLK
TS_CI1_D3
TS_CI1_D2
TS_CI1_D1
TS_CI1_D0
TS_CI1_D7
TS_CI1_D6
TS_CI1_D5
TS_CI1_D4
TS_CI1_SYNC
TS_CI1_VLD
TS_CI1_CLK
TS_DUAL_D3
TS_DUAL_D2
TS_DUAL_D1
TS_DUAL_D0
TS_DUAL_D7
TS_DUAL_D6
TS_DUAL_D5
TS_DUAL_D4
TS_DUAL_CLK
TS_DUAL_SYNC
TS_DUAL_VLD
PCM2_WAIT
VCC3V3
C603
10nF
5
43
PCM_CD
L601
60R3A
L600
60R3A
PCM2_CD2
PCM2_CD1
TP6 TP7
TP10
C609
10UF
TP12PCM_PWR_EN2
47RR642
R641
4.7K
TP8
C606
10UF
TP11PCM_PWR_EN1
47RR639
R640
4.7K
56
S1
55
S2
54
1B1
53
1B2
52
2B1
51
2B2
50
3B1
49
GND
48
3B2
47
4B1
46
4B2
45
5B1
44
5B2
43
6B1
42
6B2
41
7B1
40
7B2
39
8B1
38
GND
37
8B2
36
9B1
35
9B2
34
10B1
33
10B2
32
11B1
31
11B2
30
12B1
29
R619 NC/0R
R625 NC/0R
R629 NC/0R
SINGLE TUNER
R617 NC/0R
R623 NC/0R
5
6
7 2
8
R627 NC/0R
VCC3V3
R631
10K
IC604
VCC
1
2
GND
NC7SZ08P5X
IC606
XC8107AC05MR-GW
5
VOUT
VIN
4
FLG
CE
VSS
2
IC605
XC8107AC05MR-GW
5
VOUT
VIN
4
FLG
CE
VSS
2
VCC3V3
TS_CI1_D0
TS_CI2_D0
TS_CI1_D1
TS_CI2_D1
TS_CI1_D2
TS_CI2_D2
TS_CI1_D3
TS_CI2_D3
TS_CI1_D4
TS_CI2_D4
TS_CI1_D5
TS_CI2_D5
TS_CI1_D6
TS_CI2_D6
TS_CI1_D7
TS_CI2_D7
TS_CI1_VLD
TS_CI2_VLD
TS_CI1_SYNC
TS_CI2_SYNC
TS_CI1_CLK
TS_CI2_CLK
C612
C611
22pF
22pF
TS_SAT2_D0
TS_SAT2_D1
TS_SAT2_D2
TS_SAT2_D3
TS_SAT2_D4
TS_SAT2_D5
TS_SAT2_D6
TS_SAT2_D7
TS_SAT2_CLK
TS_SAT2_VLD
TS_SAT2_SYNC
TS_SAT_D3
TS_SAT_D2
TS_SAT_D1
TS_SAT_D0
TS_SAT_D7
TS_SAT_D6
TS_SAT_D5
TS_SAT_D4
4
TS_SAT_CLK
3
TS_SAT_SYNC
1
TS_SAT_VLD
VCC3V3
5
43
PCM2_CD
1
3
C610
10UF
TP9
1
3
C607
10UF
C604
10nF
VCC-CIB
VCC-CIA
GRUNDIG Service Chassis MK
10K
10K
Page 44
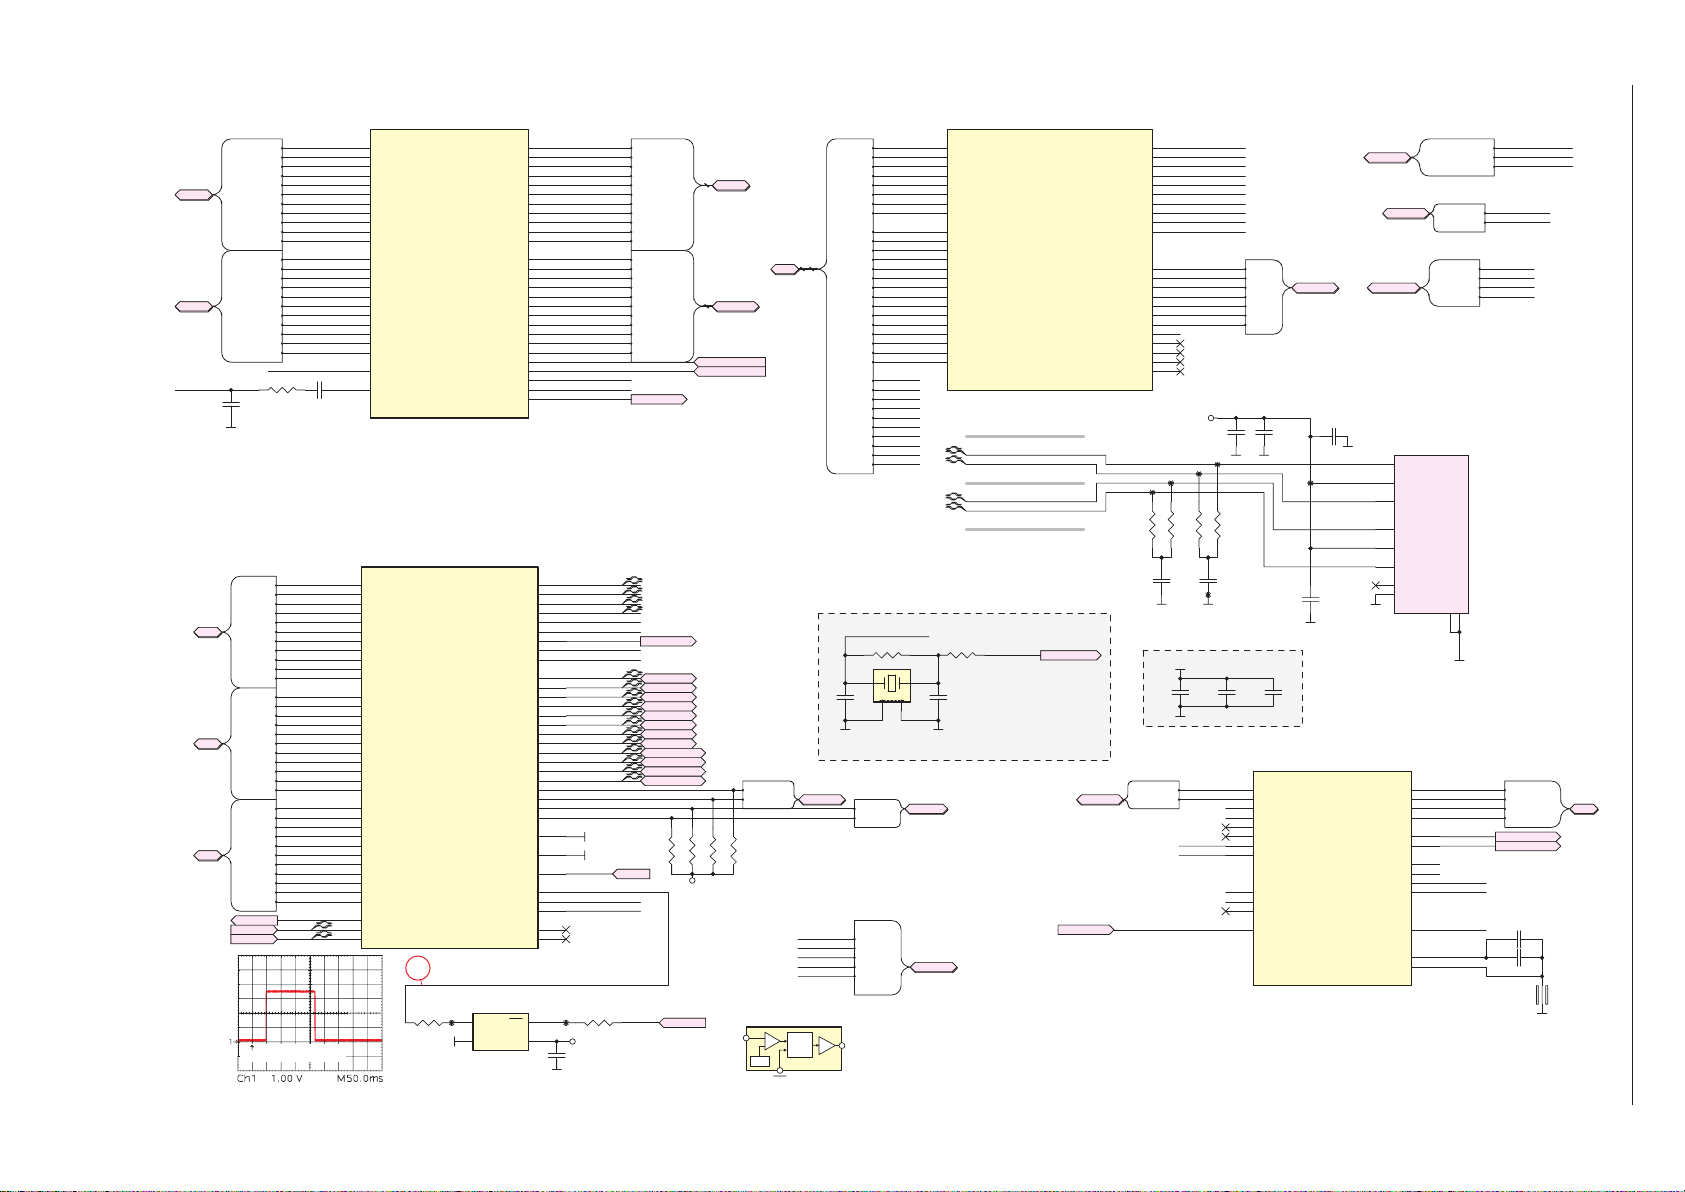
Chassisplatte / Chassis Board – Scaler-SOC / LAN
Vc
T
MR
Driver
100NF
APX812-29UG-7
IC200 MSD8361MVK
IC200 MSD8361MVK
0
GRUNDIG Service Chassis MK
2 - 18
HDMIA
HDMIA
HDMIB
HDMIB
HDMI-ARC
TS1
TS1
TS0
TS0
TS2
TS2
HDMIA-RX0_N
HDMIA-RX0_P
HDMIA-RX1_N
HDMIA-RX1_P
HDMIA-RX2_N
HDMIA-RX2_P
HDMIA-CLK_N
HDMIA-CLK_P
HDMIA-HPDIN
HDMIB-RX0_N
HDMIB-RX0_P
HDMIB-RX1_N
HDMIB-RX1_P
HDMIB-RX2_N
HDMIB-RX2_P
HDMIB-CLK_N
HDMIB-CLK_P
HDMIB-HPDIN
HDMIA-RX0_N
HDMIA-RX0_P
HDMIA-RX1_N
HDMIA-RX1_P
HDMIA-RX2_N
HDMIA-RX2_P
HDMIA-CLK_N
HDMIA-CLK_P
HDMIA-SCL
HDMIA-SCL
HDMIA-SDA
HDMIA-SDA
HDMIA-HPDIN
HDMIB-RX0_N
HDMIB-RX0_P
HDMIB-RX1_N
HDMIB-RX1_P
HDMIB-RX2_N
HDMIB-RX2_P
HDMIB-CLK_N
HDMIB-CLK_P
HDMIB-SCL
HDMIB-SCL
HDMIB-SDA
HDMIB-SDA
HDMIB-HPDIN
HDMI-CEC
R200
C201
0R
47PF
TS1-D0
TS1-D0
TS1-D1
TS1-D1
TS1-D2
TS1-D2
TS1-D3
TS1-D3
TS1-D4
TS1-D4
TS1-D5
TS1-D5
TS1-D6
TS1-D6
TS1-D7
TS1-D7
TS1-CLK
TS1-CLK
TS1-VLD
TS1-VLD
TS1-SYNC
TS1-SYNC
TS0-D0
TS0-D0
TS0-D1
TS0-D1
TS0-D2
TS0-D2
TS0-D3
TS0-D3
TS0-D4
TS0-D4
TS0-D5
TS0-D5
TS0-D6
TS0-D6
TS0-D7
TS0-D7
TS0-CLK
TS0-CLK
TS0-VLD
TS0-VLD
TS0-SYNC
TS0-SYNC
TS2-D0
TS2-D0
TS2-D1
TS2-D1
TS2-D2
TS2-D2
TS2-D3
TS2-D3
TS2-D4
TS2-D4
TS2-D5
TS2-D5
TS2-D6
TS2-D6
TS2-D7
TS2-D7
TS2-CLK
TS2-CLK
TS2-VLD
TS2-VLD
TS2-SYNC
TS2-SYNC
IFAGC
IFAGC
DIF_P
DIF_P
DIF_N
DIF_N
Power on (trigger: +5V2_ST)
C200
1UF
B3
A2
B2
B1
C1
C2
C4
A3
D8
E7
D9
B6
C6
B5
C5
B4
A4
C7
A6
D5
E6
D6
F6
E9
IC200 MSD8361MVK
W6
V4
V5
V6
T6
U5
T5
R4
U4
U6
W5
AB7
AC5
AC6
AA5
AA4
Y4
Y6
Y5
AC4
AB6
AB5
AE11
AD12
AC12
AD10
AD11
AE10
AB11
AB12
AC13
AD13
AE13
T3
V1
V2
RXA0N
RXA0P
RXA1N
RXA1P
RXA2N
RXA2P
RXACKN
RXACKP
DDCDA_CK
DDCDA_DA
HOTPLUGA
RXB0N
RXB0P
RXB1N
RXB1P
RXB2N
RXB2P
RXBCKN
RXBCKP
DDCDB_CK
DDCDB_DA
HOTPLUGB
CEC
ARC0
TS1_D[0]
TS1_D[1]
TS1_D[2]
TS1_D[3]
TS1_D[4]
TS1_D[5]
TS1_D[6]
TS1_D[7]
TS1_CLK
TS1_VLD
TS1_SYNC
TS0_D[0]
TS0_D[1]
TS0_D[2]
TS0_D[3]
TS0_D[4]
TS0_D[5]
TS0_D[6]
TS0_D[7]
TS0_CLK
TS0_VLD
TS0_SYNC
TS2_D[0]
TS2_D[1]
TS2_D[2]
TS2_D[3]
TS2_D[4]
TS2_D[5]
TS2_D[6]
TS2_D[7]
TS2_CLK
TS2_VLD
TS2_SYNC
IF_AGC
VIFP
VIFM
10
R214
100R
HDMI
TP236
RXC0N
RXC0P
RXC1N
RXC1P
RXC2N
RXC2P
RXCCKN
RXCCKP
DDCDC_CK
DDCDC_DA
HOTPLUGC
RXD0N
RXD0P
RXD1N
RXD1P
RXD2N
RXD2P
RXDCKN
RXDCKP
DDCDD_CK
DDCDD_DA
HOTPLUGD
AVDD5_HDMI_C
AVDD5_HDMI_D
GPIO21
GPIO22
GPIO23
GPIO72/LED[0]
GPIO73/LED[1]
GPIO177
GPIO178
GPIO179
GPIO180
HWRESET
RST2MR
1
GND
IC201
GPIO75
GPIO78
GPIO79
DM_P0
DP_P0
DM_P1
DP_P1
DM_P2
DP_P2
SSRXN
SSRXP
SSTXP
SSTXN
GND
GND
XOUT
SIFP
SIFM
VCC
TN
TP
RN
RP
DM
DP
IRIN
XIN
AD1
AD3
AE1
AE2
AF1
AF2
AC3
AD2
AB3
AC2
AB2
B9
C9
B8
C8
B7
A7
C10
A9
C3
D3
D4
E5
E4
E8
F9
B10
B16
A16
B17
C17
C16
A15
C18
B18
A18
B19
A19
AG3
AH3
AG2
AH2
L28
L27
K27
L26
M28
M26
W3
V3
U2
U3
G20
B20
F11
D12
AA1
AA2
W1
W2
3
TP193
4
HDMIC-RX0_N
HDMIC-RX0_P
HDMIC-RX1_N
HDMIC-RX1_P
HDMIC-RX2_N
HDMIC-RX2_P
HDMIC-CLK_N
HDMIC-CLK_P
HDMIC-SCL
HDMIC-SDA
HDMIC-HPDIN
HDMID-RX0_N
HDMID-RX0_P
HDMID-RX1_N
HDMID-RX1_P
HDMID-RX2_N
HDMID-RX2_P
HDMID-CLK_N
HDMID-CLK_P
HDMID-SCL
HDMID-SDA
HDMID-HPDIN
AVDD5V_HDMIC
AVDD5V_HDMID
MHL_CABLE_DET
MHL_VBUS_EN
MUTE_SC
ET_TXD0_N
ET_TXD0_P
ET_RXD0_N
ET_RXD0_P
HDMIA-DET
HDMIB-DET
DVB_RST
HDMIC-DET
HDMID-DET
P0_N
P0_P
P1_N
P1_P
P2_N
P2_P
USB_N
USB_P
USB_SSRX_N
USB_SSRX_P
USB_SSTX_P
USB_SSTX_N
I2C_T_SCL
I2C_T_SDA
I2CS_SCL
I2CS_SDA
IRIN
IRIN
System-RST
XTALI
XTALO_Mstar
R212
MR_POW
100R
VCC3V3-ST
C216
HDMIC
HDMIC-RX0_N
HDMIC-RX0_P
HDMIC-RX1_N
HDMIC-RX1_P
HDMIC-RX2_N
HDMIC-RX2_P
HDMIC-CLK_N
HDMIC-CLK_P
HDMIC-SCL
HDMIC-SDA
HDMIC-HPDIN
HDMID-RX0_N
HDMID-RX0_P
HDMID-RX1_N
HDMID-RX1_P
HDMID-RX2_N
HDMID-RX2_P
HDMID-CLK_N
HDMID-CLK_P
HDMID-SCL
HDMID-SDA
HDMID-HPDIN
MUTE_SC
DVB_RST
P0_N
P0_P
P1_N
P1_P
P2_N
P2_P
USB_N
USB_P
USB_SSRX_N
USB_SSRX_P
USB_SSTX_P
USB_SSTX_N
R211
4.7K
VCC3V3
MR_POW
HDMIC
HDMID
HDMID
AVDD5V_HDMIC
AVDD5V_HDMID
R209
R210
4.7K
4.7K
R213
4.7K
c
I2C_T_SCL
I2C_T_SDA
Vref
CI
CI
PCM-IRQA
PCM-IORD
PCM-WAIT
PCM-IOWR
System XTAL
C212
10PF
I2CT
I2CT
AU-DAC2-L
AU-DAC2-R
SC-Lin
SC-Rin
SPDIF-OUT
Delay
Circuit
APX811/812
PCM-D0
PCM-D1
PCM-D2
PCM-D3
PCM-D4
PCM-D5
PCM-D6
PCM-D7
PCM-A0
PCM-A1
PCM-A2
PCM-A3
PCM-A4
PCM-A5
PCM-A6
PCM-A7
PCM-A8
PCM-A9
PCM-A10
PCM-A11
PCM-A12
PCM-A13
PCM-A14
PCM-OE
PCM-CE
PCM-WE
PCM-CD
PCM-RST
PCM-REG
I2CS
AUDIO
RESE
PCM-D0
PCM-D1
PCM-D2
PCM-D3
PCM-D4
PCM-D5
PCM-D6
PCM-D7
PCM-A0
PCM-A1
PCM-A2
PCM-A3
PCM-A4
PCM-A5
PCM-A6
PCM-A7
PCM-A8
PCM-A9
PCM-A10
PCM-A11
PCM-A12
PCM-A13
PCM-A14
PCM-IRQA
PCM-OE
PCM-IORD
PCM-WAIT
PCM-CE
PCM-WE
PCM-IOWR
PCM-CD
PCM-RST
PCM-REG
XTALI
R207
1 3
2
X200
24MHZ
I2CS_SCL
I2CS_SDA
AU-DAC2-L
AU-DAC2-R
SC-Lin
SC-Rin
SPDIF-OUT
TD+
TDCT
TD-
RD+
RDCT
RD-
NC
CH_GND
E24
E25
F25
F24
R3
P1
T2
T1
R2
R1
F21
P2
P3
ARC_CEC
MHL
AVDD5V_HDMIC
MHL_CABLE_DET
MHL_VBUS_EN
HDMI-ARC
HDMI-CEC
HDMI_DET
HDMID-DET
HDMIC-DET
HDMIB-DET
HDMIA-DET
GND2
GND1
9
10
I2S_OUT-BCK
I2S_OUT-MCK
I2S_OUT-WS
I2S_OUT-SD
HP_Audio-L
HP_Audio-R
AU-DAC2-L
AU-DAC2-R
SPDIF-OUT
AUVAG
AUVRM
BK1005LL241-T
AVDD5V_HDMIC
MHL_CABLE_DET
MHL_VBUS_EN
HDMI-ARC
HDMI-CEC
HDMID-DET
HDMIC-DET
HDMIB-DET
HDMIA-DET
I2S
I2S_OUT-BCK
I2S_OUT-MCK
I2S_OUT-WS
I2S_OUT-SD
HP_Audio-L
HP_Audio-R
L200
I2S
1UFC214
10UFC215
AH9
PCM_D[0]
AF10
PCM_D1]
AH10
PCM_D[2]
AE4
PCM_D3]
AD4
PCM_D[4]
AE5
PCM_D[5]
AD5
PCM_D[6]
AE6
PCM_D[7]
AG9
PCM_A[0]
AF9
PCM_A[1]
AG8
PCM_A[2]
AF8
PCM_A[3]
AF7
PCM_A[4]
AH6
PCM_A[5]
AF6
PCM_A[6]
AG5
PCM_A[7]
AC9
PCM_A[8]
AD9
PCM_A[9]
AC8
PCM_A[10]
AE8
PCM_A[11]
AG4
PCM_A[12]
AB9
PCM_A[13]
AC10
PCM_A[14]
Ethernet PHY
ET_TXD0_P
ET_TXD0_N
ET_RXD0_P
ET_RXD0_N
1M
R208
XTALO_Mstar
1K
C213
10PF
4
I2CS
AUDIO
GND
GND
GND
XTALO_Mstar
UHD_SPDIF
PCM_IRQA_N
PCM_IORD_N
PCM_RESET
PCM_REG_N
PCM_IOWR_N
PCM_WAIT_N
EMMC_CMD
EMMC_RSTN
VGA-AU
PCM_OE_N
PCM_CE_N
PCM_WE_N
PCM_CD_N
NF_ALE
NF_WPZ
NF_CEZ
NF_CLE
NF_REZ
NF_WEZ
NF_RBZ
NF_CEZ1
NF_DQS
EMMC_CLK
R204
49.9R
VGA-AU
TP83
VGA-AUL1
VGA-AUR1
UHD_SPDIF
AF5
PCM-IRQA
AD8
PCM-OE
AD7
PCM-IORD
AD6
PCM-CE
AH4
PCM-WE
AE3
PCM-CD
AG6
PCM-RST
AG7
PCM-REG
AB8
PCM-IOWR
AH7
PCM-WAIT
AG13
F-ALE
AG14
F-WPZ
AF14
F-CEZ
AH13
F-CLE
AH12
F-REZ
AG12
F-WEZ
AF13
F-RBZ
AF15
AG10
AF11
AG11
AF12
AVDD25_ETH
TP81
TP82
R201
49.9R
R205
49.9R
C205
100NF
Cooler Mechanical Limiter
C211
10UF
VGA-AUL1
VGA-AUR1
SC-Lin
SC-Rin
TP80
TP85
C208
10UF
C204
1UF
C206
100NF
FLASH
F-ALE
F-WPZ
F-CEZ
F-CLE
F-REZ
F-WEZ
F-RBZ
R202
49.9R
C209
10UF
IC200 MSD8361MVK
N3
N2
M2
M1
L1
M3
L2
L3
E23
D24
D23
E21
C203
100NF
LINEIN_L0
LINEIN_R0
LINEIN_L1
LINEIN_R1
LINEIN_L2
LINEIN_R2
LINEIN_L3
LINEIN_R3
I2S_IN_BCK
I2S_IN_SD
I2S_IN_WS
SPDIF_IN
AUDIO
FLASH
TP84
C207
10NF
C202
10NF
MHL
ARC_CEC
HDMI_DET
1
4
2
3
5
6
7
8
RJ45MAG TS-20001
I2S_OUT_BCK
I2S_OUT_MCK
I2S_OUT_WS
I2S_OUT_SD
EAR_OUTL
EAR_OUTR
LINEOUT_L0
LINEOUT_R0
LINEOUTL2
LINEOUTR2
SPDIF_OUT
AUVAG
AUVRM
S200
Page 45
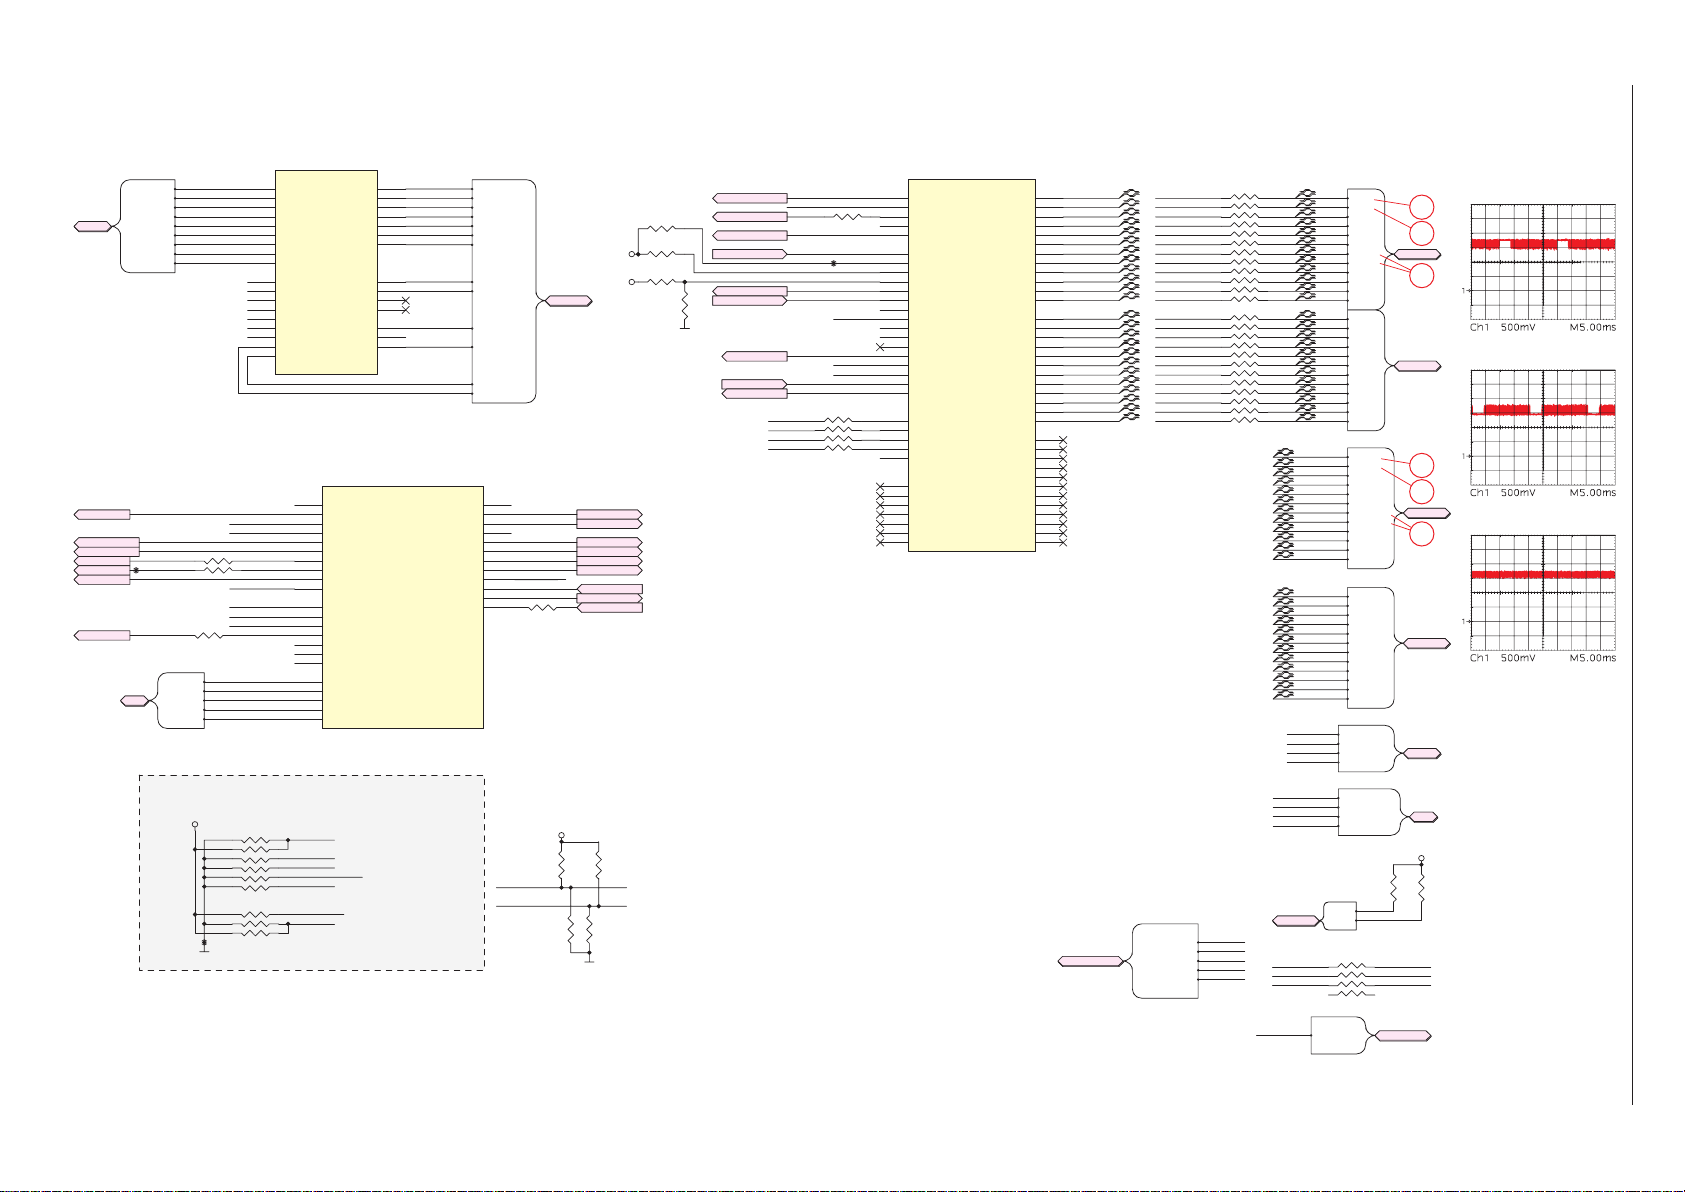
Chassisplatte / Chassis Board – Scaler-SOC
IC200 MSD8361MVK
‹
›
fi
GRUNDIG Service Chassis MK
2 - 19
VGA
EDID_WP
PCM_PWR_EN1
PCM_PWR_EN2
BL_CTRL
URSA_RST
TCON_ON
3D_EN
VGACONN
VGA_RIN-
VGA_RIN+
VGA_GIN-
VGA_GIN+
VGA_BIN-
VGA_BIN+
VGA_SOG
VGA_HSYNC
VGA_VSYNC
BL_CTRL
URSA_RST
TP87
3D_EN
CI2
CI2
PCM2-IRQA
PCM2-WAIT
PCM2-RST
VGA.VGA_RINVGA.VGA_RIN+
VGA.VGA_GINVGA.VGA_GIN+
VGA.VGA_BINVGA.VGA_BIN+
VGA.VGA_SOG
VGA.VGA_HSYNC
VGA.VGA_VSYNC
EDID_WP
BYPASS1-EN
BYPASS2-EN
PCM_PWR_EN1
PCM_PWR_EN2
0RR307
R308
100R
TCON_ON
TUNER_RST
TSP-SELECT
TSP-SELECT_1
TSP-SELECT_2
R301NC
PCM2-CE
PCM2-CE
PCM2-IRQA
PCM2-WAIT
PCM2-RST
PCM2-CD
PCM2-CD
IC Configuration (H/W Boot Strap)
VCC3V3
R314NC
R325NC I2S_OUT-WS
TP88
G3
F2
F1
F3
E2
E3
E1
G2
H3
K2
K3
J2
J1
H1
H2
J3
F5
G4
4.7KR315
4.7K*4R311
4.7KR323
4.7KR326
RIN0M
RIN0P
GIN0M
GIN0P
BIN0M
BIN0P
SOGIN0
HSYNC0
VSYNC0
RIN1M
RIN1P
GIN1M
GIN1P
BIN1M
BIN1P
SOGIN1
HSYNC1
VSYNC1
SOGIN2
CVBSOUT1
CVBSOUT2
IC200 MSD8361MVK
C21
GPIO60/UART_TX1
B21
GPIO61/UART_RX1
E22
GPIO62/UART_TX2
F22
GPIO63/UART_RX2
E14
GPIO64/UART_TX3
F14
GPIO65/UART_RX3
F18
GPIO66
G23
GPIO69
D14
GPIO70
G22
GPIO71
E17
GPIO53/EJ_RSTZ
D17
GPIO54/EJ_TRST_N
F16
GPIO55/EJ_TCK
E16
GPIO56/EJ_TMS
D18
GPIO57/EJ_TDI
F17
GPIO58/EJ_TDO
E18
GPIO59/EJ_DINT
P26
PCM2_CE_N
P28
PCM2_IRQA_N
N27
PCM2_WAIT_N
N26
PCM2_RESET
P27
PCM2_CD_N
I2S_OUT-BCK
SPI-SDI
I2S_OUT-SD
3D_SYNC_S8_O
PWM1
I2S_OUT-MCK
K5
RIN2M
RIN2P
GIN2M
GIN2P
BIN2M
BIN2P
CVBS0
CVBS1
CVBS2
CVBS3
VCOM
SCART_RIN-
J6
SCART_RIN+
H4
SCART_GIN-
J4
SCART_GIN+
H6
SCART_BIN-
H5
SCART_BIN+
J5
SCART_SOG
L6
SC_CVBS-IN
M6
SCART_C
M5
N5
L5
SC_CVBS_OUT
L4
M4
CVBS-
SC-VSYNC
SC-HSYNC
R315,R326-> Without SPI flash
R314,R325-> With SPI flash
GPIO8
GPIO9
GPIO10
GPIO11
GPIO12
GPIO13
GPIO17
GPIO16
GND
GPIO18
GPIO19
GPIO20
SCART
SCART_RINSCART_RIN+
SCART_GINSCART_GIN+
SCART_BINSCART_BIN+
SCART_SOG
SC_CVBS-IN
SCART_C
SC_CVBS_OUT
CVBS-
SC-VSYNC
SC-HSYNC
F12
F10
F8
B12
B11
B13
C13
E12
A13
E15
A10
C11
TSP-SELECT_1
TSP-SELECT_2
SCART
SPKR-EN
MUTE-AMP
POWER_SW
USB_EN
POWER_SW2
USB3_EN
POWER_DROP
USB_CHRG
R305 NC
VCC3V3
R316
NC
VCC3V3-ST
VCC3V3-ST
SPKR-EN
MUTE-AMP
POWER_SW
USB_EN
POWER_SW2
USB3_EN
POWER_DROP
USB_CHRG
WOWL
R310NCR312
R313
NC
IC200 MSD8361MVK
R336
NC
TP86
SPI-SDI
I2C-SCL
I2C-SDA
UART-RX
UART-TX
G25
PWM0
F23
PWM1
H24
PWM2
0R
H23
PWM3
G24
PWM_PM
D21
SAR_GPIO[0]
E20
SAR_GPIO[1]
F20
SAR_GPIO[2]
E19
SAR_GPIO[3]
F19
VID0/GPIO48
D20
POWER_SENSE
C15
SPI_CK
B14
SPI_DI
C14
SPI_DO
F15
GPIO14
D15
SPI_CZ
A12
VID1/GPIO49
E13
DDCR_CK
F13
DDCR_DA
E11
DDCA_CK
D11
DDCA_DA
4
T27
SPI1_DI
T26
3
SPI1_CK
R27
SPI2_DI
R28
1
SPI2_CK
R26
VSYNC_LIKE
A22
LCK
B22
LDE
A21
LHSYNC
C22
LVSYNC
P4
TCON12
R6
TCON13
P6
TCON14
SPI1-SDI
SPI1-SCK
SPI1-SDO
SPI1-CS1N
3D_SYNC_S8_O
PWM1
BRI_ADJ
R304
PM_PWM
SAR0
SAR1
GPIO_VID_0
POWER_SENSE
GPIO_VID_1
5
6
7 2
8
3D_SYNC_S8_O
R302
10K
BRI_ADJ
PM_PWM
SAR0
GPIO_VID_0
POWER_SENSE
GPIO_VID_1
UART-RX
UART-TX
R317
10K
R303
10K
R300
NC
NC
LVB0P
LVB0N
LVB1P
LVB1N
LVB2P
LVB2N
LVBCLKP
LVBCLKN
LVB3P
LVB3N
LVB4P
LVB4N
LVA0P
LVA0N
LVA1P
LVA1N
LVA2P
LVA2N
LVACLKP
LVACLKN
LVA3P
LVA3N
LVA4P
LAV4N
TCON0
TCON1
TCON2
TCON3
TCON4
TCON5
TCON6
TCON7
TCON8
TCON9
TCON10
TCON11
C23
B23
C24
B24
A24
C25
A25
B25
A26
A27
B26
B27
B28
C26
C28
C27
D26
D27
E26
E27
E28
F26
F28
F27
J26
H28
H25
H27
H26
J24
G26
J25
G27
K25
K24
P5
LVA0_N
LVA0_P
LVA1_N
LVA1_P
LVA2_N
LVA2_P
LVACLK_N
LVACLK_P
LVA3_N
LVA3_P
LVA4_N
LVA4_P
LVB0_N
LVB0_P
LVB1_N
LVB1_P
LVB2_N
LVB2_P
LVBCLK_N
LVBCLK_P
LVB3_N
LVB3_P
LVB4_N
LVB4_P
BYPS_CTRL
BYPS_CTRL
BYPASS1_EN
BYPASS2_EN
TSP_SELECT
TSP_SELECT_1
TSP_SELECT_2
LVA0_N
LVA0_P
LVA1_N
LVA1_P
LVA2_N
LVA2_P
LVACLK_N
LVACLK_P
LVA3_N
LVA3_P
LVA4_N
LVA4_P
LVB0_N
LVB0_P
LVB1_N
LVB1_P
LVB2_N
LVB2_P
LVBCLK_N
LVBCLK_P
LVB3_N
LVB3_P
LVB4_N
LVB4_P
4
3
1
4
3
1
4
3
1
4
3
1
4
3
1
4
3
1
BYPASS1_EN
BYPASS2_EN
TSP_SELECT
TSP_SELECT_1
TSP_SELECT_2
5
47R*4RP300
6
72
8
5
47R*4RP301
6
72
8
5
47R*4RP302
6
72
8
5
47R*4RP303
6
72
8
5
47R*4RP304
6
72
8
5
47R*4RP305
6
72
8
I2S_OUT-BCK
I2S_OUT-MCK
I2S_OUT-WS
I2S_OUT-SD
BYPASS2_EN
BYPASS1_EN
TSP_SELECT
TUNER_RST
LVA0_N
LVA0_P
LVA1_N
LVA1_P
LVA2_N
LVA2_P
LVACLK_N
LVACLK_P
LVA3_N
LVA3_P
LVA4_N
LVA4_P
LVB0_N
LVB0_P
LVB1_N
LVB1_P
LVB2_N
LVB2_P
LVBCLK_N
LVBCLK_P
LVB3_N
LVB3_P
LVB4_N
LVB4_P
SPI1-SCK
SPI1-SDI
SPI1-SDO
SPI1-CS1N
I2C
I2C
FE-RST
TUNER_RST
A0_N
A0_P
A1_N
A1_P
A2_N
A2_P
ACK_N
ACK_P
A3_N
A3_P
A4_N
A4_P
B0_N
B0_P
B1_N
B1_P
B2_N
B2_P
BCK_N
BCK_P
B3_N
B3_P
B4_N
B4_P
I2C-SCL
I2C-SDA
A0_N
A0_P
A1_N
A1_P
A2_N
A2_P
ACK_N
ACK_P
A3_N
A3_P
A4_N
A4_P
B0_N
B0_P
B1_N
B1_P
B2_N
B2_P
BCK_N
BCK_P
B3_N
B3_P
B4_N
B4_P
LVA
LVA0_N
LVA0_P
LVA1_N
LVA1_P
LVA2_N
LVA2_P
LVACLK_N
LVACLK_P
LVA3_N
LVA3_P
LVA4_N
LVA4_P
LVB
LVB0_N
LVB0_P
LVB1_N
LVB1_P
LVB2_N
LVB2_P
LVBCLK_N
LVBCLK_P
LVB3_N
LVB3_P
LVB4_N
LVB4_P
SPI1
SPI1-SCK
SPI1-SDI
SPI1-SDO
SPI1-CS1N
I2S
I2S_OUT-BCK
I2S_OUT-MCK
I2S_OUT-WS
I2S_OUT-SD
I2C-SCL
I2C-SDA
100R*4
R324
LVDSA
33
34
LVDSA
35
LVDSB
LVDSB
33
34
35
SPI1
VCC3V3
R306
4.7K
BYPASS2-EN
BYPASS1-EN
TSP-SELECT
FE-RST
LVA
LVB
I2S
R309
4.7K
Page 46
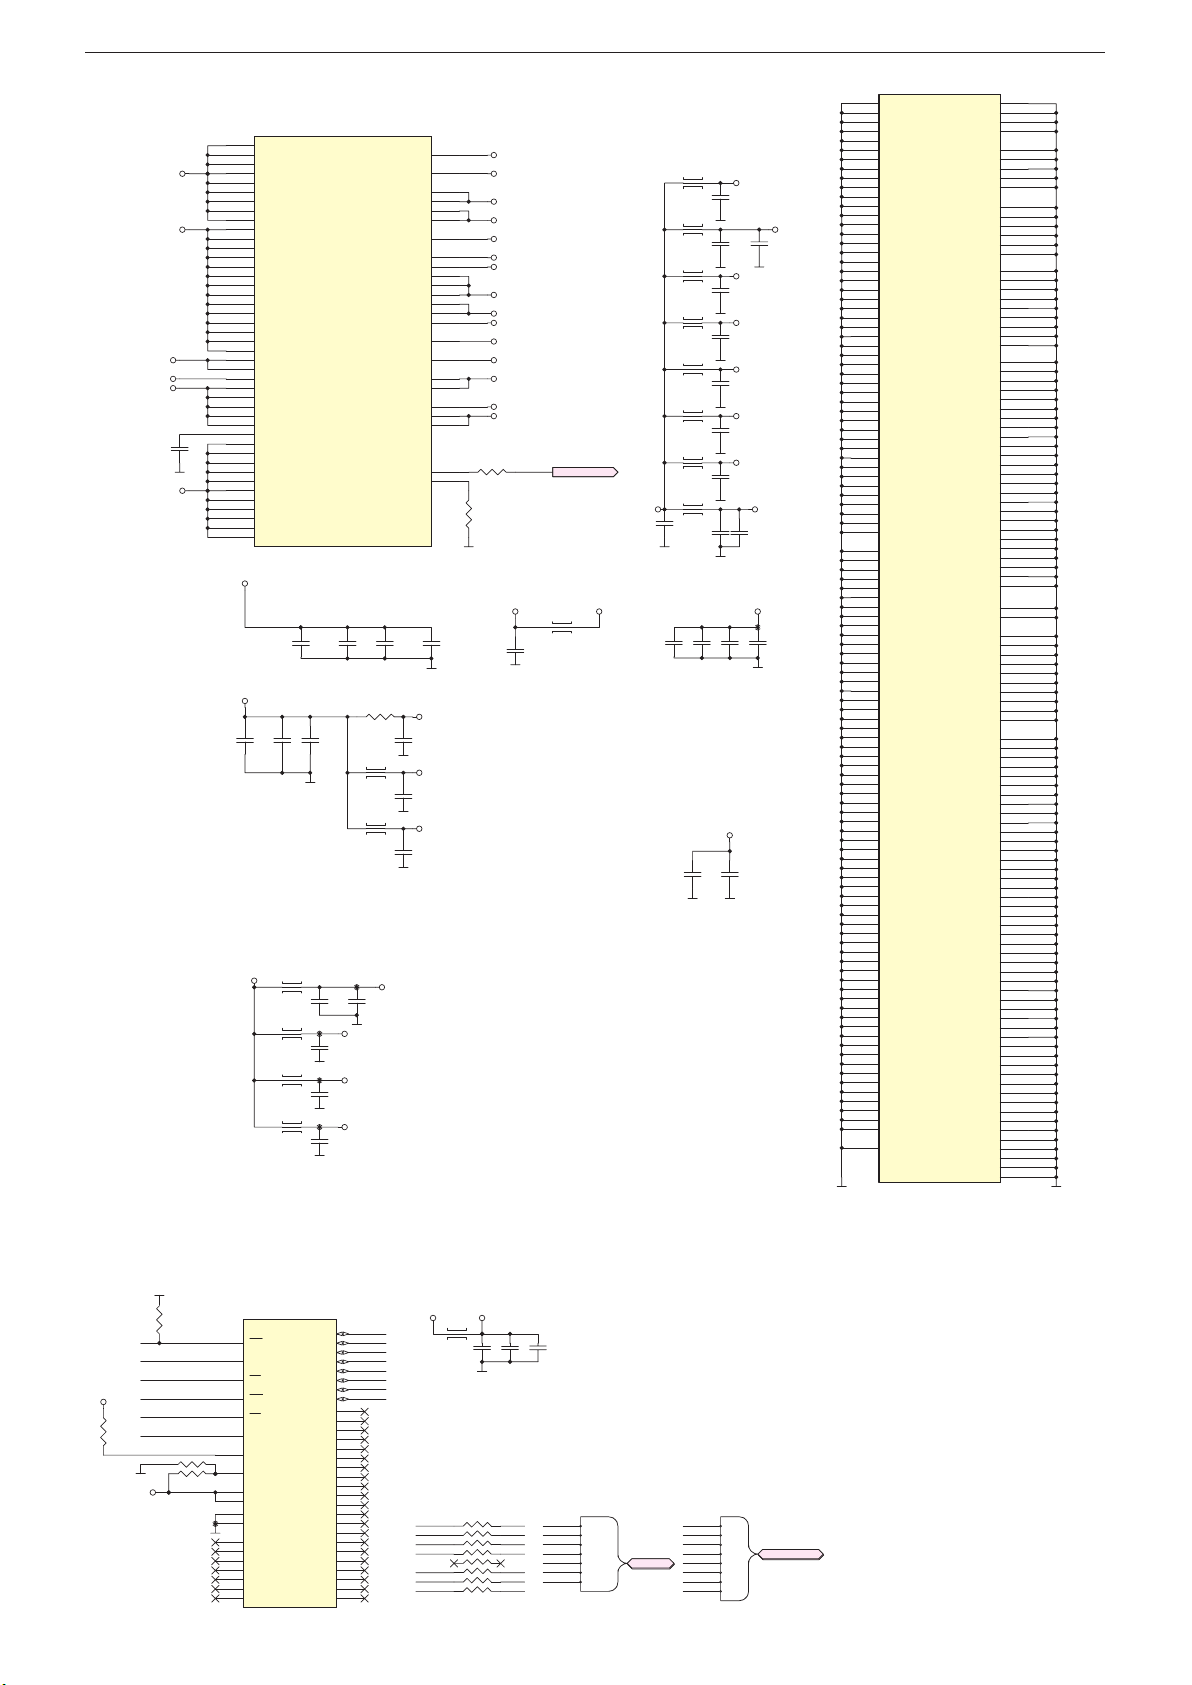
GRUNDIG Service Chassis MK
A
IC200 MSD8361MVK
FLH_3.3V
47R*4
Chassisplatte / Chassis Board – Scaler-SOC
IC200 MSD8361MVK
M19
VDDC_CPU
M20
VDDC_CPU
M21
VDDC_CPU
N19
VDDC_CPU
VCC1V17
VDDL_MOD
AVDDL_USB
MIUVDDC
DVDD_1.2V
1UF
C406
AVDD_DDR
N20
N21
P19
P20
P21
K17
K18
L11
L12
L13
M11
M12
M13
N12
N13
P12
P13
T7
U7
R12
R13
N11
U19
U17
U18
V17
V18
K8
U20
V20
U21
V21
AH26
V19
W18
W19
Y18
AG26
W20
VDDC_CPU
1.15V CORE POWER
VCC1V17
C420
10UF
VCC3V3
VDDC_CPU
VDDC_CPU
VDDC_CPU
VDDC_CPU
VDDC_CPU
VDDC_CPU
VDDC
VDDC
VDDC
VDDC
VDDC
VDDC
VDDC
VDDC
VDDC
VDDC
VDDC
VDDC
VDDC
VDDC
AVDDLV_MOD
AVDDLV_MOD
AVDDLV_USB
DVDD_DDR
DVDD_RX_1
DVDD_RX_1
DVDD_RX_2
DVDD_RX_2
DVDD_NODIE
AVDD_DDR0_D
AVDD_DDR0_D
AVDD_DDR0_D
AVDD_DDR0_D
AVDD_DDR0_D
AVDD_DDR0_C
AVDD_DDR1_D
AVDD_DDR1_D
AVDD_DDR1_D
AVDD_DDR1_D
AVDD_DDR1_C
C421
100NF
L412
L413
L414
L415
C417
10UF
AVDD_ADC33
AVDD_NODIE
AVDD_DVI33
AVDD_DVI33
AVDD_USB33
AVDD_USB33
AVDD_DMPLL
AVDD_AU33
AVDD_EAR33
AVDD_RX33
AVDD_LPLL
AVDD_LPLL
AVDD_MPLL33
AVDD_ETH25
AVDD_MOD
AVDD_MOD
VDDC_MCP
VDD_MCP33
VDD_MCP33
VSENSE_VDD
VSENSE_VSS
C418
10UF
L409
C423
1UF
L410
L411
NORMAL 3.3V POWER
TP97
C429
C428
10UF
100NF
TP98
AVDD_LPLL
C430
100NF
TP99
MCP_VDD33
C431
100NF
TP100
AVDD_MOD
C432
100NF
VDDP_5
C419
100NF
VDD33
VDDP
VDDP
C422
100NF
C425
100NF
C427
100NF
K7
G9
G12
H12
H15
G15
G11
G8
H7
Y12
AA13
Y13
Y10
Y11
M22
G14
G16
AA14
Y14
P11
W9
Y9
J28
J27
C416
1UF
MIUVDDC
AVDDL_MOD
AVDDL_USB
R400
R401
AVDD3P3_ADC
AVDD_NODIE
AVDD3P3_DVI
AVDD3P3_USB
AVDD_DMPLL
AU33
AVDD_EAR33
VDD33
AVDD_LPLL
VDD33
AVDD_MPLL
AVDD25_ETH
AVDD_MOD
MCP_VDDC
MCP_VDD33
VCORE_FB
MCP_VDDC
C411
1UF
VCORE_FB
L408
VCC1.22V
300mA
VCC3V3-ST
STANDBY 3.3V POWER
L400
L401
L402
L403
L404
L405
L406
1UF
C407
C408
L407
C410
100NF
10UF
1.5V DDR3 POWER
220mA
C414
C413
C412
10UF
100NF
1UF
AVDD25_ETH
1UF
C426
AVDD_NODIE
C400
100NF
C401
100NF
AVDD3P3_ADC
C402
100NF
AVDD_DMPLL
C403
100NF
AVDD_MPLL
C404
100NF
AU33
C405
100NF
AVDD_EAR33
C409
10UF
AVDD_DDR
C415
100NF
C424
100NF
AVDD3P3_USB
C433
10UF
AVDD3P3_DVI
TP96
AH24
AH21
AG27
AG15
AG1
AE25
AE24
AE22
AE19
AE16
AE14
AD28
AD25
AD24
AH18
B15
GND
C19
GND
C20
GND
G13
GND
G7
GND
G17
GND
G18
GND
G19
GND
G21
GND
H8
GND
H9
GND
H10
GND
H11
GND
H13
GND
H14
GND
H16
GND
H17
GND
H18
GND
H19
GND
H20
GND
H21
GND
H22
GND
J7
GND
J8
GND
J9
GND
J10
GND
J11
GND
J12
GND
J13
GND
J14
GND
J15
GND
J16
GND
J17
GND
J18
GND
J19
GND
J20
GND
J21
GND
J22
GND
J23
GND
K9
GND
K10
GND
K11
GND
K12
GND
K13
GND
K14
GND
K15
GND
K16
GND
K19
GND
K20
GND
K21
GND
K22
GND
K23
GND
K26
GND
L7
GND
L8
GND
L9
GND
L10
GND
L14
GND
L15
GND
L16
GND
L17
GND
L18
GND
L19
GND
L20
GND
L21
GND
L22
GND
L23
GND
L24
GND
L25
GND
M7
GND
M8
GND
M9
GND
M10
GND
M14
GND
M15
GND
M16
GND
M17
GND
M18
GND
M23
GND
M24
GND
M25
GND
M27
GND
N6
GND
N7
GND
N8
GND
N9
GND
N10
GND
N14
GND
N15
GND
N16
GND
N17
GND
N18
GND
N22
GND
N23
GND
N25
GND
GND
GND
GND
GND
GND
AF4
GND
GND
GND
GND
GND
GND
GND
GND
GND
GND
GND
GND
GND
GND
GND
GND
GND
GND
GND
GND
GND
GND
GND
GND
GND
GND
GND
GND
GND
GND
GND
GND
GND
GND
GND
GND
GND
GND
GND
GND
GND
GND
GND
GND
GND
GND
GND
GND
GND
GND
GND
GND
GND
GND
GND
GND
GND
GND
GND
GND
GND
GND
GND
GND
GND
GND
GND
GND
GND
GND
GND
GND
GND
GND
GND
GND
GND
GND
GND
GND
GND
GND
GND
GND
GND
GND
GND
GND
GND
GND
GND
GND
GND
GND
GND
GND
GND
GND
GND
GND
GND
GND
GND
GND
GND
GND
GND
GND
GND
GND
GND
GND
GND
GND
GND
GND
GND
GND
GND
GND
P7
P8
P9
P10
P14
P15
P16
P17
P18
P22
R7
R8
R9
R10
R11
R14
R15
R16
R17
R18
R19
R20
R21
R22
T8
T9
T10
T11
T12
T13
T14
T15
T16
T17
T18
T19
T20
T21
T22
T25
U8
U9
U10
U11
U12
U13
U14
U15
U16
U22
U27
V7
V8
V9
V10
V11
V12
V13
V14
V15
V16
V22
V28
W7
W8
W10
W11
W12
W13
W14
W15
W16
W17
W21
W22
W25
Y2
Y3
Y7
Y8
Y15
Y16
Y17
Y19
Y20
Y21
Y22
AA3
AA7
AA8
AA15
AA16
AA17
AA18
AA19
AA20
AA21
AA22
AA28
AB1
AB15
AB16
AB17
AB18
AB19
AB20
AB21
AB22
AB25
Chassisplatte / Chassis Board – FLASH
R1200
3.3K
FLH_3.3V
R1201
NC
R1203
NC
F_WPZ
F_ALE
F_CEZ
F_WEZ
F_REZ
F_CLE
F_RBZ
R1202
NC
TP113
IC1200
TC58NVG2S3ETA00
NAND FLASH
19
WP
17
ALE
9
CE
18
WE
8
RE
16
CLE
7
READY
38
LOCK/NC
12
VCC
37
VCCQ
13
VSS
36
VSS
45
NC45
46
NC46
47
NC47
NC4848NC27
40
NC40
39
NC39
35
NC35
NC1
NC2
NC3
NC4
NC5
NC6
NC10
NC11
NC14
NC15
NC20
NC21
NC22
NC23
NC24
NC25
NC26
NC28
NC33
NC34
29
IO0
30
IO1
31
IO2
32
IO3
41
IO4
42
IO5
43
IO6
44
IO7
1
2
3
4
5
6
10
11
14
15
20
21
22
23
24
25
26
27
28
33
34
F_D0
F_D1
F_D2
F_D3
F_D4
F_D5
F_D6
F_D7
VCC3V3
F_WPZ
F_WEZ
F_ALE
F_CLE
F_CEZ
F_REZ
F_RBZ
L1200
1 8
3 6
1 8
3 6
FLH_3.3V
GND
RP1200
47R*4
RP1201
C1202
1UF
C1201
C1200
100NF
100NF
F-WPZ
72
F-WEZ
F-ALE
54
F-CLE
72
F-CEZ
F-REZ
54
F-RBZ
F-CLE
F-REZ
F-WEZ
F-WPZ
F-RBZ
F-CEZ
F-ALE
F-CLE
F-REZ
F-WEZ
F-WPZ
F-RBZ
F-CEZ
FLASH
FLASH
F-ALE
F_D0
F_D1
F_D2
F_D3
F_D4
F_D5
F_D6
F_D7
FLASHDATA
F_D0
F_D1
F_D2
F_D3
F_D4
F_D5
F_D6
F_D7
FLASHDATA
2 - 20
Page 47
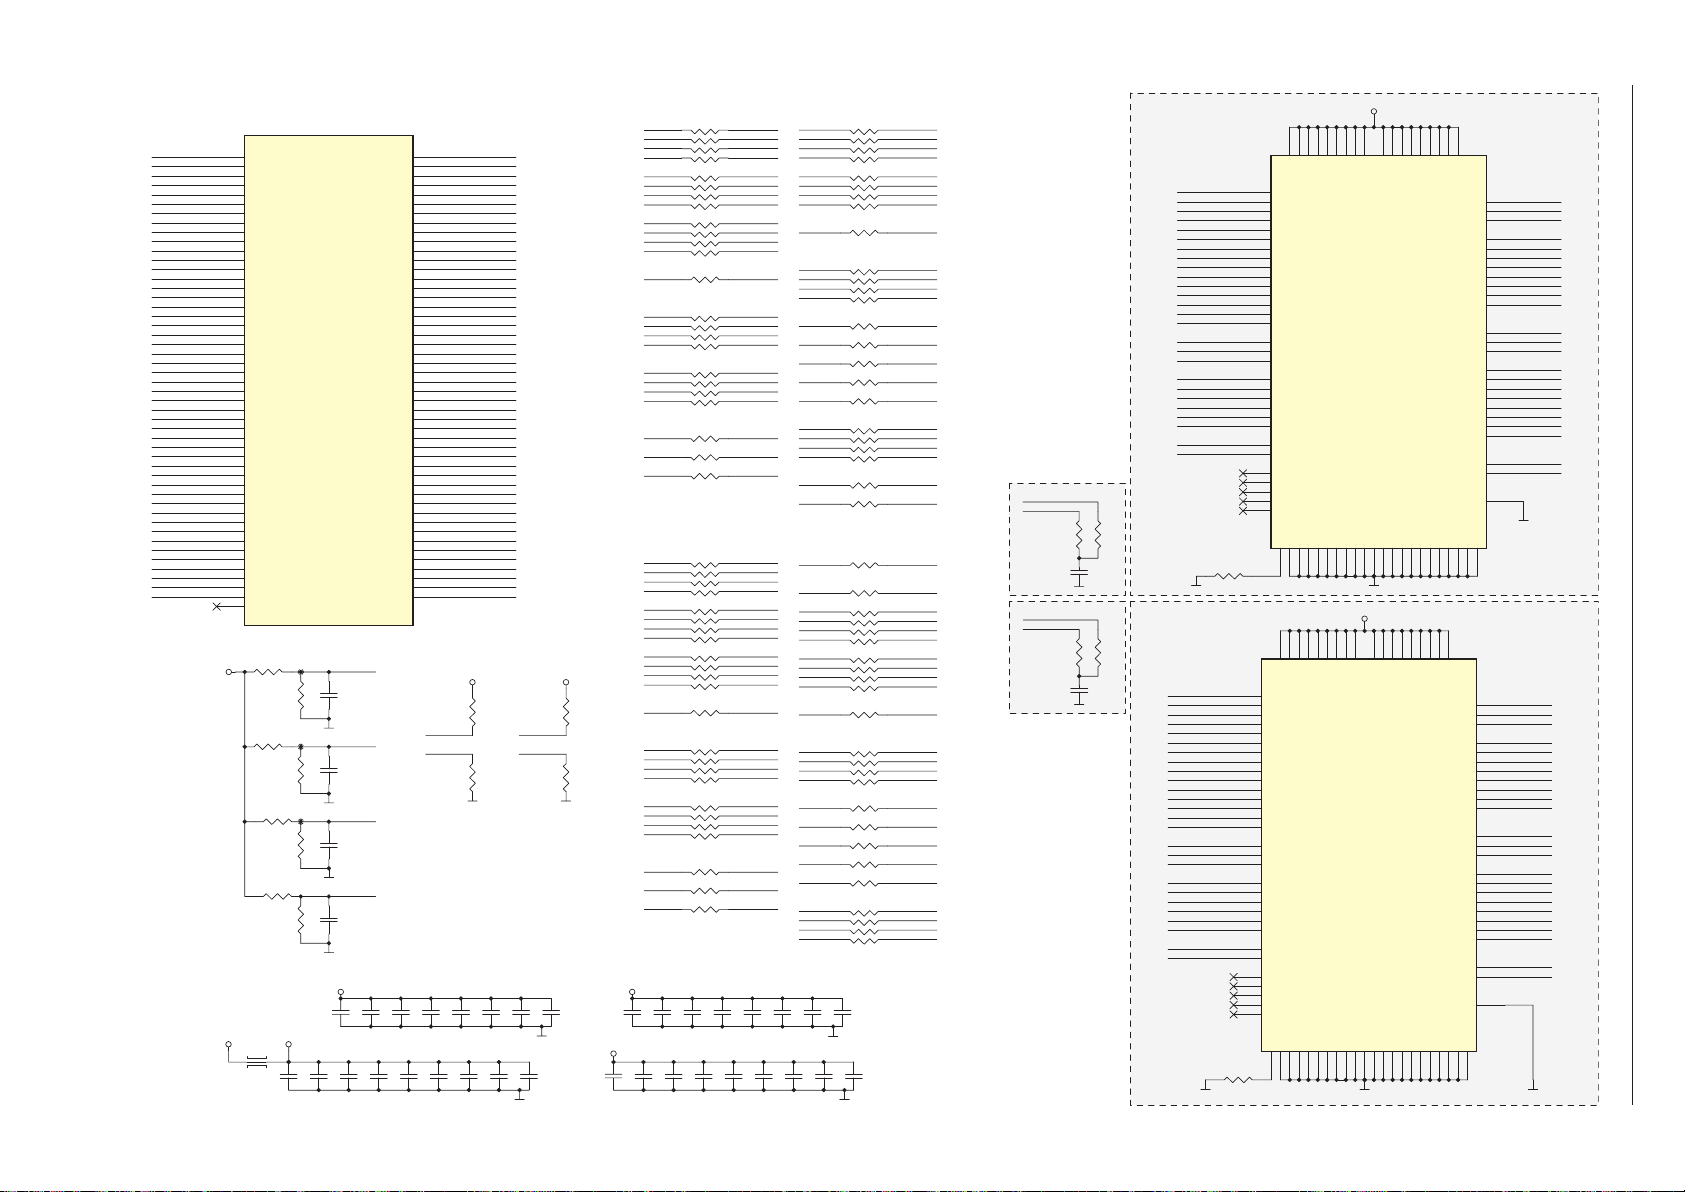
Chassisplatte / Chassis Board – RAM
2 - 21
A-TMA0
A-TMA1
A-TMA2
A-TMA3
A-TMA4
A-TMA5
A-TMA6
A-TMA7
A-TMA8
A-TMA9
A-TMA10
A-TMA11
A-TMA12
A-TMA13
A-TMA14
A-TMDQL0
A-TMDQL1
A-TMDQL2
A-TMDQL3
A-TMDQL4
A-TMDQL5
A-TMDQL6
A-TMDQL7
A-TMDQU0
A-TMDQU1
A-TMDQU2
A-TMDQU3
A-TMDQU4
A-TMDQU5
A-TMDQU6
A-TMDQU7
A-TMCASB
A-TMRASB
A-TMWEB
A-TMDML
A-TMDMU
A-TMODT
A-TMBA0
A-TMBA1
A-TMBA2
A-TMRESETB
A-TMCKE
A-TMCK
A-TMCKB
A-TMDQSL
A-TMDQSLB
A-TMDQSU
A-TMDQSUB
AVDD_DDR
Y24
R23
AA25
AA23
R25
AA24
R24
AB23
P23
AC25
V23
P24
T23
AC24
N24
AF28
AB27
AF26
AA26
AH27
AB26
AG28
AC27
W26
AD26
V26
AE26
Y27
AE27
W27
AD27
U23
U24
V24
AA27
AF27
V25
Y23
T24
W24
AB24
U28
V27
U26
AC26
AC28
Y26
Y28
W23
VCC1V5
IC200 MSD8361MVK
L500
A_DDR3_A[0]
A_DDR3_A[1]
A_DDR3_A[2]
A_DDR3_A[3]
A_DDR3_A[4]
A_DDR3_A[5]
A_DDR3_A[6]
A_DDR3_A[7]
A_DDR3_A[8]
A_DDR3_A[9]
A_DDR3_A[10]
A_DDR3_A[11]
A_DDR3_A[12]
A_DDR3_A[13]
A_DDR3_A[14]
A_DDR3_DQL[0]
A_DDR3_DQL[1]
A_DDR3_DQL[2]
A_DDR3_DQL[3]
A_DDR3_DQL[4]
A_DDR3_DQL[5]
A_DDR3_DQL[6]
A_DDR3_DQL[7]
A_DDR3_DQU[0]
A_DDR3_DQU[1]
A_DDR3_DQU[2]
A_DDR3_DQU[3]
A_DDR3_DQU[4]
A_DDR3_DQU[5]
A_DDR3_DQU[6]
A_DDR3_DQU[7]
A_DDR3_CASZ
A_DDR3_RASZ
A_DDR3_WEZ
A_DDR3_DML
A_DDR3_DMU
A_DDR3_ODT
A_DDR3_BA[0]
A_DDR3_BA[1]
A_DDR3_BA[2]
A_DDR3_RESET
A_DDR3_CKE
A_DDR3_MCLK
A_DDR3_MCLKZ
A_DDR3_DQSL
A_DDR3_DQSLB
A_DDR3_DQSU
A_DDR3_DQSUB
A_DDR3_CS0
R524
TP101
1K
R526
1K
R533
TP102
1K
R534
1K
R537
TP103
1K
R540
1K
R543
1K
R544
1K
AVDD_DDR
C522
10UF
MIU
AVDD_DDR
C523
100NF
B_DDR3_A[0]
B_DDR3_A[1]
B_DDR3_A[2]
B_DDR3_A[3]
B_DDR3_A[4]
B_DDR3_A[5]
B_DDR3_A[6]
B_DDR3_A[7]
B_DDR3_A[8]
B_DDR3_A[9]
B_DDR3_A[10]
B_DDR3_A[11]
B_DDR3_A[12]
B_DDR3_A[13]
B_DDR3_A[14]
B_DDR3_DQL[0]
B_DDR3_DQL[1]
B_DDR3_DQL[2]
B_DDR3_DQL[3]
B_DDR3_DQL[4]
B_DDR3_DQL[5]
B_DDR3_DQL[6]
B_DDR3_DQL[7]
B_DDR3_DQU[0]
B_DDR3_DQU[1]
B_DDR3_DQU[2]
B_DDR3_DQU[3]
B_DDR3_DQU[4]
B_DDR3_DQU[5]
B_DDR3_DQU[6]
B_DDR3_DQU[7]
B_DDR3_CASZ
B_DDR3_RASZ
B_DDR3_WEZ
B_DDR3_DML
B_DDR3_DMU
B_DDR3_ODT
B_DDR3_BA[0]
B_DDR3_BA[1]
B_DDR3_BA[2]
B_DDR3_RESET
B_DDR3_CKE
B_DDR3_MCLK
B_DDR3_MCLKZ
B_DDR3_DQSL
B_DDR3_DQSLB
B_DDR3_DQSU
B_DDR3_DQSUB
A-MVREFCA
C501
100NF
A-MVREFDQ
C502
100NF
C-MVREFCA
C504
100NF
C-MVREFDQ
C505
100NF
C506
C507
100NF
100NF
C524
C525
100NF
100NF
AD17
C-TMA0
AD22
C-TMA1
AC16
C-TMA2
AC17
C-TMA3
AC21
C-TMA4
AD16
C-TMA5
AE23
C-TMA6
AC15
C-TMA7
AD23
C-TMA8
AD14
C-TMA9
AD19
C-TMA10
AC22
C-TMA11
AC20
C-TMA12
AC14
C-TMA13
AC23
C-TMA14
AG16
C-TMDQL0
AF21
C-TMDQL1
AH16
C-TMDQL2
AG21
C-TMDQL3
AH15
C-TMDQL4
AG20
C-TMDQL5
AF16
C-TMDQL6
AF20
C-TMDQL7
AG23
C-TMDQU0
AG18
C-TMDQU1
AG24
C-TMDQU2
AG17
C-TMDQU3
AF23
C-TMDQU4
AF18
C-TMDQU5
AF24
C-TMDQU6
AF19
C-TMDQU7
AC19
C-TMCASB
AE20
C-TMRASB
AD20
C-TMWEB
AF22
C-TMDML
AF17
C-TMDMU
AC18
C-TMODT
AE17
C-TMBA0
AD21
C-TMBA1
AD18
C-TMBA2
AD15
C-TMRESETB
AG25
C-TMCKE
AF25
C-TMCK
AH25
C-TMCKB
AH19
C-TMDQSL
AG19
C-TMDQSLB
AH22
C-TMDQSU
AG22
C-TMDQSUB
AVDD_DDR AVDD_DDR
R552
200R
A-MRESETB
A-MCKE
R557
1K
C508
C509
C526
100NF
100NF
100NF
C527
C510
100NF
C528
100NF
100NF
C511
100NF
C529
100NF
R553
200R
C-MRESETB
C-MCKE
R558
1K
C512
100NF
C530
100NF
C513
100NF
A-TMBA1
A-TMA12
A-TMA4
A-TMA6
A-TMA1
A-TMA8
A-TMA11
A-TMA14
A-TMWEB
A-TMA10
A-TMCASB
A-TMRASB
A-TMA0 A-MA0
A-TMA2
A-TMA5
A-TMA3
A-TMBA0
A-TMA13
A-TMA9 A-MA9
A-TMRESETB
A-TMA7
A-TMODT A-MODT
A-TMCKE
C-TMBA1
C-TMA12
C-TMA4
C-TMA6
C-TMA1
C-TMA8
C-TMA11
C-TMA14
C-TMWEB
C-TMA10
C-TMCASB
C-TMRASB
C-TMA0
C-TMA2
C-TMA5
C-TMA3
C-TMBA0
C-TMA13
C-TMA9
C-TMRESETB
C-TMA7
C-TMODT
C-TMBA2
C-TMCKE
AVDD_DDR
C514
100NF
AVDD_DDR
C532
C531
100NF
10UF
C515
100NF
0R
C533
100NF
R506
R516
R517
R520
R538
R550
R554
R555
C516
100NF
C534
100NF
4*0RR500
4*0RR502
4*0RR504
4*0RR508
4*0RR512
0R
0R
0R
4*0RR527
4*0RR531
4*0RR535
0R
4*0RR541
4*0RR546
0R
0R
0R
C517
100NF
A-MBA1
A-MA12
A-MA4
A-MA6
A-MA1
A-MA8
A-MA11
A-MA14
A-MWEB
A-MA10
A-MCASB
A-MRASB
A-MA2
A-MA5
A-MA3
A-MBA0
A-MA13
A-MRESETB
A-MA7
A-MBA2A-TMBA2
A-MCKE
C-MBA1
C-MA12
C-MA4
C-MA6
C-MA1
C-MA8
C-MA11
C-MA14
C-MWEB
C-MA10
C-MCASB
C-MRASB
C-MA0
C-MA2
C-MA5
C-MA3
C-MBA0
C-MA13
C-MA9
C-MRESETB
C-MA7
C-MODT
C-MBA2
C-MCKE
C518
100NF
C535
100NF
A-TMDQL0
A-TMDQL4 A-MDQL4
A-TMDQU7
A-TMDMU
A-TMDML
A-TMDQL3
A-TMDQL1
A-TMDQL5
R509
A-TMDQSLBA-MDQSLB
R510
R511
A-TMDQSUB
R513
A-TMDQSU
R514
A-TMDQL7
A-TMDQU4
R521
A-TMCKB
R522
A-TMCK
(MST IC)
R525
C-TMCK
C-TMDQL0
C-TMDQL2
C-TMDQL6
C-TMDQU7
C-TMDQU1
C-TMDQU5
R539
C-TMDMU
C-TMDQU2
C-TMDQU6
C-TMDQU0
C-TMDQU4
R545
C-TMDQSLB
R547
C-TMDQSL
R548
C-TMDQSUB
R549
C-TMDQSU
R551
C-TMDQL7
C-TMDML
R556
C-TMDQL3
C-TMDQL1
C-TMDQL5
4*0R
C519
C520
C537
100NF
100NF
C521
100NF
C538
100NF
100NF
C536
100NF
C539
100NF
4*0RR501
4*0RR503
0RR505
4*0RR507
0R
0R
0R
0R
0R
4*0RR515
0R
0R
0R
0RR529
4*0RR532
4*0RR536
0R
4*0RR542
0R
0R
0R
0R
0R
A-MDQL0
A-MDQL2A-TMDQL2
A-MDQL6A-TMDQL6
A-MDQU7
A-MDQU1A-TMDQU1
A-MDQU5A-TMDQU5
A-MDQU3A-TMDQU3
A-MDMU
A-MDML
A-MDQL3
A-MDQL1
A-MDQL5
A-MDQSLA-TMDQSL
A-MDQSUB
A-MDQSU
A-MDQL7
A-MDQU2A-TMDQU2
A-MDQU6A-TMDQU6
A-MDQU0A-TMDQU0
A-MDQU4
A-MCKB
A-MCK
C-MCKBC-TMCKB
C-MCK
C-MDQL0
C-MDQL2
C-MDQL6
C-MDQL4C-TMDQL4
C-MDQU7
C-MDQU1
C-MDQU5
C-MDQU3C-TMDQU3
C-MDMU
C-MDQU2
C-MDQU6
C-MDQU0
C-MDQU4
C-MDQSLB
C-MDQSL
C-MDQSUB
C-MDQSU
C-MDQL7
C-MDML
C-MDQL3
C-MDQL1
C-MDQL5
A-MCK
A-MCKB
R519
56R
C-MCK
C-MCKB
R530
56R
C500
10NF
C503
10NF
R518
R528
GRUNDIG Service Chassis MK
AVDD_DDR
F1
A8
K2
R1
R9
K8
N9
G7
N1
D9
VDD
VDD
VDD
VDD
VDD
VDD
VDD
VSS
VDD
VSS
VSS
P1
K8
VDD
M9
VSS
VSS
M9
M1
2Gbit
AVDD_DDR
G7
K2
VDD
VDD
VSSM1VSS
VSS
J8
VDDB2VDD
VSS
VSSG8VSS
J8
J2
E1
D9
H9
VDDB2VDD
VSS
VSSE1VSS
J2
A9
G8
R523
240R
R559
240R
N3
P7
P3
N2
P8
P2
R8
R2
T8
R3
L7
R7
N7
T3
T7
M2
N8
M3
J3
K3
L3
K1
T2
K9
J7
K7
J1
J9
L1
L9
M7
N3
P7
P3
N2
P8
P2
R8
R2
T8
R3
L7
R7
N7
T3
T7
M2
N8
M3
J3
K3
L3
K1
T2
K9
J7
K7
J1
J9
L1
L9
M7
2Gbit ->50Hz only
A0
A1
A2
A3
A4
A5
A6
A7
A8
A9
A10
A11
A12
A13
A14
BA0
BA1
BA2
/RAS
/CAS
/WE
ODT
/RESET
CKE
CK
/CK
NC1
NC2
NC3
NC4
NC5
L8
R9
A0
A1
A2
A3
A4
A5
A6
A7
A8
A9
A10
A11
A12
A13
A14
BA0
BA1
BA2
/RAS
/CAS
/WE
ODT
/RESET
CKE
CK
/CK
NC1
NC2
NC3
NC4
NC5
ZQ
T9
L8
VSS
VSS
ZQ
P9
T1
T9
N1
R1
VDD
VDDN9VDD
VSS
VSST1VSS
P1
P9
A-MA0
A-MA1
A-MA2
A-MA3
A-MA4
A-MA5
A-MA6
A-MA7
A-MA8
A-MA9
A-MA10
A-MA11
A-MA12
A-MA13
A-MA14
A-MBA0
A-MBA1
A-MBA2
A-MRASB
A-MCASB
A-MWEB
A-MODT
A-MRESETB
A-MCKE
A-MCK
A-MCKB
56R
56R
C-MA0
C-MA1
C-MA2
C-MA3
C-MA4
C-MA5
C-MA6
C-MA7
C-MA8
C-MA9
C-MA10
C-MA11
C-MA12
C-MA13
C-MA14
C-MBA0
C-MBA1
C-MBA2
C-MRASB
C-MCASB
C-MWEB
C-MODT
C-MRESETB
C-MCKE
C-MCK
C-MCKB
C1
C9
H9
H2
E9
D2
A1
VDDQ
VDDQ
VDDQ
VDDQ
VDDQ
VDDQ
VDDQ
VDDQ
/DQSU
VREFDQ
VREFCA
VSSQ
VSSQE2VSSQ
VSSQ
VSSA9VSS
VSSQ
VSS
F9
E8
B3
G9
D8
G1
C1
D2
F1
A1
E9
A8
VDDQ
VDDQ
VDDQ
VDDQ
VDDQC9VDDQ
VDDQH2VDDQ
VDDQ
DMU
DQSU
/DQSU
DQU0
DQU1
DQU2
DQU3
DQU4
DQU5
DQU6
DQU7
DML
DQSL
/DQSL
DQL0
DQL1
DQL2
DQL3
DQL4
DQL5
DQL6
DQL7
VREFDQ
VREFCA
VSSQ
VSSQ
VSS
B3
VSSQ
VSSQ
VSSQE8VSSQ
VSSQ
VSS
F9
E2
D1
G1
D8
G9
VDDQ
DMU
DQSU
DQU0
DQU1
DQU2
DQU3
DQU4
DQU5
DQU6
DQU7
DML
DQSL
/DQSL
DQL0
DQL1
DQL2
DQL3
DQL4
DQL5
DQL6
DQL7
/CS
VSSQD1VSSQ
B9
/CS
VSSQB9VSSQ
B1
IC500
K4B4G1646D
D3
A-MDMU
C7
A-MDQSU
B7
A-MDQSUB
D7
A-MDQU0
C3
A-MDQU1
C8
A-MDQU2
C2
A-MDQU3
A7
A-MDQU4
A2
A-MDQU5
B8
A-MDQU6
A3
A-MDQU7
E7
A-MDML
F3
A-MDQSL
G3
A-MDQSLB
E3
A-MDQL0
F7
A-MDQL1
F2
A-MDQL2
F8
A-MDQL3
H3
A-MDQL4
H8
A-MDQL5
G2
A-MDQL6
H7
A-MDQL7
H1
A-MVREFDQ
M8
A-MVREFCA
L2
VSSQ
VSSQ
B1
IC501
K4B4G1646D
D3
C-MDMU
C7
C-MDQSU
B7
C-MDQSUB
D7
C-MDQU0
C3
C-MDQU1
C8
C-MDQU2
C2
C-MDQU3
A7
C-MDQU4
A2
C-MDQU5
B8
C-MDQU6
A3
C-MDQU7
E7
C-MDML
F3
C-MDQSL
G3
C-MDQSLB
E3
C-MDQL0
F7
C-MDQL1
F2
C-MDQL2
F8
C-MDQL3
H3
C-MDQL4
H8
C-MDQL5
G2
C-MDQL6
H7
C-MDQL7
H1
C-MVREFDQ
M8
C-MVREFCA
L2
Page 48
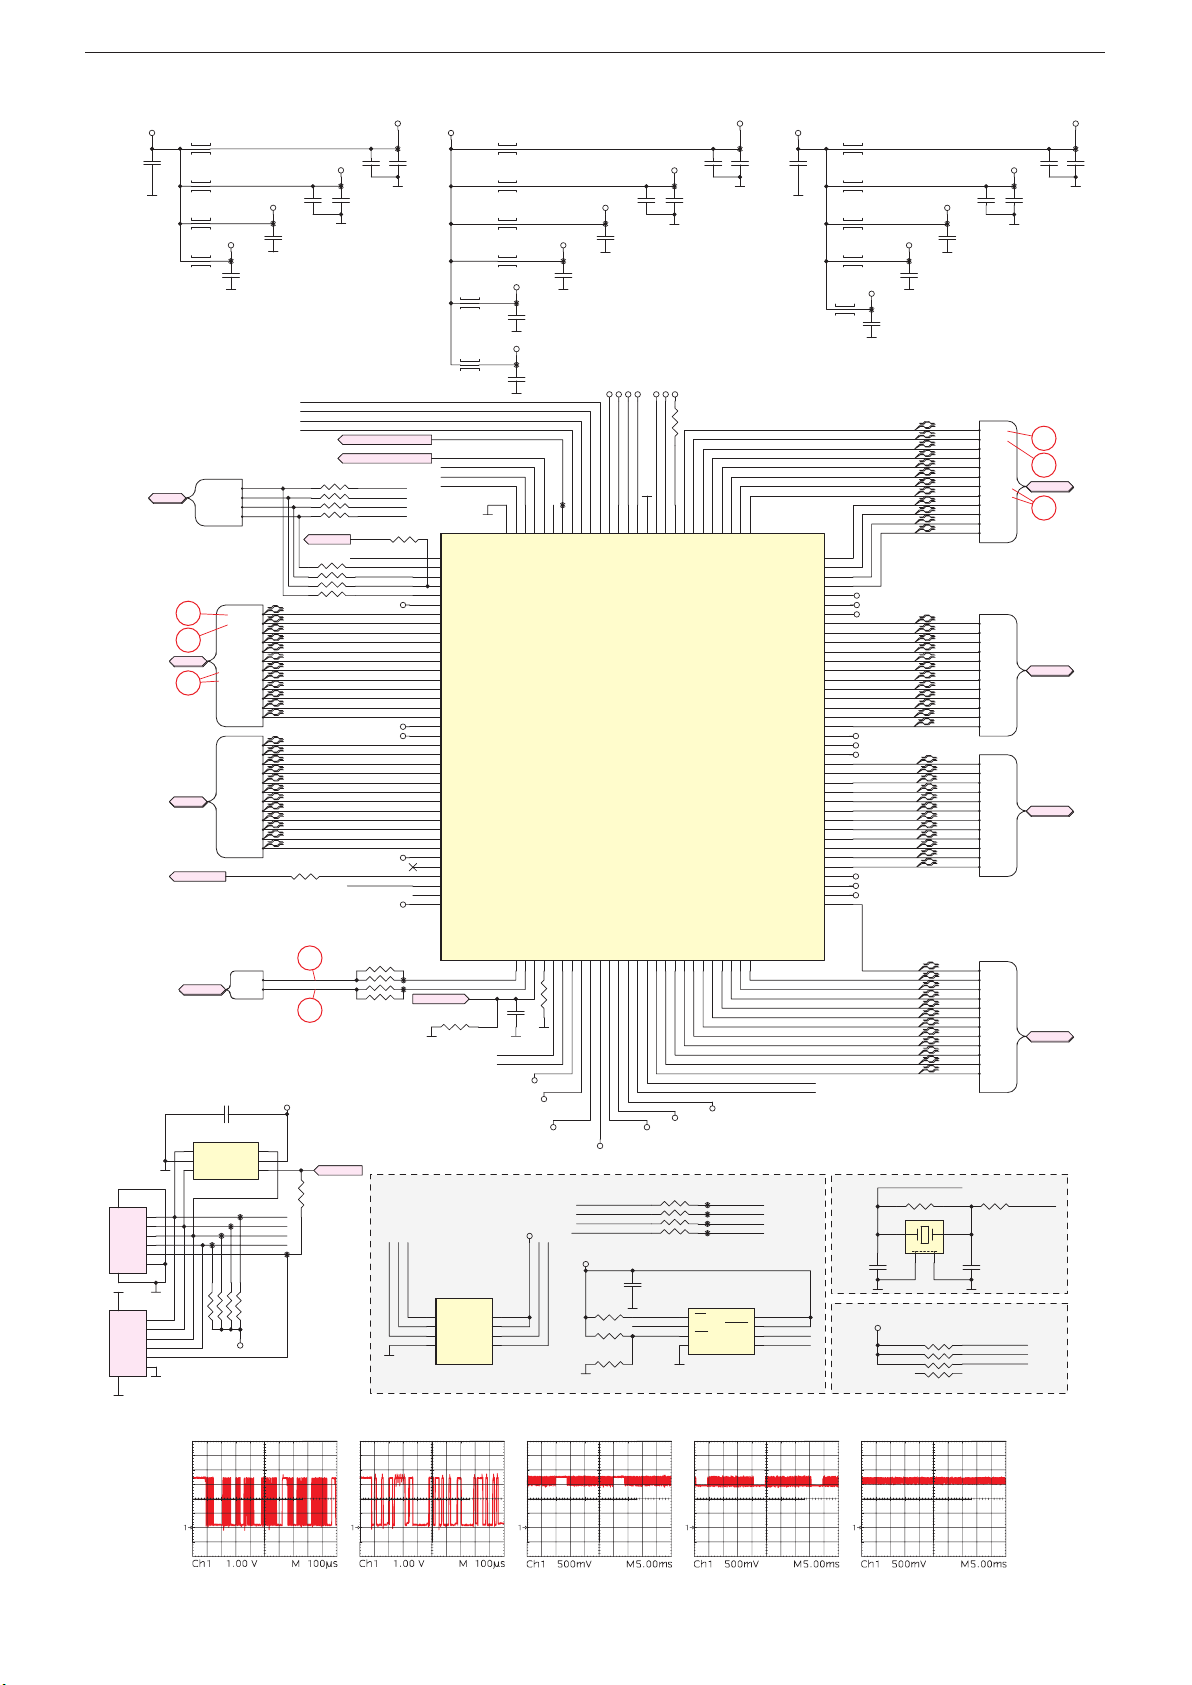
GRUNDIG Service Chassis MK
DVDD
AVDDIO_CMD0
AVDD_LVDSRX
NORMAL 3.3V POWER
DDR POWER
2
CORE POWER
BACKLIGHT SPI-PWM CONNECTOR
)
¡ ‹ ›
fi
Chassisplatte / Chassis Board – FRC
VCC3V3
L1702
C1706
10UF
L1705
L1708
FRC_AVDD_MPLL
L1711
SPI1
SPI1-CS1N
SPI1
SPI1-SDO
SPI1-SCK
33
34
LVA
35
LVB
BL_CTRL
FRC_AVDD_MOD
TP162
C1720
100nF
SPI1-CS1N
SPI1-SDO
SPI1-SDI
SPI1-SDI
SPI1-SCK
LVA
LVA0_N
LVA0_P
LVA1_N
LVA1_P
LVA2_N
LVA2_P
LVACLK_N
LVACLK_P
LVA3_N
LVA3_P
LVA4_N
LVA4_P
LVB
LVB0_N
LVB0_P
LVB1_N
LVB1_P
LVB2_N
LVB2_P
LVBCLK_N
LVBCLK_P
LVB3_N
LVB3_P
LVB4_N
LVB4_P
BL_CTRL R17170R
TP159
C1717
100nF
SPI_DI
SPI_CK
SPI_CZ
SPI_DO
5
6
7 2
8
5
6
7 2
8
LVA0_N
LVA0_P
LVA1_N
LVA1_P
LVA2_N
LVA2_P
LVACLK_N
LVACLK_P
LVA3_N
LVA3_P
LVA4_N
LVA4_P
LVB0_N
LVB0_P
LVB1_N
LVB1_P
LVB2_N
LVB2_P
LVBCLK_N
LVBCLK_P
LVB3_N
LVB3_P
LVB4_N
LVB4_P
FRC_VDDP
TP156
C1713
C1714
100nF
10UF
R1703
NC
BRI_ADJ
R1702
NC
AVDD_LVDSRX
AVDD12_LVDSRX
AVDD_LVDSRX
AVDD12_LVDSRX
FRC_TCON_ON
3D_SYNC_FRC_O
4
FRC-CZ
3
FRC-SDO
FRC-SDI
1
FRC-SCK
BRI_ADJ
VD_TX
4
3
1
FRC_VDDP
VCC1.18V VCC1.8V
TP153
C1708
C1707
100nF
10UF
R1315
NC
1
2
3
4
5
6
7
8
9
10
11
12
13
14
15
16
17
18
19
20
21
22
23
24
25
26
27
28
29
30
31
32
33
34
35
36
VSYNC
37
38
3A
L1700
L1703
3A
L1706
L1709
DVDD_DDR_DATA
L1712
DVDD_DDR_CMD
L1714
FRC_TCON_ON
3D_SYNC_O
FRC-SDI
FRC-SCK
VD_RX
128
IC1700
129
PAD_GPIO[0]
PAD_DIM0
PAD_DIM1
PAD_DIM2
PAD_DIM3
AVDD_LVDSRX
PAD_RA0N
PAD_RA0P
PAD_RA1N
PAD_RA1P
PAD_RA2N
PAD_RA2P
PAD_RACKN
PAD_RACKP
PAD_RA3N
PAD_RA3P
PAD_RA4N
PAD_RA4P
AVDD12_LVDSRX/DVDD
AVDD_LVDSRX
PAD_RB0N
PAD_RB0P
PAD_RB1N
PAD_RB1P
PAD_RB2N
PAD_RB2P
PAD_RBCKN
PAD_RBCKP
PAD_RB3N
PAD_RB3P
PAD_RB4N
PAD_RB4P
AVDD12_LVDSRX/DVDD
PAD_SSPI2_DO
PAD_SSPI2_CZ
PAD_SSPI2_CK
PAD_SSPI2_DI
VDDP3_B
E-Pad
R
R
FRC_AVDDL_MOD
TP160
C1718
100nF
TP163
C1721
100nF
TP165
C1723
100nF
124
123
126
127
125
PAD_GPIO[1]
PAD_GPIO[5]
PAD_GPIO[2]
PAD_GPIO[4]
PAD_GPIO[6]
PAD_GPIO[3]
AVDD12_LVDSRX
TP157
C1715
100nF
FRC_VDDP
TP166
122
118
121
117
119
120
VDDP3_L
PAD_SPI_DI
PAD_SPI_CZ
PAD_SPI_CK
PAD_SPI_DO
MST7438BB
U8 128
AVDDL_PREDRV
C1709
10UF
DVDD
DVDD_DDR_DATA
AVDDIO_DATA1
AVDDIO_DATA0
115
116
113
114
GND
DVDD
AVDDIO_DATA1
AVDDIO_DATA0
DVDD_DDR_DATA
TP154
C1711
100nF
DVDD
FRC_AVDD_MOD
112
111
DVDD
PAD_REXT
R1700
39K
110
109
PAD_A0P
C1702
10UF
107
108
PAD_A1P
PAD_A0M
PAD_A1M
104
106
105
PAD_A2P
PAD_A2M
TP151
C1704
100nF
103
PAD_A3M
PAD_ACKP
PAD_ACKM
PAD_A4M
AVDD_MOD
AVDDL_MOD
PAD_B0M
PAD_B1M
PAD_B2M
PAD_BCKP
PAD_BCKM
PAD_B3M
PAD_B4M
AVDDL_PREDRV
AVDD_MOD
AVDDL_PREDRV
PAD_C0M
PAD_C1M
PAD_C2M
PAD_CCKP
PAD_CCKM
PAD_C3M
PAD_C4M
AVDDL_MOD
AVDD_MOD
PAD_A3P
PAD_A4P
DVDD
PAD_B0P
PAD_B1P
PAD_B2P
PAD_B3P
PAD_B4P
PAD_C0P
PAD_C1P
PAD_C2P
PAD_C3P
PAD_C4P
DVDD
PAD_D0P
C1701
10UF
3A
L1701
R
3A
L1704
R
3A
L1707
R
3A
L1710
R
AVDDIO_MCLK
L1713
R
3A
102
101
100
99
98
FRC_AVDD_MOD
97
FRC_AVDDL_MOD
96
DVDD
95
94
93
92
91
90
89
88
87
86
85
84
83
AVDDL_PREDRV
82
FRC_AVDD_MOD
81
AVDDL_PREDRV
80
79
78
77
76
75
74
73
72
71
70
69
68
DVDD
67
FRC_AVDDL_MOD
66
FRC_AVDD_MOD
65
AVDDIO_DATA0
AVDDIO_DATA1
TP161
C1719
100nF
TP164
C1722
100nF
TP158
C1716
100nF
A0_P
A0_N
A1_P
A1_N
A2_P
A2_N
ACK_P
ACK_N
A3_P
A3_N
A4_P
A4_N
B0_P
B0_N
B1_P
B1_N
B2_P
B2_N
BCK_P
BCK_N
B3_P
B3_N
B4_P
B4_N
C0_P
C0_N
C1_P
C1_N
C2_P
C2_N
CCK_P
CCK_N
C3_P
C3_N
C4_P
C4_N
AVDDIO_CMD1
TP155
C1712
C1710
100nF
10UF
LVDSA
A0_P
A0_N
A1_P
A1_N
A2_P
A2_N
ACK_P
ACK_N
A3_P
A3_N
A4_P
A4_N
LVDSB
B0_P
B0_N
B1_P
B1_N
B2_P
B2_N
BCK_P
BCK_N
B3_P
B3_N
B4_P
B4_N
LVDSC
C0_P
C0_N
C1_P
C1_N
C2_P
C2_N
CCK_P
CCK_N
C3_P
C3_N
C4_P
C4_N
33
34
LVDSA
35
LVDSB
LVDSC
C1703
10UF
TP15
C1705
100nF
AVDDIO_CMD1
PAD_RESET
PAD_SPI4_CK43PAD_TESTPIN
PAD_SPI4_DI44DVDD45DVDD50DVDD_DDR_CMD
PAD_I2CS_SDA
I2C-SCL
I2C-SDA
20
I2C
I2C-SCL
I2C
I2C-SDA
21
VCC3V3
C1730
100nF
NC
1
PB0
2
GND
PB13PB2
1
2
3
4
5
6
S1700
1
2
3
4
5
6
IC1705
TP265
7
S102
P1
P2
GND
P3
P4
P5
GND
P6
8
7
P1
P2
GND
P3
P4
P5
P6
GND
8
TP263
TP264
1
8
TP262
5
7 246
VCC3V3
VCC
PB3
3
6
5
4
SPI1-SCK
SPI1-SDI
SPI1-SDO
SPI1-CS1N
VSYNC
R169
NC
TP266
R1317
NC
BRI_ADJ
R1720
47R
FRC_SPI_WPN
TP167
TP168
FRC_CSN
FRC_SDO
URSA_RST
R1722
10K
IC1701
NC
1
CE#
2
SO
3
WP#
VSS4SI
150mill
HOLD#
URSA_RST
VDD
SCK
PAD_I2CS_SCL
40
39
C1724
R1721
0R
100nF
FRC-CZ
FRC-SDO
DVDD
AVDDIO_CMD0
AVDDIO_CMD1
FRC SPI Flash
VCC3V3
8
7
6
5
41
42
FRC_SCK
AVDDIO_MCLK
VCC3V3
FRC_SDI
AVDDIO_CMD1/AVDDIO_MCLK
AVDDIO_CMD0
49
46
47
51
48
DVDD_DDR_CMD
FRC_SDO
FRC_CSN
FRC_SCK
FRC_SDI
R1732
4.7K
R17334.7K
R1734
NC
*100MHz, No anyVIA hole!
AVDD_MPLL
PAD_D4P
PAD_D4M54PAD_XTALI
PAD_XTALO
55
53
52
DVDD
R1729
47R
C1727
100nF
FRC_CSN
FRC_SDO
FRC_SPI_WPN
56
PAD_D2P
PAD_D3M
PAD_DCKM58PAD_DCKP
PAD_D3P
PAD_D2M
59
57
60
61
FRC_AVDD_MPLL
TP169
TP170
TP171
TP172
IC1702
1
CS
2
DO
HOLD
3
WP
GND4DI
W25Q80BVSSIG
PAD_D1M
62
SPI_DO
SPI_CZ
SPI_CK
SPI_DI
VCC
CLK
200mill
PAD_D0M
PAD_D1P
64
63
FRC_XTALI
FRC_XTALO
FRC XTAL
8
7
6
FRC_SCK
5
FRC_SDI
R1727
X1700
1 3
24MHz
CL=8pF
C1726
10pF
2
FRC Configuration (H/W Boot Strap)
VCC3V3
5
6
7 2
8
D0_P
D0_N
D1_P
D1_N
D2_P
D2_N
DCK_P
DCK_N
D3_P
D3_N
D4_P
D4_N
FRC_XTALI
1M
4
R1705
4.7K
LVDSD
D0_P
D0_N
D1_P
D1_N
D2_P
D2_N
DCK_P
LVDSD
DCK_N
D3_P
D3_N
D4_P
D4_N
R1728
FRC_XTALO
1k
C1725
10pF
4
FRC-SCK
3
VD_RX
VD_TX
1
2 - 22
Page 49
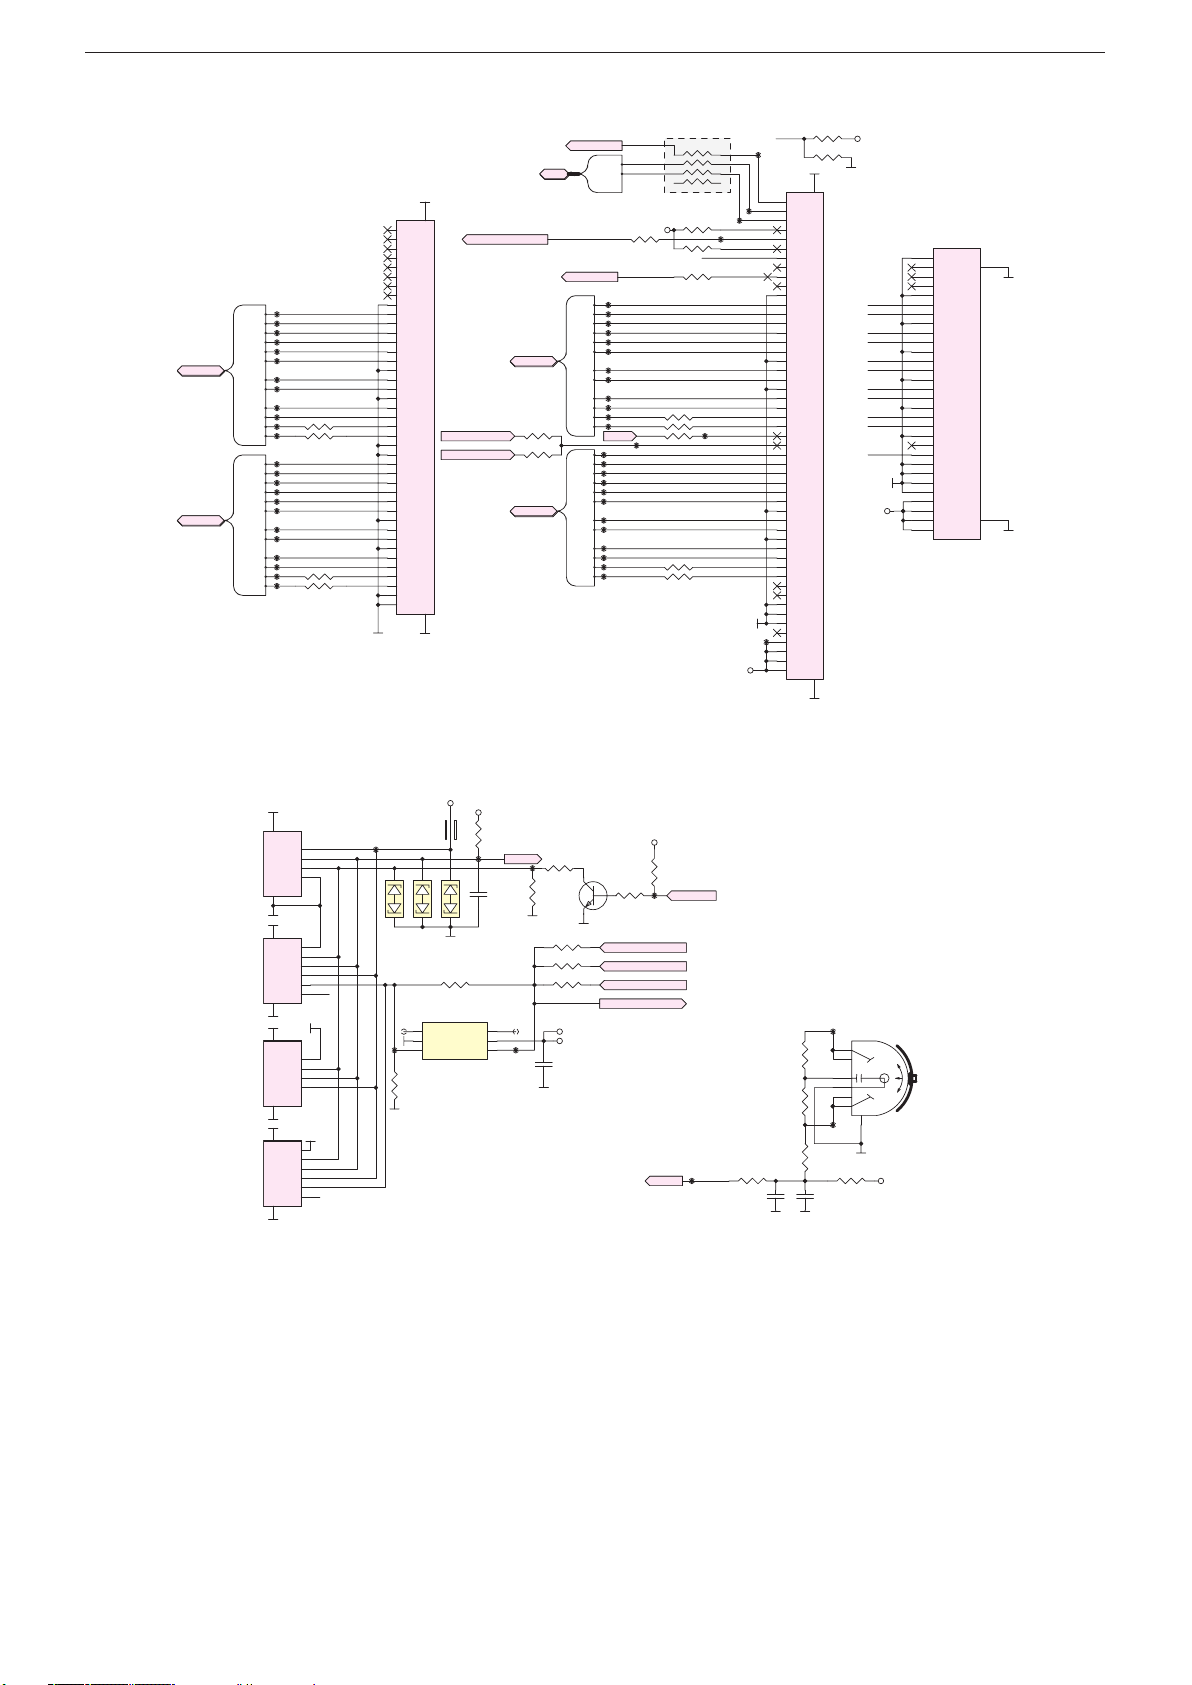
GRUNDIG Service Chassis MK
R1309
FOR UHD
6
5
T
8
7
+5V2_ST
6
5
8
7
Chassisplatte / Chassis Board – LVDS
VESA
NC
R1312
NC
52
GND
GND
53
VCC3V3
PANEL-VCC
A3_P
A3_N
ACK_P
ACK_N
A2_P
A2_N
A1_P
A1_N
A0_P
A0_N
VESA
S1300
1
P1
2
3
4
5
6
7
8
9
10
11
12
13
14
15
16
17
18
19
20
21
22
23
24
25
26
27
28
29
30
31
P2
P31
P3
P4
P5
P6
P7
P8
P9
P10
P11
P12
P13
P14
P15
P16
P17
P18
P19
P20
P21
P22
P23
P24
P25
P26
P27
P28
32
P29
P32
P30
LVDSC
LVDSD
LVDSD
LVDSC
C0_P
C0_N
C1_P
C1_N
C2_P
C2_N
CCK_P
CCK_N
C3_P
C3_N
C4_P
C4_N
D0_P
D0_N
D1_P
D1_N
D2_P
D2_N
DCK_P
DCK_N
D3_P
D3_N
D4_P
D4_N
TP17
TP19
TP21
TP23
TP25
TP52
TP60
TP112
TP136
TP181
TP183
TP194
TP198
TP200
TP202
TP204
TP206
TP208
TP210
TP212
TP214
TP216
TP218
TP220
R1305
R1307
R1310
R1313
BRI_ADJ
I2C-SCL
I2C-SDA
VCC3V3
R1316
0R
UHD_SPDIF
R13040R
R13060R
R1314 0R
TP196
R1308 0R
R1311 0R
R1318
47R*4
4.7K
R1302
3D_FORMAT0
TP15
3D_FORMAT1
VESA
4.7K
R1303
R215
NC
A0_P
A0_N
A1_P
A1_N
A2_P
A2_N
ACK_P
ACK_N
A3_P
A3_N
A4_P
A4_N
TP195
3D_EN
3D_SYNC_PANEL_I
B0_P
B0_N
B1_P
B1_N
B2_P
B2_N
BCK_P
BCK_N
B3_P
B3_N
B4_P
B4_N
PANEL-VCC P1
TP14
TP13
TP2
TP241
S1302
51
P51
50
P50
49
P49
48
P48
47
P47
46
P46
45
P45
44
P44
43
P43
42
P42
41
P41
40
P40
39
P39
38
P38
37
P37
36
P36
35
P35
34
P34
33
P33
32
P32
31
P31
30
P30
29
P29
28
P28
27
P27
26
P26
25
P25
24
P24
23
P23
22
P22
21
P21
20
P20
19
P19
18
P18
17
P17
16
P16
15
P15
14
P14
13
P13
12
P12
11
P11
10
P10
9
P9
8
P8
7
P7
6
P6
5
P5
4
P4
3
P3
2
P2
1
BRI_ADJ
I2C
I2C-SCL
I2C
I2C-SDA
42
S1114
41
P41
40
P40
39
P39
38
P38
37
P37
36
P36
35
P35
34
P34
33
P33
32
C0_P
P32
31
C0_N
P31
30
C1_P
P30
29
C1_N
P29
28
C2_P
P28
27
C2_N
P27
26
P26
25
CCK_P
P25
24
CCK_N
P24
23
P23
22
C3_P
P22
21
C3_N
P21
20
0R
C4_P
P20
19
0R
C4_N
P19
18
P18
17
P17
16
D0_P
P16
15
D0_N
P15
14
D1_P
P14
13
D1_N
P13
12
D2_P
P12
11
D2_N
P11
10
P10
9
DCK_P
P9
8
DCK_N
P8
7
P7
6
D3_P
P6
5
D3_N
P5
4
0R
D4_P
P4
3
0R
D4_N
P3
2
P2
1
P1
GND
3D_SYNC_FRC_O
3D_SYNC_S8_O
GND
43
3D_SYNC_PANEL_O
LVDSA
R1300
R1301
LVDSB
47R
47R
3D_SYNC_PANEL_O
UHD_SPDIF
LVDSA
TP16
A0_P
TP18
A0_N
TP20
A1_P
TP22
A1_N
TP24
A2_P
TP26
A2_N
TP53
ACK_P
TP65
ACK_N
TP127
A3_P
TP180
A3_N
TP182
A4_P
TP192
A4_N
3D_EN
TP197
B0_P
TP199
B0_N
TP201
B1_P
TP203
B1_N
TP205
B2_P
TP207
B2_N
TP209
BCK_P
TP211
BCK_N
TP213
B3_P
TP215
B3_N
TP217
B4_P
TP219
B4_N
LVDSB
Chassisplatte / Chassis Board – Keyboard
VCC3V3-ST
S1500
YY-1654-04SR-NH
4
P4
GND
3
P3
2
P2
1
P1
GND
S1501
1
P1
2
P2
GND
3
P3
4
P4
5
P5
DMY
6
GND
P6
3D OPTION
S1502
1
P1
GND
2
P2
3
P3
4
P4
GND
S1503
1
P1
2
P2
GND
3
P3
4
P4
5
P5
DMY
6
GND
P6
TP242
D1500 D1501 D1502
TP119
R1514
NC
L1500
240R
0.25A
IC1500
1
PB0
2
GND
PB13PB2
NC
0R
R1513
VCC
R1500
10k
IRIN
IRIN
R1503
LED
TP118TP117
6
5
4
TP120
R1505
NC
R1511
R1512
R1510
560R
C1503
100nF
VCC5V
VCC3V3
C1500
47pF
PB3
32
1
T1500
BC847B
47R
47R
47R
3D_SYNC_PANEL_O
3D_SYNC_OUT
VKT190R-6
VKT190R-2
VCC3V3-ST
R1502
47K
R1504
10K
3D_SYNC_S8_O
3D_SYNC_FRC_O
SAR0
PM_PWM
TP246
SAR0
R1509
47R
R1506
1K
R1507
470R
C1501
47pF
TP244
R1508
270R
C1502
100nF
TP245
1
2
T
C
3
4
R1501
1K
E
A
B
SW1500
VCC3V3-S
2 - 23
Page 50
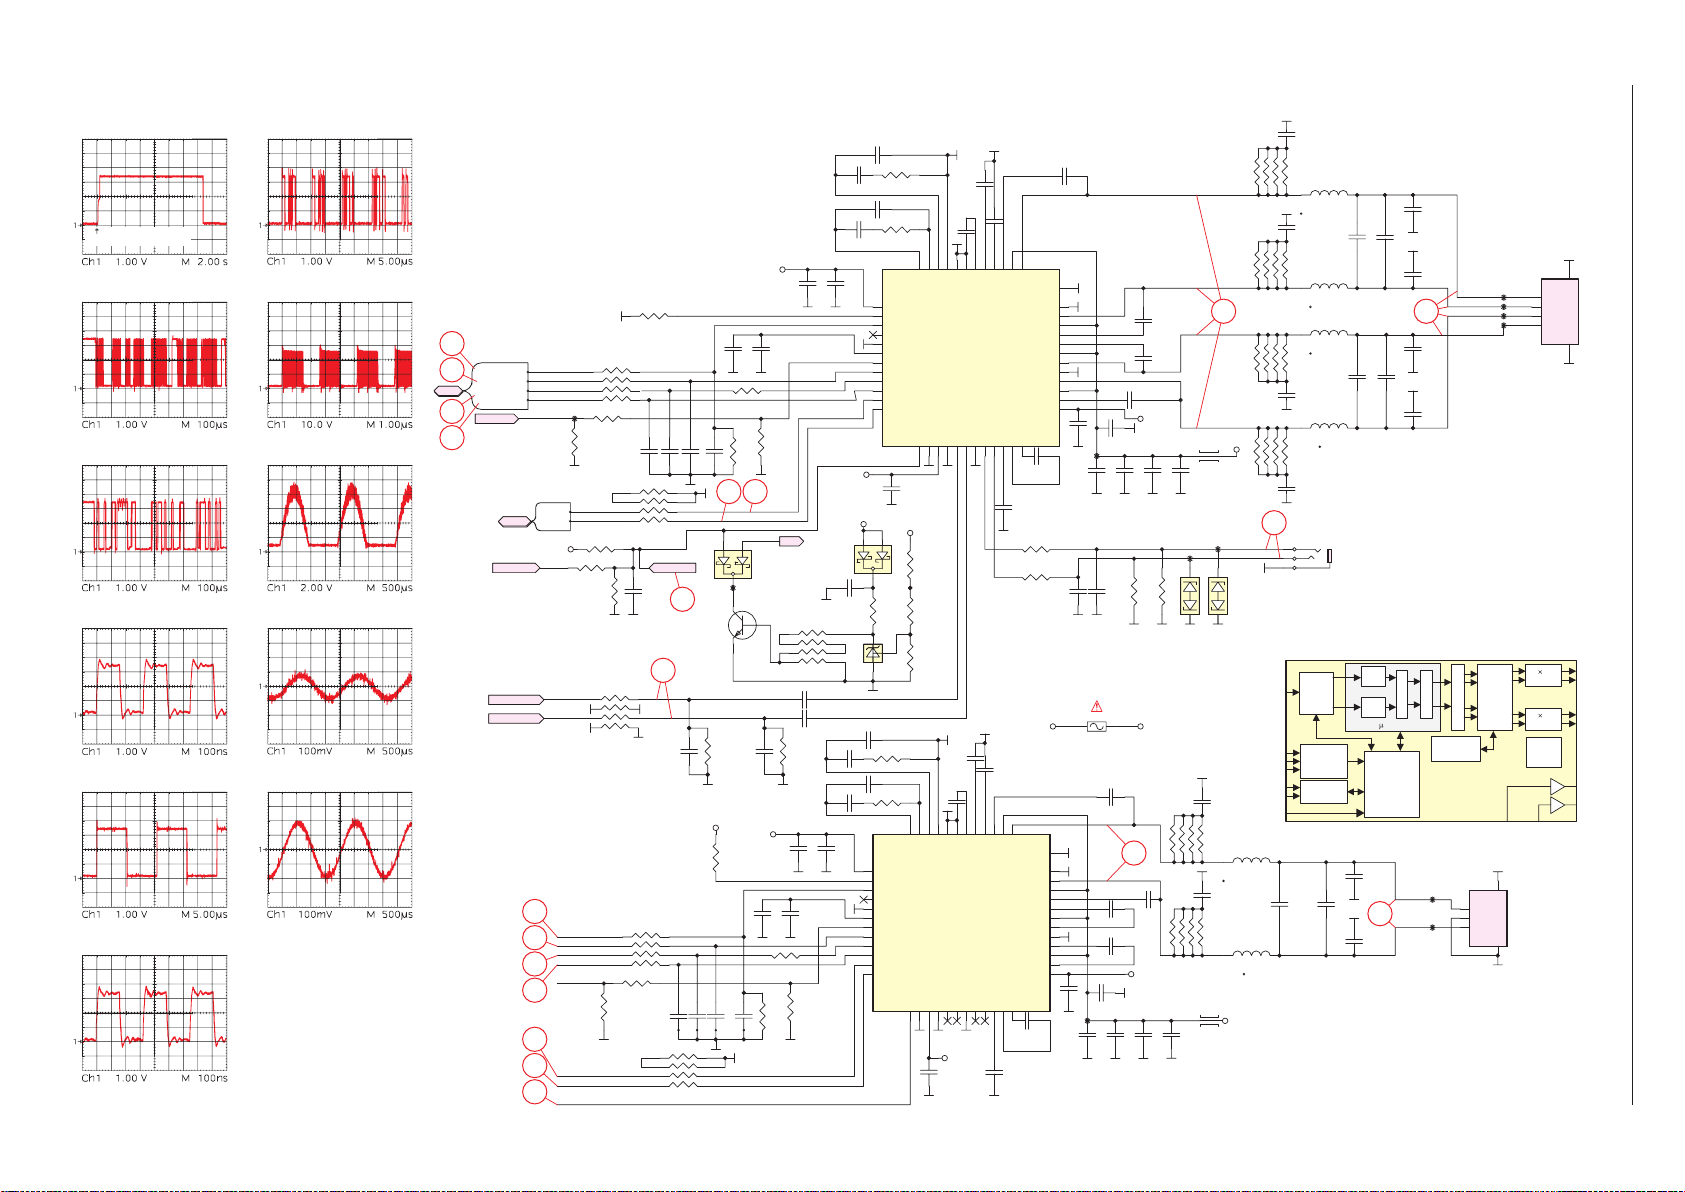
Chassisplatte – Verstärker / Chassis Board – Amplifier
LRCLK
HPL_OUT
T
HPR_INHPL_IN
C902
0
RES_AU
#
)
¡
fl
‡
°
·
‚
=
+
,
GRUNDIG Service Chassis MK
Power on (trigger: +5V2_ST)
2 - 24
HPR
HPL
43
SDIN
MCLK
SCLK
SDA
SCL
330pF50V
RP900
NC/100R
NR 6045T 220M
C910
330p
50V
RP901
NC/100R
NR 6045T 220M
RP902
NC/100R
C924
330p
50V
RP903
NC/100R
C938
330pF
50V
3
2
1
S605
Serial
Audio
Sample Rage
Autodetect
Terminal Control
C962
220nF/50V
L900
L901
NR 6045T 220M
L902
L903
NR 6045T 220M
L
Port
R
and PLL
Serial
Control
C963
NC
C911
220nF
50V
C921
220nF
50V
7 BQ
7 BQ
Microcontroller
System
C959
220nF/50V
41
C967
220nF/50V
C912
NC
C922
NC
DAP
Based
Control
VOLUME
SUBW+
SUBW-
C909
220nF
50V
C913
41
C919
220nF
50V
C925
220nF
50V
220nF
50V
SP_LEFT+
SP_LEFTSP_RIGHT-
SP_RIGHT+
DRC
Click and Pop
Control
TAS5739
3
TP77
2
1
TP78
SRC
S902
TO Woofer
TP68
TP69
TP70
TP71
MOLEX_502585047
th
4
Order
Noise
Shaper
and
PWM
5
P3
GND
P2
P1
GND
4
1
P1
2
P2
3
P3
4
P4
S900
TO Speaker
2HB
FETOut
2HB
FETOut
Protection
Logic
5
6
GND
GND
OUT_A
OUT_B
OUT_C
OUT_D
HPR_OU
C900 4.7nF
C901
R900
470R
47NF
C906 4.7nF
C908
R901
470R
47NF
VCC3V3
R902
4.7K
36
37
I2S
38
39
I2S
I2S_OUT-MCK
I2S_OUT-WS
I2S_OUT-BCK
I2S_OUT-SD
SPKR-EN
I2C
MUTE-AMP
I2S_OUT-MCK
I2S_OUT-WS
I2S_OUT-BCK
I2S_OUT-SD
SPKR-EN
I2C
I2C-SDA
I2C-SCL
VCC3V3
MUTE-AMP
TP72
1
3
4
R906
1k
R908
4.7K
I2C-SDA
I2C-SCL
R912
R915
1k
R917
27K
R904 100R
R910
NC
C928
22pF
1
3
4
8
72
6
5
100R
1UF
C942
C929
22pF
RES_AU
RES_AU
C930
22pF
72
6
5
13
C917
10uF
6.3V
R905
R909
C931
100K
22pF
8
20 21
1
2
3
TP76
32
42
R922
HP_Audio-R
HP_Audio-R
HP_Audio-L
HP_Audio-L
36
37
38
39
21
20
13
I2S_OUT-MCK
I2S_OUT-WS
I2S_OUT-BCK
I2S_OUT-SD
SPKR-EN
I2C-SDA
I2C-SCL
1K
1
3
4
R931 1K
R933
4.7K
R929 100R
1
3
4
C946
3.3N
8
72
6
5
C971
C972
22pF
22pF
R935 100R
R924
220K
VCC3V3
C973
22pF
8
72
6
5
R927
4.7K
C947
3.3N
VCC3V3
C974
22pF
C918
100nF
0R
R907
NC
PD
D901
BAT54CW
T900
BC847B
1
C964
10uF
6.3V
R930
R934
100K
C914
10uF 6.3V
PD
BAT54CW
R920
1
3
4
10K
1UFC944
1UFC945
R923
220K
C957
10uF
6.3V
C965
100nF
0R
R932
NC
C915
100nF
VCC3V3
D900
C943
10UF
8
72
6
5
C958
100nF
+5V2_ST
1
C949
47NF
C954
47NF
13
14
15
16
17
18
19
20
21
22
23
24
IC900
13
14
15
16
17
18
19
20
21
22
23
24
C937
100nF
2
3
R918
10K
2
IC901
3
AP432SRG-7
C948
4.7nF
R925 470R
C952
4.7nF
R926 470R
IC902
AVDD
A0/FAULT
MCLK
NC
DVSS
VR_DIG
/PDN
LRCLK
SCLK
SDIN
SDA
SCL
AVDD
A0/FAULT
MCLK
NC
DVSS
VR_DIG
/PDN
LRCLK
SCLK
SDIN
SDA
SCL
V_AUDIO
R916
R919
1
R921
1.2K%1
12
VR_ANA
/RESET
25
12
11
10
11
VR_ANA
PLL_FLTP
PLL_FLTM
/RESET25STEST26DVDD
27
NC
2.7K %1
100nF
10
9
AVSS
PLL_FLTP
PLL_FLTM
TAS5739MD
STEST26DVDD27DVSS
28
C981
100nF
C903
2.2n
C907
100nF
9
8
7
GND
AVSS
AGND
TAS5739MD
DVSS
HPR_IN29HPL_IN
30
28
C950
2.2n
C953
7
8
6
GND
VREG
AGND
HPR_IN
HPL_IN30HP_GND31HPR_OUT
29
VCC3V3
6
31
5
32
5
VREG
HP_GND
32
4
SSTIMER
33
C904
4
SSTIMER
GVDD_OUT
HPR_OUT
HPL_OUT
33
C951
1UF 25V
3
BST_A
GVDD_OUT
HPL_OUT
HPVSS
34
1UF 25V
2
3
BST_A
PVDD_A
PGND_AB
PGND_CD
PVDD_D
HPVSS34CPN35CPP
C939
10uF 6.3V
V_AUDIO
2
1
OUT_A
PVDD_A
PGND_AB
OUT_B
PVDD_B
BST_B
BST_C
PVDD_C
OUT_C
PGND_CD
OUT_D
PVDD_D
BST_D
HPVDD
CPN
CPP
35
36
1UF25V
C980
1UF25V
1
EPAD
OUT_A
OUT_B
PVDD_B
BST_B
BST_C
PVDD_C
OUT_C
OUT_D
BST_D
HPVDD
36
C936
1UF 25V
R903
0R
R911
0R
EPAD
C979
33nF50V
C941
10nF
C969
1UF
C905
1UF
C926
49
48
47
46
45
44
43
42
41
40
39
38
37
49
48
47
46
45
44
43
42
41
40
39
38
37
C932
10uF
35V
F900
5A
C927
100nF
TP73
C933
10uF
35V
C940
10nF
C955
33nF 50V
C923
33nF 50V
C934
10uF
35V
R9131KR914
1K
C916
33nF 50V
C920
33nF 50V
VCC3V3
VCC19V
40
C961
C966
33nF
33nF 50V
50V
C968
33nF 50V
VCC3V3
C970
100nF
TP79
C976
C975
C977
10uF
10uF
10uF
35V
35V
35V
C935
10uF
35V
C978
10uF
35V
40
V_AUDIO
30R
L904
4A
TP74
TP75
D902 D903
C956
330pF50V
RP904
NC/100R
C960
330pF50V
RP905
NC/100R
4A
30R
L908
L906
NR 6045T 220M
L907
NR 6045T 220M
V_AUDIO
Page 51
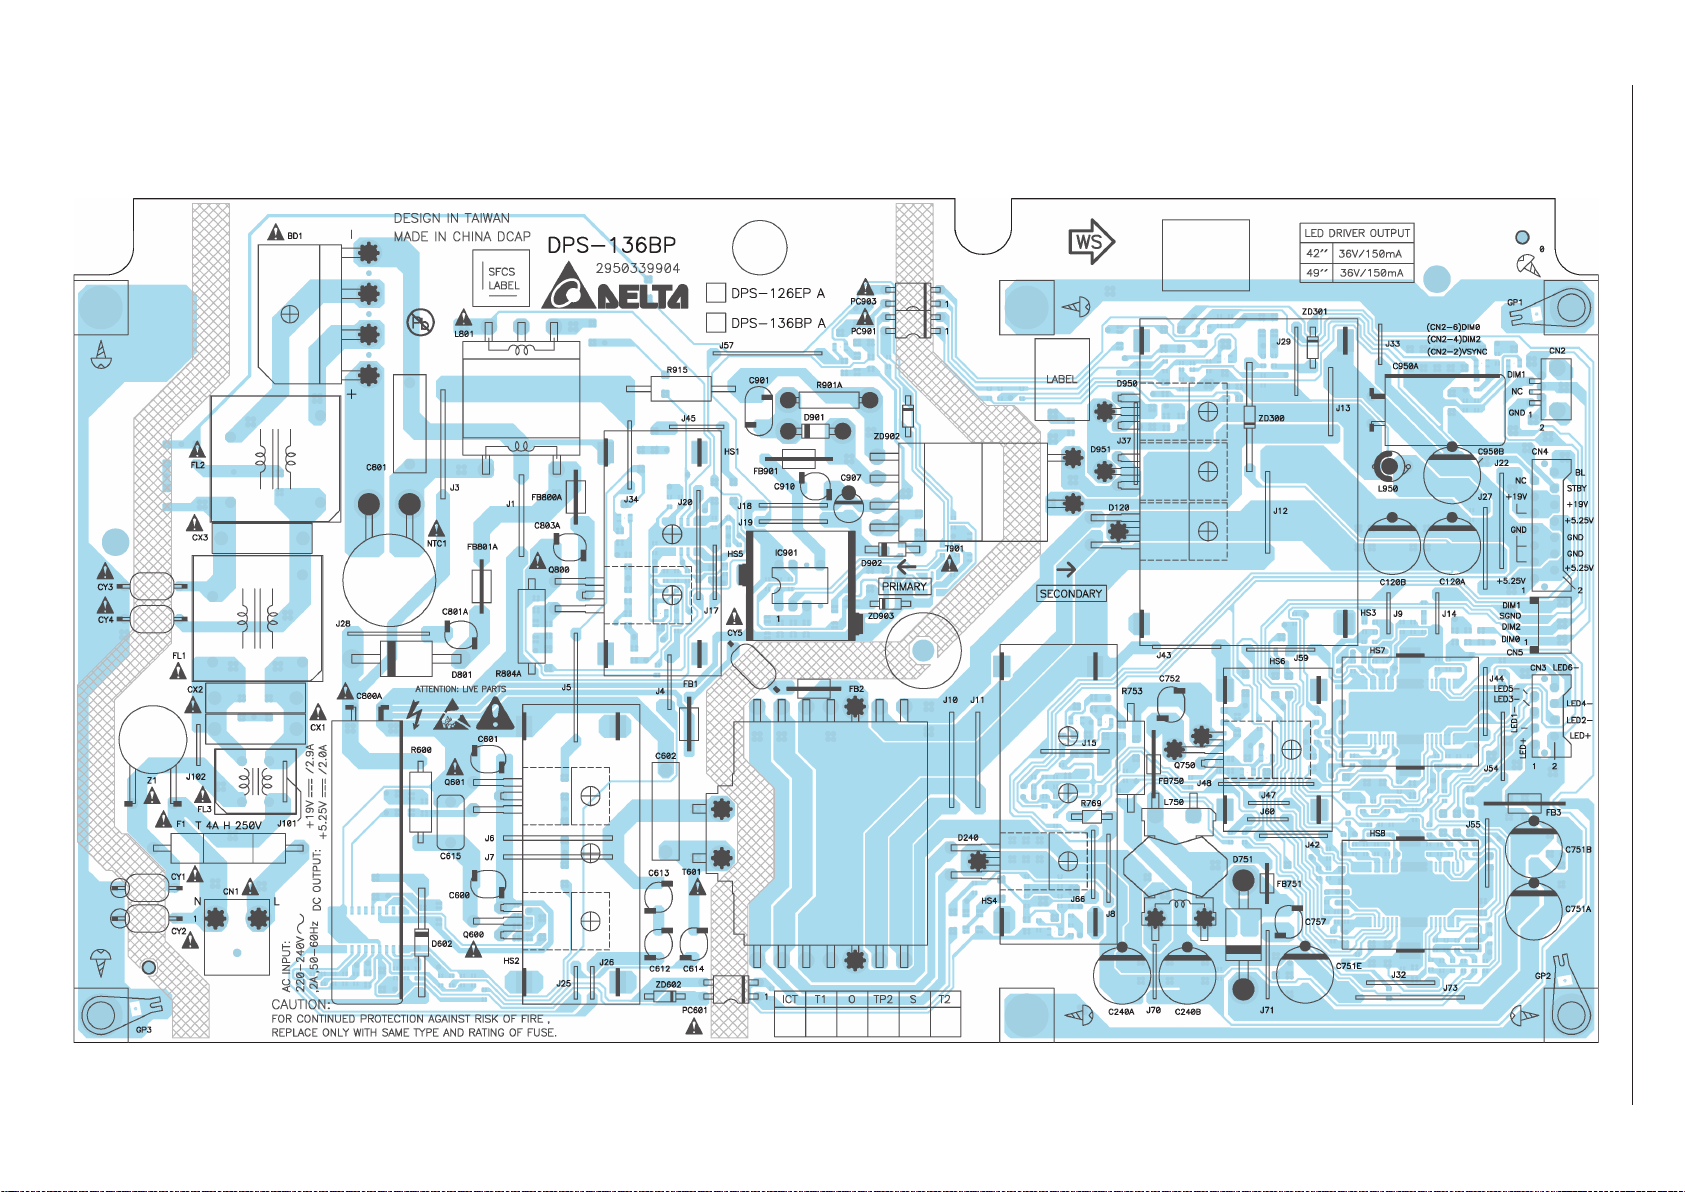
Netzteil / Power Supply DPS-126BP A / DPS-136BP A Ansicht von der Bestückungsseite / View of Component Side
2 - 25
GRUNDIG Service Chassis MK
Page 52
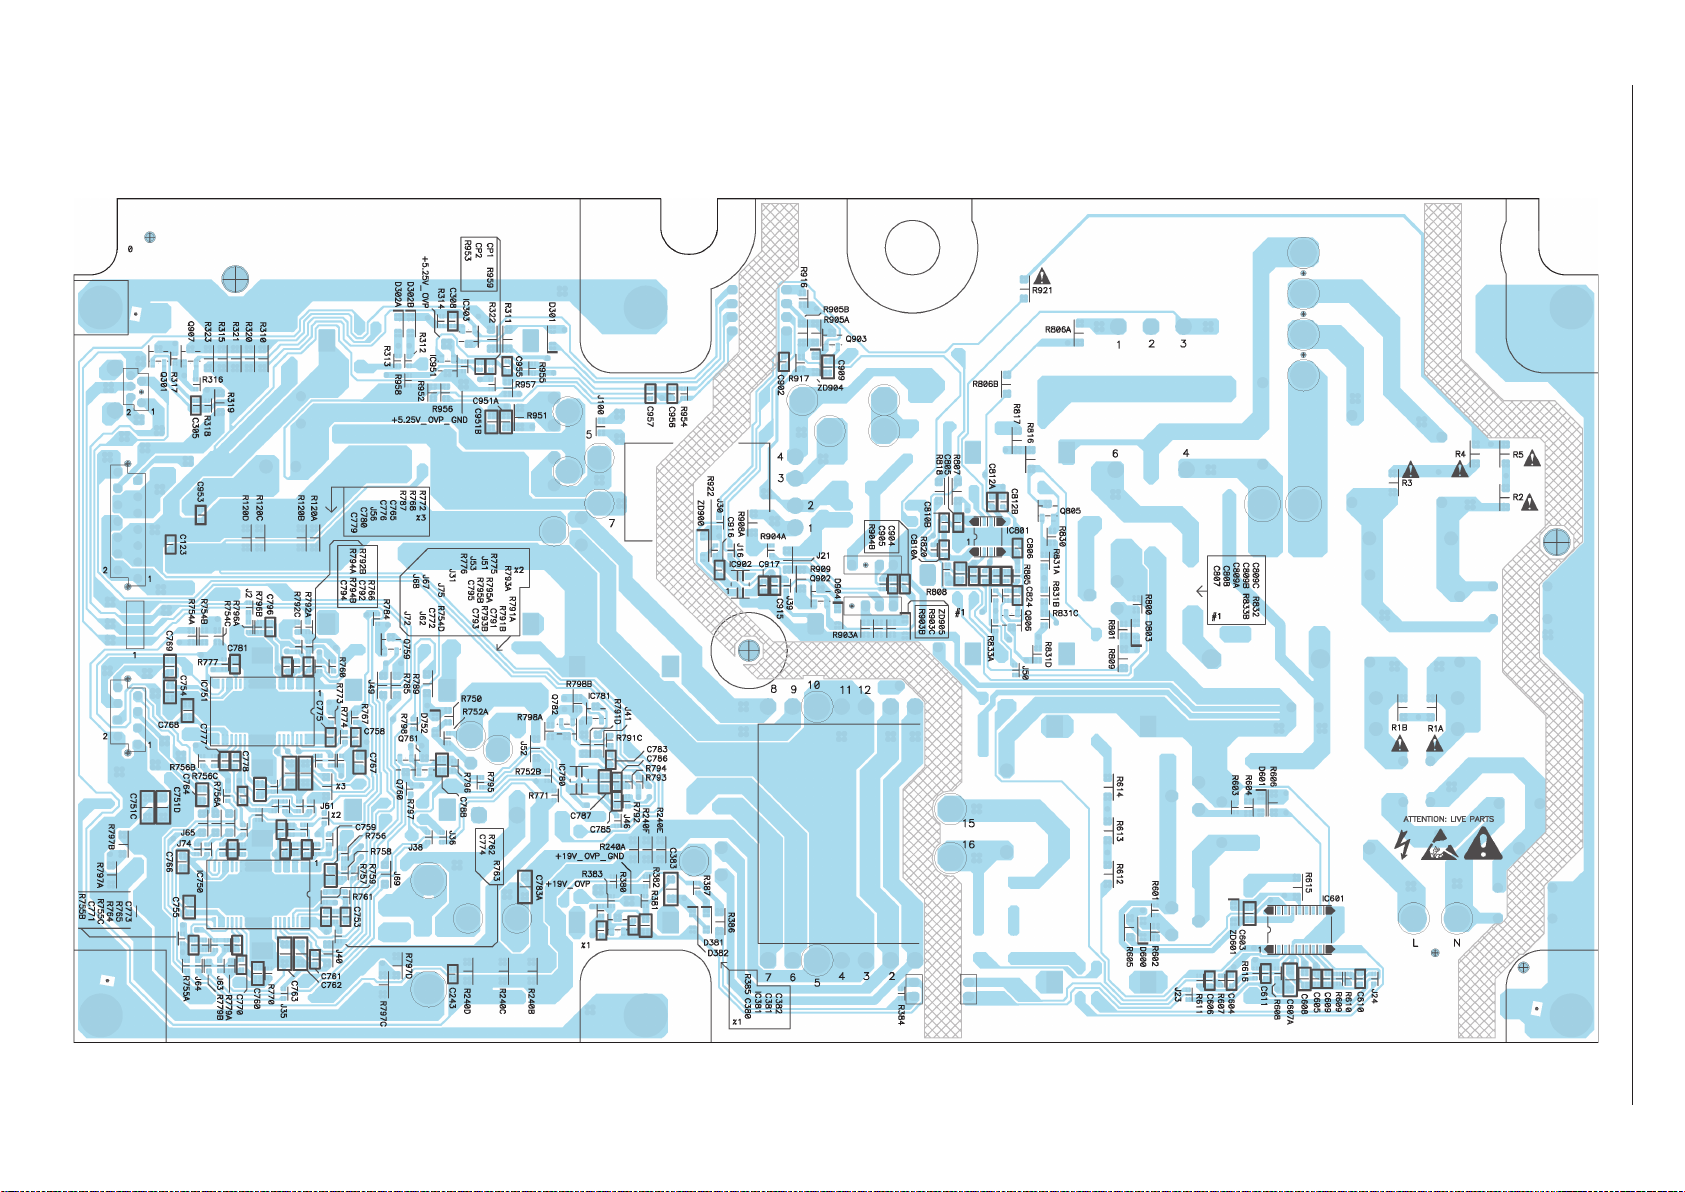
Netzteil / Power Supply DPS-126BP A / DPS-136BP A Ansicht von der Lötseite / View of Solder Side
2 - 26
GRUNDIG Service Chassis MK
Page 53
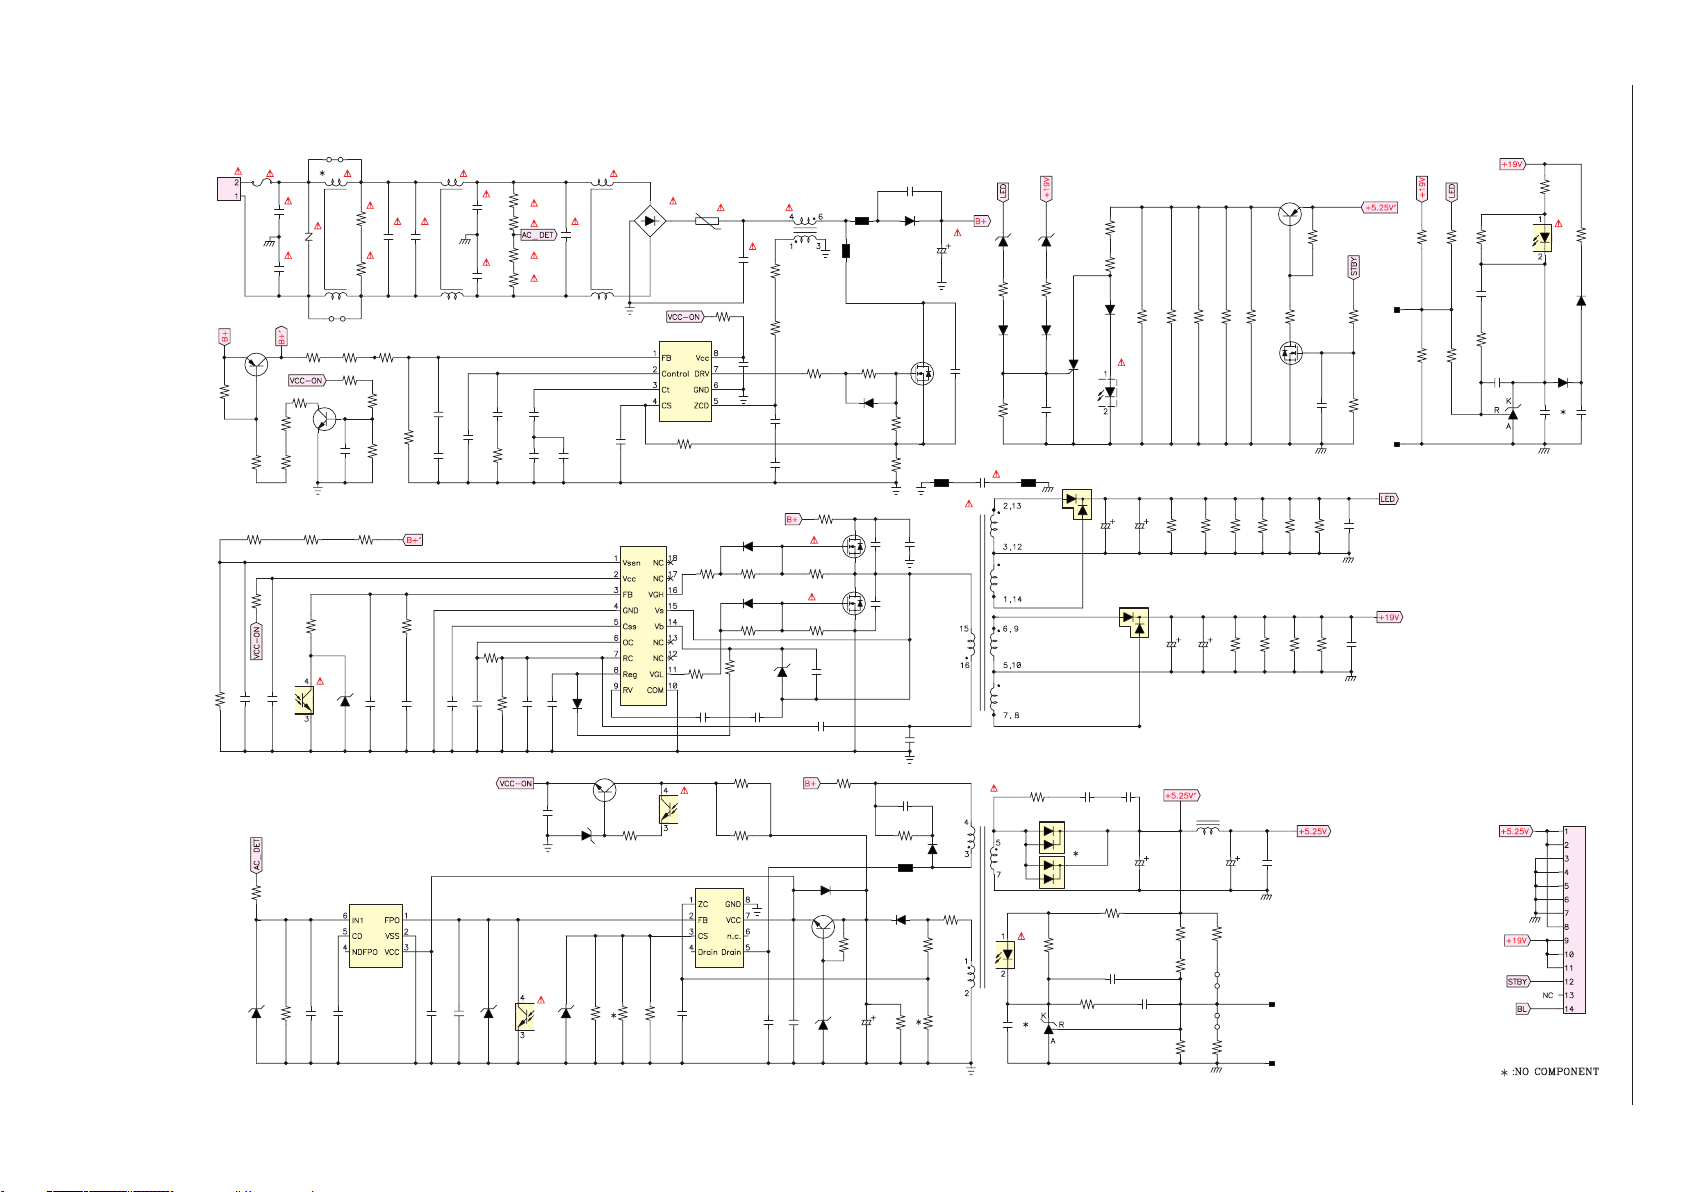
Netzteil / Power Supply DPS-126BP A / DPS-136BP A
J102
CN1
F1 FL1 FL2FL3
L
N
2 - 27
Q805
R830
R831A
R612 R613
R607
R611
C606
R921
ZD900
CY1CY2
R816
R831D
R831B R831C
C604
R922
Z1
J101
R817 R818
Q806
R616
1/2 PC601
C916
C915
R833A
C824
R614
ZD602
IC902
R1AR1B
R833B
R832
C611
CX1
R820
R608
C607A
CX2
C917
GRUNDIG Service Chassis MK
C801A
Q903
BD1
NTC1
R807
IC801
R805
C806
IC601
R605
R606
C612
R905B
R916
R903C
PC903
R905A
1/2
IC901
R903B
C905
R903A
D600
D601
R615
C613
C801C805
C910
R806AR806B
C812A
C812B
L801
ZD601
R809
R601R602
R603R604
C904
C614
D904
Q902
R600
Q600
Q601
C603
R915
ZD903
FB801A
FB800A
R801
D803
R909
C907
C600C601
C901
R901A
FB901
D902
D801
IC303
D240
C951A C951B
D951
R956
C956
R955
IC951
R322
R311
D301
PC903
1/2
C240A
D120
C955
R320
C240B
C950A
R310
R240A
C120A
R952
R957R953
R315
R240B
C120B
L950
ZD300
ZD301
C800A
R312
R313
D302B
D302A
Q800
C803A
R314
FB2
C957
C308
R951T901
D950
R954
PC901
1/2
R800R804A
FB1
CY5
T601
C615
C602
D901
R908A
R904AR904B
R917
R2
CY3CY4
R5
CX3
R4
R3
C608
C902
C808
R610
C605
C807
C809A
R808
C809B
C809C
R609
ZD902
C609
D602
C610
C909
ZD904
ZD905
PC901
1/2
C810AC810B
CP1 CP2
R958R959
R321
R240C
R120A
C950B
Q907
R323
R240D
R120B
C953
+5.25V_OVP
+5.25V_OVP_GND
R317
Q301
R240E
R120C
R316
C305
R240F
R120D
+19V_OVP
R319
R318
+19V_OVP_GND
C243
C123
R381 R382
R380
R383
R384
C380
R385
C381
R386
R387
PC601
1/2
D381
D382
C382
IC381
C383
CN4
Page 54
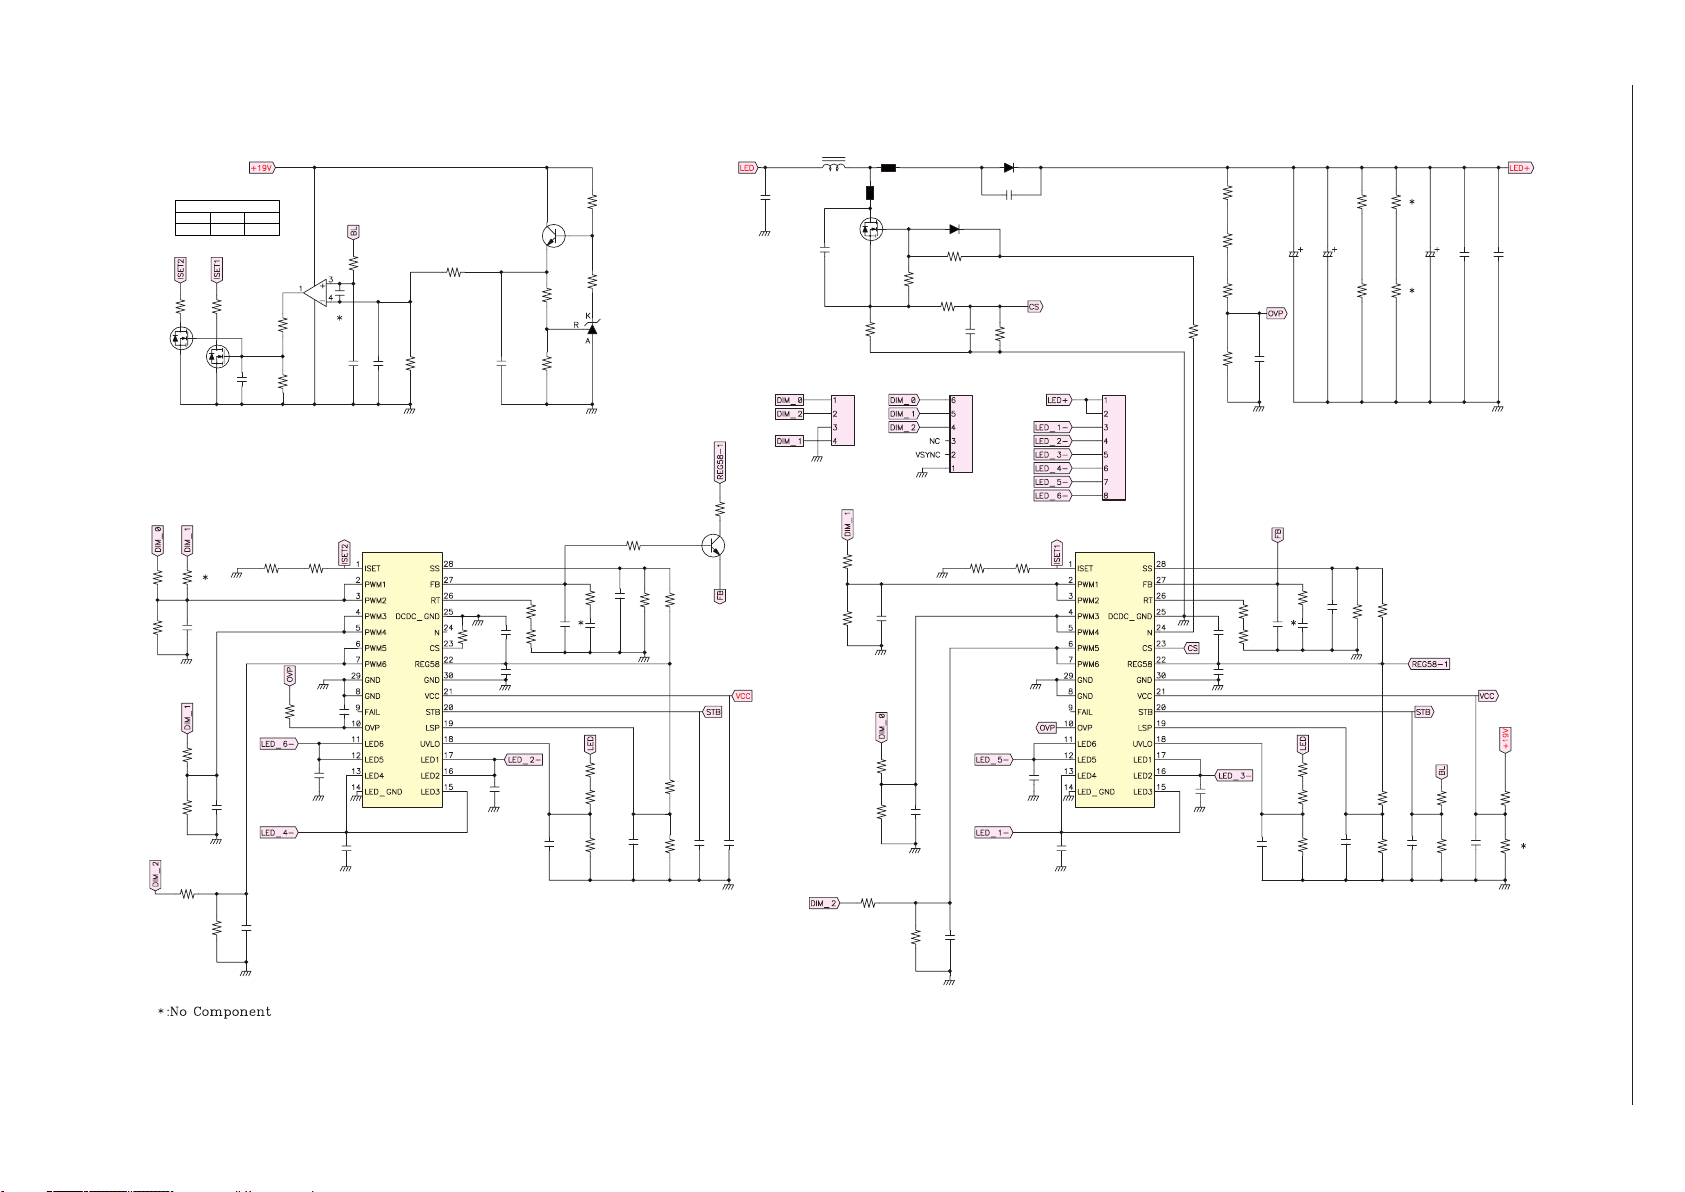
Netzteil / Power Supply DPS-126BP A / DPS-136BP A
L750
GRUNDIG Service Chassis MK
2 - 28
Power Table
RefDes +19V SGND
IC78025
R797
R798
Q761
Q760
R792C
R792AR792B
IC780
C788
R760 R766
R777
R795R796
C781
C787
R792
C785
C786
IC751
R794
R793
R787
C783
C765
C776
R768R772
Q782
R791C
R791D
C758
R767
C767
R798A
R798B
IC781
R784
C775
R773
Q759
R774
R785
D752
R750
D751
C757
C761
R771
CN2
R756R758
CN3
IC750
R789
R759
C763
C762
R754AR754BR754CR754D
R761
C772
C753
C751A
R757
C759
C751B
C774
R797AR797B
R762
R763R764
R797CR797D
C751E
C751D
C751C
FB751
C752
CN5
FB750
Q750
R752A
R752B
R753
R791AR791B
C791
C783A
R796A
R794AR794B C792
C794
R796B
C796
C754
C769
C768
C777
R795A
R793AR793B
C793
C795
R795B
C766
C755
C764
C771
R755AR755B
C760
R769
R770
R779B
C773
R755C
R765
C770
R779A
R756AR756B
R756C
C779
R775
R776
C778
C780
Page 55
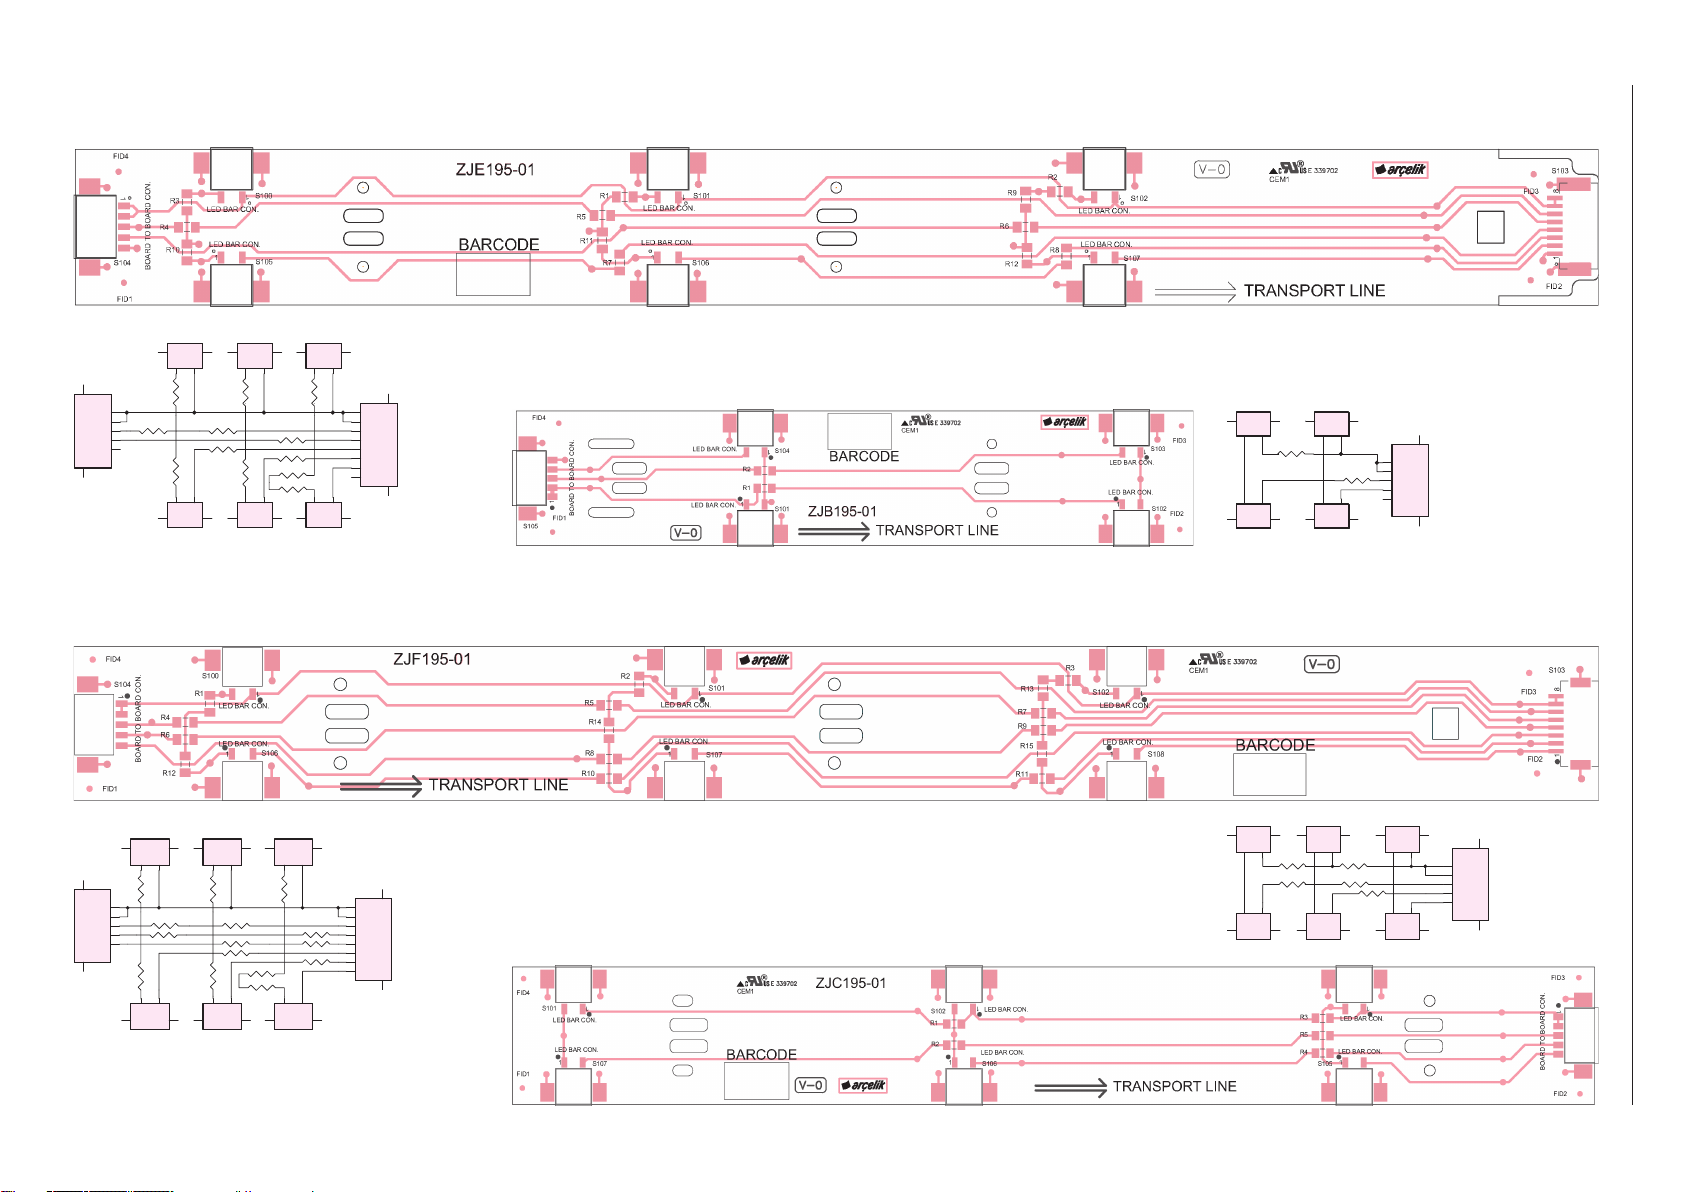
Docking-Platte / Board ZJE195-01
CON2+2
S102
CON2+2
S103
7
6
CON2+2
CON2+2
CON2+2
S100
S101
S102
CON2+2
S102
K
S101
CON2+2
S103
CON2+2
7
6
CON2+2
CON2+2
CON2+2
S100
S101
S102
Ansicht von der Bestückungsseite / View of Component Side
GRUNDIG Service Chassis MK
CON2+2
3
2
S104
1
P1
GND
2
P2
3
R4
P3
4
P4
5
P5
GND
4
S105
R3
R10
P11P2
P11P2
R5
R7
2
4
3 4
3
CON2+2
2
R1
R11
P11P2
S106
P11P2
R6
R8
R9
R12
2
CON2+2
3 4
34
S107
2
R2
P11P2
P11P2
9
8
P8
7
P7
GND
6
P6
5
P5
4
P4
3
P3
2
P2
1
GND
P1
2
10
34
2 - 29
Docking-Platte / Board ZJF195-01
Ansicht von der Bestückungsseite / View of Component Side
GND
GND
S104
P1
P2
P3
P4
P5
3
1
2
3
4
5
4
CON2+2
2
R4
R6
S106
R1
R12
P11P2
2
P11P2
CON2+2
4
3
2
R5
R8
R10
3
S107
R2
R14
P11P2
2
P11P2
CON2+2
3
4
R13
R15
34
4
P11P2
2
R3
S103
9
8
P8
7
P7
GND
6
P6
5
R7
R9
R11
2
P11P2
4
S108
P5
4
P4
3
P3
2
P2
1
GND
P1
10
3
Docking-Platte / Board ZJB195-01
Ansicht von der Bestückungsseite / View of Component Side
Docking-Platte / Board ZJC195-01
Ansicht von der Bestückungsseite / View of Component Side
CON2+2
3
S103
CON2+2
3
4
S107
2
P11P2
2
P11P2
S101
CON2+2
4
3 4
P11P2
R1
2
34
4
P11P2
R1
R2
2
3
2
R2
P11P2
S104
CON2+2
3 4
2
2
P11P2
S106
P11P2
2
P11P2
R3
R5
34
34
CON5+2ERKEK
3
R4
1
2
3
4
5
S105
CON2+2
2
S105
P1
P2
P3
P4
P5
P11P2
6
GND
GND
7
4
P11P2
2
34
S104
1
P1
2
P2
3
P3
4
P4
5
P5
CON5+2ERKE
6
GND
GND
7
Page 56
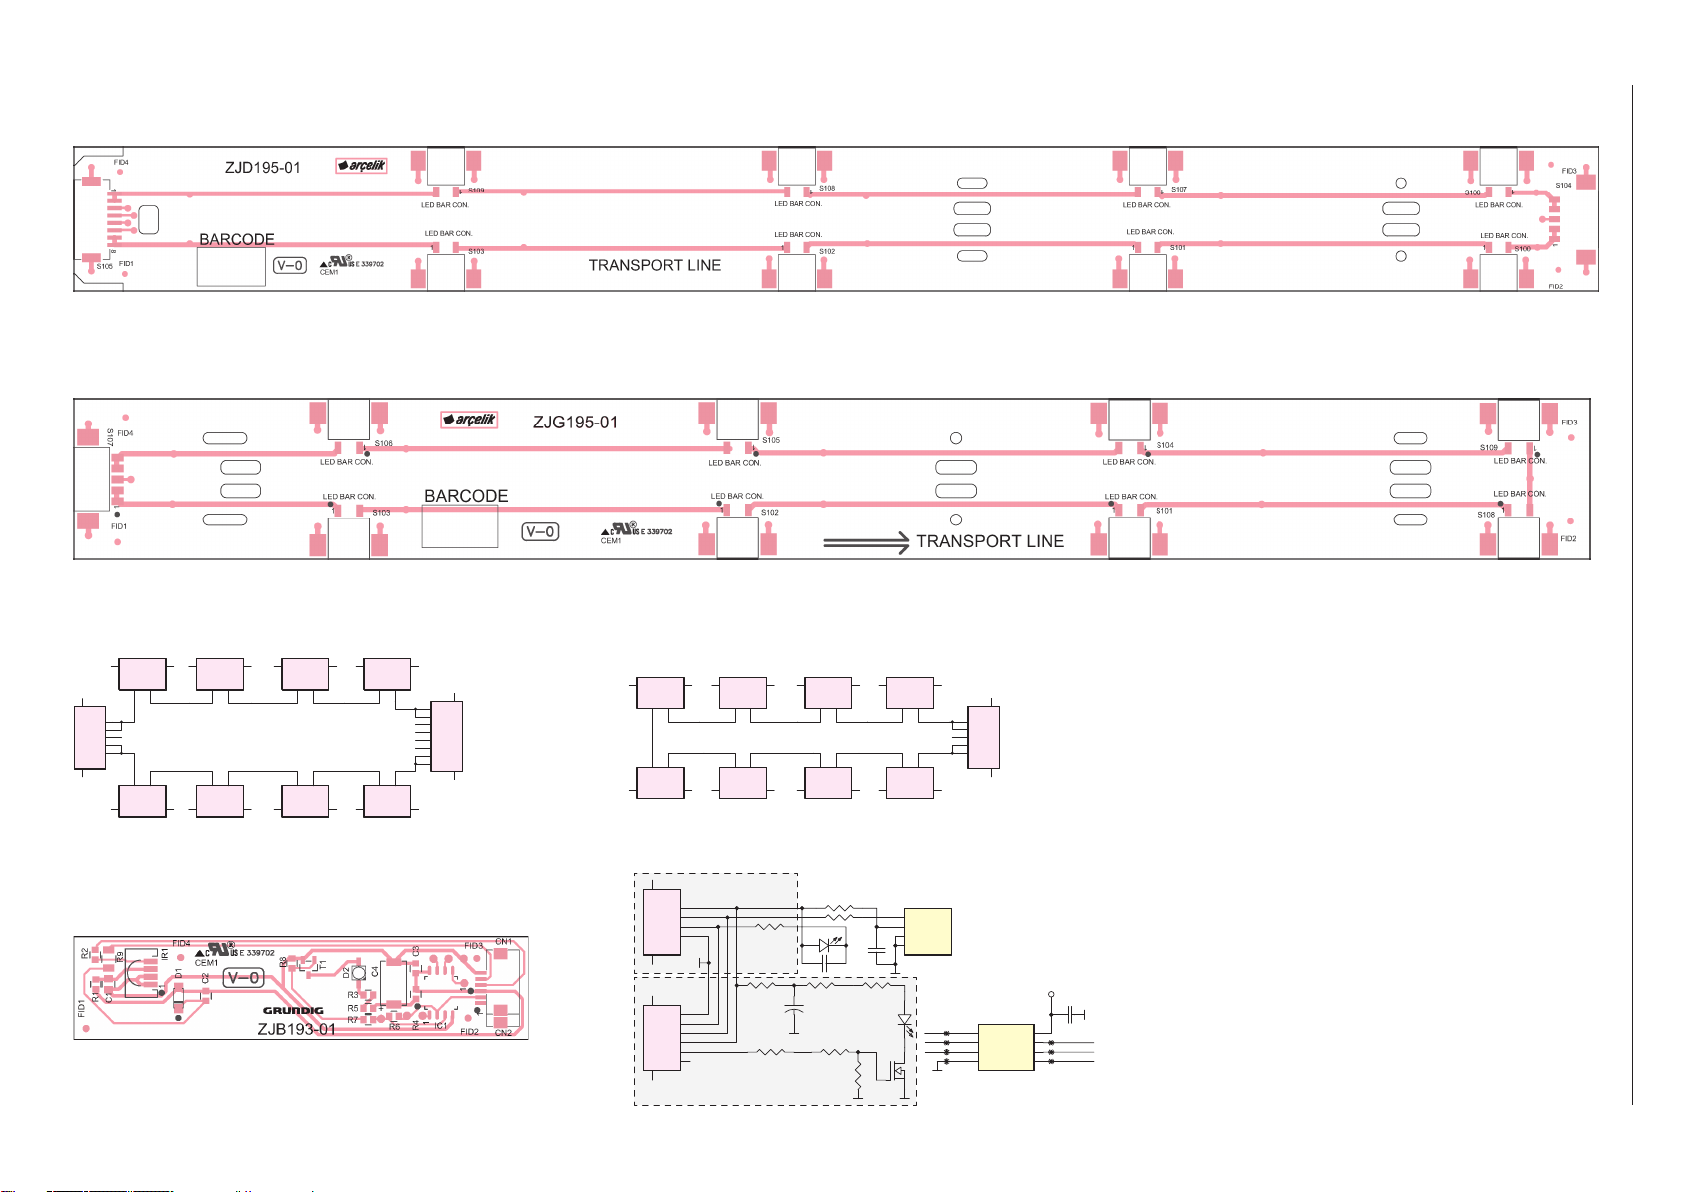
Docking-Platte / Board ZJD195-01
Ansicht von der Bestückungsseite / View of Component Side
Docking-Platte / Board ZJG195-01
Ansicht von der Bestückungsseite / View of Component Side
2 - 30
Docking-Platte / Board ZJD195-01 Docking-Platte / Board ZJG195-01
GRUNDIG Service Chassis MK
6
S104
P1
GND
P2
P3
P4
P5
GND
7
S100
3 4
2
1
2
3
4
5
S106
P11P2
P11P2
2
S101
3 4
34
S107
2
P11P2
P11P2
2
3 4
34
S102
S108
2
P11P2
P11P2
2
S103
3 4
34
S109
2
P11P2
P11P2
S105
9
8
P8
7
P7
GND
6
P6
5
P5
4
P4
3
P3
2
P2
1
GND
P1
2
10
34
IR-/LED-Platte / Board ZJB193-01
Ansicht von der Bestückungsseite / View of Component Side
S108
3 4
P11P2
2
2
P11P2
S109
5
CN1
P1
GND
P2
P3
P4
GND
6
3D
8
CN2
P6
P5
GND
P4
P3
P2
GND
P1
7
34
VCC
1
IR_OUT
2
LED_B
3
4
6
5
4
3
2
1
S101
S104
SYNC
P11P2
2
2
P11P2
WITHOUT 3D
R9
R4
R6
150R
4
3 4
34
0R
8.2R
+
LED
R5
S102
S105
D1
C4
2
R1
R2
P11P2
10NFC2
8.2R
R7
150R
P11P2
2
R8
10K
3
34
150R
150R
C1
10UF
R3
DMN3150L-7
T1
1
S103
2
P11P2
S106
4
OUT
3
VS
2
GND/NC
1
GND
IR1
TSOP35436TT
0R
D2
32
P11P2
2
Reset
SYNC
LED
4
6
S107
1
P1
GND
2
P2
3
P3
4
P4
5
P5
GND
7
34
VCC
VCC
C3
10NF
8
SCK
7
PB2
MISO
6
TP3
PB1
MOSI
5
TP5
TP7
IC1
1
PB5
2
TP1
PB3
3
TP2
PB4
TP4
GND4PB0
TP6
ATTINY13
Page 57

Ersatzteilliste
Spare Parts List
ǵ
TV
Ersatzteilliste
Spare Parts List
GRUNDIG Service Chassis MK
ǵ
TV
3 - 1
10 / 2015 42 VLE 8500 B0
Pos. Fig. Material-Nr. Ref.
001.000 759551812500 GEH.- VORDERTEIL SCHWARZ FRONT CABINET BLACK
002.000 759551829000 RUECKWAND SCHWARZ BACK COVER BLACK
003.000 759551802000 GEH.- MITTELTEIL SCHWARZ CABINET MIDDLEPART BLACK
005.000 759551793000 STANDFUSS SCHWARZ STANDFOOT BLACK
005.100 759551703500 STANDFUSS SCHRAUBE SCHWARZ M4X12 STANDFOOT SCREW BLACK M4X12
015.000 759551829100 LAUTSPRECHER 8R 10/15W 192x30MM SPEAKER 8R 10/15W 192x30MM
019.000 759551525500 KABEL DISPLAY-LVDS 410MM CABLE DISPLAY -LVDS 410MM
020.000! 057D42-A15 * LCD BMS 056D42-A04 KT Z9 *1 LCD BMS 056D42-A04 KT Z9 *1
020.000! 057D42A15P * LCD BMS 056D42A04P KT/Z9-CF *2*3 LCD BMS 056D42A04P KT/Z9-CF *2*3
020.001! 052D42LG2 * LCD LG LC420DUJ-SGE1 *1 LCD LG LC420DUJ-SGE1 *1
020.001! 052D42LG2P * LCD LC420DUJ-SGE1 FHD 2D PL *2*3 LCD LC420DUJ-SGE1 FHD 2D PL *2*3
020.002! ZBA60600-AA * LED BAR 42 - 6 LI A TIP ATHENA LED BAR 42 - 6 LI A TIP ATHENA
020.003! ZBB60600-AA * LED BAR 42 - 6 LI B TIP ATHENA LED BAR 42 - 6 LI B TIP ATHENA
020.100! 759551790300 T-CON MODUL (XVZ) *1 T-CON BOARD (XVZ) *1
021.000 759551713400 KABEL 400MM 6P CABLE 400MM 6P
021.100 759551827400 KABEL CHASSIS-NETZTEIL 350MM 14P CABLE CHASSIS-POWER 350MM 14P
022.000! 759551806900 NETZKABEL 42 MIT NETZSCHALTER POWER CORD 42 WITH POWER SWITCH
023.000! 275990321800 NETZTEIL LED KT LIPS (ZKK) POWER SUPPLY LED KT LIPS (ZKK)
024.000! 759551737800 NETZSCHALTER OHNE HALTER POWER SWITCH WITHOUT HOLDER
025.000! 275991237000 X CHASSISMODUL MK (J19) *1 CHASSIS BOARD MK (J19) *1
025.000! 275991237100 X CHASSISMODUL MK (J1B) *2 CHASSIS BOARD MK (J1B) *2
025.000! 275991240000 X CHASSISMODUL MK (J12) *3 CHASSIS BOARD MK (J12) *3
027.000 759551800700 FERNBEDIENUNG TS3 NETFLIX REMOTE CONTROL TS3 NETFLIX
027.100 759551844400 FERNBEDIENUNG TS5-R5 NETFLIX *3 REMOTE CONTROL TS5-R5 NETFLIX *3
028.000 720117145300 FERNBEDIENUNG TP EASY SCHWARZ REMOTE CONTROL TP EASY BLACK
031.000 759551789900 IR/LED MODUL (ZMJ) IR/LED BOARD (ZMJ)
032.000 759551786600 IR-EMPFAENGER TSOP36438TT IR-RECEIVER TSOP36438TT
033.000 759551549100 LED-SMD 1206 BLAU 250MCD 3.3V LED-SMD 1206 BLUE 250MCD 3.3V
034.000 759551786700 FLACHBANDKABEL 4P 1MM 120MM FFC 4P 1MM 120MM
038.000 759551790000 WIFI MODUL WIFI BOARD
038.100 759551825700 VERBINDUNGSKABEL USB 6P 300MM CABLE USB 6P 300MM
090.000 759551790100 KARTON 42 CARTON 42
091.000 759551790200 POLSTER KOMPLETT CUSHION COMPLETE
Part No.
PAM000 * 42 VLE 8500 B0 42 VLE 8500 B0
Bezeichnung
d
PRODUKTCODE PAM PRODUCT CODE PAM
Hinweis:
Sollte in dieser Ersatzteilliste Ihr "Product Code"
oder Ihre Display-Variante nicht aufgeführt sein,
finden Sie eine aktualisierte Version auf dem
Service-Portal "http://service.grundig.de".
* KEIN ERSATZTEIL * NO SPARE PART
X = SIEHE GESONDERTE E-LISTE X = SEE SEPARATE PARTS LIST
DIE BEDIENUNGSANLEITUNG IST THE INSTRUCTION MANUAL CAN BE
UEBER FOLGENDER ADRESSE ABRUFBAR: DOWNLOAD FROM ADRESS:
WWW.GRUNDIG.DE/SERVICE/DOWNLOADS WWW.GRUNDIG.DE/SERVICE/DOWNLOADS
BESTELL-NR. / ORDER NO.: PAM000 (PAM)
Description
©
Note:
If your "Product Code" or display variant is not
mentioned in the spare parts list, please look
for a current version at the service portal
"http://service.grundig.de".
10 / 2015 49 VLE 8500 B0
Pos. Fig. Material-Nr. Ref.
001.000 759551812600 GEH.- VORDERTEIL SCHWARZ FRONT CABINET BLACK
002.000 759551811000 RUECKWAND SCHWARZ BACK COVER BLACK
003.000 759551792800 GEH.- MITTELTEIL SCHWARZ CABINET MIDDLEPART BLACK
005.000 759551793000 STANDFUSS SCHWARZ STANDFOOT BLACK
005.100 759551703500 STANDFUSS SCHRAUBE SCHWARZ M4X12 STANDFOOT SCREW BLACK M4X12
015.000 759551829100 LAUTSPRECHER 8R 10/15W 192x30MM SPEAKER 8R 10/15W 192x30MM
019.000 759551600400 KABEL DISPLAY-LVDS 500 MM CABLE DISPLAY-LVDS 500 MM
020.000! 057D49-A17 * LCD BMS 056D49-A05 KT Z9 LCD BMS 056D49-A05 KT Z9
020.001! 052D49LG3 * LCD LG LC490DUY-SHA1 FHD LCD LG LC490DUY-SHA1 FHD
020.002! ZBC60600-AA * LED BAR 49 6 LI A TIP ATHENA LED BAR 49 6 LI A TIP ATHENA
020.003! ZBD60600-AA * LED BAR 49 6 LI B TIP ATHENA LED BAR 49 6 LI B TIP ATHENA
021.000 759551775100 KABEL 6 PIN 550 MM CABLE 6 PIN 550 MM
021.100 759551827300 KABEL CHASSIS-NETZTEIL 550MM 14P CABLE CHASSIS-POWER 550MM 14P
022.000! 759551805300 NETZKABEL 49 MIT NETZSCHALTER POWER CORD 49 WITH POWER SWITCH
023.000! 275990322100 NETZTEIL LIPS (ZJC) POWER BOARD LIPS (ZJC)
024.000! 759551737800 NETZSCHALTER OHNE HALTER POWER SWITCH WITHOUT HOLDER
025.000! 275991236900 X CHASSISMODUL MK (J1E) *1 CHASSIS BOARD MK (J1E) *1
025.000! 275991239900 X CHASSISMODUL MK (PAL) *2 CHASSIS BOARD MK (PAL) *2
027.000 759551800700 FERNBEDIENUNG TS3 NETFLIX *1 REMOTE CONTROL TS3 NETFLIX *1
027.000 759551844400 FERNBEDIENUNG TS5-R5 NETFLIX *2 REMOTE CONTROL TS5-R5 NETFLIX *2
028.000 720117145300 FERNBEDIENUNG TP EASY SCHWARZ REMOTE CONTROL TP EASY BLACK
031.000 759551789900 IR/LED MODUL (ZMJ) IR/LED BOARD (ZMJ)
032.000 759551786600 IR-EMPFAENGER TSOP36438TT IR-RECEIVER TSOP36438TT
033.000 759551549100 LED-SMD 1206 BLAU 250MCD 3.3V LED-SMD 1206 BLUE 250MCD 3.3V
034.000 759551786700 FLACHBANDKABEL 4P 1MM 120MM FFC 4P 1MM 120MM
038.000 759551790000 WIFI MODUL WIFI BOARD
038.100 759551825700 VERBINDUNGSKABEL USB 6P 300MM CABLE USB 6P 300MM
090.000 759551802100 KARTON 49 CARTON 49
091.000 759551807100 POLSTER 4-TEILIG CUSHION 4 PARTS
Part No.
PAL000 * 49 VLE 8500 B0 49 VLE 8500 B0
Bezeichnung
d
PRODUKTCODE PAL PRODUCT CODE PAL
Hinweis:
Sollte in dieser Ersatzteilliste Ihr "Product Code"
oder Ihre Display-Variante nicht aufgeführt sein,
finden Sie eine aktualisierte Version auf dem
Service-Portal "http://service.grundig.de".
* KEIN ERSATZTEIL * NO SPARE PART
X = SIEHE GESONDERTE E-LISTE X = SEE SEPARATE PARTS LIST
DIE BEDIENUNGSANLEITUNG IST THE INSTRUCTION MANUAL CAN BE
UEBER FOLGENDER ADRESSE ABRUFBAR: DOWNLOAD FROM ADRESS:
WWW.GRUNDIG.DE/SERVICE/DOWNLOADS WWW.GRUNDIG.DE/SERVICE/DOWNLOADS
BESTELL-NR. / ORDER NO.: PAL000 (PAL)
Description
©
Note:
If your "Product Code" or display variant is not
mentioned in the spare parts list, please look
for a current version at the service portal
"http://service.grundig.de".
Es gelten die Vorschriften und Sicherheitshinweise gemäß dem Service Manual "Sicherheit", Mat.-Nummer 720108000001, sowie zusätzlich die eventuell abweichenden, landesspezifischen Vorschriften!
The regulations and safety instructions shall be valid as provided by the
S
"Safety" Service Manual, part number 720108000001, as well as the
respective national deviations.
( ! )
ÄNDERUNGEN VORBEHALTEN / SUBJECT TO ALTERATION
Es gelten die Vorschriften und Sicherheitshinweise gemäß dem Service Manual "Sicherheit", Mat.-Nummer 720108000001, sowie zusätzlich die eventuell abweichenden, landesspezifischen Vorschriften!
The regulations and safety instructions shall be valid as provided by the
S
"Safety" Service Manual, part number 720108000001, as well as the
respective national deviations.
( ! )
ÄNDERUNGEN VORBEHALTEN / SUBJECT TO ALTERATION
Page 58

Ersatzteilliste
Spare Parts List
GRUNDIG Service Chassis MK
ǵ
TV
3 - 2
9 / 2015 55 VLE 8500 B0
Pos. Fig. Material-Nr. Ref.
001.000 759551800500 GEH.- VORDERTEIL SCHWARZ FRONT CABINET BLACK
002.000 759551807200 RUECKWAND SCHWARZ BACK COVER BLACK
003.000 759551830100 GEH.-MITTELTEIL SCHWARZ CABINET MIDDLEPART BLACK
005.000 759551793000 STANDFUSS SCHWARZ STANDFOOT BLACK
005.100 759551703500 STANDFUSS SCHRAUBE SCHWARZ M4X12 STANDFOOT SCREW BLACK M4X12
015.000 759551798600 LAUTSPRECHER 8R 15/18W 182x30MM SPEAKER 8R 15/18W 182x30MM
018.000 759551622500 KABEL LVDS 51 P 600MM CABLE LVDS 51 P 600MM
019.000 759551719100 KABEL LVDS 400MM CABLE LVDS 400MM
020.000
020.001 S 052D55SS5 * LCD LSC550HF02 FHD100Hz LCD LSC550HF02 FHD100Hz
020.002 S ZBJ60600-AB * LED BAR 55 - 8 LI A TIP APOLLON LED BAR 55 - 8 LI A TIP APOLLON
020.003 S ZBK60600-AB * LED BAR 55 - 8 LI B TIP APOLLON LED BAR 55 - 8 LI B TIP APOLLON
020.004 S ZBL60600-AB * LED BAR 55 - 7 LI C TIP APOLLON LED BAR 55 - 7 LI C TIP APOLLON
020.005 S ZBM60600-AB * LED BAR 55 - 7 LI D TIP APOLLON LED BAR 55 - 7 LI D TIP APOLLON
020.100 S 759551830200 T-CON MODUL (XMP) T-CON BOARD (XMP)
021.100 759551827200 KABEL CHASSIS-NETZTEIL 600MM 14P CABLE CHASSIS-POWER 600MM 14P
022.000 S 759551805200 NETZKABEL 55 MIT NETZSCHALTER POWER CORD 55WITH POWER SWITCH
023.000 S 275990322500 NETZTEIL (ZJG) POWER SUPPLY (ZJG)
024.000 S 759551737800 NETZSCHALTER OHNE HALTER POWER SWITCH WITHOUT HOLDER
025.000 S 275991236800 X CHASSISMODUL MK (J1D) CHASSIS BOARD MK (J1D)
027.000 759551800700 FERNBEDIENUNG TS3 NETFLIX REMOTE CONTROL TS3 NETFLIX
028.000 720117145300 FERNBEDIENUNG TP EASY SCHWARZ REMOTE CONTROL TP EASY BLACK
031.000 759551789900 IR/LED MODUL (ZMJ) IR/LED BOARD (ZMJ)
032.000 759551786600 IR-EMPFAENGER TSOP36438TT IR-RECEIVER TSOP36438TT
033.000 759551549100 LED-SMD 1206 BLAU 250MCD 3.3V LED-SMD 1206 BLUE 250MCD 3.3V
034.000 759551830600 FLACHBANDKABEL 4P 1MM 300MM FFC 4P 1MM 300MM
038.000 759551790000 WIFI MODUL WIFI BOARD
038.100 759551825900 VERBINDUNGSKABEL USB 6P 400MM CABLE USB 6P 400MM
090.000 759551798400 KARTON 55 CARTON 55
091.000 759551798500 POLSTER 4-TEILIG CUSHION 4-PARTS
Part No.
PAK000 * 55 VLE 8500 B0 55 VLE 8500 B0
S 057D55-A40 * LCD BMS 056D55-A14 KT/Z9-DA-Z8 LCD BMS 056D55-A14 KT/Z9-DA-Z8
Bezeichnung
d
PRODUKTCODE PAK PRODUCT CODE PAK
Hinweis:
Sollte in dieser Ersatzteilliste Ihr "Product Code"
oder Ihre Display-Variante nicht aufgeführt sein,
finden Sie eine aktualisierte Version auf dem
Service-Portal "http://service.grundig.de".
* KEIN ERSATZTEIL * NO SPARE PART
X = SIEHE GESONDERTE E-LISTE X = SEE SEPARATE PARTS LIST
DIE BEDIENUNGSANLEITUNG IST THE INSTRUCTION MANUAL CAN BE
UEBER FOLGENDER ADRESSE ABRUFBAR: DOWNLOAD FROM ADRESS:
WWW.GRUNDIG.DE/SERVICE/DOWNLOADS WWW.GRUNDIG.DE/SERVICE/DOWNLOADS
BESTELL-NR. / ORDER NO.: PAK000 (PAK)
Description
©
Note:
If your "Product Code" or display variant is not
mentioned in the spare parts list, please look
for a current version at the service portal
"http://service.grundig.de".
Es gelten die Vorschriften und Sicherheitshinweise gemäß dem Service Manual "Sicherheit", Mat.-Nummer 720108000001, sowie zusätzlich die eventuell abweichenden, landesspezifischen Vorschriften!
The regulations and safety instructions shall be valid as provided by the
S
"Safety" Service Manual, part number 720108000001, as well as the
respective national deviations.
( ! )
ÄNDERUNGEN VORBEHALTEN / SUBJECT TO ALTERATION
Page 59
Chassis SUGRUNDIG Service
275991236800
275991236900
275991237000
275991237100
275991239900
275991240000
Pos.
D804
Part Number
759551832600
Description
DIO-SMD ESD PRTR5V0U2X SOT143B
PCB
Code
D809
F900
S
IC101
IC102
759551832600
759551778400
DIO-SMD ESD PRTR5V0U2X SOT143B
FUSE-SMD 5A 63V 0603 FAST ACT
759551282700
759551282700
IC-CHIP NL17SZ32DFT2 G SOT353
IC-CHIP NL17SZ32DFT2 G SOT353
IC103
IC104
IC105
IC107
759551817500
759551781600
IC-SMD TPS54335ADRCR QFN
IC-SMD TPS562200DDCR SOT23-6
759551781600
759551771500
IC-SMD TPS562200DDCR SOT23-6
IC-SMD XC8107AC10MR-G SOT23-5
IC108
IC110
IC112
IC113
759551781600
759551817500
IC-SMD TPS562200DDCR SOT23-6
IC-SMD TPS54335ADRCR QFN
759551781600
759551781500
IC-SMD TPS562200DDCR SOT23-6
IC-SMD TPS542941RSAR
IC114
IC115
IC200
759551606300
759551817500
IC-SMD XC8102AA01GR-G USP-4
IC-SMD TPS54335ADRCR QFN
759551778700
759551830500
IC-SMD MSD8361MVT-YS BGA
IC-SMD MSD8361MVT-002D(DTS) NDVX
IC201
IC500
IC501
IC700
759551561000
759551780100
IC-SMD APX812-29UG-7
IC-SMD K4B4G1646D-BCMATDT FBGA
759551778900
759551771600
IC-SMD K4B2G1646Q-BCMATDT FBGA
IC-SMD DRV632PWR TSSOP
IC800
IC801
IC802
IC803
759551771500
759551606600
IC-SMD XC8107AC10MR-G SOT23-5
IC-SMD CAT24C02TDI-GT3A TSOT23-5
759551606600
759551606600
IC-SMD CAT24C02TDI-GT3A TSOT23-5
IC-SMD CAT24C02TDI-GT3A TSOT23-5
IC804
IC900
IC901
IC1200
759551606600
759551771800
IC-SMD CAT24C02TDI-GT3A TSOT23-5
IC-SMD TAS5739MDPHPR QFP
759551605900
759551777400
IC-SMD AP432SRG-7 SOT23R
IC-SMD K9F4G08U0E-SCB0T00
IC1400
IC1401
IC1403
IC1600
759551771500
759551771400
IC-SMD XC8107AC10MR-G SOT23-5
IC-SMD XC8107AC05MR-G SOT23-5
759551771400
759551606600
IC-SMD XC8107AC05MR-G SOT23-5
IC-SMD CAT24C02TDI-GT3A TSOT23-5
IC1700
IC1702
L100
759551790900
759551783300
IC-SMD MST7468BB EPLQFP
IC-SMD MST7438BB EPLQFP
759551551200
759551781300
IC-SMD W25Q80BVSSIG
BOB-SMD 6.3UH 3.6A 0.036R 6*6*4.5
L108
L110
L112
L113
759551561300
759551561300
SMD SPULE 3.3UH 2A
SMD SPULE 3.3UH 2A
759551770500
759551770600
COIL-SMD 2.2UH 1.48A 3*3*1.5
BOB-SMD 4.7UH 3.1A 4.9*4.9*4.1
L114
L116
L122
L123
759551770600
759551770500
BOB-SMD 4.7UH 3.1A 4.9*4.9*4.1
COIL-SMD 2.2UH 1.48A 3*3*1.5
759551781400
759551781400
BOB-SMD 2.2UH 3A 0.042R 4*4*1.8
BOB-SMD 2.2UH 3A 0.042R 4*4*1.8
L900
L901
L902
L903
759551562500
759551562500
SMD SPULE 22UH 1.9A
SMD SPULE 22UH 1.9A
759551562500
759551562500
SMD SPULE 22UH 1.9A
SMD SPULE 22UH 1.9A
S200
S605
S702
S703
759551616000
759551781100
CON RJ45MAG TS-20001-1 DIK
KOPFHOERERBU. STEREO 3.5MM H=13MM
759551616200
759551561700
CON SCART LOCK VERT.
CONN. OPT JACK TOSLINK-TX
S800
S801
S802
S900
759551498700
759551606900
CON.500254-1927 MOLEX HDMI
CON-SMD HDMI 13MM VERT.
759551606900
759551833300
CON-SMD HDMI 13MM VERT.
CON-SMD 4PIN 1.5MM FEMALE HOR.
S906
S1102
S1401
S1402
759551498700
759551801900
CON.500254-1927 MOLEX HDMI
CON USB30 9PIN DIK
759551807600
759551807600
CONN.USB-001-A HORZ. BLACK
CONN.USB-001-A HORZ. BLACK
S1404
S1502
S1600
S1601
759551833700
759551834100
CON-SMD 6PIN 1.5MM FEMALE HOR.
CON-SMD 4PIN 1MM H=6MM YTK KLTL
759551501300
759551781100
BUCHSE VGA (DSUB15)
KOPFHOERERBU. STEREO 3.5MM H=13MM
S1700
SW1500
T100
T101
759551833800
759551825000
KON-SMD 6PIN 1MM KLTL YTK
SWITCH NAV. 5 POLE L=1.2MM PA9T
759551098200
759551388500
TRANS BC847BPDW1T
TRANS-CHIP PMV65XP P-CH
T102
T103
T104
T700
759551098300
759551098200
TRANS BC847BDW1T1
TRANS BC847BPDW1T
759551616300
759551098200
TRN-SMD DMN2004DWK-7 20V N-DUAL SOT363
TRANS BC847BPDW1T
T801
T802
T803
X200
759551098300
759551098300
TRANS BC847BDW1T1
TRANS BC847BDW1T1
759551098300
759551562100
TRANS BC847BDW1T1
QUARZ-CHIP 24MHZ
X1700
759551562100
QUARZ-CHIP 24MHZ
Chassis MK
J1D
J1E
J19
X
X
X
XX
XX
X
X
X
X
XXX
X
XXX
X
X
X
X
X
XXX
X
XXX
X
X
X
X
XXX
X
XX
X
X
X
X
XXX
X
XXX
X
X
X
X
X
XXX
X
XXX
X
X
X
X
X
XXX
X
XXX
X
X
X
X
X
XXX
X
XXX
X
X
X
X
XX
XXX
X
X
X
X
X
XXX
X
XXX
X
X
X
X
X
XXX
X
XXX
X
X
X
X
X
XXX
X
XXX
X
X
X
X
X
XXX
X
XXX
X
X
X
X
X
XXX
XX
X
X
X
X
XXX
X
XXX
X
XXXXX
X
XXXX
XXX
X
X
X
X
X
XXX
X
XXX
X
X
X
X
X
XXX
X
XXX
X
XXX
J1B
PAL
X
J12
X
XXX
XX
X
X
X
XXX
X
XXX
X
X
X
X
X
XXX
X
XXX
X
X
X
X
X
XXX
X
X
X
X
X
X
XXX
X
XXX
X
X
X
X
X
XXX
X
XXX
X
X
X
X
X
XXX
X
XXX
X
X
X
X
X
XXX
X
XXX
X
X
X
X
X
XX
XXX
X
X
X
X
XXX
X
XXX
X
X
X
X
X
XXX
X
XXX
X
X
X
X
X
XXX
X
XXX
X
X
X
X
X
XXX
X
XXX
X
X
X
X
X
XXX
X
XX
X
X
X
X
X
XXX
X
XXX
X
X
X
X
X
X
X
XXX
X
X
X
X
X
XXX
XXX
X
X
X
X
X
XXX
X
XXX
X
X
X
X
X
XXX
X
XXX
X
X
X
X
X
XXX
Chassis MKGRUNDIG Service
Ersatzteilliste / Spare Parts List
10 / 2015
3 - 3
3 - 3
TV
CHASSISMODUL / CHASSIS BOARD MK
 Loading...