

VALVE ROUGH SET
CONJUNTO DE VÁLVULAS
This product complies with NSF61/9, ASME/ANSI A112.18.1
and CSA B 125 Standards.
Este se encuentra conforme con losestandares de NSF61/9,
producto
de ASME/ANSI A112.18.1 y de CSA B 125.
Dear Customer Estimado Cliente
ENGLISH
Thank you for selecting our product. We are confident we can fully satisfy Muchas gracias por elegir nuestro producto. Estamos seguros que podemos
your expectations by offering you a wide range of technologically advanced satisfacer completamente sus expectativas ofreciéndole una amplia variedad
products which directly result from our many years of experience in faucet
and fitting production.
For easy installation of your Para la instalación fácil de su producto
GRAFF product you will need: de la GRAFF usted necesitará:
to READ ALL the instructions completely before beginning, LEER TODAS las instrucciones completamente antes de comenzar,
to READ ALL the warnings, care and maintenance information. LEER TODA la información sobre las advertencias,
You should have the following tools: cuidado y mantenimiento.
Hacksaw or Tubing Cutter
Solder
Rags
Propane Torch
(115mm)
4-1/2"
ENGLISH
Model
Modelo
8xØ3/16"
(Ø5mm)
Installation Instructions Instrucciones de Instalación
de productos tecnológicamente avanzados que resultan directamente de
muchos años de experiencia en grifos y su producción apropiada.
Usted debe tener las herramientas siguientes:
Sierra para metales o cortatubos
Suelda
Trapos
Soplete de propano
1020
14 1312 1215
~
ESPANOL
~
ESPANOL
(108mm)
(110mm)
4-1/4"
4-3/8"
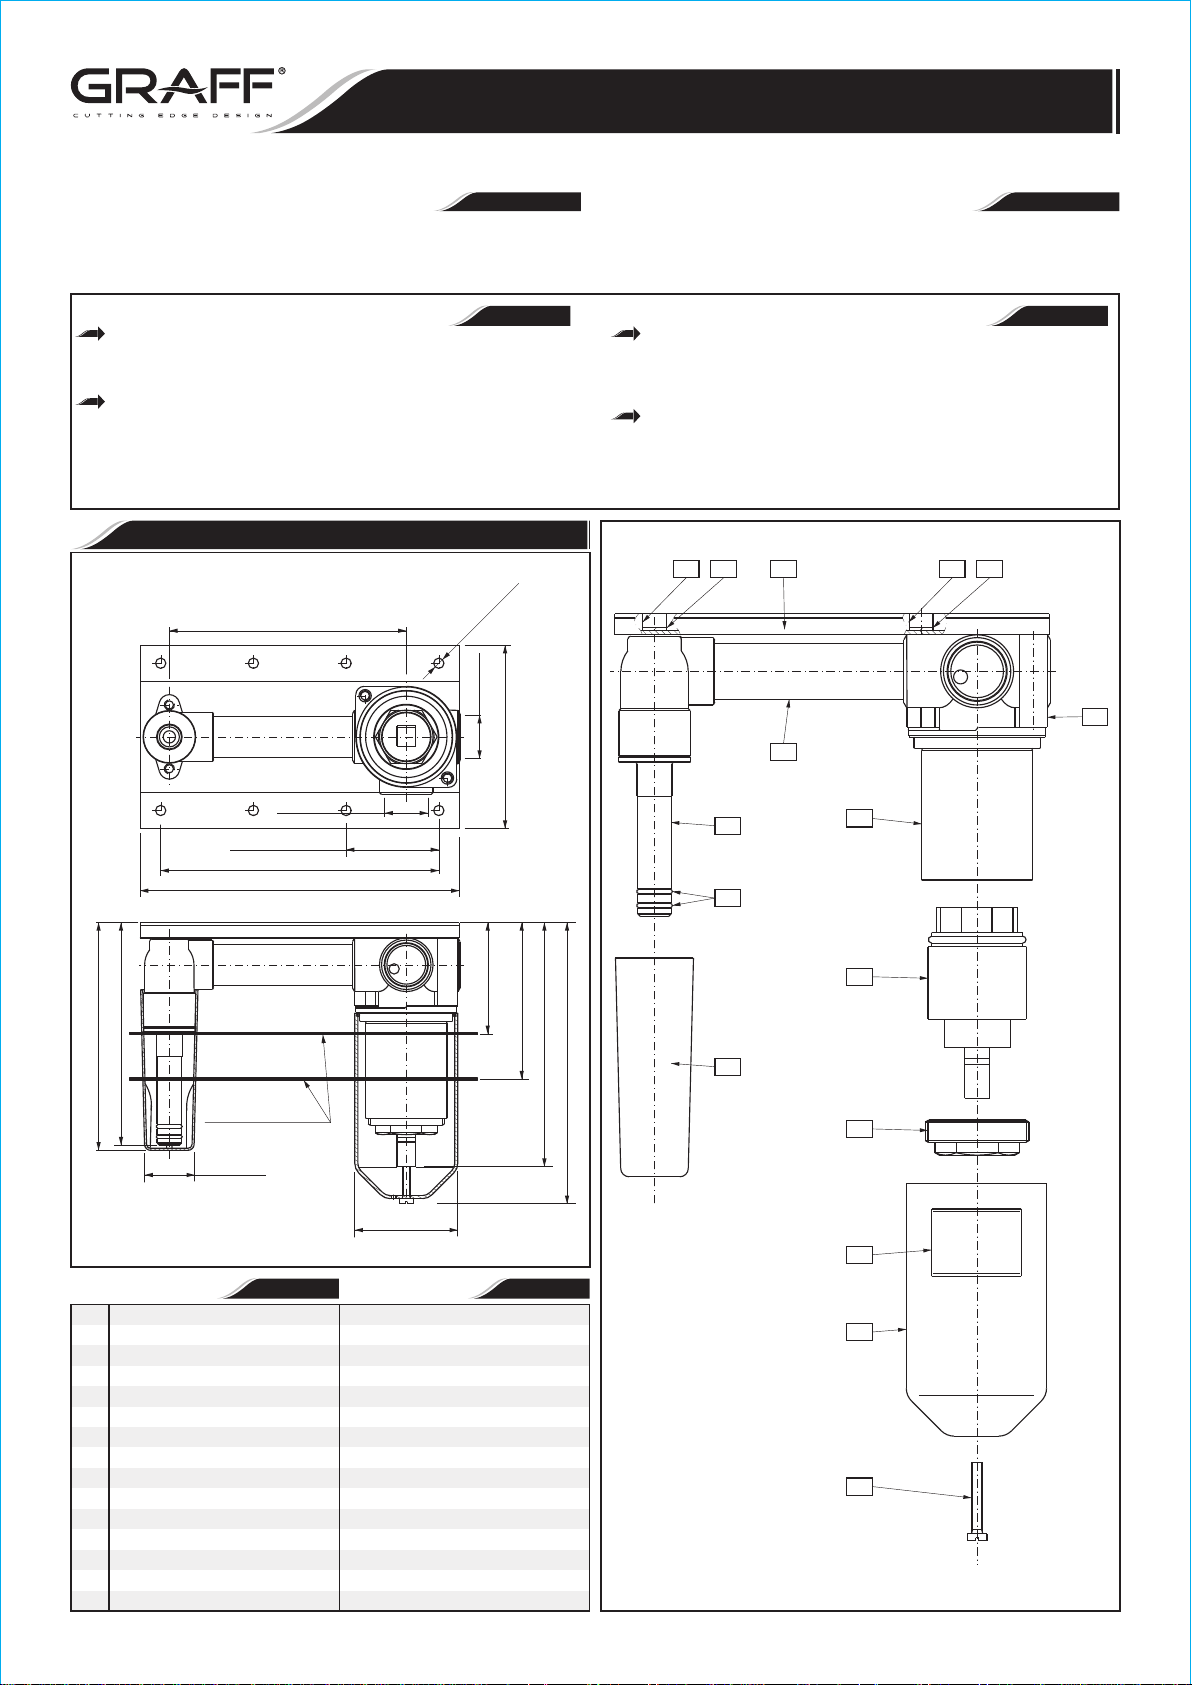
ROUGH BODY
1
SPOUT CONNECTION
2
O-RING SEAL
3
CONNECTION COVER
4
SCREW
5
CARTRIDGE COVER
6
LABEL - WALL MIN/MAX
7
MOUNTING NUT
8
CARTRIDGE
9
10
CARTRIDGE SLEEVE
SPACING SLEEVE
11
SPRINGING WASHER
12
STUD BOLT
13
STUD BOLT
14
PLATE
15
IOG 2827.19
1/2NPT-14
1-3/4"
(45mm)
5-5/16"
(155mm)
6-1/8"
Finished Wall
Acabado de la Pared
Ø1-1/8"
(Ø28mm)
ENGLISH
(135mm)
Ø2"
(Ø50mm)
CUERPO DE CONJUNTO
CONEXIÓN DEL CAÑO
EMPAQUETADURA DE ANILLO
PROTECCIÓN DE CONEXIÓN
TORNILLO
CUBIERTA DEL MEZCLADOR
ETIQUETA - PARED MIN/MAX
TUERCA DE MONTAJE
CARTUCHO
CASQUILLO DE DISTANCIA
JUNTA DE MUELLE
TORNILLO
TORNILLO
PLACA
1/2NPT-14
(89mm)
3-1/2"
(76mm)
(54mm)
MIN. 2-1/8"
MAX.3"
ESPANOL
CARTUCHO CASQUILLO DEL
(118mm)
(136mm)
4-11/16"
5-3/8"
~
1
11
1
2
10
3
9
4
8
WALL MAX.
7
WALL MIN.
6
5
Rev. 2 May 2013
VALVE ROUGH SET
CONJUNTO DE VÁLVULAS
This product complies with NSF61/9, ASME/ANSI A112.18.1
and CSA B 125 Standards.
Este se encuentra conforme con losestandares de NSF61/9,
producto
de ASME/ANSI A112.18.1 y de CSA B 125.
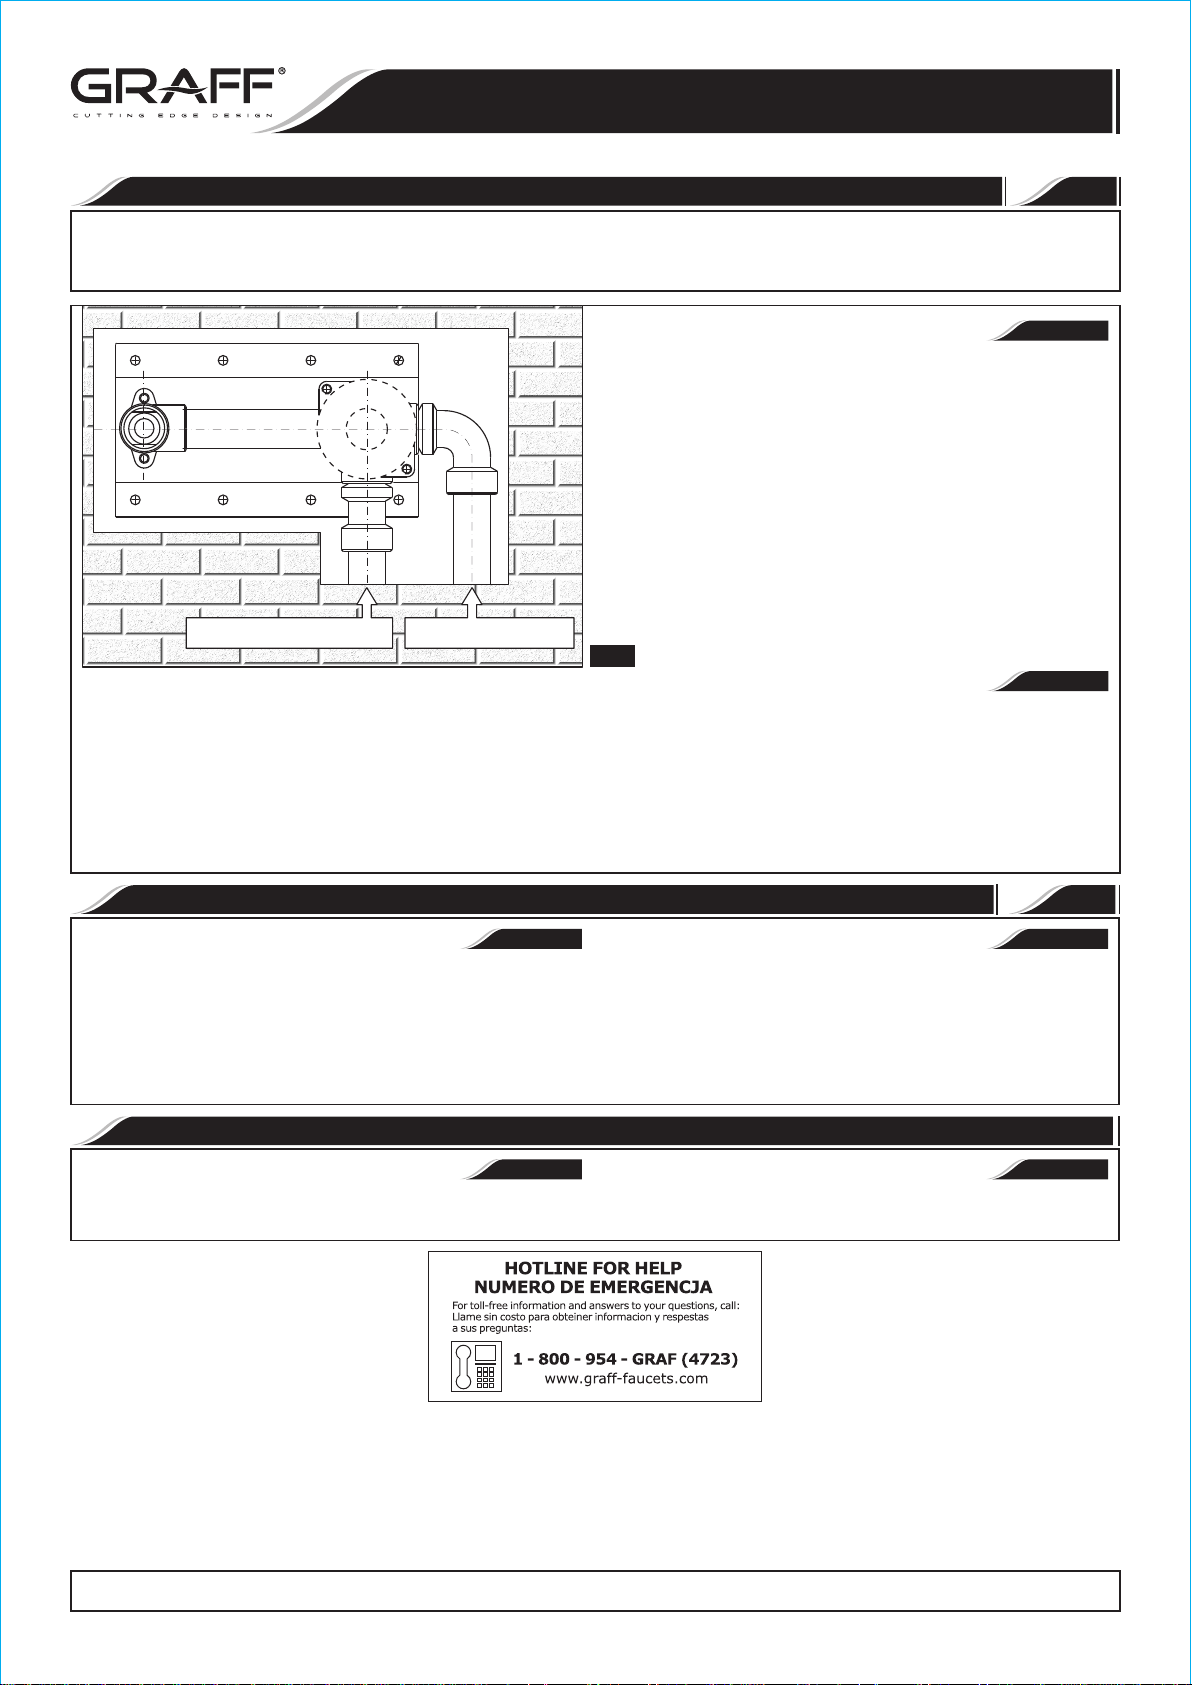
ROUGH-IN INSTALLATION INSTALACIÓN DEL CONJUNTO
BEFORE INSTALLING ANTES DE LA INSTALACIÓN
Before installing the faucet, it is good to rinse the supply pipelines Antes de instalar el grifo, es bueno enjuagar las tuberías suministro para
in order to do away with the dirty residue. eliminar residuos.
We recommend installing the filter taps. Recomendamos el instalar los tapones de filtro.
Installation Instructions Instrucciones de Instalación
1
See fig. 1
ENGLISH
1. Prepare the recess in the wall for the faucet body unit pipe work taking
into account the maximum and minimum depth allowed. Arrange the
pipe work so that the hot water feed is underneath the body (HOT) and
the cold in on the right (COLD) in relation to the faucet body unit.
2. Place faucet body unit into the wall recess. Recommended depth for
faucet body unit in a wall measured from center of faucet body unit to
finished wall surface is in the range MIN. 1-5/16” (33mm) – MAX.
2-3/16” (55mm). Attach the faucet body unit to the wall using
anchors and screws.
3. Apply thread sealant to the pipe nipple threads of 1/2" pipe
connectors. Screw in a 1/2" pipe connectors onto faucet body unit
inlets. Connect HOT water supply to underneath valve inlet and COLD
water supply to right valve inlet.
HOT WATER INLET
ENTRADA DE AGUA CALIENTE
COLD WATER INLET
ENTRADA DE AGUA FRÍA
1
Ver el dis. 1
1. Preparar un agujero en la pared para las tuberías del cuerpo del grifo tomando en consideración la profundidad máxima y mínima admisible.
Instalar los tubos de tal manera que la fuente del agua caliente se encuentre por debajo del cuerpo (HOT) y del agua fría a la derecha (COLD) en
relación al cuerpo del grifo.
2. Colocar el cuerpo del grifo en el agujero de la pared. La profundidad recomendada para la unidad del cuerpo del grifo en la pared, medida desde el
centro del cuerpo del grifo hasta la superficie de la pared acabada es de MIN. y MAX. Fijar el cuerpo del
a la pared
3. Usar la junta de rosca para el manguito roscado del tubo de 1/2". Enroscar los manguitos del tubo de 1/2" a los orificios de entrada al cuerpo de
grifo. Conectar el suministro del agua CALIENTE a la entrada inferior de la válvula y del agua FRÍA a la entrada derecha de la válvula.
usando anclajes y tornillos.
1-5/16” (33mm)
2-3/16” (55mm).
CARE AND MAINTENANCE CUIDADO Y MANTENIMIENTO
ENGLISH
Your Graff product is designed and engineered in accordance with the
highest quality and performance standards. Be sure not to damage the
finish during installation. Care should be given to the cleaning of this
product. Although its finish is extremely durable, it can be damaged by
harsh abrasives or polish. Never use abrasive cleaners, acids,
solvents, etc. to clean any Graff product. To clean, simply wipe
gently with a damp cloth and blot dry with a soft towel.
Su producto de la Graff esta diseńado y dirigido acuerdo con los estándares
de funcionamiento y calidad más altos. Este seguro no dańar las
terminaciones del grifo durante la instalación. Cuide el producto
manteniendolo siempre limpio. Aunque su acabado es extremadamente
durable, puede ser dańado por los abrasivos o pulientes ásperos. Nunca
utilice limpiadores abrasivos, ácidos, solventes, el etc. para limpiar
cualquier producto de la Graff. Para limpiar, simplemente use un
pańo húmedo y seque con una toalla suave.
the
~
ESPANOL
grifo
4
~
ESPANOL
ENGLISH
Warranty conditions and warranty registration card are outlined on a
separate sheet.
All dimensions and drawings are for reference only. For details, please refer to actual products.
Todas las dimensiones y dibujos sirven únicamente de referencia. Para consultar detalles, ver los productos.
IOG 2827.19
WARRANTY GARANTÍA
ESPANOL
Las condiciones de la garantía y la tarjeta del registro de la garantía se
encuentran en una pagina separada.
2
Rev. 2 May 2013
~
 Loading...