

GOAL ZERO Yeti Link User Manual

1
IMPORTANT SAFETY INSTRUCTIONS
WARNING: Do not exceed 22V input for the Link. Doing so can cause
serious damage to the Yeti and potential bodily injury. Take note of
voltages when using third party solar panels or third party lead acid
batteries with the module. Do not chain solar panels or lead acid
batteries in series (positive to negative, positive to negative, etc.), as
this can result in dangerously high voltages.
WARNING: Never connect a power source to the Yeti Link before
installing into the Yeti. Always connect the Link to the Yeti before
connecting any power source.
1
Please save these instructions
Read all the instructions and cautions before
beginning installation.
Do NOT disassemble or attempt to repair the module.
Do NOT allow water to enter the module, the Goal Zero Yeti
Lithium, or the Goal Zero Yeti Tank.
Make sure all connections are tight and secure before using.
Do NOT exceed 22V input for the module; this can cause
serious damage to the Yeti Lithium and potential bodily
injury. Check specs for third party solar panels and lead acid
batteries before attempting to use them with the module.
Do NOT chain third party solar panels or lead acid batteries
in series (connecting positive to negative, positive to
negative, etc.), as this can result in dangerously high levels
of voltage that can cause serious damage to the Yeti Lithium
and potential bodily injury.
Compatible with Yeti 1000, 1400 and Yeti 3000 Lithium
Power Stations
Table of Contents
Important Safety Instructions 1
Get To Know Your Gear 2
How It Works 4
How To Install 5
Charging Indicator Lights 7
Frequently Asked Questions 7
Technical Specifications 9
Français 10
Deutsch 18
Español 26
Japanese 34
32
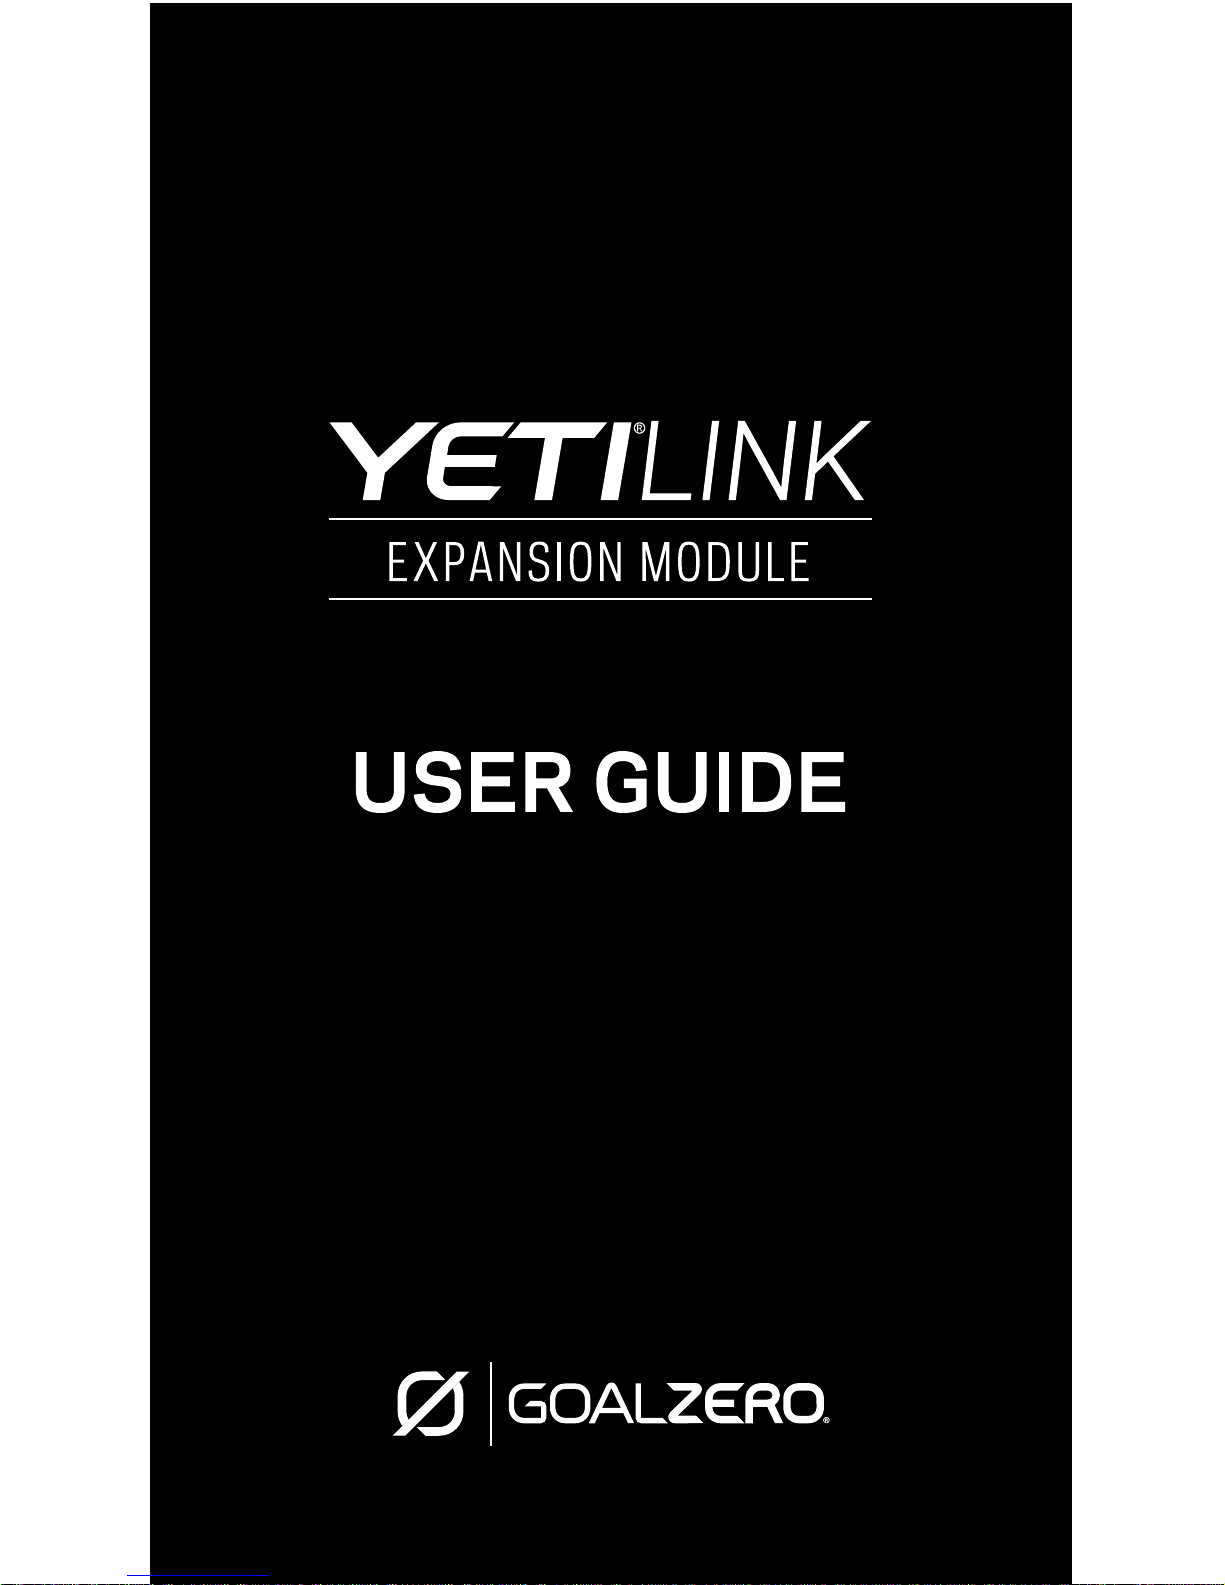
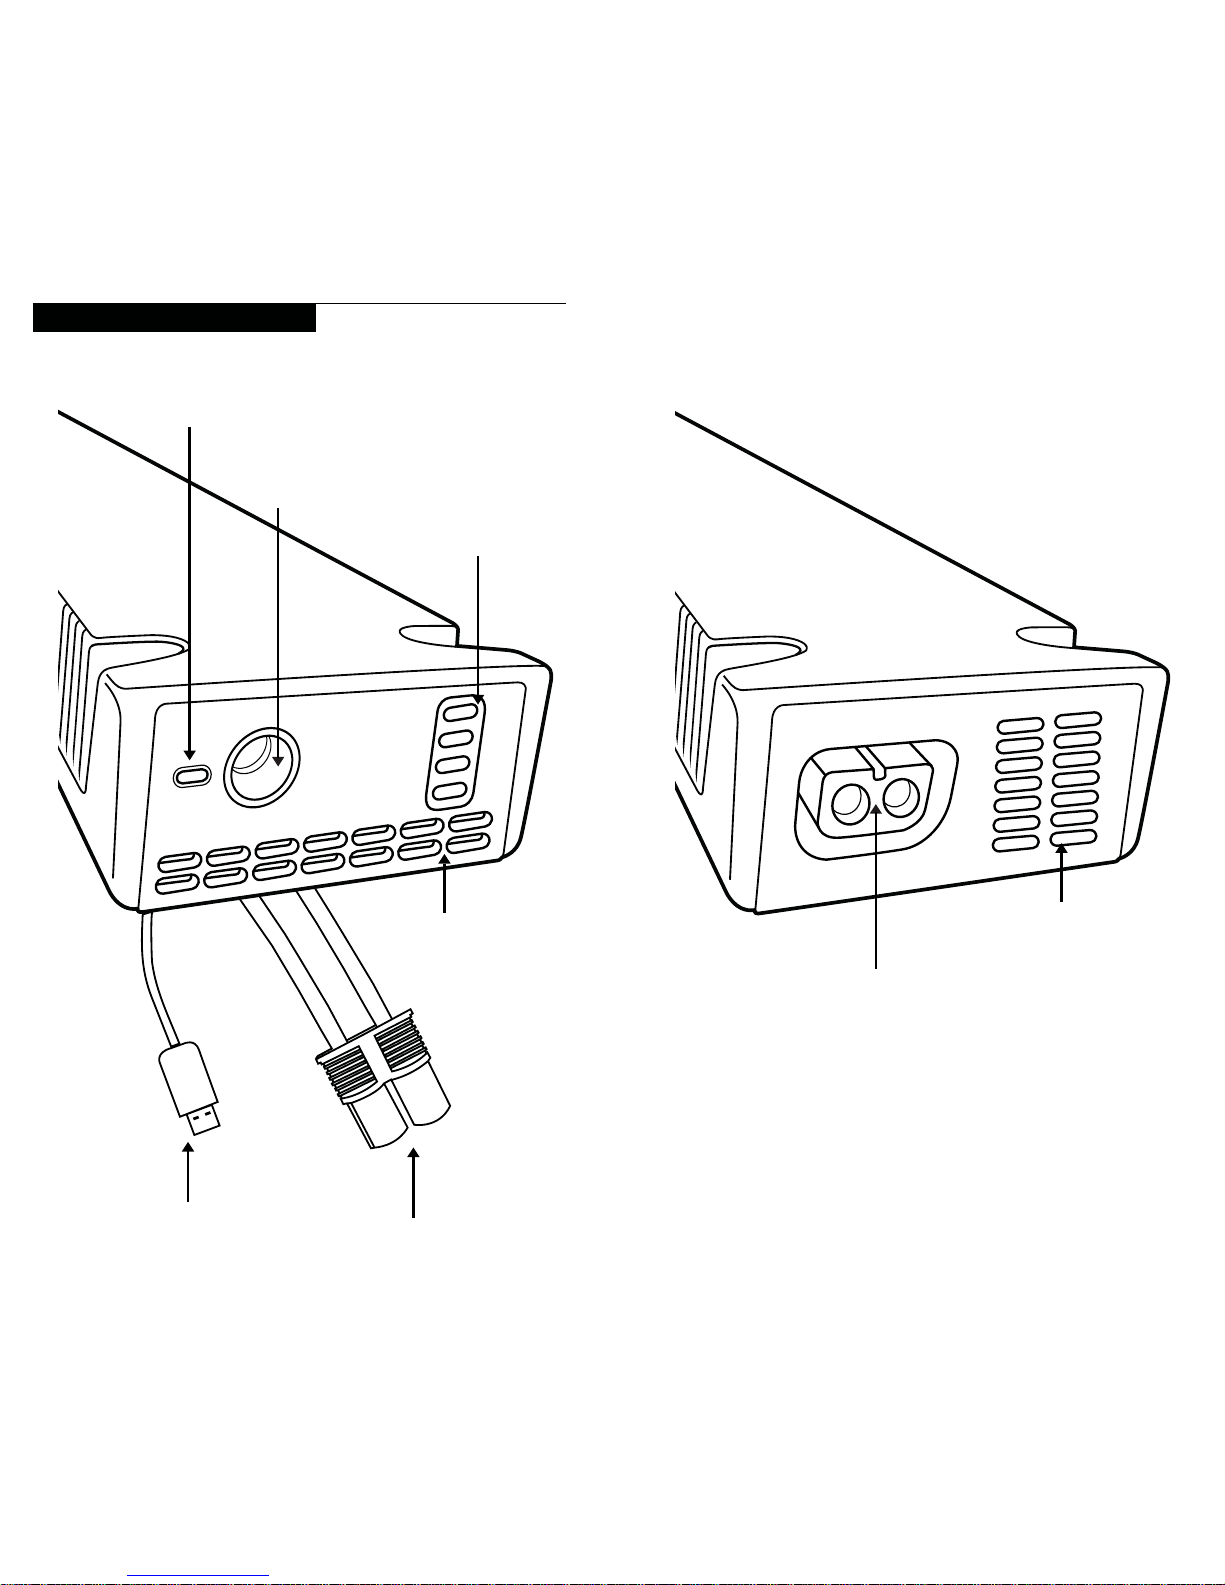
GET TO KNOW YOUR GEAR
Data Transfer Connector
Master 8mm Input
for Yeti Link & Yeti Tank
Expansion Battery
Input Charge Indicator
Lead-Acid State of
Charge Indicator
Blue Connector
Fan Vent
External Battery
Connector
Fan Vent
Front of Link Expansion Module Back of Link Expansion module
54
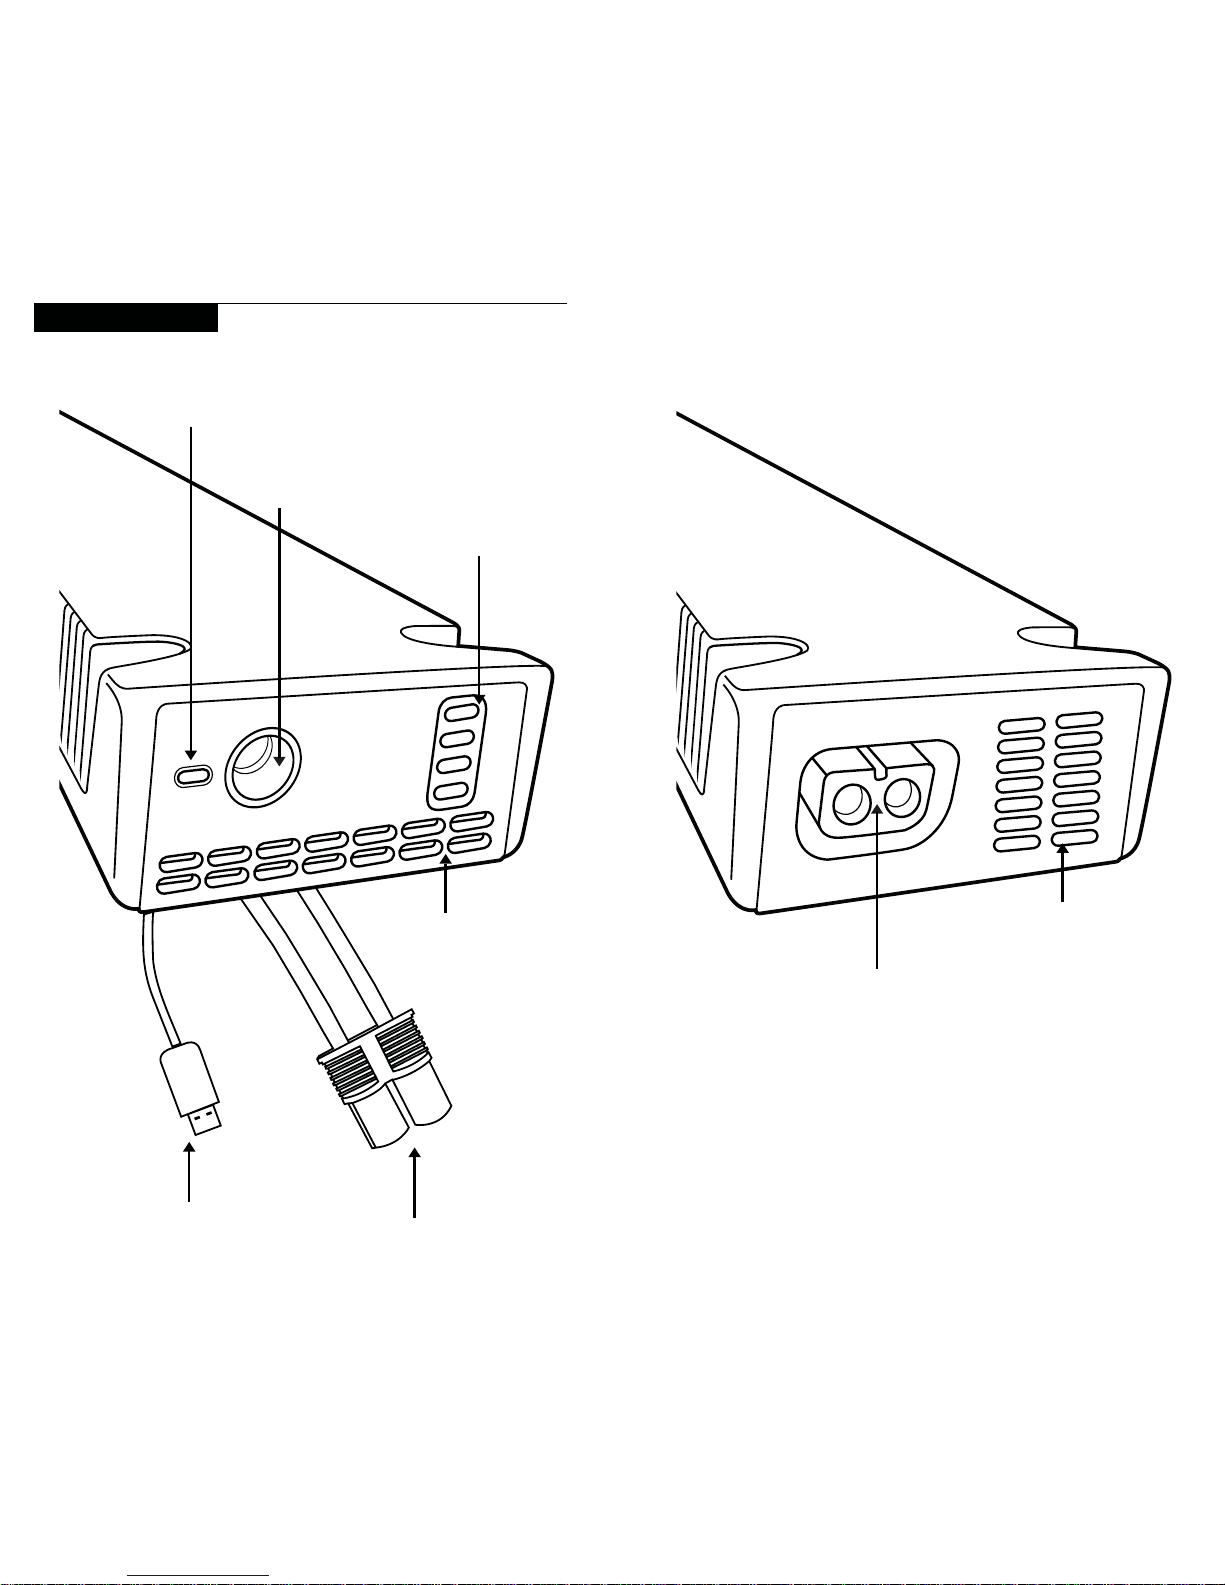
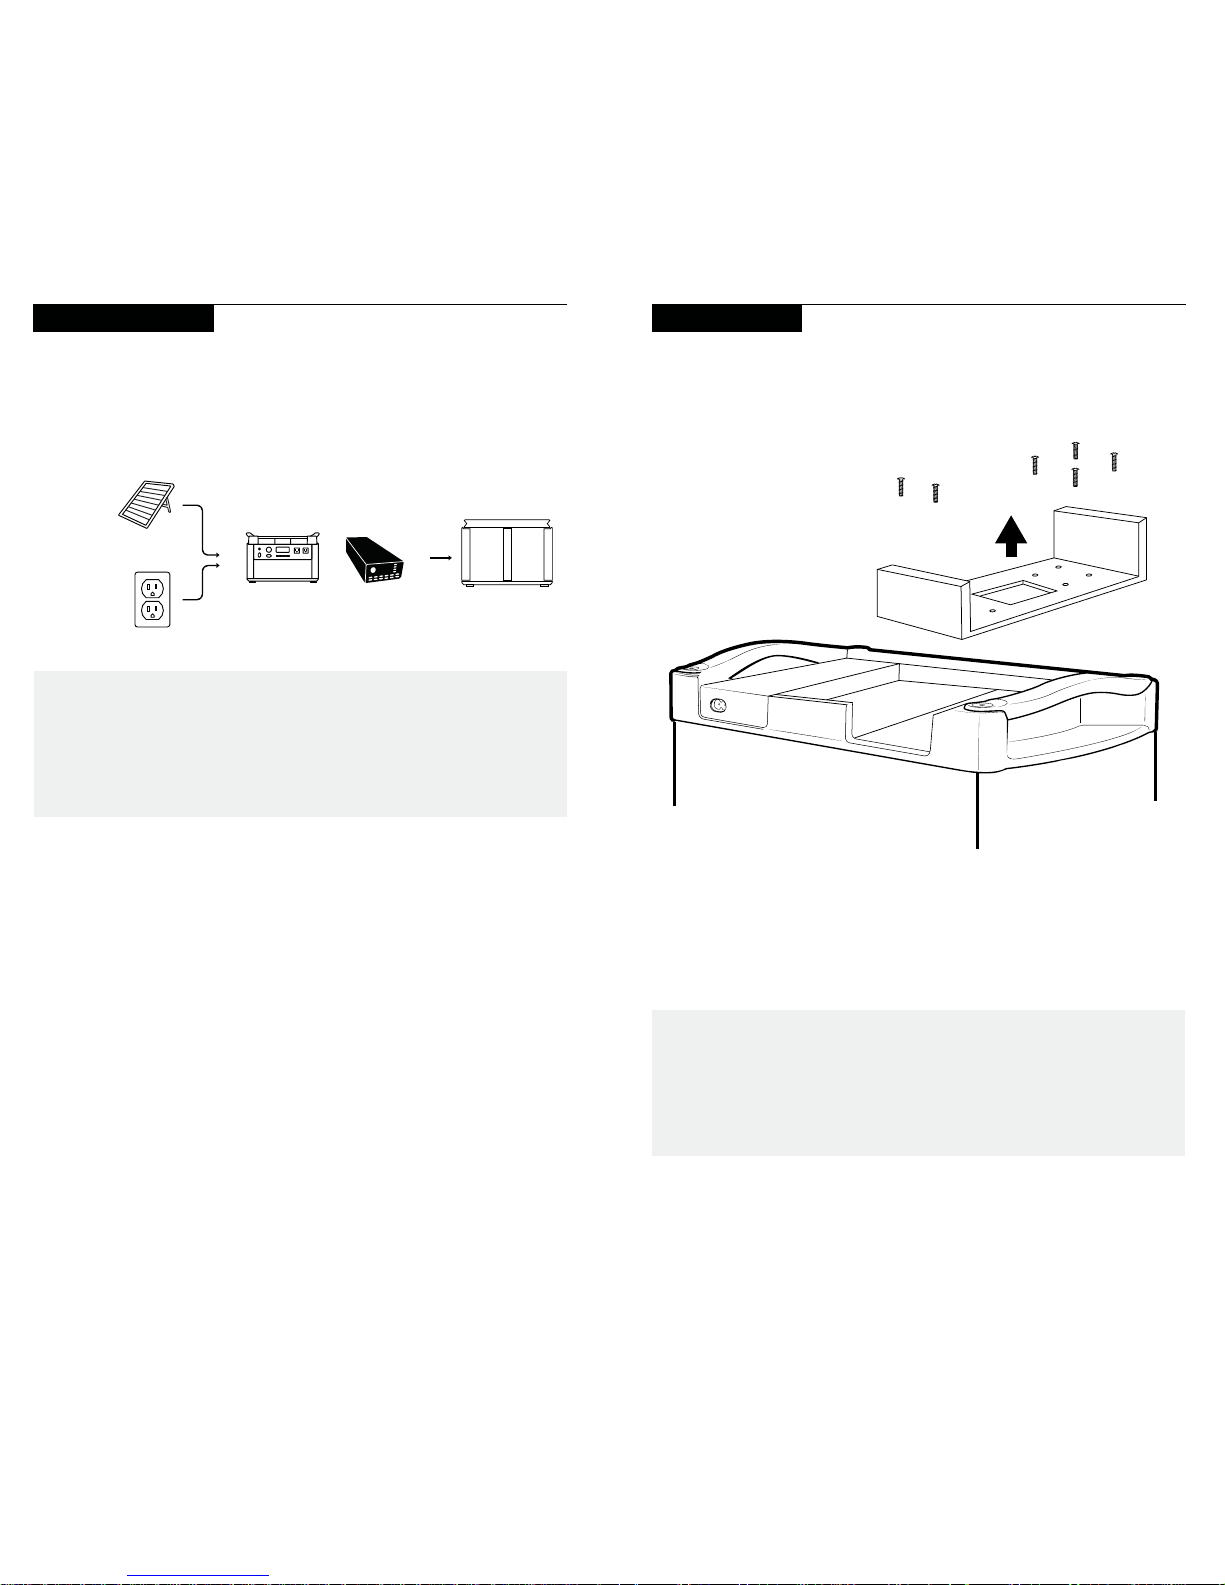
HOW IT WORKS
The Goal Zero Yeti Link Expansion Module integrates with a Goal Zero
Yeti Lithium Portable Power Station and Goal Zero Yeti Tank Expansion
Battery to increase your energy storage capacity. The Link is a 65 Amp
Lead-Acid to Lithium Charge Controller that allows you to chain lead-acid
batteries to a Yeti Lithium power station.
WARNING: Never connect a power source to the Link before
installing into the Yeti. Always connect the Link to the Yeti before
connecting any power source.
4
AC Wall
Outlet
Goal Zero
Solar Panels
(Sold Separately)
Goal Zero Yeti Tank
Expansion Battery
Goal Zero Yeti Lithium and
Goal Zero Yeti Link Expansion Module
REQUIRED (sold separately) REQUIRED (sold separately)
+
WARNING: Do not exceed 22V input for the module. Doing so
can cause serious damage to the Yeti and potential bodily injury.
Take note of voltages when using third party solar panels with the
module. Do not chain solar panels in series (positive to negative,
positive to negative, etc.), as this can result in dangerously high
voltages.
HOW TO INSTALL
Tools you’ll need: Screwdriver
1. Turn off all the output ports and unplug the Yeti from any power
source.
2. Open the lid of the Yeti and remove the expansion module carriage
from the Yeti by removing the six screws and sliding out the
carriage.
a. Use both hands to work the expansion module carriage out of
its position.
5
76
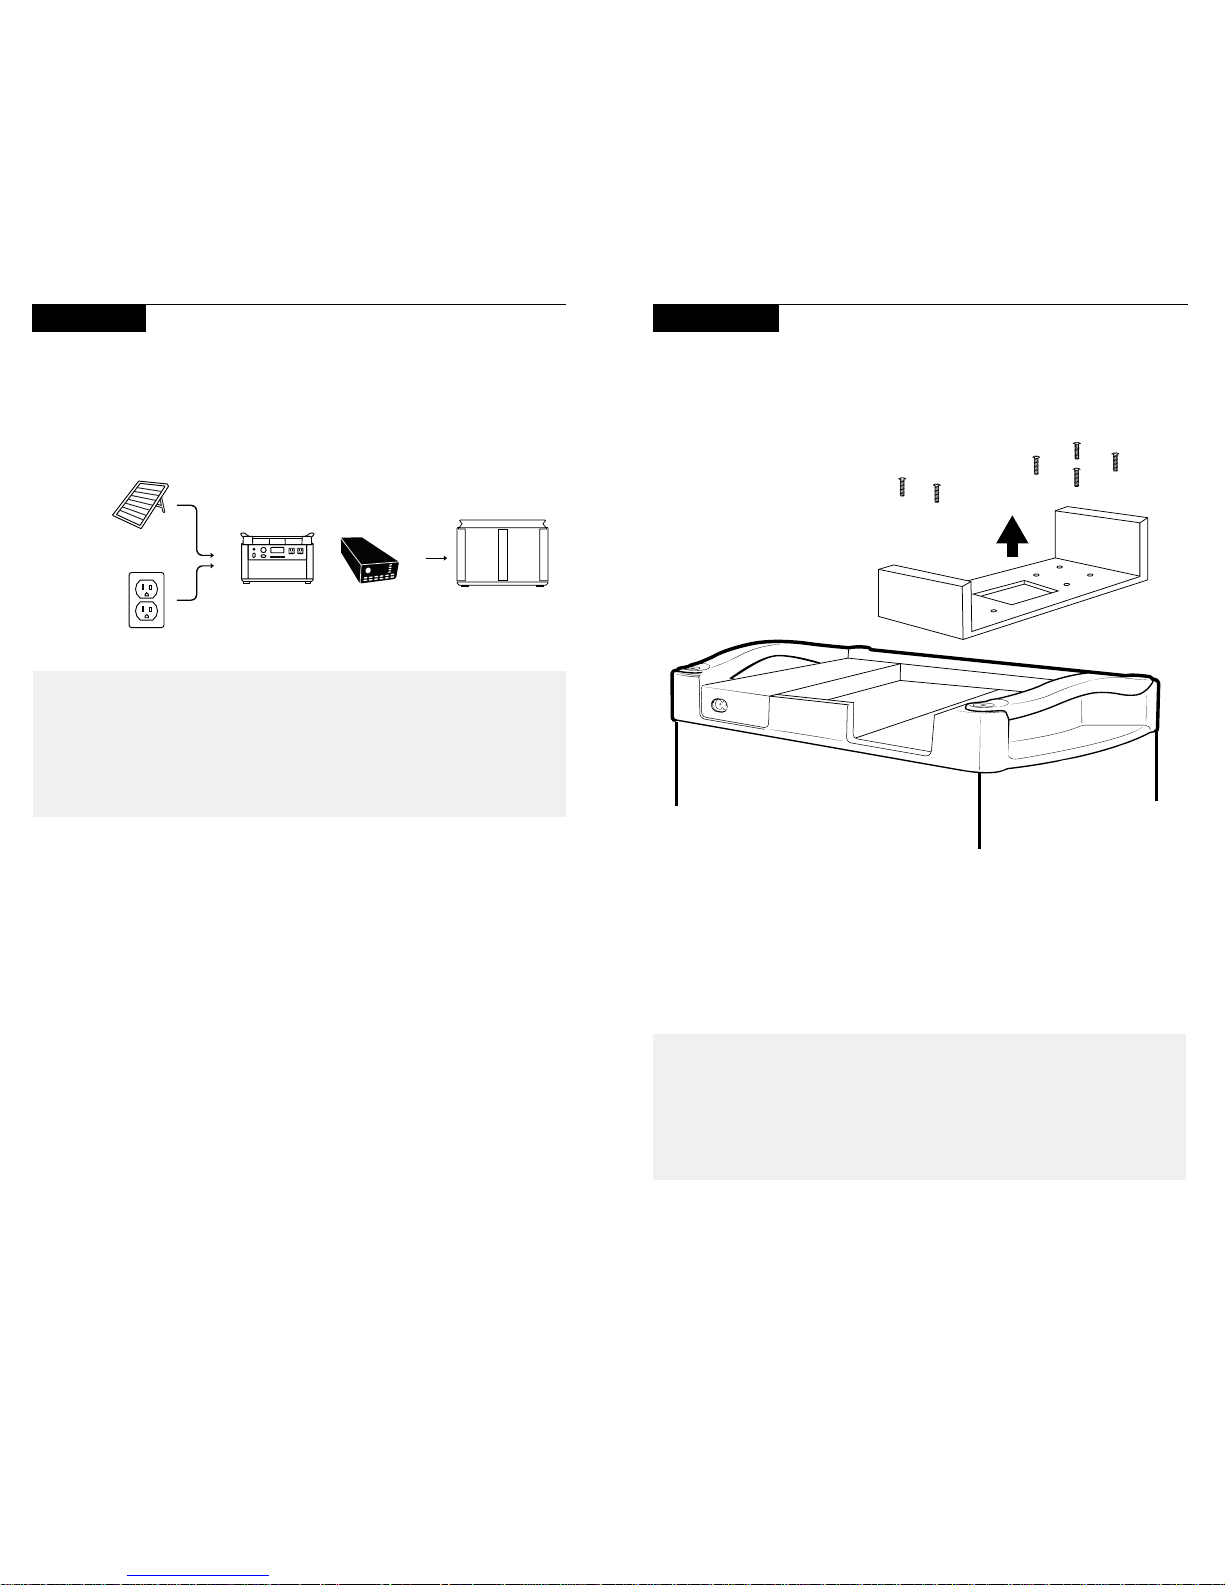
3. Take note of the positive and negative terminals on the Yeti’s module
port, as well as on the Link’s blue connector. Insert the blue connector
into the module port on the Yeti, matching positive to positive, negative
to negative.
4. Insert the micro-USB connector on the Link into the micro-USB port on
the Yeti.
5. Gently set the Link into place, tucking the cables into the opening.
6. Using the provided four screws, secure the Link into place.
7. Using the 8mm port, plug the power source into the Link.
8. Using the External Battery Connector, connect the Tank Expansion
Battery (sold separately) to the Link.
9. When the power source is correctly plugged in, the Input Charge Indicator
light will turn blue. When the Tank is correctly connected to the Link and
the power source is plugged in, the Lead-Acid State of Charge Indicator
light will begin flashing green. NOTE: Upon plug-in, all LEDs will turn
on, then off before correct lights are displayed. This may take up to 30
seconds.
10. Power source will charge the Yeti first. When the Yeti is fully charged,
power will begin to store in the Tank.
Black Cable (-)
-
Red Cable (+)
Blue Connector
Data Transfer
Connector
+
CHARGING INDICATOR LIGHT
Input Charge Indicator:
FLASHING BLUE - Power source is correctly plugged into
8mm input and charging.
BLUE - Lead-Acid battery is full.
Lead Acid State of Charge Indicator:
1 LED LIGHT - Lead-Acid battery is 25% full or less
2 LED LIGHTS - Lead-Acid battery is 25% - 50% full
3 LED LIGHTS - Lead-Acid battery is 50% - 75% full
ALL LED LIGHTS - Lead-Acid battery is 75% full or more
Error LED
FLASHING RED - Yeti is in an over voltage condition or lead
acid battery is in an under voltage condition. Disconnect
all Tank Cables from Link and Yeti and please call our solar
experts at 888-794-6250.
NOTE
The 8mm input port on the Link is the only way to charge both the Yeti and
Tank. Input ports on the Yeti display will only charge the Yeti, not the Tank.
FREQUENTLY ASKED QUESTIONS
Q: I installed my Link into my Yeti, connected my batteries, and I’m not
showing a charge. What’s going on?
A: Upon initial installation, the Link needs time to identify which type of Yeti
you own in order to maximize performance. It can take up to 30 seconds
to start operating.
Q: I’m charging my Yeti and it is connected to one or more Tank batteries,
but my Tank batteries are not filling up. What should I do?
A: First, make sure you are using the input on your Link to charge your
system. This input is the only way to charge both your Tank(s) and Yeti
at the same time. If you are using the correct input and still having a
problem, try resetting by reinstalling your Link.

98
Q: Can I use third party, non-Goal Zero lead-acid batteries with the Link?
A: Yes, you can use any 12V SLA or AGM deep cycle lead acid battery with
the Link. However, you will need a Goal Zero Female Link Chaining Cable
to connect your batteries to the Link.
Q: If I’m using my own third party lead acid batteries, how do I wire them
up?
A: When connecting multiple 12V lead-acid batteries to your Link, be sure
to connect the batteries in parallel. Parallel connections will increase your
current rating, but the voltage will stay the same.
WARNING: Connecting batteries in series will increase the voltage, causing
damage to the unit and possible personal injury or death.
Q: How many lead acid batteries can I plug into the Link?
A: You can attach as many 12V lead-acid batteries to your Link as you’d like.
Q: How fast will the Link charge the Tank(s) using the Yeti power supply?
A: Plugging the Yeti power supply into your Link will provide 5A of power into
your Tank. At this rate, it will take around 20 hours to charge each Tank.
Q: Why is my Link only charging my Yeti up to 98%?
A: The Link will only charge a first generation Yeti Lithium to 98%. This
protection is in place to protect and prolong the life of your battery.
Second generation Yeti Lithium power stations equipped with the latest
firmware updates can be charged to 100%.
TECHNICAL SPECIFICATIONS
65 Amp Charge Controller
Charges the following:
GOAL ZERO Yeti 1000 @ Max Input 454-605W
GOAL ZERO Yeti 1400 @ Max Input 454-750W
GOAL ZERO Yeti 3000 @ Max
Input
750W
Ports: Do not exceed 22V Input
8mm Charging port 14 - 22V, Do not exceed
150W per port
External Battery Connector
(Output)
65A charge controller
10.7 - 15V
General:
Weight 1.5 lbs (680 g)
Dimensions 10.25 x 3.3 x 1.5 in (26 x
8.4 x 3.8 cm)
Warranty 12 months
Certs
Yeti Link Expansion Module

1110
Veuillez conserver ces consignes
Lisez toutes les consignes et mises en garde avant de
commencer l'installation.
NE PAS désassembler ou tenter de réparer le module vous-même.
NE PAS laisser de l'eau pénétrer dans le module, ou dans le Goal
Zero Yeti Lithium.
Assurez-vous que toutes les connexions sont bien serrées et
sécurisées avant toute utilisation.
NE PAS excéder une entrée de 22V pour le module ; Cela pourrait
causer des dommages sérieux au Yeti Lithium et d'éventuelles
blessures corporelles. Vérifiez bien les spécifications des panneaux
solaires tiers avant d'essayer de lesutiliser avec
le module.
NE PAS enchaîner plusieurs panneaux solaires en série (connexion
positive ànégative, positive à négative, etc.), car cela peut entraîner
des niveaux de tensiondangereusement élevés qui pourraient
causer des dommages sérieux au Yeti Lithium et d'éventuelles
blessures corporelles.
Utilisez UNIQUEMENT avec les alimentations portatives Goal Zero
Yeti Lithium appropriées.
CONSIGNES DE SÉCURITÉ IMPORTANTES
AVERTiSSMENT : Ne dépassez pas 22V à l'entrée du module lors d'une
utilisation standard. Cela pourrait causer des dommages sérieux au Yeti
Lithium et d'éventuelles blessures corporelles. Prenez note des tensions
électriques lors de l'utilisation de panneaux solaires tiers avec le module.
N'enchaînez pas plusieurs panneaux solaires en série (positive à négative,
positive à négative, etc...), car cela peut entraîner des niveaux detension
dangereusement élevés.
AVERTiSSMENT : Ne jamais connecter une source d'alimentation au module
avant de l'avoir installé dans le Yeti Lithium. Connectez toujours le module
au Yeti Lithium avant debrancher une source d'alimentation.
FRANÇAIS
1312
Batteries d’expansion
Connecteur
Ventilateur
Face arrière du module d’expansion Link
APPRENDRE À CONNAÎTRE VOTRE ÉQUIPEMENT
Connecteur de transfert de données
Entrée de 8mm primaire pour
le Yeti Link & le réservoir Yeti
Batterie d’extension
Indicateur de charge
État plomb-acide de
l’indicateur de charge
Connecteur bleu
Ventilateur
Face avant du module d’expansion Link
1514
ATTENTION : Ne dépassez pas plus de 22V en entrée pour le module. Cela
pourrait causer des dommages sérieux au Yeti et d’éventuelles blessures
corporelles. Prenez note des tensions électriques lors de l’utilisation
de panneaux solaires tiers avec le module. N’enchaînez pas plusieurs
panneaux solaires en série (positive à négative, etc.), car cela peut
entraîner des niveaux de tension dangereusement élevés.
COMMENT L’INSTALLER
Les outils dont vous aurez besoin : un tournevis
1. Éteignez tous les ports de sortie et débranchez le Yeti de toute source
d’alimentation.
2. Relevez le couvercle du Yeti et extrayez le support du module
d’expansion du Yeti en dévissant les six vis et en le faisant glisser
verslehaut.
a. Utilisez vos deux mains pour extraire le support de son emplacement.
COMMENT ÇA FONCTIONNE ?
Le module d’extension de liaisons Goal Zero Yeti Link s’intègre à l’alimentation
portative au Lithium Goal Zero et à une batterie d’extension du réservoir Goal
Zero Yeti Tank pour augmenter votre capacité de stockage d’énergie. Le Link
est un contrôleur de charge acide au plomb de 65 A au lithium qui vous permet
d’enchaîner des batteries plomb-acide à une source d’alimentation Yeti Lithium.
ATTENTION : Ne jamais connecter une source d’alimentation au Link
avant de l’avoir installé sur le Yeti. Connectez toujours le module Link
auYeti avant de brancher une source d’alimentation.
Prise
murale A C
Goal Zero
Panneaux solaires
(Vendu séparément)
Réservoir Goal Zero Yeti
Batterie d'extension
Goal Zero Yeti Lithium et
Module d’extension de liaisons Goal Zero Yeti Link
REQUIS (vendu séparément) REQUIS (vendu séparément)
+
 Loading...