

GOAL ZERO YETI 3000 Lithium User Manual

1
Getting Started
i. Get to Know Your Gear 2
ii. How it Works
Charging Your Goal Zero Yeti 4
i. Charging from Solar
ii. Charging from the Wall
Using Your Goal Zero Yeti 6 - 9
ii. How to use
iii. Best-Use Strategy
iv. Cold Weather Usage
v. LCD Display
Goal Zero Yeti Roll Cart & Storage and
Downtime Maintenance
8 - 9
Technical Specifications 10
Frequently Asked Questions 12
Troubleshooting 15
Education 16
i. Batteries 101
ii. Solar 101
Warranty 18
Français 20 - 38
Deutsch 39 - 57
Español 58 - 76
Table of Contents
Before using or storing, plug your Goal Zero Yeti into the wall until it is fully
charged. Keep your Goal Zero Yeti plugged in when not in use. For more tips
and tricks on keeping your battery healthy, see the BATTERIES 101 section.
Read all instructions and cautions carefully before use to avoid personal
injury or damage to the unit and any connected products
Observe all Input/Output connectors ratings: To avoid fire or electrical
shock hazard, observe all ratings on unit, and products you intend to use;
check manuals for more information.
Use in a ventilated area: Ensure proper ventilation while in use and do not
obstruct fan openings on unit. Inadequate ventilation may cause damage to
the unit. Do not stack anything on top of the unit in storage or in use.
DO NOT operate in wet conditions: In order to avoid short circuits or electric
shock do not allow unit to get wet. Let unit dry completely before using.
Keep the unit clean and dry: Inspect the unit for dirt, dust, or moisture on a
regular basis.
Shock or Fire Hazard: This Yeti generates the same potentially lethal AC
power as a normal household wall outlet. Please use it carefully just like
using a normal AC outlet on the wall.
DO NOT insert foreign objects into outputs or ventilation holes.
DO NOT attempt to replace the internal battery with anything other than the
authorized replacement battery available from Goal Zero.
Any manipulation to the unit or its components will void all warranties.
IMPORTANT SAFETY INSTRUCTIONS
CHARGE ME NOW
2
3
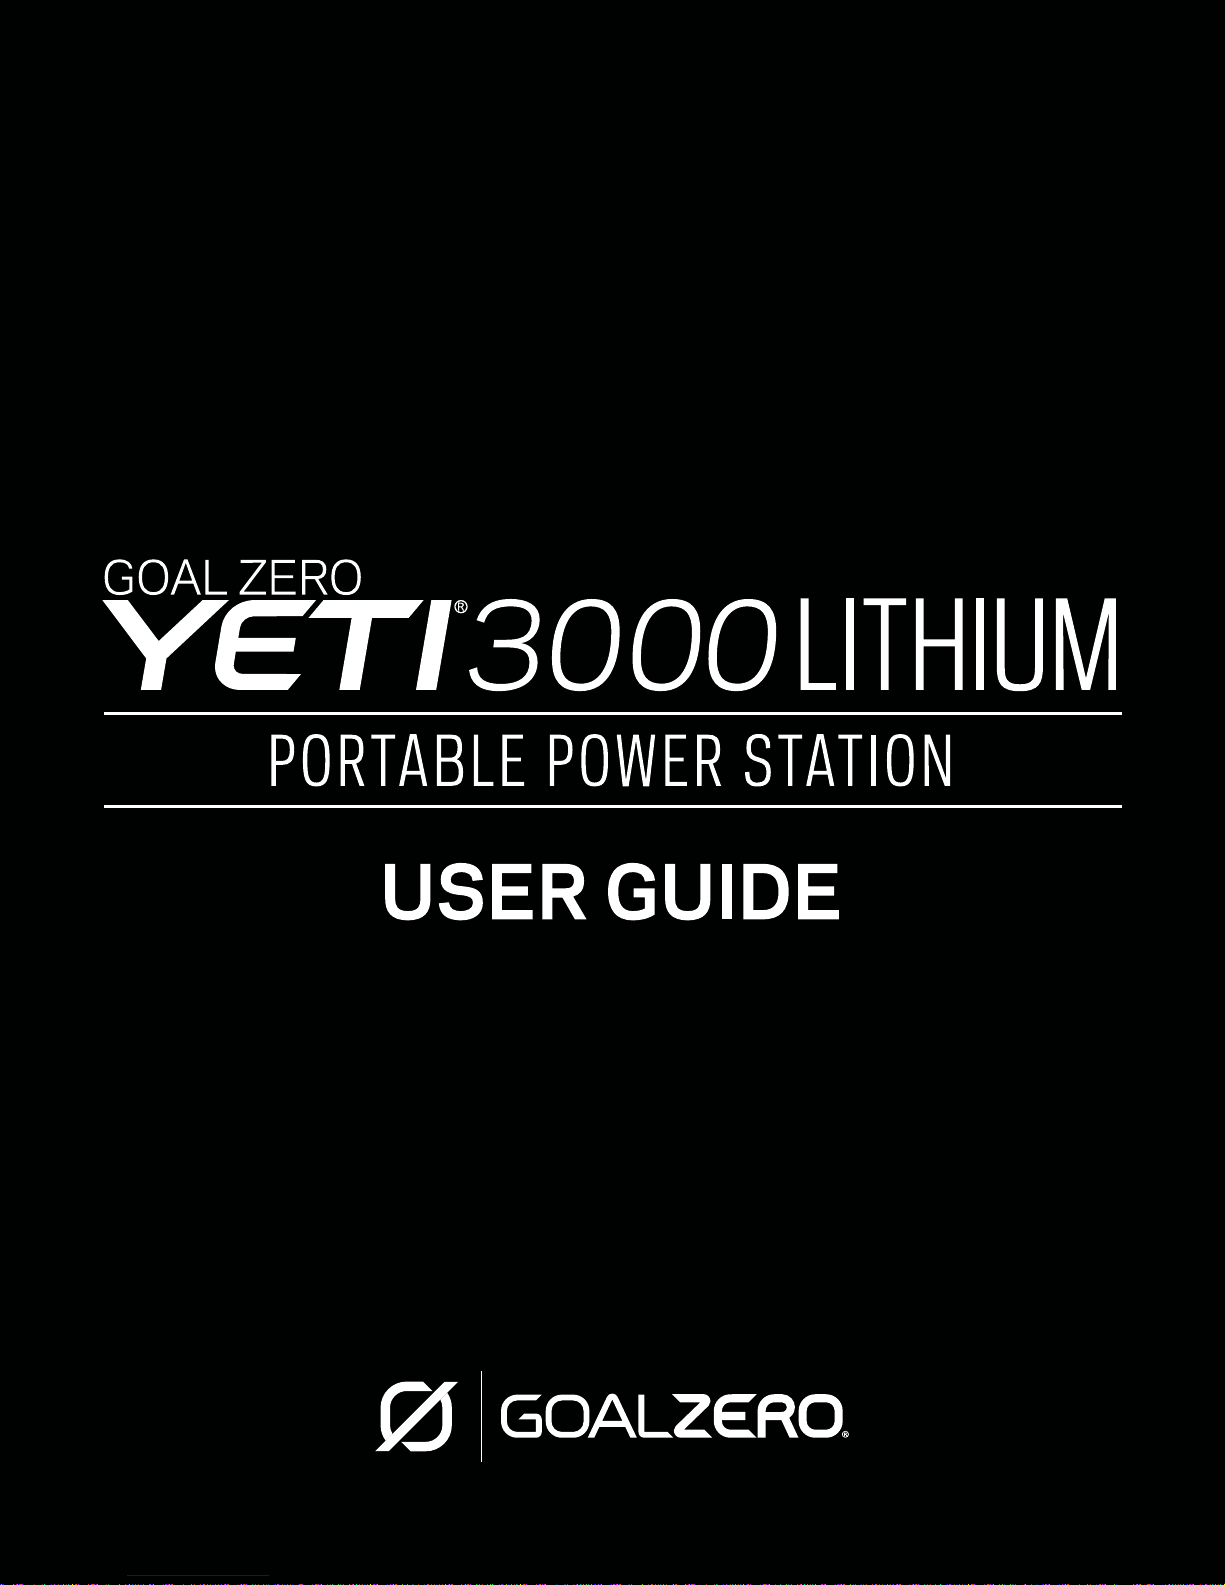
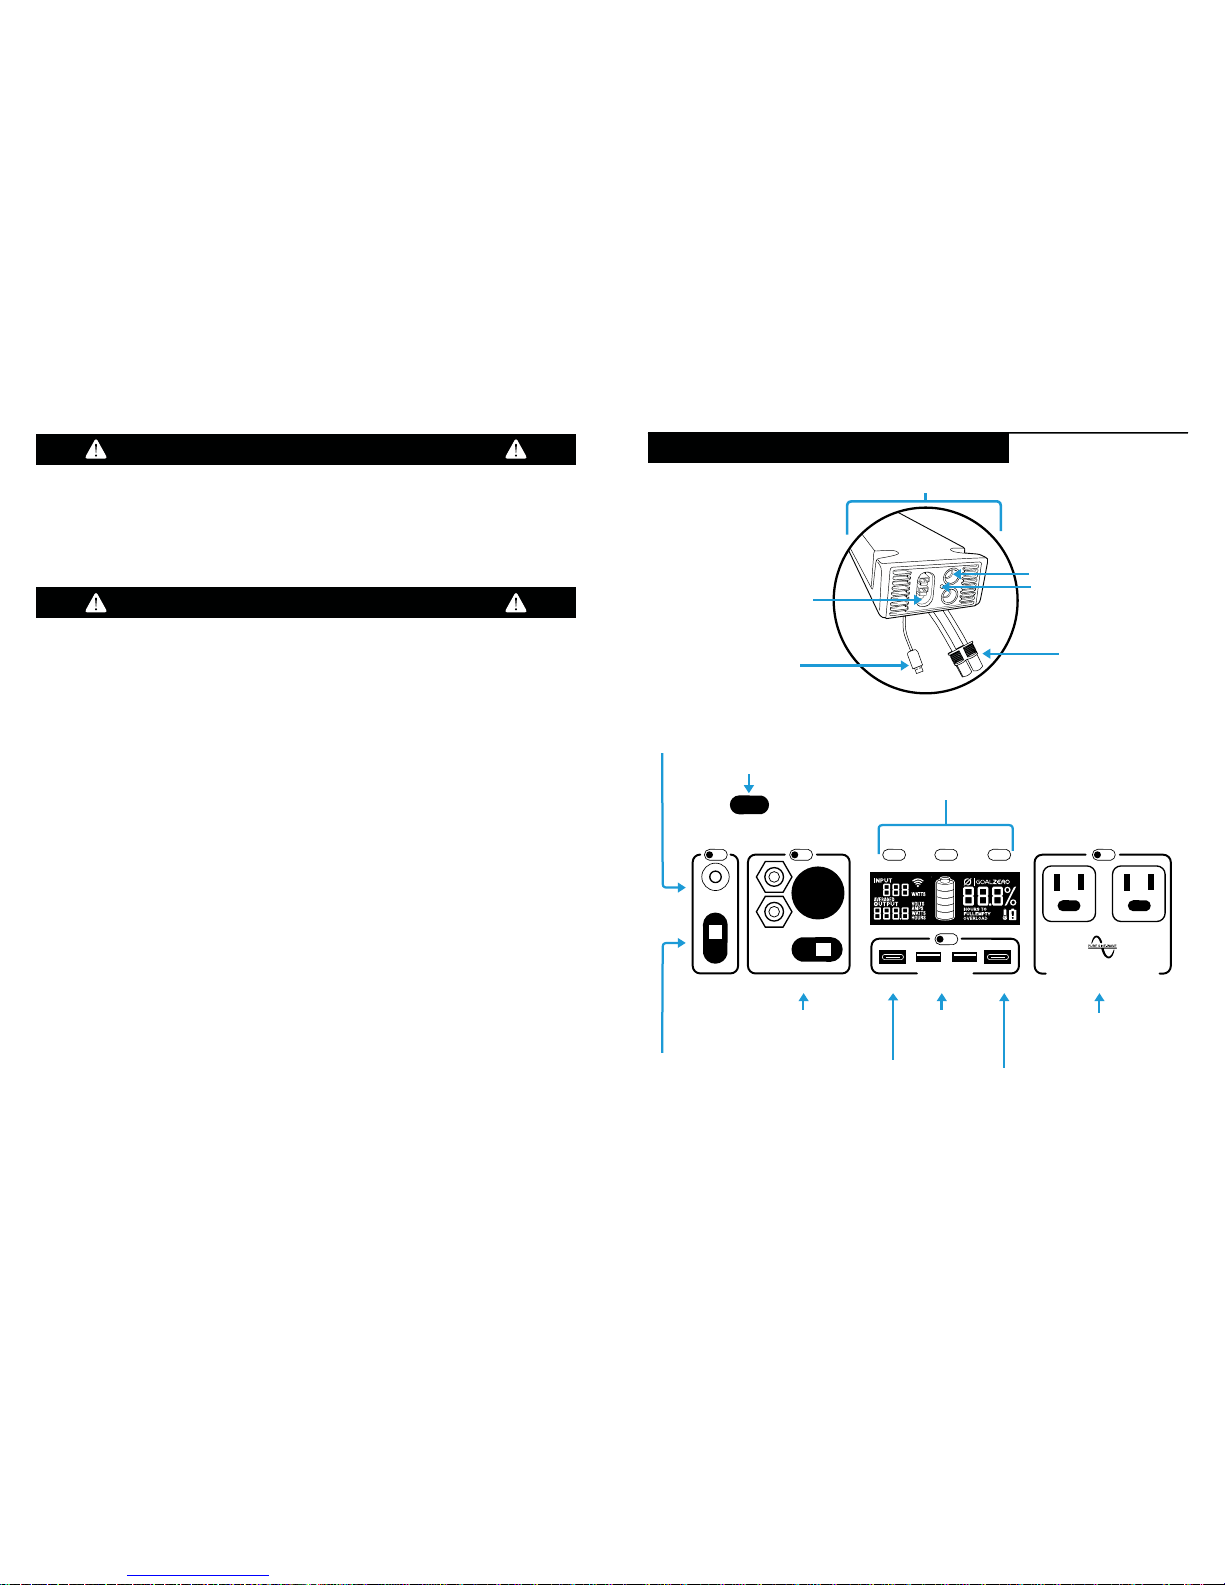
Input for AC Charging
8mm Input for Charging from Goal
Zero Solar Panels, or AC
Anderson Power Pole
Input for Charging from
Goal Zero Solar Panels.
(adapter may be required)
12V Outputs USB Outputs
5V, up to 2.4A
(12W)
USB-C Power Delivery
5/12/20V, up to 3A
(60W)
USB-C 5V,
3A (15W)
Interactive Buttons
and LCD Screen
Solar Charging Optimization Module
AC Outputs
2 x AC Plug
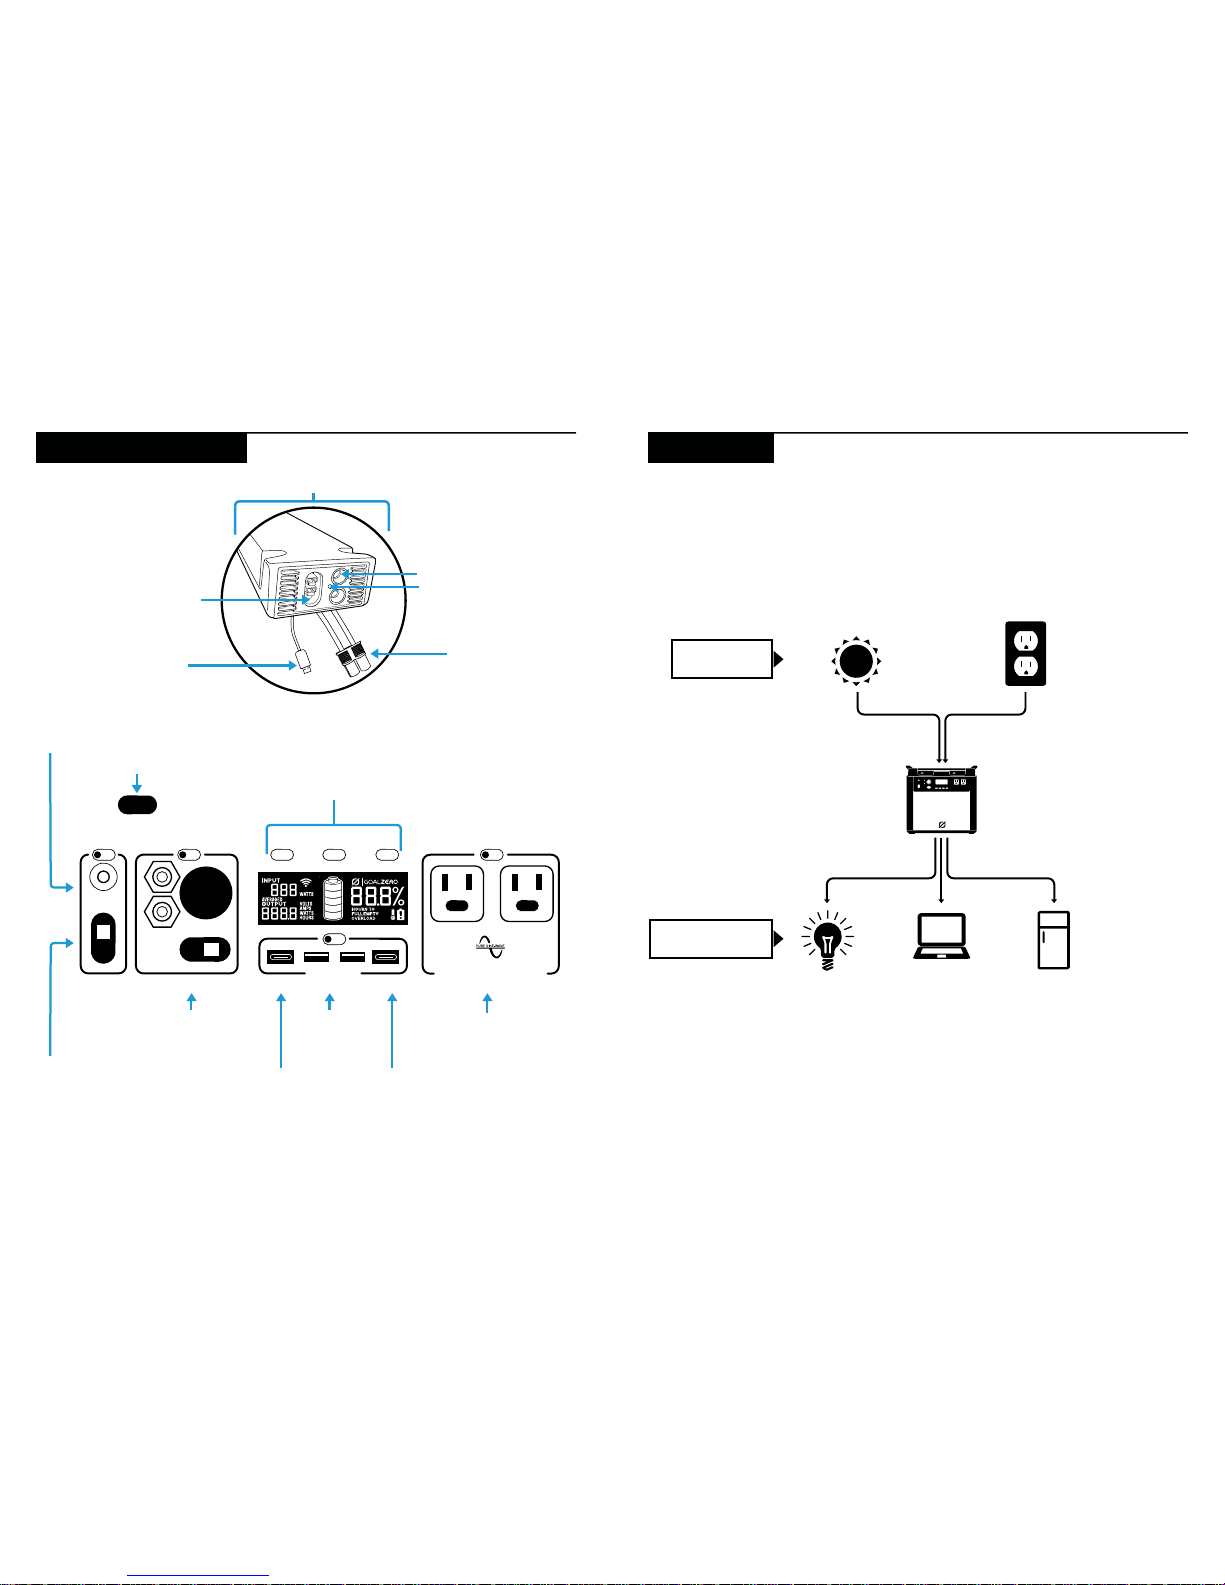
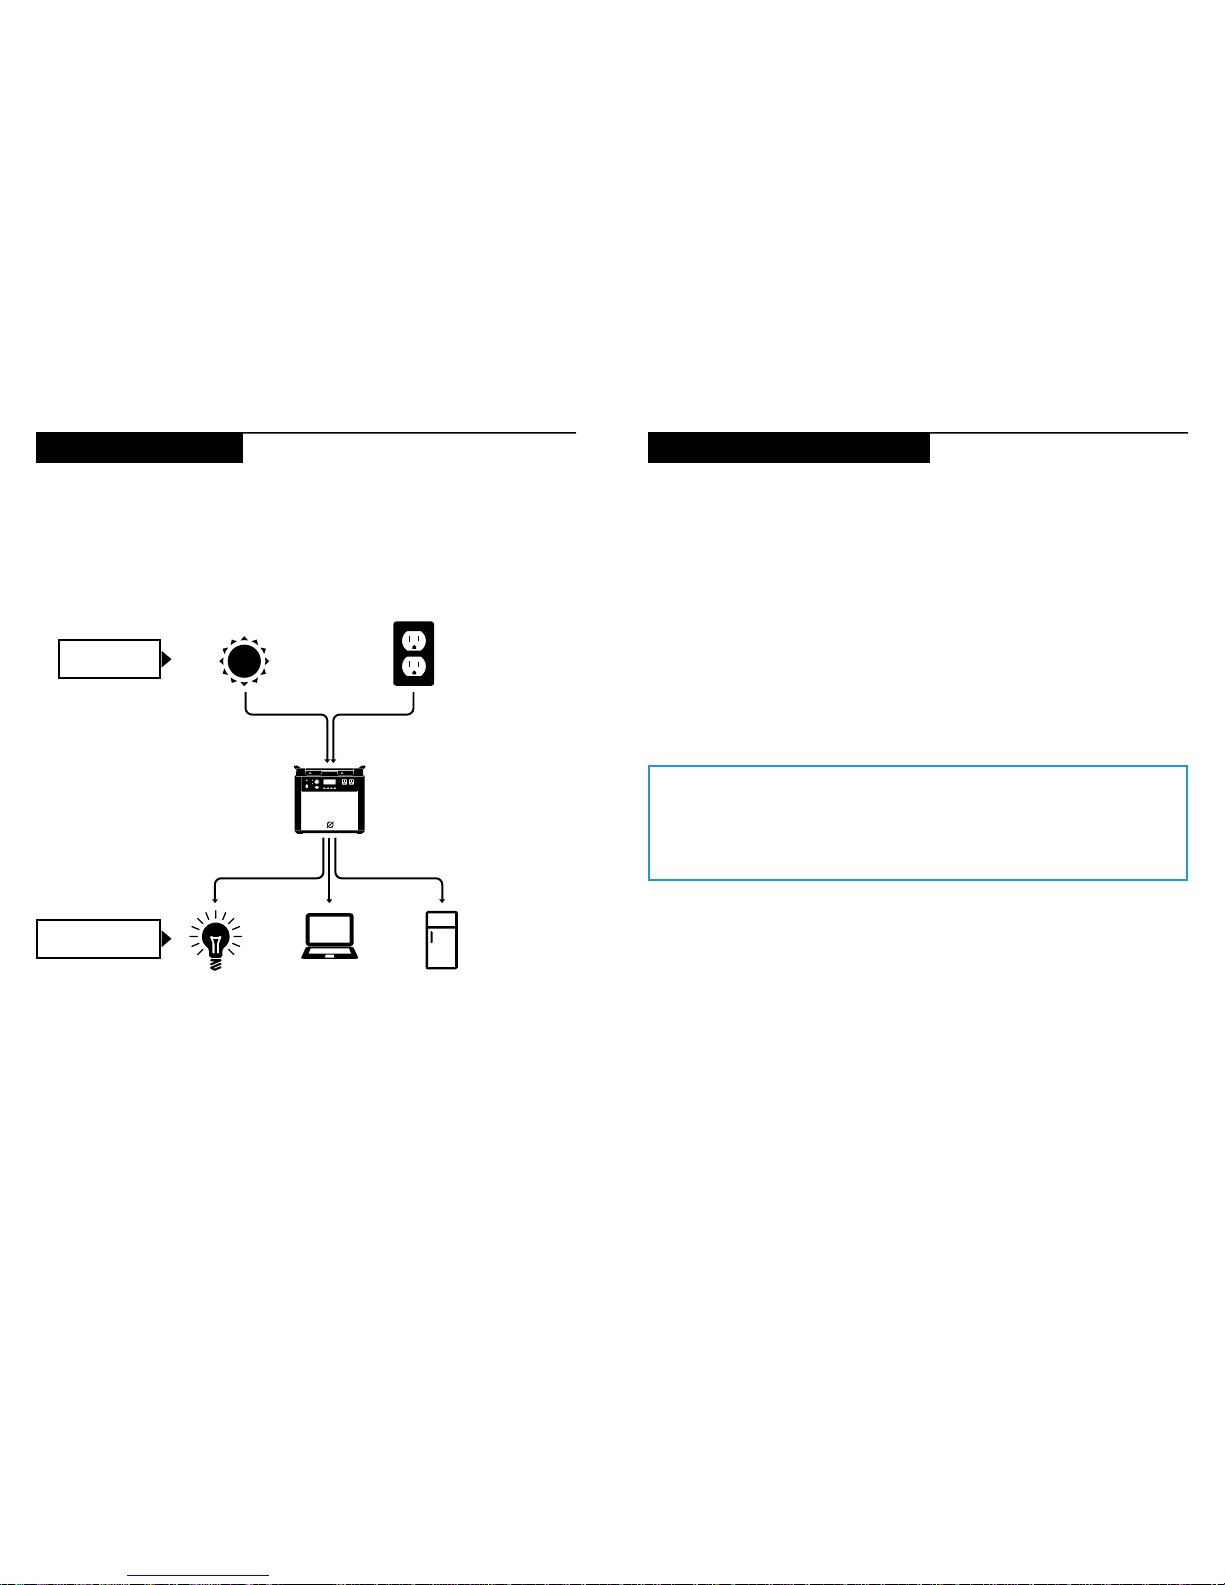
25 Hours
Solar
(Sold separately)
6 Hours
(Based off max input)
12V LED
1000+ Hours
Laptop
50x
Fridge
50+Hours
+ MORE
CHARGE IT
WHAT IT POWERS
Get To Know Your Gear How it Works
INPUT
INPUT 12V UNITS
LIGHT
INFO 120V AC
1500W, 3000W SURGE
CONNECT TO POWER SOURCE
WHEN NOT IN USE
Data Transfer Connector
Anderson Power Pole Input
2 x 8mm Inputs
Indicator Light
Blue Yeti Connector
USB-A 5V, 2.4A
USB-C 5V, 3.0A
4
5
3. You can also connect the YETI to other brands of solar panels using the Anderson
Power Pole port.
4. You can chain multiple Goal Zero Solar Panels together to reduce solar recharge times.
Do not exceed more than 22V input through the integrated input ports.
5. You can charge your YETI with solar panels, and a wall charger at the same time.
Solar Charging Optimization Module
The pre-installed Solar Charging Optimization Module functions as a maximum power
point tracker (MPPT). It actively monitors the energy source you’re using to charge the
Goal Zero Yeti Lithium and optimizes the source to maximize power, resulting in up
to 40% faster charge times. You may also notice better charge times from AC when
utilizing the Yeti Lithium’s AC charging cable plugged into the module. The three ports
on the right side of the Yeti are part of the Solar Charging Optimization Module. Refer
to the included Solar Charging Optimization manual for more information.
Charging from the Wall
Using the included AC Wall Charger, plug your Goal Zero Yeti into any wall outlet. You
will know the Goal Zero Yeti is charging when the blue LED light next to the INPUT port
turns on, and battery segments in the BATTERY DISPLAY are blinking. The Goal Zero
Yeti is fully charged when all battery segments stop blinking and remain solid. The Goal
Zero Yeti should recharge from the wall in about 25 hours.
1. The AC wall adapter comes in two pieces. Connect the two pieces by plugging the
cable into the box.
2. The AC cable can be plugged into the AC adapter while it’s stored inside the
storage compartment with the 8mm DC barrel connector plugged into the port inside
the compartment, or it can be moved out of the compartment and plugged into the
front panel input port.
3. You can purchase an additional wall charger from Goal Zero for faster charge times.
CHARGE ME NOW: Before using or storing, plug your Goal Zero Yeti into the wall until it is
fully charged. Keep your Goal Zero Yeti plugged in when not in use. For more tips and tricks
on keeping your battery healthy, see the BATTERY 101 section.
When charging your Goal Zero Yeti you will notice a battery segment blinking in the
display. This indicates the current charge status. Once your Goal Zero Yeti is fully
charged, all battery segments will be lit and remain solid. As long as there is more power
going into the Goal Zero Yeti than is being pulled from the output ports, the display will
also indicate an estimated time until fully charged. This is an estimated time based on the
power input and output numbers at that time; it will gradually adjust to a shorter or longer
time as the average charge or discharge rates fluctuate.
Charging from Solar
There are several different inputs you can use when charging your YETI from solar, two
of which are located in the “INPUT” area on the left side of the YETI faceplate and a third
one located inside the storage compartment under the top lid. The round 8mm ports are
designed to be used with Goal Zero Solar Panels. The combined input power maximum
is 360W.
1. Place your solar panel where it will get as much direct sunlight as possible.
2. Insert the blue-ringed solar panel plug into one of the INPUT ports, either on the
front of the YETI or in the storage compartment under the top lid. You will know the Yeti
is charging when the blue LED light next to the INPUT port lights up, and the battery
segments in the LCD BATTERY DISPLAY are blinking. The YETI is fully charged when all
battery segments stop blinking and remain solid.
IMPORTANT NOTE: Do not exceed 22V input into the integrated input ports or
the Solar Charging Optimization Module; doing so will cause damage to the unit
and potential bodily injury. For questions about solar recharging and proper way
to set up your solar panels, call our solar experts at 888-794-6250.
Charging Your Goal Zero Yeti
IMPORTANT NOTE: The Goal Zero Yeti Lithium is not compatible recharging from
a 12V source, it can result in damage to the unit, cable, as well as your vehicle.

6
7
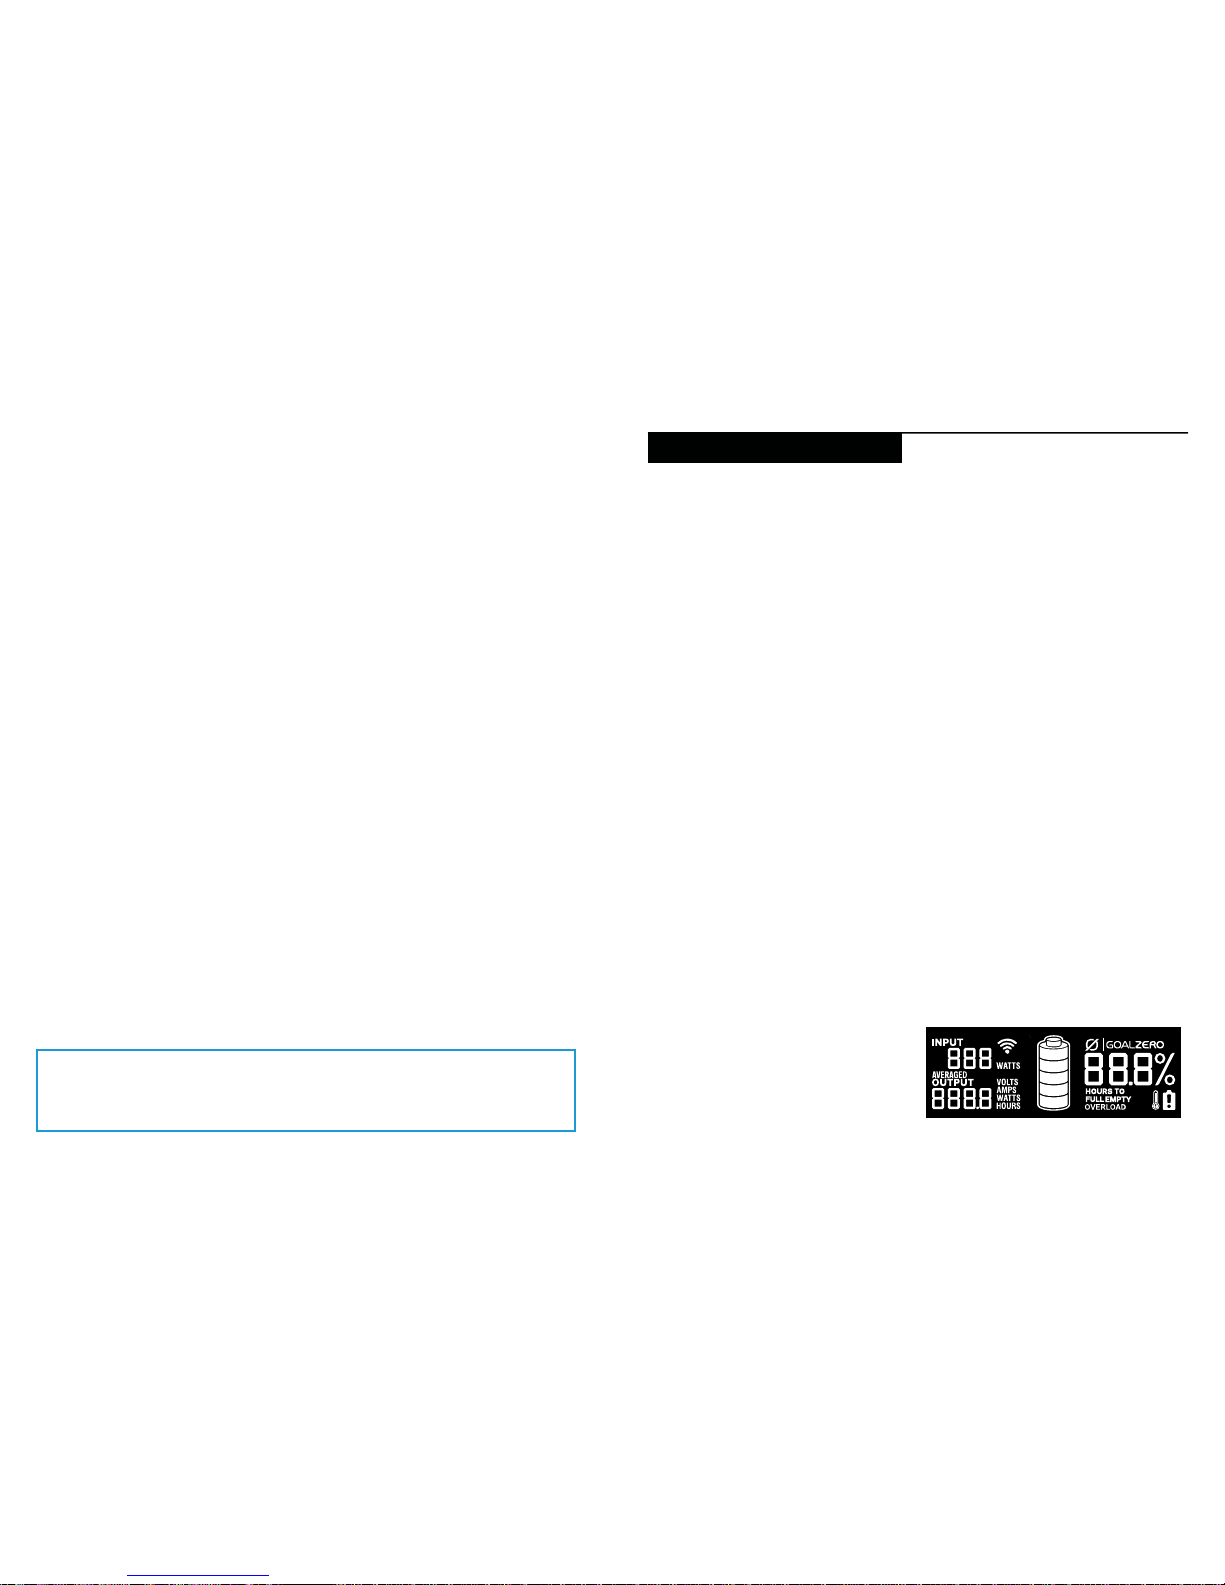
1. INPUT shows the amount of power (watts) going into the Goal Zero Yeti while
charging. If charging from solar, you’ll see the watts change as you reposition the panels
into/out of the sunlight.
a. LO will be displayed if power flow is below a measurable amount.
2. OUTPUT shows the amount of power (watts) your devices are using while plugged
into the Goal Zero Yeti.
3. TIME TO EMPTY/FULL shows the amount of time before your Goal Zero Yeti is
completely charged or empty, depending on if the net amount of power going into the
Goal Zero Yeti is positive or negative.
4. BATTERY LEVEL shows 5 segments, approximating 20% - 40% - 60% - 80%
-100% capacity. As you use your Goal Zero Yeti, segments will disappear from the
display, indicating the remaining charge. When charging your Goal Zero Yeti you will
notice a battery segment blinking. This indicates the current charge status. Once your
Goal Zero Yeti is fully charged, all battery segments will be lit and remain solid. As long
as there is more power going into the Goal Zero Yeti than is being pulled from the output
ports, the display will also indicate an estimated time until fully charged. This is an
estimated time based on the power input and output numbers at that time; it will adjust
to a shorter or longer time if the charge or discharge rates fluctuate. Note that when you
first plug in a power source, whether it’s a solar panel or a wall charger, the Yeti may take
a minute to detect and adjust its charge circuitry before it starts drawing power from
the source.
5. The WiFi symbol indicates the Yeti’s WiFi is turned on. If flashing, the Yeti is ready to
connect to a device.
Front Buttons:
Pressing the UNITS button will scroll through different output and power consumption
settings.
Pressing the LIGHT button will turn the display backlight on and off.
Pressing the INFO button will alternate the screen between showing the detailed battery
state of charge percentage and the Time to Empty/Full.
LCD Display
The built-in LCD display indicates four
important things:
Using your Goal Zero Yeti
How to use your Goal Zero Yeti:
1. Press the power button located above each port you will be using. **When not
using certain ports, make sure to turn them off to conserve power.
2. You’ll know the port is turned on when the green LED light on the button is
illuminated.
3. Plug in your gear for power anywhere life takes you.
4. If possible, keep your Goal Zero Yeti plugged into a power source when not in use.
5. You can charge your Goal Zero Yeti, and run your gear at the same time.
Best-Use Strategy:
When charging gear with your Goal Zero Yeti, take note of the LCD Battery Display. If you plug
in devices that have a high power requirement (a large refrigerator), the charge level of your Goal
Zero Yeti can drop very quickly and you may not get exactly 3000Wh of energy. Also, especially
when using the AC power output, the Goal Zero Yeti will be converting the energy from the DC
power of the battery to the AC power needed by your device. Although your Goal Zero Yeti has a
highly efficient inverter, there is still some energy lost in this conversion and you will not get the
full rated capacity of the battery. If you’re experiencing shorter runtimes, you may want to check
the device’s power requirements, see TROUBLESHOOTING for help.
Cold Weather Usage:
Cold temperatures (below freezing) can impact the Goal Zero Yeti’s battery capacity. If
you’ll be out living off-grid in sub-zero conditions, we recommend keeping your Goal Zero
Yeti in an insulated cooler, connected to a power source (solar panels), and charging your
gear. The natural heat generated by the Goal Zero Yeti contained in an insulated cooler
will keep battery capacity at its highest.
8
9
Goal Zero Yeti Lithium Roll Cart
Storage and Downtime Maintenance
Having your Goal Zero Yeti connected to a power source, like a solar panel or wall plug,
between adventures or while in storage keeps its battery healthy and topped off. This
prolongs battery life and will ensure your Goal Zero Yeti is charged and ready to go all
day, every day.
If you can’t keep your Goal Zero Yeti plugged into a power source during storage,
fully-charge your Goal Zero Yeti every 3 months and store it in a cool, dry place.
Failure to maintain your Goal Zero Yeti by following these steps can result in battery
damage which will void the product warranty.
The Yeti Roll Cart comes pre-installed on the Goal Zero Yeti 3000 and can be easily
removed when needed.
1. Lay the entire unit on its backside with the outputs of the Yeti facing up.
2. Remove the 4 screws holding the Yeti to the roll cart.
3. Carefully lift the Yeti off the cart.
The included handle is telescoping and can slide up and down while pressing down on
the button.
Using your Goal Zero Yeti
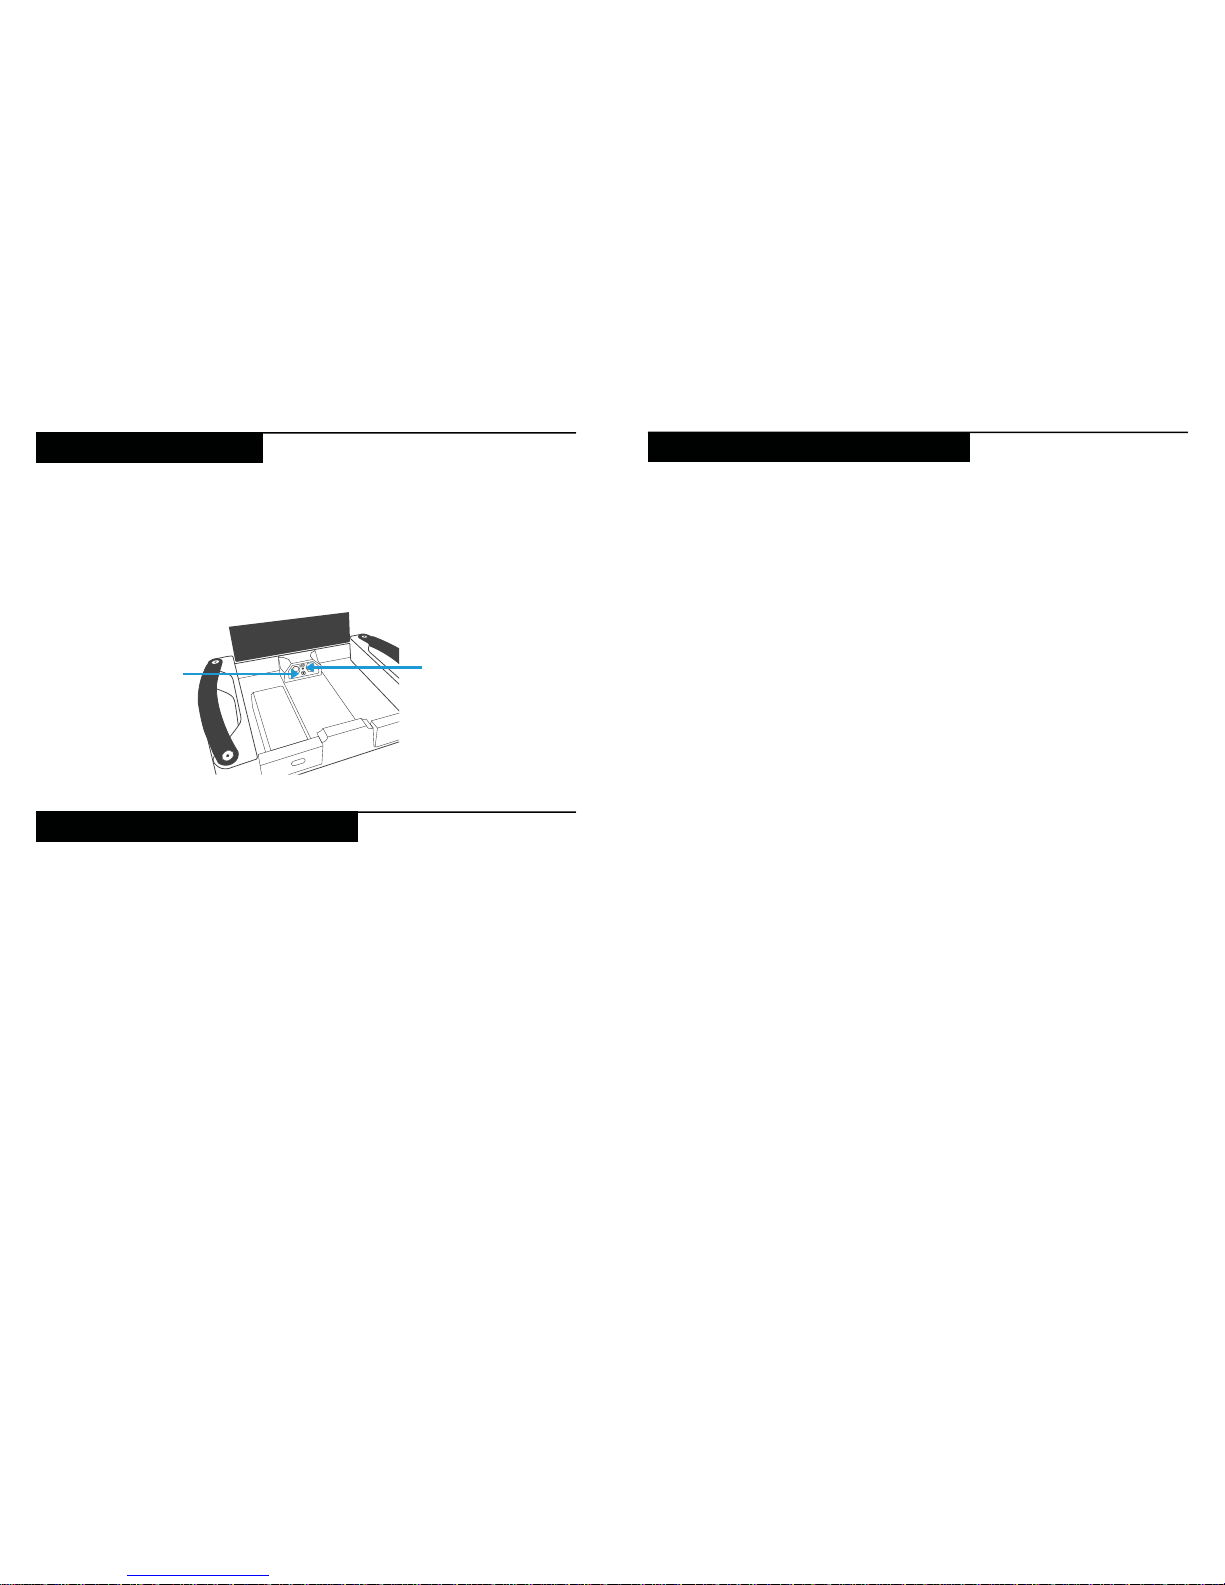
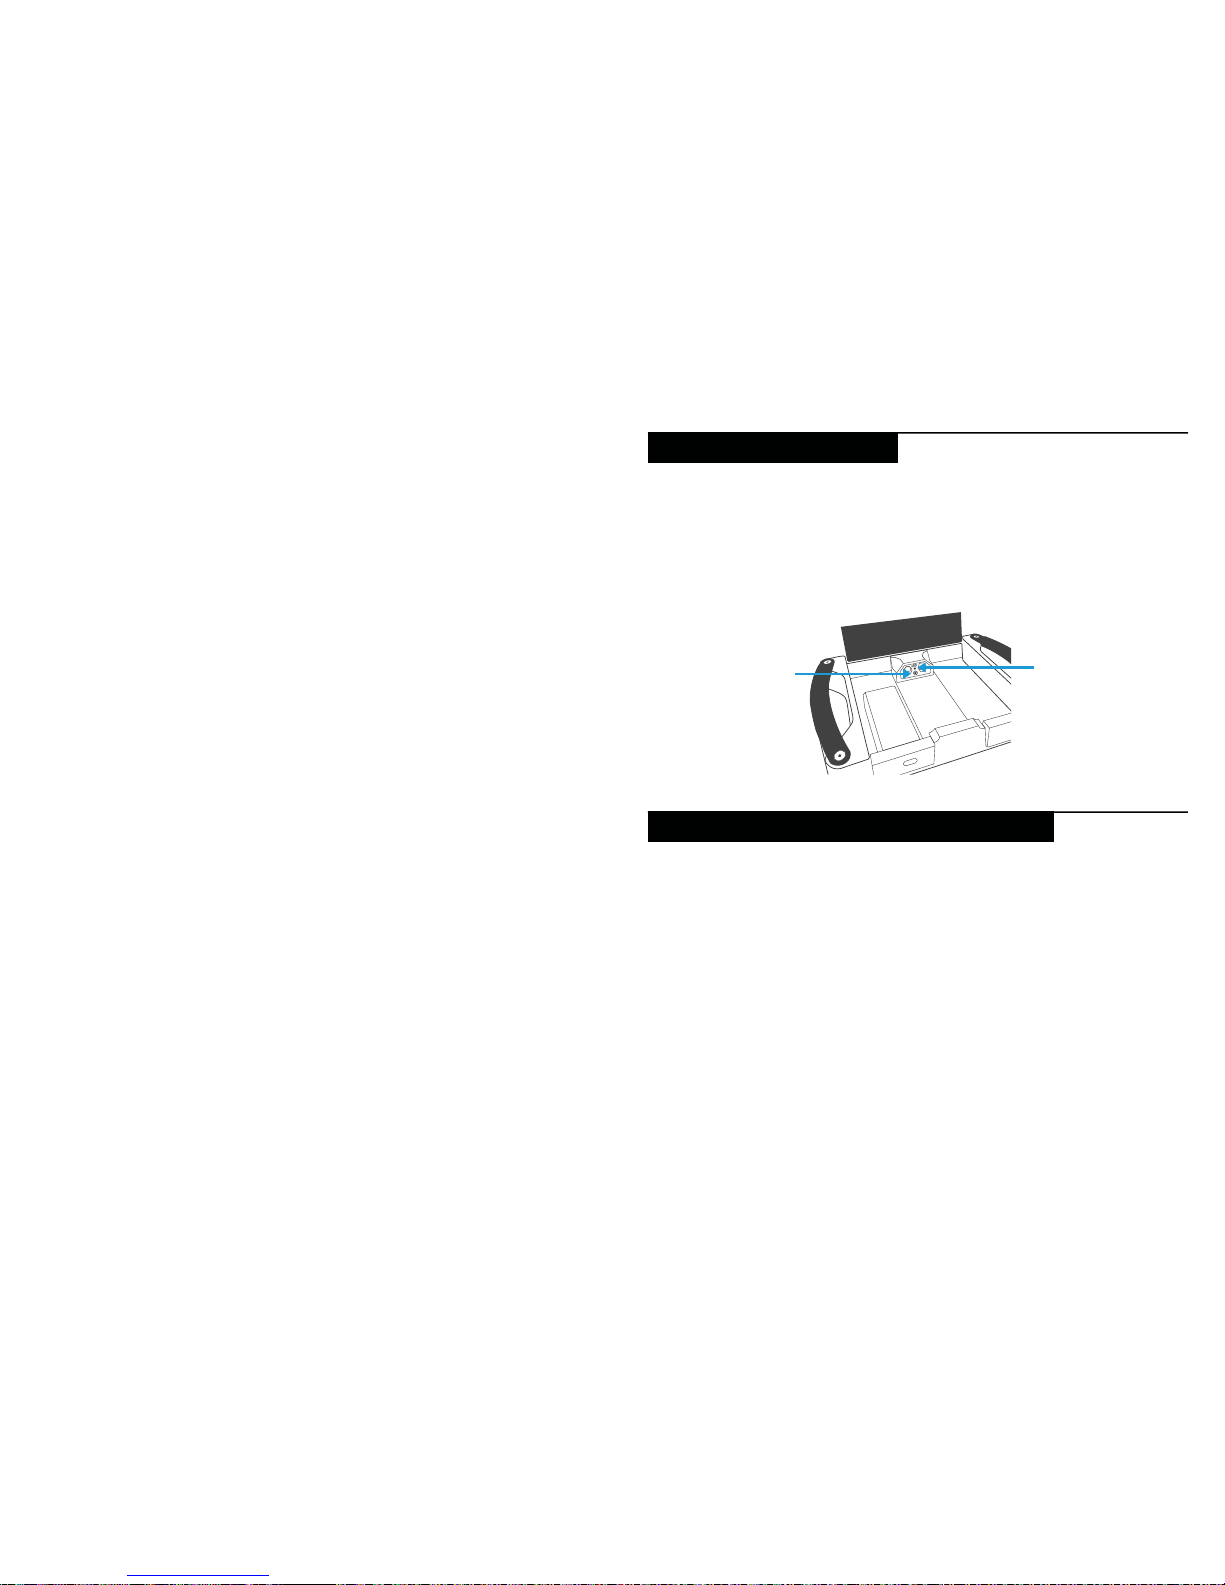
Buttons Under Lid:
Pressing the WiFi button will activate the Yeti’s WiFi for connection to a device. For
information on connecting your device to the Yeti, see the included Yeti App Start Up
Guide.
Pressing and holding the RESET button will reset the WATT HOUR output counter.state
of charge percentage and the Time to Empty/Full.
WiFi button
Reset button

10
11
Technical Specifications Technical Specifications
Charge times
Maximum input (standard) 9 hrs
Maximum input (standard and MPPT) 6 hrs
Wall charger (2x 5A) 25 hrs
Goal Zero Boulder 100 or 100 Briefcase 60-120 hrs
Goal Zero Boulder 200 Briefcase 30-60 hrs
Battery:
Cell Chemistry Li-ion NMC
Pack Capacity 3075Wh (10.95V, 280.8Ah)
Single Cell Equivalent Capacity 842Ah @ 3.65V
Lifecycles 500 Cycles to 80% capacity
Shelf-life Charge every 3-6 months
Management System PWM charge controller, low battery protection
Ports:
USB-A Port (output) 5V, up to 2.4A (12W max), regulated
USB-C Port (output) 5V, up to 3.0A (15W max), regulated
USB-PD Port (output) 5V, 12V, 20V up to 3.0A (60W max), regulated
6mm Port (output, 6mm) 12V, up to 10A (120W max)
12V Car Port (output) 12V, up to 10A (120W max)
12V Power Pole port (output) 12V, up to 20A (240W max)
120V AC Inverter (output, pure sine wave) 120VAC 60Hz, 12.5A (1500W, 3000W surge)
230V AC Inverter (output, pure sine wave)
UNIVERSAL OR AUSTRALIA TYPE AC PLUGS
230VAC 50Hz, 6.5A (1500W, 3000W surge)
Charging Port (input, 8mm) 14-22V, up to 10A (120W max)
Power Pole Charging Port (input) 14-22V, up to 30A (360W max)
Expansion Module port Covered port under the lid. To be used with Goal Zero
expansion modules only.
WiFi:
RF Certification FCC/CE/IC/TELEC/KCC/SRRC/NCC
Protocols
802.11 b/g/n (802.11n up to 150 Mbps)
Frequency Range 2.4~2.5 GHz
General:
Weight (Yeti & MPPT charger) 68.6 lbs (31.1 kg)
Weight (cart only) 8.9 lbs (4 kg)
Dimensions 10.1 x 15.3 x 13.1 in (25.7 x 38.9 x 33.3 cm)
Operating Usage Temp. 32-104 F (0-40 C)
Certs
Warranty 12 months

12
13
Frequently Asked Questions
What type of battery is in my Goal Zero Yeti?
Your Goal Zero Yeti uses custom designed Lithium Ion. Here are some basic facts about
Lithium Ion batteries:
1. Lithium Ion batteries can store and release a lot of energy in a short period of time.
The batteries in your Goal Zero Yeti are in a protective enclosure with a sophisticated
battery management and protection system controlling its terminals to the outside
world.
2. It is critical that your battery does not get wet as moisture and water can get into the
battery cells behind the protection circuitry and bypass that protection.
Can I replace the battery in my Goal Zero Yeti?
Yes, the battery inside the Goal Zero Yeti is designed to be easy to replace.
1. Turn your Goal Zero Yeti upside-down and place its top surface on towel or blanket
over a hard surface.
2. Remove the 10 screws on the bottom plate.
3. Unscrew the 2 bolts that connect to the battery terminals.
4. Pull on and disconnect the data connector to the battery.
5. Remove the 8 screws holding the battery pack to the Goal Zero Yeti.
6. Lift the old battery out of the body of the Goal Zero Yeti
**This battery is HEAVY. Use caution and proper technique when lifting.
7. Insert replacement battery and reassemble in reverse order of steps above.
8. Replaceable batteries will be available from GoalZero.com. Call us at 888-7946250 for assistance.
How do I know if my Goal Zero Yeti is charged?
To check the charge level of your Goal Zero Yeti, refer to the LCD Battery Display. When lit
up, you’ll see a battery outline with 5 segments, indicating the current charge level. It is OK
to use your Goal Zero Yeti even when it’s not fully charged.
Why is the light on the AC button blinking?
A blinking light on the AC button indicates that at the current load, the AC inverter will be
shutting off soon. Recharge your Goal Zero Yeti as soon as possible to continue powering
your device. Once the AC inverter has shut off, the Yeti will attempt to reset itself three
times. After three attempts, the AC inverter will remain off until you physically reset it by
pushing the AC button or by recharging the battery a small amount.
How do I know if my device will work with the Goal Zero Yeti?
First, you’ll need to determine the amount of power your device requires. This may require
some research on your end, a good internet search or examining the user guide for your
device should suffice.
Second, you will need to check the capacity for the individual output ports. For example,
the Goal Zero Yeti’s AC port is powered by an inverter that allows for 1500W of power.
This means if your device is pulling more than 1500W for an extended period of time, the
Goal Zero Yeti’s inverter will shut off. Another number to watch for is the surge rating of
your device as compared to that of the port. The Goal Zero Yeti inverter has an advanced
surge management system that will maximize its compatibility with various devices, but
there will still be items that will surge at a higher rate, and for a longer time, than the
Goal Zero Yeti can manage, in which case the port will turn itself off.
Finally, once you know your device is compatible, you’ll want to determine how long you’ll be
able to power your gear from the Goal Zero Yeti. Here’s a quick and dirty lesson in power.
All GOAL ZERO power packs and solar generators have a number in their name, ex.
Guide10 Plus Power Pack, Goal Zero Yeti 3000. These numbers refer to the Watt Hours
(Wh), or the amount of energy that can be stored in each recharger, and how you’ll know if
your gear is compatible with each recharger. For example, a 200Wh recharger should run
a 100W light for 2 hours (200/100=2). If your gear falls within the 3000Wh capacity of
the Goal Zero Yeti, you’ll want to check the restrictions on each of the output ports.
Another factor in the math is how much power is being converted going from the Goal
Zero Yeti battery to the device you are powering/charging. In some situations, like when
running a 12V device, such as the LAL 350, directly off the 12V port, there will be no
conversion and so no additional losses. In using the USB ports to charge a phone, you
add a layer of conversion (12V battery in the Goal Zero Yeti is being converted to a 5V
USB output), which introduces around 10% of losses. When using the inverter, there are
14
15
two layers of conversion (12V to high voltage, DC to AC). The least efficient way of using
the battery in the Goal Zero Yeti is to use an AC-DC adapter off the AC ports, as is the
case if you use a phone wall charger to charge your phone, as it adds yet another layer of
conversion in the wall adapter.
So when you’re deciding on what to power from your new GOAL ZERO recharger, do
some research into your device’s watt consumption. For more quick tips and learning
tools, check out www.GoalZero.com/learn.html
If you are having trouble with WiFi connection:
1. Press and hold the WiFi button for approximately 3 seconds to force the Yeti into
connection mode. The WiFi symbol on the screen will begin to flash.
2. Reconnect your device to your Yeti following the instructions in the Goal Zero Yeti App,
If your devices are not recharging from your Goal Zero Yeti, follow these steps:
1. Ensure the Output Port has been turned on. The green LED light on the power button
should be lit up.
a. If any of the lights have turned red, this indicates a trip. Push the button again to reset
it. The light will turn green when it is successfully reset.
2. Check the Battery Display. If it is at 20% or below, charge your Goal Zero Yeti.
3. Check the LCD Display for warning icons:
OVERLOAD: Power draw exceeds port’s maximum allowance. Indicated by red light in
the port’s button.
4. Verify your device is suitable for use with the Goal Zero Yeti:
a. All of the Goal Zero Yeti output ports have their own max power capacity. Check the
Goal Zero Yeti’s Tech Specs to ensure your device is compatible.
5. If you are still experiencing trouble with your Goal Zero Yeti, please call our Customer
Solutions Center at 1-888-794-6250 or by email at support@goalzero.com.
Troubleshooting
Temperature warning.
Allow unit to cool.
Battery requires attention.
Contact customer support.
1-888-794-6250

16
17
Education
BATTERIES 101: GOAL ZERO utilizes the latest and greatest in battery technology to
accompany you on all life’s adventures. From the versatile and lightweight Lithuim Ion, to
the robust and powerful Lead Acid, we’ve compiled some helpful tips to keep your GOAL
ZERO batteries working their best.
i. Batteries need exercise.
The best thing for any battery is to use it. Don’t leave the battery sitting without being
charged for extended periods of time. If you will be storing the Goal Zero Yeti without a
charger, make sure it’s fully charged before you put it away.
ii. The “Battery Memory” myth.
Thanks to old Nickel-Cadmium (NiCd) batteries, there’s a myth running around that you
should completely drain your batteries before plugging them in for a recharge, called “deep
cycling”. Although true with NiCd batteries, the typical batteries you’ll find in most of your
gear today, including the advanced lithium and lead-acid batteries used in your GOAL ZERO
rechargers, require no such draining. In fact, you should avoid deep cycling your batteries – it
does more harm than good in most cases.
iii. The “Stadium Effect”.
The stadium effect occurs when recharging your batteries. You’ll notice your battery quickly
filling up in the beginning, then slowing down noticeably when trying to charge up the last
several percentages. Think of how quickly a stadium fills up when the doors first open – there
are hundreds of open seats so it’s easy to find the one you want. Eventually there are only
a few open seats here and there and people have to maneuver around to find the spot they
want and filling those seats takes longer. The same theory applies to recharging batteries.
It’s easy for energy to flow in and take up empty space in the beginning, and as time goes on
and there is less space available, it takes longer for the energy to fill in the holes.
iv. Read the manual.
Yeah, it might be a long read, but the manual is the best place to find the dos and don’ts for
the battery in your specific device. Reading your manual will ensure you’re taking steps to
keep your batteries happy and healthy.
SOLAR 101: GOAL ZERO makes it easy to recharge your gear from the sun – we didn’t
invent solar power, we perfected it. Some things to keep in mind when recharging your
gear with solar power:
i. Solar panels don’t store power from the sun, they collect it.
We teach you to COLLECT – STORE – USE, which is the best way to utilize solar power to
recharge your gear. COLLECT the sun’s energy with a solar panel. STORE the power in a
recharger. USE the recharger to power your gear, day or night. If you’re really a diehard, you
can plug your gear directly into the junction box located on the back of our NOMAD Solar
Panels to recharge from the sun.
ii. Not all solar charge times are created equal.
Most solar panel manufacturers calculate their recharge times with the following equation:
Device Watt Hours/Solar Panel Watts = Solar Recharge Times. So theoretically, a 13 watt
solar panel would recharge a 50 watt-hour recharger in 3.84 hours (50/13 = 3.84) – and
this is the number you could find in marketing material for a solar panel. However, in order
to standardize results across all manufacturers, these tests are completed in laboratory
settings. The truth is, on a good, sunny day, you’ll receive about 50-75% of your solar panel’s
rated wattage, and this is how the engineers at GOAL ZERO calculate the solar recharge
times you see on our packaging.
iii. Solar works, even in overcast conditions.
Solar panels utilize IR, UV, and visible rays from the sun that can penetrate through clouds.
Although the efficiency of the solar panel will decrease in cloudy conditions, you’ll still be
collecting valuable power from the sun.
iv. Keep away from shade and windows.
Although you should seek out the shade on sunny days, your solar panels will collect
more power when fully exposed to the sunlight. Windows also have a habit of decreasing
efficiency. So keep those panels outside and in the bright sunlight.
v. Proper alignment works wonders.
Keeping your solar panel angled toward the sun can dramatically increase solar efficiency.
Set it up and let Mother Nature do the rest.
18
19
Warranty & Contact
LIMITED WARRANTY
GOAL ZERO LLC warrants to the original consumer purchaser that this GOAL ZERO product will be free
from defects in workmanship and material under normal consumer use during the applicable warranty
period identified in Paragraph 2, below, subject to the exclusions set forth in Paragraph 5, below. This
warranty statement sets forth GOAL ZERO’s total and exclusive warranty obligation. We will not assume,
nor authorize any person to assume for us, any other liability in connection with the sales of our products.
WARRANTY PERIOD
The warranty period for GOAL ZERO battery cells (whether purchased on a stand-alone basis or as part
of another product) is 180 days. The warranty period for all other GOAL ZERO products and components
is one (1) year. In each case, the warranty period is measured starting on the date of purchase by the
original consumer purchaser. The sales receipt from the first consumer purchase, or other reasonable
documentary proof, is required in order to establish the start date of the warranty period. If you
completed the online GOAL ZERO Product Registration Form within 30 days after purchasing your
product, that registration can also establish the start date of the warranty period (but warranty coverage
is not conditioned upon such registration).
REMEDY
GOAL ZERO will repair or replace (at GOAL ZERO’s option and expense) any GOAL ZERO product that
fails to operate during the applicable warranty period due to a defect in workmanship or material.
LIMITED TO ORIGINAL CONSUMER BUYER
The warranty on GOAL ZERO’s products is limited to the original consumer purchaser and is not
transferable to any subsequent owner.
EXCLUSIONS
GOAL ZERO’s warranty does not apply to (i) any product that is misused, abused, modified, damaged
by accident, or used for anything other than normal consumer use as authorized in GOAL ZERO’s thencurrent product literature, or (ii) any product purchased through an online auction house. GOAL ZERO’s
warranty does not apply to any battery cell or product containing a battery cell unless the battery cell
is fully charged by you within seven (7) days after you purchase the product and at least once every 6
months thereafter.
HOW TO RECEIVE SERVICE
To obtain warranty service, you must contact our customer service team via telephone at (888) 7946250, or via email at support@goalzero.com. If our customer service team determines that further
assistance is required, they will give you a Return Material Authorization (“RMA”) number and will provide
you with prepaid return shipping label that you can use to mail back your non-functioning item(s). You must
properly package the product, clearly marking the RMA number on the package and including proof of
your purchase date with the product. We will process your return and send your repaired or replacement
product to you at our expense for product being shipped to locations in North America. For product
purchased or being shipped outside of North America, please contact the local distributor from whom you
purchased the product or email support@goalzero.com to obtain further distributor information.
IMPLIED WARRANTIES
THE LIMITED WARRANTY STATED HEREIN IS IN LIEU OF ALL OTHER EXPRESS WARRANTIES. IN
NO EVENT SHALL ANY IMPLIED WARRANTIES, INCLUDING BUT NOT LIMITED TO ANY WARRANTIES
OF MERCHANTABILITY, FITNESS FOR A PARTICULAR PURPOSE OR NON-INFRINGEMENT, EXTEND
BEYOND THE APPLICABLE WARRANTY PERIOD IDENTIFIED IN PARAGRAPH 2, ABOVE. Some states
do not allow limitations on how long an implied warranty lasts, so the above limitation may not apply to
you. This warranty gives you specific legal rights, and you may also have other rights which vary from
state to state.
EXCLUSIVE REMEDY; LIMITATION OF LIABILITY
The foregoing provisions state GOAL ZERO’s entire liability, and your exclusive remedy, for any breach of
warranty, express or implied. IN NO EVENT WILL GOAL ZERO BE LIABLE FOR ANY CONSEQUENTIAL
OR INCIDENTAL DAMAGES ARISING FROM ANY USE OR MALFUNCTION OF ANY GOAL ZERO
PRODUCT, OR FROM ANY BREACH OF WARRANTY, INCLUDING DAMAGE TO OTHER DEVICES. IN NO
EVENT WILL GOAL ZERO’s LIABILITY FOR ANY CLAIM, WHETHER IN CONTRACT, WARRANTY, TORT
(INCLUDING NEGLIGENCE AND STRICT LIABILITY) OR UNDER ANY OTHER THEORY OF LIABILITY,
EXCEED THE AMOUNT PAID BY YOU FOR THE GOAL ZERO PRODUCT. Some states do not allow the
exclusion or limitation of incidental or consequential damages, so the above limitation or exclusion may
not apply to you.
FREE EXTENDED WARRANTY
Get an ADDITIONAL YEAR of protection for your Goal Zero Yeti Lithium
Portable Power Station by simply registering your product at:
GOALZERO.com/extendedwarranty
This gives you TWO TOTAL years of worry-free product coverage.
It’s free and easy peace of mind for you and your new power companion.
20
21
Avant de l'utiliser ou de le stocker, branchez votre Goal Zero Yeti sur une
prise murale jusqu'à ce qu'il soit complètement chargé. Gardez votre
Goal Zero Yeti branché lorsqu'il n'est pas utilisé. Pour plus de conseils et
d'astuces pour maintenir le bon fonctionnement de votre batterie, consultez
la section PRINCIPES DE BASE SUR LES BATTERIES.
Lisez toutes les consignes et mises en garde avec soin avant toute utilisation pour
éviter d'éventuelles blessures corporelles ou des dommages sérieux à l'appareil ou
tout autre appareil connecté
Respectez toutes les puissances nominales des connecteurs d'Entrée/Sortie :
Pour éviter tout risque d'incendie ou d'électrocution, observez toutes les indications
de puissance nominale sur l'unité et celles des produits que vous souhaitez utiliser ;
Vérifiez leurs manuels respectifs pour plus d'informations.
À utiliser dans un espace bien ventilé : Assurez une ventilation adéquate pendant
son utilisation et n'obstruez jamais les ouvertures du ventilateur de l'appareil. Une
ventilation inadéquate peut endommager l'appareil. Ne jamais empiler quoi que ce
soit sur l'appareil, lors de son stockage ou en cours d'utilisation.
NE PAS faire fonctionner dans des conditions humides : Afin d'éviter les courts-
circuits ou les chocs électriques, ne permettez pas à l'appareil de devenir mouillé.
Laissez l'appareil sécher complètement avant de l'utiliser à nouveau.
Gardez l'appareil propre et sec : Inspectez régulièrement l'appareil pour la saleté,
la poussière ou l'humidité.
Risque de choc ou d'incendie : Ce Yeti génère la même puissance électrique
potentiellement mortelle qu'une prise murale domestique normale. Utilisez-le avec
autant de précaution que lors de l'utilisation d'une prise secteur murale.
NE PAS insérer d'objets étrangers dans les sorties électriques ou les
trous de ventilation.
NE PAS tenter de remplacer la batterie interne par une autre batterie que celle de
remplacement autorisée par Goal Zero et disponible sur leur site en ligne.
Toute manipulation sur l'unité ou ses composants annulera toutes les garanties.
CONSIGNES DE SÉCURITÉ IMPORTANTES
RECHARGEZ-MOI MAINTENANT
Entrée pour chargeur CA
Entrée de 8 mm pour charger à partir des
Panneaux Solaires de Goal Zero ou de CA
Entrée pour les connecteurs
Anderson Power Pole pour
charger à partir des Panneaux
Solaires de Goal Zero.(un
adapteur peut être nécessaire)
Sorties 12V Sorties 12V
USB
Livraison d'alimentation
USB-C
5/12/20V jusqu'à 3A
(60W)
USB-C 5V,
3A (15W)
Boutons Interactifs
et Écran LCD
Module d'optimisation de charge solaire
Sorties CA
Apprendre à Connaître Votre Équipement
ENTRÉE
ENTRÉE 12V UNITÉS
LUMIÈRE
INFO 120V CA
1500W, 3000W À
PLEINE TENSION
CONNECTEZ À LA SOURCE
D'ALIMENTATION LORSQU'ELLE
N'EST PAS UTILISÉE
Connecteur de
transfert de données
Entrée Anderson Power Pole
2 entrées de 8mm
Indicateur lumineux
Connecteur
Yeti bleu
USB-A 5V, 2,4A
USB-C 5V, 3,0A
22
23
2 prises de CA
25 Heures
Énergie Solaire
(Vendu séparément)
6 Heures
(basé sur une tension d'entrée max.)
12V DEL
+ de 1000 Heures
Ordinateur portable Réfrigérateur
+ de 50 Heures
ENCORE +
RECHARGEZ-LE
CE QUE ÇA PEUT
ALIMENTER
Comment il fonctionne
CHARGEZ-MOI MAINTENANT : Avant de l'utiliser ou de le stocker, branchez votre Goal
Zero Yeti sur une prise murale jusqu'à ce qu'il soit complètement chargé. Gardez votre
Goal Zero Yeti branché lorsqu'il n'est pas utilisé. Pour plus de conseils et d'astuces pour
maintenir le bon fonctionnement de votre batterie, consultez la section PRINCIPES DE
BASE SUR LES BATTERIES.
Lorsque vous rechargez votre Goal Zero Yeti, vous remarquerez un segment de la batterie
qui clignotera à l'écran. Cela indique l'état actuel de charge. Une fois que votre Goal Zero
Yeti est complètement rechargé, tous les segments de la batterie s'allumeront et resteront
allumés. Tant qu'il y aura plus de courant entrant dans la batterie Goal Zero Yeti que de
courant tiré des ports de sortie, l'affichage indiquera également un temps estimé jusqu'à
ce qu'il soit complètement rechargé. Il s'agit d'une durée estimée basée sur le nombre
d'entrées et de sorties d'alimentation à ce moment-là ; Cette durée s'ajustera à un temps
plus court ou plus long lorsque les taux de charge ou de décharge fluctuent.
Charger à partir d'une Source d’Énergie Solaire
Les ports ronds de 8 mm sont conçus pour fonctionner avec des panneaux solaires Goal
Zero. La puissance maximale combinée en entrée est de 360W.
1. Placez votre panneau solaire où il obtiendra le plus de lumière directe du soleil que possible.
2. Insérez la fiche à anneau bleu du panneau solaire dans l'un des ports d'ENTRÉE, soit
sur la face avant du YETI ou dans le compartiment de rangement sous le couvercle.
Vous saurez quand le Goal Zero Yeti sera en charge lorsque le voyant bleu à côté du
port INPUT (entrée) s'allumera et que les segments de la batterie dans AFFICHAGE
LCD DE LA BATTERIE clignoteront. Le Yeti est complètement rechargé lorsque tous les
segments de la batterie cessent de clignoter et restent éclairés en continu.
NOTE IMPORTANTE : Ne dépassez pas 22V à l'entrée des ports d'entrée
intégrés ou du module d'optimisation de charge solaire ; cela pourrait causer des
dommages sérieux à l'appareil et d'éventuelles blessures corporelles. Pour toutes
questions à propos de charge solaire et comment bien installer vos panneaux
solaires, appelez nos experts en énergie solaire au (+1) 888-794-6250.
Recharger Votre Goal Zero Yeti
24
25
3. Vous pouvez également connecter le Goal Zero Yeti à d'autres types de panneaux
solaires en utilisant le port Anderson au pôle électrique
4. Vous pouvez connecter plusieurs Panneaux Solaires Goal Zero ensemble pour réduire
les temps de recharge solaire.
5. Vous pouvez charger votre Goal Zero Yeti avec des panneaux solaires, et depuis une
prise murale en même temps.
Module d'optimisation de charge solaire
Le module d'optimisation de charge solaire pré-installé fonctionne comme un traceur
de point de puissance maximum (MPPT). Il trace activement la source d'énergie que
vous utilisez pour charger le Goal Zero Yeti Lithium et optimise la source pour maximiser
l'alimentation, entraînant des temps de charge jusqu'à 40% plus rapides. Vous
remarquerez également des temps de charge plus rapide depuis une prise murale lorsque
vous utilisez le câble de recharge CA du Yeti Lithium branché au module. Les trois ports
situés sur le côté droit du Yeti font partie du module d'optimisation de charge solaire.
Reportez-vous au manuel d'optimisation de charge solaire inclus pour plus d'informations.
Recharger à partir d'une Prise Murale
En utilisant le chargeur mural CA inclus, branchez votre Goal Zero Yeti dans n'importe
quelle prise murale. Vous saurez que le Goal Zero Yeti sera en train de se recharger
lorsque la DEL bleue à côté du port INPUT (entrée) s'allumera et que les segments de
la batterie dans l'indicateur BATTERY DISPLAY (affichage de la batterie) clignoteront.
Le Goal Zero Yeti est complètement chargé lorsque tous les segments de la batterie
cessent de clignoter et restent éclairés en continu. Le Goal Zero Yeti devrait se
recharger à partir d'une prise murale en 25 heures environ.
1. L'adaptateur mural CA est livré en deux pièces détachées. Connectez les deux
pièces en branchant le câble dans le boîtier.
2. Le câble CA peut être branché dans l'adaptateur secteur lorsqu'il est stocké à
l'intérieur du compartiment de stockage avec le connecteur à canaux CC de 8 mm
branché dans le port à l'intérieur du compartiment ou peut être déplacé hors du
compartiment et branché sur le port d'entrée du panneau avant.
3. Vous pouvez acheter un chargeur mural supplémentaire chez Goal Zero pour des
temps de charge plus rapides.
NOTE IMPORTANTE : Le Goal Zero Yeti Lithium n'est pas compatible avec une
charge depuis une source de 12V, cela peut entraîner des dommages à l'appareil,
son câble ainsi qu'à votre véhicule.
Affichage LCD
L'écran LCD intégré indique quatre
choses importantes :
Utiliser votre Goal Zero Yeti
Comment utiliser votre Goal Zero Yeti :
1. Appuyez sur l'interrupteur d'alimentation situé au-dessus de chaque port que
vous allez utiliser. **Si vous n'utilisez pas certains ports, veillez à les éteindre pour
économiser l'énergie.
2. Vous saurez quand le port sera allumé lorsque le voyant vert du bouton s'illuminera.
3. Branchez votre équipement pour qu'il fonctionne n'importe où que vous soyez.
4. Si possible, gardez votre Goal Zero Yeti branché sur une prise d'alimentation
lorsqu'il n'est pas utilisé.
5. Vous pouvez recharger votre Goal Zero Yeti et vous servir de votre équipement en
même temps.
Stratégie d'Utilisation Optimale :
Lorsque vous rechargez vos appareils avec le Goal Zero Yeti, prenez note de l'écran LCD
de la batterie. Si vous branchez des appareils nécessitant une puissance élevée (un grand
réfrigérateur), le niveau de charge de votre Goal Zero Yeti peut chuter très rapidement et vous
pourriez ne pas obtenir exactement 3000Wh d'énergie. De plus, lorsque vous utilisez la sortie
d'alimentation CA, la batterie Goal Zero Yeti convertira l'énergie du courant CC de sa batterie
en courant alternatif nécessaire au bon fonctionnement de votre appareil. Bien que votre Goal
Zero Yeti dispose d'un convertisseur très efficace, il y a toujours un peu d'énergie perdue dans la
conversion et vous n'obtiendrez pas la pleine capacité nominale de la batterie. Si vous rencontrez
des durées d'utilisation bien plus courtes, vous devriez peut-être vérifier les exigences
d'alimentation de l'appareil en question, voir la section DÉPANNAGE pour obtenir de l'aide.
Utilisation par Temps Froid :
Les températures froides (en dessous du point de congélation) peuvent influer sur la capacité
de la batterie du Goal Zero Yeti. Si vous êtes en pleine nature dans des conditions froides
inférieures à zéro, nous vous recommandons de garder votre Goal Zero Yeti dans une
glacière isotherme, connecté à une source d'alimentation (panneaux solaires), et en train de
recharger votre équipement. La chaleur naturelle générée par le Goal Zero Yeti contenu dans
une glacière isotherme maintiendra la capacité de sa batterie à son maximum.
26
27
1. INPUT (entrée) vous indique la quantité de courant (watts) entrant dans le Goal Zero
Yeti pendant le chargement. Si vous le rechargez depuis une source d'énergie solaire,
vous verrez le nombre de watts changer lorsque vous modifiez la position des panneaux
solaires en fonction des rayons du soleil.
a. LO sera affiché si le débit électrique est inférieur à une quantité mesurable.
2. OUTPUT (sortie) vous indique la quantité de courant (watts) utilisée par vos appareils
pendant qu'ils sont branchés sur le Goal Zero Yeti.
3. TIME TO EMPTY/FULL (temps restant/plein) indique le temps nécessaire restant
pour que votre Goal Zero Yeti soit totalement rechargé ou vide, dépendamment du
montant net de courant géré par le Goal Zero Yeti, et si ce montant est positif ou négatif.
4. BATTERY LEVEL (niveau de la batterie) vous indique 5 segments, approximativement
20% - 40% - 60% - 80% - 100% de sa capacité. Lorsque vous utilisez votre Goal
Zero Yeti, les segments disparaissent de l'affichage, indiquant la charge restante.
Lorsque vous chargez votre Goal Zero Yeti, vous remarquerez un segment de la batterie
qui clignote. Cela indique l'état actuel de charge. Une fois que votre Goal Zero Yeti est
complètement rechargé, tous les segments de la batterie s'allumeront et resteront
allumés. Tant qu'il y aura plus de courant entrant dans la batterie Goal Zero Yeti que de
courant tiré des ports de sortie, l'affichage indiquera également un temps estimé jusqu'à
ce qu'il soit complètement rechargé. Il s'agit d'une durée estimée basée sur le nombre
d'entrées et de sorties utilisées à ce moment-là ; Cette durée s'ajustera à un temps plus
court ou plus long si les taux de charge ou de décharge fluctuent. Notez que lorsque
vous branchez une source d'alimentation, qu'il s'agisse d'un panneau solaire ou d'un
chargeur mural, le Yeti peut prendre une minute pour détecter et ajuster ses circuits de
charge avant de commencer à se charger depuis cette source.
5. Le symbole WiFi indique que le WiFi du Yeti est allumé. S'il clignote, le Yeti est prêt à
se connecter à un appareil.
Boutons avant :
Appuyer sur le bouton LIGHT (lumière) allumera ou éteindra le rétro-éclairage de l'écran.
En appuyant sur le bouton INFO, vous alternerez l'écran entre l'indication détaillée du
pourcentage de charge de la batterie et le temps restant/plein.
Chariot de transport du Goal Zero Yeti Lithium
Le chariot de transport Yeti Roll Cart est pré-installé sur le Goal Zero Yeti 3000 et
peut être facilement détaché si nécessaire.
1. Placez l'appareil à plat sur sa face arrière avec les sorties du Yeti pointant vers le haut.
2. Retirez les 4 vis qui maintiennent le chariot attaché au Yeti.
3. Soulever doucement le Yeti du chariot.
La poignée incluse est télescopique et peut glisser vers le haut et vers le bas en
appuyant sur le bouton.
Utiliser votre Goal Zero Yeti
Boutons sous le couvercle :
Appuyer sur le bouton WiFi activera le Wi-Fi du Yeti pour le connecter à un périphérique.
Pour plus d'informations sur la connexion de votre appareil au Yeti, reportez-vous au
guide inclus de l'application Yeti.
Bouton WiFi
Bouton Reset
(réinitialisation)

28
29
Stockage et Temps d’Arrêt pour la Maintenance
En ayant votre Goal Zero Yeti connecté à une source d'alimentation, comme un panneau
solaire ou prise murale, entre deux aventures ou pendant son stockage gardera sa
batterie en bon état et rechargée. Cela prolongera la durée de vie de la batterie et
garantira que votre Goal Zero Yeti sera toujours chargé et prêt à fonctionner à n'importe
quelle heure du jour ou de la nuit.
Si vous ne pouvez pas avoir votre Goal Zero Yeti branché à une source d'alimentation
pendant son stockage, chargez entièrement votre Goal Zero Yeti tous les 3 mois
et rangez-le dans un endroit frais et sec. Si vous ne suiviez pas ces étapes pour
maintenir votre Goal Zero Yeti en bon état, cela pourra entraîner des dommages à la
batterie qui annuleront la garantie du produit.
Spécifications Techniques
Temps de charge
Entrée maximum (standard) 9 hrs
Entrée maximum (standard et MPPT) 6 hrs
Chargeur mural (2x 5A) 25 hrs
Goal Zero Boulder 100 ou 100 Briefcase 60-120 hrs
Goal Zero Boulder 200 Briefcase 30-60 hrs
Batterie:
Type de batterie Li-ion NMC
Capacité du Bloc 3075Wh (10,95V, 280,8Ah)
Capacité équivalente de la batterie 842Ah @ 3,65V
Cycles de vie 500 cycles à 80% de capacité
Durée de vie À recharger tous les 3à 6mois
Système de gestion Contrôleur de charge PWM, protection de la
batterie lorsqu'elle est faible
Ports:
Port USB-A (sortie) 5V, jusqu'à 2,4A (12W max), régulé
Port USB-C (sortie) 5V, jusqu'à 3,0A (15W max), régulé
Port USB-PD (sortie) 5V, 12V, 20V jusqu'à 3,0A (60W max), régulé
Port 6mm (sortie, 6mm) 12V, jusqu'à 10A (120W max)
12V Port voiture (sortie) 12V, jusqu'à 10A (120W max)
12V port pour Power Pole (sortie) 12V, jusqu'à 20A (240W max)
Convertisseur 120V CA (sortie, onde sinusoïdale) 120V CA 60Hz, 12,5A (1500W, 3000W tension max.)
Convertisseur 230V CA (sortie, onde sinusoïdale)
PRISES CA UNIVERSELLE OU AUSTRALIENNE TYPE
230V CA 50Hz, 6,5A (1500W, 3000W tension max.)
Port de Chargement (entrée, 8mm) 14-22V, jusqu'à 10A (120W max)
Port de charge au Power Pole (entrée) 14-22V, jusqu'à 30A (360W max)
Port du module d'expansion Port couvert sous le couvercle. À n'utiliser qu'avec le
module d'expansion Goal Zero.
 Loading...