

Page 1

Page 2

Maxwell C – versatile in use
With your Maxwell C, you have purchased a high-quality, multifunctional and future-proof
device.
well C is a new addition to Gigaset's tried and trusted DECT handset portfolio and offers
The Max
a solution for people who prefer to use a traditional telephone handset.
You can use your Max
well C on many different DECT bases and DECT-enabled gateways.
On a Gigaset base
Connect your Maxwell C to a Gigaset base and use the many features with the quality you would
expect from Gigaset.
If your Gigaset base is IP-enabled (e.g. N510 IP PRO) you can also use your M
wideband calls in excellent quality.
All the functions that are available for your Max
All the functions offered by Gigaset bases are described i
Gigaset system.
All the Gigaset user guides are available
well C are detailed/described in this guide.
n the guide relevant to your
axwell C to make
• in an online format at gigasetpro.com
• as pdf files at wiki.gigasetpro.com
On a DECT/GAP base or router from another manufacturer
The Maxwell C also functions on DECT/GAP bases from other manufacturers and on DECT
routers. For more detailed information please go to
wiki.gigasetpro.com
On DECT routers with CAT-iq 2.0
You r G ig aset Maxwell C is certified in accordance with the DECT/CAT-iq 2.0 standard. As a result,
operation with a DECT router with CAT-iq functionality is possible.
Maxwell C func
tions on a CAT-iq router (amongst others):
• full access to the central directory on the router as well as the local directory integrated in the
device,
• convenient calling and use of call lists,
• using several lines and call numbers
• broadband calls in guaranteed/certified HD-Voice
Details can be found in the user guide for your router.
Detailed information on the functionality of the Max
found at
wiki.gigasetpro.com
*
,
™
quality.
well C on various bases and routers can be
*
The relevant scope of the function is dependent on the country, network and router
2
Page 3
Overview
2
3
5
12
1
INT 1
Calls Calendar
6
10
9
4
11 13 14 15
7
8
E
ABC D
Overview
3
Page 4

Overview
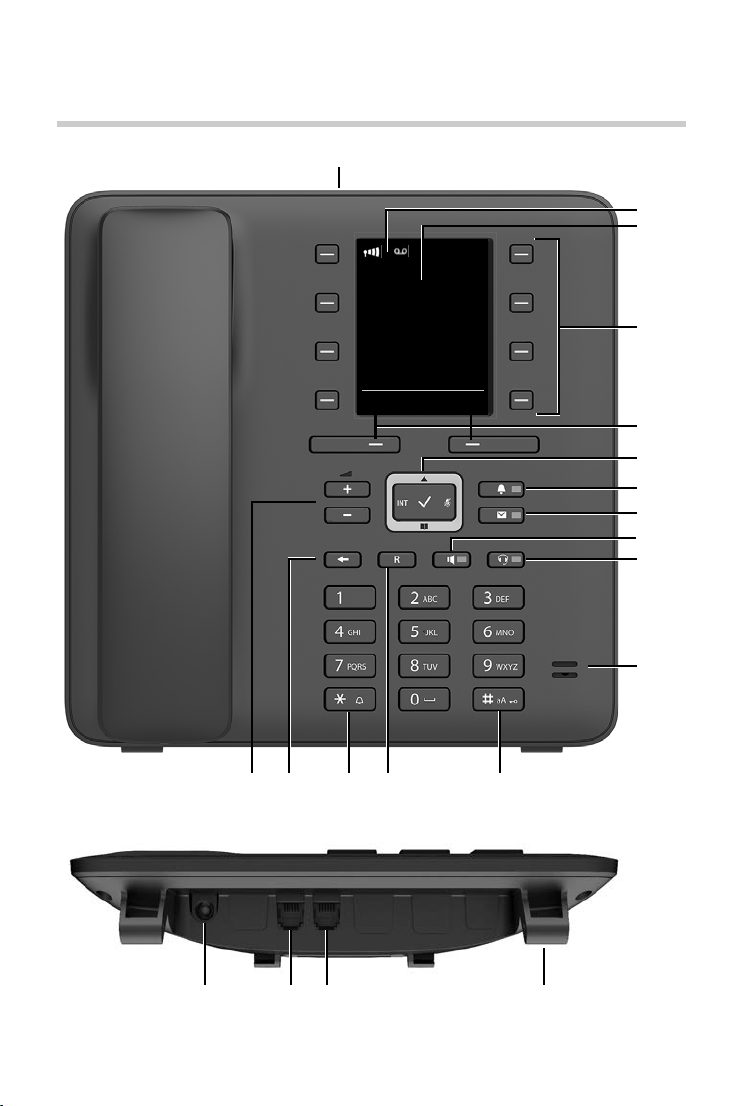
Keys
1 Status bar ( p. 54)
Icons display current settings and operating status of the telephone
2Display
3 Quick dial keys ( p. 15)
4Display keys ( p. 15)
Various functions, depending on the operating situation
5 Control key / Menu key ( p. 14)
Open a menu; navigate in menus and entry fields; access functions (depending on the situation)
6 Profile key ( p. 29)
Switch between sound profiles
lit up: Do not disturb function activated
7Message key ( p. 26)
Access to the call and message lists
flashes: new message or new call
8 Handsfree key
Accept call through the handsfree function; switch from handset to handsfree mode
In idle status: Start dialling
lit up: Call is being made via the handsfree function
9 Headset key
Make a call via the headset; switch between handset and handsfree mode
lit up: Call is being made via the headset
10 Microphone
11 Vo lume k eys
During a call: Adjust the volume of the speaker, handset or headset
12 End/Back key
Cancel function; go back one menu level
Return to idle status
13 Star key
Disable ringtone
Open special characters table (when inputting text)
Switch from pulse dialling to tone dialling (for the existing connection)
14 Recall key
Consultation call (flash)
15 Hash key / Lock key
Enable/disable keypad lock (in idle status)
Toggle between upper/lower case and digits (for text entry)
Insert a dialling pause
¥ Press briefly
¥ Press briefly
¥ Press and hold
¥ Press and hold
¥ Press briefly
¥ Press briefly
¥ Press and hold
¥ Press and hold
¥ Press briefly
¥ Press and hold
Connectors
A Socket for power adapter
B Socket for headset with RJ9 plug
C Socket for handset
D Brackets for attaching the base stand
E Micro USB for connecting a data cable
Getting started, p. 9
4
Page 5

Contents
Contents
Overview . . . . . . . . . . . . . . . . . . . . . . . . . . . . . . . . . . . . . . . . . . . . . . . . . . . . . . . . . . . . . . . . . . . . . . . . . . . . . 3
Safety precautions . . . . . . . . . . . . . . . . . . . . . . . . . . . . . . . . . . . . . . . . . . . . . . . . . . . . . . . . . . . . . . . . . . . . 8
Getting started . . . . . . . . . . . . . . . . . . . . . . . . . . . . . . . . . . . . . . . . . . . . . . . . . . . . . . . . . . . . . . . . . . . . . . . 9
Using the telephone . . . . . . . . . . . . . . . . . . . . . . . . . . . . . . . . . . . . . . . . . . . . . . . . . . . . . . . . . . . . . . . . . 14
Getting to know your telephone . . . . . . . . . . . . . . . . . . . . . . . . . . . . . . . . . . . . . . . . . . . . . . . . . . . . .
Making calls . . . . . . . . . . . . . . . . . . . . . . . . . . . . . . . . . . . . . . . . . . . . . . . . . . . . . . . . . . .
Local answer machine . . . . . . . . . . . . . . . . . . . . . . . . . . . . . . . . . . . . . . . . . . . . . . . . . . . . . . . .
Local handset directory . . . . . . . . . . . . . . . . . . . . . . . . . . . . . . . . . . . . . . . . . . . . . . . . . . . . . .
Message lists . . . . . . . . . . . . . . . . . . . . . . . . . . . . . . . . . . . . . . . . . . . . . . . . . . . . . . . . . . .
Call lists . . . . . . . . . . . . . . . . . . . . . . . . . . . . . . . . . . . . . . . . . . . . . . . . . . . . . . . . . . .
Additional functions . . . . . . . . . . . . . . . . . . . . . . . . . . . . . . . . . . . . . . . . . . . . . . . . . . . . .
Sound profiles . . . . . . . . . . . . . . . . . . . . . . . . . . . . . . . . . . . . . . . . . . . . . . . . . . . . . . . . .
Calendar . . . . . . . . . . . . . . . . . . . . . . . . . . . . . . . . . . . . . . . . . . . . . . . . . . . . . . . . . . . . . . .
Alarm clock . . . . . . . . . . . . . . . . . . . . . . . . . . . . . . . . . . . . . . . . . . . . . . . . . . . . . . . . . . . .
Room monitoring . . . . . . . . . . . . . . . . . . . . . . . . . . . . . . . . . . . . . . . . . . . . . . . . . . . . . . . . . . . .
ECO DECT . . . . . . . . . . . . . . . . . . . . . . . . . . . . . . . . . . . . . . . . . . . . . . . . . . . . . . . . . . . . . .
Protection against unwanted calls . . . . . . . . . . . . . . . . . . . . . . . . . . . . . . . . . . . . . . . . . . . . . . . . . . .
Resource Directory . . . . . . . . . . . . . . . . . . . . . . . . . . . . . . . . . . . . . . . . . . . . . . . . . . . . . . .
Bluetooth . . . . . . . . . . . . . . . . . . . . . . . . . . . . . . . . . . . . . . . . . . . . . . . . . . . . . . . . . . . . . .
Additional functions using the PC interface . . . . . . . . . . . . . . . . . . . . . . . . . . . . . . . . . . . . . . . . . . . . 40
Setting the handset . . . . . . . . . . . . . . . . . . . . . . . . . . . . . . . . . . . . . . . . . . . . . . . . . . . . . .
Appendix . . . . . . . . . . . . . . . . . . . . . . . . . . . . . . . . . . . . . . . . . . . . . . . . . . . . . . . . . . . . . . . . . . . . . . . . . . . 50
Customer Service & Help . . . . . . . . . . . . . . . . . . . . . . . . . . . . . . . . . . . . . . . . . . . . . . . . . . . . .
Manufacturer's advice . . . . . . . . . . . . . . . . . . . . . . . . . . . . . . . . . . . . . . . . . . . . . . . . . . . . . . . .
Technical data . . . . . . . . . . . . . . . . . . . . . . . . . . . . . . . . . . . . . . . . . . . . . . . . . . . . . . . . .
Display icons . . . . . . . . . . . . . . . . . . . . . . . . . . . . . . . . . . . . . . . . . . . . . . . . . . . . . . . . . . .
Index . . . . . . . . . . . . . . . . . . . . . . . . . . . . . . . . . . . . . . . . . . . . . . . . . . . . . . . . . . . . .
. . . . . . . . . . . . . . . 18
. . . . . . . . . . . . . . . 26
. . . . . . . . . . . . . . . . . . . . 27
. . . . . . . . . . . . 28
. . . . . . . . . . . . . . . 29
. . . . . . . . . . . . . . . 30
. . . . . . . . . . . . . . . 32
. . . . . . . . . . . . . . . 34
. . . . . . . . . . . . . 37
. . . . . . . . . . . . . . . 38
. . . . . . . . . . . . 42
. . . . . . . . . . . . . . . 52
. . . . . . . . . . . . . . . 54
. . . . . . . . . . . . . . . . . . . 56
. . 14
. . . . . . . . . 21
. . . . . . . . . 22
. . . . . . . . . 33
. . 35
. . . . . . . . . 50
. . . . . . . . . 50
From a technical point of view, Gigaset Maxwell C is a DECT handset. In order to be
able to make calls with it, it requires a connection to a DECT base station, e.g. to a
router with CAT-iq functionality or a Gigaset base.
Once the connection is established, you can set up Gigaset Maxwell C at any location
within the reach of the base.
Hereinafter, Gigaset Maxwell C is referred to as handset.
Not all functions described in the user guide are available in all countries or from all
network providers.
5
Page 6

Contents
Additional information
You can obtain all Gigaset user guides
in PDF format:
online:
wiki.gigasetpro.com
gigasetpro.com
6
Page 7
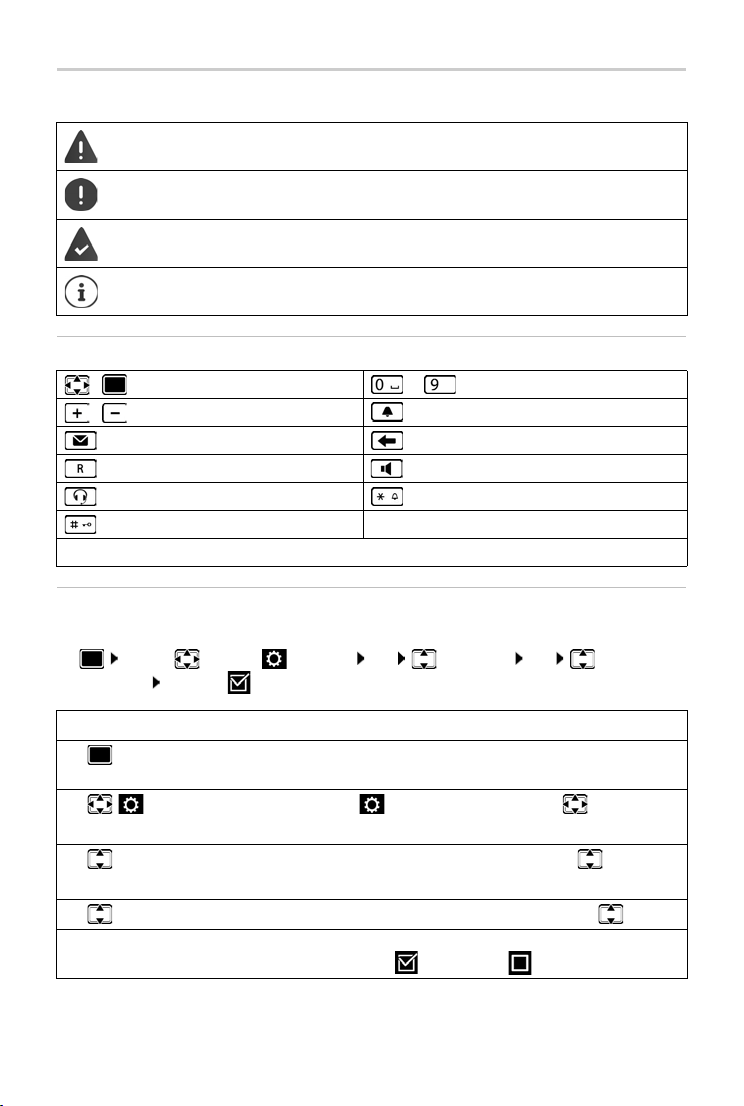
Illustration in the user guide
Illustration in the user guide
Warnings, which if not heeded, can result in injury to persons or damage to devices.
mportant information regarding function and appropriate handling or functions
I
that could generate costs.
Prerequisite for being able to carry out the following action.
Additional helpful information.
Keys
/ Control key rim / centre to Digit/letter keys
/ Volume keys Profile key
Message key End/Back key
Recall key Handsfree key
Headset key Star key
Hash key
OK, Back, Select, Change, Save, . . . Display keys
Procedures
Example: Activating/deactivating radiation-free
¤ . . . use to select Settings OK ECO DECT OK No
Radiation Change ( = on)
Step Actions required
¤ Press the middle of the control key when the handset is in idle
mode. The main menu is opened.
¤
¤ OK
¤ ECO DECT
¤ OK
Navigate to the icon using the control key .
Press OK to confirm. The Settings submenu is opened.
Select the ECO DECT entry using the control key .
Press OK to confirm. The ECO DECT submenu is opened.
¤ No Radiation Select the No Radiation entry using the control key .
¤ Change Enable or disable it using Change.
Function is activated /deactivated .
7
Page 8
Safety precautions
Read the safety precautions and the user guide before use.
Comprehensive user guides for all telephones and telephone systems as well as for
accessories can be found online at gigasetpro.com
We thereby help to save paper while providing fast access to the complete
up-to-date documentation at any time.
The device cannot be used in the event of a power failure. In case of a power failure it
is also not possible to make emergency calls.
Emergency numbers cannot be dialled if the keypad/display lock is activated!
Do not use the devices in environments with a potential explosion hazard
(e.g. paint shops).
The devices are not splashproof. For this reason do not install them in a damp environment such as bathrooms or shower rooms.
Use only the power adapter indicated on the device.
Remove faulty devices from use or have them repaired by our Service team, as these
could interfere with other wireless services.
Using your telephone may affect nearby medical equipment. Be aware of the technical conditions in your particular environment, e.g. doctor's surgery. If you use a medical device (e.g. a pacemaker), please contact the device manufacturer. They will be
able to advise you regarding the susceptibility of the device to external sources of
high frequency energy (for the specifications of your Gigaset product see "Technical
data").
Safety precautions
in the Support category.
8
Page 9
Getting started
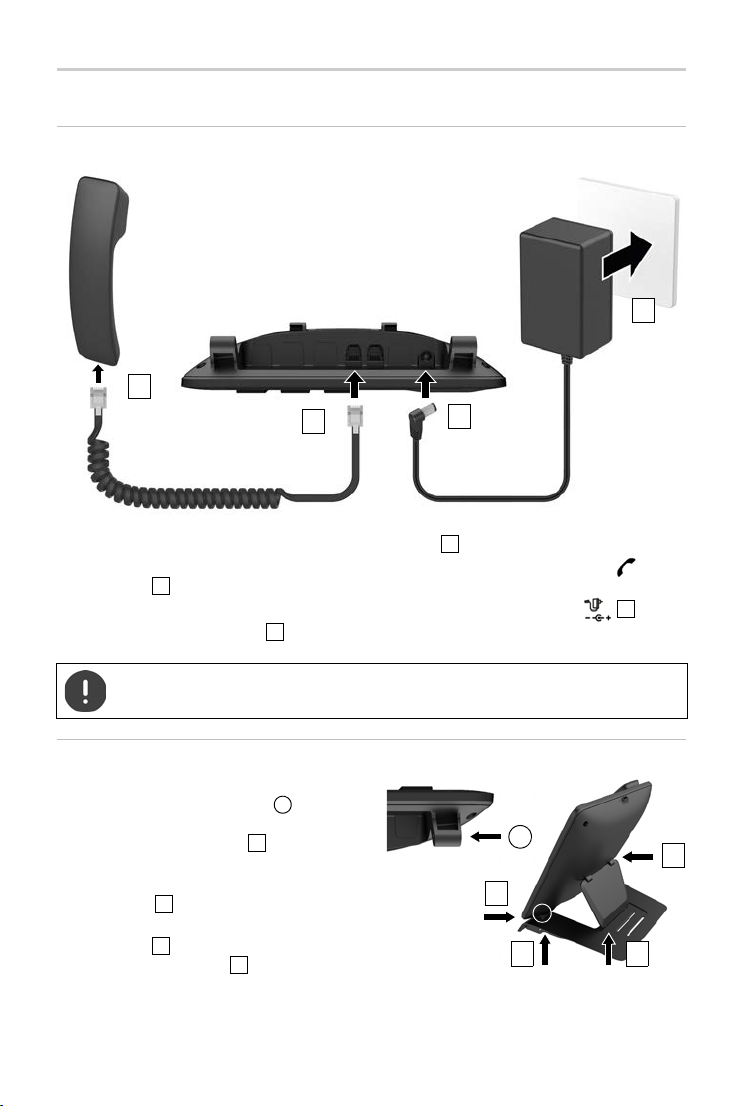
Contents of the package
• 1 x telephone
• 1 x handset
• 1 x handset connecting cable
• 1 x base stand
• 1 x support panel
• 1 x power adapter
• 1 x user guide
The device is designed for use in enclosed, dry rooms within a temperature range of
+5 °C to +45 °C.
The device's feet do not usually leave any marks on surfaces. However, due to the multitude of different varnishes and polishes used on furniture, contact marks on the surfaces cannot be completely ruled out.
Never expose the telephone to heat sources, direct sunlight or other electrical
devices.
Protect your telephone from moisture, dust, corrosive liquids and vapours.
Getting started
Availability and operation of the functions
may differ on your telephone.
9
Page 10
Getting started
2
1
4
3
1
234
1
3
A
2 4
A
A
123
4
Setting up the telephone for use
Connecting the telephone
¤ Connect the handset connecting cable to the handset .
¤ Insert the other end of the handset connecting cable into the socket marked with on the
telephone .
¤ Insert the power cable from the power adapter into the socket marked with .
¤ Connect the power adapter .
The power adapter must always be connected during operation, as the device will
not operate without a power supply.
Setting up the telephone
¤ Press the brackets on the right and left at
the bottom of the telephone onto the
corresponding openings on the base stand
until they click into place .
¤ Thread the cables on the right or left
through the recesses on the bottom of the
base stand .
¤ Attach the support panel to the back of the
telephone and insert it into one of the
slits on the base stand .
Which slit you use determines the angle of
the telephone.
10
Availability and operation of the functions
may differ on your telephone.
Page 11
Setting the display language
Deutsch
English
Fran cais
¤ Press the control key until the language required is selected
on the display, e.g. English press the display key OK
You can also change the display language later on in the Settings
menu.
Registering the handset (depending on the base)
From a technical point of view, Gigaset Maxwell C is a DECT handset. In order to be
able to make calls with it, it requires a connection to a DECT base station, e.g. to a
router with CAT-iq functionality or a Gigaset base.
Once the connection is established, you can set up Gigaset Maxwell C at any location
within the reach of the base.
Hereinafter, Gigaset Maxwell C is referred to as handset.
Registration must be initiated on the base station and on the handset.
Both must be carried out within 60 secs.
On the base / router
Getting started
Gigaset base: ¤ Press and hold the Registration/Paging key on the base station
Other base station/
router:
(approx. 3 sec.).
¤ Information regarding the registration procedure Documentation
regarding your base/your router
On the handset
¤ Register . . . an available base is searched . . . if requested: enter the system PIN
(default setting on Gigaset bases: 0000) OK
Once registration is complete, the handset returns to idle status. The internal number of the
handset appears in the display, e. g. INT 1.
A handset can be registered to up to four base stations.
¤ . . . use to select Settings OK Registration OK
Registering the
handset:
Change of base:
De-registering the
handset (depending
on the base):
¤ Register Handset OK . . . an available base is sought . . . if
required: enter system PIN (default setting on Gigaset bases: 0000)
OK
¤ Select Base OK . . . use to select base or Best Base Select
( = selected)
Best Base: The handset chooses the base station with the best
reception as soon as it loses connection to the current base station.
¤ De-register Handset OK . . . the handset being used is selected
. . . use to select another handset if required OK . . . enter
system PIN if required OK . . . Confirm de-registration with Yes
If the handset is still registered to other bases, it switches to the base
with the best reception (Best Base).
Availability and operation of the functions
may differ on your telephone.
11
Page 12

Getting started
Date/Time
Date:
15.08.2018
Time:
00:00
Back Save
1
1
Data protection
If the product is connected to the Internet via an IP base station or router, it will automatically connect to
the Gigaset support server sending regular product specific information. This information will for example
be used for firmware updates or to provide internet services. For more information regarding the stored
data, please visit gigaset.com
Setting the date and time
Set the date/time so that the correct date and time can be assigned to incoming calls and to
enable the alarm to be used.
Date and time are set using the base. The date and time can also be set on an
IP-compatible base via a time server on the network.
If the base permits it, you can set the date and time manually using the handset.
¤ . . . use to select Settings OK Date/Time OK
The active cursor position flashes . . . change cursor posit ion with
. . . switch between cursor positions with
Enter date:
¤ . . . using enter the day, month and year in 8-digit format.
Enter time:
¤ . . . using enter hours and minutes in 4-digit format.
Save settings:
¤ Press the display key Save. . . . Saved is shown in the display and
a confirmation tone sounds.
Return to idle status:
¤ Press and hold the Back key
The telephone is now ready for use.
Connecting the headset
¤ Connect the headset with the RJ9 plug to
the socket labelled .
or
¤ Connect headset via Bluetooth ( p. 38).
The headset volume corresponds to the
etting for the handset volume ( p. 44).
s
Accept a call on the headset
¤ Press the headset key
If two headsets are connected: select the required headset by pressing the display key
(Bl
uetooth or Corded)
12
Availability and operation of the functions
may differ on your telephone.
Page 13

Connecting the USB data cable
1
1
For data exchange between the handset and PC:
¤ Insert the USB cable with the micro-USB plug into the USB
socket on the top of the handset .
Use Gigaset QuickSync to transfer data, e.g.
ringtones, directory entries or new firmware
from the PC to the handset ( p. 40).
Connect the handset directly to the PC and not via a USB hub.
Use a fully wired USB cable. Cables which are wired for charging only, for example,
cannot be used for transmitting data.
Getting started
Availability and operation of the functions
may differ on your telephone.
13
Page 14
Getting to know your telephone
Using the telephone
Getting to know your telephone
Lock/unlock the keypad
The keypad lock prevents any accidental use of the telephone.
Locking the keypad:
Unlocking the keypad:
Keypad lock activated: the following symbol appears
If a call is indicated on the handset, the
accept the call. It then locks again when the call is finished.
It is not possible to call emergency numbers either when keypad lock is activated.
Control key
The control key enables you to navigate the menus and input fields, and also to
c
all up certain functions depending on the situation.
In the description below, the side of the control key (up, down, right, left) that you have to press
in the different operating situations is marked in black, e. g. for "press right on the control
key" or for "press the centre of the control key".
In idle status
Open the directory Press briefly
Open the list of available online dir
directory of the base (e.g. CAT-iq base)
Open the main menu or
Open the list of handsets
In submenus, selection and entry fields
Confirm a function
¤ Press and hold
¤ Press and hold . . . use to enter the handset pin (if it is
not 0000) OK
Handset PIN: p. 48
keypad automatically unlocks and you can
ectories (Gigaset Base) or central
Press and hold
During a conversation
Open the directory Press briefly
Open the list of available online dir
directory of the base (e.g. CAT-iq base)
Mute the microphone
Initiate an internal consultation call
Adjust the loudspeaker volume for receiver and handsfree mode
14
ectories (Gigaset Base) or central
Press and hold
Page 15
Getting to know your telephone
Current display key
functions
Display keys
Back Save
Quick dial key
Assignment of a
quick dial key
Susan
Brown
Peter
Winterbott...
Keys not assigned
12345678 Marilyn
Paul & Mary
Smith
Sandra
Williams
><
Volume keys
Set the volume for the receiver/headset, handsfree mode and appointment reminders:
Press the volume keys /
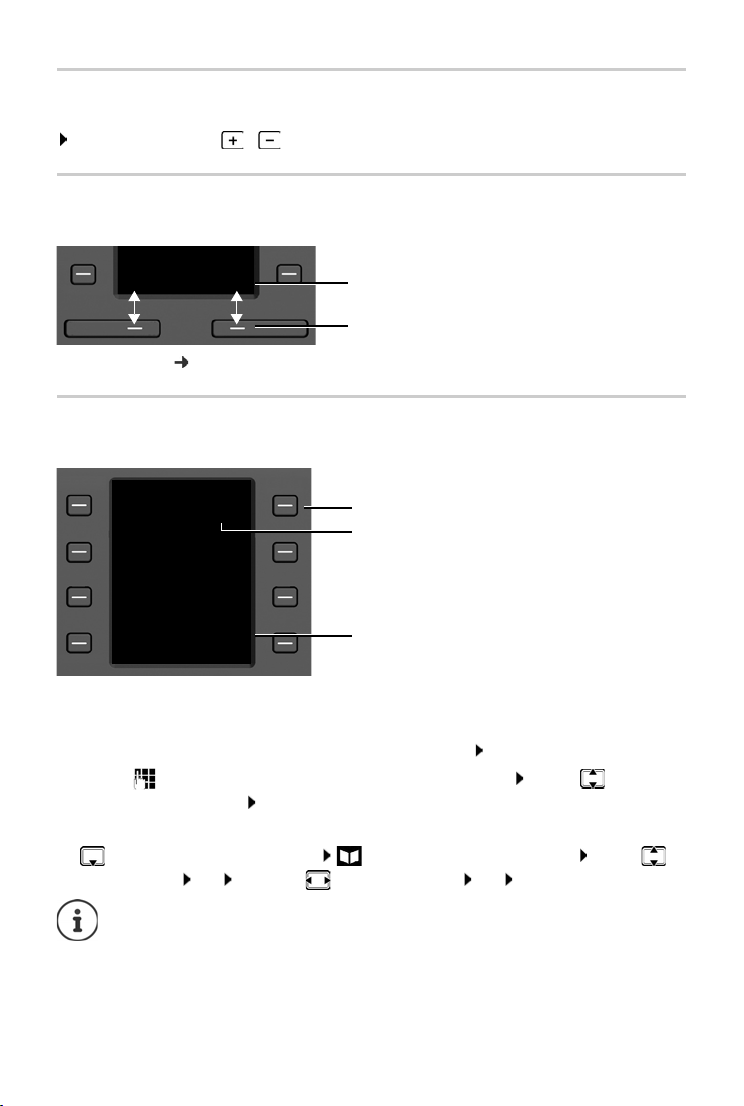
Display keys
The display keys perform a range of functions depending on the operating situation.
Display key icons p. 54.
Quick dial keys
Programmable keys offer rapid access to frequently used numbers.
Assigning a quick dial key
Quick dial key not yet assigned:
Quick dial key is already assigned:
¤ Briefly press the key
¤ Press and hold the key Edit entry
¤ . . . use to enter the first name and/or last name and number . . . use to toggle
between the entry fields Save
or transfer a number from the directory:
¤ scroll to the Number entry field . . . the local directory is opened . . . use to
select an entry OK . . . or use to select a number OK Save
Entries without numbers are not possible.
15
Page 16
Getting to know your telephone
Example
Settings
Back OK
Displaying current value
¤ In idle status press
or
¤ Select Quick dial screen as screensaver ( p. 42).
If a name (first or last name) is specified, it is displayed next to the key. If not, the number
is displayed.
Deleting the assignment of the quick dial key
¤ Press and hold the quick dial key Delete entry OK
Menu guidance
The functions of your telephone are displayed in a menu that consists of several levels.
The menu guidance depends on the base. Depending on the number and type of
available functions, these may be provided in different menus, e.g. at top level or in a
submenu.
Examples: Audio Settings may be in the top-level menu or in the Settings submenu,
while Calendar may be in the Organizer menu or the Additional Features menu.
Selecting/confirming functions
Confirm selection using OK or pr
One menu level back using Back or pr
Change to idle status Press and ho
Switch function on/off using Change on / off
Activate/deactivate option using Select activated / not activated
ess the centre of the control key
ess the Back key
ld the Back key
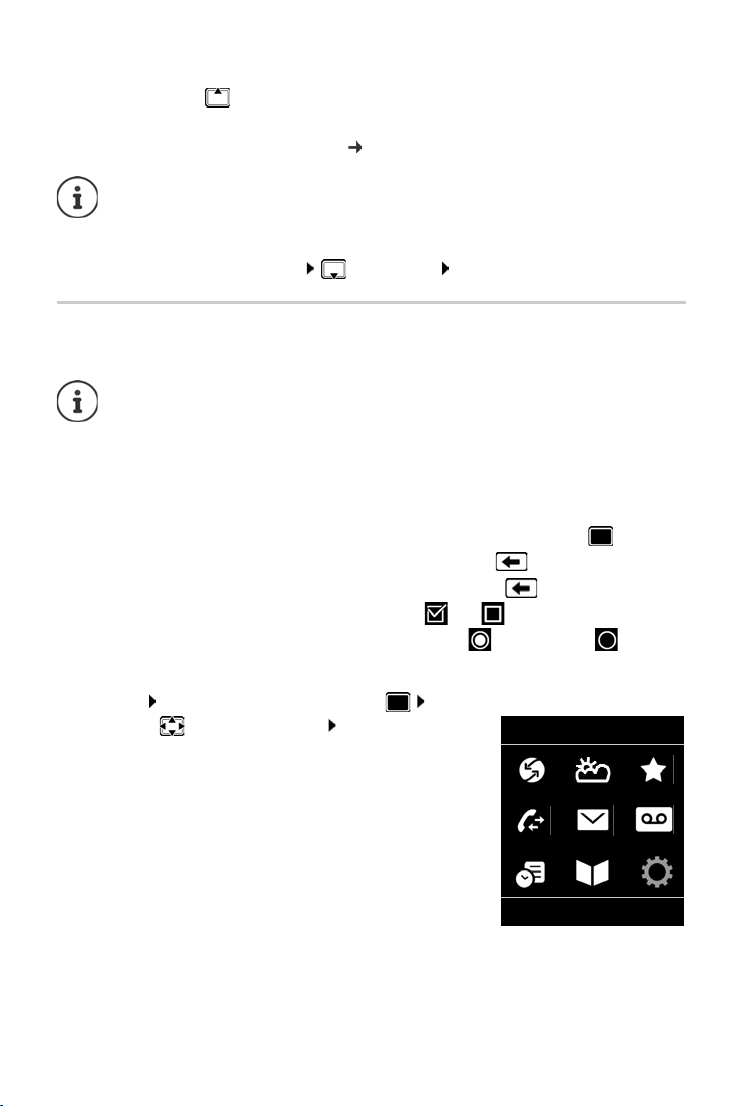
Main menu
In idle status: Press the centre of the control key . . . use
the control key to select a submenu OK
The main menu functions are shown in the display as icons. The
or the selected function is highlighted in colour and the
icon f
name of the associated function appears in the display header.
16
Page 17
Getting to know your telephone
Settings
Date/Time
Audio Settings
Display & Keypad
Language
Registration
Back OK
Example
New Entry
First Name :
Peter
Surname :
Phone (Home):
Abc
‚
Save
Submenus
The functions in the submenus are displayed as lists.
To access a function: . . .
function OK
Return to the previous menu level:
use the control key to select a
¤ Press the display key Back
or
¤ Briefly press the Back key
Returning to idle status
¤ Press and hold the Back key
If a key is not pressed, after 2 minutes the display will automatically change to idle
status.
Entering text
Input position
¤ Use to select an entry field. A field is activated when the
cursor is blinking inside it.
¤ Use to move the position of the cursor.
Correcting incorrect entries
• Delete characters to the left of the cursor: Press briefly
• Delete words to the left of the cursor: Press and hold
Entering letters/characters
Multiple letters and numbers are assigned to each key between
and and the key. As soon as a k
possible characters are displayed at the bottom of the display. The
ected character is highlighted.
sel
ey is pressed, the
• Selecting letters/numbers: Press the key briefly several times in succession
• Switch between lower case, upper case and number entry mode: Press the hash key
When editing a directory entry, the first letter and each letter following a space is
automatically in upper case.
• Entering special characters: Press the star key . . . use to navigate to the
desired character Insert
The availability of special characters depends on the language setting.
17
Page 18

Making calls
Making calls
Making a call
¤ . . . use to enter a number lift the handset
or
¤ lift the handset . . . use to enter a number
or
¤ press the handsfree key . . . use to enter a number
Cancel dialling: Replace the handset or press the handsfree key
On an IP-compatible Gigaset base (e.g. a Gigaset N510 IP PRO)
The connection is selected via the send connection (line) set for the handset. To use another line:
¤ Lift the handset . . . use to select a line Dial . . . use to enter a number . . .
the number is dialled approximately 3 seconds after the last digit has been entered
Dialling a number from the local directory
¤ . . . use to open the directory . . . use to select an entry lift the handset
If multiple numbers are entered:
¤ . . . use to select a number lift the handset . . . the number is dialled
For fast access (quick dial): Assign numbers from the directory to the digit, display or
quick dial keys.
Dialling from a public/central directory
Depending on the base to which the handset is connected, you can dial from a public directory
or a central directory on a CAT-iq base.
¤ Press and hold
Further information in the detailed user guide for your base/router
18
Availability and operation of the functions
may differ on your telephone.
Page 19

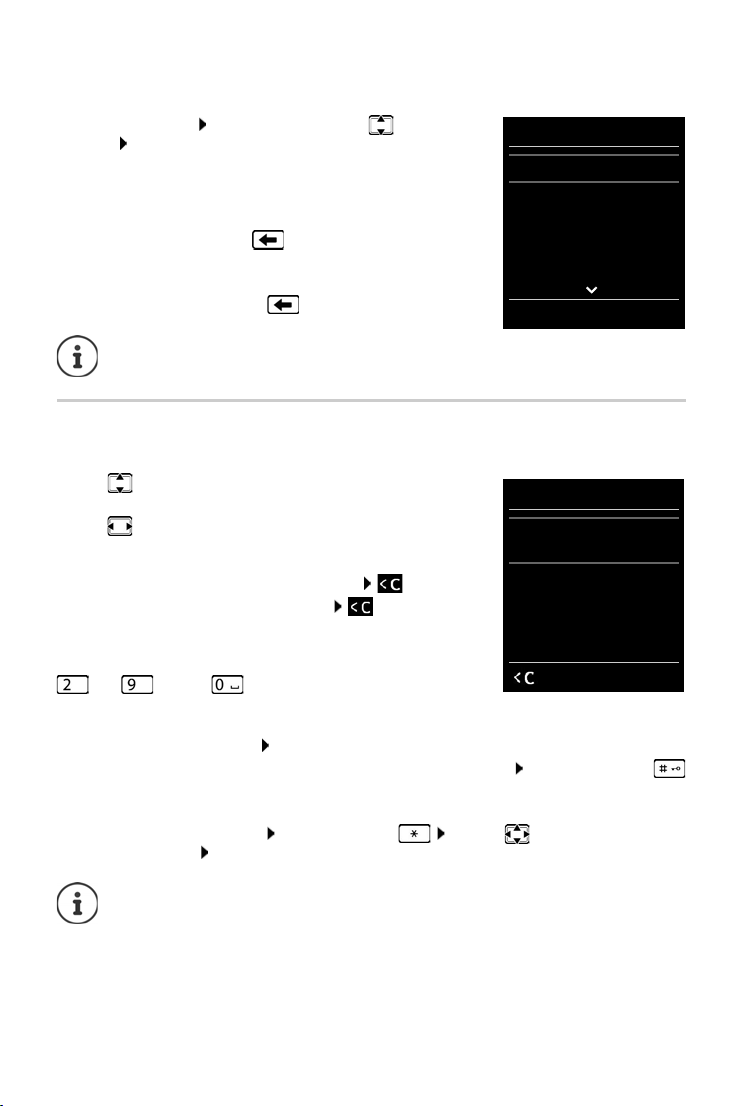
Making calls
All calls
Frank
14.02.18, 15:40
089563795
13.02.18, 15:32
Susan Black
11.02.18, 13:20
View Options
Example
07:15
INT 1 22 Feb
OneTouchCall active
0891234567
OFF
Example
Dialling from a call list
The call lists ( p. 27) contain the most recent accepted, outgoing (redial list) and missed calls.
¤ . . . use to select Call Lists OK . . . use
to select a list OK . . . use to select an entry lift
the handset
The call lists can be displayed directly by pressing the
displa
y key Calls if the relevant function has been
assigned to the display key.
The Missed calls list can also be opened by pressing
the Message key .
One touch call
A predefined number is dialled by pressing any key. This allows
children who are not yet able to enter a number to call a certain
number, for example.
Activate one touch call mode:
¤ . . . use to select Additional Features OK
One Touch Call OK . . . use to activate
Activation Call to . . . use to enter the number
Save . . . activated One Touch Mode is shown in the idle
display
Make a one touch call: Press any key . . . the saved number is
dialled
¤ Conduct a call over the handsfree function
or
¤ Lift the handset
Cancel dialling: Press the handsfree key .
End one touch call: Press and hold the key
Availability and operation of the functions
may differ on your telephone.
19
Page 20

Making calls
Incoming calls
An incoming call is indicated by ringing and in the display.
Accept the call:
on the handset: ¤ Lift the handset
through the loudspeaker:
¤ Press the handsfree key
¤ or Accept (on a base without an answer machine)
through a headset:
Divert a call to the answer machine: (on a base with an answer machine)
Switch the ringtone off: Silenc
display
On an IP-compatible Gigaset base with an answer machine
Forward to the answer machine: GAP Online Divert to AM
Reject the call: GA
¤ Press the headset key
If two headsets are connected: select the required headset by
pressing the display key (Bluetooth or Co
e . . . the call can be accepted for as long as it is shown on the
P Online Reject call
rded)
During a conversation
Handsfree mode
Activating/deactivating handsfree mode during a call, when establishing a connection and
when listening to the answer machine:
¤ Press the handsfree key
Call volume
Applies to the current mode (handsfree, receiver or headset if the handset has a headset connection):
¤ Press the volume keys / or . . . Use / or to set the volume Save
The setting is automatically saved after around 3 seconds, even if Save is not pressed.
Muting the microphone
When the microphone is switched off, callers will no longer hear you.
Switch the microphone on/off during a call: Press .
20
Availability and operation of the functions
may differ on your telephone.
Page 21

Local answer machine
Local answer machine
(only on Gigaset bases with local answer machine)
Switching the answer machine on/off:
¤ . . . use to select Answer Machine OK Activation OK . . . use
to select an answer machine (if there are several) Change . . . use to select
On or Off Save
Playing back messages:
¤ Press the Message key . . . use to select an answer machine (if there are messages
for several answer machines) OK
Recording a personal announcement/advisory message:
¤ . . . use to select Answer Machine OK Announcements OK . . .
use to select Record Announcem. or Rec. Advisory Msg. OK . . . use to select
an answer machine (if there are several) OK OK . . . record an announcement (at least
3 seconds) . . . possible options
Complete the recording and save:
¤ End . . . the announcement is played back for you to check
Cancel the recording:
Resume the recording:
Repeat the recording:
¤ Replace the handset or Back
¤ OK
¤ New
Availability and operation of the functions
may differ on your telephone.
21
Page 22

Local handset directory
Example
New Entry
First Name :
Robert
Surname :
I
Tel .1 - Type :
Abc
‚
Save
Local handset directory
The local directory is unique to the handset. However, it is possible to send entries to other
handsets.
Information on online directories (e.g. on on a Gigaset N510 IP PRO) or central directories on CAT-iq bases
User guide for the base.
Opening the directory
¤ Briefly press in idle status
Directory entries
Number of entries: up to 500
Information: First name and surname, up to three telephone numbers, e-mail
Length of the entries: Numbers: max. 32 digits
address, anniversary with alert, VIP ringtone with VIP icon, CLIP-picture
First name, surname: max. 16 characters
E-mail address: max. 64 characters
Creating an entry
¤ <New Entry> OK
Name:
¤ . . . Use to toggle between the entry fields Firs t Name
/Surname Use to enter the first and/or last name
Numbers:
¤ Tel .1 - Type . . . Use to select a number type
(Home, Office or Mobile) . . . Use to enter a
number
Enter more numbers: Use to toggle between the entry
fields Tel .1 - Typ e /Tel. 2 - Typ e /Tel. 3 - Ty pe . . . Use to
enter a number
Anniversary:
¤ . . . use to activate/deactivate Anniversary . . . use
to enter date and time . . . use to select type of alert (Visual on ly or a ringtone)
Caller Melody (VIP) :
¤ . . . use to sel ect the rin gto ne tha t wi ll i ndi cat e a c all fro m th e pa rt ici pan t . . . if a Caller
Melody (VIP) has been assigned, the entry will appear in the directory with the icon.
Save entry: Save
The entry is only valid if it contains at least one number.
22
Availability and operation of the functions
may differ on your telephone.
Page 23

Local handset directory
Searching for/selecting a directory entry
¤ . . . use to browse searched names
or
¤ . . . use to enter initial letters (max. 8 letters) . . . the display jumps to the first name
starting with these initial letters . . .
needed
Scroll through directory: Press and ho
Displaying/changing an entry
use to continue browsing to the desired entry, if
ld
¤ . . . use to select entry View . . . use to select the field to be
changed Edit
or
¤ . . . use to select an entry Options Edit entry OK
Deleting entries
Delete the selected entry: . . . use to select an entry Options Delete
entry OK
Delete all en
tries: Options Delete all OK Ye s
Setting the order of the directory entries
Directory entries can be sorted by first name or surname.
¤ Options Sort by Surname / Sort by First Name
If no name was entered, the default telephone number is shown in the surname field. These
ntries appear at the beginning of the list, regardless of how the entries are sorted.
e
The sort order is as follows:
Space | Digits (0-9) | Letters (alphabetically) | Other characters.
Displaying the number of entries available in the directory
¤ Options Available Memory OK
Availability and operation of the functions
may differ on your telephone.
23
Page 24

Local handset directory
Copying number to the directory
Copy numbers to the directory:
• From a list e.g. the call list or the redial list
• When dialling a number
The number is displayed or highlighted.
¤ Press the display key or Options Copy to Directory OK . . . possible options:
Create a new entry:
¤ <New Entry> OK . . . use to select number type OK complete entr y Save
Add number to an existing entry:
¤ . . . use to select an entry OK . . . use to select number type OK . . . the
number is entered or a prompt to overwrite an existing number is displayed . . . if
required, answer the prompt with Ye s /No Save
Copying an entry/directory
The sending and receiving handset must both be registered to the same base station.
The other handset and the base station are able to send and receive directory entries.
An external call interrupts the transfer.
Only the date is transferred for an anniversary.
Both handsets support vCards:
• No entry with the name is available: a new entry is created.
• An entry with the name is already available: The entry is expanded to include the
new numbers. If the entry contains more numbers than allowed by the recipient
handset, a second entry is created with the same name.
The recipient handset does not support vCards:
A separate entry is created and sent for each number.
The sending handset does not support vCards:
A new entry is created on the receiving handset and the transferred number is added
to the Phone (Home) field. If an entry with this number already exists, the copied number is discarded.
Copying individual entries
¤ . . . use to select the desired entry Options Copy entry OK to
Internal OK . . .
Copy the next entry after successful transfer: Press Ye s or No
Copying the entire directory
use to select the receiving handset OK . . . the entry is copied
¤ Options Copy all OK to Internal OK . . . use to select the
receiving handset OK . . . the entries are copied one after the other
24
Availability and operation of the functions
may differ on your telephone.
Page 25

Local handset directory
Copying a vCard using Bluetooth
Copy directory entries in vCard format, e.g. to exchange entries with a mobile phone.
Bluetooth mode is activated
The other handset/mobile phone supports Bluetooth.
¤ . . . use to select an entry if needed Options Copy entry / Copy all
vCard via Bluetooth
device OK
Receiving a vCard using Bluetooth
If a device in the Known Devices list sends a vCard to your handset, a directory entry is
automatically created and a message is shown in the display.
If the sending device is not in the list: . . . use to enter the PIN of the send
device OK
. . . the copied vCard is available as a directory entry
Synchronising the phonebook with the PC address book (Gigaset QuickSync)
The Gigaset QuickSync programme has been installed on the computer.
The handset is connected via Bluetooth or via a USB data cable to the computer.
Free download and further information at gigaset.com/quicksync
. . . the Known Devices list is displayed . . . use to select
ing Bluetooth
Availability and operation of the functions
may differ on your telephone.
25
Page 26

Message lists
07:15
INT 1 14 Oct
02 10
08
Calls Calendar
Example
Messages & Calls
Missed Alarms: (2)
Missed Calls: (5)
Mailbox: (1)
Answer Mach.:
Back OK
Example
Message lists
Notifications about missed calls, messages on the answer machine/network mailbox and missed
alarms are saved in the messages list.
As soon as a new me
Message key also flashes (if activated). Activation from the
handset is only possible on Gigaset bases. Use the web interface as
re
quired for CAT-iq routers. Information user guide of the base/
router.
Icons for message types and the number of new messages are
shown on the i
Notification for the following message types is available:
on the answer machine/network mailbox
in the missed calls list
in the missed alarms list
The icon for the network mailbox is always displayed, provided the number is stored
in the telephone. The other lists are only displayed if they contain messages.
¤ Display messages: Press the Message key . . . Messages
lists that contain messages are displayed, Mailbox: is always
displayed
An entry is marked in bold: new messages are available. The
number of new messages is shown in brackets.
An entry is not marked in bold: no new messages. The number
of old messages is shown in brackets.
¤ . . . use to select a list OK . . . the calls or messages are
listed
Network mailbox: The network mailbox number is dialled.
ssage arrives, an advisory tone will sound. The
dle display.
The message list contains an entry for every answer machine assigned to the handset,
e.g. for the local answer machine on a Gigaset base / CAT-iq router or for a network
mailbox.
26
Page 27

Call lists
All calls
Frank
Today, 15:40
[3]
089563795
13.05.18, 18:32
Susan Black
12.05.18, 13:12
View Options
Example
Call lists
The telephone saves different types of calls (missed, accepted and outgoing calls) in lists.
The base/router to which the handset is registered provides information on call
numbers.
Detailed information can be found at wiki.gigasetpro.com
List entry
The following information is displayed in the list entries:
• The list type (in the header)
• Icon for the type of entry:
Missed calls,
Accepted calls,
Outgoing calls (redial list),
Call on the answer machine
• Caller's number. If the number is stored in the directory, the
name and number type ( Phone (Home), Phone (Office),
Phone (Mobile)) are shown instead. In the event of missed
calls, the number of missed calls from this number is also
shown in square brackets.
• Connection by which the call was received/made (if the call is made via an IP connection)
• Date and time of call (if set)
Opening the call list
Via the display key: ¤ Calls . . . use to select the list OK
Via the menu:
Via the Message key (missed calls):
Calling back a caller from the call list
¤ . . . use to select Call Lists OK . . . use to select list OK . . . use
to select entry Lift the handset
¤ . . . use to select Call Lists OK . . . use to select
the list OK
¤ Press the Message key Missed Calls: OK
Additional options
¤ . . . use to select Call Lists OK . . . use to select list OK . . . possible
options:
View an entry:
Copy the number to the directory:
Delete an entry:
Delete list:
27
¤ . . . use to select entry View
¤ . . . use to select entry Options Copy to Directory
¤ . . . use to select entry Options Delete entry OK
¤ Options Delete List OK Ye s
Page 28

Additional functions
Additional functions
The functions actually available on your telephone and how they are operated
depends on the base/router to which the handset is registered.
The following description applies to a Gigaset N510 IP PRO. The procedure required
for your telephone may differ from the procedures described here.
Additional information
You can obtain all Gigaset user guides
in PDF format: wiki.gigasetpro.com
online: gigasetpro.com
28
Availability and operation of the functions
may differ on your telephone.
Page 29

Sound profiles
Sound profiles
The telephone has sound profiles for adapting the handset to the environmental conditions:
Profile Loud, Profile Silent, Profile Personal. You can use the Do not disturb pr
the handset signalling an incoming call.
¤ Use to switch between the profiles . . . the profile is changed straight away without a
prompt
Profile Do not disturb
Activating/deactivating quickly Press and hold the key
• The idle display shows "Do not disturb" active. The LED on the Profile key lights up.
• Incoming calls are not signalled but show up in the call list as missed calls.
• Most messages are blocked. Exceptions: Appointments, alarm clock and anniversaries.
An i ncom ing call occu pies a line even if it is n ot si gnal led. I f all the l ines o n the base are
occupied, calls cannot be made.
If a call arrives while you are using the telephone, the handset can return to idle status
(depends on the base).
Sound profiles
The profiles are set as follows by default:
ofile to prevent
Default setting Profile
Ringtone On Off On
Ringtone volume Internal 5 Off 5
External 5 Off 5
Handset volume Receiver 5 3 3
Handsfree 5 3 3
Advisory tones Key click Yes No Yes
Confirmation
tone
Activate aler t tone for an incoming c all for P
the display key Beep . . . the icon appears in the status bar
Changes to the settings listed in the table:
rofile Silent: after switching to Profile Sil ent press
Loud
Yes No Ye s
Profile Silent Profile
Personal
• apply in the Loud and Silent profiles as long as the profile is not changed.
• are permanently saved in Profile Personal for this profile.
Availability and operation of the functions
may differ on your telephone.
29
Page 30

Calendar
June 2018
Mo Tu We Th Fr Sa Su
01 02 03
04 05 06 07 08 09 10
11 12 13 14 15 16 17
18 19 20 21 22 23 24
25 26 27 28 29 30
Back OK
Calendar
You can remind yourself of up to 30 appointments.
In the calendar, the current day is outlined in white; on days with
pointments, the numbers are displayed in colour. When a day
ap
is selected, it will be outlined in colour.
Saving appointments to the calendar
Date and time have been set.
¤ . . . use to select Organizer OK Calendar OK . . . use to
select desired day OK . . . then
Switch on/off:
Enter date:
Enter time:
Set name:
Set alarm tone:
Enter information for the appointment:
Save appointment:
¤ Activation: . . . use to select On or Off
¤ Date . . . the selected day has been pre-set . . . use to enter
new date
¤ Time . . . use to enter hours and minutes of the
appointment
¤ Tex t . . . use to enter a description of the appointment (e.g.
evening meal, meeting)
¤ Signal . . . use to select the melody of the reminder alarm
or deactivate the acoustic signal
¤ . . . use to successively select Date, Time, Te xt and Signal . . .
use or to set the relevant value Save
¤ Save
If an appointment has already been entered: <New Entry> OK . . . Then
enter information for the appointment.
30
Availability and operation of the functions
may differ on your telephone.
Page 31

Calendar
Notification of appointments/anniversaries
Anniversaries are transferred from the directory and displayed as an appointment. An
appointment/anniversary is displayed in idle status and the selected ringtone plays for
60 seconds as a notification.
Acknowledge and stop the reminder: Press the display key OF
During a call, a reminder is indicated on the handset once with an advisory tone on the
handset.
F
Displaying missed appointments/anniversaries
The following appointments and anniversaries are saved in the Missed Alarms list:
• The appointment/anniversary call was not acknowledged.
• The appointment/anniversary was notified during a phone call.
The last 10 entries are stored. The icon and the number of new entries are shown in the
display. The most recent entry appears at the top of the list.
Opening the list
¤ Press the Message key Missed Alarms: OK . . . use to browse through
the list of any appointments
or
¤ . . . use to select Organizer OK Missed Alarms OK
Each entry is displayed with the number or name,
at the top of the list.
Delete an appointment/anniversary: Delet
date and time. The most recent entry appears
e
Displaying/changing/deleting stored appointments
¤ . . . use to select Organizer OK Calendar OK . . . use to
select day OK . . . the appointment list is displayed . . . use to select date . . . possible
options:
Display appointment details:
¤ View . . . The appointment settings are displayed
Change appointment:
Activate/deactivate appointment:
¤ View Edit
or Options Edit entry OK
¤ Options Activate/Deactivate OK
Delete appointment:
Delete all appointments for a day:
¤ Options Delete entry OK
¤ Options Delete all Appoints. OK Ye s
Availability and operation of the functions
may differ on your telephone.
31
Page 32

Alarm clock
Alarm clock
Date and time have been set.
Activating/deactivating the alarm clock and setting the wake-up time
¤ . . . use to select Organizer OK Alarm Clock OK . . . then
Sw
itch on/off:
Setting the wake-up time:
Set days:
Set the volume:
Set alarm:
Enter alarm data:
Save settings:
When the alarm clock is activated, the icon and the wake-up time are displayed in idle
display.
Alarm
An alarm is shown on the display and indicated by the selected ringtone melody. The alarm
sounds for 60 seconds. If no key is pressed, the alarm is repeated after 5 minutes. After the
second
repetition, the alarm call is deactivated for 24 hours.
¤ Activation: . . . use to select On or Off
¤ Time . . . use to enter hours and minutes
¤ Occurrence . . . use to switch between Monday-
Friday and Daily
¤ Vol ume . . . use to set volume in 5 levels s or select
crescendo (increasing volume)
¤ Melody . . . use to select a ringtone for the alarm
¤ . . . use to successively select Time, Occurrence, Vo lume
and Melody . . . use or to set the relevant value
Save
¤ Save
During a call, the alarm is only indicated by a short tone.
Switching off /repeating the alarm after an interval (snooze mode)
Deactivate the alarm: OFF
Repeat the alarm (snooze mode): Press Sno
repeated after 5 minutes.
32
Availability and operation of the functions
may differ on your telephone.
oze or any key . . . the alarm is switched off and
Page 33

Room monitoring
07:15
INT 1
14 Oct
Room Monitor
0891234567
OFF Options
Room Monitor activated
When the room monitor is switched on, the stored (internal or external) destination number is
called as soon as a defined noise level is exceeded in the vicinity of the handset. The alarm to an
external number is cancelled after approximately 90 seconds.
You can answer the alarm using the Tw
loudspeaker of the handset located in the room being monitored on or off.
In room monitor mode, incoming calls are only indicated on the display (without ringt
display backlight is reduced to 50%. Advisory tones are deactivated. All keys are locked, with the
exception of the display keys and the centre of the control key.
If you accept an incoming call, the room monitor mo
but the function remains activated.
The range of the room monitor is max. 2 meters in the direction in which the microphone is facing.
The room monitor is activated 20 seconds after switching on.
The answer machine for the destination number must be switched off.
After switching on:
¤ Test sensitivity.
¤ Test the connection, if the alarm is being forwarded to an external number.
Activating and setting the room monitor
¤ . . . use to select Additional Features OK
Room Monitor OK . . . then
Switch on/off:
¤ Activation: . . . use to select On or Off
Enter destination:
¤ Send alarm to . . . use to select External or
Internal
External: Number . . . use to enter the
number
or select a number from the directory:
Internal: Handset Change . . . use to
select the handset OK
Activate/deactivate two-way talk:
¤ Two Way Talk . . . use to select On or Off
Set microphone sensitivity:
¤ Sensitivity . . . use to select High or Low
Save settings: Save
The destination number is displayed in idle display when the room monitor is activated.
o Way Talk function. This function is used to switch the
de is suspended for the duration of the call,
Room monitoring
one). The
Availability and operation of the functions
may differ on your telephone.
33
Page 34

ECO DECT
Deactivating the room monitor / cancelling the alarm
Deactivate room monitor: ¤ In idle status press the display key OFF
Cancel the alarm:
¤ During an alarm press and hold the Back key
Deactivating the room monitor remotely
The alarm is forwarded to an external destination number.
The receiving phone supports tone dialling.
If the alarm is activated via a VoIP connection, the DTMF signalling must take place
via SIP info or RFC2833 (
setting on the base station).
¤ Accept the alarm call press the keys
The room monitor is deactivated and the handset is in idle status. The room monitor settings
on the handset (e.g. no ringtone) will remain activated until you press the display key OFF.
The room monitor cannot be reactivated remotely.
Reactivate: p. 33
ECO DECT
(depending on the base)
The device range is set to maximum as default. T
the handset and the base station. In idle status, the handset will not function (as it is not
transmitting). Only the base station will maintain contact with the handset via a low wireless
signal. During a call, the transmission power automatically adapts to the distance between the
base station and handset. The smaller the distance to the base, the lower the radiation.
To reduce the radiation further:
his guarantees the best connection between
Reducing radiation by up to 80%
¤ . . . use to select Settings OK ECO DECT OK Maximum
Range Change ( = off )
The range is also reduced with this setting.
It is not possible to use a repeater to increase the range.
Deactivating radiation in idle status
¤ . . . use to select Settings OK ECO DECT OK No
Radiation Change ( = on)
34
Availability and operation of the functions
may differ on your telephone.
Page 35

Protection against unwanted calls
Time Control
For external calls:
On
Suspend ring. from:
22:00
Suspend ring. until:
07:00
Back Save
Example
To benefit from the advantages of the setting No Radiation, all registered handsets
must support this feature.
If the setting No Radiation is activated and a handset is registered to the base that
does not support this feature, No Radiation is automatically deactivated. As soon as
this handset is de-registered, No Radiation will automatically be re-activated.
The wireless connection will only be established for an incoming or outgoing call and
the connection will be delayed by about 2 seconds.
When No Radiation is activated, there will be no range display/range alarm on the
handset. Contactability can be tested by attempting to establish a connection.
¤ Lift the receiver . . . the dialling tone sounds.
Protection against unwanted calls
Time control for external calls
Date and time have been set.
¤ Enter a time period during which the handset should suspend
ringing to indicate external calls e.g. during the night.
. . . use to select Settings OK Audio Set tings
OK Ringtones (Handset) OK Time
Control OK . . . then
Switch on/off:
Enter time:
Save:
¤ use to select On or Off
¤ use to switch between Suspend ring.
from and Suspend ring. until . . . use
to enter start and end in 4-digit format
¤ Save
The time control only applies to the handset for which the setting is configured.
The telephone will continue to ring for numbers that have been assigned to a VIP
group in the directory.
Protection from anonymous callers
The handset will not ring if callers' numbers are not revealed. This setting can be applied to only
one or to all registered handsets.
For one handset
¤ . . . use to select Settings OK Audio Settings OK
Ringtones (Handset) OK Anon. Calls Silent Edit ( = o n) . . . the call is o nly
signalled on the display
Availability and operation of the functions
may differ on your telephone.
35
Page 36

Protection against unwanted calls
For all handsets
(only on some Gigaset bases)
¤ . . . use to select Settings OK Te lep hony OK Anonymous
Calls Edit (= on) . . . use to select Protection Mode:
No Protection Anonymous calls are indicated in the same way as identified numbers
Silent Call The telephone will not ring and the incoming call will only appear in the
Block Call The telephone will not ring and the incoming call will not appear in the
Save settings: Save
display.
display. The caller will hear the busy tone.
Black list
(only on some Gigaset bases: wiki.gigasetpro.com
When the black list function is activated, calls from black list numbers are not indicated or are
only indicated in the display. These settings apply to all registered handsets.
Displaying/editing the black list
)
¤ . . . use to select Settings OK Tel epho ny OK Black List
Edit Blocked Numbers OK . . . the list of blocked numbers is displayed . . . possible
options:
Create an entry:
Delete an entry:
¤ New . . . use to enter a number Save
¤ . . . use to select an entry Delete . . . the entry is deleted
Transferring a number from a call list to the black list
¤ . . . use to select Call Lists OK . . . use to select Accepted calls/
Missed calls OK . . . use to select entry Options Copy to Blacklist OK
Setting the protection mode
¤ . . . use to select Settings OK Te lep hony OK Black List
Edit Protection Mode OK . . . use to select desired protection:
No Protection All calls are indicated, including from callers whose numbers are on the
Silent Call The telephone will not ring and the incoming call will only appear in the
Block Call The telephone will not ring and the incoming call will not appear in the
Save settings: Save
36
black list.
display.
display. The caller will hear the busy tone.
Availability and operation of the functions
may differ on your telephone.
Page 37

Resource Directory
Resource Directory
Sounds for ringtones and images that can be used as caller pictures (CLIP pictures) or as a
screensaver are saved in the handset's resource directory. A range of monophonic and
polyphonic sounds and pictures have been pre-set but further images and sounds can be
downloaded using a PC ( Gigaset QuickSync).
Media types:
Typ e Format
Sound Ringtones
Picture
If ins uff ici ent me mor y is ava ila bl e, yo u mu st del ete one or m ore pic tur es o r s oun ds b efo re o the rs
ca
Monophonic
Polyphonic
Imported sounds
CLIP-picture
Screensaver
n be saved.
Manage CLIP pictures/sounds
¤ . . . use to select Additional Features OK Resource Directory OK
. . . possible options:
View CLIP-picture:
Play sound:
Rename picture/sound:
¤ Caller Pictures OK . . . use to select picture View
. . . the selected picture is displayed
¤ Sounds OK . . . use to select sound . . . the selected
sound is played
Set volume: Options Volu me OK . . . use to select
volume Save
¤ Select Caller Pictures / Sounds OK . . . use to select
sound/image Options Rename . . . use to delete
name, use to enter new name Save . . . the entry is saved
with the new name
Delete picture/sound:
¤ Select Caller Pictures / Sounds OK . . . use to select
sound/picture Options Delete entry . . . the selected entry is
deleted
Internal
Internal
Internal
WMA, MP3, WAV
BMP, JPG, GIF
240 x 172 pixels
240 x 320 pixels
The relevant options are not available if a picture/sound cannot be deleted.
Check memory
Display the available memory for screensavers and CLIP-pictures.
¤ . . . use to select Additional Features OK Resource Directory
OK Capacity OK . . . the percentage of available memory is displayed
Availability and operation of the functions
may differ on your telephone.
37
Page 38

Bluetooth
Bluetooth
The handset is able to use Bluetooth™ to communicate wirelessly with other devices that also
use this technology, e.g. for connecting a Bluetooth headset.
Bluetooth is activated and the devices have
The following devices can be connected:
been registered to the handset.
• A Bluetooth headset
The headset features the Headset or Handsfree Profile. If both profiles are available, the handsfree profile is used to communicate.
It may take 5 seconds to establish a connection, whether a call is accepted using the headset
or transferred to the headset, or a call is made from the headset.
• Up to 5 data devices (PCs, tablets or mobile phones) for the transmission of address book
entries as a vCard or for the exchange of data with the computer.
In order for telephone numbers to be used further, the area code (international and local area
code) must be saved to the telephone.
Operating Bluetooth devices
device user guides
Activating/deactivating Bluetooth mode
¤ . . . use to select Bluetooth OK Activation
Change ( = activated)
If the local area code is still not saved: . . . use to enter local area code OK
When in idle status, the activated Bluetooth mode is indicated on the handset by the icon.
Registering Bluetooth devices
The distance between the handset in Bluetooth mode and the active Bluetooth device (headset
or data device) should not exceed 10 m.
The registration of a headset overwrites a previously registered headset.
If a headset is to be registered that is already registered with a different device, this
connection must be deactivated before registering.
¤ . . . use to select Bluetooth OK Search for Headset / Search Data
Device OK . . . the search starts (may take up to 30 seconds) . . . the nam es of found devices
are displayed . . . possible options:
Register device:
38
¤ Options Trust Device OK . . . use to enter the PIN of the
Bluetooth device to be registered OK . . . the device is added to the
list of known devices
Availability and operation of the functions
may differ on your telephone.
Page 39

Bluetooth
Display information about a device:
¤ . . . use to select a device, if applicable View . . . the device name
and device address are displayed
Repeat search:
Cancel search:
¤ Options Repeat Search OK
¤ Cancel
Editing the list of known (trusted) devices
Open the list
¤ . . . use to select Bluetooth OK Known Devices OK . . . the known
devices are listed, an icon indicates the type of device
Bluetooth headset
Bluetooth data device
If a device is connected, the relevant icon is shown in the display header instead of .
Edit an entry
¤ . . . use to select Bluetooth OK Known Devices OK . . . use
to select entry . . . possible options:
View an entry:
De-register a Bluetooth device:
¤ View . . . the device name and device address are displayed Press OK
to go back
¤ Options Delete entry OK
Edit name:
If an active Bluetooth device is de-registered, it may try to re-connect as a "nonregistered device".
¤ Options Edit Name OK . . . use to edit name Save
Rejecting/accepting a non-registered Bluetooth device
If a Bluetooth device that is not registered in the list of known devices tries to connect to the
handset, a prompt will appear asking you to enter the PIN of the Bluetooth device (Bonding).
Reject:
Accept:
¤ Press the Back key
¤ . . . use to enter the PIN of the Bluetooth device to be accepted OK . . . Wait
for PIN confirmation . . . then
Add the device to the list of known devices: Ye
Use the device temporarily: No
as the device is located within transmission
. . . the Bluetooth connection can be used, as long
s
range or until it is switched off
Changing the Bluetooth name of the handset
The handset is shown by this name on another Bluetooth device.
¤ . . . use to select Bluetooth OK Own Device OK . . . the name and
the device address are shown Change . . . use to change the name Save
Availability and operation of the functions
may differ on your telephone.
39
Page 40

Additional functions using the PC interface
Additional functions using the PC interface
The Gigaset QuickSync program has been installed on the computer.
Free to download at gigaset.com/quicksync
QuickSync functions:
• Sync the handset's directory with Microsoft® Outlook®
• Upload CLIP-pictures (.bmp) from the computer to the handset
• Upload pictures (.bmp) as screensavers from the computer to the handset
• Upload sounds (ringtone melodies) from the computer to the handset
• Update firmware
• Cloud synchronisation with Google™
¤ Connecting the handset to the computer via Bluetooth or via a USB data cable.
Connect the handset directly to the PC, not via a USB hub.
Transferring data
Data transfer using Bluetooth:
• The computer has Bluetooth capability.
• A USB data cable is not plugged in. If a USB data cable is plugged in during an
existing Bluetooth connection, the Bluetooth connection is interrupted.
¤ Launch the Gigaset QuickSync program on the computer.
The message Data transfer in progress is shown on the display during data transfer between
the handset and PC. During this time, it is not possible to enter any data using the keypad and
incoming calls are ignored.
Carrying out a firmware update
¤ Connect the telephone and the PC using a USB data cable Launch Gigaset QuickSync
Establish connection to the handset
¤ Start firmware update in Gigaset QuickSync . . . Information about this can be found in
Gigaset QuickSync help feature
The update process may take up to 10 minutes (not including download time).
The data are first downloaded from the online update server. The time required for this depends
on Internet connection speed.
The display on your telephone is switched off, the Message key flashes.
Once the update is complete, your tele
The firmware can also be updated directly via the DECT radio link if the base/router
supports this ( Handset Update).
40
Availability and operation of the functions
phone will automatically restart.
may differ on your telephone.
Page 41

Additional functions using the PC interface
Procedure in the event of an error
If the update procedure fails or the telephone no longer functions properly after the update,
repeat the update procedure:
¤ End the "Gigaset QuickSync" program on the PC Remove the USB data cable from the
telephone Detach the power cable from the device Re-insert the power cable
¤ Carry out the firmware update again as described above
If th e up da te p ro ced ur e f ail s m ore th an o nc e or it is no l on ger po ss ibl e t o co nn ec t to th e PC , c ar ry
out the Em
ergency Update:
¤ End the "Gigaset QuickSync" program on the PC Remove the USB data cable from the
telephone Detach the power cable from the device
¤ Press and hold keys and at the same time Re-insert the power cable
¤ Release keys and
¤ Carry out the firmware update as described above
Always save pictures and sounds uploaded onto the handset on the PC, as they are
deleted during an Emergency Update.
Availability and operation of the functions
may differ on your telephone.
41
Page 42

Setting the handset
Setting the handset
Changing the language
¤ . . . use to select Settings OK Language OK . . . use to
select language Select ( = selected)
If the handset has been set to an incomprehensible language:
¤ Press the keys slowly one after the other . . . use to select the correct
language press the right display key
Display and keypad
Screensaver
A digital or analogue clock, Info Services and a range of pictures can be selected to be displayed
as a screensaver when in idle status. You can also display the assignment of the quick dial keys
in idle status.
¤ . . . use to select Settings OK Display & Keypad OK
Screensaver Edit ( = on) . . . then
Switch on/off:
Select screensaver:
View screensaver:
Save selection:
The screensaver is activated approx. 10 seconds after the display has changed to idle status.
¤ Activation: . . . use to select On or Off
¤ Selection . . . use to select a screensaver (Quick dial
screen / Digital Clock / Analog Clock / Info Services / <Pictures>
/ Slideshow)
¤ View
¤ Save
All pictures from the Screensaver folder of the Resource Directory are available for
selection.
End screensaver
¤ Press the Back key . . . the display changes to idle status
42
Availability and operation of the functions
may differ on your telephone.
Page 43

Notes on displaying Info Services
(only on a Gigaset N510 IP PRO or another Gigaset-IP base)
Setting the handset
Info Services a
The telephone is connected to the Internet.
The type of info service available to your phone is set on the Internet on the
Gigaset.net server.
If no information is currently available, the digital time (Digital Clock) is displayed
instead until information is available again.
re activated via the web configurator.
Switching Info Services on/off
(only on a Gigaset N510 IP PRO or another Gigaset-IP base)
The text information from the Internet that is set for the screensaver Info Services can be
displayed as a scrolling message in idle status.
¤ . . . use to select Settings OK Display & Keypad OK
Info Ticker Edit (= on)
The text appears as soon as the telephone changes t
display, the info text is not displayed.
o idle status. If a message is shown in the
Large font
Show text and icons in call lists and in the directory in a larger size in order to improve legibility.
Only one entry is shown in the display and names are abbreviated if necessary.
¤ . . . use to select Settings OK Display & Keypad OK Large
Font Change ( = on)
Colour scheme
You can choose from a range of colour combinations for the display.
¤ . . . use to select Settings OK Display & Keypad OK
Colour Schemes OK . . . use to select the desired colour scheme
Select ( = selected)
Activating/deactivating automatic keypad lock
Automatically lock the keypad when the handset has been in idle status for around 15 seconds.
¤ . . . use to select Settings OK Display & Keypad OK Auto
Keypadlock Change ( = on)
Availability and operation of the functions
may differ on your telephone.
43
Page 44

Setting the handset
Volu me
For internal calls
and alarms:
< >
External Calls:
Back Save
Example
Changing the earpiece and handsfree volume
You can set the volume of the earpiece and speaker at 5 levels independently of each other.
Changes are only saved permanently in Profile Personal.
During a conversation
¤ Handset Volume . . . use to select volume Save . . . the setting is saved
Without saving, the setting is automatically saved after around 3 seconds.
In idle status
¤ . . . use to select Audio Settings OK Handset Volume OK . . . then
For the earpiece:
For the speaker:
Save settings:
¤ Earpiece: . . . use to set the volume
¤ Speaker . . . use to set the volume
¤ Save
Earpiece profiles
Select a profile for the earpiece in order to adapt the telephone as much as possible to the
surroundings. Check which is the most comfortable profile for you.
¤ . . . use to select Audio Settings OK Earpiece Profiles OK . . .
use to select Profile High or Low Select ( = selected)
Ringtones
Ringtone volume
¤ . . . use to select Audio Settings OK
Ringtones (Handset) OK Volume OK . . .
use to select For internal calls and alarms or External
Calls . . . use to set volume in 5 levels or in crescendo
mode (increasing volume) Save
Changes are only saved permanently in Profile Personal.
44
Availability and operation of the functions
may differ on your telephone.
Page 45

Setting the handset
Ringtone melody
Set different ringtones for internal and external calls for every available receive connection of
the telephone (Landline, IP1) or set the same ringtone for All calls.
¤ . . . use to select Audio Settings OK Ringtones (Handset) OK
Melodies OK . . . use to select the connection . . . use to select the ringtone/melody in each case Save
Switching the ringtone on/off
Switching the ringtone off permanently
Using the Star key:
Using the sound profile Si
. . . appears in the status bar
Switching the ringtone on permanently
Ringtone switched off using the Star key:
¤ Press and hold the key
lent: ¤ Use the key to set Profile Silent
¤ Press and hold the key
Ringtone switched off using the sound profile Silent:
¤ Use the key to set Profile Loud or Profile Personal
Switching the ringtone off for the current call
¤ Silence
Switching the alert tone (beep) on/off
Switch on an alert tone (beep) instead of the ringtone:
¤ . . . Press the Profile key to select Profile Silent press Beep within 3 seconds . . . the
following icon appears in the status bar
Switching off the alert tone: . . . Press the Profile key to change profile
Switching advisory tones on/off
The handset notifies acoustically about different activities and statuses. These advisory tones
can be switched on/off independently of each other.
¤ . . . use to select Audio Settings OK Advisory Tones OK . . . then
Tone when keys are pressed:
¤ Key Tones: . . . use to select On or Off
Confirmation/error tone after making entries, advisory tone when a new message has been
received:
¤ Confirmation . . . use to select On or Off
Warning tone when the handset is moved out of range of the base station:
¤ Out of Range: . . . use to select On or Off
Save settings:
¤ Save
Availability and operation of the functions
may differ on your telephone.
45
Page 46

Setting the handset
Fast access to numbers and functions
Number keys: It is possible to assign a number from the directory to the keys and
to .
Display keys: The lef
keys can be re-assigned.
You can then dial the number or start the function by simply pressing a key.
t and right display keys have a function preset by default, but the
Assigning a number to digit keys (quick dial)
A number has not been assigned to the digit key.
¤ Press and hold the digit key
or
¤ Briefly press the digit key Press the display key QuickDial
The directory opens.
¤ . . . use to select an entry OK . . . use to select a number if necessary OK . . .
the entry is saved to the digit key
If the entry in the directory is deleted later, this will not affect the assignment of the
digit key.
Dialling a number
¤ Press and hold the digit key . . . the number is dialled immediately
or
¤ Briefly press the digit key . . . the number/name (possibly in abbreviated form) is shown on
the left display key . . . press the display key . . . the number is dialled
Changing the digit key assignment
¤ Briefly press the digit key Change . . . the directory is opened . . . possible options:
Change the assignment:
Delete the assignment:
46
¤ . . . use to select an entry OK . . . select a number if
required OK
¤ Clear Key
Availability and operation of the functions
may differ on your telephone.
Page 47

Setting the handset
Assigning display keys, changing assignments
¤ Press and hold the left or right display key in idle status . . . the list of possible key
assignments is opened . . . use to select function OK . . . possible options:
Seize Line Initiate call using handsfree function
INT Open the list of handsets registered to the same base
Quick Dial Assign a number from the directory to the display key
Room Monitor Set and activate/deactivate the room monitor
Timer Set, enable and disable the timer
Alarm Clock Set and activate/deactivate the alarm clock
Calendar Open calendar
One Touch Call Set up one touch call
Bluetooth Open Bluetooth menu
Redial Show redial list
Handset Directory Open the handset's local directory
More Functions...
Call Lists Show call lists
Withhold Number Withhold phone number identification for next call
Call Divert Activate/deactivate Call Divert
The availability of options depends on the base.
Starting a function
With the telephone in idle status: Briefly press . . . the assigned function is executed
¤ OK . . . use to select other function
Changing the name of a connection (line)
(only on a CAT-iq router)
¤ . . . use to select Settings OK Tele phony OK
Connections OK . . . all available connections (lines) are displayed . . . use to select
connection OK Connection Name OK . . . use to change the name of the
connection Save
Assigning handsets to a connection (line)
(only on a CAT-iq router)
Multiple handsets can be assigned to a connection.
a connection will be forwarded to all handsets assigned to the connection.
Incoming calls to the number designated to
¤ . . . use to select Settings OK Tele phony OK
Connections OK . . . use to select connection OK Assigned Handsets . . .
all registered handsets are displayed . . . use to select handset
Change ( = handset is assigned)
Availability and operation of the functions
may differ on your telephone.
47
Page 48

Setting the handset
Permit/prevent multiple calls
(only on a CAT-iq router)
If the function is activated, multipl
e calls can be made in parallel.
¤ . . . use to select Settings OK Tele phony OK
Connections OK . . . use to select connection OK Multiple Calls
Change ( = on)
Permit/prevent internal listening in
(only on a CAT-iq router)
If the function is enabled, an internal party can listen
conversation (conference).
in to an external call and take part in the
¤ . . . use to select Settings OK Tele phony OK
Connections OK . . . use to select connection OK Listening In OK
Change ( = on)
Changing the handset PIN
The handset is protected against unauthorised use by a PIN. The handset PIN must be entered
e. g. when switching off the keypad lock.
Change the handset's 4-digit PIN (default setting: 0
000):
¤ . . . use to select Settings OK System OK Handset PIN
OK . . . use to enter the current PIN OK . . . use to enter the new handset PIN
OK
48
Availability and operation of the functions
may differ on your telephone.
Page 49

Setting the handset
Handset update
The handset supports firmware updating via the DECT radio link to the base/router
(SUOTA = Software Update Over The Air).
The base/router to which the handset is registered must also support this function
( wiki.gigasetpro.com
If your base/router does not support this function, you can also update the firmware
via a USB cable and Gigaset Quick Sync.
If new firmware is available for the handset a message to this effect will be displayed.
)
¤ Start the firmware update with Ye s .
Start the firmware update manually:
¤ . . . use to select Settings OK System OK Handset
Update OK Update OK OK . . . if there is new firmware, the update will start
The update process may take up to 30 minutes. During this time, only restricted
handset use is available.
Resetting the handset to the default settings
Reset any individual settings and changes that you have made.
¤ . . . use to select Settings OK System OK Handset
Reset OK Ye s . . . the handset's settings are reset
The following settings are not affected by a reset
• Registration of the handset to the base station
• Date and time
• Directory entries and call lists
Availability and operation of the functions
may differ on your telephone.
49
Page 50

Customer Service & Help
Appendix
Customer Service & Help
Do you have any questions?
For quick help and information, please refer to this user guide or visit
For online information and services concerning
• Product s
• Documents
• Interop
• Firmw are
• FAQ
• Support
please refer to
For further information our Gigaset specialised reseller w
product.
wiki.gigasetpro.com.
ill be happy to help you related to your Gigaset
Manufacturer's advice
Authorisation
This device is intended for use worldwide. Use outside the European Economic Area (with the exception of
Switzerland) is subject to national approval.
Country-specific requirements have been taken into consideration.
Hereby, Gigaset Communications GmbH declares that
compliance with Directive 2014/53/EU.
The full text of the EU declaration of conformity is available at the following internet address:
gigasetpro.com/docs.
This declaration could also be available in the "Inter
Declarations of Conformity" files.
Therefore please check all of these files.
the radio equipment type Gigaset Maxwell C is in
national Declarations of Conformity" or "European
gigasetpro.com.
50
Page 51

Environment
Manufacturer's advice
Environmental management system
Gigaset Communications GmbH is certified pursuant to the international standards ISO 14001 and
ISO 9001.
ISO 14001 (Environment): C
ISO 9001 (Quality): C
GmbH.
ertified since 17/02/1994 by TÜV SÜD Management Service GmbH.
ertified since September 2007 by TÜV SÜD Management Service
Disposal
All electrical and electronic products should be disposed of separately from the municipal waste stream via
designated collection facilities appointed by the government or the local authorities.
For more detailed information about disposal of your old
centre or the original supplier of the product.
This crossed-out wheeled bin symbol on the pro
pean Directive 2012/19/EU. The correct disposal and separa
help prevent potential negative consequences for the environment and human health. It is a precondition for reuse and recycling of used electrical and electronic equipment.
duct means the product is covered by the Euro-
te collection of your old appliance will
appliance, please contact your local council refuse
Care
Wipe the device with a damp cloth or an antistatic cloth. Do not use solvents or microfibre cloths.
Never use
a dry cloth; this can cause static.
In rare cases, contact with chemical substances can cause
variety of chemical products available on the market, it was not possible to test all substances.
Impairments in high-gloss finishes can be carefully removed using display polishes for mobile phones.
changes to the device’s exterior. Due to the wide
Contact with liquid
If the device comes into contact with liquid:
1 Disconnect the power supply.
Allow the liquid to drain from the device.
2
3Pat all parts dry.
4 Place the device in a dry, warm place for at least 72 hours ( not in a microwave, oven etc.) with the keypad
facing down (if applicable).
5 Do not switch on the device again until it is completely dry.
When it has fully dried out, you will normally be able to use it again.
51
Page 52

Technical data
Technical data
Power consumption of the handset
In idle status (with screensaver) *: approx. 0.5 W
During a call using the receiver *: approx. 1.5 W
During a call using the handsfree function *: approx. 2.0 W
* Maximum Range activated
General specifications
DECT standard Supported
CAT-iq standard Certified in accordance with standard CAT-iq 2.0 with HD
GAP standard Supported
No. of channels 60 duplex channels
Radio frequency range 1880-1900 MHz
Duplex mode Time division multiplexing, 10 ms frame length
Repetition frequency of the transmission pulse 100 Hz
Duration of the transmission pulse 370 μs
Channel grid 1728 kHz
Bit rate 1152 kbit/s
Modulation GFSK
Language code 32 kbit/s
Transmission power 10 mW average power per channel, 250 mW pulse power
Range Up to 50 m indoors, up to 300 m outdoors
Environmental conditions for operation +5 °C to +45 °C; 20% to 75% relative humidity
Bluetooth: Radio frequency range 2402-2480 MHz
Bluetooth: Transmission power 4 mW pulse power
Voice dect.org/cat-iq-certification.aspx
52
Page 53

Character charts
1) Space
2) Line break
1x 2x 3x 4x 5x 6x 7x 8x 9x 10x
1
abc2дбавгз
def 3лйик
gh i4ïíìî
jkl5
mno6цсутфх
pqr s7Я
tuv8üúùû
wxy z 9 яэжше
.,?! 0
1)
2)
Standard characters
Press the relevant key the number of times indicated.
Technical data
53
Page 54

Display icons
Icon Meaning
Signal strength (No Radiation off )
1% -100%
white, if Maximum Range on;
green, if Maximum Range off
Red: no connection to the base station
No Radiation activated:
white, if Maximum Range on;
green, if Maximum Range off
Answer machine activated indicator
flashes: Answer machine is recording
a message or is being operated by
another internal participant
Profile Silent activated (Ringtone
switched off )
"Beep" ringtone activated
Keypad lock activated
Icon Meaning
Icon Meaning
Last number redial
Delete text
Open the directory
Copy number to the directory
Divert a call to answer machine
Icon Meaning
Icon Meaning
External call
Internal call
Establishing a call (outgoing call)
Connection established
No connection established/
connection terminated
Reminder for appointment
Reminder for anniversary
Alarm call
Countdown timer
Answer machine is recording
Icon Meaning
Display icons
The following icons are displayed depending on the settings and the operating status of your
telephone.
Icons in the status bar
Display key icons
Display icons to indicate . . .
54
Page 55

Other display icons
Icon Meaning
Alarm clock is activated, display with
alarm time
Timer switched on, display with
countdown
Action complete (green)
Action failed (red)
Information
(Security) prompt
Please wait ...
Icon Meaning
Display icons
55
Page 56

Index
Index
A
Advisory tones . . . . . . . . . . . . . . . . . . . . . 45, 46
Alarm . . . . . . . . . . . . . . . . . . . . . . . . . . . . . . . 32
Alarm (room monitor)
Alarm clock . . . . . . . . . . . . . . . . . . . . . . . . . . . 32
Alert tone (beep) . . . . . . . . . . . . . . . . . . . . 29, 45
Anniversary, see Appointment
Answer machine
Appointment
Assigning number key . . . . . . . . . . . . . . . . . . . 46
Authorisation . . . . . . . . . . . . . . . . . . . . . . . . . 50
B
Back key . . . . . . . . . . . . . . . . . . . . . . . . . . . . . . 4
Beep (alert tone) . . . . . . . . . . . . . . . . . . . .29, 45
Best base station . . . . . . . . . . . . . . . . . . . . . . .11
Black list . . . . . . . . . . . . . . . . . . . . . . . . . . . . . 36
Bluetooth . . . . . . . . . . . . . . . . . . . . . . . . . . . . 38
C
Calendar . . . . . . . . . . . . . . . . . . . . . . . . . . . . . 30
Call
Call block . . . . . . . . . . . . . . . . . . . . . . . . . . . . 36
Call list
Call lists . . . . . . . . . . . . . . . . . . . . . . . . . . . . . 27
Call protection . . . . . . . . . . . . . . . . . . . . . . . . 35
Call, anonymous
Calling
Calls
Care . . . . . . . . . . . . . . . . . . . . . . . . . . . . . . . .51
Care of the device . . . . . . . . . . . . . . . . . . . . . . 51
Changing
. . . . . . . . . . . . . . . . . . . . . . . . . . 34
switch off
switch on/off . . . . . . . . . . . . . . . . . . . . . . . 32
calling back a caller . . . . . . . . . . . . . . . . . . . 27
display missed
missed . . . . . . . . . . . . . . . . . . . . . . . . . . . .31
notification. . . . . . . . . . . . . . . . . . . . . . . . . 31
setting . . . . . . . . . . . . . . . . . . . . . . . . . . . . 30
activate . . . . . . . . . . . . . . . . . . . . . . . . . . . 38
changing the device name. . . . . . . . . . . . . . 39
copy director y (vCard) . . . . . . . . . . . . . . . . . 25
de-registering devices . . . . . . . . . . . . . . . . . 39
list of known devices . . . . . . . . . . . . . . . . . . 39
registering devices . . . . . . . . . . . . . . . . . . .38
external
copying a number to the directory
delete . . . . . . . . . . . . . . . . . . . . . . . . . . . . 27
delete an entry . . . . . . . . . . . . . . . . . . . . . . 27
dialling . . . . . . . . . . . . . . . . . . . . . . . . . . . . 19
entry . . . . . . . . . . . . . . . . . . . . . . . . . . . . . 27
opening . . . . . . . . . . . . . . . . . . . . . . . . . . . 27
protection from
external
making an external call
display language
. . . . . . . . . . . . . . . . . . . . . . . 21
. . . . . . . . . . . . . . . . . . . . . . 31
. . . . . . . . . . . . . . . . . . . . . . . . . . . 18
. . . . . . . . 27
. . . . . . . . . . . . . . . . . . . . . . 35
. . . . . . . . . . . . . . . . . . . . . . . . . . . 18
. . . . . . . . . . . . . . . .18
. . . . . . . . . . . . . . . . . . . . . 42
earpiece volume. . . . . . . . . . . . . . . . . . . . . 44
handsfree volume. . . . . . . . . . . . . . . . . . . . 44
Changing the device name (Bluetooth). . . . . . . 39
Changing the handset PIN. . . . . . . . . . . . . . . . 48
Character charts . . . . . . . . . . . . . . . . . . . . . . . 53
CLIP-picture
view in Resource Directory
Colour scheme . . . . . . . . . . . . . . . . . . . . . . . . 43
Connecting the power cable . . . . . . . . . . . . . . 10
Connecting the USB data cable . . . . . . . . . . . . 13
Connection
assigning handset
changing name . . . . . . . . . . . . . . . . . . . . . 47
headset . . . . . . . . . . . . . . . . . . . . . . . . . . . . 4
Contact with liquid . . . . . . . . . . . . . . . . . . . . . 51
Contents of the package . . . . . . . . . . . . . . . . . . 9
Control key. . . . . . . . . . . . . . . . . . . . . . . . . 4, 14
Correcting incorrect entries . . . . . . . . . . . . . . . 17
Customer Care . . . . . . . . . . . . . . . . . . . . . . . . 50
Customer S ervice . . . . . . . . . . . . . . . . . . . . . . 50
D
Deactivating wireless module . . . . . . . . . . . . . 34
De-registering devices (Bluetooth) . . . . . . . . . . 39
Dialling
from the call list
from the directory . . . . . . . . . . . . . . . . . . . 18
using quick dial . . . . . . . . . . . . . . . . . . . . . 46
Directory . . . . . . . . . . . . . . . . . . . . . . . . . . . . 22
copy vCard (Bluetooth) . . . . . . . . . . . . . . . . 25
copying numbers . . . . . . . . . . . . . . . . . . . . 24
dialling numbers . . . . . . . . . . . . . . . . . . . . 18
entry . . . . . . . . . . . . . . . . . . . . . . . . . . . . . 22
memory. . . . . . . . . . . . . . . . . . . . . . . . . . . 23
opening. . . . . . . . . . . . . . . . . . . . . . . . . . . 22
order of entries. . . . . . . . . . . . . . . . . . . . . . 23
saving an entry. . . . . . . . . . . . . . . . . . . . . . 22
searching. . . . . . . . . . . . . . . . . . . . . . . . . . 23
selecting an entry . . . . . . . . . . . . . . . . . . . . 23
sending entry/list to handset . . . . . . . . . . . . 24
sending to handset. . . . . . . . . . . . . . . . . . . 24
Display
changing display language
colour scheme . . . . . . . . . . . . . . . . . . . . . . 43
directory memory. . . . . . . . . . . . . . . . . . . . 23
missed appointment/anniversary . . . . . . . . 31
network mailbox message. . . . . . . . . . . . . . 26
screensaver . . . . . . . . . . . . . . . . . . . . . . . . 42
setting. . . . . . . . . . . . . . . . . . . . . . . . . . . . 42
Display icons . . . . . . . . . . . . . . . . . . . . . . . . . 54
Display keys . . . . . . . . . . . . . . . . . . . . . . . . 4, 15
assigning . . . . . . . . . . . . . . . . . . . . . . . . . . 46
icons . . . . . . . . . . . . . . . . . . . . . . . . . . . . . 54
Display language
setting
Disposal. . . . . . . . . . . . . . . . . . . . . . . . . . . . . 51
"Do not disturb" profile . . . . . . . . . . . . . . . . . . 29
. . . . . . . . . . . . . . . . . . . . . 19
. . . . . . . . . . . . . . . . . . . . . . . . . . . . 11
. . . . . . . . . . . . . 37
. . . . . . . . . . . . . . . . . . . 47
. . . . . . . . . . . . . 42
56
Page 57

Index
E
Earpiece profile . . . . . . . . . . . . . . . . . . . . . . . . 44
Earpiece volume . . . . . . . . . . . . . . . . . . . . . . . 20
ECO DECT . . . . . . . . . . . . . . . . . . . . . . . . . . . . 34
Emergency numbers
not possible
End key. . . . . . . . . . . . . . . . . . . . . . . . . . . . . . . 4
Entering numbers . . . . . . . . . . . . . . . . . . . . . . 17
Entering special characters . . . . . . . . . . . . . . . . 17
Entering text . . . . . . . . . . . . . . . . . . . . . . . . . . 17
Entering umlauts . . . . . . . . . . . . . . . . . . . . . . .17
Environment . . . . . . . . . . . . . . . . . . . . . . . . . . 51
F
Firmware update . . . . . . . . . . . . . . . . . . . . . . . 49
Firmware updates . . . . . . . . . . . . . . . . . . . . . . 40
G
Getting started . . . . . . . . . . . . . . . . . . . . . . . . . 9
Gigaset QuickSync . . . . . . . . . . . . . . . . . . .25, 40
H
Handset
advisory tones
assigning connection . . . . . . . . . . . . . . . . . 47
automatic keypad lock. . . . . . . . . . . . . . . . . 43
changing the settings . . . . . . . . . . . . . . . . .42
colour scheme . . . . . . . . . . . . . . . . . . . . . . 43
connect . . . . . . . . . . . . . . . . . . . . . . . . . . . 10
display language. . . . . . . . . . . . . . . . . . . . . 42
earpiece volume . . . . . . . . . . . . . . . . . . . . . 44
handset volume . . . . . . . . . . . . . . . . . . . . . 20
handsfree volume . . . . . . . . . . . . . . . . . 20, 44
idle status. . . . . . . . . . . . . . . . . . . . . . . . . . 17
large font . . . . . . . . . . . . . . . . . . . . . . . . . . 43
muting. . . . . . . . . . . . . . . . . . . . . . . . . . . .20
overview . . . . . . . . . . . . . . . . . . . . . . . . . . . 4
registering . . . . . . . . . . . . . . . . . . . . . . . . . 11
restoring to default setting. . . . . . . . . . . . . . 46
update . . . . . . . . . . . . . . . . . . . . . . . . . . . . 49
use for room monitoring . . . . . . . . . . . . . . . 33
Handsfree key . . . . . . . . . . . . . . . . . . . . . . 18, 20
LED . . . . . . . . . . . . . . . . . . . . . . . . . . . . . . . 4
Handsfree mode . . . . . . . . . . . . . . . . . . . . . . . 20
Handsfree volume . . . . . . . . . . . . . . . . . . . . . . 20
Hash key. . . . . . . . . . . . . . . . . . . . . . . . . . . . . . 4
Headset (Bluetooth). . . . . . . . . . . . . . . . . . . . . 38
Headset connection. . . . . . . . . . . . . . . . . . . . . . 4
Headset key . . . . . . . . . . . . . . . . . . . . . . . . . . . 4
LED . . . . . . . . . . . . . . . . . . . . . . . . . . . . . . . 4
Headset socket . . . . . . . . . . . . . . . . . . . . . . . . 12
Help . . . . . . . . . . . . . . . . . . . . . . . . . . . . . . . . 50
I
Icons
alarm clock
displaying new messages. . . . . . . . . . . . . . . 26
indications . . . . . . . . . . . . . . . . . . . . . . . . . 54
. . . . . . . . . . . . . . . . . . . . . . . . . 8
. . . . . . . . . . . . . . . . . . . . . . 46
. . . . . . . . . . . . . . . . . . . . . . . . . 32
on display keys. . . . . . . . . . . . . . . . . . . . . . 54
status bar. . . . . . . . . . . . . . . . . . . . . . . . . . 54
Idle status
returning to
Indications, icons . . . . . . . . . . . . . . . . . . . . . . 54
Internal listening in . . . . . . . . . . . . . . . . . . . . . 48
K
Key
end/back
headset . . . . . . . . . . . . . . . . . . . . . . . . . . . . 4
volume . . . . . . . . . . . . . . . . . . . . . . . . . . . . 4
Key, assigning. . . . . . . . . . . . . . . . . . . . . . . . . 46
Keypad lock, automatic . . . . . . . . . . . . . . . . . . 43
Keys
control key
display keys . . . . . . . . . . . . . . . . . . . . . . 4, 15
handsfree . . . . . . . . . . . . . . . . . . . . . . . . . 20
handsfree key. . . . . . . . . . . . . . . . . . . . . . . 18
hash key . . . . . . . . . . . . . . . . . . . . . . . . . . . 4
menu . . . . . . . . . . . . . . . . . . . . . . . . . . . . 14
message key . . . . . . . . . . . . . . . . . . . . . . . . 4
profile key . . . . . . . . . . . . . . . . . . . . . . . 4, 29
recall key . . . . . . . . . . . . . . . . . . . . . . . . . . . 4
star key . . . . . . . . . . . . . . . . . . . . . . . . . . . . 4
volume . . . . . . . . . . . . . . . . . . . . . . . . . . . 15
L
Language
display
Large font . . . . . . . . . . . . . . . . . . . . . . . . . . . 43
LED
handsfree key
headset key . . . . . . . . . . . . . . . . . . . . . . . . . 4
profile key . . . . . . . . . . . . . . . . . . . . . . . . . . 4
Line . . . . . . . . . . . . . . . . . . . . . . . . . . . . . . . . 47
Liquid . . . . . . . . . . . . . . . . . . . . . . . . . . . . . . 51
List
known devices (Bluetooth)
Lock/unlock the keypad . . . . . . . . . . . . . . . . . 14
Lower/upper case . . . . . . . . . . . . . . . . . . . . . . 17
M
Manufacturer’s advice. . . . . . . . . . . . . . . . . . . 50
Maximum Range . . . . . . . . . . . . . . . . . . . . . . 34
Medical equipment . . . . . . . . . . . . . . . . . . . . . . 8
Melody
ringtone for internal/external calls
Memory in the directory . . . . . . . . . . . . . . . . . 23
Memory, resource directory . . . . . . . . . . . . . . . 37
Menu key (Control key) . . . . . . . . . . . . . . . . . . 14
Message key. . . . . . . . . . . . . . . . . . . . . . . . . . . 4
Message lists . . . . . . . . . . . . . . . . . . . . . . . . . 26
Microphone
switch on/off
Missed anniversaries/appointments . . . . . . . . . 31
Multiple calls . . . . . . . . . . . . . . . . . . . . . . . . . 48
Muting the handset . . . . . . . . . . . . . . . . . . . . 20
. . . . . . . . . . . . . . . . . . . . . . . . 17
. . . . . . . . . . . . . . . . . . . . . . . . . . . 4
. . . . . . . . . . . . . . . . . . . . . . . 4, 14
. . . . . . . . . . . . . . . . . . . . . . . . . . . . 42
. . . . . . . . . . . . . . . . . . . . . . . . 4
. . . . . . . . . . . . . 39
. . . . . . . . 45
. . . . . . . . . . . . . . . . . . . . . . . 20
57
Page 58

Index
N
Number
copying to the directory
saving in the directory. . . . . . . . . . . . . . . . . 22
O
Overview
handset
. . . . . . . . . . . . . . . . . . . . . . . . . . . . 4
P
PC Interface . . . . . . . . . . . . . . . . . . . . . . . . . . 40
Picture
as CLIP image
as screensaver. . . . . . . . . . . . . . . . . . . . . . . 37
delete . . . . . . . . . . . . . . . . . . . . . . . . . . . . 37
formats . . . . . . . . . . . . . . . . . . . . . . . . . . .37
rename . . . . . . . . . . . . . . . . . . . . . . . . . . .37
Port
USB
Power adapter. . . . . . . . . . . . . . . . . . . . . . . 8, 10
Power consumption. . . . . . . . . . . . . . . . . . . . . 52
Profile key . . . . . . . . . . . . . . . . . . . . . . . . . .4, 29
LED . . . . . . . . . . . . . . . . . . . . . . . . . . . . . . . 4
Profiles . . . . . . . . . . . . . . . . . . . . . . . . . . . . . .29
Protection from calls
"Do not disturb" profile
anonymous . . . . . . . . . . . . . . . . . . . . . . . . 35
black list. . . . . . . . . . . . . . . . . . . . . . . . . . . 36
time control . . . . . . . . . . . . . . . . . . . . . . . .35
Q
Quick dial . . . . . . . . . . . . . . . . . . . . . . . . . . . . 18
Quick dial keys . . . . . . . . . . . . . . . . . . . . . . . . 15
as screensaver. . . . . . . . . . . . . . . . . . . . . . . 16
assigning . . . . . . . . . . . . . . . . . . . . . . . . . . 15
display assignment . . . . . . . . . . . . . . . . . . . 16
QuickSync. . . . . . . . . . . . . . . . . . . . . . . . . 25, 40
R
Radiation
reducing
Radiation-free . . . . . . . . . . . . . . . . . . . . . . . . . 34
Recall key . . . . . . . . . . . . . . . . . . . . . . . . . . . . . 4
Redial list . . . . . . . . . . . . . . . . . . . . . . . . .19, 27
Registering (handset). . . . . . . . . . . . . . . . . . . . 11
Registering device (Bluetooth) . . . . . . . . . . . . . 38
Resetting the handset to the default
settings
Resource Directory . . . . . . . . . . . . . . . . . .37, 46
memory . . . . . . . . . . . . . . . . . . . . . . . . . . . 37
view CLIP picture. . . . . . . . . . . . . . . . . . . . . 37
Ringtone. . . . . . . . . . . . . . . . . . . . . . . . . . . . . 44
activating/deactivating . . . . . . . . . . . . . . . . 45
changing . . . . . . . . . . . . . . . . . . . . . . . . . . 44
melody for internal/external calls . . . . . . . . . 45
time control . . . . . . . . . . . . . . . . . . . . . . . .35
volume. . . . . . . . . . . . . . . . . . . . . . . . . . . . 44
Room monitor
activation
. . . . . . . . . . . . . . . . . . . . . . . 37
. . . . . . . . . . . . . . . . . . . . . . . . . . . . . . . 4
. . . . . . . . . . . . . . . . . . . . . . . . . . . 34
. . . . . . . . . . . . . . . . . . . . . . . . . 49
. . . . . . . . . . . . . . . . . . . . . . . . . . 33
. . . . . . . . . . . . . . . 24
. . . . . . . . . . . . . . . .29
Room monitoring . . . . . . . . . . . . . . . . . . . . . . 33
S
Safety precautions . . . . . . . . . . . . . . . . . . . . . . 8
Screensaver . . . . . . . . . . . . . . . . . . . . . . . . . . 42
quick dial keys . . . . . . . . . . . . . . . . . . . . . . 16
Searching in directory . . . . . . . . . . . . . . . . . . . 23
Sending
entire directory to handset
Setting the date . . . . . . . . . . . . . . . . . . . . . . . 12
Setting the time . . . . . . . . . . . . . . . . . . . . . . . 12
Show new messages . . . . . . . . . . . . . . . . . . . . 26
Signal strength . . . . . . . . . . . . . . . . . . . . . . . . 54
Signal tone, see Advisory tones
Snooze mode (alarm)
Sound
. . . . . . . . . . . . . . . . . . . . . . . . . . . . 37
delete
formats . . . . . . . . . . . . . . . . . . . . . . . . . . . 37
playback . . . . . . . . . . . . . . . . . . . . . . . . . . 37
rename . . . . . . . . . . . . . . . . . . . . . . . . . . . 37
Sound profiles . . . . . . . . . . . . . . . . . . . . . . . . 29
Sounds for ringtones. . . . . . . . . . . . . . . . . . . . 37
Speaker . . . . . . . . . . . . . . . . . . . . . . . . . . . . . 20
Star key . . . . . . . . . . . . . . . . . . . . . . . . . . . . . . 4
Status bar. . . . . . . . . . . . . . . . . . . . . . . . . . . . . 4
icons . . . . . . . . . . . . . . . . . . . . . . . . . . . . . 54
SUOTA . . . . . . . . . . . . . . . . . . . . . . . . . . . . . . 49
Symbols, see Icons . . . . . . . . . . . . . . . . . . . . . 54
T
Technical data . . . . . . . . . . . . . . . . . . . . . . . . 52
Telephone
. . . . . . . . . . . . . . . . . . . . . . . . . . . . . 10
angle
connecting . . . . . . . . . . . . . . . . . . . . . . . . 10
operating. . . . . . . . . . . . . . . . . . . . . . . . . . 14
set-up . . . . . . . . . . . . . . . . . . . . . . . . . . . . 10
Time control for external calls . . . . . . . . . . . . . 35
U
Update . . . . . . . . . . . . . . . . . . . . . . . . . . . . . 40
Upper/lower case . . . . . . . . . . . . . . . . . . . . . . 17
USB port . . . . . . . . . . . . . . . . . . . . . . . . . . . . . 4
V
Viewing network mailbox message . . . . . . . . . 26
VIP group, classify directory entry. . . . . . . . . . . 22
VIP ringtone . . . . . . . . . . . . . . . . . . . . . . . . . . 22
Volu me
earpiece
. . . . . . . . . . . . . . . . . . . . . . . . . . . 44
handset handsfree volume . . . . . . . . . . . . . 44
handset speaker/earpiece volume . . . . . . . . 20
speaker . . . . . . . . . . . . . . . . . . . . . . . . . . . 44
Volume key . . . . . . . . . . . . . . . . . . . . . . . . . . . 4
Volume keys . . . . . . . . . . . . . . . . . . . . . . . . . . 15
W
Warning tone, see Advisory tones
. . . . . . . . . . . . . 24
. . . . . . . . . . . . . . . . . . . 32
58
All rights reserved. Rights of modification reserved.
Page 59

Issued by
Gigaset Communications GmbH
Frankenstr. 2a, D-46395 Bocholt
© Gigaset Communications GmbH 2018
Subject to availability.
All rights reserved. Rights of modification reserved.
gigasetpro.com
 Loading...