


 Loading...
Maxwell 10
Administration
Contents
Contents
Overview . . . . . . . . . . . . . . . . . . . . . . . . . . . . . . . . . . . . . . . . . . . . . . . . . . . . . . . . . . . . . . . . . . . . . . . . . 4
Connectors . . . . . . . . . . . . . . . . . . . . . . . . . . . . . . . . . . . . . . . . . . . . . . . . . . . . . . . . . . . . . . . . . . . . . . . . . . . . . . . . . . . . 4 Front . . . . . . . . . . . . . . . . . . . . . . . . . . . . . . . . . . . . . . . . . . . . . . . . . . . . . . . . . . . . . . . . . . . . . . . . . . . . . . . . . . . . . . . . . . 4 SD card . . . . . . . . . . . . . . . . . . . . . . . . . . . . . . . . . . . . . . . . . . . . . . . . . . . . . . . . . . . . . . . . . . . . . . . . . . . . . . . . . . . . . . . . 5 Display key . . . . . . . . . . . . . . . . . . . . . . . . . . . . . . . . . . . . . . . . . . . . . . . . . . . . . . . . . . . . . . . . . . . . . . . . . . . . . . . . . . . . 6 Additional information about your phone . . . . . . . . . . . . . . . . . . . . . . . . . . . . . . . . . . . . . . . . . . . . . . . . . . . . . . 6
Using the phone in different scenarios . . . . . . . . . . . . . . . . . . . . . . . . . . . . . . . . . . . . . . . . . . . . . 7
First steps . . . . . . . . . . . . . . . . . . . . . . . . . . . . . . . . . . . . . . . . . . . . . . . . . . . . . . . . . . . . . . . . . . . . . . . . . 9
Setting the language . . . . . . . . . . . . . . . . . . . . . . . . . . . . . . . . . . . . . . . . . . . . . . . . . . . . . . . . . . . . . . . . . . . . . . . . . . . 9 Registering the handset (DECT) . . . . . . . . . . . . . . . . . . . . . . . . . . . . . . . . . . . . . . . . . . . . . . . . . . . . . . . . . . . . . . . . 9 Establishing a connection to the local network . . . . . . . . . . . . . . . . . . . . . . . . . . . . . . . . . . . . . . . . . . . . . . . . . . 9 Configuring Internet telephony . . . . . . . . . . . . . . . . . . . . . . . . . . . . . . . . . . . . . . . . . . . . . . . . . . . . . . . . . . . . . . . 11
Web configurator – configuring the phone on a PC . . . . . . . . . . . . . . . . . . . . . . . . . . . . . . . . . 12
Starting the Web configurator . . . . . . . . . . . . . . . . . . . . . . . . . . . . . . . . . . . . . . . . . . . . . . . . . . . . . . . . . . . . . . . . . 12 Understanding the Web configurator menu tree . . . . . . . . . . . . . . . . . . . . . . . . . . . . . . . . . . . . . . . . . . . . . . . 13
Network and connectors . . . . . . . . . . . . . . . . . . . . . . . . . . . . . . . . . . . . . . . . . . . . . . . . . . . . . . . . . 14
LAN settings . . . . . . . . . . . . . . . . . . . . . . . . . . . . . . . . . . . . . . . . . . . . . . . . . . . . . . . . . . . . . . . . . . . . . . . . . . . . . . . . . . 14 Phone Systems . . . . . . . . . . . . . . . . . . . . . . . . . . . . . . . . . . . . . . . . . . . . . . . . . . . . . . . . . . . . . . . . . . . . . . . . . . . . . . . 16 QoS settings (Quality of Service) . . . . . . . . . . . . . . . . . . . . . . . . . . . . . . . . . . . . . . . . . . . . . . . . . . . . . . . . . . . . . . . 17 VoIP settings . . . . . . . . . . . . . . . . . . . . . . . . . . . . . . . . . . . . . . . . . . . . . . . . . . . . . . . . . . . . . . . . . . . . . . . . . . . . . . . . . . 18 Security settings . . . . . . . . . . . . . . . . . . . . . . . . . . . . . . . . . . . . . . . . . . . . . . . . . . . . . . . . . . . . . . . . . . . . . . . . . . . . . . 19
Telephony . . . . . . . . . . . . . . . . . . . . . . . . . . . . . . . . . . . . . . . . . . . . . . . . . . . . . . . . . . . . . . . . . . . . . . . 20
Connections . . . . . . . . . . . . . . . . . . . . . . . . . . . . . . . . . . . . . . . . . . . . . . . . . . . . . . . . . . . . . . . . . . . . . . . . . . . . . . . . . . 20 Audio settings . . . . . . . . . . . . . . . . . . . . . . . . . . . . . . . . . . . . . . . . . . . . . . . . . . . . . . . . . . . . . . . . . . . . . . . . . . . . . . . . 23 Video settings . . . . . . . . . . . . . . . . . . . . . . . . . . . . . . . . . . . . . . . . . . . . . . . . . . . . . . . . . . . . . . . . . . . . . . . . . . . . . . . . 25 Call divert . . . . . . . . . . . . . . . . . . . . . . . . . . . . . . . . . . . . . . . . . . . . . . . . . . . . . . . . . . . . . . . . . . . . . . . . . . . . . . . . . . . . 25 Local settings . . . . . . . . . . . . . . . . . . . . . . . . . . . . . . . . . . . . . . . . . . . . . . . . . . . . . . . . . . . . . . . . . . . . . . . . . . . . . . . . . 26 Dialling plans . . . . . . . . . . . . . . . . . . . . . . . . . . . . . . . . . . . . . . . . . . . . . . . . . . . . . . . . . . . . . . . . . . . . . . . . . . . . . . . . . 27 Do Not Disturb (DND) . . . . . . . . . . . . . . . . . . . . . . . . . . . . . . . . . . . . . . . . . . . . . . . . . . . . . . . . . . . . . . . . . . . . . . . . . 28 Call records . . . . . . . . . . . . . . . . . . . . . . . . . . . . . . . . . . . . . . . . . . . . . . . . . . . . . . . . . . . . . . . . . . . . . . . . . . . . . . . . . . . 28 Voice mail services . . . . . . . . . . . . . . . . . . . . . . . . . . . . . . . . . . . . . . . . . . . . . . . . . . . . . . . . . . . . . . . . . . . . . . . . . . . . 28
Services . . . . . . . . . . . . . . . . . . . . . . . . . . . . . . . . . . . . . . . . . . . . . . . . . . . . . . . . . . . . . . . . . . . . . . . . . 29
Door interphone . . . . . . . . . . . . . . . . . . . . . . . . . . . . . . . . . . . . . . . . . . . . . . . . . . . . . . . . . . . . . . . . . . . . . . . . . . . . . . 29 Online directory . . . . . . . . . . . . . . . . . . . . . . . . . . . . . . . . . . . . . . . . . . . . . . . . . . . . . . . . . . . . . . . . . . . . . . . . . . . . . . 29 LDAP directory . . . . . . . . . . . . . . . . . . . . . . . . . . . . . . . . . . . . . . . . . . . . . . . . . . . . . . . . . . . . . . . . . . . . . . . . . . . . . . . . 30
Function keys . . . . . . . . . . . . . . . . . . . . . . . . . . . . . . . . . . . . . . . . . . . . . . . . . . . . . . . . . . . . . . . . . . . . 32
System settings . . . . . . . . . . . . . . . . . . . . . . . . . . . . . . . . . . . . . . . . . . . . . . . . . . . . . . . . . . . . . . . . . . 34
Date and time . . . . . . . . . . . . . . . . . . . . . . . . . . . . . . . . . . . . . . . . . . . . . . . . . . . . . . . . . . . . . . . . . . . . . . . . . . . . . . . . 34 Security . . . . . . . . . . . . . . . . . . . . . . . . . . . . . . . . . . . . . . . . . . . . . . . . . . . . . . . . . . . . . . . . . . . . . . . . . . . . . . . . . . . . . . 35 Rebooting the system and restoring factory settings . . . . . . . . . . . . . . . . . . . . . . . . . . . . . . . . . . . . . . . . . . . 35 Auto Provisioning . . . . . . . . . . . . . . . . . . . . . . . . . . . . . . . . . . . . . . . . . . . . . . . . . . . . . . . . . . . . . . . . . . . . . . . . . . . . . 35 Saving and restoring telephone data . . . . . . . . . . . . . . . . . . . . . . . . . . . . . . . . . . . . . . . . . . . . . . . . . . . . . . . . . . 36 Updating firmware . . . . . . . . . . . . . . . . . . . . . . . . . . . . . . . . . . . . . . . . . . . . . . . . . . . . . . . . . . . . . . . . . . . . . . . . . . . . 36 Screenshot . . . . . . . . . . . . . . . . . . . . . . . . . . . . . . . . . . . . . . . . . . . . . . . . . . . . . . . . . . . . . . . . . . . . . . . . . . . . . . . . . . . 37 System log . . . . . . . . . . . . . . . . . . . . . . . . . . . . . . . . . . . . . . . . . . . . . . . . . . . . . . . . . . . . . . . . . . . . . . . . . . . . . . . . . . . . 37
Checking the status of the phone . . . . . . . . . . . . . . . . . . . . . . . . . . . . . . . . . . . . . . . . . . . . . . . . . 38
Device . . . . . . . . . . . . . . . . . . . . . . . . . . . . . . . . . . . . . . . . . . . . . . . . . . . . . . . . . . . . . . . . . . . . . . . . . . . . . . . . . . . . . . . . 38 PCAP logging . . . . . . . . . . . . . . . . . . . . . . . . . . . . . . . . . . . . . . . . . . . . . . . . . . . . . . . . . . . . . . . . . . . . . . . . . . . . . . . . . 38
2
Contents
Service (Customer Care) . . . . . . . . . . . . . . . . . . . . . . . . . . . . . . . . . . . . . . . . . . . . . . . . . . . . . . . . . . 39
Questions and answers . . . . . . . . . . . . . . . . . . . . . . . . . . . . . . . . . . . . . . . . . . . . . . . . . . . . . . . . . . . . . . . . . . . . . . . |
39 |
Protecting our environment . . . . . . . . . . . . . . . . . . . . . . . . . . . . . . . . . . . . . . . . . . . . . . . . . . . . . . 39
Appendix . . . . . . . . . . . . . . . . . . . . . . . . . . . . . . . . . . . . . . . . . . . . . . . . . . . . . . . . . . . . . . . . . . . . . . . . 40
Care . . . . . . . . . . . . . . . . . . . . . . . . . . . . . . . . . . . . . . . . . . . . . . . . . . . . . . . . . . . . . . . . . . . . . . . . . . . . . . . . . . . . . . . . . . 40 Contact with liquid . . . . . . . . . . . . . . . . . . . . . . . . . . . . . . . . . . . . . . . . . . . . . . . . . . . . . . . . . . . . . . . . . . . . . . . . . . . . 40 Specifications . . . . . . . . . . . . . . . . . . . . . . . . . . . . . . . . . . . . . . . . . . . . . . . . . . . . . . . . . . . . . . . . . . . . . . . . . . . . . . . . . 40
Open Source Software . . . . . . . . . . . . . . . . . . . . . . . . . . . . . . . . . . . . . . . . . . . . . . . . . . . . . . . . . . . |
41 |
General . . . . . . . . . . . . . . . . . . . . . . . . . . . . . . . . . . . . . . . . . . . . . . . . . . . . . . . . . . . . . . . . . . . . . . . . . . . . . . . . . . . . . . . |
41 |
Information on license rights and copyright . . . . . . . . . . . . . . . . . . . . . . . . . . . . . . . . . . . . . . . . . . . . . . . . . . . |
41 |
Index . . . . . . . . . . . . . . . . . . . . . . . . . . . . . . . . . . . . . . . . . . . . . . . . . . . . . . . . . . . . . . . . . . . . . . . . . . . . 42
3
Overview
Overview
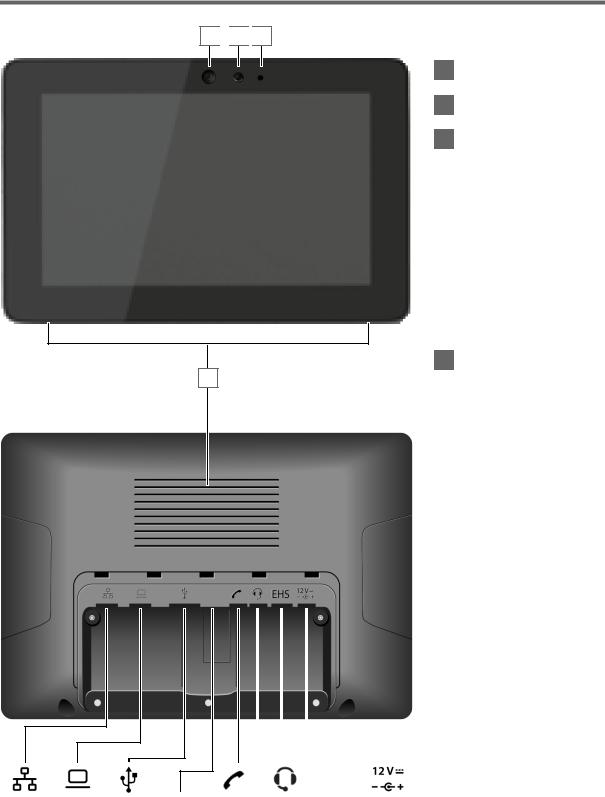
Front
1 
 2
2 
 3
3
1 Camera
2 Camera Status LED
3 Microphone
4 Loudspeaker
4
Connectors
|
|
5 |
LAN (PoE) |
||||
|
|
PC |
|||||
|
|
6 |
|||||
|
|
USB (headset, camera, |
|||||
|
|
7 |
|||||
|
|
|
|
|
|
|
mouse, keyboard) |
|
|
HDMI (projector, TV) |
|||||
|
|
8 |
|||||
|
|
Handset |
|||||
|
|
9 |
|||||
|
|
|
|
|
|
|
Headset |
|
|
|
|
||||
|
|
|
|
10 |
|||
|
|
|
|
EHS Headset |
|||
|
|
|
|
11 |
|||
|
|
|
|
Power Supply Unit |
|||
|
|
|
|
12 |
|||
|
|
|
|
|
|
|
|
|
|
|
|
|
|
|
|
|
|
|
|
|
|
|
|
EHS
5 |
|
6 |
|
7 |
|
8 |
|
9 |
|
10 |
|
11 |
|
12 |
|
|
|
|
|
|
|
|
|
|
|
|
|
|
|
4

Overview
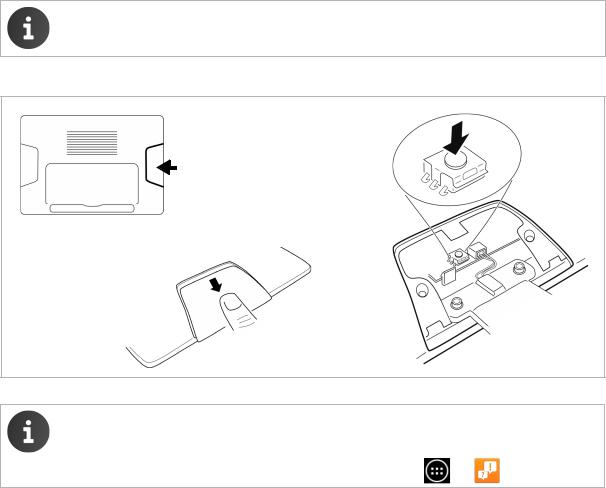
SD card
In order to extend the internal memory and store personal data, images, videos or music, you can insert a microSD card (not included) into your phone.
1 |
¤ Open the left cover on the |
back of the device 1. |
2 |
¤Insert fingernail into the slit on the card slot and pull card slot forwards 2.
¤Flip card slot upwards 3.
4 |
3 |
5 |
6 |
¤Insert card 4.
¤Flip card slot downward 5.
¤Push backwards until it clicks into place 6.
¤ Close cover 7.
7 |
5
Overview
Display key
You can use the display key to switch the display on or off, or to capture a screenshot of the display currently shown.
u If the screenshot feature is activated: A screenshot of the display currently shown is captured. u If the screenshot feature is not activated: The display is switched on/off.
The screenshot feature must be activated in the Web configurator (£ p. 37). The screenshots are stored in the  Gallery app.
The display key is located behind the right cover on the back of the device.
¤ Press the
display key.
¤Open the right cover on the back of the device.
Additional information about your phone
Using the phone: |
Video films on your device |
¢ |
|
|
¤ On the start screen: ¢ |
Helper |
6
Using the phone in different scenarios
Using the phone in different scenarios
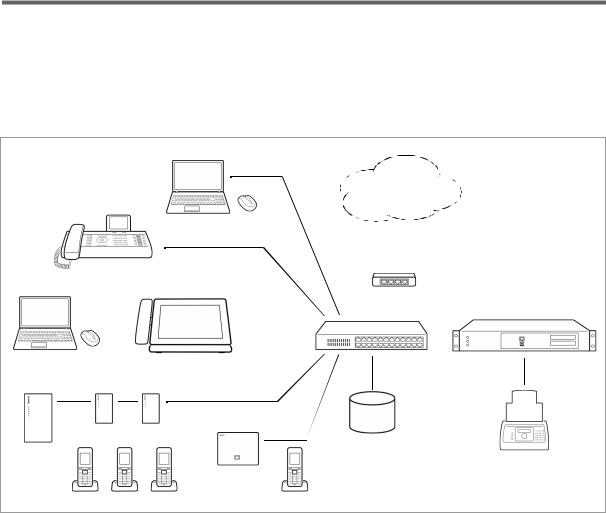
Using your phone in a professional environment with phone system and server structure
If you use your Maxwell 10 in a corporate network with a telephone infrastructure, your phone incorporates functions and data from the phone system and servers.
In a corporate environment, the VoIP accounts and most of the settings are configured centrally by the phone system.
|
|
|
|
Internet |
|
|
ISDN,S2M |
||
|
|
|
|
|
|
|
|
||
1 |
|
7 |
|
|
|
|
|
||
|
|
|
|
|
|
||||
|
|
|
|
|
|
||||
|
|
|
|
|
|
|
|||
2 |
5 |
|
6 |
|
|||||
|
|
||||||||
|
|
||||||||
|
|
|
|
|
|||||
|
|
|
|
|
|
|
|
||
|
|
|
|
|
|
|
|
||
|
|
|
|
|
|
|
|
|
|
) |
|
) |
) |
|
) |
|
) |
|
))) |
))) |
))) |
3
)))
4
FAX
8
§§1§§ Gigaset IP telephone
§§2§§ Gigaset IP telephone with integrated gigabit switch (Maxwell 10).
Your PC is connected directly to the phone, providing you with an additional LAN connection in your network.
§§3§§ DECT Multicell System for connetion to up to 100 DECT handsets. §§4§§ DECT base for connection to DECT handsets.
§§5§§ Ethernet switch
Supports Quality of Service (QoS), Gigabit Ethernet and PoE (Power over Ethernet). §§6§§ Phone system (e.g., Gigaset T500 PRO)
Forms Internet telephony, ISDN or S2M connections. Analogue devices can be connected. A network connection is established using Ethernet.
§§7§§ Gateway to the Internet for all connected devices. Routes VoIP calls from the phone system to the Internet.
§§8§§ File, e-mail and workgroup servers, or NAS systems, can be wirelessly integrated into the phone system architecture. As a result:
–Invitations to conference calls can be organised via the phone system
–The phone system can be backed up to a server or the system can be started via the network
–Online directories (LDAP) can be managed centrally
7
Using the phone in different scenarios
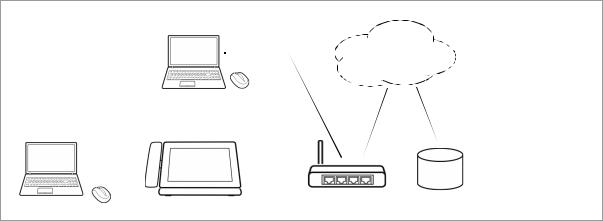
Using your phone in a simplified environment without a phone system
You can also use your Maxwell 10 without a phone system.
Internet
|
) |
|
|
|
|
|
1 |
3 |
|
|
ISDN,S2M |
||
|
|
|
|
|
|
|
|
|
|
|
|
|
|
|
|
|
|
|
|
|
§§1§§ Gigaset IP telephone with integrated gigabit switch (Maxwell 10).
Your PC is connected directly to the phone, providing you with an additional LAN connection in your network.
§§2§§ Gateway to the Internet for the connected devices. Routes VoIP calls from the phone to the Internet. You establish the connection to the gateway via cable or wirelessly via WI-Fi.
§§3§§ The SIP provider transfers calls from the Internet and establishes a connection with the standard telephone network.
In this scenario, you must manually configure the VoIP accounts for your phone. You can create up to 12 VoIP accounts on your phone.
8
First steps
First steps
For information on unpacking and installing the device please refer to the Maxwell 10 Installation Guide.
Your device will start automatically as soon as it is connected to the mains power supply.
Please be aware that if the device is powered by PoE (Power over Ethernet) it is supplied with power as soon as it is connected to an Ethernet switch with PoE-functionality.
Setting the language
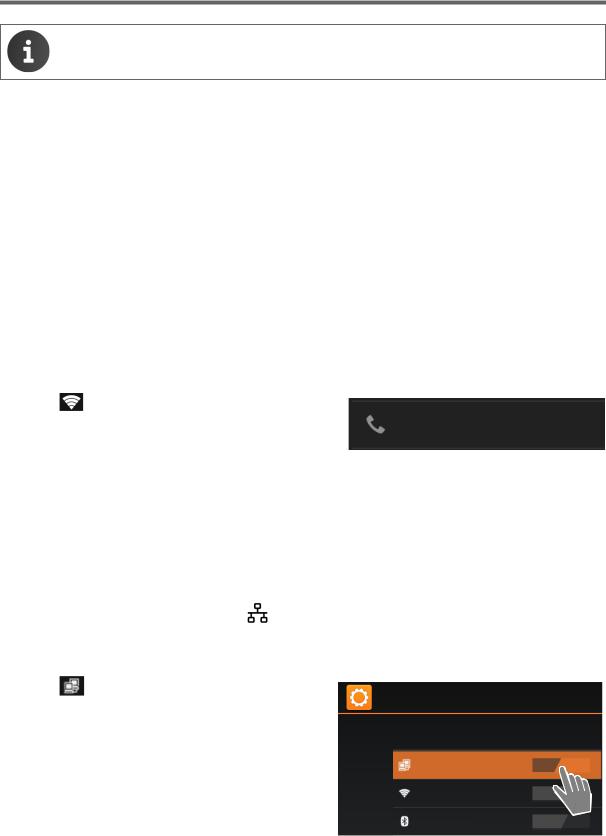
¤On the Start screen tap on  to open the list of available apps.
  Select
  Settings.
¤Scroll down and select  Language & input
  Tap on Language
  Select your desired language.
Registering the handset (DECT)
If you use a DECT handset you need to register it on the phone.
¤Install the handset as described in the Installation Guide and place it in the cradle in order to charge the battery.
¤On the Start screen tap on  to open the list of available apps.
  Select
  Settings.
¤Select DECT  Tap on Register DECT Handset.
The registration process may take some time. If the reg-
Register DECT Handset
Touch here to register Dect Handset
istration is successful a message is output.
Establishing a connection to the local network
Your phone must be connected to the local network before it can connect to a phone system or the Internet and before you can operate it from a PC. You can connect the phone to the local network via Ethernet or Wi-Fi.
Connecting via Ethernet
¤ Make sure that the phone’s LAN port |
is connected to an Ethernet switch/router by an |
Ethernet cable. |
|
¤On the Start screen tap on  to open the list of available apps.
  Select
  Settings.
¤Select Ethernet  Drag switch by Ethernet to
the right to switch on Ethernet function. |
Settings |
|
|
|
|
||
The network connection is established if the phone |
|
|
|
has automatically been assigned an IP address from a |
WIRELESS & NETWORKS |
|
|
DHCP server in the network. |
Ethernet |
ON |
|
If your device is assigned a static IP address, your net- |
|||
Wi-Fi |
OFF |
||
work administrator must tell you the IP address of |
|||
|
|||
your device. You then assign this address to your |
Bluetooth |
OFF |
|
phone manually. |
|||
|
|
9
First steps
Ethernet configuration
¤ Tap on Ethernet configuration.
If the network connection is established, the configuration information, e.g. the IP address, is displayed.
If the network connection has not been established automatically, you can enter the configuration data manually.
Proxy configuration
When a connection to internal or external network resources is made via a proxy server, you must enter the proxy server data. Proxy settings are used by the browser but may not be used by other apps.
¤Tap on Proxy Configuration.  Enter the data of your proxy server.
Connecting via Wi-Fi
Configure Ethernet device
Network Type
IPV4
IPV6
Connection Type
DHCP
Static IP
IP address
Netmask
DNS address
Gateway address
Save Cancel
¤On the Start screen tap on  to open the list of available apps.
  Select
  Settings.
¤Select Wi-Fi  Drag switch by Wi-Fi to the
right to switch on Wi-Fi function. |
Settings |
|
|
|
|
||
The phone attempts to connect with a Wi-Fi in range. |
|
|
|
Once a connection has been established, you will see |
WIRELESS & NETWORKS |
|
|
the Wi-Fi icon in the toolbar. It displays the signal |
Ethernet |
ON |
|
strength. |
|||
|
|
A list of Wi-Fis in range of your phone is displayed. An icon indicates the signal strength. Secure networks are identified with a lock icon.
¤If necessary, tap on  context menu
  Scan to update the list.
¤Tap on the desired Wi-Fi.  Enter password/network key.
¤Tap on Connect.
Wi-Fi
Bluetooth OFF
WiFi 100
Signal strength |
Fair |
Security |
|
Password |
|
|
Show password |
Show advanced options |
|
Cancel |
Connect |
Adding another Wi-Fi
Wi-Fis that are not in range or that withhold the SSID and are therefore not displayed in the list can be entered manually. You will require the network name (SSID), the security protocol used and the network key. Once the tablet is in range of one of these Wi-Fis, the connection is established.
¤Select  Wi-Fi
Wi-Fi  Tap on
 Enter Network SSID.
¤Select security protocol (None, WEP, WPA/WPA2 PSK, 802.1x EAP).
¤Enter password/network key.  Save.
Save.
10
First steps
Configuring Internet telephony
Before you can use the device to phone anyone you need the services of a VoIP provider.
Prerequisite:
u You have a phone system in your network that provides VoIP accounts for your device, or u You have registered with a VoIP provider (e.g., via your PC) and set up a VoIP account.
The device searches the network for a provisioning file and checks whether VoIP accounts already exist. If the telephone has existing VoIP accounts, these accounts are configured automatically. You can now make calls with your phone via the Internet.
If the telephone has no existing VoIP accounts, you must configure them manually. The Web configurator will help you with this (£ p. 20).
11
Web configurator – configuring the phone on a PC
Web configurator – configuring the phone on a PC
The Web configurator provides you with a user interface that you can use to configure your Maxwell 10 on the PC.
Prerequisites:
u Your phone is connected to the local network. u The Web server is enabled.
Enabling the web server
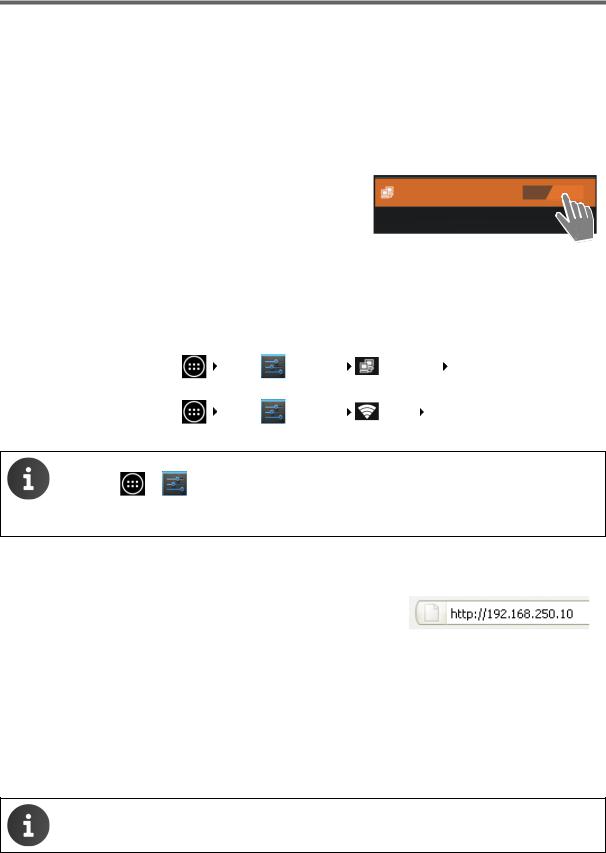
¤On the Start screen tap on  to open the list of available apps.
  Select
  Settings.
¤Select WebUI  Drag switch by WebUI to the right to
switch on the Web server function. |
WebUI |
ON |
|
|
Starting the Web configurator
To start the Web configurator you will need the IP address for your phone. You will find this via the phone display, in the Ethernet or WLAN settings for the device:
If connected via Ethernet: |
|
|
|
|
¤ |
On the Start screen tap on |
Select |
Settings |
Ethernet Ethernet configuration. |
If connected via Wi-Fi: |
|
|
|
|
¤ |
On the Start screen tap on |
Select |
Settings |
Wi-Fi Tap on the network your |
phone is connected to.
uThe IP addresses are also displayed on the status page:
¤  Settings
 About tablet
  Status.
uThe IP address can sometimes change, depending on the settings of the DHCP server in your network.
Accessing the Web configurator:
¤Launch the Internet browser on your PC.
¤Enter the IP address in the browser's address field. Example:
The login screen appears.
¤Select the appropriate language from the drop-down list.
¤Enter the password. Default: admin
¤Click on Login.
The Web configurator will now start.
¤ Select the function that you wish to use.
u Use the Settings tab to set or change individual functions on your phone.
u Open the Status tab to obtain information about the status of your phone ( p. 38).
For your security, you should change the default passwords ( p. 35).
12

Web configurator – configuring the phone on a PC
Understanding the Web configurator menu tree
|
Settings |
|
Network and Connections |
|
Local Area Network (LAN) |
|
p. 14 |
|
|
|
|
|
|
|
p. 16 |
|
|
|
|
|
Phone Systems |
|
|
|
|
|
|
|
|
|
p. 17 |
|
|
|
|
|
Quality of Service (QoS) |
|
|
|
|
|
|
|
|
|
p. 18 |
|
|
|
|
|
VoIP |
|
|
|
|
|
|
|
|
|
p. 19 |
|
|
|
|
|
Security Settings |
|
|
|
|
|
|
|
|
|
p. 20 |
|
|
|
Telephony |
|
Connections |
|
|
|
|
|
|
|
|
|
p. 23 |
|
|
|
|
|
Audio |
|
|
|
|
|
|
|
|
|
p. 25 |
|
|
|
|
|
Video |
|
|
|
|
|
|
|
|
|
p. 25 |
|
|
|
|
|
Call Divert |
|
|
|
|
|
|
|
|
|
p. 26 |
|
|
|
|
|
Local Settings |
|
|
|
|
|
|
|
|
|
p. 27 |
|
|
|
|
|
Dialling Plans |
|
|
|
|
|
|
|
|
|
p. 28 |
|
|
|
|
|
Do Not Disturb |
|
|
|
|
|
|
|
|
|
p. 28 |
|
|
|
|
|
Call Live Recording |
|
|
|
|
|
|
|
|
|
p. 28 |
|
|
|
|
|
Voicemail Services |
|
|
|
|
|
|
|
|
|
p. 29 |
|
|
|
Services |
|
Door Interphone |
|
|
|
|
|
|
|
|
|
p. 29 |
|
|
|
|
|
Online Directories |
|
|
|
|
|
|
|
|
|
p. 30 |
|
|
|
|
|
LDAP |
|
|
|
|
|
|
|
|
|
p. 32 |
|
|
|
Function Keys |
|
Keys |
|
|
|
|
|
|
|
|
|
p. 34 |
|
|
|
System |
|
Date and Time |
|
|
|
|
|
|
|
|
|
p. 35 |
|
|
|
|
|
Security |
|
|
|
|
|
|
|
|
|
p. 35 |
|
|
|
|
|
Reboot and Reset |
|
|
|
|
|
|
|
|
|
p. 35 |
|
|
|
|
|
Auto Provisioning |
|
|
|
|
|
|
|
|
|
p. 36 |
|
|
|
|
|
Save and Restore |
|
|
|
|
|
|
|
|
|
p. 36 |
|
|
|
|
|
Firmware Update |
|
|
|
|
|
|
|
|
|
p. 37 |
|
|
|
|
|
Screenshot |
|
|
|
|
|
|
|
|
|
p. 37 |
|
|
|
|
|
System Log |
|
|
|
|
|
|
|
p. 38 |
|
|
|
Status |
|
Device |
|
|
|
|
|
|
|
|
|
p. 38 |
|
|
|
|
|
PCAP Logging |
|
|
|
|
|
|
|
|
|
|
|
|
13
Network and connectors
Network and connectors
All of the settings for connecting your phone to the local network must be correct to enable communication with other devices in the network and phone calls via the Internet.
If you use the Web configurator, your phone is already connected to the local network. You can use the Network and Connections menu to change and extend these settings. You can also create settings for phone connections:
u LAN settings (£ p. 14) u Phone Systems (£ p. 16)
u QoS settings (Quality of Service) (£ p. 17) u VoIP settings (£ p. 18)
u Security settings (£ p. 19)
LAN settings
If an error occurs when you are changing the LAN settings, the PC connection to the phone may be cancelled and you will no longer have access to the Web configurator.
If this happens, you must re-establish phone access to the local network via the display ( p. 9).
Settings  Network and Connections
  Local Area Network (LAN)
VLAN tagging
A local network can be divided into logical subnetworks known as VLANs (VLAN = Virtual Local Area Network, Standard IEEE 802.1Q). Multiple VLANs share a physical network and its components, e.g., switches. Data packets from a VLAN are not forwarded to another VLAN. VLANs are often used to separate the data traffic of different services (Internet telephony, Internet TV etc.) and to define different priorities for the data traffic.
You can operate your phone and a PC connected to the PC port on your phone in two different VLANs. In this case, you enter the VLAN identifiers (VLAN tags) for your VLAN. Your network operator will supply you with this data.
If you operate the PC in a different VLAN from the phone, you will no longer have direct access to the Web configurator of the phone from the PC.
14
Loading...