Gigabyte GV-AR64DG, GV-AG32S Manual
AG32S
RAGETM 128 Pro Graphics Accelerator
USER'S MANUAL
your Upgrade
Life
REV. 1.22 12MD-AG32S-122

AG32S Graphics Accelerator
Chapter 1 User’s Manual
Copyright
Copyright by GIGA-BYTE TECHNOLOGY CO., LTD. (“GBT”) No part of this manual may be reproduced or transmitted in any from without the expressed, written permission of GBT.
Trademarks
Third-party brands and names are the property of their respective owners.
Notice
Due to rapid change in technology, some of the specifications might be out of date before publication of this booklet.
The author assumes no responsibility for any errors or omissions which may appear in this document nor does it make a commitment to update the information contained herein.
Please do not remove any labels on VGA card , this may void the warranty of this VGA card.
This product incorporates copyright protection technology that is protected by method claims of certain U.S. patents and other intellectual property rights owned by Macrovision Corporation and other rights owners. Use of this copyright protection technology must be authorized by Macrovision Corporation, and is intended for home and other limited viewing uses only unless otherwise authorized by Macrovision Corporation. Reverse engineering or disassembly is prohibited.
March 17, 2003 Taipei, Taiwan
2

Table of Content
Table of Contents
1.INTRODUCTION |
|
1.1. PREFACE ................................................................................... |
4 |
1.2.Overview ..................................................................................... |
4 |
2.HARDWARE INSTALLATION |
|
2.1. UNPACKING ............................................................................... |
5 |
2.2. BOARD LAYOUT ........................................................................ |
6 |
2.3. HARDWARE INSTALLATION ...................................................... |
7 |
3.SOFTWARE INSTALLATION |
|
3.1Win98/98/SE or WinME / WinXP Driver And Utilities Installation ..... |
9 |
3.1.1 Operating system requirement ................................................ |
9 |
3.1.2 DirectX installation ................................................................ |
10 |
3.1.3 Driver installation .................................................................. |
12 |
3.1.4 Utilities on driver CD ............................................................. |
15 |
3.1.5 Taskbar Icon ......................................................................... |
15 |
3.1.6 Property pages ..................................................................... |
18 |
3.2.WINDOWS NT 4.0 DRIVER INSTALLATION ............................. |
22 |
3.3.WINDOWS 2000 DRIVER INSTALLATION ................................. |
23 |
3.4 BIOS FLASH UTILITY ................................................................ |
23 |
4.Troubleshooting Tips ................................................................................. |
24 |
5.Appendix |
|
5.1.How to refash the BIOS .............................................................. |
25 |
5.2.Resolutions and Color Depth Table ............................................. |
27 |
3

AG32S Graphics Accelerator
1.INTRODUCTION
1.1. PREFACE
At the center of the AG series performance is a unique 128-bit, SuperScalar Rendering architecture designed to operate at dramatically elevated memory and engine speeds. Single-Pass Multi Texturing (SMT) enables advanced 3D effects like texturing, lighting and shading at full performance. Additional gains are obtained with ATI's unique TwinCache Architecture (TCA) which incorporates texture and pixel cache to increase the effective memory bandwidth for extra performance..
1.2. KEY FEATURES
n Features 32MB of memory and ATI RAGE 128 PRO™ graphics technology
nFull 3D acceleration in all modes and color depths in resolutions up to 1920x1200 @ 32bpp
nDirectX®, Direct3D, DirectDraw
nTriangle Setup Engine
nTexture Cache
nBilinear/Trilinear Filtering
nLine & Edge Anti-Aliasing
nZ-buffering and Double-buffering
4

Hardware Installation
2.HARDWARE INSTALLATION
WARNING!
Expansion cards contain very delicate Integrated Circuit (IC) chips. To protect them against damage from static electricity, you should follow some precautions whenever you work on your computer.
1.Turn off your computer and unplug power supply.
2.Use a grounded wrist strap before handling computer components. If you do not have one, touch both of your hands to a safely grounded object or to a metal object, such as the power supply case.
3.Place components on a grounded antistatic pad or on the bag that came with the components whenever the components are separated from the system.
The card contains sensitive electric components, which can be easily damaged by static electricity, so the card should be left in its original packing until it is installed.
Unpacking and installation should be done on a grounded anti-static mat. The operator should be wearing an anti-static wristband, grounded at the same point as the anti-static mat.
Inspect the card carton for obvious damage. Shipping and handling may cause damage to your card. Be sure there are no shipping and handling damages on the card before proceeding.
MDO NOT APPLY POWER TO YOUR SYSTEM IF IT HAS BEEN DAMAGED ON THE
CARD.
MIn order to ensure your graphics card working correctly, please use official Gigabyte
BIOS only Use none official gigabyte BIOS might cause problem on the graphics card.
2.1. UNPACKING
The AG32S package contains the following:
•The AG32S graphics accelerator
•This USER'S MANUAL
•DVD Player software included
•Lite version 3D Game x2 (CD x 1)
•CD for driver & Utilities
5

AG32S Graphics Accelerator
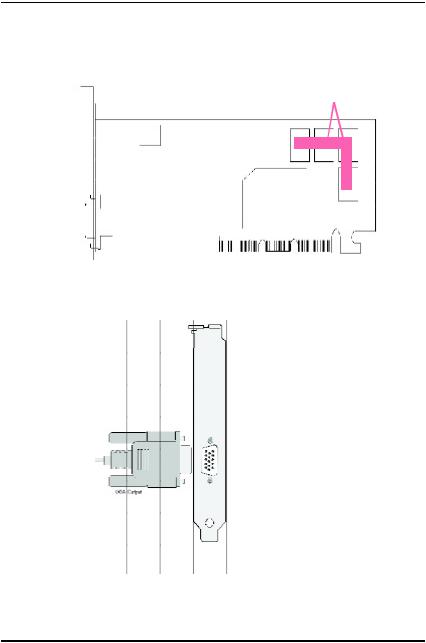
2.2. BOARD LAYOUT
AG32S (4Mx16 32MB SDRAM)
4Mx16 Frame Buffer SDRAM
BIOS
ImpacTV2
(Optional)
VGA Monitor
Connector (15pin)
ATi
RAGE 128 Pro
|
VGA Monitor |
VGA Output |
C onnector |
|
(15pin) |
6

Hardware Installation
2.3. HARDWARE INSTALLATION
Installing Your Graphics card..
Now that you have prepared your computer, you are ready to install your graphics accelerator card.
To install your graphics accelerator card
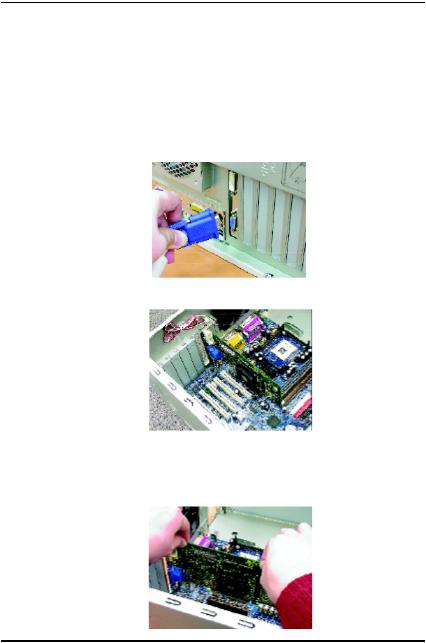
1.Power off the computer and monitor , then disconnect the display cable from the backof your computer.
2.Remove the computer cover. If necessary, consult your computer's manual for help in removing the cover.
3.Remove any existing graphics card from your computer.
Or, if your computer has any on-board graphics capability, you may need to disable it on the motherboard. For more information, see your computer documentation.
7

AG32S Graphics Accelerator
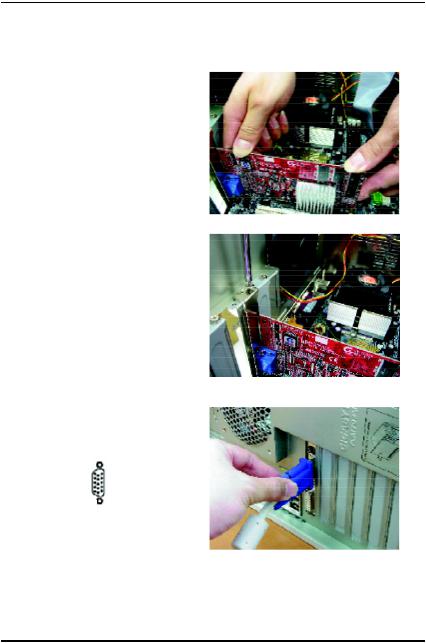
4.Locate the AGP slot. If necessary, remove the metal cover from this slot; then align your Graphics card with the AGP slot, and press it in firmly until the card is fully eated.
AG 32S Graphics card
AGP Slot
5. Replace the screw to fasten the card in place, and replace the computer cover.
AG 32S Graphics card
6. Plug the display cable into your card; then turn on the computer and monitor.
To VGA MON IT OR
You are now ready to proceed with the installation of the Graphics card driver. For detailed instructions, select your operating system from the list below:
8

Software Installation
3.SOFTWARE INSTALLATION
In this manual, we assume that your CD-ROM Drive letter to be Drive D:
3.1. WINDOWS® 98 /98SE or WINDOWS ME /WINDOWS XP DRIVER AND UTILITIES INSTALLATION
The installation of Win 98/98SE / Win ME / Win XP drivers is very simple.
When you insert the driver CD into your CD-ROM drive, you can see the AUTORUN window (if it does not show up, run "D:\setup.exe"). Then you can follow guides to setup your AG32S driver (Please follow the subsection 3.1.3 "Step By Step Installation" to install the driver for your graphics accelerator.
3.1.1.Operating systemrequirement
•If your OS is Microsoft Windows, when loading the AG32S drivers for the system, please make sure your system ( Windows 98/98SE or Windows ME)has installed DirectX8.1 or later.
•If you install the AG32S drivers for the mainboard, which
consist of SIS, ALI or VIA chipsets, please install the appropriate Driver programfor that mainboard. Or please contact your motherboard nearest dealer for M/B Diver.
9
 Loading...