


1 |
Using AORUS Notebook for the First Time |
|
English
2 |
330W 230W
1
2 |
330W |
3 |
|
|
|
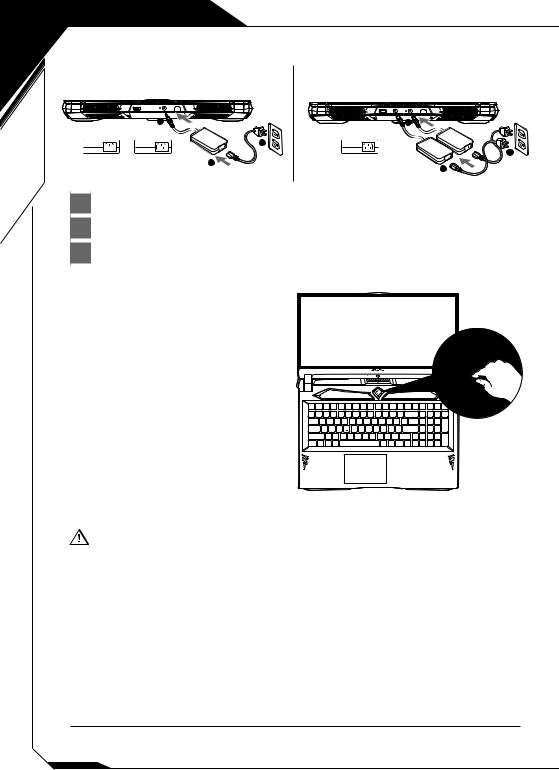
1 |
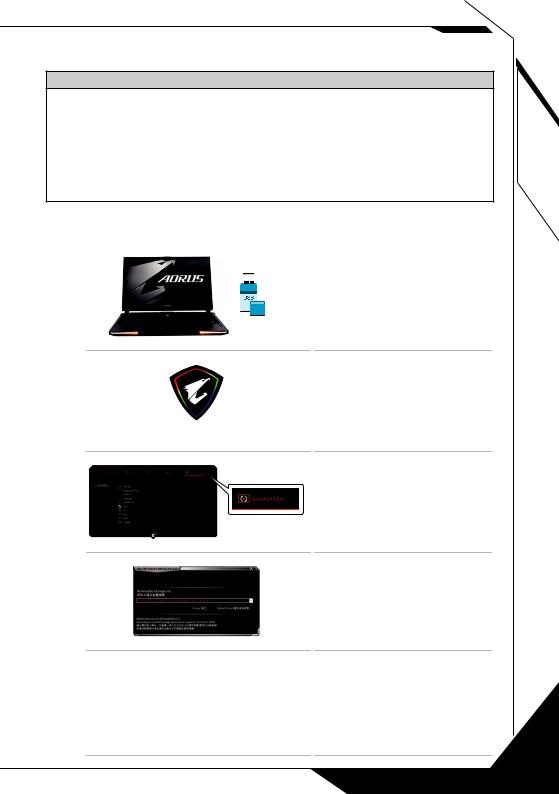
1ConnectthepowercordtotheACadapter.
ConnecttheadaptertothePower(DC)InputPortonthebacksideofthe
2notebook.
3Connectthepowercordtothepoweroutlet.
SwitchingonthePower:
After you turn on the notebook for the very first time, do not turn it off until the operating system has been configured. Please notethatthevolume for the audio will not function until Windows® Setup has completed.
IMPORTANT
thatyourNotebookPCisconnectedtoagroundedpoweradapterbeforeturningitonforthefirsttime.
● WhenusingyourNotebookPConpoweradaptermode,thesocketoutletmustbeneartotheunitandeasilyaccessible.
● Locatetheinput/outputratinglabelonyourNotebookPCandensurethatitmatchestheinput/outputratinginformationon yourpoweradapter.SomeNotebookPCmodelsmayhavemultipleratingoutputcurrentsbasedontheavailableSKU.
● Poweradapterinformation: -Inputvoltage:100-240Vac -Inputfrequency:50-60Hz
-Ratingoutputvoltage:19.5V,16.9A or19.5V,11.8A
Full User Manual
For more user guide and software instruction, please refer to the below link: https://www.gigabyte.com/Support
*Product specificationsandproductappearancemaydifferfrom country tocountry.
Werecommendthatyoucheckwith yourlocaldealersfor the specificationsandappearanceoftheproductsavailable inyourcountry.
*Althoughweendeavortopresentthe mostaccurateandcomprehensiveinformationatthe timeofpublication, wereservetherighttomakechangeswithout priornotice.

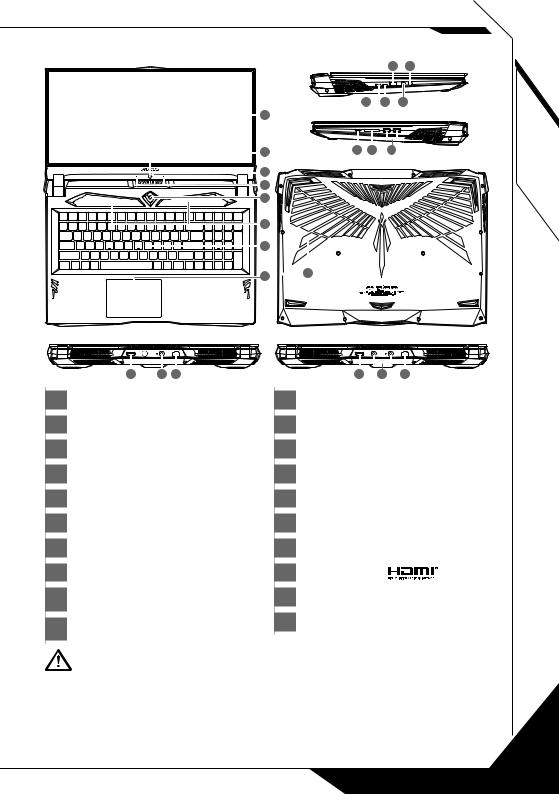
AORUS Notebook Tour
|
|
|
11 |
13 |
|
|
9 |
10 |
12 |
1 |
|
|
|
|
2 |
14 |
15 |
16 |
|
3 |
|
|
|
|
4
5
6
7
8
 17
17
English
18 |
19 |
20 |
18 |
19 |
20 |
1 |
Display Panel |
11 |
USB 3.1 Port ( USB type-A , Gen1 ) |
|
||
2 |
Webcam |
12 |
Microphone Input Jack Port |
|
||
3 |
Webcam Indicator |
13 |
Headphone Output Jack Port |
|
||
4 |
Microphone |
14 |
USB 3.1 Port ( USB type-C , Gen1 ) |
|
||
5 |
Power Button |
15 |
SD Card reader ( UHS-II ) |
|
||
6 |
Speaker |
16 |
USB 3.1 Port ( USB type-A , Gen1 ) |
|
||
7 |
Keyboard |
17 |
Subwoofer |
|
|
|
8 |
TouchPad |
18 |
HDMI 2.0 Port |
|
||
9 |
Display 1.4 & USB 3.1 Port |
19 |
Power |
( DC ) |
Input Port |
|
|
( USB type-C ) |
|
|
|
||
10 |
Thunderbolt 3 Port ( USB type-C ) |
20 |
Ethernet ( LAN) Port |
|
||
|
IMPORTANT: |
|
|
|
|
|
● Donotremovethebuilt-inlithiumbattery.Foranyserviceneeds,pleasecontactyourlocalGIGABYTEAuthorizedServiceCenter. |
|
|||||
● DonotinstalltheNotebookPConaslantoraplacepronetovibrations,oravoidusingtheNotebookPCinthatlocationfor |
|
|||||
alongtime.Thisincreasestheriskthatamalfunctionordamagetotheproductwilloccur. |
|
|
||||
● DonotstoreanduseNotebookPCindirectsunlightorthelocationwheretemperaturesexceed112°F(45°C)such |
|
|||||
asinsideavehicle.ThereisadangerofLithium-ionbatteryexpansionandaging. |
|
|
|
|||
● Do not use the Notebook PC in a badly ventilated location such as on bedding, on a pillow or cushion, etc, and do not use it in |
|
|||||
a location such as room with floor heating as it may cause the computer to overheat.Take care that the Notebook PC vents (on |
|
|||||
the side or the bottom) are not blocked especially in these environments. If the vents are blocked, it may be dangerous and |
2 |
|||||
causetheNotebookPCtooverheat. |
|
|
|
|
||

3 English
Hotkeys
The computer employs hotkeys or key combinations to access most of the computer’s controls like screen brightness and volume output. To activate hotkeys, press and hold the <Fn> key before pressing the other key in the hotkey combination.
Hotkey |
Function |
Description |
Fn+ESC |
FanSpeedToggle |
Switch between different fan speed |
modes. |
||
Fn+F1 |
Sleep |
Put the computer in Sleep mode. |
Fn+F2 |
Wireless LAN |
Enables / disable the Wireless LAN |
function. |
||
Fn+F3 |
Brightness Down |
Decrease the screen brightness. |
Fn+F4 |
Brightness Up |
Increase the screen brightness. |
Fn+F5 |
Display Toggle |
Switche display output between the |
display screen, external monitor |
||
|
|
(if connected) and both. |
Fn+F6 |
Screen Display |
Turn the screen display on and off. |
Toggle |
||
Fn+F7 |
Speaker Toggle |
Turn the speaker on and off. |
Fn+F8 |
Volume Down |
Decrease the sound volume. |
Fn+F9 |
Volume Up |
Increase the sound volume. |
Fn+F10 |
Touchpad Toggle |
Turn the internal touchpad on and off. |
Fn+F11 |
Airplane Mode |
Enable/disable the Airplane Mode |
function. |
||
Fn+Space |
Keyboard |
Turnthekeyboardbacklightonandoff. |
Backlight Toggle |
||
Fn+Windows |
Windows Update |
Turn the Windows Update on and off. |
Toggle |
System Backup Guide
 WARNING
yy You can backup original recovery image through this application in case of losing by device damage.
yy You can backup original recovery image to USB Flash Drive and restore the system if any storage system replacement with the recovery USB Flash Drive.
yy Before you restore the system through the recovery USB Flash Drive, please make sure that you have already made the backup of your data.
yy Please DO NOT shut down or un-plug the system when performing backup through recovery USB Flash Drive.
|
|
|
|
• Pleaseplug in theUSBFlashDrive |
1 |
|
|
|
|
|
|
|
which is at least 32GB in capacity |
|
|
|
|
|
to make the original image |
|
|
|
>32G |
(backup the data in USB first. All |
|
|
|
||
|
|
|
data will be eliminated during the |
|
|
|
|
|
creation of recovery USB Flash |
|
|
|
|
Drive) |
|
|
|
|
|
2 |
|
|
|
• Open the "ControlCenter"(If it’s |
|
|
|
|
|
|
|
|
|
not installed, please download |
|
ControlCenter |
from http://www.gigabyte.com) |
||
|
|
|||
|
|
|
|
|
3 |
|
|
|
|
|
|
|
|
• Select "Smart Utilities"-- |
|
|
|
|
>"System Backup" |
|
|
|
|
|
4 |
|
|
|
• Select your USB Flash Drive from |
|
|
|
|
|
|
|
|
|
the drop-down list and start to |
|
|
|
|
create the recovery USB disk. |
|
|
|||
5 |
yyThe window will pop out when the creation of recovery disk is done. |
|||
|
yyPlease press F12 on starting the system when you need to restore the system. |
|||
|
Select " boot from recovery USB Flash Drive " and the system will be restored. |
|||
yyThe time needed for restore will be around 30 mins (time needed may vary by USB disk model).
English
4
5 English
Recovery Guide
System Recovery (Restore your laptop operating system)
When something is going wrong with the laptop operating system, the storage of the laptop has a hidden partition containing a full back up image of the operating system that can be used to restore the system to factory default settings.
Note
yyIfthestoragehasbeen switchedor thepartitiondeleted, therecoveryoptionwillnolonger be y availableanda recovery service willbe needed.
y Therecoveryfunctionis onlyavailable ondeviceswithO/S preinstalled.DeviceswithDOS do
nothavetherecovery function.
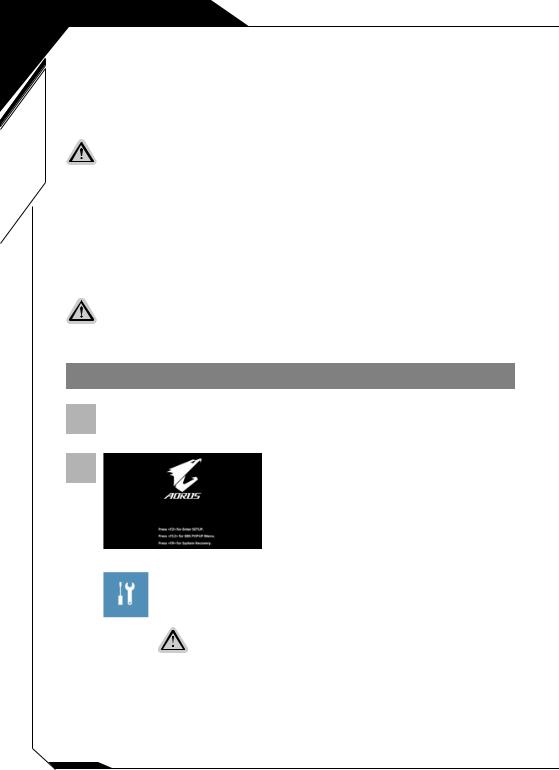
Launch System Recovery
The system recovery feature is preinstalled before the laptop is shipped from the factory. The option menu allows you to launch the Windows recovery tool to reinstall the operating system to factory default.
The brief introduction below will show you how to start the recovery tool and restore your system.All ready to go
Make sure your PC is plugged in. This will take a few minutes.
Windows 10 Recovery Guide
1 Turn off and restart the laptop.
2
During the laptop turn on process, press and hold F9 key to launch the tool.
|
Choose “Troubleshoot”to enter the recovery settings. |
||
3 |
|||
(Also you can choose “Continue” to exit recovery system and continue to Windows 10 for |
|||
|
files or data backup.) |
||
|
|||
|
There˙ |
are two options for system recovery |
|
|
˙ Reset this PC |
||
|
You can choose to keep or remove your files and then reinstalls Windows without |
||
losing your files.
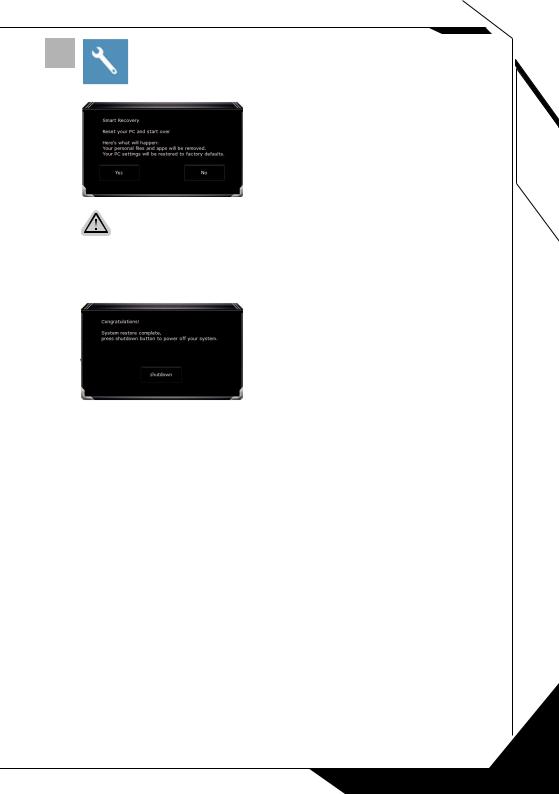
˙˙ AORUS Smart Recovery
Your PC settings will be restored to factory default settings.
Caution: All personal data and files will be lost.

4 |
AORUS Smart Recovery |
|
The recovery will be activated and you will see the option buttons on the window.
Click on "Yes" to start it.
Caution
˙˙ Once the "Recovery" is selected, your personal data and files will be deleted after the laptop starts restoring, and the operating system will be reset to factory default settings.
˙˙ A progress indicator bar will show on the window when the recovery process is running. Please make sure the AC-adapter is plugged in and do not turn off the laptop.
After the system recovery is completed, you will see the option button on the window, please click on "Shutdown".
English
6

7 English
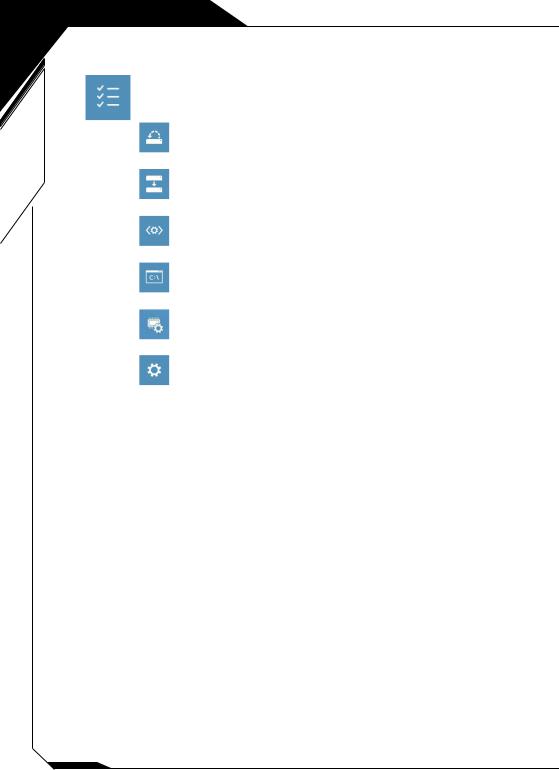
Advanced options
System Restore
Use a restore point recorded on your PC to restore Windows.
System Image Recovery
Recover Windows using a specific system image file.
Startup Repair
Fix problems that keep Windows from loading.
CommandPrompt
Use the Command Prompt for advanced trobleshooting.
UEFI Firmware Settings
Change settings in your PC’s UEFI firmware.
Startup Settings
Change Windows Startup behavior.
Appendix
Warranty Service :
In order to have the completed warranty service of GIGABYTE/AORUS notebook products, please registry yournotebookproducts. Theglobal warrantyserviceofnotebookproduct will be available after you finish the registration process https://member.aorus.com/tw/product/register
FAQ (Frequently Asked Questions) :
Please visit the GIGABYTE support page to get related help when you have any question on using our notebook product.
https://www.gigabyte.com/Support/Faq

1 |
|
AORUS |
|
|
|
|
|
|
2 |
|
|
330W |
230W |
|
1 |
2 |
330W |
3 |
|
|
|
1 |
:
無法設定。
(1) 30 10
(2) 2
2 1
●
●
● / / ●
100-240Vac50-60Hz19.5V,16.9Aor19.5V,11.8A
Download-Center https://www.gigabyte.com/tw/Support

AORUS
|
|
|
11 |
13 |
|
|
9 |
10 |
12 |
1 |
|
|
|
|
2 |
14 |
15 |
16 |
|
3 |
|
|
|
|
4
5
6
7
8
 17
17
18 |
19 |
20 |
18 |
19 |
20 |
1 |
|
11 |
USB 3.1 ( USB-A , Gen1 ) |
|
2 |
|
12 |
|
|
3 |
|
13 |
|
|
|
USB 3.1 ( USB-C , Gen1 )*** |
|
||
4 |
14 |
|
||
5 |
|
15 |
SD ( UHS-II ) |
|
6 |
|
16 |
USB 3.1 ( USB-A , Gen1 ) |
|
7 |
|
17 |
|
|
8 |
|
18 |
HDMI 2.0 |
|
9 |
Display 1.4 & USB 3.1 |
19 |
|
|
|
( USB-C )* |
|
|
|
10 |
Thunderbolt 3 ( USB-C )** |
20 |
( LAN ) |
|
* USB-C : 10 Gb/S , , |
** USB-C : 40 Gb/S , , |
|
||
5V/3A ( 3840x2160 60Hz) |
5V /3A ( 3840x2160 60Hz) |
|
||
|
|
***USB-C : 5Gb/S , 5V/3A |
|
|
|
|
|
|
|
● |
|
|||
● |
|
|||
● 45 C |
|
|||
● |
|
|||
|
2 |
|||
|
|
|
||
3 |
|
|
|
|
|
|
|
|
|
|
|
|
|
|
|
|
|||
|
|
|
|
|
|
<Fn> <F1>~<F11> |
|
||
|
|
|
|
|
|
|
|||
|
|
Fn+ESC |
|
|
|
|
Fn+F1 |
|
|
|
|
Fn+F2 |
WIFI |
/ |
|
|
Fn+F3 |
|
|
|
|
Fn+F4 |
|
|
|
|
Fn+F5 |
|
|
|
|
, |
||
|
|
Fn+F6 |
|
/ |
|
|
Fn+F7 |
|
|
|
|
Fn+F8 |
|
|
|
|
Fn+F9 |
|
|
|
|
Fn+F10 |
|
/ |
|
|
Fn+F11 |
|
/ |
|
|
Fn+Space |
|
|
|
|
Fn+Windows |
Windows Update |
/ Windows Update |
|
|
|
||

System Backup

●●
●● USB
●● USB ●● USB
|
|
|
|
• USB |
1 |
|
|
|
|
|
|
|
|
32GB |
|
|
|
|
|
|
|
|
>32G |
USB ( USB |
|
|
|
||
|
|
|
|
|
|
|
|
|
USB ) |
2
• "ControlCenter",http://www. gigabyte.com
ControlCenter
3
• "SmartUtilities"--> "System Backup"
4
|
• USB |
|
USB |
|
|
5 |
• |
|
|
|
• F12 USB |
|
USB |
|
• 30 ( USB ) |
4

5
˙˙ ˙˙ DOS
Windows
Windows 10
1
2
3
F9
“Troubleshoot”
“Continue” Windows 10“Turn off your PC”
˙˙ Reset this PC
定值而不遺失個人檔案。
˙˙ AORUS Smart Recovery
4 |
AORUS Smart Recovery |
|
“ ”
˙˙ ˙˙
“ ”
6
7
Advanced options
System Restore
System Image Recovery
Windows
Startup Repair
Windows
CommandPrompt
UEFI Firmware SettingsUEFI BIOS
UEFI BIOS
Startup Settings
Windows
:
於產品註冊完成後立刻生效。
https://member.aorus.com/tw/product/register
FAQ ( ) :
https://www.gigabyte.com/Support/Faq
1 |
|
AORUS |
|
|
|
|
|
|
2 |
|
|
330W |
230W |
|
1 |
2 |
330W |
3 |
|
|
|
1 |
:
●
●
● / / ●
100-240Vac50-60Hz19.5V,16.9Aor19.5V,11.8A
Download-Center http://www.gigabyte.cn/Support
AORUS
|
|
|
11 |
13 |
1 |
|
9 |
10 |
12 |
|
|
|
|
|
2 |
14 |
15 |
16 |
|
3 |
|
|
|
|
4 |
|
|
|
|
5 |
|
|
|
|
6 7
8
 17
17
|
18 |
19 |
20 |
|
18 |
19 |
20 |
1 |
|
|
|
11 |
USB 3.1 ( USB-type A ) |
||
2 |
|
|
|
12 |
|
|
|
|
|
|
|
|
|||
3 |
|
|
|
13 |
|
|
|
|
|
|
|
|
|
||
4 |
|
|
|
14 |
USB 3.1 ( USB-type C ) |
||
5 |
|
|
|
15 |
SD (UHS-II ) |
||
6 |
|
|
|
16 |
USB 3.1 ( USB-type A ) |
||
7 |
|
|
|
17 |
|
|
|
|
|
|
|
|
|
||
8 |
|
18 |
HDMI 2.0 |
9 |
Display 1.4 & USB 3.1 |
19 |
|
|
( USB-type C ) |
|
|
10 |
Thunderbolt 3 |
20 |
( LAN ) |
|
( USB-type C ) |
|
|
|
|
|
|
● , |
|
● |
|
● 45 C |
|
● |
|
|
2 |
|

3 |
|
|
|
|
|
||||
|
|
|
|
|
<Fn> <F1>~<F11> |
||||
|
|
|
|
|
|
|
|||
|
|
Fn+ESC |
|
|
|
|
Fn+F1 |
|
|
|
|
Fn+F2 |
|
/ |
|
|
Fn+F3 |
|
|
|
|
Fn+F4 |
|
|
|
|
Fn+F5 |
|
|
|
|
|
||
|
|
Fn+F6 |
|
/ |
|
|
Fn+F7 |
|
|
|
|
Fn+F8 |
|
|
|
|
Fn+F9 |
|
|
|
|
Fn+F10 |
|
/ |
|
|
Fn+F11 |
|
/ |
|
|
Fn+Space |
|
|
|
|
Fn+Windows |
Windows Update |
/ WindowsUpdate |
|
|
|
||

System Backup

yy
yy USB
yy USB yy USB
|
|
|
|
|
1 |
|
|
|
• USB |
|
|
|
|
|
|
|
|
|
20GB |
|
|
|
|
|
|
|
|
>32G |
USB ( USB |
|
|
|
|
|
|
|
|
|
USB ) |
2
• "ControlCenter",http://www.gigabyte.com
ControlCenter
3
• "Smart Utilities"--> "System Backup"
4
• USBUSB
5 yy
yy F12 USBUSB
yy 30 ( USB )
4
 Loading...