


Operation and
Maintenance Manual
3630436275
®
DC POWERED SCREW DRIVE OPENER
Table of Contents
Warranty Information.. . . . . . . . . . . . . . . . . . . 2 Safety Information.. . . . . . . . . . . . . . . . . . . . . . 3 Important Installation Instructions. . . . . .3. Safety Features .. . . . . . . . . . . . . . . . . . . . . . . . . 3 Pre-installation Checklist.. . . . . . . . . . . . . . 4-6 Control Adjustments. . . . . . . . . . . . . 7.-8. . Accessories.. . . . . . . . . . . . . . . . . . . . . . . . . . . 8-9 Maintenance.. .. .. .. .. .. .. .. .. .. .. .. .. .. .. .. .. .. .. .. .. .. .. .. .. .. .. 10 Troubleshooting Guide .. . . . . . . . . . . . 11-13 Wiring Diagram. . . . . . . . . . . . . . . . . 14. . Parts Lists / Exploded Views. . . . . . .15. . -. 16 Accessory Order Form.. .. .. .. .. .. .. .. .. .. .. .. .. .. .. .. .. .. 17
Complete with INTELLICODE®
Remote Control anD SERIESII ElectronicS
For 7’ 6” Doors. Extension Kit is available for 8’ Doors
Included Wall Console MUST be installed prior to Operation of this Garage Door Opener.
Safe-T-Beam® Safety Reverse System MUST be Installed and
. . . the Force Controls MUST be Properly set to close door.
This Equipment meets or exceeds all Federal, State and UL 325 Safety Requirements.
Will not operate “twice as fast” on one-piece doors.
. . . . .Having Difficulty? Need Help?
Please call us: 1-800-35-GENIE (354-3643) www.geniecompany.com
Please have Model information ready when calling.
|
MANUAL |
FOR |
|
THIS |
|
||
|
REFERENCE |
||
SAVEFUTURE |
|
|
|

The Genie Company Limited Warranty
What is covered?
Any defect in material and product workmanship from personal, normal household use in accordance with the Owner’s Manual..
For how long?
MODEL H8000-07 .. .. .. Lifetime* on motor and 5 years all other parts.
*Lifetime = For as long as you own your home..
Who gets the warranty?
This warranty is limited to the consumer who originally purchased the product..
Geographic scope:
This warranty applies only to units installed and operated within the country where they were purchased..
Limitations:
IMPLIED WARRANTIES, INCLUDING THOSE OF FITNESS FOR A PARTICULAR PURPOSEANDMERCHANTABILITY (AN UNWRITTEN WARRANTY THAT THE PRODUCT IS FIT FOR ORDINARY USE), ARE LIMITED TO ONE YEAR FROM THE DATE OF PURCHASE.. GENIE WILL NOT PAY FOR: LOSS OF TIME; INCONVENIENCE; LOSS OF USE OF YOUR GENIE PRODUCT OR PROPERTY DAMAGE CAUSED BY YOUR GENIE PRODUCT OR ITS FAILURE TO WORK; ANY SPECIAL, INCIDENTAL OR CONSEQUENTIAL DAMAGES; OR ANY DAMAGES RESULTING FROM MISUSE OR MODIFICATION OF YOUR GENIE PRODUCT..
Some states and provinces do not allow limitations on how long an implied warranty lasts or the exclusion of incidental or consequential damages, so the above limitations or exclusions may not apply to you..
This warranty is the only one we will give on your Genie product, and it sets forth all our responsibilities regarding your Genie product..Therearenoother express warranties ..
State and province rights: This warranty gives you specific legal rights,and you may also have other rights which vary from state to state and province to province..
How to get warranty service:
To obtain warranty service for your Genie product, you must provide proof of the date and place of purchase of the product..
1.Do-It-Yourself-Service.
Call the Genie Customer Service toll free at 1..800..354..3643 to speak in person to a trained Genie representative for assistance in diagnosing the problem and arranging to supply you with the required parts for do-it- yourself repairs.. Trained service representatives are available Monday-Friday, 8:00 a..m.. - 9:00 p..m.., Eastern Time, and on Saturday, 10:00 a..m.. to 7:00 p..m.., Eastern Time (subject to holidays) You may also get the information you need at www.geniecompany.com.
2.Service From Authorized Dealers.
You also may obtain warranty service from Genie authorized dealers by calling the Genie Customer Service at 1..800..354..3643 or by visiting www.geniecompany.com before scheduling warranty service.. If warranty service is provided by an authorized dealer, Genie will provide all required parts under warranty at no charge to you, but the dealers are independent business people and may render a bench or service call charge for their services.. Genie will not reimburse you or otherwise be responsible for those charges..
We suggest that you retain your original packing material in the event we choose to repair or replace your Genie Product and request that you ship it to us.. Be sure to include your name, address, telephone number, proof of date and place of purchase and a description of the operating problem.. After repairing or replacing, your Genie
product, we will ship it to your home at no cost to you for parts and labor, but you will have to pay a minimum of $5..00 for shipping and handling charges..
Your choice of either one of the above-described service options is your exclusive remedy under this warranty..
What this warranty does not cover:
This warranty does not cover batteries (which are considered replaceable parts), installation, commercial use, defects resulting from accidents, damage while in transit to our service location or damage resulting from alterations, misuse or abuse, lack of proper maintenance, unauthorized repair or modification of the product, affixing of any attachment not provided with the product, programming of the Remote Control
Devices, Safe-T-Beam® adjustment/cleaning, staples through wiring, pinched or broken wires, Carriage disengaged, Force Control adjustments, door out of balance, broken springs or cables, power outages, use of extension cords, missing or damaged parts on discounted, clearanced, final sale or taped cartons, phantom operations (labor is not covered if Opener is functioning properly while technician is in garage),fire, flood, or acts of God, or other failure to follow the Owner’s Manual..
2
Please note the following information,so it is available if you need to call us.
Date Purchased |
__________/_________/__________ |
Serial Number* |
______________________________ |
Operator Model* |
______________________________ |
Dealer Name |
______________________________ |
Dealer Address |
______________________________ |
City |
______________________________ |
State / Zip |
______________________________ |
*Model Number and Serial Number are located on Motor Cover inside the lens..
See Power Head Assembly Exploded View on page 15
NOTE
Please keep original or photocopy of your sales receipt with this manual for future reference should service ever be required.
INCLUDED IN THIS PACKAGE
Manual 1) Warranty Information
2)Pre Installation Checklist to be reviewed prior to any assembly or installation
3)Necessary Adjustments
4)Programming Remote Devices
5)Maintenance and Troubleshooting
6)Parts Explosions
7)Accessory Order Form
8)Door Opener Association Safety and Maintenance Brochure (DASMA)
9)Entrapment Warning Label - To be Adhered
in close proximity to wall control
Poster 1) Pictorial and step by step opener assembly instructions
2) Pictorial and step by step opener installation instructions
IT IS CRITICAL THAT ALL SAFETY WARNINGS MARKED CLEARLY IN BOTH THE MANUAL AND POSTER ARE READ, UNDERSTOOD AND FOLLOWED.
Visit Our Website at: www.geniecompany.com
FOR ANSWERS: CALL 1.800.354.3643
SAVE THESE INSTRUCTIONS
For Help, call 1-800-35-GENIE or visit www.geniecompany.com

OVERVIEW OF POTENTIAL HAZARDS
Overhead doors are large, heavy objects that move with the help of springs under high tension and electric motors.. Since moving objects, springs under tension, and electric motors can cause injuries, your safety and the safety of others depend on you reading the information in this manual.. If you have questions or do not understand the information presented, call The Genie Company.. or your local Genie Distributor..
In this section, and those that follow, the words Danger, Warning and Caution are used to emphasize important safety information.. The word:
 DANGER: indicates an imminently hazardous situation which, if not avoided, will result in death or serious injury..
 WARNING: indicates a potentially hazardous situation which, if not avoided, could result in death or serious injury..
 CAUTION: indicates a potentially hazardous situation which, if not avoided, may result in injury or property damage.. The word NOTE is used to indicate important steps to be followed or important considerations..
|
|
POTENTIAL HAZARD |
EFFECT |
PREVENTION |
|
|
|
|
|||||
|
|
|
|
|
WARNING: |
• Keep people clear of opening |
while door is moving |
. |
|
|
|
||
|
|
|
|
|
|
|
|
||||||
|
|
|
|
|
|
|
|
||||||
|
|
|
|
|
Could result in death |
• Do Not allow children to play with the door operator |
.. |
|
|
||||
|
|
MOVING DOOR |
or serious injury.. |
• Do Not operate a door that jams or one that has a broken |
spring.. |
||||||||
|
|
|
|
|
|
|
|
|
|
|
|||
|
|
|
|
|
WARNING: |
• Turn off power before removing operator cover. |
|
|
|
|
|||
|
|
|
|
|
• When replacing cover, make sure wires are not pinched or near |
||||||||
|
|
|
|
|
Could result in death |
||||||||
|
|
|
|
|
moving parts.. |
|
|
|
|
|
|
|
|
|
|
|
|
|
or serious injury.. |
|
|
|
|
|
|
|
|
|
|
|
|
|
• Operator must be properly grounded. |
|
|
|
|
|
|||
|
|
ELECTRICAL SHOCK |
|
|
|
|
|
|
|||||
|
|
|
|
|
|
|
|
|
|
|
|||
|
|
|
|
|
|
• Do Not try to remove, repair or adjust springs or anything to |
|||||||
|
|
|
|
|
WARNING: |
which door spring parts are fastened, |
such as, wood blocks, |
||||||
|
|
|
|
|
steel brackets, cables or other like items.. |
|
|
|
|
||||
|
|
|
|
|
Could result in death |
|
|
|
|
||||
|
|
|
|
|
or serious injury.. |
• Repairs and adjustments must be made by a trained door |
|
||||||
|
|
HIGH SPRING TENSION |
|
system technician using proper |
tools and instructions |
.. |
|
||||||
Important Installation
Instructions
 WARNING:
To reduce the risk of severe injury or death:
1READ AND FOLLOW ALL SAFETY, INSTALLATION AND OPERATION INSTRUCTIONS .. If you have any questions or do not understand an instruction, call your authorized Genie installation professional..
2Do Not install operator on an improperly balanced door.. An improperly balanced door could cause
severe injury.. Repairs and adjustments to cables, spring assembly, and other hardware must be made by a trained service person using proper tools and instructions ..
3Remove all ropes, and disable all locks connected to the door before installing operator..
4Install door operator 7 feet or more above the floor.. Mount the emergency release knob 6 feet above the floor..
5Do Not connect the operator to the source of power until instructed to do so..
6Locate the control button:
•Within sight of door.
•At a minimum height of 5 feet, so small children cannot reach it.
•Away from all moving parts of the door.
7Install the entrapment WARNING label next to the wall button or console.. Install the emergency release tag on, or next to, the emergency release
8The operator must reverse when the door contacts a
1-1/2 inch high object on the floor at the center of the doorway.. This is about the size of a 2” x 4” board laid flat..
Safety Features
Safe-T-Beam® (STB) Non-Contact Reversing System
Places an invisible beam across door opening, that reverses the door during down travel to the fully open position if anything passes through beam..
Safe-T-Reverse® Contact Reversing System
Automatically stops and reverses a closing door within 2 seconds of contact with an object..
Safe-T-Stop® Timed Reversed System
Automatically opens a closing door, if door does not close within 30 seconds..
ForceGuard® Control
Used to set the force required for opening and closing door.. For maximum safety, set the minimum force required to fully open and close door..
Automatic Lighting System
Light bulbs up to 60 Watts max.. , used for safer entries and exits.. The lights turn on when door is activated and automatically turn off 4..5 minutes later..
Manual Emergency Release
Allows the garage door to be opened or closed manually for emergencies or maintenance..
For Help, call 1-800-35-GENIE or visit www.geniecompany.com |
3 |
Pre-Installation Checklist
This Opener includes parts and supplies needed to install in most garages and connect to most garage doors.. There are many variations of garages and garage doors.. A few additional parts and supplies may be needed to install Opener into your garage and connect to your garage door.. While checking items listed below, note any additional items you will need..
Tools used in this section:
• 12’+ Tape Measure • Pencil • Ladder • Level
Check following items before assembling Opener:
Check Step 1: Check Door ConDition anD ThicknesS
Check condition of vertical stile in center of door, and its connection to door’s top and bottom beams.. (Figure 1)
AIf door frame is nailed together and not a solid connection, door frame must be braced or reinforced before installing Opener..
BIf door is “lightweight” (made with frame and skin - not solid), door (including door frame) must be braced or reinforced before installing Opener..
CA door opener reinforcement bracket may also be needed to connect garage door to Opener’s Door Bracket.. This Opener is designed for installation on a properly braced sectional door or solidly braced one-piece door..
DContact your Genie Factory Authorized Dealer or dealer of your garage door for any necessary bracing and a door opener reinforcement bracket (if needed) before proceeding..
EIf you have a wooden door, measure door’s thickness.. If your door is less than 2” thick, brace door or use shorter Door Bracket Lag Screws (1/4” x 1-1/4” – not included)
SECTIONAL DOOR, TORSION SPRINGS |
SECTIONAL DOOR, EXTENSION SPRINGS |
ONE-PIECE DOOR, TRACKLESS |
|
Torsion |
Extension |
Header Area |
|
Springs |
|||
Springs |
|||
|
|
||
|
Center |
|
|
|
Stile |
|
|
|
|
Center Stile |
Figure 1 Note Door Type
Check Step 2: Check Garage Door aligNment, Operation,
anD BalanCe
ARaise door, check alignment and see if it moves freely (Figure 2).. If door appears out of alignment, binds, or does not move smoothly, contact a Genie Factory Authorized Dealer or dealer of your garage door for repairs and adjustments to door mechanism..
BRaise door to 3’ – 4’ above ground and carefully let go.. Door should stay stationary.. Slight movement is acceptable.. More than slight movement means door is out of balance.. Contact a Genie Factory Authorized Dealer or dealer of your garage
door for repairs and adjustments to door mechanism..
 WARNING:
If your door sticks, binds, or is out of balance, have it adjusted by a Genie Factory Authorized Dealer.. Door springs, cables, pulleys, brackets and associated hardware are under extreme tension and can cause serious injury or death..
4
KEEP FEET CLEAR OF DOOR
3’ - 4’ |
Sectional |
3’ - 4’ |
One-Piece |
|
|
||
|
Door |
|
Door |
Figure 2 Checking door balance
C Check door type.. Make a note of whether it is a sectional or a one-piece door for reference later (Figure 2)..
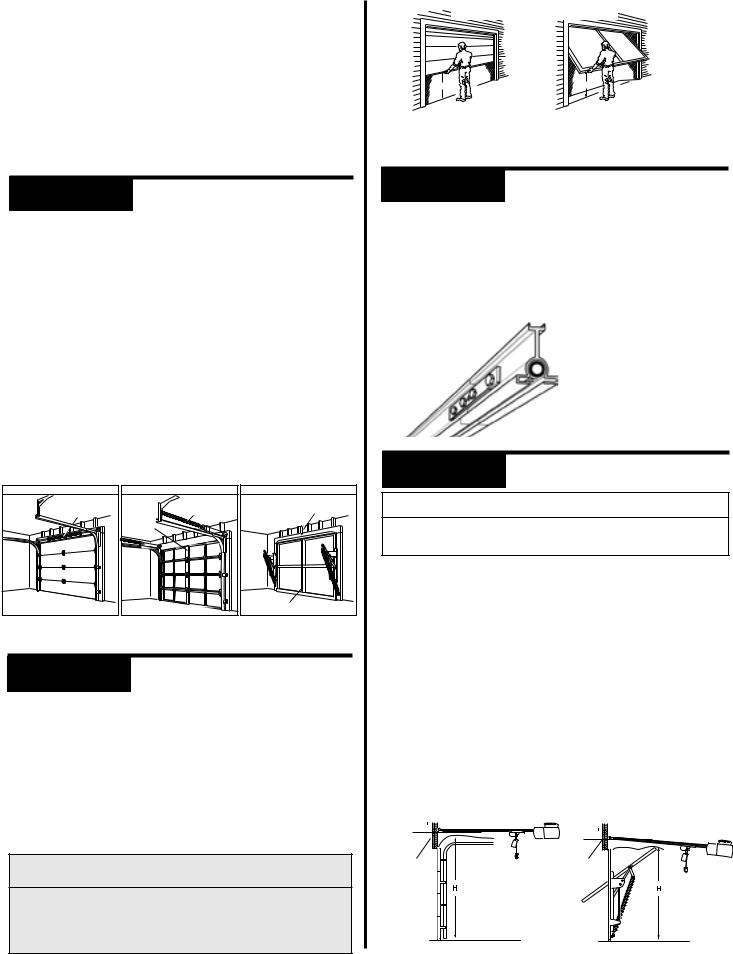
Check Step 3: Measure Garage Door Height
AMeasure door height (floor to top of door) using a tape measure..
BThis new Garage Door Opener is designed for doors up to and including 7’ 6” tall.. If door height is 7’ 6” or less continue to Check Step 4..
CIf door height is 8’-0”, you need a Rail Extension Kit.. (Figure 3).. (See Accessories Order Form, Page 16)..
DIf the door height is taller than 8’-0”, the opener you purchased is the wrong version.. Contact your Customer Service Representative
at 1-800-354-3643..
Rail Extension for 8’ door
Figure 3 Rail Extension Kit
Check Step 4: Check Door Header Area
NOTE
The header is a heavily reinforced section of the wall just above the top of the garage door opening..
AFind vertical center line of door and header:
•Close door.
•Measure door width at top.
•Mark a point at center of door and on header directly above door.. Draw a center line to connect points.
BFind Header Bracket mounting height (Figure 4): (Do not attach Header Bracket)..
•Raise door, watching top edge of door and stop door when its edge reaches its highest point..
•Measure distance (“H”) from top edge of door to floor..
–For sectional doors, add 2-1/2” to “H”.. Mark a point on center line.. Bottom of Header Bracket will be installed here..
–For one-piece doors, add 6” to “H”.. Mark this point on center line.. Bottom of Header Bracket will be installed here..
SECTIONAL DOOR |
ONE-PIECE DOOR |
H+ 2-1/2 |
H+ 6 |
|
|
HEADER |
HEADER |
Figure 4 Find Highest Point of Travel
For Help, call 1-800-35-GENIE or visit www.geniecompany.com

NOTE
•For all types and styles of doors:
–If the ceiling in your garage is so low that there is not at least a 3” space above the Header Bracket mounting point, contact a Genie Factory Authorized Dealer.
•If a door spring is in the way, place the Header Bracket above the spring.. Do Not move the door spring..
 WARNING:
Door springs are under extremely high tension and should be handled ONLY by a trained professional..
C Check wall for a stud or a solid header at your mark: (If checking a finished wall, a stud finder may be helpful)..
•If location is above Header, a 2” x 6” board must be screwed to studs beside your mark with at least two Lag Screws and Flat Washers (not provided)..
•Transfer your mark to new mounting board..
Check Step 5: Check Power Head
MountinG Area
Check ceiling or space above where Opener Power Head will be mounted (Figure 5): There must be a 120 Volt grounded outlet or wiring box within 3 feet of Power Head..
Grounded outlet

 10’ (7’-6” door)
11’ (8’ door)
Door Center Line
Figure 5 Check Power Head location
AThe measurements above are taken from the garage door centerline toward the rear of the garage..
BFind location of ceiling joist or truss above where Opener Power Head will be and estimate type and quantity of materials needed for your installation (Figure 6A & B)..
MOUNTING EXAMPLES
Standard Straps Extra wood required Perforated Angle Iron
Figure 6A
OPEN CEILINGS Straps and angle iron may attach directly to joists or trusses..
For Help, call 1-800-35-GENIE or visit www.geniecompany.com
Perforated Straps
FINISHED CEILINGS
Locate ceiling joists or trusses using a stud finder or similar device.
Attach angle iron(not included) to joists or trusses through finish material using Lag Screws..
Figure 6B Mounting methods for open beam or finished ceilings
Check Step 6: Check CeilinG for GrounDed power SourCe
A Check that there is a 15 Amp 120 Volt grounded electrical outlet or grounded permanent wiring box (per building code) within 3’ of Opener Power Head: Figure 5
•If not, an outlet or wiring box must be installed.. Contact a licensed electrician for installation..
•If building codes require permanent wiring, Power Head must be partially disassembled to install appropriate wiring in place of Power Cord.. (See Assembly and Installation Poster..)
NOTE
Permanent wiring must be installed by a Licensed Electrician.. Not all Genie Factory Authorized Dealers are Licensed Electrician’s.. Contact someone who is a Licensed Electrician..

 WARNING:
Do Not use an extension cord! Extension cords can cause dangerous overheating conditions..
Do Not use portable generator! This product is designed to operate using standard house current..
Do Not use alternate power supplies,
Check Step 7: Check Safe-T-Beam®
MountinG Bracket Location
Check for wood garage frame, jamb, or masonry at mounting location (6” above floor) with attachment tabs facing away from garage door (Figure 7)..
A If you cannot mount Safe-T-Beam® Mounting Bracket to wood frame:
•Concrete screws and concrete anchors (not included) must be used to mount Brackets on masonry with attachment tabs facing away from garage door..
Source |
|
||
|
Sensor |
|
|
|
Safe-T-Beam® |
Top of |
|
Mounting Bracket |
|||
Bracket |
|||
|
|
||
Figure 7 |
Mounting |
6” above |
|
floor |
|||
|
Safe-T-Beam® |
||
|
|
||
|
Components |
|
|
5
 Loading...