

Page 1
*
YOUR
“
READAND SAWTHISBOOK
Model JVM57
.,+:
>.-
4(
.
- .---- ,
-.
,.
.
,.-4. >>
,.. .
.
.
‘.*
Page 2
Before Using Your Microwave Oven
Q_...LLA.alLriahtsts r.es@cu=l
Read This Use and Care Book
it contains detailed information on the operation and
recommended maintenance of your new Microwave
Oven. Once YOU have read the book, keep it handy to
answer any questions you may have.
If you have any additional questions concerning the
operation of your Microwave Oven, write—including
your phone number—to:
Consumer Affairs
General Electric Company
Appliance Park
Louisville, Kentucky 40225
IF YOU RECEIVED A DAMAGED OVEN, immediately
contact the retail dealer (or builder) from whom you
purchased it. They have been informed of the proper
procedure to take care of such matters and can
handle it for you.
Before You Call for Service:
Check “Common Problems” section. (See Table of
Contents for page number.) It lists many minor causes
of operating problems that you can correct yourself
and may save you an unnecessary service call.
Need Service?
In many cities, there’s a General Electric Factory Service Center. Call, and a radio-dispatched truck will
come to your home by appointment—morning or
afternoon. Charge the work, if you like. All the centers
accept both Master Charge and Visa cards. (See Fac-
tory Service Centers in Table of Contents.)
Or look for General Electric franchised Customer
Care@ servicers. You’ll find them in the Yellow Pages
under “GENERAL ELECTRIC CUSTOMER CARE@
SERVICE”.
Register Your Oven
It is important that we the manufacturer know the
location of the Microwave Oven you are now using
should a need occur for adjustments.
Please check with your supplier to be sure he has
registered you as the owner; also send in your Purchase Record Card. If you move, or if you are not the
original purchaser please write to US, stating model
and serial numbers. This appliance must be regis-
tered. Please be certain that it is.
Write to:
General Electric Company
Product Service Section
Range Marketing Operation
AP2-21O
Appliance Park
Louisville, Kentucky 40225
Record Model and Serial Numbers
Your General Electric Microwave Oven has a nameplate on which is stamped the model number and
serial number. (See page 9 for location.)
Model and serial numbers are also on the Purchase
Record Card which came with your Microwave Oven.
Before sending in this card, please record the numbers
in the space provided, or get them from the nameplate
described above, and record here.
Please refer to both model and serial numbers in any
future correspondence or product service calls concerning your Microwave Oven.
Model Number
Serial Number
Date Purchased
KEEP PURCHASE RECEIPT WITH THIS BOOK FOR
FUTURE REFERENCE.
Steps to Follow for Further Help
First, ‘contact the people who serviced your m[cro-
wave oven. Explain why you are dissatisfied. In most
cases, this will solve the problem.
Next, if you are stilr dissatisfied, write all the details—
including your phone number—to:
Manager, Consumer Relations
General Electric Company
WCE-312
Appliance Park
Louisville, Kentucky 40225
Finally, if your problem is still not resolved, write:
Major Appliance Consumer Action Panel
20 North Wacker Drive
Chicago, Illinois 60606
This panel, known as MACAP, is a group of independent consumer experts under the sponsorship of
several industry associations. Its purpose is to study
practices and advise the industry of ways to improve
customer service. Because MACAP is free of industry
control and influence, it is able to make impartial
recommendations, considering each case individually.
—
—
c~enemlEkdric
2
Page 3
,’
*
\
Table of Contents
Before Microwaving ..... ..... ....... ..... .... .. .... ....... .. .. ........ ..........
Grounding Instructions&Precautions ......... .... .... ........ ..... ........3
Safety Tips . .. .. .... ...
Introduction to Oven
Touch Control Panel
How to Defrost ...... .
How to Time Cook ..
How to Temp Cook..
The Temperature Probe ............ ........... ..... .... .. ...... .. .. ....... ....ll
Howto Sim'n Cook ..... ..... .. . .. .. ......... .. ......... .. .. ........ .. .........l2
Howto Temp Hoid . .. .. ..... ....... . .... ....... .
Howto Use Memory . .. .. ... ..... .. .......
Howto Use Hold/Timer ........ . .. ...
The Exhaust Feature . ..... .. ..... .. ..
Care of Your Oven
Problems & Solutions . ..... ......... ..... .
Factory Service Centers ....... ....... .. ....... .. .. ..... ........... ..... .... ...2l
Warranty .... .............. .. .. ..... .. ... .
. . . . . . . .. . .. ... .. . . . . . . . . . .. . .. .. . . .. . . . . . .. . . . . .. . .. .. . . .. .
. . . . . . . .. . .. .. . ...
. . . . . . . .. .. .. .. .. . . .
. . . . . . . .. . .. ... .. . . .
. . . . . . . .. . .. ... .. . . . . . . . . . . . . .. . . . . . . . . . . . . . .. . .. . .. . . . .. . . .
. . . . . . . . .. . . .. . . . . . . .. . .. . . . . .. . . . . . . . .. . . . . . . . . . . .. .. . .. . .
... ..... ....... ... .. ........... .. ............ .. .. ....... .
. . . . . . . .. .. . . .. . .. . .. . . . . . . . . . . .. . .. .. . . ..
. . . . . . . . . . .. .. . . .. . . . . . . .. . . .. . .. . .. . . . .
. . . . . . . .. . .. .. . . .. . . . . . . .. . . .. . . . .. . . .. .
.... ............ ............. ..
...... ..... .. .. .... ...... .... ...
.. .... ..... .. .............. .. ..... ...... .
.... .... ..... .. ...... .......... .... .... ...
.. .. ..... .. .. .............. .. ........
............... ..............
Back Cover
14, 15
18, 19
2
4
5
b
8
9
10
13
16
17
20
9
/
Grounding Instructions
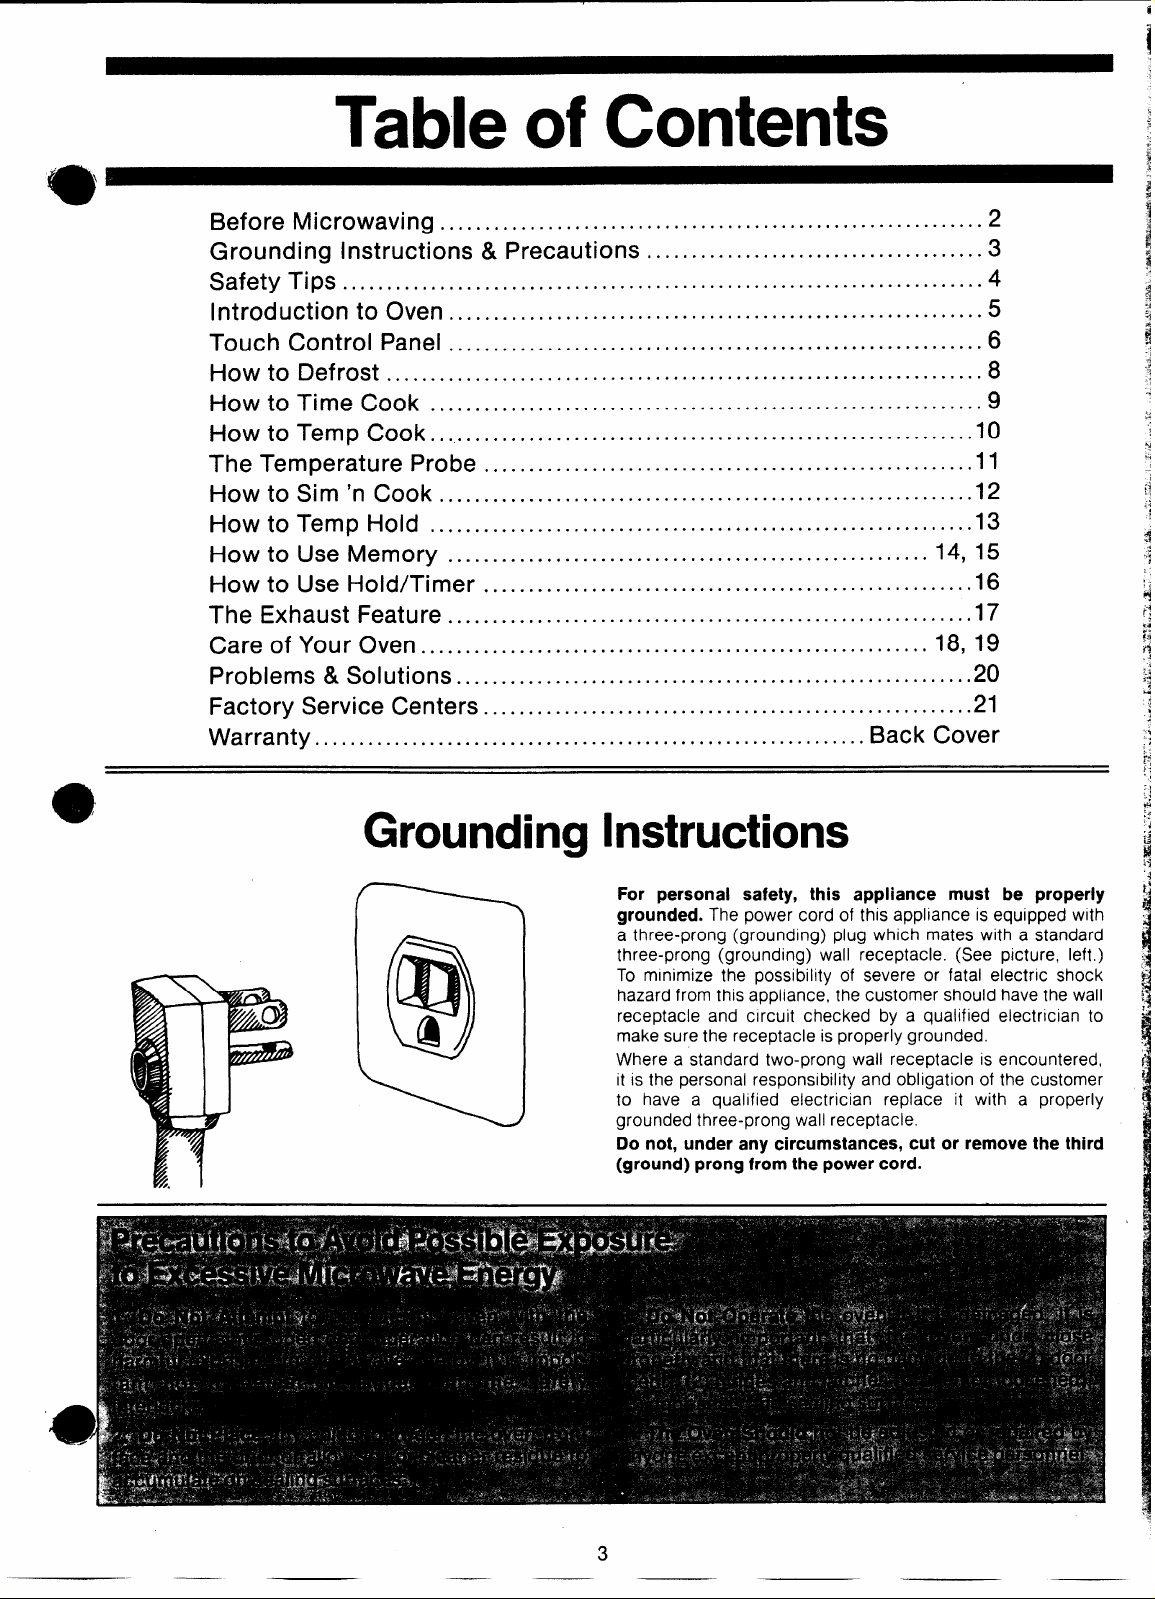
For personal safety, this appliance must be properly
grounded. The power cord of this appliance is equipped with
a three-prong (grounding) plug which mates with a standard
three-prong (grounding) wall receptacle. (See picture, left. )
To minimize the posslbildy of severe or fatal electric shock
Q
Q
Q
hazard from this appliance, the customer should have the wall
receptacle and circuit checked by a qualified electrician to
make sure the receptacle is properly grounded.
Where a standard two-prong wall receptacle is encountered,
it is the personal responsibility and obligation of the customer
to have a qualified electrician replace it with a properly
grounded three-prong wall receptacle.
Do not, under any circumstances, cut or remove the third
(ground) prong from the power cord.
3
Page 4
Safetv Tim to Follow
1. For personal safety the oven must be properly
grounded. See grounding instructions on Page 3 of
this book.
2. Cooking utensils may become hot because of
heat transferred from the heated food. This is espe-
cially true if plastic wrap has been covering the top
and handles of the utensil. Pot holders may be
needed.
3. Sometimes, the oven shelf can become too hot to
touch. Be careful when touching the shelf during and
after cooking.
4. “Boilable” cooking pouches and tightly closed
plastic bags should be slit, pricked or vented as di-
rected in Cookbook. If they are not, plastic could
burst during or immediately after cooking, possibly
resulting in injury. Also, plastic storage containers
should be at least partially uncovered because they
form a tight seal. When cooking with containers,
tightly covered with plastic wrap, remove covering
carefully
face.
5. Don’t defrost frozen beverages in narrow necked
bottles especially carbonated ones. Even if the con-
tainer is opened, pressure can build up. This can
cause the container to burst, resulting in injury.
6. Don’t overcook. Excessive overcooking dehy-
drates potatoes, and may cause them to catch fire
causing damage.
7. If food shouid ever ignite, keep the oven door
closed. Turn off the power immediately. Touch
CLEAR/OFF or disconnect power cord or shut off
power at the fuse or circuit breaker panel.
8. Remove the temperature probe from the oven
when not using it to cook with. If you leave the probe
inside the oven without inserting it in food or liquid
and turn on microwave energy, it can create electrical arcing in the oven, and damage oven walls or
shelf.
9. Remove wire twist-ties on paper and plastic
bags before placing in oven. Twist-ties sometimes
cause bag to heat, and may cause fire.
10. Boiiing eggs (in or out of the sheil) is not recom-
mended for microwave cooking. Pressure can build
up inside egg yolk and cause it to burst, resulting in
injury.
11. Do not pop popcorn in your microwave oven
unless in a special microwave popcorn accessory or
unless you use popcorn in a package labeled for
microwave ovens. Because of the heat generated,
without these precautions, the container could catch
fire.
12. Use metai oniy as directed in cookbook. Metal
strips as used on meat roasts are helpful in cooking
food when used as directed. Metal trays may be used
and direct steam away from hands and
for TV dinners. However, when using metal in the
microwave oven, keep metai at least l-inch away
from sides of microwave oven.
13. Do not use any thermometer in food you are
microwaving unless that thermometer is designed or
recommended for use in the microwave oven.
14. Do not store flammabie materiais in an oven.
Also, do not use flammable fluids in the vicinity of
your oven.
15. Do not use your microwave oven to dry news-
papers. If overheated, they can catch fire.
16. Piastic Utensiis–Plastic utensils designed for
microwave cooking are very useful, but should be
used carefully. Even microwave plastic may not be as
tolerant of overcooking conditions as are glass or
ceramic materials and may soften or char if subjected to short periods of overcooking. In longer exposures to overcooking, the food and utensils may
even ignite. For these reasons: 1) Use microwave
plastics only and use them in strict compliance with
the utensil manufacturer’s recommendations. 2) Do
not subject empty utensils to microwaving. 3) Do not
permit children to use plastic utensils without complete supervision.
17, Don’t operate the oven whiie empty in order t
prolong the life of the oven and save energy. If, by
accident, the oven should run empty a minute or two,
no harm is done.
THE HOOD:
1.
Have it instailed and properly grounded by a qual-
ified instaiier. See the special installation booklet
packed with the microwave oven.
2. The vent fan in your Spacemaker oven wiii oper-
ate automatically under certain conditions (see
Automatic Fan Feature, page 7). Whiie the fan is operating caution is required to prevent the starting
and spreading of accidental cooking fires whiie the
vent fan is in use. For this reason:
A. Never ieave surface units unattended at high
heat settings. Boilover causes smoking and greasy
spillovers that may ignite and spread if vent fan is
operating. To minimize automatic fan operation,
use adequate sized utensils and use high heat settings only when necessary.
B. in the event of a grease fire, smother flaming
pan on surface unit by covering pan completely
with well-fitting lid, cookie sheet or flat tray.
C. Never frame foods under the oven with the vent
fan operating because it may spread the flames.
D. Keep hood and grease fiiters clean, accordin
to instructions on pages 17 and 19, to maintain
good venting and avoid grease fires.
@
a
4
———
Page 5
Introduction to Your Oven
,
I
@@
1-41
“,1I fl 14
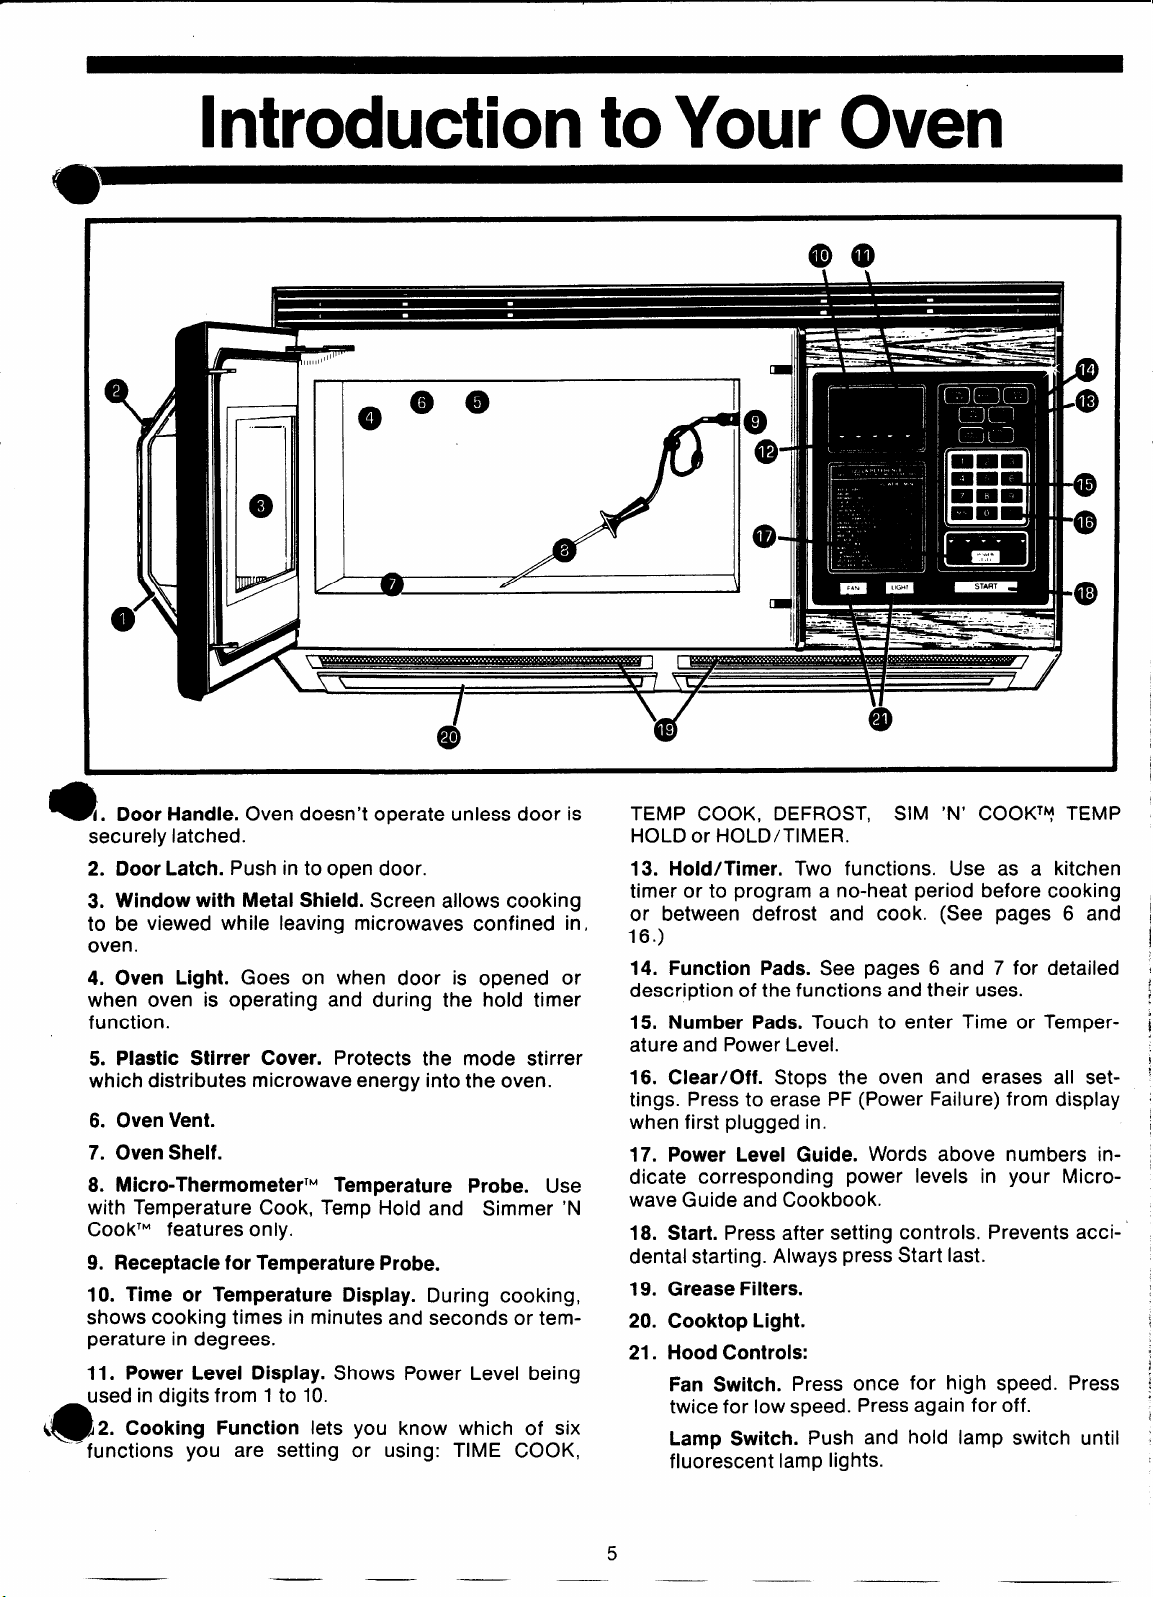
9 (. Door Handle. Oven doesn’t operate unless door is
securely latched.
2. Door Latch. Push in to open door. 13. Hold/Timer. Two functions. Use as a kitchen
3. Window with Metal Shield. Screen allows cooking
to be viewed while leaving microwaves confined in,
oven.
4. Oven Light. Goes on when door is opened or
when oven is operating and during the hold timer
function. 15. Number Pads. Touch to enter Time or Temper-
5. Plastic Stirrer Cover. Protects the mode stirrer
which distributes microwave energy into the oven.
6. Oven Vent.
7. Oven Sheif.
8. Micro-ThermometerTM Temperature Probe. Use
with Temperature Cook, Temp Hold and Simmer ‘N
CookTM features only.
9. Receptacle for Temperature Probe.
10. Time or Temperature Dispiay. During cooking,
shows cooking times in minutes and seconds or tem-
perature in degrees.
11. Power Levei Dispiay. Shows Power Level being
used in diaits from 1 to 10.
2. Cooking Function lets you know which of six
(
@
‘functions you are setting or using: TIME COOK,
“
.e@
.4-
/
---
\*
d
TEMP COOK, DEFROST, SIM ‘N’ COOKTV TEMP
HOLD or HOLD/TIMER.
timer or to program a no-heat period before cooking
or between defrost and cook. (See pages 6 and
16.)
14. Function Pads. See pages 6 and 7 for detailed
description of the functions and their uses.
ature and Power Level.
16. Ciear/Off. Stops the oven and erases all set-
tings. Press to erase PF (Power Failure) from display
when first plugged in.
17. Power Levei Guide. Words above numbers indicate corresponding power levels in your Microwave Guide and Cookbook.
18. Start. Press after setting controls. Prevents acci-
dental starting. Always press Start last.
19.
Grease Fiiters.
20.
Cooktop Light.
21.
Hood Controis:
Fan Switch. Press once for high speed. Press
twice for low speed. Press again for off.
Lamp Switch. Push and hold lamp switch until
fluorescent lamp lights.
.-
@
W
——2-:. -.<
5
—
Page 6
Features of Your Micr(
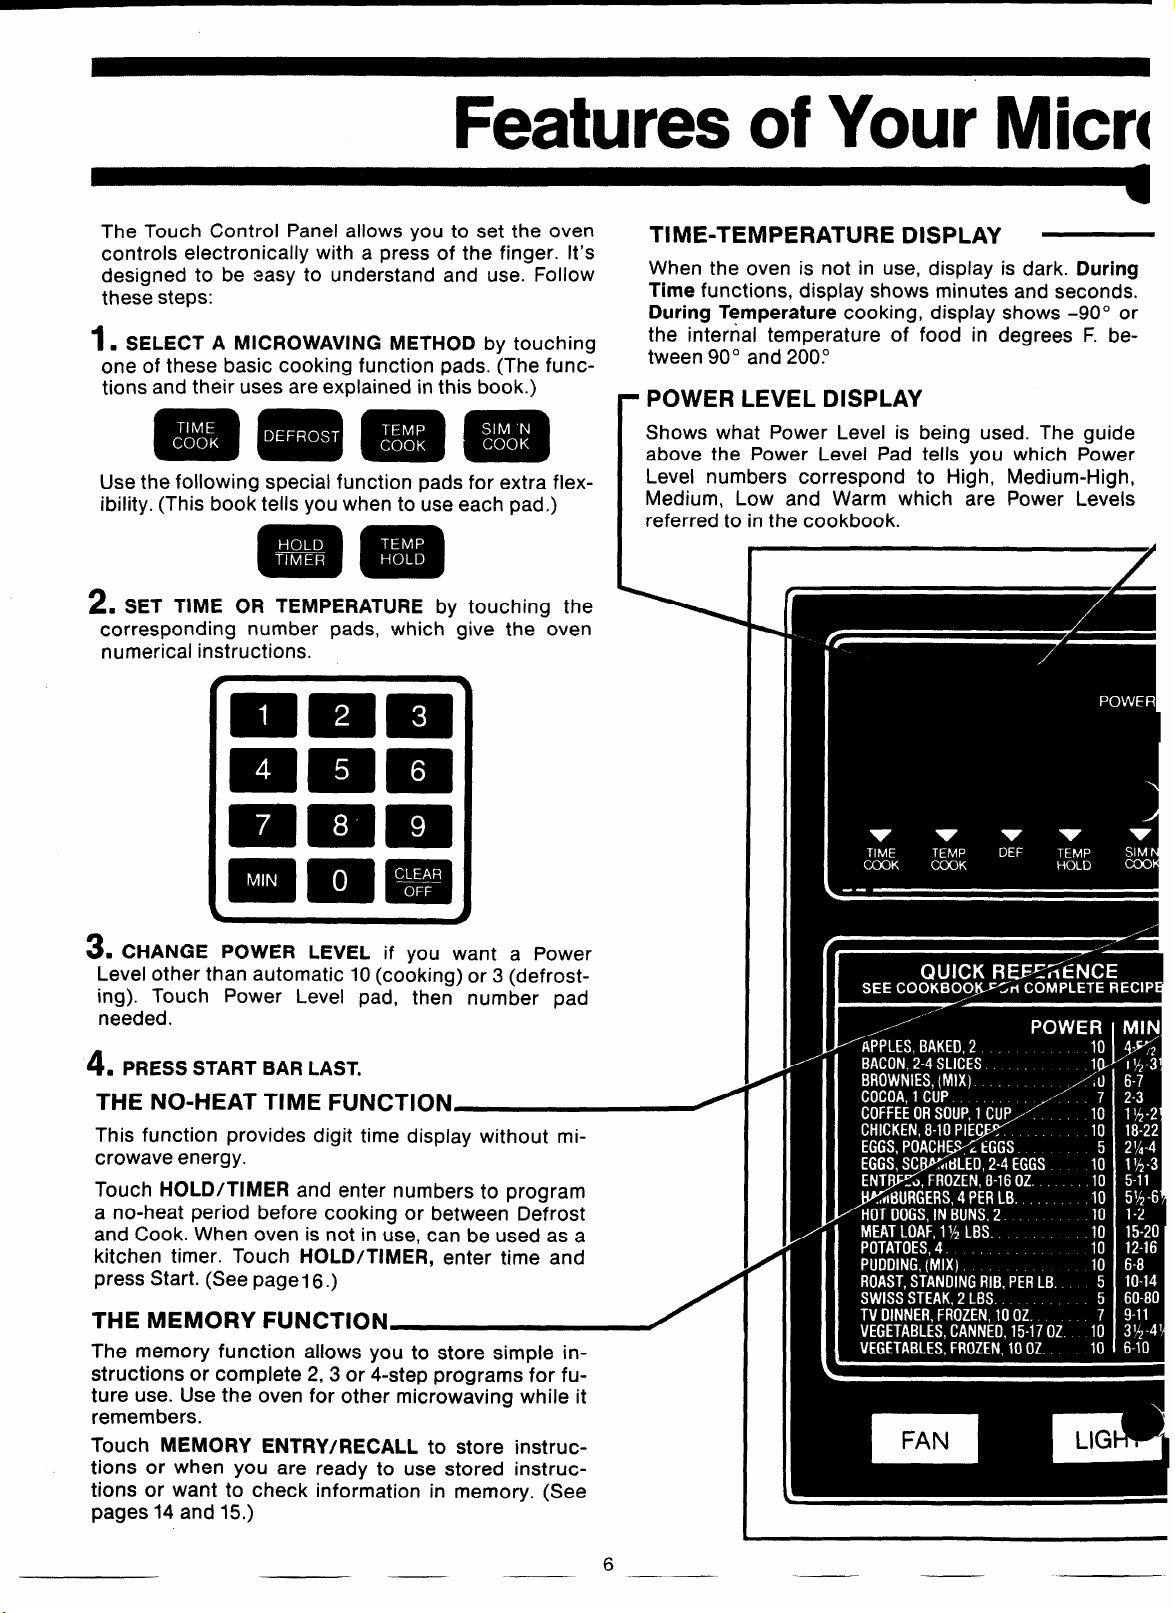
The Touch Control Panel allows you to set the oven
controls electronically with a press of the finger. It’s
designed to be easy to understand and use. Follow
these steps:
1. SELECT A MICROWAVING METHOD by touching
one of these basic cooking function pads. (The func-
tions and their uses are explained in this book.)
Use the following special function pads for extra flexibility. (This book tells you when to use each pad.)
2. SET TIME OR TEMPERATURE by touching the
corresponding number pads, which give the oven
numerical instructions.
TIME-TEMPERATURE DISPLAY —
When the oven is not in use, display is dark. During
Time functions, display shows minutes and seconds.
During Temperature cooking, display shows -90° or
the internal temperature of food in degrees F. between 90° and 200:
-
POWER LEVEL DISPLAY
Shows what Power Level is being used. The guide
above the Power Level Pad tells you which Power
Level numbers correspond to High, Medium-High,
Medium, Low and Warm which are Power Levels
I
referred to in the cookbook.
3. CHANGE POWER LEVEL if you want a Power
Level other than automatic 10 (cooking) or 3 (defrost-
ing). Touch Power Level pad, then number pad
needed.
4. PRESS START BAR LAST.
THE NO-HEAT TIME FUNCTION
This function provides digit time display without microwave energy.
Touch HOLD/TIMER and enter numbers to program
a no-heat period before cooking or between Defrost
and Cook. When oven is not in use, can be used as a
kitchen timer. Touch HOLD/TIMER, enter time and
press Start. (See pagel 6.)
THE MEMORY FUNCTION
The memory function allows you to store simple instructions or complete 2, 3 or 4-step programs for future use. Use the oven for other microwaving while it
remembers.
Touch MEMORY ENTRY/RECALL to store instructions or when you are ready to use stored instructions or want to check information in memory. (See
pages 14 and 15.)
#
I
6
——
Page 7
ave Touch Control Panel
.—
1
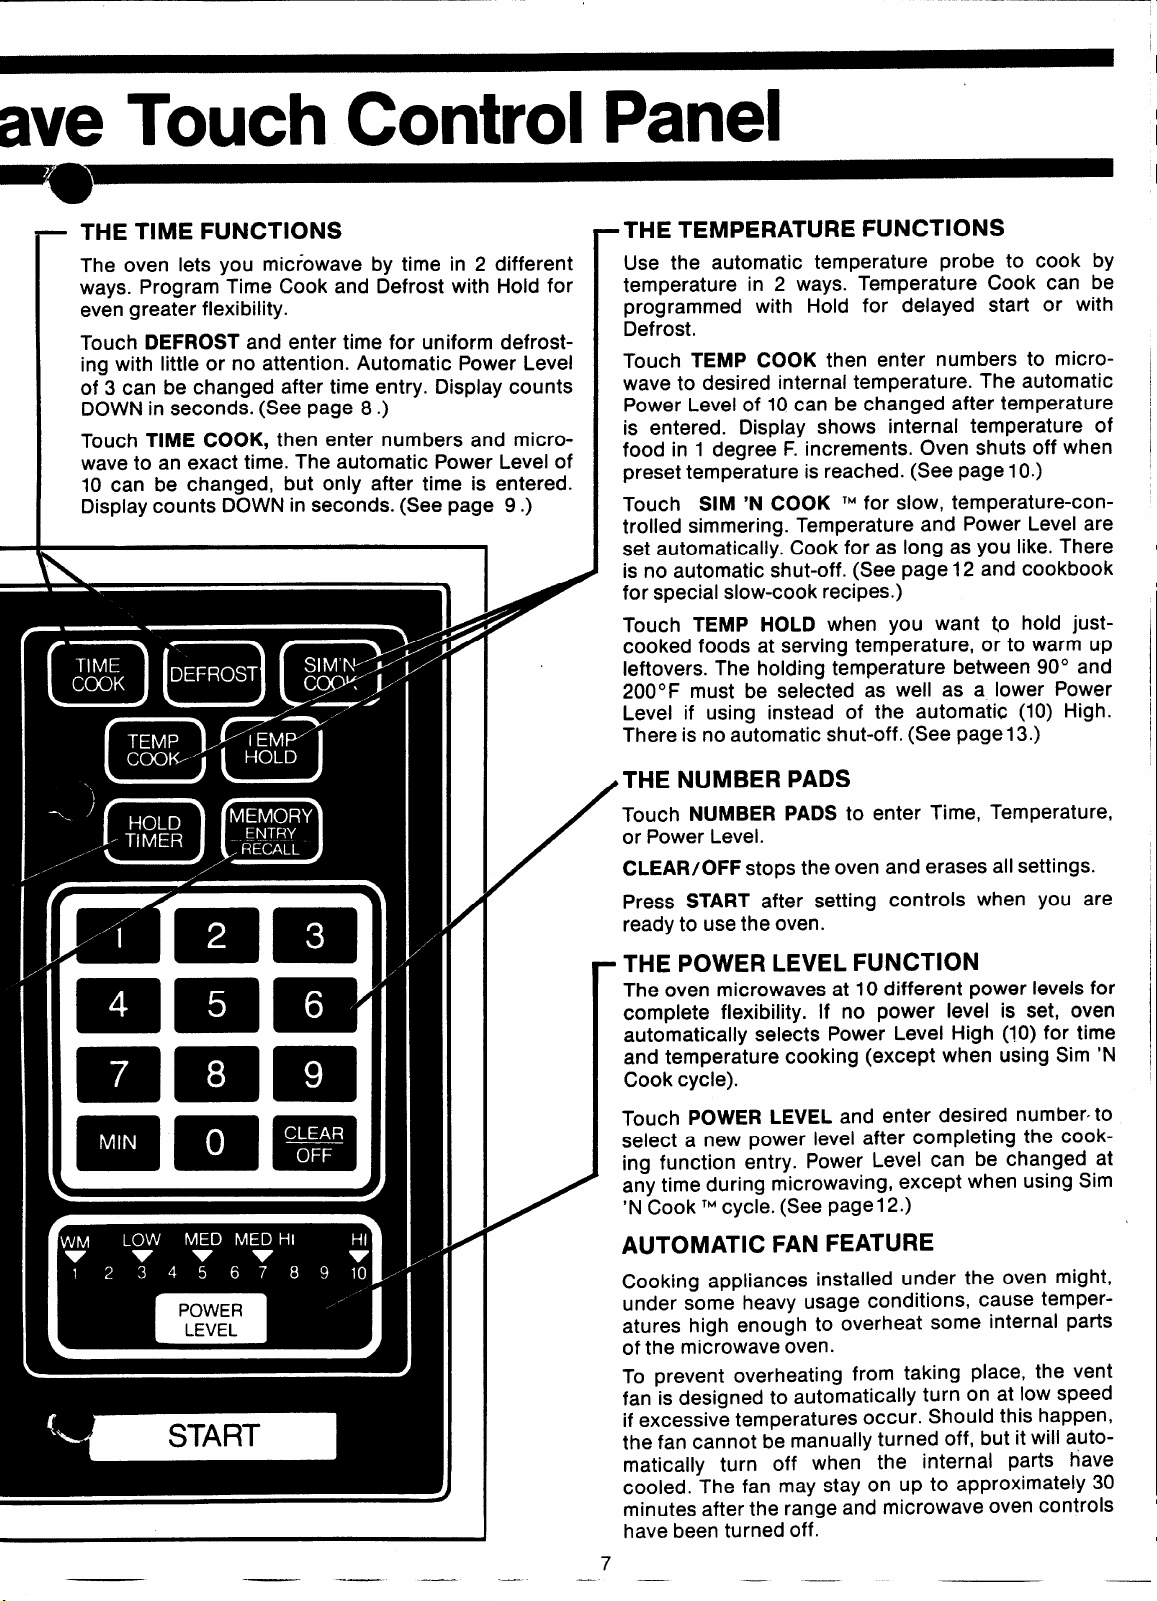
- THE TIME FUNCTIONS
The oven lets you mic~owave by time in 2 different
ways. Program Time Cook and Defrost with Hold for
even greater flexibility.
Touch DEFROST and enter time for uniform defrost-
ing with little or no attention. Automatic Power Level
of 3 can be changed after time entry. Display counts
DOWN in seconds. (See page 8.)
Touch TIME COOK, then enter numbers and micro-
wave to an exact time. The automatic Power Level of
10 can be changed, but only after time is entered.
Display counts DOWN in seconds. (See page 9.)
. .
m
2
THE TEMPERATURE FUNCTIONS
Use the automatic temperature probe to cook by
temperature in 2 ways. Temperature Cook can be
programmed with Hold for delayed start or with
Defrost.
Touch TEMP COOK then enter numbers to microwave to desired internal temperature. The automatic
Power Level of 10 can be changed after temperature
is entered. Display shows internal temperature of
food in 1 degree F. increments. Oven shuts off when
preset temperature is reached. (See page 10.)
Touch SIM ‘N COOK ‘Mfor slow, temperature-con-
.
trolled simmering. Temperature and Power Level are
set automatically. Cook for as long as you like. There
is no automatic shut-off. (See page 12 and cookbook
for special slow-cook recipes.)
Touch TEMP HOLD when you want to hold just-
cooked foods at serving temperature, or to warm up
leftovers. The holding temperature between 90° and
200”F must be selected as well as a, lower Power
Level if using instead of the automatic (10) High.
There is no automatic shut-off. (See page13.)
,THE NUMBER PADS
Touch NUMBER PADS to enter Time, Temperature,
or Power Level.
/
CLEAR/OFF stops the oven and erases all settings.
Press START after setting controls when you are
ready to use the oven.
THE POWER LEVEL FUNCTION
The oven microwaves at 10 different power levels for
complete flexibility. If no power level is set, oven
automatically selects Power Level High (10) for time
and temperature cooking (except when using Sim ‘N
Cook cycle).
Touch POWER LEVEL and enter desired number’ to
select a new power level after completing the cooking function entry. Power Level can be changed at
any time during microwaving, except when using Sim
/
‘N Cook ‘Mcycle. (See pagel 2.)
AUTOMATIC FAN FEATURE
Cooking appliances instaiied under the oven might,
under some heavy usage conditions, cause temperatures high enough to overheat some internai parts
of the microwave oven.
To prevent overheating from taking piace, the vent
fan is designed to automatically turn on at low speed
if excessive temperatures occur. Shouid this happen,
the fan cannot be manuaily turned off, but it wiii auto-
matically turn off when the internai parts have
cooied. The fan may stay on up to approximateiy 30
minutes after the range and microwave oven controis
have been turned off.
—— — —
Page 8

How to Defrost .”
Defrosting is one of the most important advantages
of a microwave oven. Your new oven makes defrosting even easier and better. It’s microwave-fast, but
gentle enough to defrost uniformly with a minimum of
attention. The Microwave Guide & Cookbook helps
too, with step-by-step instructions for defrosting all
types of food.
The Defrost setting gives you an automatic power
level of 3, which is best for most defrosting. You may
change it if you wish, which makes Defrost a versatile
function. Power Level can be changed, but only after
time is entered.
You may open the door at any time during micro-
waving. To resume defrosting, close the door and
press START.
TIPS FOR DEFROSTING
Foods frozen in paper or plastic can be defrosted
right in the package. The Microwave Guide & Cook-
book gives you special instructions for packaging
and freezing foods which will be used in automatic 3step cooking programs.
For even defrosting, many foods need to be turned
over, rotated or broken up part way through the defrosting time. Let the oven remember for you. If you
set the oven for the first time period, it will signal
when food needs attention. Always start with minimum defrosting time.
“HURRY-UP” DEFROSTING
With “Hurry-Up” defrosting, food will need less time
but more frequent attention. If you want to defrost
small items in a hurry, you can raise the Power Level
after entering time by touching POWER LEVEL pad
and 7 or 10.
To defrost at Power Level 7 (Medium-High), cut total
defrosting time to %. Rotate, turn over or stir food af-
ter Yzof the new total time.
To defrost at Power Level 10 (High), cut total defrost- -.
ing time to %. Rotate, turn over or stir food fre
quently.
a
HOW TO DEFROST 2 POUNDS OF PORK CHOPS
1. Touch DEFROST. The function
legend lights up.
2. Enter Time. Touch 8 and O ,
0 . Display shows 8:00. Power
Level is automatically at 3.
3. Press START. When oven shuts
off, turn package over.
4. Touch DEFROST.
5. Enter Time. Touch 8 and O ,
0 . Display shows 8:00.
8
—
—-
-—
6. Press START. When oven shuts
off, separate pieces. Let stand to
complete defrosting.
—
Page 9

How to Time Cook
Time Cooking, or cooking your food according to a predetermined amount of time, is probably familiar to you from
conventional cooking. With your microwave oven, however,
you preset the time and the oven turns off automatically.
Using Your Oven to Time Cook
Follow the cooking steps below to
help you learn to Time Cook
properly.
Step 1: Fill a cup % full of water
and 1 teaspoon of freeze dried coffee. Use a cup that has no metal
decoration. Place cup in oven and
se door.
Step 2: Touch TIME COOK. Signal
light above TIME COOK comes on.
The read-out panel shows :0 and
Power 10.
Step 3: Select your time. Touch 1,
2, and O for a minute and 20 seconds. Readout shows 1:20. If another Power Level is desired touch
Power Level and the number although Power Level 10 (HIGH) is
preferred for this cup of coffee.
\
Step 4: Touch START, Inside light
comes on and fan starts. Cooking
time counting down shows on display.
Step 5: When time is up, oven signals. Oven, light, and fan shut off.
Microwaving Tips
● Make sure all utensils used in
your microwave oven are labeled
“suitable for microwaving”. Check
your Cookbook for specific test to
determine “microwave-safe” utensils.
. Paper towels, wax paper, and
plastic wrap can be used to cover
dishes in order to retain moisture
and prevent spattering.
. Most microwaved foods require
stirring, rotating, or rearranging.
Check your Cookbook for specific
instructions for the food you are
microwaving.
. Some foods such as unshelled
eggs and hot dogs must be
pricked to allow steam to escape
during cooking.
Questions
and Answers
Q. I set my oven for the time called
for in the recipe but at the end of
the time allowed, my dish wasn’t
done. What happened?
A. Since house power varies due
to time or location, many Time
Cook recipes give you a time range
prevent overcooking. Set the
n for minimum time, test the
e
food for doneness, and cook your
dish a little longer, if necessary.
Q. I want to cook my dish on a
Power Level other than HIGH, what
do 1need to do?
A. To change the Power Level,
touch the Power Level pad, then
touch number pad for power level
desired.
Q. Can I interrupt my Time Cook
function to check the food?
A. Yes. To resume cooking, simply
close the door and touch START.
NOTE: Microwave power will not
come on until you are ready. You
must touch START for cooking to
begin.
9
Q. I touched the number pads and
selected my power level. When I
touched START, however, my oven
didn’t come on. Why not?
A. The TIME COOK pad must be
touched before setting the number
pads or else your oven will not begin cooking.
Page 10

.
●
—.
How to Temp Cook
For many foods, temperature cooking (Temp Cook) is
the most accurate method. Use it for cooking meat-
loaf, roasts and other foods where internal temperature is the best test of doneness. Use it to heat or
reheat foods to precise serving temperature. It takes
the guesswork out of cooking, because the oven
shuts off automatically when food reaches the preset
temperature.
Temperature Cook gives you an automatic Power
Level of 10. After entering the temperature, you may
change power level.
The oven helps you with temperature cooking. If
after you press START, the oven gives a 3-second
signal, it means you selected a temperature lower
than that of the food.
If you set a temperature lower than 90° or higher
than 200°, the oven gives a 3-second signal and
shows you the incorrect figure so you can recognize
your mistake and reset.
If you forget the probe or have not attached it to the
oven correctly, or if probe needs service, the oven
gives a 3-second signal and then shuts off. All you
have to do is attach the probe and press START.
HOW TO USE A TEMPERATURE COOK
RECIPE
Temperature Cook recipes tell you where to place
the probe and attach the cable. Temperature and
power level are printed in bold type so you can read
them at a glance. Be sure to touch TEMP COOK before touching the number pads. If you need to
change the power level, do so after you have entered
the temperature.
BASIC MEATLOAF
Basic Meatloaf
POWER LEVEL: High
APPROX. MICROW~VE TIME: 15 to 20 min.
I% Ibs. ground chuck ....... Mix together beef, on-
beef
3A cup chopped onion
% cup fine dry bread
crumbs
1 egg
2 tablespoons
ketchup
1 cup milk
1 teaspoon salt
‘A teaspoon pepper
% teaspoon paprika
2 tablespoons ketchup., Spread ketchup evenly
Insert temperature probe so tip is in center of loaf.
Cover tightly with plastic wrap, arranging loosely
around probe to vent. Attach cable end into receptacle. Microwave at High. Set Temp, Set 170°.
When oven signals, remove meatloaf and let stand
about 10 minutes to firm before serving. Serve in
wedges.
ion, crumbs, egg, ketchup, milk and seasonings. Mold into a
rounded, flat loaf in 9-in.
pie plate.
over top of loaf.
TEMP: 170°
Makes 6 servings.
HOW TO TEMPERATURE COOK BASIC MEATLOAF
.
1. Insert Probe and insert
cable end into receptacle.
Touch TEMP COOK.
2. Enter Temperature.
Touch 1 , 7 and O .
Display shows 170. Power
Level shows 10. No
change needed. food in degrees until 170°
3. Press START. Display
shows -90 until temper-
ature reaches 90°. Then
it displays temperature of
is reached.
10
——
Page 11

THE MICRO-THERMOMETERTM PROBE LETS YOU COOK TO ACCURATE TEMPERATURE.
1
The Micro-Thermometer probe is essential when using both the Temperature Cook and Sim ‘N Cook TM
controls. When temperature cooking, insert the
probe at least one inch into the food which you are
cooking. When using the probe with the Sim ‘N Cook
settinq, insert the probe into the liquid portion of the
food. -
Place food with probe in oven and insert the cable
end into receptacle on oven wall. If you forget the
probe or do not attach it correctly, the oven will
sound a 3-second signal when you press START.
The oven will not start.
When needed, loop the cable and use the clip to hold
it in place. This prevents the probe from slipping out
of position. If the probe does slip out of position during cooking, reposition the probe, press START and
continue cooking. When closing the door, make sure
the probe cable doesn’t interfere with door seal. Do
not leave the probe in the oven if it is not inserted in
food; this could cause damage to the oven.
FOODS NOT RECOMMENDED FOR USE WITH THE
TEMPERATURE PROBE.
Delicate butter icings, ice cream, frozen whipped
toppings, etc., soften rapidly at warm temperatures.
Lowest setting on temperature probe is 90°. Time
cook these heat sensitive foods.
Most frozen foods. The probe should not be inserted
into hard foods. Defrost roasts, casseroles or convenience foods, then cook or heat them with the
probe to precise serving temperature. .
Batters and doughs should be observed during baking and tested for doneness. They may also require
turning of the dish. Time cook these foods.
HOW TO POSITION THE PROBE IN TYPICAL FOODS FOR TEMPERATURE COOKING
Raw Vegetable Casserole. Position
the probe so that the tip rests on
the bottom of the dish at the center. Set temperature for 200”.
overs. Position the probe so
(
@
- tip is in center of the dish, not
touching the bottom. Heat to 150°
to 160°.
Plates of Food. insert probe as
horizontally as possible, so tip is in
center of largest item, but not
touching a bone. Heat to 160°.
Meatloaf. Insert probe as horizontally as possible, so that tip is in
center of the loaf. Set temperature
for 170”.
11
— 11—.
Soups and Beverages. Use the clip
to hold the probe tip in the center
of the food off the bottom of cup.
Heat cream soups to 140°, waterbased soups to 150° to 160°.
Dips. Insert probe so tip is in center of dip. Use clip to hold it in
place, Heat sour cream dips to 90°
and cheese dips to 120°.
Page 12

—
How to Use Sim ‘N CookTMControl
Setting the oven to use the “Sire ‘N Cook” control is
easy. You don’t enter time because it is a temper-
ature function. You don’t enter temperature or power
level because the oven does that automatically.
There is no automatic shut-off.
The “Sire ‘N Cook” control lets you slow-cook foods
which need long, gentle cooking to tenderize or de-
velop flavor. Food is brought to a simmer rapidly,
then the temperature probe maintains simmering at
about 180° for as long as you want. Choose this setting for pot roasts, stews, or any favorite slow-cook
recipe.
If, after you press start, a 3-second signal sounds
and the oven shuts off, it means you have forgotten
the probe or have not attached it to the oven
correctly.
Casserole Suggestions for
Automatic Simmering
Your Cook Book recipes specify size of casseroles
needed for simmering certain foods. A summary of
dish sizes for a variety of foods which automatically
simmers with excellent results’is listed below.
Be sure to use the amount of water called for in the
recipe, and to cover the food. Covering retains the
steam which helps soften and tenderize the food dur-
ing microwaving.
Covering the food tightly to retain steam is so important that we recommend that you use plastic wrap,
stretching over the top of the casserole. Gather it
loosely around the probe, allowing some space for
venting (see pictures in your cookbook). Do not use
the lids to your casseroles.
Alternately, check department stores housewares
sections for plastic or stoneware accessories designed for automatic temperature cooking. These
pots have lids designed with slots cut out so the temperature probe can be inserted from the outside of
the casserole through the lid directly into the food.
FOOD
Chuck Roast (5 lb.)
Beef Stew (2 lb. beef
cubes)
Chicken, Stewing or
Simmering
Chili, and other Saucy
Hamburger Mixtures
Dried Beans or Peas
soup
Pork Chops
MICROWAVE
OVENPROOF
UTENSIL
Oblong 13 x 9 x 2-in. dish
or12 x10x2-in. dish
3 to 4-qt. casserole or
4-qt. heat-tempered glass
mixing bowl
4 to 5-qt. casserole or
4-qt. heat-tempered glass
mixing bowl
5-qt. casserole
3 to 4-qt. casserole or
4-qt. heat-tempered glass
mixing bowl
5-qt. casserole
Oblong 13 x 9 x 2-in. dish
HOW TO USE SIMMER ‘N COOK ‘M CONTROL TO COOK A STEW
1. Insert Probe as
directed in cookbook.
Always loop cable and
fasten with the clip so it
stays put during long
cooking.
2. Attach Cable End into
Receptacle. Make sure
cable doesn’t get caught
in the door.
3. Touch “SIM ‘N
COOK”. The function
legend lights up.
12
—
4. Press START. Cooking
continues until you open
the door or clear the program by touching
CLEAR-/OFF. -
—
Page 13

How to UseTemp HoId
Temp Hold is an especially handy feature of your mi-
crowave oven. It lets you hold foods at serving temperature, keeping them “just-cooked” hot and fresh.
With the Temp Hold feature:
1. You can select a holding temperature between
90° and 200”F.
~
1
v
2. You can select any Power Level you want.
Because foods tend to stay moist and tender during
microwaving, Temp Hold is the perfect way to keep
vegetables, casseroles, and even scrambled eggs
piping hot and ready to serve. Roasts, ham and
poultry, too, may be kept juicy and table ready with
this feature.
You can even warm up leftovers!
If you wish, you can set your oven to automatically
defrost, hold, time or temperature cook, and then
Temp. Hold. You must be sure, when you combine
Time Cook and Temp Hold, that the temperature
probe is placed in the food before starting the
microwave oven.
For temperature cooking and holding, you can
choose one finished temperature and power level for
e cooking and if you want another
wer level for the Temp Hold cycle.
4$
not turn off automatically so you
holding time. (Allow foods to hold
safe. Times vary depending on
amount.)
temperature and
Temp Hold does
can control the
only as long as
food type and
Things to remember when setting
your oven to microwave
Temp Hold.
● TO prevent spoilage, do not hold foods except
solid roasts at temperatures below 150° for more
than 2 hours.
. Solid (not rolled) roasts may be held below 150°.
However, during the microwave roasting process,
a great amount of heat is stored in the roast. Keep-
ing the roast in the warm oven cavity during
TEMP/HOLD can cause a greater increase in internal temperature than when allowing the roast to
stand outside the oven on a kitchen counter. Temperatures of up to 20° to 30° above the TEMP/
HOLD setting are possible. Because of this heat
storage, it is not possible to hold roasts at a rare
degree of doneness.
It is suggested that you first remove the roast from
the oven and let it stand, uncovered, for about 10 to
15 minutes before returning to TEMP/HOLD. Or, if
you know before cooking that you intend to hold a
solid roast at serving temperature, you may com-
pensate for the stored heat by undercooking the
roast. See your Cookbook for details.
How to speed up
Automatic Simmer recipes
The Automatic Simmer recipes in the Mcrowave
Guide and Cookbook were especially developed for
long slow cooking. However, you can speed up the
cooking process by using the Temp Hold feature and
following the instructions as given in the cookbook.
You can cut the time in half for most simmer-cooking
recipes with no risk of toughening because with the
temperature probe you do not exceed the recom-
mended temperature,
HOW TO TEMPERATURE HOLD
+’1
1. Insert probe in food
and attach probe to oven.
(If vou have iust Tem~
“eked you; food, steps
*
.ne and two are already
done)
2. Touch TEMP HOLD.
Read out displays: O .
Select the holding temperature. Oven will
automatically microwave
the food until it reaches
pre-set temperature, then
maintains temperature.
3. Select POWER LEVEL.
Oven will automatically
use High unless you
select another level. See
cookbook for suggested
power levels.
13
$/
4. Press START. The
oven will not shut off until
you touch the CLEAR/
OFF Pad.
Page 14

How to Use Memory Function
Q
.
—.
The Memory Entry/Recall pad allows you to store When the pre-set cooking function is needed, touchcomplete 2, 3, or 4-step programs or any l-step
cooking function which requires the entry of time or oven automatically for the cooking function(s) you
temperature. Just set the oven and press the Memory
Entry/Recall pad instead of Start. As Memory Entry/
Recall pad is pressed, readout becomes blank, indicating that oven can now be used for other
programs.
ing Memory Entry/Recall pad once again will set the
previously stored in memory. Touch Start and the
oven begins microwaving this pre-set program.
DO THIS TOUCH THIS
Set the control panel for the way
you want the food cooked. But Before you touch Memory Entry/
don’t press START. Use a single Recall, signal lights on the readout
setting or a program as described
on page 16. Defrost, cook by time
or temperature. . . any settings but Memory Entry/Recall pad is
the automatic simmer function
work with memory.
Leave these simple instructions with the baby sitter:
DO THIS TOUCH THIS
Put the food in oven and close the
door. Insert probe if TEMP COOK
or TEMP HOLD has been selected.
YOU’LL SEE THIS HAPPENING
ON THE CONTROL PANEL
above the function that you set
come on. Lights go off as soon as
touched.
SHE’LL SEE THIS HAPPENIN
ON THE CONTROL PANEL
Signal lights show what kind of
microwaving you selected. (No
light shows when using HOLD/
TIMER.)
a
The oven will cook dinner the way
the children like it. Just as if
Mother were there.
Change your mind? It’s easy to clear the Memory,
Just enter a new program, and the old instructions Memory only stores instructions. You’re free to use
are automatically erased. The oven is ready to remember new instructions.
Remember: If you have any cooking program set in
the oven, pressing Memory Entry/Recall pad will
store that program in oven’s memory, and will erase
the previous memory.
Use your oven while it’s remembering. Using the
the oven for any type microwaving. Only when you
touch Memory Entry/Recall and START does the
oven start carrying out the stored instructions.
14
All signal lights go off, except the
one that confirms your first instruction. The oven carries out the
cooking program.
a
Page 15

Forget what you
programmed the oven
●
●O
m
@ do? Just ask.
Your new microwave oven
Suppose you programmed the oven
to defrost, hold, then cook. You stored the inforrna~
tion for later. During the day, while you were using
the oven for other things, you forgot what program
you entered.
TO ASK BEFORE YOU START
MICROWAVING:
1. Touch MEMORY ENTRY/RECALL. Signal lights
of specific functions light up to show you which type
of cooking you selected.
2. Touch the cooking function pads you want to
know about.
3. The answers appear in the read-out panei.
WHEN YOU WANT TO ASK THIS
will remind you of what’s
in the mornina
m
TO ASK WHILE YOU’RE
1. The read-out panel and cooking signal lights tell
you how the oven is microwaving at the moment.
2. Touch the other cooking function pads you want
to know about.
3. The answers appear in the read-out panei.
TOUCH THIS
●
● D
MICROWAVING:
● 0
m
@Es
tocome.
YOU’LL SEE THiS ANSWER ON
THE CONTROL PANEL
tered a program this morning.
*
What cooking did it call for?
How long will defrosting be?
How long will cooking be?
Did I ask for any hold-time in
between?
The signal lights on the display
above TIME COOK and DEFROST
come on.
The read-out panel shows the
amount of total time for defrosting.
(The Defrost signal light stays on
until touching TiME COOK in the
instruction below.)
The read-out panel shows the
amount of total time for cooking.
(The Defrost signal light goes off.)
The Time Cook signal light comes
on.
The read-out panel shows the
amount of HOLD time. (No signal
lights are on.)
15
Page 16

How to Use the Hold/Timer
—.
Your HOLD/TIMER, which operates without microwave energy,
has three timing functiorls.
It operates as a Minute Timer, it
can be set to delay cooking or may
be used as a hold setting after defrosting. Hold/Timer can be set up
to 99 minutes.
Step 1: Touch HOLD/TIMER pad.
The read-out panel shows :0.
Step 2: Select the amount of time
you desire. Touch the appropriate
number pads. If, for example, you
are timing a three minute phone
call, touch 3, 0, and O. The readout
panel shows 3:00.
Step 3: Touch START. The readout
display shows the time as it counts
down.
Step 4: When time is up, a signal
sounds. The oven turns off.
The HOLD/TIMER can also be
used to program “standing time”
between microwave cooking func-
tions. The time can range from one =
second to 99 minutes and 99 sec-
ends. A HOLD, or “standing” time
may be found in some of yo-ur own
recipes or Cookbook.
To set the oven to delay cooking
Up to 99 minutes follow Steps 1
and 2 to enter hold time, then set
time or temperature desired before
pressing START. When holding before temperature cooking, be sure
probe is in food before pressing
START.
How to Defrost-Hold/Time–Time Cook
TO help you become acquainted with the HOLD/TIMER feature as used with Time Cook or Temp Cook follow
Steps below to defrost a frozen casserole for 15 minutes, then hold 10 minutes and then cook 25 minutes. If USing Temp Cook after Hold/Timer, be sure to insert probe correctly as shown in Temp Cook section of this book.
Step 1: Remove casserole from the
freezer and place in oven. Touch
the DEFROST pad. The readout
panel shows :0. Signal light above
DEFROST comes on.
Step 2: Touch 1, 5, 0, and O for defrosting time. 15:00 and Power 3
appear on readout. (Defrosting is
automatically set on Power Level 3
but can be changed by touching
POWER LEVEL pad and the new
Power Level.)
Questions
and Answers
Q. What will happen if I accidentally reverse the instructions?
A. If you accidentally reverse the
sequence of programming instructions, your oven automatically
rearranges your program. Defrosting always comes first, then hold,
and then the cooking function.
Step 4: Touch 1, 0, 0, and O to hold
for ten minutes. 10:00 and “HOLD”
appear on the display.
Q. Can I Defrost-Hold only on my
oven?
A. Sometimes you may want to defrost a food, hold it, and refrigerate
it to be cooked later. All you need
to do is program in Defrost and
amount of time. Then program
Hold and amount of time. Put your
thawed dish in the refrigerator and
cook later at a convenient time.
NOTE: Allow foods to remain at
room temperature only as long as
safe. Times will vary.
Step 5: Touch the TIME COOK
pad. The display shows :0 and
Power 10 (HIGH). Signal light
above TIME COOK comes on.
Step 6: Touch 2, 5, 0, and O for
twenty-five minutes of cooking
time. 25:00 and Power 10 appear
on the display panel.
Step 7: Touch START. Power 3 and
15:00 counting down on display.
All signal lights except Defrost turn
off. When TIME COOK begins, signal light above TIME COOK
appears.
Q. I programmed my oven for a
specific defrosting time but it de- t
frosted longer than necessary.
What happened?
A. When instructions conflict, the
oven carries out the last instruc-
tion. You may have set the oven to
Defrost for 4 minutes, Hold/Time
for 2 minutes, and then Defrost for
6 minutes. In this case, the oven
would Defrost for 6 minutes and
Hold/Time for 2 minutes.
a
16
—
Page 17

The Exhaust Feature ~
.-
.
\
The exhaust hood feature on your GE microwave
oven is equipped with a metal filter which collects
grease. When the fan is operated, air is drawn up
To remove grease filter, grasp the “finger hold” on
the filter and push to the rear. The filter will drop out.
To replace grease filter, insert the filter in the top
me slot on the back of the opening. Push to the
a
~ar and upward to snap into place.
I
through the filter and is then discharged through
provided venting to the outside. The hood also has a
light for illuminating the counter surface.
Soak, t~en agitate filter in hot detergent solution.
Don’t use ammonia or other alkali because it will
darken metal. Light brushing can be used to remove
inbedded dirt. Rinse, shake and remove moisture be-
fore replacing. Filters should be cleaned at least
once a month. Never operate your hood without the
filter in place. In situations where flaming might
occur on surfaces below hood, filter can retard entry
of flames into the unit.
—
17
— — —
Page 18

Care for Your Microwave Oven
,
—
Your New Microwave Oven is a Valuable Appliance,
Protect It From Misuse By Following These Rules:
● Keep your oven clean and sweet-smelling.
Opening the oven door a few minutes after cooking
helps “air-out” the interior. An occasional thorough
wiping with a solution of baking soda and water
keeps the interior fresh.
● Don’t use sharp-edged utensils with your oven.
The interior and exterior oven walls can be
scratched. The control panel can be damaged.
● Don’t remove the cover over the “stirrer” at the
top of the oven (microwave feature
You will damage the oven.
4 on page 5).
BE CERTAIN POWER IS OFF BEFORE CLEANING ANY PART OF THIS OVEN.
How to Clean the Interior
Walls, floor and plastic cover. Because there is little
heat except in the food, or sometimes in the utensils, spills and spatters are easy to remove. Some
spatters are easy to remove. Some spatters can be
removed with a paper towel, others may require a
damp cloth. Remove greasy spatters with a sudsy
cloth, then rinse and dry. Do not use abrasive
cleaners on oven walls. NEVER USE A COMMERCIAL OVEN CLEANER ON ANY PART OF
YOUR MICROWAVE OVEN.
Door-inside. Glass: Wipe up spatters daily, wash
when soiled, with a minimum of sudsy warm water.
Rinse thoroughly and dry.
Metal and plastic parts on door: Wipe frequently
with a damp cloth to remove all soil. DO NOT USE
ABRASIVES, SUCH AS CLEANING POWDERS OR
STEEL AND PLASTIC PADS. THEY WILL MAR THE
SURFACE.
Special note when using Brown ‘N Sear Dish: High
heat generated on bottom of Brown ‘N Sear Dish
can cause scorched appearing stains to bake onto
the oven shelf if grease is present. These may be re-
moved with Delete R
Drackett Products Co.
After using Delete, rinse and dry thoroughly, following instructions on can. Do not use Delete on the
painted surfaces such as walls. It will scratch the
paint.
.
Polishing Cleanser by the
Delete may be purchased from your local dealer or
from your Authorized Service Center. Check the
“yellow pages” for location and phone number.
Delete may be sold in grocery or hardware stores,
or in the housewares section of some department
stores.
Automatic Temperature Probe. Probe is sturdy, but
care should be taken in handling. Do not twist or
bend; avoid dropping temperature probe.
Clean as soon after using as possible. To clean,
wipe with sudsy cloth, then rub lightly with plastic
scouring ball if necessary. Rinse and dry. (Or wash
in dishwasher. )
How to Clean the Exterior
Case. Clean the outside of your oven with soap and
water, then rinse and dry. The outer pane of the
window is glass. Just wipe clean with a damp cloth.
Chrome trim is best wiped with a damp cloth and
then with a dry towel.
Control Panel. Wipe with a damp cloth. Dry thor-
oughly. Do not use abrasives or sharp objects on
the panel. They can damage it.
A.
*
18
— —
Page 19

\
Y&
\\
\
....:.,............:............,.,,:
To replace hood lamp, first disconnect power at
main fuse or circuit breaker panel or pull plug. Remove 2 screws from each side of lower panel and 3
screws from front edge. Lower panel until it rests on
range below. Place fingers on top near each end of
lamp. Press down and roll top of lamp gently toward
front until it stops. Remove. Replace with same type
and wattage lamp. Hold lamp near each end and insert prongs in sockets. Gently roll top of lamp toward
rear of range until it stops. Raise lower panel and
replace screws.
To replace your oven lamp, first disconnect power at
main fuse or circuit breaker or pull plug. Remove the
top grill by taking off 2 screws which hold it in place.
Next, remove the single screw on top left that
secures lamp housing. (On models so equipped.)
Open oven door for easier removal of the lamp hous-
ing assembly. Then grasp tab and pull out and up to
clear door hinge and front lip of oven. To remove
bulb, push it inward gently and turn to left, then pull
outward from socket. Replace with GE Lamp
# 25T8DC.
Do not attempt to operate the oven unless the grill is
place.
@
——
Clean off the grease and dust on hood surfaces
often. Use a warm detergent solution. About 1 tablespoon of ammonia may be added to the water. Take
care not to touch the filters and enameled surfaces
with this. Ammonia will tend to darken metal.
19
Page 20

Common Problems and Easy Solutions
—.—
Problem: The oven doesn’t seem to work at all.
Solution: Make sure power is on. Check to see that
3-prong plug is inserted firmly into a proper outlet.
Check the house control box to see that wall outlet
and fuses are working.
If power is on, then the oven is not accepting your
instructions. You may have entered another func-
tion, or you may have programmed functions which
cannot be combined, or you may have made a numerical entry before a function entry. Touch
CLEAR/OFF.
Problem: The control panel lights up but oven
won’t turn on when 1touch START.
Solution: Check that door is securely closed. Un-
less door is closed to engage the safety interlocks,
the microwave energy cannot come into the oven.
Problem: “PF” appeared
Solution: “PF” shows on readout when you first
plug in your oven–or if the power supply has been
interrupted.
controls.
Problem: My oven light has burned out. Can I still
use my oven?
Solution: Yes, see page 17 regarding replacement.
For safety’s sake the socket should not be left open.
General Electric service does not stock these lights.
Problem: Hood fan isn’t working right.
Solution: If it doesn’t work at all, check the main
fuse or circuit breaker. If it works but is faster than
usual, the filter may need cleaning. If fan goes on
and off, it’s probably overheating or if fan is on and
can’t be turned off, see page 7 about the Automatic
Fan Feature.
Problem: If I want to check temperature that I set
for Temp Cook or the present temperature during
Sim ‘n Cook what do I do?
Solution: Touch Temp Cook or Sim ‘n Cook pad and
temperature will be displayed on readout.
Touch CLEAR/OFF and reset the
onmy readout display.
Problem: My oven displayed the “temperature set”
and a 3 second signal sounded even though I
thought I set it right.
Solution: Be sure probe is in place in oven and con-
nected at the receptacle end. If Temperature Cook
and Probe are properly set, and food temperature is
above IO” F, yet a 3 second signal still sounds, call
for service and indicate that you probably have a
problem with a probe or a wiring defect.
Problem: When using Temperature Cook, after I
touch START, a signal sounds, and oven turns off.
I’ve rechecked everything and 1 have set the oven
properly.
Solution: You have probably set an end temper-
ature which is lower than the present temperature
of the food. For example, if you set oven to heat
your cup of coffee to 150° but your coffee is already
155°, the oven turns off because the temperature
you set has been reached.
Problem: I have some TV and radio interference
while operating my microwave oven. Is anything
wrong?
Solution: Some TV and radio interference similar to
other appliance interference might be noticed while
operating the microwave oven, but does not indicate a problem with your oven.
Problem: My food is undercooked although 1set all
the controls properly.
Solution: Food may have not been fully defrosted.
Times given in the recipe are minimum, but the density or size of food varies and thus cooking time
should be adjusted. Check recipe for special instructions for turning or stirring of food.
Problem: Oven gives a signal when I try to set tem-
perature and press START.
Solution: You are setting a temperature outside the
oven’s range of 90° to 200° or have not connected
the probe.
0
—- -c ——
20
—
Page 21

Need Service?
-ou’11 find General Electric Factory Service Centers in all these cities.
ALABAMA
Birmingham -
35210
2500 Crestwood
Boulevard
(205) 956-0333
(Decatur-Hunts-
ville)
Huntsville -35805
1209 Putnam Drwe
(205) 830-0150
Mobde -36609
1107 Beltline
Htghway South
(205) 471-1451
ARIZONA
Phoenix -85031
25 South 51st
Avenue
60X 14278
P.O.
(602) 269-2121
Tucson -85705
2015 North Forbes
Boulevard
Suite 111
(602) 623-8415
ARKANSAS
Little Rock -72209
8405 New Benton
Hwy,
(501) 568-7630
CALIFORNIA
(San Bernardlno-
Riverstde)
Bloomington -
92316
10121 Cactus
Avenue
(714) 877-3434
(San Francisco)
Burhngame -
4010
9 Adrian Road
5) 981-8760
a
Fresno -93727
1809 North Helm
Street
(209) 255-1851
Los Anaeles -
90055
2815 East 46th
Street
(213) 583-1141
Sacramento -
95815
1613Y2 Arden Way
(916) 929-2247
San Diego -92101
3554 Kettner
Boulevard
(714) 297-3221
San Jose -95123
5763 Winfleld Rd
(408) 298-3870
Van Nuys -91405
6843 Lennox
Avenue
(213) 989-5710
COLORADO
C:l:0#3 Springs -
1865 North
Academy
Su\te B
(303) 597-8492
Denver -80207
5390 East 39th
Avenue
(303) 320-3301
CONNECTICUT
Bridgeport -06604
615 North
Washington Ave
(203) 367-5311
East Hartford -
06108
‘65-Prestige Park,
Iaza 3
3) 528-9811
*
ELAWARE
(Brandywlne -
Wllmlngton)
Gl;en3t#s, PA -
RD. =2,
Box 210
(215) 358-1500
DISTRICT OF
COLUMBIA
Jessup, MD -
20794
8201 Stayton Drive
(301) 953-9130
FLORIDA
Fort Lauderdale -
33309
1101 W McNab Rd.
(305) 974-6708
Fort Myers -33901
4160 S, Cleveland
Avenue
(813) 939-2812
Jacksonwlle -
32205
5266 Highway
Avenue
(904) 783-1330
(P:~:ca:)o-W. Palm
Lake Worth -
33460
1802 Madrid
Avenue
(305) 655-7040
Miami -33167
3200 NW. llOth
Street
(305) 685-5144
Orlando -32807
6545 East Colonial
Drive
(305) 273-6370
Tallahassee -
32301
1205 South Adams
Street
(904) 222-6931
Tampa -33611
5201 S. Westshore
Boulevard
60x 13708-
Interbay Station
(813) 837-1906
GEORGIA
Atlanta -30325
1695 Marietta
Boulevard
PO Box 19917
(404) 897-6400
Savannah -31406
211 Telewslon
Circle
(912) 925-0445
HAWAII
Honolulu -96813
404 Cooke Street
(808) 533-7462
IDAHO
(Boise)
G:$a;4Clty -
5250 Chlnden
Boulevard
(208) 376-5880
ILLINOIS
Champaign -
61820
1205 North Hagen
(217) 359-4088
Chicago -60638
5600 West 73rd
Street
(312) 594-2424
Elk Grove Village -
60007
10 Kmg Street
(312) 593-2525
Lombard -60148
827-635 Westmore
Avenue
(312) 629-8010
Peons -61614
7708 North
Crestl!ne Drive
(309) 692-5070
Rockford -61107
401 North 2nd
Street
(815) 962-7200
Springfield -62702
2252 South 15th
Street
(217) 753-8088
INDIANA
Evansville -47714
1016-K s.
Weinbach
Avenue
(812) 476-1341
Fort Wayne -46808
4632 Newaygo
Road
(219) 484-9005
Gary -46409
5185 Broadway
(219) 981-2533
Indianapolis -
46219
6233 Brookwlle
Road
(317) 356-8861
South Bend -
46613
1902 Miamt Street
(219) 288-0685
lOWA
Cedar RapIds -
52405
11~~ Street,
(319) 366-8579
Davenport -52802
1074 South Dittmer
BOX 3188
PO.
(319) 326-5101
Des Motnes -
50313
1637 N.E. 58th
Avenue
(515) 266-2191
KANSAS
Kansas City -
66115
2949 Chrysler Road
(913) 371-2242
Wichita -67211
820 East
Indianapolis
(316) 267-3366
KENTUCKY
Lexington -40505
1144 Floyd Drive
(606) 255-0848
Louisville -40218
4421 Bishop Lane
BOX 32130
PO.
(502) 452-3511
LOUISIANA
Baton Rouge -
70814
2935 Crater Lake
Drwe
(504) 926-5062
(New Orleans)
Harahan -70123
701 Edwards
Avenue
(504) 733-7901
Shreveport -71102
1430 Dalzell Street
(318) 425-8654
MAINE
South Portland -
04106
54 Darllng Avenue
(207) 775-6385
MARYLAND
Jessup -20794
8201 Stayton Drive
(301) 953-9130
MASSACHUSETTS
(Cape Cod)
Hyannw -02601
80 Enterprise - Unit
(6:;) 771-5905
Pittsfield -01201
1450 East Street
(413) 499-4391
(Boston-South)
Westwood -02090
346 Untverslty
Avenue
(617) 329-1250
(Boston-North)
Wilmmgton -01887
281 Main Street
(617)944-7500
MICHIGAN
Detroit -48234
6501 East Nevada
(313) 892-4200
Grand RapIds -
49508
350 28th Street,
S.E.
(616) 452-9754
Lansing -48912
1004 E. Michigan
Avenue
(517) 484-2561
MINNESOTA
(Mnnapohs-st,
Edina -55435
7450 Metro
Boulevard
(612) 835-5270
MISSISSIPPI
Jackson -39209
325 Industrial Drive
(601) 352-3371
MISSOURI
Kansas City, KS -
66115
2949 Chrysler Road
(913) 371-2242
St. LOUIS -63178
1355 Warson Road
North
P.O. Box 14559
(314) 993-6200
Springfield -65807
1334 West
Sunshine
(417) 831-0511
NEBRASKA
Lincoln -68503
1145 North 47th
Street
(402) 464-9148
Omaha -68117
6636 “F” Street
(402) 331-4045
NEVADA
Las Vegas -89109
3347 S. Htghland
Drwe
Suite 1
(702) 733-1500
Reno -89511
Del Monte
Shopping Center
6465 S, Virglnla
Street
(702) 826-7070
NEW JERSEY
Mount Hollv -
08060 “
Route 38 & Easllck
Avenue
(609) 261-3500
North Caldwell -
07006
5 Falrfleld Road
(201) 256-8850
(Asbury Park)
Oakhurst -07712
2111 Highway 35
(201) 493-2100
Vineland -08360
749 North Delsea
Drive
(609) 696-1506
NEW MEXICO
Albuquerque -
87107
3334 Princeton
Drive, NE.
(505) 345-1861
NEW YORK
Albany -12205
2 Interstate Avenue
(518) 438-3571
Brooklyn -11234
5402 Avenue “N”
(212) 253-8181
Buffalo -14225
3637 Umon Road
(716) 686-2268
(Westchester
County Area)
Elmsford -10523
Fa[:~w Industnal
Route =9-A
(914) 592-4330
(Binghamton)
Johnson City -
13790
278 Ma!n Street
(607) 729-9248
Long Island City -
11101
49-10 Northern
Boulevard
(212) 626-9600
(Nassau-Suffolk
County)
Melwlle -11746
336 South Serwce
Road
(516) 694-8600
(Oflra:e County
Newburgh -12550
1135 Union Avenue
(914) 564-2000
Rochester -14622
1900 Ridge Road
East
(716) 544-7100
Syracuse -13204
965 West Genesee
Street
(315)471-9121
NORTH CAROLINA
Charlotte -28234
700 Tuckaseegee
Road
60X 34396
P 0.
(704) 372-8810
Greensboro -
27406
2918 Baltlc Avenue
(919) 272-7153
Ralelgh -27611
3300 Bush Avenue
60x 28107
PO.
(919) 876-5603
OHIO
Akron -44319
2262 S Admgton
Road
(216) 773-0361
Cincinnati -45242
10001 Alllance
Road
(513) 745-5500
Cleveland -44142
20600 Sheldon
Road
(216) 362-4200
Columbus -43212
1155 West Fifth
Avenue
(614) 294-2561
Dayton -45414
5701 Webster
Street
(513) 898-7600
Toledo -43611
3300 Summit Street
(419) 729-1651
OKLAHOMA
Oklahoma City -
73118
3228 North Santa
(4& 528-2381
Tulsa -74112
6913 East 13th
(918) 835-9526
OREGON
(Portland Area)
Beaverton -97005
14305 SW. Millikan
Way
(503)646-1176
Eugene -97402
1492 W Sixth St.
(503) 342-7285
PENNSYLVANIA
(Brandywlne-Wll-
mington)
Glen MIIIs -19342
RD. =2, Box21O
(215) 385-1500
Johnstown -15905
214 Westwood
Shopping Plaza
(814) 255-6721
(Harrisburg)
Lemoyne -17043
1059 Columbus
Avenue
(717) 761-8185
Phlladel Dhla -
19115’
9900 Global Road
(215) 698-3270
Pittsburgh -15206
6555 Penn Avenue
(412) 665-3700
(Allentown)
Whitehall -18052
1906 MacArthur
Road
(215) 437-9671
RHODE ISLAND
East Providence -
02914
1015 Waterman
Avenue
(401) 438-0300
SOUTH CAROLINA
Columbla -29602
825 Bluff Road
Box 1210
(803) 771-7880
(Greenwlle)
Tavlors -29687
25’Hampton Vdlage
(803) 292-0830
TENNESSEE
Chattanooga -
37403
613 East llth Street
(615) 265-8598
Johnson City -
37601
2912 Bristol
Highway
(615) 282-4545
Knoxwlle -37919
3250 Mynatt Street
(6;5;524-7571
Memphis -38118
3770 South Perkins
(901) 363-1141
Nashville -37204
3607 Trousdale
(615) 834-2150
TEXAS
Austin -78704
2810 S First Street
(512) 442-7893
Corpus Chnstl -
78415
3225 Ayers Street
(512) 884-4897
Dallas -75247
8949 Diplomacy
Row
PO
60X 47601
(214) 631-1380
El Paso -79925
7600 Boeing Drive
(915) 778-5361
(Brownswlle)
Harlingen -78550
1204 North Seventh
(512) 423-1204
Houston -77207
60x 26837
PO,
6126 South
(713) 641-0311
Lubbock -79490
4623
P.O
(806) 793-1620
(Odessa)
Midland -79701
P.O.
Midland Termmal
(915) 563-3483
San Antonio -
12::, N Hackberry
PO,
(512) 227-7531
UTAH
swe City -
2425 South 900
West
PO Box 30904
(801)974-4600
VIRGINIA
Fairfax -22031
2810 Dorr Avenue
(703) 280-2020
Norfolk -23502
4552 E Princess
Anne Dr
(804) 857-5937
Richmond -23228
2910 Hungary
Spring Rd
(804) 288-6221
WASHINGTON
(Trl-City)
Kennewlck -99336
Union Square-
Sulte 206
101 North Union
Street
(509) 783-7403
Seattle -98188
401 Tukwlla
Parkway
(206) 575-2700
Spokane -99206
9624 East
Montgomery St
(509) 926-9562
WEST VIRGINIA
(Charleston)
Huntington -25704
1217 Adams
Avenue
PO
(304) 529-3307
Wheel!ng -26003
137 North River
(304) 233-8511
WISCONSIN
Appleton -54911
343 W W~scons~n
Avenue
(414) 731-9514
Madison -53704
4630 East
Washington Ave
(608) 241-9321
Milwaukee -53225
11100 W Sliver
(414) 462-9225
East
LOOP 289
West
Box 16288
60X 6286
78208
BOX 8278
60X 7518
Road
Spring Rd
LOOP
WATCHFORCHANGES.Addresses and telephone numbers sometimes change. And new Centers open. If the numbers change, check your
telephone book.
Look in the White Pages under “GENERAL ELECTRIC COMPANY” OR“GENERALELECTRICFACTORYSERVICE”.
21
Page 22

FULL ONE-YEAR WARRANTY
GENERAL ELECTRIC MICROWAVE RANGE
(Includes cooking centers and microwave ovens)
FROM GENERAL ELECTRIC TO YOU - This warranty is extended by General Electric to the orig-
inal purchaser and to any succeeding owner and applies to products purchased in the United
States, retained within the 48 contiguous states, the state of Hawaii or the District of Columbia,
and employed in ordinary
WHAT WE WILL DO -
defect within one year from the date of original purchase, we
charge to you. Parts and service labor are included. Service will be provided in the home in the 48
contiguous states, the state of Hawaii or in the District of Columbia.
HOW TO OBTAIN SERVICE - Service will be provided by our local Customer Caren factory service organization or by one of our franchised Customer Care servicers during normal business
hours after you notify us of the need for service. Service can be arranged by telephone.
Look for “GENERAL ELECTRIC COMPANY” or “GENERAL ELECTRIC FACTORY SERVICE” in
the White Pages of your telephone directory or “GENERAL ELECTRIC CUSTOMER CARE@
SERVICE” in the Yellow Pages or write to the address given below.
WHAT IS NOT COVERED - This warranty does not cover the failure of your Microwave Range if it
is damaged while in your possession, used for commercial purposes, or if the failure is caused by
unreasonable use including failure to provide reasonable and necessary maintenance. IN NO
EVENT SHALL THE GENERAL ELECTRIC COMPANY BE LIABLE FOR CONSEQUENTIAL DAMAGES. This warranty does not apply to the state of Alaska nor to the Virgin Islands, Guam, American Samoa, the Canal Zone or the Commonwealth of Puerto Rico.
Some states do not allow the exclusion or limitation of incidental ‘or consequential damages, so
the above limitation or exclusion may not apply to you. This warranty gives you specific legal
rights, and you may also have other rights which vary from state to state.
The magnetron tube is covered in the above full warranty. [n addition to that warranty, if the magnetron tube fails because of a manufacturing defect within the second through fifth year from date
of the original purchase, we will furnish without charge, a replacement magnetron tube. You must
pay the service labor charge for the home call, diagnostic work, and removal, and reinstallation of
the magnetron tube.
All other provisions of this additional limited warranty are the same as stated in the full warranty
above.
home use.
If your General Electric Microwave Range fails because of a manufacturing
will repair the product without
../ ‘
(
ADDITIONAL LIMITED FOUR-YEAR MAGNETRON
TUBE WARRANTY
‘.,
LIMITED WARRANTY
Applicable to the State of Alaska
In the state of Alaska free service including parts will be provided to correct manufacturing de-
fects at our nearest service shop location or in your home, but we do not cover the cost of trans-
portation of the product to the shop or for the travel cost of a technician to your home. You are
responsible for those costs. All other provisions of this limited warranty are the same as those
stated in the full and limited warranties above.
WHERE TO GET FURTHER HELP - If you wish further help or information concerning this warrantv. contact:
M&ager-Consumer Affairs
General Electric Company
Appliance Park, WCE—Room 316
Louisville, Kentucky 40225
A bill of sale, cancelled check or other payment record should be kept to verify the originai purchase date and to estabiish the warranty periud.
RANGE MARKETING DEPARTMENT
GENERAL ELECTRIC COMPANY
Appliance Park, Louisville, Kentucky 40225
GENERAL
WARRANTOR–
General Electric Company
Appliance Park
Louisville, Ky. 40225
ELECTRIC
Pub. No. 49-4492
m
-1- *WW
~m=a=%=ya~
.
6/8 I
Part. No. 862A300PI 40
—
 Loading...