

Page 1

SETUPGUIDE
Page 2
FOR EXTRA HELP...
CONTACT HELP. If you need help while setting up
your computer, call our Automated Troubleshooting
System at 800-846-2118 and choose option 7. When
prompted, enter 531 followed by #.
If you need help after setting up your computer, visit the
Gateway Support Web site at www.support.gateway.com
.
SEE YOUR STARTER GUIDE. After setting up your
computer, read the Starter Guide for tips on using your
computer.
SEE YOUR ONLINE DOCUMENTATION. For
detailed information about using your Gateway
computer, see the User Guide or Reference Guide that
has been included on your hard drive. To access these
guides, click (Start), All Programs, then click
Gateway Documentation.
CHECK GATEWAY SUPPORT. For help and
information about common issues, visit the Gateway
Support Web site at www.support.gateway.com
.
®
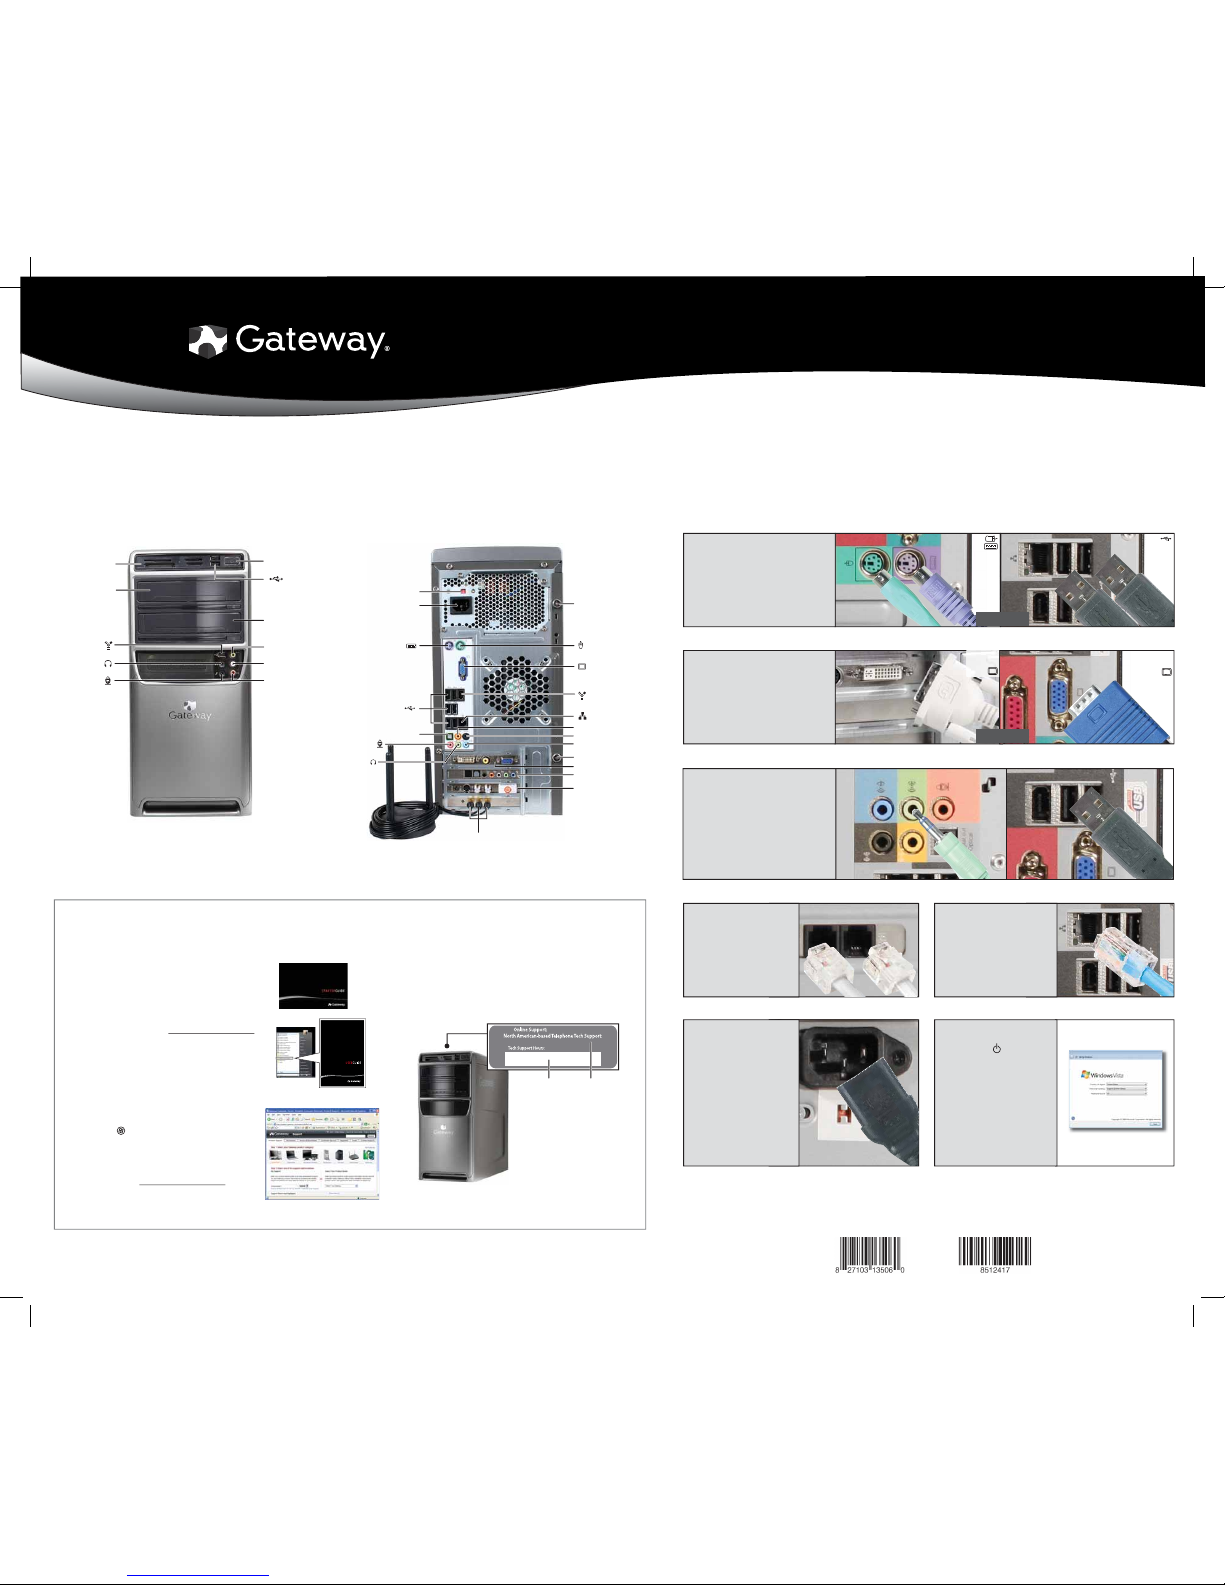
Your Gateway computer is packed with many powerful features.
Icons and color coding help make setting up your computer as easy as possible.
DVD/CD drive
Power button/
power indicator
USB ports
IEEE 1394/
FireWire™ port
Microphone jack
Headphone jack
Memory card reader
DVD/CD drive
(optional)
Audio left jack (optional)
Video jack (optional)
Audio right jack (optional)
SETTING UP YOUR GATEWAY COMPUTER
MAN GERSHWIN SETUP POSTER R1 5/07
SERIAL NUMBER AND CONTACT
INFORMATION LABEL
Gateway Customer Care telephone numbers vary by country or region.
Actual product may vary from image shown. Product specifications subject to change without notice.
© 2007 Gateway, Inc. All rights reserved. Trademarks used herein are trademarks or registered trademarks of Gateway, Inc. in the United States and other countries. All other brands and product names are trademarks or
registered trademarks of their respective companies.
FRONT (may vary with options)
BACK (may vary with options)
otherwise
Integrated video
(VGA)
otherwise
1
Connect the mouse and
keyboard
If you have a wireless mouse or
keyboard, follow the instructions that
came with them.
5
Connect the network
(optional)
Connect the network (RJ45)
cable to the Ethernet jack and a
cable mode, DSL modem, or
network jack.
6
Connect the
power cord
Connect the power cable to
the computer, then plug it
into a power supply. To
protect your system from
power fluctuations, use a
surge protector.
WARNING: To protect your computer
during electrical storms, unplug the
power cord and the modem and
network cables.
7
Turn on the
power
( )
Turn on the monitor and
computer. Follow the Windows
setup screen instructions.
IMPORTANT: Connect devices, such as a
printer or scanner, after you complete the
Windows setup. Follow the instructions
that came with the device.
2
Connect the monitor
(depending on your model)
If available, connect to Add-in video
(DVI or VGA), otherwise connect to
Integrated video (VGA).
4
Connect the
modem
(optional)
Connect the modem cable to
the modem jack and the
telephone wall jack. You can
connect your telephone to the
telephone jack.
Add-in video
(DVI or VGA)
Voltage switch
Headphone jack
Microphone jack
S/PDIF jack
TV tuner (optional)
Audio card (optional)
USB ports
PS/2 keyboard port
PS/2 mouse port
Power connector
Case cover thumbscrew
Case cover thumbscrew
Ethernet (network) jack
Add-in video card (optional)
Integrated monitor
(VGA) port
Center/subwoofer jack
Surround left/right jack
IEEE 1394/ FireWire™ port
3
Connect the speakers*
(optional)
1 Plug the audio cable into the back of
your computer.
2 Plug the USB cable into one of your
computer's USB ports.
Note: If you have a speaker bar, follow
the instructions that came with it.
Wireless antenna connectors (optional)
Audio in/side speaker jack
Gateway help
resources and
Customer Care
information
Model and
serial number
 Loading...