

Page 1
Gateway Noteboo
k
de
ser Gui
Page 2

Page 3

Contents
1Getting Help. . . . . . . . . . . . . . . . . . . . . . . . . . . . . . . . . . . . . . . . . . . . . . . 1
Gateway Web site . . . . . . . . . . . . . . . . . . . . . . . . . . . . . . . . . . . . . . . . . . . . 3
Using eSupport . . . . . . . . . . . . . . . . . . . . . . . . . . . . . . . . . . . . . . . . . . . 3
Help and Support . . . . . . . . . . . . . . . . . . . . . . . . . . . . . . . . . . . . . . . . . . . . . 5
Searching for a topic . . . . . . . . . . . . . . . . . . . . . . . . . . . . . . . . . . . . . . . 6
BigFix . . . . . . . . . . . . . . . . . . . . . . . . . . . . . . . . . . . . . . . . . . . . . . . . . . . . . . 6
Using Your Computer guide . . . . . . . . . . . . . . . . . . . . . . . . . . . . . . . . . . . . . 7
Online help . . . . . . . . . . . . . . . . . . . . . . . . . . . . . . . . . . . . . . . . . . . . . . . . . . 7
2 Checking Out Your Gateway Notebook. . . . . . . . . . . . . . . . . . . . 9
Front . . . . . . . . . . . . . . . . . . . . . . . . . . . . . . . . . . . . . . . . . . . . . . . . . . . . . . 10
Left side . . . . . . . . . . . . . . . . . . . . . . . . . . . . . . . . . . . . . . . . . . . . . . . . . . . 11
Right side . . . . . . . . . . . . . . . . . . . . . . . . . . . . . . . . . . . . . . . . . . . . . . . . . . 12
Back . . . . . . . . . . . . . . . . . . . . . . . . . . . . . . . . . . . . . . . . . . . . . . . . . . . . . . 13
Bottom . . . . . . . . . . . . . . . . . . . . . . . . . . . . . . . . . . . . . . . . . . . . . . . . . . . . 14
Keyboard area . . . . . . . . . . . . . . . . . . . . . . . . . . . . . . . . . . . . . . . . . . . . . . 15
Identifying your model . . . . . . . . . . . . . . . . . . . . . . . . . . . . . . . . . . . . . . . . 16
Gateway model and serial number . . . . . . . . . . . . . . . . . . . . . . . . . . . 16
Microsoft Certificate of Authenticity . . . . . . . . . . . . . . . . . . . . . . . . . . . 16
Finding your specifications . . . . . . . . . . . . . . . . . . . . . . . . . . . . . . . . . . . . . 17
Accessories . . . . . . . . . . . . . . . . . . . . . . . . . . . . . . . . . . . . . . . . . . . . . . . . 17
3Getting Started . . . . . . . . . . . . . . . . . . . . . . . . . . . . . . . . . . . . . . . . . . . 19
Installing the battery . . . . . . . . . . . . . . . . . . . . . . . . . . . . . . . . . . . . . . . . . . 20
Connecting the AC adapter . . . . . . . . . . . . . . . . . . . . . . . . . . . . . . . . . . . . 20
Protecting from power source problems . . . . . . . . . . . . . . . . . . . . . . . 22
Connecting the dial-up modem . . . . . . . . . . . . . . . . . . . . . . . . . . . . . . . . . 23
Connecting to a cable or DSL modem or to an Ethe rnet network . . . . . . 2 4
Starting your notebook . . . . . . . . . . . . . . . . . . . . . . . . . . . . . . . . . . . . . . . . 25
Waking up your notebook . . . . . . . . . . . . . . . . . . . . . . . . . . . . . . . . . . 26
Turning off your notebook . . . . . . . . . . . . . . . . . . . . . . . . . . . . . . . . . . . . . 26
Restarting (rebooting) your notebook . . . . . . . . . . . . . . . . . . . . . . . . . . . . 27
Status indicators . . . . . . . . . . . . . . . . . . . . . . . . . . . . . . . . . . . . . . . . . . . . . 28
Using the keyboard . . . . . . . . . . . . . . . . . . . . . . . . . . . . . . . . . . . . . . . . . . 29
Key types . . . . . . . . . . . . . . . . . . . . . . . . . . . . . . . . . . . . . . . . . . . . . . . 30
System key combinations . . . . . . . . . . . . . . . . . . . . . . . . . . . . . . . . . . 31
Using the EZ Pad touchpad . . . . . . . . . . . . . . . . . . . . . . . . . . . . . . . . . . . . 33
Using the touchpad . . . . . . . . . . . . . . . . . . . . . . . . . . . . . . . . . . . . . . . 34
www.gateway.com
i
Page 4

Adjusting the volume . . . . . . . . . . . . . . . . . . . . . . . . . . . . . . . . . . . . . . . . . .36
Turning your wireless radio on or off . . . . . . . . . . . . . . . . . . . . . . . . . . . . .37
4 Using Drives and Ports . . . . . . . . . . . . . . . . . . . . . . . . . . . . . . . . . . .39
Using the DVD drive . . . . . . . . . . . . . . . . . . . . . . . . . . . . . . . . . . . . . . . . . .40
Identifying drive types . . . . . . . . . . . . . . . . . . . . . . . . . . . . . . . . . . . . . .40
Inserting a CD or DVD . . . . . . . . . . . . . . . . . . . . . . . . . . . . . . . . . . . . .41
Playing a CD . . . . . . . . . . . . . . . . . . . . . . . . . . . . . . . . . . . . . . . . . . . . .42
Playing a DVD . . . . . . . . . . . . . . . . . . . . . . . . . . . . . . . . . . . . . . . . . . . .42
Creating CDs and DVDs . . . . . . . . . . . . . . . . . . . . . . . . . . . . . . . . . . . .42
Using the memory card reader . . . . . . . . . . . . . . . . . . . . . . . . . . . . . . . . . .43
Memory card types . . . . . . . . . . . . . . . . . . . . . . . . . . . . . . . . . . . . . . . .43
Inserting a memory card . . . . . . . . . . . . . . . . . . . . . . . . . . . . . . . . . . . .43
Using a memory card . . . . . . . . . . . . . . . . . . . . . . . . . . . . . . . . . . . . . .43
Removing a memory card . . . . . . . . . . . . . . . . . . . . . . . . . . . . . . . . . . .44
Adding and removing a PC Card . . . . . . . . . . . . . . . . . . . . . . . . . . . . . . . .44
Viewing the display on a projector or monitor . . . . . . . . . . . . . . . . . . . . . .46
Connecting a video camera to your notebook . . . . . . . . . . . . . . . . . . . . . .48
5 Managing Power . . . . . . . . . . . . . . . . . . . . . . . . . . . . . . . . . . . . . . . . . .49
Monitoring the battery charge . . . . . . . . . . . . . . . . . . . . . . . . . . . . . . . . . . .50
Recharging the battery . . . . . . . . . . . . . . . . . . . . . . . . . . . . . . . . . . . . . . . .51
Recalibrating the battery . . . . . . . . . . . . . . . . . . . . . . . . . . . . . . . . . . . . . . .51
Changing batteries . . . . . . . . . . . . . . . . . . . . . . . . . . . . . . . . . . . . . . . . . . . .53
Replacing the battery . . . . . . . . . . . . . . . . . . . . . . . . . . . . . . . . . . . . . .53
Extending battery life . . . . . . . . . . . . . . . . . . . . . . . . . . . . . . . . . . . . . . . . . .55
Conserving battery power . . . . . . . . . . . . . . . . . . . . . . . . . . . . . . . . . . .55
Using alternate power sources . . . . . . . . . . . . . . . . . . . . . . . . . . . . . . .56
Changing power modes . . . . . . . . . . . . . . . . . . . . . . . . . . . . . . . . . . . .56
6 Upgrading Your Notebook . . . . . . . . . . . . . . . . . . . . . . . . . . . . . . . .59
Preventing static electricity discharge . . . . . . . . . . . . . . . . . . . . . . . . . . . . .60
Adding or replacing memory . . . . . . . . . . . . . . . . . . . . . . . . . . . . . . . . . . . .61
Replacing the hard drive kit . . . . . . . . . . . . . . . . . . . . . . . . . . . . . . . . . . . .65
7 Using the Optional Port Replicator. . . . . . . . . . . . . . . . . . . . . . . .71
Top . . . . . . . . . . . . . . . . . . . . . . . . . . . . . . . . . . . . . . . . . . . . . . . . . . . . . . . .72
Right . . . . . . . . . . . . . . . . . . . . . . . . . . . . . . . . . . . . . . . . . . . . . . . . . . . . . . .73
Back . . . . . . . . . . . . . . . . . . . . . . . . . . . . . . . . . . . . . . . . . . . . . . . . . . . . . . .74
Connecting to the port replicator . . . . . . . . . . . . . . . . . . . . . . . . . . . . . . . . .75
Attaching to the port replicator . . . . . . . . . . . . . . . . . . . . . . . . . . . . . . .75
ii
www.gateway.com
Page 5

Disconnecting from the port replicator . . . . . . . . . . . . . . . . . . . . . . . . . 78
8 Maintaining Your Notebook . . . . . . . . . . . . . . . . . . . . . . . . . . . . . . 79
Caring for your notebook . . . . . . . . . . . . . . . . . . . . . . . . . . . . . . . . . . . . . . 80
Cleaning your notebook . . . . . . . . . . . . . . . . . . . . . . . . . . . . . . . . . . . . . . . 81
Cleaning the exterior . . . . . . . . . . . . . . . . . . . . . . . . . . . . . . . . . . . . . . 81
Cleaning the keyboard . . . . . . . . . . . . . . . . . . . . . . . . . . . . . . . . . . . . . 82
Cleaning the notebook screen . . . . . . . . . . . . . . . . . . . . . . . . . . . . . . . 82
Cleaning CDs or DVDs . . . . . . . . . . . . . . . . . . . . . . . . . . . . . . . . . . . . 82
Protecting your notebook from viruses . . . . . . . . . . . . . . . . . . . . . . . . . . . 83
Updating Windows . . . . . . . . . . . . . . . . . . . . . . . . . . . . . . . . . . . . . . . . . . . 86
Restoring your system . . . . . . . . . . . . . . . . . . . . . . . . . . . . . . . . . . . . . . . . 87
9 Troubleshooting. . . . . . . . . . . . . . . . . . . . . . . . . . . . . . . . . . . . . . . . . . 89
Safety guidelines . . . . . . . . . . . . . . . . . . . . . . . . . . . . . . . . . . . . . . . . . . . . 90
First steps . . . . . . . . . . . . . . . . . . . . . . . . . . . . . . . . . . . . . . . . . . . . . . . . . . 91
Troubleshooting . . . . . . . . . . . . . . . . . . . . . . . . . . . . . . . . . . . . . . . . . . . . . 92
Audio . . . . . . . . . . . . . . . . . . . . . . . . . . . . . . . . . . . . . . . . . . . . . . . . . . 92
Battery . . . . . . . . . . . . . . . . . . . . . . . . . . . . . . . . . . . . . . . . . . . . . . . . . 92
CD drives . . . . . . . . . . . . . . . . . . . . . . . . . . . . . . . . . . . . . . . . . . . . . . . 92
Device installation . . . . . . . . . . . . . . . . . . . . . . . . . . . . . . . . . . . . . . . . 92
Display . . . . . . . . . . . . . . . . . . . . . . . . . . . . . . . . . . . . . . . . . . . . . . . . . 93
DVD drives . . . . . . . . . . . . . . . . . . . . . . . . . . . . . . . . . . . . . . . . . . . . . . 94
File management . . . . . . . . . . . . . . . . . . . . . . . . . . . . . . . . . . . . . . . . . 96
Hard drive . . . . . . . . . . . . . . . . . . . . . . . . . . . . . . . . . . . . . . . . . . . . . . 97
Internet . . . . . . . . . . . . . . . . . . . . . . . . . . . . . . . . . . . . . . . . . . . . . . . . . 98
Keyboard . . . . . . . . . . . . . . . . . . . . . . . . . . . . . . . . . . . . . . . . . . . . . . 100
Memory . . . . . . . . . . . . . . . . . . . . . . . . . . . . . . . . . . . . . . . . . . . . . . . 100
Memory card reader . . . . . . . . . . . . . . . . . . . . . . . . . . . . . . . . . . . . . 101
Modem (dial-up) . . . . . . . . . . . . . . . . . . . . . . . . . . . . . . . . . . . . . . . . . 101
Mouse . . . . . . . . . . . . . . . . . . . . . . . . . . . . . . . . . . . . . . . . . . . . . . . . . 105
Networks . . . . . . . . . . . . . . . . . . . . . . . . . . . . . . . . . . . . . . . . . . . . . . 105
Passwords . . . . . . . . . . . . . . . . . . . . . . . . . . . . . . . . . . . . . . . . . . . . . 106
PC Cards . . . . . . . . . . . . . . . . . . . . . . . . . . . . . . . . . . . . . . . . . . . . . . 107
Power . . . . . . . . . . . . . . . . . . . . . . . . . . . . . . . . . . . . . . . . . . . . . . . . . 107
Printer . . . . . . . . . . . . . . . . . . . . . . . . . . . . . . . . . . . . . . . . . . . . . . . . . 108
Sound . . . . . . . . . . . . . . . . . . . . . . . . . . . . . . . . . . . . . . . . . . . . . . . . . 109
Status indicators . . . . . . . . . . . . . . . . . . . . . . . . . . . . . . . . . . . . . . . . 110
Touchpad . . . . . . . . . . . . . . . . . . . . . . . . . . . . . . . . . . . . . . . . . . . . . . 110
Video . . . . . . . . . . . . . . . . . . . . . . . . . . . . . . . . . . . . . . . . . . . . . . . . . 111
Telephone support . . . . . . . . . . . . . . . . . . . . . . . . . . . . . . . . . . . . . . . . . . 112
Before calling Gateway Customer Care . . . . . . . . . . . . . . . . . . . . . . 112
www.gateway.com
iii
Page 6

Telephone numbers . . . . . . . . . . . . . . . . . . . . . . . . . . . . . . . . . . . . . .113
Self-help . . . . . . . . . . . . . . . . . . . . . . . . . . . . . . . . . . . . . . . . . . . . . . .114
Tutoring . . . . . . . . . . . . . . . . . . . . . . . . . . . . . . . . . . . . . . . . . . . . . . . .114
Training . . . . . . . . . . . . . . . . . . . . . . . . . . . . . . . . . . . . . . . . . . . . . . . .114
A Safety, Regulatory, and Legal Information . . . . . . . . . . . . . . .115
Index . . . . . . . . . . . . . . . . . . . . . . . . . . . . . . . . . . . . . . . . . . . . . . . . . . . . . . . 127
iv
www.gateway.com
Page 7

Chapter 1
Getting Help
• Using the Gatew ay W eb site
• Using Help and Supp ort
•Using BigFix
• Using Your Comput er guide
• Using online help
1
Page 8

Chapter 1: Gettin g Help
Thank y ou for purchasing our
notebook!
You have made an excellent decision choosing Gateway . W e are sure t hat
you will be pleased with the outstanding quality, reliability, and
performance of your new notebook. Each and every Gateway notebook
uses the latest technology and pas ses through the m ost strin gent quality
control tests to ensure that you are provided with the best product
possible.
Your new Gateway notebook is designed to provide an exceptional
balance of performance and portability. Your notebook uses the latest
chipset and mobile processor technologies to manage the processor speed
and power consumption for a greater battery life experience. This design
provides you with maximum performance when plugged into AC power
balanced with optimized battery life when on battery power.
Please read this manual carefully to familiarize yourself with our range
of services and support. We have highlighted some basic care and safety
information to help you keep your notebook in good operating
condition.
Gateway stands behind our v alue proposition to our customers — to
provide best-of-class service and support in addition to high-quality,
brand-name components at affordable prices. If you ever have a problem,
our knowledgeable, dedicated customer service depar tment will provide
you with fast, considerate service.
We sincerely hope that you will receive the utmost satisfaction and
enjoyment from your new Gateway notebook for years to come.
Thank you again, from all of us at Gateway.
2
www.gateway .com
Page 9
Gateway Web s ite
Gate way W eb sit e
Gateway's online support is available 24 hours per d ay, 7 days per week
and provides the most current drivers, product specifications, tutorials,
and personalized information about your notebook. Visit the Gateway
eSupport Web site at support.gateway.com
.
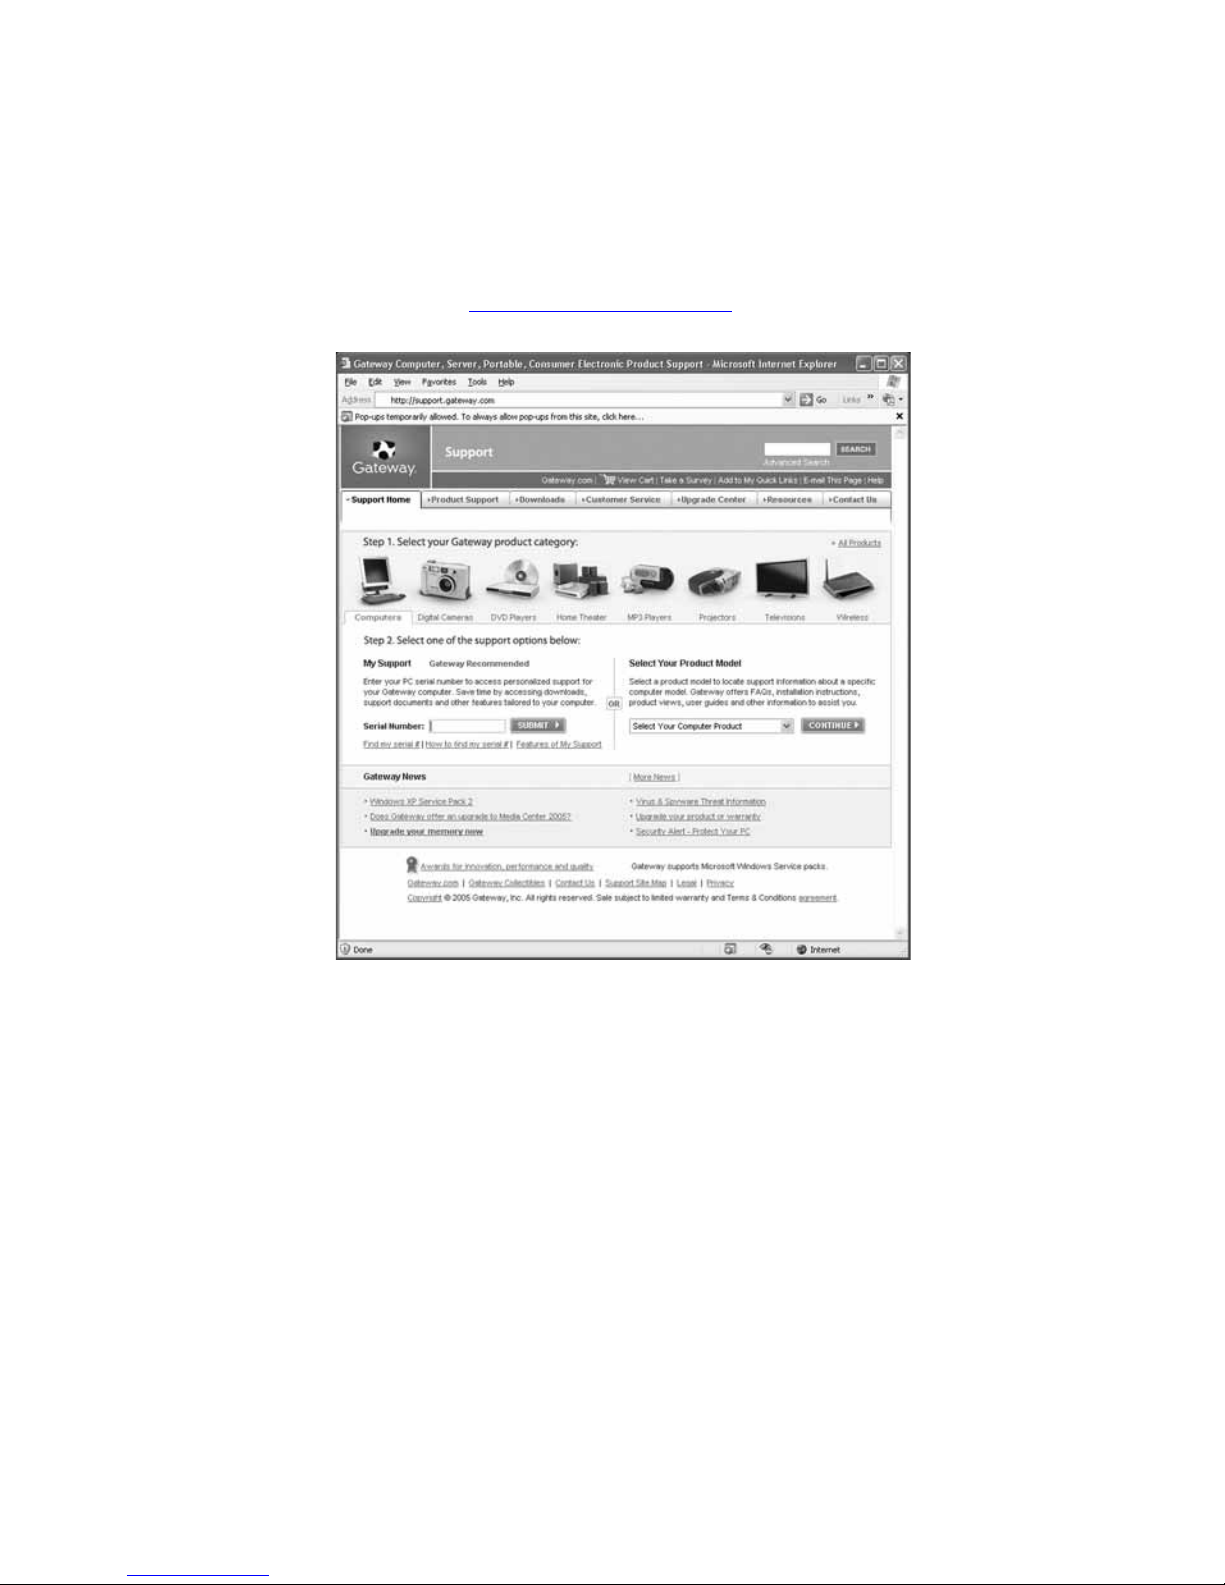
Using eSupport
The eSupport site is divided into seven major areas:
■ Support Hom e
■ Product Support
■ Downloads
■ Customer Service
■ Upgrade Center
■ Resources
■ Contact Us
www.gateway.com
3
Page 10

Chapter 1: Gettin g Help
Support Home
Click Support Home, then click Computers. T o view support documents for
your notebook, type your serial number in the
click
Submit.
Serial Number box, then
Click the arrow button to open the
click
specifications, and guides for all Gateway notebooks.
Notebook Computers to access product documentation,
Select Y our Com puter Product box, then
Product Support
Click Product Support to view a list of all the products that Gateway
supports.
Downloads
Click Downloads, then click My Downloads to get the latest software
updates for BIOS and driver upgrades. By entering your serial number you
get drivers specific to your notebook. Click
through a step-by-step wizard to locate your drivers.
Browse All Downloads to walk
Customer Service
Click Customer Service to view information about your account and
general information about warranties and special offers.
Upgrade Cen ter
Click Upgrade Center to view and purchase upgrades for your notebook.
Resources
Click Resources to access utilities to help you manage your notebook.
Contact Us
Click Contact Us to access links to customer care with a live technician,
including chat and e-mail. Clic k
numbers for both sales and support. For more information, see
“Telephone support” on pa ge 112.
Call Us to get a list of Gateway telephone
4
www.gateway .com
Page 11

Help and Suppor t
Help and Support
Your notebook includes Help and Support, an easily accessible collection
of help information, troubleshoote rs, and automa ted support. Use Help
and Support to answer questions a bout Windows an d to help you quickly
discover and use the many features of your Gateway notebook.
To start Help and Support:
■ Click Start, then click Help and Support. Help and Supp ort opens.
You can find help informatio n by clicking a link, performing a search,
or browsing the index.
www.gateway.com
5
Page 12

Chapter 1: Gettin g Help
Searching for a topic
To search for a topic in Help and Support, type a word or phrase (keyword)
in the
click the arrow button.
For each search, you receive the following search result types:
■ Suggested T o pics - These topics are located in Help and Support and
■ Full-text Search Matches - These topics are located in Help and
■ Microsoft Knowledge Base - These topics are located on the Microsoft
Search box located at the top of any Help and Support screen, then
are relevant to yo ur search topic.
Support and contain the words you entered in the
Web site and contain the words you entered in the
must be connected to the Internet to search for and access these
topics.
Search box.
Search box. You
To view a list of your search results, click the results header for the type
of results you want to view.
To view a topi c, click the topic n ame in the
Search Resu lts list.
BigFix
Your notebook may include BigFix. BigFix monitors your notebook for
problems and conflicts. It automatically gathers information about the
latest bugs, security alerts, and updates from BigFix sites on the Internet.
Whenever BigFix detects a problem , it alerts you by flashing the blue
taskbar icon. To fix the problem, click on that icon to open BigFix.
To start BigFix:
■ Click Start, All Programs, Accessories, System Tools, then cli ck BigFix.
To learn more about using BigFix:
■ From the BigFix program, click Help, then click Tutorial.
6
www.gateway .com
Page 13
Using Your Comp uter guide
Using Your C omputer guide
In addition to this guide, the Using Y our Computer guide has been included
on your hard drive. The Using Your Computer guide includes information
on using Windows, using the Internet, sending a fax, and changing
power-saving settings as well as other topics.
To access the Using Your Computer guide:
■ Click Start, All Programs, then click Gateway Documentation.
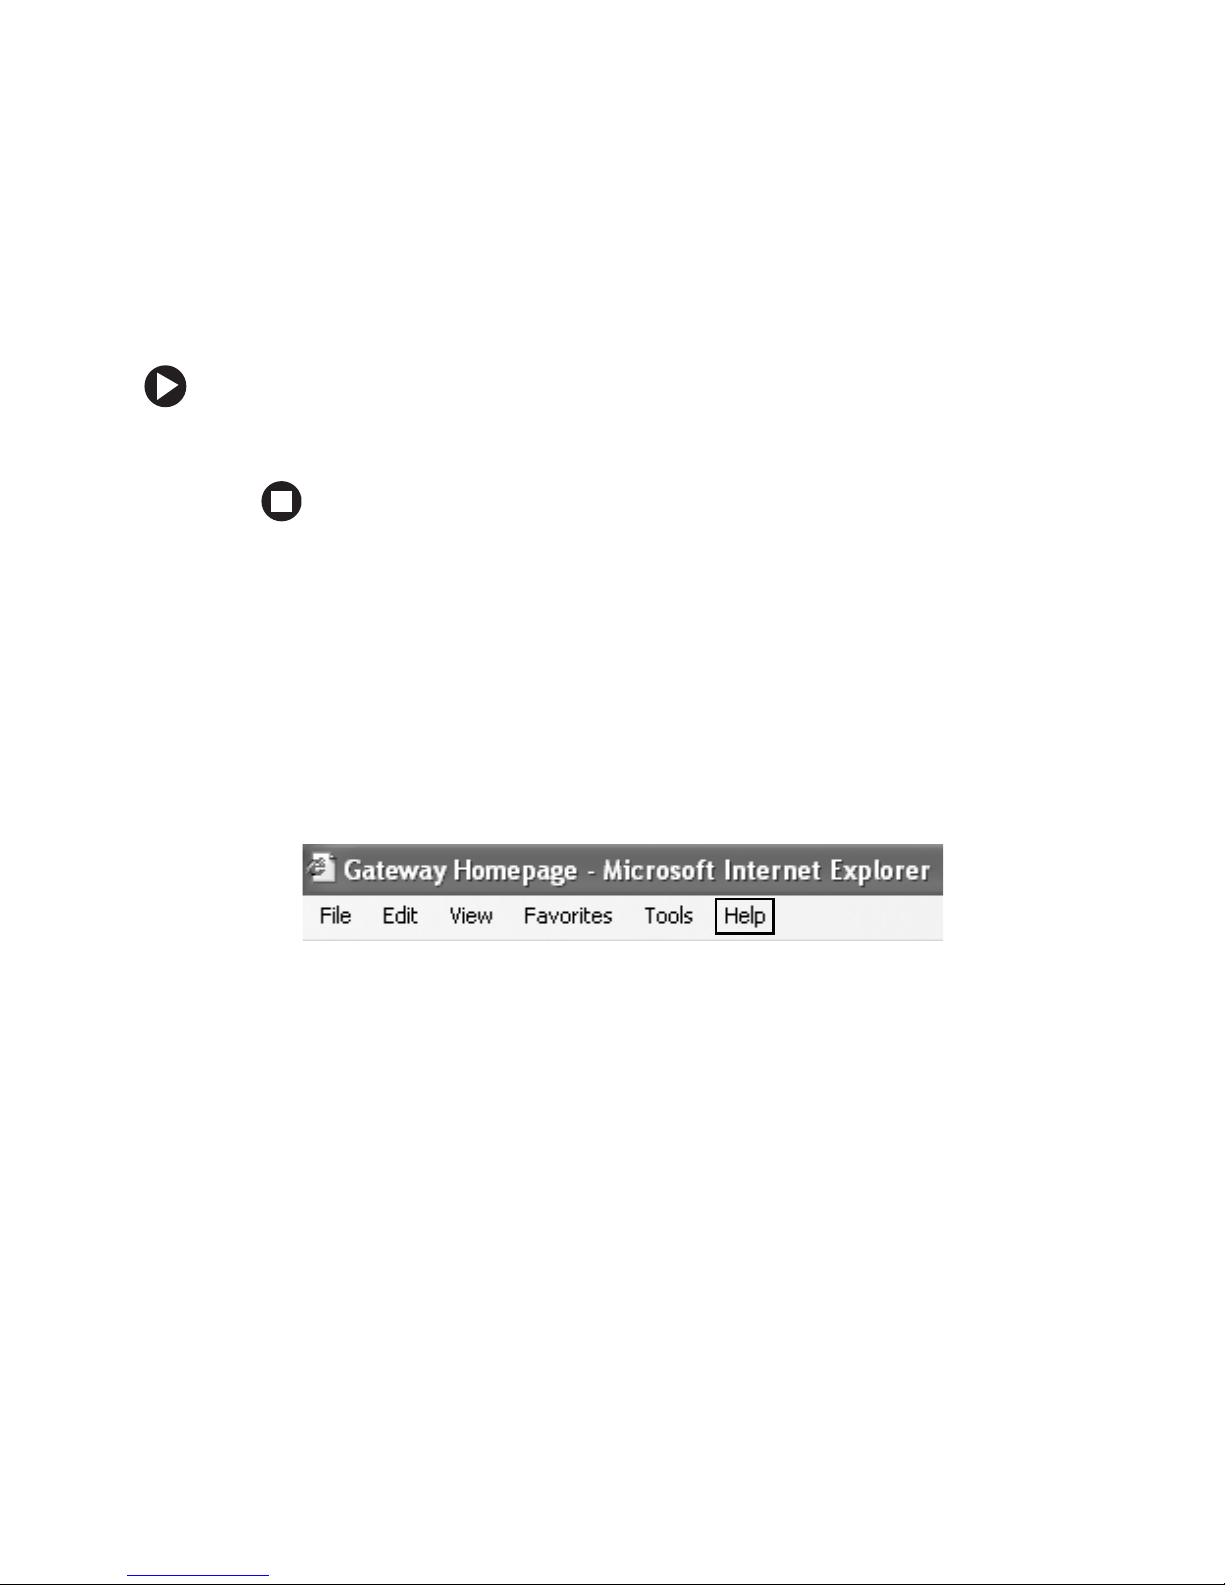
Online help
Many programs provide information online so you can research a topic
or learn how to perform a task while you are using the program. You can
access most online help information by selecting a topic from a
menu or by clicking a
Help button.
Help
www.gateway.com
7
Page 14
Chapter 1: Gettin g Help
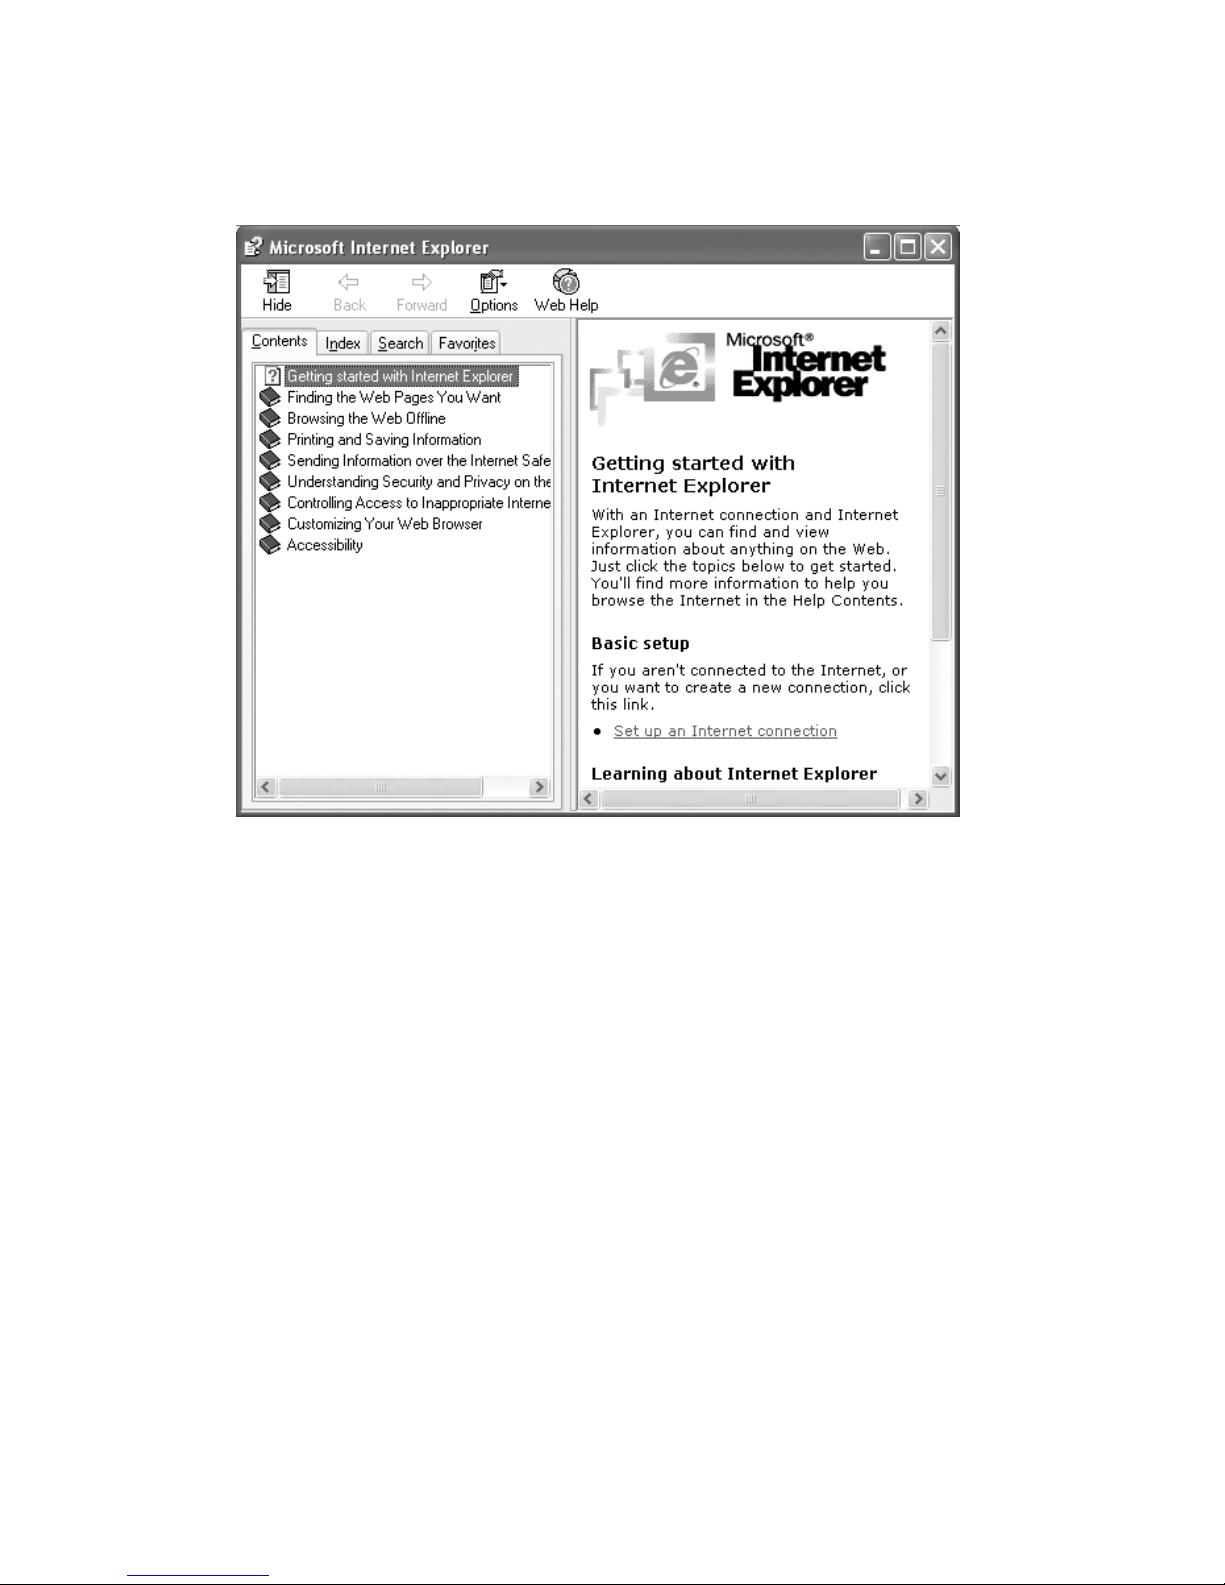
You can search for information by viewing the help contents, checking
the index, searching for a topic or keyword, or browsing through the
online help.
8
www.gateway .com
Page 15

Chapter 2
Checking Out Your
Gateway Notebook
• Identifying f eatures
• Locating y our notebook’ s mod el and serial
number
• Locating the Microsoft Certificate of
Authenticity
• Locating the specifica tions for y our
notebook
• Purchasing accessories
9
Page 16
Chapter 2: Checki ng Out Your Gateway No tebook
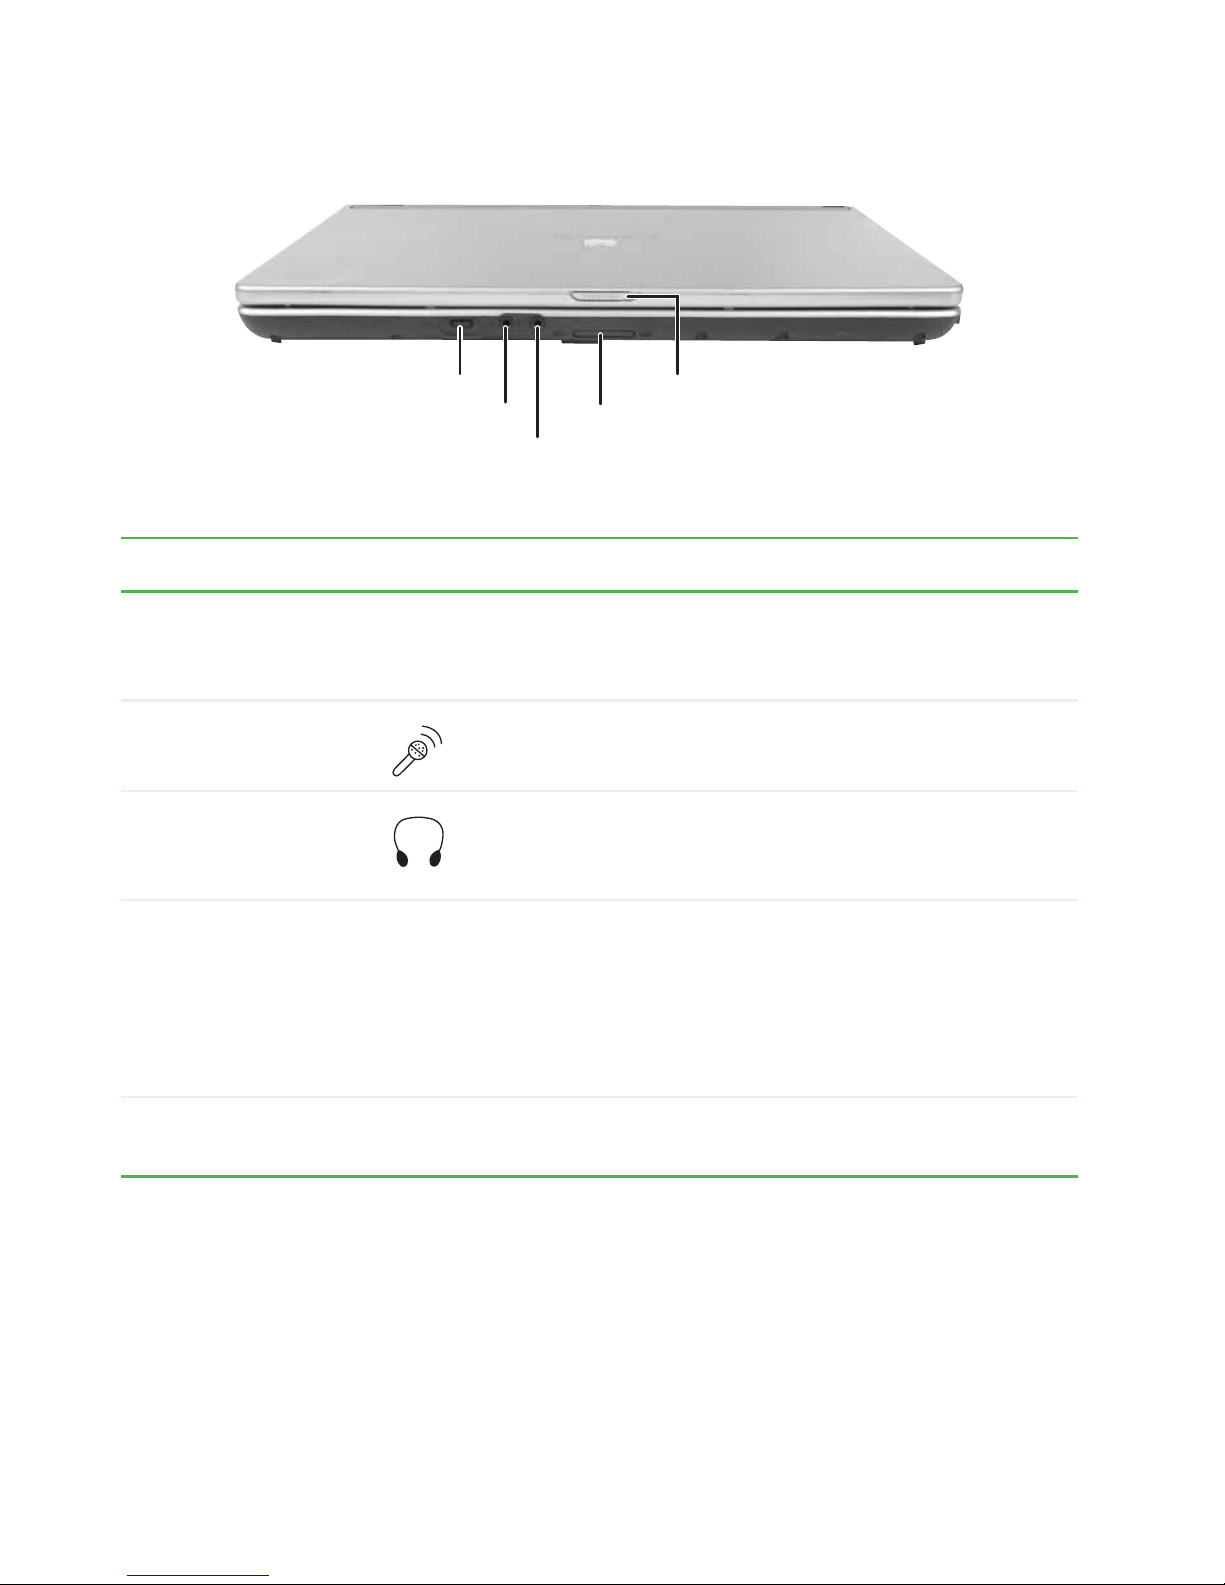
Front
Volume control
Microphone jack
Headphone jack
Memory
card
reader
LCD panel
release latch
Component Icon Description
Vo l u m e con tro l
Microphone jack Plug a microphone into this jack.
Headphone jack Plug ampli fied speake rs or headphone s into this jack .
Memory card
reader
■
Press the b u tton to th e right to increase the volume .
■
Press the button to the left to decrease the volume.
■
Press the button in to mute the volume.
The buil t-in spea kers a re turned off when spe akers or
headphones are plugged into this jack.
Insert a memory card from a digital camera, MP3
player, PDA, or cellular telephone into the memory
card reader. For more information, see “Using the
memory card reader” on page 43. The memory card
®
reader supports Memory Stick
, Memory Stic k Pr o®,
MultiMediaCard™, and Secure Digital™.
LCD panel release
latch
10
Open the LCD panel by sliding the release latch.
www.gateway .com
Page 17
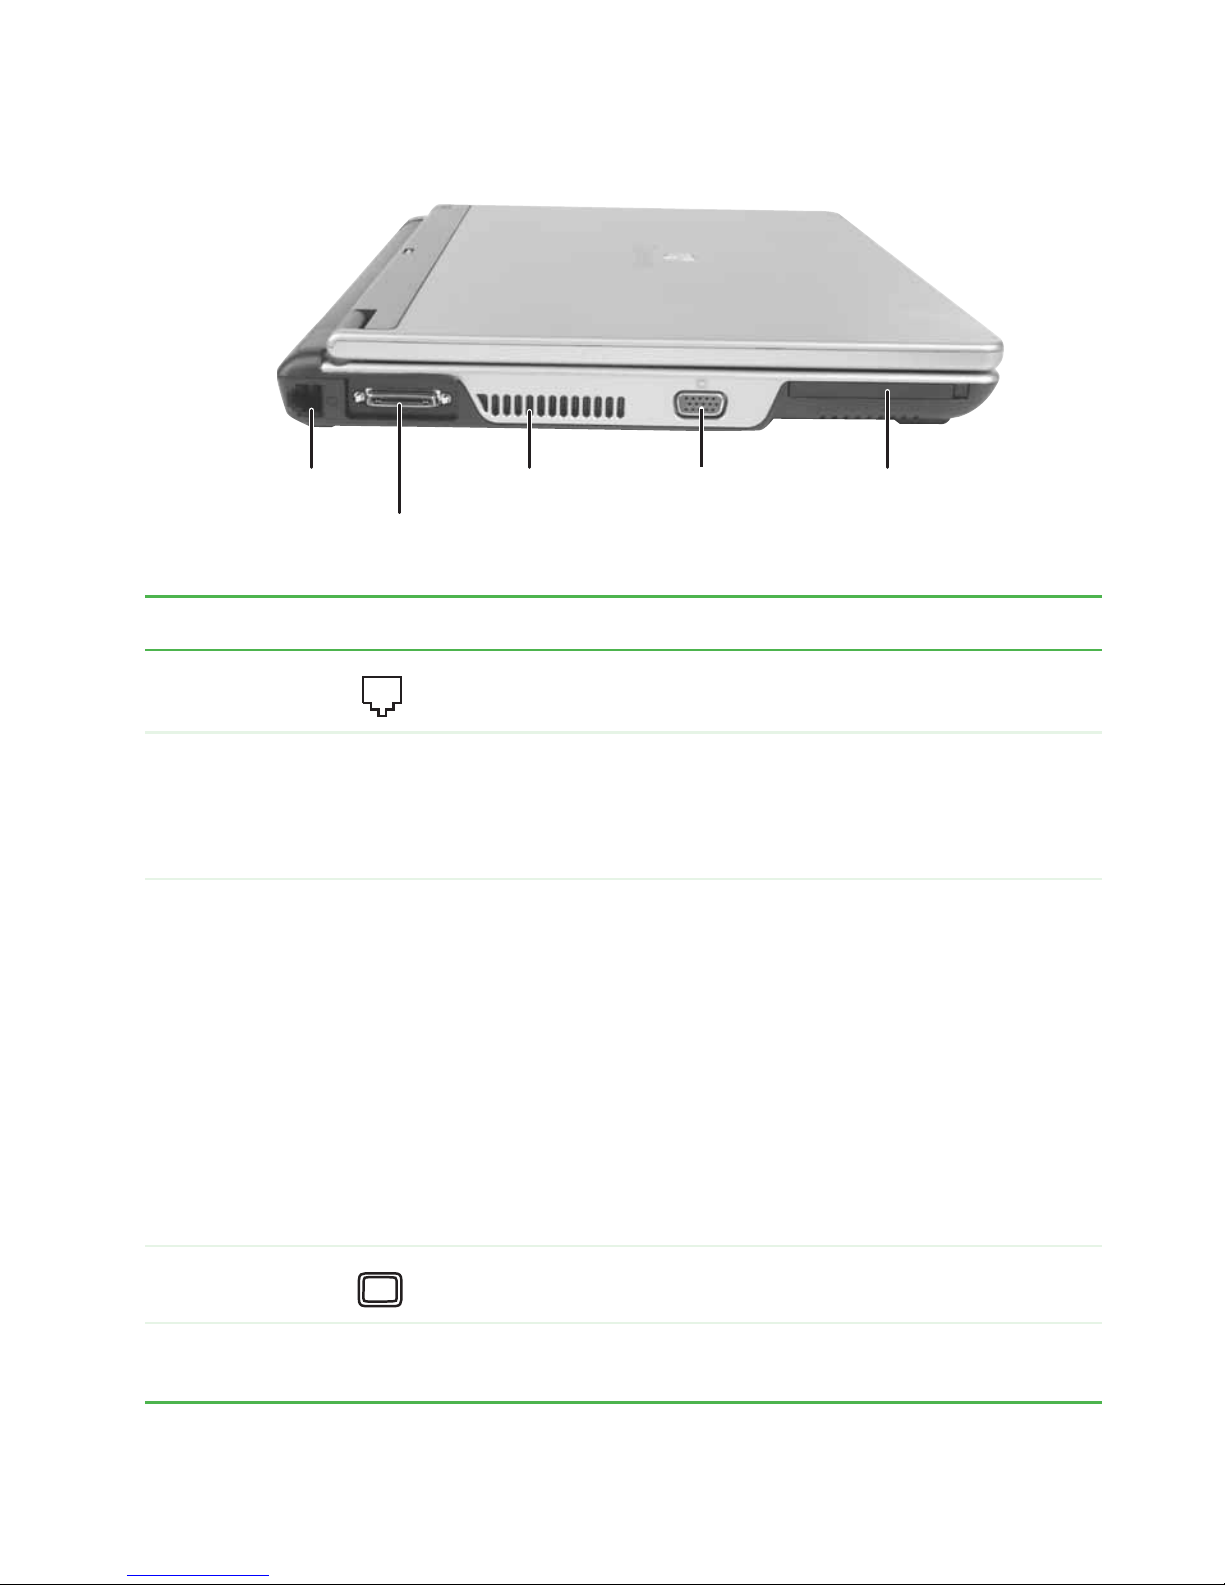
Left side
Left side
Modem jack
Docking port
Ventilation fan PC Card
Monitor
port
slot
Component Icon Description
Modem jac k Plug a modem c able into this jack. For more information, s ee
“Connecting the dial -up modem” on page 23.
Docking port Connect the port replicator to this port.
Warning: Power is passed through this por t. This docking
connection is certified to UL 1950 for use only with port
replicators designed for your Gateway notebook.
Ventilation fan Helps cool internal components.
Warning: Do not work for long periods with the notebook
resting on your lap. If the air vents are blocked, the notebook
may become hot enough to harm your skin.
Caution: Do not block or in ser t objects i nto these slots. If
these slots are b lock ed, your notebook may ov erheat resultin g
in unexpected shutdown or permanent damage to the
notebook.
Monitor port Plug an analog VGA monitor or projector into this port.
PC Card slot Insert one Type II PC Card into this slot. F or more information ,
Caution: Provide adequate space around your notebook so
air vents ar e not obs tructed . Do not us e the not ebook on a
bed, sofa, r ug, or other similar surface.
see “Adding and removing a PC Card” on page 44.
www.gateway.com
11
Page 18
Chapter 2: Checki ng Out Your Gateway No tebook
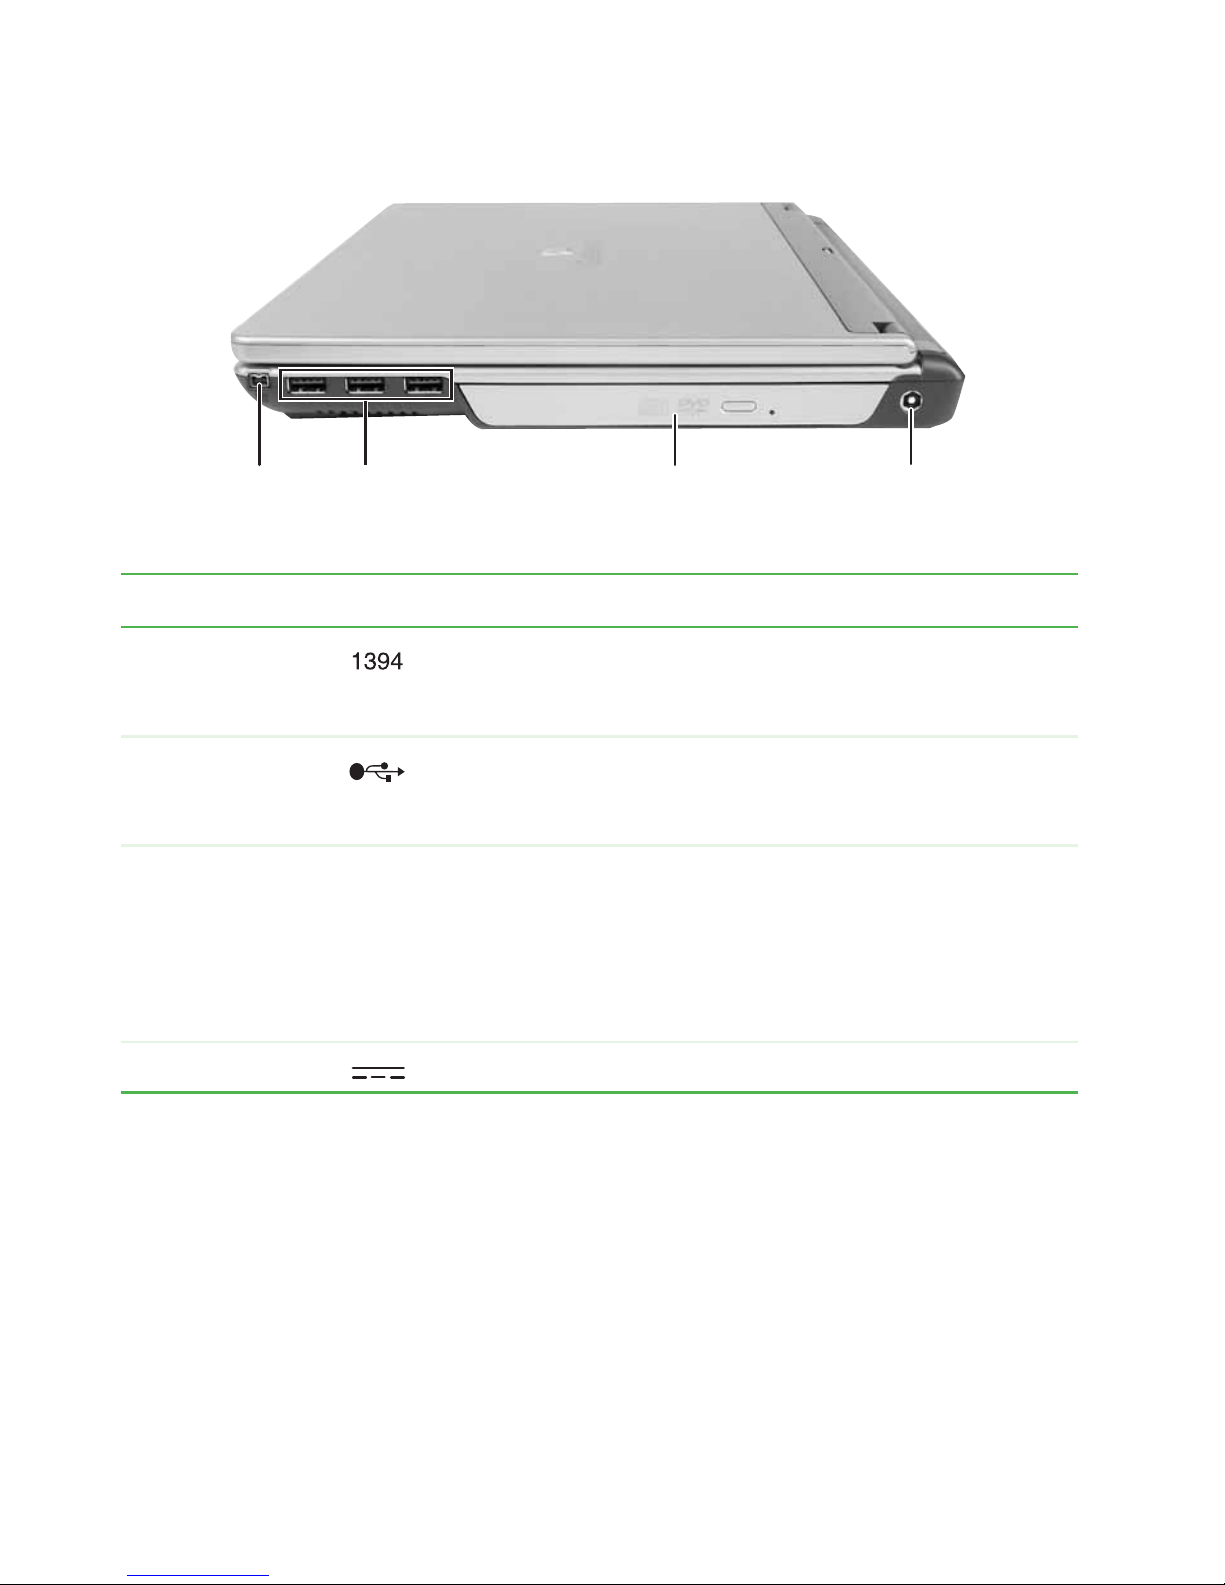
Righ t sid e
IEEE 1394
port
USB
ports
DV D d r i ve Po w er
connector
Component Icon Description
IEEE 1394 port Plug an IEEE 1394 (also known as Firewire® or i.Link®)
device (such as a digital camcorder or external hard drive)
into this 4-pin IEEE 1394 port.
USB por ts Plug USB devices (such as a diskette d rive, flash dr ive,
printer, scanner, camera, keyboard, or mouse) into these
ports.
DVD/CD-RW or
record able DVD
drive
Insert CDs or DVDs into this drive. For more information,
see “Using the DVD drive” on page 40. This drive may be
a combina tion DVD/CD-RW or recordable DVD drive. To
determine the type of drive in the notebook, examine the
drive tray’s plastic cover and compare the logo to those
listed in “Identifying drive types” on page 40.
Power connector Plug the AC adapter cable into this connector.
12
www.gateway .com
Page 19
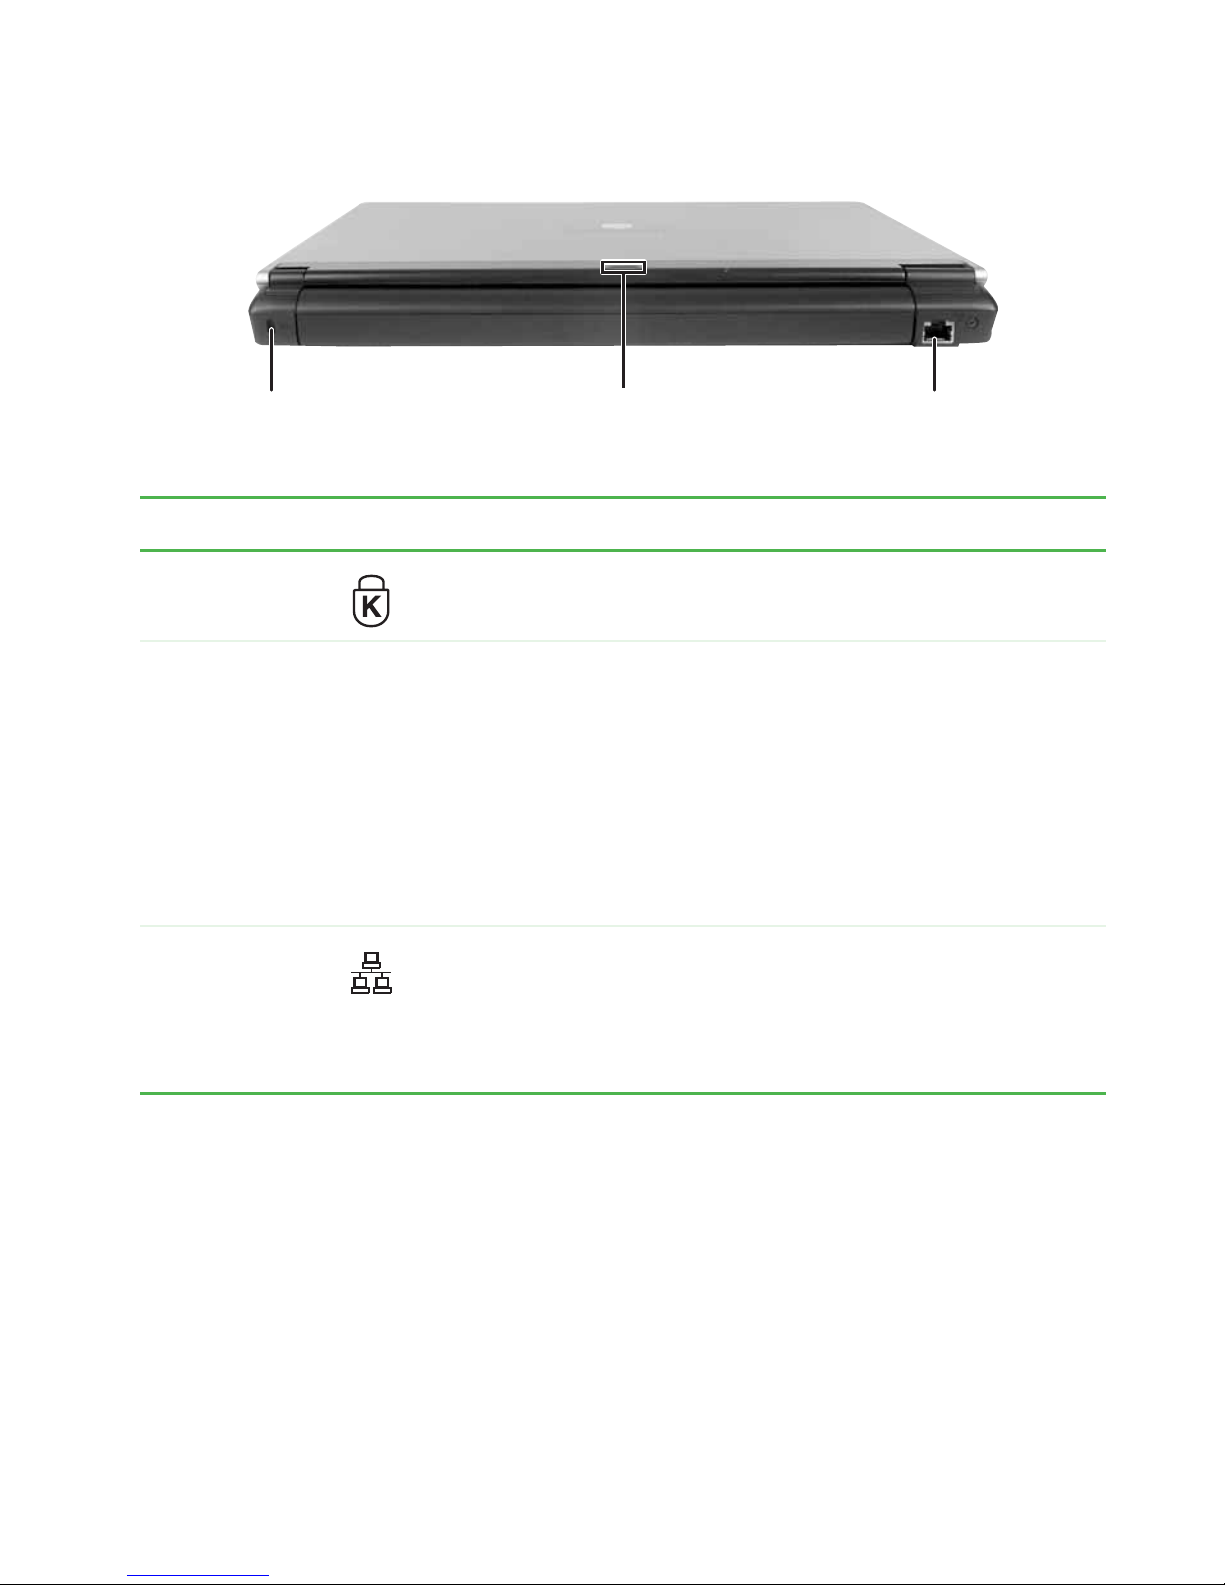
Back
Component Icon Description
Back
Ethernet jackKensington lo ck slot Power/batt ery
charge indicator
Kensington™
lock slot
Power/
battery
charge
indicator
Secure your no tebook to an object b y connecting a K ensington
cable lock to this slot.
■
LED soli d blue - note book is on, and if th e notebook is
connected to AC power, the battery is fully charged.
■
LED blinking blue - notebook is in Standby mode.
■
LED solid purple - battery is charging.
■
LED blinking pu rple - bat tery is charg i ng an d not eb o ok is in
Standby mode.
■
LED blinking red - battery charge is very low and has
insufficient power to turn on the notebook.
■
LED off - notebook is off.
Ethernet jack Plug a 10/100/1000 Eth ernet network cab l e i nto this jack. The
other end of the cable can be plugged into a cable modem,
DSL modem, router , access point, or an Ethernet netwo rk jack.
For more information, see “Connecting to a cable or DSL
modem or to an Ether net network” on page 24.
www.gateway.com
13
Page 20
Chapter 2: Checki ng Out Your Gateway No tebook
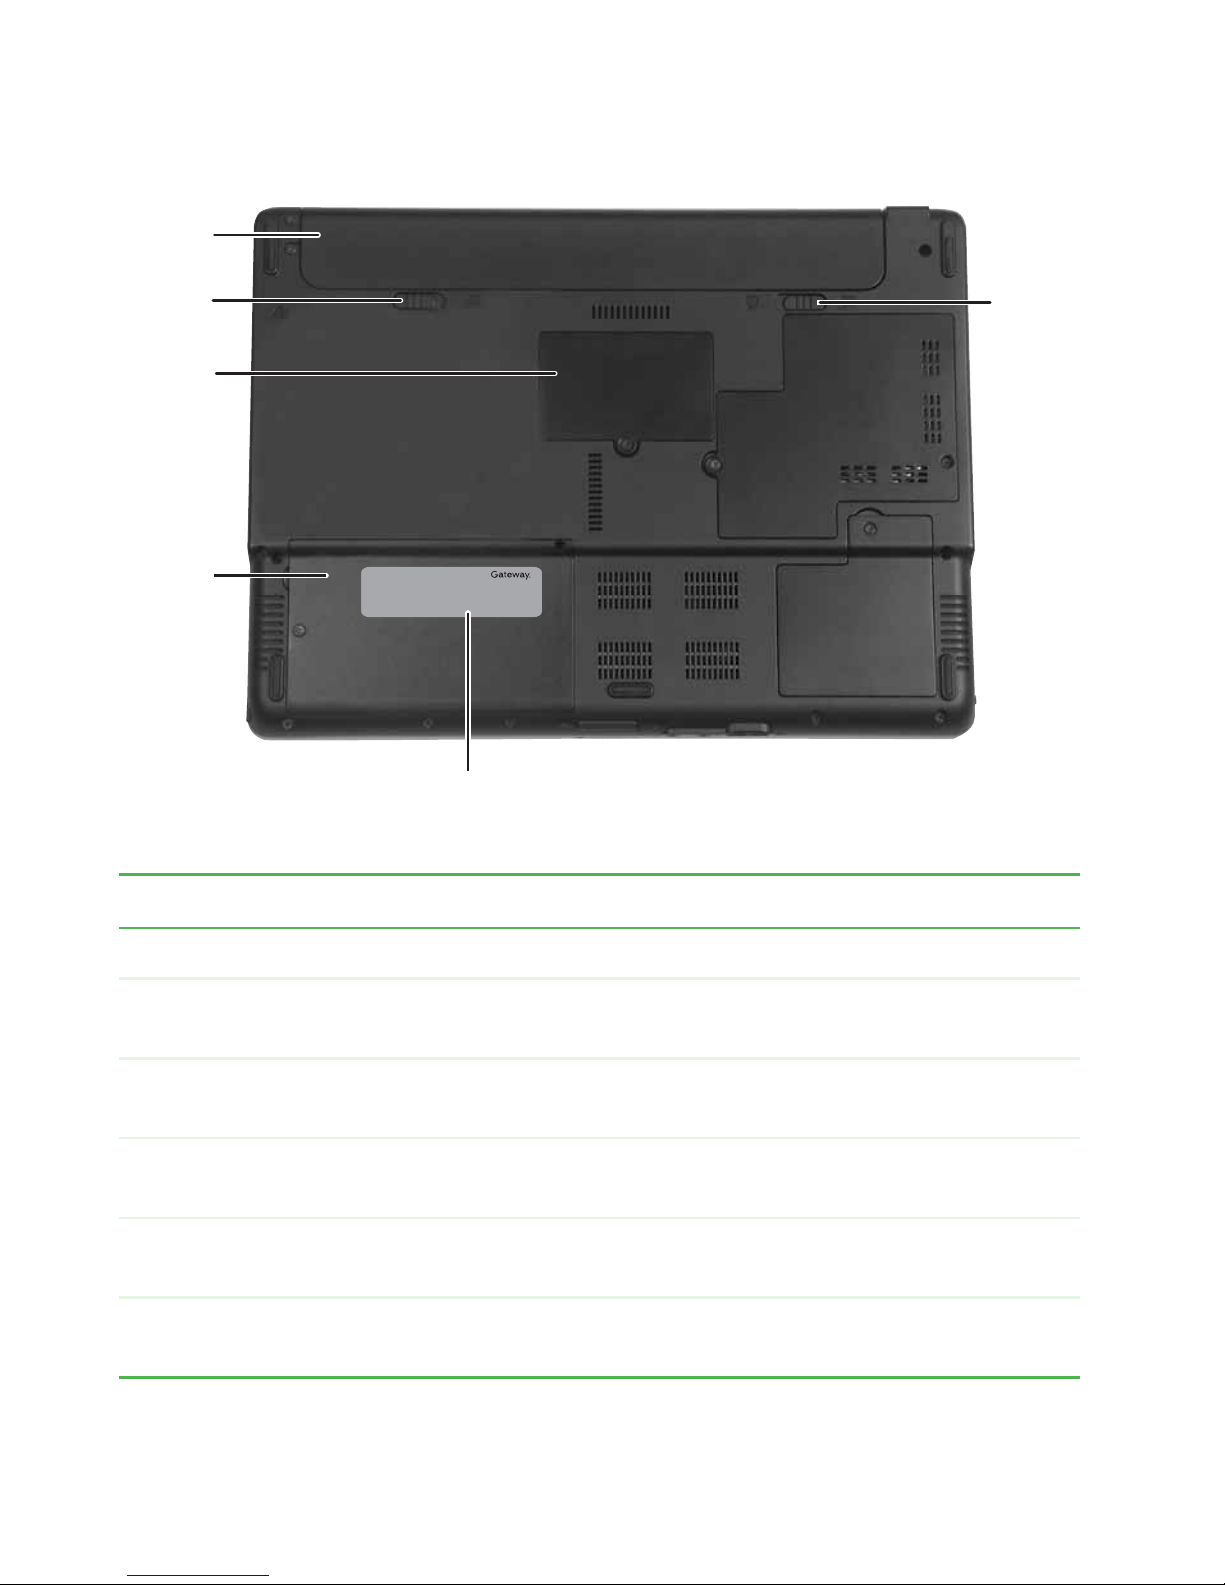
Bottom
Battery
Battery
latch
emory
bay
Hard
drive
bay
Website:
Online Support:
Tech Support Phone:
Hours:
Battery
lock
System
label
Component Description
Battery Provides power when the notebook is not plugged into AC power.
Battery latch Slide to release the battery. For more information, see “Changing
batteries” on page 53.
Memory bay Install a memory module into this bay. For more information, see
“Adding or replacing memory” on page 61.
Hard dr ive bay The hard drive is loca ted in th is bay. For more i nformatio n, see
“Replacing the hard drive kit ” on page 65.
System label Includes the product model number. For more information, see
“Identi fying your mod el” on page 1 6.
Battery lock Slide to unlock the battery. For more information, see “Changing
batteries” on page 53.
14
www.gateway .com
Page 21

Ke yboard area
Keyboard are a
Power
button
Keyboard
Status
indicators
Touchpad
Component Icon Description
Power button Press to turn the power on or off. You can also configure the
power button for Standby/Resume mode. For more
information on configuring the power button mode, see
“Changing Power-Saving Settings” in
which has been included on your hard drive. To access this
guide, click Start, All Programs, then click Gateway
Documentation.
Keyboard Provides all the features of a full-sized keyboard. For more
information, see “Using the keyboard” on page 29.
Touchpad Provides all the functionality of a mouse . For more i nformation,
see “Using the EZ Pad touchpad” on page 33.
Status
indicators
Inform you when a drive is in use or when a button has been
pressed that affects how the keyboard is used. For more
information, see “Status indicators” on page 28.
Using Your Computer
www.gateway.com
15
Page 22
Chapter 2: Checki ng Out Your Gateway No tebook
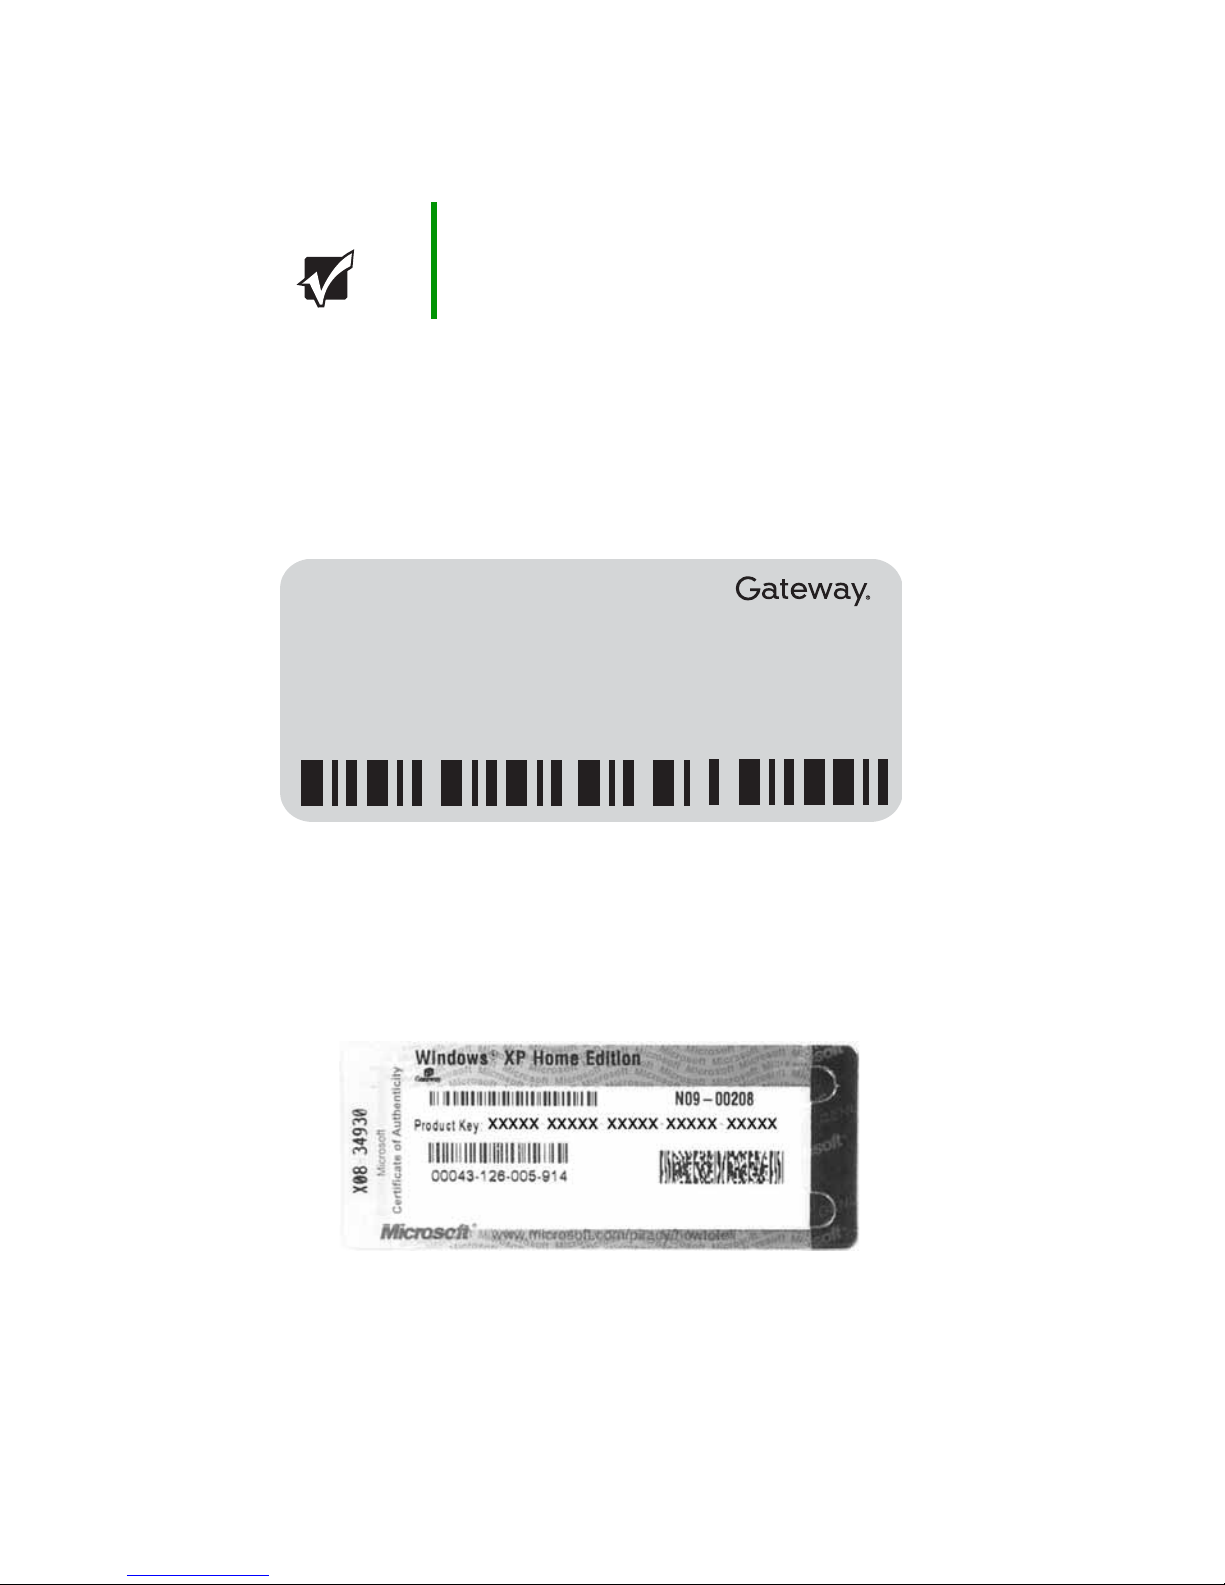
Identifying your model
Important The la bels shown in this sec tion are for i nformatio nal
purposes only. Label in formation v aries b y model, f eat ures
ordered, and location.
Gatew ay model and serial number
The label on the bottom of your notebook contains informat ion that
identifies your notebook model and its features. Gateway Customer Care
will need this information if you call for assistance.
Online Support: support.gateway.com
Tech Support Phone:
Hours:
Model:
S/No:
Microsoft Certificate of Authenticity
The Microsoft Certificate of Authenticity label found on the bottom of
your notebook includes the product key code for your operating system.
16
www.gateway .com
Page 23

Finding your s pecifications
F inding your specifications
For more information about your notebook, such as memory size,
memory type, and hard drive size, visit Gateway’s eSupport page at
support.gateway.com
Gateway documentation and detailed specifications. For more
information, see “Gateway Web site” on page 3.
. The eSupport page also has links to additional
Accessories
To order accessories, visit the Accessory Store at accessories.gateway.com.
Batteries
If you run your notebook on battery power for extended periods, you
may want to buy an additional battery so you can swap batteries when
necessary. See “Changing batteries” on page 53 for more information
about using an additional battery.
Carrying cases
Gateway has large-cap acity carrying cases if you need additional space
for accessories or supplies.
Memory
Large programs, such as multimedia game s or graphics programs, use a
lot of memory . If your programs are running more slowly than you think
they should, try adding more memory. See “Adding or repl acing
memory” on page 61 for more information.
Port replicators
Although you can attach devices directly to your notebook, a port
replicator lets you make all of those connections at one time. When you
travel with your notebook, you merely disconnect from the port
replicator instead of unplugging all the devices.
A port replicator also provide s additional ports and other expansion
features not included with your notebook. See “Using the Optional Port
Replicator” on pa ge 71 for more information about using a port replicator
with your notebook.
www.gateway.com
17
Page 24

Chapter 2: Checki ng Out Your Gateway No tebook
Printers
You can attach almost any type of printer to your notebook. The most
common types are inkjet and laser printers, which print in color or black
and white.
Inkjet printers and cartridges are relatively inexpensive, but they are
slower than laser printers. Using an inkjet color printer, you can print
pictures, banners, and greeting cards, as well as documents.
Laser printers and cartridges are more expensive, but they print much
faster than inkjet printers. Laser printers are better than inkjet printers
when you are printing large document s.
USB flash drive
Use a USB flash drive for storing files or transferring files to another
computer.
18
www.gateway .com
Page 25

Chapter 3
Getting Started
• Installing the ba ttery
• Connecting the AC adapter
• Connecting the di al-up modem
• Connecting to a cable or DSL modem or to
an Ethernet network
• Turning y our notebook on and off
• Using the status indicator s
• Using the ke yboard and the EZ P ad
touchpad
• Adjusting the v olume
• Connecting to a wireless network
19
Page 26

Chapter 3: Gettin g Started
Installing the battery
To install the battery:
1 Close the LCD panel.
2 Turn your notebook over so the bottom is facing up.
3 Hold the battery label-side down and slide it into the open battery
slot until the battery clicks into place.
4 Slide the battery lock to the locked position.
Co nnecting the A C adapter
You can run your notebook using an AC adapter or your notebook’s
battery . The battery was shipped to you partially charged. Y o u should use
the AC adapter right away to fully charge the battery. Allow three hours
for the battery to fully charge.
Important If the battery is not fully charged before you use your
notebook on ba ttery power f or the first time, the battery lif e
may be much shorter than you expect. If the battery life
seems short even after being charged for three hours, the
battery may need to be recalibrated. For information on
recalibrating th e battery , see “Recalibr ating the battery” on
page 51.
20
www.gateway .com
Page 27
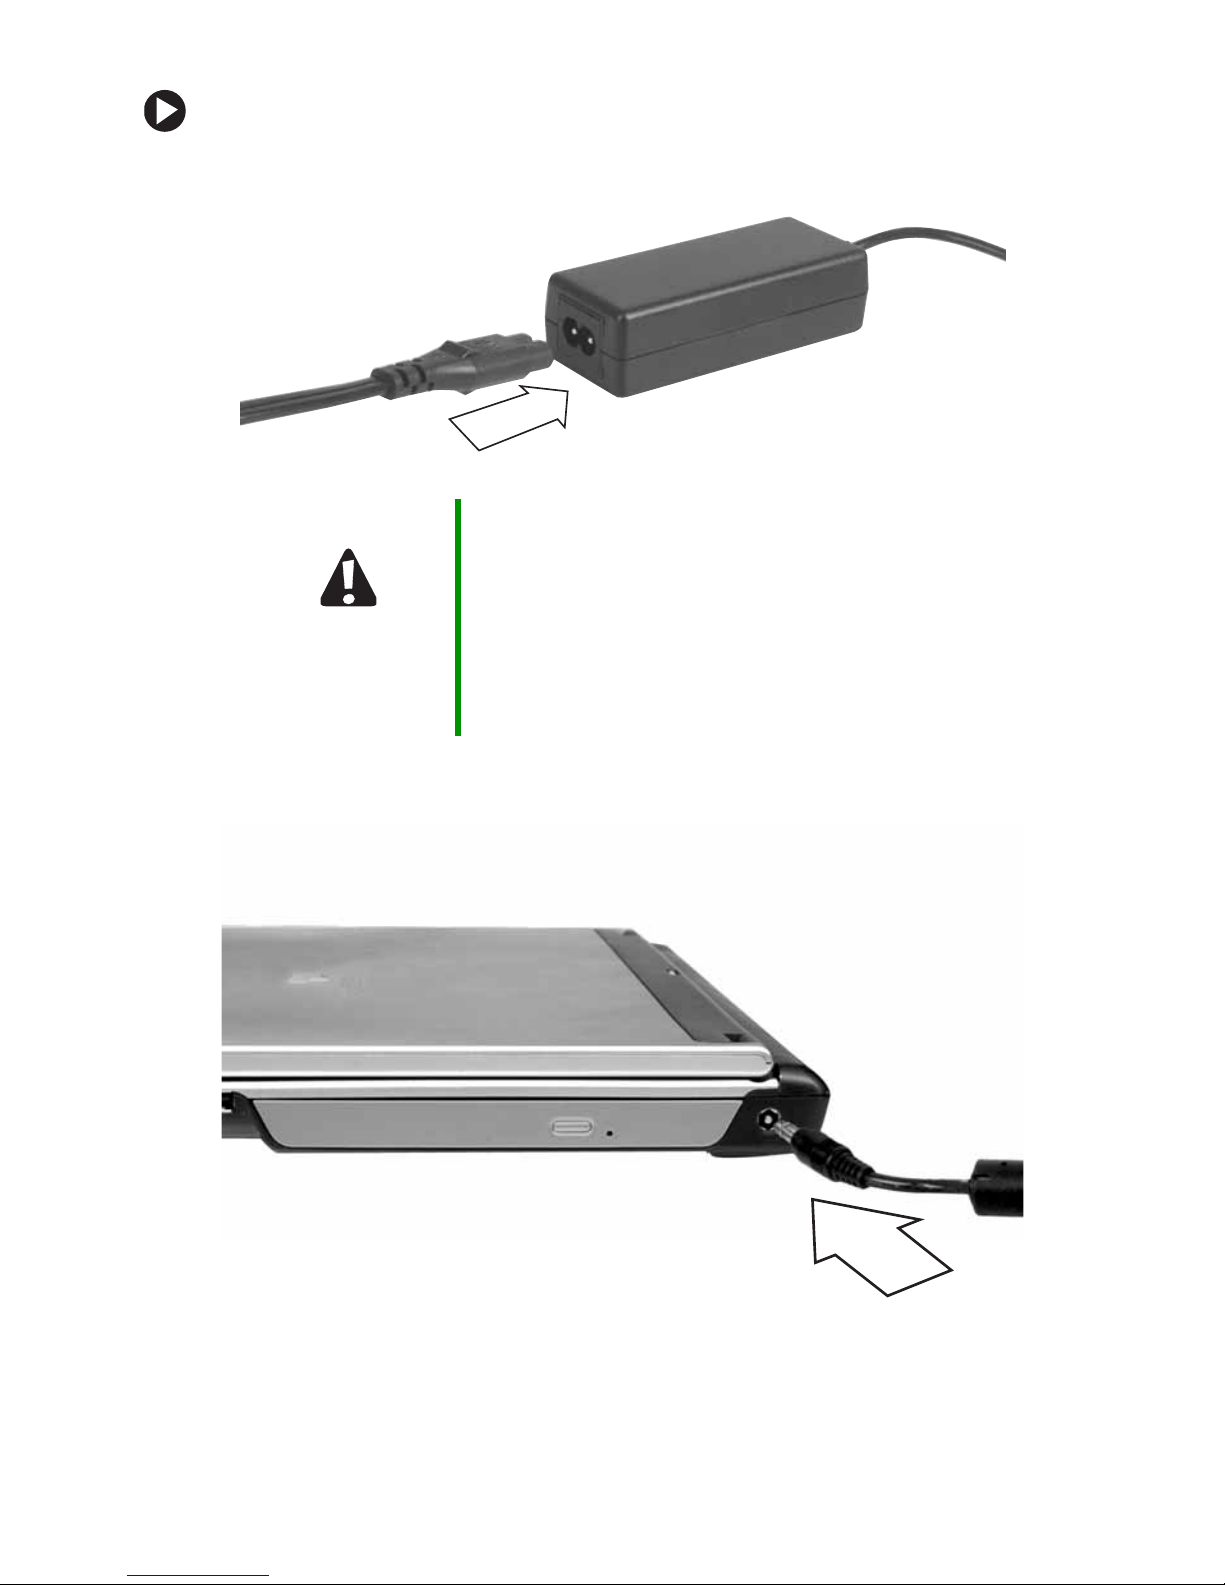
To connect the AC adapter:
1 Connect the power cord to the AC adapter.
Caution Make sure that y ou use the AC adapter that came with y our
notebook or one of the same type purchased from
Gateway.
Replace the power cord if it becomes damaged. The
replacement cord must be of the same type and voltage
rating as the original cord or your notebook may be
damaged.
Connecting the AC adapter
2 Connect the AC adapter to your notebook’s power connector.
www.gateway.com
21
Page 28

Chapter 3: Gettin g Started
3 Plug the power cord into a wall outlet. The power/battery charge
indicator turns on (see “Back” on page 13 for the location of the
power/battery charge indicator). If the power/battery charge
indicator does not turn on, complete the following steps until it
turns on:
a Unplug the adapter from your notebook, then plug it back in.
b Press FN+F1 to toggle the status lights on and off.
4 When you finish using your no tebook for the first time, turn off your
notebook and leave your notebook connected to AC power until the
power/battery charge indicator turns blue.
Warning Do not attempt to disassemble the AC adapter. The
AC adapter has no user-replaceable or user-serviceable
parts inside. The A C adapter has dangerous vo ltages that
can cause seriou s injury or death. C ontact Ga tew a y about
returning defective AC adapters.
Important If the power/battery charge indicator does not tur n blue
after three hours, contact Gateway Customer Care at
support.gateway.com
.
Prot ecting from power sourc e problems
During a power surge, the voltage level of electricity coming into your
notebook can increase to levels far above normal levels and cause data
loss or system damage. Protect your notebook and peripheral devices by
connecting them to a surge prot ector, which absorbs voltage surges and
prevents them from reaching your notebook.
Warning High voltages can enter your notebook through both the
power cord and the modem connection. To protect your
notebook and a void electrica l shock, use a surg e protector .
If you ha ve a tel ephone modem, u se a surge prot ector that
has a modem jac k. If you ha ve a cab le modem, use a surg e
protector that has an antenna/cable TV jack. During an
electrical storm, unplug both the surge protector and the
modem.
22
www.gateway .com
Page 29
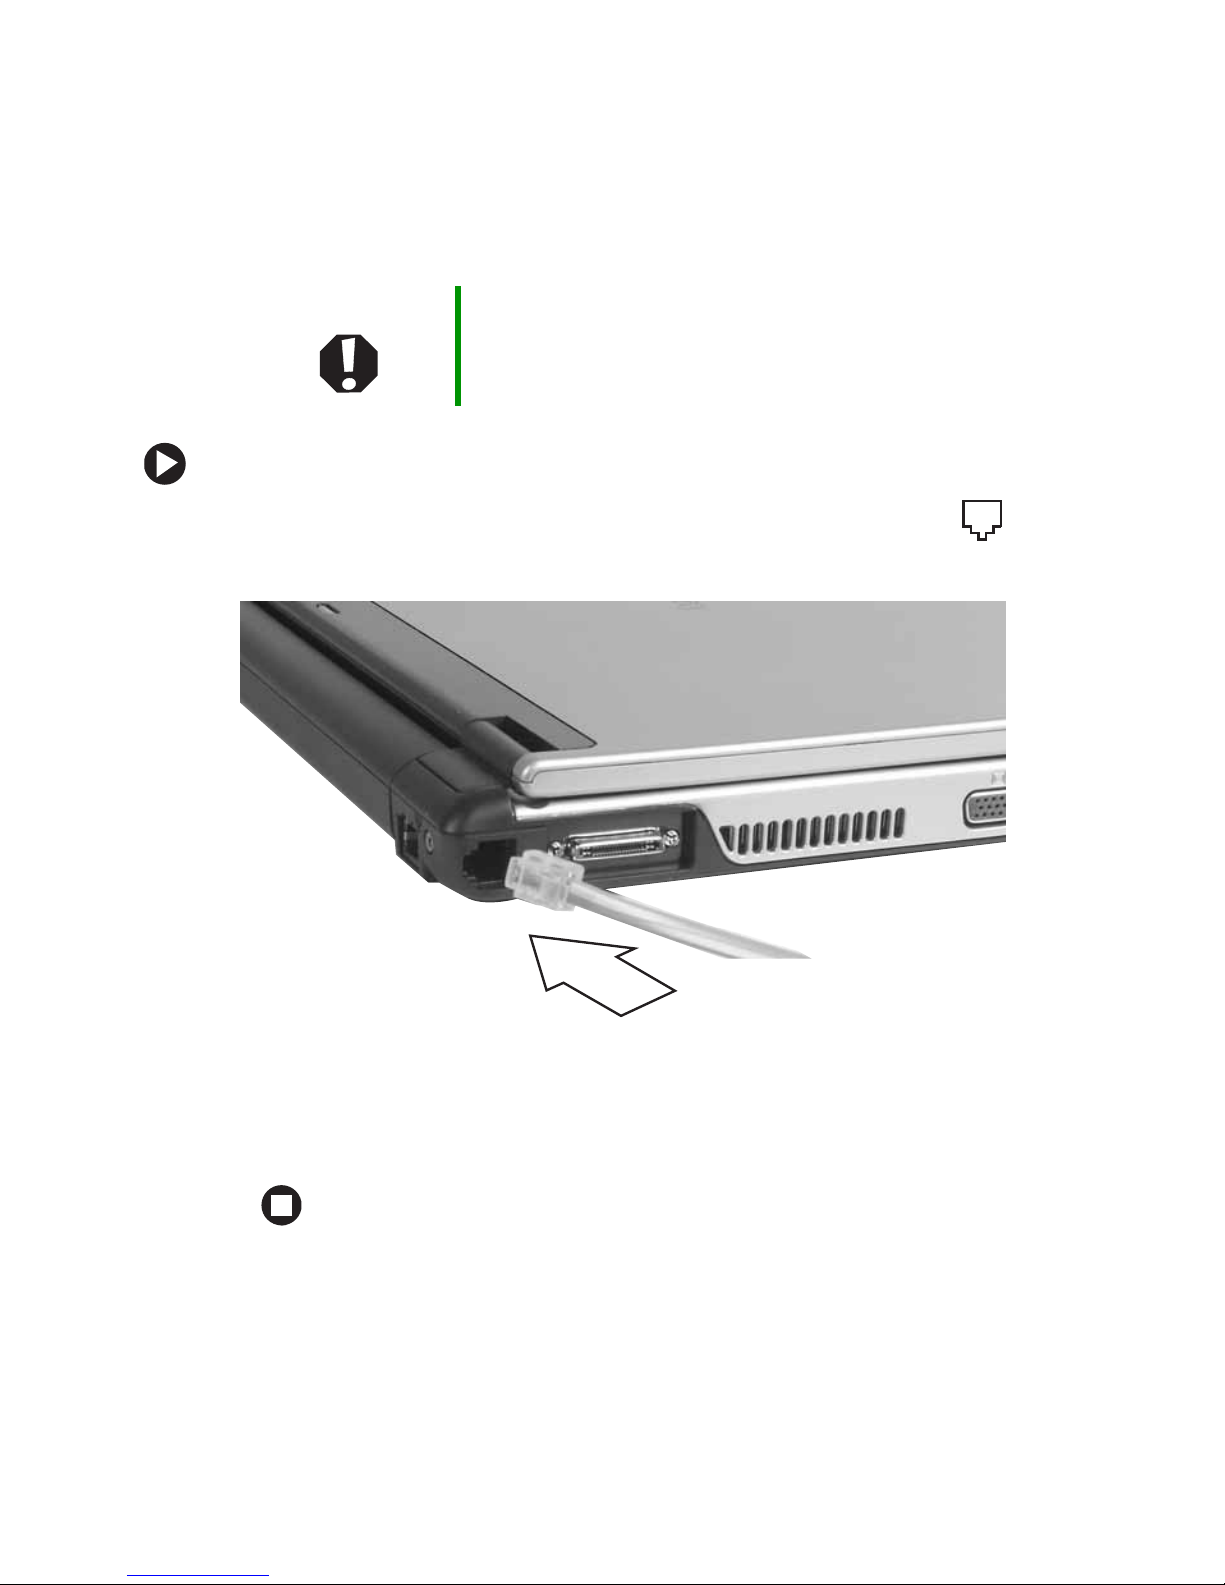
Connecting the dial-up modem
Co nnecting the dial-up modem
Your notebook has a built-in 56K modem that you can use to connect
to a standard telep hone line.
Warning To reduce the risk of fire, use only No. 26 AWG or larger
telecommunications line cord.
To connect the modem:
1 Insert one end of the modem cable into the modem jack on the
left side of your notebook.
2 Insert the other end of the modem cable into a telephone wall jack.
The modem will not work with digital or PBX telephone lines.
3 Start your notebook, then start your communications program.
www.gateway.com
23
Page 30
Chapter 3: Gettin g Started
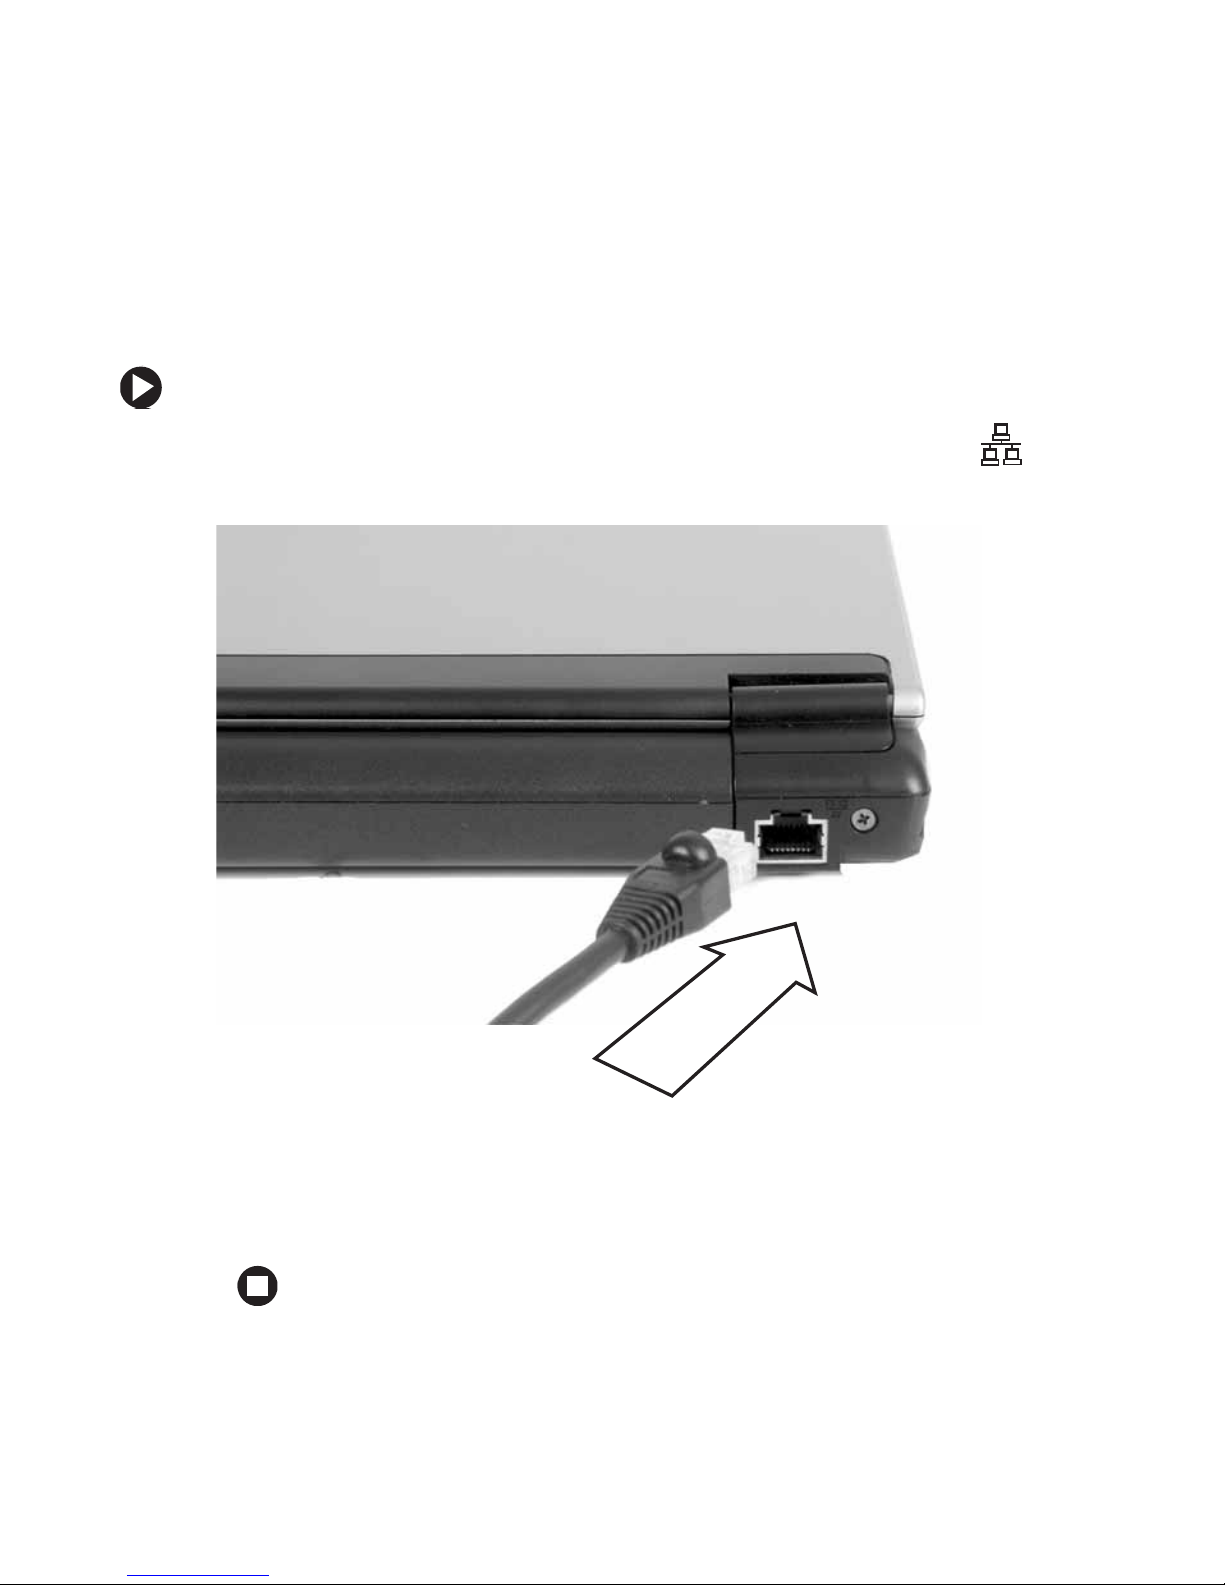
Co nnecting to a cable or DSL
modem or to an Ethernet network
Your notebook has a network jack that you can use to c onnect to a cable
or DSL modem or to an Ethernet net work.
To connect to a cable or DSL modem or to an Ethernet network:
1 Insert one end of the network cable into th e network jack on
the back of your notebook.
2 Insert the other end of the network cable into a cable modem , DSL
modem, or Ethernet network jack.
3 Start your notebook.
24
www.gateway .com
Page 31

Starting your notebook
To start your notebook:
1 Slide the latch on the front of your notebook, then lift the LCD
panel.
2 Press the power button located above the keyboard.
Starting your n otebook
The power button is preset to On/Off mode. However, you can also
set it to function in Standby/Resume mode.
Tips & Tricks For more information about changing the power button
3 If you are starting your notebook for the first time, follow the
on-screen instructions to set up your notebook.
mode, see “Changing Power-Saving Settings” in
Your Computer
drive. T o access t his guide, click Start, All Programs, then
click Gateway Documentati on.
www.gateway.com
which has been included on your hard
Using
25
Page 32

Chapter 3: Gettin g Started
Warning Do not work for long periods with the notebook resting on
your lap. If the air vents are blocked, the notebook may
become hot enough to harm your skin.
Caution Provide adequa te space around your no tebook so air vents
are not obstructed. Do not use the notebook on a bed,
sofa, rug, or other similar surface.
W aking up your no tebook
When you have not used your notebook for several minutes or if you
close the LCD panel without turning off your notebook, it may enter a
power-saving mode called Standby. While in Standby, the power indicator
flashes.
If your notebook is in Standby mode, press the power button to “wake”
it up.
Tips & Tricks For more information about changing the power button
mode, see “Changing Power-Saving Settings” in
Your Computer
drive. T o access t his guide, click Start, All Programs, then
click Gateway Documentati on.
which has been included on your hard
T urning off y our notebook
To turn off your notebook:
1 Click Star t, then click Turn Off Computer. The Turn Off Computer dialog
box opens.
2 Click Tu r n Off. Windows shuts down and turns off yo ur notebook.
Using
Important If for some reason you cannot use the Turn Off Computer
26
option i n Windows to turn off your not ebook, pre ss and
hold the power button for about five seconds, then
release it.
www.gateway .com
Page 33

Restarting (reb ooting) your notebook
Restarting (rebooting) your
notebook
If your notebook does not respond to keyboard, touchpad, or mouse
input, you may have to close pr ograms that are not responding. If closing
unresponsive programs does not restore your notebook to normal
operation, you may have to restart (reboot) your notebook.
To close unresponsive programs and restart your notebook:
1 Press CTRL+ALT+DEL. The Windows Security dialog box opens.
2 Click Task Manager. The Windows Task Manager dialog box opens.
3 Click the program that is not responding.
4 Click End Task.
5 Click X in the top-right corner of the Windows Task Manager dialog
box.
6 If your notebook does not respond, turn it o ff, wait ten seconds, then
turn it on again.
Important If your notebook does not turn off immediately, complete
the following steps until the notebook tur ns off:
1 Press and hol d the pow er butto n f or about fiv e seconds,
then release it.
2 Unplug the powe r cord an d remo ve the battery f or more
than 10 seconds.
As a part of the regular startup process, a program to check the disk
status runs automatically. When the ch ecks are finished, Windows
starts.
www.gateway.com
27
Page 34

Chapter 3: Gettin g Started
A
Status indicat ors
Status indicators inform you when a drive is being used or when a but ton
has been pressed that affects how the keyboard is used.
AC power
Caps lock
Wireless network
Indicator Icon Description
AC power
Wireless network
(optional)
Caps lock
Num lock
1
Drive
■
LED on - AC power is connecte d.
■
LED off - AC power is not connected.
■
LED on - Wi reless n etwork is turned on.
■
LED off - Wireless network is turned off.
■
LED on - C aps lo ck is turn ed on.
■
LED off - Caps l ock is tur ned off.
■
LED on - Numeric keypad is turned on.
■
LED off - Numeric keypad is turned off.
■
LED blinking - The hard drive or DVD drive is in use.
■
LED off - The hard dr ive or DVD drive is no t in use.
Drive
Num lock
Important If none of the indicators are on, you may need to press
28
FN+F1 to toggle the status lights on and off.
www.gateway .com
Page 35

Using the k eyboard
Your notebook features a full-size keyboard that functions the same as a
desktop computer keyboard. Many of the keys ha ve been assigned
alternate functions, including shortcut keys for Windows, function keys
for specific system operations, and the Num Lock keys for the numeric
keypad.
Function keys/System keys
Numeric
keypad
Using the keyboard
Navigation
keys
FN key
Windows key
Tips & Tricks You can attach an external keyboard to the
notebook or port replicator using a USB por t. You
do not need to shut down the note book to con nect
a USB keyboard.
Application key
Arrow
keys
www.gateway.com
29
Page 36

Chapter 3: Gettin g Started
Key types
The keyboard has several different types of keys. Some keys perform
specific actions when pressed alone and other actions when pressed in
combination with another key.
Key type Icon Description
Function keys Press th ese keys labeled F1 to F12 to perform actions
in programs. For example, pressing
Each program uses different function keys for different
purposes. See the program documentation to find out
more about the function key actions.
F1 may open help.
System keys Press these colo red keys in combination with the
to perform specific actions. For more information, see
“System key combinations” on page 31.
Navigation keys Press th ese keys to move the curs or to the b eginning
of a line, to the end of a l ine, up the pag e, down the page,
to the beginning of a document, or to the end of a
document.
Arrow keys Press these keys to move the cursor up, down, right, or
left.
Application key Press this key for quick access to shortcut menus and
help ass istants in Windows.
Windows key Press this key to open the Windows Start menu. This
key can also be used in combination with other keys to
open utilities like
F (Sea rch utili ty), R (Run utility), and
FN key
E (Explorer utility).
FN key Press the FN key in combination with a colored system
key to perform a specific action.
Numeric keypad Use these keys to type numbers when the numeric
30
keypad is turned on. Press
numeric keypad.
www.gateway .com
FN+ to turn on the
1
Page 37

Using the keyboard
Sy stem key combinations
When you press the FN key and a system key at the same time, your
notebook performs the action identified by the text or icon on the key.
Press and hold F
N, then
press this system key...
To...
Toggle t he status i ndicator s on or off. For mor e
information, see “Status indicators” on page 28.
Tur n the optio nal wirel ess networ k on or of f. For more
information, see the printed network guide that came
with your notebook.
Warning: Radio frequency wireless comm uni catio n can
interfere with equ ipme nt on comm ercial aircr a ft. Current
aviation regulations require wireless devices to be turned
off whil e traveling in an a irp lane. 80 2.11G (a lso know n
as wireless Ethernet or Wifi) comm unica tion de vice s are
examples of devices that provide wireless
communication.
Enter St andby mode. Pr ess the power butt on to leave
Standby mode. For more information, see “Changing
Power-Saving Settings” in
Using Your Computer
has been included on your hard dr ive. To access this
guide, click Start, All Programs, then click Gateway
Documentation.
which
Toggle t he noteboo k display in t he following orde r:
■
The LCD
■
An external monitor or projec tor (a monitor or projector
must be plugged into the monitor port on your
notebook)
■
Both displays at the same time
For more information, see “Viewing the display on a
projector or monitor” on page 46.
Decrease the LCD panel brightness.
www.gateway.com
31
Page 38

Chapter 3: Gettin g Started
Press and hold FN, then
press this system key...
To...
Increas e the LCD panel bri ghtness.
Play or Pause the CD or DVD.
Stop playing the CD or DVD.
Skip back one CD song or DVD track.
Skip ahead one CD song or DVD track.
Turn on Num Lock so you can use the numer ic keypad.
Press this key combination again to turn off Num Lock.
The Num Lock status indicator appears when this
function is turned on.
32
www.gateway .com
Page 39

Using the EZ P ad touchpad
Using the EZPad touchpad
The EZ Pad™ consists of a touchpad, two buttons, and a scroll zone.
Touchpad
Scroll
zone
Left button Right button
When you move your finger on the touchpad, the pointer (arrow) on the
screen moves in the same direction. You can use the scroll zone to scroll
through documents. Use of the scroll zone may vary from program to
program.
www.gateway.com
33
Page 40

Chapter 3: Gettin g Started
You can use the EZ-Pad left and right buttons below the touchpad to select
objects.
Tips & Tricks For instructions on how to adjust the double-click speed,
pointer speed, right-hand or left-hand configuration, and
other touchpad settings, see “Changing the mouse or
touchpad settings” in
been included on your hard drive. To access this guide,
click Start, All Programs, then click Gateway
Documentation.
Using Your Computer
which has
Using the touchpad
To... Do this...
Move the pointer on
the screen.
Select an object on
the screen.
Start a program or
open a file or folder.
Move your finger
around on the
touchpad. If you run
out of space and
need to move the
pointer farther, lift
your finge r, mov e it to
the middle of the
touchpad, then
continue moving your
finger.
Position the pointer
over the objec t.
Quickly press and
release t he left
button once. This
action is called
clicking
Position the pointer
over the objec t.
Press the left button
twice in rapid
successio n. This
action is called
double-clicking
.
.
34
www.gateway .com
Page 41

To... Do this...
Using the EZ P ad touchpad
Access a shortcut
menu or find more
information about
an object on the
screen.
Move an object on
the screen.
Position the pointer
over the objec t.
Quickly press and
release t he rig ht
button once. This
action is called
right-clicking
Position the pointer
over the objec t.
Press the left button
and hold i t down,
then use the
touchpad to move
(drag) the object to
the appropriate part
of the scr een.
Release the button to
drop the object
where you want it.
.
Tips & Tricks You receiv ed y our not ebook with the EZ P ad to uchpad set
to only accept cli cking by using the t ouc hp ad buttons. You
can change this feature to allow tapping on the touchpad
to simulate clicking the left button. For more infor mation,
see “Changing the mouse or touchpad settings” in
Your Computer
drive. T o access t his guide, click Start, All Programs, then
click Gateway Documentati on.
which has been included on your hard
Using
www.gateway.com
35
Page 42

Chapter 3: Gettin g Started
Adjusting the v olume
You can use the volume control to adjust the overall volume your
notebook.
To adjust the overall volume level using hardware controls:
■ If you are using external speakers, turn the knob on the front of the
speakers.
-ORPress the volume control on the notebook. For more information,
see “Front” on page 10.
Tips & Tricks For instructions on how to adjust the volume in Windows,
see “Adjusting th e Volume” in
has been inclu ded on your ha rd drive. To access this guide ,
click Start, All Programs, then click Gateway
Documentation.
Using Your Computer
which
36
www.gateway .com
Page 43

Turning your wi reless radio on or off
T urning y our wireless r adio on or
off
Warning Radio frequency wireless communication can interfere
with equipment on commercial aircraft. Current aviation
regulations requi r e wire les s devices to be turned off while
trav eling in an airplane. IEEE 802.11a, IEEE 802.11b, and
IEEE 802.11g communication devices are examples of
devices that provide wireless communication.
Warning In environments where the risk of interference to other
devices or services is harmful or perceived as harmful, the
option to use a wireless device may be restricted or
eliminated. Airports, hospitals, and oxygen or flammable
gas laden atmospheres are limited examples where use
of wireless devices may be re st rict ed or e li mi nate d. Whe n
in environments where you are uncertain of the sanction
to use wireless devices, ask the applicable authority for
authorization prior to us e or turning on the wire less de vice .
Your Gateway notebook may have wireless networking built-in.
To turn the wireless radio on or off:
■ Press FN + F2. The wireless status indicator turns on or off. For the
location of the wireless status indicator, see “Status indicators” on
page 28.
www.gateway.com
37
Page 44

Chapter 3: Gettin g Started
38
www.gateway .com
Page 45

Chapter 4
Using Drives and Ports
• Using D VD driv es
• Using the media card reader
•Using a PC Card
• Viewing the display on a monitor or
projector
• Connecting a video cam era to your
notebook
39
Page 46

Chapter 4: Using Drive s and Ports
Using the D VD drive
Y ou can use your notebook to enjoy a wide variety of multimedia features.
Important Some music CDs have copy protection software. You may
not be able to play these CDs on your notebook.
Identifying drive types
Your Gateway note book may contain one of the following drive types.
Look on the front of the drive for one o r more of the following logos:
If your drive has thi s logo... This is your drive type... Use your drive for...
ROM/R/RW
Combination
DVD/CD-RW drive
Multi-format
DVD
±RW/CD-RW drive
Installing programs,
playing audio CDs,
playing DVDs, accessing
data, and recording music
and data to recordable
CDs. You cannot use this
drive to create DVDs.
Installing programs,
playing audio CDs,
playing DVDs, accessing
data, recording music and
data to CD-R or CD-RW
discs, and recording video
and data to DVD-R,
DV D + R , DVD - R W, o r
DV D + RW d i s c s .
40
www.gateway .com
Page 47

Inserting a CD or DVD
Eject button
To insert a CD or DVD:
Using the DVD drive
Manual eje ct hole
1 Press the eject button on the DVD drive. After the tray opens slightly,
pull the disc tray completely open.
2 Place the disc in the tray with the label facing up, then press down
carefully on the disc until it snaps into place.
Important When you place a single-sided disc in the tray, make sure
that the label side is facing u p. If the disc h as tw o playable
sides, place the disc so the name of the side you want to
play is facing up.
3 Push the tray in until it is closed.
www.gateway.com
41
Page 48

Chapter 4: Using Drive s and Ports
Playing a CD
Use a music program or Windows Media Play er on your notebook to:
■ Play music CDs
■ Create MP3 and WMA music files from your music CDs
■ Edit music track information
■ Use your music files to build a music library
Tips & Tricks For more information about playing CDs, see “Using
Windows Media Player” in
been included on your hard drive. To access this guide,
click Start, All Programs, then click Gateway
Documentation.
Using Your Computer
which has
Playing a D VD
A Digital Versatile Disc (DVD) is similar to a standard CD but has greater
data capacity. Because of this increas ed capacity, full-length movi es,
several albums of music, or several gigabytes of data can fit on a single
disc. You can play DVDs with a DVD program or Windows Media Player.
Tips & Tricks For more information about playing DVDs, see “Using
Windows Media Player” and “Using CyberLink PowerD VD”
in
Using Your Computer
hard drive. To access this guide, click Start, All Programs,
then click Gateway Documentation.
which has been included on your
Crea ting CDs and DV Ds
You can use a CD and DVD burning program, Windows X P,
Windows Media Player, or Windows Movie Maker to copy or create data
CDs and DVDs, create music CD s, create video DVDs, and more.
Tips & Tricks For more information about creating CDs and DVDs, see
42
“Using Window s Media Play er”, “Using Nero Express”, a nd
“Editing videos” in
included on your hard drive. To access this guide, click
Start, All Programs, then clic k Gateway Documentation.
www.gateway .com
Using Your C omput er
which has been
Page 49

Using the memor y card reader
Using the memory card reader
You can use memory cards to transfer pictures from a digital camera to
your notebook. You can also use the memory card reader to transfer data
between your notebook and a device that uses memory cards, such as a
PDA, MP3 player, or cellular telep hone.
Memory card types
The memory card reader supports Memory Stick®, Memory Stick Pro®,
MultiMediaCard™, and Secure Digital™.
Inserting a memory card
To insert a memory card:
1 Remove the protector from the memory card slot. For the location
of the memo ry card slot, se e “Front” on p age 10. To remove the
protector, follow the steps in “Removing a memory ca rd” on page 44.
2 Insert the memory card into the memory card slot with the label
facing up and the arrow on the label poi nting towards the notebook.
Using a memory card
To access a file on a memory card:
1 Click Start, then click My Computer.
2 Double-click the drive letter (for example, the E: drive), th en
double-click the file name.
www.gateway.com
43
Page 50

Chapter 4: Using Drive s and Ports
Removing a memory card
Important Do not use the remove hardware icon in the taskbar
to remove the memory card. If you use the remove
hardware icon, your notebook may not recognize your
memory card reader until you restart your notebook.
To remove a memory card:
1 Push the memory card into the notebook. The memory card pops
out slightly.
2 Pull the memory card out of the notebook.
3 Insert the protector into the memory card slot.
Adding and r emoving a PCCard
Your notebook has a PC Card slot (also known as a PCMCIA card slot).
This slot accepts one Type II card. Yo u do not need to restart your
notebook when changing mo st cards because your notebook supports
hot-swapping. Hot-swapping means that you can insert a PC Card while
your notebook is running. If your PC Card does not work after
hot-swapping, see the PC Card manufacturer’s documentation fo r further
information.
44
www.gateway .com
Page 51

Adding and re moving a PC Car d
To insert a PC Card:
■ Push the card firmly into the PC Card slot label-side up until the
outer edge of the card is flush with the side of your notebook.
To remove a PC Card:
1 Click the remove hardware icon in the taskbar, the PC Card
name, then click
-ORTurn off your notebook.
Important If the remove hardware icon does not appear on the
Stop.
taskbar, click the show hidden icons button.
2 Release the eject button by pressing the PC Card eject button once.
3 Eject the PC Ca rd by pressing the eject button again.
www.gateway.com
45
Page 52

Chapter 4: Using Drive s and Ports
Viewing the displa y on a
projector or monitor
You can use your notebook for giving presentations by connecting an
external monitor or projector to your monitor (VGA) port. Y our notebook
supports simultaneous LCD and external display. Simultaneous display
lets you control the presentation from your notebook and at the same
time face your audience.
To use a projector or external monitor:
1 Turn off your notebook.
2 Plug the projector or monitor cable into the VGA port on your
notebook. For the location of the VGA port, see “Left side” on
page 11.
3 Turn on your notebook.
4 Plug the projector’s or monitor’s power cord into an AC power source
and turn it on. Wind ows reco gni zes th e new hardware and se arches
for its driver. You may need to install the driver from the disc
supplied by the manufacturer or download the driver from the
manufacturer’s Web site.
5 After the driver is installed, right-click any empty space on the
desktop, then click
opens.
Properties. The Display Properties dialog box
46
www.gateway .com
Page 53

6 Click the Settings tab.
Viewing the display on a projector or monitor
7 Right-click the second monitor icon (labeled 2), then click Attached.
8 Click Apply.
9 Adjust properties such as Screen Resolut ion or Color Quality if
necessary.
10 Click OK.
Important Press FN+F4 to swi tch between viewi ng the displa y on th e
LCD panel and viewing the display on the projector or
monitor.
Important If an external monitor or projector is connected and you
close the LCD panel, your notebook may turn off the LCD
panel, but will not enter Standby mode.
www.gateway.com
47
Page 54

Chapter 4: Using Drive s and Ports
Co nnecting a video camera to
your not ebook
Your notebook has a 4-pin IEEE 1394 port (also known as a Firewire® or
i.Link
To connect your video camera to your notebook:
®
port) for connecting devices such as a video ca mera.
1 Connect one end of the IEEE 1394 cable to your video camera.
Important For more information about using the IEEE 1394 port on
your video camera, see your camera’s documentation.
2 Connect the other end of the cable to the IEEE 1394 port on
the side of your notebook.
Tips & Tricks For more information about editing video, see “Editing
48
videos” in
on your hard drive. To access this guide, click Start,
All Programs, then click Gateway Documentation.
Using Your Computer
www.gateway .com
which has been included
Page 55

Chapter 5
Managing Power
• Checkin g and recharging the b attery
• Recalibrat ing the battery
• Changing batteries
• Extending the lif e of the battery
49
Page 56

Chapter 5: Managin g Power
Monitoring the battery charge
Your new Gateway notebook is designed to provide an exceptional
balance of performance and portability. Your notebook uses the latest
chipset and mobile processor technologies to manage the processor speed
and power consumption for a greater battery life experience. This design
provides you with maximum performance when plugged into AC power
balanced with optimized battery life when on battery power.
Closely monitor the battery charge. W hen the battery charge gets low,
change the battery or connect to AC power immediately to prevent losing
any unsaved work. To monitor the battery charge:
■ Double-click the power cord icon or battery icon in the
taskbar. The Power Met er dialog box opens.
Important If the power cord or battery icon does not appear on the
taskbar , clic k the show hidd en icons button. If the icon
still does not appear, make sure that Always show icon
on the taskbar is checked on the Advance tab in the
Power Options Properties
For more information, see “Changing advanced settings”
in
Using Your Computer
hard drive. To access this guide, click Start, All Programs,
then click Gateway Documentation.
■ Look at the power/battery charge indicator (see “Back” on page 13):
■ LED solid blue - notebook is on, and if the notebook is connected
dialog box.
which has been included on your
to AC power, the battery is fully charged.
■ LED blinking blue - notebook is in Standby mode.
■ LED solid purple - battery is charging.
■ LED blinking purple - battery is charging and notebook is in
Standby mode.
■ LED blinking red - battery charge is very low and has insufficient
power to turn on the notebook.
■ LED off - notebook is off.
■ Wait for a Low Battery warning message to appear.
50
www.gateway .com
Page 57

Recharging the batte ry
If your power/battery charge indicator displays what looks like an
inaccurate charge, you may need to recalibrate the ba ttery. For more
information, see “Recalibrating the battery” on page 51 .
Recharging the battery
The battery recharges while it is installed and your notebook is connected
to AC power. While the battery recharges, the p ower/battery charge
indicator turns on and the power cord icon in the taskbar has a lightning
bolt .
Important If the power cord or battery icon does not appear on the
taskbar , clic k the show hidd en icons button. If the icon
still does not appear, make sure that Always show icon
on the taskbar is checked on the Advance tab in the
Power Options Properties
dialog box.
For more information, see “Changing notebook power
settings” in
on your hard drive. To access this guide, click Start,
All Programs, then click Gateway Documentation.
Using Your Computer
which has b een include d
Recalibrati ng the battery
If your notebook unexpectedly goes into Standby mode while you are
using it but the battery charge is not low, you may need to recalibrate
your battery. You should also recalibrate the battery periodically to
maintain the accuracy of the battery gauge.
To recalibrate the battery:
1 Close all open files and programs.
2 Connect your notebook to AC power and let the battery charge
completely.
3 Disconnect the AC power and restart your notebook.
www.gateway.com
51
Page 58

Chapter 5: Managin g Power
4 Completely discharge the battery by doing the following:
a From the desktop, right-click on the power icon, then select
Adjust Power Properties.
b Click the Pow er Sc he m es tab.
c C lick the arrow button to open the Power Schemes list, then click
Always On.
d Click the Alarms tab.
e C lick to clea r the Low battery alarm and Critical battery alarm check
boxes. Let the battery drain until your notebook automatically
turns off.
Important Do not use your notebook during the recalibration process.
Do not connect the AC adapter to your notebook during
this process, or you will interrupt the recalibrati on proc es s
and will have to start again.
5 After the battery is completely drained, reconnect your notebook to
AC power.
6 Charge the battery completely until the battery status indicator turns
blue.
7 When you are ready to use your notebook again, do the following:
a From the desktop, right-click the power icon, then select Adjust
Pow er Properties
.
b Click the Pow er Sc he m es tab.
c C lick the arrow button to open the Power Schemes list, then click
Portable/Laptop.
d Click the Alarms tab.
e C lick to select the Low battery alarm and Critical battery alar m check
boxes.
52
www.gateway .com
Page 59

Changing batte ries
Changing batt eries
If your notebook is connected to AC power, you can change the battery
while the notebook is turned on. If your notebook is not plugged into
an AC outlet, you must turn the notebook off while changing the battery .
Warning Danger of explosion if battery is incorrectly replaced.
Replace only with a battery specifically manufactured for
your Gate w ay notebook . Discard u sed batteries accordin g
to local hazardous material regulations.
The battery used in this device may present a fire or
chemical burn hazard if mishandled. Do not disassemble,
heat above 212°F (100°C), or incinerate. Dispose of used
battery promptly. Keep away from children.
Replacing the battery
To replace the battery:
1 Disconnect your notebook from the optional port replicator
(“Disconnecting from the port replicator” on page 78).
2 If your notebook is on and is connected to AC power, go to Step 3.
-ORIf your notebook is on and is not plugged into an AC outlet, save
your work and turn off your notebook.
3 Close the LCD panel.
4 Turn your notebook over so the bottom is facing up.
www.gateway.com
53
Page 60

Chapter 5: Managin g Power
5 Slide the battery lock to the unlock position.
6 Slide the battery release latch, then slide the battery out of the
notebook.
7 Slide a recharged battery into the notebook until it snaps into place.
8 Slide the battery lock to the locked position.
9 Turn your notebook over.
10 Open the LCD panel and press the power button.
54
www.gateway .com
Page 61

Extending batter y life
Extending battery life
Conserving batt ery power
To conserve power while using the battery to power your notebook:
■ Dim the display as low as is comfortable.
■ Remove PC Cards when you do not need them. Many PC Cards use
a small amount of power while inserte d, even if they are not being
used.
■ Modify the power management settings for maximum power
savings.
Tips & Tricks For more information about using power management
setting s, see “Cha nging Power-Saving Sett ings” in
Your Computer
drive. T o access t his guide, click Start, All Programs, then
click Gateway Documentati on.
which has been included on your hard
Using
■ Close the LCD panel to turn off the display while you are not using
your notebook. The display stay s off unti l y ou open the panel again.
■ Use Hibernate mode for maximum power savings while your
notebook is not in use.
Tips & Tricks For more information about using Hibernate mode, see
“Changing notebook power settings” in
Computer
access this guide, click Start, All Programs, th en click
Gateway Documentation.
■ Use the DVD drive only when nece ssary. This drive uses a larg e
which has be en in cluded on your hard drive. To
Using Your
amount of power.
■ Recharge the battery often, take an extra battery, and fully recharge
the batteries before traveling. For more information, see “Recharging
the battery” on page 51 and “Changing batteries” on page 53.
www.gateway.com
55
Page 62

Chapter 5: Managin g Power
Tips & Tricks For more information about traveling with your notebook,
see “Tra veling w ith your no tebook” in
which has been i ncluded on y our hard driv e. To acces s this
guide, click Start, All Programs, then click Gateway
Documentation.
Using Your Computer
Using alterna te power sourc es
To extend batter y life, use alternate power sources whenever possible.
■ If traveling internationally, take electrical adapters. Save the battery
for times when you cannot use a power adapter . If you plan on taking
your AC power adapter, also take a single-plug surge protector.
■ If you will have access to an EmPower™ in-flight power receptacle,
an automobile power outlet, or an automobile cigarette lighter, use
a power inverter. Save the battery for times when you cannot use a
power adapter.
■ To find AC power outlets in airports, look for them next to support
pillars, in large areas such as boarding gates, and under banks of
telephones.
Changing pow er modes
You can use the following power modes to lengthen the life of your
notebook’s battery:
■ Standby - while your notebook is in Standby, it switches to a low
power state where devices, such as the display and drives, turn off.
■ Hibernate - (also called s ave to disk) writes all current memory (RAM)
information to the hard drive, then turns y our notebook completely
off. The next time you turn on your notebook, it reads the memory
information from the hard drive an d opens the programs and
documents that were open when you activated Hibernate mode.
Using power saving modes
Always save your work before usin g Standby mode. In Standby mo de,
your notebook reduces or turns off the power to most devices except
memory. However, the information in memory is not saved to the hard
drive. If power is interrupted, the information is lost.
56
www.gateway .com
Page 63

Extending batter y life
When in Hibernate mode, your notebook saves all memory information
to the hard drive, then turns the power completely off.
If your notebook is... ...and you want to... ...then
On Enter Standby m ode Press FN+F3.
On Enter Hibernate
mode (must be
activated)
In Standby or
Hibernate mode
Exit Standby or
Hibernate mode
Click Start, then click
Turn Off Computer. Press and hold
SHIFT, then click Hibernate.
Press th e power button.
www.gateway.com
57
Page 64

Chapter 5: Managin g Power
58
www.gateway .com
Page 65

Chapter 6
Upgrading Your Notebook
• Adding and rep lacing memory
• Replacing th e hard drive
59
Page 66

Chapter 6: Upgrading Your Notebook
Pre venting sta tic electricity
discharge
Important Before installing memory or replacing the hard drive, you
should read and understa nd the in f ormation in t his sec tion.
The components inside your notebook are extremely sensitive to static
electricity, also known as el ectrostatic discharge (ESD).
Warning To avoi d exposure to dangerous electrical voltages and
moving parts, turn o ff your note book and unplug the power
cord, modem cab le , and netw ork cab le be fore opening the
case.
Warning To prevent ri sk of electr ic shock, d o not i nser t any obj ect
into the vent holes of the notebook.
Before installing memory or replacing the hard drive, follow these
guidelines:
■ Avoid static-causing surfaces such as carpeted floors, pl astic, and
packing fo am.
■ Remove components from their antistatic bags only when you are
ready to use them. Do not lay components on the outside of
antistatic bags because only the inside of the bags provide
electrostatic protection.
■ Always hold components by their edges. Avoid touching the edge
connectors. Never slide components over a ny surface.
■ Wear a grounding wrist strap (available at most electronics stores)
and attach it to a bare metal part of your workbench or other
grounded connection.
■ Touch a ba re metal surface on your wo rkbench or other grounded
object.
60
www.gateway .com
Page 67

Adding or replaci ng memory
Adding or replacing memory
Your notebook uses memory modules called SO-DIMMs (Small Outline
Dual Inline Memory Modules). The modules are available in various
capacities and any m odule can be placed in the slot. Use only memor y
modules designed for your Gateway notebo ok for upgrading your
memory.
Memory
bay
To add or replace memory modules:
1 Follow the guidelines under “Preventing static electricity discharge”
on page 60 .
2 Turn off your notebook.
3 Disco nnect the A C adapte r, modem cable , and netw ork cabl e.
4 Disconnect all peripheral devices and remove any PC cards.
5 Disconnect your notebook from the optional port replicator (see
“Disconnecting from the port replicator” on page 7 8).
6 Turn your notebook over so the bottom is facing up.
www.gateway.com
61
Page 68

Chapter 6: Upgrading Your Notebook
7 Remove the battery. For more information, see “Replacing the
battery” on page 53.
8 Remove the memory bay cover screw.
Screw
9 Slide the memory bay cover, then remove it.
62
www.gateway .com
Page 69

Adding or replaci ng memory
10 If you are removing a module, gently press out ward on the clip at
each end of the memory module until the module tilts upward.
Clip
11 Pull the memory module out of the slot.
Clip
www.gateway.com
63
Page 70

Chapter 6: Upgrading Your Notebook
12 Hold the new or replacement module at a 30-degree angle and press
it into the empty memory slot. This module is keyed so it can only
be inserted in one direction. If the module does not fit, make sure
that the notch in the module lines up with the tab in the memory
bay.
Important Use onl y memory modules de signed for your
Gateway notebook.
13 Gently push the module down until it clicks in place.
14 Replace the memor y bay cover, then replace the cove r screw.
15 Insert the battery, then turn your notebook over.
16 Reconnect the optional port replicator.
17 Connect the power adapter, modem cable, and network cable, then
turn on your notebook.
64
www.gateway .com
Page 71

Replacing the har d drive kit
Replacing the hard drive kit
If you would like more hard drive capacity, you can replace your original
drive with a hig her-capacity dri ve.
Hard
drive
To replace the hard drive kit:
1 Back up any data you want to transfer to the new hard drive. For
more information, see “Backing up files” in Using Your Computer
which has been included on your hard drive. To access this guide,
click
Start, All Programs, th en click Gateway Documentation.
2 Follow the guidelines under “Preventing static electricity discharge”
on page 60 .
3 Turn off your notebook.
4 Disco nnect the A C adap ter, modem cabl e, and ne twork ca ble.
5 Disconnect all peripheral devices and remove any PC cards.
6 Disconnect your notebook from the optional port replicator (see
“Disconnecting from the port replicator” on page 7 8).
7 Turn your notebook over so the bottom is facing up.
www.gateway.com
65
Page 72

Chapter 6: Upgrading Your Notebook
8 Remove the battery. For more information, see “Changing batterie s”
on page 53 .
9 Remove the hard drive bay cov er screw, slide the hard drive bay
cover, then remove it.
Screw
10 Remove the two screws securing the hard driv e kit to the no tebook.
Screw
Screw
66
www.gateway .com
Page 73

Replacing the har d drive kit
11 Slide the old hard drive kit away from the hard drive connector , then
lift the hard drive kit out of your notebook.
12 If your new hard drive already includes the hard drive kit bracket,
go to Step 17.
-ORIf you need to move the hard drive kit bracket from your old hard
drive kit to your new hard drive, go to Step 13.
www.gateway.com
67
Page 74

Chapter 6: Upgrading Your Notebook
13 Remove the screws that secure the hard drive to the hard drive kit
bracket.
Screws
Screws
68
www.gateway .com
Page 75

14 Remove the bracket from the old drive.
Replacing the har d drive kit
15 Insert the new drive into the bracket so the screw holes line up.
16 Replace the screws that secure the bracket to the drive.
17 Slide the new hard drive kit into your notebook, then replace the
screws that secure the hard drive kit to the notebook.
18 Replace the hard drive bay c over and replace the cover screw.
19 Insert the battery, then turn your notebook over.
20 Reconnect the optional port replicator.
www.gateway.com
69
Page 76

Chapter 6: Upgrading Your Notebook
21 Connect the power adapter, modem cable, and network cable, then
turn on your notebook.
22 For instructions on installing Windows, your drivers, and your
applications, see the instructions in the restore booklet that came
with your notebook.
70
www.gateway .com
Page 77

Chapter 7
Using the Optional Port
Replicator
• Identifying f eatures
• Connecting and disco nnecting the port
replicator
• Securing the port replicator wi th a locking
cable
71
Page 78

Chapter 7: Using th e Optional Port Replicat or
Top
Component Icon Description
Power button
Power button Press to turn the power on or off.
72
www.gateway .com
Page 79

Right
Right
USB
ports
Component Icon Description
USB ports Plug USB devices (such as a diskette drive, flash
drive, printer, scanner , camer a, ke yboard, or mou se)
into these ports.
www.gateway.com
73
Page 80

Chapter 7: Using th e Optional Port Replicat or
Back
USB
Headphone
jack
IEEE 1394
port
Component Icon Description
Headphone jack Plug amplified speakers or headphones into this jack.
port
Parallel
port
Serial
port
The built-in speakers are turned off when speakers or
headphones are plugged into this jack.
Monitor
port
Ethernet
jack
Power
connector
®
IEEE 1394 port Plug an IEEE 1394 (also known as Firewire
device (such as a digital camcorder or exter nal hard
drive) into this 4-pin IEEE 1394 port.
USB port Plug a USB device (such as a diskett e drive, flash drive,
print er, scanner, camera, keyboard, or mo use) int o this
port.
Parallel port Plug a parallel device (such as a printer) into this port.
Serial port Plug a serial device into this port.
Monitor port Plug an analog VGA monitor or projector into this port.
Ethernet jac k Plug a 10/100/100 0 Ethernet network cable into th is jack.
The other end of the cable can be plugged into a cable
modem, DSL modem, or an Ethernet network jack. For
more info rmation, see “Connecting to a cable or DSL
modem or to an Ethernet network” on page 24.
or i.Link®)
Power connector Plug the AC adapter cable into this connector.
74
www.gateway .com
Page 81

Connecting to the po rt replicator
Co nnecting to the port replicator
Y o u can attach your notebook to the port replicator while your notebook
is off, on, or in Standby mode.
Attaching t o the port replicator
To attach your notebook to the port replicator:
1 Connect the power cord to the AC adapter that was packaged with
your port replicator.
2 Connect the AC adapter to your port replicator’s power connector.
For more information, see “Back” on page 74.
www.gateway.com
75
Page 82

Chapter 7: Using th e Optional Port Replicat or
3 Plug the power cord into a wall outlet.
4 Connect external devices to the ports on the port replicator.
5 Plug the port replicator into t he port replicator jack on the notebook.
For more information, see “Left side” on page 11.
6 Press the power button located on the top of the port replicator.
76
www.gateway .com
Page 83

Connecting to the po rt replicator
Important The notebook may detect additional devices and add
drivers after being attached to the por t replicator. This
process must be completed for components to work
correctl y. Follow any on-sc reen instr uctions, if ne cessar y.
Important The port replicator’s power button controls both the
notebook and the port replicator only after the por t
replicator is connected to AC power.
Important The notebook’s monitor port is disabled when the port
replicator is conne ct ed to the not ebook. If yo u w ant t o use
an external monitor, plug it into the monitor port on the port
replicator.
Important The notebook’s Ethernet jack is disabled when the port
replicator is connected to the notebook. If you want to
connect to a cable or DSL modem, or to an Ethernet
network, plug the Eth ernet cable into the Ethernet jack on
the port replicator.
Important If you are using a USB or parallel port printer connected
to the port replicator, y ou mus t select Virtual printer port
for USB during the Windo w s printer ins tallati on. Wind ow s
will not be able to det ect your printer if y ou make a diff erent
selection.
Important This port replicator does not support Fast IR.
www.gateway.com
77
Page 84

Chapter 7: Using th e Optional Port Replicat or
Disconnecting from the port replicator
You can separate your notebook from the port replicator while your
notebook is off or on (not in Standby or Hibern ate mode).
To separate your notebook from the port replicator:
1 If your notebook is off, go to Step 2.
-ORIf your notebook is on, click
Undock Computer menu i tem ap pears in the Start menu only while
the notebook is docked.
Start, then click Undock Computer. The
2 Unplug the port replicator from the notebook.
78
www.gateway .com
Page 85

Chapter 8
Maintaining Your Notebook
• Caring for y our notebook
• Cleaning y our notebook
• Protecting your notebook from viruses
• Updating Windows
• Restoring your system
79
Page 86

Chapter 8: Maintaini ng Your Notebook
Caring for your not ebook
To extend the life of your notebook:
■ Be careful not to bump or drop your note book, and do not put any
objects on top of it. The case, although strong, is not made to support
extra weight.
■ When transporting your notebook, we recommend that you put it
in a carryi ng case.
■ Keep your notebook away f rom ma gnetic fields. Magnetic fields can
erase data on hard drives.
■ Never turn off your notebook when the drive indicator is on because
data on the hard drive could be lost or corrupted.
■ Avoid subjecting your notebook to extreme temperature changes.
The case (and LCD panel) can become brittle and easy to break in
cold temperatures and can melt or warp in high temperatures.
Damage due to either extreme is not c overed by your warranty. As
a gener al rule, y our note book is sa fest at te mperatur es that a re
comfortable for you.
■ Keep all liquids away from your notebook. When spilled onto
computer components, almost any liquid can result in expensive
repairs that are not covered under your warranty.
■ Avoid dusty or dirty work environments. Dust and dirt can clog the
internal mechanisms and can lead to permanent damage to the
notebook.
■ Do not block the ventilation fan slots. If these slots are blocked, your
notebook may overheat resulting in un expected shutdown or
permanent damage to the notebook.
■ When storing your notebook for an extended period of time, unplug
AC power and remove the battery after discharging it partway.
80
www.gateway .com
Page 87

Cleaning your noteb ook
Cleaning y our notebook
Keeping your notebook clean and the vents free from dust helps keep
your notebook performing at its best. You may want to gather th ese items
and put together a notebook cleaning kit:
■ A soft, lint-free cloth
■ An aerosol can of air that has a narrow, straw-like extension
■ Cotton s wabs
■ A DVD drive cleaning kit
Cleaning the exterior
Warning When you shut down your notebook, the power turns off,
but some electrical current still flows through your
notebook. To avoid possible injury from electrical shock,
unplug the power cord, modem cable, and network cable
from the wall outlets.
Always turn off your notebook and other peripherals before cleaning any
components. Also, remove the batter y before clea ning any co mponents.
Use a damp, lint-free cloth to clean your notebook and other parts of
your system. Do not use household abrasive or solvent cleaners because
they can damage the finish on components.
Your notebook is cooled by air circulated through the vents on the case,
so keep the vents free of dust. With your notebook turned off and
unplugged, brush the dust away from the vents with a damp cloth. Be
careful not to drip any water into the vents. Do not attempt to clean dust
from the inside of your notebook.
www.gateway.com
81
Page 88

Chapter 8: Maintaini ng Your Notebook
Cleaning the keyboard
You should clean the keyboard occasionally by using an aerosol can of
air with a narrow, straw-like extension to remove d ust and lint trapped
under the keys.
If you spill liquid on the keyboard, turn off yo ur notebook and turn the
notebook upside down. Let the liquid drain, then let the keyboard dry
before trying to use it again. If the keyboard does not work after it dries,
you may need to replace it.
Cleaning the notebook screen
Use a soft cloth and water to clean the LCD scree n. Squirt a little water
on the cloth (never directly on the screen), and wipe the screen with the
cloth.
Caution A notebook LCD screen is made of specially coated glass
and can be scratched or damaged by abrasive or
ammonia-based glass cleaners.
Cleaning CDs or DVDs
Wipe from the center to the edge, not around in a c irc le, using a product
made especiall y for the purpose.
82
www.gateway .com
Page 89

Protecting your notebook from viruses
Protecting your notebook from
viruses
A virus is a program that attaches itself to a file on a computer, then
spreads from one computer to another . V iruses can damage data or cause
your notebook to malfunction. Some viruses go undetected for a period
of time because they are activated on a certain date.
Protect your notebook from a virus by:
■ Register in g y ou r co p y of No rto n
®
Internet Security and subscribing
to the virus definition upd ate service. Y ou received a free limited time
subscription to the Norton Internet Security service when you
purchased your notebook.
■ Using the Norton Internet Security program to check files and
programs that are attached t o e-mail messag es or downloa ded from
the Internet.
■ Checking all programs for viruses before installing them.
■ Disabling macros on suspicious Microsoft Word and Excel files.
These programs will warn you if a document that you are opening
contains a mac ro that might have a vi rus.
■ Periodically updating the Norton Internet Security program to
protect against the latest viruses.
■ Making sure the Windows Security Center is configured to provide
you with the highest level of protection.
Tips & Tricks For more inform ation ab out modifyi ng secur ity setti ngs,
Help and
Support
see “Modifying Security Se ttin gs ” in
which has been i ncluded on y our hard driv e. To acces s this
guide, click Start, All Programs, then click Gateway
Documentation.
For more information about protecting your notebook
against viruses, click Start, then click Help and Support.
Type the keyword viruses in the Search box
, then click the arrow.
www.gateway.com
Using Your Computer
83
Page 90

Chapter 8: Maintaini ng Your Notebook
To scan for vi ruses:
1 Click Start, All Programs, Norton Internet Security, then click Norton
Internet Security
. Norton Internet Security op ens.
2 Click Norton AntiVirus.
84
www.gateway .com
Page 91

3 Click Scan for Viruses.
Protecting your notebook from viruses
4 Click the type of scan you want to make in the Scan for Viruses area.
To remove a virus:
1 If Norton Internet Security finds a virus, follow all on-screen
instructions to remove the virus.
2 Turn off your notebook and leave it off for at least 30 seconds.
3 Turn on your notebook and rescan for the virus.
To update Norton Internet Security:
Important You receiv ed a free lim ited ti me sub scription to the N orton
Internet Security service when you purchased your
notebook. To update Norton Internet Security after the free
subscription period, you must extend your subscription.
1 Make sure that you are connected to the Internet.
2 Click Start, All Programs, Norton Internet Security, then click Norton
Internet Security
. Norton Internet Security op ens.
www.gateway.com
85
Page 92

Chapter 8: Maintaini ng Your Notebook
3 Click LiveUpdate. The LiveUpdate wizard opens.
4 Follow the on-screen instructions to update your Norton Internet
Security program with the latest virus protection files.
5 When the program has finished, click Finish.
Updating W indows
Windows Up date is the online extension of Windows that help s you keep
your notebook up-to-date. Use Wind ows Update to choose updates for
your notebook’s operating system, software, and hardware. New content
is added to the site regularly, so you can always get the most recent
updates and fixes to protect your notebook and keep it runnin g smoothly .
Windows Update scans your notebook and provides you with a tailored
selection of updates that apply only to the software and hardware on your
notebook.
To run Windows Update:
1 Connect to the Internet.
2 Click Start, All Programs, then click Windows Update .
3 Follow the on-screen instructions.
Help and
Support
For more information about Windows Update in
Windows XP, click Start, then click Help and Support.
Type the keyword Windows Update in the HelpSpot
Search box , then click the arrow.
86
www.gateway .com
Page 93

Restoring your syste m
Restoring your syst em
All programs that were preinstalled on yo ur notebook are available on
the backup restore discs that you created with the recovery media
program, on the hard drive, or on restore discs that were included with
your notebook. If you need to restore your notebook to the original
configuration, you can use the backup restore discs or you can use the
backup files located on the hard drive.
The instructions for using the restore discs or hard drive backup files are
included in the instruction booklet that came with your notebook.
www.gateway.com
87
Page 94

Chapter 8: Maintaini ng Your Notebook
88
www.gateway .com
Page 95

Chapter 9
Troubleshooting
• Troubleshooting typica l hardware an d
software pro blems
• Getting telephon e support
• Using automated troub leshooting systems
89
Page 96

Chapter 9: Trouble shooting
Safety guidelines
While troubleshooting your notebook, follow these safety guidelines:
■ Never remove the memory bay or hard drive bay cover while your
notebook is turned on, while the battery is installed, and while the
modem cable, network cable, and AC power adap ter are connected
to your notebook.
■ Make sure that you are correctly grounded before accessing internal
components. For more information about preventing damage from
static electricity, see “Preventing static electricity discharge” on
page 60.
■ After you complete any maintenance tasks where you remove the
memory bay or h ard d rive ba y co ver, make sure tha t yo u rep lace t he
cover, reinstall any screws, then replace the battery before you start
your notebook.
Warning Do not tr y to t roubles hoot your pr oblem if power cords or
plugs are damaged, if your notebook was dropped, or if
the case was damaged. Instead, unplug your notebook
and contact a qualified computer technician.
90
www.gateway .com
Page 97

F irst steps
If you have problems with your notebook, try these things first:
■ Make sure that the AC power adapter is connected to your notebook
and an AC outlet and that the AC outlet is supplying power.
■ If you use a power strip or surge protector, make sure that it is turned
on.
■ If a peripheral device (such as a keyboard or mouse) does not work,
make sure that all connections are secure.
■ Make sure that your hard drive is not full.
■ If an error message appears on the screen, write down the ex act
message. The message may help Gateway Customer Care in
diagnosing and fixing the problem.
First steps
■ If you added or removed per ipheral devices, rev iew the installat ion
procedures you performed and make sure that you followed each
instruction.
■ If an error occurs in a program, see the pro gram’s printed
documentation or the online help.
Help and
Support
For more information about troubleshooting, click Start,
then click Help and Support. Type the keyword
troubleshooting in the Search box
, then click the arrow.
www.gateway.com
91
Page 98

Chapter 9: Trouble shooting
Troubleshooting
Audio
Audio troubleshooting is covered under “Sound” on pag e 109.
Battery
Battery troubleshooting is cov ered under “Power” on page 107.
CD drives
CD drive troubleshooting is covered u nder “DVD drives” on page 94.
Device installa tion
You have computer problems after adding a new device
Sometimes a new device, such as a PC Card, can cause a system resource
(IRQ) conflict. Check IRQ usage to determine if there is an IRQ conflict.
To check IRQ usage:
1 Click Start, then click Control Panel. The Control Panel window
opens. If your Control Panel is in Category View, click
Performance and Maintenance.
2 Click/Double-click System, click the Hardware tab, then click
Device Manager. The Devic e Manager window opens.
3 Click View, then click Resources by type. Double-click Interrupt
request (IRQ)
displayed.
. All IRQs and their hardware assignments are
92
www.gateway .com
Page 99

Troubleshooting
Help and
Support
For more information about IRQs, click Start, then click
Help and Support. Type the keyword IRQs in the Search
box , then click the arrow.
To free IRQ resources for the new device:
1 In the Device Manager window, check the device list for a
resource conflict. A reso urce conflict appears as a bl ack
exclamation point in a yellow circle.
2 Remove the device you are trying to install, then determine
which one of the existing devices or ports you can disable.
3 Right-click the device or port you want to disable, then click
Disable. The device or port is disabled.
Display
The screen is too dark
Adjust the brightness using the system keys. For more information, see
“System key combinatio ns” on page 31.
The screen resolution is not correct
Change the screen resolution from the Display Properties dialog box.
Tips & Tricks For instructions on changing the screen resolution, see
“Adjusting the screen resolution” in
which has been i ncluded on y our hard driv e. To acces s this
guide, click Start, All Programs, then click Gateway
Documentation.
The text on the display is dim or difficult to read
■ Adjust the brightness and contrast using the system keys. For more
information, see “System key combinations” on page 31.
Using Your Computer
www.gateway.com
93
Page 100

Chapter 9: Trouble shooting
■ Change the display settings.
Tips & Tricks For instructions on changing the display settings, see
“Adjusting the screen and desktop settings” in
Computer
access this guide, click Start, All Programs, then click
Gateway Documentation.
■ Move your notebook away from sources of electrical interference,
which has be en in cluded on your hard drive. To
Using Your
such as televisions, unshielded speakers, microwaves, fluorescent
lights, and metal beams or shelves.
The display has pixels that are always dark or too bright
This condition is normal and inherent in the TFT technology used in
active-matrix LCD screens. Gateway’s inspection standards keep these to
a minimum. If you feel these pixels are unacceptably numerous or dense
on your display, contact Gateway Customer Care to identify whether a
repair or replacement is justified based on the number of pixels affected.
The display is blank
■ Adjust the brightness using the system keys. For more information,
see “System key combinations ” on page 31.
■ Make sure the notebook is not in standby or hibernate mode. For
more information, see “Changing power modes” on page 56.
■ The notebook may be sending its display to an external monitor or
projector . Press F
N + F4 several times to toggle through the a ttached
display, an external monitor or projector, or both.
An external monitor or project is not working
If your notebook is connected to a port replicator, make sure the external
monitor or projector is connected to the monitor port on the port
replicator and not on the notebook. The notebook’s monitor port is
disabled when connected to a port replica tor.
DVD drives
Your note book does not r ecogni ze a disc
■ The disc may not be seated correctly in the tray. When you place a
disc on the tray, make sure that you press the disc firmly onto the
spindle so the retainers hold the disc in place.
94
www.gateway .com
 Loading...