


User Guide
Gateway 30-inch LCD TV


Contents
1 Introducing Your Gateway LCD TV. . . . . . . . . . . . . . . . . . . . . . . . . . . . . . . 1
Package contents . . . . . . . . . . . . . . . . . . . . . . . . . . . . . . . . . . . . . . . . . . . . . . . . . . . 2
Features . . . . . . . . . . . . . . . . . . . . . . . . . . . . . . . . . . . . . . . . . . . . . . . . . . . . . . . . . . . 3
Front panel controls . . . . . . . . . . . . . . . . . . . . . . . . . . . . . . . . . . . . . . . . . . . . . . . . . . 4
Back panel connections . . . . . . . . . . . . . . . . . . . . . . . . . . . . . . . . . . . . . . . . . . . . . . . 5
Accessories . . . . . . . . . . . . . . . . . . . . . . . . . . . . . . . . . . . . . . . . . . . . . . . . . . . . . . . . 6
2 Watching TV . . . . . . . . . . . . . . . . . . . . . . . . . . . . . . . . . . . . . . . . . . . . . . . . . . . . . 7
Connecting your satellite set-top box . . . . . . . . . . . . . . . . . . . . . . . . . . . . . . . . . . . . 8
Using component video . . . . . . . . . . . . . . . . . . . . . . . . . . . . . . . . . . . . . . . . . . . . 8
Connecting off-air TV or cable TV . . . . . . . . . . . . . . . . . . . . . . . . . . . . . . . . . . . . . . . 9
Turning on the power . . . . . . . . . . . . . . . . . . . . . . . . . . . . . . . . . . . . . . . . . . . . . . . . 10
Watching a TV program . . . . . . . . . . . . . . . . . . . . . . . . . . . . . . . . . . . . . . . . . . . . . . 11
3 Connecting Other Components . . . . . . . . . . . . . . . . . . . . . . . . . . . . . . . . . 13
Understanding video connections . . . . . . . . . . . . . . . . . . . . . . . . . . . . . . . . . . . . . . 14
Connecting your DVD player . . . . . . . . . . . . . . . . . . . . . . . . . . . . . . . . . . . . . . . . . . 15
Using component video . . . . . . . . . . . . . . . . . . . . . . . . . . . . . . . . . . . . . . . . . . . 15
Using S-Video . . . . . . . . . . . . . . . . . . . . . . . . . . . . . . . . . . . . . . . . . . . . . . . . . . 16
Using composite video . . . . . . . . . . . . . . . . . . . . . . . . . . . . . . . . . . . . . . . . . . . 17
Connecting your HDTV set-top box . . . . . . . . . . . . . . . . . . . . . . . . . . . . . . . . . . . . . 18
Using component video . . . . . . . . . . . . . . . . . . . . . . . . . . . . . . . . . . . . . . . . . . . 18
Using VGA video . . . . . . . . . . . . . . . . . . . . . . . . . . . . . . . . . . . . . . . . . . . . . . . . 19
Connecting your VCR or video camera . . . . . . . . . . . . . . . . . . . . . . . . . . . . . . . . . . 20
Using S-Video . . . . . . . . . . . . . . . . . . . . . . . . . . . . . . . . . . . . . . . . . . . . . . . . . . 20
Using composite video . . . . . . . . . . . . . . . . . . . . . . . . . . . . . . . . . . . . . . . . . . . 21
Connecting external amplified speakers . . . . . . . . . . . . . . . . . . . . . . . . . . . . . . . . . 22
Connecting an external receiver or amplifier . . . . . . . . . . . . . . . . . . . . . . . . . . . . . . 23
Connecting a computer . . . . . . . . . . . . . . . . . . . . . . . . . . . . . . . . . . . . . . . . . . . . . . 24
Using DVI video . . . . . . . . . . . . . . . . . . . . . . . . . . . . . . . . . . . . . . . . . . . . . . . . . 24
Using VGA video . . . . . . . . . . . . . . . . . . . . . . . . . . . . . . . . . . . . . . . . . . . . . . . . 25
4 Adjusting Your LCD TV Settings . . . . . . . . . . . . . . . . . . . . . . . . . . . . . . . . 27
Understanding viewing features . . . . . . . . . . . . . . . . . . . . . . . . . . . . . . . . . . . . . . . 28
Viewing modes . . . . . . . . . . . . . . . . . . . . . . . . . . . . . . . . . . . . . . . . . . . . . . . . . 28
Picture-in-Picture (PIP) mode . . . . . . . . . . . . . . . . . . . . . . . . . . . . . . . . . . . . . . 29
Using the on-screen display . . . . . . . . . . . . . . . . . . . . . . . . . . . . . . . . . . . . . . . . . . 31
OSD menus and options . . . . . . . . . . . . . . . . . . . . . . . . . . . . . . . . . . . . . . . . . . 32
Using parental controls . . . . . . . . . . . . . . . . . . . . . . . . . . . . . . . . . . . . . . . . . . . . . . 36
Setting parental controls . . . . . . . . . . . . . . . . . . . . . . . . . . . . . . . . . . . . . . . . . . 36
Setting a password . . . . . . . . . . . . . . . . . . . . . . . . . . . . . . . . . . . . . . . . . . . . . . 39
www.gateway.com
i

Using key lockout . . . . . . . . . . . . . . . . . . . . . . . . . . . . . . . . . . . . . . . . . . . . . . . .40
Using IR lockout . . . . . . . . . . . . . . . . . . . . . . . . . . . . . . . . . . . . . . . . . . . . . . . . .41
Setting the sleep timer . . . . . . . . . . . . . . . . . . . . . . . . . . . . . . . . . . . . . . . . . . . . . . .41
5 Maintenance and Troubleshooting . . . . . . . . . . . . . . . . . . . . . . . . . . . . . .43
Important safeguards . . . . . . . . . . . . . . . . . . . . . . . . . . . . . . . . . . . . . . . . . . . . . . . .44
Cleaning and maintenance . . . . . . . . . . . . . . . . . . . . . . . . . . . . . . . . . . . . . . . . . . . .45
Cleaning the screen . . . . . . . . . . . . . . . . . . . . . . . . . . . . . . . . . . . . . . . . . . . . . .45
Cleaning the exterior . . . . . . . . . . . . . . . . . . . . . . . . . . . . . . . . . . . . . . . . . . . . .46
Troubleshooting . . . . . . . . . . . . . . . . . . . . . . . . . . . . . . . . . . . . . . . . . . . . . . . . . . . .46
Contact Technical Support . . . . . . . . . . . . . . . . . . . . . . . . . . . . . . . . . . . . . . . .48
A Safety, Regulatory, and Legal Information . . . . . . . . . . . . . . . . . . . . . .49
Index . . . . . . . . . . . . . . . . . . . . . . . . . . . . . . . . . . . . . . . . . . . . . . . . . . . . . . . . . . . . . . 55
ii
www.gateway.com

Chapter 1
Introducing Your Gateway
■ Package contents
LCD TV
■ Features
■ Controls and connections
■ Accessories
1
Package c ontents
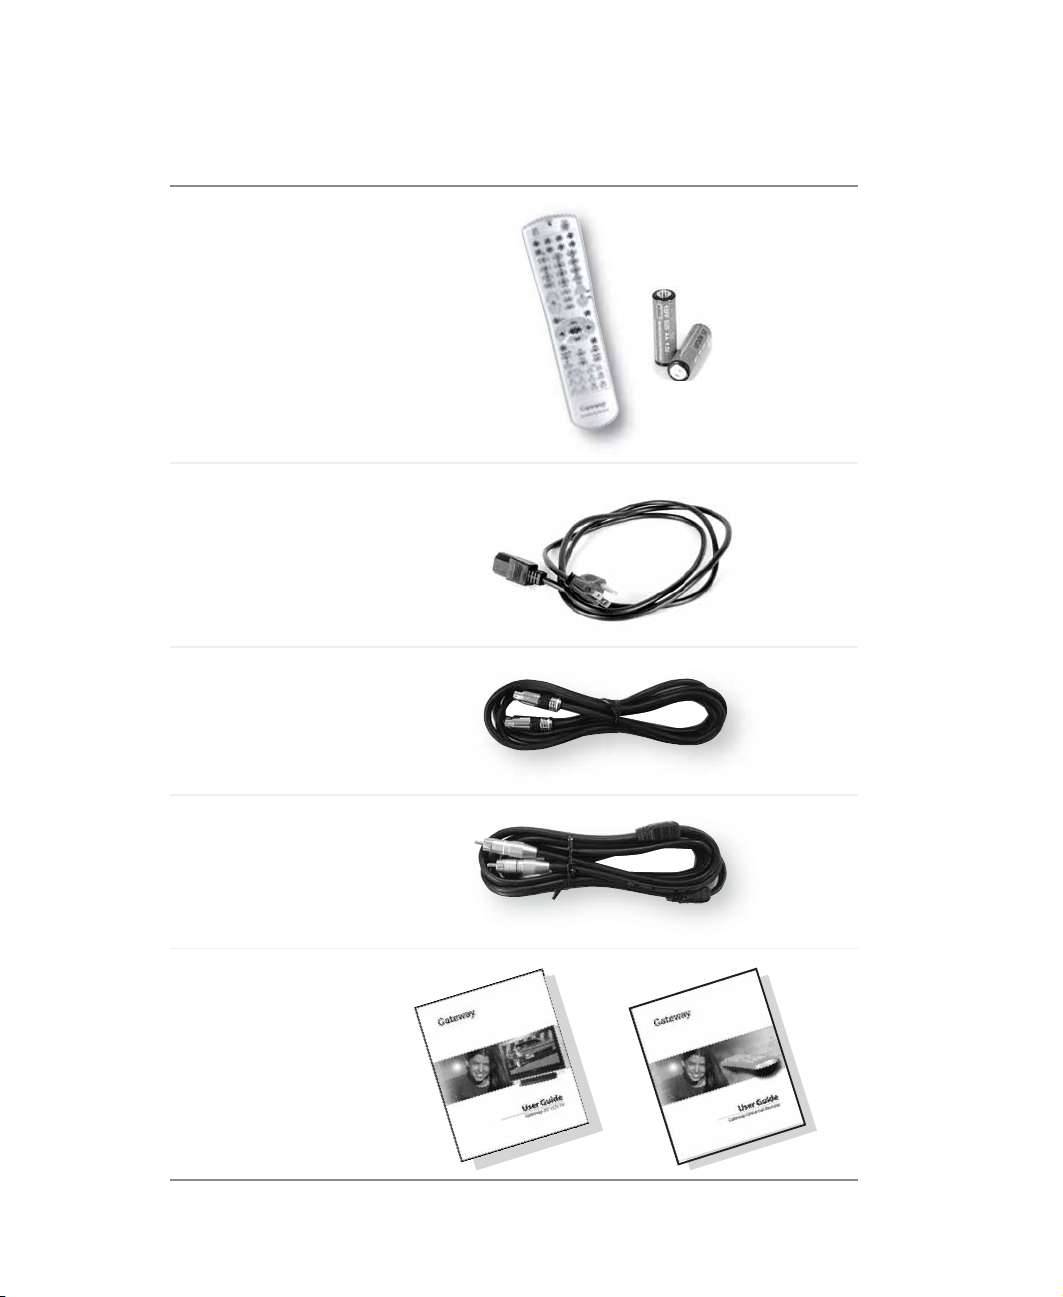
Along with your LCD TV, the packaging box contains the following items:
Remote control and
two AA batteries
Power cord
S-Video cable
Audio cable
LCD TV user guide
and remote control
user guide
2
www.gateway.com

Features
Your LCD TV features:
■ A bright, flicker-free image
■ Automatic convers ion of film content for correc t display with minimal screen noise
■ Accurate color processing
■ High-definition component video input that automatically synchronizes the display to
match the incoming source
■ Picture-in-picture (PIP) mode that lets you watch two programs simultaneously
■ HDTV signal compatibility using an external HDTV decoder with VGA, DVI, or
component video outputs
■ Digital zoom modes get rid of “black bars” around the display imag e
■ Built-in internal amplifier and speakers
■ A built-in Digital Visual Interface (DVI) to eliminate the need for digital-to-analog
conversion with HDCP.
■ 1280 × 768 SXGA support for computer input
■ 720p and 1080i support for HDTV signals
■ Audio and composite video output that lets you watch a program on a separa te
television or VCR.
www.gateway.com
3
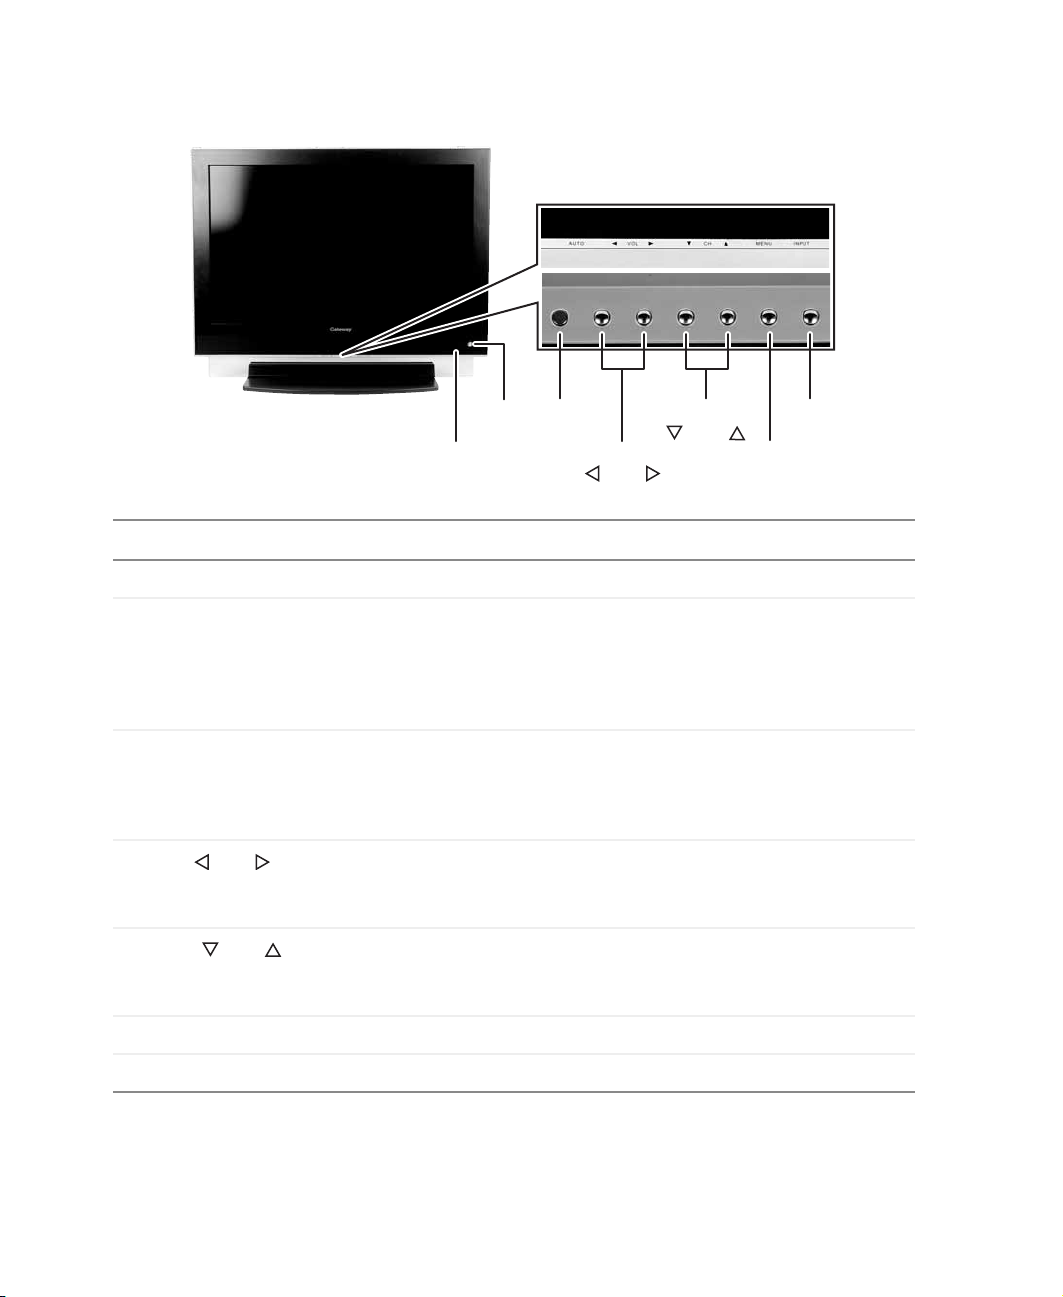
Fr ont panel contr ols
Power
Remote
control sens or
Auto
Volume
and
Channel
and
Input
Menu
Button Description
Remote control sensor Receives signals from the remote control. Do not block.
Power/Status LED Tur ns your LCD TV on and off. When you turn your LCD TV on or
off, wait three seconds before pressing this button again.
■
Not lit - No ACpower detected. The power cord is not connected.
■
Solid yellow - Your LCD TV is off.
■
Solid gree n - Your LCD TV is on.
Auto Automatical ly adjusts the disp lay to the best se ttings in V GA and D VI
modes.
OSD active: Accepts an on-screen display (OSD) menu item. For
more information, see “Using the on-screen display” on page 31.
Volume and Increases or decreases the volume.
OSD active: Adjusts on-screen display (OSD) options. For more
information, see “Using the on-screen display” on page 31.
Channel and Changes the channel.
OSD active: Selects on-screen display (OSD) options. For more
information, see “Using the on-screen display” on page 31.
Menu Opens and closes the on-screen display (OSD).
Input Switches between available input sources.
4
www.gateway.com
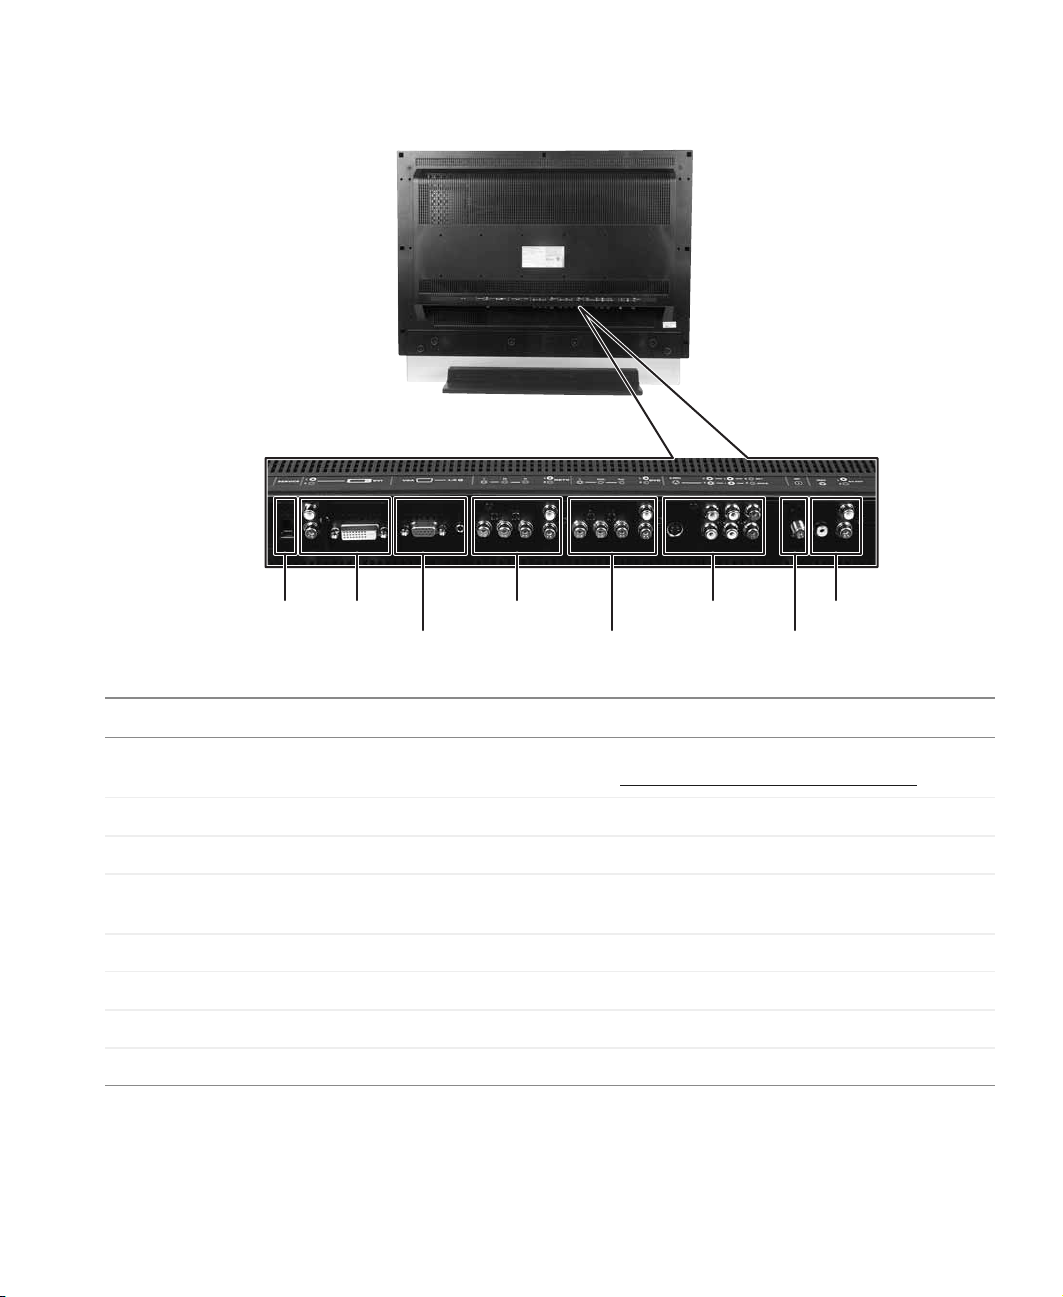
Back panel connections
Service
Connector
Service Connects to a wired remote. For more information, see the documentation
DVI/Audio In Connects to a DVI audio/video device, such as a computer or set-top box.
VGA/Audio In Connects to a VGA audio/video device, such as a computer or set-top box.
Component HDTV In Connects to a c omponent audio/v ideo device , such as an HDTV set-top bo x.
Component DVD In Connects to a component DVD player. (480i/480p only)
A V In Connects to two comp osite or S-Video audio/vid eo devi ces, such as a VCR.
Antenna Connects to a VHF/UHF antenna or cable TV.
AV Out Connects to an audio/video device, such as a receiver or television.
DVI/Audio In
VGA/Audio In
Component HDTV In
Component DVD In
AV In AV Out
Antenna
Description
on the Gateway Web site at support.gateway.com/support/manlib/
(480i, 480p, 720p, and 1080i)
.
www.gateway.com
5

Accessories
You can purchase these optional accessories for your LCD TV:
■ Cable ki ts. Gateway cable kits consist of high-quality gold cables of various lengths,
including:
■ DVI-D video cable
■ RCA audio cable
■ RCA component video cable
■ RCA composite video cable
■ S-Video cable
■ VGA video cable
Contac t Gatewa y for thes e and oth er access ories.
6
www.gateway.com

Chapter 2
Watching TV
■ Connecting a satellite dish
■ Connecting cable TV or an off-air
antenna
■ T urning on your LCD TV
■ W atching a TV program
7
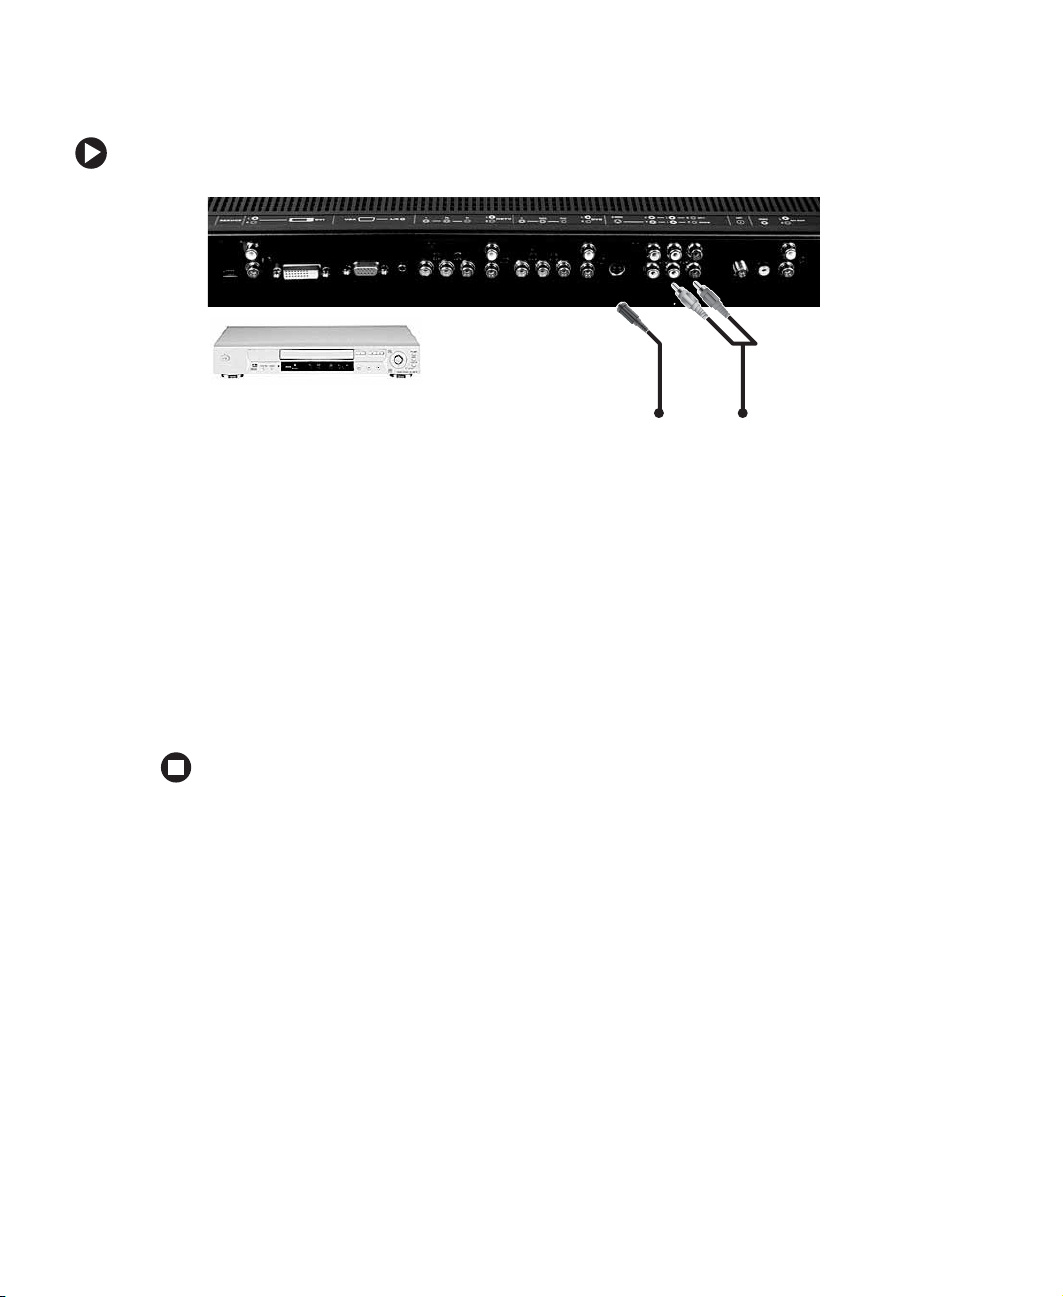
Connecting y our satellite set-top box
Using component video
To connect your satellite set-top box using component video:
1 Make sure that the power button on your LCD TV is turned off.
2 Connect the green Y jack on the back of your satellite set-top box to the
COMPONENT HDTV green Y jack on the back of your LCD TV.
3 Connect the red PR or CR
COMPONENT HDTV red PR/CR jack on the back of your LCD TV.
jack on the back of your satellite set-top box to the
4 Connect the blue PB or CB jack on the back of your satellite set-top box to the
COMPONENT HDTV blue PB/CB jack on the back of your LCD TV.
5 Connect the red (R) and white (L) audio jacks on the back of your satellite set-top
box to the
COMPONENT HDTV R and L audio-in jacks on the back of your LCD TV.
8
www.gateway.com
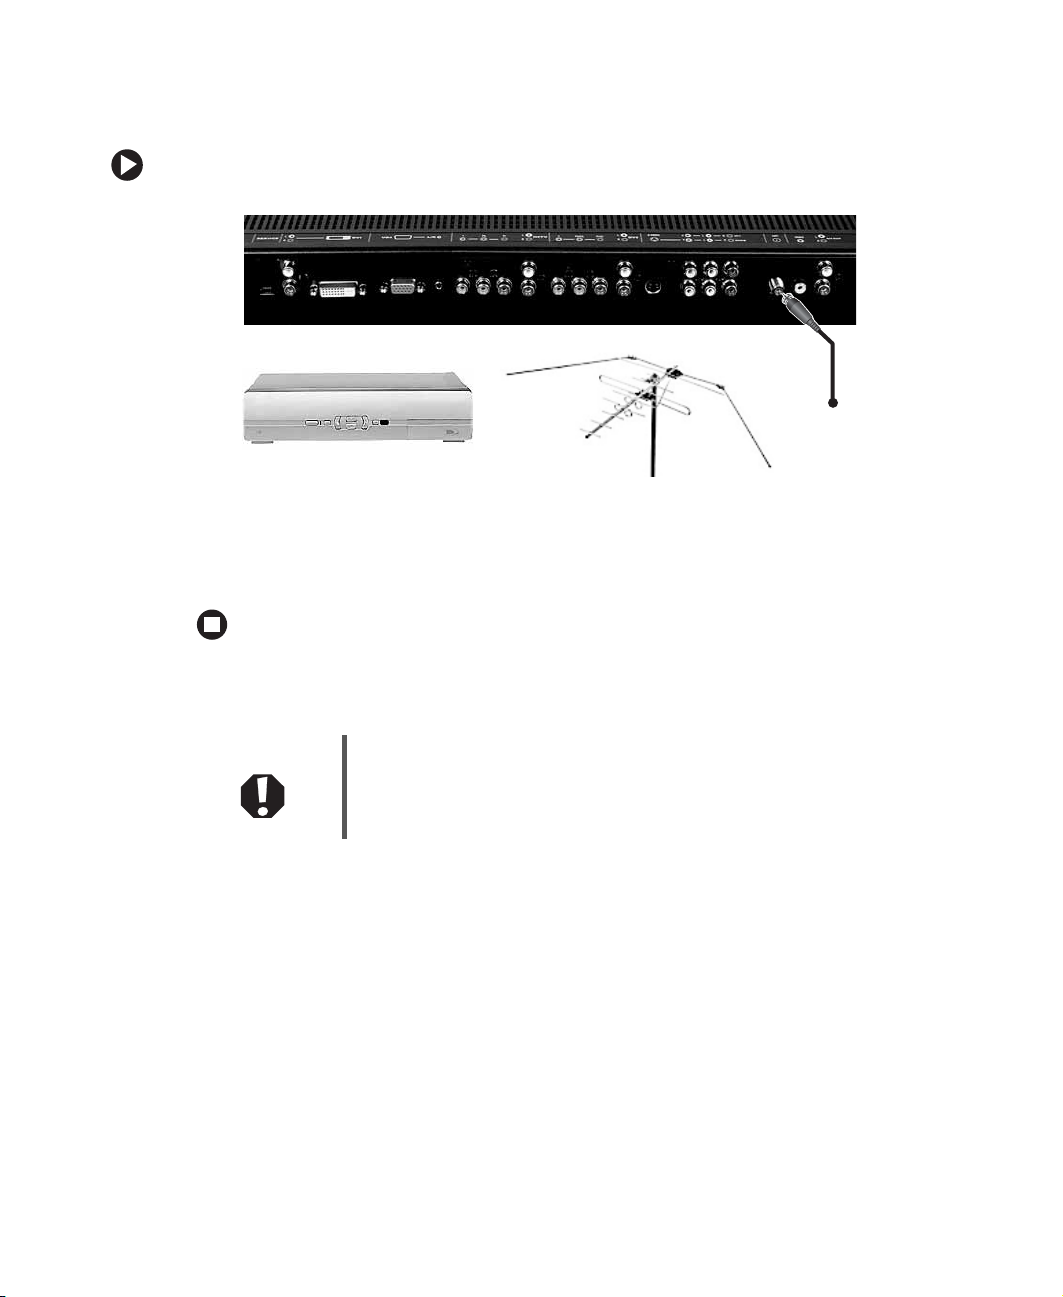
Connecting off-airTV or cableTV
To connect off-air TV or cable TV using coaxial (RF) audio and video:
- OR -
1 Make sure that the power button on your LCD TV is turned off.
2 Connect the coaxial (RF) connector from your antenna or cable box to the Ant.
connector on the back of your LCD TV.
If you have connected a VCR to the
your off-air TV or cable TV cable to the
Warning If an outdoor antenna or cable system is connected to your LCDTV,
make sure that the antenna or cable system is correctly grounded.
For more inf ormation, see “Television ant enn a c onn ect ors prote ct ion
(for systems fitted with TV/cable TV tuner cards)” on page 51.
Ant. connector on the back of your LCD TV, connect
www.gateway.com
Ant. connector on the back of your VCR.
9
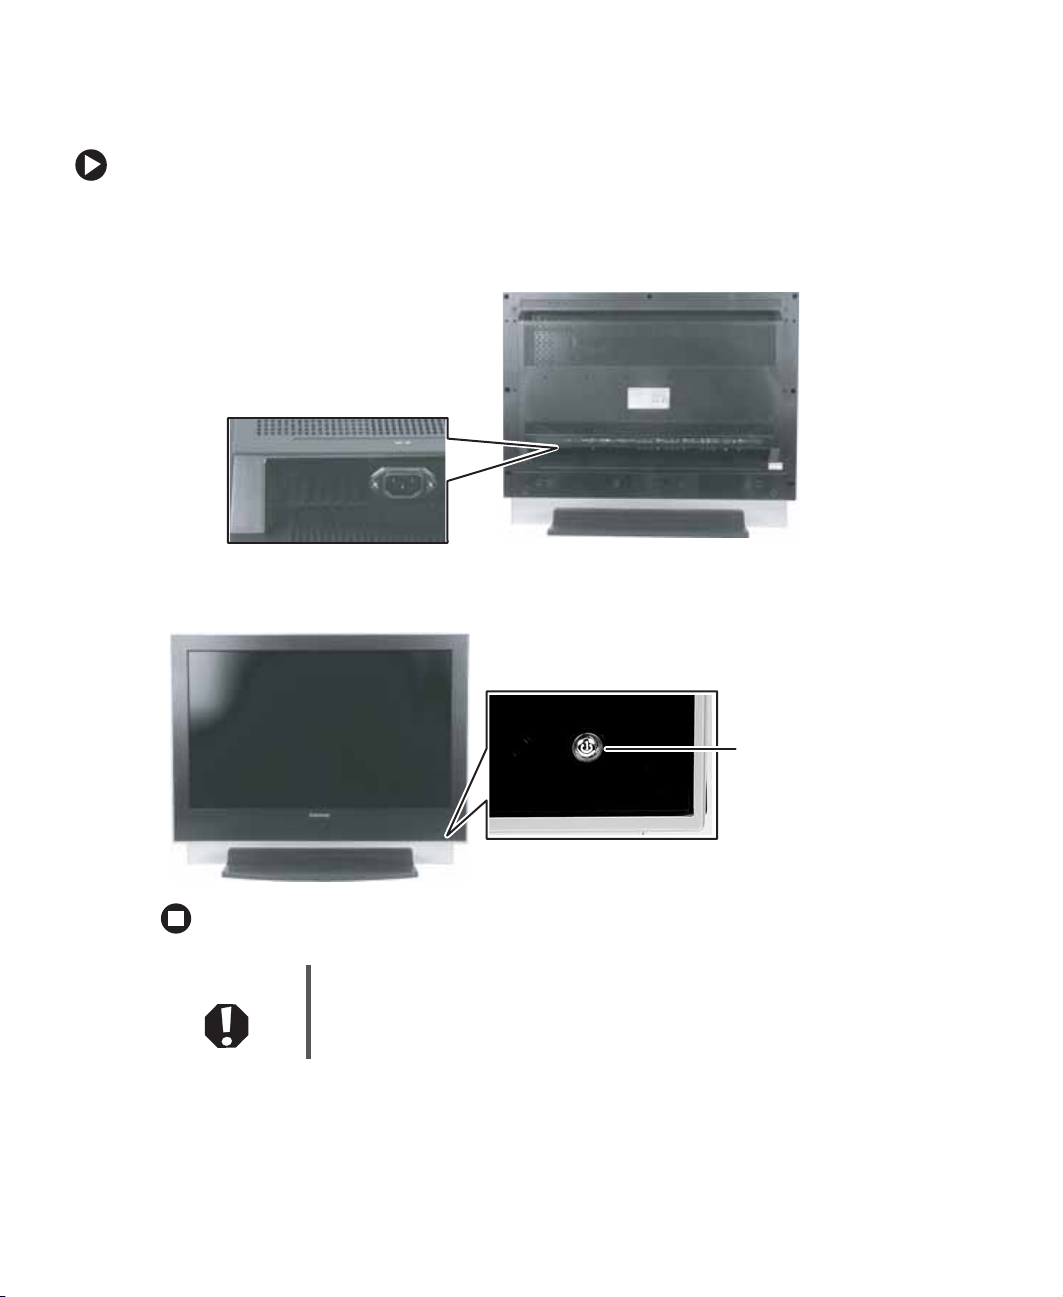
T urning on the pow er
To turn on the power:
1 Connect the power cord to the power cord connector on the back of your LCD TV,
then plug the other end of the power cord into a correctly grounded electrical outlet
or surge protector.
2 Press the power button.
10
Pow er b u tt o n
Warning For added protection during a lightning storm or when your LCD TV
is left unattended or unused for long periods of time, unplug it from
the wall outlet and disconnect the antenna or cable system.
www.gateway.com

W atching a TV program
To watch a TV program, make sure that:
■ All cable, satellite, or off-air antenna connections are secure.
■ The power cord is plugged into a correctly grounded electrical outlet or surge protector.
To watch a TV program:
1 Press the power button on the front of your LCD TV. The Status LED on the front
turns green.
2 Select TV using the INPUT button on the front of your LCD TV if you are watching a
cable TV box or off-air antenna.
- OR -
HDTV using the INPUT button on the front of your LCD TV if you are watching
Select
your satellite dish.
You should be able to see a picture. If you do not, make sure that all connections are
secure and you have selected the correct video input source.
3 Press the CH and buttons on the front of your LCD TV to change the channel.
Important The CH and buttons on the front of the television do not work
if you are watching a program using HDTV input.
You can also use your remote control to change these settings. For more information, see
your remote control user guide.
To make addi tional adjustments to your LCD TV, see “Adjusting Your LCD TV Settings”
on page 27.
www.gateway.com
11

12
www.gateway.com

Chapter 3
Connecting Other
Components
■ Connecting DVD players – go to page 15
■ Connecting HDTV decoder set-top
boxes – go to page 18
■ Connecting VCRs and video
camcorders – go to page 20
■ Connecting external audio devices – go
to page 22
■ Connecting computers – go to page 24
13
Understanding video connections
Warning To prevent electrical shock, unplug your LCD TV before connecting
any external components. To restart your LCD TV, see “Tu rning on
the power” on page 10.
Your LCD TV has four types of standard video connections. You should use the best
connection available to get the best display. For example, if your DVD player suppo rts a
component video connection, connect the DVD player to your LCD TV using component
video instead of composite video or S-Video.
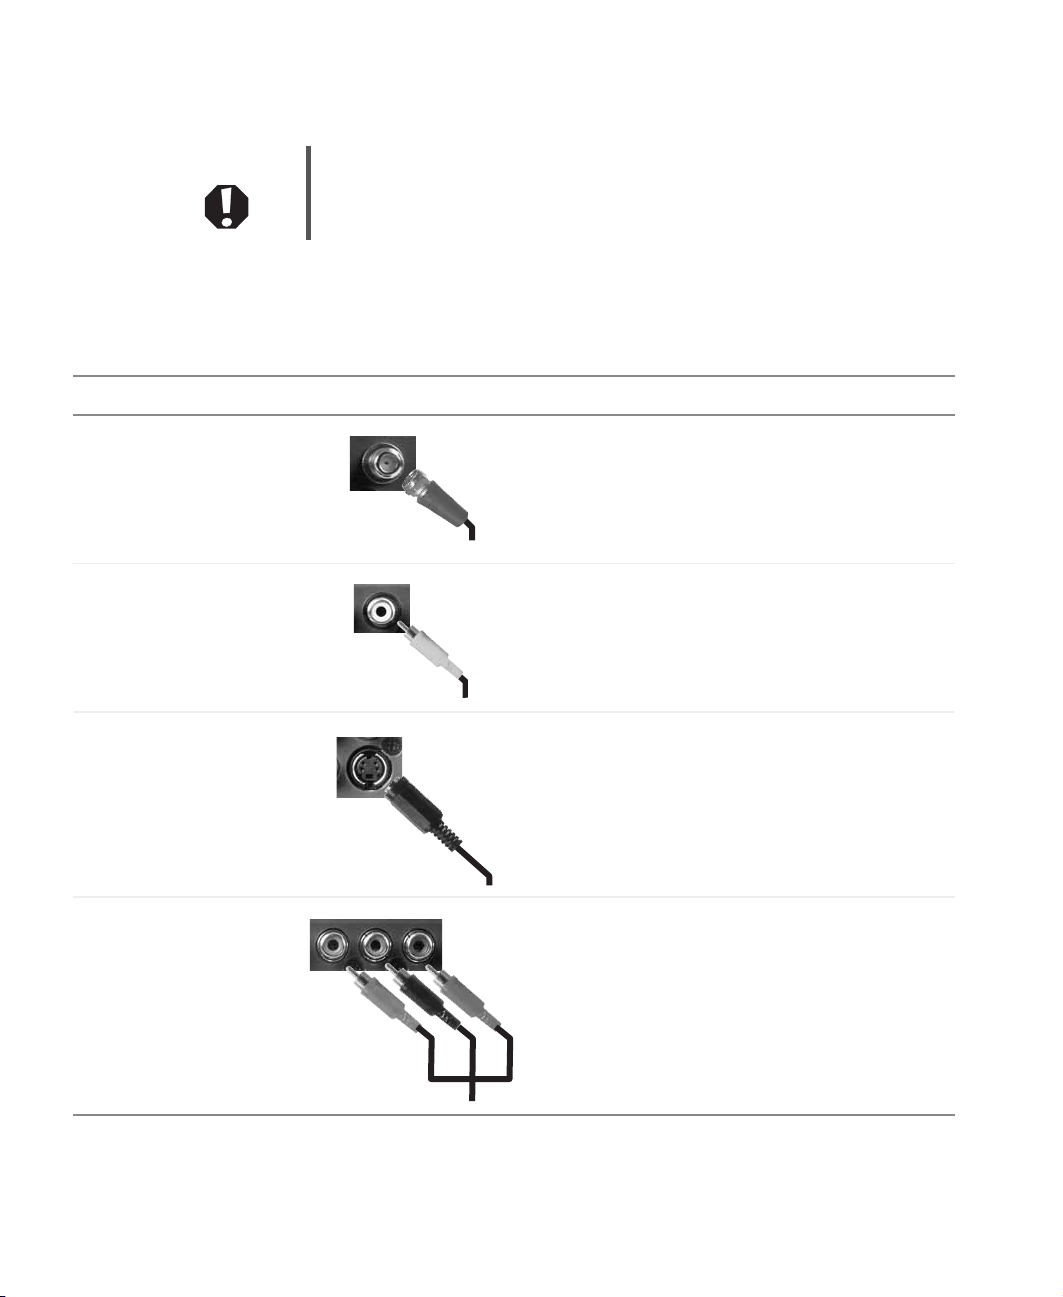
Connection Quality Cable and Connector Description
Basic Coaxial (RF). The video and au dio si gnals are
both carried in one cable (the other three
connection types only handle video, and
require separate connections for sound).
Coaxial is the only way to connect an antenna
to your LCD TV.
Good Composite. The video signal is carried through
a single “pin.” This connection method is the
one that is most commonly found on devices.
Better S-Video. The video signal is split into two
signals, black-and-white and color. Text
displayed on-screen through this connection
will be noticeably sharper than composite or
coaxial (RF).
Best Component. The video signa l is split into thre e
signals, two color, and one black-and-white.
Use component video to tak e adv antage of the
superior picture provided by signal sources as
HDTV and DVD.
14
www.gateway.com
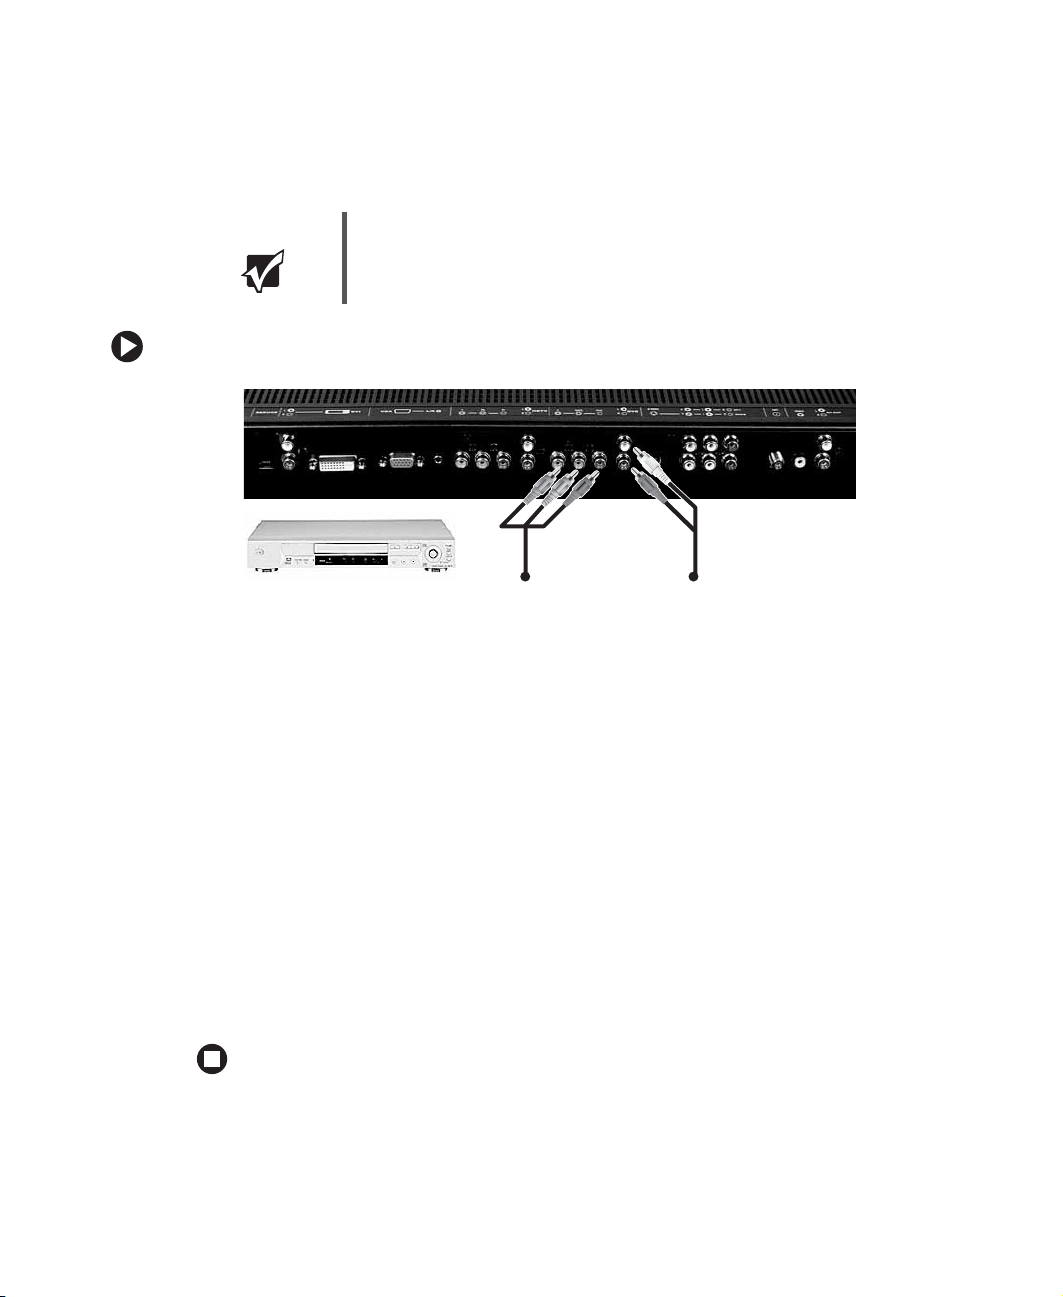
Connecting y our DVD play er
Using component video
Important You can connect 480i (interlaced) and 480p (progressive scan) DVD
players in this w a y. Y o u cannot use 480p as a Pi cture-in -Picture (PIP)
source.
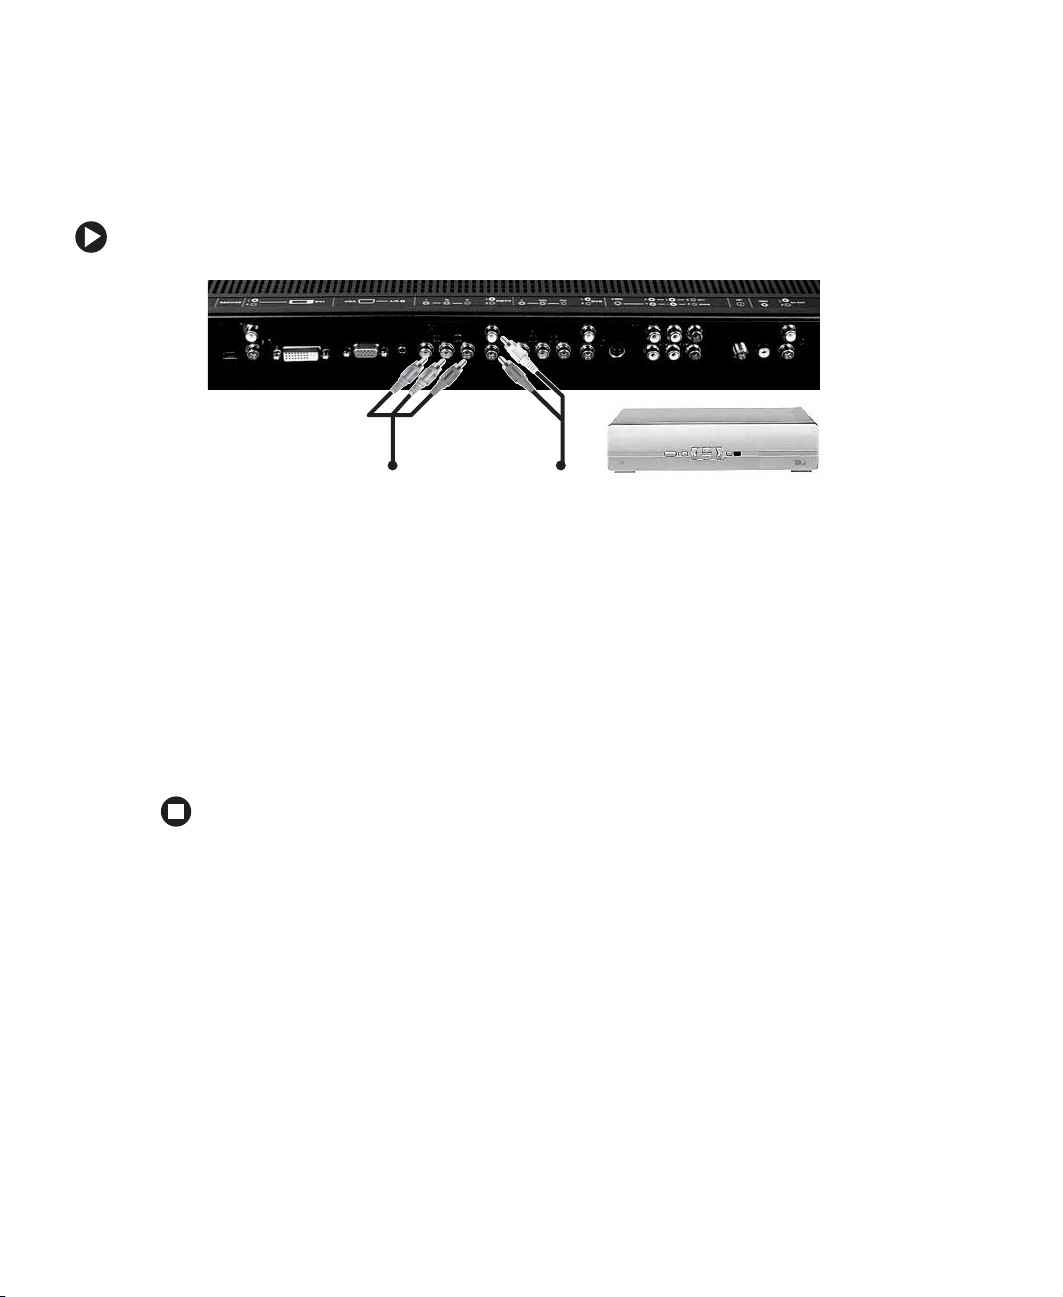
To connect your DVD player using component video:
1 Make sure that the power button on your LCD TV is turned off.
2 Connect the green Y jack on the back of your DVD player to the DVD green Y jack
on the back of your LCD TV.
3 Connect the red P
jack on the back of your LCD TV.
4 Connect the blue P
PB/CB jack on the back of your LCDTV.
or C
R
jack on the back of your DVD player to the DVD red PR/C
R
or CB jack on the back of your DVD player to the DVD blue
B
R
5 Connect the red (R) and white (L) audio jacks on the back of your DVD player to the
DVD R and L audio-in jacks on the back of your LCDTV.
6 Restart your LCD TV. See “Turning on the power” on page 10.
7 Select DVD using the INPUT button on the front of your LCD TV.
You should be able to see a picture. If you do not, make sure that all connections are
secure and you have selected the correct video input source.
www.gateway.com
15
Using S-Video
To connect your DVD player using S-Video:
1 Make sure that the power button on your LCD TV is turned off.
2 Connect the S-Video jack on the back of your DVD player to the A V 2/S IN S-VIDEO jack
on the back of your LCD TV.
3 Connect the red (R) and white (L) audio jacks on the back of your DVD player to the
AV 2 / S I N R and L audio-in jacks on the back of your LCDTV.
4 Restart your LCD TV. See “Turning on the power” on page 10.
5 Select AV2/S using the INPUT button on the front of your LCD TV.
16
You should be able to see a picture. If you do not, make sure that all connections are
secure and you have selected the correct video input source.
www.gateway.com

Using composite video
To connect your DVD player using composite video:
1 Make sure that the power button on your LCD TV is turned off.
2 Connect the yellow video jack on the back of your DVD player to the yellow AV1 or
AV2/S IN jack on the back of your LCD TV.
3 Connect the red (R) and white (L) audio jacks on the back of your DVD player to the
AV1 or AV 2 / S I N R and L audio-in jacks on the back of your LCDTV.
4 Restart your LCD TV. See “Turning on the power” on page 10.
5 Select AV1 or AV2/S using the INPUT button on the front of your LCD TV.
You should be able to see a picture. If you do not, make sure that all connections are
secure and you have selected the correct video input source.
www.gateway.com
17

Connecting y our HDTV set-top box
Using component video
Important You can connect 480i (interlaced), 480p (progressive scan), 720p,
and 1080i set-top bo x es in thi s wa y. Y ou ca nnot use co mponent vid eo
as a Picture-in-Picture (PIP) source.
To connect your HDTV decoder set-top box using component video:
1 Make sure that the power button on your LCD TV is turned off.
2 Connect the green Y jack on the back of your HDTV set-top box to the HDTV green
Y jack on the back of your LCD TV.
3 Connect the red P
red
PR/C
jack on the back of your LCD TV.
R
4 Connect the blue P
blue
PB/C
jack on the back of your LCD TV.
B
or C
R
B
jack on the back of your HDTV set-top box to the HDTV
R
or CB jack on the back of your HDTV set-top box to the HDTV
5 Connect the red (R) and white (L) audio jacks on the back of your HDTV set-top box
to the
HDTV R and L audio-in jacks on the back of your LCD TV.
6 Restart your LCD TV. See “Turning on the power” on page 10.
7 Select HDTV using the INPUT button on the front of your LCD TV.
You should be able to see a picture. If you do not, make sure that all connections are
secure and you have selected the correct video input source.
18
www.gateway.com

Using VGA video
Important You cannot use VGA video as a Picture-in-Picture (PIP) source.
For best results, we recommend using the component video connectors for this device.
However, if yo u have already used th e component video connectors for o ther devices, you
can connect your HDTV set-top box using VGAVIDEO.
To connect your HDTV decoder set-top box using VGA video:
1 Make sure that the power button on your LCD TV is turned off.
2 Connect the 15-pin D-Sub VGA jack on the back of your HDTV set-top box to the
VGAVIDEO IN jack on the back of your LCDTV.
3 Connect the red (R) and white (L) audio-out jacks on the back of your HDTV set-top
box to the
VGA R/L Audio jack on the back of your LCD TV using a 1/8-inch stereo plug.
4 Restart your LCD TV. See “Turning on the power” on page 10.
5 Select VGA using the INPUT button on the front of your LCD TV.
You should be able to see a picture. If you do not, make sure that all connections are
secure and you have selected the correct video input source. Press the
on the front of your LCD TV if necessary.
After you connect your HDTV set-top box to the VGA input jack on your LCD TV, you
may need to adjust various LCD TV picture settings to correctly match the output from
the HDTV set-top box (see “PICTURE (for VGA and DVI inputs)” on page 33).
www.gateway.com
AUTO button
19

Connecting y our VCR or video camera
Using S-Video
To connect your VCR or video camera using S-Video:
- OR -
1 Make sure that the power button on your LCD TV is turned off.
2 Connect the S-Video jack on the back of your VCR or video camera to the
AV2/S IN S-VIDEO jack on the back of your LCD TV.
3 Connect the red (R) and white (L) audio jacks on the bac k of your VC R or video came ra
to the
AV2/S IN R and L audio-in jacks on the bac k of your LCD TV.
4 Restart your LCD TV. See “Turning on the power” on page 10.
5 Select AV2/S using the INPUT button on the front of your LCD TV.
You should be able to see a picture. If you do not, make sure that all connections are
secure and you have selected the correct video input source.
20
www.gateway.com

Using composite video
To connect your VCR or video camera using composite video:
- OR -
1 Make sure that the power button on your LCD TV is turned off.
2 Connect the yellow video jack on the back of your VCR or video camera to the yellow
AV1 or AV2/S IN VIDEO jack on the back of your LCDTV.
3 Connect the red (R) and white (L) audio jacks on the back of your VCR or video ca mera
to the
AV1 or AV2/S IN R and L audio-in jacks on the back of your LCD TV.
4 Restart your LCD TV. See “Turning on the power” on page 10.
5 Select AV1 or AV2/S using the INPUT button on the front of your LCD TV.
You should be able to see a picture. If you do not, make sure that all connections are
secure and you have selected the correct video input source.
www.gateway.com
21

Connecting external amplified speak ers
You can connect your LCD TV to a set of external, amplified speakers using the AV OUT
jacks located on the ba ck of your LCD TV.
Important The audio is line-out (not variable). It can be muted using the mute
function on the remote control.
Important The audio output through these jacks can be either the Main picture
audio or the PIP sub-pi cture audio . You can set the audio o utput using
the PIP AUDIO button on the remote control.
To connect your external amplified speakers:
1 Make sure that the power button on your LCD TV is turned off.
2 Connect the red (R) and white (L) audio jacks on the back of your speakers to the
AV OUT jacks on the back of your LCD TV.
3 Restart your LCD TV. See “Turning on the power” on page 10.
22
www.gateway.com

Connecting an external rec eiver or amplifier
You can connect a n external receiver or amplifi er to your LCD TV.
Important The audio is line-out (not variable). It can be muted using the mute
function on the remote control.
Important The audio output through these jacks can be either the Main picture
audio or the PIP sub-pi cture audio . You can set the audio o utput using
the PIP AUDIO button on the remote control.
To connect your external receiver or amplifier:
1 Make sure that the power button on your LCD TV is turned off.
2 Connect the red (R) and white (L) audio jacks on the back of your exter nal am plifier
or receiver to the
AV OUT jacks on the back of your LCD TV.
3 Restart your LCD TV. See “Turning on the power” on page 10.
www.gateway.com
23

Connecting a computer
Using DVI video
Important This jack supports HDCP d evices such as DVD players and
set-top-boxes. You cannot use component video as a
Picture-in-Picture (PIP) source.
To connect your computer using DVI video:
1 Make sure that the power button on your LCD TV is turned off.
2 Connect the DVI connector on your computer to the DVI IN connec tor on the back o f
your LCD TV.
3 Connect the Audio Out jack on your computer to the DVI R and L Audio jacks on the
back of your LCD TV.
4 Restart your LCD TV. See “Turning on the power” on page 10.
5 Select DVI using the INPUT button on the front of your LCD TV.
You should be able to see a picture. If you do not, make sure that all connections are
secure and you have selected the correct video input source. Press the
on the front of your LCD TV if necessary.
24
www.gateway.com
AUTO button

Using VGA video
Important You cannot use VGA video as a Picture-in-Picture (PIP) source.
To connect your computer using VGA video:
1 Make sure that the power button on your LCD TV is turned off.
2 Connect the 15-pin D-Sub VGA connector on your computer to the VGA IN connector
on the back of your LCD TV.
3 Connect the Audio Out jack on your computer to the VGA R/L Audio jack on the back
of your LCD TV.
4 Restart your LCD TV. See “Turning on the power” on page 10.
5 Select VGA using the INPUT button on the front of your LCD TV.
You should be able to see a picture. If you do not, make sure that all connections are
secure and you have selected the correct video input source. Press the
on the front of your LCD TV if necessary.
www.gateway.com
AUTO button
25

26
www.gateway.com

Adjusting Your LCD TV
■ Viewing modes
Chapter 4
Settings
■ Using Picture-in-Picture (PIP) mode
■ Adjusting settings
■ Using parental controls
■ Setting the sleep timer
27

Understanding viewing features
Your LCD TV features four viewing modes and Picture-in-Picture (PIP) mode. You can
switch viewing modes using the on-screen display (OSD) or the remote control. For more
information on using the OSD, see “Using the on-screen display” on page 31. For
information about using the remote control, see your remote control user guide.
Important Viewing mode and volume are saved based on input. For example,
you last wa tched a D VD i n widescreen mode and at high v olume , and
then watched TV in standard mode and low volume. When you s witch
back to DVD input, the viewing mode will return to widescreen and
your volume will be high.
Viewing modes
Viewing Mode Description
Standard mode. The original 4:3 aspect ratio (1.33:1 source) is
preserved, so black bars are added to the left and right of the display
image.
Standard TV broadcas ts a re di spl ayed with a 4:3 asp ect rati o. Movies i n
4:3 may b e referred to as pan-and-sc an or full frame. These movies were
originally filmed in 16:9 (w idescreen), the n were modified to fit a traditional
TV screen (4:3).
28
Widescreen mode. When watching a standard broadcast or full-frame
movie in this mode, the display image is stretched proportionately to fill
the TV screen.
When watching a widescreen (1.76:1 source) program or movie the
display image fills the TV screen.
If you are watching a widescreen (1.85:1 or 2.35:1 source) program or
movie, there will still be black bars at the top and bottom.
Panoramic mode. When watching a standard broadcast or full-frame
movie in this mode, the 4:3 aspect ratio (1.33:1 source) display image is
stretched horizontally on the left and right sides to fill the TV screen. The
center of the image is not stretched.
www.gateway.com

Viewing Mode Description
Zoom mode. When watching a widescreen (1.76:1, 1.85:1, or 2.35:1
source) program or movie, the display image is zoomed proportionally to
fill the width of the scree n. The top a nd botto m are cut off to remo v e m ost
of the source material’s black bars. This mode is good for programs or
movies with subtitles.
Picture-in -Picture ( PIP) mode
Your LCD TV features PIP mode so you can watch two pictures at the same time. You can
use PIP mode if your PIP video input source is set to TV, AV1, AV2/S, or 480i DVD.
Important You cannot use HDTV, VGA, DVI, or 480p DVD video as
Picture-in-Picture (PIP) sources.
Picture-in-Picture Source
Main Source
TV
AV1
AV2/S
DVD
HDTV
VGA
DVI
TV AV1 AV2/S DVD HDTV VGA DVI
√√√480i ———
√√√480i ———
√√√480i ———
√√√480i ———
√√√480i ———
√√√480i ———
√√√480i ———
PIP mode
When PIP is turned on, you can display two pictures at one time. One pict ure is di splay ed
on the full screen and the other picture is displayed in a small window. The picture on
the full screen is the main picture. The picture in the window is the sub-picture. The
sub-picture can be set to small, medium, or large.
www.gateway.com
29

PIP channel
The PIP channel is independent of the main TV channel.
To change the PIP channel:
■ Press the PIP CH + or - button on the remote control.
PIP audio
You can listen to either the audio of the program in the main picture or the program in
the PIP sub-picture.
To listen to the audio in the PIP sub-picture:
■ Press PIP AUDIO on the remote control. Pressing PIP AUDIO again will return the audio
to the main picture.
Swapping PIP video
You can swap the program that is in the main picture with the program in the PIP
sub-picture.
To swap the main picture program with the PIP sub-picture program:
■ Press SWAP on the remote control. Pressing SWAP again will return the program to the
main picture.
30
www.gateway.com

Using the on-scr een displa y
Your LCD TV features an on-screen display (OSD) that lets you adjust and save contrast,
brightness, and other settings. Your LCD TV saves changes you make to the settings, even
if you turn off the television.
To adjust settings from the OSD:
1 Press the MENU button on the front of your LCD TV. The OSD opens.
VIDEO
BRIGHTNESS
CONTRAST
COLOR
TINT
SHARPNESS
COLOR TEMP
NOISE REDUC.
2 Press the MENU button on the front of your LCD TV to select the menu you want.
3 Press the CH and button on the front of your LCD T V to select a menu option.
1 2 3 4 5
Cool
4 Press the VOL and button on the front of your LCD TV to adjust the option
setting.
5 Press the MENU button on the front of your LCD TV repeatedly until the OSD closes.
You can also use your remote control to change some settings. For more information, see
your remote control user guide.
www.gateway.com
31

OSD menus and options
You can use these OSD menus and options to adjust various settings for your LCD TV.
In the following table, some of the menu options can vary depending on the video input
source that you are using. Available video input sources include:
■ VGA
■ DVI
■ HDTV
■ DVD
■ AV1
■ AV2/S
■ TV
OSD Menu Description
VIDEO (for AV1, AV2/S, DVD, HDTV, and TV
inputs)
VIDEO
BRIGHTNESS
CONTRAST
COLOR
TINT
SHARPNESS
COLOR TEMP
NOISE REDUC.
1 2 3 4 5
Cool
BRIGHTNESS—Adjusts the amount of light in the darkest
portion of the picture. Increasing brightness makes the
overa ll picture li ghter . Decrea sing the brig htness mak es the
overall picture darker.
You may need to readjust brightness after the LCD TV
warms up.
CONTRAST—Adjusts the level of white between the
lightest and darkest portions of a image. If the contrast is
too low, the picture appears dark and lacks detail. If the
contrast is too high, the picture appears faded and lacks
shadow and depth.
COLOR—Adjusts the levels of white and color in the
picture. Highl y satur ated co lors tend to be deep and stron g
while unsaturated colors are weaker and lighter.
TINT—Adjusts the amount of white or black in a color. For
example, if the re d looks pin k, you can ad just the ti nt to
make the red more intense.
SHARPNESS—Adjusts the clarity of the picture. If the
sharpness is set incorrectly , the pict ure appears fuzzy or out
of focus.
COLOR TEMPERATURE—Adjusts the intensity of the
colors in the picture. A “cool” or low color temperature is
good for watching movies or for watching programs in a
darkened envi ronme nt. A “w arm” or h igh col or temp eratu re
is good for daylight viewing like sporting events.
NOISE REDUCTION (AV1 only)—Eliminates video noise.
32
www.gateway.com

OSD Menu Description
PICTURE (for VGA and DVI inputs)
PICTURE
BRIGHTNESS
CONTRAST
AUTO PICTURE
COLOR
TINT
MANUAL PICTURE
SHARPNESS
COLOR TEMP
1 2 3 4 5
9300 K
AUDIO (for all inputs)
AUDIO
VOLUME
TREBLE
BASS
BALANCE
SPATIAL
SPEAKERS
AUDIO OUTPUT
On
Fixed
BRIGHTNESS—Adjusts the amount of light in the darkest
portion of the picture. Increasing brightness makes the
overa ll picture li ghter . Decrea sing the brig htness mak es the
overall picture darker.
You may need to readjust brightness after the LCD TV
warms up.
CONTRAST—Adjusts the level of white between the
lightest and darkest portions of a image. If the contrast is
too low, the picture appears dark and lacks detail. If the
contrast is too high, the picture appears faded and lacks
shadow and depth.
AUTO PICTURE—Automatically se ts th e position and size
of the pictu re.
MANUAL PICTURE—Manually sets the position and size
of the picture. You can also fine tune the picture manually.
SHARPNESS—Adjusts the clarity of the picture. If the
sharpness is set incorrectly , the pict ure appears fuzzy or out
of focus.
COLOR TEMPERATURE—Adjusts the intensity of the
colors in the picture. A “cool” or low color temperature is
good for watching movies or for watching programs in a
darkened envi ronme nt. A “w arm” or h igh col or temp eratu re
is good for daylight viewing like sporting events.
VOLUME—Adjusts the volume.
TREBLE—Adjusts t he treble.
BASS—Adjusts the bass.
BALANCE—Adjusts the balance level between the
channels.
SPATIAL—Enhances the stereo sound of the built-in
speakers.
SPEAKERS—Tur ns the LCD TV’s internal speakers on or
off.
AUDIO OUTPUT—Determin es whether the v olu me can be
adjusted using the remote control. If the setting is FIXED,
the remote control cannot adjust volume. If the setting is
VARIABLE, the remote control can adjust volume.
www.gateway.com
33

OSD Menu Description
TV (for TV i nput)
TV
SOURCE
CABLE MODE
CHANNEL SCAN
CHANNEL SKIP
CHANNEL FIX
CC MODE
PARENTAL CONTROLS...
BLOCKING (for TV input)
BLOCKING
CHANGE PASSWORD...
SETUP TV BLOCKING...
SETUP MOVIE BLOCKING...
BLOCKING ENABLE
KEY LOCKOUT
IR LOCKOUT
FACTORY RESET
Cable
Auto
Add
Off
CC1
Yes
Off
Off
SOURCE—Sets the source for the tuner.
AIR sets th e tuner for an an tenna.
CABLE sets the tuner for cable or a satellite dish.
CABLE MODE—Specifies the type of cable system you
subscribe to. Options include Standard, HRC, IRC, and
Auto. For most cable systems, you can set this value to
Auto . How e ver, if y ou ar e no t rece iving all th e chan nels y ou
subscribe to, you may need to set this value.
CHANNEL SCAN—Adds all chann els th at ha v e a si gnal to
the channel list f or access using the CH and buttons.
CHANNEL SKIP—Specifies the channels that are s kippe d
while pressing the CH and buttons.
CHANNEL FIX—Sets a channel to use as a single display
for external video input, such as for cable box systems or
satellite receivers. If this is on, you cannot change the
channel using the LCD TV.
CC MODE—Turns captioning on and off and selects the
closed caption style.
PARENTAL CONTROLS (
controls. F or more i nformation a bout P arental Co ntrols, see
the BLOCKING menu. You need the remote control to use
parental c ontrols. For mo re inform ation, see your remot e
control user guide.
CHANGE PASSWORD—Changes the password used for
modifying t he parent al control settings or watching a
program blocked by the parental controls. For more
information , see “Setting a password” on page 39.
SETUP TV BLOCKING—Sets the lev el of tele vi sion sho ws
that will be blo cked without ty ping in the pass word. For m ore
information , see “Setting parental controls” on page 36.
SETUP MOVIE BLOCKING—Sets the level of movies that
will be blocked without typing in the password. For more
information , see “Setting parental controls” on page 36.
BLOCKING ENABLE—Turns TV and movie bloc king on or
off.
KEY LOCKOUT—Locks the LCD TV so it cannot be
controlled using the b uttons on th e front of the TV. For more
information , see “Using key lockout” on page 40.
IR LOCKOUT—Locks the LCD TV so it cannot be
controlled using the remote control. For more information,
see “Using IR lockout” on page 41.
FACTORY RESET—Resets all settin gs to the facto ry
default.
blocking
)—Activates parental
34
www.gateway.com

OSD Menu Description
SETUP (for all inputs)
SETUP
LANGUAGE
GAMMA
WIDE
PIP...
OSD STYLE
IR COMMAND SET
PiP
PiP
SWITCH
STYLE
POS
WIDE
?
SOURCE
English
Vivid 3
Full Screen
Translucent
Set A
ON
Medium
Lower Right
Standard
TV
LANGUAGE—Changes the language of the OSD menu.
GAMMA—Changes the color space.
WIDE—Changes the viewing mode. For more information,
see “Viewing modes” on page 28.
PIP—Modifies the Picture-in-Picture settings. For more
information , see the PiP menu.
OSD STYLE—Switches the OSD ba ckg round from opaque
to translucent.
IR COMMAND SET—Not func tional.
SWITCH—Turns Picture-in-Picture on or off.
STYLE—Changes the size of the PIP sub-picture. Sizes
include Small, Medium, and Large.
POS—Moves the sub-picture within the display image.
WIDE—Sets the viewing mode of the PIP sub-picture.
Modes include standard and widescreen.
SOURCE—Changes the video input source of the
sub-picture when PIP is turned on. Sources include AV1,
AV2/S, DVD, and TV.
PIP TV CHANNEL—(TV only , not sho wn) Changes the PIP
channel if the source is set to TV. Use
the and buttons to change the channel up or down.
www.gateway.com
35

Using parent al controls
The parental controls feature prevents viewers from watching programs that are not
age-appropriate, such as programs containing violence, adult language, or adult themes.
Setting parental controls
To set the parental controls:
1 Press the INPUT button on the remote or LCD TV until the TV input is selected.
2 Press the MENU button on the remote control until the TV menu opens.
TV
SOURCE
CABLE MODE
CHANNEL SCAN
CHANNEL SKIP
CHANNEL FIX
CC MODE
PARENTAL CONTROLS...
Cable
Auto
Add
Off
CC1
3 Press to highlight PARENTAL CONTROLS, th en pres s OK. The Enter Password window
opens.
Enter Password:
36
www.gateway.com

4 Use the number pad to type the password, then press OK. The password was set to
0000 at the factory. The BLOCKING sub-menu opens.
BLOCKING
CHANGE PASSWORD...
SETUP TV BLOCKING...
SETUP MOVIE BLOCKING...
BLOCKING ENABLE
KEY LOCKOUT
IR LOCKOUT
FACTORY RESET
5 Press to highlight SETUP TV BLOCKING, then press OK. The TV-Rating window
opens.
Y7Y7Y7
Yes
Off
Off
On this window, you can customize the following TV ratings:
■ Y (all children)
■ Y7 (older children)
■ G (general audience)
■ PG (guidance suggested)
■ 14 (strongly cautioned)
■ MA (mature audience)
www.gateway.com
37

6 Press the or to select each rating, then press or to toggle the rating to
blocked or unblocked.
You can also customize the TV ratings for the following content:
■ FV (fantasy violence)
■ D (sexual dialog)
■ L (adult language)
■ S (sexual situations)
■ V (violence)
7 Press the or to select ea ch content, then press or to tog gle the content
to blocked or unblocked.
8 Press the MENU button on the remote control.
9 Press to highlight SETUP MOVIE BLOCKING, then press OK. The MPAA window
opens.
MPAA
G
PG
PG 13
R
NC 17
X
NR
On this menu, you can customize the following MPAA movie ratings:
■ G (general audience)
■ PG (parental guidance suggested)
■ PG-13 (recommended for children 13 years of age or older)
■ R (mature audience)
■ NC-17 (no one under 17 years of age)
■ X (no one under 17 years of age)
10 Press the or to select each rating, then press or to toggle the rating to
blocked or unblocked.
38
www.gateway.com

11 Press the MENU button on the remote control.
12 Press to highlight BLOCKING ENABLE, then press or to toggle the blocking
enable to yes.
Setting a password
To change the parental control password:
1 Press the MENU button on the remote control until the TV menu opens.
TV
SOURCE
CABLE MODE
CHANNEL SCAN
CHANNEL SKIP
CHANNEL FIX
CC MODE
PARENTAL CONTROLS...
Cable
Auto
Add
Off
CC1
2 Press to highlight PARENTAL CONTROLS, th en pres s OK. The Enter Password window
opens.
Enter Password:
www.gateway.com
39

3 Use the number pad to type the password, then press OK. The password was set to
0000 at the factory. The BLOCKING sub-menu opens.
BLOCKING
CHANGE PASSWORD...
SETUP TV BLOCKING...
SETUP MOVIE BLOCKING...
BLOCKING ENABLE
KEY LOCKOUT
IR LOCKOUT
FACTORY RESET
4 Highlight CHANGE PASSWORD, then press OK. The Change Password window opens.
Change Password:
New Password
Confirm Password
Yes
Off
Off
5 Use the number pad to type the new four-digit password.
6 Use the number pad to retype the new four-digit password.
Using ke y lockout
Key lockout lets you lock the buttons on the LCD TV so tha t someone must use the remote
control to control the television. Options include
and
Off. For more information, see “BLOCKING (for TV input)” on page 34.
40
www.gateway.com
Lock All, Lock None , Lock All But Power,

Using IR lockout
IR lockout lets you lock the television so that someone must use the buttons on the LCD TV
to control the television. For more information, see “BLOCKING (for TV input)” on
page 34.
Important If you set key lockout, and then set IR lockout without turning off key
lockout, the television will continue to run. You will not be able to use
either the buttons on the television or the remote control to control
the television unless you complete a master unlock. For more
information, see “The buttons on the remote control and the buttons
on the television do not work” on page 48.
Setting the sleep timer
The sleep timer lets you set a time delay to turn off your LCD TV automatically.
To set the sleep time using the remote control:
1 Press the TV component butto n.
2 Press the SLEEP button on the remote control. The sleep timer appears in the center
of your screen.
3 Press the SLEEP button one or more times to select the time you want.
4 Press the EXIT button to hide the sleep timer display. Your sleep timer is now running
in the background.
To turn off the sleep time using the remote control:
■ Press the SLEEP button repeatedly until Off appears.
www.gateway.com
41

42
www.gateway.com

Chapter 5
Mainte nance and
Troubleshooting
■ Important safeguards
■ Cleaning your LCD TV
■ T roubleshooting tips
43

Important safeguards
Warning Risk of electric shock - Do not open
To reduce the risk of electric shock, do no remove the back cover.
There are no user-serviceab le parts inside. Rem oving the bac k co ver
voids the warranty.
Have your LCD TV repaired by qualified service personnel only.
Warnings and precautions
■ Do not place your hands, face, or objects close t o the ventilation openings of your
LCD TV. The top of your LCD TV gets very hot from exhaust air that is released through
the ventilation openings. Burns or personal injuries may occur if you are too close to
the LCD TV. Damage may occur if you place any object near the top of your LCD TV.
■ Disconnect all cables before moving your LCD TV . Moving your LCD TV with its cables
attached may damage the cables and cause fire or electric shock danger.
■ Do not expose your LCD TV to rain or moisture.
■ Keep your LCD TV away from excessive dust, high temperatures, moisture, or direct
sunlight.
■ Use your LCD TV in a well-ventilated area and do not cover the ventilation openings.
■ Do not modify your LCD TV or use an unshielded power cord or video input source
cable, or you may experience excessive interference.
■ Disconnect your LCD TV and unplug the power cord when not used for a long period
of time.
■ If the picture displayed is in any way abnormal, turn off your LCD TV, then disconnect
it from the electrical outlet. Make sure that your video input source cable is connected
correctly, then reconnect your LCD TV to the electrical outlet.
■ Disconnect your LCD TV from the electrical outlet before cleaning or performing
maintenance. Do not use liquid or aerosol cleaners. Use only a slightly damp cloth for
cleaning.
■ Do not place your LCD TV on an unstable cart, stand, or table. Your LCD TV may fall,
causing serious damage.
■ Do not place your LCD TV on a bed, sofa, rug, or other similar surfaces.
■ Never place your LCD TV near or over a radiator or heat so urce.
■ Do not install your LCD TV in an enclosed area unless correct ventilation is provided.
■ Your LCD TV should be operated from the type of power source indicated on the label.
If the type of available power is unknown, consult your electrician or local power
company.
44
www.gateway.com

■ Your LCD TV is equipped with a 3-pin grounded plug. The plug will only fit into a
grounded power outlet. This is a safety feature. If you cannot plug the power cord into
the outlet, contact your electrician. Do not alter the plug because this will defeat the
safety feature.
■ Do not rest objects on the power cord and avoid placing the power cord near high traffic
areas.
■ Do not overload wall outlets and extension cords because this can result in a risk of
fire or electric shock.
■ Unplug your LCD TV and contact qualified service personnel if:
■ The power cord or plug is damaged or frayed.
■ Liquid has been spilled into your LCD TV.
■ Your LCD TV has been exposed to water or moisture.
■ Your LC D TV does not operate normally when the operating instructions are
followed. Adjust only those controls that are covered by the operating instructions.
Incorrect adjustment of other controls may result in damage which often requires
extensive work by a qualified technician to restore your LCD TV to normal
operation.
■ Your LC D TV has been dropped or the cabinet has been damaged.
Cleaning and maintenance
Cleaning the screen
■ Do not use substances such as glass cleaners, solvents, and thinners.
■ The screen of your LCD TV has been specially treated. Wipe the surface gently using
only a cleaning cloth or a soft, lint-free cloth.
■ If the surface is particular dirty, use a soft cloth and water to clean the screen. Squirt
a little water on the cloth (never directly on the screen), then wipe the screen with the
cloth.
Warning The screen of your LCD TV is made of specially coated glass and
can be scratched or dam aged by abras ive or ammonia-bas ed window
cleaners.
Scratches on the bezel or glass are not covered by your warranty.
■ Do not scratch or hit the surface of the screen with your fingers or any hard objects.
www.gateway.com
45

Cleaning the exterior
■ Y our LCD TV is cooled by air circulated through the vents on the case, so keep the vents
free of dust. With your LCD TV turned off and unplugged, brush the dust away from
the vents with a damp cloth. Be careful not to drip any water into the vents. Do not
attempt to clean dust from the inside of your LCD TV.
■ Do not use abrasive or solvent cleaners because they can damage the finish on
components.
■ Do not allow any excessive water or moisture to come into contact with the surface
of your LCD TV. If water or moisture gets inside your LCD TV, operating problems and
electrical and shock hazards may result.
■ Do not scratch or hit the cabinet with your fingers or any hard objects.
■ Do not place articles made from rubber or PVC near the cabinet for any extended periods
of time.
Troubleshooting
Use the following information to solve common problems.
You cannot see a picture
■ Make sure that the power cord is plugged into a grounded electrical outlet.
■ Make sure that the power button is turned on.
■ Make sure that the selected input source is connected to a working input source.
■ If your LCD TV is connected to your computer in VGA or DVI mode, press any key on
your keyboard to “wake” your computer.
■ Press the AUTO button on the front of your LCD TV if you are using VGA or DVI input.
You see a distorted picture or hear unusual sound
■ You may be getting interference from electrical appliances, cars, motorcycles, or
fluorescent lights. Try moving your LCD TV to another location.
The color is abnormal
■ Make sure that the input source cable is connected securely and correctly to the back
of your LCD TV.
The picture has ab normal pattern s
■ Make sure that the input source cable is attached securely and correctly to the back of
your LCD TV.
46
www.gateway.com

■ Make sure that the video input source is within the range of your LCD TV. Compare
the video input source’s specifications with your LCD TV specifications.
The display imag e does not co ver the en tire screen
■ If you are using VGA mode, make sure that H Size and V Position in the OSD are set
correctly.
■ If you are using TV, AV1, AV2/S, or component (DVD or HDTV) with 480i input, use
the WIDE button on the remote control to scroll through various screen modes.
You can see a picture but you cannot hear sound
■ Make sure that the volume is not turned down.
■ Make sure that the sound is not muted.
■ Make sure that your audio input source cables are connected securely and correctly.
The L CDTV has pixels that are alwa ys bright , dark, or color ed
■ Your LCD TV is manufactured using an extremely high level of precision technology.
However, sometimes some pixels of your LCD TV may not display. Pixel defects within
industry specifications are inherent to this type of product and do not constitute a
defective product.
You see “noise ” or “tra sh” on the screen
■ When your LCD TV’s digital capabilities exceed a digital broadcast signal, the signal is
up-converted (increased) to match your LCD TV’s display capabilities. Up-converting
can cause noise or trash.
Screen brightness is diminished
■ Video display devices experience degradation of brightness over the life of the device.
Normal brightness degradation is not covered by your warranty.
You switch to a different input and the v olume change s
■ The LCD TV remembers the volume level from the last time you used a particular input
(AV1, AV2/S, DVD, HDTV, TV).
You switch to a different input and the s creen size changes
■ The LCD TV remembers the viewing mode from the last time you used a particular
input (AV1, AV2/S, DVD, HDTV, TV).
The PIP input is set to DVD but the picture does n ot look correct
■ The PIP DVD source mu st be 480i (interl aced) and not 480p (progressive sc an). Set your
DVD player to interlaced or choose a different PIP source.
www.gateway.com
47

The buttons on the remote control and the buttons on the television do not work
■ You may have set both key lockout and IR lockout on the television.
To complete a master unlock of the television:
1 Remove the power cord from the wall outlet.
2 While pressing and holding the CH , VOL , and MENU buttons on your
television at the same time, plug the power cord back into the wall outlet. Both
the key lockout and IR lockout are turned off.
The L CDTV will not accept the parental c ontrol pa ssword
To reset the parental control password:
1 Use the remote control to access the Parental Controls OSD menu. When prompted
for the password, use
0317.
2 Set the password using the steps in “Setting a password” on page 39.
Contact Technical Support
If this troubleshooting information does not resolve your problem, or if you have other
questions relating to your LCD TV, go to Gateway’s Technical Support Web site at
support.gateway.com/support/default.asp
48
.
www.gateway.com

Appendix A
Safety , Regulatory , and L egal
Information
■ Safety information
■ Regulatory statements
■ Notices
49

Regulatory compliance statements
United States of America
Federal C ommunications C ommission (FC C)
Unintentional emitt er per FC C P art15
This device has been tested and found to comply with the limits for a Class B digital device, pursuant to Part 15
of the FCC rules. These limits are designed to pr ovide reasonable pro tection against harmful interferenc e in a
residential installation .
This equipment generates, uses, and can radiate radio frequency energy and, if not installed and used in
accordance with the instructions, may cause harmful interference to radio or television reception. However,
there is no guarantee that interference will not occur in a particular installation. If this equipment does cause
interference to radio and television reception, which can be determined by turning t he equipment off and on,
the user is encouraged to try to correct the interference by one or more of the following measures:
■
Reorient or relocate the receiving an tenna
■
Increase the separation between the equipment and receiver
■
Connect the equipment to an outlet on a different circuit from that to which the receiver is connec ted
■
Consult the dealer or an experienced radio/TV technician for help.
Compliance Accessories: The accessories associated with this equipment are: shielded video cable when an
external monitor is connected. These accessories are required to be used in order to ensure compliance with FCC
rules.
FCC declarat ion of conformity
Responsible party:
Gateway , Inc.
14350 Myford Road
Irvine, CA 92606 USA
Product:
■
SHD-3010
This device complies with Part 15 of the FCC Rules. Operation of this product is subject to the follo wing two
conditions: (1) this device may not cause har mful interference, and (2) this device must accept any int erference
received, including interference that may cause undesired operation.
Caution Changes or modifications not expressly approved by Gateway could
void the FCC compliance and negate your authority to operate the
product.
California Proposition65 Warning
Warning This product contai ns chemicals, including le ad, known to
the State of California to cause cancer, birth defects or
reproductive harm.
50
www.gateway.com

Canada
Industry Canada (IC) Unin tentional emit ter per IC ES-003
This digital apparatus does not exceed the Class B limits for radio noise emissions from digital apparatus as set
out in the radio interference regulations of Industry Canada.
Le présent appareil numérique n’émet pas de bruits radioélectriques dépassant les limites applicables aux
appareils numériques de Classe B prescrites dans le règlement sur le brouillage radioélectrique édic té par I ndustrie
Canada.
Laser safety statement
All Gateway systems equipped with CD and DVD drives comply with the appropriate safety standards, including
IEC 825. The laser devices in these components are classified as “Class 1 Laser Products” under a US Department
of Health and Human Services (DHHS) Radiation Performance Standard. Should the unit ever need servicing,
contact an authorized service location.
Warning Use of controls or adjustments or performance of procedures other
than those specifie d in thi s manu al may result in hazardous r ad iation
exposure. To pre v ent e xposure to las er beams , do not try to open the
enclosure of a CD or DVD drive.
Television antenna connectors protection (for systems
fitted with TV/cable TVtuner cards)
External television antenna groundin g
If an outside antenna or cable system is to be connected to your Gateway PC, make sure that the antenna or
cable system is electrically grounded to provide some protection against voltage surges and static charges.
Article 810 of the National Electrical Code, ANSI/NFPSA 70, provides information with regar d to proper
grounding of the mast and supporting structure, grounding of the lead-in wire to an antenna discharge unit, size
of grounding conductors, locatio n of antenna discharge unit, connec tion to grounding electrodes , and
requirements for the grounding electrode.
Lightning protection
For added protection of any Gateway product during a lightning storm or when it is left unattended or unused
for long periods of ti me, unplug the p roduct from the wa ll outlet and disconnect the antenna or cable system.
www.gateway.com
51

Power lines
Do not locate the antenna near overhead light or power cir cuits, or where it could fall int o such power lines or
circuits.
Warning When installing or realigning an outside antenna system, extreme
care should be taken to keep from touching such power lines or
circuits. Contact with them could be fatal.
7
6
5
4
3
1
Antenna and satellite grounding
2
Reference Grounding component
1 Electri c servic e equipme nt
2 Power service grounding electrode system (NEC Art 250, Part H)
3 Ground clamps
4 Grounding conductors (NEC Section 810-21)
5 Antenna discharge unit (NEC Section 810-20)
6 Ground clamp
7 Antenna lead-in wire
52
www.gateway.com

Notices
Copyright © 2004 Gateway, Inc.
All Rights Reserved
14350 Myford Road
Irvine, CA 92606 USA
All Rights Rese rved
This publication is protected by copyright and all rights are reserved. No part of it may be reproduced or transmitted by any
means or in any form, without prior consent in writing from Gateway.
The information in this manual has been carefully checked and is belie ved t o be accurate. Howe ver , changes are made
periodically . These changes are incorporated in newer publ ication editions. Gatewa y may improv e and/or change products
described in this publication at any time. Due to continuing system improvements, Gatewa y is not responsible f or inaccurate
information which may appear in this manual. For the latest product updates, consult the Gate way W eb site at
www.gateway.com
damages resulting from any defect or omission in this manual, ev en if advised of the possibility of such damages.
In the interest of continued product development, Gatew ay reserves the right to make improv ements in this manual and the
products it describes at any time, without notices or obligation.
Trad emark Acknowledg ments
Gateway and the Black-and-White Spot Design are trademarks or registered trademarks of Gateway, Inc. in the U.S. and
other countries. SpotShop, Spotshop.com, and Your:)Ware are trademarks of Gateway , Inc. Intel, I ntel Inside logo, and
Pentium are registered trademarks and MMX is a trademark of Intel Corporation. Microsoft, MS, MS-DOS, and Windows are
trademarks or registered trademarks of Microsoft Corporation. All other product names mentioned herein are used for
identification purposes only , and may be the trademarks or registered trademarks of their respective companies.
. In no event will Gatewa y be liable f or direct, indirect, special, ex emplary , incidental, or consequential
www.gateway.com
53

54
www.gateway.com

Index
Numerics
16:9 mode 28
4:3 mode 28
A
accessories 6
adjust
audi output
auto picture 33
balance 33
bass 33
blocking enable 34
brightness 32, 33
cable mode 34
CC mode 34
change password 34
channel fix 34
channel scan 34
channel skip 34
closed caption mo de 34
color 32
color temperature 32, 33
contrast 32, 33
factory reset 34
gamma 35
IR lockout 34
key lockout 34
language 35
manual picture 33
noise reduction 32
OSD style 35
parental controls 34
PIP 35
PIP TV channel 35
POS 35
set up movie blocking 34
set up TV blocking 34
sharpness 32, 33
sound 33
source 34, 35
spatial 33
speakers 33
style 35
33
switch (PIP) 35
tint 32
treble 33
TV settings 32
volume 33
wide 35
amplified speakers
connecting
amplifier
connecting
antenna connection 5
audio cable 2
audio out connection 5
audio output 33
auto picture 33
22
23
B
back panel connections 5
balance 33
bass 33
batteries 2
blocking enable 34
brightness 32, 33
C
cable kits 6
cable mode 34
cable TV
connecting coaxial (RF)
CC mode 34
change password 34
channel button 4
channel fix 34
channel scan 34
channel skip 34
cleaning 45
exterior 46
screen 45
closed caption mode 34
coaxial (RF) video 14
color 32
color temperature 32, 33
component video 14
9
www.gateway.com
55

Component Video/Audio In 1 connec tion 5
Component Video/Audio In 2 connec tion 5
composite video 14
connection 5
computer
connecting DVI video
connecting VGA video 25
connecting
amplifier
cable TV 9
computer 24
DVD player 15
external amplified speakers 22
external receiver 23
HDTV decoder set-top box 18
off-air TV 9
power cord 10
satellite set-top box 8
VCR 20
video camera 20
connections
audio out
AV1 5
back panel 5
Component Video 2 5
Component Video/Audio In 1 5
composite video 5
DVI audio in 5
DVI video in 5
S-Video 5
TV In 5
VGA audio in 5
VGA video in 5
contrast 32, 33
23
5
24
D
display mode 29
PIP 29
down button 4, 11, 31, 34
DVD player
connecting componen t video
connecting composit e video 17
connecting S-Video 16
DVI
audio in connection
video in connection 5
5
15
E
external amplified speakers
connecting
external receiver
connecting
22
23
F
factory reset 34
features 3
front panel buttons 4
G
gamma 35
H
HDTV decoder set-top box
connecting component video
connecting VGA video 19
I
Input button 4
IR lockout 34, 48
K
key lockout 34, 48
L
language 35
left button 4, 31
M
maintenance 43, 45
manual picture 33
Menu button 4, 31
modes
display
viewing 28
29
N
noise reduction 32
O
off-air TV
connecting coaxial (RF)
on-screen display
see OSD
18
9
56
www.gateway.com

OSD 31
audio menu 33
audio output 33
auto picture 33
balance 33
bass 33
blocking enable 34
brightness 32, 33
cable mode 34
CC mode 34
change password 34
channel fix 34
channel scan 34
channel skip 34
closed caption mo de 34
color 32
color temperature 32, 33
contrast 32, 33
factory reset 34
gamma 35
IR lockout 34
key lockout 34
language 35
manual picture 33
noise reduction 32
OSD style 35
parental controls 34
Parental controls menu 34, 35
picture men u 33
PIP 35
PIP TV channel 35
POS 35
set up TV blocking 34
setting up
movie blocking
setup menu 35
sharpness 32, 33
source 34, 35
spatial 33
speakers 33
style 35
switch (PIP) 35
tint 32
treble 33
TV menu 34
video menu 32
34
volume 33
wide 35
OSD style 35
P
Panorama mode 28
parental controls 34
PIP 35
PIP mode 29
PIP TV channel 35
POS 35
power
button
turning on 10
power cord 2
connection 10
4
R
receiver
connecting
remote control 2
sensor 4
user guide 2
right button 4, 31, 48
23
S
safety 44
satellite set-top box
connecting component video
setting up
movie blocking
safety precautions 44
TV blocking 34
sharpness 32, 33
source 34, 35
spatial 33
speakers 33
status LED 4
style 35
support 48
S-Video 14
S-Video cable 2
switch (PIP) 35
34
T
tint 32
8
www.gateway.com
57

treble 33
troubleshooting 43, 46
U
up button 4, 11, 31, 34, 48
V
VCR
connecting composit e video
connecting S-Video 20
VGA
audio in connection
video in connection 5
Video 1 connection 5
video camera
connecting composit e video
connecting S-Video 20
video connections
types of
viewing mode 28
16:9 28
4:3 28
Panorama 28
Zoom 1 29
volume 33
volume button 4
14
5
21
21
W
wide 35
Z
Zoom 1 mode 29
58
www.gateway.com


MAN 30”LCD TV USR GDE R1 12/04
 Loading...