

Instructions-Parts
Gateway Network
312785C
Communication Kits
Installation and program setup instructions for use with ProMix® 2KS Electronic
Proportioners. For professional use only.
Not approved for use in European explosive atmosphere locations.
See page 3 for kit information.
Important Safety Instructions
Read all warnings and instructions in this manual
and in your proportioning system manual. Save
these instructions.
EN
TI12933b

Contents
Graco Gateway Kits . . . . . . . . . . . . . . . . . . . . . . . . . 3
Related Manuals . . . . . . . . . . . . . . . . . . . . . . . . . . . 3
Warnings . . . . . . . . . . . . . . . . . . . . . . . . . . . . . . . . . 4
Graco Gateway Overview . . . . . . . . . . . . . . . . . . . . 5
Install the Gateway Module Hardware . . . . . . . . . . 5
Location . . . . . . . . . . . . . . . . . . . . . . . . . . . . . . . 5
Mounting . . . . . . . . . . . . . . . . . . . . . . . . . . . . . . . 5
Grounding . . . . . . . . . . . . . . . . . . . . . . . . . . . . . . 5
Connect the Module to the EasyKey . . . . . . . . . . 7
Cabling Connections . . . . . . . . . . . . . . . . . . . . . . 7
Mount the Control on DIN Rail . . . . . . . . . . . . . 11
Install CompactFlash
Install the GracoConfig Software . . . . . . . . . . . . . 12
System Requirements . . . . . . . . . . . . . . . . . . . . 12
Load the Software . . . . . . . . . . . . . . . . . . . . . . . 13
Software Updates . . . . . . . . . . . . . . . . . . . . . . . 13
Download the Preconfigured Database to the
Gateway Module . . . . . . . . . . . . . . . . . . . . . 14
Graco Gateway Network Communications
Configuration . . . . . . . . . . . . . . . . . . . . . . . . . 15
Startup . . . . . . . . . . . . . . . . . . . . . . . . . . . . . . . 15
GracoConfig Main Page . . . . . . . . . . . . . . . . . . 15
Setup the Database . . . . . . . . . . . . . . . . . . . . . 16
Map Data . . . . . . . . . . . . . . . . . . . . . . . . . . . . . 18
Modbus and I/O Data . . . . . . . . . . . . . . . . . . . . . . . 21
Start Mix Process . . . . . . . . . . . . . . . . . . . . . . . 21
Stop Mix Process . . . . . . . . . . . . . . . . . . . . . . . 21
Color Change Process . . . . . . . . . . . . . . . . . . . 21
Purge Process . . . . . . . . . . . . . . . . . . . . . . . . . 21
ProMix 2KS Active Alarms (Modbus Register
40010) . . . . . . . . . . . . . . . . . . . . . . . . . . . . 29
ProMix 2KS Modbus/TCP Variable Map . . . . . . 30
ProMix 2KS Recipe Bits . . . . . . . . . . . . . . . . . . 31
Troubleshooting . . . . . . . . . . . . . . . . . . . . . . . . . . . 32
General Troubleshooting . . . . . . . . . . . . . . . . . . 32
Graco Gateway Messages Troubleshooting . . . 35
Serial Communication Troubleshooting . . . . . . . 36
Ethernet Communication Troubleshooting . . . . 37
LED Functions . . . . . . . . . . . . . . . . . . . . . . . . . 38
System Electrical Schematic . . . . . . . . . . . . . . . . 39
Parts . . . . . . . . . . . . . . . . . . . . . . . . . . . . . . . . . . . . 40
15V331 Gateway Ethernet Kit (shown) . . . . . . . 40
15V963 Gateway DeviceNet Kit . . . . . . . . . . . . 40
15V964 Gateway Profibus Kit . . . . . . . . . . . . . . 40
®
Card . . . . . . . . . . . . . . . 11
Appendix A: DeviceNet
Overview . . . . . . . . . . . . . . . . . . . . . . . . . . . . . . 42
Introduction . . . . . . . . . . . . . . . . . . . . . . . . . . . . 42
DeviceNet Port Protocols . . . . . . . . . . . . . . . . . 42
About DeviceNet . . . . . . . . . . . . . . . . . . . . . . . . 44
Hardware . . . . . . . . . . . . . . . . . . . . . . . . . . . . . . 45
Automatic Update of the EDS File . . . . . . . . . . . 51
Configure the RSNetWorx for
DeviceNet Software . . . . . . . . . . . . . . . . . . 52
Configure the Allen Bradley ControlLogix PLC . 55
Wire the DeviceNet Network . . . . . . . . . . . . . . . 56
Appendix B: Profibus
Overview . . . . . . . . . . . . . . . . . . . . . . . . . . . . . . 57
Introduction . . . . . . . . . . . . . . . . . . . . . . . . . . . . 57
Profibus Port Protocols . . . . . . . . . . . . . . . . . . . 57
About Profibus DP . . . . . . . . . . . . . . . . . . . . . . . 58
Setup the PLC . . . . . . . . . . . . . . . . . . . . . . . . . . 59
Graco Gateway Setup . . . . . . . . . . . . . . . . . . . . 66
Appendix C: Graco Gateway to ControlLogix via
Ethernet IP . . . . . . . . . . . . . . . . . . . . . . . . . . . . 72
Overview . . . . . . . . . . . . . . . . . . . . . . . . . . . . . . 72
Introduction . . . . . . . . . . . . . . . . . . . . . . . . . . . . 72
ControlLogix Configuration . . . . . . . . . . . . . . . . 73
Graco Gateway Configuration . . . . . . . . . . . . . 77
Dimensions . . . . . . . . . . . . . . . . . . . . . . . . . . . . . . . 79
Technical Data . . . . . . . . . . . . . . . . . . . . . . . . . . . . 81
Graco Standard Warranty . . . . . . . . . . . . . . . . . . . 82
Graco Information . . . . . . . . . . . . . . . . . . . . . . . . . 82
™
Slave Communication 42
™
DP Slave Communication 57
2 312785C

Graco Gateway Kits
Graco Gateway Kits
15V331 Gateway Ethernet Kit
Allows communication between ProMix 2KS and a PLC
over an ethernet. Enables process equipment to read
variables while operating, as well as control the ProMix
2KS and change setup. It does not provide access to job
and alarm logs.
15V963 Gateway DeviceNet Kit
Allows communication between ProMix 2KS and a PLC,
using DeviceNet process control. Enables process
equipment to read variables while operating, as well as
control the ProMix 2KS and change setup. It does not
provide access to job and alarm logs.
15V964 Gateway Profibus Kit
Allows communication between ProMix 2KS and a PLC,
using Profibus process control. Enables process equipment to read variables while operating, as well as control the ProMix 2KS and change setup. It does not
provide access to job and alarm logs.
Related Manuals
Component Manuals in English
Manual Description
312778 ProMix 2KS Automatic System
Installation
312779 ProMix 2KS Automatic System
Operation
312780 ProMix 2KS Automatic System
Repair-Parts
313386 Basic Web Interface/Advanced Web
Interface
312785C 3
Warnings
Warnings
The following warnings are for the setup, use, grounding, maintenance, and repair of this equipment. The exclamation point symbol alerts you to a general warning and the hazard symbols refer to procedure-specific risks. When
these symbols appear in the body of this manual, refer back to these Warnings. Product-specific hazard symbols and
warnings not covered in this section may appear throughout the body of this manual where applicable.
WARNING
FIRE AND EXPLOSION HAZARD
Flammable fumes, such as solvent and paint fumes, in work area can ignite or explode. To help prevent
fire and explosion:
• Use equipment only in well ventilated area.
• Eliminate all ignition sources; such as pilot lights, cigarettes, portable electric lamps, and plastic drop
cloths (potential static arc).
• Keep work area free of debris, including solvent, rags and gasoline.
• Do not plug or unplug power cords, or turn power or light switches on or off when flammable fumes
are present.
• Ground all equipment in the work area. See Grounding instructions.
• Use only grounded hoses.
• Hold gun firmly to side of grounded pail when triggering into pail.
• If there is static sparking or you feel a shock, stop operation immediately. Do not use equipment
until you identify and correct the problem.
• Keep a working fire extinguisher in the work area.
ELECTRIC SHOCK HAZARD
This equipment must be grounded. Improper grounding, setup, or usage of the system can cause
electric shock.
• Turn off and disconnect power at main switch before disconnecting any cables and before servicing
equipment.
• Connect only to grounded power source.
• All electrical wiring must be done by a qualified electrician and comply with all local codes and
regulations.
EQUIPMENT MISUSE HAZARD
Misuse can cause death or serious injury.
• Do not operate the unit when fatigued or under the influence of drugs or alcohol.
• Do not exceed the maximum working pressure or temperature rating of the lowest rated system
component. See Technical Data in all equipment manuals.
• Use fluids and solvents that are compatible with equipment wetted parts. See Technical Data in all
equipment manuals. Read fluid and solvent manufacturer’s warnings. For complete information
about your material, request MSDS forms from distributor or retailer.
• Check equipment daily. Repair or replace worn or damaged parts immediately with genuine manufacturer’s replacement parts only.
• Do not alter or modify equipment.
• Use equipment only for its intended purpose. Call your distributor for information.
• Route hoses and cables away from traffic areas, sharp edges, moving parts, and hot surfaces.
• Do not kink or over bend hoses or use hoses to pull equipment.
• Keep children and animals away from work area.
• Comply with all applicable safety regulations.
4 312785C
Graco Gateway Overview
Graco Gateway Overview
The Graco Gateway enables the ProMix 2KS to network
with a programmable logic controller (PLC). Kits are
available for Ethernet, DeviceNet, or Profibus protocols.
The Graco Gateway will support many other protocols;
contact Graco Technical Assistance for information to
support your desired protocol.
NOTE: Only persons very familiar with their PLC communication architecture should use this hardware and
software. This manual assumes that the person using
the Graco Gateway has full understanding of the PLC
equipment and related software.
NOTE: Network communications essentially operate
with the same rules as Discrete I/O. However, network
communications require placing correct values or
adjusting appropriate bits within various Modbus registers (for example, see Table 4). These changes should
only be made by qualified persons familiar with this type
of communication.
The module allows for most PLCs to communicate with
the ProMix 2KS via Modbus RTU protocol by bridging
the gap between the desired communication protocol
and RS485 Modbus RTU. As a result, the PLC has full
access to all the registers for monitoring and controlling
the ProMix 2KS. It is the responsibility of the integrator
or user to ensure proper configuration of the communication hardware on the PLC side.
Install the Gateway Module Hardware
Location
This equipment is not for use in explosive atmospheres. Do not install equipment approved only for
non-hazardous location in a hazardous area.
Install the Gateway module near the EasyKey™, in a
non-hazardous area.
Mounting
1. See Dimensions, page 79.
2. Ensure that the wall and mounting hardware are
strong enough to support the weight of the equipment, cables, and stress caused during operation.
3. Using the equipment as a template, mark the
mounting holes on the wall at a convenient height
for the operator and so equipment is easily accessible for maintenance.
4. Drill mounting holes in the wall. Install anchors as
needed.
5. Bolt equipment securely.
Grounding
Your system must be grounded. Read Warnings,
page 4.
The Gateway module is grounded through its connection to the EasyKey, which must be connected to a true
earth ground. See the system installation manual. A
ground wire and clamp, part no. 223547, is available
from Graco.
312785C 5
Install the Gateway Module Hardware
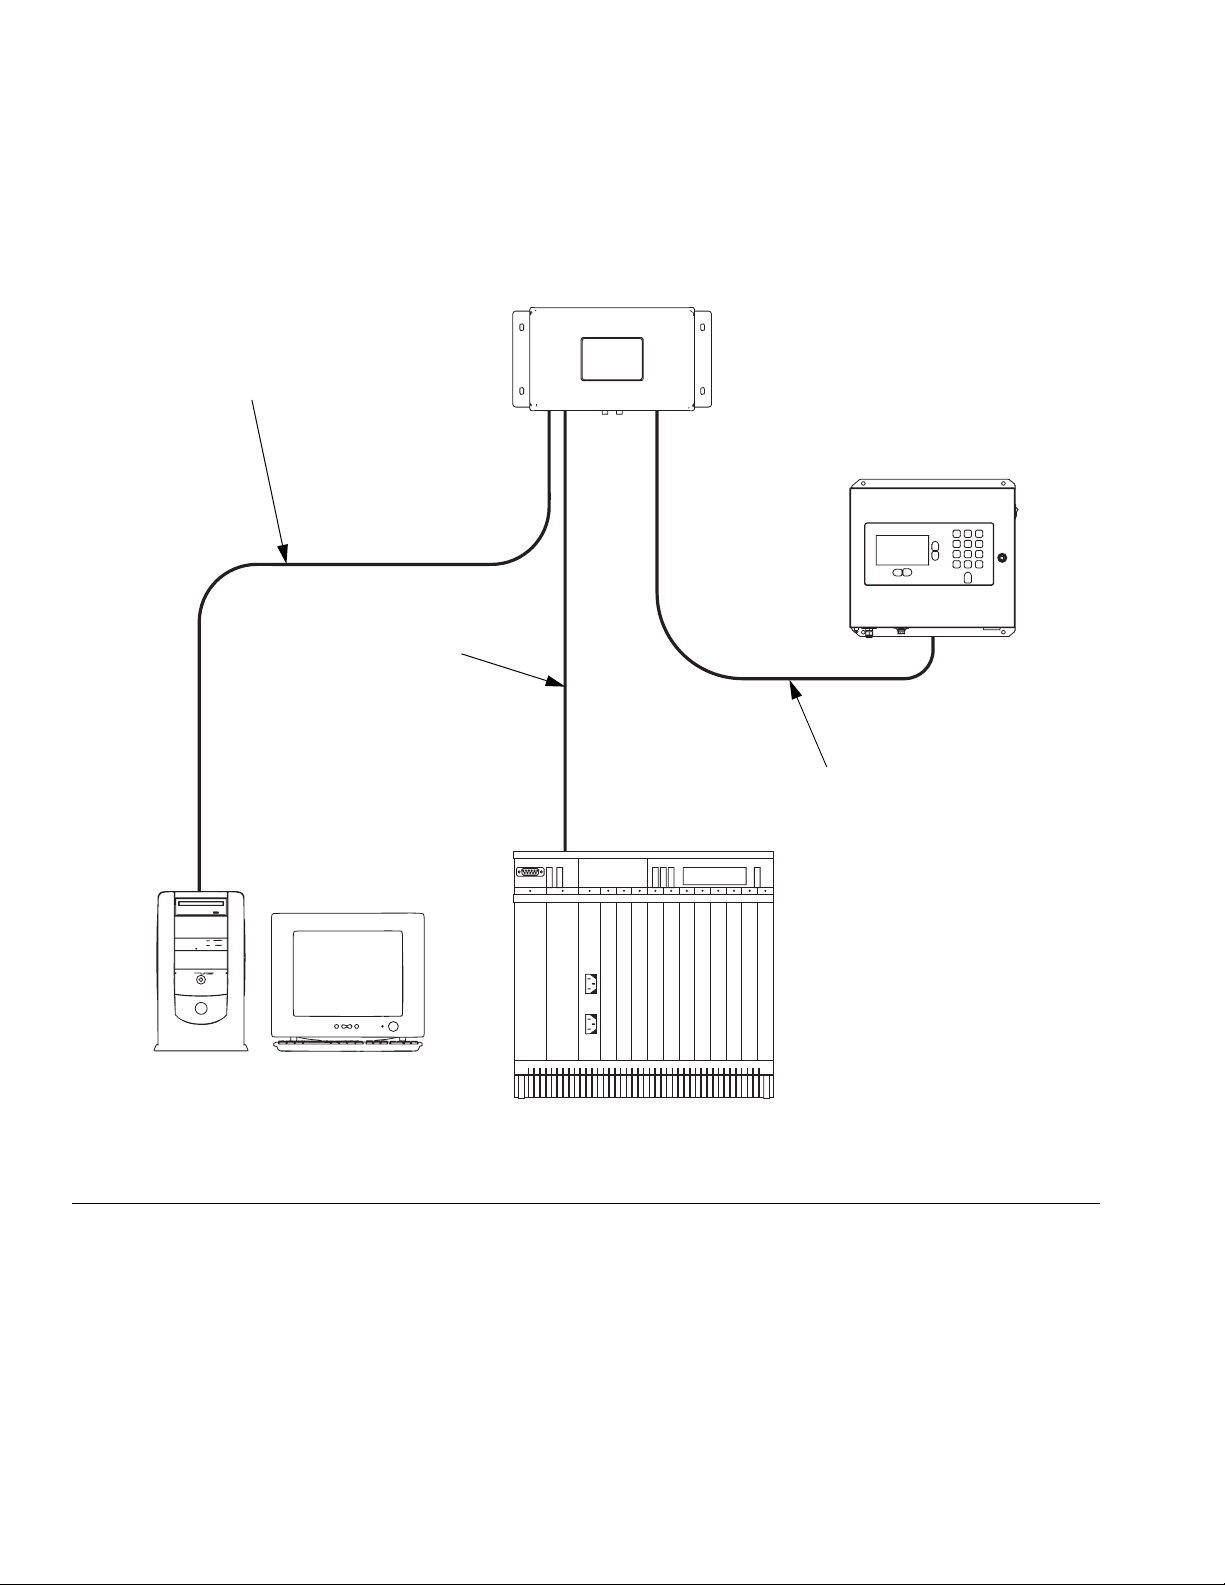
USB Cable
(included), for initial
setup only
PLC Communication
Wire/Cable
(protocol dependent)
NON-HAZARDOUS AREA
Graco Gateway
Module
EasyKey
Computer (PC)
FIG. 1: Graco Gateway Typical Installation
2-wire twisted
pair cable, with
shield wire
TI13939a
Programmable Logic Controller (PLC)
6 312785C

Connect the Module to the EasyKey
FIG. 1 is only a guide showing installation of the Graco
Gateway in a ProMix 2KS System; it is not a complete
system design, Contact your Graco distributor for assistance in designing a system to suit your particular
needs.
Install the Gateway Module Hardware
1. Shut off ProMix 2KS power (0 position). F
shut off power at main circuit breaker.
F
IG. 2: Power Off
2. Connect a 2-wire twisted pair cable with shield wire
from the EasyKey connector to the connector on the
Gateway module. Connect a communications
wire/cable (protocol dependent) from the Gateway
module to the PLC. See F
IG. 3.
IG. 2. Also
0 = OFF
TI12657a
NOTE: Graco provides expansion cards for DeviceNet
and Profibus protocols. DeviceNet setup procedures are
on page 42. Profibus setup procedures are on page 57.
See page 40 for Parts.
NOTE: If using the Graco Gateway in your system, disconnect its cable from the EasyKey before updating the
ProMix 2KS software.
Cabling Connections
See FIG. 4 and FIG. 5 for typical cable connections in a
ProMix 2KS system.
F
IG. 6 through FIG. 9 show other possible cable connec-
tions.
312785C 7
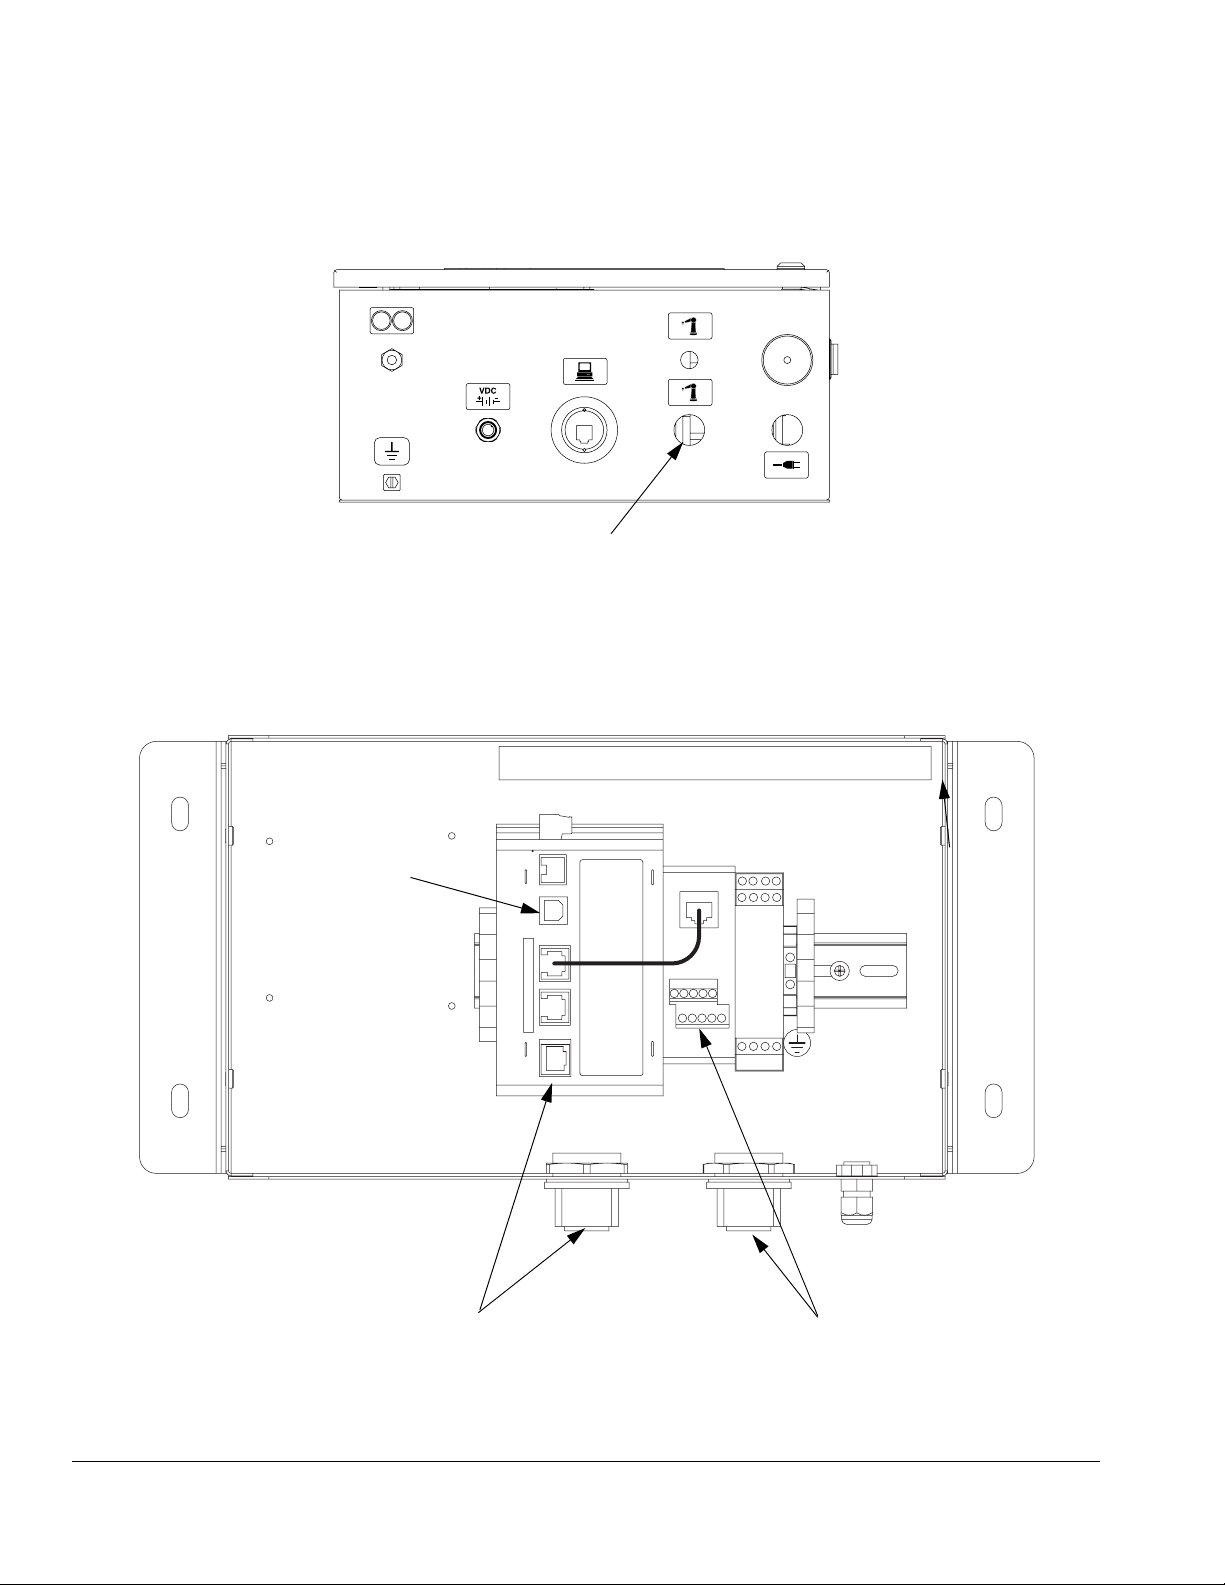
Install the Gateway Module Hardware
2-wire twisted pair cable, with
shield wire (to Gateway Module)
EasyKey (Bottom View)
TI12638a
USB Port
Gateway Module
TI12930a
Communication Wire/Cable (to PLC).
This connection is protocol dependent.
2-wire twisted pair cable, with
shield wire (to EasyKey). See
Wiring Diagrams on page 41
for pin connections.
FIG. 3: EasyKey and Module Cable Connection Points
8 312785C
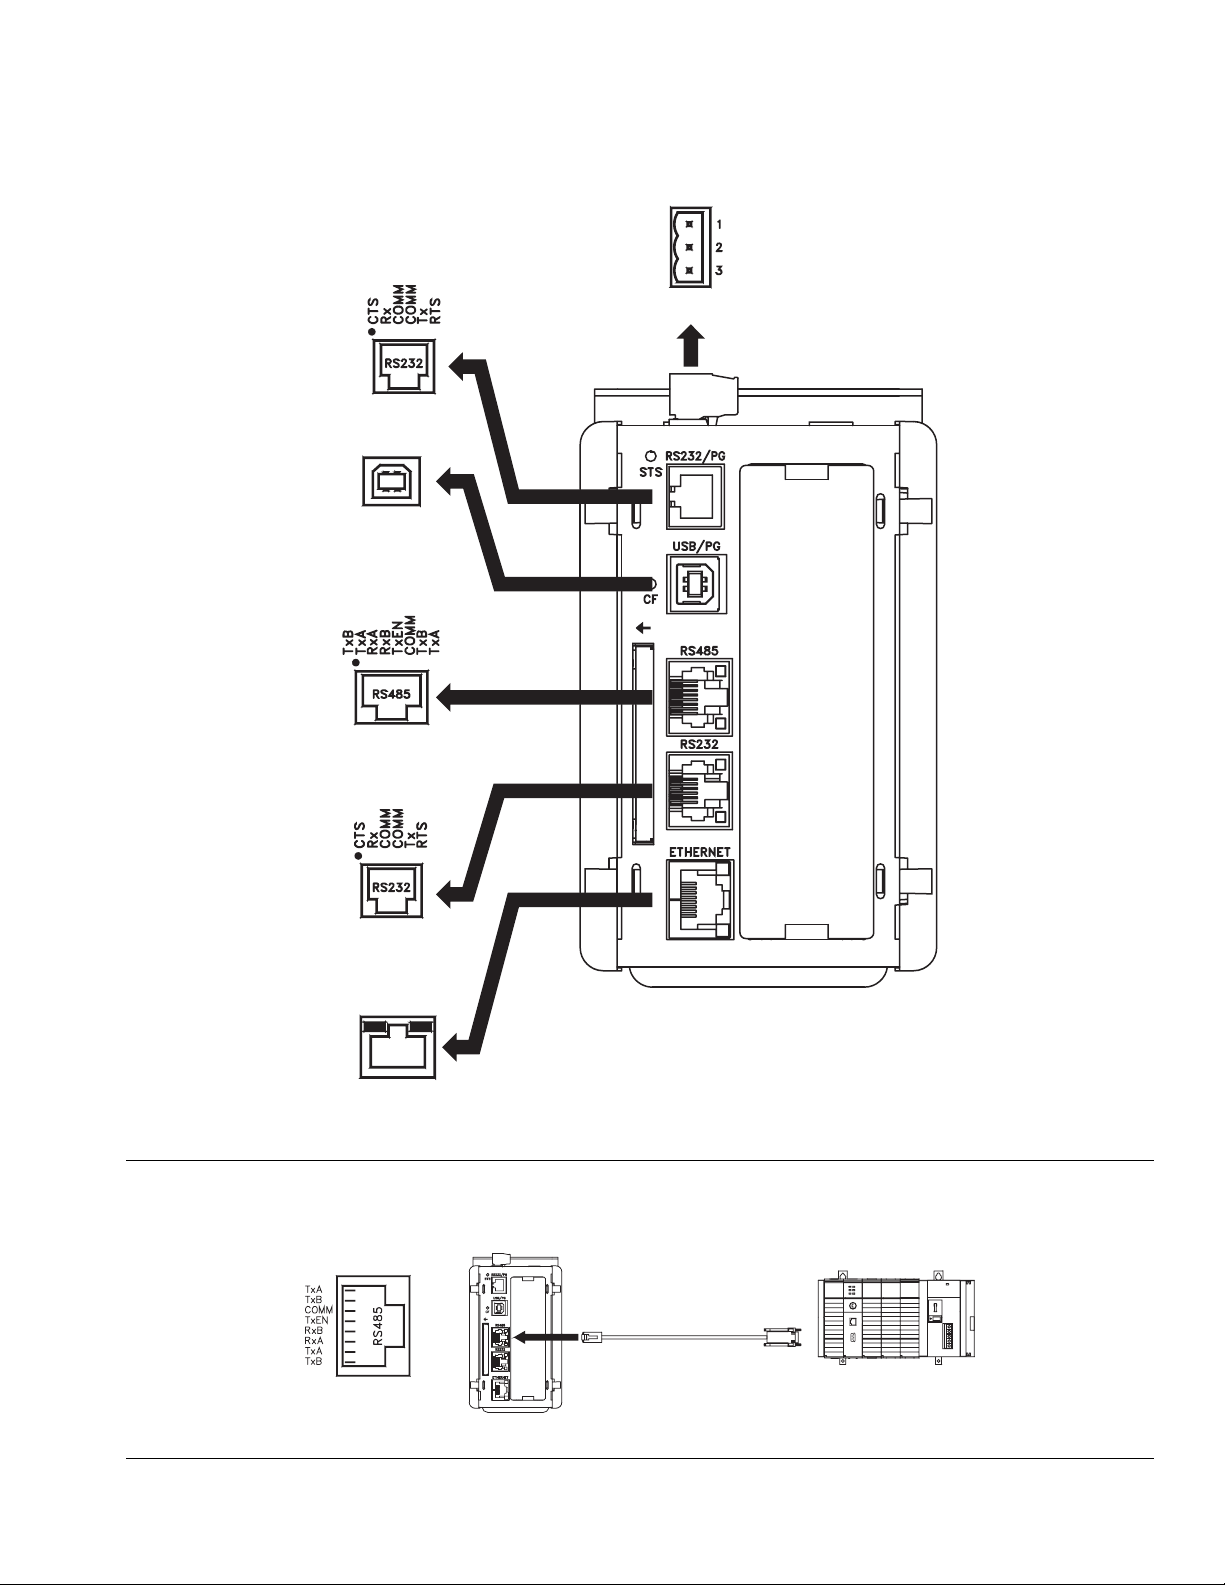
Pin 1
RS232/PG
USB/PG
Install the Gateway Module Hardware
Common
24 Vdc +/- 10%
Pin 6
N/C
Power Connector
Pin 1
Pin 8
COMMS
Pin 1
Pin 6
COMMS
Green/
Amber
LED
Ye l l o w
LED
ETHERNET (NIC)
FIG. 4: Graco Gateway Port Pin Outs
Expansion
Port
TI13974a
TI13972a
FIG. 5: RS485 Communication Port (Typical ProMix 2KS Connection)
312785C 9
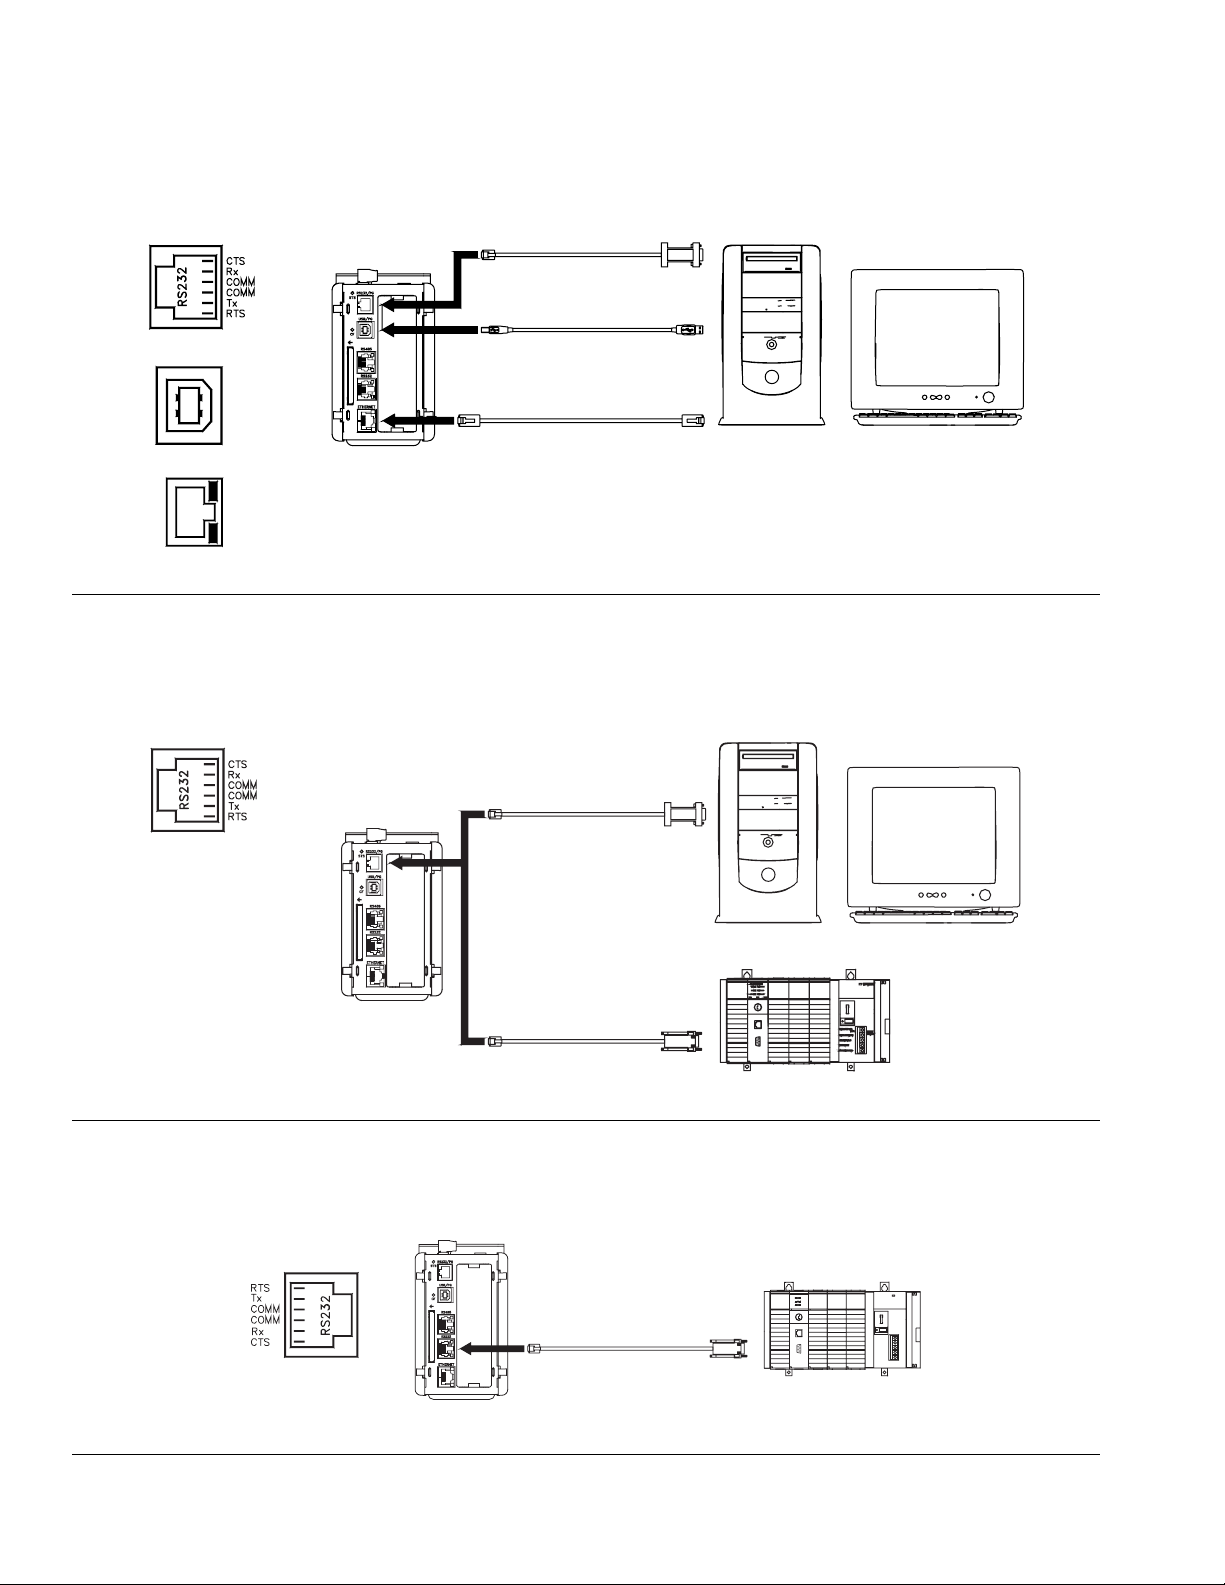
Install the Gateway Module Hardware
RS232/PG
USB/PG
OR
OR
ETHERNET
Green/Amber LED
Yellow LED
FIG. 6: Programming Ports
RS232/PG
TI13969a
OR
TI13970a
FIG. 7: RS232/PG Communication Ports
RS232
TI13971a
F
IG. 8: RS232 Communication Ports
10 312785C
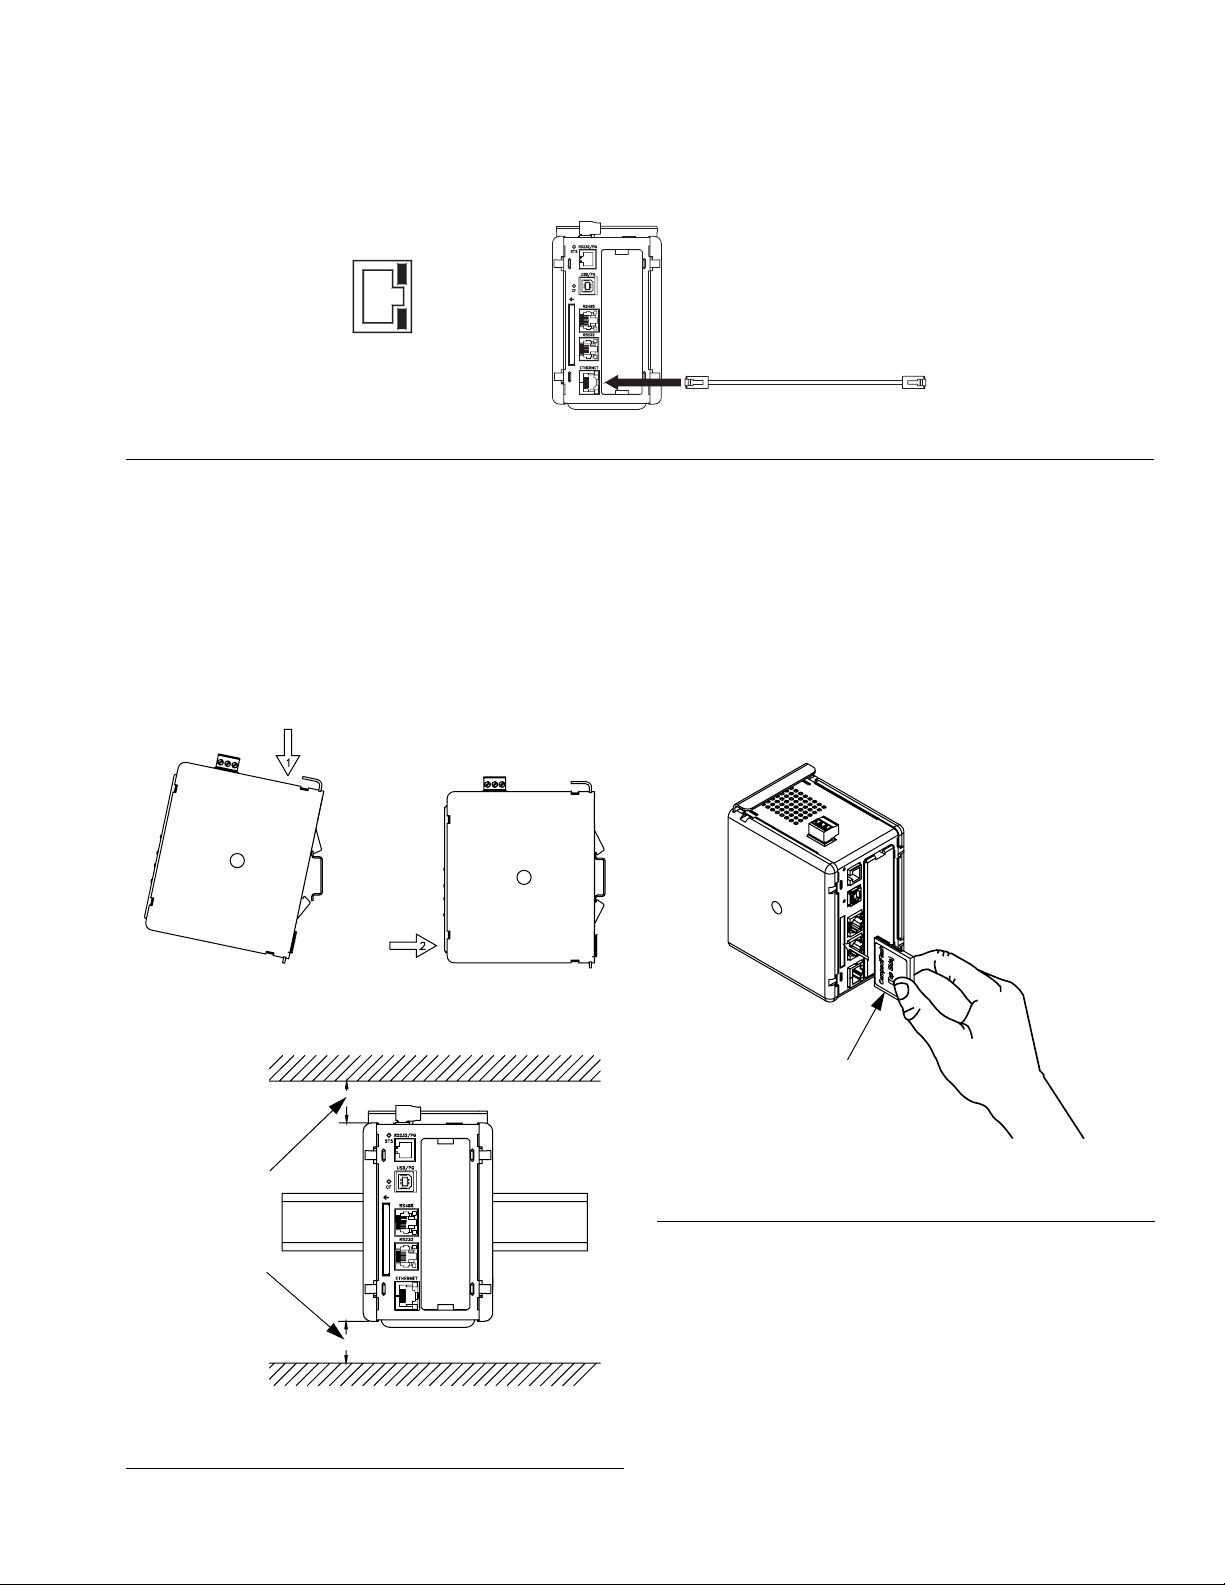
ETHERNET
F
IG. 9: Ethernet Connection
Install the Gateway Module Hardware
Green/Amber
LED
Yel low LE D
Standard Ethernet Cable
TI13973a
Mount the Control on DIN Rail
The Gateway control mounts on a DIN rail. Tilt the control and push down onto the DIN rail, then push in. See
F
IG. 10. A minimum clearance of 1 in. (25 mm) above
and below the control is required to ensure adequate
ventilation.
TI13965a
1 in. (25 mm)
minimum
clearance top
and bottom
Install CompactFlash® Card
The CompactFlash socket accepts either Type I or Type
II cards. These cards are available at most computer
and office supply retailers. Use cards with a minimum of
4 Mbytes and a maximum of 2 Gbytes. Use the CompactFlash card for optional database storage only. See
F
IG. 11.
Insert card with top side
on the left. Do not insert
or remove card while
power is applied.
FIG. 11: Install a CompactFlash Card
TI13967a
TI13966a
FIG. 10: Mount the Control on a DIN Rail
312785C 11

Install the GracoConfig Software
Install the GracoConfig Software
GracoConfig software provides access to the Graco
Gateway module hardware. The CD provided contains
the GracoConfig software (GracoConfigXXX.exe, where
the XXX represents the version control number). It also
includes a preconfigured database which is essentially a
setup file for the Gateway. The database file has a .gg2
extension.
The Graco Gateway provides conversions for many protocols, including the following:
• All Allen-Bradley protocols
• DeviceNet
• Ethernet TCP/IP
• Ethernet IP
• Mitsubishi
• Modbus (ASCII, RTU)
•Profibus
•Siemens
NOTE: Graco provides expansion cards for DeviceNet
and Profibus protocols. DeviceNet setup procedures are
on page 42. Profibus setup procedures are on page 57.
See page 40 for Parts.
System Requirements
GracoConfig software will run on PCs with the following
specifications:
• A Pentium class processor as required by the chosen operating system.
NOTE: GracoConfig software will operate with all
versions of Microsoft
dows 2000 or above is recommended for more
robust operation.
• RAM and free disk space as required by the chosen
operating system.
• An additional 50MB of disk space for software
installation.
• A display of at least 800 by 600 pixels, with 256 or
more colors.
• USB port for downloading a configured database to
the Gateway module.
®
Windows 98 and above. Win-
NOTE: Contact your Graco distributor or Graco Technical Assistance for information regarding additional supported protocols.
12 312785C
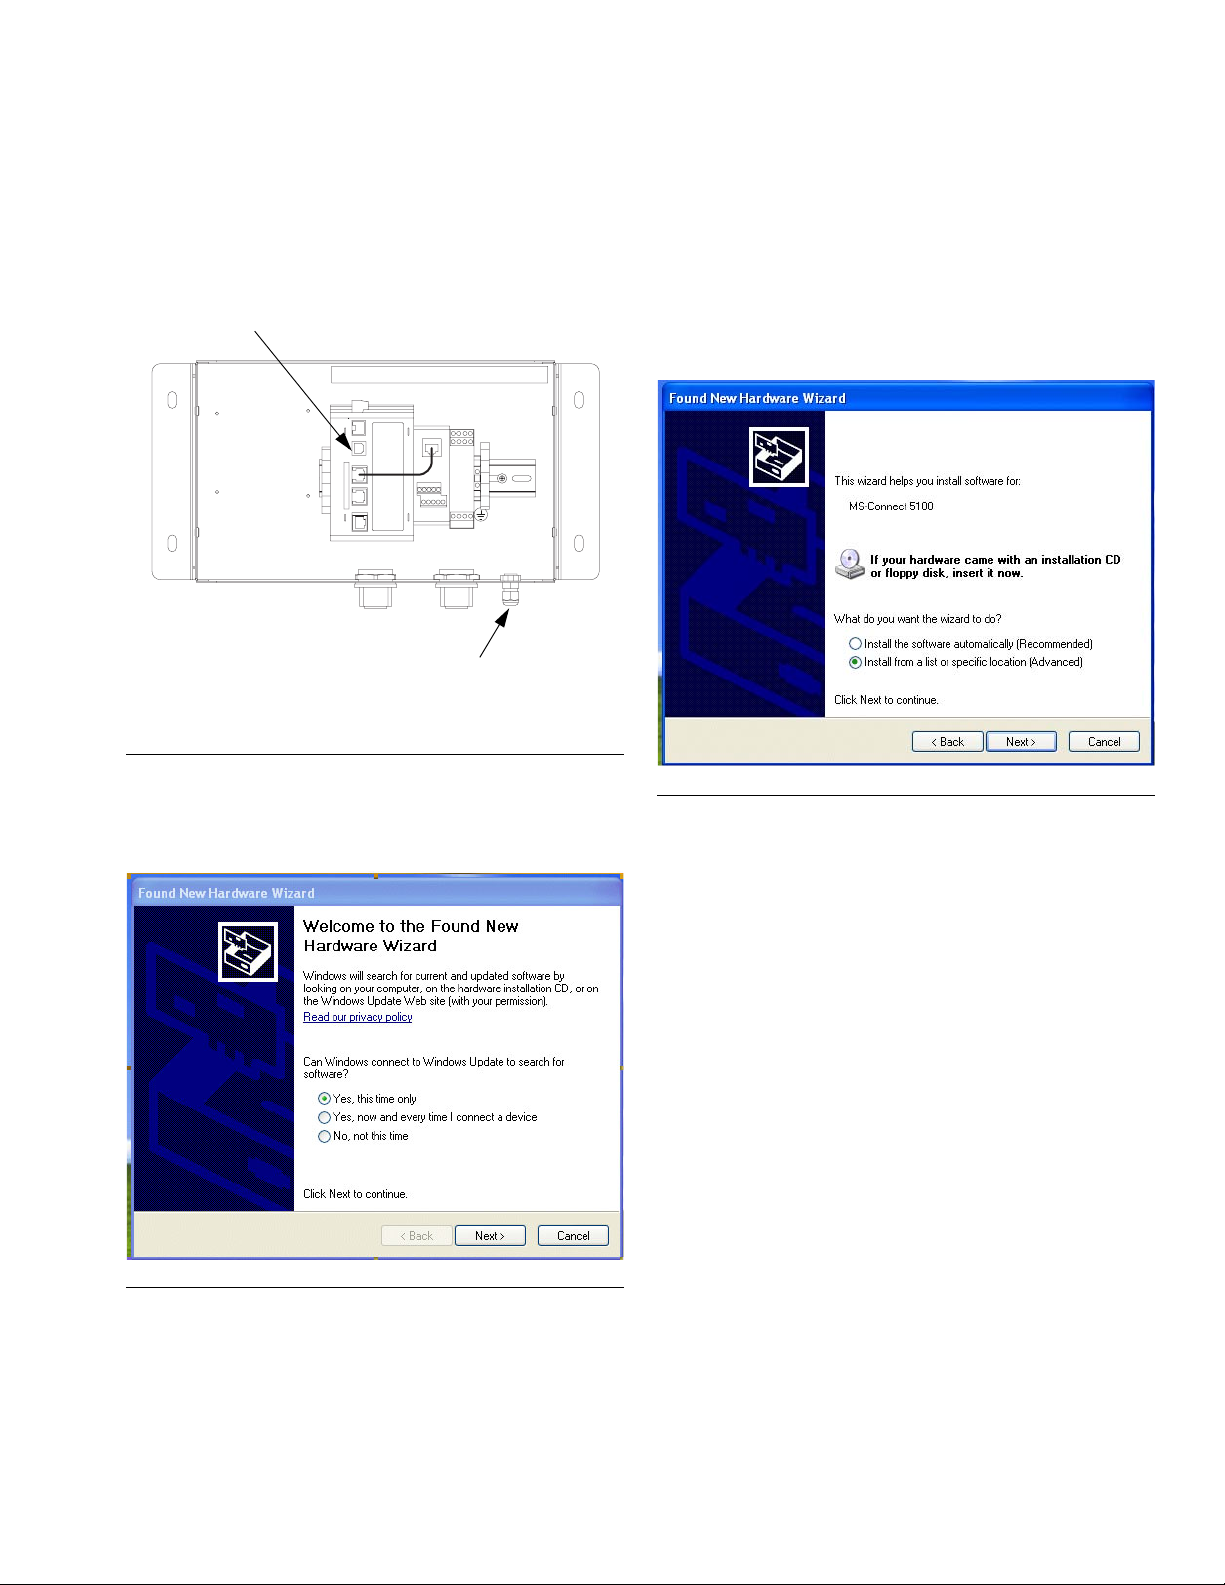
Load the Software
1. Connect the USB cable (23, supplied) between the
USB port on the Gateway module and a USB port
on your PC. See F
USB Port
IG. 12.
TI12930a
USB Cable Strain Relief
Install the GracoConfig Software
IG. 14 will appear. Insert the CD in your PC’s
3. F
CDROM drive. Select “Install the software from a list
or specific location”, then click Next. The program
location is C:\Program Files\Graco\GracoConfig\Device.
NOTE: The name of the driver may be different. Just
accept the name and proceed by following the
instructions on the screen.
F
IG. 12: Gateway Module USB Port
2. F
IG. 13 will appear. Select “Yes, this time only”, then
click Next.
F
IG. 13: Found New Hardware Screen
FIG. 14: Load Software from a Specific Location
Software Updates
Contact your distributor or Graco Technical Assistance
for software updates.
312785C 13
Install the GracoConfig Software
Download the Preconfigured Database to the Gateway Module
Graco supplies a preconfigured database as a setup file
for the Gateway, containing parameters which communicate between the Gateway and the ProMix 2KS. The file
name has a .gg2 extension.
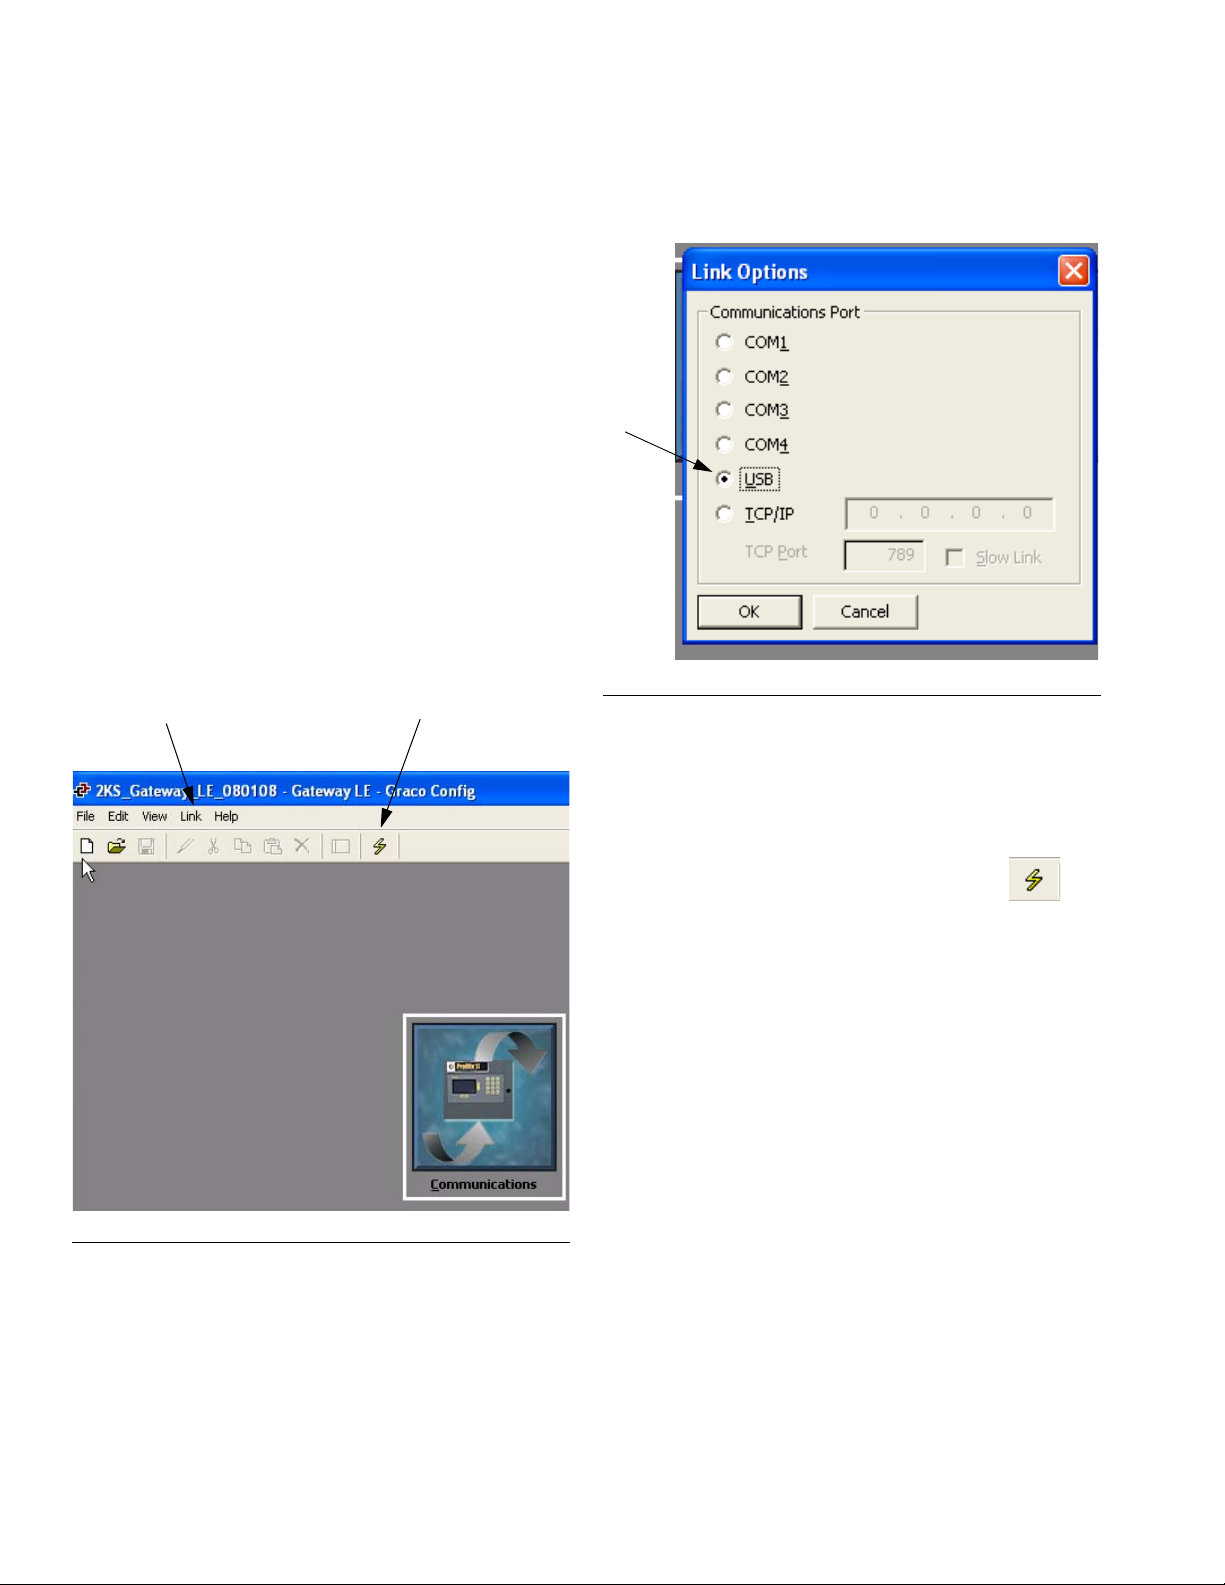
GracoConfig files are downloaded to the Gateway module using the Link menu. The programming link between
the PC and the Gateway module uses the USB cable.
Before downloading, check that the Communications
Port is set to USB, as follows.
NOTE: During programming the Gateway module may
ask for an updated driver. Follow the instructions on the
screen to automatically find and select the drivers.
1. Go to Start>Programs>Graco>GracoConfig and run
the program. The GracoConfig main page will
appear.
Link Pulldown Menu Update Symbol
2. Using the Link pulldown menu, select Options to
open the Link Options window. Check that the Com-
munications Port is set to USB, and click OK.
IG. 16: Set Communications Port to USB
F
F
IG. 15: GracoConfig Main Page
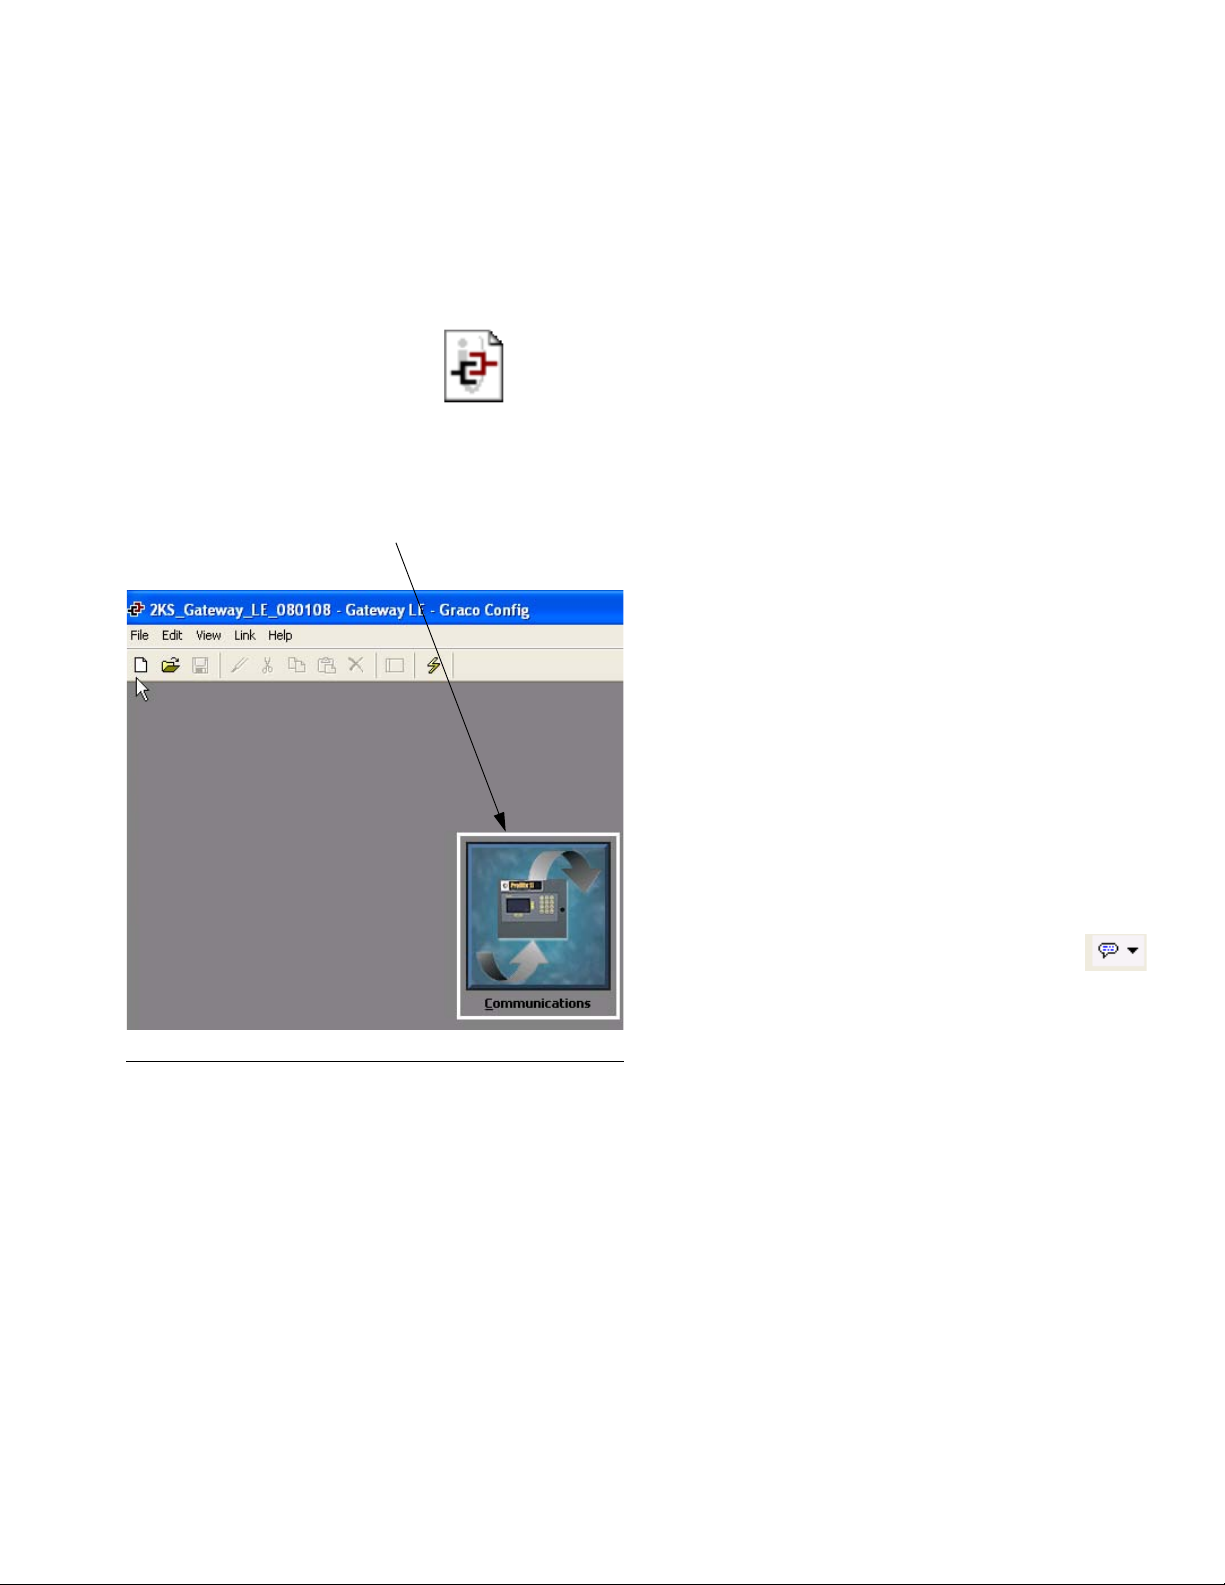
3. Go to File>Open and select the file with the xx.gg2
extension. The file name should appear at the top of
the window (F
4. Download the database using the Link>Update
command. As a shortcut, use the Update
symbol on the toolbar. See F
NOTE: Downloading typically takes only a few seconds but may take longer if the software has to
update firmware on the Gateway module.
IG. 15) once loaded.
IG. 15.
14 312785C
Graco Gateway Network Communications Configuration
Graco Gateway Network Communications
Configuration
Startup
To run GracoConfig, select the icon from the
Graco folder on the Programs section of your Start
Menu. The main page will appear, showing the Commu-
nications button.
Communications Button
GracoConfig Main Page
Communications Button
The Communications button provides access to screens
used to configure your system and setup parameters,
allowing you to:
• Specify which protocols are to be used on the Gateway serial ports and on the Ethernet port.
• If using master protocols (ie., protocols by which the
Gateway initiates data transfer to and from a remote
device), you can specify one or more devices to be
accessed.
• If using slave protocols (i.e., protocols by which the
Gateway receives and responds to requests from
remote devices or computer systems), you can set
read or write access for specific data items.
• Move data between one remote device and another.
Balloon Help
F
IG. 17: Communications Button
The Balloon Help feature allows you to see help information for each icon in the main menu, or for each field
in a dialog box or window. It is controlled via the
icon at the right-hand edge of the toolbar. Balloon Help
has three user-selectable modes:
• Do Not Display disables balloon help
• When Mouse Over displays help when the mouse
pointer is held over a particular field for a certain
period of time
• When Selected displays help constantly for the currently selected field.
312785C 15
Graco Gateway Network Communications Configuration
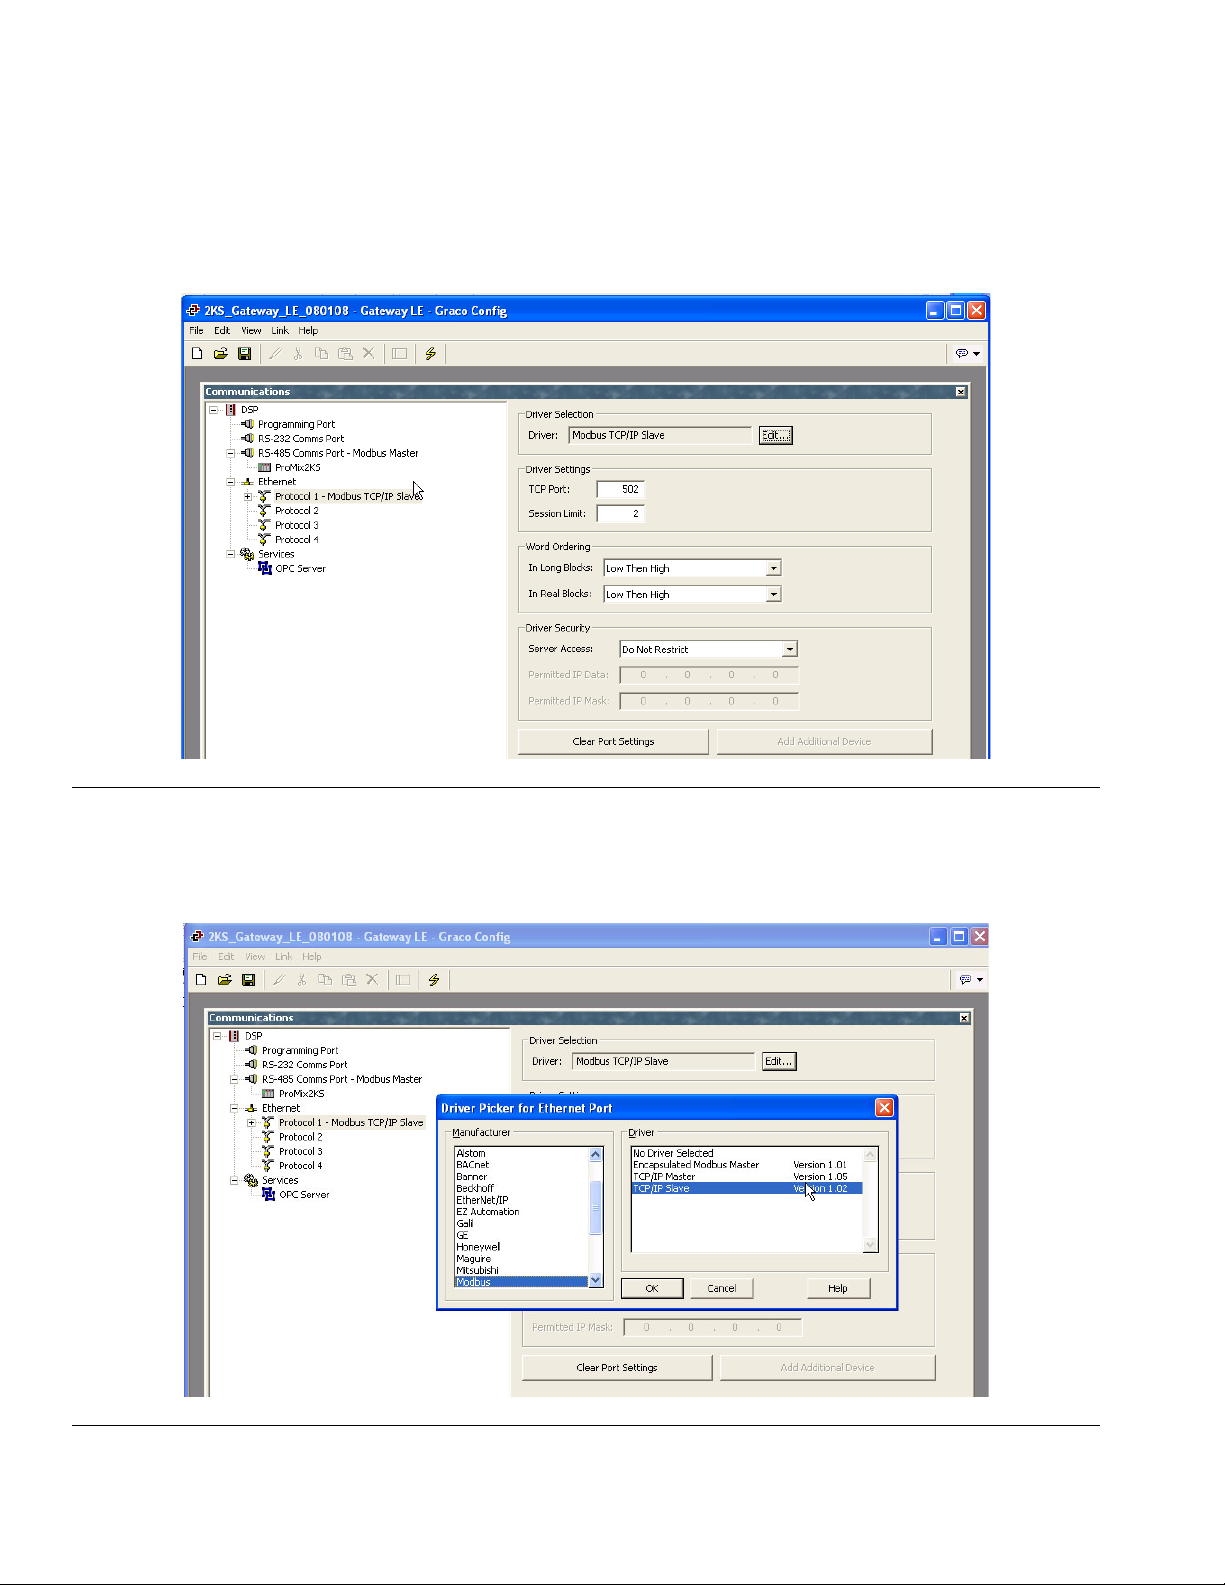
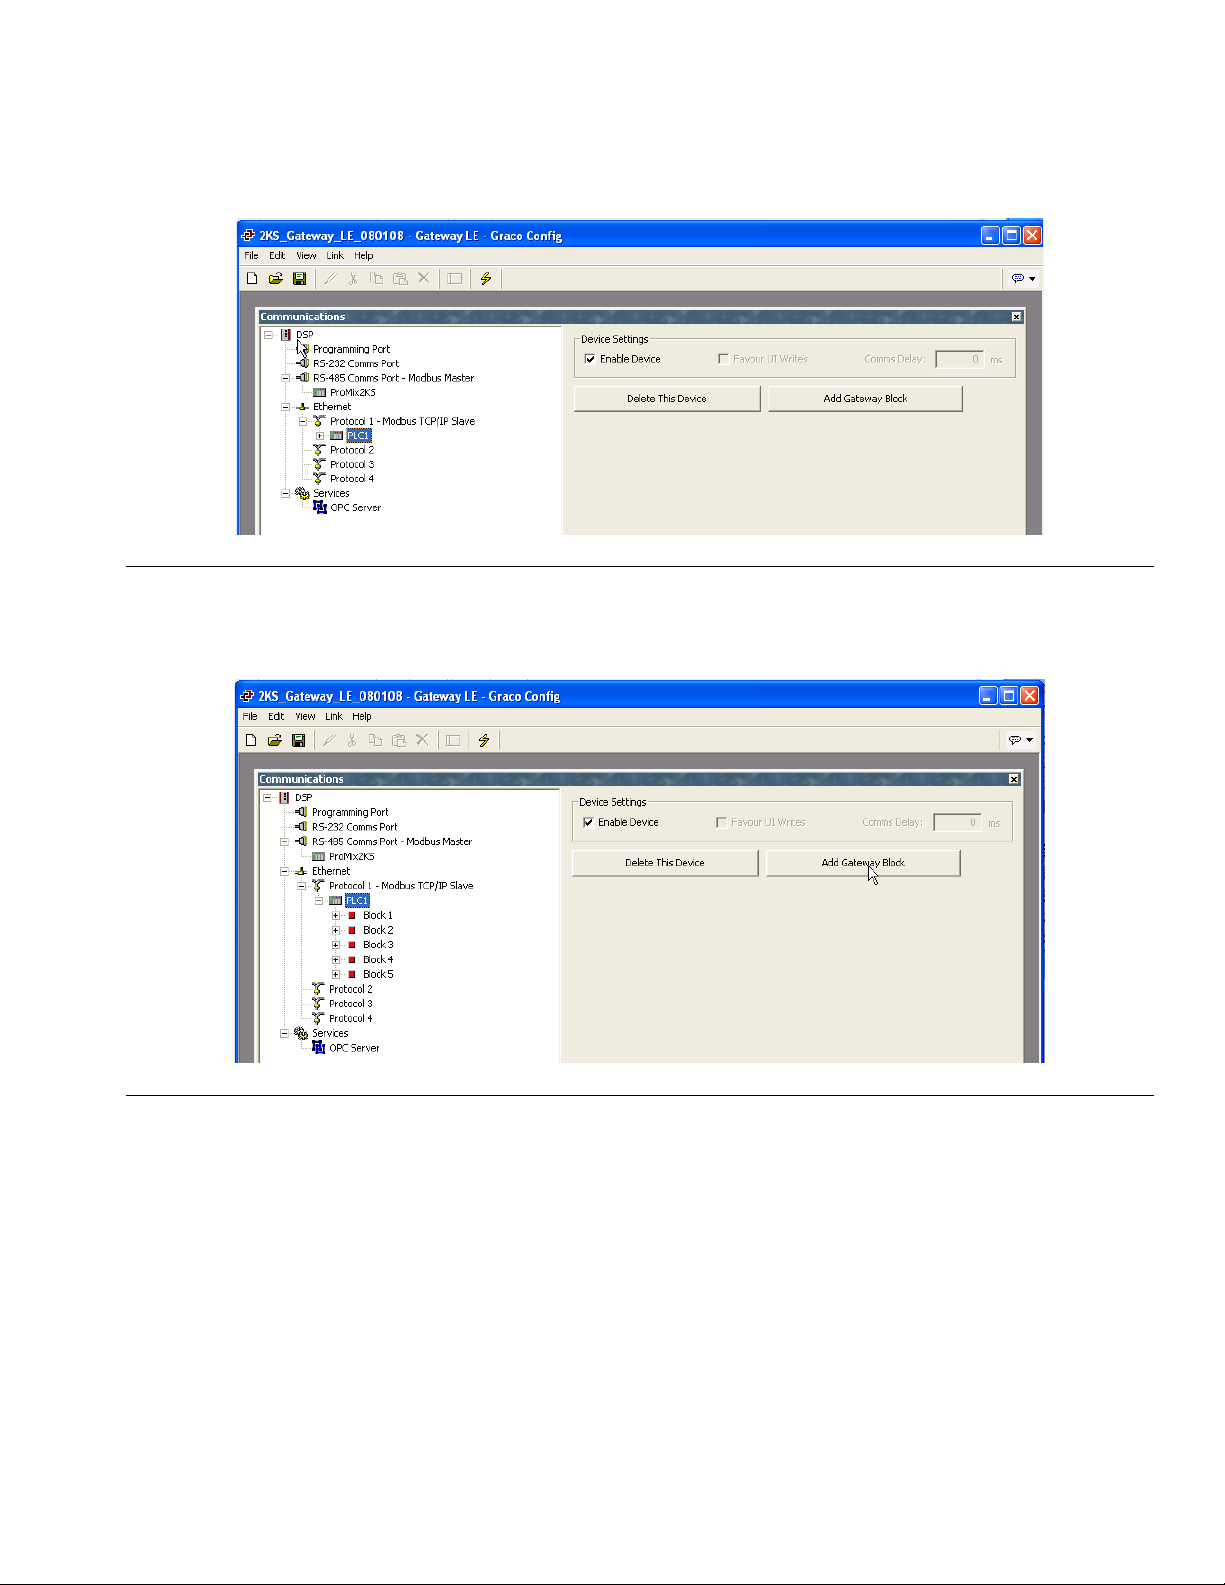
Setup the Database
1. Double-click on the Communications button to open
the preconfigured database (.gg2). The file is
already setup for ProMix 2KS. See F
IG. 18.
F
IG. 18: Preconfigured Database
2. See F
IG. 19. Highlight Protocol 1. Click the Edit but-
ton on the right side of the window to open the
Driver Picker window. Choose a protocol from the
lists provided, in this example Modbus and TCP/IP
Slave. The system will create device PLC1.
FIG. 19: Select Protocol
16 312785C
3. See FIG. 20. Right click on device PLC1 to rename it
to something meaningful for your system.
F
IG. 20: Rename PLC1
Graco Gateway Network Communications Configuration
4. See F
IG. 21. Add as many Gateway blocks as
desired under each device.
FIG. 21: Add Gateway Blocks
312785C 17
Graco Gateway Network Communications Configuration
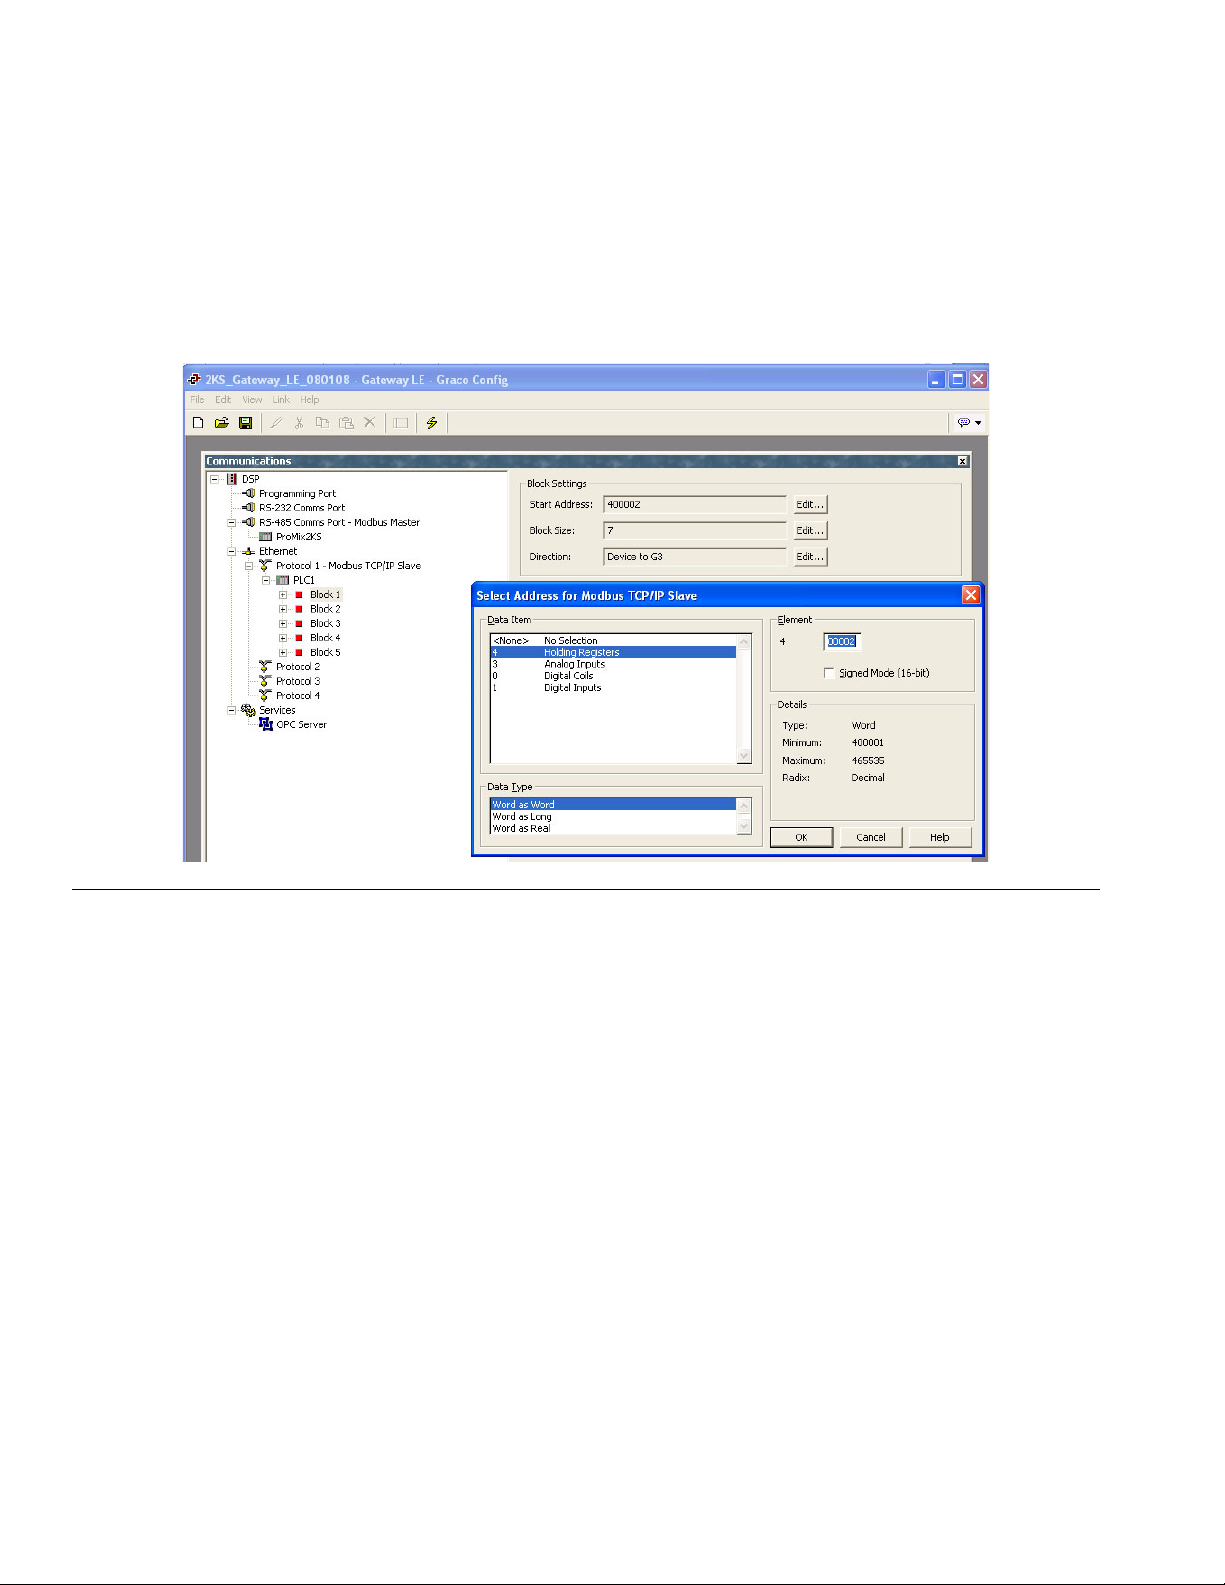
Map Data
1. See FIG. 22. Select the block for data mapping. Click
the Edit button next to the Start Address field on the
right side of the window. The Select Address window will open.
2. Refer to Table 4 on page 30 for a Modbus map.
Select the desired Modbus register address as a
starting point (in this case 40002). Enter the appropriate values in the Select Address window and click
OK. The desired register address will populate the
Start Address field.
F
IG. 22: Mapping Gateway Blocks
18 312785C
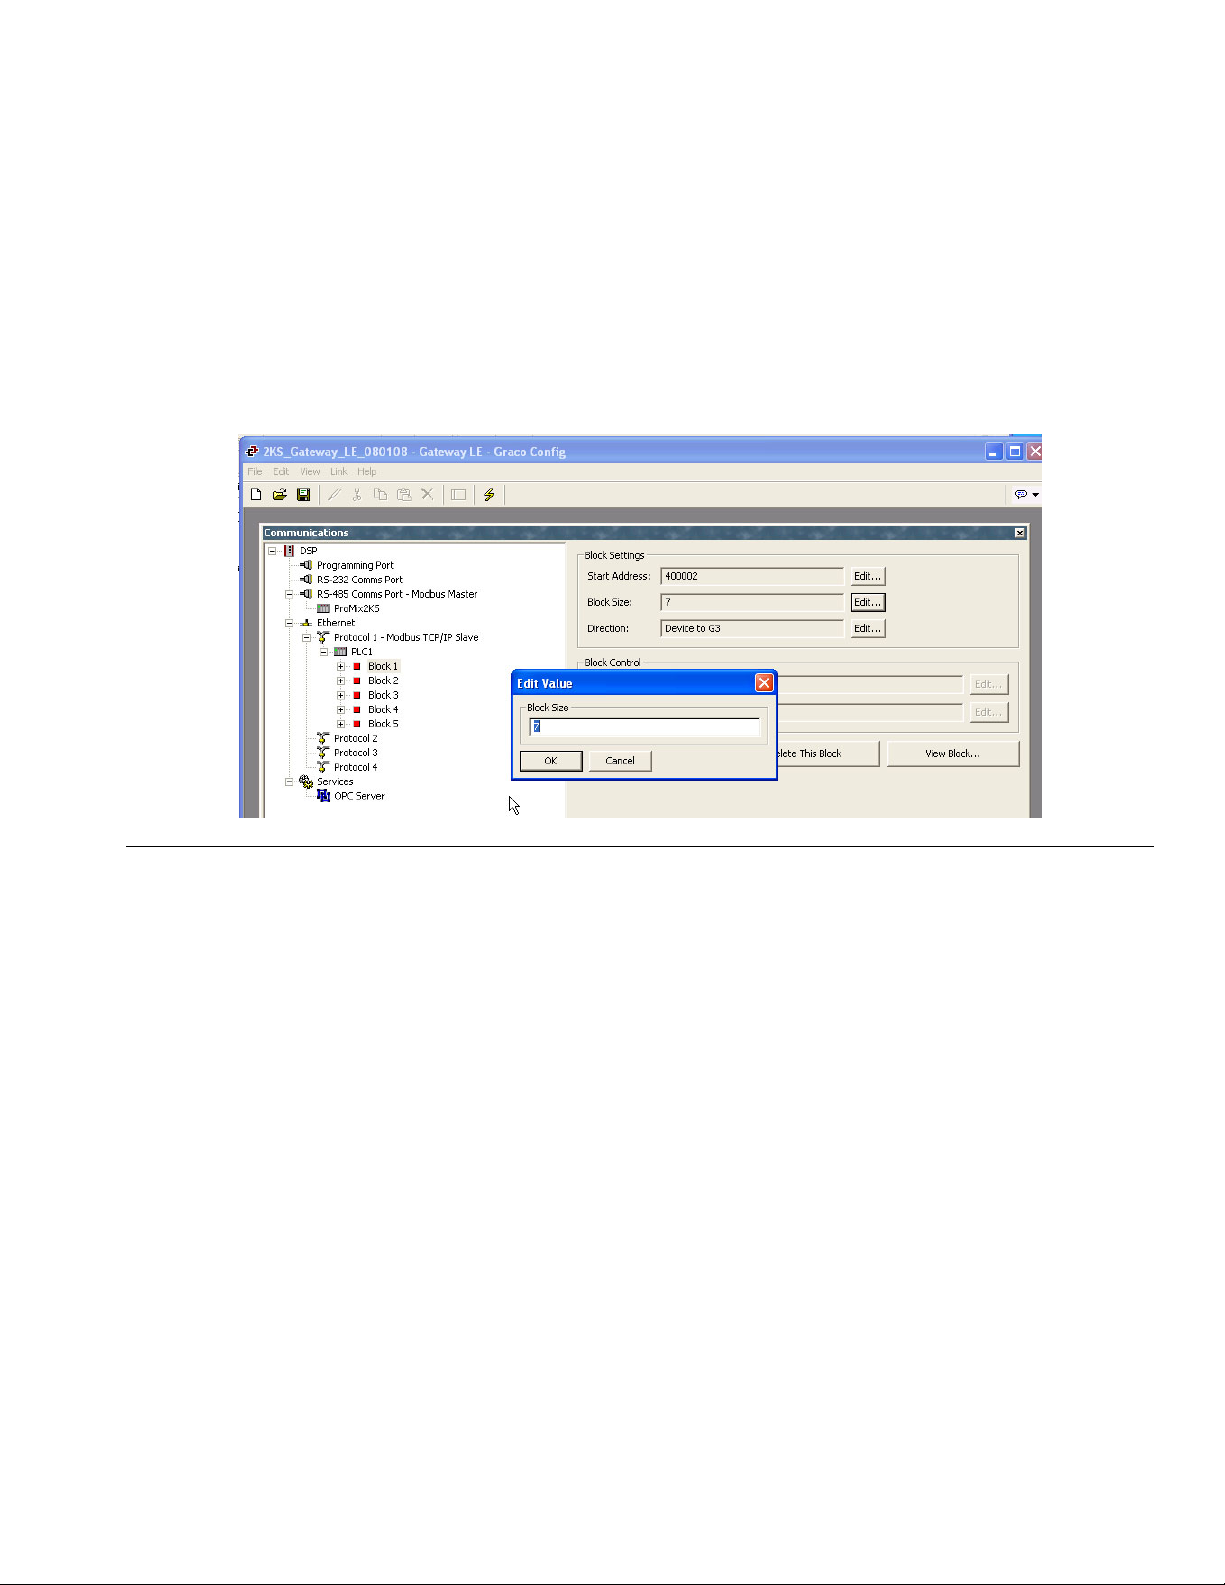
3. See FIG. 23. Click the Edit button next to the Block
Size field on the right side of the window. The Edit
Value window will open. Enter the number of Modbus register addresses in the range from the starting address entered in step 2 to the desired ending
address, inclusive. In this example, 7. The
addresses must be contiguous. This means that
each address must be available and addressable
from the ProMix 2KS. If one of the 7 addresses does
not exist within the ProMix 2KS Modbus structure,
the complete block will not communicate.
Graco Gateway Network Communications Configuration
F
IG. 23: Setting Block Size
312785C 19
Graco Gateway Network Communications Configuration
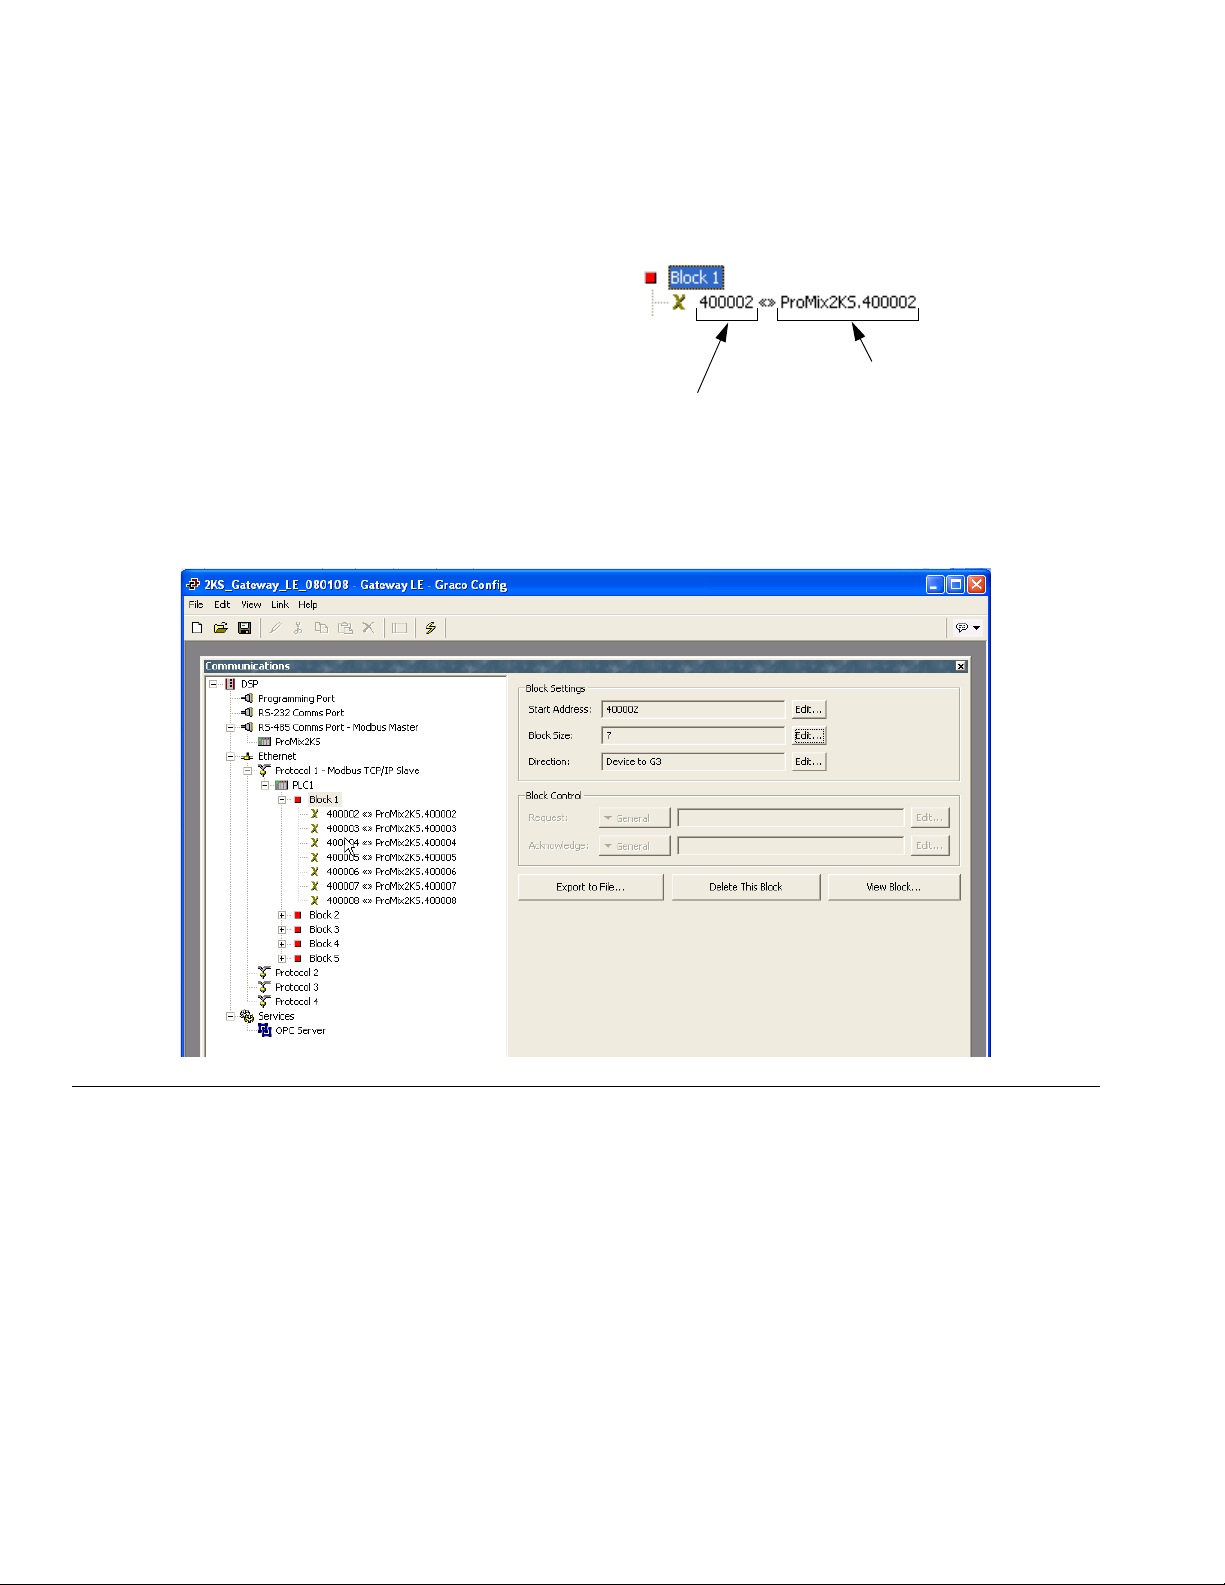
4. See FIG. 24. Click OK. The range of addresses will
appear under the appropriate Block on the left side
of the window.
NOTE: In this example, a Modbus device master
communicating via TCP/IP will have direct access to
Modbus registers 40002 through 40008 of the ProMix 2KS.
For example, see Block 1 address line 1:
Modbus address
Modbus address (command)
from TCP/IP master
connected to Gateway.
of ProMix 2KS.
5. The Direction field typically should remain set to
Device to G3.
FIG. 24: Block Mapping Data
20 312785C

Modbus and I/O Data
Modbus and I/O Data
See Table 4 through Table 5 for Modbus register
addresses and input/output data.
Reference the Discrete I/O listing of all the inputs and
outputs (see page 30). Ensure these are fully understood. The same implementation used for Discrete I/O is
used for the Network communication protocol.
For example: The Gun Trigger Input will now be a specific bit of Modbus Register 40040. Monitoring of Modbus Register 40041 for specific output status conditions
will be required as explained in the Discrete I/O section
of the ProMix 2KS Operation manual. The PLC will have
to read the various bits, and in some cases (40040 and
40041 for example) must mask out the various bit positions to determine each of the separate input and output
statuses. This requires experience and should not be
done on the job site. A full understanding of the color
change process as well as the required timing of various
inputs and outputs is required.
NOTE: Analog input for flow control set point will now be
a dedicated Modbus register. Register 40137 will
require the specific flow rate (i.e. 125 cc/min). This is
not a voltage reading but the actual flow target.
2. The Mix Active output should clear and Mix Ready
should now be set.
NOTE: The ProMix 2KS will automatically go into Idle
mode after 2 minutes of inactivity. A general alarm will
be present and Mix Active will remain High. The Alarm
bit (40010) will indicate the system Idle alarm. When a
new Gun Trigger input is seen, the ProMix 2KS will
resume mixing material where it left off. Do not toggle
the Mix bit; doing so restarts the Mix process from the
beginning.
Color Change Process
See FIG. 28, Table 1, and Table 2.
1. Verify that Mix Ready is set. This ensures that there
are no alarms and that the system is ready for the
next command.
2. Load ccNewRecipe (Modbus 40046) with a recipe
number to color change to.
3. Set color change (40040 bit 6).
4. Verify that Purge_CC_Active is seen (40041 bit 0).
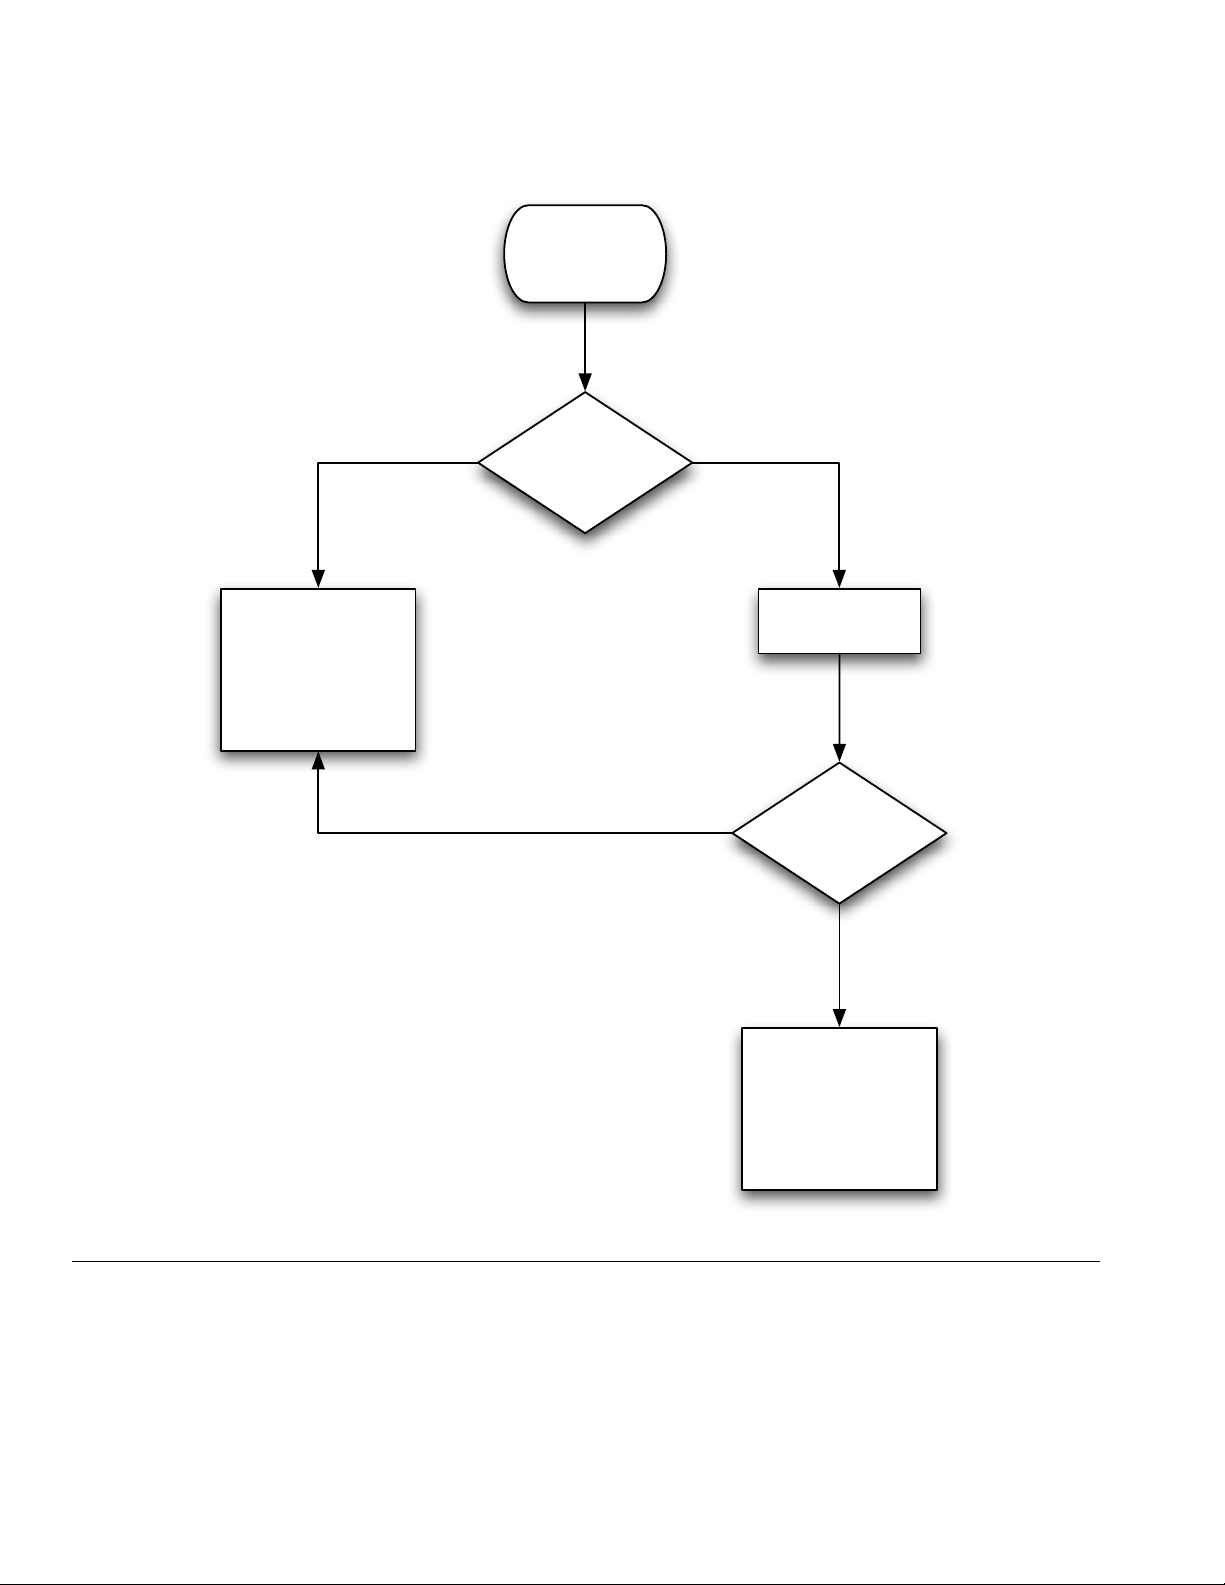
Start Mix Process
See FIG. 25, Table 1, and Table 2.
1. Verify that the Mix Ready bit (bit 2 of 40041) is on.
2. Turn on the Mix bit (bit 7 of 40040).
3. Verify that the Mix Active bit (bit 1 of 40041) is on, to
ensure that the Mix request was received.
Stop Mix Process
See FIG. 26, Table 1, and Table 2.
1. Clear the Mix bit.
5. Clear color change bit (momentary only).
6. Do not change the ccNewRecipe value until a new
recipe change is requested.
7. The color change process will stop automatically as
programmed. Monitor Purge_CC_Active bit for completion.
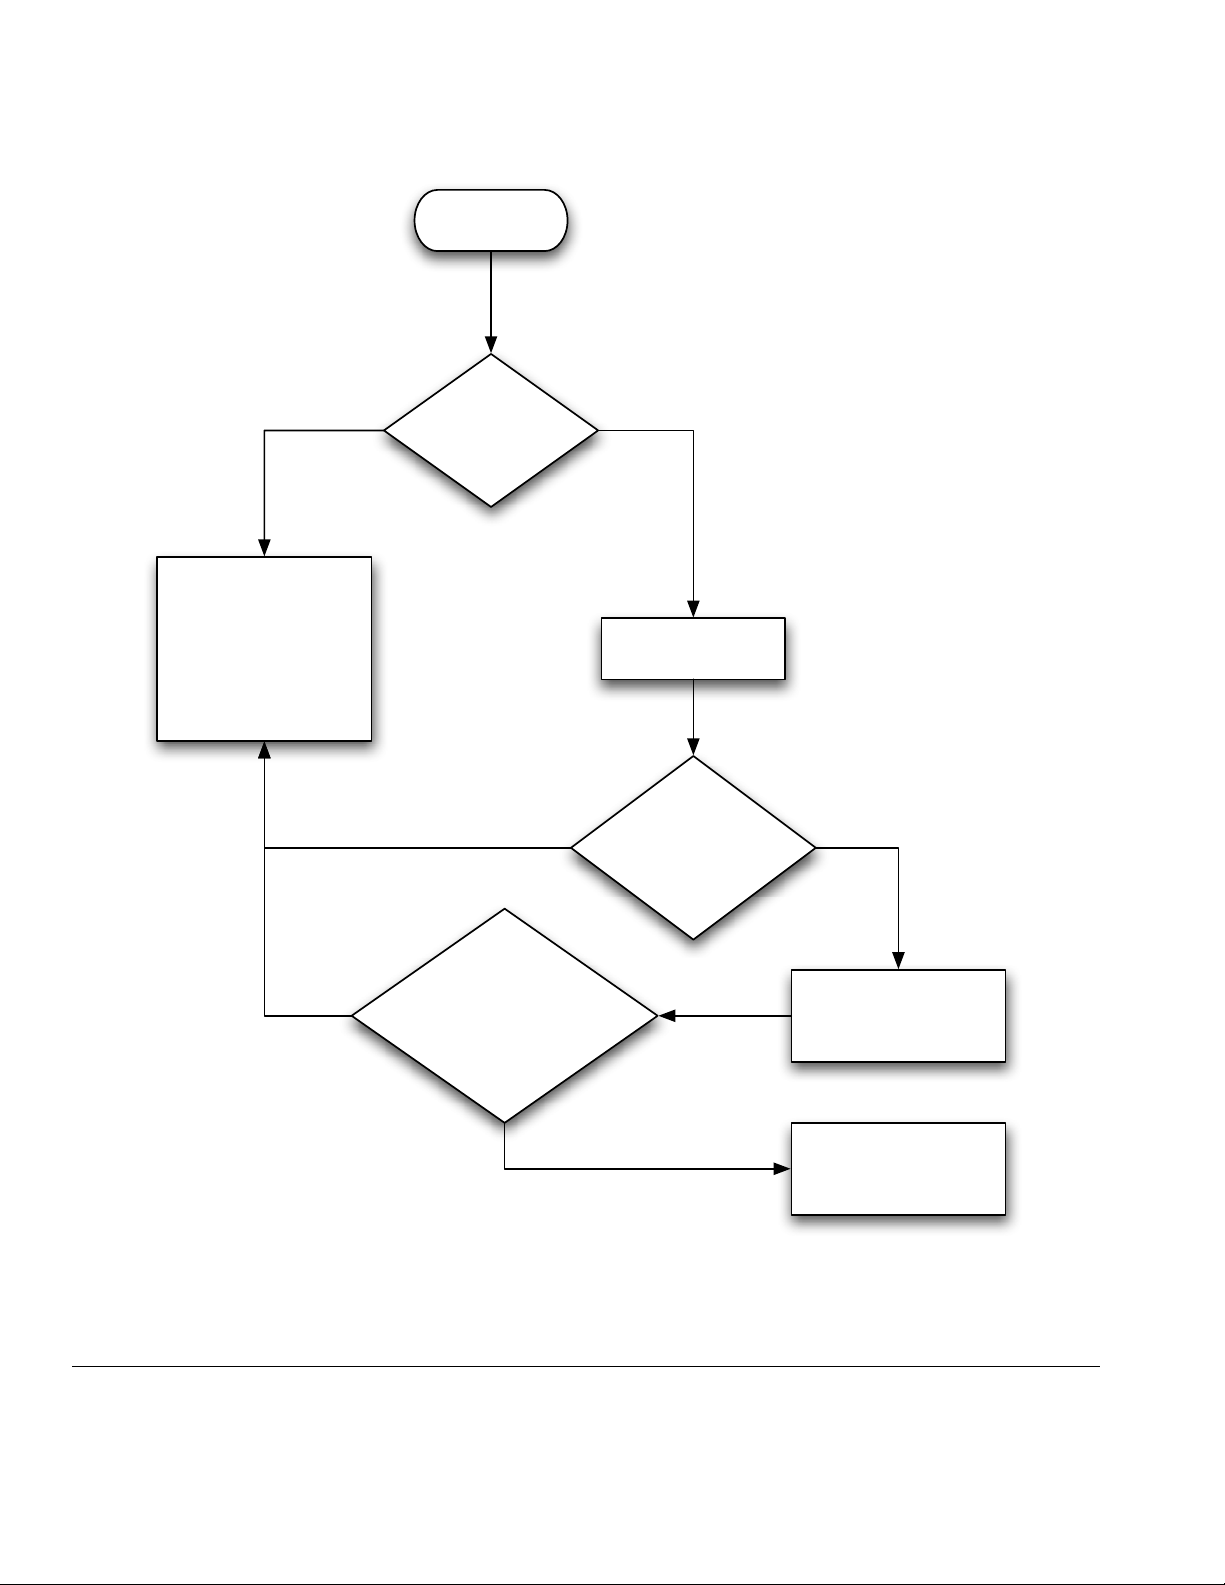
Purge Process
See FIG. 27, Table 1, and Table 2.
1. Verify that Mix Ready is set. This ensures that there
are no alarms and that the system is ready for the
next command.
2. Set purge (40040 bit 8).
3. Verify that Purge_CC_Active is seen (40041 bit 0).
4. When Purge_CC_Active bit clears, clear
Purge_Start bit. Clearing this bit in the middle of a
purge sequence will abort the purge sequence.
312785C 21
Modbus and I/O Data
Start Mix
Mode Process
Must be Alarm Condi-
tion or Active Recipe
61. See Alarm Pro-
cessing on page 26,
or Startup from Recipe
61 (see NOTE below)
NOTE: At power up the system
defaults to Recipe 61, which is
not a valid recipe number. Initiate
a color change to Recipe 0 or a
valid recipe number (1-60).
Is Mix Ready
bit = 1?
NO
YESNO
Set Mix bit = 1
Is Mix Active
bit = 1?
YES
ProMix 2KS in Mix
Mode (Complete)
Mix Active = 1 while
the ProMix 2KS is in
Mix mode
FIG. 25. Start Mix Mode Process Flow Chart
22 312785C
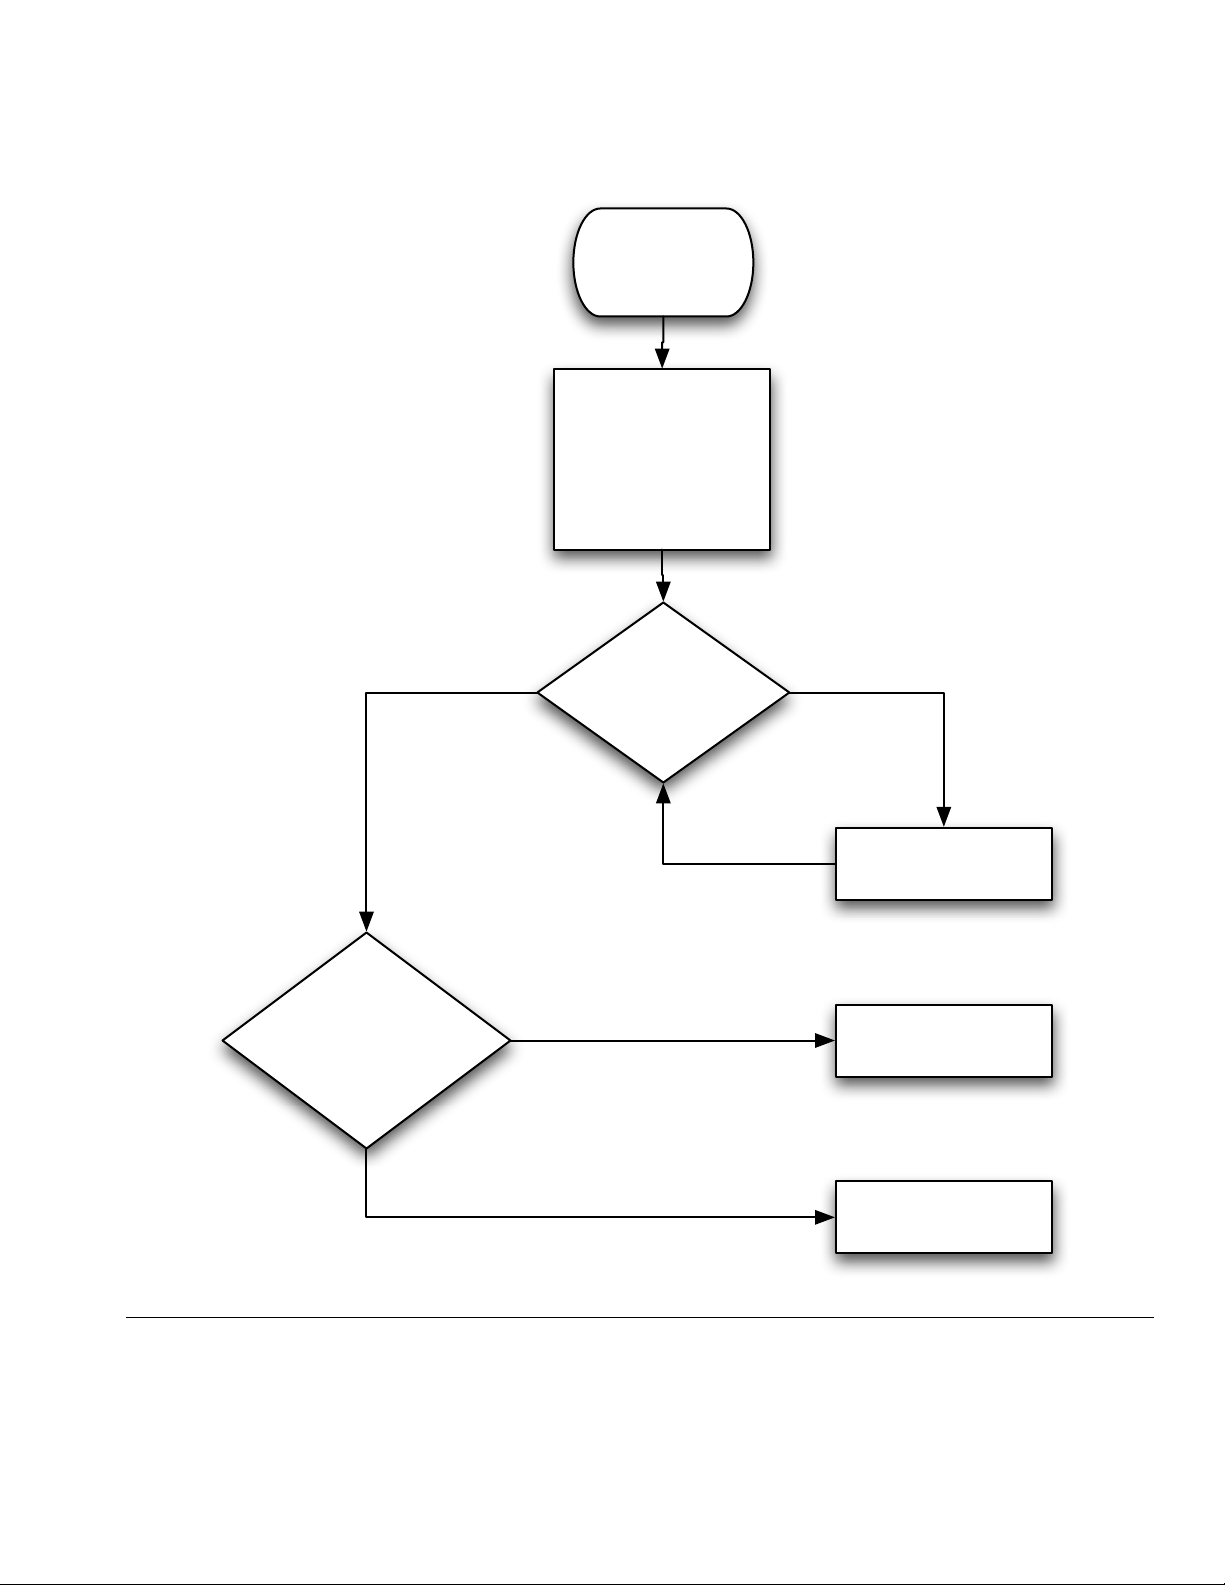
Mixing Mode
Process
Mixing Mode is desired.
PLC is polling to ensure
Mixing Mode is main-
tained.
Modbus and I/O Data
Check Alarm
Condition: is Alarm_
General bit = 1?
YES
NO
Is Mix Active
bit = 1?
YESNO
Mixing Process active
2KS is in Standby. Go to
Start Mix Process, page
21.
Go to Alarm Process-
ing, page 26
FIG. 26. Mixing Mode Process Flow Chart
312785C 23
Modbus and I/O Data
Start
Must be Alarm
Condition or Active
Recipe 61. See
Alarm Processing
on page 26, or
Startup from Recipe
61 (see NOTE below).
Is Mix Ready
bit = 1?
NO
YESNO
Set Purge bit = 1?
Is Purge_CC_Active
bit = 1?
YES
ProMix 2KS in
Purge_CC Mode
(Process Started)
Set Purge Bit = 0.
ProMix 2KS Purge
Process (Complete)
NO
NOTE: At power up the system
defaults to Recipe 61, which is
not a valid recipe number. Initiate
a color change to Recipe 0 or a
valid recipe number (1-60).
(Wait for Mix Ready)
Is Mix Ready
bit = 1?
YES
FIG. 27. Purge Mode Process Flow Chart
24 312785C
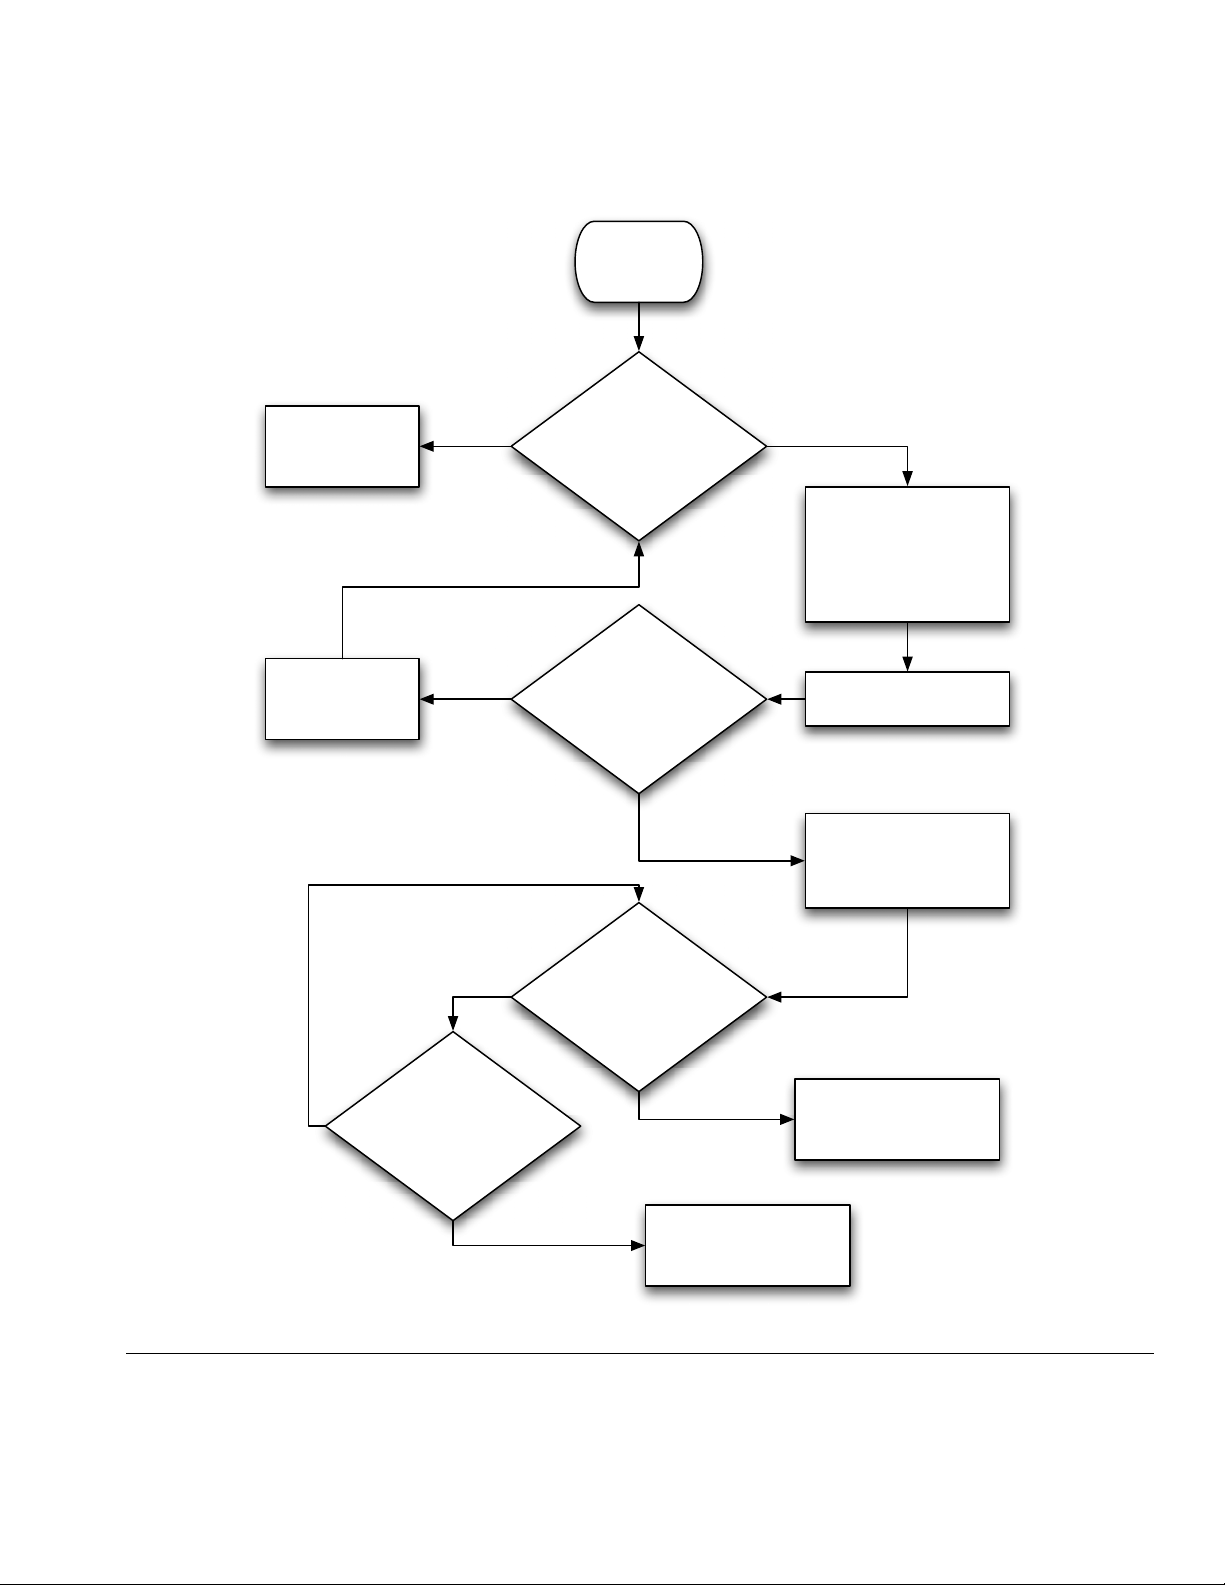
Color Change
Process
(basic)
Modbus and I/O Data
Do nothing.
Spraying at
desired recipe.
Ensure Color-
Change bit is seen
by ProMix 2KS
YES NO
NO
NO
Is Active Recipe =
to desired recipe?
(Register 40005).
Is
Purge_CC_Active
bit = 1?
YES
(Wait for Mix Ready)
Load ccNewRecipe
(Register 40046) with
recipe number to Color
Change to (0 through
60 is valid).
Set ColorChange (CC)
bit = 1.
Clear ColorChange (CC)
bit (momentary input).
CC process started.
Is Mix Ready
bit = 1?
NO
Check Alarm
Condition: is Alarm_
General bit = 1?
YES
YES
Process Alarm. See
Alarm Processing,
page 26.
ProMix 2KS Color
Change Process
(Complete)
FIG. 28. Color Change Mode Process Flow Chart
312785C 25

Modbus and I/O Data
Alarm Processing
See FIG. 29, Table 1, Table 2, and Table 3.
Alarm Processing
An Alarm Condition
has been found
previously.
Alarm_General = 1.
Determine the exact alarm
from Table 3 on page 29
and solve what caused the
alarm, as required.
Reset the alarm.
Reset_Alarm = 1.
NO YES
Is Mix Ready
bit = 1?
Check if Potlife
Alarm: is Alarm_
Potlife bit = 1?
YESNO
Two options:
• Purge or Color Change to remove
mixed material in the line.
• Place in Mix mode and spray the
Potlife Volume set in the ProMix
2KS.
NOTE: The Reset key only silences
the alarm. To clear the alarm you must
use one of these two options.
Go to next process,
as desired.
IG. 29. Alarm Processing Flow Chart
F
26 312785C

Modbus and I/O Data
Table 1: ProMix 2KS Digital Inputs (Modbus Register 40040)
Bit Digital Input Binary Name Details
0:5 0000000000XXXXXXRecipe Binary bits for viewing discrete inputs only.
6 000000000
1000000Color Change
Set bit to “1” to initiate Color Change (momentary)
(CC)
7 00000000
8 0000000
10000000Mix Set bit initiate Mix mode (maintain)
100000000Purge Set bit to “1” to initiate Purge sequence (maintained)
9 0000001000000000Job_Complete Set bit to “1” to initiate Job Complete input (momen-
tary)
10 0000010000000000External CC
Ready
Set bit to “1” to initiate External Color Change
(momentary)
11 0000100000000000Not Used
12 0001000000000000FC _Calibrate Set bit to “1” to initiate a Flow Control Calibrate input
(momentary)
13 0010000000000000Gun_Trigger Set bit to “1” to indicate the gun is actually triggered
(maintain while gun is triggered, remove when gun is
closed)
14 0
100000000000000Reset_Alarm Set bit to “1” to clear an active Alarm (momentary)
15 1000000000000000Remote Stop Set bit to remotely stop unit (momentary)
NOTE: Shaded cells relate to the flow charts on pages 23-26.
312785C 27

Modbus and I/O Data
Table 2: ProMix 2KS Digital Outputs (Modbus Register 40041)
Bit Digital Input Binary Name Details
0 000000000000000
1 Purge_CC_Active “1” indicates Purge or Color Change is in prog-
ress
1 00000000000000
2 0000000000000
10Mix_Active “1” indicates Mix is in progress
100Mix_Ready “1” indicates No Alarms and OK to Mix
3 0000000000001000CC_Fill_Active “1” indicates the Fill portion of a Color Change is
in progress
4 0000000000010000FCalActive “1” indicates the Flow Control Calibrate routine is
in progress
5 0000000000100000Flow_Rate_Alarm “1” indicates the Flow Rate Alarm/Warning is
active
6 0000000001000000Special_1 “1” indicates the Special_1 output is on (monitor
only)
7 0000000010000000Special_2 “1” indicates the Special_2 output is on (monitor
only)
8 0000000100000000Special_3 “1” indicates the Special_3 output is on (monitor
only)
9 0000001000000000Special_4 “1” indicates the Special_4 output is on (monitor
only)
10 0000010000000000Not Used
11 0000100000000000Not Used
12 0 0 0
1000000000000Alarm_General “1” indicates a General Alarm is in process. (If
Mix_Active is still High, then a Warning only.) See
ProMix 2KS Active Alarms (Modbus Register
40010) on page 29 for details on type.
13 0010000000000000Alarm_Potlife “1” indicates a Potlife Alarm is in process.
NOTE: Shaded cells relate to the flow charts on pages 23-26.
28 312785C

ProMix 2KS Active Alarms (Modbus Register 40010)
Table 3: ProMix 2KS Active Alarms (Modbus Register 40010)
Bit Digital Input Binary Name Details
Low Byte: 0 0000 0000 0000 0000 No Bits Set No Active Alarms
Low Byte: 0 0000 0000 0000 0001 Comm_Error
Low Byte: 0 0000 0000 0000 0010 Potlife_Alarm
Low Byte: 0 0000 0000 0000 0100 Ratio_High_Alarm
Low Byte: 0 0000 0000 0000 1000 Ratio_Low_Alarm
Low Byte: 0 0000 0000 0001 0000 Overdose_A_Alarm
Low Byte: 0 0000 0000 0010 0000 Overdose_B_Alarm
Low Byte: 0 0000 0000 0100 0000 Dose_Time_A_Alarm
Low Byte: 0 0000 0000 1000 0000 Dose_Time_B_Alarm
Low Byte: 0 0000 0001 0000 0000 Mix_In_Setup_Alarm
Low Byte: 0 0000 0010 0000 0000 Remote_Stop_Alarm
Low Byte: 0 0000 0100 0000 0000 Purge_Volume_Alarm
Low Byte: 0 0000 1000 0000 0000 CC_Comm_Error_Alarm
Low Byte: 0 0001 0000 0000 0000 High_Flow_Alarm
Low Byte: 0 0010 0000 0000 0000 Low_Flow_Alarm
Low Byte: 0 0100 0000 0000 0000 System_Idle_Alarm
Low Byte: 0 1000 0000 0000 0000 Setup_Change_Alarm
High Byte: 0 0000 0000 0000 0001 Power_On_Alarm
High Byte: 0 0000 0000 0000 0010 Defaults_Loaded_Alarm
High Byte: 0 0000 0000 0000 0100 IO_Alarm
High Byte: 0 0000 0000 0000 1000 Purge_Initiate_Error
High Byte: 0 0000 0000 0001 0000 Material_Fill_Alarm
High Byte: 0 0000 0000 0010 0000 Tank_A_Low_Alarm
High Byte: 0 0000 0000 0100 0000 Tank_B_Low_Alarm
High Byte: 0 0000 0000 1000 0000 Tank_S_Low_Alarm
High Byte: 0 0000 0001 0000 0000 Auto_Dump_Complete
High Byte: 0 0000 0010 0000 0000 Color/Catalyst_Purge_Alarm
High Byte: 0 0000 0100 0000 0000 Color/Catalyst_Fill_Alarm
High Byte: 0 0000 1000 0000 0000 Num_Alarm_Desc
High Byte: 0 0001 0000 0000 0000 Spare3_Alarm
High Byte: 0 0010 0000 0000 0000 Spare2_Alarm
High Byte: 0 0100 0000 0000 0000 Spare1_Alarm
High Byte: 0 1000 0000 0000 0000 Potlife_Buzzer
Modbus and I/O Data
312785C 29

Modbus and I/O Data
ProMix 2KS Modbus/TCP Variable Map
Table 4: ProMix 2KS Modbus/TCP Variable Map
EasyKey
* Read/Write
Status
Read Only 40003 Current flow rate 16 Bit cc/min 0 5000
Read Only 40004 Actual ratio 16 Bit none 0 9999
Read Only 40005 Active recipe 16 Bit none 0 60
Read Only 40006 Potlife 1 remaining 16 Bit sec 0 9999
Read/Write 40007 Job complete 16 Bit none 0 0xFFFF
Read/Write 40008 Reset job total 16 Bit none 0 9
Read Only 40009 Potlife 2 remaining 16 Bit sec 0 9999
Read Only 40010 Active fault 32 Bit none 0 0xffffffff
Read Only 40032 Control version 32 Bit none 0 0xffffffff
Read/Write 40040 Robot digital input 16 Bit none 0x0000 0xFFFF
Read Only 40041 Robot digital output 16 Bit none 0x0000 0xFFFF
Read/Write 40046 New recipe 16 Bit none 0 60
Read Only 40048 Current fluid pressure 16 Bit psi 0 5000
Read Only 40049 V/P percent output 16 Bit % 0 100
Read Only **40056 Actual ratio reducer 16 Bit none 0 9999
Read Only 40114 Flow control option 16 Bit 0=proportioning only
Read/Write 40115 Flow setpoint data source 16 Bit 0=discrete
Read/Write 40120 Manual override percent
Read/Write 40125 Flow control range 16 Bit 0=0-300 cc/min
Read/Write 40126 Flow control tolerance 16 Bit % 0 99
Read/Write 40127 Flow control proportional
Read/Write 40128 Flow control integral gain Ki16 Bit default=40 0 9999
Modbus
Register Description Size Units Low Limit High Limit
04
1=1K flow control
(future)
2=2K flow control
3=pressure override
4=manual percent
override
01
1=network
16 Bit % 0 100
opening
02
1=0-600 cc/min
2=0-1200 cc/min
16 Bit default=400 0 9999
gain Kp
Read/Write 40129 Flow control alarm time 16 Bit sec 0 99
Read/Write 40137 Flow control setpoint 16 Bit cc/min 0 1200
Read/Write 43123 Flow control override
mode
Read/Write 43141 Flow control enable 16 Bit 0=off
* This column represents the rule that must be implemented by automation. Writing to Read Only registers must be
avoided.
** For ProMix 3KS Systems only.
30 312785C
16 Bit 0=off (normal)
1=% open
2=pressure mode
1=on
02
01

ProMix 2KS Recipe Bits
Table 5: ProMix 2KS Recipe Bits
Recipe Bits Number
543210 543210
000000 0 100001 33
000001 1 100010 34
000010 2 100011 35
000011 3 100100 36
000100 4 100101 37
000101 5 100110 38
000110 6 100111 39
000111 7 101000 40
001000 8 101001 41
001001 9 101010 42
001010 10 101011 43
001011 11 101100 44
001100 12 101101 45
001101 13 101110 46
001110 14 101111 47
001111 15 110000 48
010000 16 110001 49
010001 17 110010 50
010010 18 110011 51
010011 19 110100 52
010100 20 110101 53
010101 21 110110 54
010110 22 110111 55
010111 23 111000 56
011000 24 111001 57
011001 25 111010 58
011010 26 111011 59
011011 27 111100 60
011100 28
011101 29
011110 30
011111 31
100000 32
Recipe Bits Number
Modbus and I/O Data
312785C 31

Troubleshooting
Troubleshooting
NOTE: This section covers the most common problems
encountered while setting up, programming or using the
product. Do not forget to always download in the device
after changing settings in Graco Gateway.
General Troubleshooting
PROBLEM CAUSE SOLUTION
Unit screen is blank and PWR LED is
off.
Unit screen is blank and PWR LED is
on.
Unit continually cycles on and off. Cross-references between tags, e.g.,
Unit cycles power after an operation. Most likely a program going in an
CF LED flashing slowly. CF card corrupted or invalid. Format the card from Graco Gateway
No power applied to the unit. Check power supply. Units require 24
VDC, ± 10%.
Contrast too low (Graco Gateway
only).
No primitives on the display. Add objects to the User Interface in
Backlight is off. Push one of the soft keys to turn it
Backlight tube is broken. Replace the backlight tube.
Var1 uses Var2 as maximum which in
turn uses Var1 as minimum.
Database is corrupted. Create a new database or send to
endless loop.
Program one of the soft keys with the
action as User Defined and the following code in the field On Pressed:
dispcontrast++
Graco Gateway.
back on.
Remove one of the references or use
formula tags for indirect reference,
e.g., Form1 is equal to Var1 and used
in Var2 minimum instead of Var1.
technical support for debugging.
Check if the operation launches pro-
gram containing loops with no exit
point.
using the Link > Format Flash menu.
32 312785C

Troubleshooting
PROBLEM CAUSE SOLUTION
Unit shows “Version Mismatch”. The database currently in the device
does not match Graco Gateway’s
Download the database from Graco
Gateway again.
firmware version. (Message occurs
after a download with a new version
of C2 interrupted before the database
was downloaded.)
Unit shows “Invalid Database”. The database in the device is cor-
rupted or there are no databases in
Download a database from Graco
Gateway.
the device.
Values show “----” No communication with target device. See Serial Communication Trou-
bleshooting (page 36) or Ethernet
Communication Troubleshooting
(page 37).
Value does not update. The tag on the screen is not linked
correctly.
Check the tag mapping making sure
the target device (PLC, etc.) register
is correct.
Check the primitive Data Source in
the user interface in case the word
WAS is displayed. Re-link the tag in
this case.
Value shows +BIG or –BIG. Not enough digits before the decimal
point to show the number. For exam-
Increase the number of digits before
the decimal point in the tag format.
ple, data is 1000.5 and format is
three digits before the decimal point
and one after.
Value deviates by a factor of ten. The tag format is not correct. Change the decimal point position in
the tag format.
Value is invalid. Incorrect tag type. Check if the tag type corresponds to
the data type. Is the data a floating
point number and thus the tag a real
(Pi symbol), and not an integer (X
symbol)?
Incorrect data mapping. Check if the tag is accessing the cor-
rect target device register.
Incorrect primitive on the display. Check if the primitive corresponds to
the tag type. For example, primitive is
a Text Integer so the tag has to be an
integer.
Data received is not what’s expected.
For example, bytes reversed in the
word.
Use the transform property on the tag
to modify the data source. You might
have to try multiple solutions to solve
the issue.
312785C 33

Troubleshooting
PROBLEM CAUSE SOLUTION
Symbol or image leaves a trace when
animated.
The background of the image is not
refreshed.
Change the primitive Fill Format to
Solid color.
Add the system variable dispcount
in the background of the image to
force the refresh.
Rich Bar Graph or Dial Gauge does
not move
Tag minimum and maximum are not
setup.
Check the tag’s minimum and maximum values. These are used by both
primitives for minimum and maximum.
Trend Viewer curve stuck at the bottom.
No minimum and maximum setup on
the data tags displayed in the viewer.
Check that all displayed tags in the
trend viewer have a Minimum and a
Maximum setup.
USB Drivers location for Windows. Location of the drivers unknown. The drivers are located under Graco
Gateway 2.0\Device installation
folder. For example C:\Program
Files\Graco Gateway\Device.
USB Driver installation. The operating system is unable to
find the driver or the installation
failed.
In your operating system device manager, check if the Graco Gateway is
present. If so, uninstall that device.
Follow the USB installation guide.
Upgrading Graco Gateway did not
upgrade the software version.
The option selected during the
upgrade was Modify instead of
Launch the upgrade again and
choose Repair when prompted.
Repair.
34 312785C

Troubleshooting
Graco Gateway Messages Troubleshooting
PROBLEM CAUSE SOLUTION
Device incompatible with file. The device you are trying to down-
load into doesn’t match the database
device.
Unable to open communication port. The communication port you try to
download with is unavailable:
• Cable not connected. Check if the cable is connected cor-
• Incorrect download communica-
tion port.
• Port already used. Check that the communication port is
• Target device IP address incor-
rect.
• No USB Drivers. Check that the USB drivers were
No reply from terminal. Cable is not connected. Make sure the cable is connected or
If the message appears while downloading to the device.
CompactFlash required for upgrade. The version of Graco Gateway on the
PC is different from the target device
firmware version when attempting a
download via Ethernet.
The window is too small to allow editing.
The device returned an unexpected
reply code.
The current User interface view is too
small to allow editing.
The device you are trying to download to is not supported by this version of Graco Gateway.
Create a new database file corre-
sponding to your device (File > New).
rectly to the PC and the device pro-
gramming ports (USB or PG Port).
Check that Graco Gateway is
directed to the correct communica-
tion port (Link > Options).
not used by another service or soft-
ware especially for serial ports.
If you download via Ethernet, check
the IP address of the target device in
Link > Options.
installed successfully. Reinstall
Graco Gateway USB driver under the
PC device manager if necessary.
check above solutions.
Download again with Link > Update
or F9.
Insert a CompactFlash Card in the
target device.
Use another communication port for
download: USB or Serial.
Change the panel view using View >
Panel > Display only.
Update Graco Gateway to the latest
version available (contact your Graco
distributor or Graco Technical Assis-
tance). Choose Repair when upgrad-
ing.
312785C 35

Troubleshooting
Serial Communication Troubleshooting
This section is used to troubleshoot the communication between two devices linked via serial ports, i.e. RS232 or
RS485.
TIP: For communication troubleshooting, it is strongly advised to create a new Graco Gateway database including
only one data tag mapped to a known register in the target device.
PROBLEM CAUSE SOLUTION
Values show “----” Port settings do not match. Check that the port settings of the
Graco Gateway device match the target device (i.e. Baud, Parity, etc.).
Incorrect target device address. Check that the target device address
in Graco Gateway (in communications on the PLC symbol) matches
the target device address setup.
Incorrect cable. Check the cable part number or
cabling to match your protocol.
Incorrect communication port. Check if the cable is connected to the
correct communication port.
Values blink between the data and
“----”
If the above is correct, check that the
protocol settings are on the correct
communication port in Graco Gateway.
Communication port connector pins
bent inward.
Incorrect tag mapping. Check that the tag is mapped to an
Incorrect tag mapping on one of the
tags on the display.
Communications times-out. Increase the Slave Response or
Although unlikely, check the communication port connector pins on the
Graco Gateway in case some are
bent inward resulting in a bad contact
with the cable.
existing register in the target device.
Delete tags one after another and
download in-between. When the values on the screen stop blinking, the
last deleted tag was mapped incorrectly or accessed an unknown register in the target device.
Device Timeout on the communication port or target device in Graco
Gateway.
36 312785C

Troubleshooting
Ethernet Communication Troubleshooting
This section is used to troubleshoot the communication between two devices linked via Ethernet.
TIP: For communication troubleshooting, it is strongly advised to create a new Graco Gateway database including
only one data tag mapped to a known register in the target device.
PROBLEM CAUSE SOLUTION
Values show “----” Incorrect target device IP address. Check the target device IP address in
Graco Gateway (in communications
on the PLC symbol) to match the tar-
get device IP address setup.
Incorrect cable or wrong connection. Check the LED on the Graco Gate-
way device Ethernet port. If none are
lit, there are no connections. Check
the cable or that the Ethernet port is
enabled in Graco Gateway, see
below.
Ethernet port disabled. Check that the Ethernet port in Graco
Gateway is enabled.
Graco Gateway and target devices
are in a different address domain:
Values blink between the data and
“----”
• If no routers are present on the
network.
• If a router is present on the net-
work.
Incorrect tag mapping. Check that the tag is mapped to an
Incorrect tag mapping on one of the
tags on the display.
Communications times-out. Increase the Slave Response or
Check that the target device IP
address and Graco Gateway device
IP address are different but in the
same domain. (For example, both
start with the same three first num-
bers; ex: 192.168.2.xxx if the mask is
255.255.255.0).
Check the Graco Gateway device
Ethernet port Gateway address to
match the router IP address.
existing register in the target device.
Delete tags one after another and
download in-between. When the val-
ues on the screen stop blinking, the
last deleted tag was mapped incor-
rectly or accessed an unknown regis-
ter in the target device.
Device Timeout on the communica-
tion port or target device in Graco
Gateway.
312785C 37

Troubleshooting
LED Functions
Status (STS) LED
The green Status LED provides information on the status of the Graco Gateway, including various stages of
the startup routine and any errors that occur.
Status Indication
Rapidly
Flashing
Steady Graco Gateway is operating normally.
Graco Gateway is currently running the
boot loader and/or being upgraded.
User Communication Ports - TX/RX LEDs
Status Indication
Green Transmitting
Red Receiving
Ethernet LEDs
Status Indication
Yellow
(Steady)
Yellow
(Flashing)
Green 10 BASE-T Communications
Amber 10 BASE-TX Communications
Link Established
Network Activity
CompactFlash (CF) LED
Status Indication
Off No CompactFlash card is present.
Steady Valid CompactFlash card is present.
Rapidly
Flashing
Flickering Unit is writing to the CompactFlash
Slowly
Flashing
* Do not turn off power to the unit while this light is
flickering. The unit writes data in two minute intervals. Later Microsoft operating systems will not lock
the drive unless they need to writer data; Windows
98 may lock the drive any time it is mounted, thereby
interfering with logging. Contact Graco Technical
Assistance for further information.
CompactFlash card is being checked.
card, either to store data or because the
PC connected via the USB port has
locked the drive.*
Incorrectly formatted CompactFlash
card is present.
38 312785C

System Electrical Schematic
Non-Hazardous Area
OPERATOR INTERFACE
+
POWER
+
SUPPLY
-
-
BARRIER
BOARD
POWER DIST.
TERMINAL
BLOCKS
-
-
-
-
I/O HARNESSES
12L1
N
1
UNUSED
2
UNUSED
3
UNUSED
J1
4
UNUSED
5
UNUSED
1
J5
2
3
1
J4
+
+
+
+
+24VDC
2
OPEN
3
COMMON
MEMBRANE
SWITCH
WITH
RIBBON
CABLE
DISPLAY
J4
1
2
3
4
5
6
7
8
9
10
11
J2
1
2
3
4
5
6
7
8
9
10
11
12
13
14
15
16
17
18
19
20
POWER HARNESS
DISPLAY
BOARD
RJ45
J6
J10
DC OK
+24 VDC
COMMON
COMMON
1
+
2
-
J9
3
4
RJ45
FLOW CONTROL CAL. (BLK)
1
GUN TRIGGER (WHT )
2
DIGITAL IN COMMON (RED)
3
REMOTE STOP (GRN)
4
ALARM RESET (BRN)
5
J5
ALARM OUTPUT (BLU)
6
DIGITAL OUTPUT COMMON (ORG)
7
POT LIFE (YEL)
8
FLOW RATE ANALOG IN (PUR)
9
FLOW RATE ANALOG COMMON (GRAY)
10
RS485 INTEGRATION A (WHT/BLU)
1
RS485 INTEGRATION B (BLU/WHT)
2
RS485 INTEGRATION GROUND (SHIELD)
3
RS485 NETWORK A (WHT/ORG)
4
RS485 NETWORK B (ORG/WHT)
5
RS485 NETWORK GROUND (SHIELD)
6
85-250 VAC
+12VDC I/S (RED)
COM (BLACK)
SHIELD
+
-
SHIELD
HARNESS
3'
1
2
3
4
5
6
7
8
9
10
1
2
3
4
5
6
ALARM
RJ45
RJ45
REMOTE
I/O
INTEGRATION
BOARD
TERMINAL
BLOCKS
System Electrical Schematic
NON-HAZARDOUS AREA
LINE
FILTER
OPEN
OPEN
J2
J3
J4
J5
L1
N
GND
1
GND LUG
2
3
1
POWER
2
ROCKER
1A
SWITCH
1B
2A
2B
CABLE
(50' STD.)/
(100' OPTION)
1
MIX INPUT
2
PURGE INPUT
3
JOB COMPLETE INPUT
4
EXTERNAL CLR CHG READY
5
RESET ALARM INPUT
6
DIGITAL INPUT COMMON
1
DIGITAL INPUT COMMON
2
RECIPE BIT 0 INPUT
3
RECIPE BIT 1 INPUT
4
RECIPE BIT 2 INPUT
5
RECIPE BIT 3 INPUT
6
RECIPE BIT 4 INPUT
7
RECIPE BIT 5 INPUT
8
RECIPE CHANGE INPUT
1
DIGITAL OUTPUT COMMON/POWER
2
PURGE/RECIPE CHG ACTIVE OUTPUT
3
MIX ACTIVE OUTPUT
4
MIX READY OUTPUT
5
FILL ACTIVE
6
FLOW CAL. ACTIVE
7
FLOW RATE ALARM OUTPUT
8
DIGITAL OUTPUT COMMON/POWER
1
DIGITAL OUTPUT COMMON/POWER
2
SPECIAL OUTPUT #1
3
SPECIAL OUTPUT #2
4
SPECIAL OUTPUT #3
5
SPECIAL OUTPUT #4
6
DIGITAL OUTPUT COMMON/POWER
L1
N
GND
(+24) YEL
(COM) GRAY
ORG
BRN
RED
TERMINAL
BLOCK
L1
N
GND
BEACON
GND N L1
85-250
VAC
L1
N
CABLE
J7
FO IN (BLK)
J8
FO OUT (BLU)
RJ45
RJ45
P1
3'
RJ45
BULKHEAD
3'
(25'-200' OPTIONS)
RJ45
WEB SERVER
RJ45
MODULE
312785C 39

Parts
Parts
15V331 Gateway Ethernet Kit (shown)
15V963 Gateway DeviceNet Kit
15V964 Gateway Profibus Kit
Ref.
No. Part No. Description Qty
1 15V339 PANEL, back 1
2 15T752 COVER 1
3 n/a DIN RAIL 1
4 120369 POWER SUPPLY, 24 Vdc 1
5 15V345 GROMMET, cable entry 2
6 111987 CONNECTOR, strain relief 1
7n/aWIREWAY 1
8▲ 186620 LABEL, ground 1
9 n/a COVER, wireway 1
10 CONTROL BOX, Gateway
10a 15V966 BOX, DeviceNet; includes
items 20a, 23, and 27; used
on 15V963 Kit only
10b 15V965 BOX, Profibus; includes items
20b, 23, and 27; used on
15V964 Kit only
10c 15X492 BOX, ethernet; includes items
23 and 27; used on 15V331
Kit only
1
1
1
Ref.
No. Part No. Description Qty
11 120838 BLOCK, clamp end 2
12 103833 SCREW, machine 4
13 112443 BLOCK, terminal, ground 1
14 15V344 CONNECTOR 1
15 121994 CABLE, CAT 5 1
16 121700 CABLE, 2 connector 1
17 n/a WIRE, copper, 16 ga.; 9 in.
(230 mm)
18 n/a WIRE, copper, 16 ga; 9 in.
(230 mm)
20a 15V347 CARD, DeviceNet; 15V963 Kit
only
20b 15V346 CARD, Profibus; 15V964 Kit
only
23 15T999 CABLE, USB; not shown 1
25 n/a SCREW, machine, serrated
hex-head
27 258527 CD ROM, software, Gateway;
not shown
1
1
1
1
4
1
▲ Replacement Danger and Warning labels, tags, and
cards are available at no cost.
Parts labeled n/a are not available separately.
NOTE: All brand names or marks are used for identifica-
tion purposes and are trademarks of their respective
owners.
40 312785C

Parts
Screw Location
(item 25)
USB Port
(ref item 23)
10a, b, or c 20a or b
4
7, 9, 121, 2
1314
11
12
3
8
TI12930a
DRRJ45 Network Terminals
12345678shsh
16
123
ASHB
ProMix 2KS EasyKey
RS485 Network Terminals
TI12931a
14
4
To 4
Wiring Diagrams
17
18
56
10
15
14
17
TI12929a
To 1 0
18
TI12932a
312785C 41

Appendix A: DeviceNet™ Slave Communication
Appendix A: DeviceNet™ Slave Communication
Overview
This appendix describes the Gateway’s support for DeviceNet and details the configuration steps necessary to
use this feature. It does not provide a detailed description of DeviceNet, but only a brief introduction, necessary to define the terms that are used throughout the
remainder of this document.
Introduction
DeviceNet is a low-level network using the Controller
Area Network (CAN) technology, to provide communication between a range of industrial devices, from simple
devices such as sensors and actuators, to high-level
devices such as controllers and HMIs.
DeviceNet Port Protocols
The DeviceNet option card has one DeviceNet port. See
F
IG. 30. The port may be configured for various Devi-
ceNet protocols. Contact Graco Technical Assistance for
currently supported protocols.
• CAN_H
Position 4 of the pluggable connector provides the
CAN_H bus line (active high). This terminal is isolated from the Graco Gateway.
• V+ (optional 24 Vdc)
Position 5 of the pluggable connector is provided for
optional 24 Vdc connections. This position is available only to tie 24 Vdc wires together. The DeviceNet option card neither provides or uses 24 Vdc
power through this connection. The V+ position is
not connected to any circuitry internal to the DeviceNet option card or Graco Gateway.
Also see Appendix A: DeviceNet
cation on page 42.
™
Slave Communi-
DeviceNet Option Card Pin Outs
• V-
Position 1 of the pluggable connector provides a
CAN ground connection. This terminal is isolated
from the Graco Gateway.
• CAN_L
Position 2 of the pluggable connector provides the
CAN_L bus line (active low). This terminal is isolated from the Graco Gateway.
• DRAIN (optional)
Position 3 of the pluggable connector is provided for
optional drain connections. This position is available
only to tie drain wires together or to earth ground.
There is no internal connection to earth ground. The
DRAIN position is not connected to any circuitry
internal to the DeviceNet option card.
42 312785C

LED
Appendix A: DeviceNet™ Slave Communication
V-
CAN_L
DRAIN
CAN_H
V+
TI13963a
PLC Connection
DeviceNet
Option Card
FIG. 30: DeviceNet Port Pin Outs and PLC Connection
XCDN
NET STS
V-
CAN_L
DRAIN
CAN_H
V+
TI13962a
312785C 43

Appendix A: DeviceNet™ Slave Communication
About DeviceNet
DeviceNet is a connection-based network. In this context the term connection refers to a communication path
between two or more devices, and not the physical
(cable) connection to the DeviceNet network. A connection must be established between two devices in order
to transfer data.
There are two types of connection defined by the DeviceNet specification. Each has different characteristics
and is suited to a specific type of communication.
• I/O Connection – Dedicated data transfer between
a producer and one or more consumers. The format
of the data is known or implied by the connection.
• Explicit Messaging – Generic multi-purpose mes-
saging connection, typically command and
response message commands.
Each connection type has an extensive number of
parameters, which can affect the characteristics of the
communication path. For many Master/Slave communications scenarios, a defined set of connections, together
with their respective parameter settings exist under the
collective name Predefined Master/Slave Connection
Set. Many of the steps involved in creating and configuring a connection have been removed with this connection set, thus simplifying the network configuration.
• I/O Poll Connection: The Poll connection is an I/O
connection over which Poll command and response
messages are transferred. The Poll command is
transmitted by the master, and is directed to a single
slave device. The slave device in turn responds with
a Poll response message. Both the Poll command
and Poll response messages can contain any number of bytes.
• I/O Data Connection: The I/O Data connection is
part of the Predefined Master/Slave Connection Set,
but instead is included for devices, which support
creating I/O data connections via the UCMM
(Unconnected Message Manager).
Level of Support
The Gateway provides Group 2 Server level support: A
UCMM capable device that is configured to act as a
Slave for the Predefined Master/Slave connection set.
Predefined Master/Slave Connection Set
The DeviceNet specification details a number of connections that facilitate data transfer between a Master
and Slave devices. The following sections detail the connection types supported by the Gateway.
• I/O Bit-Strobe Connection: The Bit-Strobe connec-
tion is an I/O connection over which Bit-Strobe I/O
command and response messages are transferred.
The Bit-Strobe command is broadcast by the Master
device and is received by all slave devices simultaneously. The command message contains a single
bit of information for each slave on the network.
Each slave device is required to respond with a BitStrobe response message. The response message
can contain up to 8 bytes of information.
44 312785C

Appendix A: DeviceNet™ Slave Communication
Hardware
To use DeviceNet on the Gateway, an option card must
first be installed. The option card provides the hardware
necessary to support the CAN physical layer specification as required by the DeviceNet standard.
Configuring the option card is a two-stage process; first
the option card must be selected in Gateway (DeviceNet
Option Card), and then the ‘DeviceNet Predefined
Group 2 Server Driver’ configured to run on the newly
created DeviceNet Interface port.
Gateway Configuration
The following example requires use of an Allen Bradley
1756-ControlLogix PLC, along with RSLogix 5000 and
RSNetWorx for DeviceNet software and a Gateway.
Configure the Gateway DeviceNet Option
Card
Install the Gateway DN0000 option card in the Gateway
as per the provided instructions.
Click on File>New to create a new Gateway database
and select Gateway Series HMI – Gateway 10.
Enter the Communications section. In the tree on the
left, select Gateway from the top of the tree. Select the
Edit button at the right, and select the DeviceNet Option
Card from the dialog box as shown in F
IG. 31. Click OK.
IG. 31: Select DeviceNet Option Card
F
312785C 45

Appendix A: DeviceNet™ Slave Communication
The DeviceNet Option card appears at the end of the
tree. Select the DeviceNet Interface from under the
DeviceNet Option Card item.
IG. 32: Select DeviceNet Server
F
On the right hand pane, click on the Edit button to open
the driver picker dialog box. Select the DeviceNet Pre-
defined Group 2 Server driver. F
IG. 32.
Set the appropriate Station Address, Baud Rate, and I/O
Poll Size. Make sure the Data Format Settings are set to
Transform: Swap Bytes In Word. F
IG. 33.
46 312785C

IMPORTANT NOTE: The I/O Polled Size is determined
by the settings in both the DeviceNet Master and the
registered .EDS file for the Gateway. To change these
settings, see Automatic Update of the EDS File on
page 51 before setting up the PLC.
Appendix A: DeviceNet™ Slave Communication
F
IG. 33: Device Settings
312785C 47

Appendix A: DeviceNet™ Slave Communication
Create Gateway Blocks
Select the DeviceNet device from the tree at the left, and
add two Gateway Blocks; one for Read Data and one for
Write Data, using the Add Gateway Block button on the
right hand pane.
IG. 34: Add a Gateway Block
F
Select the first Gateway Block and select the Edit button
at the right.
Set the block for I/O Polled Command Data, starting at
element PollC 00000. F
IG. 35.
48 312785C

NOTE: For 16-bit support, select Word as Word. For
32-bit support, select Word as Long. The latter is recommended as DeviceNet uses 32 bits integer addressing.
Set the block size for 4, and the Direction for: Device To
Gateway. This will be the Read Data block.
Appendix A: DeviceNet™ Slave Communication
F
IG. 35: Select Data Type (Word as Long)
312785C 49

Appendix A: DeviceNet™ Slave Communication
Select the second Gateway Block and set it up for I/O
Polled Response Data 00000, with a length of 4, and the
Direction Gateway To Device. This will be the Write Data
Block. F
IG. 36 shows both Gateway blocks once com-
pleted.
F
IG. 36: DeviceNet Block Mapping
NOTE: Read and Write are from the Gateway point of
view. This means the master can send data in Block A,
so the Gateway can read data. On the other hand, the
master can only pull data from Block B, so the Gateway
can only write data.
The addressing scheme available is outlined below:
BitC – Identifies the I/O Bit-Strobe command data (Master to Slave).
BitR – Identifies the I/O Bit-Strobe response data (Slave
to Master).
PollC – Identifies the I/O Poll command data (Master to
Slave).
PollR – Identifies the I/O Poll response data (Slave to
Master).
DataC – Identifies the I/O Consumed Data (Master to
Slave).
DataP – Identifies the I/O Produced Data (Slave to Master).
50 312785C

Automatic Update of the EDS File
Appendix A: DeviceNet™ Slave Communication
DeviceNet nodes use an EDS (Electronic Data Sheet) to
describe the communications parameters available at
each device on the DeviceNet network.
By design, each DeviceNet master can handle a maximum of 124 Input words and 123 Output words. In the
default EDS file for the Gateway, the Input and Output
data sizes are set at 16 bytes each. This equates to four
words of data input and four words of data output. These
values can be set higher, but it is important to note that if
the default values are set higher, they might conflict with
other DeviceNet implementations.
Gateway provides an EDS file generator tool to create a
file that matches your Gateway settings. This file can
therefore be used to configure the Master.
To generate this file, enter the Communications module
and select the DeviceNet interface on the left. Under the
Electronic Data Sheet, select Yes in Synchronize and
choose the path and name where the file should be
saved using the Browse button. F
IG. 37.
F
IG. 37: Automatic EDS Update
Saving the database using the File>Save command will
synchronize and therefore update the EDS file.
Each time EDS parameters are modified, the EDS file
will need to be re-registered within RSNetWorx for DeviceNet. These changes will also need to be reflected in
the following locations:
• RSNetWorx master node Scanlist, Input Table, and
Output Table
• ControlLogix PLC DeviceNet Scanner configuration
312785C 51
NOTE: Inputs and Outputs are with respect to the master, therefore inputs refer to data sent from the slave and
read by the master.

Appendix A: DeviceNet™ Slave Communication
Configure the RSNetWorx for DeviceNet Software
RSNetWorx for DeviceNet is used to set up and manage
a DeviceNet network. To begin the configuration, launch
RSNetWorx for DeviceNet from your development PC.
Start a new network by selecting: File>New>DeviceNet
Configuration.
Register the EDS file generated by Gateway as shown
in the previous section of this document by selecting:
Tools>EDS Wizard>Register an EDS file(s).
Make sure that the .EDS file validation is successful.
FIG. 40: EDS Validation
If desired, select a new image file to represent the Gateway.
F
IG. 38: Register the EDS File
Select Register a single file, and browse to the location
where you saved the Gateway.EDS file.
F
IG. 39: Browse to Graco Gateway EDS File
IG. 41: EDS Image File
F
52 312785C

Appendix A: DeviceNet™ Slave Communication
Review the EDS registration, and finish the process.
F
IG. 42: Review EDS Registration
Select the DeviceNet Master by navigating in the tree on
the left hand side. Navigate to: DeviceNet>Category>Communication Adapter>1756-DNB/A. Select the
appropriate Major Rev and drag it into the network workspace at the right.
Select the Gateway Slave by navigating in the tree on
the left. Navigate to: DeviceNet>Vendor>Graco Controls>Generic Device. Select the Gateway-SERVER and
drag it into the network workspace at the right.
Configure the master to add the slave device to the
scanlist. Right click the DNB module and select properties.
From the Scanlist tab, select the Gateway-SERVER
from the Available Devices pane, and add it to the Scan-
list pane. Select the Edit I/O Parameters button.
FIG. 43: Configure the DeviceNet Master
312785C 53

Appendix A: DeviceNet™ Slave Communication
Make sure that the Strobed or Change of State boxes
are not selected. In the Polled section, verify that the
Input and Output sizes are 16 bytes. These must match
the I/O Poll Size selections made above in the Gateway.
In DeviceNet networks, 4 bytes constitute a full word.
Therefore the 16 bytes selection represents 4 full words
of addressable 32-bit data.
Select the Input tab. Verify that the four words of Gateway-SERVER data are mapped to YourDNBSlot:I.Data[0…3]. From the Output tab, verify that the
four words are mapped to YourDNBSlot:O.Data[0…3].
Apply the changes, and save your RSNetWorx for DeviceNet configuration.
F
IG. 44: Apply and Save
54 312785C

Appendix A: DeviceNet™ Slave Communication
Configure the Allen Bradley ControlLogix PLC
Allen Bradley ControlLogix PLCs are programmed with
RSLogix 5000 programming software. To begin the
DeviceNet configuration, launch RSLogix 5000 from
your development PC.
Create a ControlLogix program containing a valid DeviceNet Scanner. In this application a 1756-DNB was
used.
F
IG. 45: Create Valid DeviceNet Scanner
312785C 55

Appendix A: DeviceNet™ Slave Communication
Configure the DeviceNet Scanner to be address 0.
Make sure to set up the 32-bit Input and Output memory
spaces for a size of 32 (to match the configuration made
above in both Gateway and RSNetWorx for DeviceNet).
Select the RSNetWorx tab, and navigate to the RSNetWorx for DeviceNet configuration that you have previously created. Open the configuration from here and
download it to the network.
F
IG. 46: Main Task Tree
In the Main Task tree, open the Main Routine Ladder
Logic file. Create a rung of ladder to enable the DeviceNet network. The required output is always:
Local:YourDNBSlot:0.CommandRegister.Run
Create a few rungs by taking the DeviceNet Input data,
Local:2:I.Data[0…3], and adding 1 to them. Store the
results in Local:2:O.Data[0…3]. Based on the configuration in the Gateway, if values are changed on the Gateway Write tags, the Read tags will display the respective
values, plus one.
Save and download this configuration to the ControlLogix PLC.
56 312785C
Wire the DeviceNet Network
All DeviceNet networks require a termination resistor at
the two end nodes on the network. Place a ¼ watt 120
ohm resistor between CAN H (White) and CAN L (Blue)
of the DeviceNet connection.

Appendix B: Profibus™ DP Slave Communication
Appendix B: Profibus™ DP Slave Communication
Overview
This appendix describes the Gateway’s support for Profibus DP and details the configuration steps necessary
to set up a Graco Gateway with an S7300 PLC,
CPU315-2DP via Profibus. It does not provide a
detailed description of Profibus, but only a brief introduction, necessary to define the terms that are used
throughout the remainder of this document.
Introduction
Profibus DP stands for “Profibus for Decentralized
Peripherals”. Profibus DP is a device level bus that supports both analog and discrete signals. It has widespread usage for such items as remote I/O systems,
motor control centers, and variable speed drives. Profibus DP communicates at speeds from 9.6 Kbps to 12
Mbps over distances from 100 to 1,200 meters.
The protocol supported by the Profibus DP option card
is Profibus DP Slave. Therefore, the Graco Gateway
must be linked to a Profibus network with a PLC.
Profibus Port Protocols
The Profibus option card has one Profibus port. See
F
IG. 47.
™
Also see Appendix B: Profibus
cation on page 57.
DP Slave Communi-
Profibus Option
F
IG. 47: Profibus PLC Connection
PLC Connection
Card
TI13964a
312785C 57

Appendix B: Profibus™ DP Slave Communication
About Profibus DP
Profibus DP communication takes the form of block
exchange. Profibus blocks are made of memory bytes
where 2 bytes make a word and 4 bytes a double word,
or Dword.
A block is a range of consecutive byte addresses and is
unidirectional. This means the PLC will exchange data
read only and write only blocks with DP slave units.
Addresses in each device are independent and only relevant to the device for its own program. For example,
the address range for the first block in the master can
start at 256 with a 64 words block length and could
result in the slave with a range starting from 0 with 64
words length.
However, since blocks are consecutive, this means the
first block start address, in the above example 256, will
be the slave start address 0. Then, 257 in the master
would be 1 in the slave, and so on.
Block length can be defined in bytes, words, or double
words. Since start addresses between the master and
the slave can be different, one could give its start
address and length in bytes, and the other in words.
For example, the master start address is byte 256, with
a 64 words block length.
• This results in a range from byte 256 up to byte 383.
The slave start address is word 0, with a 64 words
block length.
• This results in a range from word 0 to word 63. F
IG.
48 illustrates this exchange.
NOTE: Do not forget that the Input block is independent
from the Output block, and although the address range
is the same, the data are different.
NOTE: F
IG. 48 has no connection with the Input Block
and Output Block in Graco Gateway. The terminology
used in the tags configuration is from the PLC point of
view (DP Master). Refer to Graco Gateway Setup for
more information.
byte 256 to byte 383
byte 256 to byte 383
F
IG. 48: Master/Slave Exchange
DP Master
Output Block
Input Block
DP Slave
Input Block
word 0 to word 63
Output Block
word 0 to word 63
58 312785C

Appendix B: Profibus™ DP Slave Communication
Setup the PLC
The Siemens Simatic Manager software is used to set
up the S7300 PLC. The following figures and explanations are extracted from this software.
Install the GSD file
The first step is to install the GSD file so Simatic is able
to map data blocks to our device. Contact Graco Technical Assistance for Profibus GSD files.
Start Simatic Manager and open or create a new PLC
project. Select the Simatic 300 Station in the navigation
pane as shown in F
IG. 49.
IG. 49: Select Simatic 300 Station
F
Double-click Hardware in the right hand window. This
will start the HWConfig where most of the work is done.
The HWConfig shows the current PLC hardware configuration. Close this configuration (NOT HWConfig) and
choose Options>Install GSD File… F
FIG. 50: Install the GSD File
IG. 50.
312785C 59

Appendix B: Profibus™ DP Slave Communication
Click Browse to select the folder were the GSD file
downloaded previously is, select the file and click Install.
F
IG. 51.
Once the GSD file is installed successfully, the PLC
hardware setup can be opened again by doing Station
and selecting the latest opened file which should be
number 1.
If this is a new project, configure your PLC with the right
modules.
F
IG. 51: Browse to GSD File
60 312785C

Setup the Profibus Network
Appendix B: Profibus™ DP Slave Communication
The following steps show how to set up the Profibus DP
network. Skip these steps if your PLC application
already possesses a Profibus DP network.
In the floating window that represents the PLC, double
click the DP area to open the properties window as
shown in F
IG. 52.
IG. 52: DP Properties Window
F
312785C 61

Appendix B: Profibus™ DP Slave Communication
In the General tab, click the properties button to open
the Profibus properties. F
F
IG. 53: Open Profibus Properties
IG. 53.
In the properties window, go to the Parameters tab and
click on the New button to create a new network. F
IG.
54.
FIG. 54: Create a New Profibus Network
62 312785C

Select the Network Settings tab and choose the Transmission Rate that fits the application. In this example, it
will be 12 Mbps. The profile should be DP. F
F
IG. 55: Set Transmission Rate
IG. 55.
Appendix B: Profibus™ DP Slave Communication
Close the popup windows by clicking OK. HWConfig
should now show the Profibus DP master system next to
the PLC. F
IG. 56.
FIG. 56: Profibus DP Master System
312785C 63

Appendix B: Profibus™ DP Slave Communication
Add the Graco Gateway to the Profibus Network
To add the Graco Gateway to the Profibus network, drag
the Gateway Profibus Card from the Catalog navigation
situated on the right hand side of HWConfig to the Profibus DP Master System. The card is situated under Profibus DP>Additional Field Devices>MMI.
In the properties window that popped up, select the Profibus address the Gateway will take on the network. This
address should be unique. In this example, the Gateway
will take address 5. F
IG. 57. Click OK.
IG. 57: Add Graco Gateway to Profibus Network
F
64 312785C

Appendix B: Profibus™ DP Slave Communication
The Gateway is now on the Profibus DP network and
selected. HWConfig shows the slots available under the
Gateway to configure the data blocks to exchange.
Just drag and drop one of the data blocks available
under the Gateway Profibus Card in the slot number 1.
Simatic will automatically assign a start address (byte
number) in the respective Input and output columns
depending of the block type chosen. In this example, 64
words in and 64 words out.
More blocks can be inserted in the following slots to fit
your application. F
IG. 58 shows an example with a 16
words input block in slot 2 and 5 words output block in
slot 3. Addresses are given automatically but can be
edited by the user.
NOTE: If the starting address for a block in slot 2 or
above changes and creates a gap in the address range,
it will not affect the Gateway blocks, as all data are consecutive. It is however advised to keep the addresses
consecutive to facilitate development.
F
IG. 58: Configure Data Blocks
Save the configuration and download it to the PLC.
NOTE:
• The maximum number of input bytes allowed is
244.
• The maximum number of output bytes allowed
is 244.
• The maximum number of bytes overall is 436.
312785C 65

Appendix B: Profibus™ DP Slave Communication
Graco Gateway Setup
Once the PLC is setup, the Gateway can be programmed to fit its configuration.
NOTE: For a Gateway to communicate on Profibus DP,
a Profibus Option card has to be fitted in the unit. Refer
to the device manual to find the proper option card and
installation procedure.
Setup the Profibus Communication
Enter the communication module and select the Gateway. On the right hand pane, click the Edit button to
select the Option card. Select Profibus Option card and
click OK. F
IG. 59.
IG. 59: Select Profibus Option Card
F
66 312785C

The option card appeared in the communication tree.
Select the Profibus Interface and click the Edit button to
select a driver. Click OK to pick the Profibus DP driver.
F
IG. 60.
Appendix B: Profibus™ DP Slave Communication
F
IG. 60: Select Profibus Server
Graco Gateway now displays the driver settings where
the Station Address can be changed. This address is
the Gateway address on the Profibus network. In our
example, this address is 5 as setup in the PLC earlier.
NOTE: There are no Baud Rate settings as the Profibus
option card detects the transmission rate automatically.
A device called PLC1 is now displayed under the Profibus Interface. This device represents the Profibus Master and can be renamed to fit the application. In this
example, the name PLC1 remains. F
IG. 61.
FIG. 61: Block Settings
312785C 67

Appendix B: Profibus™ DP Slave Communication
Setup Tags
Once the communication is set up, tags can be created
to access the PLC blocks. This is where the section
Setup the Profibus Communication, page 66, is
important.
First, create a variable that correspond to the data type
required. In this example, an integer. F
IG. 62.
F
IG. 62: Create a Variable
Select the variable and rename it eventually. Then, click
on Internal next to mapping on the right hand side pane,
and select PLC1, which is the Profibus Master. F
IG. 63.
Select PLC1 from
pulldown menu
FIG. 63: Variable Properties
68 312785C

Appendix B: Profibus™ DP Slave Communication
In the popup window, select the block type required. Two
choices are available:
• Input block: The terminology input is from the Siemens perspective. Therefore this will be a block the
Gateway will write to. The tag mapped to an input
block has to be set up as Write Only.
• Output block: The terminology output is from the
Siemens perspective. Therefore this will be a block
the Gateway will read from. The tag mapped to an
output block has to be set up as Read Only.
• Select the data offset, which points the address to
read or write in the block. Select the data type to
read or write. This defines how many bytes to
access in the block to get the correct data. In this
example we choose output block, with data offset 0
(Which points to 256 in the PLC) and as a Word.
F
IG. 64.
F
IG. 64: Select Block Type
NOTE: Since the output block is a reading block from
the Gateway standpoint, this variable should be set up
as Read Only as shown in Fig. 19. The same rule
applies if the block is an input block, it should be set up
as Write Only.
To avoid mistakes, the mapping shows with an R or W
for output or input block respectively. F
IG. 65.
FIG. 65: Properties of Variable
312785C 69

Appendix B: Profibus™ DP Slave Communication
How Addressing Works
PLC addressing is in byte and uses the scheme shown
in F
IG. 66.
Byte 0
Word 0
Byte 1
Dword 0
Byte 2
Word 2
Byte 3
Byte 4
Word 4
Byte 5
Dword 4
Byte 6
Word 6
Byte 7
Byte 8
Word 8
Byte 9
Note how a Dword or word address starts at the
address of the first byte included in it.
The Gateway addressing follows a different scheme, as
shown in F
IG. 67.
This means that the address number will be different
when accessing words or Dwords in the Gateway data
tags than the PLC. Table 6 shows the address relation-
ship for integer tags mapped as word in the Gateway.
Byte 0
Word 0
Byte 1
Dword 0
Byte 2
Word 1
Byte 3
Byte 4
Word 2
Byte 5
Dword 1
Byte 6
Word 3
Byte 7
Byte 8
Word 4
Byte 9
F
IG. 66. PLC Addressing Scheme
Block Type
64 words in, 64 words out 256...383 256...383 0...63 0...63
16 words in 384...415 - 64...79 -
5 words out - 384...393 - 64...68
Here, the word or Dword addresses follow the normal numeric increment and are not directly related
to the word or bytes they are composed of.
F
IG. 67. Gateway Addressing Scheme
Table 6: Addressing Relationship
PLC Gateway
Input (bytes) Output (bytes) Input (words) Output (words)
70 312785C

Useful Formulas
The following formula can be used to find the byte num-
ber from a word address:
ByteAddress = PLCOffset + (WordAddress x 2), where:
• ByteAddress is the address we are looking for in the
PLC
• PLCOffset is the first byte number in the complete
block mapping in the PLC, here 256
• WordAddress is the address mapped in the Gateway. So, for example, word 77 in the Gateway,
would start at byte 410 in the PLC, and so would be
composed of byte 410 and 411.
The following formula can be used to find the byte num-
ber from a Dword address:
ByteAddress = PLCOffset + (DWordAddress x 4),
where:
Appendix B: Profibus™ DP Slave Communication
• ByteAddress is the address we are looking for in the
PLC
• PLCOffset is the first byte number in the complete
block mapping in the PLC, here 256
• DwordAddress is the address mapped in the Gateway. So, for example, Dword 14 in the Gateway,
would start at byte 312 in the PLC, and so would be
composed of byte 312, 313, 314 and 315.
NOTE: For the formula to work, all the blocks in the PLC
Profibus configuration for the Gateway have to be consecutive. F
IG. 57.
312785C 71

Appendix C: Graco Gateway to ControlLogix via Ethernet IP
Appendix C: Graco Gateway to ControlLogix via
Ethernet IP
Overview
This appendix describes the configuration steps necessary to establish a communication path between the
Graco Gateway and a ControlLogix unit. You will need
either a 1756-ENET/B or a 1756-ENBT/A together with
a Logix5550 controller. It may be possible to upgrade a
1756-ENET/A to the required 1756-ENET/B by flashing
the firmware; you should check the hardware version
with your vendor before hand to ensure its suitability.
You will also need Rockwell Software’s RSLinx and
RSLogix 5000 software configuration utilities.
Introduction
In the following example, the ControlLogix will establish
a Class1 connection and I/O data will be exchanged
between the ControlLogix and the Graco Gateway terminal. The network parameters used in this example will
almost certainly not apply to your application. Be sure to
consult your network administrator when selecting
appropriate values.
TI15057a
Ethernet Connection
to PLC
F
IG. 68: Ethernet PLC Connection
72 312785C

Appendix C: Graco Gateway to ControlLogix via Ethernet IP
ControlLogix Configuration
1. Run the RSLogix 5000 program and create a new
configuration.
2. Add a 1756-ENET/B or a 1756-ENBT/A to your I/O
configuration. You will need to:
a. Switch to offline mode.
b. Right click on the I/O Configuration node in the
Controller Organizer view and choose Add Module.
c. In the Select Module Type window, choose
1756-ENET/B or 1756-ENBT/A entry. RSLogix
will open the Module Properties window. See
F
IG. 69.
d. Enter the IP Address of the ENET/B or ENBT/A
interface.
e. Click Finish to add the interface to your I/O con-
figuration.
f. Download the configuration.
g. Switch to online mode and open the
1756-ENET/B or 1756-ENBT/A node properties under the I/O Configuration in the Controller
Organizer.
h. Select the Port Configuration Tab from the Mod-
ule Properties window. See F
IG. 70.
i. Enter the IP Address and Subnet Mask. The IP
Address must match the IP Address entered in
the Properties window (F
IG. 69).
j. Apply the settings using the Set button.
k. You can now verify the network module network
communications with your unit using suitable
diagnostic tools such as Ping.
3. Add the Graco Gateway to the RSLogix configuration as follows:
a. Switch to offline mode.
b. Right click on the 1756-ENET/B or
1756-ENBT/A node under the I/O Configuration
in the Controller Organizer view and choose
Add Module.
c. In the Select Module Type window, choose
Generic Ethernet Module. See F
IG. 71.
d. Click OK. This will open the Module Properties
window. See F
IG. 72.
IP Address
Finish Button
IG. 69. Ethernet Module Properties
F
312785C 73

Appendix C: Graco Gateway to ControlLogix via Ethernet IP
IP Address
Subnet Mask
FIG. 70. Port Configuration Window
Set Button
F
IG. 71. Ethernet Module Selection
74 312785C

Appendix C: Graco Gateway to ControlLogix via Ethernet IP
e. In the Name field, enter a descriptive name to
identify the module. See F
IG. 72.
f. In the Address/Host Name field, enter the IP
Address of the Graco Gateway.
g. Enter 2 in the Input Assembly Connection Point
and a size of 2. This will match a read only
Slave Gateway block configured in the Gateway,
and will be used for reading data from the Gateway to the ControlLogix.
h. Enter 3 in the Output Assembly Connection
Point and a size of 2. This will match a
read/write Slave Gateway block configured in
the Gateway, and will be used for writing data
from the ControlLogix to the Gateway.
i. Enter 1 in the Configuration Connection Point
and a size of 0. Configuration data is not supported by the Gateway.
j. Press Finish to add the Gateway to the I/O con-
figuration.
The connection points and sizes are arbitrary, as
long as the connection point, size, and direction are
matched in the configuration of the Gateway.
Connection point direction is always relative to the
originator, which in the case of the current Gateway
Ethernet/IP implementation is always the device and
never the Gateway. An input connection therefore
specifies data flow from the Gateway to the device,
and an output connection specifies data flow from
the device to the Gateway.
F
IG. 72. Ethernet Module Properties
312785C 75

Appendix C: Graco Gateway to ControlLogix via Ethernet IP
See FIG. 73. You should now see a new ETHERNET-MODULE Gateway_HMI branch of the
1756-ENET/B node in the I/O Configuration view.
You should also see three new entries in the Controller Tags view:
• Gateway_HMI:I to view the input data
• Gateway_HMI:O to modify the output data
• Gateway_HMI:C to view the configuration data
4. Download the new I/O configuration to the controller. Once the download is complete, the controller
will automatically establish a new Class1 connection
with the Gateway.
F
IG. 73. Ethernet Configuration Data
76 312785C

Appendix C: Graco Gateway to ControlLogix via Ethernet IP
Graco Gateway Configuration
1. Ethernet Settings. Set the IP Address to
192.168.2.101. This should match the Address/Host
Name entered in F
2. Protocol Settings. Select the Ethernet/IP Slave
Adapter communications driver.
The ENET/B module prefixes all output data with a
header containing status information about the originator’s run/idle state. With the Run/Idle Header
checked, the communications driver will automatically process the header, and data will be ignored if
the device is in the Idle state. With the option
unchecked, extra space must be allocated in the
Gateway block to receive the status information; all
data is accepted regardless of the device state.
IG. 72.
3. Device Settings. A Gateway block must be created
for each connection point.
For the purpose of configuring, the data transfer
terms input and output are relative to the device and
not the Gateway. An input connection is therefore
specified as Gateway to Device, and an output con-
nection is specified as Device to Gateway.
Connection point mapping is defined in the Start
Address block setting and comprises the connection
point instance and a data offset. The instance must
match that specified by the originator; the offset can
be used to skip over data not required by the Gate-
way, useful mainly on shared connection points.
F
IG. 74. Ethernet Block Settings
312785C 77

Appendix C: Graco Gateway to ControlLogix via Ethernet IP
The following settings mirror the I/O settings of the
ControlLogix configuration detailed earlier.
a. Input Connection Point. Create a Gateway
block configuration (see Table 7).
Table 7: Input Connection Points
Connection Point 2
Data Offset 0000
Data Type Long as Long
Block Size 2
Direction Graco Gateway to Device
b. Output Connection Point. Create a Gateway
block configuration (see Table 8).
Table 8: Output Connection Points
Connection Point 3
Data Offset 0000
Data Type Long as Long
4. Data Mapping. the connection points are now configured so that:
Gateway_HMI:O >> PLC1:Block1
Gateway_HMI:I << PLC1:Block2
5. Testing. Using the RSLogix5000 program, you can
modify tags Gateway_HMI:O and verify they are
written into Var1 and Var2, and verify changes made
in the Gateway to tags Var3 and Var4 are updated in
Gateway_HMI:I. Ensure the device is in the Run
mode, otherwise the data transfer will be ignored by
the Gateway.
Block Size 2
Direction Device to Graco Gateway
78 312785C

Dimensions
Dimensions
16.57 in. (420.9 mm)
4.52 in.
(114.8 mm)
15.07 in. (382.8 mm)
5.31in.
(134.9 mm)
TI12930a
8.71in.
(221.2 mm)
TI12825b
312785C 79

Dimensions
80 312785C

Technical Data
Technical Data
Electrical power . . . . . . . . . . . . . . . . . . . . . . . . . . . . 24 Vdc, +/- 10%. 200 mA minimum without expansion card; 1
Amp maximum with expansion card fitted. Requires Class 2 or
SELV rated power supply.
Communication ports
USB/PG Ports . . . . . . . . . . . . . . . . . . . . . . . . . .
Serial Ports . . . . . . . . . . . . . . . . . . . . . . . . . . . .
RS232/PG Port . . . . . . . . . . . . . . . . . . . . . . . . .
COMM Ports . . . . . . . . . . . . . . . . . . . . . . . . . . .
DH485 TXEN Port . . . . . . . . . . . . . . . . . . . . . . .
Ethernet Port . . . . . . . . . . . . . . . . . . . . . . . . . . .
LEDs. . . . . . . . . . . . . . . . . . . . . . . . . . . . . . . . . . . . . STS: Status LED indicates condition of Gateway module.
Memory
On-board user memory . . . . . . . . . . . . . . . . . . .
On-board SDRAM . . . . . . . . . . . . . . . . . . . . . . .
Memory card . . . . . . . . . . . . . . . . . . . . . . . . . . .
Real-time clock. . . . . . . . . . . . . . . . . . . . . . . . . . . . . Typical accuracy is less than 1 minute per month drift. Lithium
Environmental conditions
Operating temperature range. . . . . . . . . . . . . . .
Storage temperature range . . . . . . . . . . . . . . . .
Operating and storage humidity . . . . . . . . . . . . .
Vibration according to IEC 68-2-6 . . . . . . . . . . .
Shock according to IEC 68-2-27 . . . . . . . . . . . .
Altitude . . . . . . . . . . . . . . . . . . . . . . . . . . . . . . . .
Construction . . . . . . . . . . . . . . . . . . . . . . . . . . . . . . . Carbon steel and stainless steel. Installation category 1, Pollu-
Power connection . . . . . . . . . . . . . . . . . . . . . . . . . . . Removable wire clamp screw terminal block. Wire gage capac-
Mounting. . . . . . . . . . . . . . . . . . . . . . . . . . . . . . . . . . Snaps onto standard DIN style top hat (T) profile mounting rails
Weight (Gateway control box only). . . . . . . . . . . . . . 15.1 oz (456.4 g)
Adheres to USB specification 1.1. Device only using Type B
connection.
Format and Baud rates for each port are individually software
programmable up to 115,200 baud.
RS232 port via RJ12.
RS422/485 port via RJ45, and RS232 port via RJ12.
Transmit enable; open collector, V
mA maximum.
10 BASE-T/100 BASE-TX, RJ45 jack is wired as a NIC (Network Interface Card).
TX/RX: Transmit/Receive LEDs show serial activity.
Ethernet: Link and activity LEDs.
CF: CompactFlash LED indicates card status and read/write
activity.
4 Mbytes of non-volatile Flash memory.
2 Mbytes
CompactFlash Type II slot for Type I and Type II cards. Used for
optional database storage only.
coin cell battery; typical lifetime of 10 years at 25°C. This unit is
not field serviceable. All work must be done by a qualified technician.
0 to 50°C
-30 to +70°C
80% relative humidity, non-condensing, from 0 to 50°C
Operational 5 to 150 Hz, in X, Y, Z direction for 1.5 hr, 2 g’s
Operational 30 g, 11 msec in 3 directions
Up to 2000 m
tion degree 2.
ity: 24 AWG to 12 AWG. Torque: 4.45-5.34 in-lb (0.5-0.6 N•m).
according to EN50022 -35 x 7.5 and -35 x 1.5.
=15 Vdc, VOL=0.5 V @ 25
OH
312785C 81

Graco Standard Warranty
Graco warrants all equipment referenced in this document which is manufactured by Graco and bearing its name to be free from defects in
material and workmanship on the date of sale to the original purchaser for use. With the exception of any special, extended, or limited warranty
published by Graco, Graco will, for a period of twelve months from the date of sale, repair or replace any part of the equipment determined by
Graco to be defective. This warranty applies only when the equipment is installed, operated and maintained in accordance with Graco’s written
recommendations.
This warranty does not cover, and Graco shall not be liable for general wear and tear, or any malfunction, damage or wear caused by faulty
installation, misapplication, abrasion, corrosion, inadequate or improper maintenance, negligence, accident, tampering, or substitution of
non-Graco component parts. Nor shall Graco be liable for malfunction, damage or wear caused by the incompatibility of Graco equipment with
structures, accessories, equipment or materials not supplied by Graco, or the improper design, manufacture, installation, operation or
maintenance of structures, accessories, equipment or materials not supplied by Graco.
This warranty is conditioned upon the prepaid return of the equipment claimed to be defective to an authorized Graco distributor for verification of
the claimed defect. If the claimed defect is verified, Graco will repair or replace free of charge any defective parts. The equipment will be returned
to the original purchaser transportation prepaid. If inspection of the equipment does not disclose any defect in material or workmanship, repairs will
be made at a reasonable charge, which charges may include the costs of parts, labor, and transportation.
THIS WARRANTY IS EXCLUSIVE, AND IS IN LIEU OF ANY OTHER WARRANTIES, EXPRESS OR IMPLIED, INCLUDING BUT NOT LIMITED
TO WARRANTY OF MERCHANTABILITY OR WARRANTY OF FITNESS FOR A PARTICULAR PURPOSE.
Graco’s sole obligation and buyer’s sole remedy for any breach of warranty shall be as set forth above. The buyer agrees that no other remedy
(including, but not limited to, incidental or consequential damages for lost profits, lost sales, injury to person or property, or any other incidental or
consequential loss) shall be available. Any action for breach of warranty must be brought within two (2) years of the date of sale.
GRACO MAKES NO WARRANTY, AND DISCLAIMS ALL IMPLIED WARRANTIES OF MERCHANTABILITY AND FITNESS FOR A
PARTICULAR PURPOSE, IN CONNECTION WITH ACCESSORIES, EQUIPMENT, MATERIALS OR COMPONENTS SOLD BUT NOT
MANUFACTURED BY GRACO. These items sold, but not manufactured by Graco (such as electric motors, switches, hose, etc.), are subject to
the warranty, if any, of their manufacturer. Graco will provide purchaser with reasonable assistance in making any claim for breach of these
warranties.
In no event will Graco be liable for indirect, incidental, special or consequential damages resulting from Graco supplying equipment hereunder, or
the furnishing, performance, or use of any products or other goods sold hereto, whether due to a breach of contract, breach of warranty, the
negligence of Graco, or otherwise.
FOR GRACO CANADA CUSTOMERS
The Parties acknowledge that they have required that the present document, as well as all documents, notices and legal proceedings entered into,
given or instituted pursuant hereto or relating directly or indirectly hereto, be drawn up in English. Les parties reconnaissent avoir convenu que la
rédaction du présente document sera en Anglais, ainsi que tous documents, avis et procédures judiciaires exécutés, donnés ou intentés, à la suite
de ou en rapport, directement ou indirectement, avec les procédures concernées.
Graco Information
For the latest information about Graco products, visit www.graco.com.
TO PLACE AN ORDER, contact your Graco distributor or call to identify the nearest distributor.
Phone: 612-623-6921 or Toll Free: 1-800-328-0211 Fax: 612-378-3505
All written and visual data contained in this document reflects the latest product information available at the time of publication.
GRACO INC. AND SUBSIDIARIES • P.O. BOX 1441 • MINNEAPOLIS, MN 55440-1441 • USA
Copyright 2009, Graco Inc. All Graco manufacturing locations are registered to ISO 9001.
Graco reserves the right to make changes at any time without notice.
Original instructions. This manual contains English. MM 312785
Graco Headquarters: Minneapolis
International Offices: Belgium, China, Japan, Korea
www.graco.com
Revised 09/2011
 Loading...