

Page 1
GDT™ 43
Installation Instructions
Important Safety Information
WARNING
See the Important Safety and Product Information guide in the
chartplotter or fishfinder product box for product warnings and
other important information.
You are responsible for the safe and prudent operation of your
vessel. Sonar is a tool that enhances your awareness of the
water beneath your boat. It does not relieve you of the
responsibility of observing the water around your boat as you
navigate.
CAUTION
Failure to install and maintain this equipment in accordance with
these instructions could result in damage or injury.
Always wear safety goggles, ear protection, and a dust mask
when drilling, cutting, or sanding.
NOTICE
When drilling or cutting, always check what is on the opposite
side of the surface.
This equipment should be installed by a qualified marine
installer.
To obtain the best performance and to avoid damage to your
boat, you must install the Garmin® device according to these
instructions.
Read all installation instructions before proceeding with the
installation. If you experience difficulty during the installation,
contact Garmin Product Support.
Registering Your Device
Help us better support you by completing our online registration
today.
• Go to my.garmin.com/registration.
• Keep the original sales receipt, or a photocopy, in a safe
place.
Garmin Support Center
Go to support.garmin.com for help and information, such as
product manuals, frequently asked questions, videos, software
updates, and customer support.
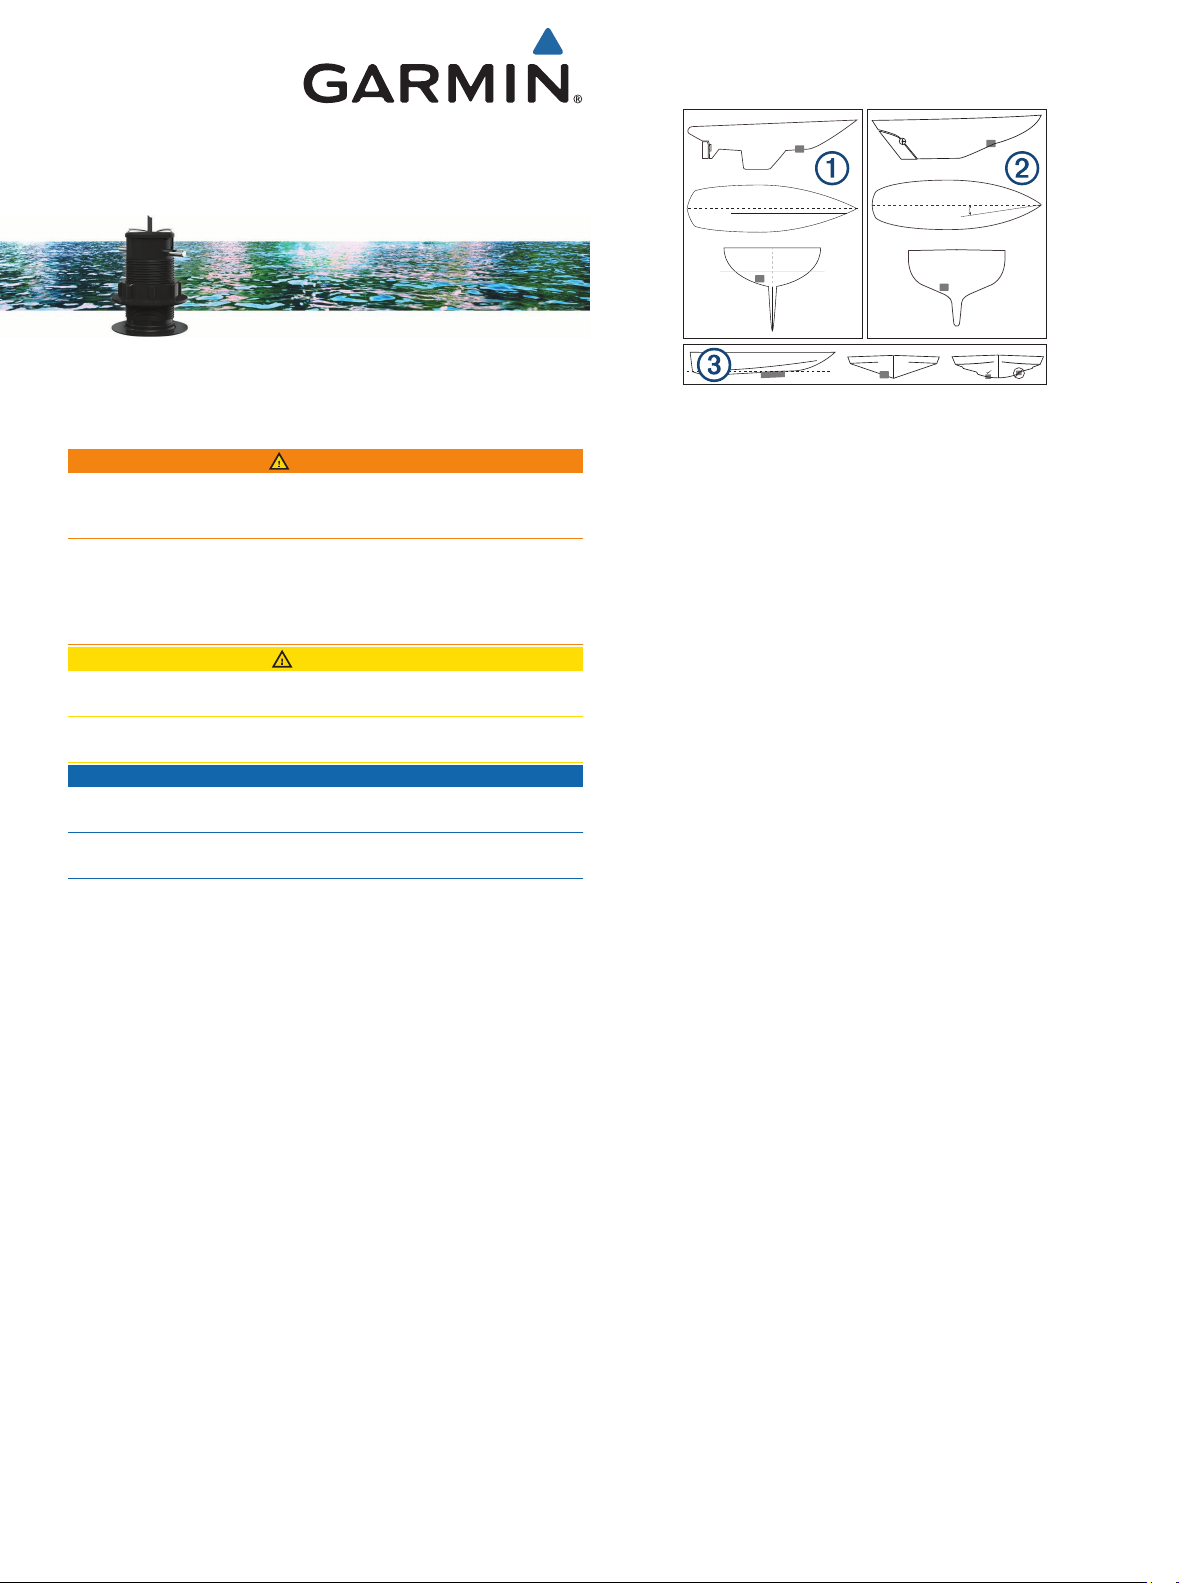
Mounting Location Considerations
• On fin-keel vessels À, the transducer should be mounted
more than 25 cm (10 in) and less than 75 cm (30 in) in front
of the keel and less than 10 cm (4 in) to the side of the
centerline.
• On full-keel vessels Á, the transducer should be mounted at
a slight angle that aims at the bow, not parallel to the
centerline.
• On power boats and hulls with chines Â, the transducer
should not be mounted near the edge of sharp hull chines.
• On single-drive boats, the transducer must not be mounted in
the path of the propeller.
• On twin-drive boats, the transducer should be mounted
between the drives, if possible.
• The transducer should be mounted parallel to the bow-stern
axis of your vessel.
• The transducer should be mounted in a location that allows
accessibility to the transducer from the inside of the vessel.
• The transducer should not be mounted behind strakes, struts,
fittings, water intake or discharge ports, or anything that
creates air bubbles or causes the water to become turbulent.
• The transducer should not be mounted in a location where it
might be jarred when launching, hauling, or storing.
• The transducer can cause cavitation that can degrade the
performance of the boat and damage the propeller.
• The transducer must be in clean (non-turbulent) water for
optimal performance.
• If you have a question about the location of the thru-hull
transducer, contact your vessel builder or other owners of
similar vessels for advice.
Tools Needed
• Drill
• 43 mm (1 11/16 in.) hole saw
• 52 to 55 mm (2 1/16 to 2 3/16 in.) hole saw (cored-fiberglass
hull installations)
• Marine sealant
• Silicone grease
• Cable cutter
• Metal file (metal-hull installations)
• Fiberglass cloth and resin (option for sealing a coredfiberglass hull)
• 43 mm (1 11/16 in.) cylinder, wax, tape, and casting epoxy
(option for sealing a cored-fiberglass hull)
Installing the Thru-Hull Transducer
If you are installing the transducer in a cored-fiberglass hull, you
must first prepare the hull (Preparing a Cored-Fiberglass Hull,
page 2).
April 2017
190-02112-02_0C
Page 2
Use a 43 mm (1 11/
1
the mounting location.
Insert the thru-hull fitting in the hull.
2
Apply marine sealant to the outer flange of the thru-hull fitting
3
and tighten the nut by hand.
Slide both rubber O-rings onto the plug.
4
Apply silicone grease to the outside of the plug.
5
Using a slow, twisting motion, insert the plug into the thru-hull
6
fitting.
Verify that the plug is properly seated into the fitting.
7
Mount the fitting with the pin at a 90 degree angle to the
8
centerline of the boat.
After the marine sealant applied in step 3 has cured, remove
9
the nut and apply sealant on the fitting inside the hull.
Replace the nut and tighten it by hand.
10
After installation of the fitting, replace the plug with the actual
11
transducer.
NOTE: It is recommended that you keep the plug for use
while cleaning or servicing your transducer.
Install the wire locking device onto the transducer.
12
in.) hole saw to cut through the hull at
16
Preparing a Cored-Fiberglass Hull
NOTICE
If the core of a cored-fiberglass hull is not sealed properly, water
may seep into the core and severely damage the boat.
Fiberglass or casting epoxy (not included)
À
Cylinder spacer (not included)
Á
Inner fiberglass skin
Â
Core
Ã
Outer fiberglass skin
Ä
• If the pilot hole is not in the correct location, seal the hole
with epoxy and repeat step 1.
• If the pilot hole is in the correct location, use a 43 mm (1
11
/16 in.) hole saw to cut a hole from the outside of the
boat through the outer fiberglass skin only. Do not cut
completely through the hull.
On the inside of the boat, at the pilot hole location, use a hole
3
saw to cut a hole 9 to 12 mm (3/8 to 1/2 in.) larger than the
hole you cut in the outside of the boat in step 2.
Cut through the inner fiberglass skin and most of the core,
without cutting the outer skin.
NOTE: When cutting the inner fiberglass skin and core, be
careful to not cut the outer fiberglass skin, or you will not be
able to correctly seal the hull.
Remove the inner fiberglass skin and core you cut in step 3.
4
You should be able to see the inside of the outer fiberglass
skin.
Sand the inside of the hole and the areas immediately around
5
both the inside and outside fiberglass skin.
Clean the area using a mild detergent or weak solvent, such
6
as isopropyl alcohol, to remove any dust and dirt.
Sealing the Hull with Fiberglass
From inside the boat, coat a layer of fiberglass cloth with
1
fiberglass resin and place it inside the hole to seal the core.
Add layers of fiberglass cloth and resin until the hole is the
2
correct diameter of 43 mm (1 11/
After the fiberglass has hardened, sand and clean inside and
3
around the hole.
The cored-fiberglass hull is now prepared, and you can
complete the transducer installation.
Sealing the Core with Casting Epoxy
To properly seal the core with casting epoxy, you must create a
cylinder with a diameter of 43 mm (1 11/
as the epoxy sets.
Coat a 43 mm (1 11/
1
Insert the cylinder in the hole through the outer skin and tape
2
it in place on the outside of the boat.
Fill the space between the cylinder the core with casting
3
epoxy.
After the epoxy has hardened, remove the cylinder, and sand
4
and clean inside and around the hole.
The cored-fiberglass hull is now prepared, and you can
complete the transducer installation.
in.) cylinder with wax.
16
in.).
16
in.) to act as a spacer
16
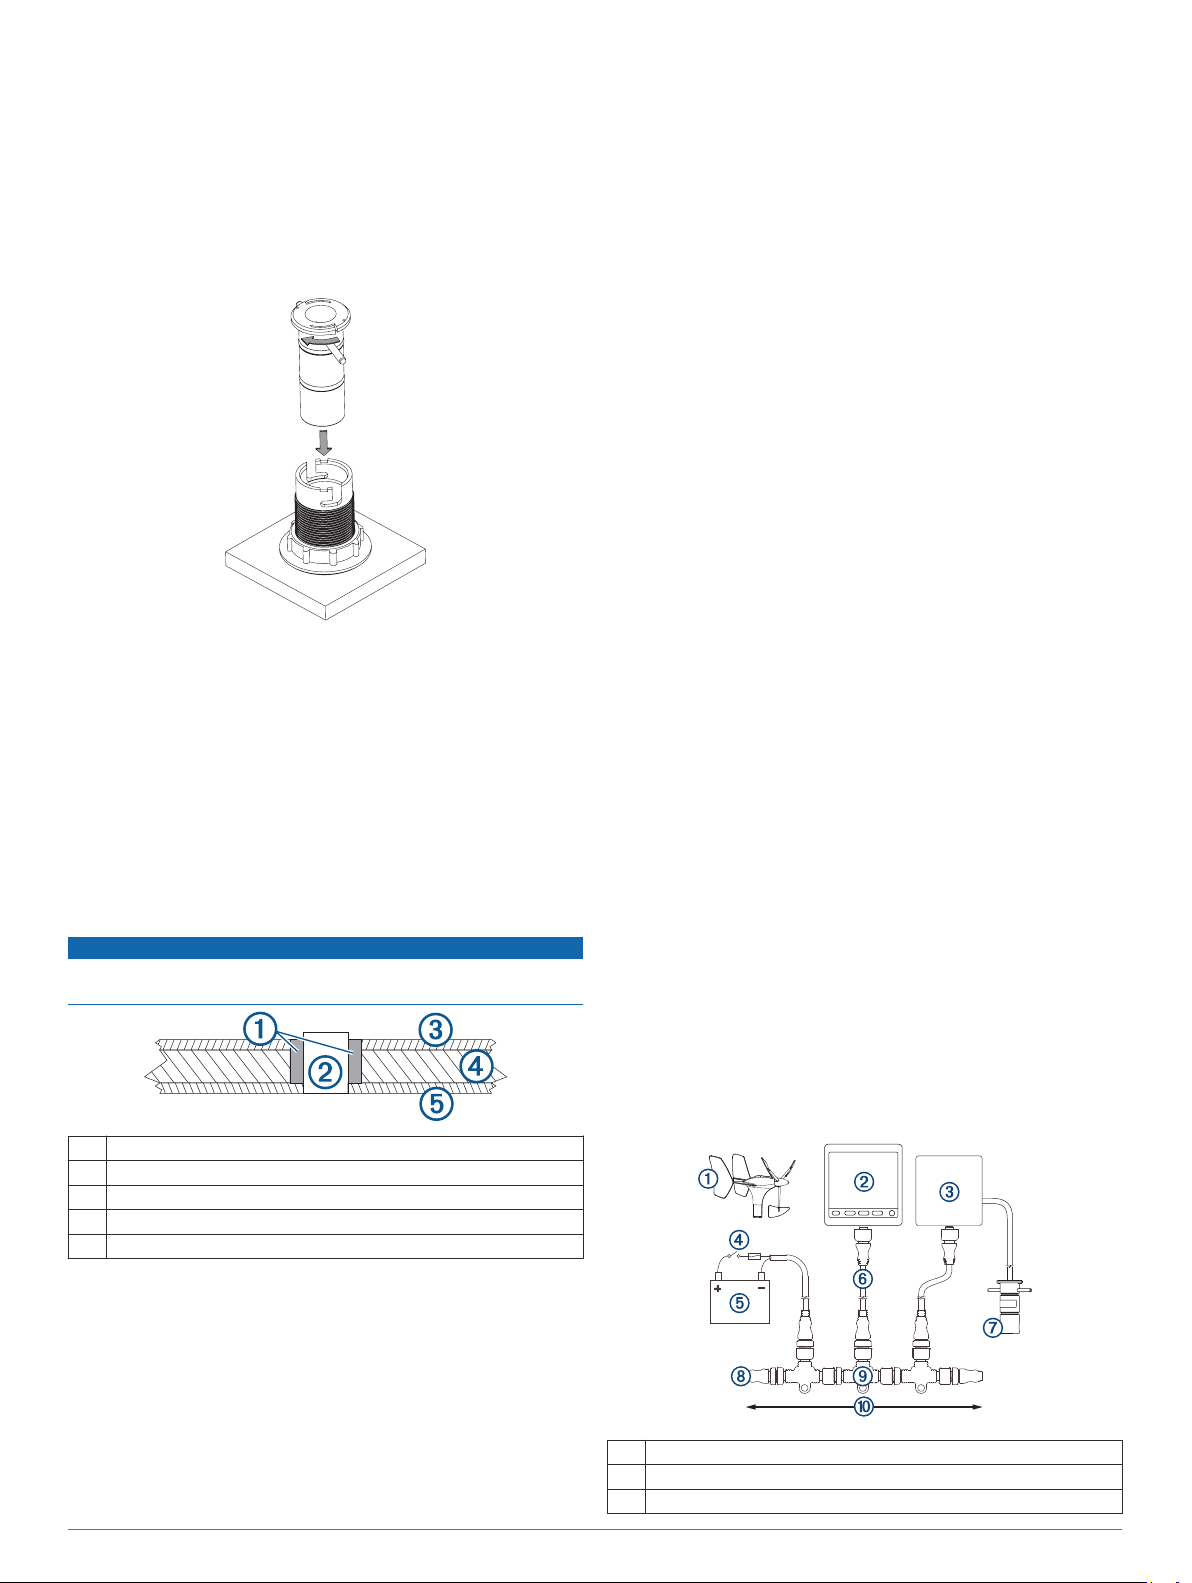
NMEA 2000® Connection
The GDT 43 transducer connects to the NMEA 2000 network
through the NMEA 2000 adapter.
Drill the hole through the hull.
1
Seal the core inside the hull using either fiberglass (Sealing
2
the Hull with Fiberglass, page 2) or casting epoxy (Sealing
the Core with Casting Epoxy, page 2).
Drilling a Hole in a Cored-Fiberglass Hull
From inside the boat, drill a 3 mm (1/8 in.) pilot hole
1
completely through the hull.
Examine the pilot hole on the outside of the boat, and select
2
an option:
2
gWind™ Wireless 2 transducer
À
GNX™ Wind instrument
Á
NMEA 2000 adapter
Â
Page 3

Ignition or in-line switch
Ã
12 Vdc power source
Ä
Drop cable
Å
GDT 43 transducer
Æ
NMEA 2000 terminator or backbone cable
Ç
NMEA 2000 T-connector
È
Existing NMEA 2000 network
É
NMEA 2000 Adapter Specifications
Dimensions (W x L x D) 101.4 x 116.3 x 76.2 mm (4 x 4 19/32 x 3 in.)
Weight Adapter: 120.9 g (4.26 oz.)
With bracket: 200.7 g (7.08 oz.)
Power input From 9 to 16 Vdc
Power consumption Max. 2.4 W
Temperature range From -15 to 70ºC (from 5 to 158°F)
Nexus® Wiring
When you connect the GDT 43 to a Nexus system, you must cut
the GDT 43 cable to the desired length and connect the wires to
the dedicated depth port on the Nexus device.
GDT 43 Nexus
Black Black
Red Blue
Screen Screen
White Do not use
Transducer Calibration
NOTE: If you are using a Nexus system or if the transducer data
does not appear, the transducer must be calibrated.
You can use the NexusRace™ software to calibrate the
transducer. To download the NexusRace software, go to
garmin.com/NexusRace.
Maintenance
Testing the Installation
NOTICE
You should check your boat for leaks before you leave it in the
water for an extended period of time.
The transducer must be in the water to work properly.
When your boat is in the water, check for leaks near the
1
transducer installation site.
If leaks are found, apply marine sealant around the
2
installation site, let the sealant cure, and repeat step 1.
Cleaning the Transducer
Aquatic fouling accumulates quickly and can reduce your
device's performance.
Remove the fouling with a soft cloth and mild detergent.
1
If the fouling is severe, use a scouring pad or putty knife to
2
remove growth.
Wipe the device dry.
3
NMEA 2000 PGN
Type PGN Description
Transmit and
receive
Transmit 126996 Product information
© 2017 Garmin Ltd. or its subsidiaries
Garmin®, the Garmin logo, and Nexus® are trademarks of Garmin Ltd. or its subsidiaries,
registered in the USA and other countries. GDT™, GST™, and NexusRace™ are
trademarks of Garmin Ltd. or its subsidiaries. These trademarks may not be used
without the express permission of Garmin.
NMEA 2000® and the NMEA 2000 logo are registered trademarks of the National Marine
Electronics Association.
005932 ISO acknowledgment
059904 ISO request
060928 ISO address claim
126208 NMEA®:Command, request, and
acknowledge group function
126464 Transmit and receive PGN list group function
128267 Water depth
130312 Temperature
Specifications
GDT 43 Specifications
Dimensions (W x L) 42 x 86 mm (1.65 x 3.38 in.)
Hull thickness Min. 6 mm (0.24 in.)
Max. 42 mm (1.65 in.)
Temperature range Operating: From -10 to 70ºC (from 14 to
158°F)
Storage: From -35 to 70ºC (from 31 to 158°F)
Transducer cable length 6 m (19.7 ft.)
Sonar frequency 200 kHz
Sonar depth* 275 m (900 ft.)
*Dependent upon the water conditions.
3
Page 4

 Loading...