

Garmin Forerunner 735XT Owners Manual
Forerunner® 735XT
Owner’s Manual
April 2016 190-02058-00_0A

All rights reserved. Under the copyright laws, this manual may not be copied, in whole or in part, without the written consent of Garmin. Garmin reserves the
right to change or improve its products and to make changes in the content of this manual without obligation to notify any person or organization of such
changes or improvements. Go to www.garmin.com for current updates and supplemental information concerning the use of this product.
Garmin®, the Garmin logo, ANT+®, Auto Lap®, Auto Pause®, Edge®, Forerunner®, VIRB®, and Virtual Partner® are trademarks of Garmin Ltd. or its subsidiaries,
registered in the USA and other countries. Connect IQ™, Garmin Connect™, Garmin Express™, HRM-Run™, HRM-Tri™, HRM-Swim™, tempe™, Varia™, Varia
Vision™, and Vector™ are trademarks of Garmin Ltd. or its subsidiaries. These trademarks may not be used without the express permission of Garmin.
Android™ is a trademark of Google Inc. Apple® and Mac® are trademarks of Apple Inc., registered in the U.S. and other countries. The Bluetooth® word mark and
logos are owned by the Bluetooth SIG, Inc. and any use of such marks by Garmin is under license. The Cooper Institute®, as well as any related trademarks,
are the property of The Cooper Institute. Shimano® and Di2™ are trademarks of Shimano, Inc. Advance heartbeat analytics by Firstbeat. Training Stress
Score™, Intensity Factor™, and Normalized Power™ are trademarks of Peaksware, LLC. Windows® is a registered trademark of Microsoft Corporation in the
United States and other countries. Other trademarks and trade names are those of their respective owners.
This product may contain a library (Kiss FFT) licensed by Mark Borgerding under the 3-Clause BSD License http://opensource.org/licenses/BSD-3-Clause.
This product is ANT+® certified. Visit www.thisisant.com/directory for a list of compatible products and apps.
M/N: A02924

Table of Contents
Introduction.....................................................................1
Keys............................................................................................ 1
Locking and Unlocking the Device Keys................................ 1
Opening the Menu................................................................. 1
Icons...................................................................................... 1
Training........................................................................... 1
Going for a Run.......................................................................... 1
Multisport Activities..................................................................... 1
Triathlon Training................................................................... 1
Heart Rate While Swimming....................................................... 2
Going for a Pool Swim........................................................... 2
Swimming in Open Water...................................................... 2
Swim Terminology...................................................................... 2
Indoor Activities.......................................................................... 2
Workouts.....................................................................................2
Following a Workout From the Web.......................................2
Starting a Workout................................................................. 2
About the Training Calendar.................................................. 2
Using Garmin Connect Training Plans.............................. 2
Interval Workouts................................................................... 2
Creating an Interval Workout............................................ 2
Starting an Interval Workout..............................................3
Stopping a Workout...........................................................3
Canceling a Workout......................................................... 3
Using Virtual Partner®........................................................... 3
Setting a Training Target....................................................... 3
Cancelling a Training Target............................................. 3
Racing a Previous Activity..................................................... 3
Personal Records.................................................................. 3
Viewing Your Personal Records....................................... 3
Restoring a Personal Record............................................ 3
Clearing a Personal Record.............................................. 4
Clearing All Personal Records.......................................... 4
Heart Rate Features....................................................... 4
Viewing the Heart Rate Widget...................................................4
Wearing the Device and Heart Rate...................................... 4
Turning Off the Wrist Heart Rate Monitor.............................. 4
Tips for Erratic Heart Rate Data.............................................4
Setting Your Heart Rate Zones...................................................4
Letting the Device Set Your Heart Rate Zones...................... 4
Broadcasting Heart Rate Data to Garmin® Devices.................. 4
Running Dynamics......................................................................5
Training with Running Dynamics........................................... 5
Color Gauges and Running Dynamics Data.......................... 5
Ground Contact Time Balance Data................................. 5
Tips for Missing Running Dynamics Data.............................. 6
Physiological Measurements...................................................... 6
About VO2 Max. Estimates.................................................... 6
Getting Your VO2 Max. Estimate for Running.................. 6
Getting Your VO2 Max. Estimate for Cycling.................... 6
Viewing Your Predicted Race Times..................................... 7
Recovery Advisor................................................................... 7
Turning On the Recovery Advisor..................................... 7
Recovery Heart Rate............................................................. 7
Viewing Your Stress Score.................................................... 7
Performance Condition.......................................................... 7
Viewing Your Performance Condition............................... 7
Lactate Threshold.................................................................. 7
Performing a Guided Test to Determine Your Lactate
Threshold.......................................................................... 8
Getting Your FTP Estimate.................................................... 8
Conducting an FTP Test................................................... 8
Activity Tracking............................................................ 8
Turning On Activity Tracking
Using the Move Alert.................................................................. 8
Sleep Tracking............................................................................ 8
Auto Goal.................................................................................... 9
Intensity Minutes......................................................................... 9
Earning Intensity Minutes.......................................................9
.......................................................8
Smart Features............................................................... 9
Pairing Your Smartphone........................................................... 9
Phone Notifications................................................................ 9
Enabling Bluetooth Notifications....................................... 9
Viewing Notifications......................................................... 9
Managing Notifications...................................................... 9
Playing Audio Alerts During Your Run................................... 9
Opening the Music Controls...................................................9
Locating a Lost Smartphone.................................................. 9
Widgets....................................................................................... 9
Viewing the Widgets............................................................ 10
About My Day...................................................................... 10
Bluetooth Controls Widget................................................... 10
Viewing the Weather Widget................................................10
VIRB Remote....................................................................... 10
Controlling a VIRB Action Camera.................................. 10
Using Do Not Disturb Mode...................................................... 10
Bluetooth Connected Features................................................. 10
Turning On the Smartphone Connection Alert..................... 10
Turning Off Bluetooth Technology....................................... 10
Connect IQ™ Features............................................................. 11
Downloading Connect IQ Features...................................... 11
Downloading Connect IQ Features Using Your
Computer........................................................................ 11
History........................................................................... 11
Viewing History......................................................................... 11
Viewing Your Time in Each Heart Rate Zone...................... 11
Viewing Data Totals.................................................................. 11
Deleting History........................................................................ 11
Data Management.................................................................... 11
Deleting Files....................................................................... 11
Disconnecting the USB Cable..............................................11
Sending Data to Your Garmin Connect Account...................... 11
Garmin Connect........................................................................11
Navigation..................................................................... 12
Adding the Map.........................................................................12
Map Features............................................................................12
Marking Your Location.............................................................. 12
Editing a Location................................................................ 12
Deleting a Location.............................................................. 12
Viewing Your Current Elevation and Coordinates............... 12
Navigating to a Saved Location................................................ 12
Navigating Back to Start........................................................... 12
Courses.................................................................................... 12
Following a Course From the Web...................................... 13
Viewing Course Details........................................................ 13
Deleting a Course................................................................ 13
Stopping Navigation................................................................. 13
ANT+ Sensors............................................................... 13
Pairing ANT+ Sensors.............................................................. 13
Foot Pod................................................................................... 13
Going for a Run Using a Foot Pod....................................... 13
Foot Pod Calibration............................................................ 13
Training with Power Meters...................................................... 13
Setting Your Power Zones................................................... 13
Using Shimano® Di2™ Shifters............................................... 13
Situational Awareness.............................................................. 14
Compatible Heart Rate Monitors.............................................. 14
HRM-Swim Accessory......................................................... 14
Table of Contents i

Sizing the Heart Rate Monitor......................................... 14
Putting On the Heart Rate Monitor.................................. 14
Tips for Using the HRM-Swim Accessory....................... 14
Caring for the Heart Rate Monitor................................... 14
HRM-Tri Accessory.............................................................. 14
Pool Swimming............................................................... 14
Putting On the Heart Rate Monitor.................................. 14
Data Storage................................................................... 15
HRM-Run Accessory........................................................... 15
Putting On the Heart Rate Monitor.................................. 15
Caring for the Heart Rate Monitor........................................ 15
Tips for Erratic Heart Rate Data...........................................15
Customizing Your Device............................................ 15
Setting Up Your User Profile.....................................................15
Activity Profiles......................................................................... 15
Creating a Custom Activity Profile....................................... 15
Changing Your Activity Profile............................................. 15
Activity Settings........................................................................ 16
Customizing the Data Screens............................................ 16
Alerts.................................................................................... 16
Setting Range Alerts....................................................... 16
Setting a Recurring Alert................................................. 16
Setting Walk Break Alerts............................................... 16
Editing an Alert................................................................ 16
Using Auto Pause®............................................................. 16
Running with the Metronome............................................... 16
Marking Laps by Distance....................................................16
Customizing the Lap Alert Message.................................... 16
Using Auto Scroll................................................................. 17
Changing the GPS Setting................................................... 17
Using UltraTrac Mode..................................................... 17
Power Save Timeout Settings..............................................17
Activity Tracking Settings..........................................................17
System Settings........................................................................ 17
Changing the Device Language.......................................... 17
Time Settings....................................................................... 17
Time Zones..................................................................... 17
Setting the Time Manually...............................................17
Setting the Alarm................................................................. 17
Deleting an Alarm............................................................17
Backlight Settings................................................................ 17
Setting the Device Sounds.................................................. 17
Changing the Units of Measure........................................... 17
Format Settings....................................................................17
Data Recording Settings...................................................... 17
Device Information....................................................... 18
Charging the Device................................................................. 18
Specifications............................................................................18
Forerunner Specifications.................................................... 18
HRM-Swim Specifications and HRM-Tri Specifications....... 18
HRM-Run Specifications...................................................... 18
Device Care.............................................................................. 18
Cleaning the Device............................................................. 18
User Replaceable Batteries................................................. 18
Replacing the Heart Rate Monitor Battery...................... 18
Troubleshooting........................................................... 19
Support and Updates................................................................ 19
Getting More Information.......................................................... 19
Acquiring Satellite Signals........................................................ 19
Improving GPS Satellite Reception.......................................... 19
Resetting the Device.................................................................19
Clearing User Data................................................................... 19
Restoring All Default Settings................................................... 19
Viewing Device Information...................................................... 19
Updating the Software.............................................................. 19
Maximizing Battery Life
My daily step count does not appear........................................ 19
My device does not beep in cold weather................................ 20
.............................................................19
Appendix....................................................................... 20
Data Fields................................................................................20
Software License Agreement................................................... 22
BSD 3-Clause License..............................................................22
Fitness Goals............................................................................ 22
About Heart Rate Zones........................................................... 22
Heart Rate Zone Calculations...................................................23
VO2 Max. Standard Ratings..................................................... 23
FTP Ratings.............................................................................. 23
Index.............................................................................. 24
ii Table of Contents

Introduction
WARNING
See the Important Safety and Product Information guide in the
product box for product warnings and other important
information.
Always consult your physician before you begin or modify any
exercise program.
Keys
VIRB® camera status
Forerunner alarm status
Power status
Training
Going for a Run
The first fitness activity you record on your device can be a run,
ride, or any outdoor activity. You may need to charge the device
(Charging the Device, page 18) before starting the activity.
Select , and select an activity profile.
1
Go outside, and wait while the device locates satellites.
2
Select to start the timer.
3
Go for a run.
4
À
Á
Â
Ã
Hold to turn the device on and off.
Select to turn the backlight on and off.
Select to start and stop the timer.
Select to choose an option or to acknowledge a
message.
Select to mark a new lap.
Select to return to the previous screen.
Select to scroll through the widgets, data screens,
options, and settings.
Select > to select an activity profile.
Select > to open the menu.
Hold to view the options menu.
Locking and Unlocking the Device Keys
You can lock the device keys to avoid accidental key presses
during an activity or in watch mode.
Hold .
1
Select Lock Device.
2
Hold to unlock the device keys.
3
Opening the Menu
Select .
1
Select .
2
Icons
A flashing icon means the device is searching for a signal. A
solid icon means the signal was found or the sensor is
connected.
GPS status
Bluetooth® technology status
Heart rate monitor status
Foot pod status
LiveTrack status
Speed and cadence sensor status
Varia™ bike light status
Varia bike radar status
Varia Vision™ status
tempe™ sensor status
After you complete your run, select to stop the timer.
5
Select an option:
6
• Select Resume to restart the timer.
• Select Save to save the run and reset the timer. You can
select the run to view a summary.
• Select Discard > Yes to delete the run.
Multisport Activities
Triathletes, duathletes, and other multisport competitors can
take advantage of the custom multisport profiles (Creating a
Custom Activity Profile, page 15). When you set up a
multisport profile, you can switch between sport modes and still
view your total time for all sports. For example, you can switch
from biking mode to running mode and view your total time for
biking and running throughout your workout.
Triathlon Training
When you participate in a triathlon, you can use the triathlon
activity profile to quickly transition to each sport segment, to time
each segment, and to save the activity.
Select > > Triathlon.
1
Select to start the timer.
2
Select at the beginning and end of each transition.
3
The transition feature can be turned on or off for the triathlon
activity profile.
After you complete your activity, select > Save.
4
Introduction 1
Heart Rate While Swimming
NOTE: Wrist-based heart rate is not available while swimming.
The HRM-Tri™ accessory and the HRM-Swim™ accessory record
and store your heart rate data while swimming. Heart rate data
is not visible on compatible Forerunner devices while the heart
rate monitor is underwater.
You must start a timed activity on your paired Forerunner device
to view stored heart rate data later. During rest intervals when
out of the water, the heart rate monitor sends your heart rate
data to your Forerunner device.
Your Forerunner device automatically downloads stored heart
rate data when you save your timed swim activity. Your heart
rate monitor must be out of the water, active, and within range of
the device (3 m) while data is downloaded. You can review your
heart rate data in the device history and on your Garmin
Connect™ account.
Going for a Pool Swim
Select > > Pool Swim.
1
Select your pool size, or enter a custom size.
2
Select to start the timer.
3
History is recorded only while the timer is running.
Start your activity.
4
The device automatically records swim intervals and lengths.
Select or to view additional data pages (optional).
5
When resting, select to pause the timer.
6
Select to restart the timer.
7
After you finish the activity, select > Save.
8
Swimming in Open Water
You can use the device for open water swimming. You can
record swim data including distance, pace, and stroke rate. You
can add data screens to the default open water swimming
activity profile (Customizing the Data Screens, page 16) or
create your own profile (Creating a Custom Activity Profile,
page 15).
Select Menu > > Open Water.
1
Go outside and wait while the device locates satellites.
2
It may take a few minutes.
The satellite bars turn green when the device is ready.
Select to start the timer.
3
After you complete your activity, select > Save.
4
Swim Terminology
Length: One trip down the pool.
Interval: One or more consecutive lengths. A new interval starts
after a rest.
Stroke: A stroke is counted every time your arm wearing the
device completes a full cycle.
Swolf: Your swolf score is the sum of the time for one pool
length and the number of strokes for that length. For
example, 30 seconds plus 15 strokes equals a swolf score of
45. Swolf is a measurement of swimming efficiency and, like
golf, a lower score is better.
Indoor Activities
The Forerunner device can be used for training indoors, such as
running on an indoor track or using a stationary bike.
GPS is turned off for indoor activities. When running or walking
with GPS turned off, speed, distance, and cadence are
calculated using the accelerometer in the device. The
accelerometer is self-calibrating. The accuracy of the speed,
distance, and cadence data improves after a few outdoor runs or
walks using GPS.
Workouts
You can create custom workouts that include goals for each
workout step and for varied distances, times, and calories. You
can create workouts using Garmin Connect or select a training
plan that has built-in workouts from Garmin Connect, and
transfer them to your device.
You can schedule workouts using Garmin Connect. You can
plan workouts in advance and store them on your device.
Following a Workout From the Web
Before you can download a workout from Garmin Connect, you
must have a Garmin Connect account (Garmin Connect,
page 11).
Connect the device to your computer.
1
Go to www.garminconnect.com.
2
Create and save a new workout.
3
Select Send to Device, and follow the on-screen
4
instructions.
Disconnect the device.
5
Starting a Workout
Before you can start a workout, you must download a workout
from your Garmin Connect account.
Select Menu > Training > My Workouts.
1
Select a workout.
2
Select Do Workout.
3
Select to start the workout.
4
After you begin a workout, the device displays each step of the
workout, the target (if any), and current workout data.
About the Training Calendar
The training calendar on your device is an extension of the
training calendar or schedule you set up in Garmin Connect.
After you have added a few workouts to the Garmin Connect
calendar, you can send them to your device. All scheduled
workouts sent to the device appear in the training calendar list
by date. When you select a day in the training calendar, you can
view or do the workout. The scheduled workout stays on your
device whether you complete it or skip it. When you send
scheduled workouts from Garmin Connect, they overwrite the
existing training calendar.
Using Garmin Connect Training Plans
Before you can download and use a training plan, you must
have a Garmin Connect account (Garmin Connect, page 11).
You can browse your Garmin Connect account to find a training
plan, schedule workouts, and send them to your device.
Connect the device to your computer.
1
From your Garmin Connect account, select and schedule a
2
training plan.
Review the training plan in your calendar.
3
Select , and follow the on-screen instructions.
4
Interval Workouts
You can create interval workouts based on distance or time. The
device saves your custom interval workout until you create
another interval workout. You can use open intervals for track
workouts and when you are running a known distance. When
you select , the device records an interval and moves to a
rest interval.
Creating an Interval Workout
Select Menu > Training > Intervals > Edit > Interval >
1
Type.
Select Distance, Time, or Open.
2
TIP: You can create an open-ended interval by setting the
type to Open.
2 Training
Select Duration, enter a distance or time interval value for
3
the workout, and select .
Select Rest > Type.
4
Select Distance, Time, or Open.
5
If necessary, enter a distance or time value for the rest
6
interval, and select .
Select one or more options:
7
• To set the number of repetitions, select Repeat.
• To add an open-ended warm up to your workout, select
Warm Up > On.
• To add an open-ended cool down to your workout, select
Cool Down > On.
Starting an Interval Workout
Select Menu > Training > Intervals > Do Workout.
1
Select .
2
When your interval workout has a warm up, select to
3
begin the first interval.
Follow the on-screen instructions.
4
When you complete all of the intervals, a message appears.
Stopping a Workout
• At any time, select to end a workout step.
• At any time, select to stop the timer.
Canceling a Workout
During the workout, hold .
1
Select Cancel Workout > Yes.
2
Using Virtual Partner
Your Virtual Partner is a training tool designed to help you meet
your goals. You can customize the Virtual Partner to train (run,
bike, other) at a target speed or pace.
NOTE: Virtual Partner is not available in swim mode.
Select an activity profile.
1
Select Menu > Activity Settings > Data Screens > Virtual
2
Partner > Status > On.
Select Set Pace or Set Speed.
3
You can use pace or speed as your format (Format Settings,
page 17).
Enter a value.
4
Select to start the timer.
5
During your activity, select or to view the Virtual Partner
6
screen and see who is leading.
®
Setting a Training Target
The training target feature works with the Virtual Partner feature
so you can train toward a set distance, distance and time,
distance and pace, or distance and speed goal. This feature can
be used with the running, cycling, and other single sport activity
profiles (excludes swimming). During your training activity, the
device gives you real-time feedback about how close you are to
achieving your training target.
Select Menu > Training > Set a Target.
1
Select an option:
2
• Select Distance Only to select a preset distance or enter
a custom distance.
• Select Distance and Time to select a distance and time
target.
You can enter the time target, use prediction (based on
your VO2 max. estimate), or use your personal record
time.
• Select Distance and Pace or Distance and Speed to
select a distance and pace or speed target.
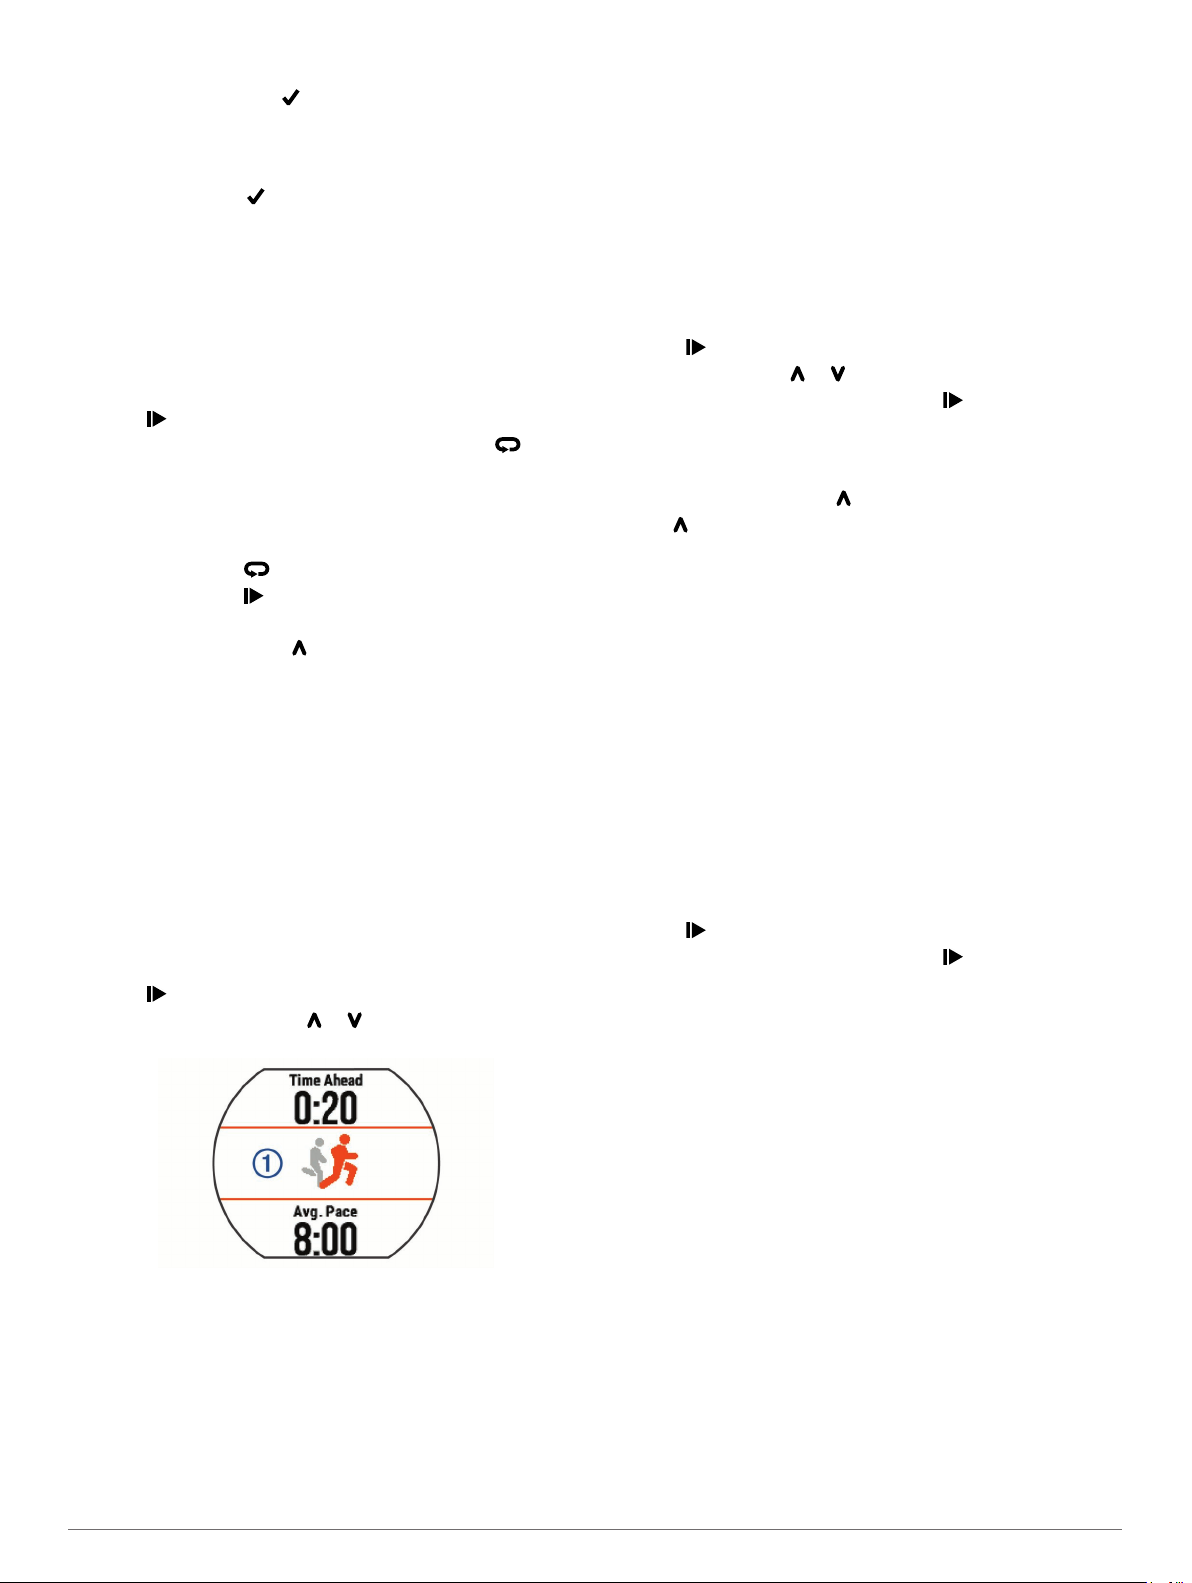
The training target screen displays your estimated finish time.
The estimated finish time is based on your current
performance and the time remaining.
Select to start the timer.
3
If necessary, select or to view the screen.
4
After you complete your activity, select > Save.
5
A summary screen appears indicating that you finished
ahead of or behind the target.
Cancelling a Training Target
During the activity, select to view the target screen.
1
Hold .
2
Select Cancel Target > Yes.
3
Racing a Previous Activity
You can race a previously recorded or downloaded activity. This
feature can be used with the running, cycling, and other single
sport activity profiles (excludes swimming). This feature works
with the Virtual Partner feature so you can see how far ahead or
behind you are during the activity.
Select Menu > Training > Race an Activity.
1
Select an option:
2
• Select From History to select a previously recorded
activity from your device.
• Select Downloaded to select an activity you downloaded
from your Garmin Connect account.
Select the activity.
3
The Virtual Partner screen displays your estimated finish
time.
Select to start the timer.
4
After you complete your activity, select > Save.
5
A summary screen appears indicating that you finished the
race ahead of or behind the previously recorded or
downloaded activity.
Personal Records
When you complete an activity, the device displays any new
personal records you achieved during that activity. Personal
records include your fastest time over several typical race
distances and longest run or ride.
Viewing Your Personal Records
Select Menu > My Stats > Records.
1
Select a sport.
2
Select a record.
3
Select View Record.
4
Restoring a Personal Record
You can set each personal record back to the one previously
recorded.
Select Menu > My Stats > Records.
1
Select a sport.
2
Select a record to restore.
3
Select Previous > Yes.
4
NOTE: This does not delete any saved activities.
Training 3
Clearing a Personal Record
Select Menu > My Stats > Records.
1
Select a sport.
2
Select a record to delete.
3
Select Clear Record > Yes.
4
NOTE: This does not delete any saved activities.
Clearing All Personal Records
Select Menu > My Stats > Records.
1
NOTE: This does not delete any saved activities.
Select a sport.
2
Select Clear All Records > Yes.
3
The records are deleted only for that sport.
Tips for Erratic Heart Rate Data
If the heart rate data is erratic or does not appear, you can try
these tips.
• Clean and dry your arm before putting on the device.
• Avoid wearing sunscreen under the device.
• Wear the device above your wrist bone. The device should
be snug but comfortable.
NOTE: You can try wearing the device higher on your
forearm. You can try wearing the device on your other arm.
• Warm up for 5 to 10 minutes and get a heart rate reading
before starting your activity.
NOTE: In cold environments, warm up indoors.
• Rinse the device with fresh water after each workout.
Heart Rate Features
The Forerunner device has a wrist-based heart rate monitor and
is also compatible with ANT+® chest heart rate monitors. You
can view wrist-based heart rate data on the heart rate widget.
When both wrist-based heart rate and ANT+ heart rate data are
available, your device uses the ANT+ heart rate data. You must
have a heart rate monitor to use the features described in this
section.
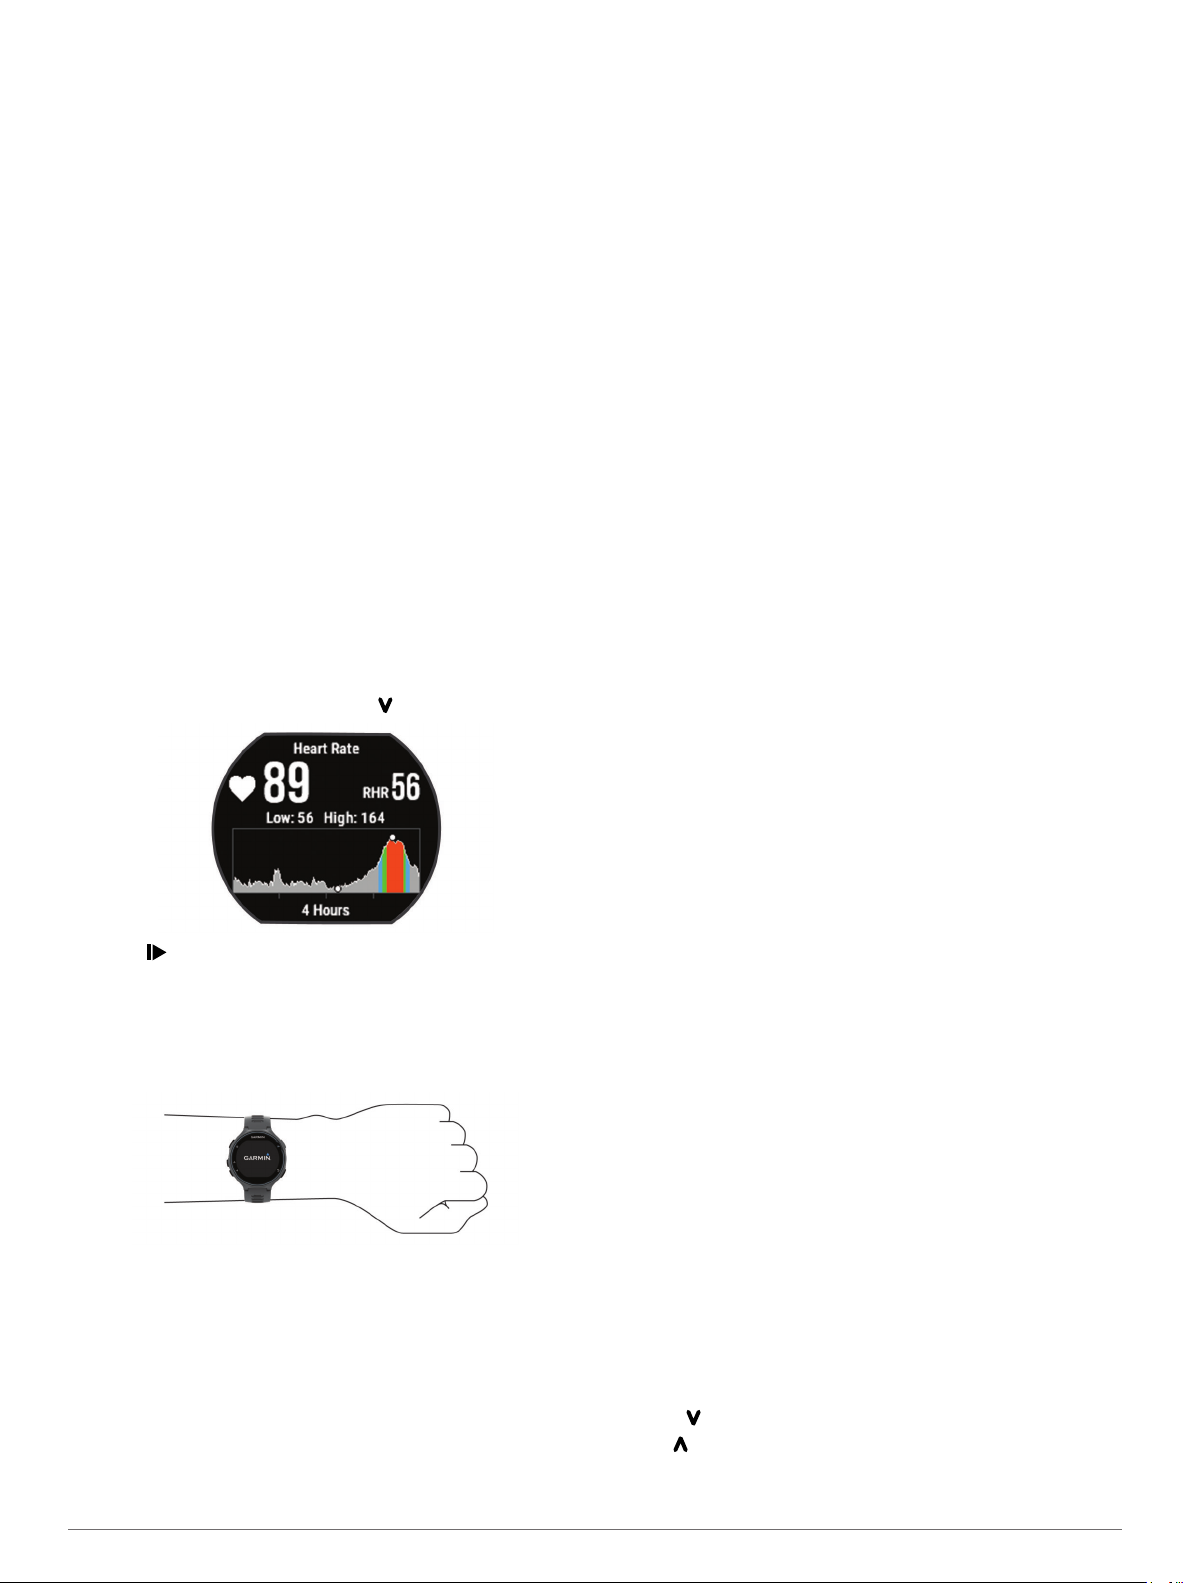
Viewing the Heart Rate Widget
The widget displays your current heart rate in beats per minute
(bpm), resting heart rate for today, and a graph of your heart
rate.
From the time of day screen, select .
1
Select to view your average resting heart values for the
2
last 7 days.
Wearing the Device and Heart Rate
• Wear the Forerunner device above your wrist bone.
NOTE: The device should be snug but comfortable, and it
should not move while running or exercising.
• Do not damage the heart rate sensor on the back of the
device.
• See Tips for Erratic Heart Rate Data, page 4 for more
information about wrist-based heart rate.
Turning Off the Wrist Heart Rate Monitor
The default heart rate setting for the Forerunner is Auto. The
device uses wrist-based heart rate automatically unless there is
an accessory heart rate monitor connected to the device.
Select Menu > Settings > Heart Rate Monitor > Off.
Setting Your Heart Rate Zones
The device uses your user profile information from the initial
setup to determine your default heart rate zones. You can
manually enter heart rate values and set the range for each
zone. The device supports separate heart rate zones for
running, cycling, and swimming.
Select Menu > My Stats > User Profile > Heart Rate.
1
Select Max. HR, and enter your maximum heart rate.
2
Select LTHR, and enter your lactate threshold heart rate.
3
Select Resting HR, and enter your resting heart rate.
4
Select Zones > Based On.
5
Select an option:
6
• Select BPM to view and edit the zones in beats per
minute.
• Select %Max. HR to view and edit the zones as a
percentage of your maximum heart rate.
• Select %HRR to view and edit the zones as a percentage
of your heart rate reserve (maximum heart rate minus
resting heart rate).
• Select %LTHR to view and edit the zones as a percentage
of your lactate threshold heart rate.
Select Add Sport Heart Rate to add different zones for each
7
sport.
Select a zone, and enter a value for each heart rate zone.
8
Letting the Device Set Your Heart Rate Zones
The default settings allow the device to detect your maximum
heart rate and set your heart rate zones as a percentage of your
maximum heart rate.
• Verify that your user profile settings are accurate (Setting Up
Your User Profile, page 15).
• Run often with the wrist or chest heart rate monitor.
• Try a few heart rate training plans, available from your
Garmin Connect account.
• View your heart rate trends and time in zones using your
Garmin Connect account.
Broadcasting Heart Rate Data to Garmin
®
Devices
You can broadcast your heart rate data from your Forerunner
device and view it on paired Garmin devices. For example, you
can broadcast your heart rate data to an Edge® device while
cycling, or to a VIRB action camera.
NOTE: Broadcasting heart rate data decreases battery life.
Select to view the heart rate widget.
1
Hold .
2
Select Broadcast Heart Rate.
3
4 Heart Rate Features
The Forerunner device starts broadcasting your heart rate
data, and appears.
NOTE: You can view only the heart rate page while
broadcasting heart rate data.
Pair your Forerunner device with your Garmin ANT+
4
compatible device.
NOTE: The pairing instructions differ for each Garmin
compatible device. See your owner's manual.
TIP: To stop broadcasting your heart rate data, select any
key, and select Yes.
Running Dynamics
You can use your compatible Forerunner device paired with the
HRM-Run™ accessory or HRM-Tri accessory to provide realtime feedback about your running form. If your Forerunner
device was packaged with the heart rate monitor, the devices
are already paired.
The heart rate monitor has an accelerometer in the module that
measures torso movement in order to calculate running metrics.
NOTE: The HRM-Run accessory and the HRM-Tri accessory
are compatible with several ANT+ fitness products and can
display heart rate data when paired. The running dynamics
features are available on only some Garmin devices.
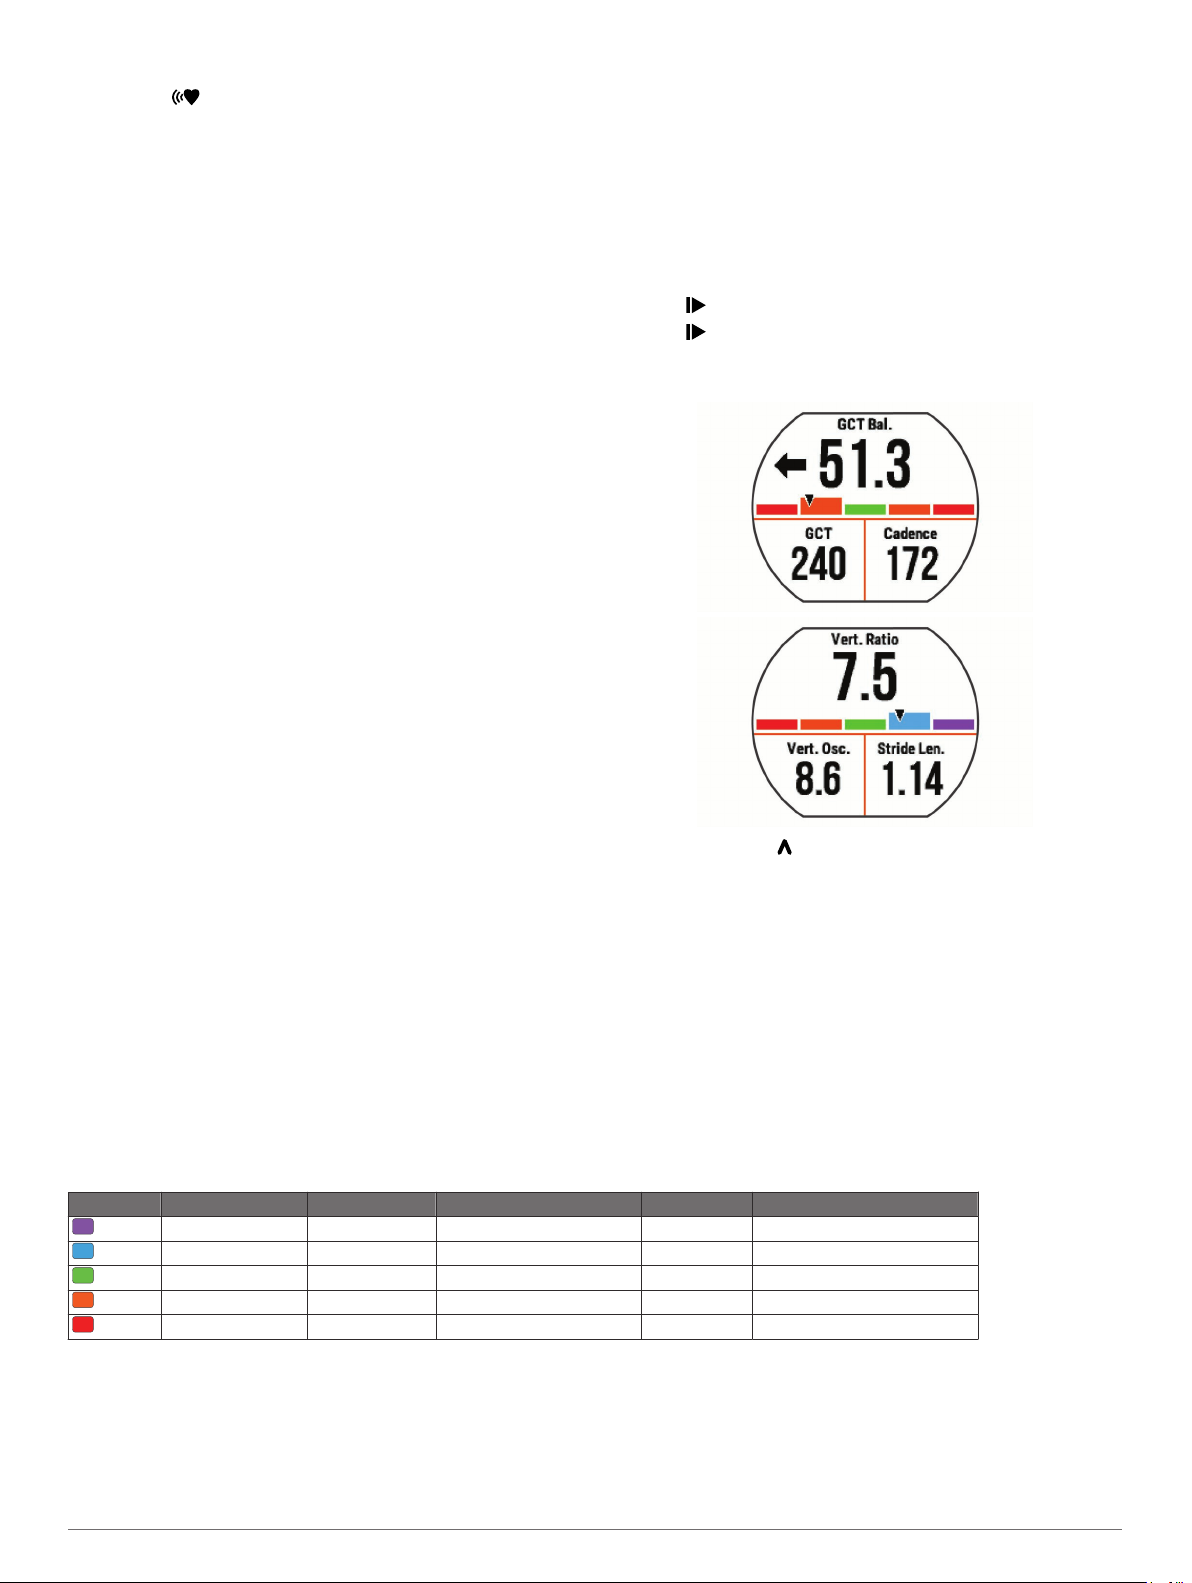
Cadence: Cadence is the number of steps per minute. It
displays the total steps (right and left combined).
Vertical oscillation: Vertical oscillation is your bounce while
running. It displays the vertical motion of your torso,
measured in centimeters for each step.
Ground contact time: Ground contact time is the amount of
time in each step that you spend on the ground while
running. It is measured in milliseconds.
NOTE: Ground contact time is not available while walking.
Ground contact time balance: Ground contact time balance
displays the left/right balance of your ground contact time
while running. It displays a percentage. For example, 53.2
with an arrow pointing left or right.
Stride length: Stride length is the length of your stride from one
footfall to the next. It is measured in meters.
Vertical ratio: Vertical ratio is the ratio of vertical oscillation to
stride length. It displays a percentage. A lower number
typically indicates better running form.
Training with Running Dynamics
Before you can view running dynamics, you must put on the
HRM-Run accessory or HRM-Tri accessory and pair it with your
device (Pairing ANT+ Sensors, page 13).
If your Forerunner was packaged with the heart rate monitor, the
devices are already paired, and the Forerunner is set to display
running dynamics.
Select , and select a running activity profile.
1
Select .
2
Go for a run.
3
Scroll to the running dynamics screens to view your metrics.
4
If necessary, hold to edit how the running dynamics data
5
appears.
Color Gauges and Running Dynamics Data
The running dynamics screens display a color gauge for the primary metric. You can display cadence, vertical oscillation, ground
contact time, ground contact time balance, or vertical ratio as the primary metric. The color gauge shows you how your running
dynamics data compare to those of other runners. The color zones are based on percentiles.
Garmin has researched many runners of all different levels. The data values in the red or orange zones are typical for less
experienced or slower runners. The data values in the green, blue, or purple zones are typical for more experienced or faster
runners. More experienced runners tend to exhibit shorter ground contact times, lower vertical oscillation, lower vertical ratio, and
higher cadence than less experienced runners. However, taller runners typically have slightly slower cadences, longer strides, and
slightly higher vertical oscillation. Vertical ratio is your vertical oscillation divided by stride length. It is not correlated with height.
NOTE: The color gauge for ground contact time balance is different (Ground Contact Time Balance Data, page 5).
Go to www.garmin.com for more information on running dynamics. For additional theories and interpretations of running dynamics
data, you can search reputable running publications and websites.
Color Zone Percentile in Zone Cadence Range Vertical Oscillation Range Vertical Ratio Ground Contact Time Range
Purple >95 >183 spm <6.4 cm <6.1% <218 ms
Blue 70–95 174–183 spm 6.4–8.1 cm 6.1–7.4% 218–248 ms
Green 30–69 164–173 spm 8.2–9.7 cm 7.5–8.6% 249–277 ms
Orange 5–29 153–163 spm 9.8–11.5 cm 8.7–10.1% 278–308 ms
Red <5 <153 spm >11.5 cm >10.1% >308 ms
Ground Contact Time Balance Data
Ground contact time balance measures your running symmetry and appears as a percentage of your total ground contact time. For
example, 51.3% with an arrow pointing left indicates the runner is spending more time on the ground when on the left foot. If your
data screen displays both numbers, for example 48–52, 48% is the left foot and 52% is the right foot.
Heart Rate Features 5
 Loading...