

Sid Meier’s
Create A New Nation
™
TECHNICAL SUPPLEMENT
HARDWARE & SYSTEM REQUIREMENTS
To play Colonization, your computer must have:
• a 386SX processor or better (For best play, we recommend at least
a full 386 with a system speed of 33MHz or more),
• at least 575,000 bytes (approx. 565 Kb) of free conventional
memory,
• VGA graphics or better, and
• DOS version 5.0 or higher.
For ease of play and convenience, we strongly recommend that your
computer system include a mouse.
1

SOFTWARE COMPATIBILITY ISSUES
Please note that this list includes only the known conflicts and
incompatibilities. Since no test procedure can ever be totally
comprehensive, you may run into undiscovered problems. Please
consult with Customer Service if you do.
This game has not been tested under Microsoft Windows; therefore we
suggest you do not use it with Windows. Chances are very good that the
two will not work together.
We strongly recommend that you not have any Terminate-and-StayResident programs (TSRs) other than disk caching programs (SMARTDRV,
for example) loaded into memory when playing Colonization. Not only
will they decrease the amount of free memory available (thus slowing the
game), but there may be unpredictable interactions.
KEYBOARD CONTROLS
All the features of Colonization are available through keyboard control
except Trade Routes. If you do not have a mouse attached to your
system, or if you prefer using the keyboard, the control system
described here is for you.
THE MAP
All the commands available on the map are included in the pull-down
menus at the top of the screen. To open one of these menus, hold down
[Alt] and press the letter that is highlighted in the menu name. (For
example, to open the game menu, you would press [Alt]-[G].)
Once the menu is open, there are two ways to select one of the
listed features. You can use the arrow keys to scroll the highlight bar to
the feature you want, then press [Enter] to select it. If there is a shortcut
key (a “hot key”) listed alongside the feature, you can simply press that
key instead.
2

Advisers Shortcuts
Rather than going through the menu, you can consult your advisers at
any time (even when not on the map) using the following shortcuts:
Religious Adviser . . . . . . . . .[F2]
Continental Congress
Adviser . . . . . . . . . . . . . . . . .[F3]
Labor Adviser . . . . . . . . . . . .[F4]
Economic Adviser . . . . . . . . .[F5]
Colony Adviser . . . . . . . . . . .[F6]
Naval Adviser . . . . . . . . . . . .[F7]
Foreign Affairs Adviser . . . . .[F8]
Indian Adviser . . . . . . . . . . . .[F9]
Current Colonization Score . .[F10]
Map Commands
The command keystrokes for the map view are listed below. Most of
these keys give commands to the active unit (the flashing one) or
whichever unit the highlight box currently surrounds.
Move active unit . . . .Arrow Keys
Activate unit . . . . . . . . . . . . . . .A
Wait for next unit . . . . . . . . . . .W
Active unit, do nothing
this turn . . . . . . . . . . .[Spacebar]
Fortify active unit . . . . . . . . . . .F
Put active unit on Sentry . . . . . .S
Build colony with active unit . . .B
Active unit, join colony . . . . . . .B
Clear forest with
active Pioneer unit . . . . . . . . . .P
Plow field with
active Pioneer unit . . . . . . . . . .P
Build Road with
active Pioneer unit . . . . . . . . . .R
Active unit, Go
to a named place . . . . . . . . . . .G
Active ship, dump
cargo Overboard . . . . . . . . . . .O
Active ship/wagon, Load
most valuable cargo . . . . . . . . .L
Active ship/wagon, Unload
most valuable cargo . . . . . . . . .U
Disband (delete)
active unit . . . . . . . . . . . .[Shift]-D
Put display in View mode . . . . .V
Put display in Move mode . . . .M
Got to the Europe screen . . . . .E
Zoom in . . . . . . . . . . . . . . . . . .Z
Zoom out . . . . . . . . . . . . . . . . .X
Show Hidden terrain . . . . . . . . .H
Center view on cursor
or active unit . . . . . . . . . . . . . .C
Get terrain information . . . . . .[F1]
Exit game . . . . . . . . . . . . . .[ESC]
THE COLONY DISPLAY
Rather than menus, the colony display has colonists and units. If any
are present in the colony, one is highlighted. To select the highlighted
unit, tap [Tab]. The [Tab] key moves the highlight between the different
views, while the arrow keys move the highlight within the active view.
3

Key Commands
The following key commands are available on the colony display:
Move highlight from view to view . . . . . . . . . . . . . . . . . . . . [Tab]
Move highlight within a view . . . . . . . . . . . . . . . . . . Arrow keys
Open Jobs menu for a colonist/unit . . . . . . . . . . . . . . . . . . [Enter]
Load most valuable cargo . . . . . . . . . . . . . . . . . . . . . . . . . . . . L
Load all of selected cargo onto selected ship/wagon . . . . . . . [=]
Load some of selected cargo onto selected ship/wagon . . . . . [+]
Unload cargo from ship . . . . . . . . . . . . . . . . . . . . . . . . . . . . . .U
Unload all of selected cargo from ship/wagon . . . . . . . . . . . . . [-]
Unload some of selected cargo from ship/wagon . . . . . . . . . . [_]
Toggle between views in Multi-function display . . . . . . . . . . . . M
Show Production view in Multi-function display . . . . . . . . . . . . . 1
Show Units view in Multi-function display . . . . . . . . . . . . . . . . . 2
Show Construction view in Multi-function display . . . . . . . . . . . 3
Toggle production Numbers on/off . . . . . . . . . . . . . . . . . . . . . . N
Open Construction menu . . . . . . . . . . . . . . . . . . . . . . . . . . . . . C
Buy the current construction project . . . . . . . . . . . . . . . . . . . . B
Get information about the selected item . . . . . . . . . . . . . . . . [F1]
Exit and return to the Map . . . . . . . . . . . . . . . . . . . . . . . . . [ESC]
SOME EXAMPLES
To change the orders of a unit: [Tab] to select the unit, press [Enter] to
call up the orders menu, then highlight the item you want on the
menu and press [Enter] again.
Load cargo onto ship or wagon: [Tab] to select the ship you want to
load (move the cursor to a different ship, if you have to, using the
arrow keys), [Tab] to select the warehouse strip at the bottom of the
screen; move the cursor to the cargo you wish to load, then press [=]
to load all of that cargo (up to 100) or [+] ([Shift]-[=]) to load some of it.
Load all of the most valuable cargo: Tap the load key ([L]) to load the
most valuable cargo currently available.
Move a colonist to a different square in the area view: Use [Tab] and
the arrow keys to select the colonist you want to move (the highlight
box flashes when the colonist is selected), then move the white
cursor to the square to which you wish to move that colonist. Press
[Enter] to command the colonist to move.
4

EUROPE DISPLAY
The Europe display functions much like the colony display. [Tab]
moves the highlight from area to area, and the arrow keys move it within
each area. [Enter] selects the highlighted item or opens a menu related to
the highlighted item. The menus themselves function exactly like those
on the map.
The key commands available at the Europe display are:
Move highlight from view to view . . . . . . . . . . . . . . . . . . . . [Tab]
Move highlight within a view . . . . . . . . . . . . . . . . . . Arrow keys
Open dock options menu for a Colonist. . . . . . . . . . . . . . . [Enter]
Open harbor options menu for a Ship . . . . . . . . . . . . . . . . [Enter]
Buy full load of selected cargo . . . . . . . . . . . . . . . . . . . . . . . . . L
Buy full load of selected cargo . . . . . . . . . . . . . . . . . . . . . . . . [=]
Buy some of selected cargo. . . . . . . . . . . . . . . . . . . . . . . . . . [+]
Sell cargo from ship . . . . . . . . . . . . . . . . . . . . . . . . . . . . . . . . . U
Sell all of selected cargo . . . . . . . . . . . . . . . . . . . . . . . . . . . . . [-]
Sell some of selected cargo . . . . . . . . . . . . . . . . . . . . . . . . . . [_]
Open recruit menu . . . . . . . . . . . . . . . . . . . . . . . . . . . . . . R or 1
Open purchase menu. . . . . . . . . . . . . . . . . . . . . . . . . . . . P or 2
Open train menu . . . . . . . . . . . . . . . . . . . . . . . . . . . . . . . T or 3
Get information about the selected item . . . . . . . . . . . . . . . . . F1
Exit and return to the map . . . . . . . . . . . . . . . . . . . . . . ESC or E
ALSO:
Special thanks to Murray Taylor for “debabelizing” and to Errol Roberts
for the “dog’s teeth”.
5

Sid Meier’s
Create A New Nation
™
Instruction
Manual
®
STRATEGY
INTRODUCTION
1

BACKGROUND
Colonization puts you in the role of Viceroy of the New World. You
are sent by your King and country to establish colonies in the newlydiscovered Americas that lie to the west. You face many of the same
challenges that faced colonial organizers of the time—competition
from other Old World powers, strange native cultures, the problems
of establishing profitable trade programs, and the problems of
organizing an army from a rag-tag band of colonists.
The game begins with the European discovery of the Americas
(1500) and continues until approximately the time of the American
Revolution (1800). In the beginning of the game you are given a
trading/exploration ship and a small group of colonists. You have no
knowledge of what lies ahead of your ship, so you must explore until
you find a suitable spot to lay down your first colony. As your
colonies grow larger and larger, you inevitably encounter native
populations and are confronted with competing imperial powers
from the Old World.
To be successful in Colonization, you must balance your need for
military might with your need for essentials. You must decide early
what your strategy is and pursue it relentlessly, but be flexible
enough to adjust to a changing situation. It is very important to have
a consistent policy with the natives, because your handling of
those relationships are critical. Finally, you must build a colonial
society that has the infrastructure to survive a test by fire—
the War of Independence.
In Colonization, you have the chance to change history. As a
colonial power, you decide the policies, you make the plans, you
choose what is important and what is insignificant. Finally, you will
be called upon to decide when to declare independence from your
mother country.
The French, British, Spanish, and Dutch competed in the New
World for dominance. But only the British and Spanish remained
when the dust settled.
What happened to the Dutch; what did they do wrong?
And the French… there are still French-speaking peoples in
Canada and Louisiana, but they do not predominate.
Why?
2

COLONIES AND COLONISTS
The major problem the real colonists had upon arrival in the
New World was survival. They could bring very limited food
supplies and tools across the Atlantic on their initial voyage, so
colonists had to quickly establish a steady source of nutrition to
enable them to live. Many colonial enterprises, such as those at
Roanoke Island and countless others in the Caribbean, vanished
soon after they arrived, and starvation was probably the cause.
Others, like the English settlements in Virginia, were just barely
able to scrape by for the first several years—and without the aid of
native tribes they very likely would have perished.
The colonists of New England in Massachusetts were lucky
enough to settle in an area with exceptionally friendly, helpful
natives. They established and maintained with the Indians a
peace that lasted for many generations, to the great benefit of the
colonies. Without this forbearance and compassion from the
natives, this colony, too, would have vanished.
Resources: One thing the New World had in abundance was
resources. Colonists had to learn the best ways to cultivate these
new foods and staples like corn, tobacco, cotton, and so on, to
establish a viable economy. Of course in Mesoamerica, the
Spanish were after different resources—gold and silver. The
Spanish sought to exploit the existing cultures to enrich their royal
coffers. Frenchman found a different sort of wealth in the pelts of
beaver and otter along the waterways of North America, and in
the fisheries off the Great Northern Banks. The Dutch were
interested in a vast global trading empire that would dominate the
world market, and beaver was at the center of their North
American enterprise. Whatever their approach to the exploitation
of the New World, the natural resources of the largely
undeveloped Americas were the catalyst that kept the Europeans
coming to the New World in hopes of riches.
Colonies: Your colonies act as processing centers for the
resources found in the countryside. The people in a colony work
the area surrounding their settlement to grow food, to harvest
cash crops (cotton, tobacco, sugar cane), to mine ore and silver,
and to trap the elusive beaver. Inside each colony is a small
cottage industry capable of turning out a meager supply of
processed goods like cloth, rum, or cigars.
Some colonists can act as lumberjacks to provide timber
needed for internal building. As the population of a colony
increases, it can erect more and more buildings. A carpenter's
shop allows colonists to add improvements such as a stockade
for protection from angry natives, docks which allow the
development of a fishing enterprise, or larger processing facilities
to improve the output of the colonial industries.
3

Skills: Possibly the most important resource you have at your
disposal is the skills of your people. Many of your colonists arrive
in the New World as unskilled, indentured servants or petty
criminals. Others arrive as free colonists ready to work. Still others
bring skills learned and practiced for many generations in Europe.
These skilled workers can be very valuable because their output
is far superior to that of ordinary, unskilled workers.
Education: Your colonies can construct schools so that the
skilled can teach the unskilled what they know. Education is a vital
aspect of creating a viable society. Petty criminals can learn to be
servants, and servants can earn their freedom through education.
Free colonists can become masters of their new trade—capable of
teaching others.
Indian Lore: Expertise in some areas, such as tobacco planting,
fur trapping, and wood lore, can be learned from natives, so
maintaining friendly relations with the Indians is important. As your
presence in the New World increases, they become uneasy,
restless, angry and somewhat unpredictable, unless you trade
with them and succumb to their demands. You must maintain
friendly relations in order to learn what they have to teach.
Trade: Once your colonists have a thriving cottage industry, are
producing enough food to sustain colonial life, and have learned
to grow cash crops, you can begin to build an economy. To do
this, you must trade with your home country. The market sets the
prices of goods and commodities, and if you flood the market
you’ll see prices fall. You must be careful, therefore, to create a
balanced economy. As your colonial treasury grows and your
people learn more and more skills, you can convert your cottage
industry into a much larger production machine.
Taxation: Your king sees your colonies as a mere extension of
his personal domain and as a source of revenues to support his
international activities. From time to time, he increases your tax
rate, enabling him to take more profit from your trade. He may
also increase taxes whenever his government intervenes upon
your behalf.
Ships: In order to maintain your trade, and protect your
commerce from privateers and other unfriendly sea forces, you’ll
need to establish a naval presence in coastal waters. You can
purchase cargo ships and warships from the Crown (your king’s
government) or you can build them yourself. The latter strategy
requires a coastal colony with a shipyard and plenty of lumber.
There are three types of cargo ships (caravels, merchantmen, and
galleons) and two warships (privateers and frigates). Sooner or
later your European rivals will ply the coastal waters with their
own frigates and privateers, and blockade your main harbors—
you must be ready for this. A third type of warship, the man-o-war,
does not appear in American waters until the War of
Independence begins.
4

Ore: In the long term, one of the most important resources
found in the New World is an abundance of metal ores. Your
blacksmiths can process this ore to create tools and other metal
products. Gunsmiths can then use the tools to fashion muskets.
As European competition heats up, you’ll find it more and more
necessary to stockpile muskets.
Founding Fathers: From the time your people build their first
colony, great issues are debated in the Town Halls. There are five
categories of discussion: trade, politics, military, religion, and
exploration. As the discussions continue, great ideas are formed—
ideas that fundamentally affect the course of history. As your
colonies grow, these ideas—embodied in the men who articulate
them—increase the potential inherent in your colonies as an
independent nation.
Independence: Ultimately, if your colonies grow and become
self-sufficient, your people will desire independence. When you
feel ready to take on the Royal Expeditionary Force, which you
can see growing throughout the game, you can declare
independence. If you successfully defend your colonial empire,
you win the game.
TO PLAYERS OF CIVILIZATION
One of the main goals in the design of Colonization was to
provide a rewarding experience to those who loved Civilization.
This meant maintaining a lot of the same features that were used
so successfully in Civilization. For this reason, if you played
Civilization, you’ll find a lot that is familiar—particularly in the user
interface. Many of the same game mechanics have found a life
here, as well.
If you’ve played Civilization a lot, probably the best way to learn
this game is to jump right in and start to experiment; if you are
unfamiliar with Civilization, read on, and have fun.
Even if you are familiar with Civilization, we strongly encourage
you to play one game at the Discoverer level and take advantage
of the tutorial.
5

BEFORE YOU START
This manual contains details and tips on playing Colonization. It
also provides background material about the topic and suggestions
for further reading on the Age of Discovery. The manual applies to all
computer systems, except where indicated.
Components: The game includes three 3.5" disks, this manual,
a player-aid card, and a short technical supplement that provides
technical information not included in the manual. If your copy of
Colonization does not include all these components, contact our
customer service department for help: (410) 771-1151.
Installation: To install Colonization onto your hard drive: Insert
Disk A into your floppy drive, and type INSTALL. Follow the
instructions that appear on the screen thereafter.
Learning the Game: There are essentially two ways to approach
learning this game: you can study the manual first (Chapters I
through VII), or you can just begin playing, referring to the manual
when you have questions. The table of contents and the index will
help you pinpoint information about a particular aspect of the game.
Whichever method you prefer, we recommend you read the
introduction of this manual first to get an idea of your goals.
INTERFACE
This section is for players using an IBM-compatible machine. If
you’re playing a different version of the game, refer to the
technical supplement for details about the interface.
Colonization is designed to be fully operational using a variety
of controllers. It can be operated using the mouse only, the
keyboard only, or with a combination of both. The easiest way to
control the game is by using both mouse and keyboard. This
manual is written along these lines.
A description of how to operate the game with keyboard only
appears in the technical supplement.
6

Using the Mouse: We assume here that the user understands
basic mouse functionality, like clicking and dragging. Since your
mouse has two buttons, the interface distinguishes between them.
The following definitions refer to their usage in this manual.
• A “click” refers to placing the pointer over an area of the
screen and clicking with the left mouse button.
• A “click-and-hold” refers to holding the left mouse button down
until the cursor changes to a direction arrow.
• A “right-click” is a click with the right mouse button.
• A “drag” means holding the left button down while moving the
mouse.
• A “Shift-drag” is dragging while holding down the Shift key.
• “Opening a menu” requires a “click” on the name of the menu
in the menu bar.
• “Selecting” means clicking on something.
• “Pressing a button” with the mouse means “clicking” on the
screen button.
Right Mouse Button: In general, the right mouse button provides
the user with information about whatever he has right-clicked on.
Not everything responds to a right-click, but it’s almost always
worth a try.
Menu Bar: Along the top of the main display (see Map Display),
is the menu bar. The game can be played exclusively using menu
bar commands accessed by mouse.
Short Cut Keys: Most menu items have a short-cut key
associated with them: this key is indicated on the menu by a
highlighted letter that corresponds to the key that can be used
instead of the mouse and menus.
PRE-GAME OPTIONS
When you start Colonization, you are required to make a
number of choices about the game you wish to play. To start the
game, follow the instructions in the technical supplement. After
the title and credits animation, you are asked some questions.
Game/World Options
In Colonization you have a variety of choices concerning the
world in which you wish to play.
Start Game in NEW WORLD: If you choose this option, the
computer creates an “undiscovered America” (randomly
generated), so you can get the sense of what it might have been
like to actually discover and explore a “New World.”
Start Game in AMERICA: This option causes the computer to
create a world in which the Americas are accurately mapped
according to real-world geography.
7

Customize New World: Choose this option if you want to have
some control over the world that is created. You can adjust the
average size of land masses, the amount of moisture in the world,
whether you want the climate to be temperate, cold, or tropical,
and so on. All of these choices have a dramatic effect upon the
final geography of the New World.
Load Game: Use this option to continue a game that you have
previously saved. There are 10 slots for saving games during play
(see Save/Load Game). The next-to-last and last slots of the saved
game menu contain autosaved games from the most recently
played game, if the autosave feature was on (see Game Options).
Other slots contain games that you have previously saved.
View Hall of Fame: This option shows the Hall of Fame screen
– all the top scoring games you’ve played.
Difficulty Levels
The next set of options allows you to select the difficulty level
at which you wish to play. A number of factors are adjusted at
each level to make the game more or less difficult to win.
Discoverer: This is the easiest level and is recommended for
novice players.
Explorer: Your opponents are now a little stronger and smarter,
and the natives, a little less friendly. This level is recommended for
the occasional player who wants an interesting game, but doesn’t
want too difficult a challenge.
Conquistador: This level is recommended for those who are
experienced with Colonization and who like a challenging game
experience. The enemy powers are substantially more aggressive
and cunning, but still probably somewhat below your level.
Governor: At this level, your opponents are evenly matched
with you. Skilled players will generally like this level the best; it is
a strong challenge, and victory is never guaranteed.
Viceroy: This is the most difficult level at which to play. You can
win if you are very skilled, have lots of experience, and make few
mistakes. This level can be won, but not consistently.
Choose Your Nationality
Here you select the nationality you wish to represent in the
game. Each nationality has a special power or condition that
differentiates it from the other three. These powers and conditions
can fundamentally affect the strategy you use to play the game.
English Power: During the Age of Discovery, England was
steeped in religious strife and dissension. The colonies became a
safe haven for religious groups looking for freedom from
persecution.
• Accordingly, the English produce a greater number of
immigrants than the other nations.
8

French Power: The primary strength of the French colonial
endeavor lay in their ability to cooperate with the native
population. Alliances and trade agreements were made and
maintained between French colonists and native tribes for many
years. While these relationships were not without violent incident,
they were largely successful.
• The French have the ability to live among the natives more
peacefully than other nations.
Spanish Power: Spain had recently completed a centuries-long
war of re-conquest of the Iberian Peninsula and had an abundance
of military-minded young men spoiling for further conquest. The
Native American population offered a good target for just such
adventures. The Spanish ruthlessly destroyed countless
Amerindian civilizations in their relentless search for gold, silver,
and other plunder.
• Accordingly, the Spaniards receive a 50% attack bonus when
attacking Indian villages and towns.
Dutch Power: During the Age of Expansion, the Dutch gained
their independence from Spain, and quickly began to extend their
economic influence globally. They established the Dutch East
India Company, which dominated trade in the East Indies. They
subsequently attempted to do the same in the west by
establishing the Dutch West India Company. These large-scale
trading concerns were made possible by the rulers of the
Netherlands, who were primarily of the merchant class.
• Accordingly, the Dutch economy is more stable than the other
European powers. This is reflected by the consistency of
prices in Amsterdam. Also, the Dutch start the game with a
trading vessel.
Your Name
Type in the name by which you wish to be known. Enter it by
pressing the Enter key. The game suggests a name if you can’t
think of one.
9

THE GAME TURN
Colonization is played in a series of game turns, each following a
strict sequence of actions. Each of your opponents (including the
natives) has a segment of the turn (called player turn) in which to
move units and manage affairs. During your segment, you direct the
movement of colonists, ships, and wagons, make decisions about
the jobs each of your people is doing, attack enemy units, make
naval attacks, and so on.
Date
At the beginning of each game turn the date advances.
Player Turns
Each game turn is divided into a series of player turns. The
natives go first in every game turn, then each nationality goes in
order (England, France, Spain, Netherlands).
European Issues: During each player turn, events in Europe are
assessed first (like changes in market prices and the tax rate, the
arrival of new immigrants to the docks, and various other items).
Colonial Issues: Next, events and issues in each of the nation’s
colonies are assessed and reported if necessary (food shortages
and spoilage, lack of this or that resource to complete this or that
project, and completion of construction projects).
Movement and Combat: Finally, each unit may now move and
attack according to the rules of movement and combat (see
Moving Units and Combat in the New World). Each unit is activated
one after the next, until all have had the opportunity to move (see
Giving Orders for details).
During the movement phase, you may perform all other
management tasks for your colonies, like examining the map and
your colonies (see The Map Display), checking European status
(see The Europe Display), consulting any of your advisors for
reports (see Other Menus), and so on. When all active units have
been moved or have had the chance to move, your player turn
ends and the next player's begins.
End of Game Turn
At the end of each game turn, you see an “End of Turn”
message flashing (if the “End of Turn” option is turned on under
Game Options). Otherwise, “End of Turn” is only displayed at the
end of a turn in which you haven’t yet had a chance to move a
unit. Pressing the Space Bar, Enter key, or clicking on the
information sidebar (see Information Sidebar) causes the next
game turn to begin. Before invoking the next turn—while the “End
of Turn” message is still flashing—you may continue to perform
management functions as described above.
10

ENDING THE GAME AND WINNING
A game of Colonization may be ended in several different ways.
You may quit or retire at any time, attempt a revolution (which you
can either win or lose), or play until the game ends automatically.
ENDING PLAY
Quitting: You may quit during your turn by choosing “Exit” from
the game menu on the map display (see Game Menu). When you
quit you are given a chance to change your mind before the
decision is irrevocable. Your score will not be calculated, and you
will not be entered into the Hall of Fame if you quit.
Retiring: You may retire from play during any turn by choosing
“Retire” from the game menu. Again, you are given a chance to
change your mind. If you proceed, your score is calculated and
shown, and you may be entered into the Hall of Fame if you qualify.
The Revolution: If you declare your nation’s independence,
then back up that claim with a convincing show of military
strength that results in victory, the game ends with a celebration,
and you receive a hefty bonus to your score. If you fail to
establish your sovereignty, you do not receive a bonus.
Automatic Ending: The game ends for scoring purposes in the
year 1800 if you’re not fighting the War of Independence. At this
time, your score is calculated and the end of game sequence is
shown. You may continue to play after 1800, but no further
scoring will occur. The game ends automatically in 1850 if you’re
fighting the War of Independence in 1800 and you don’t win the
war first. It also ends if you lose your last colony (for any reason)
and it is the year 1600 or later.
WINNING
You win by successfully gaining independence from your
mother country. Any other result is considered inferior. While you
may receive a good score, you will never achieve true greatness
without declaring and winning independence.
SCORING
Your Colonization score is a sum of the following points:
Colonization scoring
Population Score: You score points for the colonists in your nation
at game’s end according to the following schedule:
+1 for each petty criminal or indentured servant (see Colonists and Skills).
+2 for each free colonist (see Colonists and Skills).
+4 for each skilled colonist (see Colonists and Skills).
Continental Congress Score: +5 for each Founding Father in your
Continental Congress (see Continental Congress).
Treasury Score: +1 for every 1000 gold in your treasury.
Rebel Sentiment Score: +1 for each point of rebel sentiment (see
Liberty Bells).
Indian Destruction Penalty: -(difficulty +1) for each native
settlement you destroyed.
11

Revolution Bonus
If your people achieve their independence before any other
European powers do, your Colonization score is doubled. If one
other power declares before you, your bonus is 50%, and if two
other colonial powers become independent ahead of you, your
bonus is 25%. In addition, you get one point per liberty bell
produced after foreign intervention (see Liberty Bells During
the Revolution).
Additionally, if you’ve declared your independence before 1780,
your score is increased; the sooner you declare, the better
your Bonus.
YOUR EPITAPH
At the end of every game, the people of the world remember
you for your accomplishments—great or small. They will give your
name to some item for which you will forever be remembered.
HALL OF FAME
The Hall of Fame records the best colonial empires you have
built, listed in order of ranking. The ranking is derived from the
Colonization score modified by a difficulty factor (derived from the
Level of Difficulty you chose when starting the game).
You can examine the Hall of Fame when starting a new game
from the pre-game options menu. When you retire or reach the
end of a game, you are shown the Hall of Fame even if you don’t
qualify to carve your name there.
12
THE NEW WORLD
13

The New World in which you establish your colonies is the newly-
discovered Americas. If you chose “Start a Game in America” from
the world menu, it is the “real” Americas—geographically accurate. If
you chose “Start a Game in New World,” it is an imaginary world—
historically plausible, but imaginary. If you wish to experiment and, to
some extent, customize the New World, you can choose “Customize
New World” from the world menu.
Regardless of the setting you chose, the eastern and western
edges of the New World map connect to your home country, so a
ship can reach your home port by sailing off either the eastern or
western edge of the known ocean (although it takes longer to reach
Europe from the western edge). The northern and southern map
edges are bounded by polar ice which cannot be penetrated.
When the game starts, you have no knowledge of what lies over
the horizon; you only recognize the area immediately surrounding
your ship. The Native American tribes and other European powers
remain hidden until you encounter them directly. As you move and
explore, you discover more and more of the New World. Once
revealed, an area remains visible for the remainder of the game.
The map is divided into squares, which are illustrated according
to terrain type. Each terrain has its own economic usefulness, effect
upon movement, and effect upon combat (see the Terrain Chart).
The economic usefulness of underlying terrain is important when
considering where to build a new colony, since the area surrounding
a colony can be worked by the colonists to produce commodities
such as food, tobacco, cotton, fur, and so on. The inhabitants of the
colony need to grow food to eat and to increase their population;
other commodities can be sold or processed to produce goods for
sale (see Working the Colony). Most terrain on the map may be
“improved” by clearing the forest, plowing, and building roads to
make it more productive (see Other Orders and the orders menu).
14
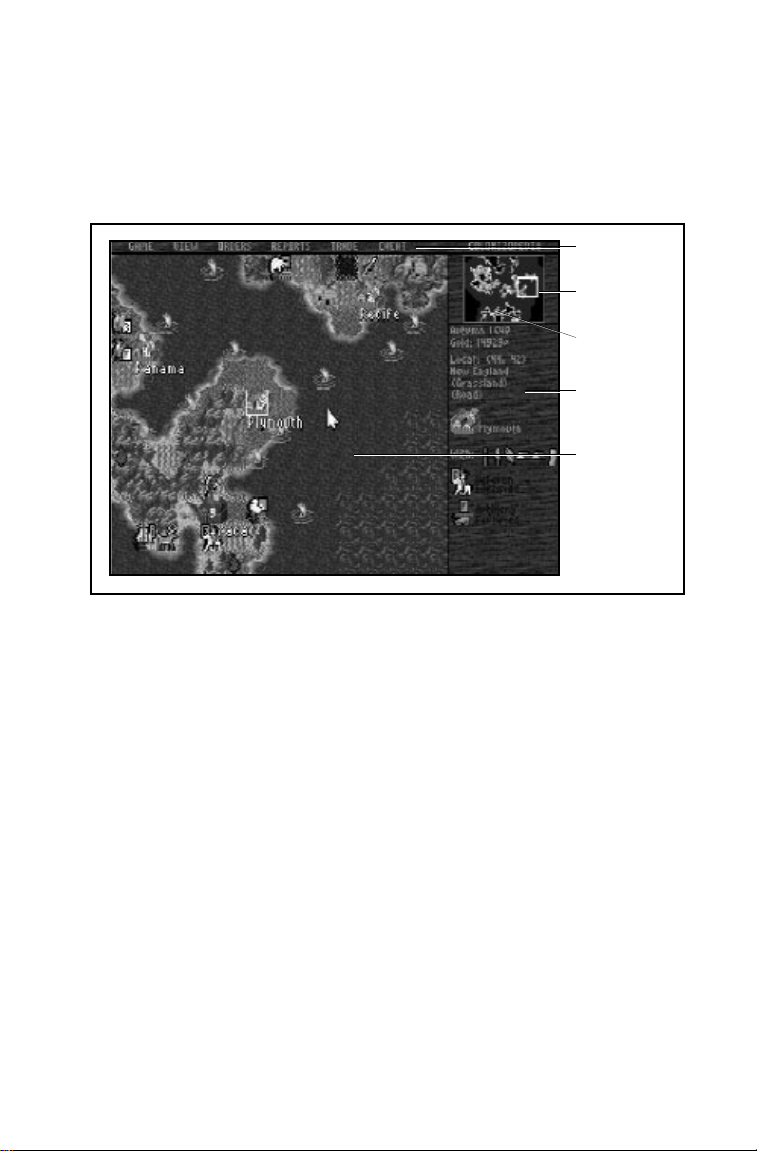
THE MAP DISPLAY
The most important display in the game is the map display. This
is the screen most commonly used during play. From here you
control the movement of your people around the New World,
observe the development of other European powers, and examine
reports from your various advisors.
Menu Bar
Area shown
in Map View
New World
View
Information
Sidebar
Map View
The map display consists of several different parts: the map
view, New World view, information sidebar, and the menu bar.
MAP VIEW
The largest area of the map display is the map view. It shows
a part of the New World in detail. Here you can get as close to the
surface of the planet as possible, so you can examine the terrain,
move your colonists, and observe the activities of your neighbors.
At the beginning of the game, when the New World is largely
unexplored, the map view appears to be one large ocean—as far
as you know, there is no New World. But as you travel farther
westward, you encounter islands and continents. As you explore,
more and more areas appear until you have "recorded" an
entire map.
It is sometimes advantageous to explore the world as quickly
as possible so you can discover important resources, good
defensible areas, and exotic tribes.
15

Changing the Map View: You can quickly and easily move the
map view (scroll) to a different area of the New World in a variety
of ways. If you click anywhere on the map, the view centers on
your click. Use the Center key (C) to center on the currently-active
(flashing) unit. You can select “Find Colony” from the view menu,
and type the name of a known colony into the dialogue box. The
view centers on the chosen colony. Finally, you can click in the
New World view (see below), and the map view centers.
Movement or View Mode: The map view can be in either of
two modes at any time. Move mode is the “normal” mode—that is,
the mode in which you normally play the game. View mode
allows you to check out any square on the map to see what type
of terrain is there. The display may be put into view mode in one
of two ways.
To examine a terrain square, right-click on the square (or put the
display into view mode [V]), causing a square cursor to appear.
Use arrow keys, number pad, or mouse to move the square
cursor around on the map. As you do so, information about the
currently-selected square appears in the information sidebar to the
right (see Information Sidebar). Press the move mode key (M) or
click in the information sidebar to return to movement mode.
Zooming in and out: If you want to see a wider area of the map
for some reason, you can zoom and unzoom the view. Press the
zoom key (Z) to zoom in, and the unzoom key (X) to zoom out.
Showing Hidden Terrain: To get a clearer picture of what terrain
lies under forests, colony icons, and so on, press the hidden terrain
key (H), and the map automatically clears the land of all obscuring
terrain. Terrain returns to normal when you do anything else.
Alternatively, right-clicking on any square causes information
about that square to appear in the information sidebar (see below)
and switches to view mode automatically. To return to move
mode, either press the move mode key (M) or click in the sidebar.
Terrain Types
The following is a brief description of each terrain type.
Prairie (Cotton Land): This is relatively flat, open land, ideal for
producing cotton; you can also grow food crops here.
Grasslands (Tobacco Land): Fertile soil in temperate areas, this
is perfect for tobacco growing; you can also harvest food here.
Savannah (Sugar Land): Rich, moist soil specially suited for
growing sugar; this land is good for food production, as well.
Plains (Food Land): This area is good for growing a wide variety
of food stuffs. You can grow a little cotton here as well.
16

Tundra: This rather cold, open land can produce a minimal
amount of food, but little other agriculture; however, you often find
ore here.
Marsh: A cool, wet, briny area where the sea meets the land.
You can grow some foodstuffs, and find ore in abundance.
Swamp: Low, tropical wetlands that often harbor bog deposits
of ore. You can grow a little food and some sugar cane here.
Desert: A dry, sparse area difficult to grow food in (although it is
possible). You can sometimes mine ore here.
Arctic: Cold and icy, the arctic is almost incapable of supporting life.
Forested Terrain: Each of the above types of terrain may also
be forested. When forested, the agricultural potential of the terrain
is severely limited. However, wooded terrain can produce lumber,
and trappers can find beaver and deer pelts in the forests. Note
that forests in the colder terrain types produce the most fur
and lumber.
Mountains: There are large areas of mountainous terrain,
difficult for travel, but likely sources of ore and silver. Colonies
cannot be established in mountain terrain.
Hills: A gently rolling area that offers easy access to ore; you
can also develop some agriculture here.
Rivers: You can find rivers in any of the above terrain types as
well. In general, the presence of a river, with its nourishing water
and sedimentary soil, enhances the production of whatever can
normally be produced in a terrain type (major Rivers are even
more productive). Fur trapping is more lucrative along rivers
because of the many beaver dams found in such places.
Additionally, rivers function much like roadways in the wilderness.
Colonists and wagons moving along a river are assumed to be
using canoes or other types of boats to hasten travel.
Lakes: These are bodies of fresh water—good for fishing.
Ocean: This is the wide open water of the sea. It is somewhat
useful for fishing, especially along the coasts.
Sea Lane: This is open ocean that leads to standard sea routes
from the New World to Europe, and vice-versa. To return to
Europe, a ship only has to enter a sea lane, then move toward the
east (if exiting east) or west (if exiting west) map edge.
17

Special Resources
Aside from the intrinsic terrain in a square, some squares also
contain special resources, represented by icons superimposed
over the normal terrain. These icons indicate a particularly
abundant source of produce. They are as follows:
Silver Deposits: Usually found in the mountains, these are
particularly abundant sources of silver, like the incredible veins the
Spanish found near Potosi. Silver deposits, if mined, become
depleted after a while, depending upon the extent of the deposit.
Ore Deposits: Found in hilly areas, these are abundant sources
of iron and other metals used in making tools and weapons. Ore
deposits, if mined, also become depleted after a while.
Mineral Deposits: These are generally rich metal deposits that
yield both ore and silver. They are not as productive as other
deposits, but have the benefit of diversity. These too may deplete
after extensive mining.
Trapping Areas: These are areas in which particularly large
numbers of fur-bearing mammals—beaver, otter, raccoon, and so
on—are found. This can be especially productive terrain if a river
runs through it.
Game Areas: The presence of game indicates abundant food.
Trapping is also worthwhile in these areas.
Oasis: An oasis is a fertile area with water reserves and
nutrients, found in dry, arid terrain like deserts. These areas are
capable of producing a surprising quantity of food, and a few
other resources.
Prime Cotton Land: This is an area extremely well suited for
cultivation of cotton.
Prime Tobacco Land: This is an area particularly well suited for
cultivation of tobacco.
Prime Sugar Land: This is an area especially well suited for
cultivation of sugar cane.
Prime Timber Land: This is an area of tall pine and straight oak
that produces lumber perfectly suited for construction.
Prime Food Land: This is an area ideal for agriculture involving
food—corn, squash, beans, and wheat.
18

Fishery: Underwater banks, reefs, and nutrients make these
excellent fishing grounds.
Rumors of Lost Cities: There may be something of value if you
enter this square, or there may be nothing; it may be very
dangerous to enter, or benign; there may be a Fountain of Youth,
or an abandoned burial ground. You’re always taking a chance
entering these squares, but it may be worth it.
Indian Villages, Towns and Cities: These are centers of Indian
culture and commerce. There are three different sizes of
settlement: the group of teepees is a camp of the nomadic tribes
(Sioux, Apache, or Tupi). The long house represents a village of
the woods-dwellers (Iroquois, Cherokee, and Arawak). The
pyramids are Aztec cities and the terraced stone dwellings,
Inca cities.
NEW WORLD VIEW
In the upper right hand corner of the map display is a smaller
view. This is the New World view and is an extremely “zoomed
out” view of the entire New World. The small white box inside this
view shows the portion of the New World that is currently visible
in the map view. The currently-active unit (if any) appears in the
New World view as a flashing dot.
During the early years of exploration and discovery, the New
World view is of little use because it is almost totally dark. But as
you map larger areas, it becomes very useful in showing where
your current view is located in relation to the rest of the New
World. Also, you’ll be able to locate at a glance the positions of
your rivals and judge how close they are to you.
Map Scrolling: You can click anywhere in the New World view
to cause the map view to center on your click. This is a very
convenient, high-speed way to move the view from place to
widely-separated place on the map.
19
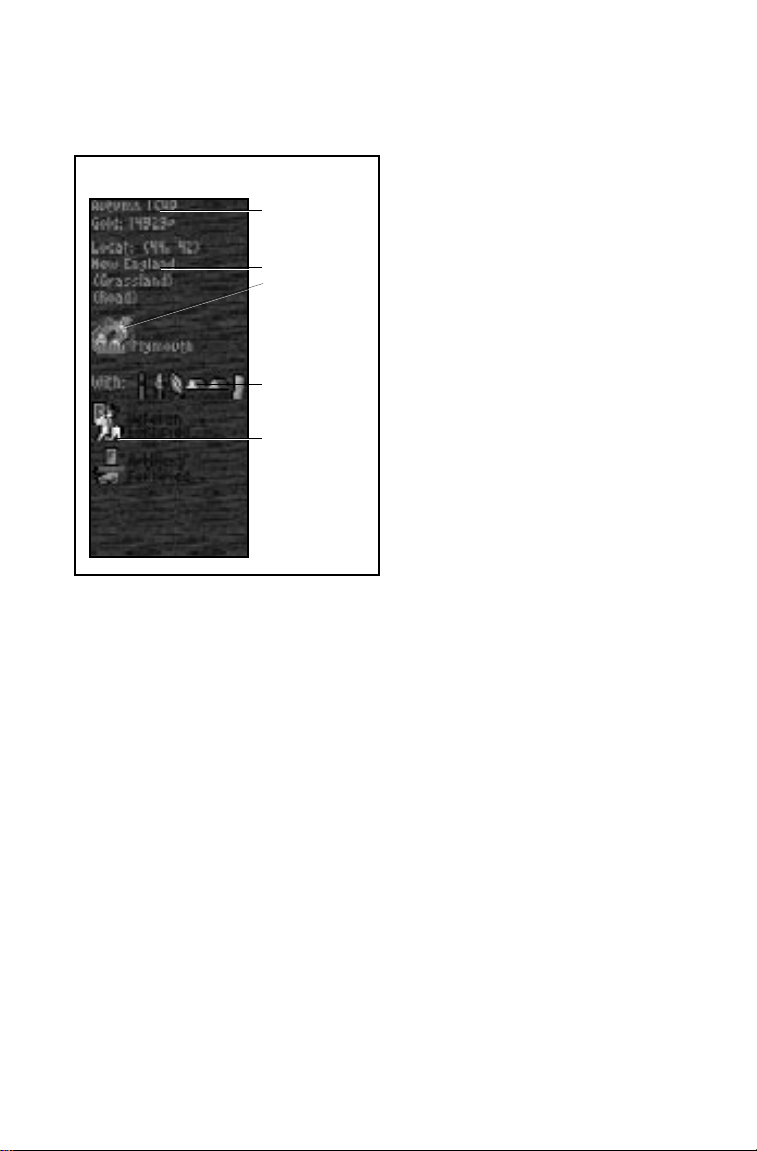
INFORMATION SIDEBAR
Along the right side of the map display is an area called the
information sidebar. The following information appears here.
Date and Treasury:
Information Sidebar
Date &
Treasury
Terrain Type
& Other
Features
Cargo
present
Units
present
Colonies and Cargoes: If there is a colony in the square, some
information is given about it as well—its name, and the contents
of its storage area. The order in which the cargo is listed depends
upon the current market value of that cargo and the amount
currently stored at the colony. In essence, the most valuable cargo
is always listed first, the next most valuable second, and so on.
Immediately beneath the New
World view is the current
game date and the amount of
gold you currently control in
your colonial treasury.
Active Unit: When the display
is in movement mode (M),
information about the
currently active unit appears
at the top—a picture of the
unit, its name, how many
moves it has remaining and
its current location (given in
x,y coordinates).
Terrain Type and Other
Features: A brief description
of the type of terrain appears
as well—the underlying
ground, whether it’s forested,
whether or not there are
improvements such as roads
and plowed fields, special
resources, and so on.
20

MENU BAR
Across the top of the display is the menu bar. From here, you
can access all the various options, displays, reports, and so on in
the game. All game functions such as passing orders to units and
buying and selling cargo may be accomplished using the menu bar.
GAME MENU
The game menu includes the following:
Game Options
From here you can adjust various game features. A standard
toggle switch turns features on and off.
Show Indian Moves: When this switch is on, you can watch the
motion of bands of natives as they move near your people.
Show Foreign Moves: When this switch is on, you can watch
the movement of other Europeans in the New World—but only
when they are near one of your people.
Fast Piece Slide: This option makes your game pieces move
faster on the map.
End of Turn: The end of turn option causes a message
announcing the end of each turn to appear.
Autosave: The autosave option causes versions of the current
game to be saved at the end of each turn and at the end of each
decade. The most recently saved game is always available in the
last slot of the save game menu; the previous decade saved
game is always in the next-to-last slot.
Combat Analysis: The combat analysis option causes a special
screen to appear explaining the combat parameters before each
combat situation is resolved.
Water Color Cycling: You can toggle water color cycling on/off
to speed the game’s performance.
Tutorial Help: If you want advice while you play, turn this on.
Colony Report Options
These options allow you to turn on or off certain types of
reports that appear automatically during the game.
Sound Options
This allows you to turn music and sound effects on and off.
Pick Music
Because we know you’ll love the music in this game (especially
if you have a wave table synthesis sound card), we give you the
option to listen to any of the compositions at any time. Note that
music must be “ON” under sound options for this to work.
21

Save/Load Game
This allows you to save the game you’re currently playing, or
load a previously saved game. There are 10 slots for saving games
during play. The last two are special, “autosave” slots. The next-tolast slot always contains a version of the most recent game from
last turn; every ten years, a copy of the game is saved and placed
in the last slot.
Declare Independence
Also included on this menu is the option to declare your
independence. Do this only when you are sure your colonial
empire is ready to withstand a prolonged conflict with your home
country (see Declaring and Winning Your Independence).
Retire
This ends the current game and calculates your score. Note that
your colonial empire will be lost if it’s not already saved.
Exit
This ends the game without calculating a score; your colonial
empire is lost if not already saved.
OTHER MENUS
The views menu contains options for switching the map display
from view to move modes, for viewing the Europe screen, and
other helpful commands.
The orders menu lists any special commands that can be given
to the currently-active unit, in addition to normal movement
commands (see Giving Orders for details).
The reports menu contains special reports that you can request
from your various advisors. The reports are described in the
appropriate sections of the manual.
The trade menu contains items related to automating various
aspects of trade in the game (see Automating Trade).
The Colonizopedia gives you access to the on-line
encyclopedia of Colonization. Use it to obtain information quickly
about a variety of game-related topics. Right-clicking on units,
terrain, and other stuff also accesses the Colonizopedia.
22
THE COLONISTS
23

As Viceroy of the New World, you control the activities of all the
colonists from your nation. You decide where they move, what they
explore, where they build settlements, what they build inside the
settlements, and so on. Each of your people has a skill—or the
potential to gain a skill—that can be valuable to you and your
empire, if you use it wisely. Deciding whom to give what skills, and
where to employ them is a major part of Colonization.
Not only do you decide where your people work, you also
determine what job they do. It is usually wise to let skilled people do
what they do best, although sometimes this is not possible, and
sometimes it is not advisable. You must decide year-to-year how
best to utilize your people resources.
Also, by combining your people's skills with other resources like
horses, tools, and muskets, you can create colonists with special
abilities and powers. Mounting a colonist on horseback creates a
scout who can range far and wide gathering information about the
New World and carrying news of your arrival. Giving a colonist tools
creates a pioneer unit that can build roads, clear woods, and plow the
land to make it yield its produce more efficiently. If you give your
people muskets they become soldiers that can defend your hard-won
foothold in the New World, expand the might of your new nation, and
break free from tyranny.
Icon: Each colonist is represented by a small icon of a person.
Each type of colonist wears clothes or carries implements that reflect
his skill or status. For example, the carpenter stands in front of a
sawhorse, the petty criminal has his head and hands in stocks, and
the lumberjack wears a red shirt and holds a saw (see the
Colonizopedia or Skills Chart for details).
Orders Box: In addition, each colonist who moves around the
map carries an “orders box.” This box has two functions: the color of
the box indicates the colonist’s nationality (red for English, blue for
French, yellow for Spanish, and orange for Dutch); and a letter inside
the box indicates the orders the colonist is currently carrying out.
24

GIVING ORDERS
Each turn you give orders to your colonists, ships, wagon
trains, and artillery (collectively called units), one at a time. The
unit that is currently flashing is waiting for orders. You have
several options with each unit: you may move it (up to the limit of
its movement allowance), skip it and move it later in the turn, or
have it do nothing at all this turn. In addition, you may give some
units orders to build roads, plow fields, clear woods, or attack
enemies. Units may also fortify themselves or go on sentry duty.
MOVING UNITS
Each unit has a “movement allowance,” which is the number of
moves it may make in a turn. Normally, it requires one move to
enter a square. But some squares, like those with a forest, require
more than one move to enter; in fact, the move cost to enter a
square may vary widely depending upon the type of terrain in
that square. When a unit does not have enough moves remaining
to carry out a movement order, its turn is finished and the next
unit begins flashing (see the Terrain Chart for more about
movement costs).
Normal Movement
To move a unit you may use the number pad or the mouse.
You can even use special long-range movement orders if you like.
Movement Restrictions: All non-ship units must remain on land
at all times (but see Naval Transport). All ship units must remain in
ocean or sea lanes at all times unless in a coastal settlement (a
colony adjacent to the ocean).
Standard Movement Order: A unit can be moved across the
map by using the numeric keypad numbers 1-9 (except 5). The
numbers on the keypad represent the eight directions in which a
colonists may move (for example, pressing the “2” key causes a
colonist to move south on the map; “9” causes it to move
diagonally northeast).
Long Range Moves: If you want to set a long-term destination
for a unit, use the mouse to point to the eventual destination and
click-and-hold until the arrow cursor turns to the “To” cursor. This
gives a move order and sets the destination of the unit. If the
destination cannot be reached in one turn, the unit progresses in
subsequent turns until it reaches the destination. You can tell
when a unit has a long-term order because a “G” appears in its
orders box.
The GO TO Menu: By using the go key (G) you can bring up a
menu showing all the friendly named destinations that the
currently-active unit could reach. Select the destination you want
for the unit, and it will find its way there. This is identical to
selecting the named destination using the mouse as above.
25

Naval Transport
Units may be transported over ocean squares by any ship that
has enough empty holds. A ship needs one empty hold to carry a
colonist (and any guns, tools, or horses he has with him, if he's a
soldier, etc.) or artillery. It needs six holds to carry a treasure train.
Embarking: A unit may board a ship by moving onto it from an
adjacent land square. Also, if on sentry duty (see Sentry, below)
inside a settlement, a unit boards a ship automatically when the ship
leaves the harbor. While aboard ship, all units are on sentry duty.
Disembarking: Units disembark automatically when their ship
enters a coastal settlement. If you attempt to move a loaded ship
onto land, a menu appears, asking whether to make landfall or
not. If you choose to make landfall, all embarked units are
automatically activated one at a time, allowing you to move them
ashore. In addition, you can move some but not all units from a
ship to any adjacent land by clicking the ship, then selecting the
units you want to activate from the menu that appears.
OTHER ORDERS
Orders Box: When not at work in a colony, every unit has an
orders box attached to it. The orders box is a small square containing a color representing the nationality of the unit. Inside the box, a
letter (or dash) also appears, indicating the unit’s current orders.
Fortify: Units may be ordered to fortify themselves by pressing
the fortify key (F). A fortified unit receives a 50% defense bonus if
attacked. Fortifying a unit stops automatic activation of that unit
each turn. A fortified unit has an “F” in its orders box, and you must
activate it to give it new orders (see below). Note that the unit will
not gain the effects of fortifying its position until the following turn.
Sentry: Units can be put on sentry duty by pressing the sentry
key (S). Units on sentry duty in a colony automatically board
outgoing ships. Putting a unit on sentry stops automatic activation
of the unit each turn, unless a foreign unit moves adjacent to it. A
unit on sentry duty has an “S” in its orders box, and you must
activate it to give it new orders (see below).
Clear Land, Plow Fields: If the active unit is a pioneer (a
colonist carrying tools), and it’s currently in a forested square, it
may be ordered to clear the land. If the active unit is a pioneer and
currently in a non-forested square, it may be ordered to plow the
fields. Press the plow key (P) to clear or plow the land. Performing
either action expends 20 of the tools the pioneer is carrying. A
pioneer that is clearing or plowing the land has a “P” in its orders
box, and must be activated to give it different orders (see below).
Clearing the land increases the potential crop production of a
square, but eliminates the potential for timber and fur production.
While you do get some lumber from the action, once cleared, land
may never be re-forested.
26

Build Road: If the active unit is a pioneer (a colonist carrying
tools), and it occupies a non-road square, it may be ordered to
construct a road in the square. Press the road key (R) to build the
road. Performing this action expends 20 of the tools the pioneer is
carrying. A pioneer that is building a road has an “R” in its orders
box and must be activated to give it different orders.
Roads speed movement through a square and increase its
productivity of ore, fur, and timber by providing easier access into
and out of the square. Building a road in a mountain square does
not increase the production of silver unless there is a silver
deposit in the square.
Build Colony: Any colonist (except Indian converts) can build a
colony anywhere except in a mountain square. To build a colony,
press the build key (B). The settlement is constructed, and you are
asked to name it. After naming the new colony, you are
immediately shown the colony display for your new settlement.
Activate Unit: A unit that is carrying out any kind of long-range
order, is fortified, or is on sentry duty must be activated by you to
give it new orders. To do so, click on the square containing the
unit(s). If only one unit occupies the square, it becomes activated,
and its orders box cleared. If more than one unit is in the square a
menu displaying all units in the square is opened. Click again on
the unit(s) you want to give orders to.
Units inside settlements are activated from the units view of the
colony display (see The Colony Display).
Skip Movement: If you want the currently-active unit to do
nothing this turn, press the no orders key (Space bar). The unit is
skipped this turn.
Wait For Next Unit: To temporarily skip a unit’s turn so you can
move or order something else, press the wait key (W). This
activates all your other units first, then returns to this one.
Disband Unit: If, for some reason, you want to delete a unit
from the game, press the disband key (Shift-D). The unit
disappears from the game forever.
27

Automating Trade
Transport units, wagons and ships, can be assigned to operate
on trade routes, thus allowing you to turn the responsibility of a
continuous and repetitive trade arrangement over to your
subordinates. Trade routes are most advantageous when you
have commodities in one colony that will be shipped to another
continually over an extended period. Alternatively, you can
arrange for a ship to travel back and forth from your ports to
Europe, picking up and selling cargoes that you specify.
Creating a Trade Route: To create a trade route, choose “Create
Trade Route” from the trade menu on the map display.
• You’ll be asked to select a starting location for the route; do
this by choosing the name of one of your colonies from the
menu provided.
• Next choose whether the route is to be by land or sea.
• You’re then prompted to enter the name of the route; a
reasonable one is given as a default.
• Next, you must fill in the itinerary for the route. You are shown
a table with three columns and four rows. Clicking on a cell of
this table calls up a menu from which you may choose what
entries to place into the itinerary. Clicking on an entry that’s
already in the table deletes the entry.
Trade Route Destinations: The left-most column is where you
indicate the various stop points in the route (there may be up to
four). By clicking a cell in this column, you get a menu of all
possible destinations for this type of trade route. (For example if
you’re creating a land route, only colonies that can be reached by
land from the initial starting location appear as choices.) The order
of entries in this column determines the order of stops units
assigned to this route will make.
Unload Cargo on Trade Routes: The center column lets you
indicate which cargoes are unloaded at the various destinations
you’ve selected. When you click in a cell of this column, you see a
menu of all possible cargoes, from which you choose the ones
you want unloaded at the destination. You may indicate up to six
cargoes that you want unloaded at each destination.
Load Cargo on Trade Routes: The right-most column lets you
indicate which cargoes are picked up at the destination. Again,
clicking in a cell of this column calls up a menu of cargoes from
which you choose the cargoes to be loaded there. You may load
a maximum of six.
28

Assigning a Unit to a Trade Route: Only ships and wagons may
be assigned to a trade route. To assign them, when the unit you
want to assign is active (that is, flashing and awaiting orders),
press the begin trade route key (T) or choose it from the orders
menu. Then choose the trade route name from the menu of
routes you’ve created previously. You may then select the port you
wish the unit to go to first. Thereafter, the unit will follow the
itinerary of the route, until you tell it to do something else.
Taking a Unit Off a Trade Route: As long as a unit is operating a
trade route, it has a “T” in its orders box. To change its orders,
click on it, and cancel its orders.
Editing a Trade Route: If you’d like to change the destination,
unload, or load instructions for any existing trade route, choose
“Edit Trade Route” from the trade menu, and re-configure the
itinerary for that route as if you were setting up a new route.
Deleting a Trade Route: If, for any reason, you wish to delete
one or more of your existing trade routes, choose “Delete Trade
Route” from the trade menu, and choose the one you wish
to eliminate.
29

COMBAT IN THE NEW WORLD
Military combat in colonial America was a brutal, savage, fluid
affair. The weapons were crude but deadly, and the action was
often hand-to-hand. There were few roads in the wilderness,
making movement and supply of large forces almost impossible.
The most common military encounter occurred between small
forces in “meeting engagements”—unstaged encounters where
one group came upon another unexpectedly. The dense forests
provided ample cover for those who knew how to use it—like
the natives.
Though few in number (a host of diseases having decimated
them already) and poorly armed, the natives, when angered,
proved valiant opponents who fought desperately and cleverly.
They knew the wilderness trails and dead ends, and they
controlled vast areas. But the muzzle-loaded musket—cumbersome
to load and fire, with a host of potential problems—proved superior
to the flesh-ripping and bone-crushing war clubs, the strong bows,
swift arrows, and heavy tomahawks of the Indians.
Not only did conflict occur between the invader and the
invaded, but between the Europeans competing for resources as
well. Though weak at first, the Europeans quickly amassed
military power in the New World. Almost from the beginning,
warfare between the invaders marked the American wilderness
with blood. The Indians often were in awe of the savagery of the
white man.
ATTACKING AND DEFENDING
Combat may occur when a unit from one nationality attempts to
enter a square containing a unit, village, or settlement of another.
In many cases more than one type of interaction with a foreign
unit is possible (for example, scouts have the ability to infiltrate
enemy settlements, or meet with native chieftains) so a menu of
options appears. If you choose to attack an enemy or if it attacks
you, a battle is conducted immediately and the result is decided.
A battle consumes all of a unit’s remaining moves. A unit may
never continue to move during a turn in which it has been
involved in battle.
There are many factors to consider in battle situations. Every
unit has an inherent combat strength, but various other factors
influence the results of a battle as well.
Colonists armed with muskets (soldiers), and/or mounted on
horses (dragoons) have increased strengths. Colonists at
settlements are better protected than those outside, and a
settlement with a stockade, fort, or fortress is a much safer place
than the countryside. Units that have fortified themselves
previously are better prepared for battle than normal, and veteran
soldiers are usually more effective overall.
Combat Strength: This is the basic attack and defense value of
a unit. Under some circumstances (outlined below) a unit can
receive a “bonus” to its combat strength, giving the unit an
advantage. The Combat Strengths Chart gives specifics about the
strengths of various units.
30

Artillery Units: Artillery is a two-step unit. When you buy or
acquire an artillery unit, you get a full-strength battery. If your
artillery is defeated in battle, it is reduced to an artillery section,
with less firepower. The Combat Strengths Chart notes
the differences.
Attack Bonus: Because of the possibility of surprise in the
wilderness, the attacker always receives a 50% bonus. This makes
units in open terrain very vulnerable.
Terrain Bonuses: Defenders in forests, hills, and mountains
receive a bonus to their combat strength. The amount of the
bonus varies according to terrain type (see the Terrain Chart). Note
however, that because of the native ambush bonus (see below)
these bonuses apply only when defending against Europeans.
Native Ambush Bonus: Natives receive the terrain combat
bonus every time they attack or defend in mountains, hills, or
forests. This reflects the natives’ knowledge of the terrain and
ability to use it intelligently.
Colonial Forces Ambush Bonus: Like the natives, colonial units
receive the ambush bonus when battling the King’s regular army
troops during the War of Independence. This bonus applies only if
the battle occurs outside a colony, in appropriate terrain. This
reflects the King’s troops’ lack of familiarity with the terrain.
Veteran Status: Soldier units (colonists armed with muskets)
have their combat strengths increased by 50% when they become
veterans. Soldiers may become veterans after winning a battle or
they can be taught in a college or university. Additionally, veteran
soldiers can be trained in Europe—for a price.
European Bombardment Bonus: Regular army troops of all
European powers receive an attack bonus of 50% when attacking
a colony. This represents the increased artillery or naval
bombardment support that European units can bring to bear.
Foreign Intervention Bombardment Bonus: If your Continental
Army forces ever gain support from foreign intervention (see
Foreign Intervention), then your forces receive this bonus as well.
Popular Support Combat Bonus: During the revolution, each
colony’s Sons of Liberty/Tory status is translated into an attack
bonus (see Sons of Liberty During the Revolution). In other words,
the attacker receives a bonus equal to his side’s popularity within
the colony.
Fortifications: Colonists of any type may fortify themselves
instead of moving in a turn by pressing the fortify key (F) to receive
a 50% defense bonus. A fortified unit has dug shallow trenches and
planned fields of fire for receiving an attacking enemy. Note that
units defending in fortified colonies receive additional bonuses (see
Defending a Colony).
31

DEFENDING A COLONY
The most effective manner in which to defend a colony is to
fortify soldiers, dragoons, army, cavalry, or artillery units in the
same square as a fortified colony. A colony may have various
levels of fortification, and each level takes considerable time or
money to complete. You’ll probably find that it is well worth the
investment to fortify your colonies.
Stockade: A stockade is a low wooden barricade made of poles
hewn from the forest and sharpened at the top. Loop holes for
firing muskets, and crude inside shelves on which gunners can
stand also have been constructed. A unit defending inside a
stockade has its defense strength increased by 100%.
Fort: A fort is a substantial improvement over a stockade. The
stockade has been reinforced with metal braces, artillery has been
installed to cover exposed approaches, and substantial defensive
planning has been carried out. The defense strength of a unit
defending in a fort is increased by 150%.
Fortress: A Fortress is an upgraded fort. The stout wooden
barricade has been reinforced, and in critical spots replaced by
stone masonry. Embrasures now house the artillery which is more
extensively used. Well planned overlapping fields of fire now
characterize the exterior approaches. Units receive a 200%
defense bonus inside fortresses.
CAPTURING A COLONY
In many cases, an enemy settlement is defended by soldier
units or artillery. If so, all enemy military units must be destroyed
before you may enter the settlement. If there are no military units
defending a settlement, then your attackers will meet a group of
colonists, who, if defeated, turn the settlement over to your forces.
Once your forces enter a settlement, it is yours as if you had
built it. All inhabitants swear allegiance to your government and
work diligently for you thereafter.
COLONISTS AND SKILLS
In the Age of Exploration, Europe was teeming with peoples
“straining to be free.” Religious persecution, sustained warfare, and
economic decline—among a host of other factors—caused a
growing desire within many communities for a new life, a new
start, and more living space.
Each of the major powers had its own reasons for attempting to
colonize the New World—exploitation of resources, hopes of a
major new trading empire, searching for a northwest passage to
the Orient, or living space—that brought adventurers and hardy
pioneer settlers to grips with the wilderness in the Americas, and
face-to-face with alien cultures.
In general there are five types of colonists in Colonization, each
with different capabilities: petty criminals, indentured servants,
native converts, free colonists, and specialists. Any of these
colonists can do any job available in the settlement, but the
specialists—the experts—do their jobs very well.
32

PETTY CRIMINALS AND INDENTURED SERVANTS
Petty criminals are colonists that have been ordered
“transported” to the New World as punishment for their crimes.
They are sent to clear out the prisons of Europe and to give them
a fresh start. In general, the criminals are the least productive
members of your communities. They make good laborers but are
almost totally ineffective in manufacturing or processing jobs.
Indentured servants are people who desire to come to the New
World but who cannot afford to pay their own way. They have,
accordingly, put themselves in bondage and agreed to work off
their passage in the New World. Because of their bonded state,
their productivity is less than desired. They, like petty criminals,
are useful workers in the fields and mines, but are less productive
in manufacturing and processing jobs than free colonists.
Getting Petty Criminals and Indentured Servants: These
colonists can be found only in Europe, either on the docks or in
the recruitment pool (see Immigration, below).
Limitations: Petty criminals can produce only one manufactured
good per turn in the buildings of your settlement; indentured
servants can produce two. The natives will not let petty criminals
live among them because of their rude disposition, but will teach
indentured servants the ways of the tribe.
FREE COLONISTS
Free colonists are people who came to the New World as free
men and women and will work to the advantage of their
communities to the best of their abilities. Free colonists are
productive in both spheres of work—in the fields and in the
cottages. Short of being specially trained in a trade, they are the
most productive members of your society.
Getting Free Colonists: Free colonists appear as immigrants on
the docks in Europe, or are born in America. A free colonist is
produced every time a settlement produces 200 or more excess
food (see Population Growth).
Limitations: Free colonists can produce 3 manufactured goods
per turn in the buildings of your settlement (see Putting Colonists to
Work), and natives happily help them learn the ways of their tribe.
NATIVE CONVERTS
Under the Spanish encomienda system, tens of thousands of
natives were “converted” to Christianity and forced to serve as
laborers on coastal plantations and in silver mines. Natives that
join your settlements are unwilling to work inside your
manufacturing concerns, but are able field laborers.
Loss of Faith: If Indian converts are not put to work in a colony
within eight turns after conversion, they lose faith and return to
their tribe.
33

SKILLED COLONISTS
Skilled colonists are people who have had training in a trade or
whose family has taught them the family livelihood. There are a
wide variety of skilled colonists; see the Skills Chart for details.
When performing the jobs for which they are trained, and given all
the necessary resources, they are extremely productive, valuable
members of a settlement. When performing a job for which they
are not trained, they function as free colonists.
Getting Skilled Colonists: Like the others, skilled colonists can
be recruited or they appear for free on the docks in Europe (see
The Docks View). In addition, you can appeal to your King for
trained men to help in your colonial pursuits (see Hiring Colonists
from the Royal University).
Learning Specialties: Petty criminals, indentured servants and
free colonists can be taught specialties by skilled colonists working
in a school. Some specialties can be taught in a schoolhouse,
others in a college, and still others can be taught only in a
university. These institutions can be constructed in your colonies.
The Skills Chart details where each skill can be learned.
Teaching a Specialty: Place a specialist in a schoolhouse,
college, or university by dragging him there. After a number of
turns pass, you will begin to see the positive effects of education:
a free colonist in the settlement may acquire the skill of the
teacher; an indentured servant may become a free colonist; or a
petty criminal may become an indentured servant. These
improvements continue as long as a teacher continues working in
the school.
Clearing a Colonist’s Specialty: If you do not like the specialty a
colonist has, you can transform her into a free colonist by
selecting “Clear Specialty” from the jobs menu.
Indian Lore Skills: Some skills cannot be gained in Europe; they
can be learned only from the natives. These skills pertain directly
to crops and commodities that were new or rare in Europe. To
learn from the Indians, move a free colonist or indentured servant
into a friendly Indian village, and choose “Live Among the Natives”
from the menu. The Indians will tell you what they can teach and
you must choose whether to learn the skill or not. If you choose for
the colonist to learn, he will become a skilled colonist of the
appropriate type.
Acquiring Skills: A free colonist that works at a particular job for
an extended period may become a specialist in that skill. The
colonist has learned through experience.
Labor Advisor Report: The Labor Advisor report (see reports
menu), provides a convenient way to locate any of your people at
any time. The report shows all the different colonists available in
the game and indicates how many of each is currently in play. By
clicking on one of the types, you zoom to a report that gives the
number and location of each colonist of the selected type.
34

IMMIGRATION AND POPULATION GROWTH
There are two ways for the population of your nation to
increase: through immigration of people from Europe or through
population growth within the colonies. Immigration can be
voluntary, in which Europeans, because of persecution or general
unhappiness at home, pay their way to come to the New World;
you can offer to pay the passage of peoples that would otherwise
not be able to make the trip. Finally, you can hire skilled colonists
to aid in building the New World nation of which you dream.
RELIGIOUS UNREST
The docks on the Europe display (see The Europe Display)
represent the place where people who are ready to go to the New
World gather. These colonists can board any ship immediately and
leave for your colonial empire. People come to the docks because
of religious unrest in Europe. The more religious freedom your
colonies exhibit (expressed by the number of crosses currently
being produced) the more people want to immigrate.
Each turn, the total number of crosses produced by all your
settlements combined is added to those produced in prior turns.
When enough crosses have been generated, a new immigrant is
driven to the docks. (The immigrant is drawn from the recruitment
pool (see Immigration and Population Growth)).
Each colony automatically produces one cross per turn,
represent-ing the religious freedom that the colonists are
experiencing in America. The number of crosses produced by a
settlement can be increased by having the people in the
settlement build a church or cathedral, and further increased by
placing a colonist in the church or cathedral to perform the role of
preacher. Like any other building in the settlement, the
church/cathedral can produce more crosses if more people are
working there. An expert preacher working in a church
dramatically increases cross production.
Religious Advisor Report: The Religious Advisor report
provides up-to-date information about how soon another
immigrant will appear on the docks in Europe.
RECRUITING
If you can’t wait for religious unrest in Europe to put more
colonists on the docks, you can recruit colonists to go to the New
World. This costs you money because you have to pay the
passage of the individuals making the sea journey. Press the
RECRUIT button on the Europe display (see The Europe Display),
and select the colonist you want from the recruitment pool.
The recruitment pool contains three colonists at all times. When
a colonist is removed from the pool, either by religious unrest or
recruitment, another immediately takes his or her place.
35

ROYAL COLLEGE
If you can’t wait for religious unrest to cause immigration, and
you don’t like the choices you have in the recruitment pool, you
can “pull strings” with the King to get the skilled colonists you need
to help your settlements grow. Press the TRAIN button on the
Europe display and select the skilled colonist you want to from the
list. You will pay dearly from your treasury for this training.
POPULATION GROWTH
Each colonist working in a settlement eats two food per turn. If
the settlement is producing more food than is needed to feed the
population, the excess is accumulated in the settlement’s
warehouses. When there is 200 extra food, a free colonist is
produced and added to the population; the 200 food is removed
from the warehouse.
36

THE COLONIES
37

Settlements are the centers of commerce and government for your
colonial empire. They are areas where several families build
dwellings and shops in an attempt to establish a self-sustaining
community. A colony must produce enough food to feed its
inhabitants and, to grow, must have a reliable source of lumber out
of which to fashion buildings and improvements.
As a settlement grows it can become a manufacturing or a
shipping center for trade with the old world. It can become a center
for agricultural productivity and population growth or a link in a chain
of commerce. It can become a flash point in the struggle for
independence from the Crown. You decide what shape your empire
will take, and what goals it will pursue. But whatever you decide,
your settlements are the pistons that drive the colonial engine.
Be careful when choosing settlement sites because the
surrounding terrain will, to a large extent, determine the character of
the new colony. Very soon after establishing a settlement, you’ll
probably want to produce some cash crops or resources. Make sure
your colony is adjacent to proper terrain for these purposes.
There are two ways to acquire new settlements. The most
common way is to build them (B key) but you can also capture them
intact from another European power.
BUILDING A NEW SETTLEMENT
Any colonist (except Indian converts) may build a settlement in
any land square on the map (except mountains). Simply press the
build key (B) when a colonist is blinking in a square upon which
you wish to build. Your advisors suggest a name for the new
settlement, which you can accept or change at your whim. When
you are satisfied with the name, enter it (Enter key).
When a settlement is named, the Colony Display appears,
showing the settlement and important information about it (see
The Colony Display, below). When you close this display, your
new settlement is on the map. The unit that built it is now working
inside the settlement.
38

PLACING COLONIES
It is important to consider carefully where to place your
colonies, because success in the game is highly dependent upon
where your settlements are. Try to put them in areas that will
provide enough food to support the type of colony you have in
mind. Consider the types of crops that can be grown in the area
and look for abundant metal resources for future production of
weapons and tools.
Town Commons: The terrain the settlement itself occupies is
very important. Some of the original founders will work in this area
and cannot be moved out of it. As a consequence, the original
settlement square—the “town commons”—always produces some
food and one other commodity, depending on the type of terrain in
the square. If there are special resources (except Prime Timber) in
the settlement square, the people take advantage of that too.
Colony Radius: In addition to the original colony square, the
squares immediately surrounding it are also available
for development.
Clearing, Plowing, and Roads: When choosing sites for your
settlements, remember that you can clear forest, plow fields, and
build roads in squares to improve the productivity of the land (see
Working the Colony).
Indian Territory: One of the most important factors to consider
when founding a settlement is the proximity and attitude of the
surrounding native towns and villages. When you first meet the
Indians they tell you how many major towns comprise their
nation. If the nation is large, it could be more dangerous, so
be careful.
39

THE COLONY DISPLAY
You direct the operations and activities of each settlement from
the colony display. From here you assign jobs to the colonists
who live in the settlement. Some work the fields and woods of the
surrounding countryside, growing food or cash crops, trapping
beaver, mining ore, or prospecting for silver, while others work in
the buildings of the town commons, fashioning goods from the
commodities gathered from the fields or constructing new
buildings from the lumber of the surrounding woodlands.
Settlement
People
Transport
Multifunction
Warehouses
Button
View
Area
View
View
View
View
Exit
The display provides an at-a-glance summary of all activities
that are occurring in the settlement. You can see what the colony
is producing, who is producing it, how much food, commodities,
and goods are on hand, what is going on in the harbor (if there is
one), what the settlement’s main construction project is at the
moment, and how many people there are.
The display is accessed from the map by clicking on the colony
icon (or by pressing Return when the square is selected). The
display is closed by clicking on the Exit button (in the lower right
hand corner) or by pressing the Escape key.
The display consists of six major views: people view,
warehouse view, transport view, area view, settlement view, and
a multi-function view. Each of these is described below.
40

PEOPLE VIEW
This view (lower left) shows all the people currently in the
settlement and how many food, crosses, and liberty bells
the settlement produces each turn. In addition, the people view
summarizes the loyalty of the people to the Crown.
Sons of Liberty
Membership
People
Excess Food
Tory Sentiment
Crosses
Liberty Bells
People: The population of a settlement is shown by a line of
colonists standing in the display. Each colonist represents a group
of settlers and corresponds to another icon working in either the
area view, settlement view, or in the units section of the
multi-function view.
If you click on a colonist in the people view, the corresponding
icon in one of the other views is highlighted by a green box.
Sons of Liberty: In the upper left corner of the view is an early
American flag with a number next to it. The number is the
percentage of the settlement's population who belong to the “Sons
of Liberty” and would favor rebellion against the mother country. In
the upper right corner is a Crown with a number indicating what
portion of the people are “Tory” and loyal to the Crown. (Note that
Sons of Liberty membership is critical to the colony’s ability to
produce; see Sons of Liberty.)
Food: Each colonist eats two food per turn. If the settlement is
currently producing more food than is needed to feed the total
population, the excess is shown after a break in the food line. At
the end of each turn any excess food is stored in the warehouse.
If the settlement is not producing enough food to feed the
population, the amount of shortfall is indicated by “X’ed-out” food.
Starvation: If there is food in the warehouse, any food shortfall
will be made good by using stored food. If there is no food in the
warehouse, each turn a shortfall cannot be made good, a colonist
starves and is lost.
Crosses: Also visible in the people view is the number of
crosses the settlement is producing each turn. These crosses
represent religious freedom and satisfaction and contribute to
religious unrest in Europe (see Religious Unrest, above).
Liberty Bells: This view also shows the number of liberty bells
the colony is currently producing per turn. Liberty bells represent
the growth and improvement of colonial government as well as
general feeling of patriotism in the colonies.
41

WAREHOUSE VIEW
This horizontal strip along the bottom of the screen shows all
the goods and commodities that can be stored in the colony, and
the number of each currently on hand. The storage capacity
depends upon the level of warehouse space that has been
constructed in the settlement. A settlement without a warehouse
can store up to 100 items of each type in its initial storage
facilities. If the colony builds a warehouse or adds warehouse
expansions each upgrade adds another 100 items to the capacity
for all goods and commodities. The single exception to this is
food. Up to 199 food may be kept in reserve at a settlement. Note
that when more than 199 food is in the warehouse, a new colonist
is created in the colony.
Colony Advisor Report: Your trusted Colony Advisor (see
reports menu) has valuable information that will help you in
making many important decisions. His report shows all goods and
commodities that can be stored in your warehouses, and the
number of each item currently on hand in every colony. This can
be very useful in planning trade routes for your ships and wagons
(see Automating Trade).
TRANSPORT VIEW
This view shows any and
all wagons or ships
Selected
Ship
Ship
Cargo
Holds
available. In this view, you can transfer cargo from your
warehouses to your ships and wagons, or vice versa. You can
also transfer cargoes between ships and wagons.
Selecting Units: In the transport view you select a particular unit
by clicking on it. The currently selected unit has a box around it,
and the holds beneath the wharf belong to it.
Moving Cargoes: Each hold of a ship or wagon train stows up
to 100 units (a full cargo load) of goods or commodities. Whenever
you transfer cargo from ship to warehouse (or vice versa) you
move as much as is available in the hold or warehouse, up to a
full load. A full load in a cargo hold appears as a color icon. A
partial cargo appears as a black-and-white icon.
Instead of cargo, each hold of a ship may carry one colonist or
artillery unit. (Scouts and dragoons units, which are actually men
and horses, are still considered one unit.) Wagons may never
carry colonists or artillery, only cargo.
currently at the
settlement. Beneath the
wharves is a row of
boxes representing the
cargo holds of the
currently-selected ship or
wagon. Note that different
ships and wagons have a
different number of holds
42

Loading Cargo
Loading Cargo Holds: Regardless of the type of unit containing
the cargo hold—whether ship or wagon—the procedure for
loading and unloading is the same. With the mouse, drag the
cargo you want to load from the warehouse onto the vessel. You
have now transferred all the cargo of that type (up to 100 items) from
the warehouse to a hold.
Load the most Valuable Cargo: If you want to pick up the most
valuable cargo in the settlement’s warehouse, there’s a shortcut:
simply press the load key (L). This loads the most valuable cargo
currently in the settlement into an empty hold of the selected ship
or wagon. However, horses, tools, and guns are not considered
cargoes for this purpose (since you seldom think of them as
commodities to be sold). Note that the load key (L) works from the
map display as well. When a wagon or ship with an empty hold is
awaiting orders in a settlement, pressing the load key (L) functions
as described above.
Unloading Cargo: Unloading cargo is the reverse of loading.
Using the mouse, drag the cargo from the hold to the warehouse
area of the Colony Display (you don’t have to drag it to its
corresponding slot, just to the area). The cargo is automatically
stowed in its proper place. If there’s not enough room in your
warehouse to stow what you are unloading, your advisors point
this out and ask for further instructions.
Unloading Shortcut: Alternatively, you can press the unload key
(U) and empty the cargo from your first hold into the warehouse.
Repeatedly pressing the unload key (U) eventually unloads an
entire ship.
Moving Partial Cargoes: You may want to load or unload
some—but not all—of the cargo in a hold or warehouse. To do so,
shift-drag the cargo. A dialog box appears, into which you can
type the exact number of items you want transferred.
Transferring Cargoes Between Units: To move a cargo from
one unit to another, drag the cargo from one unit to the other in
the transport view.
Loading Units
Units are not loaded in the same way as cargo. Instead, any
unit (except other ships or wagons) that is on sentry duty (S key),
automatically boards a ship with an available hold when it leaves
the colony. However, units may never be transported by wagons.
43

AREA VIEW
This view (upper right) is a top-down view of the area
surrounding the settlement and shows how it is being used. The
area view is where colonists do outside jobs like farming, mining,
trapping, woodcutting, and so on.
Colonists working in the
settlement can be put
to work in the area
In use by
another
Colony
Fur Trapper
Settlement
Fisherman
view by placing them in
map squares on the
area view and
choosing a job from the
jobs menu (see Putting
Colonists to Work,
below).
Each square can
produce one
commodity at a time.
The number it can
produce per turn varies
according to the type of
terrain, its level of forestation, and the expertise of the colonist
working there. Only one person at a time can work a square in the
area view. See the Terrain Chart for details.
SETTLEMENT VIEW
This view (upper left) shows the important buildings existing in
the settlement. Colonists may be placed in the buildings to
transform any commodities on hand into processed goods. The
number of goods produced each turn varies according to the skills
of the people working in the building. Up to three colonists can
work in a building at once.
44
Statesman
Blacksmith
Carpenter
Tobacconist
Cathedral
producing
Crosses
Dragoon

WORKING THE COLONY
In order to make a colony productive and profitable, you must put
people to work there. The more people you bring to a colony, the
more productive it is likely to be. But, the larger the settlement, the
more annoying it is to the native population. You must balance the
need for productivity and profit with the need for pacification of
the natives.
Colonists can either work the fields and woods around the
colony or work in the buildings of the town commons.
PUTTING COLONISTS TO WORK
To put a colonist to work, you must first decide if he should
work the fields and woods around the settlement on the area
view, or whether he should work inside the colony in one of the
buildings of the settlement view. A third possibility exists: a
colonist can be in the same square as the settlement, but not
working there at all (see Defending a Colony).
Jobs in the Area View: Your first concern is to harvest enough
food to feed the population. If you have enough food then you
probably want to grow cash crops like sugar, tobacco, or cotton,
or mine for ore or silver; you may also want to trap beaver, otter,
or other fur-bearing creatures or chop lumber for building inside
the settlement. All these jobs must be performed in the woods
and fields surrounding the settlement on the area view.
Jobs in the Settlement View: Most jobs performed inside the
settlement (in the settlement view) convert resources gathered
from outside the colony, or those currently stored in the
warehouse, into goods such as coats, tools, cloth, rum, or cigars.
Therefore, it makes sense to work inside the settlement only if you
have convertible resources or commodities on hand in the
warehouse, or people working outside that are producing such
commodities or resources.
Some jobs inside the settlement do not require other resources.
Teaching requires only some type of school building and a skilled
colonist to act as teacher. Preaching requires only a church or
cathedral and a colonist to produce crosses. Statesmen require
only a Town Hall and a colonist to produce liberty bells.
To Put a Colonist to Work: Drag him onto a terrain square in the
area view or building in the settlement view. An icon (or icons)
immediately appears next to the colonist indicating what he is
producing in that location. If you want to change his job, click on
the colonist to bring up the jobs menu and select the new job he
is to perform in that location.
While the colonist is selected (a box is around him), you can
move him to a new location on the area or settlement views
simply by clicking the location to which you want him to move.
He moves there automatically and the production icons
change accordingly.
45

Note that to select a colonist you may click on his icon in either
the area or settlement views or the people view. Regardless of
which one you click, the same colonist is selected in both views.
For example, if you click on the first colonist in the people view, a
box appears around him and around his other icon in either the
area or settlement views, depending upon where he is.
Jobs Menu: Open this menu by clicking a selected colonist in
any view of the colony display. From this menu you assign the
selected colonist to a job. If the colonist is a specialist, then the
job in which he is skilled is highlighted; if he’s unskilled, no job
is highlighted.
The jobs menu lists all the possible jobs a colonist can do, and
gives two values for each. The value to the left of the slash is the
number of goods or commodities the colonists can produce in his
current location; that to the right of the slash indicates the most
that could be produced in any usable location in that colony.
If the selected colonist is working in the settlement view, his
jobs menu has only one value for each item. This is the most that
each of the jobs will produce. When you select the job you want
him to do, he automatically moves to the most productive location
available for the job selected.
Clear Specialty Option: The jobs menu includes the choice
“Clear Specialty.” This allows you to change a specialist into a free
colonist so that he may be re-educated in a school, college,
or university.
ENTERING AND LEAVING A COLONY
The jobs listed at the bottom of the jobs menu are performed
by colonists outside the colony, that is, on the map display. These
tasks include colonist, pioneer, soldier, scout, missionary, and
dragoon. In effect, these are units you can move around the map.
The Job of Colonist: The job “colonist” is simply a colonist unit
that can wander around the map.
Pioneers Require Tools: To create a pioneer unit, you must
have at least 20 tools on hand in storage. When you create a
pioneer unit, he takes these tools to use outside the colony. A
pioneer unit takes as many as 100 tools, if they are available
in storage.
Scouts Require Horses: To create a scout unit, you must have
at least 50 horses on hand in storage. When you create a scout
unit, he takes these horses for transport.
Soldiers Require Muskets: To create a soldier unit, you must
have at least 50 muskets on hand in storage. When the soldier
unit is created, he takes these muskets to use outside the colony.
Dragoons Require Horses and Muskets: To create a dragoon
unit, you must have at least 50 muskets and 50 horses on hand in
storage. You may also create dragoons from soldiers or scouts by
giving them horses or guns, respectively. When he is created, the
dragoon takes the musket and mounts the horse.
46

Missionaries Need a Church: If the colony has constructed a
church or cathedral inside the settlement, any colonist unit may
be ordained as a missionary unit. A missionary unit carries out its
duties outside the colony (see Missionaries).
MULTI-FUNCTION VIEW
This display has three modes, represented by the three buttons
in the display: The top button is the Production button; the middle
button is the Units button; the bottom button is the Build button.
Production View
Sugar
Rum
Horses
Lumber
Hammers
Shortfalls
Production Button
Furs
Tools
To open this view, click the Production button in the multifunction view. The view shows all commodities and goods the
settlement will produce this turn. (To see a numeric
representation, click anywhere in the multi-function view after you
have clicked the Production button. Numbers appear
superimposed on the commodities icons for clarification.) All
goods and commodities produced by the colony go into storage
at the end of each turn—unless some of these products are being
converted into something else. For example, if an ore miner
producing 3 ore per turn and a blacksmith producing 3 tools per
turn work in the same settlement, the ore is not stockpiled, but is
immediately converted into tools. Any ore on hand in storage
remains untouched.
Shortfalls that occur in the production cycle are shown by “X’ed
out” commodities. For example, suppose a miner is producing
3 ore per turn, but an expert blacksmith occupies the blacksmith’s
house, producing 6 tools per turn. The miner does not produce
enough ore to fulfill the needs of the expert blacksmith, so the
production display shows a shortfall of 3 tools. If, however, there
is ore on hand in storage the shortfall is made good from there,
removing the shortfall icons from the view, but reducing your
stockpile by 3 ore each turn, until it is gone.
47

Units View
Click the Units
(middle) button to
open this view.
Units button
Units present
(Dragoon and
Artillery)
This view shows
all colonists in
the colony’s
square but not
currently in the
colony. In most
cases these units
will be soldiers or pioneers. The main purpose of this view is to
allow you to give orders to these units. If you select a colonist in
this view (by clicking on it), the options menu appears.
Move to front row: This option appears if there are so many
colonists in the square that they cannot all fit in the front row. The
selected unit moves to the front row if you choose this option.
Clear Orders: This option removes the selected colonist from
sentry duty or fortified status, and makes him available to receive
normal orders on the map display.
Sentry/Board Ship: This option puts the selected colonist on
sentry duty, which causes him to board the next available ship.
Fortify: This causes the selected unit to fortify itself. This is very
useful when defending the colony. A fortified unit inside a colony—
especially a colony defended by a stockade, fort, or fortress—is
very well protected (see the Fortification Chart).
No Changes: This option removes the menu, causing no
changes to the selected unit.
The Construction View
The construction
Current Project
Hammers
completed
Tools needed
Build button
There are two buttons in this view, labeled Buy and Change. The
project that is currently under construction is listed above
the buttons.
Building: To start a construction project, click the Change button
to open the buildings menu. The buildings menu lists all
construction projects the settlement could currently undertake, and
the number of “hammers” (representing carpenters’ effort and
lumber resources) that must be expended to complete the project.
In some cases, a project also consumes a number of tools
(representing blacksmithing effort and metal resources).
view shows the
progress of
any major
construction
projects ongoing
in the settlement
and allows you
to select which
projects to start.
48

The number of options appearing here depends upon the
population of the colony—the more people available to work, the
greater the variety of projects that can be started.
Producing Hammers: A colonist working in the carpenter’s shop
“produces” a number of hammers per turn, subject to available
lumber resources. These hammers are deposited into the
construction view at the end of each turn, and when enough have
accumulated to complete the current project, the building is added
to the settlement. Each building enhances a colony in some
advantageous way, so expanding your colony is very important
(see The Buildings).
Expending Tools: In a construction project that requires tools,
the building is not completed until the requisite hammers and
tools are available at the same time. When all the needed
hammers have accumulated in the construction view, the required
tools are removed from the colony warehouse to complete the
building. If, however, the tools are not available at that time, an
advisor informs you of the problem, and the building is not
finished until sufficient tools are brought to the colony and
deposited in storage.
Changing Projects: A project currently under construction can
be changed at any time by opening the buildings menu and
selecting a different project. Any hammers already accumulated in
the construction view are retained and used toward construction
of the new project.
Rushing Projects: Your colonial empire accumulates gold in its
treasury from successful trade with natives, other Europeans, or
your home country. You have the option of spending some of this
hard-earned cash to rush the completion of the current project.
To do so, click the Buy button. A dialog box appears, offering
you the opportunity to change your mind or go ahead with
the expense.
49

THE BUILDINGS
One of the most important actions your colonists undertake is
the expansion of their colony through the construction of new
buildings. When a colony is first laid out, several basic buildings
(enough for an initial manufacturing effort) are erected. As the
population grows, you can build new buildings and improve
existing structures. For details on how to construct buildings, see
the construction view, above.
Each building allows your colony to carry out activities and
operations that would not otherwise be possible. (For a summary
of buildings and their effects, see the Buildings Chart.)
To utilize most buildings, you must put a colonist to work “in”
the building. Simply drag him onto a building in the settlement
view. An icon (or icons) immediately appears next to the colonist
indicating what he can produce in that building if resources
are available.
ORIGINAL COLONIAL BUILDINGS
At first a community constructs some basic organizational and
manufacturing facilities—a town hall, and a carpenter’s shop and a
blacksmith’s house. Then they construct houses for residence. Out
of the residences, though, other manufacturing, on a small scale,
takes place.
Town Hall: A small town hall is one of the first structures a
Carpenter’s Shop: The community also builds a carpenter’s shop
because of the obvious need for constructing all sorts of items for
the good of the settlement.
community puts together. It provides
a place where colonists from the
surrounding area can gather to
discuss issues facing their
community. This is the first inkling of
colonial government. Also, the town
hall fosters colonial pride and
rebel sentiment.
A colonist in a town hall produces
liberty bells, which represent growing
nationalism and colonial government.
An elder statesman in a town hall
produces many liberty bells.
A colonist working in a carpenter’s
shop can produce hammers, which
accumulate to construct other
buildings and structures in the
settlement. Note, however, that a
carpenter needs lumber to
create hammers.
50

Blacksmith’s House: The community also helps
build a blacksmith’s house for much the same
reason as they erected the carpenter’s shop. They
realize the need for basic metal goods—tools,
repairs of existing implements, and so on.
A colonist working in the blacksmith’s house can
produce tools, which accumulate in the settlement’s storage area. A blacksmith needs ore to
produce tools.
Tobacconist’s House: Some colonists have been
introduced to tobacco by the natives and are
already learning how to cure and dry the weed, to
fashion pipes and to make cigars from it.
Someday, this crop may grow into a
major industry…
A colonist working in the tobacconist’s house can
produce cigars if there is tobacco available. Any
cigars he produces accumulate in storage.
Weaver’s House: A new strain of cotton is used by
the Indians in America, and some of the colonists
work with it to weave a fine grade of cloth.
A colonist working in the weaver’s house can
produce cloth if there is cotton available to work
with. Any cloth she produces accumulates
in storage.
Distiller’s House: In some areas, fine cane sugar
can be cultivated, and some of the natives
cultivate large fields of it. The colonists know that
it can be distilled to produce rum.
A colonist in the distiller’s house can produce rum
if there is sugar on hand to work with. The rum is
bottled and aged in the storage area.
Fur Trader’s House: One of the first things
colonists noticed when they got to America was
the incredible abundance of fur-bearing mammals,
and the tremendous use that some Indians made
of these pelts. They also realized the profits that
could be made from selling fur or making clothing
from it.
A colonist working in the fur trader’s house can
produce coats, if there is fur available to work
with. The coats accumulate in storage.
51

OTHER BUILDINGS AND STRUCTURES
Lumber Mill
Carpenter’s Shop
Lumber Mill
upgrade a carpenter’s shop into a lumber mill when the population
of a colony reaches 3. A mill doubles the output of hammers from
any colonists working there (but requires an equal increase in
lumber, of course).
The humble
carpenter’s
shop can be
improved and
upgraded to
make those
working there
more effective.
You may
Metal Working Facilities
The production of metal implements such as hoes, axes, nails,
Blacksmith’s
House
Blacksmith’s
Shop
Ironworks
that you develop a metal-working industry. This industry is
represented by blacksmithing facilities that output “tools,” a
generic term for all sorts of metal equipment. Note, however that
blacksmiths require ore to make their products.
Blacksmith Shop: The modest smith’s house may be expanded
into a larger blacksmith’s shop that increases the production of
tools. You may begin the project when a colony’s population
reaches 4.
Ironworks: Your colonists may construct an ironworks when
the population of their colony reaches 8, and after Adam Smith
joins your Continental Congress (see Founding Fathers Ideas and
Powers and Continental Congress). An ironworks is a factory-level
building for metal-working/production and dramatically increases
tool output.
parts for
wagons and
ships, guns,
and so on, is
critical to the
success of
your colonial
empire. In
order to fulfill
the growing
demand for
such items, it
is imperative
52

Fortifications
Stockade
Fort
Fortress
One of the most valuable structures your colonists can build is
a fort to protect the town square of the settlement. These
structures are used much in the same way city walls were used in
the old world. While most of the work of a colony is accomplished
outside the walls, fortifications provide a safe place for colonists to
hide (and defend) when threatened by enemy forces. Many
dwellings were not actually enclosed in the stockade, fort, or
fortress, but their proximity to protection gave settlers a chance to
retreat to safety. The decision to fortify a colony is important. It
represents a commitment to a permanent settlement.
Stockade: Your colony can start erecting a stockade while it is
still very small (population 3). A stockade is a low wooden
barricade made of poles, sharpened at the top, with loop holes for
firing muskets, and crude inside shelves on which gunners can
stand. The defense strength of a unit increases by 100% inside a
stockade. Once a colony has constructed a stockade, you may
never reduce its population to less than 3.
Fort: A fort is a substantial improvement over a stockade; your
colony can upgrade an existing stockade to a fort when their
population reaches 4. The improvements entail reinforcing the
walls with metal braces, installing artillery to cover exposed
approaches, and substantial defensive planning. The defense
strength of a unit increases by 150% inside a fort.
Fortress: Your colony can start upgrading an existing fort to a
fortress when their population reaches 8. This entails reinforcing
the wooden barricade for stoutness, and in critical spots replacing
it with stone masonry. Further, your colonists now house their
more extensive artillery in embrasures, located to cover the
exterior approaches with overlapping fields of fire. Units receive a
200% defense bonus inside a fortress.
53

Luxuries Industry
Textile Mill
Cigar
Factory
Sugar
Refinery
Coat
Factory
There are four cash-producing industries your colonies can
develop: cigars, cloth, rum, and coats. Each industry is based
upon a commodity that can be harvested from the woods and
fields of the New World. Each colony begins with a basic form of
each industry, represented by a tobacconist’s house, weaver’s
house, distiller’s house, and fur trader’s house. Each location can
be upgraded twice to increase the output of goods (see the
Building Chart for details). Note that your colonists can construct
factory-level buildings only after Adam Smith has joined your
Continental Congress.
Military Production Facilities
Armory Magazine
Arsenal
As your colonies grow, and the prices of goods and
commodities in Europe rise, it becomes increasingly important to
produce your own weapons. Your colonies can construct a
military industry in your empire. Again, there are three levels
of improvements.
Armory: Your people can construct an armory, a metal-working
facility which allows the steady construction of weapons, when
the colony is still quite small (population 1). Here, they forge
muskets from tools being produced in the colony or on hand in
storage. An armory also allows your carpenters to make
artillery units.
Magazine: An armory can be upgraded to a magazine when a
colony’s population reaches 8. A magazine effectively doubles the
output of muskets if the required tools are available.
Arsenal: A magazine can be upgraded to an arsenal when a
colony’s population is 8 and after Adam Smith joins your
Continental Congress. An arsenal requires only half the number of
tools to produce muskets as a magazine or armory.
54

Maritime Improvements
Dock Dry Dock
Shipyard
To support a large maritime effort, a colony must create
substan-tial docking facilities. Just about any coastal colony has
facilities to load and unload cargo from an anchored ship in their
harbor, but if the settlement wants an extensive fishing fleet, ship
repair, and ship construction abilities, they need to build
specialized structures.
Dock: A dock encompasses the moorings and wharves
necessary to process fish garnered from fishing beds and fisheries
scattered along the coasts of the New World. Building a dock in
your colony allows you to employ colonists as fishermen in any
workable ocean or lake square of the area view. You may build a
dock with a population of 1.
Drydock: A drydock includes facilities and equipment for
repairing ships and boats that have been damaged in naval
combat. (When-ever a naval unit is damaged, it is placed
automatically in the nearest drydock for repairs.) Your mother
country always has a drydock. Your people can upgrade the dock
to a drydock in any coastal colony which has a population of 6.
This enables your colony to repair any damaged ships, instead of
having them returned to Europe.
Shipyard: Shipyards are facilities that contain all the equipment
necessary to build ships. Your colony can upgrade its drydock to a
shipyard once the population of the colony reaches 8, allowing
your carpenters to construct ships.
55

Educational Facilities
Schoolhouse College
University
One of the most important assets a colony needs is the ability
to educate its people. Through education, criminals can be
rehabilitated, indentured servants can purchase their freedom, and
free colonists can become skilled citizens.
Education is one of the few processes in a colony that does not
require other resources. If an educational facility has been built in
the colony, then one or more skilled colonists can become
teachers, and pass along their specialties to free colonists. After a
specialist has been teaching for a period of time, his “student”
colonist will improve.
Only free colonists can become specialists through education.
(You may clear the specialty of an existing skilled colonist so that
he can learn a new skill by selecting “Clear Specialty” from the
jobs menu.) Not only can free colonists learn skills through
education, but servants can become free colonists, and petty
criminals can become servants. For a summary of which skills can
be taught in each level of school, see the Skills Chart.
Schoolhouse: To begin educating your citizenry, you must build a
schoolhouse. A colony can construct a schoolhouse when its
population is 4. One specialist may teach in a schoolhouse at a time.
College: A schoolhouse can be upgraded to a college when the
population reaches 8. A college allows a broader range of
specialists to teach (see Skills Chart), and two specialists may
teach simultaneously.
University: A college may be upgraded to a university when the
population reaches 10. Again, a broader range of specialists may
teach, and three specialists may teach simultaneously.
56

Warehouse and Improvements
Warehouse Stable
items of each cargo type (except food: see Population Growth),
and the expansion adds storage space for another 100 items to
this capacity.
A stable gives your colony somewhere to “stow” their livestock;
it also allows them to breed horses faster.
Normally, the initial storage
facilities in each of your
colonies can hold up
to100 items of each cargo
type. Your carpenters can
construct a warehouse and
one expansion. The
warehouse increases your
storage capacity to 200
Religious Facilities
Much of the immigration
Church Cathedral
religion reaches the Old World shores. The more intense the
religious activities in the New World (represented by crosses), the
more unrest and thus immigration is created in Europe (see
Religious Unrest).
Each colony generates one cross per turn. But constructing and
utilizing churches and cathedrals can increase this output dramatically.
Church: Your colony can construct a church almost immediately
upon landing on the shores of the New World. Their population
need only be 3. Building a church increases cross production
instantly, but putting colonists to work in the new structure creates
many more.
Cathedral: Your colony can upgrade a church to a cathedral when
their population reaches 8, dramatically increasing the colony’s
cross production and that of any colonist(s) preaching there.
that occurs during the Age
of Expansion and
Exploration is generated by
religious persecution in the
Old World. The enlightened
religious institutions within
your colonial empire create
religious unrest in Europe,
as word of the freedom of
57

Custom House
Custom
House
shipping. You no longer have to load and unload cargo or
move ships.
Another important function of the custom house is that it allows
trade with Europe to continue after the Rebellion has begun;
otherwise, access to European markets is closed (see Sons of
Liberty During the Revolution, for more details).
Putting the Custom House to Work: Click on it in the settlement
view. A shipping schedule appears, listing all goods and
commodities. Select those items you want the custom house to
sell to Europe automatically. In subsequent turns, any of the
selected goods or commodities that the colony produces—or
receives—are shipped to Europe automatically, and sold.
You can change the shipping schedule at any time by clicking
the custom house again and resetting the list.
After Peter Stuyvesant has joined the Continental
Congress (see Founding Fathers Ideas and
Powers), your colonies can begin to construct
custom houses. Constructing a custom house
allows you to automate some trading activities with
the Europeans. A custom house serves as a
permanent arrangement between the colony that
constructs it and the mother country. Once
completed, you indicate which goods and
commodities you want to sell on a regular basis to
Europe. The logistics are handled for you by a
combination of European and colonial merchant
Political Activities
Printing
Press
Newspaper
production within is increased by 50%. Building a newspaper
increases liberty bell production by 100%.
Your colony can start a printing
press and newspaper when its
population is 1. Printing presses
and newspapers provide a forum
for public expression of concerns
facing the people. This public
forum can create a sense of
community and brotherhood
which, in turn, generates feelings
of patriotism within a colony.
When a colony completes a
printing press, all liberty bell
58

THE OLD WORLD
59

Regardless of what nationality you represent and how
‘independence minded’ you are, the bonds that bind you to your
home country are strong and enduring. Your home country supplies
you with people to populate the New World, ships to get them there,
goods to trade with the natives, as well as muskets, tools, and other
provisions that allow your colonies to exist in the early years.
However, this relationship is not without price. The King wants to
profit from your endeavors. He will charge exorbitant prices for
seemingly indispensable skills and military equipment. He will tax
your colonies in order to gain revenue for the Crown, and he’ll get
you into unwanted wars with your rivals.
An important source of information and commerce is the Europe
display on which you: trade goods and commodities, recruit new
colonists, buy military equipment, and hire specialists.
SAILING TO AND FROM EUROPE
To leave the New World and sail a ship to the Old, the ship must
enter a Sea Lane square on the map display, then move toward the
nearest map edge. When this occurs, the ship disappears from the
map display, and appears in the “Expected Soon” transit view of the
Europe display. When the ship docks in the harbor, it appears in the
harbor view. When it leaves the harbor to sail to the New World, it
moves to the “Bound for New World” transit view. When the ship
arrives back in American waters, it appears in the Sea Lane square
from which it left.
The Voyage: During the voyage between continents, ships are in
the appropriate transit view on the Europe display. The journey may
last from one to four turns, depending upon the weather, the speed
of the ship, its navigator, and whether the ship sailed east or west
from the New World. It is impossible to predict exactly how long a
given voyage will last, but one that begins from the east edge of the
map is usually shorter than one from the west.
Reversing Direction: You can turn around a ship currently sailing
for Europe and bring it back to the New World (before it arrives in
Europe) by moving it from the “Expected Soon” to the “Bound for
New World” transit views. The opposite is also possible.
Leaving the Harbor: When you wish to return a ship currently in
harbor to the New World, simply drag it from the harbor view into the
“Bound for New World” transit view. Any cargo currently onboard
ship goes along, and any colonists on the docks that are on sentry
duty (“S” appears in their orders box) board the ship if there is an
empty cargo hold for them (see Recruiting and Hiring, below).
60

THE EUROPE DISPLAY
Transaction
Monitor
Transit
Boxes
En route to
New World
Harbor
View
Docks
Warehouses
Exit
Button
You conduct all trade transactions with your mother country on the
Europe display. On this display, you can examine the current prices
of all goods and commodities in your home country’s market, check
out all the ships currently in your home country's harbor, or en route
to or from the harbor, pick up immigrants that are ready or willing to
go to the New World, purchase ships or artillery units, or hire
professionals to come to America to aid in your cause. As you
establish yourself in the New World and begin trading with Europe,
your ships will probably be making the journey from New World to
Old almost continually.
To open the Europe display, press the Europe Status key (E). The
display automatically opens when one of your ships docks at the
harbor in your European home country. The display contains several
different views: the transit views, the harbor view, the warehouses,
and the docks.
61

HARBOR AND WAREHOUSE VIEWS
The harbor view and warehouses of the Europe display
function identically to their counterparts on the colony display.
The only difference is that loading and unloading cargo on the
Europe display is an economic transaction, causing the value of
your treasury to be adjusted according to the prices displayed in
the warehouses.
The warehouses (horizontal strip along the bottom of the
screen) show all the goods and commodities that can be sold or
purchased in your home country port. There is an infinite supply
of all these goods and commodities, and the port buys as much
of each as you can bring to market. Both ask and bid prices are
listed for each item. The number to the left of the slash is the
amount of gold you are paid per unit of cargo you sell (bid); the
number to the right is the amount of gold you must pay to buy the
cargo (ask).
The harbor view shows all ships currently docked in the
harbor. Beneath the wharves runs a row of boxes representing the
cargo holds of the currently-selected ship. In this view, you can
transfer cargoes from warehouses to your ships, or vice versa.
You can also transfer cargoes from ship to ship.
BUYING AND SELLING CARGO
The procedure for buying and selling cargo in Europe is nearly
identical to that for loading and unloading cargo in one of your
colonies. The only difference is that here your treasury is adjusted.
Buying Cargo: With the mouse, drag the cargo you want to buy
from the warehouse onto the ship. You can purchase up to
100 items of that cargo, and your treasury decreases accordingly.
Selling Cargo: Selling cargo works the opposite way. Using the
mouse, drag cargo from your ship’s hold to the warehouse area
of the display. The cargo is automatically stowed in its proper
place, and your treasury increases accordingly. Alternatively, you
can press the Unload key (U) and empty the cargo in your first
hold into the warehouse. Repeated use of the Unload key (U)
eventually unloads an entire ship, updating your treasury hold
by hold.
Buying and Selling Partial Cargoes: You may want to buy or
sell some—but not all—of the cargo in a hold or warehouse. To do
so, shift-drag the cargo. A dialog box appears into which you can
type the exact number of the cargo you want transferred.
62

Transaction Monitor
As you perform trading transactions on the Europe display, the
results are monitored and displayed. The information provided is
as follows:
Current Tax Rate: Each transaction is taxed at this rate and
the yield goes into the King’s treasury. The balance (net) goes into
your treasury.
Number and Type of Cargo Sold/Bought: This tells the type of
cargo involved in the current transaction, and how much of it is
changing hands.
Net Gain: This is the total revenue you receive after taxes have
been extracted.
European Economy
The prices of goods and commodities in Europe fluctuate
throughout the game. The forces that drive the economy are many
and varied. Each nation’s economy responds to the trade it is
receiving from its colonies, but it also responds to the economies
of other nations. The primary factor is the amount of trade in each
commodity: the more of a particular item sold in Europe, the lower
the price drops; if there is little trading activity in a particular good
or commodity, then the price rises. The economy is strictly
supply driven.
To some extent, the prices in your home country are affected by
trading activity in other ports of Europe. Therefore, if you can
corner the market on an item that other powers are not trading, you
can get rich fast. But since you cannot count on serendipity, it is to
your advantage to remain flexible in your production capability, so
you can switch from one item to another as easily as possible.
Economic Advisor Report: Any time you want to examine your
trade practices to see what you’ve traded the most profitably,
check with your Economic Advisor (see reports menu). His report
shows a host of information that is otherwise hidden in the game.
You can find out how many tons of each good or commodity
you’ve bought and sold, and how much gold you’ve made or
spent on each (all credits appear in green, and debits in red).
Additionally, you can see what your European rivals have been
buying and selling. By examining this report carefully, you may be
able to predict the price swings in the European market.
63

THE DOCKS VIEW
At the right side of the Europe display is the docks. When there
are colonists awaiting passage to the New World, they appear here.
RECRUITING AND HIRING
You can recruit new colonists in Europe either for free, by
picking up immigrants on the docks (see Immigration and
Population Growth), or for money, by paying the passage costs of
immigrants in the recruitment pool. In addition to recruiting those
Europeans who are looking to go to the New World, you can also
use money to persuade specific experts from the Royal University
to make the crossing.
How Immigrants Get to the Docks
As discussed in the section Immigration and Population Growth,
potential immigrants begin in the recruitment pool and are driven to
the docks by religious unrest. Religious unrest in the Old World is
sparked by religious freedom in the New World (represented by
crosses produced in the colonies). When a new immigrant arrives
on the docks, one of your trusted advisors informs you of the fact,
and another immigrant joins the recruitment pool. Thereafter, the
immigrants on the docks may be picked up by a ship that docks
in Europe.
Giving Orders to Immigrants
All immigrants that appear on the docks start on sentry duty,
meaning they will board the first available ship that leaves harbor.
If you want to change the orders of an immigrant on the docks,
click the one you want and choose a new order from the menu.
Don’t Get on Next Ship: This option removes the selected
immigrant from sentry duty and makes him watch all ships leave
the harbor without boarding. Such an immigrant will never board
ship unless he is placed back on sentry duty.
Get on Next Ship: This option appears if the selected immigrant
is not currently on sentry duty. It puts the immigrant back on sentry
duty and makes him board the next available ship for the
New World.
Move to Front of Docks: This option moves the selected
immigrant to the business end of the docks, so that he will be the
first one to board when a ship is available. This option appears
only if there is more than one immigrant on the docks.
64

Equip with Muskets: This option buys 50 muskets from the
warehouse (for the listed price) and gives them to the selected
immigrant, creating a soldier unit. This is exactly like choosing
“soldier” from the jobs menu of the colony display. Note that if the
selected immigrant already has horses, giving him muskets
creates a dragoon unit.
Sell Muskets: If the selected immigrant already has muskets,
this option appears. The muskets are sold for the current market
price, and the immigrant resumes his previous identity.
Equip with Horses: This option buys 50 horses from the ware-
house (for the listed price) and gives them to the selected
immigrant, creating a scout unit. This is exactly like choosing
“scout” from the jobs menu of the colony display. Note that if the
selected immigrant already has muskets, giving him horses
creates a dragoon unit.
Sell Horses: If the selected immigrant already has horses, this
option appears. The horses are sold for the current market price,
and the immigrant resumes his previous identity.
Equip with Tools: This option buys 100 tools from the
warehouse (for the listed price) and gives them to the selected
immigrant, creating a pioneer unit. This is exactly like choosing
“pioneer” from the jobs menu of the colony display.
Sell Tools: If the selected immigrant already has tools, this
option appears. The tools are sold for the current market price,
and the immigrant resumes his previous identity.
Bless as Missionary: If you want the selected immigrant to act
as a missionary in the New World, this option ordains him. This is
equivalent to ordaining a colonist in your settlement's church
or cathedral.
No Changes: This option removes the menu, causing no
changes to the selected unit.
RECRUITING IMMIGRANTS FROM THE POOL
Immigrants in the recruitment pool are willing to come to the
New World, but do not have the funding to get them there. If you
wish, you may use money from your treasury to pay the passage
costs for these people.
To recruit immigrants from the recruitment pool, click the
RECRUIT button and select the immigrant you want to support.
The selected immigrant automatically moves to the docks, and
your treasury is adjusted accordingly.
65

HIRING COLONISTS FROM THE ROYAL UNIVERSITY
You can hire new colonists with specific skills from the Royal
University, but the price to convince these professionals to make
the journey can be steep. They are not necessarily looking to
emigrate. The hiring price reflects your need to grease palms and
pull “royal strings” as well as entice the professional himself with
fiscal reward.
To hire a specialist, click the TRAIN button and select the
professional you need; your treasury is adjusted accordingly.
PURCHASING SHIPS AND ARTILLERY
While in Europe, you can purchase additional ships and artillery
as well as any goods visible in the warehouses. The price of
these items depends upon demand. Therefore, the more of each
item you purchase, the higher the price rises. For more
information about what ships you can buy here, see “Naval Power
and Conflict.” For the advantages of artillery, see “Combat in the
New World.”
To buy any of these items, click the PURCHASE button and
select the item you want; your treasury is adjusted accordingly.
66

NATIVES &
FOREIGN POWERS
67

Aside from the details of growing your economy and expanding
your population, you also have to contend with other European
colonists and with natives.
The cultures that the European invasion of the Americas forced
into contact couldn’t have been more different. The Amerindians, in
general, had a long-standing, deeply-rooted respect for nature and
viewed themselves as an integral part of the ecosystem. Some of the
concepts that Europeans found basic to society such as “ownership”
and “progress” meant little or were interpreted in totally different ways
by these American natives.
The vast differences which separated Amerindians from
Europeans created misunderstandings that would flash into violent
confrontations. Looking back, the friction seems inevitable—
everything the European needed to grow and prosper (in his way of
thinking), the Indian needed to maintain. Europeans were consumers,
the natives, conservers.
The competing Europeans have, in general, interests in common
with your own. Like you, they want to establish profitable trade
arrangements, expand their colonial empires, and build a viable
society in the New World. Conflicts often develop over valuable
resource deposits like silver mines, prime commodity lands, or ore
deposits. In some cases too, there are conflicting land grants and
charters. Often the Pope seems to have promised the same land to
several different nations, or the King of one nation believes he has
rights to land claimed by another. In addition to these issues, there
are a host of purely European conflicts that date back through the
generations and occasionally erupt into warfare that spills from Old
World to New.
In short, the behavior of both natives and Europeans can, at times,
seem chaotic due to the complex societies from which it springs.
DEALING WITH THE INDIANS
Natives are everywhere in the New World and are, in general,
friendly peoples. However, their cultures are alien to yours, and you
must be very careful not to offend them. Suspicions on both sides
have a tendency to escalate into violent confrontations. In general,
the Indians are conservationists; they want things to stay as they are.
Clearing land, building large colonies, and bringing weapons into
close proximity alarms them and can lead to trouble. Many of the
chiefs have good intentions but do not rule their young braves with
an iron fist.
Indian Advisor Report: The Indian Advisor report, in the reports
menu, provides some valuable information about the tribes with
which you have come into contact.
68

THE TRIBES
There are eight different native tribes in Colonization,
representing the major civilizations that existed in the Americas at
the time of European discovery:
Arawak
The Arawak represent the island-dwelling cultures of
the Caribbean—those first encountered by Columbus.
These were friendly natives who at first welcomed the
invaders with open arms and generosity. After
extremely cruel treatment at the hands of the
Spaniards, however, they became quite vicious.
Aztec
The Aztec represent all the advanced civilizations of
Mesoamerica. They built magnificent stone cities on
floating islands in tremendous lakes. Large pyramids
served as backdrops for religious ceremonies. The
Aztec and their subjects were warlike peoples with a
long heritage of art and culture.
Inca
The Inca represent the advanced civilizations of
western South America. The peoples of the Andes
and coastal plains were highly skilled builders and
farmers. Their cities were made without mortar of any
type; instead huge stones were carved and fitted
carefully together to form structures that still stand
today. Evidence of advanced farming techniques and
scientific experimentation indicates that the Inca were
one of the most agriculturally advanced civilizations
that ever existed.
Tupi
The Tupi represent various jungle-dwelling coastal
communities of the Amazon Basin and eastern South
America. Primarily stone-age peoples, they were able
to scrape a quite productive lifestyle from their jungle
habitat. The Tupi participated in ritual cannibalism as a
source of protein, which was rare in their jungle
environment. The Europeans, of course, viewed this
as evidence of base savagery.
69

Cherokee
The Cherokee represent the Woodlands Indians of the
southeastern areas of North America. These were
some of the most highly developed civilizations
existing in America at the time of the European
Invasion. Unlike the Aztec and Inca peoples, they were
not builders of vast stone structures and cities, but
tenders of forests. They lived in harmony with the
animals and plants of their environment, almost as if
represented by the Cherokee include Creek, Choctaw, Chickasaw,
and Seminole.
they sprang from the ground themselves. Other tribes
Iroquois
The Iroquois are analogous to the northeastern
Woodlands Indians. Traditionally, the Iroquois and
Cherokee are similar. They had similar dwellings,
religious beliefs, and cultural icons. The Iroquois,
however, developed an elaborate democratic
government that in many ways formed the basis for
the US Constitution. They were a coalition of as many
as six different tribes with elected representatives and
mutual protection agreements. These tribes included
Mohawk, Oneida, Onondaga, Cayuga, Seneca, and
later, Tuscarora.
Sioux
The Sioux represent the Indians of the Great Plains in
the northwestern areas of North America. These
peoples, like the Cherokee, were from highly
developed cultures. They were nomads that followed
buffalo herds. Often called the world’s best light
cavalry, Sioux warriors were highly talented horsemen.
They obtained the horse from the Spanish in the early
1500s, and by the time of their first encounters with
The Sioux relied upon the horse to such an extent that their culture
is often called a “horse culture.”
other Europeans, were formidable mounted warriors.
Apache
The Apache are representative of the great nations
of the American Southwest. They were civilized
nomads with advanced agricultural techniques. Fierce
warriors, the Apache were among the last tribes to be
subdued by the invaders. Their entire culture was
transformed by the fight for survival with Europeans.
They became desert wanderers in an attempt to
remain untouchable by European military tactics,
which centered upon destruction of military bases.
70

CITIES, VILLAGES, AND CAMPS
Each tribe consists of several
settlements scattered over an area of
Indian Settlements
Cities: Two of the native civilizations reside in cities: the Aztec
and the Inca. Aztec cities are identified by the pyramid icon; Inca
cities are the gray, terraced citadels. Cities are much better
defended than the other native settlements because of the large
populations that dwell there. In addition, cities are wealthier than
other settlement types (according to European standards, of
course) and, therefore, much more likely to yield large treasures if
captured. The level of goods cities have available to trade is
usually of higher value than that found in villages and camps.
Villages: Three of the native peoples in the game—Cherokee,
Iroquois, and Arawak—occupy villages. Villages are represented
by a collection of long houses with thatched roofs and bark walls.
Villages are not as populated as cities, but are still quite well
defended. The civilizations that live in villages were not as
“advanced” as the Mesoamerican tribes and, therefore, villages do
not contain as many items valued by Europeans.
Camps: Three tribes in Colonization dwell in camps—Tupi,
Sioux, and Apache. These tribes were nomadic cultures that did
little farming and had not developed a European-style society at
all. Camps are poorly defended and, generally, have the least
valuable items to trade.
Tribal Capitals: Every native nation has a capital, indicated by a
golden star superimposed upon the settlement icon. Capitals are
important focal centers of Indian culture and government. They
are better defended, have more treasure, and have more valuable
trading goods than an average settlement of the same tribe.
Indian Land: Each native settlement has a radius of land
squares which the Indians of that village consider to be their
homeland. Camps and villages have a home radius of one square;
cities have a home radius of two squares. On the area view of the
colony display, Indian homeland squares are indicated by the
presence of totem poles in those squares.
the map. A settlement is the dwelling
place of several braves that patrol the
map nearby. Each Indian settlement is
marked by a tiny spot (or line) of color
that matches the color of that tribe’s
orders boxes.
There are three types of Amerindian
settlements: cities, villages, and camps.
The most agriculturally based tribes live
in large, permanent cities; the tribes that
rely primarily upon hunting but indulge
in some agriculture live in smaller
villages of long houses; the nomadic
tribes dwell in camps of teepees.
71

INDIAN ANGER AND ALARM
In general, the Indians remain a mysterious entity, moving
silently through the woods and plains of their land. The attitude of
each tribe toward the settlers is a source of worry and concern to
all, but is cloaked in mystery. The native settlements each have an
identity of their own, but a general tribal uprising—involving all
settlements of that tribe—can occur if your actions toward some
villages of the tribe are insensitive or brutal.
In addition to tribal anger, each native settlement has a level of
alarm, which increases with your population and proximity. Overall
tribal anger is affected by direct action you take against the
Indians. Alarm in individual settlements is affected not by direct
action, but by indirect pressures such as your proximity to that
settlement, the size of your colony, the presence of weapons, and
so on.
ANGERING THE NATIVES
In general, Indians dislike change in the environment. Working
or changing land they deem their homeland or sacred makes the
natives more discontent.
Improving Indian Land: If you clear, plow, or build a road in
Indian homeland squares, or work their land in any way without
buying it first, their attitude shifts toward anger.
Attacking or Demanding Tribute: If you attack braves or native
settlements, the tribe’s attitude swings dramatically toward anger.
This is true regardless of the number of times they have attacked
your holdings.
If one of your soldier, scout, or dragoon units demands tribute
from an Indian village, this increases the tribe’s anger.
Alarming a Village: The more alarm generated by your colonies
(see Village Alarm, below) in villages of a certain tribe, the faster
the mood of that tribe turns from content to angry.
Involving a Capital: All of the provocations above have a more
devastating effect if a tribal capital is involved. Treat Indian capitals
with care.
Corrupting Burial Grounds: Sometimes when you explore
rumors of lost civilizations, you break into burial grounds. They
may be sacred to a nearby tribe. In some cases, it can be very
profitable to search these grounds for treasure. Be aware, though,
that if you do, you may anger the nearby Indians dramatically,
causing them to immediately attempt to rid the New World of you
and your kin.
72

CONTROLLING TRIBAL ANGER
There are several actions you can take to assuage tribal anger.
Some of them are active and some are passive.
Trading with the Indians: A healthy trading relationship with the
natives can quickly diffuse a volatile situation. You can trade with
natives by carrying cargo in a wagon or ship into an Indian village.
To be more effective at re-establishing friendship, offer them gifts
instead of always trading (see Executing the Trade).
Establishing Missions: This reduces suspicion and helps
establish friendly relations. You can establish a mission within an
Indian settlement by creating and sending missionaries to their
villages (see Missionary Powers).
Involving the Capital: Again, if any of the conciliations above
involve a capital village, the effects are more intense and,
therefore, favorable.
Cooling Down: If you can afford to wait, the Indians will
eventually forgive your “atrocities.” The natives are essentially
friendly peoples, and as time passes in which no further hostile
acts are committed by your colonists, the Indians grow more and
more content.
VILLAGE ALARM
In addition to overall tribal attitude, each individual settlement of
a tribe has its own feeling toward you. Individual settlement
attitude is called alarm and contributes to overall tribal anger.
Alarm is generated by various factors as outlined below.
Exclams: Exclams (exclamation points) superimposed over
Indian settlements on the map graphically indicate the degree of
village alarm. The number of exclams tallies how quickly the
Indians are becoming alarmed, and the color indicates what type
of interaction Indians from that settlement are likely to have
with you.
As the alarm of a native settlement increases, the color of the
exclams intensifies and changes. Exclams start out pale green and
progress through shades of blue, then yellow deepening to
brown, and finally to red. Braves from villages with green exclams
have friendly interactions with you; those from camps with red
ones are angry and are likely to attack as soon as possible; blue
and yellow exclams indicate less predictable behavior, but
settlements with blue exclams are usually more friendly than
those with yellow.
If a native settlement is alarmed by other European colonies,
but not by yours, exclams appear on a background of the color
representing the European nation with which they are alarmed.
73

What Alarms the Indians
Population and Building Density: Your presence is alarming to
the Indians. They are suspicious of you to begin with, because
they don’t understand your ways and culture. The larger the
population of a colony, the higher the density of buildings there,
and the closer it is to them the more alarmed the natives become.
Weapons: If you bring weapons into your colony (muskets
and/or cannon), this increases Indian alarm. If you move a soldier
near one of their settlements, they become more alarmed.
Foreign Missionaries: If a foreign power establishes a mission
in an Indian settlement nearby, those natives become more
alarmed at you. Foreign missionaries are bad-mouthing you and
your colonists.
How to Assuage Indian Alarm
Trading with Amerindians helps establish trust and reduces
alarm (see Controlling Tribal Anger), and a missionary working in a
settlement reduces suspicion and helps keep alarm under control.
If you establish a mission in a settlement that already has a
foreign mission, your missionaries help control the situation. You
can use a missionary to denounce the heresy of a foreign
missionary in an Indian settlement, thus causing the Indians to
destroy the foreign mission (see Missionary Powers, below).
INTERACTING WITH THE INDIANS
Whenever a unit enters an Indian settlement, some form of
interaction occurs. In most cases, a menu of possible actions
appears, and you choose the type of interaction you want to
pursue. The contents of the menu vary depending upon the type
of unit you are moving into the settlement.
TRADING WITH THE INDIANS
When the Europeans first arrived in the Americas, they
discovered that trade with the natives could be a very profitable
enterprise. The Indians had generations of experience trapping
beaver, collecting silver, growing tobacco, cotton, and sugar, and
they were willing to trade the products of these activities for items
produced relatively cheaply in Europe. Such items as tools, cheap
jewelry, or articles of European clothing, could buy a fortune in
Indian goods.
In Colonization you can trade with the natives very profitably as
well. Also, trade is a way of establishing trust between your
people and the tribes. By maintaining a friendly, cooperative trade
relationship with the Indians, it may be possible to peacefully coexist, and profit at the same time.
In order to trade with an Indian settlement, you must move a
ship or wagon unit containing at least one cargo into the settlement.
74

Indian Economy
To a large extent, the supply-demand structure of the native
economy can be deduced by examining the terrain in which they
live. The goods and commodities that the land is capable of
producing in the area of the Indian settlement are probably
abundant. Those the land does not yield are probably in short
supply. Logically, Indians are willing to trade for things they need,
but not for items they have in abundance.
Scouts as Emissaries: You can find out what an Indian
settlement will trade for by sending a scout (mounted colonist) to
speak with the chief. Move the scout into the settlement and
choose “Ask to Speak with Chief” from the menu. The Chief tells
you what the village will trade for and what skill a colonist could
learn from them if he were to “live among them” (see Other
Interactions, below). Whenever you send a scout into a village, there
is a chance he will not come out alive. This chance is influenced by
the mood of the tribe at the moment.
Exploring Trade Arrangements: To open trade talks with a new
tribe, you must meet with them on land first (to introduce yourself).
You may not open trade talks simply by sending a ship or wagon
into a newly-discovered tribe’s settlement. However, after meeting
them, if you think you want to open trade with a settlement but do
not have a scout to speak with the chief, you can send a ship or
wagon to the settlement, and refuse any trade, just to discover
what they will buy.
Executing the Trade
Initiating the Trade: To trade with an Indian village, city, or
camp, you must bring cargo to the settlement. You may bring
cargo by ship to a coastal settlement, or by wagon train to any
settlement (simply move the ship or wagon into the square).
Striking a Deal: If the Indians are in a trading mood, they’ll
examine the cargo and offer you gold if they want it. You have the
opportunity to haggle with them if you think their offer is low, or
you may accept the offer. Once you accept the offer, the cargo is
removed and your treasury is adjusted.
Make it a Gift: You may, however, choose to accept no payment
for your cargo, and make it a gift to the Indians instead. This
strategy is useful if your trade is designed to assuage Indian ire.
By giving them gifts, you reduce their anger more quickly.
Buying from the Indians: Whether you give them a gift, or sell
them your cargo, the Indians now offer to sell you some of their
goods; they offer three goods or commodities, and after you
choose the one you want, you can haggle over the price or reject
the whole deal. If you make a trade, your holds are filled with the
appropriate cargo and your treasury reduced according to the
terms of the trade.
75

Restrictions
Angry Natives: If you bring stuff the settlement doesn’t need,
the Indians won’t trade. Also, if the tribe is angry because of your
actions, or if that village is highly alarmed (red exclams) they will
not trade with you.
Restless Natives: If the tribe is restless (yellow exclams) at the
moment, a village will not trade with your ships.
Consecutive Trade: If willing to trade, the Indians always take
one of at least three different goods or commodities, but never the
same one twice in a row. If you try to bring the same village the
same cargo in consecutive trading expeditions, the villagers refuse
the subsequent trades. The single exception to this is muskets.
The natives almost always trade for muskets.
Trade from Ships: Indians will not trade with a ship unless the
tribe already knows your people. The introduction must occur
between land units. In addition, the uneasiness of natives towards
ships in general prevents ship-borne trading from being as
profitable as overland commerce. The natives much prefer trading
with wagons that come from known colonies.
OTHER INTERACTIONS
Living Among the Natives: Whenever a colonist or pioneer unit
enters a friendly Indian settlement, he has the opportunity to “live
among the natives” (to become what the French called a coureur
de bois). If you choose this option, the Indians may teach the
colonist a skill. A colonist that is already skilled cannot be taught
anything further, but the Indians are honored to have him living
among them. The Indians do not allow petty criminals to live
among them.
Demanding Tribute: Soldiers, dragoons, and scouts may
demand tribute from a settlement, hoping to gain gold from the
natives.
Attacking a Village: Soldiers, dragoons, scouts, and artillery
may attack villages. Simply choose this option from the menu.
Meeting With the Chief: Scouts may ask to speak to the
settlement Chief. The scout can learn all the goods and
commodities the natives would like to buy from your colonists and
what skills the Indians of this settlement have to teach young
Europeans. In addition, the chief may “tell tales of nearby lands,”
which reveal vast areas of unexplored territory; or he may offer a
peace gift of gold or beads to the scout.
Treasure Trains: If you capture an Indian settlement, you may
find treasure. To carry these valuables, you get a special unit: a
treasure train. Treasure trains fill six holds of a ship (it takes a
galleon to transport your prize to Europe). If you park the treasure
train in a coastal colony, your King will send one of his galleons to
transport it for you—for a price.
76

MISSIONARIES
Missionaries are very useful emissaries of your colonies. They
can influence the mood of the native population with regard to your
colonies and the colonies of your European adversaries. They can
even incite the Indians to attack other European colonies and
peoples. Any colonist can be ordained as a missionary, but expert
missionaries perform all missionary powers better than non-experts.
Obtaining Missionaries
There are several methods for obtaining missionaries.
Expert Missionaries: Expert missionaries can be purchased
from the Royal University, or they may appear as normal
immigrants on the docks in Europe (see The Europe Display).
Ordaining Missionaries: Any colonist, even skilled immigrants
on the docks of Europe, may be “Blessed as Missionaries” before
they board ship to come to the New World. In addition, any
colonist in a colony that has a church or cathedral may be
ordained and made a missionary.
Missionary Powers
A missionary that enters an Indian settlement has several options:
Establishing a Mission: A missionary can establish a mission by
choosing that option from the menu that appears when he
attempts to enter an Indian settlement. The presence of a mission
in an Indian settlement reduces the alarm in that location, and thus
reduces overall anger of the tribe. Also, if a village is alarmed by
another European power, then one establishing a mission there
increases the village’s alarm at the foreign power. An Indian
settlement with a rival European mission inside is indicated by the
presence of a small cross of that nation’s color superimposed
upon the village icon; expert missions (those established by expert
missionaries) appear in a brighter color than inexpert missions.
Denouncing as Heresy: A missionary that enters an Indian
settlement already containing a mission of another European
power has the option of denouncing the existing mission as
heretical against the true church. Faced with a proclamation of
heresy, the Indians go into council to decide what to do. Either
your missionary or the foreign one will be burned at the stake.
Your likelihood of surviving the decision depends upon the natives’
view of you contrasted with their view of your European rivals.
Inciting Indians: A missionary may enter a settlement and
request support in a war against another European power. If you
choose this option, the Indians ask which European colonies
you’d like them to attack, and offer to do it for a price. The price
they want depends upon three factors: the number of missions
you have operating within settlements of their tribe, their current
attitude toward you, and their current attitude toward the
Europeans you want them to whack. The more missions you
have, the better; the more they like you and dislike the target of
your attack, the better.
77

INDIAN WARS
The English colonists experienced a host of wars with the
Indians. Often these were protracted affairs of low-intensity combat
stretching over many years. These long periods were punctuated
by bursts of intense violence and lulls of uneasy peace. Few
permanent colonies experienced protracted periods of peace.
These “wars” were often tit-for-tat retaliations for minor incidents
that would flare into full-fledged war for short periods. Most of
these catalyst incidents were perpetrated by settlers and involved
unfair or brutal treatment of the native population.
In the unlucky event that you allow a native tribe to become
angry, and all the exclams in its villages are red, those Indians
relentlessly attack your settlements and units. It may be difficult to
avoid these conflicts, though it is possible. Whether or not these
wars are prudent and moral must be left to you.
Should you find yourself in an unwanted war with some
natives, seek to reduce their anger through the conciliatory
techniques outlined above (see Controlling Tribal Anger) and
hunker down and wait for them to cool off.
78

DEALING WITH COLONIAL POWERS
Every one of your European rivals will attempt to dominate the
Americas, to establish a monopoly on the valuable trade coming in
and out of American waters. As you operate your colonial concerns,
you will encounter foreign vessels on the high seas and sometimes
even in waters you consider your own.
Rival Europeans aggressively attempt to colonize the entire area of
the New World through whatever means available. If they sense
weakness in your attitude or deployment, they are likely to take
advantage of that and attack your forces. They attempt to capture
your colonies and force allegiance to their rule upon the population.
To achieve dominance in the New World, your rivals will use their
naval and ground forces in a variety of ways to interrupt the smooth
flow of your commerce.
Foreign Affairs Advisor: This trusted counselor has information about
the colonial holdings and activities of other European powers. At first,
his report shows only broad political realities like who is at war with
whom. After Jan de Witt joins your Continental Congress (enabling trade
with rival colonies), the report becomes much more detailed. Now it
includes a comparison of all Europeans showing the total New World
populations, the number of colonies each has, and the average size of
those colonies, along with an assessment of your military, naval, and
merchant marine forces.
NAVAL POWER AND CONFLICT
MerchantmanCaravel Galleon Privateer Frigate Man-o-War
Your European competitors have access to the same ships you
do—both cargo and war vessels. Like other units, foreign ships
carry orders boxes to identify their nationality. The number within
a foreign ship’s orders box does not indicate the current orders it’s
conducting, but the number of cargo holds currently containing
goods or commodities. This is important information for your
privateers and frigates that may be prowling for plunder.
Naval Advisor: This trusted advisor has information about all
your ships currently in play. His report lists all your ships, the
cargo each is carrying, current locations, and destinations (if
carrying out a long-range order).
79

WARSHIPS
There are three types of warships in Colonization. Some are
officially flagged by the government that produced them
(men-o-war and frigates), while others are not officially sanctioned
(privateers). All types are capable of sinking or damaging vessels,
and seizing cargo on the high seas. See the Naval Units Chart for a
summary of information about naval vessels. Note that once
Ferdinand Magellan joins your Continental Congress, the
movement allowances of all your ships are increased by one.
Man-O-War: These powerful vessels appear in American waters
only when a War of Independence develops. Your mother country
sends them against your forces, and, if foreign intervention (see
Foreign Intervention) occurs, you receive some (from your ally) to
support your forces. Men-o-war are very heavily armed with
cannon and feature 6 holds to carry large invasion forces or
cargoes. While these ships move 6 squares per turn and may
seem invincible, remember that in naval combat, as in all other
types, there are no guarantees of success.
Frigates: Frigates are dangerous gunships, capable of sinking or
damaging any of your vessels. Frigates have four cargo holds and
may move 6 squares per turn.
Privateers: These are ships owned by individuals who have
obtained a “Letter of Marque” from their government, giving them
the “right” to prey upon foreign shipping. Foreign privateers can be
very dangerous to your commerce because they observe no code
of international behavior; the countries sponsoring them will likely
claim no knowledge of their actions. Privateers move 8 squares
per turn and have two cargo holds.
Naval Patrol Radius: Armed vessels have a “zone of patrol” that
extends into all squares adjacent to the ship. This area is
considered to be under observation by the ship. As a result of this
observation, foreign ships that pass through the zone may be
slowed or stopped. In some cases, foreign ships can slip past a
warship unobserved.
Blockading Harbors: To interrupt the flow of trade from your
harbors, foreign warships often blockade them. They hover just
outside the entrance to the harbor and attack any ship that
attempts to enter or leave the port. You, of course, can use the
same tactic.
Sea Battles: A battle at sea between naval vessels is initiated
the same way that land battle is; just attempt to enter an enemyoccupied square and the battle is resolved.
80

Forts and Fortresses: Coastal colonies that have constructed a
fort or fortress “control” the sea squares adjacent to the colony.
This area functions much like the “zone of patrol” of a war vessel,
except that forts and fortresses actually open fire upon passing
vessels, in addition to merely slowing their progress.
While all forts/fortresses have an intrinsic artillery component,
those into which you have placed artillery units have a greatly
increased strength; and of course, the larger the fortification, the
more powerful the artillery.
CARGO SHIPS
In addition to the gunships that are available, there are three
types of cargo vessels in Colonization. These are capable of
carrying men and materials, but incapable of initiating combat.
They move at varying speeds and have various cargo capacities
(see the Naval Units Chart).
LAND CONQUEST AND DIPLOMACY
As your colonies expand and you build more of them, you will
inevitably come into contact with other Europeans on land. The
attitude you decide to take toward these rivals is very important. In
some cases, the government of the power with which you’re
dealing will leave you no choice but to take some particular action,
but in others you can decide the best course—whether to be
conciliatory or aggressive, sly or forthright... whatever. Be warned
though, that, unlike the native population, the Europeans are
ruthless. They will stop at nothing to control large areas of your
“hard-won” territory.
War
If you commit an act of war against a colonial power, they
immediately declare war upon you, and pursue it vigorously. An
act of war is an attack upon one of their colonists or colonies. In
addition, if you attack one of their vessels at sea with a flagged
warship (frigate), they view this an act of war. Your privateers can
attack other powers’ vessels without much fear of reprisal because
privateers fly pirate flags, not national flags. Just remember,
rumors can travel quickly, even in the New World.
Once war has been declared, it continues until one side or the
other seeks and gains peace through diplomatic means. These
colonial wars may languish on and on, draining both sides of
much-needed resources. Long, protracted colonial warfare can be
damaging even if you are “winning,” so it’s best to avoid it if
possible. However, sometimes it may be to your advantage to
prosecute a lightning campaign of conquest, if you feel the deed
can be ended quickly.
81

Peace Treaties
You can seek peace through diplomatic means (see below) or
grant peace to a repentant adversary. Signing a treaty symbolizes
cessation of hostilities between the colonial portions of both
signatories. However, a treaty is not entirely binding; either you or
the other side are capable of treachery at any time.
Diplomacy
Contacting a Foreign Power: There are several ways
communication between you and your rivals may occur. Whenever
you are adjacent to a foreign unit, there is a chance some envoy
from the foreign unit will make contact with you. Additionally, you
can send a scout (colonist on horseback) into an enemy city to
speak with the mayor.
The Negotiations: The tone and result of the negotiations are
greatly dependent upon the mood of your rival, which ranges from
cowardly to aggressive. This mood is related to many factors
such as a comparison of your two empires militarily, economically,
and strategically.
If you have been very successful in growing militarily, your rival
may be reluctant to start trouble with you; if not, he may desire a
war to take advantage of a perceived opportunity. Other possible
results include demanding or paying a tribute to avoid war, making
an alliance against another power (including native powers), or
simply agreeing to peace.
All dialogs between you and a rival require you to choose
responses from a menu of options, then read the result.
Mercenaries
When you have built up your treasury to the point where foreign
powers begin to take notice (around 5000), they may offer you
mercenary forces to aid you in your cause. Most often, the troops
offered are combined arms forces—that is, several units in one
package, with a mixture of cavalry (dragoons), artillery, and infantry
(soldiers). You can pay the fee and hire the whole package, or you
can decline the deal, but you cannot choose to hire only some of
the troops offered. Once hired, mercenary forces look just like
your own, and they are always veterans. Declining to hire
mercenaries on the first occasion they are offered does not stop
them from approaching you again.
COLONIAL TRADE
Once Jan de Witt joins your Continental Congress (see Founding
Fathers Ideas and Powers), you may trade with the colonies of
other nations, provided you are not currently involved in a war
with them. To execute these trades, move a ship or wagon into
the foreign colony and offer a cargo. They then either trade other
goods for what you offer, or buy it. It’s your choice.
82

INDEPENDENCE
83

The goal of Colonization is independence from the Crown. This is
not an easy task. All the growth, planning, building, manufacturing,
and exploration you’ve engaged in throughout the game will be
tested by fire. You must withstand the onslaught of the Crown, and
defeat his forces in war before your nation has the right to call
itself sovereign.
INCREASING TENSIONS
As your colonial government improves and becomes responsive
to the needs of its citizenry, the mother country begins to be
perceived as the source of problems. The Crown is continually
raising taxes (for what appear to be whimsical purposes), so that
trade with the mother country is no longer as profitable for the
colonies; the King’s share increases while the colonial
share decreases.
The growth and development of your government aids in your
cause. As your colonies grow and your people work on creating
government institutions, leaders emerge to help in the struggle.
These “Founding Fathers” join the Continental Congress.
A growing sense of independence and community in the
colonists themselves aids the cause, making the people more
productive and able. When half (50%) of your people feel a sense
of urgency about severing the ties to the mother country, you may
declare your independence!
Continental Congress Report: This report contains valuable
information concerning your progress toward independence. Its
items concern rebel sentiment, Founding Fathers, the Royal
Expeditionary Force, and sessions of the Continental Congress. For
details, see below.
TAXATION AND BOYCOTT
At the beginning of the game, the King of your home country is
happy to support your efforts at colonization free of charge, but as
time goes by, he’ll want a larger and larger cut of the profits. The
primary method by which the King exacts payment is through the
implementation of taxes. After all, he granted you the right to settle
the New World, he supplied the initial funding and materials; and
when you need naval support, who offers you the use of frigates
and galleons?
The King announces all tax increases and tells you the reason
for imposing each new tax. The King always seems to have a
reason for tax increases, but you may tire of them. Whenever he
increases your tax rate, some of your people may rise up,
expressing opposition to taxation without representation. You are
given a choice of submitting to the new tax, or demonstrating
against the Crown. If you demonstrate, by throwing some of your
cargo into the sea and refusing to pay the new tax, rebel
sentiment will increase but you will no longer be able to buy or
sell that item in your home port until you pay all back taxes
accumulated during the boycott.
84

Should you decide to pay your back taxes, click the boycotted
item in the European warehouses, and choose to pay the sum
requested. The item is again available for purchase.
Once Jakob Fugger joins your Continental Congress, the Crown
no longer remembers the anti-taxation “parties” you had,
regardless of how many commodities you threw into the sea. You
may once again trade the boycotted items, even if you never paid
your back taxes.
LIBERTY BELLS
The success and responsiveness of your colonial government,
and the ability of it to produce inflammatory press against the
Crown, is reflected by the production of liberty bells within your
colonies. The more effort you put into governmental concerns (in
other words, the more people you have working in government
buildings), and the more presses and newspapers that are
operating within the colonies, the faster your government
improves, and the more your people are willing to support the
notion of independence (in other words, the more bells you
produce). Liberty bells are used to make a number of important
calculations in Colonization, as follows.
REBEL SENTIMENT
A cumulative count of all liberty bells produced throughout your
colonial empire, averaged against the population, determines rebel
sentiment—which is the general sympathy among the population
as a whole toward the cause of Independence.
When rebel sentiment in your colonies reaches 50%, you can
declare independence, but not before. While rebel sentiment is
below half, the people would not support a move to separate from
the King. At the end of the game, when the score is calculated,
you receive one point for every point of rebel sentiment.
Your Continental Congress report, found under the reports
menu, provides an up-to-date reckoning of rebel sentiment.
SONS OF LIBERTY
Within each colony, the number of liberty bells produced
determines the percentage of that colony’s population that belongs
to the Sons of Liberty (an organization founded to protect the rights
of the individual against tyranny from the Crown). The Sons of
Liberty are willing to act against the King to protect the rights of
the colonies. They take bold action to encourage the King to lower
taxes, and they rise up when independence is declared to fight
against the king’s armies. The people view on each colony display
indicates the colony’s current Sons of Liberty membership. On the
map display, the color of the population number printed on each
colony icon indicates the approximate percentage of Sons of
Liberty in the colony. If the number is white, it is less than 50%; if it
is green, then it is more than 50%; if it is blue, then it is 100%.
85

Production Bonus: Inevitably, economic and political freedom
and competition in a community, combined with a sure sense of
direction and belief in government institutions, stimulates growth
within the economy. Therefore, when half (50%) of the population of
a colony belongs to the Sons of Liberty, all production within the
colony is increased by one. When Sons of Liberty membership
reaches 100%, all production within a colony is again increased
by one.
Production Penalty: If the number of Tories within a colony
(based on Sons of Liberty membership) reaches a certain number,
all production in that colony is reduced by 1. The critical number is
based on the difficulty level; at Discoverer it’s 10, at Viceroy it’s 6.
Continental Congress
As soon as your first colony is laid down, prominent men in the
community begin debating issues of concern to all citizens. These
debates continue throughout the history of your colonies and fall
into five major categories: Political, Trade, Military, Religious, and
Exploration. Great men with brilliant ideas arise from the discipline
of the debates and join the Continental Congress; these men (and
women) are called Founding Fathers.
There are five Founding Fathers within each of the five
categories outlined above. Each Founding Father brings an idea to
your government that can fundamentally change the course of
your colonial development. A cumulative count of all liberty bells
produced throughout your colonial empire determines how quickly
these ideas are discovered and when these great minds arise.
Your Continental Congress report (see reports menu) gives you
up to date information concerning when the next member of the
congress will arise, and who has joined to date.
A list of all Founding Fathers, with their ideas and powers, can
be found at the end of this chapter.
DECLARING AND WINNING YOUR
INDEPENDENCE
Whenever rebel sentiment is at 50% or greater, you may declare
independence. Once you’ve done this, there is no turning back; it
is irrevocable. You at once become an enemy of the Crown, and
no longer have friends within your home country. Further, that part
of your own population that does not join the Sons of Liberty aids
the Crown in any way it can.
There is also a time constraint on independence. You must
declare independence before 1800, or the game ends in that year
(1800). The game ends under any circumstances, even if you are
fighting a protracted independence action, in 1850.
86

Sons of Liberty during the Revolution
Sons of Liberty membership is extremely important during the
revolution. The Sons of Liberty are working for your independence
and should be supported in every way that you can. They help
keep production high, the Continental Army strong, and they
perform guerrilla operations to support your army in the field.
Continental Army Muster: On the turn you declare your nation’s
independence, a number of your veteran soldiers join the
Continental Army. Each colony musters a number of soldiers
reflecting its Sons of Liberty membership. Note, however, that a
colony with less than 50% membership in the Sons of Liberty is a
Tory city and musters no Continental Army troops. For example, a
colony with 60% Sons of Liberty support produces only a few
Continental Army units, while one with 90%-100% produces many.
Popular Support Combat Bonus: During the revolution, each
colony’s Sons of Liberty/Tory status is very important in combat.
Whenever a colony is attacked, the attacker receives a combat
bonus equal to the support for his cause in that city. For example,
if your troops attack a colony with 60% Sons of Liberty
membership, they receive a 60% attack bonus; likewise, if the
King’s forces attack the same colony, they’d get a 40% bonus,
because that percentage of the population does not subscribe to
the Sons of Liberty.
Trade During the Rebellion: Once you declare your
independence, your home country port is closed to your
commerce. You may no longer access the Europe display.
However, colonies that contain custom houses can still trade, not
with the mother country, but with other ports—European and
colonial. Some activity represents smuggling into and out of
colonial ports, while some is trade with foreign powers in the
Old World.
Regardless of the type, there are no longer tax monies flowing
into the Royal coffers. However, the ports with which the custom
house does business charge their own tariffs and fees—so much
so that your net income is only 50% of normal.
In addition to trading with Europe through your customs
houses, you can continue to trade with your fellow Europeans
(assuming, of course, you have Jan de Witt in your Continental
Congress). Note that you’ll get the best prices and commodities
from your allies—the powers that are willing to intervene on
your behalf.
87

Liberty Bells During the Revolution
During the rebellion, it is important to continue to produce as
many liberty bells as you can for two reasons: to keep the Sons of
Liberty strong and therefore receive popular support from the
colonists; and to induce a foreign power to intervene on your
behalf. During the turn after you’ve declared independence, you’ll
receive a message from a trusted advisor informing you of how
many bells must be produced to bring a foreign power into the war
on the side of the rebellion.
In a colony that is occupied by the King’s troops, liberty bells
have an effect exactly opposite to the effect they have in colonies
which your forces control: the bells increase Tory sentiment as
opposed to rebel sentiment.
THE ROYAL EXPEDITIONARY FORCE
The Crown’s military forces include a royal expeditionary force
(REF), trained for operations into foreign lands. Almost certainly
this is the force that is brought to bear if an uprising develops in
the New World. This force includes infantry regulars, cavalry
troopers, artillery units, and warships.
The units of the expeditionary force are highly-trained and wellequipped soldiers of the King’s regular army and, under ordinary
circumstances, are more effective than almost any troops your
colonies can produce (see the Combat Strengths Chart).
REF Bombardment Bonus: In addition to their increased combat
strength, the King’s troops are backed by superior artillery and
naval bombardment support when attacking colonies. This results
in an automatic 50% bonus when the King’s troops attack colonies.
The only weakness these troops possess is their lack of
familiarity with the New World terrain. Thus, colonial forces receive
the ambush bonus when battling the King’s forces in the
countryside (see Attacking and Defending).
Your Continental Congress report (see reports menu) gives you
up-to-date information concerning the current size of the Royal
Expeditionary Force.
FOREIGN INTERVENTION
After you’ve declared independence from your homeland, and
the war begins, one of the foreign powers may offer assistance to
your cause. This occurs only if you can convince them your cause
is viable, just, and honorable. Usually, the government is already
leaning toward supporting your cause, but the people must be
convinced. You do this by producing the number of liberty bells
they request. Once a foreign power intervenes on your behalf, a
number of advantages accrue to you, as follows:
Bombardment Bonus: The foreign power comes with its own
bombardment bonus which you enjoy whenever you attack Tory
colonies. This bonus is identical to the REF bombardment bonus
described above.
88

Men of War: The foreign power donates a number of warships
(men-of-war) to your cause. These ships carry your flag and you
have complete control over them.
Additional Ground Troops: You receive additional troops when
a foreign power joins your cause. These troops look and function
like ordinary Continental Army forces, and appear aboard a
warship that docks at one of your controlled ports. If you have no
port, you have already lost the war (see below).
Liberty Bells After Intervention: Even after foreign intervention
has occurred, it is still important to produce liberty bells. At the
end of the game, you receive points for all liberty bells you
produced after intervention.
MERCENARY FORCES
After the revolution begins, the foreign power that is interested
in intervening on your behalf offers mercenary forces for your use.
These come at quite a high price, but may aid you considerably.
WINNING OR LOSING THE REBELLION
The American Revolution was a rare example of a small
colonial power defeating a major world power in a War of
Independence. Not only that, but the Americans managed to lose
many of the engagements of the war, but emerge victorious at the
end. The colonies were able to field a small army, and brilliant and
heroic leadership enabled it to make successful hit-and-run
operations against small royal forces until intervention by French
forces helped seal the final victory.
Winning the Rebellion
To win the Revolution, you must successfully demonstrate your
ability to protect and defend your people and their institutions. To
do this, you must do two things:
• Control all of your colonies.
• Reduce the REF significantly, so that no more than a very few
of their troops are left in the New World—or in the Old.
Losing the Rebellion
The Revolution is tough to win, but it’s not hard to lose.
Essentially, you lose the rebellion if any one of the following occurs:
• The REF controls all of your colonies, thus effectively
squelching all resistance.
• The REF controls all your coastal colonies, thus making it
impossible for your empire to import or export goods and
commodities.
• The REF controls colonies which cumulatively contain at least
90% of your total population.
89

FOUNDING FATHERS’ IDEAS AND POWERS
The following is a list of all the Founding Fathers that can be in
your Continental Congress. A short biographical sketch and
summary of the effects of each is also included.
Military
Hernan Cortes: (1485-1547) Spanish conqueror of
Mexico and destroyer of the Aztec empire, Cortes is
the paradigm Conquistador—a master of conquest
and plunder. When Cortes joins your Congress,
conquered native settlements always yield treasure—
and more of it.
Francis Drake: (1540-1596) England’s greatest
seaman of the Elizabethan period, Drake was an
incredibly formidable privateer who terrorized the
Spanish Main with a fleet of fifteen ships, then
rescued a floundering English colony. When Drake
joins the Congress, he increases the combat strengths
of all your privateers by 50%.
John Paul Jones: (1747-1792) Dashing Scottish naval
commander who served for the colonies during the
War of Independence, he demonstrated his incredible
abilities in several daring exploits in battle, sinking
many British ships. When Jones appears in the
Congress, your colonial navy gains a frigate, without
cost.
Paul Revere: (1735-1818) American patriot who
served in the Continental Army during the War of
Independence, he roused the minutemen as British
amphibious forces approached. Paul Revere’s
example as a patriot allows colonists working at
productive duties to become 'minutemen' capable of
rallying to the defense of the colony in times of need.
Once Revere joins your Congress, a colony with no
standing militia that is attacked will have a colonist
automatically take up any muskets stockpiled in the colony in
defense. The colony is still conquered if the colonist loses the
combat, however.
George Washington: (1732-1799) Commander of
American Revolutionary forces and first President of
the United States, George Washington displayed a
remarkable ability to train and inspire colonial forces
to victory. Once Washington joins the Continental
Congress, every non-veteran soldier or dragoon who
wins a combat is upgraded in status.
90

Political
Simon Bolivar: (1783-1830) He organized and, in
large part, conducted the rebellions in a vast area of
northern South America, liberating current-day
Venezuela, Colombia, Ecuador, Peru, and Bolivia.
When Bolivar is in the Congress, Sons of Liberty
membership in all your colonies is increased by 20%.
Benjamin Franklin: (1706-1790) Colonial and
later US Statesman, Franklin became the first
postmaster, printer, and foreign ambassador in the
English colonies. He was also one of the first great
American scientists. Franklin, as ambassador to
Europe in the Continental Congress, brings
coherence to the colonies' relations with foreign
powers. When Franklin joins your Congress, the
King's European Wars have no further effect on the
relations between powers in the New World, and the costs of
negotiating with other powers is decreased. Also, all Europeans
now offer peace to you, though at some cost. It becomes your
choice to go to war...
Thomas Jefferson: (1743-1826) Great US statesman,
framer of the Constitution, and third President,
Jefferson’s ideas promoted the development of
democratic institutions within Colonial America.
Jefferson’s presence in the Congress increases
Liberty Bell production of statesmen by 50%.
Thomas Paine: (1737-1809) An Englishman who
migrated to Philadelphia, Paine wrote the important,
inflammatory pamphlet Common Sense, which strongly
advocated total independence for the colonies. He later
wrote The Rights of Man in favor of the French
Revolution, and finally The Age of Reason. When
Thomas Paine comes to the Continental Congress,
Liberty Bell production in all colonies is increased by the
current tax rate.
Pocahontas: (1595-1617) Powhattan Indian princess
who mediated tensions between the English colony at
Jamestown and the Powhattan Confederacy of Virginia,
Pocahontas married John Rolffe, an Englishman, which
led to a period of peace between the Indians and the
English. When Pocahontas joins the Congress, all
tension levels between you and the natives are reduced
to content, and from this time forward all Indian alarm is
generated only one half as fast.
91

Trade
Adam Smith: (1723-1790) British economist who
published the first major work of political economy An
Inquiry into the Nature and Causes of the Wealth of
Nations, which was a detailed examination of the
consequences of economic freedom. Adam Smith’s
presence in the Congress allows factory level buildings
to be built in the colonies.
Jakob Fugger: (1459-1525) Extremely successful
German merchant active in early import and export
business from the East Indies. Exceedingly rich, he
loaned money to Emperor Maxmillian I of Germany.
When Fugger joins the Congress, he erases the
Crown’s memory of parties you‘ve had protesting
taxes. In other words, you no longer owe back taxes
before you can resume trading goods.
Peter Minuit: (1580-1639) Director-general of the Dutch
West India Company’s Colony in America, he bought
the Island of Manhattan from the Indians for $24.
Once Peter Minuit joins your Continental Congress,
you no longer have to buy land from the Indians.
Peter Stuyvesant: (1610-1672) First successful
Governor of the Dutch colony of New Amsterdam
(New York), he ruled harshly, and promotes increased
trade and increased protection of New World
interests. Peter Stuyvesant allows construction of the
custom house in your colonies which can streamline
trade with Europe.
Jan de Witt: (1625-1672) Dutch statesmen, Chief
Minister of the United Provinces of the Netherlands,
he sought to abolish the office of the stadholder and
to limit the power of the House of Orange, breaking
their monopoly. When de Witt joins your Congress,
trade with foreign colonies (by ship or wagon train) is
allowed. In addition, your Foreign Affairs report will
now tell you information about your European rivals.
92

Religious
Father Jean de Brebeuf: (1593-1649) A French Jesuit
Missionary, he died at the hands of the Iroquois in
Huron country (now Canada) in a battle between the
Hurons and Iroquois. He translated the Catechism
into the Huron language and was canonized in 1930.
With de Brebeuf in your Congress, all missionaries
function as experts.
William Brewster: (1567-1644) One of the Pilgrim Fathers and
framers of the Mayflower Compact, William Brewster
served as the first Pilgrim minister, and was
instrumental in organizing the party that sailed on the
Mayflower. With Brewster in the Congress, you can
select which of the three available immigrants in the
recruitment pool is driven to the docks whenever
religious unrest causes a immigrant to move from the
recruitment pool to the docks (see Immigration and
Population Growth). In addition, criminals and
servants no longer appear on the docks to immigrate.
Bartolome de Las Casas: (1474-1566) The “Apostle of
the Indians,” Las Casas was a Spanish missionary who
sailed with Columbus’s third expedition. His efforts to
protect the native population from slavery and abuse
led him to speak on their behalf in the Spanish courts
on several occasions. With Las Casas’ presence in the
Congress, all currently existing Indian converts are
assimilated into the colony as free colonists.
William Penn: (1644-1718) An English Quaker
leader, William Penn obtained a large land grant in
North America for religious freedom. He founded the
state that later became Pennsylvania. With Penn in the
Continental Congress, cross production in all colonies
increases by 50%.
Juan de Sepulveda: (1490-1573) Spanish
philosopher and “humanist,” Sepulveda argued for
harsh treatment of the natives. He based his
reasoning on the proposition that natives were
incapable of ruling themselves because of their
savagery; the fact that they were unable to resist
invasion by the Spanish proved it... His presence in
the Congress increases the chance that subjugated
Indians "convert" and join a colony.
93

Exploration
Francisco de Coronado: (1510-1554) A Spanish
Conquistador, he led the first European expedition
into the American southwest. He was the first “white
man” to observe the Grand Canyon, and the Pueblos
of New Mexico. Coronado was a great and careful
organizer and scout so when he joins your Congress,
all colonies currently on the map are exposed,
including the area immediately surrounding them.
Henry Hudson: (????-1611) An English explorer in
service of the Dutch, he explored the Chesapeake
and Delaware Bays and the Hudson River as far north
as Albany. Hudson later discovered Hudson Bay and
was finally killed by mutineers. Hudson Bay became
a primary fur trapping preserve, and the Hudson Bay
Company operated extensive trapping and processing
facilities for many years. When Hudson joins your
Continental Congress, the output of all fur trappers
increases by 100%.
Sieur de La Salle: (1643-1687) A French explorer, he
sailed down the Mississippi River into the Gulf of
Mexico, claiming all land drained by this mighty river
for the French Crown. He was instrumental in
establishing French dominance of the Canadian fur
trade. When La Salle is in your Congress, all new
colonies automatically get a stockade when the
population reaches 3.
Ferdinand Magellan: (1480-1521) A Portuguese
explorer, he was the first European to lead an
expedition that successfully circumnavigated the
globe. Although Magellan himself did not complete
the voyage, his leadership and daring made it
possible. With Magellan in the Congress, the
movement allowance of all naval vessels is increased
by one, and the time it takes to sail from the west map
edge to Europe is shortened considerably.
Hernando de Soto: (1500-1542) Ruthless Spanish
Conquistador who led the first European expedition
into the Southeastern areas of North America. He
landed in Florida and explored much of Georgia,
Tennessee, Alabama, Mississippi, Louisiana, and
Arkansas. In search of gold, he is credited with the
slaughter of thousands of Native Americans. With De
Soto in your Congress, the line of sight of all units
increases to two squares, making all units able to see as
well as scouts.
94
 Loading...