

Page 1

www.idsoftware.com
THE MANUAL
Q U A K E I I
™
Page 2
1
TABLE OF CONTENTS
Story
Installation
Setup
GamePlay
Multiplayer Games
TCM Intel Brief: Classified
Customer Support / Credits
Software License Agreement
2
7
8
15
17
18
33
36
Page 3
2
THE STORY
“Yo, soldier, 3585.” The medtech’s voice startles you.
“You in or out?”
Competent hands guide you into the coffin-like
opening of your Mark 9A drop pod: sleek, dark, and
invisible to the Stroggos defence systems. One of the
techs begins to drop the reinforced pod door. “Sleep
tight, soldier. You’ll see sunlight in less than six and a
half hours. Not our sun, mind you…” <SLAM>
Pitch black except for the mild glow of your video
readout system in front of you. You’ve done this a dozen
times in the sim classes. No sweat. Just a few short
hours to sleep, recharge, and then… the moment of
glory. But this time it’s for real.
It’s also time to think. You recall your first official day of
training, your unit commander discussing how these
damn parasites made it to Earth and other nearby colonies
in the first place. By employing our best satellites and
long-range scanners, we learned how they travelled light
years so quickly – the Strogg used these black hole-like
gateways as their highway to heaven. We still don’t know
if they created these rips in the fabric of space and time,
or if they simply discovered them by accident. Either
way… it’s just like opening the door to an all-you-can-eat
restaurant for these bastards. In about two hours, we’ll
be entering the same interstellar portals, to hit ‘em where
it hurts… on their own turf.
You close your eyes and relish this thought. Eventually,
you nod off to the low hypnotic hum of the troop carrier.
3
THE STORY
Long shadows claw desperately away from your dusty combat boots, fuelled
by the relentless sun of a late Texas afternoon. Shading your eyes against the
glare, you squint for the thousandth time at the line of soldiers ahead of you.
It stretches on endlessly across the rubble, disappearing at last into the cool
shadows of a troop carrier. Soon you’ll walk up the ramp into the ship, climb
into your one-man cocoon, tear through the interplanetary gateway, and smash
down light-years away from the blowing sand and blasted ruins that surround
the Dallas-Metro crater.
“What the hell is taking so long?!” you snarl, slamming the battered barrel of
your side arm, the blaster, against your scarred palm. “I’ve waited long enough.
Time to kick some Strogg ass…”
Slightly rocking back and forth under the sweltering August sun, you spit out
of the side of your mouth, rub your eyes, and think back to the day when the
wretched creatures first attacked. Like flaming meteors, their crafts pounded
into the Earth and unbelievably, these bio-mechanical aliens… these hideous
cyborgs… swarmed out while their ships still sizzled with reentry heat. They
killed or captured anything that lived. We figured that the Strogg were after our
planet’s resources: minerals, metals, and water: things like that. But their
onboard storage facilities did little to disguise what they considered to be
resources: fleshy limbs and organs for new cyborgs, and of course, food.
The line moves. And moves again. Into the cool shadows at last. The assembled
armies branch off into new lines divided by corps and unit.
“I can’t deal with this shit – what’s the friggin’ hold-up?”
“Cool your jets, marine,” Tokay mutters and smiles over his shoulder.
“We’ll all get a few Strogg heads to take home as souvenirs. I promise you that.”
Page 4

*Crackle* ... *fzzzz* ... “Greetings to the
people of the Coalition. This is Flag Admiral
Crockett, speaking to you from the bridge
deck of Phobos. We are entering the outer
orbits of Stroggos, the alien’s home system.
As we had postulated, Stroggos’ atmosphere
is harsh but breathable. We expect to make planetfall soon. Now is the time to
switch on your debriefing panel if ya need it.”
“Boomer?” the voice crackles through every soldier’s headset. “Drop X-ray squad
in 30 on my mark. You copy?”
“Roger that!” In another pod, your sergeant snaps back. “OK boys and girls,
you see the clock on your heads-up. Two demerits for anyone who up-chucks
during bounce and roll!”
*Shthunk!!* Your drop pod is shot from the
side of the carrier and hurtles downward.
*Wheee-oooooo!* Incendiary atmosphere
howls past the pod’s rapidly heating shell.
*Ka-WHUMP! * The pod wall suddenly
buckles to your right, but stays intact.
4
THE STORY
Another pod must have clipped yours on its way in. ECM didn't indicate enemy
fire. Shit. Thrusters and stabilising gyros are fading. Based on the pings, the
other pods are pulling away. Below you, the large alien city roars into focus on
the screen. But where are the other pods? They were there a minute ago.
Suddenly, distorted radio chatter lights up, “Mayday! Mayday! Lost all power...
shielding failed... missed dz... some kind of EMP is... kzzzt... us out. We're dropping
like fli... zzzzkkkzzzt”. Silence. Damn! If the
Strogg have electromagnetic pulse defenses
and we failed to detect them… all of us are
in the shitter. That HUGE blip has to be the
Big Gun. You do a slow dogleg left as your
navcomp finds a place to land when all of a
sudden retros kick in and propel you south.
5
THE STORY
Page 5
“What the...?” Before you know it you skip across the lip of a crater and slam
into a structure, a good distance away from your target.
Dazed and bleeding from a head cut you toggle open the labelled arsenal bins
and reach for where your gear ought to be stowed. Damn. Nothing but your
sidearm.
Damn again.
You leap out the crushed pod door, alone, with blaster in hand, and tear off into
the room with the bittersweet stench of vengeance coarsing through your
veins…
6
THE STORY
7
INSTALLATION
INSTALLING QUAKE II
To install Quake II on your system, insert the game CD into
your CD-ROM drive and:
1. Double-click on Setup.exe at the root level of the CD, or
2. Go to Run... in your Start Menu and type d:\Setup.exe
(substitute your CD-ROM's drive letter if different from "d:")
Follow the on-screen instructions as they guide you through
the installation process.
For updates to Quake II, please refer to www.idsoftware.com.
Page 6
9
SETUP
8
SETUP
GOAL OF
THE GAME
GAME
STRUCTURE
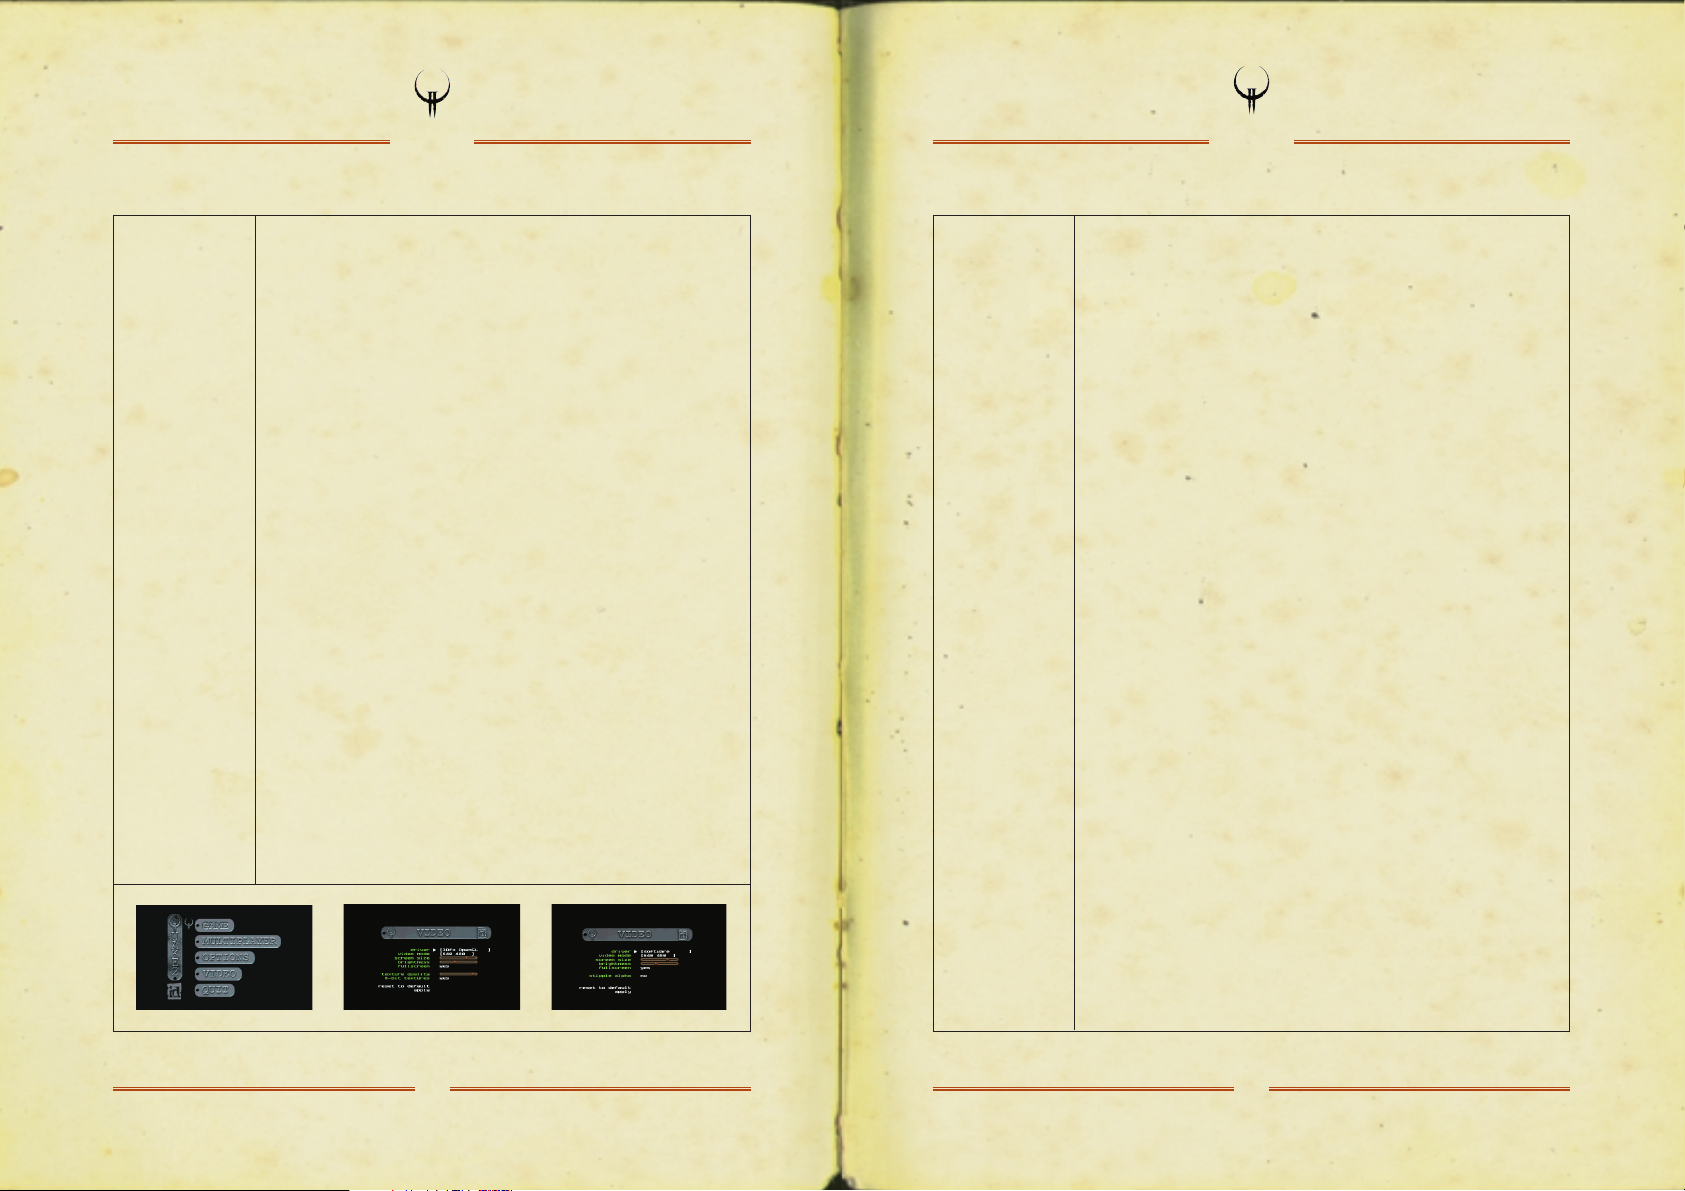
MAIN MENU
The goals of Quake II are divided into a series of complex missions
or objectives. During the game your field computer provides you with
each new objective. It is important to regularly review this information.
The Intel Brief section of this manual describes general information
on your missions, environment, weapons, special items, and alien
profiles.
Quake II contains eight large units, each with a number of levels to
complete in order to proceed to the next unit. It is likely you will have
to go between levels several times to accomplish a particular goal.
Remember that once you leave a unit you cannot return unless you
reload a saved game from that unit. Therefore it is important to
review your field computer to be sure you accomplished all of your
goals for that unit.
When you start Quake II, a demo sequence of the game will begin.
At any time, press the Escape key to pull up the Main menu. Use the
up and down arrow keys to navigate, and press the Enter key to
select. Each Main menu function brings up a list of secondary menu
items. If you have problems using the secondary menu selections,
please refer to the message banner at the bottom of the screen or the
online manual for technical details.
GAME: Start a new game with a specific skill level, load, or save a game.
MULTIPLAYER: Start a network server, join a network server, or
change your character information.
VIDEO: Select either Software only or one of several OpenGL modes,
and adjust screen modes and settings.
OPTIONS: Customise your keyboard, mouse, or joystick controls, adjust
your audio, and change your game play control options.
QUIT: Exit the game from here.
Under Game, you can select a variety of skill settings that range from
really easy to nearly unbeatable. Each skill setting adjusts reaction,
health, power, and number of the monsters you’ll face.
Easy: This is meant for kids and grandmas.
Medium: Most people should start Quake II at Medium skill.
Hard: Here at id, we play Hard skill, and we think you should too,
once you’re ready.
Load Game: Select Load Game to pull up the load game menu.
The first name on the list is an auto-saved game. Selecting this puts
you back at the start of the last level you entered. Use the arrow keys
to move down to the game you wish to load and press the Enter key.
Save Game: Select Save Game to access the save game menu.
Using the arrow keys, move down to an empty slot, or one you
don’t mind writing over and press the Enter key to save. Quake II
will generate a name for you with title of the level and the current
time.
There are two main ways to play Quake II with other people: LAN or
TCP/IP over the Internet. This menu provides three options: Join
Network Server, Start Network Server, or Network Server Player
Setup. Please see the readme.txt for details on multiplayer game play.
GAME
MULTIPLAYER
MENU
SELECTION
Page 7
11
SETUP
10
SETUP
VIDEO MENU
SELECTION
Here are controls for changing your video driver, screen resolution
or video mode, brightness, screen size, window or full screen mode,
texture quality, and translucent settings.
Depending on the selected video driver, some video settings will not
take effect until you choose the Apply option from the menu.
When changing video settings, Quake II may blink from the screen,
or the game console may appear. This isn’t unusual. After a moment
of this, the game should resume normally.
Video Driver: You have four choices under Video Driver. These are
Software, 3Dfx OpenGL, PowerVR, OpenGL, Verite OpenGL, and
System OpenGL. As you can see, generally this breaks down into
two choices: Software or some form of OpenGL.
***IMPORTANT: Your system may not support many of the video
driver options provided by Quake II. If a selected video driver is
unavailable Quake II will return to your previous selection or to a safe
software mode.
Software: If you are running under Windows 95, and do not have
OpenGL supported hardware acceleration, Quake II will use this setting.
OpenGL: With the assistance of OpenGL drivers, Quake II runs in 16
or 24 bit colour, with coloured lighting effects, cleaner graphics, and
improved translucency.
3Dfx OpenGL: Use the 3Dfx OpenGL driver on systems that possess
a 3Dfx Voodoo and Voodoo Rush accelerator.
PowerVR OpenGL: Use the PowerVR OpenGL driver on systems running
Windows 95 with a PowerVR PCX2 board installed.
Verite OpenGL: Use the Rendition Verite OpenGL on systems running
Win95, with a Rendition V1000/V2x00 board installed.
VIDEO MENU
SELECTION
(continued)
System OpenGL: The System OpenGL driver allows Quake II to render
using the default OpenGL driver installed in the system. Select this if
running under Windows NT when using a 2D/3D accelerator other
than those specifically supported in this menu.
IMPORTANT: We do not recommend using OpenGL on systems that
do not have hardware acceleration of OpenGL installed.
This information is subject to change with different revisions of the
game. Please see the readme.txt file for further details.
Video Mode: Many video modes are available to you through this menu.
Your system may not support many of the video modes provided by
Quake II.
Screen Size: The screen size slider controls the size of the game area
on the screen. Reducing the screen size will usually result in higher
performance.
Brightness: The brightness slider controls the brightness of the
screen. Its effects are immediate under software. When using
OpenGL, select Apply after modifying the brightness.
Fullscreen: This selects fullscreen or windowed rendering. Fullscreen
mode availability is dependent upon the type of graphics adaptor
installed. Fullscreen software rendering requires the presence of
Microsoft DirectX. Under OpenGL, fullscreen rendering uses the current
colour depth of the desktop.
Texture Quality (OpenGL only): The texture quality slider determines
the overall crispness of textures with OpenGL renderers. Better quality
often results in lower performance.
8-Bit Textures (OpenGL only): 8-bit texture support is available on
some graphics chipsets such as the 3Dfx Voodoo. Enabling 8-bit
textures reduces visual quality in exchange for better overall
performance. IMPORTANT: We recommend you use this setting
if you have the appropriate hardware and want to increase the
performance of Quake II.
Page 8

13
SETUP
12
SETUP
VIDEO MENU
SELECTION
(continued)
OPTIONS
Stipple Alpha (Software only): Enabling stipple alpha results in
faster performance when rendering transparent surfaces such as
windows, water, and lava, but also results in reduced image quality
when rendering transparent surfaces.
Apply: Selecting this option "applies" any modifications you make to
your video configuration.
Here you can adjust your audio settings, change your mouse options,
customise your keyboard settings, and restore all your control settings
to their defaults.
SFX Volume: Using the left and right arrow keys moves the slider bar
to increase or decrease the volume of your sound effects.
Sound Quality: Select low quality for 11 kHz sound and high
quality for 22 kHz sound. Using low sound quality may increase the
performance of Quake II on your machine.
CD Music: Use the left and right arrow keys to turn CD music on or
off. Turning the CD off will not change the performance of the game.
Mouse Speed: This allows you to adjust your mouse sensitivity.
The higher you set this the faster your character will turn in relation
to mouse movement.
Always Run: Set this to Yes if you do not want to hold down the Run
button in order to move quickly.
Invert Mouse: This gives your mouse “airplane-style” controls.
This means that pushing the mouse forward “noses down,” and
pulling it back “noses up.” Some people prefer this control technique.
Lookspring: Returns your view immediately to straight ahead when
you release the look up or look down key. Otherwise, you must move
forward for a step or two before your view snaps back. Lookspring
does not work while you are underwater.
OPTIONS
(continued)
ON-SCREEN
INFORMATION
DURING
GAMEPLAY
Lookstrafe: If you are using the look up or look down key, then this
option causes you to sidestep instead of turn when you try to move
left or right.
Freelook: With this option enabled you no longer have to press the
mouse look key to look up and down while using the mouse.
Disable Alt-Tab: This will disable moving from Quake II to your
Windows desktop by pressing the Alt and the Tab key.
Customise Controls: Selecting this option will bring up a second
menu that lists all of the game controls. Use the arrow keys to move
through the list. Press the Enter key to select a control to change.
Press the appropriate key or mouse button that you wish to use for
that control. If you want to go back to the original
controls, go to the previous menu and select Reset Defaults.
Status Bar: Your status is shown as icons floating in your view at
the bottom of the screen. There is an indicator for your health,
armour, ammo for the current weapon, and currently selected or
readied item or weapon. When you pick up something new, an icon
will briefly appear at the bottom of the screen with a picture of that
item. To view all of your inventory, press the Tab key. Maximising the
screen (+ key) may remove the Status Bar from your viewing area.
To get it back, simply press the - key.
Messages: Quake II will talk to you from time to time. Some messages
appear at the top of the screen. These are non-critical, and tell you
that you’ve picked up an object, or you’ve died in an interesting fashion
(multiplayer games). Certain messages will appear in the middle of the
screen. These are always important, and you do not want to ignore
them! Examples are “You Need the Red Key” or “Crouch Here,” etc.
Field Computer: Press the F1 key to access the field computer.
This details your unit location, your primary objective, secondary
342789012345
Page 9

15
GETTING AROUND STROGGOS
14
SETUP
ON-SCREEN
INFORMATION
DURING
GAMEPLAY
(continued)
or current objective, kill ratio, goals completed, and number of
secrets found. When your field computer receives an update an icon
will appear at the bottom of the screen. Be sure to regularly check
the computer for information on progressing to your next objective.
Console: Pressing the tilde key (~) will pull down the Console window.
This is a special area that list all of the game messages, and allows
you to give Quake II commands that cannot be given through the
menu. For more information on the Console, please refer to the
online manual.
Inventory: Press the Tab key to access your inventory. Use the
bracket ([ ]) keys to move through the list. Your status information
will update to show an image of the currently selected item. Press the
Enter key to use a highlighted item or press the single quote key ( ‘ )
to drop an item. (Dropping items is only useful for multiplayer
games.) Weapons and items are “readied” in this manner. For example,
you can select or ready an item before engaging the enemy. Then at
the appropriate time you can quickly use that item by pressing the
Enter key.
342789012345
Walking: Use the four arrow keys or the
mouse to walk around. To walk steadily
forward, hold down the forward key
(the up arrow or centre button on the
mouse). Turn left or right with the left
or right arrow keys, or by sliding your
mouse in the desired direction.
Running: To run, simply hold down the
left Shift key to increase your speed.
If you prefer to always run during the
game, open the Main menu, then the
Controls menu, and select Always Run.
Shooting: Tap the Ctrl key or the left
mouse button to fire. Hold the shooting
key down to keep firing.
Jumping: Tap the space bar to jump.
You jump farther if you’re moving
forward at the time or if you’re running.
You jump higher if you’re moving up a
slope.
Ducking: Press and hold down the
C key to duck and move forward to
crawl. When you release the C key, you
will return to an upright position. It is
also possible to avoid rockets in this
manner. You may notice some aliens
have learned this trick.
Swimming: While underwater, aim
yourself in the direction you wish to go
and press the forward key to go in that
direction. Unfortunately, as in real life,
you may lose your bearings while
underwater. Use the jump key, normally
the Space Bar, to kick straight up
towards the surface. Once on the
surface, tread water by holding down
the jump key. To get out of the drink,
swim toward the shore and you can
either jump up onto the land or walk
straight out if it is shallow enough.
There is always a way out of water, but
you may have to submerge even deeper
in order to find it.
Looking Up and Down: The letters
A and Z allow you to look up and down,
respectively. Start walking forward and
your line of vision will automatically
re-adjust to the centre position. You
may also choose to select Free Look
under the Controls menu which will
allow you to move the mouse around
as if it was your head movement.
5
Page 10

17
GETTING AROUND STROGGOS
16
GETTING AROUND STROGGOS
Strafing: Hold down either Alt key while
the left or right arrow key is pressed
and you will side-step in that particular
direction. This is perfect for avoiding
incoming missiles, rockets, or gun
blasts from enemy Strogg.
Picking Up Objects: To pick up items,
weapons, and power-ups, simply walk
over them. If you are unable to pick
something up, it means you already
have the maximum amount possible
for that object.
Selecting Items in Inventory: Use the
square bracket keys ([ ]) to cycle
through items in your inventory. Press
the Enter key to select a highlighted
item.
Dropping Objects: To drop an item, tap
the square bracket keys ([ ]) to scroll
through your belongings. When the
desired object is high- lighted, press
the single quote ( ‘ ) key to drop it.
Giving Items to Other Marines: To give
an item to another player simply select
it from your inventory and press the ‘
key. The item will then be tossed out for
anyone to pick up.
Talking: To communicate with other
players in multiplayer, press the T key
and type in your message. Press Enter
when finished and your words will
appear at the top of the screen. Look
for a reply, unless your fellow troops
have been disembowelled.
DYING
Each time you enter a level Quake II automatically saves the game. When you die,
press the Enter key to pull up the Load Game menu. Select the first game name on
that list to restart at the beginning of the last level you entered.
MULTIPLAYER GAMES
To set up, run, or join a multiplayer game, use the Multiplayer option in the Main
menu. The online manual (readme.txt) contains details that may be useful if your
network or hardware needs special configurations.
Page 11

INCOMING MESSAGE FROM
TCM MARINE COMMANDANT JAMES:
We have cleared the interplanetary gateway between Earth
and Stroggos. In exactly three hours operation Alien
Overlord will commence.
As I speak to you, your pods are being fuelled and all
systems brought online. Activate your field computers.
The following intel brief will provide you with your
military objectives, terrain information, arsenal and
equipment details, and enemy analysis.
Never before has there been a greater challenge to life,
liberty, and civilisation. This is a crusade in which we
will accept nothing less than victory. No matter how long
it may take us to overcome the Strogg’s barbaric assault,
the people of Earth in their righteous might will win
through to absolute victory. Today we will make very
certain that this form of barbaric treachery shall never
endanger us again. With confidence in you, and with the
unbending determination of our people, we will gain the
inevitable triumph –
so help us God.
So go forth and kick ass, soldiers!
18
TCM INTEL BRIEF: CLASSIFIED
19
TCM INTEL BRIEF: CLASSIFIED
OPERATION ALIEN OVERLORD:
[GEOGRAPHY] The core of the Stroggos civilisation is the
capital city of Cerberon. The highly defended complex is
built into the base of an enormous crater named Crater
Majoris. Between the northern plains and the southern sea
of Stroggos, Cerberon contains the major defence, communi-
cation, and political controls for the Strogg civilisation.
At the southern tip of Majoris is a second crater called
Crater Minor. Crater Minor contains the defence base
complex for the city of Cerberon.
[POLITICAL STRUCTURE] The Strogg civilisation is governed
through a system of Warlords. Each is given strategic
locations to command and control. A single leader, called
the Makron, is chosen from the Warlords. He commands
Stroggos from within the palace city located at the north-
ern end of Cerberon. Losing him would leave the Strogg
confused and in turmoil as the Warlords battle internally
to determine a successor. This would remove any chance
Stroggos has for creating a well-organised strike or
defensive position.
Page 12

20
TCM INTEL BRIEF: CLASSIFIED
[COMMUNICATIONS UPLINK] Your first objective is to establish
an uplink between command and the Strogg communication
computers. These are in the exterior military base south of
the main capital of Cerberon. This will enable continued
communications, location information, and combat analysis
beyond the base complex. Failure to establish this uplink
is not an option. Once on the planet, the combat situation
may change quickly. It is imperative that you regularly
check your computer systems for updated orders.
[DESTROY THE BIG GUN] From the base make your way past
the security systems and move north to destroy the Big Gun
located on the southern outskirts of the city. Further
intel will provide information to achieve this objective.
[DISABLE THE GATEWAY] Disable the interplanetary gateway
between Earth and Stroggos. Shutting down the gateway will
prohibit the Strogg from launching further attacks against
Earth. It may be a long sleep back.
[ASSASSINATE THE MAKRON] Finally, locate the Strogg
commander somewhere within the capital palace.
Assassinating the Makron will assure complete and
total disarray within the enemy’s ranks and hamper
any well-organised strike or defensive position.
21
TCM INTEL BRIEF: CLASSIFIED
[DEFENCE SYSTEMS] Guarding Stroggos is a defence system
we refer to as the Big Gun. This defence system detects
and destroys any ship over a few meters in length. Also,
to protect against ground assaults, a deadly laser security
grid surrounds the entire capital city.
[ENERGY RESOURCES] Bluish crystals called Steedium are the
source for most of the energy that powers Stroggos. The
energy gained from processing these crystals provides them
with the power run their entire civilisation as well as
their planetary defence weapons systems (a.k.a. the Big Gun).
MILITARY OBJECTIVES
Your primary objectives are to establish a communications
uplink, destroy the planetary defence systems, disable the
interplanetary gateway, and assassinate the Makron commander.
Once the communication link is made, subsequent communica-
tions will guide troops to their primary targets, destroy
targets of opportunity, and provide necessary ground support
for the follow-up air strike.
Page 13
23
THE STROGGOS ENVIRONMENT
22
THE STROGGOS ENVIRONMENT
The Strogg environment is in some ways like earth, but in many ways much more hostile.
The Strogg use a number of standard systems for activating machines, opening doors, and
using elevators. Their interface is easy to adapt to: walk to it, over it, or shoot it.
Other elements of the world are much more hazardous and can be deadly.
STRUCTURAL
SYSTEMS
Buttons, Floorplates,
and Levers:
There are
three ways to activate a
switch.Touch it, walk on
it, or shoot it.
Doors: The majority
of doors on Stroggos
open as you approach
them. If one doesn’t open
automatically, seek a
button, floorplate, or key.
Secret Doors: Some
secret doors conceal
secret passageways or
military supplies. Most
secret doors open when
shot. Others open by
activating floorplates,
buttons, or levers.
Secret Areas: The Strogg have concealed military supplies in different locations
within the city. Recon your surroundings closely. Sometimes the slightest variation
in the environment could mark the entrance of a secret area.
Platforms: Most
platforms activate
when you step on
them. Others activate
via a button, pressure
plate, or shootable
button.
Area Doors:
Specific symbols
indicate the exit to a
given area.
End of Unit
Complex Symbol:
The Strogg marked
off areas to indicate a
one way passage.
Once you leave a unit
complex you cannot
return.
ENVIRONMENTAL
HAZARDS
Traps: We know very
little about the internal
defence systems on
Stroggos. Given their
warlike nature and the
importance of
Cerberon to the Strogg,
expect the environment
to be deadly.
Slime: All over
Stroggos are pools of
toxic waste from their
refineries. This slime
eats away at your flesh
unless protected by an
enviro-suit.
Water: The water on
Stroggos is safe
enough to enter
without needing an
enviro-suit, but
remember to come up
for air periodically.
Be careful of water
currents.
Explosions: Found all through the city are explosive radioactive containers. Stay clear of
them in a fire fight or you’ll up in 46 little body bags. They’re light enough to move, and
short enough to jump on. Their explosive power can blow through weak areas in walls.
Lava: Stroggos has large amounts of
volcanic activity. Don’t go anywhere near
lava unless it is absolutely necessary.
An enviro-suit won’t help you much.
Page 14

25
ARSENAL
24
ARSENAL
There are a variety of weapons available to you. Each has a particular advantage given
the combat situation. Press a number key or use the inventory to select a weapon.
Blaster: This is the standard issue rechargeable energy side-arm. It does not require ammunition.
Useful for taking down Guards as well as exploding barrels and setting off shootable buttons
and secret doors. Keep one on you at all times.
Shotgun: This uses shells for ammunition. The spread of the
shotgun blast makes close combat more damaging, but long
range attacks easier. Perfect for the less than proficient
marksman. The shotgun is effective against Strogg Guards
and Flyers.
Super Shotgun: This is the uncompromising big brother to
the Shotgun. Choose your shots effectively. The slow firing
rate may only give you a few chances to bring down the
enemy before he’s able to engage you up close. It eats more
shells than the Shotgun, but the show is well worth it.
Machine Gun: Although this weapon is easy to use, its light
weight allows for considerable kickback that will push your
gun up. Fire in short burst until you can
effectively steady your aim.
Chain Gun: The chain gun makes mince meat out of your
enemy, but requires an insane amount of ammunition.
The long spin up and spin down time makes the chain gun
most effective for sustained attacks.
Hand Grenade: Twist the grenade to activate the fuse timer.
The longer you hold an active grenade, the farther you’ll throw
it. Just remember to throw at some point. Throwing the hand
grenade does not make a sound. Therefore the aliens can’t
easily trace it back to you.
Grenade Launcher: The grenade launcher is useful for delivering
firepower into hard to reach areas or clearing out potential
ambushes. We do not recommend using the grenade launcher
in confined areas.
Rocket Launcher: The rocket launcher delivers heavy fire power
to your target. Be careful not use this weapon in close combat.
Hyper Blaster: A hyper blaster is an energy chain gun with
no spin up delay. Its high rate of fire is incredibly effective at
destroying the enemy and depleting your energy cells.
Rail Gun: The Rail Gun fires depleted uranium slugs at super
high velocities. Take note of the distinctive blue corkscrew trail
of smoke caused by the projectile – or better yet, see how
many scumbag Stroggs it goes through before it hits concrete.
BFG: Big, uh, freakin’ gun. This weapon redefines the
word “wallpaper.” Simply fire the BFG into a small room of
unsuspecting Strogg and observe the new red paint job.
Page 15

27
MILITARY SUPPLIES
26
MILITARY SUPPLIES
Pick up these helpful items whenever possible. Some items take effect when
picked up. You must select and use other items before taking effect.
Ammo: There are five major ammo types: shells, cells,
bullets, grenades, and rockets. Except for the blaster, you
must have ammunition to use a weapon. Each ammo
type has a maximum you can carry.
Armour: There are three armour types: Flak Jacket, Combat Suit,
and Body Armour. Each one provides a certain amount of protection
against both normal attacks and energy weapon attacks. If you take
enough hits, your armour strength depletes down to nothing. So seek
out unused breast plates. Pick up and salvage armour that is not as
good as your current armour to improve your armour health.
Armour Shards: Special remnant of armours, which add a bit more
durability to your existing protection.
Energy Armour: This provides improved protection against energy weapons.
While it is being used, it drains energy from your cells when damaged.
Health: There are two types of standard health kits:
First Aid and Medkits.
Stimpacks: These provide an additional boost to your health.
Silencer: This silences the discharge of any weapon.
Bandoleer: Increases your carrying capacity for all ammunition except
grenades and rockets.
Heavy Pack: This allows you to carry more ammo on your back.
Underwater Breather: This provides oxygen when submerged in liquids.
Enviro-Suit: This protects you against damage from hazardous liquids,
such as Slime.
Quad Damage: The quad temporarily multiplies all your weapon’s
strengths by four times. Let the gibbing begin!
Invulnerability: The invulnerability item renders you temporarily
indestructible.
Super-Adrenaline: This slightly increases your health permanently.
Mega-Health: This provides a temporary but significant boost to your
health, but will wear off after a minute or so.
+
+
+
+
+
+
+
+
+
+
+
+
+
+
+
+
+
+
+
+
+
+
+
+
+
+
+
+
+
+
+
+
+
+
+
+
+
+
+
+
+
+
+
+
+
+
+
+
+
+
+
+
+
+
+
+
Page 16

GUNNER
Description: The fighting elite for the Strogg, outfitted with a powerful
machine gun and an automatic grenade launcher.
Defence/Weapon Analysis: Medium
Comments: This cybernetic terror eats Mutants for breakfast before
coming to work – on you. He does have one weakness, though. It takes a
second for his hand to open up into the machine gun so take advantage
of the brief delay.
BERSERKER
Description: He has a metal spike as one arm, a hammer as another, and
moves very quickly.
Defence/Weapon Analysis: Medium
Comments: This bald mutha is one deadly freak. He may hit the dirt easy,
but he’ll get up and is relentless in his pursuits.
IRON MAIDEN
Description: Equally as powerful as the Gunner, this femme fatalehas
both an arm-mounted rocket launcher and flesh tearing claws.
Defence/Weapon Analysis: Medium
Comments: The cyber-bitch from hell… not the kind of girl to take home
to mom.
GLADIATOR
Description: With two massively mechanised legs and one
shoulder-mounted railgun, the Gladiator is the daddy of all the
adapted humanoids.
Defence/Weapon Analysis: Medium/Hard
Comments: Once targeted, you have less than a second to sidestep or
you’re toast. Also watch for his lethal left-handed clamp grip.
29
THE ENEMY
28
THE ENEMY
Unlike humans, the Strogg aren’t just one race. They represent a combination of captured
and processed races; a bloody marriage between bone and metal, flesh and machine.
LIGHT GUARD
Description: Weakest of the three processed humans, armed solely with a
simple blaster.
Defence/Weapon Analysis: Easy
Comments: Although their weapons may only sting, they may attack in packs
or summon help from the big dogs.
SHOTGUN GUARD
Description: These loyal troops have an automatic scatter gun prosthetic.
Defence/Weapon Analysis: Easy
Comments: He goes down easy, but packs a punch.
MACHINE GUN GUARD
Description: Bigger, meaner, and deadlier than above… with a machine gun
for a right arm.
Defence/Weapon Analysis: Easy
Comments: They tend to charge in droves and have a sharp eye.
ENFORCER
Description: Strong, muscle-bound warrior who dishes out chain gun speed
damage.
Defence/Weapon Analysis: Medium
Comments: These bullies have one objective in mind, marine – to fill your
body with as much lead in the least amount of time. They can take a beating,
and are effective at ducking your ammo. Also watch out for post-mortem
spray from their chain gun caused by a spasm in their arm. Split once you
see one fall to its knees.
+
+
+
+
+
+
+
+
+
+
+
+
+
+
+
+
+
+
+
+
+
+
+
+
+
+
+
+
+
+
+
+
+
+
+
+
+
+
+
+
+
+
+
+
+
+
+
+
+
+
+
+
+
+
+
+
Page 17

PARASITE
Description: Four-legged beast with a probe on its back. Once fired,
it attaches itself and literally sucks the life from you.
Defence/Weapon Analysis: Medium
Comments: The Parasite makes Cujo look like Lassie on Prozac.
MEDIC
Description: As the name suggests, this threatening organism has
the ability to awaken dead Strogg from eternal sleep.
Defence/Weapon Analysis: Medium
Comments: When he is not healing, the Medic moves about on
two hydraulic legs, and is armed with a laser blaster that shoots at hyper
speeds.
BRAINS
Description: A vicious cyborg abomination with life-stealing tentacles
protruding from its chest during attack.
Defence/Weapon Analysis: Medium/Hard
Comments: Stay out of range of his dangerous tentacle attack.
BARRACUDA SHARK
Description: The only creatures indigenous to water on Stroggos.
Their blade-like teeth and spiked tail are capable of disembowelling you.
Defence/Weapon Analysis: Medium
Comments: They attack in packs, but generally go down easy. Just don’t
become too occupied with them that you forget to take a breath.
30
THE ENEMY
TECHNICIAN
Description: An almost completely robotic brute, controlled by a brain
that floats around inside it’s metal body in a red preserving fluid. This
creature moves about by hovering on four jets that sit under its body and
is equipped with three weapons: a shocking prod, a flesh-ripping claw,
and a laser blaster. Use energy armour if you’ve got any.
Defence/Weapon Analysis: Medium
Comments: The Technician is easy to hit, but takes a lot of damage.
A good slap from your super shotgun at close range will make him keep
his distance.
MUTANT
Description: The Strogg refineries have spewed toxins into the ecosystem
for untold decades causing this once docile creature to mutate into a
fierce, fast, flesh tearing beast.
Defence/Weapon Analysis: Medium/Hard
Comments: Run.
FLYER
Description: A small two-winged monster, comprised of a
controlling brain and a cyborg body that allows it to levitate.
Defence/Weapon Analysis: Medium/Hard
Comments: The Flyer moves fairly quickly, travels in packs, and
each wing is a laser blaster.
ICARUS
Description: Relies on a huge jet packed attached to its back,
with laser blasters mounted into his shoulders.
Defence/Weapon Analysis: Medium/Hard
Comments: With its durable shell, swift maneuverability, and
insatiable appetite for destruction, the Icarus is an aerial nightmare.
31
THE ENEMY
+
+
+
+
+
+
+
+
+
+
+
+
+
+
+
+
+
+
+
+
+
+
+
+
+
+
+
+
+
+
+
+
+
+
+
+
+
+
+
+
+
+
+
+
+
+
+
+
+
+
+
+
+
+
+
+
+
+
+
+
Page 18

TANK
Description: Tanks have three weapons they use at random:
an arm-mounted machine gun, an arm-mounted laser blaster,
and a shoulder-mounted rocket launcher.
Defence/Weapon Analysis: Hard
Comments: Get in, take your shot, and get out. Repeat as often
as necessary. These metallic beasts can endure massive gunfire.
TANK COMMANDER
Description: These Tanks are a special class, designed to secure
the Inner City from infiltrators.
Defence/Weapon Analysis: Hard
Comments: Consider planning your means of attack beforehand,
rather than running into their view with your weapons blasting.
32
THE ENEMY
Before contacting customer support, please consult the technical help file. It contains
the answers to some of our most frequently asked questions and may quickly and
easily provide a solution to your difficulty. If after reviewing the technical help file
you are still experiencing problems, please feel free to contact us through any of
the services listed. So that we can better help you, please be at your computer and
have the following information ready:
1. Complete product title
2. Exact error message reported (if any) and a brief description of the problem
3. Your computer’s processor type and speed (e.g. 486 DX2/66, Pentium 90)
4. Video and sound card make and model
(e.g., Diamond Stealth 64 video, Sound Blaster 16 sound)
ONLINE SUPPORT:
Internet: support@activision.com or http://www.activision.com
America Online: Use keyword “Activision” to locate the Activision forum
CompuServe: 76004,2122 or [GO ACTIVISION]
UNITED KINGDOM:
Technical Support: 0990-143-525 Monday - Friday 9:00 a.m. - 5:00 p.m. (U.K. time).
Customer Support: 01895-456-700 Monday - Friday 1:00 p.m. - 5:00 p.m. (U.K. time).
Mail: Activision, Customer Support, 133 High Street, Yiewsley,
West Drayton, Middlesex, UB7 7QL, England
GERMANY:
Technical Support: 01805-225115
Hintline: 0190-510055
E-Mail: Support@activision.de
Mail: Activision Deutschland GmbH, Service & Support,
Postfach 1553, D-33245 Gütersloh, Germany
For Technical Support and Customer Service in areas not listed, please contact your
local distributor or Activision via online. (Please note that online support is available
in English only.)
33
CUSTOMER SUPPORT
+
+
+
+
+
+
+
+
+
+
+
+
+
+
+
+
+
+
+
+
+
+
+
+
+
+
+
+
+
+
Page 19

QUAKE II BY ID SOFTWARE
PROGRAMMING
John Carmack, John Cash, Brian Hook
ART
Adrian Carmack, Kevin Cloud, Paul Steed
LEVEL DESIGN
Tim Willits, American McGee, Christian Antkow, Paul Jaquays, Brandon James
BUSINESS
Todd Hollenshead, Barrett (Bear) Alexander, Donna Jackson
SPECIAL THANKS
CINEMATIC SEQUENCES
Ending Cinematic by Blur Studio - Venice, California
Environment models for Introduction Cinematic by Karl Dolgener
Assistance with environment design by Cliff Iwai
SOUND EFFECTS AND MUSIC
Sound Design by Soundelux Media Labs. Music Composed and Produced by
Soundelux Media Labs.
Level Music by Sonic Mayhem www.sonicmayhem.com
"Quake II Theme Song" © 1997 Rob Zombie. All Rights Reserved.
"Climb" by Jer Sypult
Voice of computers by Carly Staehlin-Taylor
ACTIVISION
Producer: Marty Stratton
Marketing Product Manager: Henk Hartong
QA Project Leads: Tim Vanlaw, John Tam, Doug Jacobs
Quality Assurance Testers: Steve Rosenthal, Mike Spann, Winnie Lee,
Steve Elwell, Derek Johnstone, Igor Krinitskiy, Ian Stevens,
David Baker, Chad Bordwell
Manual Written by: Marc Saltzman
Thanks: Mitch Lasky, Sandi Isaacs, Michael Rivera
Manual Design JACKHAMMER, Dallas, TX
QUAKE II ©1997 Id Software, Inc. All Rights Reserved. Distributed by Activision, Inc. under license. QUAKE
®
is a registered trademark of Id Software, Inc. QUAKE II™ , the Id Software name, the "Q II" logo and the id
logo are trademarks of Id Software, Inc. Activision
®
is a registered trademark of Activision, Inc.
All other trademarks and trade names are properties of their respective owners.
34
CREDITS
35
Customers using a German operating system and keyboard, please note the alternative keys for the
following operations:
Status Bar: Your status is shown as icons floating in your view at the bottom of the screen. There is an
indicator for your health, armour, and ammo for the current weapon, and currently selected or readied item
or weapon. When you pick up something new, an icon will briefly appear at the bottom of the screen with a
picture of that item. To view all of your inventory, press the Tab key. Maximising the screen (“ ´ ” key) may
remove the Status Bar from your viewing area. To get it back, simply tap the “ß“ key.
Console: Pressing the “ 2 ” key will pull down the Console window. This is a special area that list all of the
game messages, and allows you to give Quake II commands that cannot be given through the menu. For
more information on the Console, please refer to the online manual.
Inventory: Press the Tab key to access your inventory. Use the “ ü and + ” keys to move through the list.
Your status information will update to show an image of the currently selected item. Press the Enter key to
use a highlighted item or press the “ä” key to drop an item. (Dropping items is only useful for multiplayer
games.) Weapons and items are “readied” in this manner. For example, you can select or ready an item
before engaging the enemy. Then at the appropriate time you can quickly use that item by pressing the
Enter key.
Shooting: Tap the (Alt Gr) key or the left mouse button to fire. Hold the shooting key down to keep firing.
Looking Up and Down: The keys “A” and “y” allow you to look up and down, respectively. Start walking
forward and your line of vision will automatically re-adjust to the centre position. You may also choose to
select “free look” under the “Controls” menu which will allow you to move the mouse around as if it was
your head movement.
Selecting Items in Inventory: Use the “ ü and + ” keys to cycle through items in your inventory. Press the
Enter key to select a highlighted item.
Dropping Objects: To drop an item, tap the “ ü and + ” keys to scroll through your belongings.
When the desired object is highlighted, press the (ä ) key to drop it.
Giving Items to Other Marines: To give an item to another player simply select it from your inventory and
press the (ä ) key. The item will then be tossed out for anyone to pick up.
FOR CUSTOMERS IN GERMANY
Page 20

37
6. No ID Warranties. ID DISCLAIMS ALL WARRANTIES, WHETHER EXPRESS OR IMPLIED, INCLUDING, BUT NOT LIMITED TO,
IMPLIED WARRANTIES OF MERCHANTABILITY AND FITNESS FOR A PARTICULAR PURPOSE, WITH RESPECT TO THE SOFTWARE, THE PRINTED MATERIALS AND THE ID IMAGES. ID DOES NOT WARRANT THAT THE OPERATION OF THE SOFTWARE
WILL BE UNINTERRUPTED OR ERROR FREE OR THAT THE SOFTWARE WILL MEET YOUR SPECIFIC REQUIREMENTS.
ADDITIONAL STATEMENTS SUCH AS PRESENTATIONS, WHETHER ORAL OR WRITTEN, DO NOT CONSTITUTE WARRANTIES
BY ID AND SHOULD NOT BE RELIED UPON. This section 6. shall survive the cancellation or termination of this Agreement.
7. Limited Activision Warranty. Activision warrants to the original consumer purchaser of the Software that the recording medium
on which the Software is recorded will be free from defects in material and workmanship for 90 days from the date of purchase.
If the recording medium is found defective within 90 days of original purchase, Activision agrees to replace, free of charge, any
product discovered to be defective within such period upon its receipt of the product, postage paid, with proof of the date of
purchase, as long as the Software is still being manufactured by Activision. In the event that the Software is no longer available,
Activision retains the right to substitute a similar program of equal or greater value. This warranty is limited to the recording
medium containing the Software as originally provided by Activision and is not applicable to normal wear and tear. This warranty
shall not be applicable and shall be void if the defect has arisen through abuse, mistreatment, or neglect. EXCEPT AS SET
FORTH ABOVE, THIS WARRANTY IS IN LIEU OF ALL OTHER WARRANTIES, WHETHER ORAL OR WRITTEN, EXPRESS OR
IMPLIED, INCLUDING ANY WARRANTY OF MERCHANTABILITY, FITNESS FOR A PARTICULAR PURPOSE OR NONINFRINGEMENT,
AND NO OTHER REPRESENTATIONS OR CLAIMS OF ANY KIND SHALL BE BINDING ON OR OBLIGATE ACTIVISION.
When returning the Software for warranty replacement, the original product disks must be sent only in a protective packaging
and include: (1) a photocopy of your dated sales receipt; (2) your name and return address typed or clearly printed; (3) a brief
note describing the defect, the problem(s) you are encountered and the system on which you are running the Software; (4) if
you are returning the Software after the 90-day warranty period, but within one year after the date of purchase, please include
check or money order for $10 U.S. (A$17 for Australia, or £10.00 for Europe) currency per CD or floppy disk replacement. Note:
Certified mail recommended.
In the U.S. send to: Warranty Replacements, Activision, Inc., P.O. Box 67713, Los Angeles, California 90067.
In Europe send to: Activision, Gemini House, 133 High Street, Yiewsley, West Drayton, Middlesex UB7 7QL United Kingdom.
In Australia send to: Warranty Replacements, Activision, P.O. Box 873, Epping, NSW 2121, Australia.
8. Venue and Liability Limitation. This Agreement shall be construed in accordance with and governed by the laws of the State of
Texas and applicable United States federal law. Copyright and other proprietary matters will be governed by United States laws
and international treaties. Except as set forth below, exclusive venue for all litigation with regard to this Agreement shall be in
Dallas County, Texas and you agree to submit to the jurisdiction of the courts in Dallas, Texas for any such litigation. Exclusive
venue for all litigation involving Activision, but not involving ID, with regard to this Agreement shall be in Los Angeles County,
California and you agree to submit to the jurisdiction of the courts in Los Angeles, California for any such litigation. IN ANY
CASE, NEITHER ID, ACTIVISION, NOR ANY OF ID'S OR ACTIVISION’S RESPECTIVE OFFICERS, EMPLOYEES, DIRECTORS,
AGENTS, LICENSEES (EXCLUDING YOU), SUBLICENSEES (EXCLUDING YOU), SUCCESSORS OR ASSIGNS SHALL BE LIABLE
FOR LOSS OF DATA, LOSS OF PROFITS, LOST SAVINGS, SPECIAL, INCIDENTAL, CONSEQUENTIAL, INDIRECT, PUNITIVE OR
OTHER SIMILAR DAMAGES ARISING FROM BREACH OF WARRANTY, BREACH OF CONTRACT, NEGLIGENCE, STRICT PRODUCT
LIABILITY, OR OTHER LEGAL THEORY EVEN IF ID, ACTIVISION OR THEIR RESPECTIVE AGENT(S) HAVE BEEN ADVISED OF
THE POSSIBILITY OF SUCH DAMAGES OR EVEN IF SUCH DAMAGES ARE FORESEEABLE, OR LIABLE FOR ANY CLAIM BY
ANY OTHER PARTY. Some jurisdictions do not allow the exclusion or limitation of incidental or consequential damages, so the
above limitation or exclusion may not apply to you. This section 8. shall survive the cancellation or termination of this
Agreement.
9. U.S. Government Restricted Rights. To the extent applicable, the United States Government shall only have those rights to use
the Software, the Printed Materials and ID Images appearing in the Levels as expressly stated and expressly limited and restricted
in this Agreement, as provided in 48. C.F.R. §§ 227.7202-1 through 227.7204.
10. General Provisions. Neither this Agreement nor any part or portion hereof shall be assigned or sublicensed by you. ID and
Activision each may assign its respective rights under this Agreement in the assigning party’s sole discretion. Should any provision
of this Agreement be held to be void, invalid, unenforceable or illegal by a court, the validity and enforceability of the other
provisions shall not be affected thereby. If any provision is determined to be unenforceable, you agree to a modification of such
provision to provide for enforcement of the provision's intent, to the extent permitted by applicable law. Failure of ID or
Activision to enforce any provision of this Agreement shall not constitute or be construed as a waiver of such provision or of the
right to enforce such provision. If you fail to comply with or breach any term or condition of this Agreement, YOUR LICENSES
AND THIS AGREEMENT ARE AUTOMATICALLY TERMINATED, WITHOUT NOTICE. In the event this Agreement is terminated,
you shall have no right to use the Software, the Printed Materials or the Levels, in any manner, and you shall immediately
destroy all copies of the Software, the Printed Materials and the Levels in your possession, custody or control.
YOU ACKNOWLEDGE THAT YOU HAVE READ THIS AGREEMENT, THAT YOU UNDERSTAND THIS AGREEMENT, AND UNDERSTAND
THAT BY CONTINUING THE INSTALLATION OF THE SOFTWARE, BY LOADING OR RUNNING THE SOFTWARE, OR BY PLACING
OR COPYING THE SOFTWARE ONTO YOUR COMPUTER HARD DRIVE OR RAM, YOU AGREE TO BE BOUND BY THE TERMS AND
CONDITIONS OF THIS AGREEMENT. YOU FURTHER AGREE THAT, EXCEPT FOR WRITTEN SEPARATE AGREEMENTS BETWEEN
ID, ACTIVISION AND YOU, IF ANY, THIS AGREEMENT IS A COMPLETE AND EXCLUSIVE STATEMENT OF THE RIGHTS AND
LIABILITIES OF THE PARTIES HERETO. THIS AGREEMENT SUPERSEDES ALL PRIOR ORAL AGREEMENTS, PROPOSALS OR
UNDERSTANDINGS, AND ANY OTHER COMMUNICATIONS BETWEEN ID, ACTIVISION AND YOU RELATING TO THE SUBJECT
MATTER OF THIS AGREEMENT.
36
LIMITED USE SOFTWARE LICENSE AGREEMENT
This Limited Use Software License Agreement (the "Agreement") is a legal agreement between you, the end-user, Id Software, Inc.
("ID") and Activision, Inc. (“Activision”). By continuing the installation of this game program entitled QUAKE II, by loading or running
the game program, or by placing or copying the game program onto your computer hard drive, computer RAM or other storage, you
are agreeing to be bound by the terms of this Agreement.
1. Grant of License for Software. Subject to the terms and conditions of this Agreement, ID grants to you the non-exclusive and
limited right to use the software game program entitled QUAKE II in executable or object code form only (the "Software") for
recreational purposes only. The term “Software” includes all elements of the Software such as data files, images appearing in the
Software and screen displays. You are not receiving any ownership or proprietary right, title or interest in or to the Software or
the copyright, trademarks, or other rights related thereto. For purposes of this section, "use" means loading the Software into
RAM and/or onto computer hard drive, as well as installation of the Software on a hard disk or other storage device. You agree
that the Software will not be shipped, transferred or exported into any country in violation of the U.S. Export Administration Act
(or any other law governing such matters) by you or any one at your direction and that you will not utilise and will not authorise
anyone to utilise, in any other manner, the Software in violation of any applicable law. The Software may not be exported or
reexported into (or to a national or resident of) any country to which the U.S. has embargoed goods or to anyone or into any
country who/which are prohibited, by applicable law, from receiving such property.
2. Additional Levels. Subject to the terms and conditions of this Agreement, ID grants to you the non-exclusive and limited right to
create additional levels (the “Levels”) which are operable with the Software. You may include within the Levels certain textures
and other images (the “ID Images”) from the Software. You agree that the Levels will not be shipped, transferred or exported
into any country in violation of the U.S. Export Administration Act (or any other law governing such matters) by you or anyone at
your direction and that you will not utilise and will not authorise anyone to utilise, in any other manner, the Levels in violation of
any applicable law. The Levels may not be downloaded or otherwise exported or re-exported into (or to a national or resident of)
any country to which the U.S. has embargoed goods or to anyone or into any country who/which are prohibited by applicable
law, from receiving such property. You shall not rent, sell, lease, lend, offer on a pay-per-play basis or otherwise commercially
exploit or commercially distribute the Levels. You are only permitted to distribute for free, without any cost or charge, the
Levels to other endusers. As noted below, in the event you commercially distribute or commercial exploit the Levels or commit
any other breach of this Agreement, your licenses, as granted in this Agreement, shall automatically terminate, without notice.
You hereby agree to indemnify, defend and hold harmless ID and Activision and ID’s and Activision’s respective officers, employees,
directors, agents, licensees (excluding you), sublicensees (excluding you), successors and assigns from and against all losses,
lawsuits, damages, causes of action and claims relating to and/or arising from the Levels and/or the distribution or other use of
the Levels.
3. Prohibitions with Regard to Software. You, either directly or indirectly, shall not do any of the following acts:
a. rent the Software;
b. sell the Software;
c. lease or lend the Software;
d. offer the Software on a pay-per-play basis;
e. distribute the Software by any means, including, but not limited to, Internet or other electronic distribution, direct mail, retail,
mail order or other means;
f. in any other manner and through any medium whatsoever commercially exploit the Software or use the Software for any
commercial purpose;
g. disassemble, reverse engineer, disassemble, decompile, modify or alter the Software;
h. translate the Software;
i. reproduce or copy the Software (except as permitted by section 4. hereinbelow);
j. publicly display the Software; or
k. prepare or develop derivative works based upon the Software.
4. Permitted Copying. You may make only the following copies of the Software: (i) you may copy the Software from the CD ROM
which you purchase onto your computer hard drive; (ii) you may copy the Software from your computer hard drive into your
computer RAM; and (iii) you may make one (1) “back up” or archival copy of the Software on one (1) hard disk.
5. Intellectual Property Rights. The Software, including the ID Images, and all printed material accompanying the Software (the
“Printed Materials”) and all copyrights, trademarks and all other conceivable intellectual property rights related to the Software,
the Printed Materials and the ID Images are owned by ID and are protected by United States copyright laws, international treaty
provisions and all applicable law, such as the Lanham Act. You must treat the Software, the Printed Materials and the ID Images
like any other copyrighted material, as required by 17 U.S.C., §101 et seq. and other applicable law. You agree to use your best
efforts to see that any user of the Software licensed hereunder, the Printed Materials or the Levels complies with this Agreement.
You agree that you are receiving a copy of the Software, including the ID Images, and the Printed Material by license only and
not by sale and that the “first sale” doctrine of 17 U.S.C. §109 does not apply to your receipt or use of the Software, the Printed
Materials or your inclusion of any ID Images in the Levels. This section 5. shall survive the cancellation or termination of this
Agreement.
LIMITED USE SOFTWARE LICENSE AGREEMENT
Page 21

Page 22

 Loading...