

Page 1
TIMESHOCK! Rules
Welcome to TIMESHOCK!
Using the Operator’s Menu
Tips for Mastering Pro Pinball
Page 2
TIMESHOCK! Rules
2
Page 3
I do not know exactly what
time you presently inhabit so I
cannot tell in what dark age of
pre-science you dwell, but you probably
don't even know that time is crystalline.
It flows from the future and crystallizes
at the door of the present. The future
is fluid and changeable. The past is
solid and cannot be altered.
But it can be shattered. And my work on the
fluid future threatens to destroy the solid past.
I have created – God help us –
a shock wave of anti-time which is
travelling back to the dawn of history.
The wave has nearly reached your
time already. We must return to
the beginning of time and bring
together the crystal fragments
from the future to create a
counter-shock wave.
TIMESHOCK! Rules
My time machine is crude –
the best I could do in the
circumstances. But it needs
two to pilot and navigate.
My co-pilot has… gone and
I am stuck in this time.
My past has gone already, but, if we succeed,
we can save your past… and your future…
3
Page 4

TIMESHOCK! Rules
An experiment in the future with a Time Crystal went wrong. The
Crystal shattered, creating a Timeshock. Once the Timeshock reaches
the Dawn of Time, the universe will be destroyed. You must collect the
shattered crystal fragments from FOUR different time zones to rebuild
the Crystal, then travel to the Dawn of Time to use the Crystal to create
an Anti-Timeshock to save the universe...
Time Machine Frenzy: Shoot the spinner to light the Lock-O-Meter, then
lock three balls to start Three-Ball Time Machine Frenzy. Shoot the side
ramps to collect Jackpots and locate a Crystal fragment. Shoot the lit
middle shot to collect a Crystal fragment.
Time Travel: Complete both side ramps to enable the Time Drive. Once
enabled, lock three balls in The Time Machine and one in the middle
shot to Time Travel.
Explorations: Shoot the upper ramp to search continents for
Tachyonium. If lucky, you will find a continent worth exploring.
Complete the exploration to collect a piece of Tachyonium. Use
Tachyonium pieces to unlock other Time Zones.
Time Warp Frenzy: Complete W–A–R–P to light Time Warp at the
middle shot. Shoot the middle shot to start Two-Ball Time Warp Frenzy.
Complete W–A–R–P quickly to add extra balls into play. Shoot the
middle shot when lit to score Time Warp Jackpots.
HOW TO PLAY TIMESHOCK!
Progressive Awards: Complete the left bank of drop targets to light
awards. Shoot the left orbit to collect awards.
Souvenir Quickshot: Complete the right bank of drop targets to light
quickshots. Shoot the right orbit to start quickshot. Shoot the right
orbit again to collect the quickshot value and a souvenir. Souvenirs can
be combined to earn special features...
Scanner: Complete S–C–A–N to light Scanner at the middle shot. Shoot
the Scanner to collect a random award.
MagnoSave™: Balls can be saved from the right outlane by quickly
pressing the MagnoSave™ button. Complete M–A–G–N–E–T to re-light
MagnoSave™.
Timeshock! Frenzy:
1. Collect three pieces of Tachyonium to unlock all the Time Zones.
2. Collect all four crystal fragments from The Prehistoric Age,
Ancient Rome, The Present, and The Future to rebuild the Crystal.
3. Travel to the Dawn of Time to start Timeshock! Frenzy.
4. Complete all flashing shots, then use the Crystal to save the
Universe from the deadly Timeshock!
4
Page 5
SKILL SHOT, SCANNER, AND BONUS MULTIPLIER
TIMESHOCK! Rules
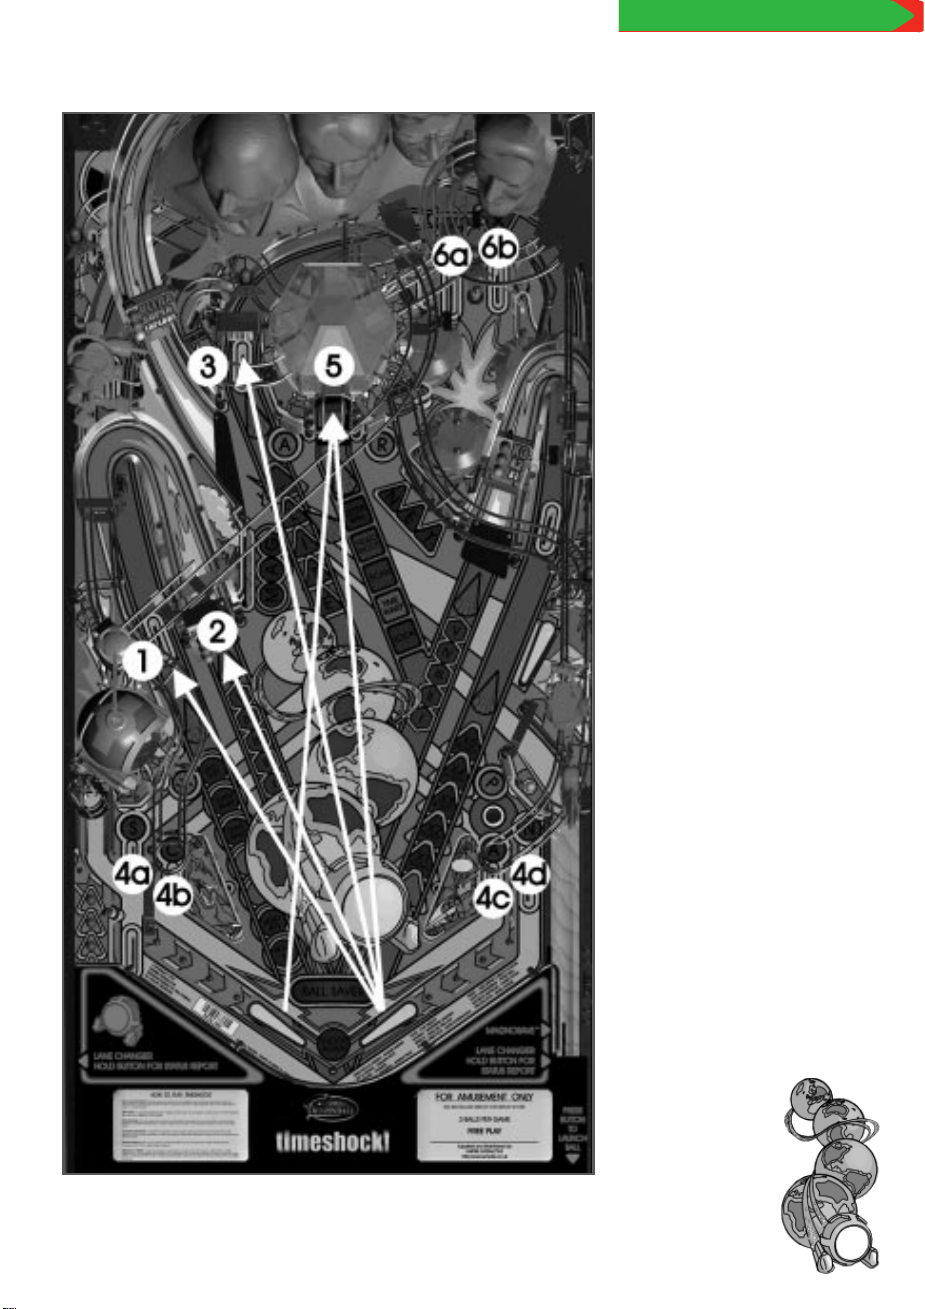
SKILL SHOT
Shoot flashing Skill Shot
(1,2 or 3) immediately
after a ball launch to
collect a Skill Shot award.
SCANNER
Complete S–C–A–N
(4a, 4b, 4c, 4d)to
enable Scanner and light
Middle Scoop for Scan.
Shoot lit Middle Scoop to
activate Scanner and
collect a random award.
Flipper buttons cycle the
lit S–C–A–N lamps.
SUPER SCANNER
Every fifth* completed
S–C–A–N enables Super
Scanner and lights
Middle Scoop for
Super Scan.
*OPERATOR ADJUSTABLE FEATURE
Shoot lit Middle Scoop to
activate Super Scanner,
then use Flipper buttons
to select and collect one
of two special random
awards.
BONUS MULTIPLIER
Make + and X (6a, 6b)
to advance Bonus
Multiplier.
Flipper buttons cycle the
lit + and X lamps.
5
Page 6
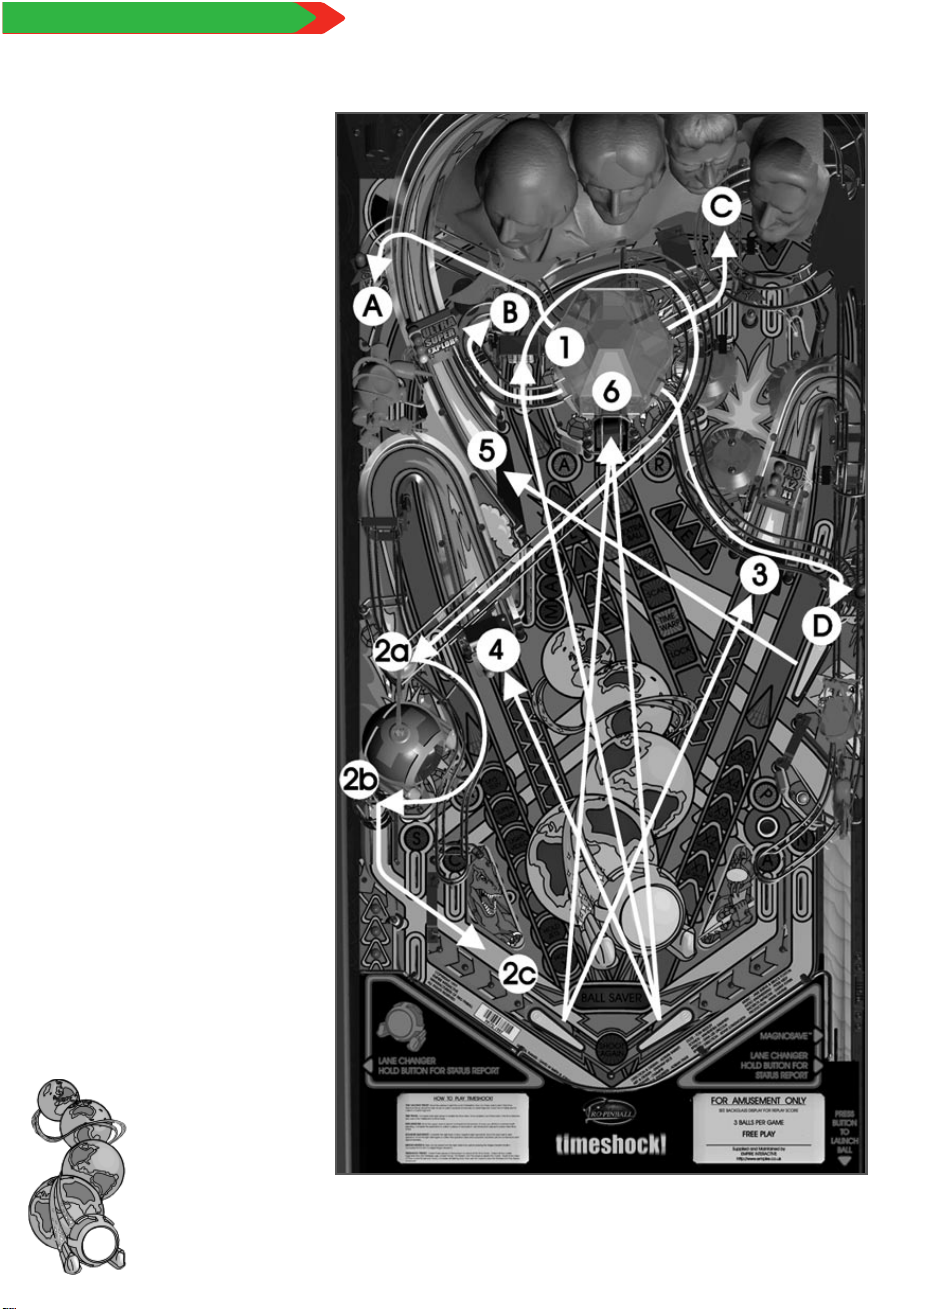
TIMESHOCK! Rules
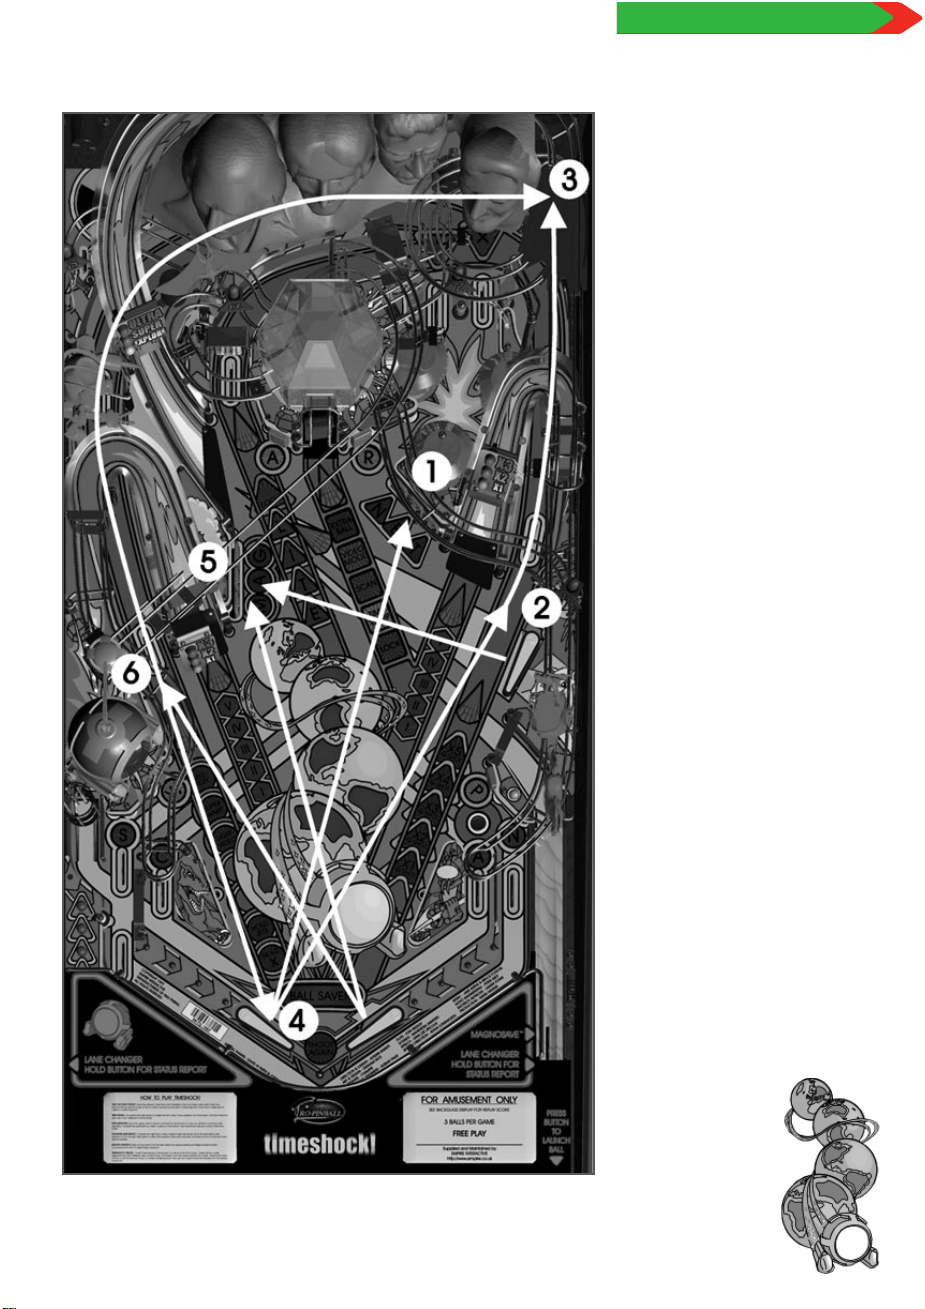
Shoot Spinner (1) to
advance Lock-O-Meter.
When Lock is lit, shoot
Spinner Lane to activate
Magno Lock (2a, 2b)
and lock a ball.
Lock three balls to start
a Three-Ball Time
Machine Frenzy.
During Time Machine
Frenzy, shoot Left and
Right Ramps (3, 4)
to score Single, Double,
and Triple Jackpots and
light Continents. Light
all Continents to locate
a Crystal Fragment and
light Upper Ramp (5)
for Super Jackpot.
TIME MACHINE FRENZY
When a Crystal Fragment
is located, shoot Middle
Scoop to collect the
Fragment; shoot
Upper Ramp to
collect Super
Jackpot.
When a Crystal Fragment
is collected, shoot Middle
Scoop after the Frenzy
ends to Lock the
Fragment in a
Time Zone Lock
Point (A–D).
6
Page 7
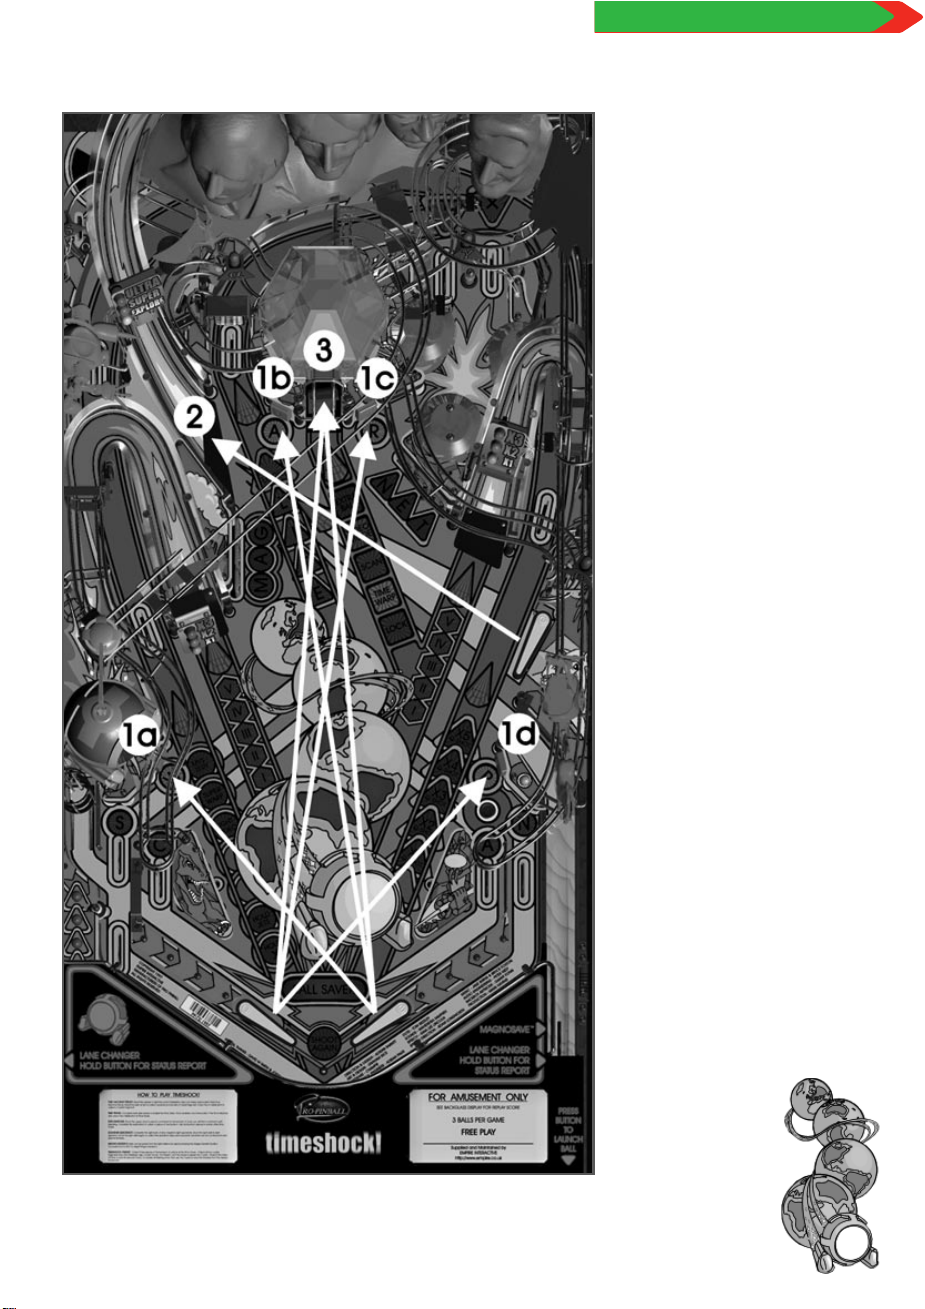
TIME WARP FRENZY
TIMESHOCK! Rules
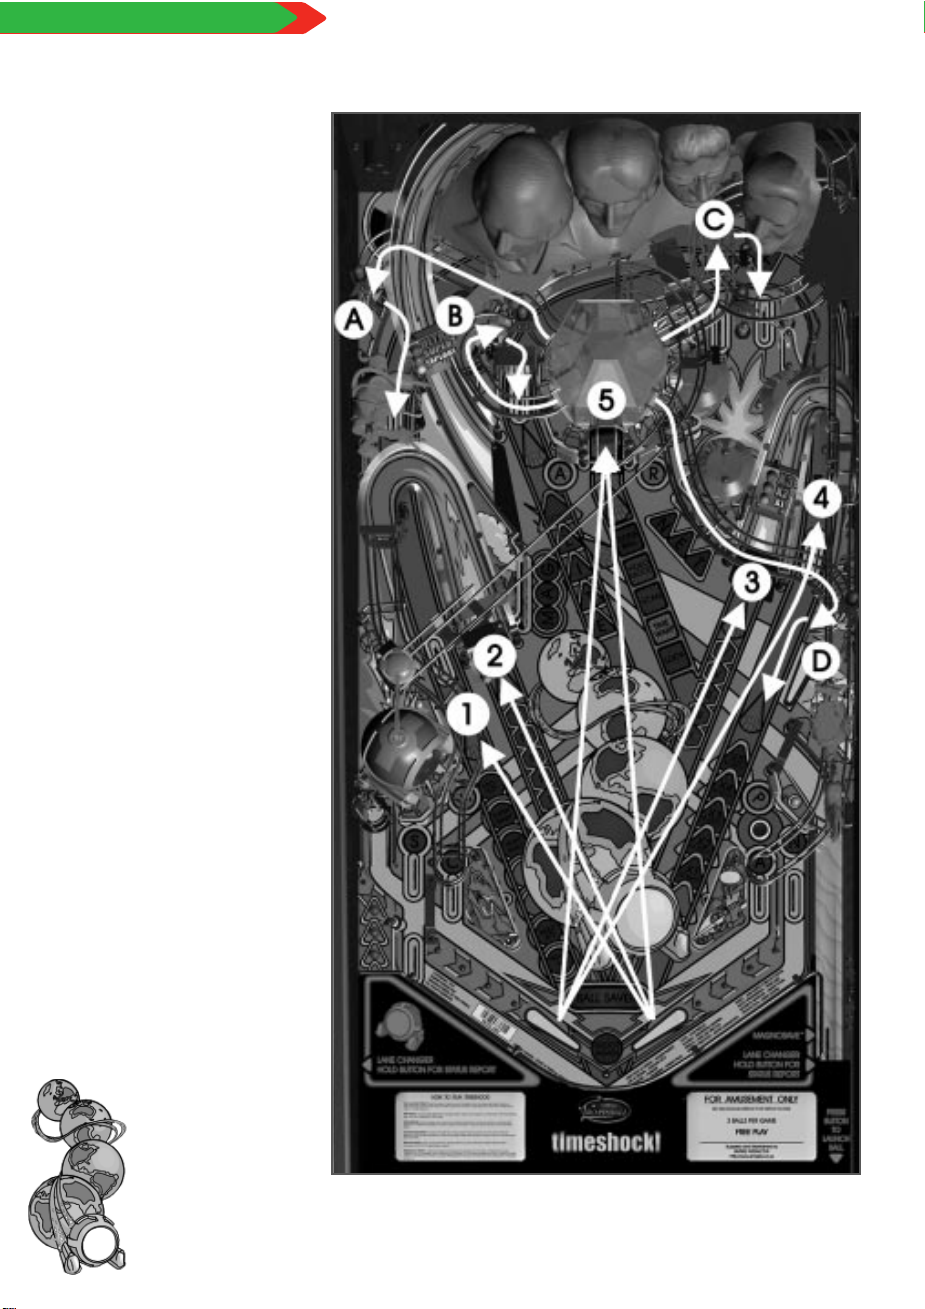
Make W–A–R–P Spots
(1a–1d) in sequence to
light Middle Scoop (3)
for Time Warp.
Shoot lit Middle Scoop to
start a Two-Ball Time
Warp Frenzy.
During Time Warp
Frenzy, complete
W–A–R–P Spots
(1a–1d) or shoot
Upper Ramp (2)
to make W–A–R–P
again and add a
ball into play.
Shooting W–A–R–P
Spots or Upper Ramp
advances Warp Jackpot
value; completing
W–A–R–P Spots
increases Warp
Jackpot multiplier.
Shoot Middle Scoop
when lit to collect
Time Warp Jackpot.
7
Page 8
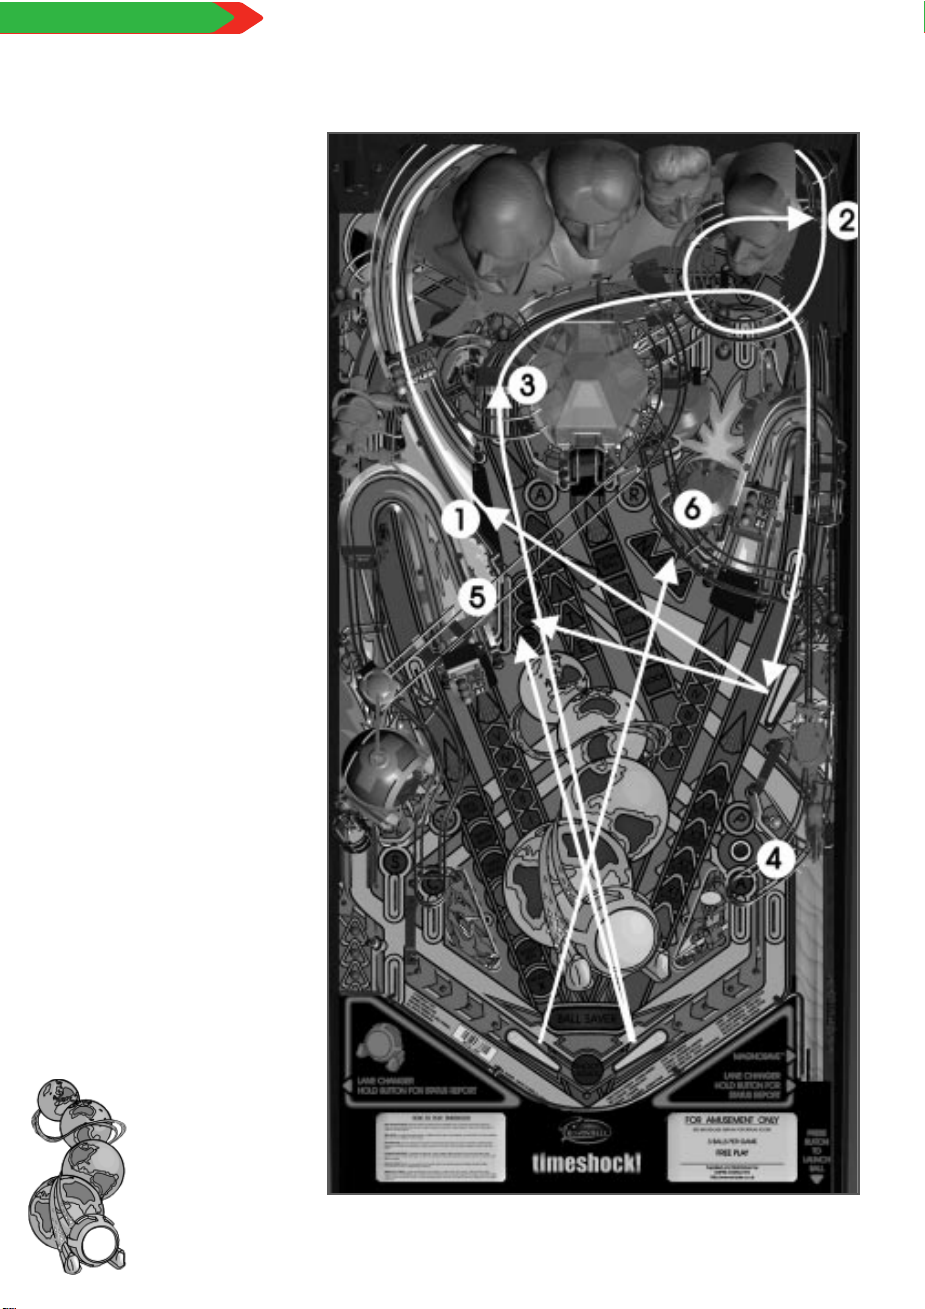
TIMESHOCK! Rules
Shoot Upper Ramp (1) to
explore a Continent.
If lucky, some of the rare
compound Tachyonium
is located, the ball is
diverted to the Top
Scoop (2), and an
Exploration begins.
Complete an Exploration
(100%) to collect
Shoot Spinner (3) first
to double the chance
of an Exploration.
T
IP: If lock is lit and you
wish to go for a
spinner–ramp combo
(3, 1), trap the ball
on the right flipper
and press the left
flipper button.
EXPLORATIONS AND MAGNOSAVE™
Tachyonium.
8
Page 9

EXPLORATIONS
CHANNEL TUNNEL: Shoot flashing shots to increase mining
power and mine out the Tachyonium, then shoot Left Orbit to
leave the Chunnel with the Tachyonium.
CHARIOT RACE: Shoot Left and Right Ramps and Orbits to
move up places. Win the race to collect the Tachyonium.
DINOSAUR STAMPEDE: Shoot flashing Orbits to avoid
dinosaurs and reach the meteorite to collect the Tachyonium.
MOUNT RUSHMORE: Shoot lit ramps to climb Mount Rushmore
and collect the Tachyonium.
POWER PLANT: Shoot Jet Bumpers to destroy Power Plant,
then shoot either Orbit to collect the Tachyonium.
PYRAMID: Shoot Middle Scoop to enter Pyramid, then shoot
flashing shots to locate main tomb and collect the Tachyonium.
ROBOT WAR: Shoot Drop Targets to defeat robot opponent
and collect the Tachyonium. If you are skilful enough, an
“uppercut” will finish him quickly.
TIMESHOCK! Rules
VOLCANO: Shoot Spinner repeatedly to scoop up water. Shoot
any Ramp to drop water and cool the volcano, then shoot
Middle Scoop to fly inside and collect the Tachyonium.
T
IP: If the ball ends up in the Jet Bumpers and you want it to
exit quickly, hold down both flipper buttons to disable the Jets.
MAGNOSAVE™
When MagnoSave™ is lit (4), press MagnoSave™ button
quickly to save balls from the right Outlane.
Complete M–A–G–N–E–T Drop Targets (5, 6) to relight
MagnoSave™.
9
Page 10
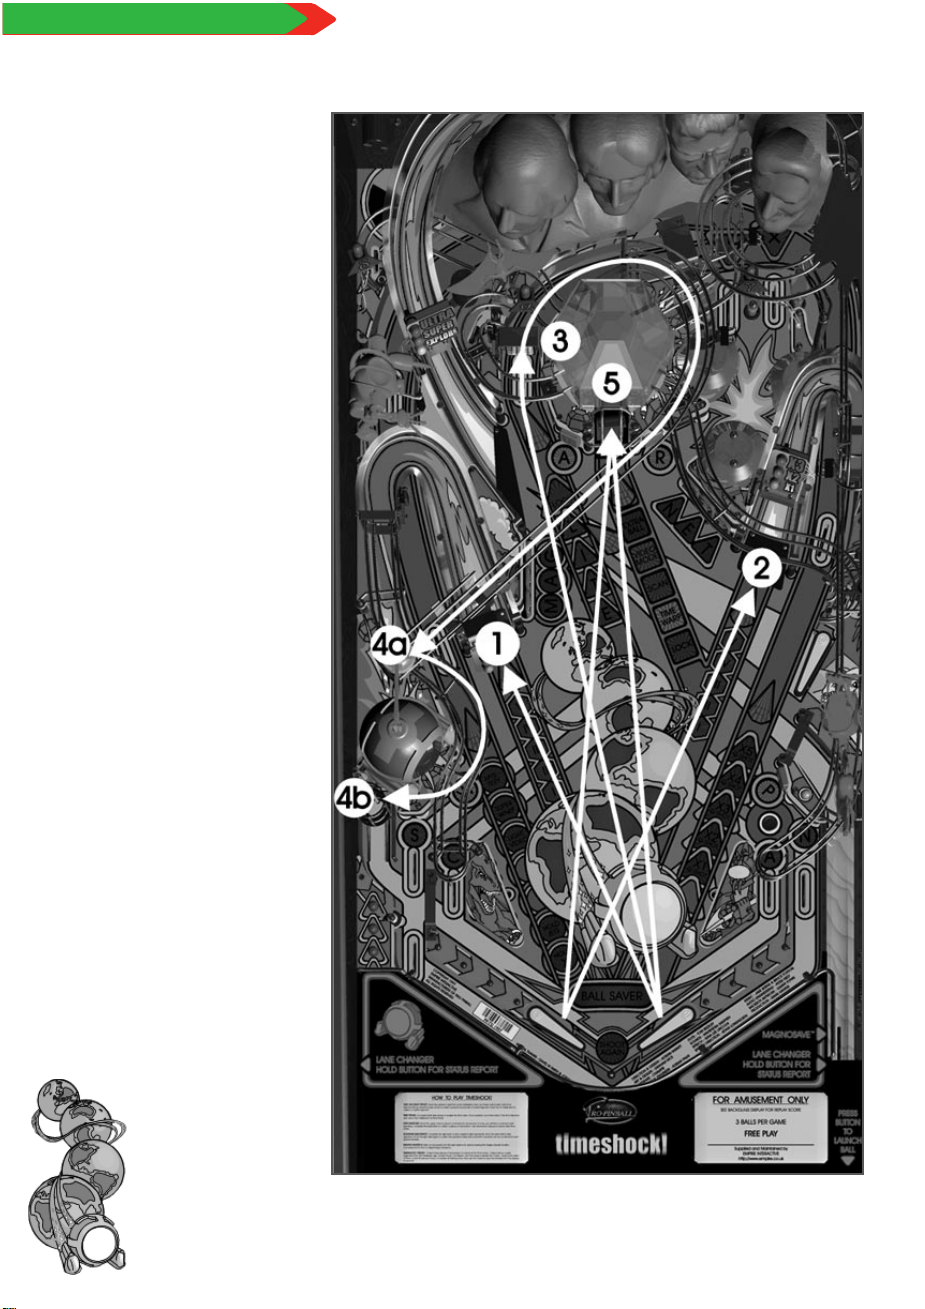
TIMESHOCK! Rules
Light all I–V lamps on Left
and Right Ramps (1, 2) to
enable Time Drive. Shoot
Ramps alternately to
enable Time Drive
more rapidly and
collect more points.
When enabled, lock three
balls in Time Machine
(4a–4b) to activate
Time Zone selector.
Use Flipper and Launch
buttons to select a
destination.
NOTE: Some destinations
are not available until
you collect enough
Tachyonium.
TIME TRAVEL
When a destination
is selected, shoot
Middle Scoop (5)
to Time Travel.
10
Page 11
SOUVENIR QUICKSHOTS AND ORBIT AWARDS
TIMESHOCK! Rules
SOUVENIR QUICKSHOTS
Make N–E–T (right Drop
Target bank 1) to light
Right Orbit for Quickshot.
Shoot lit Right Orbit (2)to
start Quickshot. Shoot
Right Orbit again quickly
to collect a Souvenir and
Quickshot value.
Souvenirs from different
Time Zones combine to
enable special features.
Collect special features by
activating the Scanner.
AWARDS
Make M–A–G (left Drop
Target bank 5) to light
Left Orbit for Award.
Shoot lit Left Orbit (6)
to collect Award.
HOLD X: Bonus Multiplier
value is held over to
next ball.
HOLD JETS: Jet Hits (for
Super Jets) are held
over to next ball.
LIGHT VIDEO: Lights
Middle Scoop for
Video Mode.
SUPER WARP: Starts a
Four-Ball Time
Warp Frenzy.
MYSTERY:
Self-explanatory.
11
Page 12
TIMESHOCK! Rules
Once all four Crystal
Fragments have been
found and locked, and
at least three pieces of
Tachyonium have been
collected, travel to
The Dawn of Time to
attempt to Save
the Universe!
Travel to ‘The Dawn of
Time’ to start a Five-Ball
Timeshock! Frenzy.
Re-build the Crystal
within 120 seconds
or the Universe will
be destroyed!
Shoot any flashing shot
(1–4) to enable a Crystal
Lock Point (A–D), then
shoot Middle Scoop
(5) to lock a ball and
re-build one–fourth
of the Crystal.
TIMESHOCK! FRENZY
Lock four balls into
Crystal Lock Points
(A–D) to re-build
the crystal.
When the Crystal is
re-built, shoot Middle
Scoop to detonate
Crystal and Save
the Universe!
12
Page 13
Welcome to TIMESHOCK!
INTRODUCTION
Welcome to TIMESHOCK!, the second in the PRO PINBALL series of pinball machine
simulation programs. As pinball machine owners ourselves, the aim of everyone on
the PRO PINBALL team is to bring you the closest experience possible to actually
owning and playing an arcade pinball machine, without the distractions of scrolling
or split screens. This manual is an important part of that experience.
Because the TIMESHOCK! simulation program contains operator features identical to
those on real machines, this manual is written in the same style as operator manuals
for arcade pinball machines. So if, like us, you own an electronic pinball machine,
we’re sure you’ll find the TIMESHOCK! simulation program (and this manual)
genuinely faithful to the real thing.
TIMESHOCK! is a constantly challenging and sometimes frustrating game, and though
the default settings have been carefully chosen to give balanced gameplay, you can
fine tune the machine to suit your preferences and playing style. You can even
examine the machine’s audit information and adjust the difficulty of individual
features exactly as you would on a real machine. The third section of this
manual explains all these features in detail.
NOTE: The complete list of TIMESHOCK! control buttons
or control keys for your system is in the separate
Technical Manual.
We sincerely believe that you’ll find the playfield
design, mechanics, music, features, sound effects,
depth of rules, animations, and gameplay in
TIMESHOCK! are truly the equal of a typical
modern pinball machine. The major differences
are that you don’t have to find house room for
the machine, there is zero maintenance, and it
only costs one per cent of the price of the real
thing to own!
We hope you enjoy playing TIMESHOCK! and
welcome your feedback. If you have an Internet
connection, you can visit the PRO PINBALL
website at http://www.empire.co.uk/propinball.
If you prefer to use e-mail, please send this to us
at the address propinball@fat.cix.co.uk.
Manual written by Cad Delworth,
The Manual Works, Edinburgh.
email:caddelworth@cix.compulink.co.uk
13
Page 14
Welcome to TIMESHOCK!
CONTENTS
INTRODUCTION 16
GAME CONTROL LOCATIONS 16
Cabinet Switches 16
Coin Door Switches 16
GAME OPERATION 17
Powering Up 17
Attract Mode 17
Starting a Game 18
Tilts 18
End of Game 18
Extra Ball Buy-In 19
High-Score Initials Entry 19
Game Over Mode 19
Novice, Tournament, and
Challenge Modes 20
Temporarily Restoring
Factory Settings 20
MENU SYSTEM OPERATION 21
Menu System 21
Main Menu 23
Book Keeping 23
Adjustments 27
Tests 34
Utilities 41
Quit 42
14
Page 15
TABLES
Table 1. TIMESHOCK! Main Menu 22
Table 2. Standard Audits 24
Table 3. Feature Audits 25
Table 4. Histograms 26
Table 5. Time Stamps 26
Table 6. Standard Adjustments 27
Table 7. Feature Adjustments 30
Table 8. High-Score Adjustments 33
Table 9. Switches 35
Table 10. Solenoids 36
Table 11. Flashlamps 37
Table 12. Controlled Lamps 37
Welcome to TIMESHOCK!
Table 13. Flipper Coils 40
15
Page 16

Welcome to TIMESHOCK!
THANK YOU FOR BUYING ANOTHER FINE
PRO PINBALL GAME!
TIMESHOCK! IS A 10 (TEN) BALL GAME.
GAME CONTROL LOCATIONS
NOTE: Switch locations may differ between production
runs. The separate Technical Manual supplied with your
game shows the exact locations of the switches on your
machine.
CABINET SWITCHES
Start Button. Press the Start Button to begin a game, or
to add players to a game in progress. When a game
ends, press the Start Button to purchase a Buy-In Extra
Ball* to continue a game in exchange for one credit.
During High–Score Initials Entry, press the Start Button
to advance to the next initial or complete High-Score
Initials Entry.
Launch Button. Press the Launch Button to launch a ball
in the plunger lane into play.
Flipper Buttons. Press a Flipper Button to fire the
flipper(s) on that side of the playfield, or to perform
other functions as directed on the display. During HighScore Initials Entry, press a Flipper Button to change the
current character.
MagnoSave™ Button. Press the MagnoSave™ Button to
save a ball draining down the right-hand outlane.
COIN DOOR SWITCHES.
The operator makes game adjustments, reads bookkeeping information, and runs diagnostic tests using
only four push button switches (refer to the MENU
SYSTEM OPERATION section of this manual on page 21
for more details).
The Up Button quits to the next higher level of the Menu
System, or returns to Attract Mode.
The Next Button cycles forward through lists of menu
items or adjustment choices.
16
*OPERATOR ADJUSTABLE FEATURE
Page 17

The Previous Button cycles backward through lists of
menu items or adjustment choices.
The Enter Button enters the next lower level of the
Menu System, selects a menu item, or confirms an
adjustment choice.
GAME OPERATION
CAUTION! AFTER ASSEMBLY AND INSTALLATION ON
SITE, THIS GAME MUST BE PLUGGED INTO A PROPERLY
EARTHED POWER SOCKET TO PREVENT ELECTRICAL SHOCK
AND TO ASSURE PROPER GAME OPERATION.
POWERING UP
When the machine is powered on, the display shows
TIMESHOCK! V followed by the version number of the
game ROMs and TESTING… while the machine performs
Start Up Tests. If no problems are encountered, the
display shows the last game score(s), then enters
Attract Mode.
Welcome to TIMESHOCK!
From Attract Mode, enter the Menu System
(refer to the MENU SYSTEM OPERATION
section of this manual on page 21 for more
details) by pressing the keys detailed in the
separate Technical Manual supplied with
your game.
ATTRACT MODE
During Attract Mode, the display shows a
series of messages, including recent and
all–time highest scores*, and the score
required to obtain a replay award. To
return to Attract Mode whilst playing a
game, keep both the Launch Button
and Start Button depressed for
two seconds.
*OPERATOR ADJUSTABLE FEATURE
17
Page 18

Welcome to TIMESHOCK!
STARTING A GAME
From Attract Mode, press the Start Button once to start
a game. The display shows a message asking the player
to select Novice* or Regular Play Mode; refer to the
Novice Mode section of this manual on page 20 for more
details. A start up sound plays, the machine resets all
playfield switches and mechanics, and a ball is ejected
into the plunger lane. The display shows BALL 1 and
PLAYER 1, and flashes 00 until the first playfield switch is
actuated. Press the Launch Button to begin play.
Additional players (up to four in total) may enter the
game by pressing the Start Button once for each
additional player; this must be done before the end of
play on the first ball.
NOTE: TIMESHOCK! IS A 10 (TEN) BALL GAME. The
machine will not start a game unless the full
complement of 10 (TEN) balls is present in the
ball trough.
TILTS
Actuating the Slam Tilt Switch inside the coin door ends
the current game for that player; other players continue
normally. With the fourth* closure of the Plumb Bob Tilt
Switch, the player loses remaining play of that ball, but
may complete the game.
18
END OF GAME
When play of the final ball ends, all the player’s earned
scores and bonuses are totalled up. While credits remain,
the player is offered* successive Buy-In Balls. When all
players’ games are complete, all scores are checked and,
for each best performance or final score which exceeds
the specified value, the player receives one or more*
replay awards and is invited to enter his or her initials on
the appropriate table. The display then shows a random
set of two digits*. For each player score where the last
two digits match the displayed random value, one
credit* is awarded. Buy-In, Game Over, High-Score, and
Match sounds and displays are made as appropriate.
*OPERATOR ADJUSTABLE FEATURE
Page 19

EXTRA BALL BUY-IN
At the end of the game, TIMESHOCK! allows each player
to continue the game by ‘buying in’ an extra ball in
exchange for one credit. The display shows CONTINUE?
and a countdown starting from 9. Press the Start Button
to purchase an extra ball, or press any other button to
quit the countdown and continue to the Game Over
sequence.
HIGH-SCORE INITIALS ENTRY
TIMESHOCK! maintains tables of High-Scores and
Champion scores. When a player qualifies for a HighScore or Champion score, the display shows the player
number and the score description. Press the Enter
Button; the display shows ENTER INITIALS, and three
initials, the first of which flashes. When the machine is
powered on, the initials are _ _ _, but the machine
will remember initials* as high-scores are
entered. Press the Flipper Buttons to cycle
through the available letters and
punctuation characters; hold a Flipper
Button down to cycle more rapidly. Press
the Start Button to advance to the next
initial. When all three initials have been
entered, the display shows >. Press the
Start Button to return to Attract
Mode. Statistics for the game just
played, including high–score codes,
can be viewed by holding down both
Flipper Buttons for two seconds.
GAME OVER MODE
The display shows GAME OVER.
Thereafter, the display shows the
current high-scores, then the game
returns to Attract Mode.
Welcome to TIMESHOCK!
*OPERATOR ADJUSTABLE FEATURE
19
Page 20

Welcome to TIMESHOCK!
TIMESHOCK! Rules
NOVICE, TOURNAMENT, AND
CHALLENGE MODES*
In addition to normal play, TIMESHOCK! allows three
special modes of play. When Novice Mode* is selected, a
single ball is played, but with the Ball Saver active for
120 seconds.* Tournament Mode*, set using Standard
Adjustment Menu item 2.1.12, disables random and
‘bonus’ game adjustments, allowing scores obtained on
different machines to be compared more equally.
Challenge Mode shares all game features and memories
among all players in a multi-player game. To enable
Challenge Mode, hold down the Left Flipper Button for
two seconds before starting a game. Tournament Mode
can also be enabled by holding down the Right Flipper
Button for two seconds before starting a game.
TEMPORARILY RESTORING FACTORY SETTINGS
If you have customised the game settings, holding down
the Launch Button for two seconds will temporarily
restore the factory settings. To return to your custom
settings, simply hold down the Launch Button
again.
20
N
OTE:
All high–scores submitted to our
WWW Worldwide High–Score
Table MUST be from games
played using Factory Settings.
*OPERATOR
ADJUSTABLE FEATURE
Page 21

Using the Operator’s Menu
MENU SYSTEM OPERATION
MENU SYSTEM
TIMESHOCK! uses a Menu System to control all
operator features. The Main Menu contains five main
categories, which lead to further lists
of options. All categories and options use
military numbering.
To enter the Menu System,
open the coin door and press
the keys detailed in the
separate Technical Manual
supplied with your game.
Alternatively, from Attract
Mode, hold down the Launch
Button and press the Start
Button. The display shows the
first Main Menu category,
1. Book Keeping. The number and
name of each successive ‘lower level’
category and option shows on the display as
it is selected.
To cycle through the Main Menu categories, press the Next
and Previous Buttons.
To select a category and proceed to the next lower list of
categories or options, press the Enter Button.
To return to the next higher menu level, press the Up Button.
To select or activate any option or test, press the Enter
Button.
To cycle through the current option adjustment values or test
types, press the Next and Previous Buttons.
To return to Attract Mode, navigate to the Main Menu
categories, then press the Up Button.
NOTE: Some menu options are initially locked out at the
factory. These options display (LOCKED) when selected. These
menu options will unlock and become available for operator
adjustment over time as the number of games played
increases.
21
Page 22

Using the Operator’s Menu
TABLE 1. TIMESHOCK!
MAIN MENU
1. BOOK KEEPING
1.1 Standard Audits
1.2 Feature Audits
1.3 Histograms
1.4 Time Stamps
1.1.1. Games Started
1.1.2 Games Completed
etc.
1.2.1 Continents Explored
1.2.2 Continents Extra Balls
etc.
1.3.1 Scores 0-99 Million
1.3.2 Scores 100-199 Million
etc.
1.4.1 Current Time
1.4.2 Audits Cleared
etc.
2. ADJUSTMENTS
3. TESTS
4. UTILITIES
5. QUIT
2.1 Standard Adjustments
2.2 Feature Adjustments
2.3 High Score Adjustments
3.1 Switch Level Test
3.2 Switch Edges Test
3.3 Solenoid Test
3.4 Flasher Test
etc.
4.1 Clear Audits
4.2 Clear Credits
4.3 Re-set High Scores
4.4 Re-set Grand Champions
etc.
2.1.1 Balls Per Game
2.1.2 Maximum Extra Balls
etc.
2.2.1 Initial Timezone
2.2.2 MagnoSave™
etc.
2.3.1 Enable High-Scores
2.3.2 Display Today’s HIgh-Scores
etc.
PRESS UP
To quit to the next higher
level of the Menu System, or
to return to Attract Mode.
RESS ENTER
P
To enter the next lower
level of the Menu System, or
to select a menu item.
RESS NEXT
P
To cycle forward through
lists of menu items or
adjustment choices.
RESS PREVIOUS
P
To cycle backward through
lists of menu items or
adjustment choices.
22
Page 23

The TIMESHOCK! menu structure is shown in diagram
form on the previous page. Familiarity with this
diagram, and with the menu option numbering system,
will help you to quickly navigate to the desired item.
The following pages describe the audit items, feature
adjustments, tests, and utilities in detail.
MAIN MENU
The Main Menu categories are:
1. BOOK KEEPING
2. ADJUSTMENTS
3. TESTS
4. UTILITIES
5. QUIT
BOOK KEEPING
From the Main Menu, cycle to category 1 then press the
Enter Button to display the Book Keeping Menu. The
Book Keeping Menu categories are:
Using the Operator’s Menu
1.1 STANDARD AUDITS
1.2 FEATURE AUDITS
1.3 HISTOGRAMS
The Standard, Feature, and Histograms audit items list
the number of times each feature has occurred. Many
audit items also show a percentage; this is usually the
percentage of total games or balls played, depending on
the item.
1.4 TIME STAMPS
The Time Stamps audit items list the times and dates
when events last occurred.
Audit items can be cleared (zeroed out) by using
Utility item 4.1.
Use the Up, Next, Previous, and Enter Buttons to view
the desired Book Keeping audit items. The available
audit items are listed in Tables 2 to 5 following.
23
Page 24

Using the Operator’s Menu
TABLE 2. STANDARD AUDITS
1.1.1 Games Started
1.1.2 Games Completed
1.1.3 Replay Awards
1.1.4 Match Awards
1.1.5 Left Drains
1.1.6 Center Drains
1.1.7 Right Drains
1.1.8 Balls Played
1.1.9 Extra Balls
1.1.10 Ball Saves
1.1.11 Time On
1.1.12 Total Play Time
1.1.13 Average Ball Time
1.1.14 Average Game Time
REMEMBER: A FULLY FUNCTIONING
GAME ALWAYS EARNS MORE THAN
ONE WITH UNRESOLVED FAULTS
1.1.15 Tilts
1.1.16 One Player Games
1.1.17 Two Player Games
1.1.18 Three Player Games
1.1.19 Four Player Games
1.1.20 Replay Level
1.1.21 Left Flipper
1.1.22 Right Flipper
1.1.23 Total Regular Plays
1.1.24 Total Novice Plays
1.1.25 Total Tournament Plays
1.1.26 Total Challenge Plays
1.1.27 High-Score Reset Count
.
24
Page 25

TABLE 3. FEATURE AUDITS
Using the Operator’s Menu
1.2.1 Continents Explored
1.2.2 Continent Extra Balls
1.2.3 Explorations Started
1.2.4 Explorations Completed
1.2.5 Rushmore Started
1.2.6 Rushmore Completed
1.2.7 Chunnel Started
1.2.8 Chunnel Completed
1.2.9 Powerplant Started
1.2.10 Powerplant Completed
1.2.11 Robot Started
1.2.12 Robot Completed
1.2.13 Chariot Started
1.2.14 Chariot Completed
1.2.15 Pyramid Started
1.2.16 Pyramid Completed
1.2.17 Dinosaur Started
1.2.18 Dinosaur Completed
1.2.19 Volcano Started
1.2.20 Volcano Completed
1.2.21 Global Dominations
1.2.22 Global Dominations Comp.
1.2.23 Locks Lit
1.2.24 Balls Locked
1.2.25 Time Machine Frenzies
1.2.26 Time-Drive Enabled
1.2.27 Time Travels
1.2.28 Fragments Found
1.2.29 Fragments Locked
1.2.30 Jackpots
1.2.31 Double Jackpots
1.2.32 Triple Jackpots
1.2.33 Super Jackpots
1.2.34 Ultra Jackpots
1.2.35 Time Warps Lit
1.2.36 Time Warps Started
1.2.37 Warp Jackpots
1.2.38 Scanners Lit
1.2.39 Scanners Collected
1.2.40 Scanner Extra Balls
1.2.41 Super Scanners Lit
1.2.42 Super Scans Collected
1.2.43 Left Drops Completed
1.2.44 Right Drops Completed
1.2.45 Magnet Completed
1.2.46 MagnoSaves™ Used
1.2.47 Successful MagnoSaves™
1.2.48 Lucky Escapes
1.2.49 Multipliers Advanced
1.2.50 Multiplier Extra Balls
1.2.51 Hold Multipliers
1.2.52 Hold Jets
1.2.53 Light Video Mode
1.2.54 Instant Time Warps
1.2.55 Mysteries
1.2.56 Reverse Frenzies
1.2.57 Reverse Extra Balls
1.2.58 Super Spinners
1.2.59 Super Jets Advanced
1.2.60 1
✕ Quickshots Started
1.2.61 1
✕ Quickshots Scored
✕ Quickshots Started
1.2.62 2
1.2.63 2
✕ Quickshots Scored
1.2.64 3
✕ Quickshots Started
1.2.65 3
✕ Quickshots Scored
✕ Quickshots Started
1.2.66 4
1.2.67 4
✕ Quickshots Scored
1.2.68 5
✕ Quickshots Started
1.2.69 5
✕ Quickshots Scored
1.2.70 Quickshot Manias
1.2.71 Quickshot Manias Comp.
1.2.72 Video Modes
1.2.73 Video Modes Completed
1.2.74 Video Mode Extra Balls
1.2.75 Ramp Rampages
1.2.76 Ramp Rampages Completed
1.2.77 Timeshock! Frenzies
1.2.78 Timeshock! Frenzies Comp.
1.2.79 Wizard Frenzies
1.2.80 Total Souvenirs
1.2.81 Ultra Bonus Boosts
1.2.82 Ultra Spinners
1.2.83 Cows
1.2.84 Secret Video Modes
1.2.85 Ultra Jets
1.2.86 Ultra MagnoSaves™
1.2.87 Ultra Ballsavers
1.2.88 Specials
1.2.89 Extraball Quickshots
1.2.90 Very Big Points
1.2.91 2-Ways
1.2.92 3-Ways
1.2.93 4-Ways
1.2.94 5-Ways
1.2.95 6-Ways
1.2.96 7-Ways
1.2.97 8-Ways
1.2.98 9-Ways
1.2.99 10-Ways+
1.2.100 Combos
1.2.101 Double Combos
1.2.102 Triple Combos
1.2.103 Super Combos
1.2.104 Ultra Combos
1.2.105 Reverse Combos
1.2.106 Spinner Shots
1.2.107 Spinner Ramp Combos
25
Page 26

Using the Operator’s Menu
TABLE 4. HISTOGRAMS
1.3.1 Scores 0-99 Million
1.3.2 Scores 100-199 Million
1.3.3 Scores 200-499 Million
1.3.4 Scores 500-999 Million
1.3.5 Scores 1-1.9 Billion
1.3.6 Scores 2-4.9 Billion
1.3.7 Scores 5-9.9 Billion
1.3.8 Scores 10+ Billion
1.3.9 Game Time 0-1 Min
NOTE:
A
LL HISTOGRAM ITEMS DISPLAY AS #(%), THE %
BEING PERCENT OF ALL GAMES
1.4.1 Current Time
1.4.1 Current Time
1.4.2 Audits Cleared
1.4.2 Audits Cleared
1.4.3 Credits Cleared
1.4.3 Credits Cleared
1.4.4 Factory Adjust
1.4.4 Factory Adjust
1.4.5 Factory Reset
1.4.5 Factory Reset
1.3.10 Game Time 1-2 Mins
1.3.11 Game Time 2-3 Mins
1.3.12 Game Time 3-4 Mins
1.3.13 Game Time 4-5 Mins
1.3.14 Game Time 5-10 Mins
1.3.15 Game Time 10-15 Mins
1.3.16 Game Time 15-20 Mins
1.3.17 Game Time 20-30 Mins
1.3.18 Game Time 30+ Mins
TABLE 5. TIME STAMPS
1.4.6 Last Game Start
1.4.6 Last Game Start
1.4.7 Last Replay
1.4.7 Last Replay
1.4.8 Last Grand Champ
1.4.8 Last Grand Champ
1.4.9 Last High Score
1.4.9 Last High Score
26
NOTE:
A
LL TIME STAMP ITEMS DISPLAY AS
hh:mm dd/mmm/yyyy
Page 27

Using the Operator’s Menu
TABLE 6. STANDARD ADJUSTMENTS
Menu Item Factory Adjustment Range
2.1.1 Balls Per Game 3 1 to 10
2.1.2 Maximum Extra Balls 10 NO, 1 to 10, unlimited
2.1.3 Ball Saver Time 20 sec. NO, 5 sec. to 30 sec. (5 sec. steps)
2.1.4 Max Saves Per Ball 2 1 to 5
2.1.5 Maximum Credits 10 NO, 1 to 30
2.1.6 Allow Extra Ball Buy-In YES YES, NO
2.1.7 Maximum E.B. Buy-Ins 3 1 to 9
2.1.8 Replay Percent 10% 5% to 25% (1% steps)
2.1.9 Replay Base 100 Million 50 Million to 1,000 Million (50M steps)
2.1.10 Match Feature 10% OFF, 1% to 25% (1% steps)
2.1.11 Show Date And Time YES YES, NO
2.1.12 Tournament Mode NO NO, YES
2.1.13 Allow Novice Mode YES YES, NO
2.1.14 Novice Mode Time 120 sec. 30 sec. to 240 sec. (30 sec. steps)
2.1.15 Tilt Warnings 3 NO, 1 to 10
2.1.16 European Score Format NO NO, YES
2.1.17 Bonus Flips YES YES, NO
2.1.18 Game Restart SLOW SLOW, INSTANT, NEVER
ADJUSTMENTS
2.1 STANDARD ADJUSTMENTS
2.2 FEATURE ADJUSTMENTS
2.3 HIGH-SCORE ADJUSTMENTS
Use the Up, Next, Previous, and Enter Buttons to view
and adjust the desired items. The available adjustment
items are listed in Tables 6 to 8 following, and are
described in more detail below.
STANDARD ADJUSTMENTS
2.1.1 BALLS PER GAME
Self-explanatory.
2.1.2 MAXIMUM EXTRA BALLS
The maximum number of extra balls (excluding Buy-In
extra balls) allowed in a single game.
2.1.3 BALL SAVER TIME
The time the Ball Saver remains active before
switching off.
27
Page 28

Using the Operator’s Menu
2.1.4 MAX SAVES PER BALL
The maximum number of saves (by the Ball Saver)
allowed per player in one ball.
2.1.5 MAXIMUM CREDITS
The maximum number of credits the machine will store.
Credits beyond this number are lost.
2.1.6 ALLOW EXTRA BALL BUY-IN
Self-explanatory.
2.1.7 MAXIMUM E.B. BUY-INS
Maximum number of Buy-In Extra Balls allowed per player
in one game. Because each Buy-In Extra Ball costs one
credit, the actual number of Buy-In Extra Balls available to
the player may be less than this number, or zero.
2.1.8 REPLAY PERCENT
The desired percentage of games which award a
High-Score Replay. The machine continuously adjusts the
High-Score Replay Award score to maintain this
percentage.
28
2.1.9 REPLAY BASE
The initial value of the High-Score Replay Award score.
2.1.10 MATCH FEATURE
The desired percentage of games which award a Match
Feature Replay at the end of the game, or OFF to disable
the Match Feature.
2.1.11 SHOW DATE AND TIME
When selected, includes a display of the current date
and time of day during Attract Mode.
2.1.12 TOURNAMENT MODE
When selected, alters game adjustments so that Ball
Saver, Extra Balls, Buy-In Extra Balls, and all random
features are disabled. The machine remains in
Tournament Mode until it is switched off again using
this menu item.
2.1.13 ALLOW NOVICE MODE
When selected, allows Novice Mode as an option at the
start of each new game. Novice Mode is a single ball
game with the Ball Saver active for an extended period
(see item 2.1.14 below).
Page 29

2.1.14 NOVICE MODE TIME
During Novice Mode, the time the Ball Saver remains
active before switching off.
2.1.15 TILT WARNINGS
The number of Plumb Bob Tilt Switch closures allowed
before the player forfeits play of the current ball, or NO
to forfeit the current ball the first time the Plumb Bob Tilt
Switch closes.
2.1.16 EUROPEAN SCORE FORMAT
When selected, displays scores in 999.999.999.999 format.
2.1.17 BONUS FLIPS
When selected, supplies power to the flippers during
bonus counts.
2.1.18 GAME RESTART
Adjust the way the game restarts when the Start Button
is pressed during the second or later ball of a game in
progress.
Using the Operator’s Menu
SLOW Start Button must be depressed for two
seconds to restart.
INSTANT Restarts the game immediately the
Start Button is pressed.
NEVER Disables the Start Button after play of
ball one is completed (until Game Over).
FEATURE ADJUSTMENTS
2.2.1 INITIAL TIMEZONE
Self-explanatory.
2.2.2 MAGNOSAVE™ LIT
Adjusts the difficulty of the MagnoSave™ feature.
START OF BALL Lights MagnoSave™ at the start
of each ball.
START OF GAME Lights MagnoSave™ at the
start of each game.
NEVER WITH NO MEMORY Switches
MagnoSave™ off at the start of each ball.
NEVER WITH MEMORY Switches MagnoSave™
off at the start of each game.
29
Page 30

Using the Operator’s Menu
TABLE 7. FEATURE ADJUSTMENTS
Menu Item Factory Adjustment Range
2.2.1 Initial Timezone THE PRESENT PREHISTORIC AGE,
2.2.2 MagnoSave™ Lit START OF GAME NEVER WITH NO MEMORY,
2.2.3 Scan Memory PARTIAL YES, PARTIAL, NO
2.2.4 Time Warp Memory PARTIAL YES, PARTIAL, NO
2.2.5 Time Warp Time 30 sec. 10 sec. to 60 sec. (5 sec. steps)
2.2.6 Time Warp Boost 15 sec. 0 sec. to 30 sec. (5 sec. steps)
2.2.7 Super Spinner Time 30 sec. 10 sec. to 60 sec. (5 sec. steps)
2.2.8 Lock Style INDIVIDUAL SHARED, INDIVIDUAL
2.2.9 Save Locked Balls NEVER NEVER, SOMETIMES, ALWAYS
2.2.10 Lock Difficulty MEDIUM EASY, MEDIUM, HARD
2.2.11 Drop Difficulty MEDIUM EASY, MEDIUM, HARD
2.2.12 Time Drive Difficulty MEDIUM EASY, MEDIUM, HARD
2.2.13 Super Scanner Every 5 S-C-A-Ns 2 to 10
2.2.14 Scanner Extra Ball At 20 S-C-A-Ns 5 to 50
2.2.15 Multiplier Extra Ball At x25 x5 to x100 (5 steps)
2.2.16 Continent Extra Ball At 12 Continents 5 to 20
2.2.17 Advance Super Jets Every 100 Jet Hits 50 to 250 (25 steps)
2.2.18 Lane Cycle Style BI-DIRECTIONAL BI-DIRECTIONAL,
2.2.19 Frenzy Ball Saver Time 30 sec. 10 sec. to 60 sec. (5 sec. steps)
ANCIENT ROME, THE PRESENT,
THE FUTURE, RANDOM
NEVER WITH MEMORY,
START OF GAME, START OF BALL
UNI-DIRECTIONAL,
NO LANE CYCLE
30
2.2.3 SCAN MEMORY
Adjusts whether lit Scanner lamps are held over to the
next ball.
YES S–C–A–N lanes and SCAN scoop lamp are
both held over.
PARTIAL SCAN scoop lamp is held over;
S–C–A–N lanes are not.
NO S–C–A–N lanes and SCAN scoop lamp are
not held over.
Page 31

2.2.4 TIME WARP MEMORY
Adjusts whether lit Time Warp lamps are held over to
the next ball.
YES W–A–R–P spots and TIME WARP scoop
lamp are both held over.
PARTIAL TIME WARP scoop lamp is held over;
W–A–R–P spots are not.
NO W–A–R–P spots and TIME WARP scoop
lamp are not held over.
2.2.5 TIME WARP TIME
During Time Warp Frenzy, the time allowed to add an
extra ball by completing W–A–R–P.
2.2.6 TIME WARP BOOST
During Time Warp Frenzy, the time added to the timer
each time W–A–R–P is completed.
2.2.7 SUPER SPINNER TIME
Self-explanatory.
Using the Operator’s Menu
2.2.8 LOCK STYLE
Adjusts whether locked balls in the Magno Lock are
shared by all players.
2.2.9 SAVE LOCKED BALLS
Adjusts whether locked balls are cleared out of the
Magno Lock at the end of a game.
NEVER Balls are never cleared.
SOMETIMES Balls are cleared if a Time
Machine Frenzy was started during the game.
ALWAYS Balls are always cleared.
2.2.10 LOCK DIFFICULTY
Adjusts the difficulty of the Lock-O-Meter spinner and
the Magno Lock.
EASY Lock-O-Meter always lights all Magno
Lock lamps.
MEDIUM Lock-O-Meter lights all Magno Lock
lamps until a Time Machine Frenzy starts, but
lights one Magno Lock lamp from then on.
HARD Lock-O-Meter always lights one Magno
Lock lamp.
31
Page 32

Using the Operator’s Menu
2.2.11 DROP DIFFICULTY
Adjusts the difficulty of the Magnet drop target banks.
EASY Incomplete banks never time out.
MEDIUM Incomplete banks time out after Quickshot
Mania starts.
HARD Incomplete banks always time out.
2.2.12 TIME DRIVE DIFFICULTY
Adjusts the difficulty of Time Drive fuelling and refuelling.
EASY Time Drive always requires five Ramp shots to
fuel and refuel.
MEDIUM Time Drive requires five Ramp shots to fuel
first time, but ten Ramp shots to refuel from then on.
HARD Time Drive always requires ten Ramp shots
to refuel.
2.2.13 SUPER SCANNER EVERY
The number of S–C–A–Ns needed to light Super Scanner.
2.2.14 SCANNER EXTRA BALL AT
The number of S–C–A–Ns needed to award an Extra Ball.
2.2.15 MULTIPLIER EXTRA BALL AT
The Multiplier value needed to award an Extra Ball.
2.2.16 CONTINENT EXTRA BALL AT
The number of Continents needed to award an Extra Ball.
2.2.17 ADVANCE SUPER JETS EVERY
The number of Jet Hits needed for each Super Jets advance.
2.2.18 LANE CYCLE STYLE
Adjusts cycling of lit S–C–A–N and Bonus Multiplier lane
lamps when Flipper Buttons are pressed.
BI DIRECTIONAL Cycles in the direction of the Flipper
Button pressed.
UNIDIRECTIONAL Always cycles from left to right.
NO LANE CYCLE Disables all lane cycling.
2.2.19 FRENZY BALL SAVER TIME
The time the Ball Saver remains active before switching off
during a Frenzy.
32
Page 33

Using the Operator’s Menu
TABLE 8. HIGH-SCORE ADJUSTMENTS
Menu Item Factory Adjustment Range
2.3.1 Enable High-Scores YES YES, NO
2.3.2 Display Today’s Scores NO NO, YES
2.3.3 Remember Initials ONE PLAYER ONLY NEVER, ONE PLAYER ONLY, ALWAYS
2.3.4 Grand Champion Credits 3 0 to 10
2.3.5 High-Score 1 Credits 2 0 to 5
2.3.6 High-Score 2 Credits 1 0 to 3
2.3.7 High-Score 3 Credits 1 0 to 3
2.3.8 High-Score 4 Credits 1 0 to 3
2.3.9 Ramp Champion Credits 1 0 to 3
2.3.10 Master Of Time Credits 2 0 to 5
2.3.11 Backup Grand Champion 1,000 Million 400 to 5,000 Million (100 Million steps)
2.3.12 Backup High-Score 1 500 Million 400 to 1,000 Million (100 Million steps)
2.3.13 Backup High-Score 2 400 Million 300 to 500 Million (100 Million steps)
2.3.14 Backup High-Score 3 300 Million 200 to 400 Million (100 Million steps)
2.3.15 Backup High-Score 4 200 Million 100 to 300 Million (100 Million steps)
2.3.16 Backup Ramp Champion 3 Ramps 3 to 10
2.3.17 Backup Master Of Time 120 sec. 60 sec. to 120 sec. (5 sec. steps)
2.3.18 High-Score Reset Every DISABLED DISABLED, 100 to 5,000 (100 steps)
HIGH-SCORE ADJUSTMENTS
High-Score Adjustments are self-explanatory with the
exception of item 2.3.3, which is described below.
Backup Adjustments adjust the values to be stored in the
system’s memory when a High-Score Reset is performed,
including all automatic High-Score Resets performed as
a result of adjusting item 2.3.18, and manual Resets
(items 4.3-4.6).
REMEMBER: A CLEAN, WAXED PLAYFIELD
MEANS LESS WEAR, LESS MAINTENANCE,
MORE PLAYERS, MORE EARNINGS!
33
Page 34

Using the Operator’s Menu
2.3.3 REMEMBER INITIALS
Adjusts whether the game remembers and pre-enters player
initials entered previously when a high-score or other award
is achieved.
TESTS
From the Main Menu, cycle to category 3 then press the Enter
Button to display the Tests Menu. The Tests Menu categories are:
NEVER No initials are remembered. High-score initials
start as _ _ _.
ONE PLAYER ONLY Initials are remembered and preentered for one-player games.
ALWAYS Initials of all four players are remembered
and pre-entered.
3.1 Switch Levels Test
3.2 Switch Edges Test
3.3 Solenoid Test
3.4 Flasher Test
3.5 Single Lamp Test
3.6 All Lamps Test
3.7 All Lamps and Flashers Test
3.8 Sound and Music Test
3.9 Display Test
3.10 Flipper Test
3.11 Crystal Test
3.12 Arm Test
34
Use the Up, Next, Previous, and Enter Buttons to view and run
the desired tests. The tests are described in more detail below.
3.1 SWITCH LEVELS TEST
This test displays all switches which the system detects as
currently closed. Use the Next, Previous, and Enter Buttons to
select switches (refer to Table 9 opposite). All detected closed
switches display an [X]. Use this test to establish whether any
switches are stuck closed. Working switches may be detected as
closed if there is a short elsewhere in their circuits.
3.2 SWITCH EDGES TEST
This test displays the last switch closed. Use the Next, Previous,
and Enter Buttons to select switches (refer to Table 9 opposite).
Page 35

TABLE 9. SWITCHES
Using the Operator’s Menu
1 Plunger Lane
2 Lower Left Outlane
3 Higher Left Outlane
4 Left Inlane
5 Right Inlane
6 Right Outlane
7 Magno Lock
8 Lock 1
9 Lock 2
10 Lock 3
11 ‘W’ARP
12 W‘A’RP
13 WA‘R’P
14 WAR‘P’
15 Left Orbit Low
16 Left Orbit High
17 Left Ramp Entry
18 Left Ramp Exit
19 Right Orbit Low
20 Right Orbit High
21 Right Ramp Entry
22 Right Ramp Exit
23 ‘M’AGNET
24 M‘A’GNET
25 MA‘G’NET
26 MAG‘N’ET
27 MAGN‘E’T
28 MAGNE‘T’
29 Top Ramp Entry
30 Top Ramp Exit
31 Middle Ramp Entry
32 Middle Ramp Exit
33 Middle Orbit Exit
34 Spinner
35 Middle Scoop
36 Top Scoop
37 Left Rollover
38 Right Rollover
39 Left Sling
40 Right Sling
41 Bottom Jet Bumper
42 Left Jet Bumper
43 Right Jet Bumper
44 Time Zone Lock Alpha
45 Time Zone Lock Beta
46 Time Zone Lock Gamma
47 Time Zone Lock Delta
48 Trough 1
49 Trough 2
50 Trough 3
51 Trough 4
52 Trough 5
53 Trough 6
54 Trough 7
55 Trough 8
56 Trough 9
57 Trough 10
58 Plumb Bob
59 Slam Tilt
60 Crystal Home
61 Crystal Locked
62 Arm High
63 Arm Low
64 LL Flipper EOS
65 LR Flipper EOS
66 UL Flipper EOS
67 UR Flipper EOS
68 Start
69 Fire
70 Left Flipper
71 Right Flipper
72 MagnoSave™
The last detected closed switch displays an [X]. Use this test to check
individual switches for proper operation and detection by
the system.
CAUTION: For best test results, operate only one switch at a time: if
more than one switch is actuated, only the last closed switch’s name
and number is displayed. If other switches remain closed when the
displayed switch is cleared, the name and number of the last switch
closed is displayed until it is cleared, and so on until no switches
remain closed.
35
Page 36

Using the Operator’s Menu
TABLE 10. SOLENOIDS
1 Plunger
2 Trough Eject
3 Knocker
4 Left Slingshot
5 Right Slingshot
6 Left Jet Bumper
7 Right Jet Bumper
8 Bottom Jet Bumper
9 Left Drops Up
10 Right Drops Up
11 Lock Release 1
12 Lock Release 2
13 Lock Release 3
3.3 SOLENOID TEST
This test fires the game solenoids in number sequence
(refer to Table 10 above). The Solenoid Test has three
modes: Repeat, Stopped, and Running. These modes are
explained in detail below. Use the Next, Previous, and
Enter Buttons to select modes.
14 Lock Release Alpha
15 Lock Release Beta
16 Lock Release Gamma
17 Lock Release Delta
18 Middle Eject
19 Top Eject Strong
20 Top Eject Weak
21 Middle Ramp Down
22 High Diverter
23 Low Diverter
24 Middle Scoop Retract
25 MagnoSave™
26 Magno Lock
36
Only one solenoid should fire at a time, regardless of the
Solenoid Test mode. If no solenoids fire during the
Repeat or Running modes, or if a solenoid fires and stays
on, or if more than one solenoid fires, the system has
detected a problem.
Repeat mode Pulses a single solenoid. The same
solenoid pulses until another is selected. Only
the solenoid whose name and number is shown
in the display should pulse during this mode.
Stopped mode Stops the Test. No solenoids
should pulse during this mode.
Running mode Pulses all solenoids in number
sequence (refer to Table 10 above). Only the
solenoid whose name and number is shown in
the display should pulse during this mode.
Page 37

TABLE 11. FLASHLAMPS
Using the Operator’s Menu
1 Left Return Lane
2 Right Return Lane
3 Time Machine
4 Time Zone Lock Alpha
1 ‘S’CAN
2 S‘C’AN
3 SC‘A’N
4 SCA’N‘
5 ‘W’ARP
6 W‘A’RP
7 WA‘R’P
8 WAR‘P’
9 Left Orbit: Arrow
10 Left Orbit: Mystery
11 Left Orbit: Timewarp
12 Left Orbit: Light Video
13 Left Orbit: Hold Jets
14 Left Orbit: Hold Bonus
15 Lt Ramp: Triple Jackpot
16 Lt Ramp: Double Jackpot
17 Lt Ramp: Jackpot
18 Lt Ramp: Arrow
19 Lt Ramp: 5
20 Lt Ramp: 4
21 Lt Ramp: 3
22 Lt Ramp: 2
23 Lt Ramp: 1
24 ‘M’AGNET
25 M‘A’GNET
26 MA‘G’NET
27 MAG‘N’ET
28 MAGN‘E’T
29 MAGNE‘T’
5 Time Zone Lock Beta
6 Time Zone Lock Gamma
7 Time Zone Lock Delta
8 Crystal
TABLE 12. CONTROLLED LAMPS
30 Top Ramp: Ultra Jackpot
31 Top Ramp: Super Jackpot
32 Top Ramp: Explore Cont.
33 Top Ramp: Arrow
34 Middle Ramp: Arrow
35 Middle Ramp: Lock
36 Middle Ramp: 4
37 Middle Ramp: 3
38 Middle Ramp: 2
39 Middle Ramp: 1
40 Centre: Arrow
41 Centre: Extra Ball
42 Centre: Video Mode
43 Centre: Scanner
44 Centre: Timewarp
45 Centre: Lock
46 Left Rollover
47 Right Rollover
48 Left Jet Bumper
49 Right Jet Bumper
50 Bottom Jet Bumper
51 Rt Ramp: Triple Jackpot
52 Rt Ramp: Double Jackpot
53 Rt Ramp: Jackpot
54 Rt Ramp: Arrow
55 Rt Ramp: 5
56 Rt Ramp: 4
57 Rt Ramp: 3
58 Rt Ramp: 2
59 Rt Ramp: 1
60 Right Orbit: Arrow
61 Rt Orbit: Quick Shot
62 Rt Orbit: Quick Shot
63 Rt Orbit: Quick Shot
64 Rt Orbit: Quick Shot
65 Rt Orbit: Quick Shot
66 MagnoSave™
67 Atlantis
68 Europe
69 Australasia
70 Antarctica
71 North America
72 South America
73 Asia
74 Africa
75 Ball Saver
76 Shoot Again
77 Lock Three
78 Lock Two
79 Lock One
80 Not Used
81 Time Zone: Alpha
82 Time Zone: Beta
83 Time Zone:
Gamma
84 Time Zone:
Delta
✕5
✕4
✕3
✕2
✕1
37
Page 38

Using the Operator’s Menu
3.4 FLASHER TEST
This test pulses the game flashlamps in number sequence
(refer to Table 11). The Flashlamp Test has three modes:
Repeat, Stopped, and Running. These modes are
explained in detail below. Use the Next, Previous, and
Enter Buttons to select modes.
Only one flashlamp should pulse at a time, regardless of
the Flasher Test mode. If no flashlamps pulse during the
Repeat or Running modes, or if a flashlamp pulses and
stays on, or if more than one flashlamp pulses, the
system has detected a problem.
Repeat mode Pulses a single flashlamp. The
same flashlamp pulses until another is selected.
Only the flashlamp whose name and number is
shown in the display should pulse during this
mode.
Stopped mode Stops the Test. No flashlamps
should pulse during this mode.
Running mode Pulses all flashlamps in number
sequence (refer to Table 11). Only the flashlamp
whose name and number is shown in the display
should pulse during this mode.
38
3.5 SINGLE LAMP TEST
This test pulses the controlled game lamps in number
sequence (refer to Table 12 below). The Single Lamp Test
has three modes: Repeat, Stopped, and Running. These
modes are explained in detail below. Use the Next,
Previous, and Enter Buttons to select modes.
Only one lamp should pulse at a time, regardless of the
Single Lamp Test mode. If no lamps pulse during the
Repeat or Running modes, or if a lamp pulses and stays
on, or if more than one lamp pulses, the system has
detected a problem.
Page 39

Repeat mode Pulses a single lamp. The same
lamp pulses until another is selected. Only the
lamp whose name and number is shown in the
display should pulse during this mode.
Stopped mode Stops the Test. No lamps should
pulse during this mode.
Running mode Pulses all lamps in number
sequence (refer to Table 12). Only the lamp
whose name and number is shown in the
display should pulse during this mode.
3.6 ALL LAMPS TEST
This test pulses all controlled game lamps
simultaneously. If any controlled lamp does not pulse, or
if any other result is obtained, the system has detected a
problem.
3.7 ALL LAMPS AND FLASHERS TEST
This test pulses all controlled game lamps and flashlamps
simultaneously. If any controlled lamp or flashlamp does
not pulse, or if any other result is obtained, the system
has detected a problem.
Using the Operator’s Menu
3.8 SOUND AND MUSIC TEST
This test exercises the sound and music systems. If music
or speech is not heard, or if any other result is obtained,
the system has detected a problem.
NOTE: In case of problems, first check the game’s volume
control settings.
REMEMBER: REMOVE PINBALLS BEFORE STORING
YOUR GAME. RUSTED PINBALLS DAMAGE
PLAYFIELDS!
39
Page 40

Using the Operator’s Menu
3.9 DISPLAY TEST
This test exercises every dot in the Dot Matrix Display by
simultaneously cycling the brightness of all dots from off
to maximum and back. Any other result indicates that
the system has detected a problem.
3.10 FLIPPER TEST
This test fires the game flipper coils in number sequence
(refer to Table 13 below). The Flipper Test has three
modes: Repeat, Stopped, and Running. These modes are
explained in detail below. Use the Next, Previous, and
Enter Buttons to select modes.
Only one coil should fire at a time, regardless of the
Flipper Test mode. If no coils fire during the Repeat or
Running modes, or if a coil fires and stays on, or if more
than one coil fires, the system has detected a problem.
Repeat mode Pulses a single coil. The same coil
pulses until another is selected. Only the coil
whose name and number is shown in the
display should pulse during this mode.
Stopped mode Stops the Test. No coils should
pulse during this mode.
Running mode Pulses all coils in number
sequence (refer to Table 13 below). Only the
coil whose name and number is shown in the
display should pulse during this mode.
40
1 Lower Left Holding
2 Lower Left Power
3 Lower Right Holding
TABLE 13. FLIPPER COILS
4 Lower Right Power
5 Upper Right Holding
6 Upper Right Power
Page 41

3.11 CRYSTAL TEST
This test exercises the Crystal servo motors. Use the Next,
Previous, and Enter Buttons to select the Move Left and
Move Right Tests.
3.12 ARM TEST
This test exercises the Magno Lock Arm servo motors.
During this test, the arm should cycle repeatedly
between its High and Low end positions. Any other
result indicates that the system has detected a problem.
UTILITIES
From the Main Menu, cycle to category 4 then press the
Enter Button to display the Utilities Menu. The Utilities
Menu categories are:
4.1 CLEAR AUDITS
4.2 CLEAR CREDITS
4.3 RESET HIGH-SCORES
4.4 RESET GRAND CHAMPION
4.5 FACTORY ADJUST
4.6 FACTORY RESET
4.7 BURN IN
Use the Next, Previous, and Enter Buttons to perform
the selected Utility function. The available functions are
described in more detail below.
Using the Operator’s Menu
4.1 CLEAR AUDITS
Resets all audit items in all Book Keeping Menus to zero.
4.2 CLEAR CREDITS
Resets the game credits to zero.
4.3 RESET HIGH-SCORES
Resets all high-score table and Champion scores to the
values of their corresponding Backup score items in the
High-Score Adjustments Menu.
41
Page 42

Using the Operator’s Menu
4.4 RESET GRAND CHAMPION
Resets the Grand Champion Score to the value of its
corresponding Backup score item in the High-Score
Adjustments Menu (2.3.11).
4.5 FACTORY ADJUST
Resets all game adustment items to their factory default
settings.
4.6 FACTORY RESET
Resets the game to its ex-factory state by performing the
Clear Audits, Clear Credits, Reset and Factory Adjust
Utility functions in sequence.
4.7 BURN IN
Endlessly exercises all game mechanics, lamps and
flashlamps. Burn in is useful when diagnosing
intermittent problems.
QUIT
From the Main Menu, cycle to category 5 then press the
Enter Button to quit the entire operator Menu System.
42
Page 43

JONAS MARTINSSON'S GUIDE TO
MASTERING PINBALL.
Mastering the game of pinball isn't easy.
These techniques will help you in your
quest for pinball wizardry!
GENERAL TECHNIQUES
NUDGING
Nudges are an important method of
keeping control of the ball when it is
not near the flippers. It can, for
example, be used to keep a ball in the
bumpers for a longer time, but it can also
magnify the bounce from some playfield
object if you anticipate that there is going to
be a dangerous deflection.
Tips for Mastering Pro Pinball
It is important to know the limit of how much you can
nudge the game before it tilts. Different games have
different tilt sensitivity, so finding the limits for a new
game can take time. It is also important to know how
the tilt mechanism works. It is a weight attached to a
pendulum, which when it rocks too far in any direction,
triggers a tilt warning. With that in mind it is best to
keep nudging and pushing in one direction only. When,
for example, the ball is in the inlane/outlane entry area,
you might want to shake the table for a longer time
until the ball is clear of danger. This can be done, even
quite hard shaking is possible. What you have to
remember though is for the nudges to be timed
properly, so that each shake doesn't increase the
pendulum's swing (I won't try to delve into the physics
behind this; please consult a physics book if you are
interested.) You won't know the proper timing for the
nudges in the beginning, but after some experimenting
it will become clear.
43
Page 44

Tips for Mastering Pro Pinball
TRAP
Purpose: There are several reasons for wanting to trap a
ball. It is often easier to take shots after the ball has
been trapped because you will have more control over
the speed and spin of it. It is useful if you want to slow
down the game and relax for a few seconds but is also a
fundamental technique during multiball and as a set up
for a slingshot pass.
Description: A trapped ball is a ball that is lying
motionless on the base of a raised flipper. This is a
fundamental pinball technique. It can be accomplished
in many different ways. The most common methods are
explained in detail in the following sections.
SLINGSHOTS
It is usually best to try to prevent balls from hitting the
slingshots. Deflections from them can be fatal. A good
example is that when a slow ball exits a loop it often
drops down to hit the slingshot. This can be avoided by
nudging the game sideways before the ball exits the
loop. This nudge (hopefully) sends the ball a little more
to the middle of the playfield, avoiding the slingshot,
and down to the flipper where it can be trapped.
44
Try to find a spot on the slingshot from where the ball
usually gets bumped straight into the opposite outlane.
When the ball hits this spot, push the table sharply
forward so that the ball will be pushed over the outlane.
When balls hit the slingshots below this spot you would
try to push the machine towards you. Since it isn't
possible to nudge in this direction, nudge forward a bit
ahead of time so that the machine will rock back at the
same time as the ball hits the sling. Hopefully the ball
will not make it to the opposite slingshot but instead
drop down to the flipper opposite the slingshot. Balls
hitting above this spot on the slingshot may be helped
further up the playfield with a forward nudge.
CATCHES
DEAD CATCH (DROP CATCH)
Purpose: To trap a ball or to reduce ball speed.
Description: A dead catch (also known as a “drop catch”)
can look very impressive. To master it you need to get
your timing right. The secret is to release the flipper at
exactly the same time as the ball hits it, creating a
damping effect and thereby eliminating all ball speed. If
Page 45

you do a perfect dead catch it will look as though the
ball glued itself to the flipper. You have to be especially
careful when you try to catch a ball with a lot of spin. If
you misjudge the spin, the ball could bounce
unexpectedly down between the flippers.
LIVE CATCH
Purpose: To trap a ball, reduce ball speed, or to set up a
backhand.
Description: This is the opposite manoeuvre to the dead
catch and may sound strange if you have never seen it
done. This technique is much harder to master than the
dead catch because it's more difficult to get the timing
right. It is achieved by using the flipper so that it reaches
its highest position a fraction of a second before the ball
hits it. During that fraction of a second, the flipper has
less power than normal, which means that the ball “dies”
on the flipper during this time. The closer to the tip of
the flipper that the ball hits, the easier this manoeuvre is
to perform. The reason that the flipper is less powerful
just when it's reached its highest position is because
different energy levels are used to power the flipper.
One for flip strength and one for holding strength. The
live catch uses the small gap between the two levels
when the energy level drops.
Tips for Mastering Pro Pinball
PASSES
BOUNCE PASS
Purpose: To redirect a ball which would normally head
for one flipper to the other, and at the same time reduce
ball speed.
Description: The technique for doing a bounce pass is
very easy – you don't have to do anything, just keep the
flippers deactivated! It is a bit more tricky to know when
to do bounce passes, though. The trick is to let the ball
bounce off a flipper at rest and onto the opposite one.
You have to make sure that the ball has the right speed
and spin, and that it hits the flipper at the correct angle.
If the ball is too slow, it will not have enough energy to
bounce over to the other flipper, but will instead drain
between them. Pushing the table forward to increase
the bounce can sometimes be enough to help a slow
ball. If, on the other hand, the speed is too great, it will
bounce up to the slingshots and you will lose control of
the ball. It is also of importance to note where on the
45
Page 46

Tips for Mastering Pro Pinball
flipper the ball bounces. The closer to the tip, the more
speed will be lost in the pass. The greatest danger with
the bounce pass is usually when the ball bounces close to
the base of the flipper. If it touches some part of the
inlane here, it will make the bounce disappear and
instead deflect parallel to the flipper and quickly drain
in the middle.
HOLD PASS
Purpose: To redirect a ball which would normally head
for one flipper to the other, and at the same time reduce
ball speed.
Description: If a ball is coming down the inlane, a hold
pass can be useful. Simply hold up the flipper closest to
the ball and make the ball jump over it, using it as a
ramp. Slower balls can be helped along by a timely
nudge, or by “tapping” the ball with the flipper when it
is on the tip of it (“top of the ramp”) to get it over to the
other flipper.
SLINGSHOT PASS
Purpose: To redirect a trapped ball from one flipper to
the other.
46
Description: This technique is quite dependent on which
game you are playing, but is feasible on most machines,
although it can be more or less easy. By quickly releasing
and activating a flipper which holds a trapped ball, you
can hit the lower part of the slingshot and make the ball
bounce or roll over to the opposite flipper.
SAVES
Save techniques are more fundamental than the
catching and passing techniques. If you can't save a
drain, you don't have much use for knowing how to
catch and pass.
SAVE FROM THE OUTLANES
Only experience will tell you if the ball is heading
straight for the outlane, or if it is in fact going to be a
few millimetres off. If the ball is heading for a straight
outlane drain, the only thing which is going to help is if
you give the game a sharp and timely push forward so
that the ball will miss the outlane. If the ball is bouncing
around near the entrance to the inlane and outlane,
some good general advice is to nudge the machine if
you're not sure which lane the ball is going to head for.
The nudges will, if done right, give the ball enough
Page 47

speed to bounce back to the centre of the playfield
again, away from the dangerous area.
SAVE MIDDLE DRAINS - SLAP SAVE
To save a ball going straight down the middle, you need
to use both flippers (but not at the same time.) Flip with
the flipper closest to the ball in order to tap the ball
towards the other flipper from which you can shoot it up
the playfield. The second flip should be done only a split
second after the first. To reach the ball with the first
flipper, a sideways nudge is often required. This can be
done by slapping the side of the table, producing both a
nudge and a flip, therefore known by the name “slap
save.” It is almost impossible to aim a slap save to a
specific target.
BANG BACK
It is possible to save balls that have drained down the
outlane by bumping them up between the flippers.
Needless to say, this requires a heavy shove of the table.
Hold up the flipper that is directly above the ball before
giving the machine a very strong push forward. If the
bang back is successful, the ball will move back into play
without tilting the game.
Tips for Mastering Pro Pinball
DEATH SAVE
A death save is slightly easier to do than a bang back. It
doesn't require quite as much brute force. Death saves
can only be performed after the ball has drained in the
right outlane, due to the design of the drain area. Hold
up the left flipper, let the ball roll under the right flipper,
over the trough and just when it hits the metal under
the left flipper leading to the drain, give the machine a
sharp push forward. If the push is hard enough and
timed correctly (and you avoid tilt) the ball will hit the
back of the left flipper and bounce onto the right flipper
and back into play.
CHILL SAVE
This save is only relevant to games like TIMESHOCK!
with a centre post between the flippers. It refers to
being cool (and wise) enough to let the post save the
ball without using the flippers. Naturally, it is easier to
drain the ball when it bounces off the centre post if the
flippers are raised, so it's better to keep them down.
(Jonas Martinsson is a Pro Pinball: The Web
Worldwide Grand Champion)
47
Page 48

Tips for Mastering Pro Pinball
1. Left Outlane
2. Left Inlane
3. Left Slingshot
4. Drain
5. Right Slingshot
6. Right Inlane
7. Right Outlane
8. Plunger Lane
9. 'P' Target
10. Right Orbit
11. Top Scoop
12. Right Ramp
13. Right Drop Targets
14. Jet Bumpers
15. Right Bonus Rollover
16. Left Bonus Rollover
17. 'R' Target
18. Middle Scoop
19. 'A' Target
20. Middle Orbit/
Middle Ramp
21. Upper Ramp
22. Left Drop Targets
23. Left Ramp
24. Left Orbit
25. 'W' Target
KEY
A. The Time Machine,
featuring Magno Lock
B. MagnoSave™
C. Ancient Rome
Lock Point
D. The Present Day
Lock Point
E. The Time Crystal
F. The Prehistoric
Age Lock
Point
G. The Distant
Future Lock
Point
 Loading...