

Page 1

CONTENTS
SYSTEM REQUIREMENTS . . . . . . . . . . . . . 2
INSTALLING THE GAME . . . . . . . . . . . . . . . 2
STARTING THE GAME . . . . . . . . . . . . . . . . 4
PAUSE MENU . . . . . . . . . . . . . . . . . . . . . . 5
CONTROLS . . . . . . . . . . . . . . . . . . . . . . . . 7
EXITING THE GAME . . . . . . . . . . . . . . . . . .9
CASTLEVANIA . . . . . . . . . . . . . . . . . . . . . .10
CASTLEVANIA II . . . . . . . . . . . . . . . . . . . . .18
CASTLEVANIA III . . . . . . . . . . . . . . . . . . 30
CONTRA . . . . . . . . . . . . . . . . . . . . . . . . . .44
SUPER C . . . . . . . . . . . . . . . . . . . . . . . . . .52
CREDITS . . . . . . . . . . . . . . . . . . . . . . . . . 58
Instruction Manual
KONAMI COLLECTOR'S SERIESKONAMI COLLECTOR'S SERIES
Thank you for purchasing Konami Collector’s Series®: Castlevania™ &
Contra™ for the PC. To get the most from your gaming experience, please
read this manual before starting play.
AT KONAMI, WE CONTINUOUSLY STRIVE TO IMPROVE OUR PRODUCTS. AS A
RESULT, YOUR PRODUCT MAY DIFFER SLIGHTLY FROM SOMEONE ELSE’S,
DEPENDING ON THE DATE OF PURCHASE.
TM
TM
Page 2

3
AUTORUN (THE AUTOMATIC WAY TO INSTALL YOUR GAME)
The "Konami Collector’s Series: Castlevania & Contra" CD contains an
Autorun program that automatically guides you through the
installation process.
1. Insert the CD into your computer’s CD-ROM drive.
2. Once the Autorun screen appears, click INSTALL GAME.
3. Follow the on-screen installation instructions. Once you have
successfully installed the game, you’re ready to play!
WHAT TO DO IF AUTORUN DOESN’T WORK
If the Autorun program doesn’t automatically bring up the Autorun
installation screen, you need to start the program yourself.
1. Double-click on the MY COMPUTER icon on your computer’s
desktop. On computers running Windows XP, the MY COMPUTER
icon can be found on the START menu.
2. Double-click on the CD-ROM drive.
3. Double-click SETUP.exe.
4. After the startup screen appears, click INSTALL to begin installation.
INSTALL MENU OPTIONS
Play: After installation of the game, you can click this button to begin
the game. If the games is not installed, this button is disabled.
Install/Uninstall: Select to install
or uninstall the game from your
computer. DirectX version 8 or 8.1 is
necessary for running Konami
Collector’s Series successfully. After
installation of the game, you can
select to setup DirectX, followed by
the DirectX setup screen.
Readme: Opens an HTML page with the latest notes about installing
and running "Konami Collector’s Series: Castlevania & Contra." This
document contains important last-minute information that will make
your gaming experience more enjoyable.
Visit us: Access the Konami Website for detailed information about all
of the latest and greatest Konami products.
Quit: Exit the Install Menu.
2
SYSTEM REQUIREMENTS
MINIMUM SYSTEM REQUIREMENTS
Windows® XP/ME/2000/98/95
Pentium® 450 MHz (or equivalent)
16 MB RAM
DirectX 8 compliant video card w/2 MB VRAM
DirectX 8 compliant sound card
DirectX 8 or higher (included)
2X CD-ROM drive
10 MB free hard disk space
RECOMMENDED SYSTEM REQUIREMENTS
Pentium® 600 MHz (or equivalent)
32 MB RAM
DirectX 8 compliant video card w/4 MB VRAM
4X CD-ROM drive
Gamepad controller
NOTE: It may be necessary to update your hardware drivers.
INSTALLING THE GAME
In order to play "Konami Collector’s Series: Castlevania & Contra",
you must first install the program on your computer’s hard drive.
Note: For Windows 2000 and Windows XP, you may have to log
in as the Administrator to install the program.
Page 3
5
4
STARTING THE GAME
Now that you’ve installed the game, there are several ways to
actually begin playing:
1. The Autorun feature automatically offers a Play option each time
you insert the game CD into your CD-ROM drive. Click Play to
begin the "Konami Collector’s Series: Castlevania & Contra"
2. You may also begin the game by clicking on your desktop
START button, then selecting PROGRAMS> Konami Collector’s
Series>Castlevania & Contra.
3. After installation, there will be a "Castlevania & Contra" icon on
your desktop, double-click it to begin the game.
NOTE: THE "KONAMI COLLECTOR’S SERIES: CASTLEVANIA
& CONTRA" CD IS NOT REQUIRED TO PLAY THE GAME.
When you first start up the game
the Konami Logo screen will
appear, followed by the Konami
Collector’s Series Main Title screen.
Press Enter to advance to the
Select A Game screen.
Highlight the game that you would
like to play and press Enter.
The appropriate game introduction
or title screen will appear at this
time. Begin the game by pressing
the assigned "START" button.
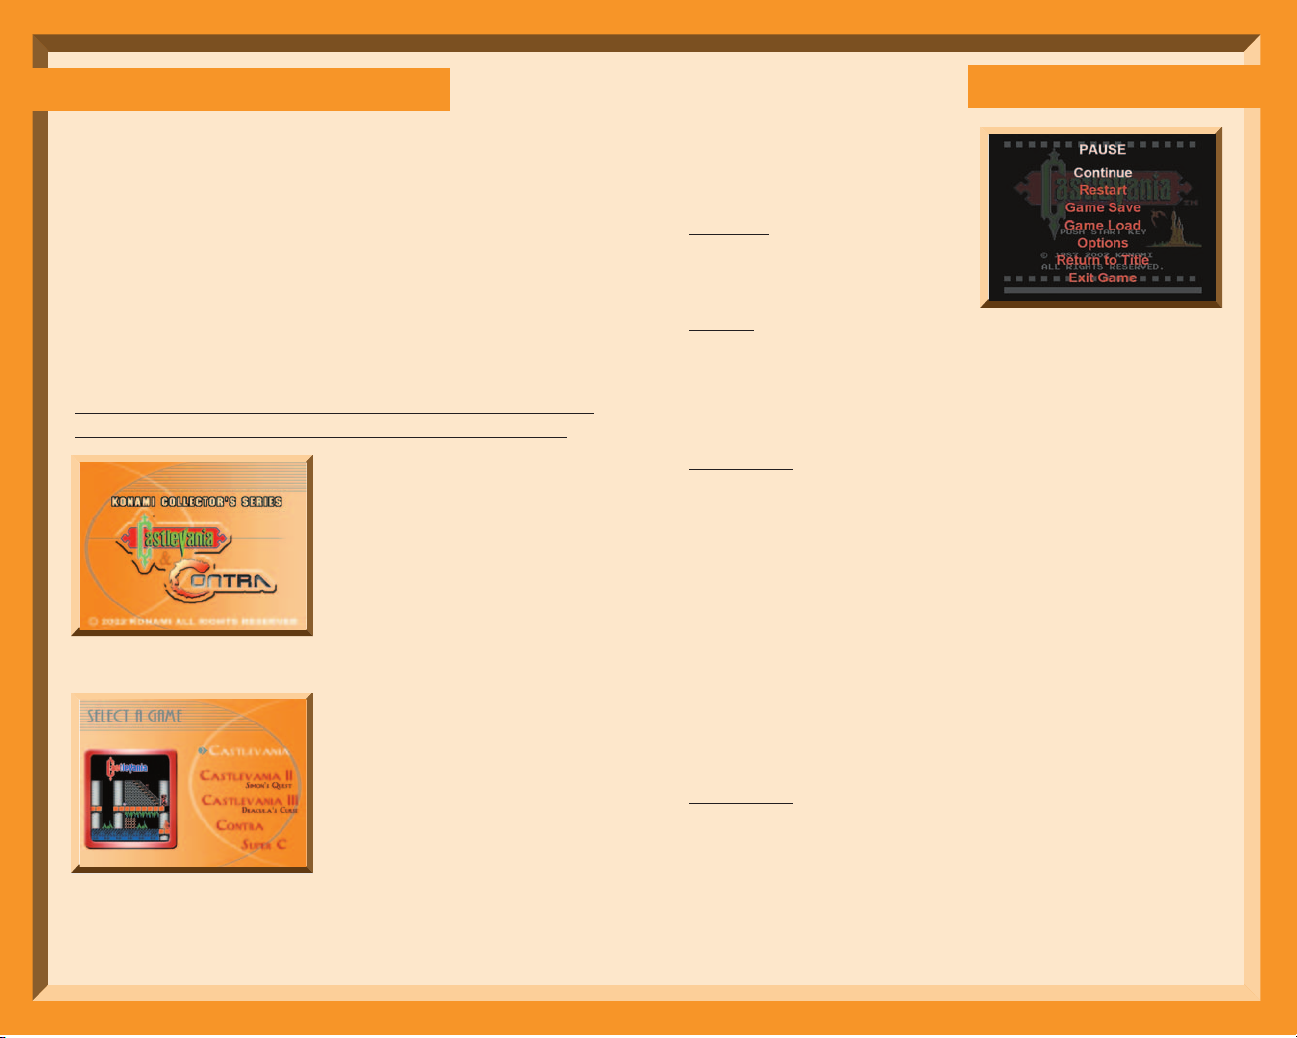
PAUSE MENU
Pressing "F1" will pause the game
and bring up the following menu:
Continue
Select Continue to resume
gameplay
Restart
Select Restart to restart the current game that you are playing. A
confirmation screen will appear:
Select "No" to return to the Pause Menu.
Select "Yes" to return to the Game Title screen.
Game Save
Select Game Save to save your current game in progress. The
Save Game screen will appear. Choose a data slot to save your
progress.
Note: You can also save over previously saved data.
Once a data slot has been selected, press "Enter" and a
confirmation screen will appear:
Select "No" to return to the Game Save Screen.
Select "Yes" to save your game, then press "Enter" to
resume gameplay
Note: All of the games can be saved from any point in the game,
and when the game is loaded, the player will be returned to the
exact spot and time where the game was saved.
Game Load
Select Game Load to load a previously saved game. The Data
Load screen will appear. Select the data that you would like to
resume, press "Enter" and a confirmation screen will appear:
Select "No" to return to the Game Load Screen.
Select "Yes" to load the selected game, then press "Enter"
to resume gameplay
Page 4
7
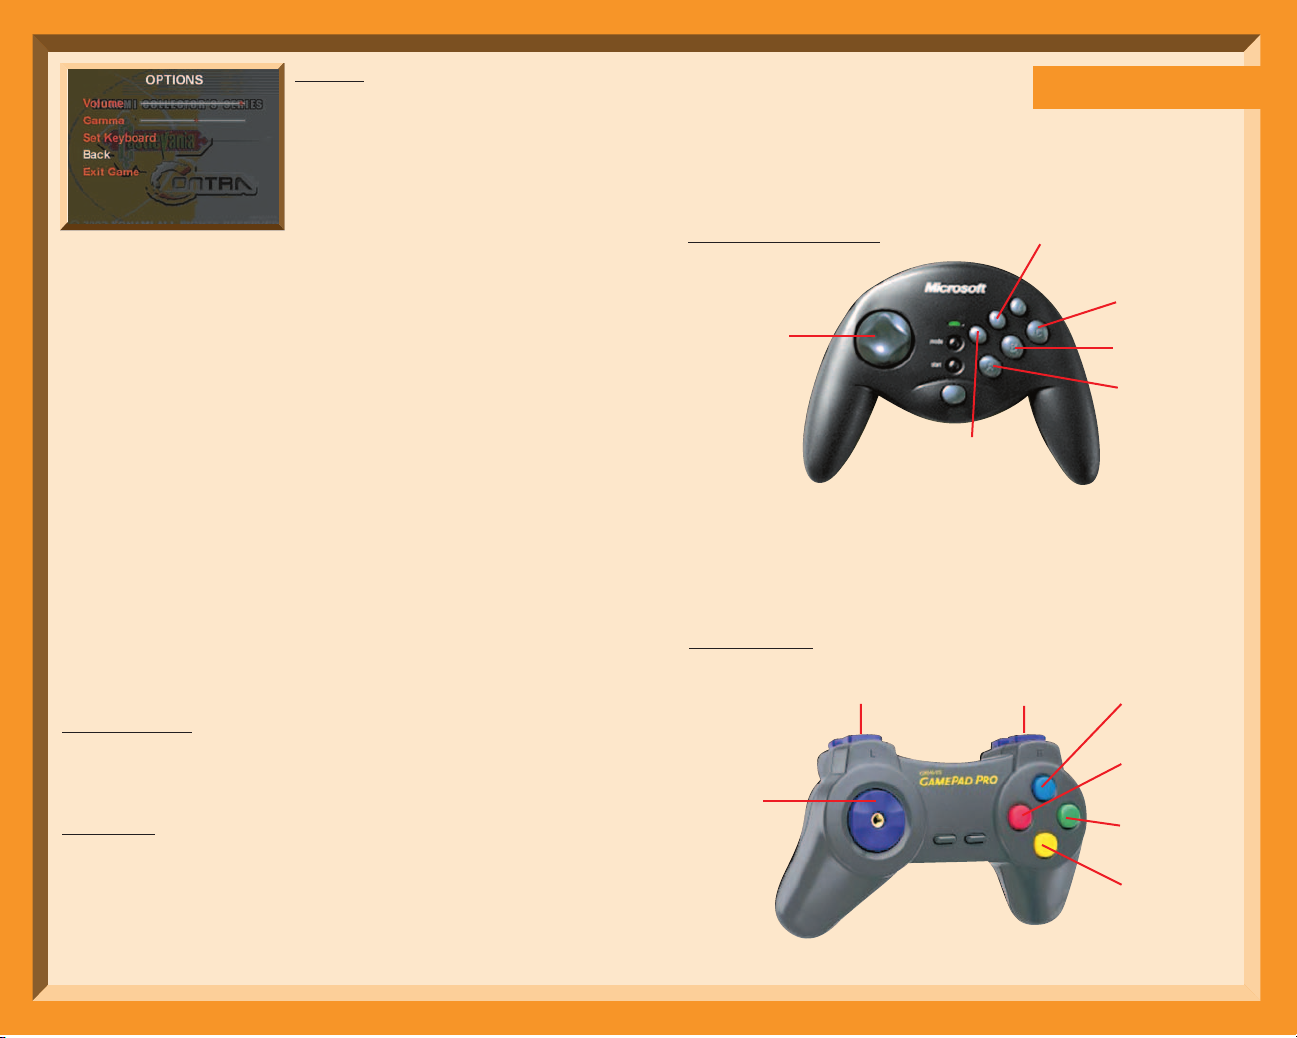
Options
Select options to bring up the Options
Screen. There are three customizable
options that appear:
Volume – Adjust the game volume with
the left and right keys
Gamma – Adjust the gamma with the left
and right keys
Set Keyboard – Customize the keyboard controls for Player 1 and Player 2.
Note: Player 1 and Player 2 cannot share keys.
Note: Controls cannot be set to the Function Keys [F1-F12].
When Set Keyboard is selected, the player is taken to the Keyboard
Config screen. The controls for Player 1 are on the left, and the controls
for Player 2 are found on the right. For both the Player 1 and Player 2
column, the original controls are listed on the left hand side, while the
corresponding keyboard controls are on the right hand side.
The player simply inputs what keys will be used for the corresponding
keyboard control. Once the player has finished assigning the
keyboard controls for Player 1, they will be automatically switched to
the Player 2 column.
F1 – “Back" key The player will be asked to confirm their settings.
Select "No" to return to the Config Keyboard screen.
Select "Yes" to save the assigned settings and return to the
Options screen.
F2 – Default (resets the keys to the default configuration)
F3 – Set Previous (moves the highlighter to set the previous key)
F4 – Set Next (moves the highlighter to set the next key)
Back – When selected, the player is returned to the Pause screen.
Return to Title
When selected, a confirmation screen appears.
Select "No" to return to the Pause Menu.
Select "Yes" to return to the Main Title screen.
Exit Game
When selected, a confirmation screen appears.
Select "No" to return to the Pause Menu.
Select "Yes" to exit the game.
For gameplay, any reference to the controls will correspond to the
key(s) that have been assigned by the player.
6
CONTROLS
The controls below show the basic movement, action, and menu
commands for the keyboard and gamepad controllers.
Microsoft Sidewinder
Gamepad Pro
D-Pad:
Control Pad
A Button
X Button
START Button
B Button
C Button
SELECT Button
D-Pad:
Control Pad
Green Button:
SELECT Button
Yellow Button:
B Button
Red Button:
A Button
Blue Button:
START Button
Y Button
Pause Menu
L1 Button
Pause Menu
R1 Button
no function
Page 5

9
The following is the default configuration for the P1 Keyboard:
PLAYER 1 BASIC CONTROLS
The following is the default configuration for the P2 Keyboard:
PLA
YER 2 BASIC CONTROLS
See Keyboard Setup on page 6 to customize your keyboard
configuration.
8
Control KEYBOARD
Up Up Arrow
Down Down Arrow
Left Left Arrow
Right Right Arrow
A Button S
B Button A
Select Button D
START Button F
Pause Menu F1
Control KEYBOARD
Up Num 8
Down Num 2
Left Num 4
Right Num 6
A Button Num Del
B Button Num 0
Select Button Num 7
START Button Num 9
Pause Menu F1
Konami Collector’s Series: Castlevania & Contra is best played with
a gamepad, so we highly recommend that you use a gamepad to
play the game if you own one. Konami Collector’s Series
specifically supports the Microsoft Sidewinder gamepad and the
Gravis Gamepad Pro.
The game program will automatically detect whether or not you
have a game controller connected to your PC. If you wish to use
your game controller, we recommend that you connect your
controller to your PC before you start the Konami Collector’s Series
program to ensure that it works properly.
Note: Whether you are using a controller or the keyboard, you
can always pause the game and bring up the pause menu using
the F1 key.
EXITING THE GAME
To exit the game, select the "EXIT GAME" option from the Pause
Screen or the Options Screen or simultaneously press the "ALT"
Key and the "F4" Key on the Keyboard.
Esc
Caps Lock
F1 F2 F3 F4 F5 F6 F7 F8 F9 F10 F11 F12
SysRq
Scroll
Lock
Print
Screen
Pause
Break
Backspace
Enter
Home
End
Page
Up
Page
Down
Insert
Delete
Num
Lock
Home
PgUp
End PgDn
Ins Del
~
`
!
1
2
3
#
@
$
%
^
&
4
56789
0
*
()
_
-
+
-
|
\
}
]{[
:
;
"
'
<
,
>
.
?
/
/
*
-
+
.
7
8
9
456
1
2
3
0
Enter
Ctrl
Alt
Shift
Tab
QWER
T
ASD
FGH
YUIOP
JKL
Shift
ZX
CVBNM
Ctrl
Alt
Page 6
11
10
Good Eeeevening!
Step into the shadows of the deadliest dwelling on earth. You've
arrived at Castlevania, and you're here on business: To destroy
forever the Curse of the Evil Count.
Unfortunately, everybody's home this evening… bats, ghosts, and
every kind of creature you can imagine. You'll find 'em all over the
place, if they don't find you first. Because you've got to get
through six monstrous floors before you even meet up with the
Master of the House. Your Magic Whip will help, and you'll
probably find a weapon or two along the way. But once you
make it to the tower, you can count on a Duel to the Death. The
Count has waited 100 years for a rematch. He's ready... Are you?
HOW TO PLAY
Castlevania is a one-player game only.
The object is to move through the passages and stairways of the
castle to reach the tower, dodging or destroying every creature in
your path. Use the controls as directed to activate your Magic
Whip and the other weapons you'll find along the way. And watch
for secret doors!
To begin, hit the START Button, and your nightmare begins.
CONTROL FUNCTIONS
Directional Keys
Moves character - Controls forward and backward movement,
standing and crouching, angle of jump, direction of attack
SELECT Button
(not used)
ST
ART Button
Begins game, pauses action during game
B Button (ATTACK)
Controls whip and all weapons
A Button (JUMP)
Controls jumping
SAMPLE MOVES
TO JUMP DIAGONALLY:
use the A Button and Left or Right directional keys.
TO ACTIVATE WHIP:
use the B Button and Left, Right or Down directional keys.
TO ACTIVATE WEAPONS:
use the B Button and Up directional key.
TO CRACK WHIP OR FIRE WEAPONS:
use the B Button.
Page 7
13
12
THE SCREEN
Power Level Indicator
You begin each game with 3 "lives", and the indicator tracks the
power remaining in each. As the creatures sap your strength, the
indicator level drops. When it reaches "0", you lose one life.
Time
When the timer shows "0", you lose one life.
Weapons Indicator
Shows the latest weapon you've picked up and activated.
Enemy P
ower Level Indicator
Indicator tracks damage you've done to the boss in any given
stage. When the level drops to "O", the Creature is out of the game.
Score
Power Level
Indicator
Weapons
Indicator
Enemy Power
Level Indicator
Time
THE CREATURES
Destroy the creature for the point total shown. BONUS POINTS
awarded for knocking out 2 or more creatures with one throw
of a weapon.
100-POINT BONUS--
Awarded for whipping each of these items:
FIRE BALL
MUMMY WRAPPINGS
BONE FROM WHITE SKELETON
AXE-MAN’S AXE
VAMPIRE BAT 200 points
ZOMBIE 100 points
BLACK LEOPARD 200 points
FISH MAN 300 points
PHANTOM BAT 3,000 points
QUEEN MEDUSA 3,000 points
MEDUSA 300 points
RAVEN 200 points
BLACK KNIGHT 400 points
WHITE SKELETON 300 points
RED SKELETON 400 points
EAGLE 300 points
HUNCHBACK 500 points
DRAGON SKULL CANNON 400 points
AXE-MAN 500 points
GHOST 300 points
SKELE-DRAGON 1,000 points
FRANKENSTEIN & IGOR 5,000 points
MUMMY MAN 3,000 points
GRIM REAPER 7,000 points
THE COUNT! 50,000 points
Page 8
15
14
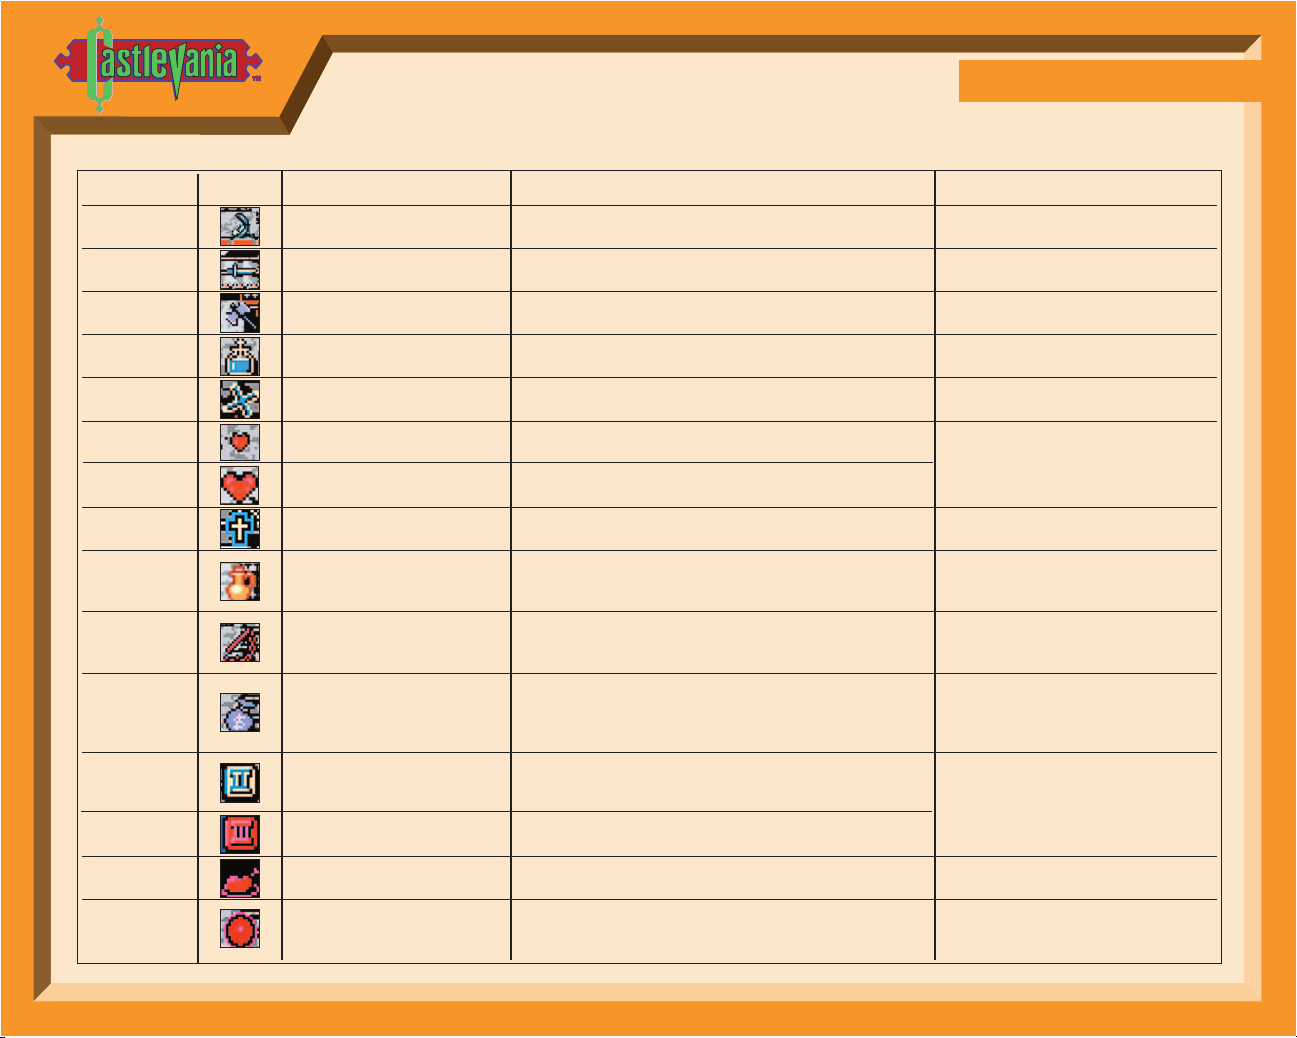
THE WEAPONS
In addition to your Magic Whip, many other weapons are hidden along your path through the Castle. You're going
to need them. Before playing, study this chart, so you'll know where to find your weapons, and how to use them.
WEAPON SYMBOL WHERE TO LOOK POWER COMMENT
WATCHHidden on path or in creature Stops enemy action (some exceptions) Costs you 5 small hearts for each use
DAGGER Hidden on path or in creature Fast, accurate attack weapon Makes target object disappear
AXEHidden on path or in creature Slow but powerful attack weapon ---------------
FIRE BOMB Hidden on path or in creature Splits the earth under target creature Incinerates anything on path
BOOMERANG Hidden on path or in creature Powerful attack weapon that comes back to your hand ---------------
SMALL HEART Hidden on path or in creature Gives you one extra shot per weapon
LARGE HEART Hidden on path or in creature Gives you 5 extra shots per weapon
CROSS Hidden on path or in creature Destroys all onscreen enemies ---------------
INVISIBILITY Hidden on path or in creature Renders you safe from harm for a few seconds --------------POTION
MORNING STAR Hidden on path or in creature Increases power of Whip in 2 Short chain for 1st level, long chain for
different stages S 2nd level boost
MONEY BAG Hidden on path or in creature Gives you free points Red = 100
Blue = 400
White = 700
DOUBLE SHOT Hidden on path, in creature Allows use of throwing weapons twice in a row
or background
TRIPLE SHOT Hidden on path or in creature Allows use of throwing weapons 3 times in a row
PORK CHOP Hidden in background Partially revives lost power Appears with secret Whip stroke
MAGIC CRYSTAL Capture from Head Creature Completely revives all lost power Can clear creatures from entire stage
in each stage
You can stockpile as many hearts
as you find for extra firepower
when you need it!
These appear when you strike
certain objects 10 times in a row
Page 9

17
16
WELCOME TO CASTLEVANIA
Page 10
19
who'll sell you weapons and other mystical items. Your purchasing
power depends on how many hearts you've collected during your
confrontations with evil.
Another warning from the spirit: a few friendly villagers are town
pranksters, and their clues are false. Of course, you'll never know
until you take the chance.
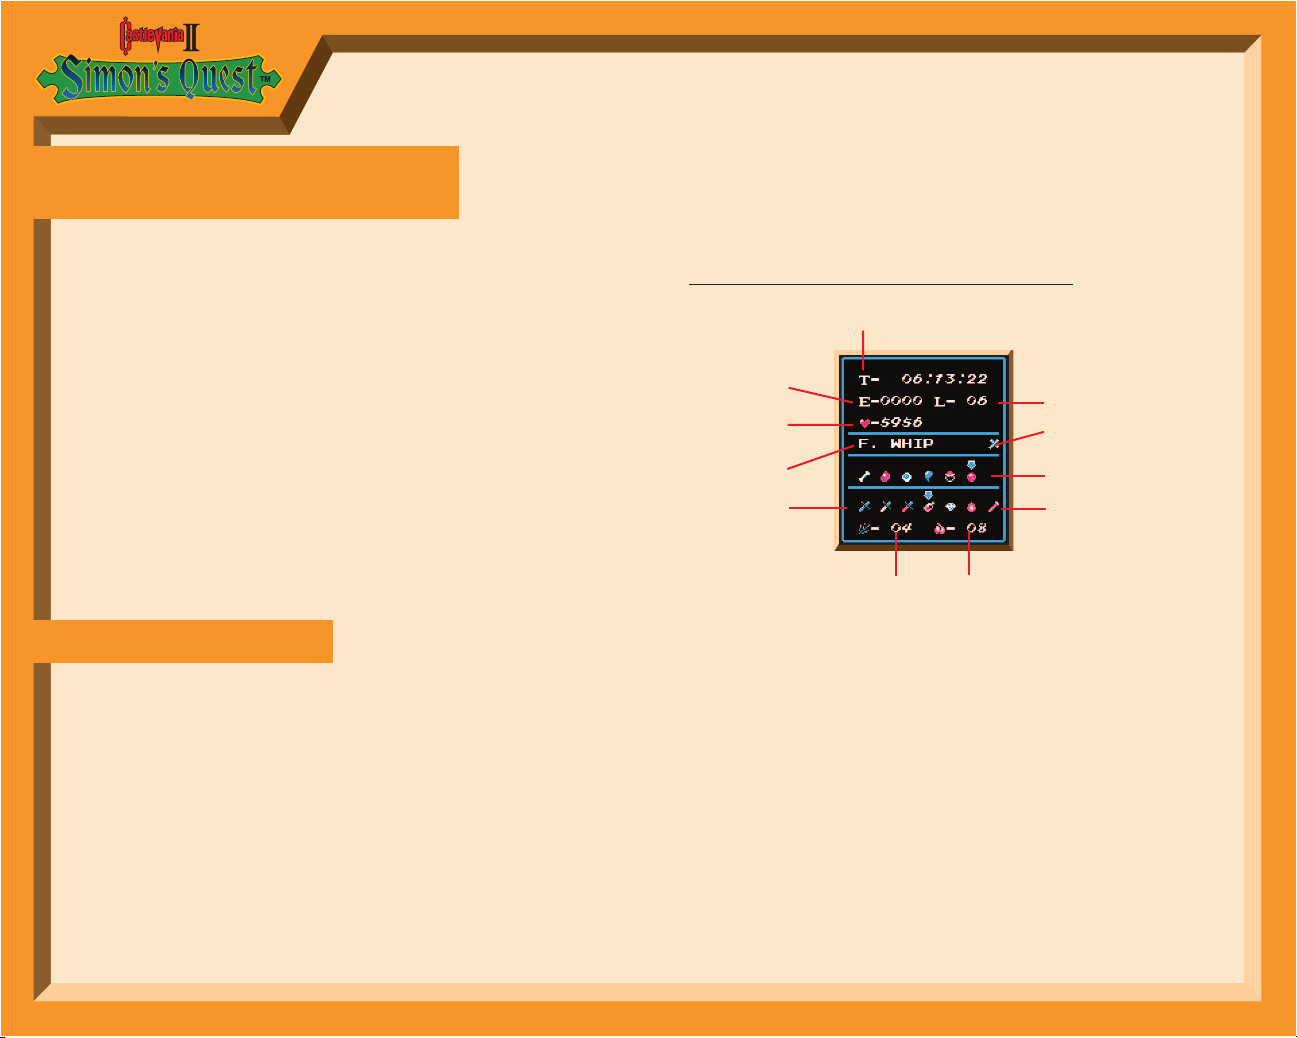
PRESS START BUT
TON FOR MULTI-SCREEN
1. The time you've spent in the adventure
2. Your Experience Rating
3. Type of Whip
4. The parts of Dracula's corpse you've collected
5. Weapons and mystical items
6. Supply of medicinal herbs
7. P l a y er level
8. Number of Hearts.
Remember, these increase your Experience Rating and the
number of times a weapon or magical item can be used. Hearts
are also used as money to buy weapons and magical items.
9. Weapons and items that can be used just by holding them
(For example: The Whip)
10 . The Oak Stake
11. Supply of Garlic
18
1
2
3
4
5
6
7
8
9
10
11
THE SECOND COMING
OF COUNT DRACULA
You're Simon Belmont, bravest of the brave, boldest of the bold, a
gothic warrior respected by kings. You earned your praise, not by
crushing Viking invaders or Turkish hordes, but by destroying the
evil Count Dracula in a duel to the death at Castlevania. But your
victory proved painful, as the wounds inflicted during the duel
slowly gnawed at your soul.
One day, though, a beautiful maiden appeared. With a soft voice
she warned that you were possessed by the Count's curse. She
said your only hope of destroying the curse and healing your
scars was to find the five body parts of Count Dracula and burn
them in his Castle, ending forever the reign of the Prince of
Darkness. Suddenly, like most beautiful visions, she began to
fade. And as you reached to touch her, she spoke her final words
"Fear not, brave Simon, for if you have the courage to risk your life,
you will find the strength to win again."
HOW TO PLAY
In this one-player adventure your quest is to discover Count
Dracula's 5 missing body parts. Upon finding these gruesome
items, proceed to Dracula's Castle, where you'll again duel to the
death with the Count. But heed the spirit's warning and find the
Magic Cross before entering his domain.
This quest won't be easy, for you must battle hideous fiends who
stalk the land. Fortunately, the longer you survive, the greater your
Experience Rating and the less vulnerable your troubled soul.
Secrets to this adventure can be found as you wander around
friendly Transylvania. Stop and talk to the villagers, because these
helpful strangers will give you clues. Some are also merchants
Page 11

21
20
CONTROL FUNCTIONS
Directional Keys
Press Up or Down to go up and down stairs. Press Left or Right to
go to the left or right. When in front of a door, press Up to go
inside. To squat and avoid enemy projectiles, simply press Down.
B Button
Press the B Button to lash with a whip. If you press the B Button
and A Button simultaneously, you can jump and lash with a whip
at the same time. Also press the B Button to talk with the friendly
Transylvanian villagers and merchants.
SELECT Button
Press the SELECT Button during the game to pause.
S
TART Button
Press the START Button to begin the game. Press during the middle
of the game to display a "Multi Screen", which gives you the
option to choose from weapons and magical items you've found.
Press again after making your selection to return to the game.
A Button
Press A Button to jump.
HOW TO USE CERTAIN WEAPONS
Press the Up Directional Key while pressing B Button to throw the
Holy Water or Dagger, drive in the Oak Stake, use the Flame, place
the Garlic in strategic locations, etc.
NIGHT AND DAY
Transylvania at High Noon
When the sun shines bright on this
Eastern European village, all
appears well and calm. This is a
perfect time to discover clues and
purchase weapons.
Transylvania At the Stroke
of Midnight
When the sun sets behind the
Transylvanian Mountains, the
friendly villagers scatter for the
safety of their homes, as creatures
of all shapes, sizes and hairiness
roam the darkness.
Page 12

23
The Forest Primevil
Enemy creatures scour the
countryside. You must destroy
these dastardly beings to increase
your experience and gain hearts
(purchasing power).
Bridge Over the River Die
Enemy creatures await you on
the bridge as well, and getting
to the other side will be a
terrifying experience in itself.
The Graveyard
Are you dying to get into the
graveyard? If so, find the old man,
who is the caretaker for the dead.
22
THE SIX HAUNTING SCENES
The Mansions
There are 5 mansions located
throughout the Transylvanian
countryside, and within each is a
heavily guarded piece of the
Count's corpse.
The Church
You'll enter the Church through
certain doors in the village. When
you arrive, a holy man will return
your strength and give you the
courage to continue.
The F
erryman
The ferryman will know exactly
where to take you, depending on
the body parts you possess. Have
confidence in this man; he knows
where he's going.
Page 13

25
The Gold Knife
This is your strongest knife, and it has a
mysterious power.
The Oak Stake
You'll need the Oak Stake to collect Dracula's
corpse at the mansions.
The Flame
The flame weakens the creatures' evil powers.
The Leather Whip
This is the weapon you begin the game with.
The Thorn Whip
The Thorn Whip is stronger than the Leather Whip.
The Chain Whip
The Chain Whip is stronger than the Thorn Whip.
The Morning Star
The Morning Star is longer than the Chain Whip.
The Flame Whip
Magic changes the Morning Star into the Flame
Whip and gives it mysterious powers.
24
COUNT DRACULA’S
MISSING PIECES
The Nail
The nail is the symbol of evil power.
The Eyeball
When it comes to the most frightening piece, the eyes
have it.
The Rib Bone
The rib bone will make the ordinary hero feel like a
spineless coward.
The Ring
It's been in the Count's family for hundreds of years.
Then again, the Count's also been in his family for
hundreds of years.
The Heart of Dracula
Watch out! The heart attacks.
MAGIC WEAPONS
The Da
gger
The dagger can be thrown to kill distant enemy creatures.
The Silver Knife
The Silver Knife can be thrown farther than the dagger.
Page 14

27
26
MAGIC ITEMS
The Cross
You must have the Cross to seal Dracula's fate.
White Crystal
The White Crystal offers a weakened source of
magic power.
Blue Crystal
Offers stronger magical powers than the White Crystal.
Red Cr
ystal
You must have the Red Crystal before you enter
Dracula's Castle.
Garlic
Place the Garlic in front of enemies, and it will weaken
them significantly.
The Diamond
Toss it and see what happens.
Silk Bag
If you have the Silk Bag you can carry a larger supply of
medicinal herbs.
Hearts
Hearts appear when you destroy an enemy creature.
Collect them because they will increase your Experience
Rating, and give you extra purchasing power.
Holy Water
Holy Water disintegrates walls and floors, which conceal
weapons and items.
The Laurel
Laurel helps make you invincible against enemy attacks.
You can purchase Laurel from town merchants.
COUNT DRACULA’S
BEST BUDDIES
Vampire Bat
Raven
The Spider
Man-Eating Plant
The Zombie
Page 15

Vampira
Slimey BarSinister
The Fish Man
The Flame Thrower
The Two-Headed Creature
Freddie
Ghostly Eyeball
The Mud Man
The Wolf
28
29
Dragon Bones
The Ghastly Leech
The Skull
Medusa Head
The Gargoyle
The Grim Reaper
The Mummy
The Wolf Man
The Zombie Hand
The Pirate Skeleton
Page 16

31
30
IT’S A CURSED WORLD
WE LIVE IN
The time is 100 years before Simon Belmont's birth. The moon
burns red overhead and black clouds loom large on the horizon. All
is still and quiet. Only the call of a distant crow stirs the cold night
air. Suddenly, thunder roars out of the Morbid Mountains and into
the village of Warakiya. Like the yell of an angry giant, the terrible
sound shakes homes and shops as if they were sapling branches.
But no one blinks an eye. The village is dead calm. For all the
people have fled after receiving warnings from the Great Beyond
that Count Dracula has assembled a mighty army of evil, and
they're poised to march up from the Valley of Graveyards to bury
mankind in a Tomb of Terror. Unfortunately, there's no corner on
Earth that won't be overrun by this bloodthirsty legion of Swamp
Dragons, Slasher Skeletons and Forces of the Undead.
The last line of defense is you, Trevor Belmont - the forefather of
Simon Belmont and the origin of the Belmont Warlord Chromosomes.
However, your chances of survival are slim. In fact, the only real
edge you have over this fang sharpened abomination is your
power to transform into three different partner spirits: Grant DaNasty,
the ferocious Ghost Pirate; Sypha, the Mystic Warlord; and Alucard,
Dracula's forgotten son. Each of these spirits will confront you as
you fight through 17 possible levels of never-ending fright, including
the Haunted Ship of Fools, the Clock Tower of Untimely Death and
Curse Castle. You must also possess the strength to wield the mighty
Battle Axe and Mystic Whip, which were given to you by the
Poltergeist King.
So go forth, young Trevor into the cold black night, where death lurks
around every corner and evil lingers on every stone. And remember,
if your courage and cunning are any less than magnificent or if you
fail to choose the correct Paths of Fate, you'll be banished to the
world of the undead, and zombies will rule until the end of time.
HOW TO PLAY IN
THE GRAVEYARD
The adventure revolves around tough-as-nails Trevor Belmont. As
Trevor, you will find several locations throughout your journey
where the road splits in two directions. On these Paths of Fate you
must make a choice - Which way will you go?
The spirits and the enemies you encounter and your fate itself will
be determined by the path you choose. You will encounter three
different spirits throughout the game, each with special talents that
can be used according to the situation at hand. Each spirit is
waiting for Trevor in a different place, so be wary at all times.
When you finally meet a spirit, he will join you in your quest to
crush the Count.
(See page 38 for details on how to transform into partner spirits.)
Clearing a Level of Terror
Depending on the Paths of Fate you choose, you will trudge
through a variety of Terror Levels, including the Murky Marsh of
Morbid Morons and the Sunken City of Poltergeists. To successfully
clear a Terror Level, you must defeat that level's Ultimate Evil and
then claim the Ball of Light to replenish your Life Gauge.
Remember, there are a total of 17 gruesome levels filled with
enemies waiting to bury you alive!
Trevor's Life Stock
You're given three lives at the start of the game. When all three
lives are extinquished by villains from the Great Beyond, the game
is over, and vampires will have free reign over the world. Note: You
will lose one life each time your Life Gauge dwindles to zero. Also,
when you have transformed into a partner spirit, you both will
share the same Life Gauge.
Page 17

32
33
Countdown to Your Last Gasp
There is a time limit for each Terror Level. If the time runs out before
you finish a level, Trevor will lose one of his precious lives.
Boosting your Power and Your Confidence
To boost your power, grab the item that appears after you have blown
out a candle or lantern, or after you have defeated an enemy.
HOW TO STIR UP THE DEAD
Read through the complete message, then press the START Button
and the title screen with the words Opening and Password will
appear. Use the SELECT Button to choose one of these messages,
then press the START Button to enter your selection.
If you are playing for the first time or want to start from the
beginning of the game, select OPENING. A screen will appear for
you to enter your name.
To enter your name, use the Directional Keys to line-up the cursor
with the letters in your name. Press the A Button to enter each of
the letters. Press the B Button to cancel a letter. You can also
replace or change letters by moving the cursor to the Arrow
Symbol on the Letter Sheet and then pressing the A Button to
make your changes. Conclude the name entry stage by selecting
"End" and pressing either the A Button or the START Button.
If you are continuing a previous game select PASSWORD. The
name screen will appear for you to enter your name just as you
did for the previous game. You must enter the identical name as
the last time you played or the password won't work. When the
password screen appears, enter the password that you received in
the previous game. Now you're ready to begin playing from the
beginning of the Terror Level where you last finished. (For more
details, see Password Instructions on page 35.)
When the Game Ends
When the game is over, you can continue your war against Dracula
by choosing CONTINUE with the SELECT Button. This allows you to
start the game again from the Terror Level where Trevor last perished.
To end the game, choose PASSWORD with the SELECT Button. Next,
press the START Button and your password will appear. Be sure to
write your password down for safekeeping.
Turning the Spooky Sound Effects On and Off
Press both the A Button and the START Button simultaneously
when the title screen is displayed and the sound mode screen will
appear. Here you can choose the eerie background music you
want to listen to during your adventure.
Press the Up or Down Directional Key to select your background
music (press Down to go forward and Up to go backward). Press the
B Button and your favorite tune will begin playing. You can turn the
music off by pressing the A Button. When you are through making
your selection, press the START Button to return to the title screen.
MEET YOUR TEAM OF
VAMPIRE HUNTERS
Trevor C. Belmont
Trevor is the infamous forefather of Simon Belmont - the
mighty warrior who pulverized Dracula in Castlevania®
and again in Simon's Quest®. Trevor has a number of
oldie but goodie attack items that have been given to him by the
Poltergeist King. These include the Mystic Whip, Battle Axe,
Banshee Boomerang, Dagger and Sacred Water. Trevor is also the
master of special items, including a Pocket Watch, Invisibility Potion
and the Rosary.
Page 18

“Spirit" Alucard
As the son of Count Dracula, Alucard once tried to prevent
Trevor from accomplishing his mission. However, he
reached a point where he could no longer abide by his
father's evil ways, and is now looking for a partner to help
him put an end to his father's wicked plans. A resident of
underground tunnels, Alucard attacks with a Ball of Destruction, which
he can also fire in three directions (if he captures a special power
booster). Alucard's primary strength, though, is his ability to turn
himself into a bat. However, he cannot attack while he is airborne and
will turn back into human form if his wings are clipped by an enemy.
“Spirit" Grant DaNasty
Count Dracula used his sinister powers to turn this Pirate
Captain into a ghost. And as one of Dracula's gruesome
gang, he will attack you from the top of the Clock Tower of
Untimely Death. However, if you can defeat this scoundrel,
his spirit will join you. He's small, nimble and has a strong spring in
his step, so he's able to jump up onto walls or ceilings and stick to
them like glue. Grant's primary attack weapons are an axe and a
dagger. Another of his attributes is his skill to scurry along hidden
routes not accessible to Trevor. Unfortunately, both his body and his
ego bruise easily.
“Spirit" Sypha Belnades
Sypha, the Mystic Warlord of Warakiya, is also a vampire
hunter who was rumored to be dead, but in actuality was
held captive by "Cyclops", the one-eyed Ultimate Evil. Sypha
moves swiftly and uses his Warakiya Staff to attack. Other
attack favorites of his include flames, frozen crystals and lightning
bolts. With these, he can destroy enemies before they get close to
him. However, his skin is very thin and blisters easily when blasted
by enemy attacks. To score BIG, Sypha must attack before his
enemies find him.
34
35
THE PASSWORD SCREEN
(A MESSAGE FROM THE GREAT BEYOND)
Press the Select Button to call forth the password screen. Use the
Directional Keys to move the cursor around the Password Sheet.
Press the B Button to select your password items (each time you
press the B Button the cursor will move one place to the right). Enter
your selection by pressing the A Button. When you have finished
entering your password, press the START Button. If you make a
mistake, press the SELECT Button to return to the name entry screen
and start over.
HOW TO CONTROL YOUR
TRANSYLVANIA TEAM
Directional Keys
Press Left or Right to move the character to the left or the right. Press
Up or Down to climb up or down stairs.
SELECT Button
Press to select Opening, Password or Continue. Also press to
transform into a partner spirit.
Name you
have entered
Item
(Password mark)
Password
Sheet
Cursor
Page 19

37
START Button
Press to begin the game and to pause the action during the game.
B Button
Press to attack with your Main Weapon. Also press the Up
Directional Key and the B Button simultaneously to attack with a
Warakiya War Item that is displayed in the Warakiya War Item
Window.
A Button
Press to jump.
Guiding Grant
Press and hold the Directional Key toward the wall you want Grant
to cling to. Then press the Directional Key in the direction you want
him to move.
NOTE: Depending on how long you press the A Button, you can
vary the height of Grant's leaps and bounds.
Assisting Alucard
Press the Down Directional Key and the A Button simultaneously
to transform Alucard into a Bat. (Repeat this procedure to return him
to his human form.)
36
AN OVERVIEW OF TERROR
(A GUIDE TO YOUR HUNTING GROUNDS)
1. Score
If your score exceeds 20,000 points, you will receive a bonus life.
From then on, you will gain a bonus life after every 50,000 points.
2. Time
When the time limit reaches zero, you will lose one of your lives.
3. Warakiya War Item Window
Warakiya War Items will appear in this window.
4. Hear
t Gauge
This will increase each time you capture a new heart. However, it
will decrease each time you use one of your Warakiya War Items.
5. Trevor's/Partner Spirit's Life Gauge
Your life gauge decreases each time you bump into an evil enemy
or are hit by an evil enemy's attack weapon. When your Life
Gauge runs out, you will lose one life..
6. Ultimate Evil's Life Gauge
Each time you successfully attack an Ultimate Evil, his Life Gauge
will decrease. When his gauge runs out, he is banished forever
into the Land of Limbo Spirits.
7. Remaining Lives 8. Level
1
2
3
4
5
6
7
8
Page 20

38
39
The Heart of Stone
The number of hearts collected determines how many times you
can use your Warakiya War Items and also how long Alucard can
remain in his bat form. The more hearts you possess, the better!
Leg of Werewolf
Find these to restore units of your Life Gauge.
Bonus Bag
Your score will increase when you grab one of these bags. The
number of points varies according to the value of the bag's
contents.
1-Up
This gives you a bonus life.
Double Trouble
This item allows you to fire a Warakiya War Item twice in a row.
NOTE: Sypha and Alucard cannot use this item.
T
riple Threat
This allows you to fire a Warakiya War Item three times in a
row. NOTE: Again, Sypha and Alucard cannot use this item.
P
ocket Watch
This item stops all evil enemies dead in their tracks.
Invisibility Potion
This makes you invisible (and, therefore invulnerable) for a
limited period of time.
Rosary
This gives you the power to destroy all the evil enemies on the
screen in the blink of an eye.
ADDING TO YOUR TEAM
At the start of the adventure, your only player is Trevor C. Belmont.
But as the game progresses, you will meet partner spirits who
Trevor will be able to transform into at his will. The spirits that appear
throughout the game will vary, depending on the Paths of Fate you
choose. To transform into a partner spirit, press the SELECT Button.
THE PARTNER SPIRIT’S APPEARANCE
Spirits will appear out of thin air when you have successfully
defeated the Ultimate Evil at the completion of a Terror Level. When
a spirit enters, the message screen will appear and the name of
the spirit joining the battle will be displayed. You can then choose
whether or not you want this spirit for your teammate. You can
only have one partner spirit at a time. If you already have a
partner spirit and you meet a new spirit, you can choose only one.
CHOOSING YOUR FRIENDS WISELY
Press the Up or Down Directional Key to choose whether you want to
form a team with a spirit. Then press the A Button to enter your decision.
GIFTS FROM THE
POLTERGEIST MASTERS
These items may appear when you knockout/blowout a candle or
lantern, when you have clobbered certain evil enemies, or when
you destroy certain walls.
Note: The Pocket Watch, Invisibility Potion and Rosary will appear
in the Warakiya War Item Window, and are used exactly like a
Warakiya War Item.
Page 21

40
41
TREVOR C. BELMONT’S
ATTACK METHODS
TREVOR’S MAIN WEAPON
Mystic Whip
The Mystic Whip is Trevor's main weapon. It has three
different power levels. By advancing a certain distance
and capturing certain items, you can boost its power to a
Chain Whip and then a longer Chain Whip.
TREVOR’S WARAKIYA W
AR ITEMS
These are weapons Trevor will find as he journeys down his Paths
of Fate. You can only possess one at a time. When you obtain a
Warakiya War Item, it will appear in the Warakiya War Item Window
and replace the one you previously had.
Battle Axe
The Battle Axe flies through the air along an arc. This is
a very powerful item.
Dagger
The Dagger flies straight and fast, but it is not very
powerful.
Banshee Boomerang
The Banshee Boomerang flies straight through the air
with the greatest of ease. When it reaches the end of its
path, it will come flying back. Though it moves slowly,
the Banshee Boomerang is very powerful.
Sacred Water
The Sacred Water flies along an arc until it crashes into
the floor, where it spills out and begins to burn.
SYPHA BELNADE’S
ATTACK METHODS
SYPHA’S MAIN WEAPON
Warakiya Staff
Sypha uses his Warakiya Staff to attack enemies. The
power of the staff can never be increased.
SYPHA’S WARAKIY
A WAR ITEMS
Flames
The flames are very powerful as they annihilate everything in
their path.
Frozen Crystals
This item lets you shoot frozen crystals in all directions to
freeze your enemies for an instant. While your enemies
are quick-frozen, climb on top of them and destroy them
with a blow from the staff.
Great Bolts of Lightning
The lightning bolt shoots zapping balls in three directions.
Page 22

42
43
COUNT DRACULA’S CAST
OF EVIL CHARACTERS
There are an unknown number of evil characters lying in wait in every
part of this cursed adventure. Only a few of them have ever been
seen by the human eye. The rest of the undead remain shrouded in
a veil of mystery. A few of the many evils lying in wait for you include:
BAD B
AT
SKELETON DRAGON
FRANKENS
TEIN
PILL
AR OF BONES
THE GATES OF DEATH
GRANT DaNASTY’S
ATTACK METHODS
Grant's Main Weapon
Dagger
Grant can use the dagger to stab his enemies or he can
hurl it at them. When thrown, the dagger flies to the right
and left. When Grant is stuck to the wall, he'll hurl it
backwards. Likewise, when Grant is stuck in the ceiling,
he throws it down.
GRANT’S WARAKIYA WAR ITEM
Axe
The axe is a very powerful weapon that can be used if
Grant is lucky enough to find it.
ALUCARD’S
ATTACK METHODS
ALUC
ARD’S MAIN WEAPON
Ball of Destruction
At first, this weapon can only be fired in one direction.
However, you can boost the firepower to shoot in two or
three directions. (You can't fire a shot when you're at the
top of the stairs.)
Although Alucard cannot fire double or triple shots and has no
special Warakiya War Items, he does have the power to transform
into a bat and fly around. Each time he transforms he uses up a
certain number of heart marks while in flight. If the supply of hearts
runs out while Alucard is a bat or if he's hit by an enemy attack, he
will immediately turn back into his human form.
Page 23

44
45
ONLY THE STRONG SURVIVE
In 1957 a large object from outer space crashed into Earth's
Amazon basin, near ruins of the lost Mayan civilization. Scientists
world-wide heralded the incident as a trivial cosmic occurrence,
and thus the collision was soon forgotten.
Now, thirty years later, rumors of an evil force have swept into the
Pentagon's front office, and tales from frightened villagers of a
hideous being with an army of alien henchmen are sending chills
down the spines of top military brass.
Unwilling to upset current political stability, an all-out assault on
the region has been overruled, and instead, two of America's most
cunning, courageous and ruthless soldiers from the Special Forces
elite commando squad have been selected to seek out and
destroy these alien intruders.
Congratulations, pal, you're one of the chosen. But before you
take pride in being the best, be warned.
You're about to come face to face against Red Falcon, the cruelest
life-form in the galaxy. He arrived on Earth thirty years ago to
establish a foothold from which he will attempt to conquer our
world and then use it as a stepping stone toward his ultimate
fiendish goal: domination of the entire universe.
Needless to say, playing hero won't be easy. But you have no
choice – you must be a hero. Because if you fail, life as we know
it will cease to exist, and the vile Red Falcon will rule forever.
If you succeed, well...it doesn't matter, because I doubt you will.
HOW TO PLAY
Your mission begins after you leap from an army assault copter
into the dense jungle engulfing the banks of the mighty Amazon.
From this point forward you must battle past hordes of alien
soldiers equipped with awesome extra-terrestrial firepower, relying
mainly on your guerrilla warfare instincts to survive.
Standing between you and destiny are eight defense zones, with
the final zone evoking the ultimate challenge -- the destruction of
Red Falcon. To advance from one zone to another, you must wipeout heavily defended detection sensors confronting you at the
end of each zone. These sensors are designed to warn Red
Falcon of your approach so he can send forth stronger
reinforcements. To destroy Red Falcon in the final zone, you'll
have to maneuver your way into his alien body, and then destroy
his cruel, cold heart. Needless to say, this ain’t easy!
Fortunately, for your sake, six different super weapons scattered
throughout Red Falcon's defenses are at your disposal. Of course
attaining these weapons is a risky business. And to do so, you must
first blast away special flying capsules and pill-box sensors, and
then capture the released Falcon symbols. (See page 50 for details.)
Contra can be played by either one or two players. If two play, the
two will play as a team to survive.
A single player can use either P1 Keyboard Configuration or P2
Keyboard Configuration. When two players act as commandos,
both controls are used.
Scores are displayed between defense zones and at the end of
the game. The game ends when you've lost the last of your 3
lives, or when you destroy the Red Falcon. For every stage you
successfully overcome, you receive one extra life.
Page 24

46
47
THE HEROES
Bill
Code Name: Mad Dog
Only after these qualities are soaked into
your soul can you stand a ghost of a
chance saving humanity from the inhumane
Red Falcon.
Lance
Code Name: Scorpion
Being an elite commando in the Special
Forces takes a special breed of hero. You
need the cunning of a lion, the spirit of a
Viking warrior, and the intelligence of a
modern day field general.
Controlling Your Commando
SELECT Button
Use to select either 1 player or 2 player mode. When the game
finishes, use to select CONTINUE or END. Note, you can CONTINUE
up to 3 times per mission.
S
TART Button
Press to begin your mission. Press again after you've selected
CONTINUE or END when the game finishes. Also press to pause
the action.
Using the Directional Keys in sync with the A Button and B Button:
Controlling Your
Commando in 3-D
Defense Zone 2 and Defense Zone 4 challenge you
3-dimensionally. In these zones you'll find yourself deep within
a Mayan temple converted into a commando death trap, complete
with Red Falcon's Royal Guards and high voltage, mind-jolting
energy fields.
Directional Keys
Use to move forward, to the left or to the right. Press the Down
Directional Key to lay down.
B Button
Press to fire.
A Button
Press to jump.
Directional Keys B Button A Button
You won't move Shoot upward Jump upward
Move right Shoot upper right Jump right
Move right Shoot right Jump right
Move right Shoot lower right Jump right
Lay down Shoot either left or right Climb down
Move left Shoot lower left Jump left
Move left Shoot left Jump left
Move left Shoot upper left Jump left
Page 25

48
49
Snow Field
Red Falcon is beginning to worry about
your progress and has turned rain
forests into treacherous ice fields. If you
don't freeze to death or get blasted by
an array of alien forces, you may
survive.
Energy Zone
Now you're in a pre-fab world of hyperspace terror. Reinforcements pour in and
all appears hopeless. Of course if you
believe in miracles maybe you'll make it.
Hangar Zone
Holy cow! You've made it to Red
Falcon's final line of defense before
you reach the mighty one, himself.
The aliens and the odds definitely
don't favor you here.
Alien's Lair
Red Falcon, I'd like you to meet one hot
shot commando. Hot Shot commando,
meet Red Falcon. The unpleasantry is
mutual, I'm sure… since you must blast
alien larvae, alien guts, and finally the
alien's heart to save the earth.
RED FALCON'S EIGHT LINES
OF DEFENSE
Jungle
Fight through the heart of the Amazon,
blasting past Red Falcon's first lines of
defense, until you reach the entrance of
the fortified Mayan temple. Destroy the
red detection sensor to advance into
BASE 1.
Base 1
Weave through an underground maze,
destroying sensors while avoiding
attacks from the Royal Guard. Remember
-- Beware the Energy Fields. And pray
to make it past the evil core at the
center of Base 1.
Waterfall
It's just a hop, skip and a jump upward
until you reach Base 2. Naturally, aliens
surround your every move, but you
must reach the diamond shaped
detection sensor and blow it up to inch
closer toward Red Falcon.
Base 2
The sensors suddenly become more
difficult to destroy, as do the Royal
Guards. Once you reach the core, you
must demolish 4 moving heads when
they are perfectly aligned. Good luck!
You'll need it.
Page 26

50
51
Fire Ball Falcon
Rapid Fire Falcon
Spread Gun Falcon
F
orce Field Falcon
Ma
ss Destruction Falcon
POWERING-UP
THE ART OF SURVIVAL
Destroy flying capsules and pill-box sensors, and power-up
Falcon Symbols will appear. Capture these symbols and you'll
obtain the firepower you'll ultimately need to survive.
Flying Capsule
Pill Box Sensor
Machine Gun Falcon
Laser Falcon
Page 27

52
TM
53
DON’T FIRE UNTIL YOU SEE
THE RED OF THEIR EYES
Sipping cold lemonade with a couple of native lovelies, Mad Dog
and Scorpion (Guerilla Warriors extraordinaire) relax on a Rio
beach and boast of how they destroyed the vile alien warmonger,
Red Falcon. Little do they know that Red Falcon didn't flee with
his pointed tail between his legs. Instead, he tactically retreated to
round-up ruffians of the universe, friends from all walks of war, to
mount a second assault on planet Earth.
One of these new recruits is Jagger Froid, a demented alien from the
Black Hole Galaxy, who dishes out punishment with a razor sharp
tongue. Red Falcon has also shuttled in The Babalu Destructoid
Mechanism, a giant alien attack tank, which was the primary
weapon used to disintegrate the innocent solar system of Tralala.
But the genius behind Red Falcon's Earth conquering concept is
his plan to have thousands of intergalactic warriors seep into the
brains of the U.S. Army. It's a mind contamination trick, which has
already taken command of U.S. Forces at Fort Fire Storm.
How do we know that our soldiers have been brain trashed? You
can see it in their eyes.
Now, if Mad Dog and Scorpion fail to recuperate from their months
on the beach in time to destroy Red Falcon's G.I. fortified Hate Nest,
his sinister scheme will permeate the world's mightiest power
(nuclear missile silos included).
And if that happens, we'll all be pushing up daisies.
HOW TO FIGHT FOR YOUR LIFE
(AND EVERYONE ELSES!)
Fire! Fire! Fire! And don't stop firing are the only instructions you
need… because in this Doomsday extravaganza, there's little time
for thinking. A killer instinct is all that matters. And if your trigger
finger lacks stamina, Earth will lack a future.
To begin this all-out mega-war, press the START Button. Next, press
the SELECT Button to choose a 1 Commando or 2 Commando
contest. If one Commando plays, you'll assume the savage role of
Mad Dog. If a second Commando plays, he or she will take charge
of Scorpion.
Finally, press the START Button again, and it's off to meet Red
Falcon...or your maker!
HOW TO POWER-UP
At the beginning of your assault on Fort Fire Storm, your
only “hide protection weapon” is a rifle. But if you blast
away bouncing Power-Up Capsules and stationary Pill
Box Sensors, they'll turn into Falcons. Capture these
Falcons by moving your Commando onto them, and
your odds of survival will improve a little.
NOTE: Each Falcon is labeled by a letter referring to
the Super Weapon you'll receive.
Page 28

54
TM
55
CONTROLLING YOUR
COMMANDO
Control Pad [Directional Keys]
Use to move your commando
SELECT Button
Use to select either 1 Commando or 2 Commando mode. When the
game finishes, use to select CONTINUE or END.
Note: You can CONTINUE up to 3 times per mission.
START Button
Press to begin your mission. Press after you’ve selected CONTINUE
or END when the game finishes. Also press to PAUSE the action,
and press again for the action to continue.
HOW TO USE THE CONTROL PAD IN SYNC WITH
THE A AND B BUTTONS
During jumping, you can fire in each direction by using the
Directional Keys while pressing the B Button. You cannot jump
when in a vertical screen.
SUPER WEAPON
Machine Gun Gives you RAT-TAT-TAT-TAT capabilities.
Spread Gun Sprays fire in five directions.
Laser Increases your destructive power.
Flame Thrower When it hits an enemy, its flame will ignite.
(To fire this fire, release the Directional Keys
and press the B Button.)
Rapid Fire Gives you more bang for the buck.
Barrier Makes you invincible for a limited period of time.
Mega Shell It destroys all enemies on the screen.
(This weapon has no identifying letter.)
Sgt. Bill Ko
(Code name: Mad Dog)
Corporal Lance
(Code name: Scorpion)
SOUND SELECT FUNCTION
During the Title Screen, hold down the A and B Buttons while
pressing the START Button, and the Sound Select Mode will appear.
Here you can choose a new "battle tune" by moving the cursor
with the Directional Keys and pressing the B Button.
To silence the song, press the A Button.
NOTE: Press the START Button to return to action!
Directional Keys B Button A Button
You won't move Shoot upward Jump upward
Move right Shoot upper right Jump right
Move right Shoot right Jump right
Move right Shoot lower right Jump right
Lie down Shoot either left or right Climb down or
or fire down when jumping jump straight up
Move left Shoot lower left Jump left
Move left Shoot left Jump left
Move left Shoot upper left Jump left
Page 29

TM
57
56
RED FALCON’S MASS
DESTRUCTION ZONES
Gates of Fort Fire Storm
Level 1
Fort Fire Storm’s Warped
Mind Command Center
Level 2
Tropics of Torture
Level 3
Lair of the Jungle Aliens
Level 4
Massacre Mountains
Level 5
Jagger Froid's Fruit-of-
the-Doom Defense Line
Level 6
Radioactive Lava Fields
Level 7
Red Falcon's
Poison Palace
Level 8
KILLER ALIENS
Alien in Sergeant Skin’s Clothing
Level 1
Babalu Destructoid Mechanism
Level 3
Kr
ypto-Crustacean
Level 5
Lip-O-Suction
Level 6
T
emple of Terror
Level 7
Jagger Froid’s Spit Soldier
Level 8
Red Falcon
Level 8
Page 30

58
SOFTWARE LICENSE AGREEMENT
1. Limited Use License. Subject to the conditions described below, Konami of America, Inc.
("Konami") grants you the non-exclusive, non-transferable, limited right and license to install and
use one copy of this program ("Program") solely and exclusively for your personal use. "Program"
includes all software included with this agreement ("Agreement"), the associated media, any
printed materials, and any online or electronic documentation. By opening this package, installing,
and/or using this Program and any software programs included within, you accept the terms of
this license. All rights not specifically granted under this Agreement are reserved by Konami and,
as applicable, Konami’s licensors. This program is licensed, not sold, for your use. Your license
confers no title or ownership in this Program and should not be construed as a sale of any rights
in this Program.
2. License Conditions. Any other use of this Program including selling, leasing, renting, copying
lending or otherwise distributing, transmitting or transferring in contravention of the above license
is in breach of Konami’s rights and, as applicable, Konami’s licensors. You shall not reverse
engineer, derive source code, modify, decompile, disassemble, or create derivative works of this
Program. Also, you shall not use the Program, or permit the use of the Program, in a network,
multi-user arrangement or remote access arrangement, including any online use, except as
provided by this Program. Export or re-export of this Program or any copy or adaptation in
violation of any applicable laws or regulations of the United States government is prohibited.
3. Ownership. All title, ownership rights and intellectual property rights in and to this Program and
any all copies thereof (including but not limited to any titles, computer code, themes, objects,
characters, character names, stories, dialog, catch phrases, locations, concepts, artwork, animation,
sounds, musical compositions, audio-visual effects, methods of operation, moral rights, any related
documentation and "applets" incorporated into this Program) are owned by Konami, affiliates of
Konami or Konami’s licensors. This Program is protected by the copyright laws of the United
States, international copyright treaties and conventions and other laws. This Program contains
certain licensed materials and Konami’s licensors may protect their rights in the event of any
violation of this Agreement.
4. Limited Warranty. Konami warrants to the original consumer purchaser of this Program that the
recording medium on which the Program is recorded will be free from defects in material and
workmanship for 90 days from the date of purchase. If the recording medium is found defective
within 90 days of original purchase, Konami agrees to replace, free of charge, any product
discovered to be defective within such period upon its receipt of the Product, postage paid, with proof
of the date of purchase, as long as the Program is still being manufactured by Konami. In the event
that the Program is no longer available, Konami retains the right to substitute a similar program of
equal or greater value. This warranty is limited to the recording medium containing the Program as
originally provided by Konami and is not applicable to normal wear and tear. This warranty shall not
be applicable and shall be void if the defect has arisen through abuse, mistreatment, or neglect. Any
implied warranties prescribed by statute are expressly limited to the 90-day period described above.
EXCEPT AS SET FORTH ABOVE, THIS WARRANTY IS IN LIEU OF ALL OTHER WARRRANTIES, WHETHER
ORAL OR WRITTEN, EXPRESS OR IMPLIED, INCLUDING ANY WARRANTY OF MERCHANTIBILITY,
FITNESS FOR A PARTICULAR PURPOSE OR NON-INFRINGEMENT, AND NO OTHER REPRESENTATIONS
OR CLAIMS OF ANY KIND SHALL BE BINDING ON OR OBLIGATE KONAMI.
When returning the Program for warranty replacement, please send the original product disc only
in protective packaging and include: (1) a photocopy of your dated sales receipt; (2) your name
and address clearly printed;(3) a brief note describing the defect, the problem(s) you encountered
and the system on which you were running the Program; (4) if you are returning the Program after
the 90-day warranty period, but within one year after the date of the purchase, please include a
check or money order for $10 US per CD.
In the US send to:
Customer Service
Warranty Replacements
Konami of America, Inc.
1400 Bridge Parkway
Redwood City, CA 94065
CREDITS
KONAMI SOFTWARE SHANGHAI, INC.
Director Lee Tong
Programmers Qian Xiaofeng
Tao Kuan
KONA
MI COMPUTER ENTERTAINMENT HAWAII, INC.
Producer Mitch Ueno
Artist Okjoo Chang
Artwork Coordinator Christine Kogure
Sound FX Brad Meyer
QA RMC
Special Thanks: Jun Funahashi, Tsuyoshi Arayashiki, Takashi Kuwabara,
Isao Ishihara, Jun Aoki, Ken Imaizumi, Haruko Goldsmith
KONAMI OF AMERICA, INC.
Chief Operating Officer Dick Wnuk
Vice President Marketing Chris Garske
Vice President Sales Catherine Fowler
Director of Product Marketing Rick Naylor
Director of Marketing Communications Cherrie McKinnon
Product Manager Dennis Lee
Senior Creative Services Manager Monique Catley
Package and Manual Design Scott Allen
Special Thanks: Lee Allison Verdeckberg, Barbara Loo, Kathie Tompkins,
Tammy Schachter, David Chen, Wilson Cheng, Jason Enos, Mike Dobbins
Page 31

5. LIMITATION ON DAMAGES. IN NO EVENT WILL KONAMI BE LIABLE FOR SPECIAL, INCIDENTAL,
OR CONSEQUENTIAL DAMAGES RESULTING FROM POSSESSION, USE OR MALFUNCTION OF THE
PROGRAM, INCLUDING DAMAGES TO PROPERTY, LOSS OF GOODWILL, COMPUTER FAILURE OR
MALFUNCTION AND, TO THE EXTENT PERMITTED BY LAW, DAMAGES FOR PERSONAL INJURIES,
EVEN IF KONAMI HAS BEEN ADVISED OF THE POSSIBLITY OF SUCH DAMAGES. KONAMI’S
LIABILITY SHALL NOT EXCEED THE ACTUAL PRICE PAID FOR THE LICENSE TO USE THE PROGRAM.
SOME STATES/COUNTRIES DO NOT ALLOW LIMITATIONS ON HOW LONG AN IMPLIED WARRANTY
LASTS AND/OR THE EXCLUSION OR LIMITATIONS OF INCIDENTAL OR CONSEQUENTIAL DAMAGES,
SO THE ABOVE LIMITATIONS AND/OR EXCLUSION OR LIMITATION OF LIABILITY MAY NOT APPLY TO
YOU. THIS WARRANTY GIVES YOU SPECIFIC LEGAL RIGHTS, AND YOU MAY HAVE OTHER RIGHTS,
WHICH VARY FROM JURSIDICTION TO JURISDICTION.
6. Indemnity. You agree to indemnify, defend and hold Konami, its partners, affiliates, licensors,
contractors, officers, directors, employees, and agents harmless from all damages, losses and
expenses arising directly or indirectly from your acts and omissions to act in using the Program
pursuant to the terms of this Agreement.
7. Injunction. Because Konami would be irreparably damaged if the terms of this Agreement were
not specifically enforced, you agree that Konami shall be entitled, without bond, other security or
proof of damages, to appropriate equitable remedies with respect to breaches of this Agreement, in
addition to such other remedies as Konami may otherwise have under applicable laws.
8. Miscellaneous. This Agreement represents the complete agreement between the parties and
supersedes all prior agreements and representations between them. Only a writing executed by
both parties may amend it. If any provision of this Agreement is held to be unenforceable for any
reason, such provision shall be reformed only to the extent necessary to make it enforceable and
the remaining provisions of this Agreement shall not be affected. This Agreement shall be
construed under California law as such law is applied to agreements between California residents
entered into and to be performed within California, except as governed by Federal law and you
consent to the exclusive jurisdiction of the state and federal courts in San Francisco, California.
 Loading...