

Page 1

TABLE OF CONTENTS
Understand Your Enemy ...................2
Getting Started ...............................4
Playing the Game............................6
Multiplayer Game..........................22
Advanced Controls.........................32
GDI Units......................................35
GDI Structures...............................44
Nod Units .....................................52
Nod Structures ..............................62
GDI Tutorial ..................................70
Nod Tutorial .................................79
Credits .........................................87
"We have waited centuries for this moment.
"We have waited centuries for this moment.
The rivers will flow with the blood of those who oppose us."
The rivers will flow with the blood of those who oppose us."
-- Kane, suspected leader of the
-- Kane, suspected leader of the
Brotherhood of Nod
Brotherhood of Nod
(Global Net Interpol, file #GEN4:16)
(Global Net Interpol, file #GEN4:16)
Page 2

THE BROTHERHOOD OF NOD
Commonly, The Brotherhood, The Ways of Nod, ShaÆSeer among the tribes of Godan;
HISTORY
see INTERPOL File ARK936, Aliases of the Brotherhood, for more.
FOUNDED
before 1,800 BC
IDEOLOGY
with imperialist tendencies. In actuality it is an aggressive and popular neo-fascist, antiWest movement vying for total domination of the world’s peoples and resources.
Operates under the popular mantra, “Brotherhood, unity, peace”.
CURRENT HEAD OF STATE
TRX11-12Q); al-Quayym, Amir (MI6 DR-416.52)
BASE OF OPERATIONS
Malaysia; somewhere in Ar-Rub’ al-Khali, Saudi Arabia; Tokyo; Caen, France.
MILITARY STRENGTH
a recent scandal involving United States defense contractors confirms that the
Brotherhood is well-equipped and supports significant land, sea, and air military
operations.
ECONOMIC STRENGTH
US
$255.2 billion, based on audits of seized financial records (see CIA Docket 3231.54-
776 FIA).
POLITICAL STRENGTH
Jordan (52%); United We Stand America party in the United States (12%); Albion First!
party in the United Kingdom (25+%), among others. (See Brookings Institution
publication A42962-94 for full disclosure.)
AFFILIATIONS
document: Brotherhood of Nod Splinter Groups.)
: Date unknown: exaggerated reports place the Brotherhood’s founding
: To unite third-world nations under a pseudo-religious political platform
: Kane; also known as Caine, Jacob (INTERPOL, File
: Global. Command posts previously identified at Kuantan,
: Previously believed only to be a smaller terrorist operations,
: Considerable operating assets believed to be in excess of
: Believed to be the sole backers of the Fist of Allah party in
: Irish Republican Party; Islamic Jihad; Khmer Rouge; others. (See
SEE ALSO: Mobius, Dr. R.H.; terrorist activities; United States Global Defense Act;
Report of World Energy Radical Redistribution, US Congressional Report, 1994, File
XXY22.
2
Page 3
GLOBAL DEFENSE INITIATIVE
Commonly, GDI. Before 1990, known as Special Operations Group Echo, Black Ops 9.
HISTORY
FOUNDED
Act (UNGDA)
IDEOLOGY
as outlined in the United Nations Charter.
CURRENT HEAD OF STATE
Staff, United Nations Military Command.
BASE OF OPERATIONS
CLASSIFIED.
MILITARY STRENGTH
Paragraph 12.
ECONOMIC STRENGTH
governments, public organizations, and private enterprise.
POLITICAL STRENGTH
and under the orders of the United Nations Security Council.
AFFILIATIONS
: 12 October 1995, in accordance with the United Nations Global Defense
: To enforce the United Nations Global Defense Act and uphold the ideals
: Brigadier General Mark Jamison Shepherd, Chief of
: United Nations Military Command Center, location
: Within parameters of the UNGDA, Article V, Section 3A,
: Funded by United Nations and various national
: Not applicable: operates within parameters of the UNGDA
: United Nations.
SEE ALSO: Shepherd, M.J.; United Nations, 1995 to present; United Nations Global
Defense Act, 1995; Mobius, Dr. R.H.
3
Page 4

System Requirements
An IBM or 100% compatible computer with Pentium CPU required
Windows ’95 or Windows 98 required
8MB of RAM (16MB strongly recommended)
Digital Audio via Windows ‘95-supported Sound Cards
Double-speed CD-ROM or faster
40MB free Hard Drive space
GETTING STARTED
14.4 (28.8 recommended) modem for modem play
IPX network for Local Area Network play
Keyboard
Mouse
1MB PCI or local bus video accelerator card (ISA video cards not supported)
®
®
Internet Requirements
28.8 modem or direct Internet connection
A valid account with an Internet service provider (ISP) and a valid Internet e-mail address
Winsock 1.1 compliant TCP/IP stack
8MB RAM (16MB
strongly
recommended)
Command & Conquer supports Westwood’s DDA™ (Direct Digital Audio). DDA provides
100% digital audio, giving you premium quality music and sound. With DDA, PC audio is
no longer restricted to FM or General MIDI limitations.
4
Page 5

Setup & Installation
Insert any C&C95 CD into the CD-ROM drive.
Command & Conquer for Windows ’95 uses the “Windows ’95 Autoplay” feature to present you with installation and gameplay options as appropriate. Inserting any C&C95 CD
into your CD-ROM drive should cause the Autoplay dialog to appear. If you have not installed
C&C95 before you will be presented with an INSTALL option from this dialog. Click this and
follow the onscreen instructions.
In the event that the “Windows ’95 Autoplay” feature does not work on your system, you
should install the product by clicking on the START button on the Windows ’95 taskbar, located in the lower left-hand corner of the screen. Click RUN…, type “D:\SETUP” (where D is
the letter that designates your CD-ROM drive), and then click the OK button. Please follow
the onscreen instructions which appear.
Once Setup is complete, you will be returned to Windows where a Westwood program group
containing icons for C&C95 and the Setup program will be added to the Start menu. By
default, C&C95 is installed into a directory named C:\WESTWOOD\C&C95.
Loading Instructions
Insert any C&C CD into the CD-ROM drive.
C&C95 uses the “Windows 95 Autoplay” feature to present you with installation and gameplay options as appropriate. Inserting any C&C95 CD into your CD-ROM drive should cause
the Autoplay dialog to appear. If you have previously installed C&C95 you will be presented
with a PLAY option from this dialog. Click this to launch the game. The Introduction to the
Game will follow.
Alternatively, C&C95 can be launched by clicking the START button on the Windows 95
taskbar, clicking PROGRAMS, then WESTWOOD, and then clicking “COMMAND &
CONQUER WINDOWS ’95 EDITION”.
GETTING STARTED
5
Page 6
Starting the Game
If you have never played Command & Conquer before, be sure
to read the Tutorial on pages 70 and 79.
CHOOSING YOUR SIDE: GDI OR THE BROTHERHOOD OF NOD
Near the end of the introduction, you are asked to choose a side to ally with. One is GDI—
the United Nations’ Global Defense Initiative peacekeeping force. The other is The
PLAYING
Brotherhood of Nod, a secretive terrorist organization that has remained hidden for centuries… until now. Choose whichever one suits your tastes by left clicking on the logo of the
appropriate side.
If you choose the Brotherhood, you will fight against GDI. If you choose GDI, you will fight
against the Brotherhood. Each side has its own characteristics and style of playing, as well as
radically different units, buildings, and tactics.
GDI Nod
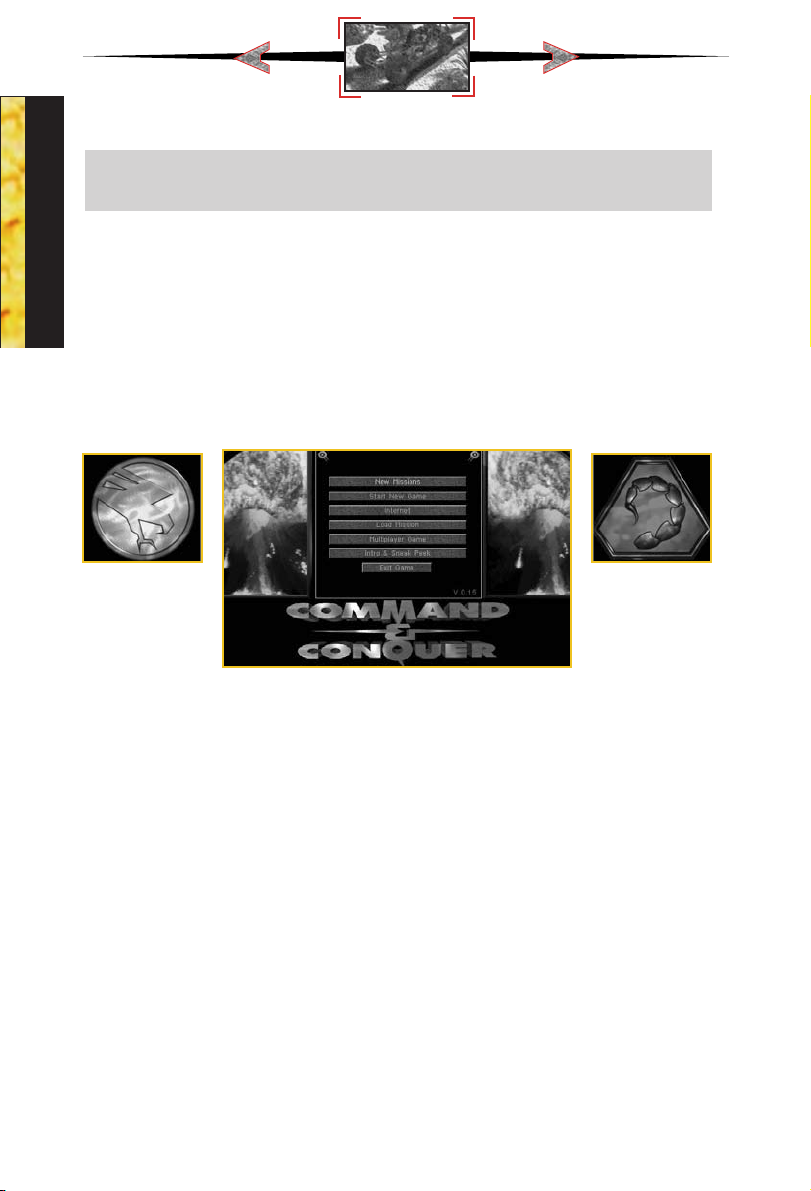
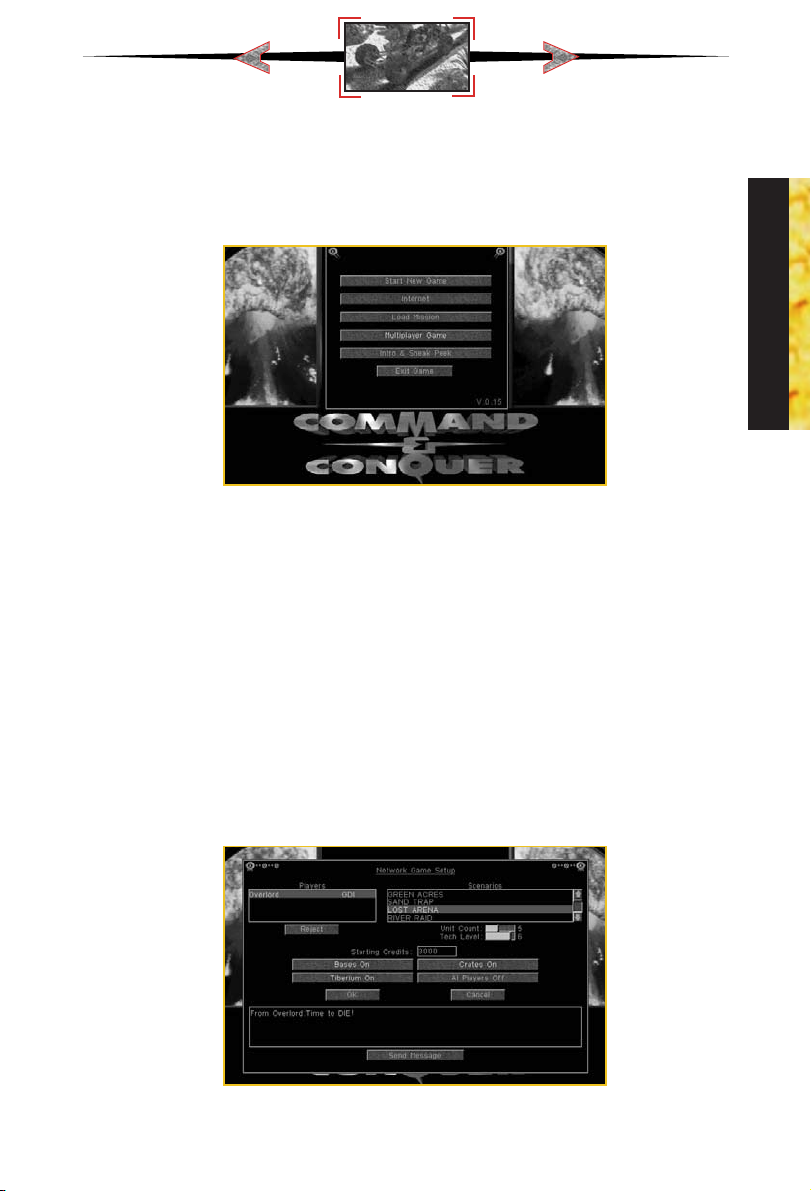
Title Screen menu
Title Screen Menu
When you start the game for the first time, you’ll be treated to C&C95’s spectacular introduction. In subsequent games, you’ll be taken directly to the Title Screen menu:
START NEW GAME
To start a new game, choose this option. You’ll go straight to the screen for choosing your
side. When starting a new game, the introduction is not shown again.
INTERNET
If you’d like to play an Internet game , choose this option. (See page 22 for more information.)
LOAD A MISSION
If you want to play a previously saved mission, choose this option. (See page 19 for saving missions.)
6
Page 7
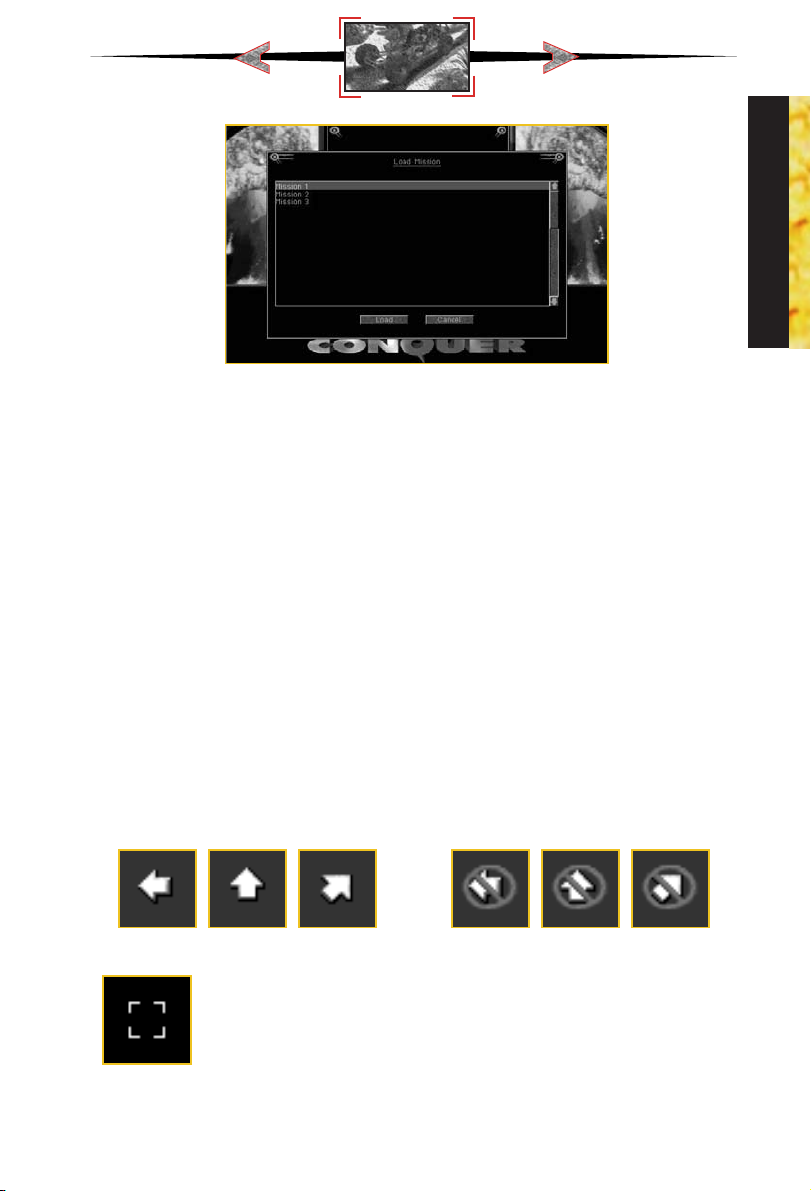
Load Mission screen
Load Mission screen
From this Load Mission screen, click on the up-arrow or down-arrow to scroll through
your saved missions. Select the saved mission you wish to reload and left click on LOAD.
MULTIPLAYER GAME
This option allows you to select a multiplayer network game (if detected) or serial game (null
modem or modem). See the Multiplayer Game section (page 22) for more details.
INTRO & SNEAK PEAK
If you want to see the introduction again, select this option.
EXIT GAME
Select this option to exit back to the Windows 95 desktop.
Playing the Game
SCROLLING AROUND
To scroll the main viewing window around the battlefield, move the cursor to the edge of the
screen. The cursor will become a white solid arrow and the view will scroll in the indicated
direction. If you’re at the edge of the battlefield, a slash will appear over the arrow indicating
that this is as far as you can go.
PLAYING
Scroll arrows Can’t Scroll arrows
ORDERING YOUR TROOPS AROUND
To get your troops to act, select a unit by left clicking on it. A bracket will
appear around the selected unit and the unit’s health will be displayed above
the unit. Move the cursor to the location on the game map where you
want the unit to go. If the cursor is over a potential target, it will change to
the targeting cursor. Left clicking here will cause the unit to attack the target. Otherwise, it
will move the unit to that location, unless it is impassible (i.e. a cliff or trees).
To cancel out of this mode (or any mode), right click and the unit will be deselected.
7
Page 8
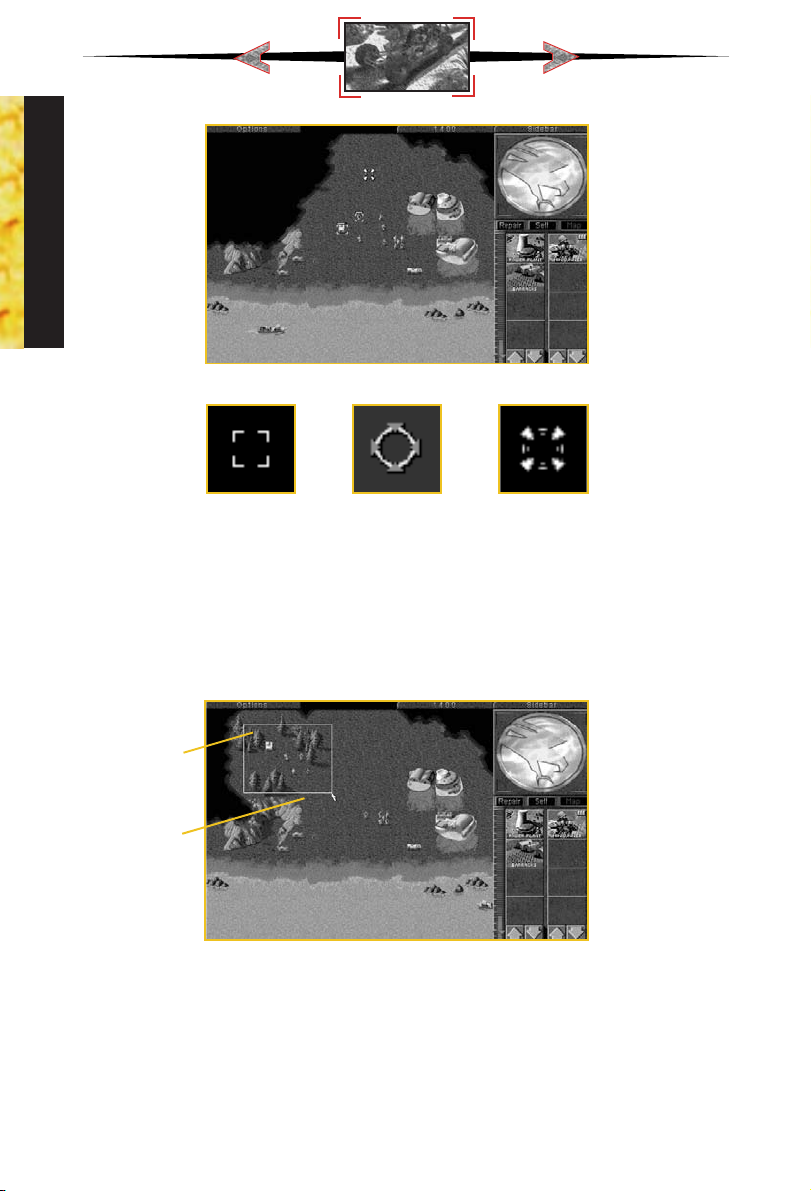
PLAYING
Main Game screen
Selection Targeting Movement
cursor cursor cursor
Group Activities
To save time, you can combine your troops into groups. To select several units simultaneously, left click and hold the mouse button down. Drag the mouse cursor to include all the
troops you want selected. A white box outline indicates the range of this selection. Then,
release the mouse button, and all the units within the white box will be selected. You can
give that group an order the same way you’d give a single unit an order.
Left click and hold
button down,
then drag the
cursor to include
desired units
Selecting many units at once
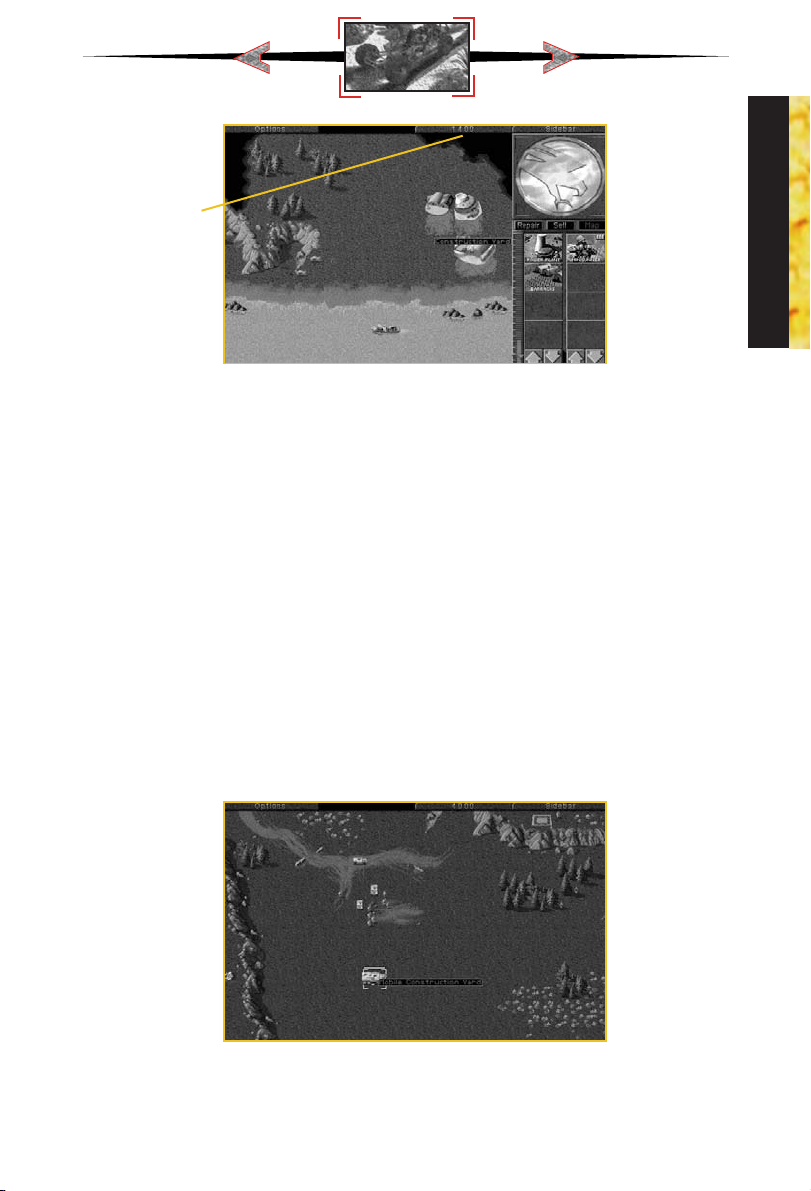
Sidebar
From the Main Game screen, the Sidebar may be opened by left clicking the sidebar button in the upper right corner. If you have a Construction Yard, or, if you deploy an MCV,
the Sidebar will open automatically. Click on the Sidebar once more to close it.
From the Sidebar, you can build units and buildings by left clicking on the corresponding
icons. The sidebar will also show you a radar map of the area (if you have radar stations)
and also tells you how much power your base is producing vs. how much it needs.
8
Page 9
Credits
Sidebar open
Credit Indicator
To the left of the sidebar, and above the main game screen is the amount of credits you may
spend. This indicator keeps track of the amount of money you have available to build structures and units. Your total credits will decrease as you build or repair units and structures. Credits
will increase when a building is sold or when a harvester unloads Tiberium at a refinery.
Production vs. Non-Production Missions
There are two types of missions: production and non-production. In production missions,
you are given either a construction site or a Mobile Construction Vehicle (MCV).
In non-production missions, you must finish the mission with units you begin with. (This may
sometimes lead to production situations. For instance, if you begin with an engineer unit and
manage to capture an enemy production structure, then the mission type may change.)
Building Things
Critical to the success of many missions is constructing your own field base, and constantly
maintaining and defending this base during combat. A strong base is often necessary to win.
PLAYING
Deploying your MCV
9
Page 10
PLAYING
Construction Yard complete
To begin building your base, you must have a Construction Yard. Unless the Construction
Yard is set up when the mission begins, you’ll have to deploy the Mobile Construction Vehicle
(MCV). Left click on the MCV and move it to where you want the Construction Yard to be
placed. If you try to deploy the MCV where there isn’t enough room, the deploy cursor will
not appear. If there is enough room, left click to deploy the MCV, and it’ll turn into a
Construction Yard.
MCV Deploy Construction
cursor Yard
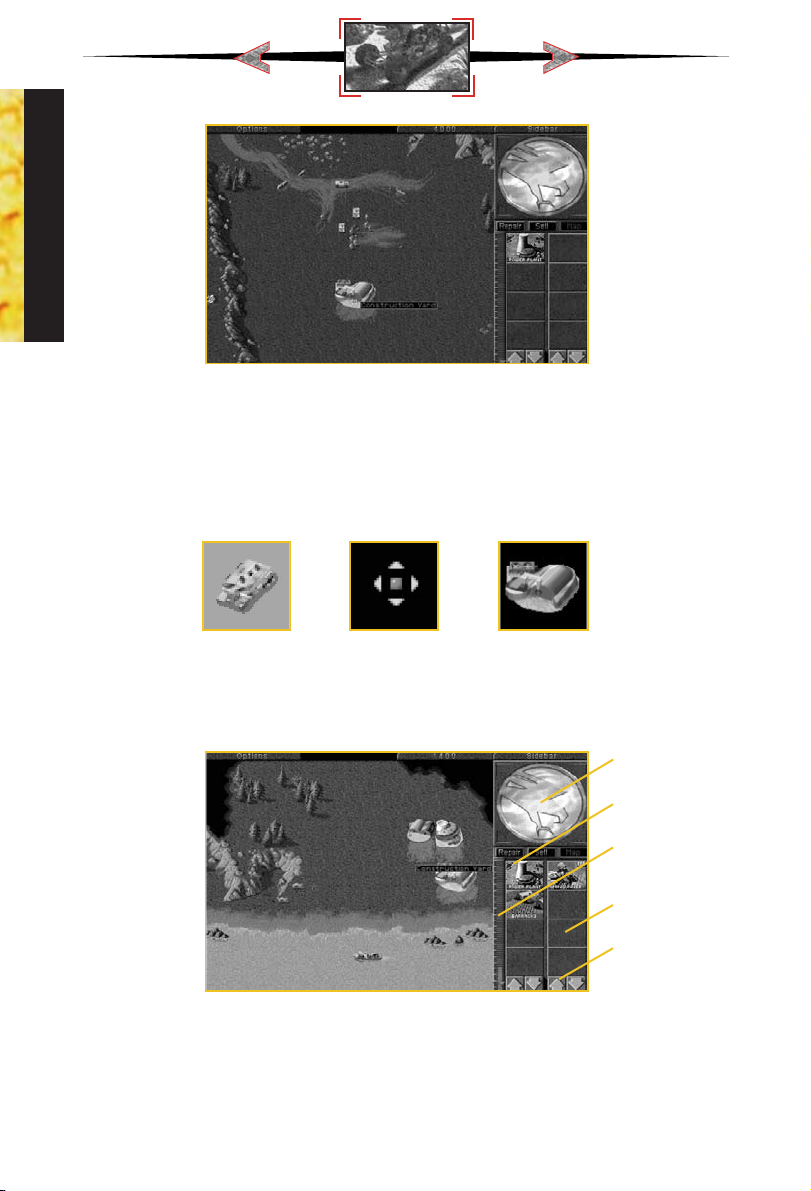
Once the Construction Yard is set up, the Sidebar will pop up. In the upper portion of the
Sidebar, you will see the symbol of your side (GDI or Nod). Later, this area becomes a radar
display, when you’ve built a Radar Facility and have enough power to support it.
Your side
Building icons
Power bar
Unit icons
Scroll buttons
Below the radar display is a row of three buttons.These are the REPAIR, SELL, and MAP buttons. Each of the buttons has a specific game function that is discussed later in this section.
Underneath the REPAIR, SELL, and MAP buttons are two columns of icons. The left column
displays which structures your Construction Yard can build; the right column displays the
units you can create. The arrow buttons at the bottom of these icons allow you to scroll through
these when there are more than four available.
10
Page 11

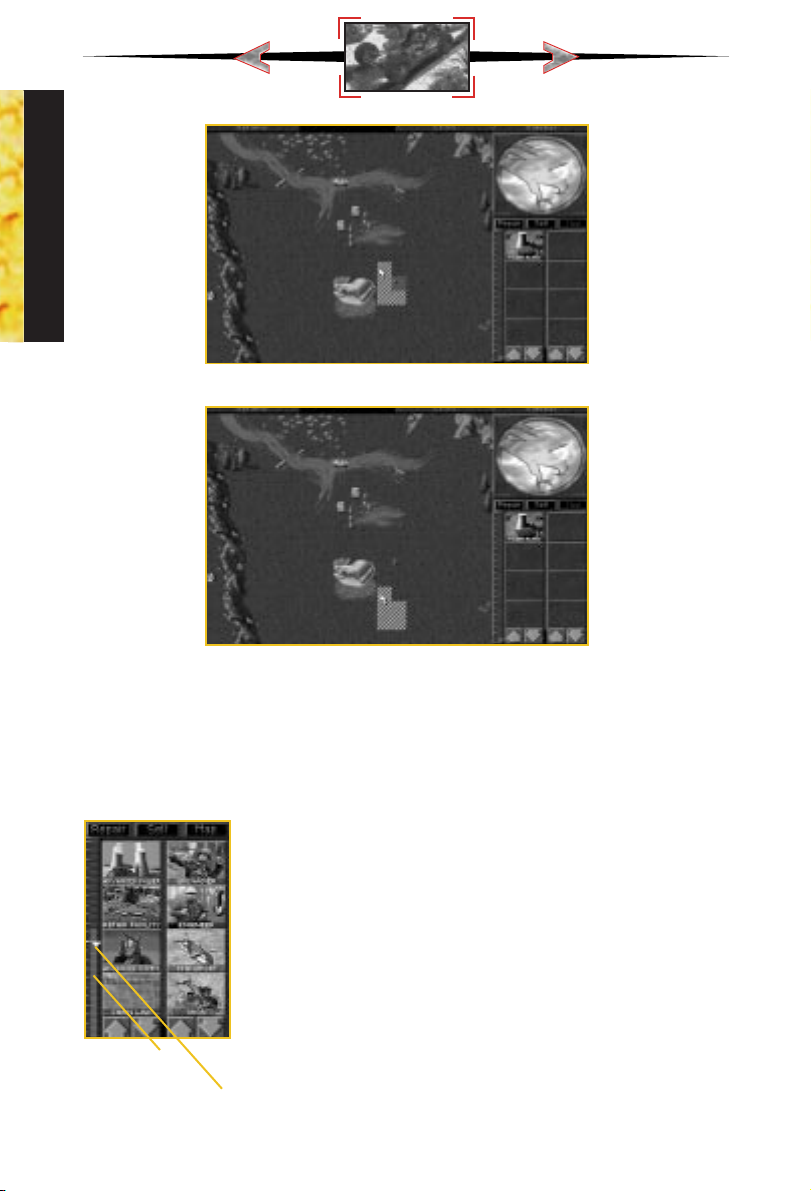
Choosing a structure in the Sidebar
To build a structure or unit, left click on the appropriate icon. Construction will take a period of time, as indicated by the sweeping arc over the icon. Cost for construction and/or
purchasing will be automatically deducted from your available credits. Only one unit and
one structure can be built at any one time. If you move the mouse cursor over the icon (without clicking), you’ll see what that icon represents and how much it would cost you to build,
buy, or train it.
Ready to place
To place a completed structure, first select a structure and left click on it. Once
construction is completed, the word READY will appear across the bottom
of the icon in the Sidebar. Left click on the icon, and the mouse cursor will
turn into a placement grid on the battlefield. The grid gives you an idea of
Placement
how large the building will be on the field. Move the grid to where you want
the building placed. The grid should be entirely white. Any red in the grid
Grid
indicates that the placement area is blocked, and you will not be able to
deploy the building. Once you’ve found a suitable location, left click and the building will
be placed where you indicated. Your new building must be adjacent to one of your existing structures or the entire placement grid will be red.
PLAYING
11
Page 12
PLAYING
Area blocked
Area clear!
While there is a grid on the field, you will not be able to build anything else. You’ll have
to either place the building or cancel its placement. To cancel, right click while the placement grid is still up. The grid will disappear, and READY will appear on the building icon
(in the sidebar) again. Right clicking again on the icon in the Sidebar will cancel the building and refund your credits.
Power
To the left of the construction icons is a narrow bar with a horizontal
indicator on it. This is your power bar—keep an eye on it! Every
building that you place requires power to run. Knowing how much
power you have and how much power you are using is very
important.
The blue “threshold” bar shows how much power your base (and all
its structures) needs to function optimally, while the vertical power production bar shows how much power your base is producing. If the
vertical power production bar is yellow or red, your base doesn’t have
Power
production
Blue “threshold” bar
enough power! If it’s green, your base has enough power to run all
the structures you have built.
Lack of full power will cause construction to go slower, and will also
shut down radar (if it was built), as well as deactivating some of the
12
Page 13

high-tech base defenses available in the game. Power Plants are good targets to go after
if the enemy has defenses that are tough to destroy. Without power, the enemy is denied
information, quick response time, and base defense.
Low power
The output of any power plant depends on how well it is functioning. Make sure to keep all
of your Power Plants fully repaired, or you may find yourself losing power at an inopportune moment. Build an extra power plant or two to be safe.
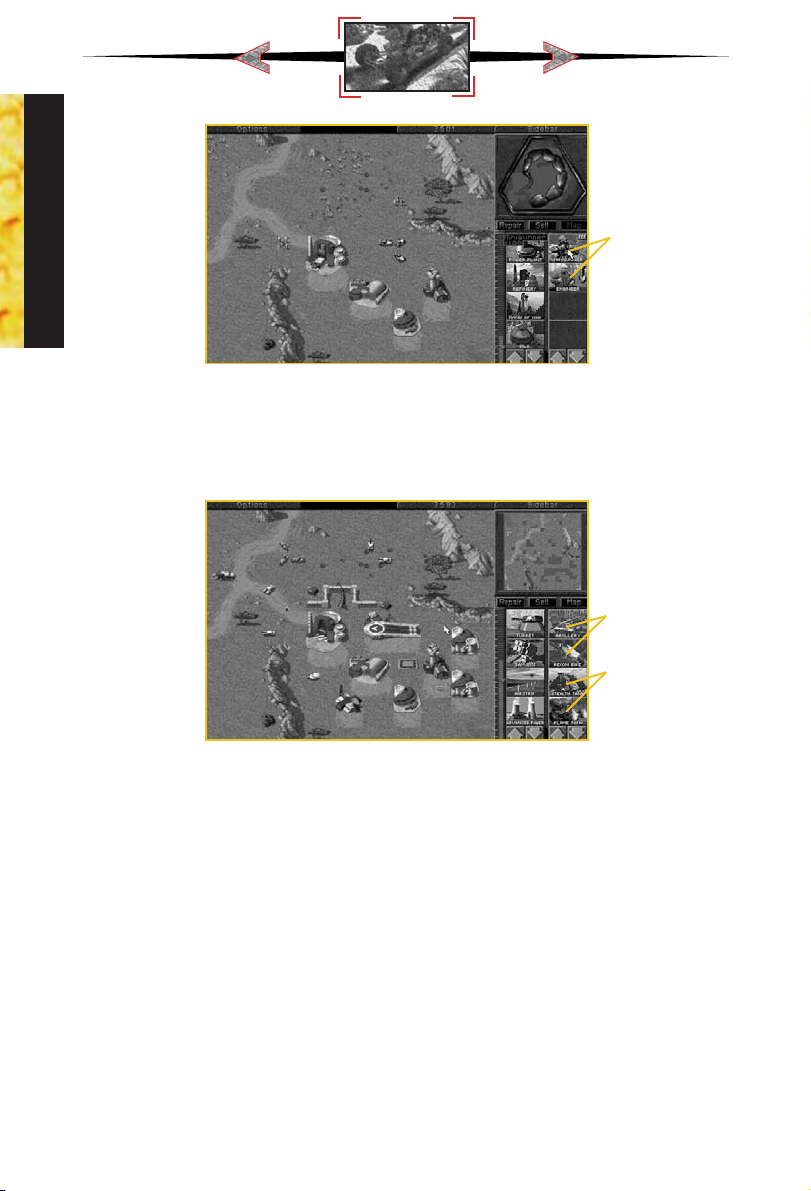
Creating Additional Units
If you have a Construction Yard and enough credits, build a Power Plant and then build a
Barracks or Hand of Nod, which will allow you to train infantry. At first, the type of troops
you can train will be limited. As you win missions you’ll receive new technologies and
upgrades. Once you do this, new troops with unique abilities will become available.
PLAYING
Ready to build barracks (Hand of Nod)
13
Page 14
Infantry
PLAYING
With Hand of Nod built, now you can train infantry
As the game progresses and you build up your base, you’ll have a chance to construct a
Weapons Factory or an Airfield. With these, you can acquire new and more powerful units
like Hum-vees, Attack Cycles, Dune Buggies, and eventually, Tanks. Keep in mind that all
the units and buildings mentioned above won’t be available for both sides.
Vehicles
Tanks
Airfield built: Now you can order vehicles and tanks
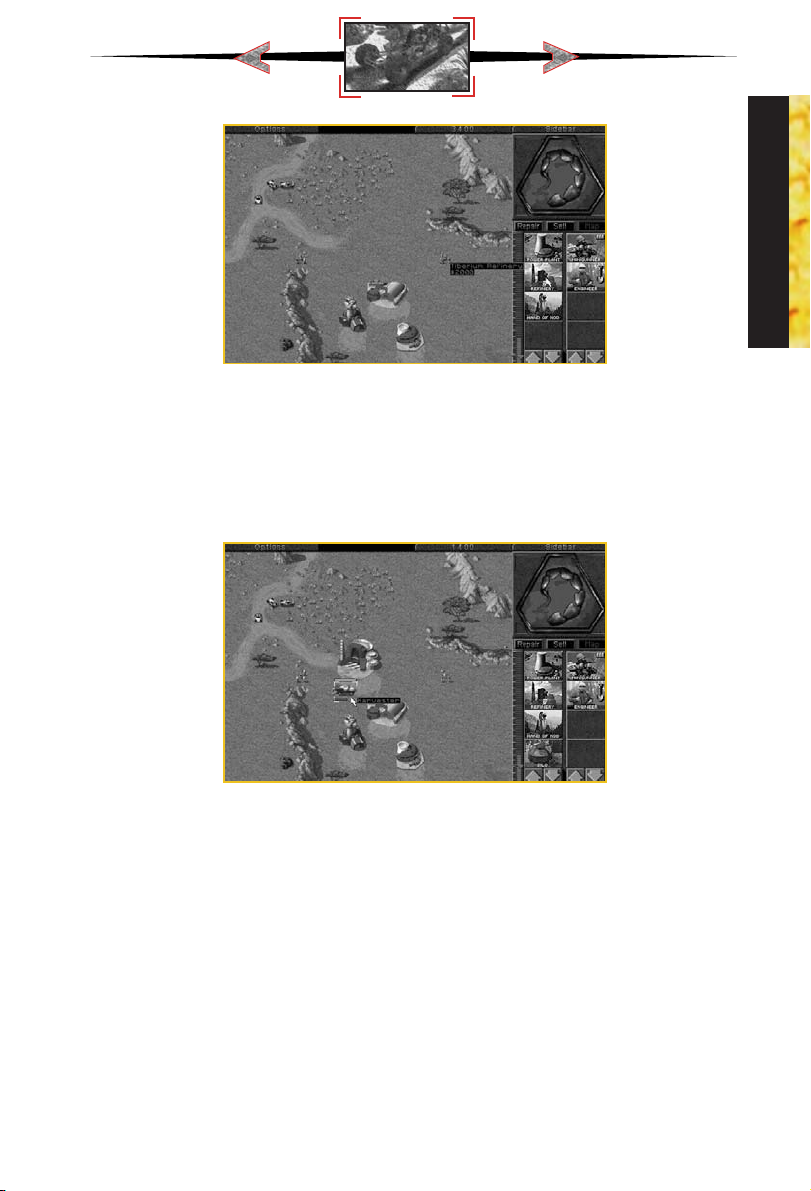
Tiberium and Harvesting
In order to make money, you need to harvest Tiberium. To harvest Tiberium, you need to
build a Refinery and a Harvester. Every Refinery that you build comes with a Harvester, and
you can build extra ones if you want to collect Tiberium faster. Once construction of the
Refinery is complete, place it in a clearing. The closer the Refinery is to Tiberium, the faster
you will make additional credits.
14
Page 15
Building a refinery
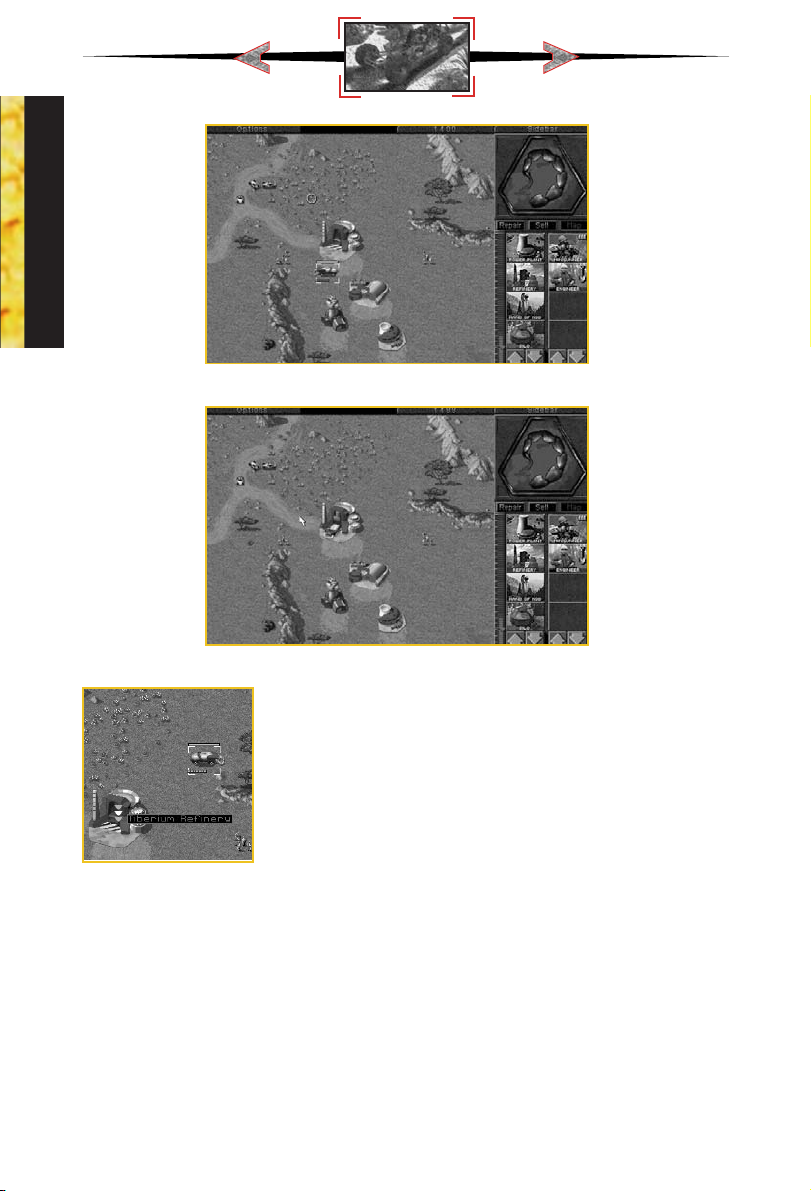
When the Refinery is built, a Harvester will appear with it.The Harvester will move to the
nearest patch of Tiberium visible on your map, and proceed to harvest it. The Harvester will
try to remember where it was collecting from, and after dumping all of the collected
Tiberium into the Refinery, it will attempt to return to the Tiberium patch and continue harvesting from it. This process is automatic, but can be interrupted by you at any time by redirecting the Harvester to another location or by any obstacles which get in the way.
Getting your harvester
If there is no visible Tiberium around when you place your Refinery, the Harvester will appear,
but will not move. Take one of your other units and scout around your base until you find
some Tiberium. Once you find some, select the Harvester by left clicking on it, and the move
the cursor over the Tiberium. You will see it change to an Attack cursor. Since the Harvester
doesn’t have a weapon, this cursor tells it to start harvesting. Left click again, and the
Harvester will proceed to the Tiberium and begin to harvest it. The automatic harvesting
process will be started.
PLAYING
15
Page 16
PLAYING
Telling your harvester where to harvest
Automatic harvesting has begun
You can force the Harvester to return to the Refinery early. To
do this, left click on the Harvester, move your cursor over the
Refinery, and left click on the Refinery when the cursor changes
into an Enter cursor. If the Enter cursor does not appear, this
means there is a Harvester already on its way back to this particular Refinery. Select another Refinery or wait until the returning Harvester has delivered its load.
NOTE: If you move the Harvester somewhere, and do not tell it
Enter cursor
stop there until you order it to move again. The automatic collection only happens when you
have a Refinery, a Harvester and Tiberium in sight.
KEEP AN EYE ON YOUR HARVESTER! There is nothing worse than not watching your
Harvester, only to have it wander into enemy territory in order to collect Tiberium. It is the
weakest link in your financial operations—remember to protect it with additional units to
keep it safe!
to collect Tiberium, it won’t. When it reaches its destination, it will
Managing Your Money
Always be sure your base has enough storage space for excess Tiberium. Your Refinery can
only hold 1000 credits worth of Tiberium, but a Silo can hold up to 1500 credits worth. If you
don’t have enough storage space, any new credits brought in by your Harvester will be lost!
16
Page 17
Loading Units Into Transports
Some units are capable of carrying infantry. These are the APC and the Chinook, each of which
can carry five infantry. To load infantry into these units, select a group (or individual), and
then move the cursor over the APC or Chinook. This should give you the Enter cursor. Click
on the APC or Chinook, and the troops will move to, then enter the unit. You can then click
on the APC or Chinook and move them to any area you wish. To deploy these troops, move
the cursor over the unit. (This should give you a Deploy cursor.) Double click on the unit and
your troops will leave the unit, ready for fighting.
Capturing Enemy Buildings
As the game advances, a special infantry unit, the Engineer, will become available. Engineers are unarmed, but they allow you to capture enemy buildings. To
do this, left click on the Engineer and place the cursor over an enemy building.
Some buildings cannot be captured. If it is one you can take, you will see an Enter
cursor. Left click if you want the engineer to try and capture the building. If you are successful,
the color of the building you targeted will change to the color of your side.
This building is now part of your base. You can build base structures around it, or sell it,
or just leave it there, denying your enemy of its use. Depending on the structure you captured, you may be able to build some units or structures that are normally unavailable to
you! Your enemy may attempt to re-take the building, so if you don’t plan on attacking from
within, sell it or be prepared to defend it!
Repairing Structures
To repair a damaged building and keep it operating at full efficiency, left click
on the REPAIR button in the Sidebar. The mouse cursor will turn into a Wrench.
Left click the Wrench on the building you want repaired. Repair will begin
immediately, indicated by a large, blinking wrench. The cost of repair will be
deducted from your account automatically. Several buildings can be repaired simultaneously by left clicking the spinning wrench on them.
If you wish to stop the repair process on a structure, left click the Wrench icon on the building under repair. If you run out of credits while repairing, the repair process will cease. The
repair process will not start up again if you get more credits—you must start the process
again. Right click when you want to cancel out of Repair mode.
PLAYING
Selling Structures
To sell a building, left click on the SELL button in the Sidebar. The mouse cursor
will turn into a $ sign. Left click on the building you want to sell. It will deconstruct, and you’ll be credited half of the structure’s original cost.
BE CAREFUL! As long as the cursor is in $ mode, any building you left click on will be deconstructed and sold! To cancel out of $ mode, right click.
17
Page 18
Check-Up
To check the health status of a unit or structure, select it by left clicking on it
when the cursor is in Select mode (deselect with a right click). As long as the
bar is green, it’s healthy. As the bar shrinks and turns red, it’s closer to being
destroyed. This will affect the speed of the unit. In later missions, vehicles can
be repaired if you build a repair facility and send them to it.
Some units (APCs, Harvesters, Orcas, Apaches) and some structures (Refineries, Silos) have
PLAYING
a carrying capacity or a limited ammo supply, indicated by a series of tiny boxes in the lower
left corner of the unit (when selected). This will tell you at a glance how much your unit is
carrying. When all the boxes are full, so is the unit.
Options
Choosing the Options mode will stop all the action on the field while you adjust your visual, audio, and game controls. To access the Options Menu, left click on the OPTIONS tab
in the upper left-hand corner of the screen. You can also hit the ESC key or Spacebar.
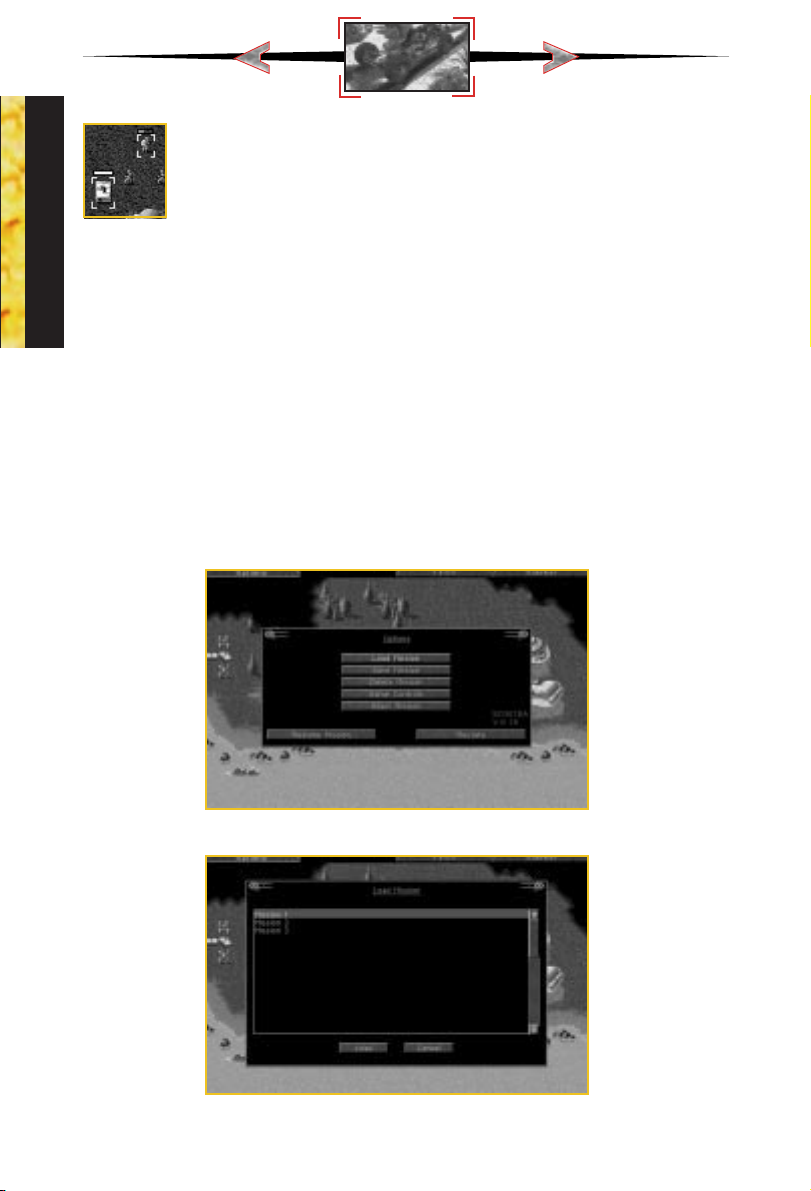
LOAD MISSION
Select LOAD MISSION from the Options menu if you want to play a previously saved mission. The mission you are currently playing will be lost unless you save it first.
18
Choose Load Mission from the Options menu
Load Mission menu
Page 19
Left click on the up or down arrow to scroll through your saved games. Then left click on
LOAD to load the selected game. If you wish to leave this screen without loading a game,
left click on CANCEL.
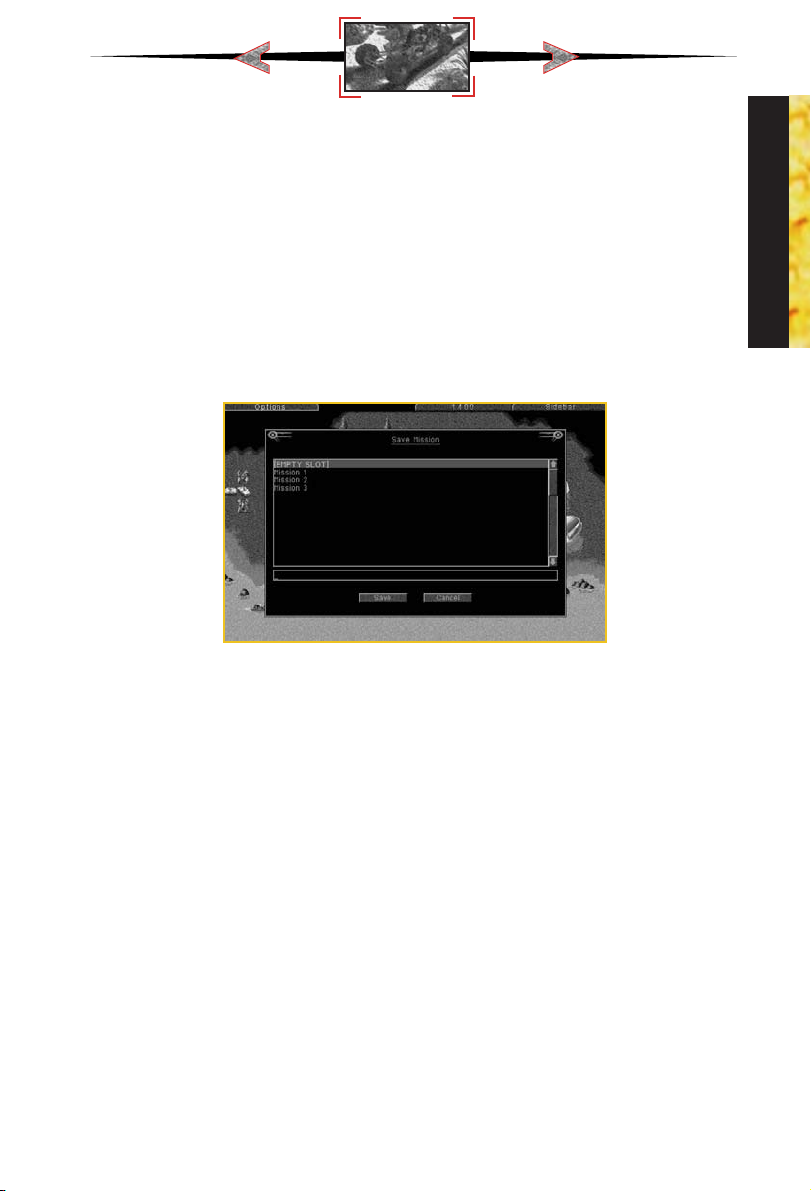
SAVE MISSION
Select SAVE MISSION from the Options menu when you want to save the mission you’re
currently playing.
In the Save Mission menu, choose the saved mission slot you wish to use. If you save a game
over a slot already used, you’ll overwrite the selected game. If you want to save into a new
slot, choose [Empty Slot] and name your mission. The number of saved games available
depends on your hard drive space. If you’re out of room, [Empty Slot] won’t appear: You’ll
have to save over a previously saved game or delete some games.
Save Mission menu
Left click on the up or down arrow to scroll through your saved games. Then left click on
SAVE to save the selected game.
If you wish to leave this screen without saving a game, left click on CANCEL.
PLAYING
DELETE MISSION
Select DELETE MISSION from the Options menu when you want to get rid of some saved
games. This is especially useful if you need to free up space on your hard drive.
In the Delete Mission menu, choose the mission you want to get rid of by left clicking on it.
Then left click on DELETE to get rid of that mission.
A confirmation window will pop up just to make sure this is what you want. If you’re intent
on ridding yourself of that mission, left click on OK. If not, left click on CANCEL.
ABORT MISSION
Select ABORT MISSION if you decide you don’t like how things are going and want to escape
to the Title Screen. A confirmation window will come up, just to make sure.
19
Page 20
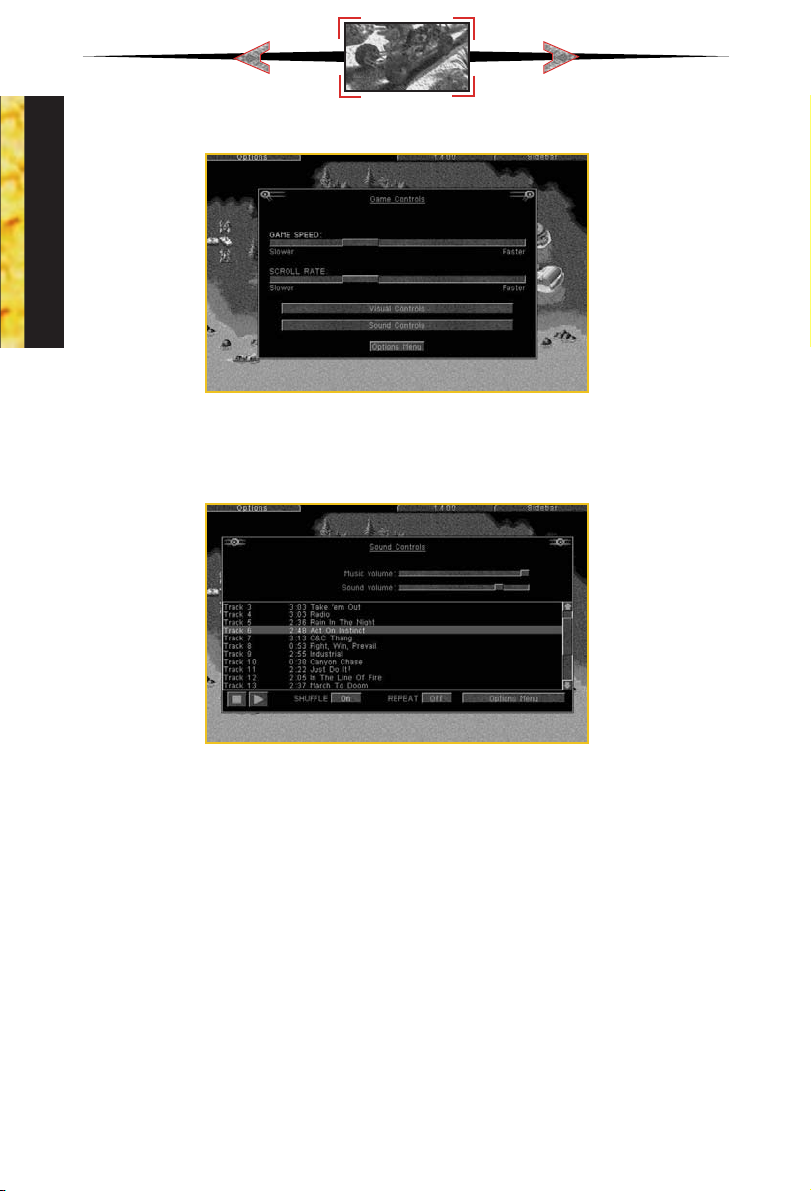
GAME CONTROLS
PLAYING
Game Controls
Sound Controls
Select GAME CONTROLS, then SOUND CONTROLS, to adjust the volume of the music or
sound effects, or to change the song currently playing.
Sound Controls
To control the volume of music or sound effects, drag the knob left or right. Going right will
make that audio track louder. Going left will make it softer. If you want to shut off music or
sounds, drag the control knob all the way to the left.
Music
To hear a new song, left click on any track (as shown above) and then left click on the PLAY
button. To stop a song from playing, left click on the STOP button.
Clicking the OPTIONS MENU button at the bottom of the menu will return you to the Options
Menu, saving any changes you have made in the Sound Controls panel.
20
Page 21
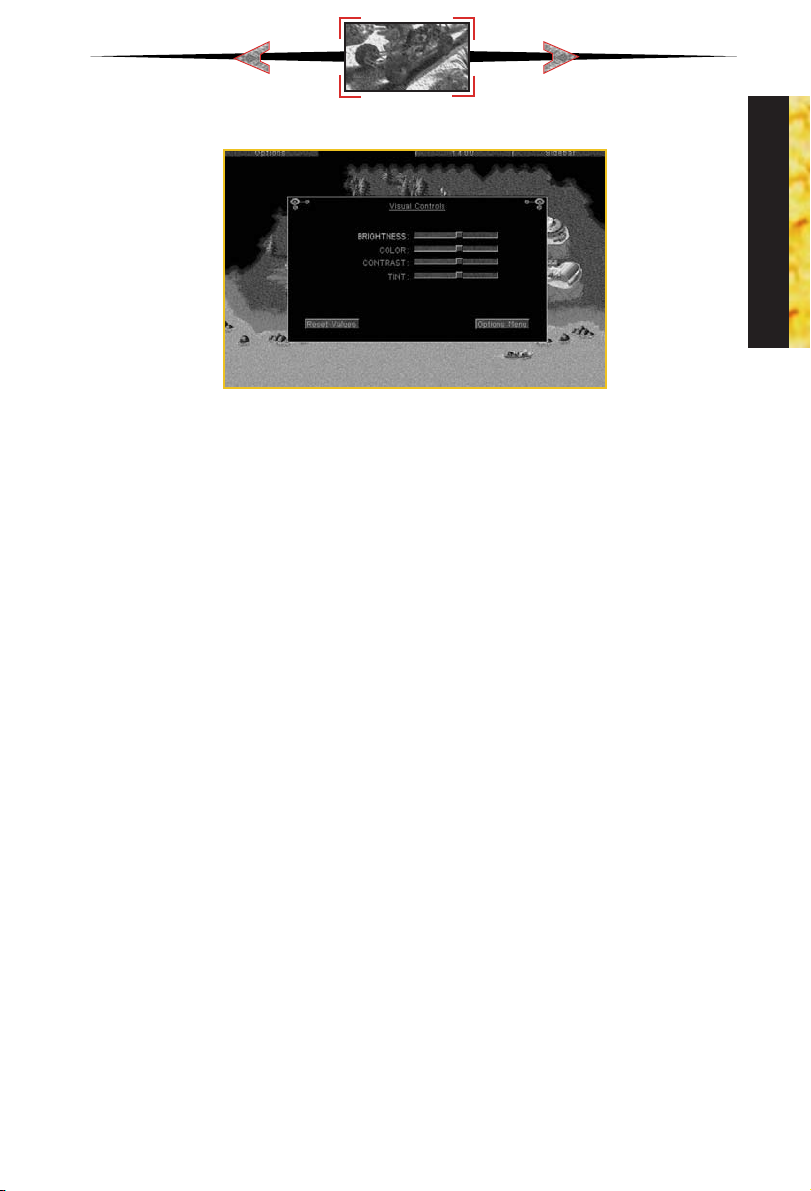
Visual Controls
Visual Controls gives you display options. To adjust any of the controls, drag the control knob
left or right. Going right increases a setting. Going left decreases a setting.
You can reset the Visual Controls to their default normal settings by clicking the RESET VALUES button.
Click on the OPTIONS MENU button to return to the Options Menu. The changes made in
the Visual Controls take immediate effect.
RESUME
left click on RESUME to get back to the main game.
RESTATE
left click on RESTATE if you forget what your mission objective is. This will display a text version of the mission’s objectives. If you want to see the video of the briefing again, left click
on the VIDEO button. When you are ready to go back to the Options Menu, left click on
the OPTIONS button.
PLAYING
21
Page 22
Multiplayer Game
C&C95 supports several different types of multiplayer support, each of which is described
in this section.
MULTIPLAYER GAME OPTIONS
When playing a multiplayer game, the game host (the player who starts the game session)
can choose several game settings:
Credits■Credits each player begins with.
■
Bases
Crates
MULTIPLAYER
Tiberium
AI Players
INTERNET GAME
C&C95 supports Head-to-Head play over the Internet right out of the box.
In order to play in Internet Head-to-Head mode, make sure you have the following:
1. 28.8 (minimum) modem, ISDN or direct connection to the Internet.
2. Winsock 1.1 compliant TCP/IP stack (included in Windows 95).
3. A valid account with an Internet service provider (ISP) and a valid Internet e-mail
address
4. 16 MB of RAM strongly recommended.
Enables/disables production and building bases.
■
Enables/disables weapon pick-ups and bonuses.
■
Enables/disables Tiberium growth.
■
This activates the non-human players and lets the
computer play any extra side for a total of 4 players.
C&C95 will attempt to connect to your Internet provider if your system is configured correctly. If you are in any doubt, you can initiate your Internet connection prior to loading
C&C95.
WESTWOOD ONLINE
From the Title menu, select Internet. If you have previously registered your copy of C&C95
with Westwood Studios and signed up for an account, the Westwood Online window will
open and you’ll be prompted for your user name and password. If you haven’t already registered, you’ll be taken step by step through the registration process. Once you’ve registered
and chosen your user name you’ll receive your Westwood Online password via e-mail within a few minutes.
Once at the Westwood Online window you can join various chat “channels” or “rooms”
to talk about C&C95 and other topics with other people around the world. You can also
host or join a game of C&C95 in Head-to-Head mode over the Internet.
22
Page 23

Main Chat window
The main chat window has a scrolling message area (your outgoing messages and incoming messages from other people appear here), a channel (or “room”) list, a user list and
a typing area. Once you’ve joined a channel (by double clicking on its name in the
channel list) the user list changes to show the user names of other users in that channel.
Joining Internet Head-to-Head Game
Open games are denoted by a C&C icon in the channel list window. Other
channels may be chat channels or other types of games. To join an open C&C95
game, simply double click on its name in the window.
Join Internet Head-to-Head Game window
Once you have joined an open game you’ll see the familiar channels list, message area, typing area and user list, along with a game options area. As a joiner you can only select the
side you want to play and color; instead you can type messages to the host requesting that
other options be changed. If at any time you are not happy with the options you can simply
leave the channel. Once you are happy with the game options, indicate this to the host and
he can then go ahead and start the game. Once the host clicks on the START THE GAME!
button, C&C95 will automatically start.
MULTIPLAYER
23
Page 24
MULTIPLAYER
Host Internet Head-to-Head Game window
If you’d prefer to be in the driver’s seat, you can choose to host a C&C95 game. To do this,
click on the C&C95 icon in the tool bar. This will bring up a dialog where you can specify a description for your game. Clicking OK in this dialog will create a new game for others to join. As the host, it is up to you to select the game options (scenario, credits, tech-level,
etc). Your opponent may send you messages requesting various options are changed. You
should change the appropriate settings if you agree—otherwise you’ll have to debate the
options! Once you have both agreed on the game settings, as host, you can start the game
by clicking on the “Start the Game!” button. C&C95 will automatically start.
Once the game is under way you can send messages to your opponent by hitting the F1 key.
When the game is over, both you and your opponent will be returned to the Westwood
Online window for post-battle debate.
Local Area Network Game (IPX)
C&C95 supports up to four players per game on a local area network (LAN) using the IPX
protocol. You must have an IPX compatible network protocol bound to your network adapter
card. This setting can be found in the Windows 95 “Network” control panel. If you are in any
doubt ask your network administrator to install the correct drivers on your workstation.
C&C95 works better if all multiplayer game participants are connected on the same local
network without routers and bridges so that IPX packets have a direct path between systems.
This will also ensure minimal load on other network components (such as servers and routers)
when a multiplayer game is in progress.
LAN GAME PRELIMINARIES
C&C95 supports an unlimited number of games over one network socket. Westwood Studios
uses a registered socket that other software cannot officially use and under normal circumstances you should never need to change this; however if you are experiencing difficulty playing C&C95 over a local network it may be because other software is using our socket.
To resolve this, you can change the socket that C&C95 will use to connect by running the “Command
& Conquer Windows 95 Edition Setup” program which can be found under the “Command
24
Page 25
& Conquer Windows 95” entry in the Windows “Start” menu. Enter a number from 0 to 16383
in the box labeled “Socket Number”. This number represents a socket in the public socket area
which any software application may use. You must use the same socket number on all the machines
you will be trying to connect with. To return to using the Westwood Studios default socket,
delete the number in the “Socket Number” box.
Choose Multiplayer Game from the Title menu
To begin a multiplayer LAN game select MULTIPLAYER GAME from the Title menu. You
should see the Select Multiplayer Game dialog with Modem/Serial and Network options.
If you see the Select Serial Game dialog, it means that C&C95 has not detected the presence of IPX drivers and you should verify that these have been installed and configured correctly for your system.
If all is well, select NETWORK. This takes you to the Join Network Game dialog. Here you
can enter your name, choose your side (GDI or Nod) and select a color for your units and
buildings. There are two windows in the dialog, the Games window and the Players window. The Games window shows all active game sessions on the current socket. Games which
are closed (in progress) are in brackets, like this: [Player’s Game].
You have two options from this point: you can choose to Join a game or to host a New game
for others to join. You cannot join a closed game.
MULTIPLAYER
START NEW NETWORK GAME
New Network Game dialog
Before clicking on NEW game you must enter your name and choose a side and color.
25
Page 26
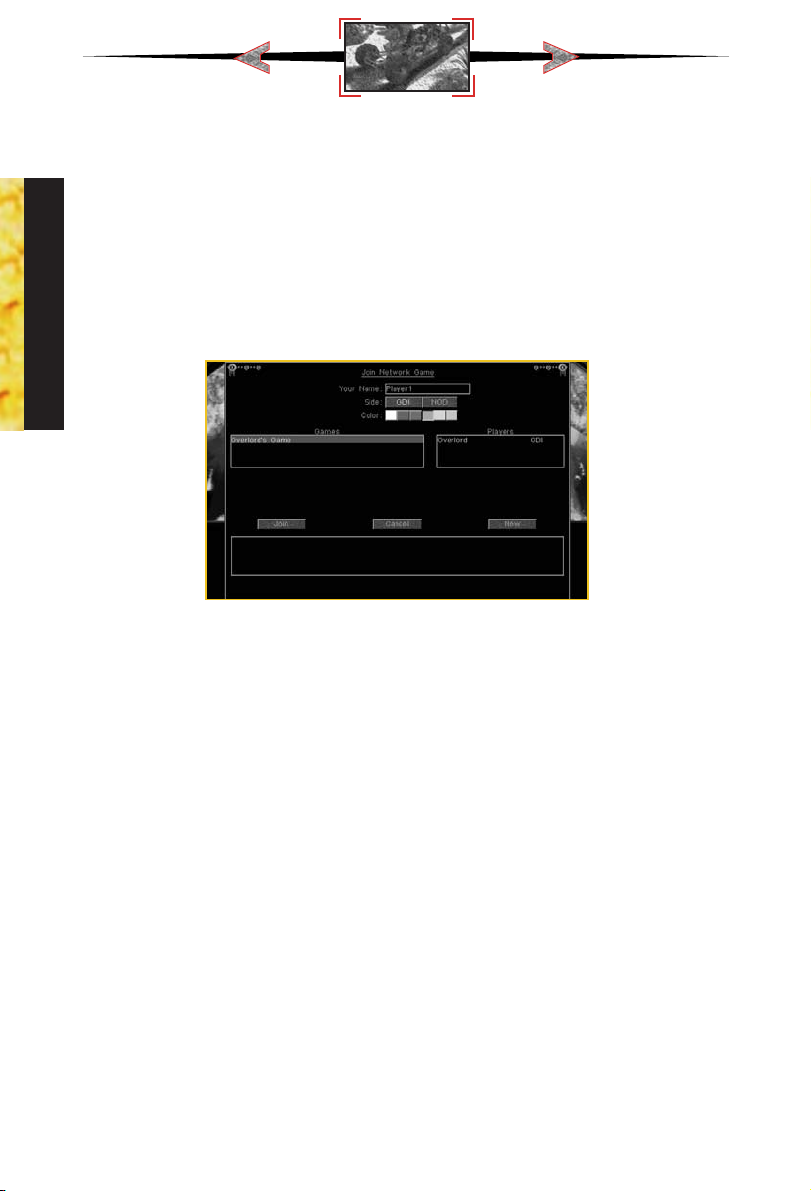
Clicking on NEW makes you the host of the new game and takes you to the Network Game
Setup dialog. This dialog has a Players window and a Scenarios window. The Players window shows you which other players are joined to your new game. As the host of the new
game you alone have the option to reject other players who might try to join the game.
The Scenarios window shows the available scenarios. As the game host, this is up to you
to select, as are the Credits, Bases, Crates, Tiberium and AI Players options.
Once you have 2 or more players, you are able to click OK. As the host, you get to decide
when to commence play, you should do this only when all game participants have joined.
JOIN NETWORK GAME
MULTIPLAYER
Join Game dialog
Before clicking on JOIN (to join a game), you must enter your name and choose a side and
color. Once you have done this, you can select an open game and then click on JOIN. If
your name is the same as an existing player you must enter a different name. If your color
is the same as an existing player the computer picks an available color for you.
The Join Game dialog has a message window. Messages from the other players in your game
appear here, just as your messages appear in the message windows of all the other players.
Once you have clicked JOIN, the dialog changes so that the N
appear. You are then in a wait state until the host of the game chooses to start the game.
In this mode you cannot change your name, side or color. You will be able to see the game
options that the host selects.
EW and JOIN buttons dis-
Sending Messages
From the Join Network Game or Network Game Setup dialog, the SEND MESSAGE button
lets you send a message to other players. Press ESC to cancel.
Within the game, keys F1-F3 send a message to one of the other players. Hit one of the “F”
keys to find out who that key is assigned to. You will see a message “To Player [Side]:” at
the top left side of the screen.
The F4 key sends a message to all other players.
Serial Game
C&C95 is designed to be played as a Head-to-Head game either by modem or null
modem link. A null modem link is a special cable which you should be able to purchase at
26
Page 27
your local computer supplier. Such a link allows two computers which are within 30ft of each
other to be connected.
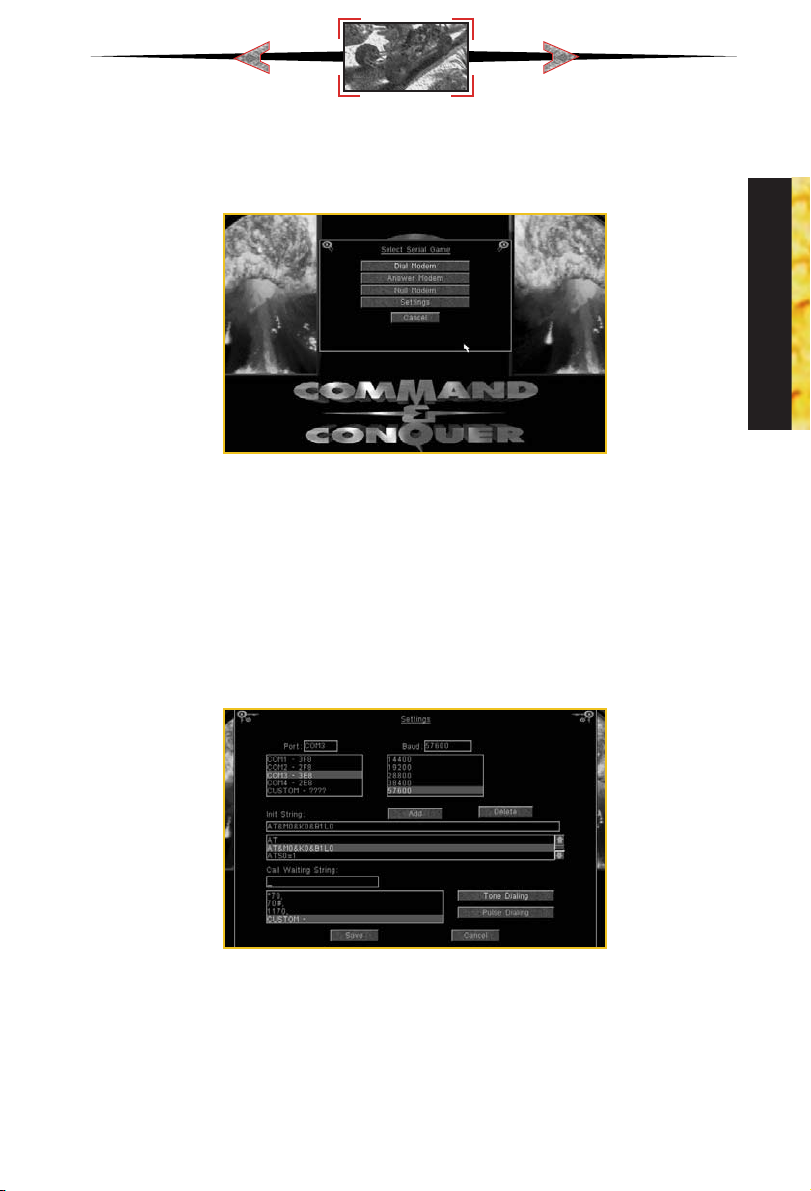
SERIAL GAME PRELIMINARIES
Select Serial Game dialog
Before you can play a serial game you will need to configure C&C95 with the appropriate settings. To do this, select MULTIPLAYER GAME from the Title menu. This will take you
to one of two dialogs:
1) Select Multiplayer Game. This dialog comes up if C&C95 detected an IPX network. Select
MODEM/SERIAL, then from the Select Serial Game dialog choose SETTINGS.
2) Select Serial Game. This dialog comes up if C&C95 did not detect an IPX network. Select
SETTINGS from the Select Serial Game dialog.
SERIAL GAME SETTINGS
MULTIPLAYER
Settings dialog
This takes you to the Settings dialog where you can set up your default serial communications settings. Select the COM/PORT which corresponds to your modem or serial port along
with the baud rate that you intend to use. It is important that the selected baud rate is at least
the speed of your modem. Once you are happy with the settings, click on SAVE and you
will be taken back to the Select Serial Game dialog.
Also in this dialog, you can enter a custom Modem Initialization string (separate multiple
lines with a “|” [vertical bar or “pipe” character]) as well as a Disable Call Waiting string.
27
Page 28
If you do not know what these terms mean, you should leave them in their default settings.
If you want to learn more about these strings please consult your modem manual and your
local telephone service provider.
You are also able to choose between TONE or PULSE dialing to suit your local telephone
service.
Next you need to select modem or null modem game.
MODEM GAME
C&C95 requires a modem that is capable of at least 14400 baud.
To begin a two-player modem game select MULTIPLAYER GAME from the Title menu. This
will take you to one of two dialogs:
MULTIPLAYER
1) Select Multiplayer Game. This dialog comes up if C&C95 detected an IPX network. Select
MODEM/SERIAL to play a modem game. This will take you to the Select Serial Game dialog.
2) Select Serial Game. From this dialog you can choose the type of serial game you wish
to play.
You next need to decide whether you or your opponent will initiate the telephone call required
to play the modem game. If the other person is going to call you, select ANSWER MODEM.
Assuming that you have the correct communications settings (using the Settings dialog) your
modem will wait for your opponent to call. Once a connection has been established, you
will see the Join Serial Game dialog.
If you are going to be making the call to your opponent, you should select DIAL MODEM.
You will then be taken to the Phone List dialog.
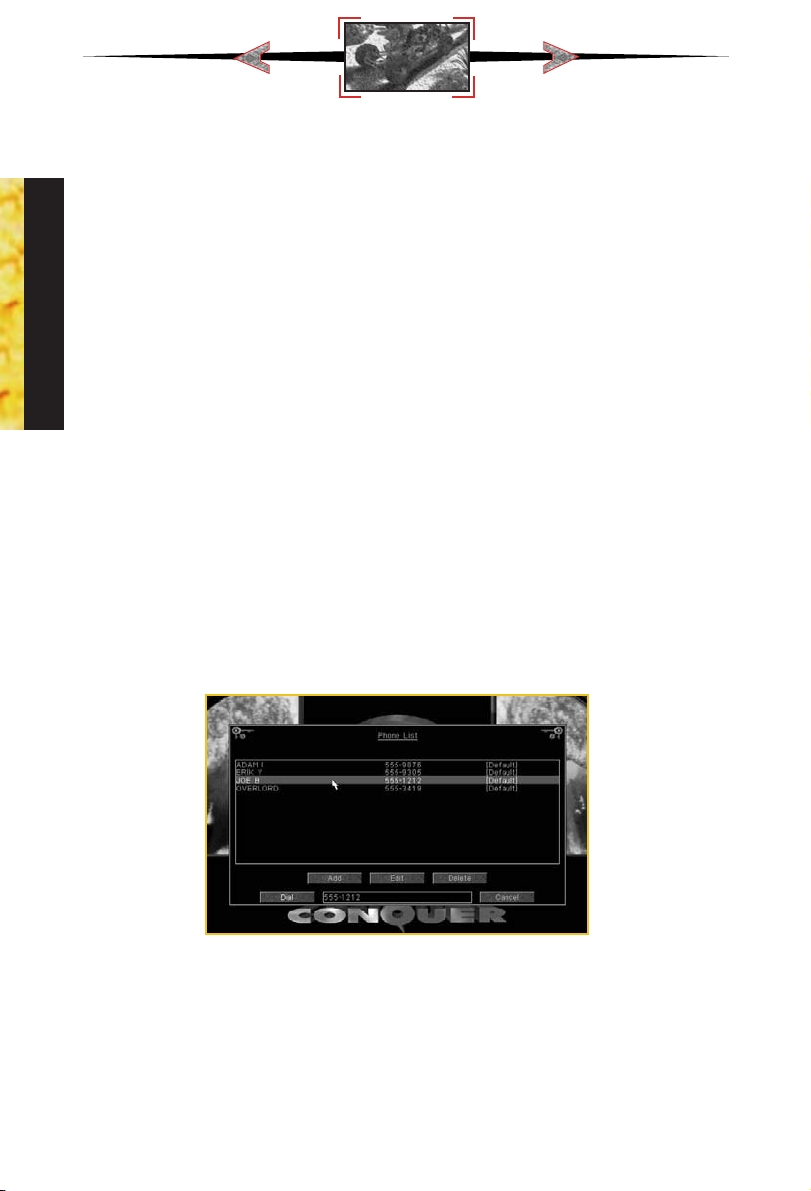
Phone List dialog
From the Phone List dialog you can dial numbers manually or add a name and number into
a Phone List to speed up dialing in the future.
To dial a number manually, click in the dial area and enter the number (the number will be
added to the Phone List without a name). To store a number for future use, along with name
and custom dialing settings, click on ADD. This will take you to the Edit Phone Number dialog. Click on EDIT to modify a previously entered number.
28
Page 29

Phone Number dialog
Here you can enter a name and associated phone number. Assign default settings
(COM/PORT, IRQ, modem init string, baud rate, etc.) by clicking on DEFAULT SETTINGS
or use custom settings by clicking on CUSTOM SETTINGS. Click SAVE to go back to the
Phone List dialog.
Once you have a number in the Phone List, you can select that number for dialing by clicking on it in the listing window. The number will appear in the Dial box.
Once the required phone number is in the dial box, either by manual entry or by selection
from the listing window, you should click on Dial which will communicate with your modem
and dial the number. Once a connection has been established you will see the Host Serial
Game dialog.
NULL MODEM GAME
To begin a two-player Null Modem game select MULTIPLAYER GAME from the Title menu.
This will take you to one of two dialogs:
1) Select Multiplayer Game. This dialog comes up if C&C95 detected an IPX network. Select
Modem/Serial, then Null Modem from the Select Serial Game dialog.
2) Select Serial Game. From this dialog select Null Modem.
Once a null modem connection has been established you will be taken to either the Host
Serial Game or Join Serial Game dialog, depending upon who clicked first on the Null
Modem selection.
MULTIPLAYER
29
Page 30

MULTIPLAYER
Host Serial Game dialog
HOST SERIAL GAME
Here you must enter your name and choose a side and color.
The Scenarios window shows the available scenarios. As the game host this is up to you to
select, as are the Credits, Bases, Crates, Tiberium and AI Players options.
You will see a message window so that you can communicate with your opponent as you
select these game options. Messages from your opponent appear in the message window.
As you change options these are reflected in the dialog that your opponent can see. As the
host, you get to decide when to commence play. Once both players have agreed on the scenario and options, you should click OK to begin play.
Join Serial Game dialog
JOIN SERIAL GAME
Before clicking on OK, you must enter your name and choose a side and color. If your name
is the same as the other player you must enter a different name. If your color is the same
as the other player, the computer picks an available color for you.
Once you have clicked OK, you are placed in a wait state until the host of the game chooses to start the game. In this mode you cannot change your name, side or color. You will be
able to see the game options that the host selects. The game commences when the host player clicks OK.
30
Page 31

Sending Messages
From the Host Serial Game or Join Serial Game dialog, the SEND MESSAGE button lets
you send a message to other players. Press ESC to cancel.
Within the game, pressing the F1 key sends a message to your opponent. You will see a
message “To Player [Side]:” at the top left side of the screen.
MULTIPLAYER
31
Page 32

Advanced Game Controls
Once you’ve got a good grasp of the basic controls for your units, it’s time to move on to
some of the more advanced controls that are offered in Command & Conquer. If you are
going to pit your skills against other players, learning how to use these controls is a must.
Teams [CTRL+#, #, ALT+#]
As you’ve learned, you can select more than one unit at a time by left clicking on an empty
space and dragging a box to select all of the units that you want to move at once. What
if you want to select that particular team again in the middle of battle? Normally you’d have
to band-box them all over again. This may mean scrolling the screen as well, since most
of the time you are trying to do more than one thing at a time. This is way too slow.
You can “save” all of the selected units into a team. To do this, first select all the units that
you want in your team, then hold down the CTRL key, and hit any one of the number keys
on your keyboard (1-9 or 0). This will make all the selected units part of that team. To instantly select that team, just hit the number key corresponding with that team, and they will all
ADVANCED
be selected.
Note that this will not re-center your view on that team, it will just select them so you can
give them orders. If you want to see that group, hold down the ALT key and hit the number you’ve assigned for that team. This will center the view on that team.
You can add members to an already existing team easily. First, select that team by hitting
the appropriate number key. Then, hold down the SHIFT key and individually click on the
units that you want to add to that team (sorry, you can’t band-box with this method). Once
you’ve got them all highlighted, re-save the team again by holding down CTRL and hitting
the number of the team. That’s it!
Guard Mode [‘G’ key]
Normally, units that you have stationed around will only respond if they’re fired upon, or an
enemy unit gets close enough for them to fire on it. However, they won’t go looking for trouble—they’ll only get involved if someone else starts it.
If you want your units to pick fights with anyone that comes within range, select the units
and hit the ‘G’ key on the keyboard. This will put all the selected units into guard mode. With
this on, your units will be much more aggressive, moving toward any threats that come near
them.
Guard mode will continue to function on those units until you move them, or give them another order, such as stop or scatter.
Force Fire [CTRL + Left Click]
Sometimes, you may want to have certain units fire on a building or area even if it isn’t an
enemy target. To get them to do this, you can use the force fire command. Simply select the
units that you want to do this, hold down the CTRL key, and click on the location that you
want the units to attack.
Units on this mode will continue to fire on that area, ignoring all other threats, until you tell
them to stop, or give them a new order to follow.
32
Page 33

Force Move [ALT + Left Click]
Infantry annoying your tanks? Squish ‘em. Using the force-move command, you can make
your tanks (or any heavy unit) move into an enemy occupied cel. And attempt to overrun
the infantry in the square. To do this, select the unit(s) to force-move, then hold down the
ALT key and left click on the area you want to force-move to. You can also use this to single-out a particular infantry unit that is giving you a hard time. Your unit will attempt to crush
that infantry until either it succeeds, you give it a new order, or your unit is destroyed.
Vehicles cannot overrun each other, and infantry cannot overrun tanks. Only tracked or heavy
units can force-move into enemy infantry. You cannot force your tanks to crush your own
infantry.
Scatter [X key]
With Tanks trying to squish your infantry and planes coming in with Napalm, the Scatter
key comes in handy. You can make your troops move in a random direction from their current location, allowing them to (most of the time) dodge out of harm’s way.
To scatter units, select them and hit the ‘X’ key. Units that are scattering will continue to carry
out attack orders, so you can select them, tell them to attack, then hit the ‘X’ key to make
them scatter from the threat.
NOTE: Scattering will only make all the selected units move once. If you want them to continually scatter, you must keep the units selected, and continue to hit the ‘X’ key every second or so. Otherwise, they will scatter once, then stop, continuing to attack the target you’ve
given them. Also, units that are scattering may scatter out of their fire range. If this happens,
left click on the target again (with the units still selected), and your units will move back into
firing range.
Next Unit [N key]
Hitting the ‘N’ key will select and center the screen onto one of your units. Hitting the ‘N’
key again will cycle to another unit and so on.
ADVANCED
Stop [S key]
If a unit is marching to certain death, or has been given an order that you don’t want them
to continue to do, you can force that unit (or structure if it’s a turret of any kind) to stop firing/moving/harvesting. Select the unit(s) that you want to stop, and hit the ‘S’ key.
Follow [CTRL + ALT + Left Click]
Sometimes, you may want units to “tail” another unit as it moves around the map. This can
be good for protecting a harvester or any other critical unit as it moves about. To follow a
unit, select the units that are going to be doing the ‘tailing’, and hold down the CTRL and
ALT keys. While these are still held down, you will see the cursor has changed to a red movement cursor. Click on the unit that you want followed, and they will automatically go after
it, following it wherever it goes.
NOTE: Having large groups of units following a unit can be counter-productive. Don’t have
a large group of units follow your harvester, or it may hinder the harvester’s movement, and
slow down your collection of Tiberium. If enough units are following, they may surround their
target, and it will not be able to move at all.
33
Page 34

Center view [HOME key]
Hitting the home key will center your view on the currently selected unit/structure.
Construction yard view [H key]
Hitting ‘H’ will instantly center your view on your construction yard. This is useful for
jumping back to your base when you’ve been concentrating your efforts somewhere else
on the battlefield.
Location Bookmarks [CTRL+F7-F10, F7-F10]
If you want to save a specific location on the map, you need to move the main battle map
to show the location you want marked, then hold down the CTRL key and hit one of the function keys (F7-F10). This will mark that location which can then be recalled by hitting the
appropriate function key.
ADVANCED
34
Page 35

MINIGUN INFANTRY
ARMOR: NONE
COST: 100
SECONDS TO PRODUCE: 7
RANGE: SHORT
WEAPON: M-16 RIFLE
Equipped with the GAU-3 “Eliminator” 5.56mm chaingun, this troop is
the key player in the GDI forces. En masse, this unit is very useful against
slow-moving armored units like tanks. Just remember that large tanks can
easily crush your infantry and flame-based weapons can quickly reduce
entire squads to ash.
GRENADIER
ARMOR: NONE
COST: 160
SECONDS TO PRODUCE: 7
RANGE: SHORT
WEAPON: HIGH EXPLOSIVE GRENADE
The Grenadier is a very useful all-purpose infantry unit. This troop is
faster, can see further, and hit harder than normal infantry. The grenade
this unit throws can not only go over walls, but can destroy them as well.
They ‘splode good, too!!
GDI UNITS
ROCKET SOLDIER
ARMOR: NONE
COST: 300
SECONDS TO PRODUCE: 17
RANGE: MEDIUM
WEAPON: LIGHT TOW ROCKETS
These infantry units are slower and easier to kill than other infantry, but
can tear through armor faster than any other infantry unit. Their major
advantage is the ability to attack airborne units. Most effective as a support unit in diverse groups.
35
Page 36

GDI UNITS
COMMANDO*
ARMOR: NONE
COST: 1000
SECONDS TO PRODUCE: 67
RANGE: LONG
WEAPON: SNIPER RIFLE AND C-4 EXPLOSIVE PACKS
The Commando is part of the GDI Elite Forces Unit. This unit uses a
Raptor 50cal. assault rifle with suppressor that is able to take out infantry
units from extreme range. In addition, the Commando carries C-4 explosives. When placed in enemy structures, these explosives will level the target structure in seconds.
ENGINEER
ARMOR: NONE
COST: 500
SECONDS TO PRODUCE: 33
RANGE: N/A
WEAPON: NONE
Engineers are used to capture enemy buildings. Since they carry no
weapons, they are extremely vulnerable on the battlefield and must be
directed very carefully. These infantry are very slow, so loading them into
an APC is an ideal way to move them about the battlefield.
36
HUMM-VEE
ARMOR: LIGHT
COST: 400
SECONDS TO PRODUCE: 27
RANGE: SHORT
WEAPON: M-60 MACHINE GUN
These all-terrain attack vehicles are fast and very useful against infantry
and can wipeout large numbers of Attack Cycles when used en masse. Its
light armor makes it vulnerable to any explosive weapon.
* Multiplay only. May be available in single-play missions as a unit given to you at the start of a
mission or as a mission objective for capture.
Page 37

APC
ARMOR: HEAVY
COST: 700
SECONDS TO PRODUCE: 47
RANGE: SHORT
WEAPON: M-60 MACHINE GUN
The Armored Personnel Carrier (APC) transports and protects up to five
troops heading to and from battle locations. Its heavy armor, fast speed,
and long sight range make it an ideal scouting unit. It is also useful for
crushing infantry.
MEDIUM TANK
ARMOR: HEAVY
COST: 800
SECONDS TO PRODUCE: 53
RANGE: MEDIUM
WEAPON: 105MM APDS
From its single barrel, the Medium Tank fires armor-piercing shells. It is
faster, heavier and more destructive than Nod’s Light Tank. This is one of
the best all around vehicles in the game. It is effective against both vehicles and structures, but can be taken down by groups of infantry or aerial
units.
GDI UNITS
MOBILE ROCKET LAUNCH SYSTEM (MRLS)
ARMOR: LIGHT
COST: 800
SECONDS TO PRODUCE: 53
RANGE: LONG
WEAPON: 227MM MISSILES
Mobile devastation. GDI’s longest-range attacker fires 227mm rockets
and is effective against just about everything, including aerial threats.
With no short-range fighting ability, this unit needs close-quarter backup.
This is an attack only vehicle. Keep it in the background and don’t let
enemies in close to it.
37
Page 38

GDI UNITS
MAMMOTH TANK
ARMOR: HEAVY
COST: 1500
SECONDS TO PRODUCE: 80
RANGE: MED/LONG
WEAPON: DUAL 120MM APDS / MAMMOTH TUSK MISSILES
Armed with dual 120mm cannons and Mammoth Tusk Missiles, this giant
is a very versatile attack unit. These weapons help compensate for its lack
of speed and mobility. When this unit takes a lot of damage, it can slowly
regenerate its health back up to 50%. When the Mammoth tank is placed
in guard mode, it can fire at aerial units.
ORCA VTOL ASSAULT CRAFT
ARMOR: LIGHT
COST: 1200
SECONDS TO PRODUCE: 80
RANGE: LONG
WEAPON: DRAGON TOW ROCKETS
This vertical takeoff and landing (VTOL) craft carries five salvos of TOW
rockets. ORCAs are exceptionally useful for taking out enemy armor like
Harvesters. When used in conjunction with Ion Cannon strikes, then can
easily destroy enemy structures. When an ORCA runs out of rockets, it
must return to base for reloading.
38
TRANSPORT “CHINOOK” HELICOPTER
ARMOR: MEDIUM
COST: 1500
SECONDS TO PRODUCE: 100
RANGE: N/A
WEAPON: NONE
Provides field transportation for all infantry, rapidly deploying new troops
into, or out of battle. This unit is basically an aerial version of the APC
without the weapon.
Page 39

MCV
ARMOR: MEDIUM
COST: 5000
SECONDS TO PRODUCE: 333
RANGE: N/A
WEAPON: NONE
The mobile construction vehicle lets you search for suitable base sites.
Once one is found, convert the MCV into a full-service Construction Yard
and use it to build other structures. Since this vehicle is slow, unarmed,
and expensive, you will want to keep it well guarded with other units.
HARVESTER
ARMOR: HEAVY
COST: 1400
SECONDS TO PRODUCE: 93
RANGE: N/A
WEAPON: NONE
This armor-plated vehicle seeks out and scoops up raw Tiberium, then
transports it to refineries for processing. It is slow and unwieldy and will
need to be protected. Its good points are that it can take a beating before
being destroyed and it is proficient at crushing enemy infantry.
GDI UNITS
HOVER CRAFT
ARMOR: HEAVY
COST: N/A
SECONDS TO PRODUCE: N/A
RANGE: N/A
WEAPON: NONE
This heavily-armored unit deploys men and vehicles during amphibious
assault. It is not buildable in any missions, including multiplay.
39
Page 40

GDI UNITS
A-10 GROUND SUPPORT AIRCRAFT
ARMOR: HEAVY
COST: N/A
SECONDS TO PRODUCE: N/A
RANGE: LONG
WEAPON: NAPALM BOMBS
These units are highly maneuverable, ground-hugging craft that level
enemy units with napalm. When playing as GDI in the solo play missions,
destroying all Nod SAM sites will give you access to the A-10 airstrikes.
Since the A-10 bombs in a line, it is a good idea to pick a target that is
part of a group. You can do damage to more enemies this way.
GUNBOAT
ARMOR: HEAVY
COST: N/A
SECONDS TO PRODUCE: N/A
RANGE: LONG
WEAPON: TOMAHAWK MISSILE
Heavily armored, and armed with surface-to-surface missiles, this unit is
the backbone of GDI’s naval forces. This unit makes special appearances
in GDI missions, but is normally unavailable.
40
Page 41

GDI UNITS
41
Page 42

GDI UNITS HIERARCHY
STRUCTURE(S) BUILT:
ALLOW(S) BUILDING OF:
BARRACKS
BARRACKS
BARRACKS
GDI UNITS
BARRACKS
WEAPONS
FACTORY
WEAPONS
FACTORY
WEAPONS
FACTORY
WEAPONS
FACTORY
42
+
ADV.COMM.
CTR.
+
WEAPONS
FACTORY
+
HELIPAD
+
ADV.COMM.
CTR.
+
REPAIR FACILITY
+
TIBERIUM
REFINERY
MINIGUN
INFANTRY
COMMANDO
INFANTRY
APC
CHINOOK* ORCA
HUMM-VEE MEDIUM TANK
ROCKET
LAUNCHER
MAMMOTH
TANK
HARVESTER
GRENADIER ROCKET
MCV*
*Available to build in multiplay only.
SOLDIER
ENGINEER
INFANTRY
For Multiplay
UNIT
Minigun Infantry 1
Grenadier 1
Rocket Soldier 2
Humm-vee 2
Harvester 2
Engineer 3
Medium Tank 3
APC 4
Mammoth Tank 5
Transport Chinook* 6
Orca 6
Commando* 7
MRLS 7
MCV 7
TECH
LEVEL
Page 43

GDI UNITS
DESCRIPTION TECH COST RANGE ARMOR PREREQUISITES WEAPON
Minigun Infantry 1 100 Short None Barracks M-16 Rifle
Grenadier 1 160 Short None Barracks High Explosive Grenade
Rocket Soldier 2 300 Med. None Barracks Light TOW Rocket
Humm-vee 2 400 Short Light Weapons Factory M-60 Chain Gun
Harvester 2 1400 N/A Heavy Weapons Factory, Refinery None
Engineer 3 500 N/A None Barracks None
Medium Tank 3 800 Med. Heavy Weapons Factory 105mm APDS
APC 4 700 Short Heavy Barracks, Weapons Factory M-60 Chain Gun
Mammoth Tank 5 1500 M/S Heavy Weapons Factory, Repair Facility 120mm APDS / Missiles
Transport Chinook* 6 1500 N/A Med. Weapons Factory, Helipad None
Orca 6 1200 Long Light Weapons Factory, Helipad Dragon TOW Rockets
Commando* 7 1000* L/S None Barracks, Adv. Comm. Center Sniper Rifle / C4 Explosive
MRLS 7 800 Long Light Weapons Factory, Adv. Comm. Ctr. 227mm Missile
MCV 7 5000* N/A Med. Weapons Factory, Adv. Comm. Ctr. None
Ion Cannon 7 N/A N/A N/A Adv. Comm. Ctr. Ion Blast
A-10 Support Aircraft - N/A Long Heavy N/A Napalm bombs
Gunboat - N/A Long Heavy N/A Tomahawk Missiles
State of the Art: GDI Units
BAR = Barracks, WEAP = Weapons Factory, ADVC = Advanced Comm. Center, HELI = Helipad, REPR = Repair Bay, REFN = Refinery
Hover Craft - N/A N/A Heavy N/A None
43
Page 44

CONSTRUCTION YARD
PURPOSE: PRODUCES STRUCTURES
The Construction Yard is the foundation of a base and allows the construction of other buildings. You must protect this structure! Without it, you
cannot build any new structures. The Construction Yard is fairly strong,
but as with almost all structures, it is vulnerable to Engineers. Try surrounding your Construction Yard with walls to keep out unwanted guests.
POWER PLANT
PURPOSE: PROVIDES POWER TO BASE
GDI STRUCTURES
This unit provides power to the structures in your base. Power output is
directly related to the Power Plant’s condition, so protect them during battles. If they get damaged, you must repair them quickly or else some of
your base defenses may cease to function. The Power Plant outputs 100
units of power.
ARMOR: LIGHT
COST: N/A
SECONDS TO PRODUCE: N/A
POWER USAGE: NONE
ARMOR: LIGHT
COST: 300
SECONDS TO PRODUCE: 20
POWER USAGE: NONE
44
ADVANCED POWER PLANT
ARMOR: LIGHT
COST: 700
SECONDS TO PRODUCE: 47
POWER USAGE: NONE
PURPOSE: PROVIDES POWER TO BASE
This high-yield structure handles the energy strains of some later, more
power-intensive structures. It may cost a bit more than the original Power
Plant, but it generates double the amount of power (200 units).
Page 45
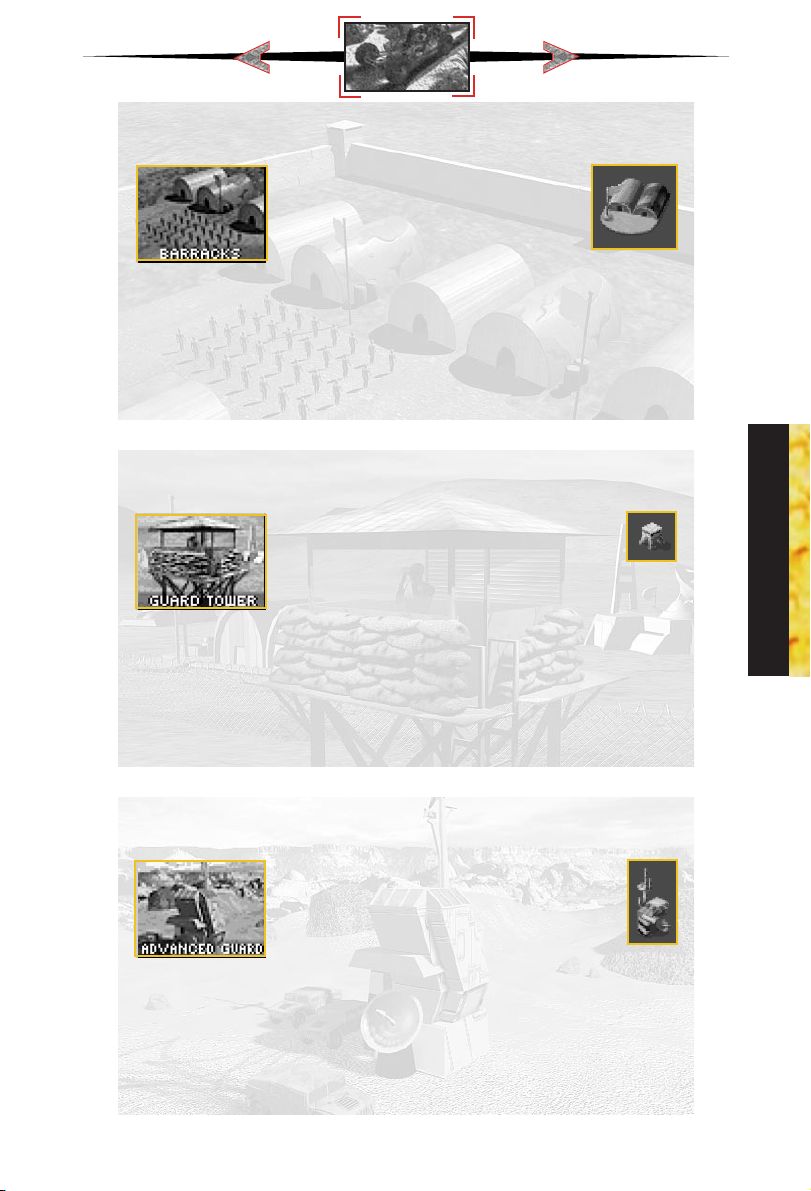
INFANTRY BARRACKS
ARMOR: MEDIUM
COST: 300
SECONDS TO PRODUCE: 20
POWER USAGE: 10
PURPOSE: PRODUCES INFANTRY
This structure is a field training center for all available infantry units.
Building multiple Barracks will increase the rate at which infantry are
produced.
GUARD TOWER
ARMOR: LIGHT
COST: 500
SECONDS TO PRODUCE: 33
POWER USAGE: 10
PURPOSE: DEFENSE
Armed with a high-velocity machine gun, this structure provides manned
defense against Nod ground attack. The Guard Tower is exceptionally
useful against infantry and other light units, and since it doesn’t require
any power, it will remain functional when your base loses power. It can
also detect Nod Stealth Tanks when they are near.
GDI STRUCTURES
ADVANCED GUARD TOWER
ARMOR: MEDIUM
COST: 1000
SECONDS TO PRODUCE: 66
POWER USAGE: 20
PURPOSE: DEFENSE
Provides strong fortification against ground and air units. The Advanced
Guard Tower (AGT) fires Tomahawk missiles at considerable range, but it
requires power. Because of the AGT’s long range, it cannot hit units that
are directly adjacent to it. It is always wise to back up the AGT with
another defense like the Guard Tower.
45
Page 46

REFINERY
PURPOSE: CONVERTS TIBERIUM TO CREDITS
This unit processes Tiberium into its component elements. Building the
refinery immediately deploys a Tiberium harvester and each Refinery can
handle an infinite number of Harvesters. The refinery stores 1,000 credits
of processed Tiberium.
SILO
PURPOSE: HOLDS REFINED TIBERIUM
GDI STRUCTURES
This unit stores up to 1,500 credits of processed Tiberium. When the
Refinery fills to its maximum capacity of Tiberium, you will want to build
Silos to handle the excess storage load. Guard it carefully. If destroyed or
captured, the amount stored is deducted from your account.
ARMOR: MEDIUM
COST: 2000
SECONDS TO PRODUCE: 133
POWER USAGE: 40
ARMOR: LIGHT
COST: 150
SECONDS TO PRODUCE: 10
POWER USAGE: 10
46
COMMUNICATIONS CENTER
ARMOR: MEDIUM
COST: 1000
SECONDS TO PRODUCE: 66
POWER USAGE: 40
PURPOSE: BASE RADAR & COMMUNICATION
Allows the use of the radar screen as long as there is sufficient power.
The radar screen allows for long range views of the battlefield and for
commanding units over great distances. When playing as Nod against
GDI in the solo play missions, destroying the GDI’s Radar Facility will
keep GDI from launching A-10 airstrikes against you.
Page 47

ADVANCED COMMUNICATIONS CENTER/ION CANNON
ARMOR: HEAVY
COST: 2800
SECONDS TO PRODUCE: 186
POWER USAGE: 200
PURPOSE: PARTICLE BEAM CANNON
An upgrade to the Communications Center, this structure not only provides
radar, but is the uplink center for the Ion Cannon—GDI’s most devastating
weapon. Once charged, it can unleash a blast on an unsuspecting target.
The Ion Cannon requires power to charge: If your base is under powered,
it will stop. To fire, left click on the Ion Cannon icon in the sidebar.
WEAPONS FACTORY
ARMOR: MEDIUM
COST: 2000
SECONDS TO PRODUCE: 133
POWER USAGE: 30
PURPOSE: PRODUCES HEAVY VEHICLES & AIR POWER
This structure builds GDI’s vehicles. It is well armored, but is also a
favorite target for enemy Engineers. If your Weapons Factory is captured,
not only do you lose the ability to build vehicles, but the enemy is able to
build your vehicles in addition to his own. Building multiple Weapons
Factories will decrease the amount of time it takes to create a vehicle.
GDI STRUCTURES
HELIPAD
ARMOR: MEDIUM
COST: 1500
SECONDS TO PRODUCE: 100
POWER USAGE: 10
PURPOSE: HELICOPTER LANDING
Building the Helipad allows the use of the ORCA attack aircraft. The
Helipad is also the rearming station for the ORCA. If the Helipad is lost,
the ORCA will not be able to reload. Any ORCA can use any Helipad on
your side.
47
Page 48

REPAIR FACILITY
PURPOSE: VEHICLE REPAIR
The repair facility allows you to repair damaged units. Moving a vehicle
onto the repair pad will begin the repair process. All repairs are deducted from your credits. If you run out of credits while repairs are in
progress, repairs will stop. Damage to the facility significantly slows
repair work.
SANDBAG BARRIER
PURPOSE: BASE DEFENSE
GDI STRUCTURES
Used to deter the enemy from advancing. Sandbags provide limited cover
and may slow units down. Only explosive weapons such as grenades,
missiles, and shells can damage Sandbags.
ARMOR: LIGHT
COST: 1200
SECONDS TO PRODUCE: 80
POWER USAGE: 30
ARMOR: LIGHT
COST: 50
SECONDS TO PRODUCE: 3
POWER USAGE: NONE
48
CHAIN LINK BARRIER
ARMOR: LIGHT
COST: 75
SECONDS TO PRODUCE: 5
POWER USAGE: NONE
PURPOSE: BASE DEFENSE
Chain Link functions in the same way that the sandbags do, but they provide more defense. Only explosive weapons such as grenades, missiles,
and shells can damage a Chain Link Barrier.
Page 49

CONCRETE BARRIER
ARMOR: MEDIUM
COST: 100
SECONDS TO PRODUCE: 7
POWER USAGE: NONE
PURPOSE: BASE DEFENSE
Concrete walls are the most effective barrier. They are much harder to
destroy and will take the enemy much longer to blast through. Only
explosive weapons such as grenades, missiles, and shells can damage
Concrete Barriers.
GDI STRUCTURES
49
Page 50

GDI STRUCTURES HIERARCHY
STRUCTURE
BUILT: ALLOWS BUILDING OF:
CONSTRUCTION
YARD
POWER PLANT
BARRACKS
GDI STRUCTURES
TIBERIUM
REFINERY
COMM.CENTER
50
BARRIER
BARRACKS
GUARD TOWER
COMM.
CENTER
ADV.COMM.
CENTER
CHAIN LINK
BARRIER
ADV. POWER
PLANT
HELIPAD
WEAPONS
FACTORY
ADV.GUARD
TOWER
SANDBAG
BARRIER
REPAIR
FACILITY
TIBERIUM SILO
POWER PLANTCONCRETE
TIBERIUM
REFINERY
For Multiplay
STRUCTURE TECH LEVEL
Construction Yard 1
Power Plant 1
Infantry Barracks 1
Tiberium Refinery 1
Tiberium Silo 1
Sandbag Barrier 2
Guard Tower 2
Weapons Factory 2
Communications Center 2
Advanced Guard Tower 4
Chain Link Barrier 5
Advanced Power Plant 5
Repair Facility 5
Helipad 6
Concrete Barrier 7
Adv. Comminication Center 7
Page 51

STRUCTURE NAME TECH COST POWER ARMOR PREREQUISITES PURPOSE/USAGE
State of the Art: GDI Structures
Construction Yard 1 N/A 30 Light None Produces structures
Power Plant 1 300 +100 Med. Const. Yard Provides power
Infantry Barracks 1 300 20 Med. Power Plant Produces infantry
Tiberium Refinery 1 2000 40 Med. Power Plant Converts Tiberium to credits
Tiberium Silo 1 150 10 Light Refinery Holds 1500 credits
Sandbag Barrier 2 50 — Light Const. Yard Base defense
Guard Tower 2 500 10 Light Barracks Defense
Weapons Factory 2 2000 30 Med. Power Plant Builds vehicles/air power
Communications Center 2 1000 40 Light Refinery Radar & comm.
Advanced Guard Tower 4 1000 20 Med. Comm. Center Defensive rocket launcher
Chain Link Barrier 5 75 — Med. Const. Yard Base defense
Advanced Power Plant 5 700 +200 Light Power Plant Provides power
Repair Facility 5 1200 30 Light Power Plant Repairs Vehicles
GDI STRUCTURES
Helipad 6 1500 10 Med. Barracks Heli landing / Rearming
Concrete Barrier 7 100 — Heavy Const. Yard Base defense
Adv. Communications Ctr. 7 2800 200 Heavy Comm. Center Radar & Ion Cannon
51
Page 52

NOD UNITS
MINIGUN INFANTRY
ARMOR: NONE
COST: 100
SECONDS TO PRODUCE: 7
RANGE: SHORT
WEAPON: M-16 RIFLE
Equipped with the M-16 Machine Gun, this troop is the key player in
Nod’s forces. En masse, this unit is very useful against slow-moving
armored units like tanks. Just remember that large tanks can easily crush
your infantry and flame-based weapons can quickly reduce entire squads
to ash.
ROCKET SOLDIER
ARMOR: NONE
COST: 300
SECONDS TO PRODUCE: 17
RANGE: MEDIUM
WEAPON: LIGHT TOW ROCKETS
These infantry units are slower and easier to kill than other infantry, but
can tear through armor faster than any other infantry unit. Their major
advantage is the ability to attack airborne units. Most effective as a support unit in diverse groups.
52
FLAMETHROWER INFANTRY
ARMOR: NONE
COST: 200
SECONDS TO PRODUCE: 13
RANGE: SHORT
WEAPON: FLAMETHROWER
Effective for maximum close-range destruction. Produces fire which burns
more slowly than normal, allowing more effective elimination of humans
and armament. Be careful when using these troops in groups—if one unit
gets in front of another, chances are that the unit in front will catch some
of the damage from the back unit. Spread them out.
Page 53

ENGINEER
ARMOR: NONE
COST: 500
SECONDS TO PRODUCE: 33
RANGE: N/A
WEAPON: NONE
Engineers are used to capture enemy buildings. Since they carry no
weapons, they are extremely vulnerable on the battlefield and must be
directed very carefully. Loading them into an Chinook is an ideal way to
move them about the battlefield. Dropping a Chinook full of Engineers in
an enemy’s base is a commonly employed tactic.
CHEM-WARRIOR
WEAPON: CHEM-SPRAY
*
ARMOR: NONE
COST: 300
SECONDS TO PRODUCE: 20
RANGE: SHORT
The Chem-Warrior is an advanced infantry unit immune to the effects of
Tiberium. The chem-blast they carry produces a short-lived toxic cloud of
Tiberium gas that will kill any infantry caught within its effects.
COMMANDO
WEAPON: SNIPER RIFLE AND C-4 EXPLOSIVE PACKS
*
ARMOR: NONE
COST: 1000
SECONDS TO PRODUCE: 67
RANGE: LONG
The Commando uses a Raptor 50cal. assault rifle with suppressor that is
able to take out infantry units from extreme range. In addition, the
Commando also carries C-4 explosives. When placed in enemy structures, these explosives will level the target structure in seconds.
NOD UNITS
* Multiplay only. May be available in single-play missions as a unit given to you at the start of a
mission or as a mission objective for capture.
53
Page 54

NOD UNITS
RECON BIKE
ARMOR: LIGHT
COST: 500
SECONDS TO PRODUCE: 33
RANGE: MEDIUM
WEAPON: DRAGON TOW ROCKETS
Mounting twin rocket launchers, the cycles have great flexibility, serving
multiple roles in Nod’s forces. Learn to use these units in packs, hunting
down lone units or harvesters. When in guard mode, they will shoot at
enemy aircraft, making them ideal at destroying incoming aerial assaults.
Their speed makes them an ideal scouting unit as well.
NOD BUGGY
ARMOR: LIGHT
COST: 300
SECONDS TO PRODUCE: 20
RANGE: SHORT
WEAPON: M60 MACHINE GUN
These all-terrain vehicles are armed with an M60 machine-gun in a turret. Faster than GDI’s Hum-vee, the Buggy has sacrificed some armor for
this advantage. Used in hit and run tactics on infantry and other lightly
armored targets, the Buggy shines. Against armor, it dies.
54
LIGHT TANK
ARMOR: MEDIUM
COST: 600
SECONDS TO PRODUCE: 40
RANGE: MEDIUM
WEAPON: 75MM APDS
This highly-mobile tread vehicle, delivers maximum weaponry and personnel destruction with minimum weight, maintenance and weaponry.
Faster than any other tank on the battlefield, these units can reach a target quickly. Used in conjunction with aerial assaults, these units are very
effective.
Page 55

MOBILE ARTILLERY
ARMOR: MEDIUM
COST: 450
SECONDS TO PRODUCE: 30
RANGE: LONG
WEAPON: 155MM BALLISTIC CHARGES
This massive cannon has great range and ballistic power. This unit is very
slow. Any attacks using this unit have to be orchestrated carefully—just
getting the unit to its target can be difficult. However, once it gets within
range, little stands in the way of its firepower. By nature, artillery is somewhat innacurate.
FLAME TANK
ARMOR: MEDIUM
COST: 800
SECONDS TO PRODUCE: 53
RANGE: SHORT
WEAPON: TWIN FLAME CANNONS
Especially useful against infantry and structures, the Devil’s Tongue Flame
Tank can mow through swarms of infantry with little or no damage to itself.
To top off its destructive capabilities, the flame tank is fast, able to avoid
some of the slower firing weapons and get close to its target quickly.
NOD UNITS
STEALTH TANK
ARMOR: LIGHT
COST: 900
SECONDS TO PRODUCE: 60
RANGE: MEDIUM
WEAPON: DRAGON TOW ROCKETS
This lightly-armored tank is equipped with the Lazarus shield, cloaking it
from enemy sight. This shield is neutralized during firing, giving the tanks
the ability to “appear” out of thin air. Although vehicles and most structures are not able to see the tank while cloaked, infantry and Guard
Towers will reveal the tank if it gets too close to them.
55
Page 56

NOD UNITS
SURFACE-TO-SURFACE MISSILE LAUNCHER(SSM)
ARMOR: LIGHT
COST: 750
SECONDS TO PRODUCE: 50
RANGE: EXTREME
WEAPON: HONEST JOHN MISSILES
*
The SSM is Nod’s longest-ranged unit, able to fire on the enemy from a
great distance. Its napalm rounds are useful at cracking through tough
base defenses without any worry of retaliation. Infantry in a large group
will also suffer from its high area of effect. The reload rate on this unit is
extremely long, requiring other units to protect it during its lag-time.
APACHE ATTACK HELICOPTER
ARMOR: MEDIUM
COST: 1200
SECONDS TO PRODUCE: 80
RANGE: MEDIUM
WEAPON: HIGH-SPEED GATLING CANNON
Nod’s Apache Helicopter is fast, mobile, and carries a large quantity of
ammunition. Used primarily against infantry and structures, the Apache
can take down armored units when en-masse. Use them to soften up
bases before a nuclear weapon is dropped, or gun through a horde of
engineers coming towards your base.
56
TRANSPORT “CHINOOK” HELICOPTER*
ARMOR: MEDIUM
COST: 1500
SECONDS TO PRODUCE: 100
RANGE: N/A
WEAPON: NONE
Provides field transportation for all infantry, rapidly deploying new troops
into, or out of battle. This unit is basically an aerial version of the APC
without the weapon.
* Multiplay only. May be available in single-play missions as a unit given to you at the start of a
mission or as a mission objective for capture.
Page 57

MCV
ARMOR: MEDIUM
COST: 5000
SECONDS TO PRODUCE: 333
RANGE: N/A
WEAPON: NONE
The mobile construction vehicle lets you search for suitable base sites.
Once one is found, convert the MCV into a full-service Construction Yard
and use it to build other structures. Since this vehicle is slow, unarmed,
and expensive, you will want to keep it well guarded with other units.
HARVESTER
ARMOR: HEAVY
COST: 1400
SECONDS TO PRODUCE: 93
RANGE: N/A
WEAPON: NONE
This armor-plated vehicle seeks out and scoops up raw Tiberium, then
transports it to refineries for processing. It is slow and unwieldy and will
need to be protected. Its good points are that it can take a beating before
being destroyed and it is proficient at crushing enemy infantry.
NOD UNITS
HOVER CRAFT
ARMOR: HEAVY
COST: N/A
SECONDS TO PRODUCE: N/A
RANGE: N/A
WEAPON: NONE
This heavily-armored unit deploys men and vehicles during amphibious
assault. This vehicle is not buildable in any missions, including multiplay.
57
Page 58
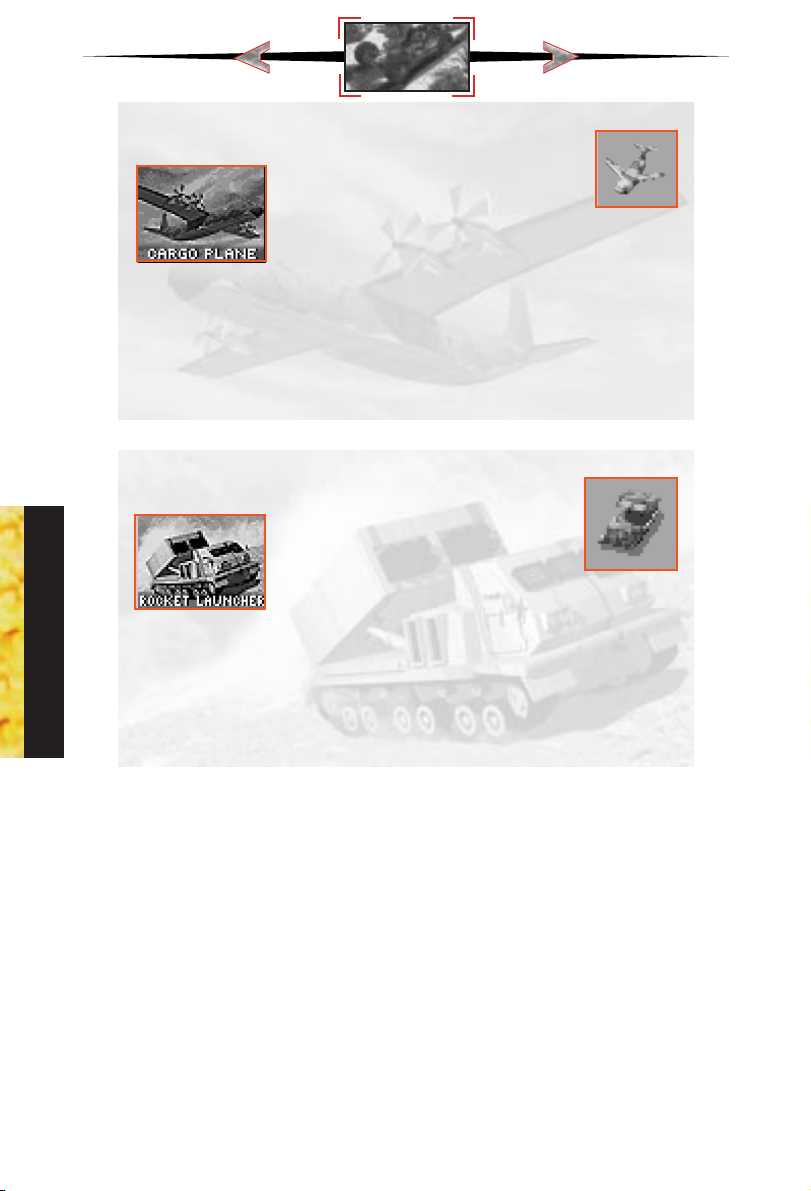
NOD UNITS
CARGO PLANE
ARMOR: HEAVY
COST: N/A
SECONDS TO PRODUCE: N/A
RANGE: N/A
WEAPON: NONE
This carrier ships purchased units to the Brotherhood of Nod via the
Airfield. Any units ordered will be shipped in as soon as possible. Only
one transport plane can be on the board (per Airfield) at any one time.
MOBILE ROCKET LAUNCH SYSTEM (MRLS)*
ARMOR: LIGHT
COST: 800
SECONDS TO PRODUCE: 53
RANGE: LONG
WEAPON: 227MM ROCKETS
Mobile devastation. This unit fires 227mm rockets and is effective against
just about everything, including aerial threats. With no short-range fighting ability, this unit needs close-quarter backup. This is an attack only
vehicle. Keep it in the background and don’t let enemies in close to it.
58
* Multiplay only. May be available in single-play missions as a unit given to you at the start of a
mission or as a mission objective for capture.
Page 59
59
NOD UNITS
Page 60

NOD UNITS HIERARCHY
STRUCTURE(S) BUILT: ALLOW(S) BUILDING OF:
HAND OF NOD
+
HAND OF NOD
+
HAND OF NOD
+
HAND OF NOD
NOD UNITS
AIRFIELD
+
AIRFIELD
+
AIRFIELD
+
+
AIRFIELD OBELISK OF LIGHT
60
TEMPLE OF NOD
AIRFIELD
HELIPAD
COMM. CTR.
TIBERIUM REFINERY
MINIGUN
INFANTRY
COMMANDO
INFANTRY
APC
CHINOOK APACHE
RECON BIKE NOD BUGGY
LIGHT TANK
FLAME TANK STEALTH TANK
HARVESTER
MCV MRLSAIRFIELD TEMPLE OF NOD
SSM
LAUNCHER
ROCKET
SOLDIER
CHEMICAL
WARRIOR
ARTILLERY
FLAMETHROWER
INFANTRY
ENGINEER
INFANTRY
* Available to build
in multiplay only.
For Multiplay
UNIT
Minigun Infantry 1
Flamethrower Inf. 1
Rocket Soldier 2
Recon Bike 2
Harvester 2
Nod Buggy 3
Engineer 3
Light Tank 3
APC* 4
Flame Tank 4
Stealth Tank 5
Mobile Artillery 6
Transport Chinook* 6
Attack Helicopter* 6
Chem-Warrior* 7
Commando* 7
MCV 7
MRLS* 7
SSM Launcher* 7
Nuclear Strike 7
TECH
LEVEL
Page 61

NOD UNITS
DESCRIPTION TECH COST RANGE ARMOR PREREQUISITES WEAPON
Minigun Infantry 1 100 Short None Hand of Nod M-16 Rifle
Flamethrower Infantry 1 200 Short None Hand of Nod Flamethrower
Rocket Soldier 2 300 Med. None Hand of Nod Light TOW Rocket
Recon Bike 2 500 Med. Light Airfield Dragon TOW Rockets
Harvester 2 1400 N/A Heavy Airfield, Refinery None
Nod Buggy 3 300 Short Light Airfield M-60 Machine Gun
Engineer 3 500 N/A None Hand of Nod None
Light Tank 3 600 Med. Med. Airfield 75mm APDS
APC* 4 700 Short Heavy Hand of Nod, Airfield M-60 Machine Gun
Flame Tank 4 800 Short Med. Airfield, Comm. Center Twin Flame Cannons
Stealth Tank 5 900 Med. Light Airfield, Comm. Center Dragon TOW Rockets
Mobile Artillery 6 450 Long Med. Airfield 150mm Ballistic Charges
Transport Chinook* 6 1500 N/A Med. Helipad, Airfield None
Attack Helicopter* 6 1200 Med. Med. Helipad, Airfield Gatling Chain-gun
Chem-Warrior* 7 300 Short None Hand of Nod, Temple of Nod Chem-spray
Commando* 7 1000 Long None Hand of Nod, Temple of Nod Sniper Rifle / C4 Explosive
MRLS* 7 800 Long Light Airfield, Temple of Nod 227mm Rockets
MCV* 7 5000 N/A Med. Airfield, Temple of Nod None
SSM Launcher* 7 750 V. long Light Airfield, Temple of Nod Honest John Missiles
Nuclear Strike 7 N/A V. long N/A Temple of Nod Nuclear Detonation
Hover Craft N/A N/A Heavy N/A N/A
Cargo Plane N/A N/A N/A Heavy N/A
State of the Art: Nod Units
AFLD = Airfield, COM = Comm. Center, HELI = Helipad, HON = Hand of Nod, REFN = Refinery, TON= Temple of Nod
*Available in Multiplayer missions only. May be available in single-player missions as unit given to you at start of mission or as a mission
objective for capture.
61
Page 62

CONSTRUCTION YARD
ARMOR: MEDIUM
COST: N/A
SECONDS TO PRODUCE: N/A
POWER USAGE: NONE
PURPOSE: PRODUCES STRUCTURES
The Construction Yard is the foundation of a base and allows the construction of other buildings. You must protect this structure! Without it, you
cannot build any new structures. The Construction Yard is fairly strong,
but as with almost all structures, it is vulnerable to Engineers. Try surrounding your Construction Yard with walls to keep out unwanted guests.
POWER PLANT
ARMOR: MEDIUM
COST: 300
SECONDS TO PRODUCE: 20
POWER USAGE: NONE
PURPOSE: PROVIDES POWER TO BASE
This unit provides power to the structures in your base. Power output is
directly related to the Power Plant’s condition, so protect them during battles. If they get damaged, you must repair them quickly or else some of
your base defenses may cease to function. The Power Plant outputs 100
units of power.
NOD STRUCTURES
ADVANCED POWER PLANT
PURPOSE: PROVIDES POWER TO BASE
This high-yield structure handles the energy strains of some later, more
power-intensive structures. It may cost a bit more than the original Power
Plant, but it generates double the amount of power (200 units).
62
ARMOR: MEDIUM
COST: 700
SECONDS TO PRODUCE: 47
POWER USAGE: NONE
Page 63

HAND OF NOD
ARMOR: MEDIUM
COST: 300
SECONDS TO PRODUCE: 20
POWER USAGE: 20
PURPOSE: PRODUCES INFANTRY
This creates elite infantry units for the Brotherhood of Nod. Building multiple barracks will decrease the time necessary to train a soldier.
TURRET
ARMOR: HEAVY
COST: 600
SECONDS TO PRODUCE: 17
POWER USAGE: 20
PURPOSE: BASE DEFENSE
For broad sweep, short-range protection against heavy assault vehicles.
This is the staple of Nod’s base defense, so be sure to have several of
these around your base entrances. Fire-power wise, they are the equivalent of a medium tank’s cannon—without the mobility.
SAM SITE
ARMOR: HEAVY/LIGHT
COST: 750
SECONDS TO PRODUCE: 50
POWER USAGE: 20
PURPOSE: DEFENSIVE ANTI-AIRBORNE UNIT
Fires surface-to-air missiles at airborne GDI units. When the it is recessed
in the ground, it is difficult to harm. However, when the launcher is
exposed, it will damage more easily. Position these around your base in a
triangular layout. This gives you the best chances of destroying aerial
threats before they can cause serious damage to your base.
NOD STRUCTURES
63
Page 64

REFINERY
ARMOR: MEDIUM
COST: 2000
SECONDS TO PRODUCE: 133
POWER USAGE: 40
PURPOSE: CONVERTS TIBERIUM TO CREDITS
This unit processes Tiberium into its component elements. Building the
refinery immediately deploys a Tiberium harvester and each Refinery can
handle an infinite number of Harvesters. The refinery stores 1,000 credits
of processed Tiberium
SILO
ARMOR: LIGHT
COST: 150
SECONDS TO PRODUCE: 10
POWER USAGE: 10
PURPOSE: HOLDS REFINED TIBERIUM
This unit stores up to 1,500 credits of processed Tiberium. When the
Refinery fills to its maximum capacity of Tiberium, you will want to build
Silos to handle the excess storage load. Guard it carefully. If destroyed or
captured, the amount stored in the silo is deducted from your account.
NOD STRUCTURES
COMMUNICATIONS CENTER
PURPOSE: BASE RADAR & COMMUNICATION
Allows the use of the radar screen as long as there is sufficient power.
The radar screen allows for long-range views of the battlefield and for
commanding units over great distances. When playing as Nod against
GDI in the solo play missions, destroying GDI’s Radar Facility will keep
GDI from launching A-10 airstrikes against you.
64
ARMOR: MEDIUM
COST: 1000
SECONDS TO PRODUCE: 66
POWER USAGE: 40
Page 65

HELIPAD*
ARMOR: MEDIUM
COST: 1500
SECONDS TO PRODUCE: 100
POWER USAGE: 10
PURPOSE: HELICOPTER LANDING
Building the Helipad allows the use of the Apache attack aircraft. The
Helipad is also the rearming station for the Apache. If the Helipad is lost,
the Apache will not be able to reload. Any Apache can use any Helipad
on your side.
AIRFIELD
ARMOR: HEAVY
COST: 2000
SECONDS TO PRODUCE: 133
POWER USAGE: 30
PURPOSE: WEAPONS RECEIVING AREA
Nod buys all its units. The Airfield allows cargo planes to land and deliver equipment. It is functionally equivalent to the GDI Weapons Factory.
However, you do not instantly get the unit when it is complete—it must be
flown in, so plan accordingly. Building multiple Airfields will increase the
ordering speed, and will enable you to have two units delivered at a time.
REPAIR FACILITY
ARMOR: LIGHT
COST: 1200
SECONDS TO PRODUCE: 80
POWER USAGE: 30
PURPOSE: VEHICLE REPAIR
The repair facility allows you to repair damaged units. Moving a vehicle
onto the repair pad will begin the repair process. All repairs are deducted from your credits. If you run out of credits while repairs are in
progress, repairs will stop. Damage to the facility significantly slows
repair work.
* Multiplay only. May be available in single-play missions as a unit given to you at the start of a
mission or as a mission objective for capture.
NOD STRUCTURES
65
Page 66

OBELISK OF LIGHT
ARMOR: MEDIUM
COST: 1500
SECONDS TO PRODUCE: 100
POWER USAGE: 150
PURPOSE: LASER-EQUIPPED BASE DEFENSE
This high-power laser effectively destroys troops and armament at long
range. It is the most powerful on-board weapon in the game. Its slow
recharge time means that it cannot be the only weapon defending your
base, however. Make sure you have excess power before building these,
because damage to your power plants will keep the obelisks off-line.
TEMPLE OF NOD
ARMOR: HEAVY
COST: 3000
SECONDS TO PRODUCE: 200
POWER USAGE: 150
PURPOSE: NUCLEAR MISSILE
Houses the central computer core that is the hub of all Nod communications and center of Nod command. It is heavily armored. This structure
also gives Nod players the ability to fire nuclear missiles.
NOD STRUCTURES
SANDBAG BARRIER
PURPOSE: BASE DEFENSE
Used to deter the enemy from advancing. Sandbags provide limited cover
and may slow units down. Only explosive weapons such as grenades,
missiles, and shells can damage Sandbags.
66
ARMOR: LIGHT
COST: 50
SECONDS TO PRODUCE: 3
POWER USAGE: NONE
Page 67

CHAIN LINK BARRIER
ARMOR: MEDIUM
COST: 75
SECONDS TO PRODUCE: 5
POWER USAGE: NONE
PURPOSE: BASE DEFENSE
Chain Link function in the same way that the sandbags so, but they provide more defense. Only explosive weapons such as grenades, missiles,
and shells can damage a Chain Link fence.
CONCRETE BARRIER
ARMOR: HEAVY
COST: 100
SECONDS TO PRODUCE: 7
POWER USAGE: NONE
PURPOSE: BASE DEFENSE
Concrete walls are the most effective barrier. They are much harder to
destroy and will take the enemy much longer to blast through. Only
explosive weapons such as grenades, missiles, and shells can damage
Concrete Barriers.
NOD STRUCTURES
67
Page 68

NOD STRUCTURES HIERARCHY
STRUCTURE
BUILT: ALLOWS BUILDING OF:
CONSTRUCTION
YARD
POWER PLANT
HAND OF NOD
TIBERIUM
REFINERY
COMM.CENTER
NOD STRUCTURES
68
CHAIN LINK
BARRIER
HAND OF
NOD
SAM SITE TURRET
COMM.
CENTER
OBELISK OF
LIGHT
BARRIER
ADV. POWER
PLANT
AIRFIELD
TEMPLE OF
NOD
SANDBAG
BARRIER
REPAIR
FACILITY
HELIPAD
TIBERIUM SILO
POWER PLANTCONCRETE
TIBERIUM
REFINERY
For Multiplay
STRUCTURE TECH LEVEL
Construction Yard 1
Power Plant 1
Hand of Nod 1
Tiberium Refinery 1
Tiberium Silo 1
Sandbag Barrier 2
Turret 2
Communications Center 2
Airfield 2
Obelisk of Light 4
Chain Link Barrier 5
Repair Facility 5
Advanced Power Plant 5
Sam Site 6
Helipad 6
Concrete Barrier 7
Temple of Nod 7
Page 69

Construction Yard 1 N/A 30 Med. None Produces structures
State of the Art: Nod Structures
DESCRIPTION TECH COST POWER ARMOR PREREQUISITES PURPOSE/USAGE
Power Plant 1 300 +100 Light Const. Yard Provides power
Hand of Nod 1 300 20 Med. Power Plant Produces infantry
Tiberium Refinery 1 2000 40 Med. Power Plant Converts Tiberium to credits
Tiberium Silo 1 150 10 Light Refinery Holds 1500 credits
Sandbag Barrier 2 50 Ø Light Const. Yard Base defense
Turret 2 600 20 Heavy Hand of Nod Base defense turret
Communications Center 2 1000 40 Med. Refinery Radar & comm.
Airfield 2 2000 30 Heavy Refinery Weapons receiving area
Obelisk of Light 4 1500 150 Med. Comm. Center Base defense laser
Chain Link Barrier 5 75 Ø Med. Const. Yard Base defense
Repair Facility 5 1200 30 Light Power Plant Repairs vehicles
Advanced Power Plant 5 700 +200 Light Power Plant Provides power
Sam Site 6 750 20 Hvy/Lt Hand of Nod Air defense site
Helipad 6 1500 10 Med. Hand of Nod Helicopter landing
Concrete Barrier 7 100 Ø Heavy Const. Yard Base defense
Temple of Nod 7 3000 150 Heavy Comm. Center Nuclear missile
69
NOD STRUCTURES
Page 70

Mission Tutorials
The following two sections contain walk-throughs for the first two GDI and Nod missions.
Don’t read theses tutorials if you want to try it on your own.
MISSION ONE
The first thing you may want to do
when the mission starts is to slow
the game down. Doing this will
give you a chance to get used to
the way the game functions. To
slow the game down, click on
the tab at the top of the screen
that is labeled “Options”. (You
can also hit the ESC key or Space
Bar.)
When you do this, the game will
pause and a menu will pop up in
the middle of the screen. Here
you will see several options,
including a box labeled “Game
Controls.” Left click on this box.
Doing this will bring up another
box that has two sliders on it.
One is labeled “Game Speed”
the other is labeled “Scroll
Speed”. Left click and hold the
bar in the middle of the Game
Speed slider. Moving the bar to
the right will increase the game
speed, moving the bar to the left
will slow the game down. Move
the bar all the way to the left.
You can also adjust the rate at
which the map scrolls around.
The game’s default Scroll Speed
it pretty good, so only change it
GDI TUTORIAL - 1
if you don’t like the way it feels.
To exit the Game Controls
Screen, left click on the box
labeled “Options Menu”. When that screen disappears, left click on the box labeled
“Resume Mission”. You can also exit this screen by hitting the ESC key twice.
70
Page 71

SCOUTING THE
TERRITORY
When the mission begins you will
see several things. In the water to
the south, a GDI Gunboat is firing on a Nod Turret. To the north
of this are your troops, four GDI
Infantry and a GDI Mobile
Construction Vehicle (MCV). You
will also see the immediate terrain
around your units but won’t see
any more of the play area. This
dark area is called the
“Unrevealed Terrain”. As you
move your units around the
battlefield, they will reveal the
terrain. Every unit reveals terrain
as it moves, but not every unit
can “see” the same distance. For
instance, infantry cannot see as
far as Humm Vees, so use the
Humm Vees to scout with.
Don’t worry about the Gunboat.
It will automatically fire on the
Nod Turret. Concentrate on
deploying your MCV. Do this by
left clicking on it twice. The first
click brings up a “Deploy” cursor
and the second click deploys the
MCV into the construction yard.
The MCV creates a fairly large
building when it deploys, so it
needs to have a clear area
around it in order to deploy. If
you attempt to deploy the MCV
and it doesn’t deploy, check
around the MCV for things that might get in the MCV’s way. It could be an Infantry unit,
a cliff, a tree, etc. In this mission, the MCV starts in a clear area and will deploy as long
as you don’t move it and as long as the an enemy unit doesn’t get in the way.
Watch out now. A Nod Minigunner from the north will begin attacking your MCV. Move
your Infantry northward to protect your Construction Yard. Do this by left clicking on the unit
you want to move, then moving the cursor to the location you wish the unit to move to and
left clicking again. For instance, if you want a unit to move to the north of the MCV, left click
on the unit, then left click on the terrain to the north of the MCV and the unit will move there.
If there is something in his way, he will try to get as close to the region you clicked on as
possible.
GDI TUTORIAL - 1
71
Page 72

Move the unit to the north (above your Construction Yard) to protect it. To directly attack
an enemy unit, left click on one of your units, then left click on the enemy unit you want to
attack. Your unit will move to get in range of the target you selected and then attack. (Infantry
troops will attack automatically either if they are being fired on directly, or if the target is
within their own attack range. Infantry will not fire automatically if the enemy unit firing on
them is out of the Infantry’s range.)
Now try moving a group of
Infantry at once. To select a group
of units, left click and hold the
mouse button near the group that
you want selected. While holding the mouse button, move the
mouse cursor across the group
you want selected. You will notice
that a box is being created as you
move the mouse cursor. Expand
the box to include all the units you
want in the group. Now let go of
the mouse button. All of the units
in the box are now selected and
will move as a group.
Left click on the enemy unit you
want to attack. Your troops will
move towards the targeted enemy
and engage them. (Tip: Try to
have several infantry gang up
on particular targets.)
GDI TUTORIAL - 1
72
Page 73

SOPHISTICATED SCOUTING
If you want to direct a unit to look for anything coming at it and engage it automatically,
you can put it into “Guard” mode. (See Advanced Play, Page 30)
BUILDING YOUR BASE
When the MCV is deployed, a sidebar appears on the right side of your screen. Your construction options appear here. The only building you can build right now is the Power Plant.
Left click on the Power Plant icon in the sidebar. The Power Plant will begin building and
the cost of the Power Plant will be deducted from your credits total at the top of the screen.
When it’s done, a “Ready” message will appear.
Now place the building. Do this by left clicking on the Power Plant icon which will give you
a placement grid. Throughout the game, the grid must be all white in order to place a building. To get the all-white grid, you must meet two conditions. First, you can’t place the grid
on top of existing units or terrain obstacles (cliffs, trees, mountains, etc.). Second, you have
to place the new building adjacent to one of your existing structures.
MEASURING POWER EFFICIENCY
Power is essential for your base to
operate efficiently.
Look at the sidebar section of
your screen. The thin vertical area
next to the construction icons is
your power bar.
The blue dividing bar shows you
how much power your base is
currently using, and the vertical
bar shows your available power.
As long as the bar is in the green,
your base has enough power to operate everything at maximum efficiency. If the bar drops
into the yellow or red, your base is under-powered. As described earlier in the manual, when
the base is under-powered, construction will take much longer than usual, and many of the
high-tech structures will shut down.
GDI TUTORIAL - 1
BUILDING OTHER STRUCTURES
With your Power Plant in place, you will now notice a Barracks icon has appeared in the
sidebar.
Build the Barracks the same way you built the Power Plant. Once the Barracks is placed,
you will be able to build Minigun Infantry. This will help you supplement your troops.
73
Page 74

KEEP YOUR EYES OPEN
While you were building up your
base, you were probably attacked
a few times by Nod troops. They
attack quickly, so fight them off with
the reinforcements you will receive
periodically. Most of the attacks will
come from the north and the west,
so place troops on these sides of
your base.
Once you have eliminated all of
the immediate threats, hunt down
all the remaining Nod troops.
Create a sizable force of at least eight-to-ten Minigun Infantry. Move the group westward
into the forest above the cliffs and eliminate the Nod troops there.
Now, move your troops directly north of the forest, where you will encounter a couple more
Nod troops on patrol.
Once you have defeated them, head to the east and slightly south where the last Nod group
is stationed.
When you have destroyed these, your mission should be complete. If the mission does not
end, it means that there are a few more Nod units hiding or structures like the Turret that
haven’t been eliminated. Explore the map and make sure to destroy all the Nod units and
structures on the map.
KEEPING SCORE
Whether you’re playing Nod or GDI, at the end of each mission, the score screen will appear.
This will rate your performance based on several factors: how long you took for the mission, how much money you ended with, compared to what you started with, and the number of units and structures that you lost, compared to the number that you built. Also listed is the high score table. The high score table will keep track of the seven highest scores
GDI TUTORIAL - 1
on any given mission. This is useful if you and your friends are competing for high scores.
When you finish entering your name, the screen will clear.
CONTINUING THE WAR
After a mission is done, you will get a map selection screen where you will choose your next
mission. Sometimes, you only have one choice for the mission, but other times there will be
multiple arrows shown.
This means that there is more than one mission available for you to play in that area. To
select the mission that you want to play, left click on the head of any one of the arrows.
Whichever one that you clicked on will then be the mission that you will play.
74
Page 75
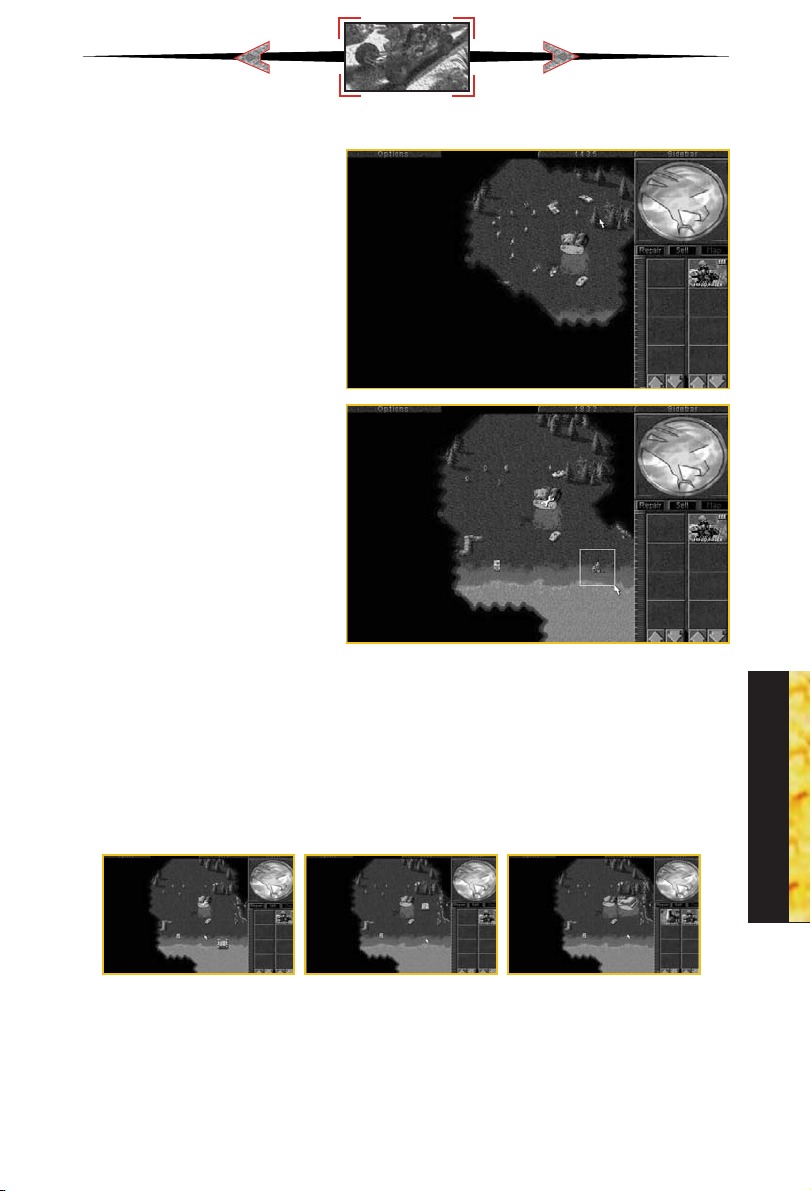
Mission Two
Here you join a battle already
in progress. Nod troops have
taken your base and will destroy
your Power Plant. Stay cool. You
can’t prevent this.
Here’s what you should do.
First, eliminate all the Nod troops
that are in your base. To do this,
select a group of your troops like
you did in mission one and left
click on the enemy units in your
base. Then quickly begin to repair
your Barracks.
You do this by left clicking on the
“Repair” button in the side bar. It’s
just above the construction icons.
When you do this, your cursor
will be in “repair mode” and it will
turn into a wrench. Now left click
on the Barracks. A wrench will
flash over the structure, signaling
that repairs are under way.
Buildings will continue to repair
until they are fully repaired or until you run out of money. If you want to stop the repair process
on a structure before the structure is fully repaired, be sure that your cursor is in repair mode
and left click on the structure you want to stop repairing. When you are done making
repairs, right click, or left click the Repair button in the Sidebar again to exit the repair mode.
While this is going on, you’ll receive engineers. Place them someplace safe, like the south
east corner of the map, for the time being.
Shortly after the engineers have arrived, you’ll get an MCV. Deploy it off the beach near
your Barracks.
Now you can build a Power Plant and more Infantry. (You can build Infantry without power,
but it will take more time.)
With the Construction Yard up and running, build a second Barracks. This allows you to
build Infantry faster than with just one Barracks.
GDI TUTORIAL - 2
75
Page 76
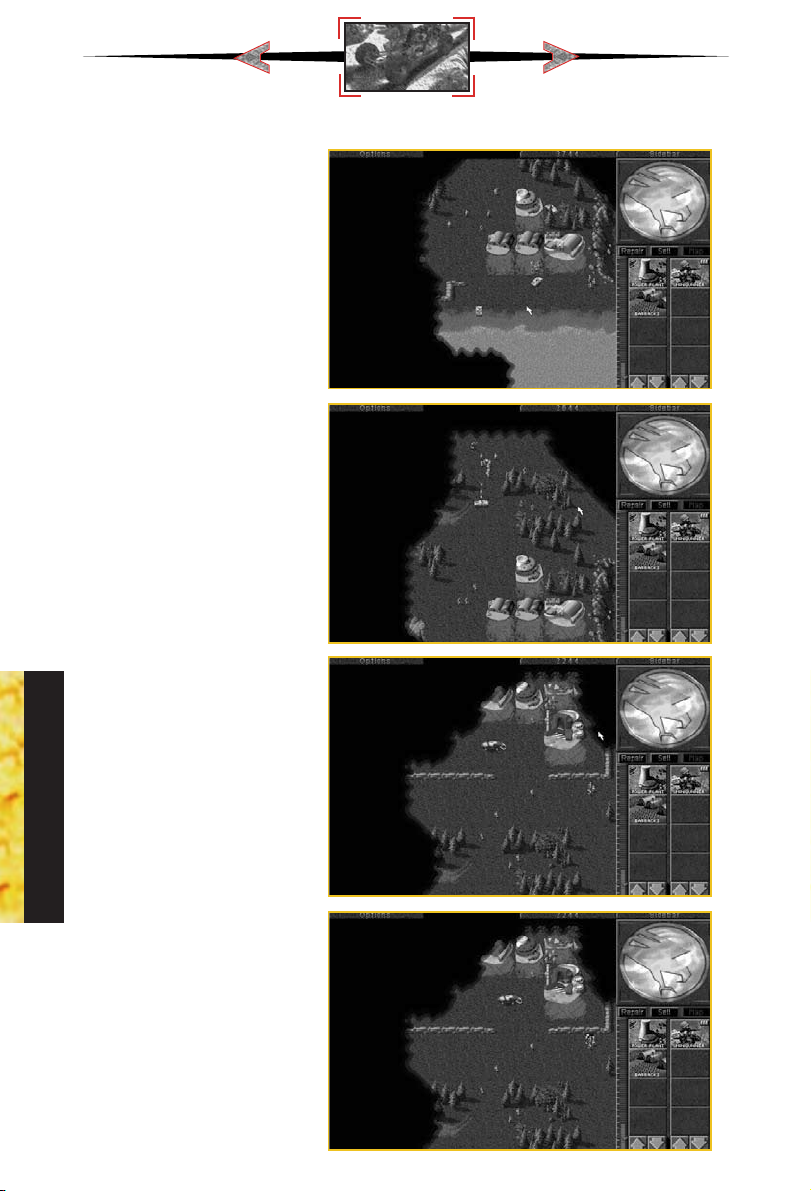
MOVING OUT
The enemy base you must destroy
is directly to the north of your
base. All the Nod attacks will
come from both north and west.
Position Infantry guards accordingly. Build a fair-sized group of
Infantry and begin moving them
north.
Destroy all patrolling Nod troops
that you encounter on your way.
If you lose too many of your
Infantry, build more. When you
reach the Nod base, eliminate
the Nod troops guarding the
Tiberium Refinery.
Do NOT shoot at the Nod
Harvester. Doing that will bring
the Nod troops running.
Once you have the Refinery isolated, bring up your engineers.
When the Nod Harvester enters
the Refinery to unload, capture
the Refinery. To do this, left click
on an engineer and then keft click
on the Refinery.
Now the Refinery and the
Harvester are yours and any
money they acquire. You can use
Engineers to capture almost all of
the enemy structures. (Structures
like Obelisks, Turrets, Guard
Towers, and Advanced Guard
Towers can not be captured.)
GDI TUTORIAL - 2
76
Page 77

GOING AFTER TIBERIUM
Now that you own a Refinery,
you can harvest Tiberium. Explore
the area until you find some
Tiberium (the green crystals that
are growing out of the ground).
There should be some along the
west edge of the map.
If you captured the Refinery with
the Harvester in it, you will own
the Harvester as well. This unit is
used to collect the Tiberium. The
Harvester has no weapon, and
aside from heavy armor, it isn’t suited to be put in combat situations.
If you have discovered any Tiberium, the Harvester will automatically move towards it and begin
to harvest it. This is an automatic process that you shouldn’t worry about. If you haven’t located any, you will have to send the Harvester out.
If you don’t see any Tiberium, select some of your other units and scout around until you
do find Tiberium. Once you have, select just the Harvester, and target the Tiberium. Left click,
and the Harvester will begin to gather the crystals. See the manual for more information on
the Harvester and how to control it in certain instances.
STORING THE TIBERIUM
The Refinery can hold up to 1000 credits worth of Tiberium. Once you collect beyond that
number you will have to Silos to hold the excess amount. Silos can hold 1500 credits of
Tiberium. Since you can’t build one right now, you may want to capture one like you captured the Refinery. If you don’t have a Silo, and run out of storage space, any credits that
you didn’t have space for are LOST, so make sure you always have some space available.
TAKING OVER THE BASE
Now it’s time to build an Infantry
Barracks in the enemy’s base.
Follow the steps you’ve already
learned to do this. Be sure that
you place your new Barracks next
to the Refinery that you captured.
When you’re done, make the
new Barracks the “Primary” structure. To do this, select Barracks by
left clicking on it, and a “Primary”
label will appear beneath the
Barracks. All infantry you build in
this mission will now emerge from this building.
Make sure you destroy all Nod troops around and in your newly-acquired base. From here,
it’s just a clean up job. You can choose to either destroy or capture the remaining buildings. Be sure all Nod units are destroyed and all Nod structures are either destroyed or cap-
GDI TUTORIAL - 2
77
Page 78

tured. Once this is done, the mission will be accomplished.
The rest of the game is up to you.
If you have further troubles in the
missions, you can log onto the
Westwood Chat server that comes
Command & Conquer
with
Macintosh
& Conquer chat room that is filled
with people who have played
Command & Conquer
give hints as to the way they solved
the missions. Just ask them, everyone loves to tell war stories.
Good luck!
. There is a Command
that can
GDI TUTORIAL
78
Page 79

Nod Tutorial
MISSION ONE
This is a non-production mission.
You can’t build any more troops or structures than what you started with, so don’t squander them in needless confrontation.
As the mission starts, you will see the forces you have to work with: an assembly of Nod
soldiers and two Nod Buggies.
SCOUTING THE TERRITORY
You will see the immediate terrain
around them but won’t see any
more of the play area. This dark
area is called the “Unrevealed
Terrain”. As you move your units
around the battlefield, they reveal
the terrain and the Unrevealed
Terrain disappears.
Every unit reveals terrain as it
moves, but not every unit can
“see” the same distance. For
instance, Minigunners cannot see
as far as Buggies, so use the
Buggies to scout with.
Take several of the Nod soldiers (or
a Buggy) and scout the general
area around you.
Do this by left clicking on the unit
you want to move, then moving
the cursor to the location you
want the unit to go to and left
clicking again. For instance, if
you want a unit to move into the
Unrevealed Terrain, left click on the unit, then left click on the Unrevealed Terrain, and the
unit will move there.
If there is something in the unit’s way, he will try to get as close to the destination as possible. Don’t click too far into the Unrevealed Terrain. Anything could be hiding under it.
NOD TUTORIAL -1
79
Page 80

MOVING OUT
At the beginning, you’re in a
gorge that heads roughly south
from where you have started.
Eight more Nod Minigunners will
come onto the board, ready for
you to use. As you move these
men, GDI units will attack from the
West. They are your first confrontation.
Select several of your Minigunners, and target them on the
enemy soldiers. To select a group
of units, left click and hold the mouse button near the group that you want selected. Now,
while holding the mouse button, move the mouse cursor across the group you want selected. You will notice that a box is being created as you move the mouse cursor. Expand the
box to include all the units you want in the group. Now let go of the mouse button. All of
the units in the box are now selected and will move as a group.
Left click on the enemy unit you want to attack. Your troops will move towards the targeted enemy and engage them. (Tip: Try to have several Minigunners gang up on particular
targets.)
Minigunner troops will attack automatically if they are being fired on directly, or if the target is within their own attack range. Minigunners will not fire automatically if the enemy unit
firing on them is out of the Minigunners’ range.
SOPHISTICATED
SCOUTING
If you want to direct a unit to
look for anything coming at it
and engage it automatically, you
can put it into “Guard” mode.
(See Advanced Play, Page 30)
Now that you’ve dealt with the
immediate threat, move your
troops down the screen, making
sure to explore the area as you
proceed, so no GDI forces can
sneak up on you. When you meet resistance from GDI troops, use overwhelming numbers
to kill them quickly, so you don’t lose your forces.
NOD TUTORIAL -1
When you arrive at the bottom of the map, proceed to the west, using the same tactics as
before.
80
Page 81

INTO THE VILLAGE
More GDI soldiers will engage
you, but keep your force together and you will defeat them quickly. As you get a little further,
you’ll see a road. Follow it to the
north and it will take you right
into the town where Nikoomba is
hiding.
When you reach the bridge, you
know that you are heading in
the right direction. GDI will
attempt to stop you from crossing
the bridge, but your forces should
be able to take the Humm Vee
out with no sweat. Just select a
group of Minigunners and target the Humm Vee. They’ll do the
rest.
When the way is clear, move into
the town. You can destroy the
village, but it is not required to
win the mission. Civilians may
try to attack you for destroying
their town, but they are no match
for your superior forces.
When you reach the end of the
road, you’ll be at the top of the
map.
Head to the east (right) and you
will move onto a small plateau
that overlooks the village. Here,
you will find Nikoomba. He is
easily recognizable by his white
shirt. Finish him off, and your
mission is complete.
KEEPING SCORE
Whether you’re playing Nod or GDI, at the end of each mission, the score screen will appear.
This will rate your performance based on several factors: how long you took for the mission, how much money you ended with, compared to what you started with, and the number of units and structures that you lost, compared to the number that you built. Also listed is the high score table. The high score table will keep track of the seven highest scores
on any given mission. This is useful if you and your friends are competing for high scores.
When you finish entering your name, the screen will clear.
NOD TUTORIAL -1
81
Page 82

CONTINUING THE WAR
After a mission is done, you will get a map selection screen where you will choose your next
mission. Sometimes, you only have one choice for the mission, but other times (like now)
there will multiple arrows shown.
This means that there is more than one mission available for you to play in that area. To
select the mission that you want to play, left click on the head of any one of the arrows.
Whichever one that you clicked on will then be the mission that you will play.
For the sake of this Tutorial, click on the TOP arrow.
Mission Two
As this mission opens, you will
see some familiar units; Minigunners and some Buggies, but
there is also a new unit; the MCV.
BUILDING YOUR BASE
Use this MCV to construct your
base. You must have a functioning base in order to build units
and harvest Tiberium (your source
of income).
To deploy your MCV and start
your base, select it (by itself) by
left clicking on it once. You can
move it around just as you would
any other unit. Now deploy the
MCV into the Construction Yard.
You do this by left double clicking
on it. The first left click brings up
a “Deploy” cursor and the second
left click deploys the MCV into the
Construction Yard. The Construction Yard is a fairly large building, so it needs to have a clear
area around it in order to deploy.
NOD TUTORIAL -2
82
Page 83

If you attempt to deploy the MCV and nothing happens, check around the MCV for things
that might get in its way. It could be a Minigunner unit, a cliff, a tree, etc. In this mission,
the MCV is already in a clear area and will deploy as long as you don’t move it and as long
as an enemy unit doesn’t get in the way.
MEASURING POWER EFFICIENCY
Power is essential for your base to operate efficiently.
Look at the sidebar section of your screen. The thin vertical area next to the construction icons
is your power bar.
The blue dividing bar shows you how much power your base is currently using, and the vertical bar shows your available power.
As long as the bar is in the green, your base has enough power to operate everything at
maximum efficiency. If the bar drops into the yellow or red, your base is under-powered.
As described earlier in the manual, when the base is under-powered, construction will take
much longer than usual, and many of the high-tech structures will shut down.
GOING AFTER TIBERIUM
When the Power Plant is
deployed, construction icons for
The Hand of Nod, and the
Refinery will appear.
You can build either of them first,
but income is always important,
and since you aren’t really in any
immediate danger, you can afford
to build your refinery first. Do the
same thing that you did to build the
power plant.
While the Refinery is being built,
move some of your soldiers up
the map a bit. Explore the area
until you find some Tiberium (the
green crystals that are growing
out of the ground).
Place your refinery as close as
you can to the Tiberium. You will
notice that when you place the
Refinery, a Harvester appears
with it. As explained in the manual, the Harvester is used to col-
NOD TUTORIAL -2
83
Page 84

lect Tiberium. It has no weapon, and aside from heavy armor, it isn’t suited to be put in combat situations.
If you have discovered any Tiberium, the Harvester will automatically move towards it and begin
to harvest it. This is an automatic process that you shouldn’t worry about. If you haven’t located any, you will have to send the Harvester manually once some Tiberium is discovered.
If you don’t see any Tiberium, select some of your other units and scout around until you
do find Tiberium. Once you have, select just the Harvester, and target the Tiberium. Left click,
and the Harvester will begin to gather the crystals. See the manual for more information on
the Harvester and how to control it in certain instances.
STORING THE TIBERIUM
On your construction bar, you should notice that you now have another option: a silo. Silos
can hold 1500 credits of Tiberium, and since your refinery can only hold, 1000, it is a good
idea to build one to hold excess credits. If you don’t build a Silo, and run out of storage space,
any credits that you didn’t have space for are LOST, so make sure you always have some
space available.
BUILDING MORE TROOPS
Now that you have some money
coming in, you can build a Hand
of Nod (the barracks for Nod’s
forces). This structure will allow
you to train all of your Minigunnertype units. Build this structure in the
same way that you built the others.
Place this one closer toward the
part of the map that you don’t
know much about. This way,
Minigunners will be closer to the
front lines, so they can respond to
threats quickly.
At this point in the game, you can only build two types of units: Minigunners and engineers.
Minigunners are your standard troops and will be used for much of the game to take out
tanks or guard your base.
Engineers are special units that are only used to capture enemy structures. These come in to
use a bit later in this mission, so for now, just build some Minigunners.
From here, you can choose what you want to build. The more Refineries that you build, the
faster your money will come in. When more than one barracks is built, Minnigunners can be
created faster. Usually, it is a good idea to have two refineries going at once, so you may want
NOD TUTORIAL -2
to build another one.
84
Page 85

WIPING OUT GDI
Now that you have established
your base, it is time to get rid of
GDI’s presence in the area. You
will see a road that heads to the
west, then forks, heading to the
north and further to the west. You
can follow either path to reach
the GDI base, but for the sake of
the tutorial, choose the western
one.
Move your troops further to the
west, and reveal more of the map.
You will probably encounter some
GDI opposition, but be sure to
have an overwhelming number
of Minigunners in your group,
and you should be able to kill
them with minimal losses.
Remember, you can still build
Minigunners from the side bar
while you are exploring with your
soldiers. This way, you will be
able to send more into the fray if
needed.
When you reach the far west side of the map, you will see a small ridge to the north. Head
to the north, and you’ve found the GDI base.
You will probably meet opposition from a Humm Vee and several GDI Minigunners. If your
forces are wiped out, build 10 to 15 Minigunners and send them all at once. You should be
able to see the GDI barracks, where their Minigunners are created, as well as some silos, a
refinery, and a construction yard.
You can destroy all the structures in the GDI base in the same way you do Minigunners, simply by targeting them. However, you can capture their
structures instead, which would be much more advantageous.
USING ENGINEERS
Build a couple of engineers and send them over to the
GDI base behind your other forces. Engineers have no
weapons, and are quite slow, so make sure that there’s
nothing threatening them while you move them to the GDI
base.
When you select an engineer and target an enemy
building, you get a set of three green arrows. This indicates that you can enter the building with that unit. In this
case, the engineer captures the building if he gets to it.
NOD TUTORIAL -2
85
Page 86

So target the GDI barracks with your engineer and let him try to capture it. If he’s successful
and enters the structure, you will receive a message from EVA informing you of your success. Since this is now a part of your base, it draws power just like any other structure of
yours would. In addition, capturing an enemy structure gives you all its functionality,
sometimes allowing you to construct some of their units that you normally cannot build.
CLEANING UP
From here on, you can mop up
the GDI base as you see fit. If
you captured the GDI barracks,
you can select it as your primary
site by left double clicking on it.
By doing this, your soldiers will
come out of here instead of your
other barracks at your base.
Capture or destroy the rest of the
GDI structures, and your victory
is assured.
One note: If you capture a Refinery
while the enemy Harvester is in it, you get the Harvester and the Refinery, which is infinitely
better than just getting the Refinery. If you capture a Silo, you get all the money that was in
the Silo at the time, so these can be a worthy investment for a 500 credit engineer to target.
Mission 3 and Beyond
From here on in, you are on your own. Study the section in the manual on advanced controls and learn how to use groups and teams effectively; this is a very important part of
Command & Conquer
for each side. Be sure to understand the capabilities of all the units at your disposal.
Good luck, commander!
NOD TUTORIAL -2
. The manual also contains a lot of information on the different units
86
Page 87

CREDITS
EXECUTIVE PRODUCER: BRETT W. SPERRY
PRODUCER: ED DEL CASTILLO
ORIGINAL CONCEPT: JOE BOSTIC, EYDIE LARAMORE,
ORIGINAL STORY: EYDIE LARAMORE
LEAD PROGRAMMERS: STEVE TALL, PHIL GORROW
PROGRAMMERS: JOE BOSTIC, BILL RANDOLPH,
TECHNICAL DIRECTION: STEVE WETHERILL, ERIC WANG
LEAD DESIGNER: ERIK YEO
DESIGNERS: EYDIE LARAMORE, MICHAEL LIGHTNER
LEAD ARTISTS: AARON POWELL, MATTHEW HANSEL
ARTISTS: CHRIS DEMERS, JOSEPH HEWITT IV,
VIDEO & FILM: FELIX KUPIS, ERIC GOOCH
CASTING & DIRECTION: JOSEPH KUCAN
GRIP & PROP MASTER: PAUL BASTARDO
SCREENPLAY: RON SMITH
AUDIO DIRECTION: PAUL S. MUDRA
ORIGINAL SOUNDTRACK: FRANK KLEPACKI
SOUND EFFECTS: DWIGHT K. OKAHARA
BRETT W. SPERRY
JEFF BROWN, BARRY GREEN,
DENZIL E. LONG, Jr.,
DAVID R. DETTMER,
MARIA del MAR McCREADY LEGG
DAMON REDMOND, SHELLY
JOHNSON, JACK MARTIN, CAMERON
CHUN, NICK deSOMOV, REN OLSEN,
BHAVIN PATEL
QA DIRECTION: GLENN SPERRY, DAVE MAXEY
QUALITY ASSURANCE: KENNETH DUNNE, CHRIS RUBYOR,
MIKE SMITH, JOHN ARCHER, LLOYD
BELL, D’ANDRE CAMPBELL, ERROL
CAMPBELL, RANDY GREENBACK, BEN
LUBLIN, RICHARD RASMUSSEN, STEVE
SHOCKEY, ALBERT SPRINGFIELD, JIM
ADKINS, BIJAN SHAHEER, KHANH
NGYUEN, WALLACE WACHI, DAVID
WALSH, RICHARD R. BRUNO, SCOTT
MANNING, TIM TRAN, GARY
MOUNTAIN, TUAN BUI
BOX DESIGN: LAUREN RIFKEN
MANUAL DESIGN: PENINA FINGER, ADAM ISGREEN,
ERIK YEO
CREDTIS
87
Page 88

CREDITS
GENERAL SHEPPARD: ERIC MARTIN
KANE: JOSEPH KUCAN
CARTER: BILL COLLINS
SETH: ERIC GOOCH
MORELLI: WENDY BAGGER
DR. MOBIUS: RICHARD SMITH
GREG BURDETTE: ERIC RANDALL
SCIENCE SHOW HOST: R.C. FAVERO
FEMALE REPORTER: MARCIA SWAYZE
GDI SOLDIER #1: AARON POWELL
GDI SOLDIER #2: MICHAEL LIGHTNER
NOD SOLDIER #1: BHAVIN PATEL
NOD SOLDIER #2: ED DEL CASTILLO
NOD SOLDIER #3: PAUL BASTARDO
NOD SOLDIER #4: CHRIS RUBYOR
NOD PANICKED SOLDIER: IAN PUGH
NOD CYBERSPACE SOLDIERS: ED DEL CASTILLO
FRANK KLEPACKI
IAN PUGH
NOD COMMUNICATIONS OFFICER: TED MORRIS
VOICE OF EVA: KIA HUNTZINGER
VOICE OF YELLING INTERROGATOR: JEFF FILLHABER
VOICE OF IN-GAME INFANTRY: PAUL MUDRA
ROB SANDBERG
VOICE OF IN-GAME
VEHICLE PERSONNEL: ELIE ARABIAN
DWIGHT OKAHARA
OTHER VOICES: JASON BUCHANAN
ELSBETH WETHERILL
FRANK KLEPACKI
CLIFFORD DAVIS
RICK GUSH
PENINA FINGER
DIRECT DIGITAL AUDIO (DDA) BY WESTWOOD STUDIOS
SPECIAL THANKS TO: Sean Brennan for the spaceship, Matt Spall and
his graviton top, Louie “the madman” Beatty, Laurie Anderson for
Red
, those great folks at Autodesk, Monty and Sonic Foundry, everyone
else at Westwood Studios, and all of you future generals and dictators who
waited so patiently while we finished this game!
88
The Bright
Page 89

For customer service please call (949) 833-1999
or on the Internet use www.westwood.com and click on Technical Support.
Command & Conquer is a registered trademark of Westwood Studios, Inc.
© 1997,1998 Westwood Studios, Inc. All rights reserved.
89
 Loading...