

Page 1

A Bridge Too Far
Page 2

Information in this document is subject to change without notice. Companies, names, and data
used in examples herein are fictitious unless otherwise noted. No part of this document may be
reproduced or transmitted in any form or by any means, electronic or mechanical, for any
purpose, without the express written permission of Microsoft Corporation.
© & 1997 Microsoft Corporation. All rights reserved.
Microsoft, MS, Windows, and the Windows logo are registered trademarks and MSN and
Windows NT are trademarks of Microsoft Corporation in the United States and/or other
countries.
Macintosh is a registered trademark of Apple Computer, Inc.
Pentium is a registered trademark of Intel Corporation.
IBM is a registered trademark of International Business Machines Corporation.
Your Guide to Microsoft Technical Support
If you have a technical question about Microsoft A Bridge Too Far, see the following
brief descriptions of the support options available from Microsoft Technical Support.
For more information, please visit Microsoft Technical Support Online at http://
www.microsoft.com/support.
Self-Help Tools to Find Answers Your self
http://www.microsoft.com/support/
Microsoft Technical Support Online uses innovative features such as Troubleshooting
Wizards and a technical Knowledge Base to help you access the most relevant
technical information and resources to answer your support questions.
Direct Assistance with a Microsoft Technical Engineer
Standard No-Charge Support
If you still need answers to your technical questions, Microsoft offers unlimited nocharge support for retail versions of this product.
To receive your Standard No-Charge Support, in the U.S., please call (425) 635-7008,
6:00
A.M. to 6:00 P.M. Pacific time, Monday through Friday, excluding holidays. In
Canada, please call (905) 568-3503, 5:00
through Friday, excluding holidays. In the U.S. and Canada, you can also submit your
support question via the Internet with Web Response. For more details, go to
Microsoft Technical Support Online at http://www.microsoft.com/support.
After-Hours Support
If you require support after normal business hours, you can purchase Pay-Per-Incident
Support as follows:
In the United States, for a fee of $15US per incident, please call (800) 936-5600 or
(900) 555-2400, 24 hours a day, 7 days a week, including holidays. In Canada, for a
fee of $45CDN plus tax per incident, please call (800) 668-7975, 5:00
P.M. Pacific time, 7 days a week, excluding holidays.
Note
Support fees for the 800# calls will be billed to your VISA, MasterCard, or
American Express credit card. Support fees for the 900# calls will appear on your
telephone bill.
Note
The services and prices listed here are available in the United States and
Canada only. Services and prices outside these countries may vary. Microsoft
Technical Support is subject to Microsoft’s then-current prices, terms, and conditions,
which are subject to change without notice.
A.M. to 5:00 P.M. Pacific time, Monday
A.M. to 9:00
Document No. X03-17108 0897
Page 3

Contents
A Bridge Too Far i
iv Quick Start: Roadmap to Glory
vi Y our Theater of War
Chapter 1: Introduction 1
1 The Game
2 Gearing Up for Gameplay
Chapter 2: Preparing for Battle 3
3 System Requirements
3 Installing A Bridge Too Far
4 Setting Options
4 Starting A Bridge Too Far
5 Choosing the Type of Action
6 Choosing Sides
6 Choosing Level of Difficulty
6 Customizing Level of Difficulty
7 Choosing a One-Player or
Two-Player Game
7 Starting the Battle
Chapter 3: On the Battlefield 8
8 Reviewing Y our Objective
8 Surveying the Battlefield
9 Deploying Units
10 Starting the Battle
10 Issuing Orders
11 Interpreting Order Dots
13 Using Y our Weapons Effectively
15 Taking Prisoners and Rallying Separated Soldiers
15 Using Bridges
17 Ending a Battle
Chapter 4: Using the Toolbar and
Monitors 18
18 The Toolbar
19 Battle Monitors
20 Soldier Monitor: Details
24 Identifying Battlefield Elements
Chapter 5: Fighting Operations and
Campaigns 26
26 Reviewing Your Objectives: Operations
26 Reviewing Your Objectives: Campaigns
27 Managing Resources
28 Operation Screens
28 Campaign Screens
28 Starting an Operation or Campaign
29 Checking Your Pre-Combat Status
30 Choosing Resources
32 Fighting the Battles
32 Debriefing Screen
33 Choosing a Cease-Fire Period
34 Allocating Supplies for Sectors
(Campaigns Only)
36 Viewing Details of Soldier Status
Chapter 6: Designing Your Own
Scenarios 39
39 Starting Battlemaker
40 Choosing a Map
41 Editing Victory Locations
42 Setting Requisition Points
43 Setting Resources
44 Saving Your Custom Scenario
44 Playing Your Custom Scenario
44 Giving the Battle to Another Player
Chapter 7: Tactics and Strategy 45
45 Using Units Effectively
50 Battlefield T actics
53 Campaign Strategy
Chapter 8: Playing Two-Player
Games 57
57 Types of Connections
58 Starting a Two-Player Game
59 Using the Net Status Bar
59 Communicating with Your Opponent
Chapter 9: History 60
60 Situation Report
60 Plans, Politics, and Logistics
65 Operation Market-Garden
Index 82
Page 4
iv
Quick Start: Roadmap to GloryQuick Start: Roadmap to Glory
Quick Start: Roadmap to Glory
Quick Start: Roadmap to GloryQuick Start: Roadmap to Glory
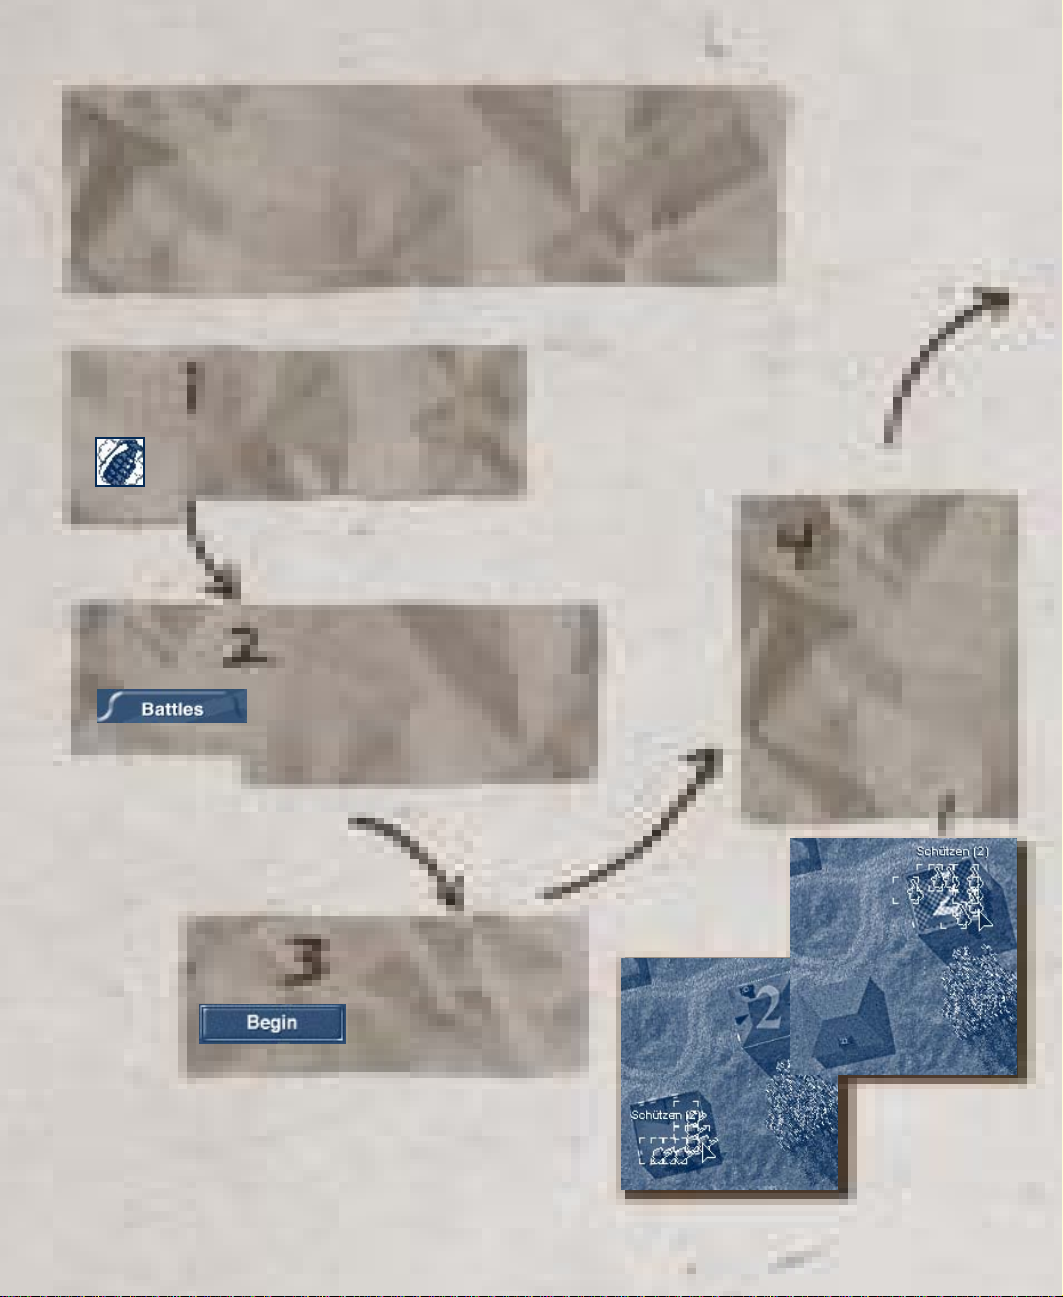
This manual, Boot Camp, and Help provide information on how to best
lead your troops when playing A Bridge Too Far. But if you just want to
jump in and start fighting, here’s how.
Double-click the icon
to launch the game.
Choose a battle by clicking
the Battles tab. In the list of
battles that appears, click
the one you want to play.
Deploy your
troops by
clicking a unit
and dragging it to a new
location in your deployment zone—the unshaded portion of the
map. Repeat for the rest
of your units. (Note: You
move entire units, not
individual soldiers.)
Click Begin to go to
the combat screen.
Page 5
Start the battle
by clicking
Begin!
v
Issue orders to a unit by rightclicking any soldier in the unit
and clicking a command on the
drop-down menu. (Note: You
issue orders only to entire units,
not to individual soldiers.)
If the order requires that you designate a position
or target, drag the line to this location.
To initiate a cease-fire, click the button showing
a hand raised in a “halt” position. The battle
ends when your opponent agrees to the ceasefire. If your opponent does not agree, you still
want to stop fighting, and you are willing to
concede the map, click the button showing a
white flag.
Page 6
vi
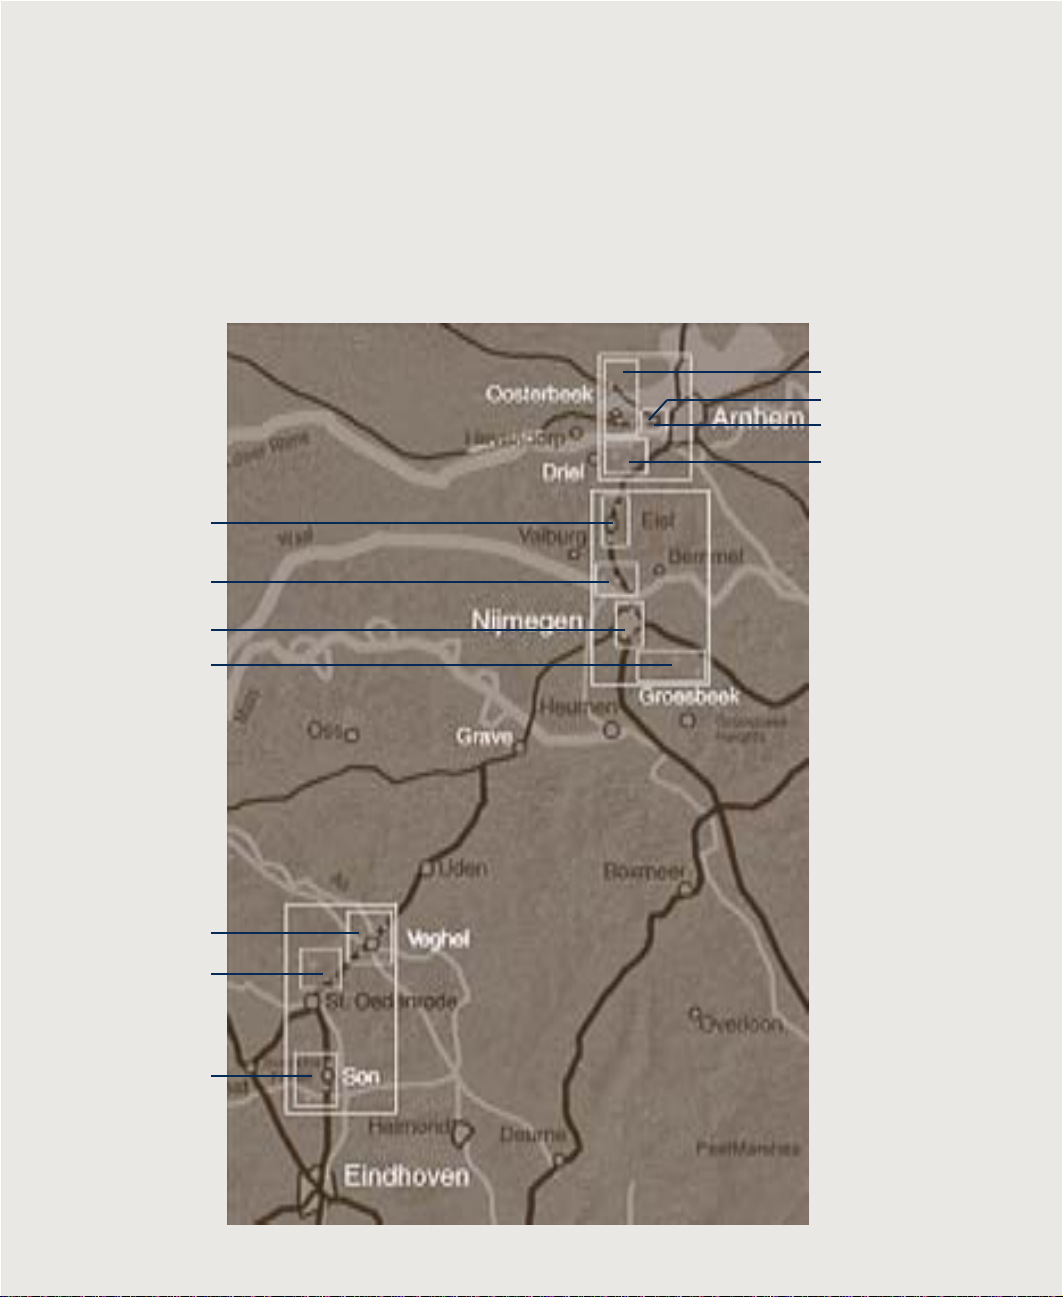
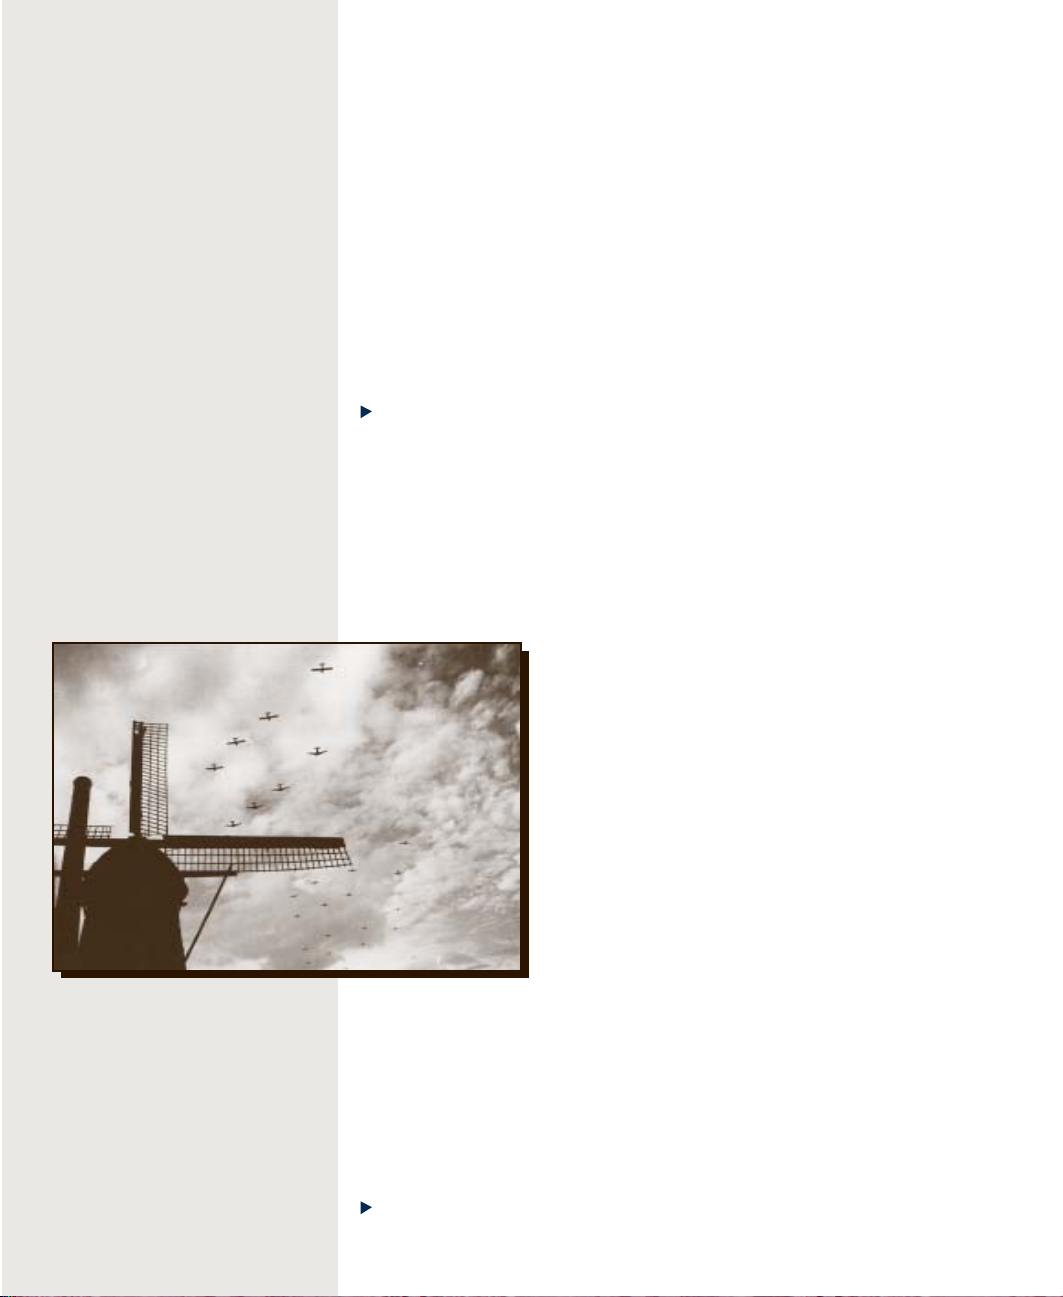
Your Theater of War
The following map of Holland shows the major components of Operation Market-Garden.
The operation spans three sectors, which appear on the map as large squares. The Allied
paratroopers initially drop in the Eindhoven sector. The operation proceeds northward
through the Nijmegen sector, followed by the Arnhem sector.
The smaller squares on the map show the operations within each sector, and the dots
within the smaller squares represent the individual maps—battles—within an operation.
Nijmegen Sector
The Island
Nijmegen Crossing
Arnhem Sector
Oosterbeek
Arnhem Relief Effort
Arnhem Bridge
Polish Drop
Nijmegen Bridge
Groesbeek
Heights
Eindhoven
Sector
Veghel
Schijndel
Son
Page 7

Chapter 1
Introduction
September 17, 1944
Chapter 1: Introduction 1
The skies of Holland fill with parachutes, and three divisions of Allied
paratroopers begin landing on Dutch soil. Their objective: seize and hold
major bridges along a 60-mile corridor stretching from Eindhoven to
Arnhem. Meanwhile, British armored units attack north toward
Eindhoven. Their objective: cross the captured bridges, flank the German
defenses, and take the first stride in a race across the North German Plain
to Berlin—and the end of World War II in Europe. Operation MarketGarden has begun.
The Germans are taken by surprise but quickly rally. Aided by several
strokes of luck, including capturing a copy of the Allied battle plan, the
Germans derail the operation’s timetable. These delays place the paratroopers in jeopardy , especially those dropped around Arnhem. If the
armored units don’t reach them soon enough, these paratroopers will have
gone “a bridge too far.”
The Game
A Bridge Too Far offers real-time action that mak es the battlefield come
alive with the sights and sounds of war. Your men in the trenches behave
like real soldiers—they react realistically to the stress of combat and are
affected by their fatigue level, ability, physical and mental
condition, and other factors. Depending on these factors,
your men may respond immediately to your orders, take
time to respond, or not respond at all. However, your
soldiers’ reactions are not out of your hands. Your ability to
take control and make timely decisions determines
whether, and how quickly, your men respond to orders.
In addition to battlefield tactics, A Bridge Too Far adds a
strategic layer . You are faced with the challenge of managing a limited set of resources, particularly if you are
playing the Allied side. In the actual Operation MarketGarden, the Allies outdistanced their supply lines, while
the Germans retreated into theirs. Regardless of which side
you play, you need to plan an overall strategy, evaluate
your status throughout the game, and decide how to best
allocate your resources.
When you play the game, your short-term decisions affect
your long-term success. Information about supplies, troop
morale, health, equipment, and which maps you control is
In 1922, German advisors to the
Soviet Union are interested to learn
of an aerial “first”: an infantry
force successfully parachutes from
an airplane. Although the German Air
Force (Luftwaffe) soon begins training paratroops, the airborne arm of
Germany’s military starts running at
full speed only when Major General
Kurt Student takes command.
Student combines the old and new to
forge an impressive force. For the
old, he employs proven equipment and
training techniques, along with
existing aircraft capable of carrying paratroops. For the new, Student
develops specially designed gliders
that can carry artillery, vehicles,
and heavy supplies.
“Where is the Prince who
can afford so to cover his
country with troops for
its defense, as that
10,000 men descending from
the clouds, might not, in
many places, do an infinite deal of mischief
before a force could be
brought together to repel
them?”—Benjamin Franklin,
American statesman,
publisher, and inventor,
1784
Page 8
2 A Bridge Too Far
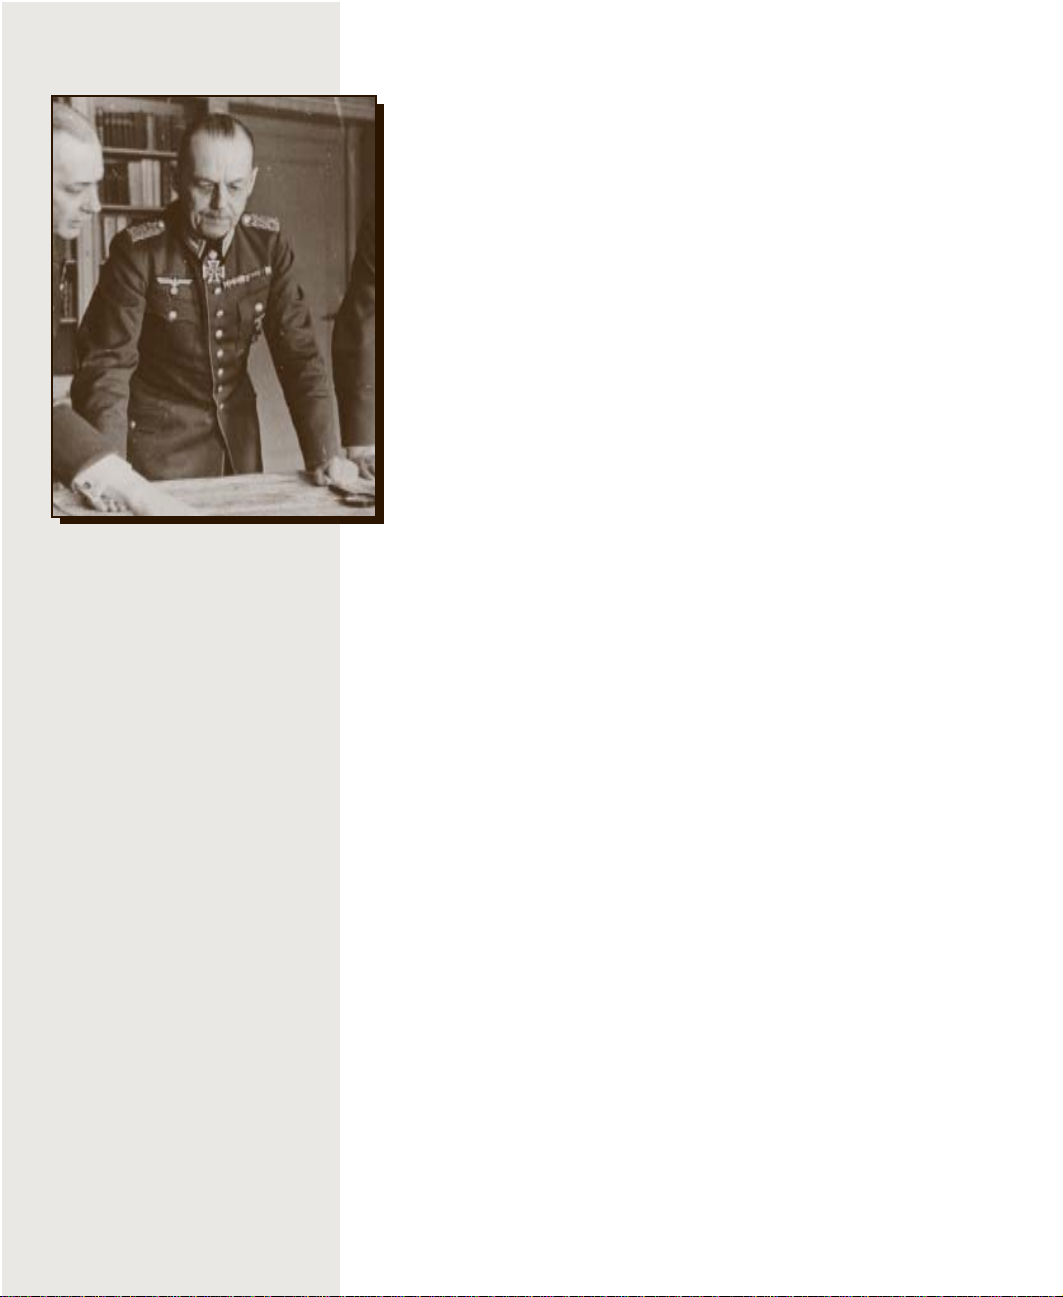
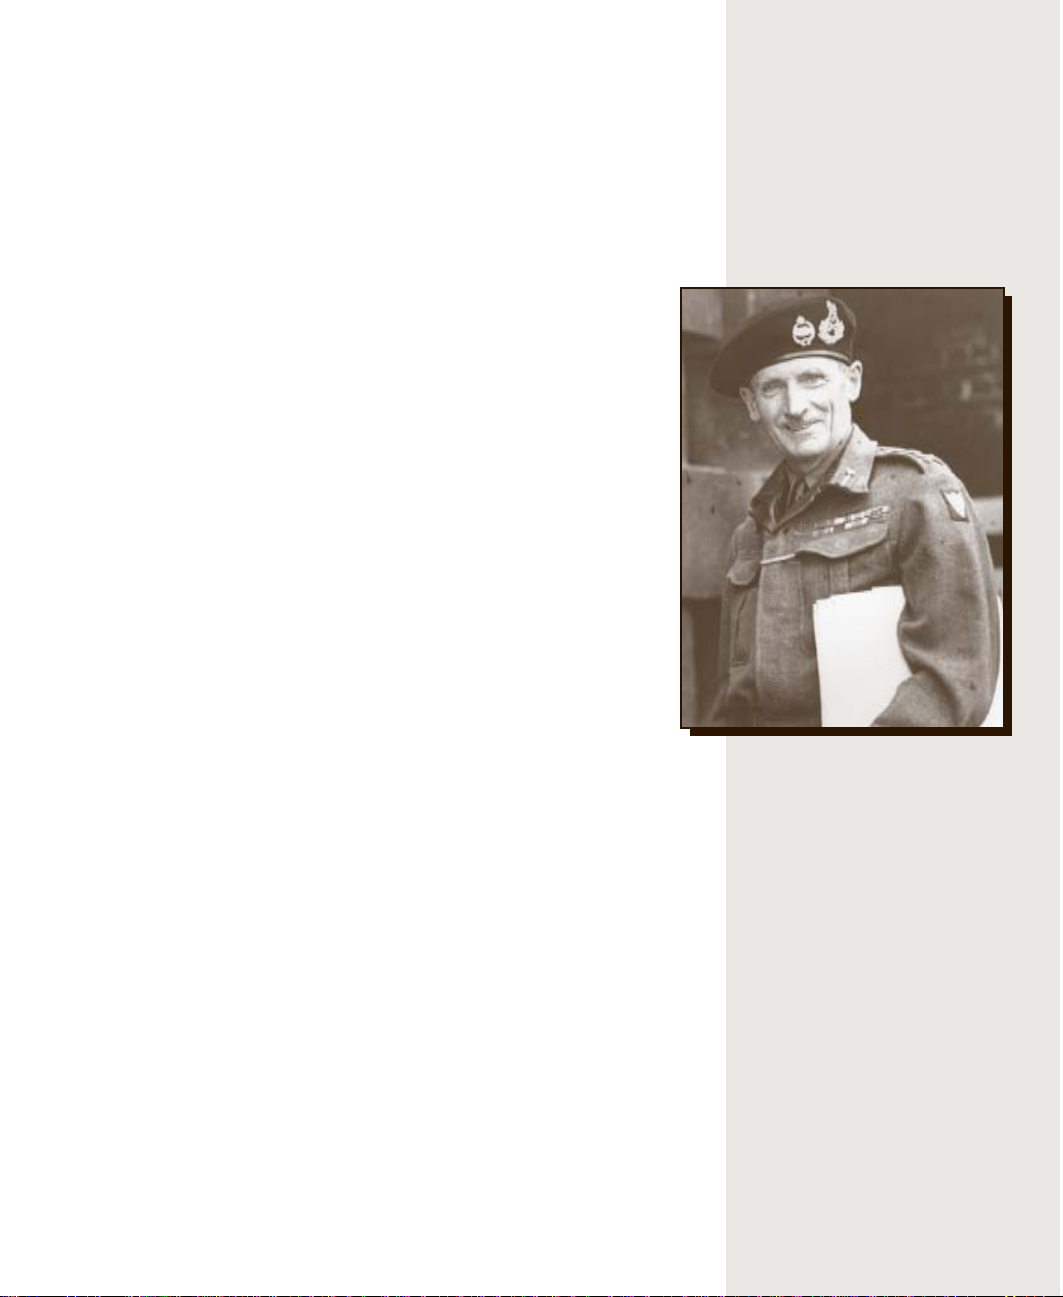
Field Marshal Gerd von
Rundstedt (center) is
reinstated as Commander
in Chief West
(Oberbefehlshaber West)
just two weeks before
Operation Market-Garden
begins.
carried over to the next battle. And any map you win doesn’t remain
under your control indefinitely; your opponent can launch a counterattack and take it back from you. You may be forced to retreat and
fight for it again.
You are in control of the scope and complexity of your game. You can
start simple—with individual battles—and then progress to operations, campaigns, and finally, the game’s Grand Campaign. You can
also design custom scenarios for battles. For example, you can set up
a battle in which you are surrounded and outnumbered but have a
greater amount of firepower and more-experienced infantry units than
your opponent.
Gearing Up for Gameplay
A Bridge Too Far is a complex game with many features you may
want to learn about. Chapter 2, “Preparing for Battle,” explains
installation procedures and options you can choose prior to actually
playing the game. Chapter 3, “On the Battlefield,” explains the
mechanics of the game from the standpoint of a single battle, while
Chapter 4, “Using the Toolbar and Monitors,” describes the information
you need to successfully monitor and command your forces.
When you have gained enough e xperience to take on new challenges,
move on to Chapter 5, “Fighting Operations and Campaigns.” Chapter 6,
“Designing Your Own Scenarios,” tells you how to create custom scenarios, while Chapter 7, “Tactics and Strategy,” helps you win battles as
well as operations and campaigns. Chapter 8, “Playing Two-Player
Games,” explains how to set up a game against an opponent over a
modem, local area network (LAN), or the Internet.
“That 2 Battalion [1st
Parachute Brigade, British 1st Airborne] held on
for as long as it did is
one of the epic tales of
the Second World War.
That it was required to
do so is one of its
sorriest blunders.”—John
Ellis, author of
Force
Brute
Online Help
Online Help is not just this manual in electronic form. It provides additional reference material, historical information, and tips you can use to
best plan your winning strategy.
Boot Camp
To get you started with commanding troops, A Bridge Too Far provides
Boot Camp, an online tutorial for learning basic battlefield skills. These
topics provide an excellent way to become familiar with the game before
risking your men in battle.
Page 9
Chapter 2: Preparing for Battle 3
Chapter 2
Preparing for Battle
Before you move onto the battlefield, you need to install the game and get
it running. You can also set options to determine the game’s look and feel
as well as what type of game you want to play.
System Requirements
To run A Bridge Too Far on an IBM-compatible computer, you
need:
• Personal computer with a Pentium
90 or higher processor
(Pentium 133 recommended), 16 megabytes (MB) of RAM, at
least 45 MB of available hard disk space, a 4×-speed CD-ROM
drive, and a video card that supports 800 × 600 resolution or
higher and 16-bit color.
• Microsoft
or Windows NT
Windows 95 operating system version 4.0 or later,
TM version 4.0 or later.
• Microsoft Mouse or compatible pointing device.
• Headphones or speakers.
• 28.8 modem for head-to-head play.
To run A Bridge Too Far on a Macintosh
® computer, you need:
• Power Macintosh personal computer, 16 megabytes (MB) of
RAM, at least 40 MB of available hard disk space, a 4×-speed CDROM drive, and a video card that supports 800 × 600 resolution or
higher at “Thousands of colors.”
• System 7.5 operating system or later.
• Apple Mouse or compatible pointing device.
• Headphones or speakers.
• 28.8 modem for head-to-head play.
Installing A Bridge Too Far
Field Marshal Bernard
Montgomery is the author
of the Operation MarketGarden plan.
To install A Bridge Too Far on an IBM-compatible computer
1
Insert the game CD into the CD-ROM driv e .
Setup will run automatically .
Note
If Setup does not start, run Setup.exe from the Windows direc-
tory on the CD.
2
From the screen that appears, click Install.
When Setup is complete, the Play button becomes av ailable.
Page 10

4 A Bridge Too Far
“This is a tale you will
tell your grandchildren,
and mightily bored
they’ll be.”—Lieutenant
General Brian Horrocks,
Commander, British XXX
Corps, summarizing Operation Garden to a delighted audience of
subordinates on September
16, 1944
“To have the United
States at our side was to
me the greatest joy. ...
All the rest was merely
the proper application of
overwhelming force.”
—Winston Churchill on the
United States entering
World War II in December
1941
To install A Bridge Too Far on a Macintosh
1
Insert the game CD into the CD-ROM driv e .
2
Go to the Mac folder and click Install.
Setting Options
You can specify options and preferences to give A Bridge Too Far the look
and feel you want.
To begin setting game options
Press F8. Or, on the combat screen’s toolbar, click Options. (For more
information on using the combat screen, see Chapter 3, “On the
Battlefield. ”) The Options dialog box appears.
Use the check boxes in the Options dialog box to adjust the following
game options:
• Sounds, such as gunfire and soldiers’ voices.
• Music.
• Game videos.
• Screen resolution. (You can make the combat screen fill your entire
screen, hiding all battle monitors.)
Note
A game area size of 800 × 600 is recommended. However, if you
have more powerful hardware, you can consider a higher setting.
• Whether trees appear on the combat screen. (If you have a slower
machine, remove trees for better performance.)
• Whether soldiers killed in action appear on the combat screen. (If you
have a slower machine, remove soldiers killed in action for better
performance.)
Game Speed
Game speed affects how quickly the game progresses in real time. If you
set it to a slower speed, your men will move slower, giving you more time
to think about your tactics. If you set it to a faster speed, action on the
screen will be faster.
To adjust game speed
In the Options dialog box, in the Game Speed box, select either
Fastest, Fast, Medium, or Slo w.
Starting A Bridge Too Far
After you start the game, the Command screen, shown in the following
figure, and the Quick Help box appear. Quick Help gives you a brief
introduction to the game and your objectives.
Page 11
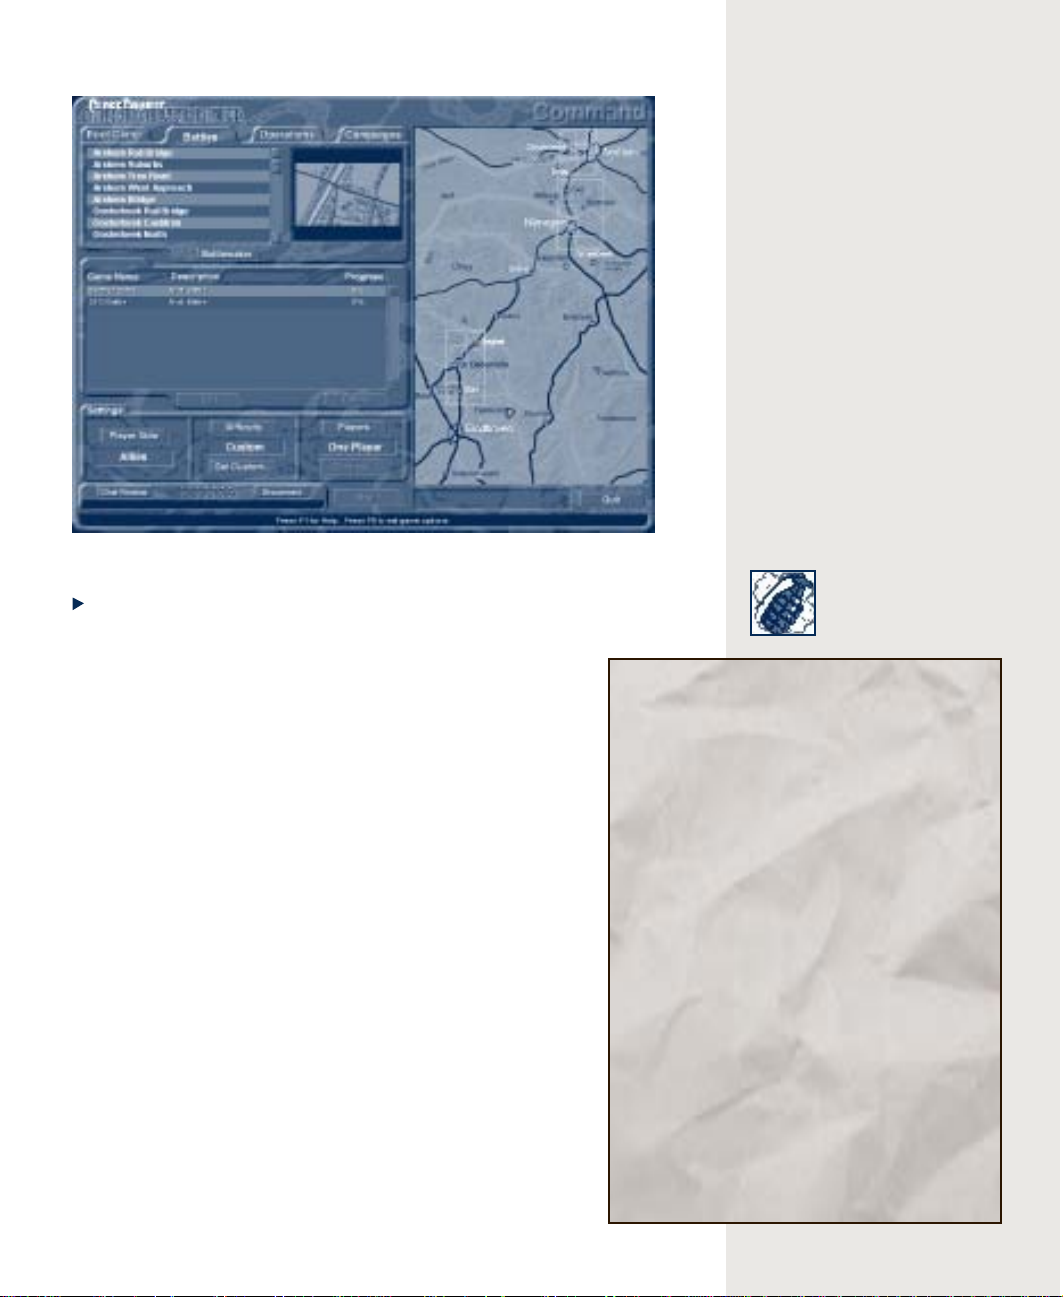
To start the game
Double-click the A Bridge Too Far icon.
In W indows 95 or Windows NT, you can also click Start, point to
Programs, point to Microsoft Games, and then click A
Bridge T oo Far.
Choosing the Type of Action
You can play four different types of action in A Bridge Too
Far.
Boot Camp
Bridge Too Far .
Battles
carryover of supplies. You can play any individual map from
Operation Market-Garden, or you can create custom battles.
For information on how to customize battles, see Chapter 6,
“Designing Your Own Scenarios.”
Operations
sectors of battle, each with a specific objective, such as a
bridge or landing zone. For more information on operations,
see Chapter 5, “Fighting Operations and Campaigns.”
Campaigns
game, or the Grand Campaign, which is fought on all three
fronts simultaneously. For more information on opera tions
and campaigns, see Chapter 5, “Fighting Operations and
Campaigns. ”
Interactive examples and explanations of A
Warfare conducted on individual maps with no
Sets of linked maps from any of the three
All opera tions for any individual sector in the
Chapter 2: Preparing for Battle 5
“... from the moment the
overwhelming industrial
capacity of the United
States made itself felt
in any theater of war,
there was no longer any
chance of ultimate victory in that theater ...
tactical skill could
only postpone the
collapse ... .”—Field
Marshal Erwin Rommel
after his defeat in North
Africa
Norway April 9, 1940
In the first airborne operations
in history, German airborne forces
land on strategic targets in
Denmark and Norway. In Denmark,
airborne troops quickly secure the
military airfield near Aalborg. In
Norway, paratroops secure the Oslo
airport, the military airfield at
Stavanger, and an important railroad junction near Dombas.
By securing the airport and airfields, the Germans ensure superiority in the air, which severely
hampers Allied efforts. While both
sides score victories on the
ground, the Allied efforts wane
when the Germans launch their
attack against France, Belgium,
and Holland on May 10. By June 10,
the Allies have evacuated their
forces from Norway.
Page 12

6 A Bridge Too Far
To choose the type of action
“Whether or not America
enters the war is a
matter of indifference
... .”—Adolf Hitler to
Benito Mussolini June 21,
1941
“It is bluff. They can
make cars and refrigerators, but not aircraft.”
—Reichsmarshall Hermann
Göring in regard to
American industrial
capabilities in 1941
On the Command screen, click one of the following tabs: Boot Camp,
Battles, Operations, or Campaigns.
To choose the specific game you want to play
In the game description box beneath the tab, click the Boot Camp
topic, battle, operation, or campaign you want to play.
–or–
In the saved games box in the left-center portion of the screen, click
the saved battle, operation, or campaign you want to play.
Choosing Sides
To choose the side you want to play
To switch between Allies and Germans, click Player Side.
Choosing Level of Difficulty
You can determine the relative strength of both sides, regardless of
whether you choose one-player or two-player mode.
Recruit
strength, morale, and supplies. However, you can
still lose the game if you don’t plan carefully.
Veteran
historically .
Your side is given every advantage in
The sides are balanced as they were
Allied paratroopers begin
loading into American
C-47s. Known as the
Skytrain to the Americans
and the Dakota to the
British, this plane is
the workhorse of Allied
transport aircraft.
Hero
Your side is initially at a disadvantage in
strength and, in campaign mode, has far fewer
resources available.
Custom
You define the difficulty level more
specifically, as described in the following section.
To choose the level of difficulty
T o c ycle through the four levels, click Difficulty.
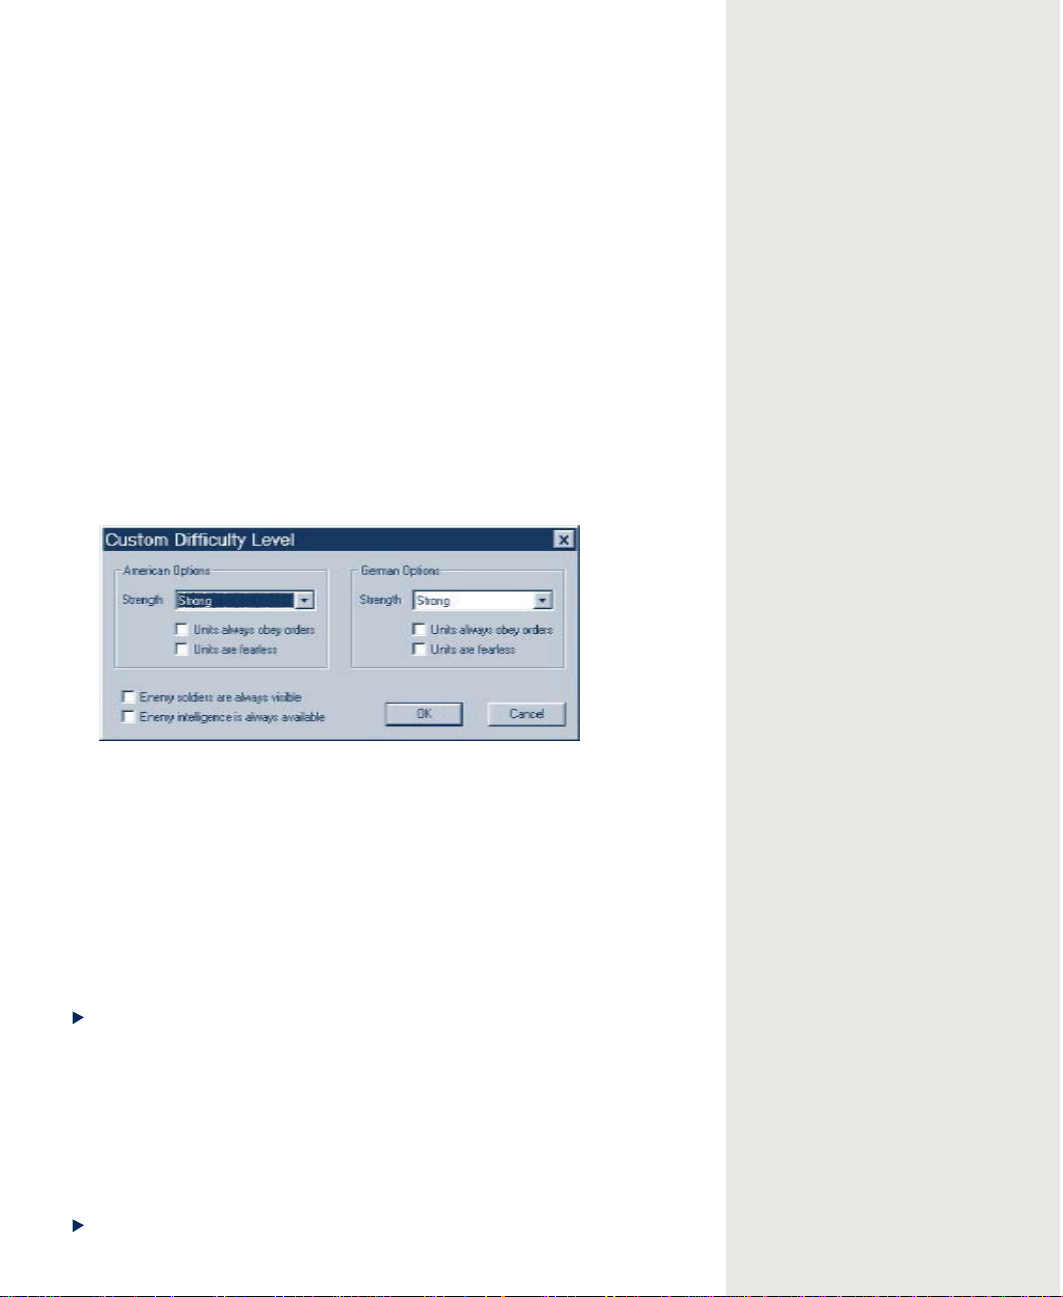
Customizing Level of Difficulty
If you choose Custom as your level of difficulty, you can adjust additional
options of gameplay.
Strength
adjust each separately.
Units always obey order s
do.
Units are fearless
Allied and German strength is not interdependent. You can
Your units will obey whate v er you tell them to
Your units will not panic regardless of their situation.
Page 13
Chapter 2: Preparing for Battle 7
Enemy soldiers are always visible
Enemy units will always appear on your
screen. Normally , A Bridge Too Far gives you a limited—but realistic—
view of the battlefield. Enemy soldiers that your troops have not noticed
will not appear, although you can sometimes spot the smoke of their guns.
Enemy intelligence is always av ailab le
You will receive all information on
the enemy just as you do for your own teams. For more information, see
“Gathering Intelligence,” in Chapter 4, “Using the Toolbar and Monitors.”
To customize the level of difficulty
1
To cycle to Custom, click Difficulty.
2
Click Set Custom.
3
In the Custom Difficulty Level dialog box, shown in the following
figure, click the check box corresponding to the option or options you
want.
Note
It is assumed throughout this manual and Help that none of these
custom options have been set.
“If we do our stuff
properly and no mistakes
are made, then I believe
that Germany will be out
of the war this year.”
—Field Marshal Bernard
Montgomery, Commander,
Allied 21st Army Group,
two months before Operation Overlord in Normandy
Choosing a One-Player or
Two-Player Game
In a one-player game, the computer is your opponent. In a two-player
game, you fight another player over a modem, local area network (LAN),
or the Internet. For more information on two-player games, see Chapter 8,
“Playing T w o-Player Games.”
To choose a one-player or two-play er game
To switch between the two options, click Players.
Starting the Battle
Now that you have selected and customized the type of game you want to
play, you are ready to march onto the battlefield. For information on how
to command your troops, see Chapter 3, “On the Battlefield.”
To start playing the game
Click Begin.
Page 14
8 A Bridge Too Far
“If you see a white plane
it’s American, if you see
a black plane it’s RAF.
If you see no planes at
all it’s the Luftwaffe.”
—German soldier on the
Western Front, 1944
Chapter 3
On the Battlefield
This chapter provides information on the mechanics of gameplay. It describes how to survey the battlef ield, deploy your units and issue orders to
them, use your weapons, and destroy bridges.
However, remember that playing A Bridge Too Far inv olv es mor e than just
mechanics. To best use the material in this chapter, study the corresponding
sections in Chapter 7, “T actics and Strategy.” Also, be sure to learn how to
use the information coming back from the field, as explained in Chapter 4,
“Using the Toolbar and Monitors.”
This chapter does not cover information on playing battles within the context
of an operation or campaign. If you are playing either of these larger scales
of warfare, see Chapter 5, “Fighting Operations and Campaigns,” after you
absorb the material in this basic chapter .
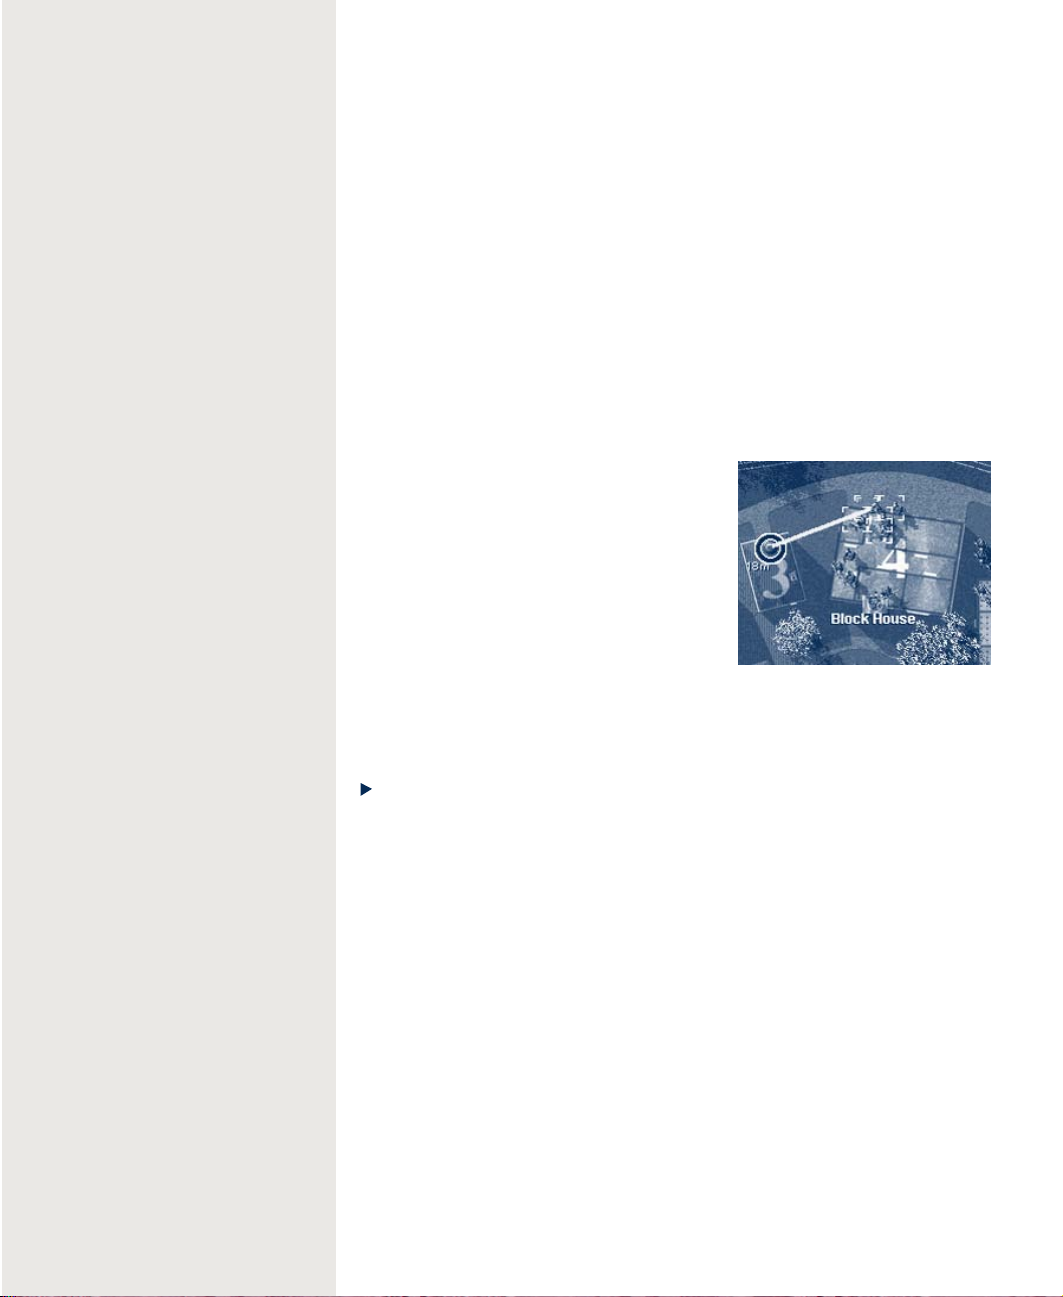
Reviewing Your Objective
Your objective is to contr ol the map. You must capture all of a map’s victory
locations and be able to hold them until the enemy offers a cease-fire, flees,
or retreats off the map. For more information on victory locations, see
“Victory Loca tions,” later in this chapter.
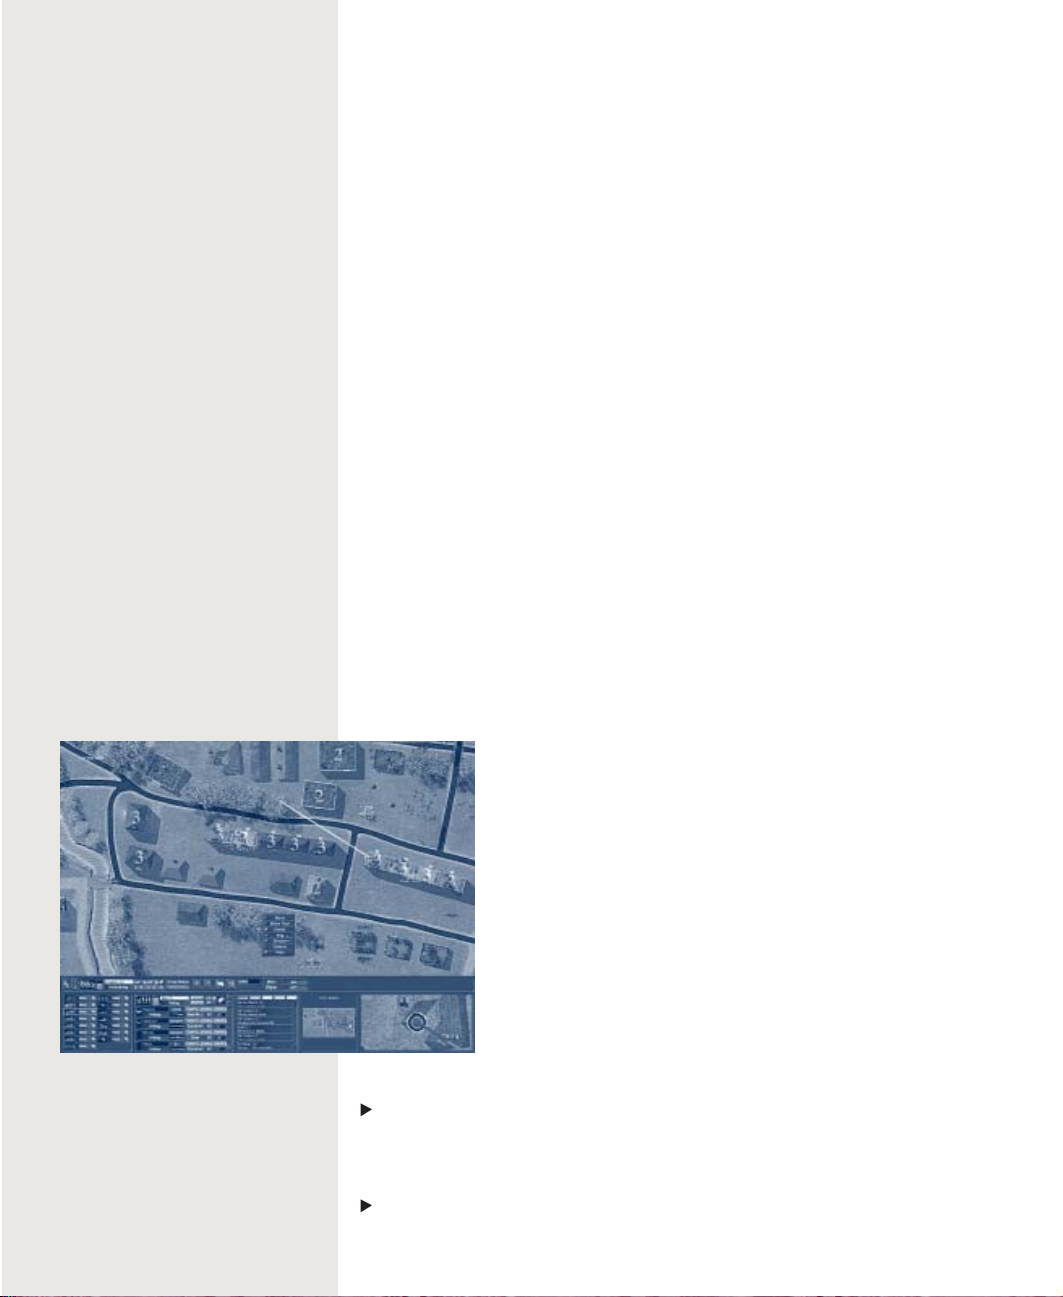
Surveying the Battlefield
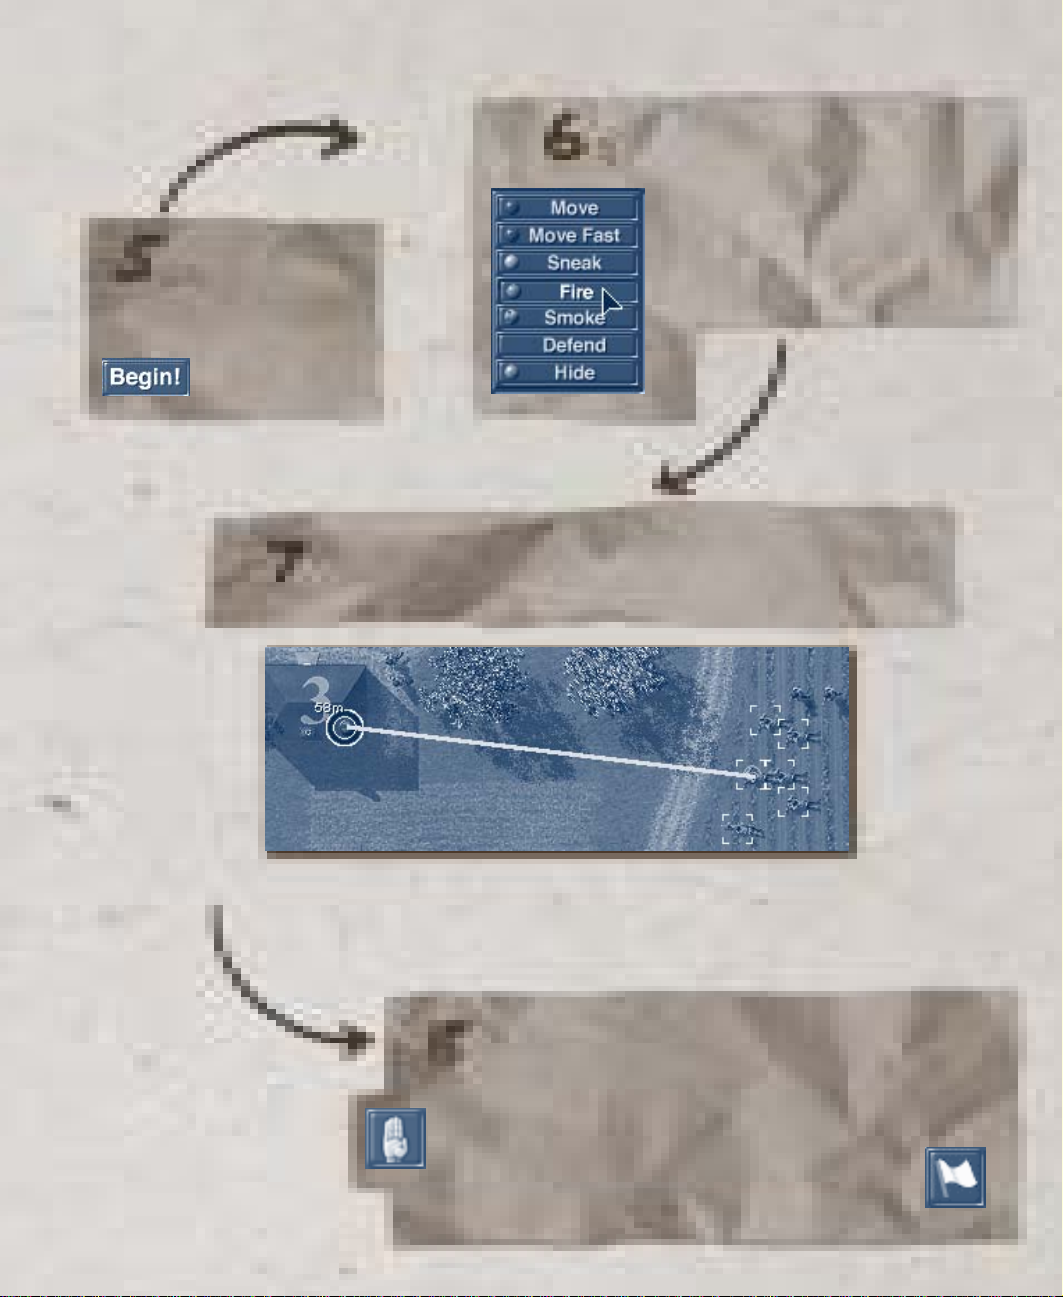
When you click Begin! the combat screen appears. The
following figure sho ws an example of one of the combat
screens in the game. Some areas of the combat screen
appear either dark or light gray . The dark gray areas are
enemy-controlled and the light gray areas indicate neutral
territory . The unshaded area is the portion of the map that
you currently control. After you start the battle, the shading
disappears.
You can zoom in or out of the map, as well as scroll to
different areas of the map. It is a good idea to zoom out
prior to deploying troops to see a complete picture of the
map and determine potential areas of strength and weakness.
To zoom in
On the toolbar, click the zoom-in button (magnifying glass with a plus
sign).
To zoom out
On the toolbar, click the zoom-out button (magnifying glass with a minus
sign).
Page 15
T o scroll through the map
Chapter 3: On the Battlefield 9
Move the mouse to the right, left, top, or bottom edge of the screen.
You can also use the arrow keys to scroll.
Victory Locations
Victory locations are buildings or terrain elements of strategic importance.
They are designated by the symbol of the side that controls them—a star
for Allies and a cross for Germans. If both sides are currently engaged in
battle for a particular victory location, half of each flag is shown. You need
to fight for the victory locations belonging to the other side and replace
their symbol with yours.
A victory location has either primary , secondary, or tertiary importance.
The larger a victory location’ s name appears, the more points it is worth
relative to other victory locations. A primary victory location is worth four
times more than a tertiary victory location, and a secondary two times
more than a tertiary.
Buildings and Terrain
Most maps include a number of buildings as well as natural terrain
features such as hills, ditches, and foliage. Multistory buildings are
indicated by numerals (2, 3, or 4) that represent the number of floors in
the building.
Use terrain to your best advantage. For example, controlling
the high ground and occupying multistory buildings is usually
a preferable position. It makes scouting easier, offers better
fields of fire, and is more difficult to attack—and easier to
defend and keep secure. For more information on using terrain,
see “Using Cover ,” in Chapter 7, “Tactics and Strategy.”
When your soldiers take a building, they control all floors of
the building. They hav e the advantages of the highest floor
while guarding the ground floor against attacks.
Deploying Units
The computer initially deploys your troops for you. Although
the default deployment may be satisfactory, you may want to
change it to fit your own battle plan.
T o move your units to a starting position
Drag your units to the location you want.
You can position your troops only on the unshaded areas of
the map. If you attempt to drop units on a shaded portion,
they snap back to their original position.
You usually issue orders after the battle starts, but you can
issue one preliminary order for each team during deployment.
Holland May 10, 1940
German airborne troops leap into
combat for the second time as
part of Operation Sicklestroke—
the German attack on France,
Belgium, and Holland. As in
Norway, relatively small forces
achieve success by subduing
strategic targets. A gliderborne
force lands on the Belgian
fortress at Eben Emael, blasts
its way through the roof, and
forces the garrison to surrender. The capture of this fort
crumples the Belgian line.
As a result of the German’s
airborne successes, British
Prime Minister Winston Churchill
orders the creation of a parachute unit “on a scale equal to
five thousand.”
“There is no longer
anything we can do. Every
shot we fire now is
harming ourselves, for it
will be returned a hundred-fold.”—Field Marshal
Erwin Rommel, Commander,
German Army Group B, in
July 1944, on the Allies’
massive advantage in men,
machines, and materiél
Page 16
10 A Bridge Too Far
“I have temporarily
changed my basic plan of
attacking both north and
east in order to help
Montgomery seize tremendously important objectives in the northeast.”—General Dwight
Eisenhower, Supreme
Commander of Allied
Troops, in a letter to
General George Marshall,
U.S. Chief of Staff, in
August 1944
For information on issuing orders, see “Issuing Orders,” later in this
chapter . If you don’t issue a preliminary order, all teams are automatically
in Hide mode, and all vehicles are in Defend mode.
To issue an initial order
Follow the procedure described in “Issuing Orders,” later in this chapter.
Only one order can be issued per team prior to starting the battle. Issuing a
second order cancels the first order.
Starting the Battle
To start the battle
On the toolbar, click Begin!
After you start the battle, the shaded portions of the map become available.
After this point, you cannot drag your troops to new locations; you must
issue orders to reposition them, as explained in the next section.
Issuing Orders
In A Bridge Too Far, you use a menu to issue any of three types of orders:
those that initiate movement (Sneak, Move, and Move Fast), those that
require a target (Fire and Smoke), and those that
have your units hold their ground and dig in
(Defend and Hide).
In England the thunder of
aircraft engines disrupts
church services; in
Holland the formations
roar across the sky for
nearly three hours.
Any order you issue remains in effect until your
unit carries it out completely. If you issue a new
order before the first one is completed, the first
order is canceled and the new one is carried out.
Note that you issue orders to an entire unit, not to
individual soldiers.
T o issue an order
1
In Windows, right-click any soldier in the unit
to which you want to issue an order.
The orders menu appears.
On the Macintosh, use
2
On the menu, drag to the order you want and click it.
3
If the order requires you to designate a position or target (Sneak,
OPTION+CLICK and hold.
Move, Move Fast, Fire, or Smoke), click the location on the combat
screen where you want the order to take place or end.
An order dot appears, as explained in the following section.
T o change an order y ou’ve already issued
Issue a new order, using the procedure for issuing orders described
previously. The original order is countermanded.
Page 17
T o cancel an order
Issue the Defend order.
Chapter 3: On the Battlefield 11
Defend is the default state.
T o change the target or destination of an order
Drag the order dot to a new location.
Using Keyboard Shortcuts
You can use keyboard shortcuts to issue orders, set options, get Help, and
pause or stop the game.
Key(s) Order/Command
Z Move
X Move Fast
C Sneak
V Fire
B Smoke
N Defend
M Hide
Arrow keys Scroll the map during battle
CTRL+G Expand game area
CTRL+T Remove trees
CTRL+K Remove KIA soldiers
CTRL+A Quit a battle
ALT+F4 Exit
F1 Help
F3 Pause
F8 Set game options
“... grotesque improvisation on a grand scale.”
—Colonel General Kurt
Student, Commander,
German First Parachute
Army, on assembling his
force in September 1944
“The danger of new reverses ... can be removed
only by speeding up the
dispatch of the reinforcements that have
repeatedly been requested.”—Field Marshal
Gerd von Rundstedt,
German Commander in Chief
West, writing to OKW in
September 1944
Interpreting Order Dots
After you issue an order, an order dot appears on the map to remind you
which order you issued. The following table shows orders and the
corresponding colors of the order dot. (Because the Defend order is in
effect by default, no order dot appears for this order.)
Order Color
Move Blue
Move Fast Purple
Sneak Y ello w
Fire (Shoot) Beige (for indirect fire)
Red (for target fire)
Smoke Gray
Hide Green
(For information on indirect fire and target fire, see “Using Your Weapons Effectively,” later in this chapter.)
Page 18
12 A Bridge Too Far
“Until the middle of
October the enemy could
have broken through at
any point he liked with
ease, and would have been
able to cross the Rhine
and thrust deep into
Germany almost unhindered.”—General Siegfried
Westphal, Rundstedt’s
Chief of Staff, referring
to the state of German
defenses in September
1944
Moving your Units (Sneak, Move, Move Fast)
The Sneak, Move, and Move Fast orders designate the speed of movement as well as how alert your troops are to danger around them as they
move.
Sneak is your troops’ slowest and safest rate of movement. Sneaking
soldiers crawl to their destination, stick to the best cover, watch carefully
for signs of the enemy, and try to avoid detection. When the unit reaches
its destination, the Hide order is in effect by default.
If you give a Sneak order to move a unit to an enemy location, they will
crawl to the location and hide.
Move is the normal movement rate. When issued a Move order, the unit
attempts to reach the destination while watching for, and defending
against, possible attack. When the unit reaches its destination, the Defend
order is in effect by default.
If you give a Move order to move a unit to an enemy location, they will
try to get close and shoot it out with the enemy.
Move Fast is the maximum movement rate. Soldiers moving fast are less
concerned with attack than they are with getting to their destination. This
order is most effective when a unit has cover fire from one or more units.
Soldiers given a Move Fast order run to their
destination.
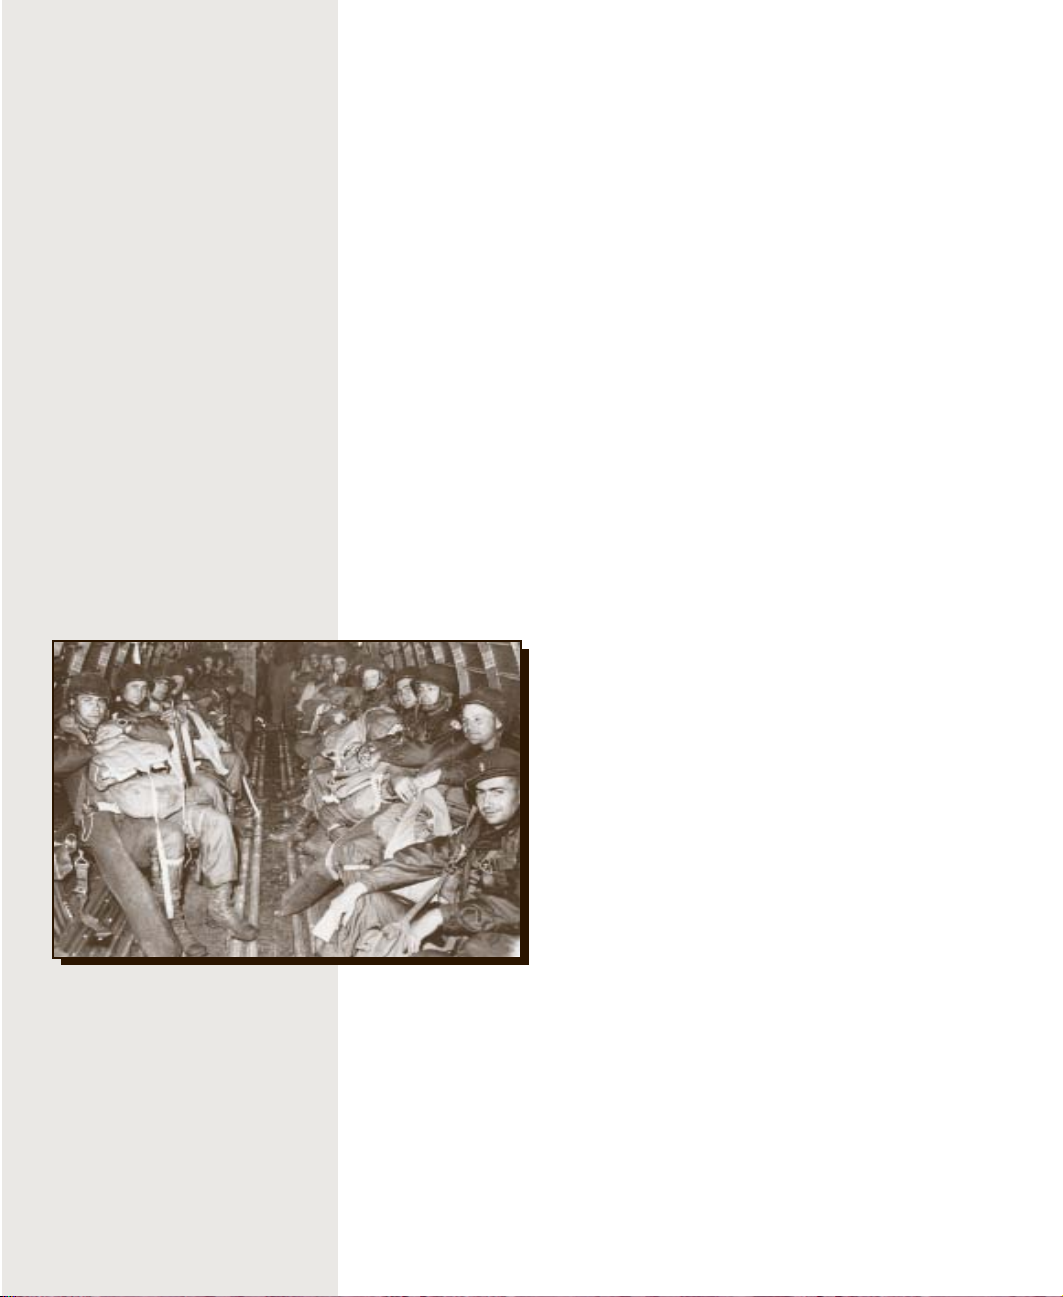
A “stick” of 18 American
paratroopers inside a
C-47 on their way to
Holland. Paratroopers
often carried their own
body weight (150 το 200
pounds) in equipment and
supplies.
If you give a Move Fast order to move a unit to
an enemy location, they will assault and try to
engage the enemy in hand-to-hand combat.
T argeting (Fire, Smoke)
Fire and Smoke are the targeting orders. If you
attempt to lay a smoke screen or fire on a target
that you can’t reach, the order is ignored. Most
infantry other than mortar units cannot throw
smoke grenades farther than 30 meters.
Because the targeting orders are important ele-
ments of the game, make sure you are fully
informed on how and when to use your weapons. For more information,
see “Using Your Weapons Effectively,” later in this chapter, and the
effectiveness chart on the back of this manual.
Digging In (Defend, Hide)
Defend and Hide are your “dig-in” orders. Defend tells your men to
take cover and stand their ground. They will return fire as necessary,
although they may decide to take the offensive on their own.
Hide tells members of a unit to keep their heads down at all cost. This is
particularly valuable when your unit is out of ammunition or too injured
Page 19

Crete May 20, 1941
German airborne forces (7th Paratroop
Division, XI Fliegerkorps) land on the
island of Crete. The largest German airborne operation of the war is preceded by
four days of bombing. On the morning of
May 20 landings take place near Máleme and
Caneá, followed by afternoon landings at
Rétimo and Herákloin. The battle for the
island quickly becomes a battle for the
airfields; unless the Germans can secure
an airfield, they will not be able to
resupply and reinforce the paratroops
already on the ground.
The fighting on the first day is fierce;
the forces and weapons are fairly equal.
At Rétimo and Herákloin the Allies succeed
in holding the Germans at bay; at Caneá
the Germans are driven inland. However, at
Máleme the luck of war turns for the
invaders.
The day’s bitter fighting has left the
airfield at Máleme a wasteland. During the
night, a New Zealand battalion is withdrawn from its position; its commander is,
through no fault of his own, unclear on
the overall tactical picture. The Germans
quickly seize the initiative at daylight;
Colonel General Kurt Student quickly
seizes the battle by changing his plan to
fit the conditions. Student shifts all the
resupply and reinforcement flights into
the captured airfield at Máleme.
Chapter 3: On the Battlefield 13
The Germans build their strength by
flying in the 5th Mountain Division.
This force helps defeat an Allied counterattack at Máleme; by May 23 the
Germans are landing artillery to pound
the lighter-armed Allies and flying in
fighter aircraft to cement their superiority in the air. By the next day, the
Allies are being gradually pushed back.
The Germans continue to reinforce and
resupply (both by air and sea), while
the Allies fight with what supplies they
have.
By May 27, both Caneá and Suda are in
German hands and the now-disorganized
Allied forces are moving toward evacuation points. By June 1 the last Allied
resistance ends. While the Allies evacuate nearly 19,000 men, losses are heavy;
over 21,000 are killed, wounded, missing, or captured.
German losses are much lower. Out of the
23,000 men Student sends into battle,
only 7,000 are killed, wounded, or
missing. But despite the relatively low
number of casualties, the percentage
killed (nearly 5,700) is unacceptable to
Hitler; consequently, he forbids any
further airborne operations. However,
Student is allowed to continue recruiting and training airborne units. The
Allies considered any airborne units
they faced to be formidable opponents.
to be of much use to you in the current battle. If they still have ammunition, your men will fire only if fired upon or if enemy soldiers pass very
close to their hiding place. Hide is the default order at the beginning of
the battle, although no order dot appears unless you specifically give the
Hide order.
Using Your Weapons Effectively
Your supply of ammunition is finite, particularly if you are fighting as the
Allies. You’ll want to evaluate which targets are worth shooting at before
you open fire.
A Bridge Too Far has two types of fire: target and area. You use target
fire when you want to hit a specific enemy target. You use area (suppres-
Page 20
14 A Bridge Too Far
“Both Antwerp and
Rotterdam are highly
vulnerable to mining and
blocking. If the enemy
succeeds in these operations, the time it will
take to open [these] ports
cannot be estimated. ...
It will be necessary for
coastal batteries to be
captured before approach
channels to the river
route can be established.”—Admiral Sir
Bertram Ramsay, Commander
in Chief, Naval Operations, SHAEF, to Field
Marshal Bernard Montgomery, Commander, Allied
21st Army Group, on
September 3, 1944
sion) fire at an entire area, not just one object. The pointer becomes a
crosshair for target fire and a circle for area fire. Mortars, which fire
indirectly, can only use area fire.
Determining Range
Range is the distance from a weapon to a target. Most weapons diminish
in effectiveness as the distance increases. Some weapons, such as smoke
and hand grenades, can be used only at very close range. If you try to
target an area out of the effective range of your weapon, the order will be
ignored.
Weapons have different range capabilities. When you issue a Fire order, a
range indicator (in meters) appears at the end of the fire line. The color
of the range indicator tells you if you are in range: green = good, yellow
= adequate, red = bad, and black = out of range.
Using the Line of Sight
The color of the line tracing to the target
indicates your team’s view of the target.
Bright green
Dark green
the target or is firing through obstructions.
Red
The unit cannot fire through the obstruction; the order will be
ignored.
The unit can see the target.
The unit cannot clearly see
T o determine range and line of sight
Issue the Fire order, and then point to the target.
A read-out (in meters) appears about the target, and the color-coded
line indicates the line of sight.
Using Indirect Fire
When you’re using weapons such as mortars, you may see an orange line
instead of a red or green line stretching to your target as you point to it.
This tells you that it is indirect fire—that you are lobbing the explosive at
your target instead of firing at it directly. An orange order dot appears on
the combat screen above the target for mortars. With indirect fire,
accuracy depends on the experience of your team, as well as whether it
can actually see the target from its position.
Using Suppression Fire
You don’t have to hit a target directly; suppression fire can be effective at
sapping enemy morale. As you concentrate fire in an area, it starts to turn
red. The heavier the fire, the greater the suppression effects on any
enemies in the area. Make sure you don’t move your own soldiers into an
area that is being actively suppressed, as they too may get shot.
Page 21

Chapter 3: On the Battlefield 15
Checking Status of Teams
Before issuing a Fire order, you can check the position of your
soldiers on the combat screen to make sure they are ready to use
their weapons:
• A prone soldier can throw a grenade only one-third its
normal range.
• A soldier must be crouched or standing to fire a bazooka or
Panzerschreck.
• A crawling soldier cannot fire any weapon.
Soldiers who are moving also have limitations:
• A moving soldier cannot fire weapons that require setup to
fire, such as a machine gun or mortar.
• A moving soldier cannot load his weapon unless it is a
semiautomatic or automatic weapon, and he cannot reload
(put a new clip in) any weapon.
You can also check the soldier monitor to see if a team still has its loader
and assistants. Any weapon aided by a loader has a higher rate of fire and
requires less time to reload than a weapon handled by just one man.
Likewise, any weapon aided by assistants has greater accuracy than one
without. For information on the soldier monitor, see Chapter 4, “Using the
Toolbar and Monitors.”
North Africa November 8, 1942
The Allies launch Operation
Torch—the invasion of French
North Africa. On November 12,
a combined air and seaborne
assault captures the port city
of Bône, Algeria. Four days
later, another airborne assault captures Souk el Arba,
Tunisia. The British 1st and
3rd Parachute Brigades, and
the U.S. 509th Parachute
Regiment, all take part in the
action.
Taking Prisoners and Rallying
Separated Soldiers
When enemy soldiers surrender to you, they become your prisoners. They
stand in place and do not participate in the battle.
To get enemy soldiers to surrender, you can try bracketing or surrounding
them with suppression fire and then move into close range for an assault.
Soldiers can get separated from their units. A soldier may r ejoin his group
without encouragement if given enough time. To encourage a separated
soldier to rally with his original team, you can move the team closer to
him.
Using Bridges
Bridges are especially important in A Bridge Too Far because the riv ers in
Holland are too cold, deep, and swift to ford on foot.
The action you take toward bridges differs greatly depending on what side
you choose to play. Only the German army can demolish a bridge and
only the Allies can build one.
“... composed entirely of
elderly gentlemen who
hitherto had been guarding the north coast of
Holland and had never
heard a shot fired in
anger.”—Colonel General
Kurt Student, Commander,
German First Parachute
Army, describing the
German 719th Division
guarding the north bank
of the Scheldt Estuary
when the British captured
Antwerp on September 4,
1944
Page 22

16 A Bridge Too Far
Securing and Repairing Bridges (Allies Only)
If you are playing as the Allies, your progress is severely delayed when the
Germans demolish a bridge. To keep a bridge from being destroyed, gain
control of both sides.
If you are playing an operation or campaign, you can “repair” a bridge.
You do not have to do anything for this to happen; just wait until the next
battle. A pontoon bridge is built in place of the bridge that was destroyed.
Blowing Bridges (Germans Only)
If you are playing as the Germans, destroy a bridge only as a last resort.
After the bridge is blown, you will be forced to retreat while the Allies
repair the bridge.
The demolition timer determines when you can demolish a bridge. This
timer counts down from the beginning of the battle. After it hits zero, the
Blow Bridge button is active (your explosives are fully wired and authorization to blow the bridge has been received). Allied fighting forces can see
the timer counting, but they cannot use the Blow Bridge b utton. Note that
if the Allies control any of the bridge approaches, the bridge may not
successfully blow. If it fails to blow, the timer will increment by one
minute. After a minute passes, you can try to destroy the bridge again.
After you have successfully blown a bridge and the ba ttle has ended, a
message appears telling you to leave the battlefield. Because the Allies
have overwhelming air and artillery superiority, holding an exposed
bridge position is too dangerous.
If a bridge is repaired, you can try to retake it and destroy it again.
To blow a bridge (Germans only)
Wait until the demolition timer counts down to zero, and then click
Blow Bridge.
Sicily July 9/10, 1943
Allied airborne forces next saw action
during Operation Husky—the invasion of
Sicily. On the night of July 9/10, 1943,
the U.S. 82nd Airborne Division, commanded
by Lieutenant General Matthew Ridgeway, is
to drop on targets behind the American
landing beaches. At the same time, the
British 1st Airborne Division, commanded by
Lieutenant General Frederick Browning, will
float down on targets behind the British
landing beaches.
The airborne forces enjoy both success
and failure. High winds cause the American paratroopers to be widely scattered.
Assembly is difficult, and while some
objectives are not secured, the paratroopers do disrupt the German and Italian defenders. Although the British
paratroopers land successfully, they lose
one-third of their gliders; many are
released too soon (by inexperienced
pilots) and crash at sea. However, once
on the ground, all the airborne forces
acquit themselves well.
Page 23

Chapter 3: On the Battlefield 17
Ending a Battle
A battle ends either when both sides press the cease-fire button, one side
flees, or neither side has any soldiers on the map left alive or able to fight.
Howev er, you can signal that you are willing to end a battle at any time.
When both you and your opponent agree to a cease-fire, each side retains
the territory it took during the battle, although neither side wins the map.
If your opponent does not agree to a cease-fire, you can either stay and
fight, retreat, or flee. When you retreat, you do not surrender your
teams; you just issue orders for them to move off the map. When you
flee, the game ends immediately. The computer calculates the teams kept
or lost, and the enemy takes control of the entire map.
After you end the battle, the Debriefing screen appears. For information
on this screen, see Chapter 5, “Fighting Operations and Campaigns.”
To signal that you are willing to disengage
On the toolbar, click the cease-fire button (which shows a depiction of
a dove).
The battle ends when both sides have clicked the cease-f i re b utton.
To retreat without surrendering
“I consider we have now
reached the stage where
one really powerful and
full blooded thrust
toward Berlin is likely
to get there and thus end
the German war. ... In my
opinion the thrust likely
to give the best and
quickest results is one
via the Ruhr.”—Field
Marshal Bernard Montgomery, Commander, Allied
21st Army Group, writing
to General Dwight
Eisenhower, Supreme
Allied Commander, on
September 4, 1944
Use the Move command to move your teams off the right or left edge
of the map.
To end the battle and surrender
On the toolbar, click the flee button (which shows a white flag).
T o quit the game after you cease-fire, retreat, or flee
1
On the Debriefing screen, click Command Screen.
2
On the Command screen, click Quit.
You can also quit using
ALT+F4.
To stop a battle
In W indows, press CTRL+A. The battle stops and is not saved.
Page 24
18 A Bridge Too Far
Pre-Battle T oolbar
Chapter 4
Using the Toolbar and Monitors
A Bridge Too Far provides two-wa y communication with your troops. Yo u
send them orders, and they keep you up-to-date on their situation and
condition as well as provide information on the enemy. Your troops’ means
of communication are the toolbar and the game’s battle monitors.
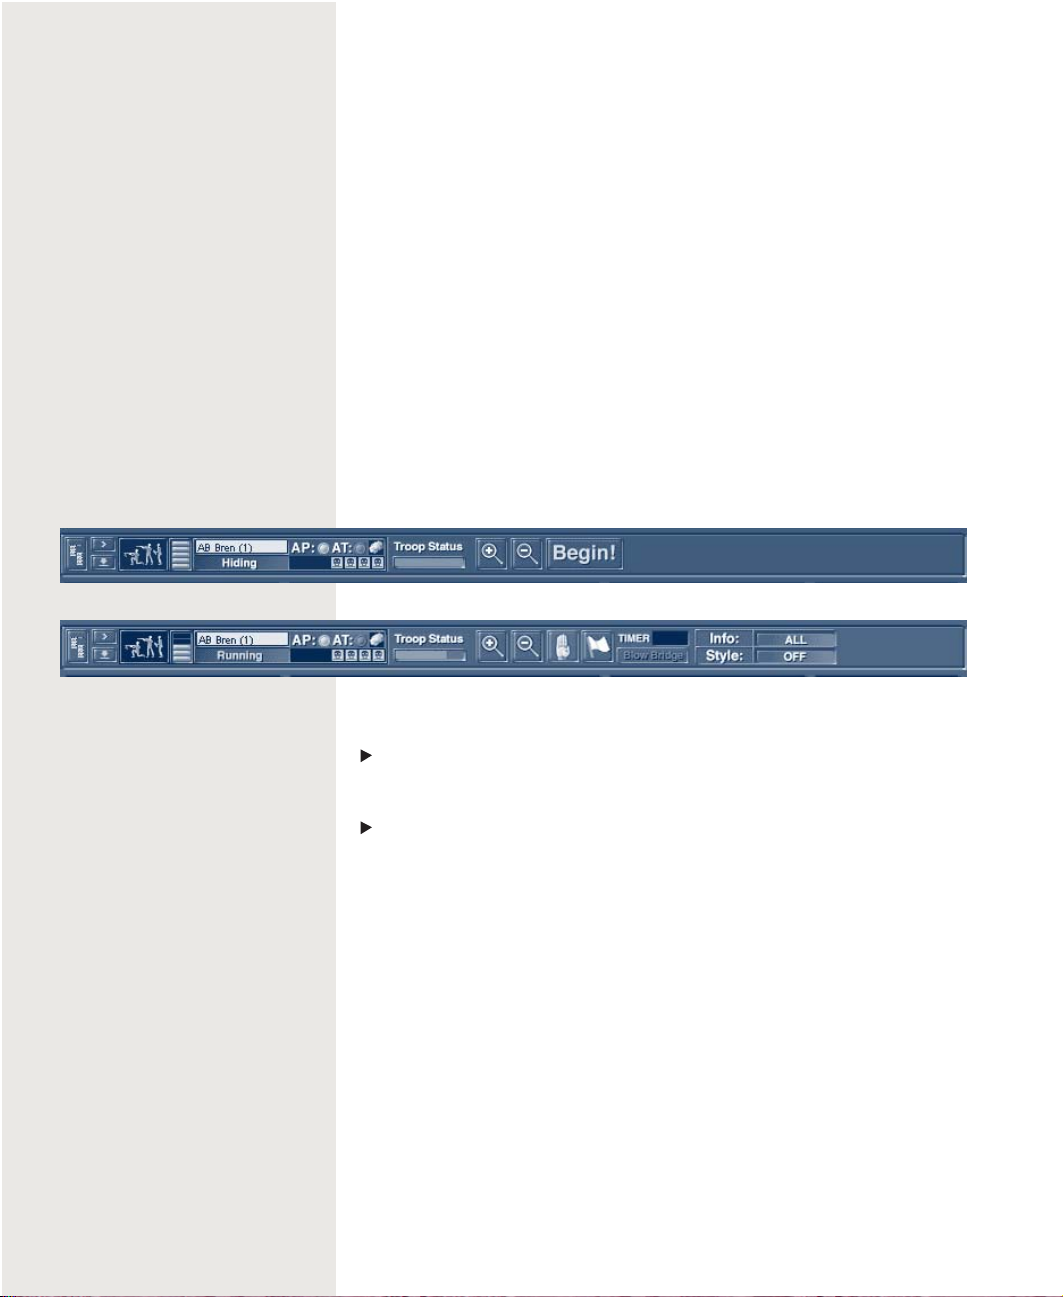
The Toolbar
The toolbar provides you with various types of information about your
troops while you are fighting a battle.
Before you click Begin! to start a battle, the toolbar provides only preliminary information, as shown in the following figur e. After you start the
battle, the toolbar shows its full range of data.
Battle T oolbar
“[You must] supervise the
refitting and rehabilitation of the 9th and 10th
SS Panzer Divisions ...
slowly disengage from the
battle and immediately
head north.”—Field Marshal Walter Model, Commander, German Army Group
B, to Lieutenant General
Wilhelm Bittrich, Commander, II SS Panzer
Corps, at Model’s headquarters near Liège on
September 4, 1944
To view a summary of a particular team
Point to the team, either in the team monitor or on the map.
To get a summary of an enemy unit
Click or point to the unit.
Information appears in the soldier monitor.
Team Summary
On the left of the toolbar is the team summary . This summary consists of
the following information:
The bars at the far left of the toolbar indicate the team’ s degree of experience: no bars = no experience; 5 bars = highly experienced.
To the right of the bars is the team type, such as AB Rifle or Mortar.
Beneath the team type is the order the team is currently following. If the
text is green, the team is following the orders you issued. Red text indicates the team is intentionally acting against the command you issued due
to battlefield conditions. White text indicates you have issued no commands to the team or the command you previously issued has been
completed.
Page 25
Chapter 4: Using the Toolbar and Monitors 19
AP
Team’ s effectiveness against personnel: green = good, red = bad, and
black = none.
AT
Team’s effectiveness against tanks: green = good, red = bad, and
black = none.
The boxes under AP and AT indicate the health of each man on the team.
Troop Status Bar
The Troop Status bar shows the current health of all your troops as a
whole (not just the team you’re pointing to). The bar is green at the
beginning of a game, indicating good health. As men are wounded, the bar
turns yellow; as killed, red.
Information from the Field
You can use the toolbar to get immediate feedback about a number of
states and abilities applying to each soldier. However, you can track only
one state at a time. The indicators use color as a guide to status: green =
good, yellow = functional, and red = useless.
To choose a state to track
Click Info, and then drag to the state you want to track.
“I’ll tell you what I’ll
do, Monty. I’ll give you
whatever you ask to get
you over the Rhine because I want a bridgehead
... but let’s get over
the Rhine first before we
discuss anything else.”
—General Dwight
Eisenhower, Supreme
Commander, SHAEF, to
Field Marshal Bernard
Montgomery, Commander,
Allied 21st Army Group,
at their meeting on
September 10, 1944
Battle Monitors
You use the four monitors below the toolbar to tra ck detailed information:
team information, soldier information, messages, and maps. (If you have
set your screen resolution to 1,024
appears.) The following figure shows the battle monitors.
Using the Team Monitor
The team monitor displays the team type, its current order, and a summary
of its overall health. The color-coding of the text is the same as that in the
Team Monitor
× 768, the spyglass monitor also
Soldier Monitor
Message Monitor
Map Monitor
Page 26

20 A Bridge Too Far
“While agreeing with your
conception and fullblooded thrust toward
Berlin, I do not agree
that it should be initiated at this moment to
the exclusion of all
other maneuvers.”—General
Dwight Eisenhower, Supreme Commander, SHAEF,
writing to Field Marshal
Bernard Montgomery,
Commander, Allied 21st
Army Group, regarding
Montgomery’s singlethrust plan
“The object is to lay a
carpet of airborne troops
down over which our
ground forces can pass.”
—Lieutenant General
Frederick Browning,
Commander, British I
Airborne Corps, to the
officers responsible for
planning Operation Market
on September 10, 1944
team summary , described earlier in this ch apter. The plus sign (+), indicating overall health, uses the same scheme as that in the toolbar: green =
good, yellow = functional, red = useless.
To get information on a team
Click the team.
To go to that team on the map
Double-click the team in the monitor .
Using the Soldier Monitor
The soldier monitor gives information on each soldier in the selected team.
Each field in the soldier monitor can display one of a large number of
different states and conditions. For a listing of all possible settings in the
soldier monitor, see the next section, “Soldier Monitor: Details.”
If you are viewing information on an enemy team, the monitor may sho w
blanks or question marks in some areas. This means that your men have
not been able to determine certain information about the enemy. To get
more enemy intelligence, see “Gathering Intelligence, ” later in this chapter.
At the far left of the soldier monitor is an insignia that indicates the team
leader’s rank. The higher ranked a soldier is, the more likely that soldier
can keep his men from panicking and can rally other soldiers near him.
Also, the higher the rank, the larger the range in which soldiers are
affected by that leader.
To the right of the insignia is the soldier’s name and current action. The
color of the text showing the action provides the same information as that
in the toolbar, as described earlier in this chapter.
To the right of the soldier’s name is his function in the team. Beneath the
team function is a graphical display of the soldier’s we apon, followed by
the name of the weapon and its ammunition type. Above the weapon
information are indicators showing the physical state, emotional state, and
fatigue level of each soldier.
To get information on an individual soldier in a team
Click the soldier.
Soldier Monitor: Details
The soldier monitor shows several aspects of y our men’s states and
conditions. The following tables show all the possible values for these
different aspects.
Page 27

Chapter 4: Using the Toolbar and Monitors 21
Current action Description
Moving Soldier is moving.
Resting Soldier is too tired to do anything but rest.
Loading Soldier is loading his weapon.
Aiming Soldier is aiming his weapon or waiting for
loader to finish loading.
Firing Soldier is firing his weapon.
T aking Co v er Soldier is looking for better cover.
Assaulting Soldier is moving forward and firing.
On Watch Soldier is looking for targets.
Holding Fire Soldier has loaded weapon and sees a target
but chooses not to fire.
Suppressed Soldier is suppressed by enemy fire (takes
cover) but will still fire.
Pinned Soldier is pinned down by enemy
fire; hides more than he shoots.
Cowering Soldier is pinned down but rarely
fires and refuses to move.
Routed Soldier is running away from the battlefield.
Panicked Soldier is panicked and is seeking
cover out of sight of the enemy.
Unjamming Soldier is trying to clear a jammed weapon.
Assisting Soldier is assisting another soldier with a
crew weapon.
Firing/T arget Soldier is firing at a specific target.
Firing/Area Soldier is firing at an area or location.
Firing Blind Soldier is firing at a target he cannot see.
Out of Ammo Soldier is out of ammunition.
Can’t See Soldier cannot see target.
Friend Block Soldier’s line of f ire is blocked by friendly
soldiers.
Gun Broken Soldier’s gun is damaged.
No T arget Soldier cannot see a target at which to fire.
Crawling Soldier is cra wling toward cover or destination.
Ambushing Soldier is ambushing the enemy.
Hiding Soldier is hiding from the enemy .
Bad Shot Soldier has a shot that is a waste of ammunition.
In Building Soldier (mortar team) is inside building and
cannot fire.
No Weapon Soldier has no usable weapon.
“The OKW will henceforth
often be no longer able
to meet demands, however
urgent and justifiable,
for air, armor, and
artillery support, even
when enemy superiority is
overwhelming. Any shortage of weapons, therefore, must be made good
by strengthening the
morale of the troops.”
—Oberkommando der
Wermacht, August, 1944
“Owing to the reduced
hours of daylight and the
distances involved, it
would not be possible to
consider more than one
lift per day ... casualties would result from
pilot and crew fatigue.”
—Major General Paul
Williams, Commander, U.S.
IX Troop Carrier Command,
responsible for Operation
Market’s air operations,
commenting on the number
of drops that can be made
on D-Day
Page 28

22 A Bridge Too Far
Current action Description
“... a narrow corridor
through ... swampy heath,
all the way to Arnhem ...
a single two-lane highway, bounded immediately
by small, open cultivated
fields hedged in by
poplar trees and surrounded by drainage
ditches. Occasionally the
road ran past thick pine
forests. Up the road the
Irish Guards would lead
XXX Corps on a front two
tanks wide.”—
page 417
“... the British ... seem
ignorant of the significance Arnhem has for the
Fatherland. ... [Arnhem
represents] the gateway
to Germany, and I did not
expect the Germans to
leave it open.”—Major
General Stanislaw
Sosabowski, Commander,
Polish 1st Parachute
Brigade, recalling his
assessment of Operation
Market-Garden
Brute Force
Repairing Soldier is repairing his weapon.
Can’t T arget Target is outside the gun’s firing arc.
Conserving Soldier is running low on ammunition so he’s
conserving it.
Too Close Soldier is too close to the target to fire.
Separated Soldier is separated from his team.
Stunned Soldier has been stunned by the concussion
effect of a grenade or other explosi ve, and can
take no actions.
Function in team Description
Leader Leader of an infantry team.
Assistant Assists the driver of a vehicle and fires bow
machine gun or is second in command on an
infantry team.
Soldat German infantryman.
G.I. American infantryman.
Cmdr . Commander; leader of a vehicle team.
Driver Driver of a vehicle.
Gunner Fires v ehicle’s main weapon.
Loader Loads v ehicle’s main weapon.
Ammo type Description
AP Armor piercing.
HE High explosive; used ag ainst inf antry, light
vehicles, and structures.
HEA T High explosive, antitank; used against tanks, tank
destroyers, and motorized artillery . Not ef fective
against infantry in the open but can be ef fective
against infantry in structures.
Smoke Smoke shells or grenades.
SP Special; includes canister and high-velocity AP.
Physical state Description
Healthy (green Physically able to obey all commands.
background)
Hurt (yellow Soldier is slightly wounded; able to
background) physically obey orders at a reduced level of
performance.
Incap. (orange Incapacitated; soldier is severely
background) wounded and unable to obey commands.
Dead (red background) Soldier is dead.
Page 29
Chapter 4: Using the Toolbar and Monitors 23
Emotional state Description
Berserk (red text on Soldier will sacrifice personal safety
black background) to attack the enemy.
Fanatic (orange text on Soldier is slightly irrational and takes
black background) chances to be a hero.
Heroic (yellow text on Soldier fights aggressive ly and is capable
black background) of heroic acts.
Stable (black text on Soldier is emotionally stable.
green background)
Panic (black text on Soldier is emotionally unstable and must
red background) be rallied to become effectiv e.
Routed (black text on Soldier is running away from the battlef ield.
red background
Fatigue level Description
Rested Soldier is well rested.
Winded Soldier is temporarily out of breath but will
recover quickly if gi ven a chance to rest.
Fatigued Soldier is so tired that his performance is
affected.
“It was absolutely impossible to get them to face
the realities of the
situation; their personal
longing to get into the
campaign before it ended
completely blinded
them.”—Major Brian
Urquhart, Chief of Intelligence, British I Airborne Corps, commenting
on state of mind among
the officers planning
Operation Market
Using the Message Monitor
The message monitor displays the messages you
receive from the field. The panels at the top represent the priority of the information coming in. Red
is highest priority and white is lowest.
To select the unit that sent a particular message
Click the message.
To filter out certain messages
Click the colored panel at the top of the message monitor corresponding to the messages
you want to filter out.
For example, to see messages only of the
highest priority (red), click all four panels other
than the red panel.
Using the Map Monitor
The map monitor provides a quick way to jump around the map. This
monitor is constantly updated to show you the positions and dispositions
of known units and victory locations. Your troops appear blue, and enemy
teams are red.
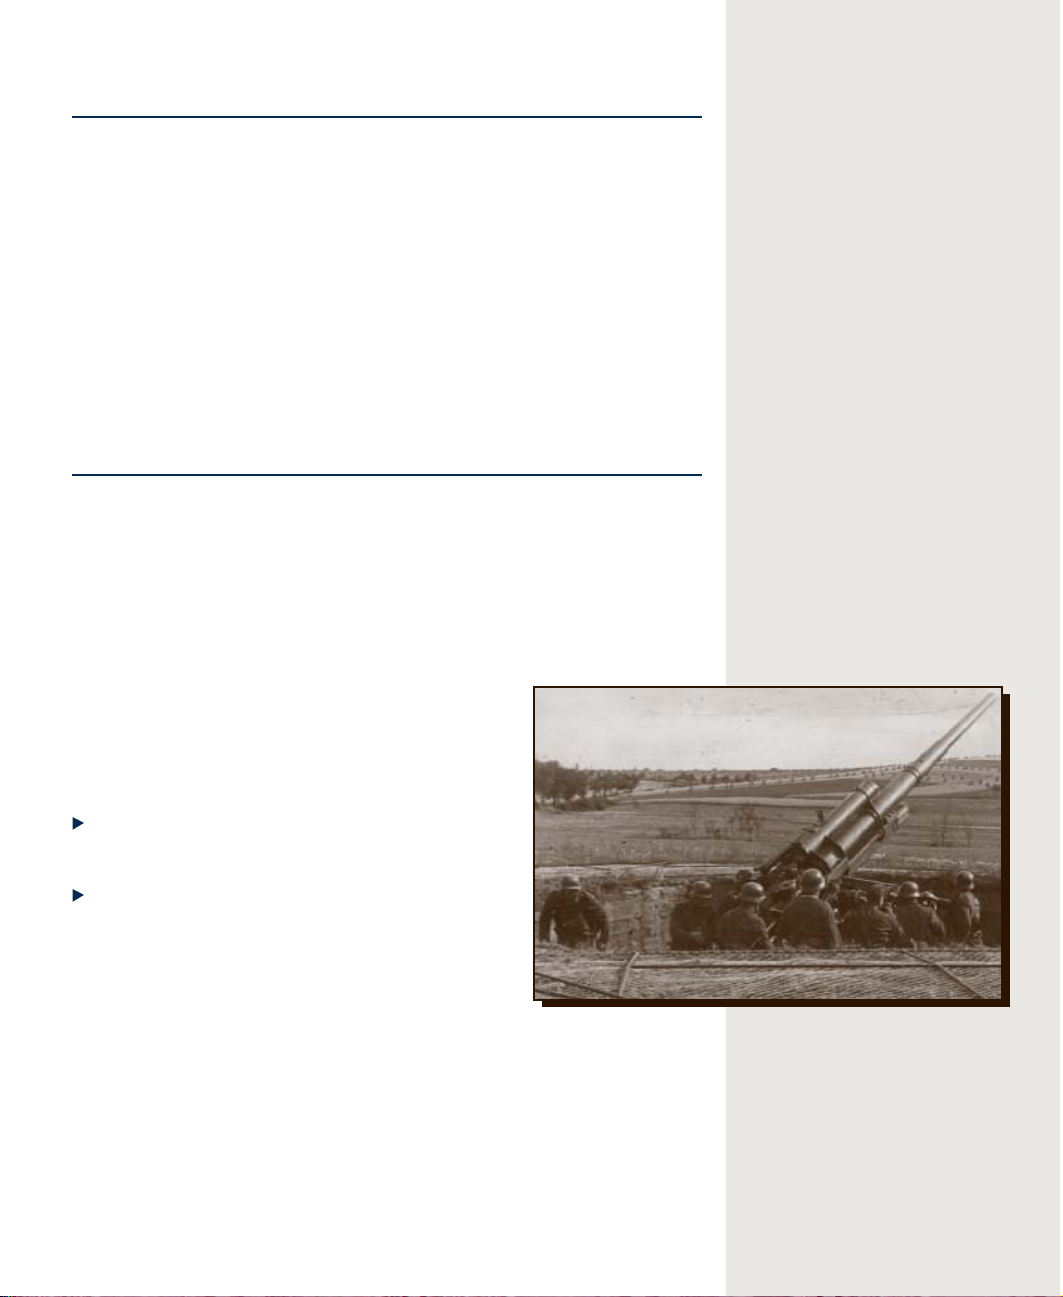
Originally developed for
use against aircraft
(FlaK 18-37, FlaK41), the
German 88mm gun achieves
lasting fame as a tank
killer. It is the main
gun on the Tiger tanks
and JagdPanther tank
destroyer.
Page 30

24 A Bridge Too Far
The first lift of Operation Market-Garden is
remarkably successful;
over 70 percent of the
gliders and 80 percent
of the paratroopers land
safely.
To view a particular portion of the map
Click the area on the map monitor you want to see on the combat
screen.
The combat screen repositions to show that area.
Using the Spyglass Monitor
The spyglass monitor shows a scaled-down
version of the current map. To bring a different part of the map into view on the combat
screen, point to the part of the map you want
displayed.
The spyglass monitor appears only if you have
set your screen resolution to 1,024
× 768 or
greater.
Identifying Battlefield
Elements
As a battle progresses, you’ll want to get
information or reminders about what you see
on the battlefield.
Identifying Units and Sides
You can zoom out or use the map monitor to see details of the battlefield.
You can also determine any team’s name and a summary of its condition.
To determine the name of a unit
“Everyone sat nonchalantly, legs crossed,
looking bored. I wanted
to say something about
this impossible plan,
but I just couldn’t. I
was unpopular as it was,
and anyway who would
have listened?”—Major
General Stanislaw
Sosabowski, Commander,
Polish 1st Parachute
Brigade
Point to the unit on the map.
The unit becomes outlined in white, and the team’s name appears
above the unit. A summary of its condition appears in the left portion
of the toolbar.
To see more information
Click the unit on the map, and look in the team monitor.
Identifying Previous Orders
Through the course of battle, you issue many orders. Each order (other
than the Defend order) is represented on the combat screen as an order
dot. As the map fills with order dots, you’ll want to keep track of which
orders you issued to your units.
Page 31

Chapter 4: Using the Toolbar and Monitors 25
To determine which unit was issued the order
Right-click the order dot you want to find out about.
The unit associated with that order is selected.
You can also click and hold the order dot to determine the unit assigned
the order.
To determine the order currently in effect for a unit
Click the unit.
A line traces out to the order dot that the unit currently has in effect.
Gathering Intelligence
Information about your opponent’s troops—whether the y are healthy or
incapacitated, whether they’ve surrendered or are pinned—can help in
your battle decisions.
Your men will hav e more information at the end of a
battle than at the beginning simply because they have had
more time to observe the enemy. The longer you observe
them, the more you will learn. Two ways you can gather
more intelligence is to control the high ground—hills and
multistory buildings—or to send a scout ahead.
Some teams are much more effective at gathering
intelligence than others. Scouts can see more than most
units, and tanks, because of their limited vision, have the
poorest ability to gather information.
Using Sound Cues
The sounds around you on the battlefield help you gauge
what is happening. A Bridg e Too Far supplies a variety of
sound cues. Each weapon has its own sound. When
troops are assaulting a victory location, they radio in their
intentions. As a unit’s morale begins to drop, they tend to
shout in panic and not listen to your orders. A recording
and description of each sound heard in the game can be
found in Sound Gallery in Help.
Field Marshal Gerd von Rundstedt is
relieved of his post as commander of
German forces in the West on July 4,
1944, less than one month after the
Allies land in Normandy. In what
Field Marshal Erwin Rommel called “a
blood-letting,” the Allies slowly
expand their beachhead. Hitler
orders a last-man defense; both
Rundstedt and Rommel find themselves
at odds with this order. However,
after both Kluge and Model prove
incapable of stopping the inevitable
Allied advances, Hitler reinstates
Rundstedt.
Although Rundstedt does not play a
direct role in the Market-Garden
fighting, the field marshal’s indirect roles are nonetheless important. First, he brings his administrative expertise, professional
bearing, and solid strategic vision
to a headquarters reeling from
Kluge’s fatalistic failures and
Model’s seat-of-the-pants style.
Second, and perhaps more important,
he facilitates the movement of
reinforcements and replacements
(such as they are) to the field of
battle.
“... its weakness seemed
to be the assumption that
the Germans would put up
no effective resistance.
... I simply did not
believe that the Germans
were going to roll over
and surrender.”—Major
Brian Urquhart, Chief of
Intelligence, British I
Airborne Corps, regarding
the Allied assessment of
the German forces in
Holland
Page 32

26 A Bridge Too Far
Chapter 5
Fighting Operations and
Campaigns
“There it is, and we’re
going to do it with
one.”—Brigadier General
James Gavin, Commander,
U.S. 82nd Airborne
Division, responding to
the assessment that the
82nd’s objectives required two divisions
“[I] was looking forward
to some peace and a
chance to get my laundry
done.”—Lieutenant Gustav
Sedelhauser, Administration Officer, German Army
Group B, after Field
Marshal Walter Model
decides to have group
headquarters operating in
Oosterbeek by September
15, 1944
Operations, sector campaigns, and the Grand Campaign add new layers of
challenges to those you have already faced on the battlefield. These larger
scales of warfare are collections of individual battles in which the result of
each battle sets the stage for the next one.
If you find yourself defending or attempting to take a map more than once,
you’ll see that buildings destroyed previously are still in rubble. Pock
marks from mortars, shells, and grenades will still mar the ground. The
amount of ammunition you have will slo w ly decrease until you resupply
the area.
Previous battles also affect the quality of your troops. Units that ha ve
received a lot of replacement soldiers to fill out their ranks will not fight as
well as a team that has been fighting together for several ba ttles. As
soldiers survive battles, their experience will increase, their choices will be
better, and their ability to fight as a cohesive unit without panicking will
improve.
Reviewing Your Objectives: Operations
Winning operations involves all elements of winning individual battles and
adds a new priority: time. At the end of each day, you receive a total of
points reflecting how many maps you control. Each map has a fix ed
number of points, as follows:
10 points = regular map (no key strategic landmarks)
20 points = landing zone
30 points = road
40 points = bridge
If neither player controls a particular map, each player receives points
according to a percentage of the victory locations each controls.
Reviewing Your Objectives: Campaigns
A Bridge Too Far offers two types of campaign play. Sector campaigns
give you command over one sector of the battle. The Grand Campaign
extends your authority over all three fronts at once.
In both types of campaigns, your success is based strictly on the progress
of XXX Corps. If you are playing the Allies, you are judged by how much
Page 33

Chapter 5: Fighting Operations and Campaigns 27
faster and farther you can move XXX Corps north than the actual Corps of
Operation Market-Garden and whether you can secure the Arnhem bridge.
If you wait too long to support your paratroopers in Arnhem, you doom
them to the increasing forces of the Germans.
As the Germans, you are judged by how effectively you can hold or even
push back the Allied attack. If you wait too long to eng age the Allies in a
serious offensive, you risk losing control of the bridges before you can
destroy them, and you miss the opportunity to push the Allies back to
Belgium.
All campaigns in A Bridge Too Far last 10 days. For information on the
challenges you face in each operation and how best to allocate your
resources, see “Campaign Strategy” in Chapter 7, “Tactics and Strategy.”
Managing Resources
In operations and campaigns, you have a reserve force in addition to the
units you are actually using in battle. You need to decide when to use them
and which types of units to call in. In a campaign, you can resupply
operations at the end of each day to increase ammunition and available
reserves.
By September 1944, German industrial capacity is unable to keep up with the demands
of the armed forces. Fighting a three-front
war would drain any economy; an economy
being bombed day and night had no hope of
keeping up.
A cursory review of production statistics
makes the German situation clear. By 1944,
German production of crude oil was 2.4
percent of Allied production. Throughout
the war years (1939–45), German production
of the basic machines and materiél of war
lagged far behind Allied production. Germany produced only 20.6 percent as many
tanks and self-propelled guns as the Allies, 19.6 percent as much artillery, 11.2
percent as many mortars, and 14.2 percent
as many machine guns.
Perhaps the most telling production statistic is military trucks. The United States
alone produced over 2,400,000 trucks
compared to Germany’s 346,000; many of
Hitler’s “motorized” divisions relied on
horses as the main source of transport.
This disparity in transportation resources led John Ellis to write: “Many
battlefields have been cited as being
particularly significant in Germany’s
defeat in the Second World War. Not the
least of them should be Detroit.”
Manpower statistics also show the disparity of riches between the Germans and the
Allies. Manpower shortages become critical for the Germans: The fighting in
Normandy (June 6 to July 23) cost the
Germans over 117,000 casualties, yet no
more than 20,000 replacements exist.
During the same time period, the Allies
landed over 20 divisions (280,000 men).
“There was a dangerous
mixture of ennui and
cynicism slowly creeping
into our lives. We were
trained to a fine edge
and I knew that if we
didn’t get into battle
soon, we would lose it.
We were ready and willing
to accept anything with
all the ‘ifs’.”—Major
General Robert Urquhart,
Commander, British 1st
Airborne Division, on the
mind-set at British
headquarters during the
planning of Operation
Market
Page 34

28 A Bridge Too Far
Operation Screens
“My problem was to get
enough men down on the
first lift, not only to
seize the main bridge in
the town itself, but also
to guard and defend the
drop zones and landing
areas for the succeeding
lifts. To seize the main
bridge on the first day,
my strength was reduced
to just one parachute
brigade.”—Major General
Robert Urquhart, Commander, British 1st
Airborne Division, recalling his tactical
considerations in capturing the Arnhem bridge
“We are being so badly
led from above that I can
no longer carry out
senseless orders. I have
never been a robot and I
don’t intend to become
one.”—Lieutenant General
Wilhelm Bittrich, Commander, II SS Panzer
Corps, explaining his
disobedience of Hitler’s
“insane” fight-to-thelast-man orders to Field
Marshal Erwin Rommel
during the Normandy
fighting
When you play an operation, you use fiv e screens. The following table
shows the purpose of each screen. The subsequent sections in this chapter
provide more information on how to perform each of the tasks listed.
Screen Purpose
Briefing Provides information on the map you will fight for
next and the overall status of the operation.
Requisition Allows you to customize your forces by pulling from
your reserves.
Deployment Provides an opportunity to deploy your troops
prior to battle.
Combat Acts as the battlefield for the game.
Debriefing Gives the previous ba ttle’s outcome and choices
for cease-fire periods.
Campaign Screens
When you play a campaign, you use six screens. The following table
shows the purpose of each screen. The subsequent sections in this chapter
provide more information on how to perform each of the tasks listed.
Screen Purpose
Briefing Provides information on the map you will fight fornext
and the overall status of the operation.
Requisition Allows you to customize your forces by pulling
from your reserves.
Deployment Provides an opportunity to deploy your troops
prior to battle.
Combat Acts as the battlefield for the game.
Debriefing Gives the previous battle’s outcome and
choices for cease-fire periods.
Supply Provides basic information on the campaign
and allows you to divide supplies among the
operations.
Starting an Operation or Campaign
To start a campaign
1
On the main screen, click either the Operations or the Campaigns tab.
2
In the game description box, double-click the operation or campaign
you want to play.
–or–
In the saved games box, click the name of a saved game.
Page 35

Chapter 5: Fighting Operations and Campaigns 29
3
Click Begin!
The Briefing screen appears.
Checking Your Pre-Combat Status
After you choose the operation you want to play , the Briefing screen,
shown in the following figure, appears to give you information on the
battle you are about to fight. The Brief ing screen also gives the status of
the entire operation.
“There was nothing else
to do but accept the
risks and plan for them.
I was left with no
choice.”—Major General
Robert Urquhart, Commander, British 1st
Airborne Division,
explaining the battle
plan he conceived for the
1st Airborne
The upper-left portion of the screen contains a listing of all operations in a
sector. The operation you are about to play appears highlighted. The map
on the right side of the screen highlights the sector and operation you are
fighting.
To the right of the operation names are small squares representing the
individual battles in the operation, with the next battle to be fought
highlighted. Green boxes indicate maps you have secured, while red ones
belong to your opponent. The letters with these boxes indicate any strategic landmarks of the battle: R = road, B = bridge, and LZ = landing zone.
Landing zones have key importance because their control determines
whether the Allies can resupply that operation by air. For more information, see “Selecting Air or Ground Supply,” later in this chapter.
The Briefing screen also provides information on requisition points for the
operation and sector, as well as the date, time, and description of the battle
ahead.
“There, in the photos, I
could clearly see tanks—
if not on the very Arnhem
landing and drop zones,
then certainly close to
them.”—Major Brian
Urquhart, Chief of Intelligence, British I Airborne Corps, recalling
the reconnaissance photographs he received in the
days before Operation
Market-Garden
Page 36

30 A Bridge Too Far
“I wouldn’t trouble
myself about those if I
were you. They’re probably not serviceable at
any rate.”—Lieutenant
General Frederick Browning, Commander, British I
Airborne Corps, when
presented with reconnaissance photographs by
Major Brian Urquhart
“Yeah, we know that,
Lieutenant, but what
country are we droppin’
on?”—Private Philip
Nadler, 504th Regiment,
U.S. 82nd Airborne
Division, when an officer
points to the bridge at
Grave
After you are done reviewing operation status
Click Continue.
The Requisition screen appears.
Choosing Resources
You use the Requisition screen to select the units you want to use in the
upcoming battle.
“[I was] struck with
horror at the plan to
blast through the German
resistance on a one-tank
front.”—Lieutenant
Colonel Giles Vandeleur,
Commander, 2nd Battalion,
Irish Guards Armored
Group, recalling his
thoughts during the
Operation Garden briefing
on September 16, 1944
After a battle ends, units automatically recover or are replenished. However, they are not necessarily brought back to full strength.
If two teams each have less than 25 percent of their soldiers left alive,
they may be combined into one team.
Determining the Number of Points Availab le
Requisition points represent your ability to bring reserves to the front.
The number of points you can use appears on the right portion of the
Requisition screen.
Sector
A reserve of points that can be used by any operation in the
sector.
Operation
Points assigned specifically to that operation.
Viewing Available Teams
The left side of the Requisition screen, under Active Teams, shows your
player teams—the troops you were preassigned or that you previously
requisitioned. (If you have played battles in the operation and taken
Page 37

Chapter 5: Fighting Operations and Campaigns 31
casualties, the screen shows only surviving troops.) The right
side, under Team Classification, gives information about the
available reserves—the troops, guns, and vehicles you can
requisition. This section includes the number of each unit
available and the cost in requisition points for each unit.
Reserves are limited in type and number and have realistic
historical constraints. Teams are categorized as either infantry
or support. Infantry teams are fighting forces with hand-held
weapons that don’t require any setup. Support teams have
weapons that require a crew. Regardless of the number of
points you have available, you are limited to nine infantry
slots and six support slots.
If you are playing as the Allies, you do not have any tanks
available until you connect with XXX Corps.
Teams are also categorized by army type and nationality. The
teams that are available to you depend on the side you have
chosen to play.
Just as a real commander doesn’t know the exact quality of
new recruits, you won’t know a new unit’s exact morale and
experience. Only a range is given until the team joins your
forces and appears on the left side of the Requisition screen.
T o get more information on an available unit
Point to the unit.
Information about the unit and its strategic uses appears
on the lower-right portion of the screen.
None of the German divisions
that fight during Operation
Market-Garden go into action at
full strength. All German units
are lacking transportation and
fuel; thousands of vehicles are
destroyed in the Normandy Campaign and resulting breakout.
The last 20th-century army to
rely heavily on horses saw a
vast number slaughtered in the
Falaise Pocket, further reducing
mobility.
Neither of the panzer divisions
fighting at Arnhem are at anything close to full strength.
When the fighting starts on
September 17, 1944, both the 9th
SS and 10th SS Panzer Divisions
are at 20 percent to 30 percent
strength. Given the British 1st
Airborne’s lack of antitank
weapons and the power of what
little strength the Germans have
(Tiger tanks), these depleted
divisions are strong enough to
stop the Red Devils.
T o view all units for a specific team type
Click either the Infantry or the Support tab.
T o view all units for a specific nationality
Click the German, American, British, or Polish tab.
Adding Reserves
When you select a unit to add to your forces, that unit moves from the
Available Teams column to either the Infantry or Support column of
the player teams area. The number in the Number Available column
decreases accordingly, as does your number of requisition points.
T o add a unit to your player teams
Click the unit.
The unit moves to the player teams area of the screen, and a green bar
appears at the left of your new team.
“... keep going like
hell.”—Lieutenant General
Brian Horrocks, Commander, British XXX
Corps, briefing his
subordinates on Operation
Garden, September 16,
1944
Page 38

32 A Bridge Too Far
Trading Reserves
“We seemed to be violating Napoleon’s maxim
about never fighting
unless you are at least
75 percent sure of
success ... we were
leaving 75 percent to
chance ... if the slightest thing went wrong—a
blown bridge, stiffer
German resistance than
anticipated—we’d be off
schedule.”—Major
Beelaerts van Blokland,
Chief of Staff, Dutch
Princess Irene Brigade,
recalling his objections
to the Operation MarketGarden plan
“This mighty spectacle
deeply impressed me. I
thought with reflection
and longing of our own
airborne operations ...
if ever I’d had such
means at my disposal.
Just once, to have this
many planes!”—Colonel
General Kurt Student,
Commander, German First
Parachute Army, watching
the vast Operation Market
air armada from his
headquarters near
Nijmegen on September 17,
1944
After each battle, you’ll want to gauge the health and morale of your units
and see which ones should be replaced with fresh reserves. When you
return units to the divisional reserves, you receiv e additional requisition
points to use for new resources. However, e xisting units are not worth as
much as new ones. For example, you can retire your AB Rifle unit for 3
points, but a fresh AB Rifle unit may cost you 7.
If you are still in the process of assembling your forces, you can move
resources back and forth between the player and available sides of the
Requisition screen without affecting requisition points. New units don’t
actually join your division until you complete your requisition, as described in the next section.
To retire a unit
Click the unit.
The unit moves back to the Available T eams column.
Completing Y our Requisition
After you have finished assembling your forces, you are ready for battle.
If you haven’t used all of y our requisition points, they will remain in the
reserve pool.
To complete your requisition and start fighting
Click Continue.
The combat screen appears.
To discard your choices and return to the Command screen
Click Cancel.
Fighting the Battles
You fight the battles in an operation or campaign just as you would
individual maps. For more information on fighting battles, see Chapter 3,
“On the Battlefield. ”
Debriefing Screen
When a battle ends, the Debriefing screen, shown in the following figure,
appears. This screen giv es you general information on your status at the
end of the battle and, if you are fighting an operation or campaign, going
into the next battle. It also provides buttons to specify options and to move
you to different screens in the game.
Page 39

Chapter 5: Fighting Operations and Campaigns 33
The Debriefing screen shows the following information.
Outcome
A brief description of the battle’s outcome, the effect it has on
the next battle, and your current score.
Victory Locations
Lists the victory locations in the most recent battle and
which side currently controls each one. The following colors indicate the
value of the victory location: red = primary , white = secondar y, and blue =
tertiary.
“Unless a man has been
through these fighterbomber attacks he cannot
know what the invasion
meant. ... Not until
they’ve wiped out every-
thing do they leave. ...
Ten such attacks in
succession are a real
foretaste of hell.”—
Force
, page 366, describing the effect of rocketfiring Typhoon fighterbombers
Brute
Casualties
Totals destroyed or taken in the most recent battle, broken into
the following categories: infantry, armor, guns, and vehicles.
Medals
Total number of medals awarded to your soldiers in the most
recent battle.
Status
Your overall status for an operation or campaign.
Choosing a Cease-Fire Period
When you end a battle, your troops regroup. You and your opponent then
choose how long each of you wants to regroup before starting the ne xt
battle. The longer you wait, the more reinforcements you receive, but the
more you delay your progress.
You can choose to wait either one hour , f our hours, or se ven hours. If the
normal time delay takes you past the last daylight hour, your only option is
to wait overnight.
“Don’t forget my cigars.”—German officer
racing out of the
Tafelberg Hotel in
Oosterbeek to Lieutenant
Gustav Sedelhauser,
Administration Officer,
Army Group B Headquarters, as the British 1st
Airborne Division lands
nearby on September 17,
1944
Page 40

34 A Bridge Too Far
“They almost got me! They
were after my headquarters!”—Field Marshal
Walter Model, Commander,
German Army Group B, to
General Wilhelm Bittrich,
Commander, II SS Panzer
Corps, after Model flees
Oosterbeek for Bittrich’s
headquarters in
Doetinchem on September
17, 1944
The waiting period used by the game is the shortest time period chosen by
either player. If you choose to wait one hour, and your opponent chooses
four, the game waits one hour.
The following table shows the percentage of your daily points you gain
and supplies (ammunition) you lose with each waiting period. Note that
the Points gained column applies only to the side that chose the shortest
cease-fire period.
Selection Points gained Supplies lost
1 hour 0 10%
4 hours 15% of daily 5%
7 hours 30% of daily 5%
Overnight Remainder of daily 5%
To choose a cease-fire period
On the Debriefing screen, click either Overnight, 1 Hour, 4 Hours,
or 7 Hours.
Retreating
If you are pushed off the map during battle and
forced to retreat, you get a 10 percent bonus of
requisition points for the next battle because
your supply chain was shortened.
Not every glider landing
is successful. Here,
American paratroopers
tend to comrades injured
after a hard landing.
Playing the Next Battle
After you have chosen a cease-fire period, you
are ready to play the next battle.
To play the next battle
On the Debriefing screen, click Play Next
Battle.
Allocating Supplies for Sectors
(Grand Campaigns Only)
At the end of each day, you use the Supply screen, shown in the following figure, to allocate supplies for the next day’s fighting.
Page 41

Chapter 5: Fighting Operations and Campaigns 35
To the right of each sector are boxes representing individual battles in each
operation, with the next battle to be fought highlighted. As on the Briefing
screen, green boxes indicate maps you have secured, while red ones
belong to your opponent. The letters with these boxes indicate any ke y
strategic landmarks of the map: R = road, B = bridge, and LZ = landing
zone.
You use the remaining sections of this screen to distribute requisition
points and select the type of supply , as described in the next two sections.
Distributing Requisition Points (Grand Campaigns Only)
“If we are to believe
these plans and are to
assume that the Arnhem
bridge is the true objective, why were not troops
dropped directly on the
bridge?”—Field Marshal
Walter Model, Commander,
German Army Group B, to
his staff when they
receive copies of the
Operation Market plans
from Colonel General Kurt
Student, Commander,
German First Parachute
Army, on September 17,
1944
Within a sector, you have a fixed pool of supplies to divide among the
operations. You’ll need to determine which operations face the greatest
challenges and are in most need of new troops and supplies.
The far right of the Supply screen shows the points for each operation; the
Supply column shows the current supply levels.
Selecting Air or Ground Supply
(Grand Campaigns Only, Allies Only)
A Bridge Too Far reflects two ways of sending units to ba ttle: air and road.
Only road supply is available to the Germans, because they had no air
supply ability during the historical Operation Market-Garden. Howe ver,
they have unlimited road resupply, while you, as the Allied commander,
have a tougher time getting resources to your troops:
“It looked like we could
get out on the wings and
walk all the way to
Holland.”—Captain Neil
Sweeney, U.S. 101st
Airborne Division, commenting on the Operation
Market air-fleet on
September 17, 1944
Page 42

36 A Bridge Too Far
“Are you hung over from
last night?”—Lieutenant
Gustav Sedelhauser,
Transportation and
Administration Officer,
Army Group B Headquarters, to the field
officer reporting gliders
landing near Oosterbeek
on September 17, 1944
• If XXX Corps has not arrived at the map on which you’re fighting, as
indicated on the map, you cannot use ground supply, b ut you can use
air drops.
• On any one day, you can choose only one sector to be supplied by air.
Furthermore, you can supply a sector by air only if you have secured
that sector’s landing zone.
Only road supply is available to the Germans, because they had no air
supply ability during the historical Operation Market-Garden. Howev er,
they have unlimited road resupply, while you, as the Allied commander,
have a tougher time getting resources to your troops:
To select the sector to be supplied by air
On the Supply screen, in the area at the right of the sector names, click
Air for the sector to be supplied by air.
Viewing Details of Soldier Status
“It was incredibly quiet.
Unreal.”—Major General
Robert Urquhart, Commander, British 1st
Airborne Division,
remembering the first few
minutes after landing on
September 17, 1944
You use the Details screen to follow the progress of indi vidual soldiers.
This screen, shown in the following figure, tra cks your most recent battle,
as well as all the previous battles.
To view the Details screen
On the Debriefing screen, click Details.
You can see only one side at a time. To switch between them, click
Player Side.
Page 43

Chapter 5: Fighting Operations and Campaigns 37
Condition Statistics
The first column of statistics is health.
This chart is a summary of each soldier’s war record while under your
command. To the far left is each soldier’s rank followed by his surname.
The chart is organized first by health status and then by decreasing rank.
Your soldiers can have four possible health states.
OK
Soldier is healthy and in fighting condition.
+
Soldier is slightly wounded, but still able to fight with diminished
capacity .
++
Soldier is incapacitated for the rest of the campaign.
KIA
Soldier was killed in action.
The chart also shows whether the soldier has surrendered.
FLAG
Soldier surrendered to enemy.
Ability Statistics
The next group of indicators shows your soldiers’ abilities. If
your soldier has increased or decreased in a particular ability due
to the most recent battle, an up or down arrow appears in the
corresponding box.
Leadership
Physical Condition (Health)
without tiring quickly and ability to withstand injury .
Mental Condition
experience. Because this ability is part of an individual soldier’s
degree of intelligence and is unaffected by experience, it never
changes throughout the game.
Ability to lead and rally units.
Ability to perform on the battlefield
Ability to react swiftly and to learn from
“... the taking and
securing of the Arnhem
bridge is of decisive
importance.”—Lieutenant
General Wilhelm Bittrich,
Commander, II SS Panzer
Corps, in orders issued
to his command on September 17, 1944
While German commanders from
Rundstedt down to field officers fear an Allied airborne
attack, none take any practical measures against paratroop
landings. As one German commander noted, the obvious
buildup of British armored
forces south of the MueseEscaut Canal was the primary
worry. Still, several bridges
between the canal and Arnhem
are prepared for demolition;
a contingency against the
expected armored thrust by
British XXX Corps.
Experience
Experience gained by the soldier (fiv e bars = elite; no
bars = conscript). Experience will only increase, but the speed of
increase is determined by his ability to learn (mental condition) and his
performance in battle.
Morale
Ability to withstand the effects of the battlefield and still fight
effectively.
Page 44

38 A Bridge Too Far
“... the only military
objective I could think
of with any importance
was the Arnhem bridge.”
—Major Sepp Kraft,
Commander, SS Panzer
Grenadier Training and
Reserve Battalion, on
seeing the British 1st
Airborne landing near
Wolfheze
Kill/Performance Statistics
The next grouping of information totals the kills for each of your soldiers
by battle (top number in the square) and total for the campaign (lower
number) as well as their performance. Occasionally , your soldiers act on
their own, brav ely or cowardly. The top number in the next column is their
actions of cowardice or bravery for the most recent battle; the lower is their
total for the campaign.
Field Marshal Walter
Model, Commander, German
Army Group B, refuses to
allow the destruction of
the road bridges at
Nijmegen and Arnhem. He
wants them saved for a
German counterattack.
Major General Robert
“Roy” Urquhart, Commander, British 1st
Airborne Division.
Operation Market-Garden
is his first experience
commanding airborne
troops in action.
Page 45

Chapter 6: Designing Your Own Scenarios 39
Chapter 6
Designing Your Own Scenarios
Along with its realistic combat model and real-time action, A Bridge Too
Far gives you the opportunity to create your o wn battlefield scenarios. You
can customize the maps on which you stage your battle and adjust both the
mix and the numbers of troops on both sides of the battlefield.
For example, you can design a challenging battle in which one side has a
lot of light, inexperienced infantry units, and the other has infantry units
that are small in number but heavy and more experienced. You can define
one single victory location to be defended by a single large force, or you
can define many small victory locations, requiring that you spread out
your forces to defend them. By adjusting these different elements of
warfare, you can create a wide range of scenarios for testing your skills as
a commander.
Starting Battlemaker
The utility for designing your own scenarios in A Bridge Too Far is called
Battlemaker. If you know which battle you want to use as a basis for your
new scenario, you can select it from the list of battles provided with the
game. You can also choose a custom scenario that you or another player
previously designed, and customize it further.
After you start Battlemaker, the Battlemaker Main screen appears, as
shown in the following figure.
“The only way this airborne assault can be
defeated is to strike
hard within the first 24
hours.”—Field Marshal
Walter Model, Commander,
German Army Group B, in
asking Field Marshal Gerd
von Rundstedt, Commander
in Chief West, for immediate reinforcements
Page 46

40 A Bridge Too Far
To start Battlemaker
“I think I’ll go and have
a look for myself,
Charles.”—Major General
Robert Urquhart, Commander, British 1st
Airborne Division, to his
chief of staff when no
information reaches
headquarters during the
fighting on September 17,
1944
“One moment we were
marching steadily towards
Arnhem; the next, we were
scattered in the
ditches.”—Sergeant Major
Harry Callahan, 3rd
Battalion, 1st Parachute
Brigade, British 1st
Airborne Division, on his
unit’s march toward
Arnhem
1
On the Command screen, click the Battles tab.
2
In the list of battles provided with the game, click the battle you want
to edit, and then click Battlemaker.
–or–
In the list of previously defined custom scenarios, click the battle you
want to edit, and then click Battlemaker.
Choosing a Map
Although you choose a map to edit when you start Battlemaker, you can
browse through other available maps after you’ve started the utility and
choose a different one if you want. You can either select a map from a set
of thumbnail sketches on the Battlemaker Maps screen, shown in the
following figure, or you can select the name of a battle in a list on the
same screen.
To choose a map from thumbnail sketches
1
On the lower-center portion of the screen, click Select Map.
The Battlemaker Maps screen appears, showing thumbnail sketches
of the available maps.
2
Click the map you want, and then click Continue.
Page 47

Chapter 6: Designing Your Own Scenarios 41
To choose a map by battle name
1
Click Select Map.
2
In the lower-right portion of the Battlemaker Maps screen, click
Select by Battle. (This button toggles between Select by Map and
Select by Battle.)
3
In the list of battles that appears, select the
battle you want to customize.
A thumbnail sketch of the battle map appears to
the left of the list.
4
Click Continue.
Editing Victory Locations
Victory locations are listed in the upper-right
portion of the Battlemaker Main screen.
Victory locations also appear on the map as redbordered boxes. When you click the name of a
victory location, the corresponding box on the
battle map is outlined in yellow.
You can move , delete, or add victory locations.
Note that when you define a new victory location, you assign it a value of
primary, secondary, or tertiary. These values come into play when neither
you nor your opponent are able to control an entire map. The percentage
of the map you control is determined by the values of the victory locations
you control. A primary victory location is worth 40 points, a secondary is
worth 20, and a tertiary is worth 10.
To begin editing victory locations
On the center-right portion of the screen, click Victory Locations.
To move a victory location
On the map, drag the victory location to a new position.
To add a new victory location
1
Click the place on the map where you want the new victory location.
2
In the dialog box that appears, next to Location Name, type a name
for the new victory location.
3
Next to Location V alue, click either Primary Objective, Secondary
Objective, or Tertiary Objective.
Allied gliders crammed
into their landing zone
during Operation MarketGarden.
“I thought whoever held
these houses held the
bridge.”—Captain Eric
Mackay, Royal Engineers,
on selecting four houses
on the east side of the
Arnhem bridge’s northern
ramp
Page 48

42 A Bridge Too Far
To delete a victory location
“... all hell seemed to
be let loose. The sky lit
up, and there was the
noise of machinegun fire,
a succession of explosions, the crackling of
burning ammunition, and
the thump of cannon. A
wooden building nearby
was wreathed in flames,
and there were screams of
agony and fear.”—Colonel
John Frost, Commander,
2nd Battalion, 1st Parachute Brigade, British
1st Airbornce Division,
remembering the fighting
at the Arnhem bridge on
the night of September
17/18, 1944
Click the victory location you want to delete, and then click Delete.
The victory location disappears from both the map and the listing.
Editing Deployment Zones
Each map in A Bridge Too Far consists of Allied, German, and neutral
deployment zones. You can use Battlemaker to redistribute territory as you
choose. For example, if an area of the map is currently controlled by the
Allies, you can give control of that area to the Germans instead.
Battle maps on the Battlemaker Main screen are divided into tiles. Each
tile contains an indicator that shows which side can deploy in that tile:
Blue dot = Allied deployment zone.
Red dot = German deployment zone.
No dot = neutral zone.
To edit deployment zones
1
To set the map mode to the side to which you want to assign territory,
click either Allied Deployment, German Deployment, or Neutral
Deployment.
2
Click the tile on the map you want to reassign.
The tile’s indicator shows its new designation, according to the side
you chose in step 1. For example, if you assigned a former Allied tile
to the Germans, the dot in the center of the tile changes from blue to
red.
Note
If you want to reassign a large number of tiles, you can drag
over them instead of individually clicking each one.
3
If you want to assign territory to another side, repeat step 1 by selecting a new side, and then repeat step 2.
Setting Requisition Points
You can use Battlemaker to select the number of requisition points allotted
to each side at the beginning of the battle. These points affect how many
and what type of units make up reserve forces for each side.
To assign the number of requisition points
1
Click Edit Points.
2
In the boxes that appear, enter the number of points you want to assign
to each side.
The new point values appear in the lower portion of the screen.
Page 49

Chapter 6: Designing Your Own Scenarios 43
Setting Resources
Using Battlemaker, you can customize the type and number of units you
want on your or your opponent’s side.
When you choose to edit forces, the Battlemaker Forces screen appears,
as shown in the following figure. This screen is a modified version of the
Requisition screen used when you fight operations and campaigns. It lists
available troops, basic information about them, and what was preselected
for you based on history. You can add or remove these units from your or
your opponent’s troop list.
All unit types are available to you from the Battlemaker regardless of
which map you choose to play.
To select which units will fight in the battle
1
Click Edit Forces.
2
Choose the side whose forces you want to edit. To choose the Germans, click the tab showing the German flag. To choose the Allies,
click any of the other tabs.
3
On the Battlemaker Forces screen, click units to add them to or delete
them from troop lists.
(For more information on how to use this screen to requisition troops,
see “Choosing Reserves,” in Chapter 5, “Fighting Operations and
Campaigns.”)
“We fought to gain
inches, cleaning out one
room after the other. It
was absolute hell.”—SS
Squad Leader Alfred
Ringsdorf, remembering
the fighting at the
Arnhem bridge during the
night of September 17/18,
1944
Page 50

44 A Bridge Too Far
“Our orders were not to
fire. If we came to close
combat we were to use
knives and bayonets. But
that trench knife seemed
mighty short, so I used
my Tommy gun.”—Private
Ray Johnson, U.S. 82nd
Airborne Division, on his
unit’s advance toward the
Nijmegen bridge on September 17/18, 1944
Saving Your Custom Scenario
When you save your custom scenario, you assign it a name to appear in
the listing of previously defined custom scenarios on the Command
screen’s Battles tab.
To save a custom battle
1
On the Battlemaker Main screen, click Save Changes.
2
In the boxes provided, type a name and description for your battle
scenario.
Playing Your Custom Scenario
Your new map will be listed in the saved games box on the Command
screen. You play the customized battle just as you would any other battle.
To play your custom battle
Click the name of your new map, and then click Begin.
Giving the Battle to Another Player
Your custom battles are saved in the \games\battles folder on y our hard
drive. If you want to give your battle to another player or copy it to another
computer, just copy the battle from your computer and paste it into the
\games\battles folder on the other computer.
When the other player starts A Bridge Too Far, the custom battle will
appear in the saved games box on the other player’s Command screen.
The Dutch resistance was one of the best
organized and most effective in Germanoccupied Europe. The Allied refusal to use
this valuable resource contributed to the
failure of Operation Market-Garden.
Individual units did obtain valuable help
from the Dutch resistance. When elements of
the 82nd Airborne capture a telephone
office, they learn that the telephone
system is at their disposal. A Dutch
engineer devised a system that enabled
certain numbers to be used without German
knowledge. At one point, paratroopers are
able to telephone engineering units to
specify the bridging equipment needed at
the front. The phone system also provides
Operation Garden commanders their first
news from Arnhem—that the British 1st
Airborne is in trouble.
Page 51

Chapter 7: Tactics and Strategy 45
Chapter 7
Tactics and Strategy
Both tactics and strategy are important elements of A Bridge Too Far.
Tactics refers to how you use your units in combat. Good tactics help you
drive your opponent from the map and win battles.
Howev er, tactics alone won’t win an operation, a sector campaign, or
the Grand Campaign. Strategy—the way you manage your forces to
secure your side’s major objectives—comes into play when you take
on these series of battles. You striv e toward victory by making your
best decisions about when and where to allocate your finite set of
resources.
Using Units Effectively
You manage sever al different types of units in A Bridge Too Far.
Each has its own set of strengths and weaknesses. The following
sections describe the best ways to use each type of unit.
Using Infantry
Though seemingly humble when compared to big guns and heavy
armor, your infantry are the primary components of your force.
Because these are the teams that take and hold victory locations,
their actions determine whether you win or lose a battle.
Infantry teams are effective in assaults and hand-to-hand combat. Because
of their low cost and high numbers, infantry are the most expendable of
your teams. Howev er, don’t waste them in assaults on enemy tanks; they
are useless against armor .
When you deploy your infantry teams, spread them out. If your teams are
too close together, you may suffer heavy losses from mortars and artillery.
And, if one team panics, those in close proximity may panic too.
Use short moves to protect your teams. Orders to move long distances not
only increase fatigue; they also invite your opponent to assault the moving
team’s flank. If you have a long distance to travel, try dividing your course
into segments, and then issue the Move or Move Fast orders to travel
these short distances.
For tips on how to assault and defend against enemy infantry, see “Flanking,” “ Ambushing, ” and “Suppression,” later in this ch apter.
Using Tanks
Tanks are the lions of the battlefield, capable of killing anything they
encounter. However, their poor visibility makes them easy prey for
antitank (AT) weapons, particularly when an AT team is hidden in dense
The fighting around
Arnhem and Oosterbeek
ranges from woods and
fields to city streets.
By the time Operation
Market-Garden is over,
much of Arnhem and
Oosterbeek lays in ruins.
Page 52

46 A Bridge Too Far
terrain. Clear the battlefield with your infantry before moving your armor
into combat.
Tanks have both strong and vulnerable areas. Allied tanks have powerful
frontal and side armor, but weak rear armor and a weak gun. German tanks
have strong guns but penetrable side and rear armor. They are also slower to
maneuver. However, German tanks are generally superior to Allied tanks and
will beat them in a head-to-head fight. If you are fighting as the Allies, use
either flanking tactics or numerical superiority (pit two or three of your
tanks against one of theirs).
If you want a tank to retreat, use the Move command. The tank will drive in
reverse, keeping its strong front armor facing the enemy. Do not use the
Move Fast command, which will make the tank turn around and expose its
rear armor to enemy fire.
For more information on defending against tanks, see “Using Antitank
Weapons” and “Using Higher Elevations,” later in this chapter.
Using Armored Cars
Armored cars are light tanks on wheels. Although they lack the strong armor
to take on antitank weapons or enemy tanks, their speed and low cost make
them useful for scouting.
Because these vehicles have long-range firepower but are vulnerable at close
range, you need to keep them at a safe distance from enemy firepower.
Using Halftracks
Halftracks are lightly armored trucks armed with mortars, machine guns,
flamethrowers, and light infantry guns. They offer the same offensiv e
The handling—or mishandling—of intelligence
before and during Operation Market-Garden
is unfortunate in light of the operation’s
failure. The 21st Army Group’s final intelligence assessment—the assessment on which
the Operation Market and Operation Garden
planners depended—was for the most part
inaccurate. The Allies had accurate data in
hand but either dismissed, discarded, or
misinterpreted the information.
Perhaps the most crucial high-level information is Hitler’s order, intercepted by
British Intelligence, that the banks of the
Scheldt Estuary be held to the last man.
This order makes German intent clear to the
Allies. Given the importance of Antwerp as
a port for landing Allied materiél, and the
fact that Antwerp (as a port) is meaning-
less unless the banks of the Scheldt
Estuary are cleared, it seems obvious what
Montgomery’s primary objective should have
been.
The largest omission in Allied intelligence is not discovering the evacuation of
the German Fifteenth Army. Over 85,000
men, along with thousands of vehicles and
guns, are ferried from Breskins to the
South Beveland Peninsula without the
Allies discovering the evacuation.
The Dutch resistance provided timely and
accurate information on the disposition
and deployment of German troops in Holland. In early September, they report that
the Germans are retreating in disarray.
Within days they report that the Germans
are no longer retreating, that the Germans
Page 53

Chapter 7: Tactics and Strategy 47
firepower as infantry units carrying these we apons, along with greater
speed and mobility. But because of halftracks’ thin armor, they are no
match for enemy tanks or antitank weapons.
Like armored cars, halftracks have long-range firepower but are vulnerable
at close range. Even infantry can immobilize these vehicles if they come
too close.
Using Assault Guns
Assault guns are tanks without turrets. Because they are heavily armored,
you can use them like tanks, except they have limited fields of fire.
You need a strong antitank weapon to defeat an assault gun. However, they
are easily approached from the side or rear, and their lack of a turret makes
them easy for an antitank weapon to trap.
Using T ank Destroyers
Tank destroyers are excellent antitank weapons, but their thin armor is a
liability in a head-to-head battle with an enemy tank. Some tank destroyers
have turrets and some don’t; those without are easily trapped by antitank
weapons.
Sending Out Scouts
“Everywhere you looked,
men were firing from
scattered positions,
often mistakenly at their
own side ... the British
fired flares pinpointing
our positions and cut our
group to pieces. Fifteen
men in my platoon were
killed in less than five
minutes.”—Master Sergeant
Emil Peterson, Reich Work
Service, describing the
fighting near the Arnhem
bridge during the night
of September 17/18, 1944
To flush an enemy out of hiding in dense terrain, send a reconnaissance or
a low-quality, depleted team to scout the area.
Be careful not to involve reconnaissance teams in battle. Because they are
usually smaller teams with short-range weapons, they cannot hold a front
are reinforcing, and that Model’s headquarters has moved to Oosterbeek. The Allies
believe the Germans are in disarray, not
because of information provided by the
Dutch resistance, but from their own
observation and reconnaissance. Unfortunately, the Allies do not believe the
Germans are reforming and reinforcing in
Holland.
Another omission is the lack of photoreconnaissance of the whole route between
Eindhoven and Arnhem. Such reconnaissance
might have located many of the German
antitank positions that caused XXX Corps so
much grief; as such, it might have speeded
the drive to Arnhem.
The aerial reconnaissance of the Arnhem
area showed the railroad and road bridges
but somehow missed the ferry running between
Driel and Heavedorp. Securing this ferry
would have enabled the British to cross the
Rhine to the west of Arnhem and perhaps
attack the Arnhem road bridge from both
sides.
The most crucial operational level mistake is
the dismissal of the aerial reconnaissance
photographs showing German tanks near Arnhem.
Major Brian Urquhart, intelligence chief for
British I Airborne Corps, was considered an
excellent officer who provided uncommonly
accurate intelligence assessments. This makes
the dismissal of his objections by both
Lieutenant General Frederick Browning (I
Airborne Corps commander) and Major General
Roy Urquhart (1st Airborne Division commander) all the more puzzling.
Page 54

48 A Bridge Too Far
on their own. After you’ve exposed the enemy’s position, you can flank
them.
Don’t send scouts into open terrain. They are likely to get pinned in an
indefensible position.
Defending Against Enemy Scouts
If you detect enemy scouts moving through your territory, try one of the
following tactics:
• Ambush the scouts and then deploy your troops to new locations.
• Order your troops to hide, let the scouts pass by, and then attack the
infantry following the scouts.
Using Machine Gun Teams
The primary function of machine gun teams is to
support the infantry. Use them to suppress your
opponent before launching an assault. Cover any
areas the enemy might use to advance his troops.
Machine guns offer good penetration ratings (the
ability to shoot through cover), and their high rate
of fire makes them ideal for suppression. Use them
any time the enemy is in your line of sight.
However, be careful when your teams are close to
the target you are shooting; they may be injured or
killed by friendly fire.
Portable pontoon bridges
similar to the one pictured are used to cross
the Wilhelmina Canal near
the village of Son.
Don’t order a machine gun team to move as part of
an assault. Their fatigue levels will rise and their fire will be less accurate
than that of a well-rested, more mobile team.
Defending Against Machine Guns
If you are being attacked by a machine gun team, lay down a smoke
screen to obscure your advance and then engage the machine gun team in
hand-to-hand combat. It’s difficult to beat a machine gun team in a
firefight.
Using Mortar T eams
Mortar teams are most effective when enemy teams are in open terrain,
among trees, and in wooden buildings. These weapons have a high rate of
fire and are very useful when the enemy is not in your line of sight. You
can also use them to lay down smoke to protect your infantry’s advance.
As with machine gun teams, avoid moving mortar teams as part of an
assault. Their fatigue levels will go up and their effectiveness will lessen.
Some tips for using mortars are:
Page 55

Chapter 7: Tactics and Strategy 49
• Mortar teams run out of ammunition quickly; manage them wisely.
However, when a team has no ammo left, you can send them to the
front line to use their smoke grenades and carbines.
• Mortars are long-range weapons. Because of the trajectory of the
shell, mortars are useless at close range.
Defending Against Mortars
If you are attacked by a mortar team, try to determine the location of the
enemy mortar team and fire your own mortars at that area. Y ou can also
lead an assault against your opponent’s team.
Using Snipers
Snipers are deadly when the enemy has to cross a large open area. A sniper
in deep cover can usually fire several shots before the enemy sees him.
When he is found, pull him out of the line of fire and hide him in a new
place. Snipers avoid shooting if they risk giving their position away,
although they will shoot if being assaulted.
Snipers prefer to shoot at leaders. Howev er, don’t rely on snipers too
heavily; unlike your infantry teams, they cannot claim control of victory
locations.
If you are attacked by a sniper, try to locate the source of the fire, use
suppression fire to pin him, and then order your troops to charge or
surround him.
Using Antitank T eams
“British paratroopers
have landed here, west of
Arnhem. We have no idea
of their actual strength
or intentions. American
airborne forces have
secured [two] lodgments.
... Simultaneously,
Montgomery’s forces have
attacked north from the
Meuse-Escaut Canal. My
belief is that the object
is to split our forces.
In my opinion, the objectives are the bridges.
Once these are secured,
Montgomery can drive
directly up to the center
of Holland and from there
into the Ruhr.”—Lieutenant General Wilhelm
Bittrich, Commander, II
SS Panzer Corps, briefing
Major General Heinz
Harmel when the latter
returns from Berlin in
the early morning hours
of September 18, 1944
Your only defense against enemy tanks are antitank (AT) guns, your own
tanks, and AT teams. You can’t win a battle without these teams. Position
them wisely and defend them well. Keep your AT teams spread out; if you
deploy them too closely, one shell can wipe out all of them.
Ambushing a tank is the best approach in case you miss with your first
shot and your opponent has a chance to return fire. To ambush a tank,
allow it to pass by, and then fire at its weak points—usually the side or
rear. Antitank weapons are usually ineffective against the tank’s strongest
parts.
To minimize the likelihood of the enemy using AT weapons on your tanks,
use your infantry to disable your enemy’s AT teams and defenses before
sending your tanks into battle.
For more information on tanks, see “Using Tanks,” earlier in this chapter.
Using Heavy Guns
Although guns are primarily antitank weapons, they are also lethal against
infantry and long-range targets. Because they can’t be moved after they are
deployed, make sure you set up your guns in a protected location with a
good line of sight.
Page 56

50 A Bridge Too Far
To defend against a gun, don’t group up and don’t hide in buildings.
Spread out in a field, cautiously approach to within grenade range, and
then charge the gun.
Using Flamethrower Teams
Use flamethrowers when you absolutely need to destroy a particular target.
After moving your troops to a safe location, use flamethrowers to make an
area impassable due to heat and fire. You can also use flamethrowers to
attack a strong defensive location, tightly grouped infantry, and even tanks.
If you decide to use a flamethrower in an area where low supplies are a
concern, use your flamer early while you still have fuel.
Flamethrowers are the most deadly teams but also the most vulnerable.
They consist of only one or two soldiers carrying large quantities of
flammable liquid. When you are attacked by a flamethrower, your best
options are either to fire at the flamethrower or get out of the way. If you
do shoot at a flamethrower, keep your distance. If the flammable liquid is
hit, it may explode and severely injure or kill anyone nearby.
Battlefield Tactics
“We felt quite pleased
with ourselves. ...”
—Private James Sims,
British 1st Airborne
Division, of the feeling
among the Red Devils
holding the north end of
the Arnhem bridge on the
morning of September 18,
1944
“[Bullets] whizzed
through shattered windows, chopped up floorboards, and we dodged as
many flying splinters as
we did actual bullets.”
—Lance Corporal Arthur
Hendy, British 1st Airborne Division, recalling
the fighting at the
Arnhem bridge
Whether you are fighting an individual battle, a sector campaign, or the
Grand Campaign, your goal is to win on the battlefield. The following
sections provide information to help you take maps and defeat your
opponent.
Using Cover
Cover provides both concealment and protection, which are related but not
identical concepts. Concealment hides you from the enemy; protection
keeps you from getting injured or killed. Some terrain, such as high grass,
can hide you effectively but still leave you vulnerable to enemy fire.
In general, the more powerful the weapon, the greater the degree of
protection you’ll need. For example, a wooden building can shield you
from rifle fire, but a .50cal. MG bullet can penetrate w ooden walls.
However, a stone building can withstand all weapons except the largest
guns (75mm or greater).
You can use four types of cover in A Bridge Too Far, each providing
varying degrees of concealment and protection.
Linear cover: walls, trenches, gullies
enemy fire coming perpendicular to the line of cover, but poor concealment and protection from parallel fire.
Light cover: high grass, b ushes
protection from enemy fire.
Medium cover: trees, crests, embankments
gives almost no cover from the side or the rear.
Provides good protection against
Provides good concealment, but very poor
Protects from the front, but
Page 57

Chapter 7: Tactics and Strategy 51
Heavy cover: buildings, f o xholes
Offers excellent protection and conceal-
ment from multiple angles.
Some tips for using cover are:
• Make use of cover whenever you can. Avoid getting pinned in cover
that provides poor concealment and protection.
• If you are attacked by an enemy who is using good cover, move your
troops to equal or better terrain, or flank the enemy.
Using Higher Elevations
Higher ground—multistory buildings and hills—has several advantages:
• A better overall view of the battlefield.
• A better line of sight.
• More protection from enemy fire.
It also has some disadvantages. You are an easy
target for long-range weapons, and you are more
visible to the enemy. Remember, if you can see
them, they can see you.
When you are attacked from higher ground, move
your troops to a higher elevation to minimize the
enemy’s line-of-sight advantage.
Tanks are vulnerable from above. Try to shoot at a
tank from a position as much directly above it as
possible (a three-story building is ideal).
“... aim right under the
gables and shoot meter by
meter, floor by floor,
until each house collapses.”—Major General
Heinz Harmel, Commander,
German 10th SS Panzer
Division, giving orders
to his tank and gun crews
on September 19, 1944
Ambushing
Setting an ambush is a much more effective way of
killing the enemy than just engaging them in a
regular firefight. Use ambushing when your opponent doesn’t know your
location. Deploy your troops in good cover and order them to hide. When
the enemy is exposed and within close range, fire on them. (If the enemy
comes within 30 meters, your troops will fire on their own.)
If you are caught in an ambush and can’t find cover, rush the enemy.
Although you have been caught by surprise, your opponent has moved
very close to you and is easy to hit.
Using Suppression
You don’t need to hit enemy soldiers to drive them from a position.
Suppression—firing at the enemy to keep them from firing back—can
reduce morale and effectiveness enough to make them panic and run. Also,
because the return fire from a suppressed enemy is minimal, you can send
in a team to assault them.
Elements of British XXX
Corps move through the
rubble-strewn streets of
Nijmegen.
Page 58

52 A Bridge Too Far
“The Germans had decided
to shell us out of existence. [It was like] lying
in a freshly dug grave
just waiting to be buried
alive.”—Private James
Sims. British 1st Airborne Division, on the
German fire at the Arnhem
bridge on September 19,
1944
Although you can use any weapon for suppression, machine guns and
mortars are especially suited to this task.
Suppression fire is a good choice when your opponent has good cover,
which reduces your chances of killing him. (Limit use of suppression
when supplies are low; it consumes a lot of ammunition.)
Well-planned deployment is the best defense against suppression. Although you’ll generally want to spread your teams out, place them close
enough to each other to offer countersuppression or protective fire if the
enemy attempts an assault on the suppressed team. If your team is in a
vulnerable situation, move them out of the line of fire before the unit
sustains heavy casualties.
Some tips for using suppression are:
• When your machine gun teams are firing at fixed targets, switch targets
at regular intervals to maximize the effect of suppression fire.
• The more intense the suppression fire, the closer safe terrain must be
for a team to move to that terrain.
Flanking
Flank the enemy—attack from the side or the rear—when you outnumber
him on a wide front. Divide his attention by providing suppression fire
while moving your flanking teams into position, and then attack.
Before flanking, study the battlefield. Flanking is less effective when your
enemy is well protected from all sides, such as in a building. Furthermore,
if the enemy outnumbers you, he can flank your flanking teams.
Using Smoke
Use smoke to provide cover for an assault or retreat, especially on open
terrain.
Some tips for using smoke are:
• When you provide covering smoke, issue your troops the Move Fast
command.
• Fire into any smoke that the enemy creates.
• Mortar weapons do not require a line of sight. Use them on troops
covered by smoke.
Using Tanks as Screens
Move a tank between you and the enemy when advancing on open terrain
and when the enemy is centralized. Avoid using a tank as a screen in
congested terrain or narrow city streets; this invites flanking.
If you are attacked by an enemy using a tank as a screen, you can either
defend yourself by killing or immobilizing the tank with antitank weapons, or you can flank the attacking infantry.
Page 59

Attacking Crews in Vehicles
Chapter 7: Tactics and Strategy 53
A crew in a vehicle that is buttoned up—that is, the entire crew is inside
the vehicle—cannot easily spot enemy teams. If a vehicle is fired upon, its
crew will button up, which makes them vulnerable to sneak attacks.
Crews that need to be exposed to fire the vehicle’s main weapon are easy
targets for small-arms fire.
Rallying Separated Soldiers
To get a soldier who has become separated from his group to rejoin a
team, move your leader closer to him. The better the leader, the better the
chance that the soldier will join the team.
A soldier may rejoin his original group without encouragement given
enough time.
Promoting Morale and Cohesion
Good morale and cohesion are essential for good performance. Troops
with bad morale may not listen to their leader and might eventually run
from the battle. You can do the following to improve your troops’ morale:
• Keep them busy. Inactive troops (those who haven’t received an order
for more than 30 minutes) may become restless and act on their own.
• Allocate sufficient teams to a maneuver.
• Avoid isolating teams unless it’s strategically advantageous.
• Minimize the likelihood of death or injury.
• Don’t order a team to move or fire if their condition is not conducive to
the order. For example, if you order a fatigued team to move fast for a
long distance, you will sacrifice their effectiv eness.
• Keep your troops away from areas with a lot of friendly dead or
wounded soldiers.
Campaign Strategy
“I knew we had reached
them because the Americans, taking no chances,
halted us with warning
fire.”—Corporal William
Chennell, Irish Guards
Armored Group, on linking
up with the U.S. 82nd
Airborne Division near
Grave on September 19,
1944
“It was the best, most
effective fire I have
ever seen. Starting from
the rooftops, buildings
collapsed like doll
houses. I did not see how
anyone could live through
this inferno. I felt
truly sorry for the
British.”—Private Horst
Weber, SS Grenadiers,
remembering the German
tank and artillery fire
at the Arnhem bridge on
September 19, 1944
Campaigns add a new strategic layer to the challenge of winning maps.
You need to determine the best actions at different points in the game. For
example, you need to determine when it’s best to retreat and save your
teams, and when you should sacrifice troops and press on. You also need
to know when to use and when to save your supplies, especially if you are
playing as the Allies.
The following sections describe the different operations in the game and
provide basic guidelines for how to approach these operations, for both
Allied and German players.
Arnhem Bridge
If you are playing as the Allies, you’ll have a fairly easy battle until
September 18. You should be able to pr ess on all the way to the Arnhem
Page 60

54 A Bridge Too Far
After being held off by
the Germans, then held
back by their commanders,
Allied tanks finally roll
across the Nijmegen
bridge toward Arnhem.
“I was surprised to
discover upon my arrival
that we did not have the
Nijmegen bridge. I assumed it would be in
airborne hands by the
time we reached it and
we’d simply sweep on
through.”—Major General
Allan Adair, Commander,
Guards Armored Division,
recalling the situation
when he arrived at Grave
on September 19, 1944
Bridge map. But if you take too much time, the
Germans will accumulate reinforcements and make
this map more difficult. Whether you delay or not,
though, you’ll meet heavy German resistance at the
Arnhem rail bridge.
If you’re playing as the Germans, push hard to
make sure the Arnhem rail bridge blows, even if it
means sacrificing your troops. You’ll get more
troops each day starting on the 18th, with a major
reinforcement on the 20th. Fight hard to clear the
British off the Arnhem Bridge map.
Oosterbeek
If you are playing as the Allies, delay as much as you can. Because you
won’t be able to hold the landing zone for very long, don’t expend too
much effort trying to keep it. The terrain is very poor, defensively. Slowly
fall back. Hopefully, by the time you reach the Oosterbeek Cauldron map,
the Poles will have linked up with you and provided fresh resources.
Expect a big assault once Arnhem falls. The Germans will get more troops
to try to push you back to the river.
As the Germans, you’ll have a difficult time mounting an offensive for the
first few days. Don’t sacrifice too many troops until September 19, when
you’ll have a large enough force to defeat the British. After the 19th, this
should be a battle of attrition as long as you were able to blow the Arnhem
rail bridge and stall the Polish drop at Driel. If you failed at either of these
objectives, the British will receive more replacements, especially if the
Arnhem rail bridge is up and XXX Corps arrives.
Arnhem Relief Attempt
If you’re playing as the Allies, don’t expect a great deal of success, no
matter what you do. Because the Germans are getting plenty of reinforcements and the British are getting nearly none, you’ll quickly get pinned
down and be forced to retreat. The best you can do is take and hold the
West Approach map. This will give the Arnhem Bridge troops muchneeded supplies and reinforcements, and the Germans will have a tough
time forcing them out.
If you are playing as the Germans, don’t let the Allies make it to the last
map. If they do, the battle in Arnhem itself will be much more difficult.
However, it should be fairly easy to hold off the Allies. T r y to lure them
into overextending their attack as much as possible so they’ll have fewer
troops to add back into the Oosterbeek operation.
Polish Dr op
As the Allies, the landing should be easy, as should taking the town of
Driel. The Polish will run into very heavy resistance in the farmlands and
Page 61

Chapter 7: Tactics and Strategy 55
could potentially lose Driel. Take care not to lose everything while taking
the farmlands. Wait for XXX Corps to help force the Germans out and
link up with the Oosterbeek operation.
As the Germans, hold at all costs. After XXX Corps arrives, you won’t
have much chance to hold your position. Inflict as many casualties as you
can as you fight to the last man.
Groesbeek Heights
If you are playing as the Allies, you’ll have the upper hand early and
should try to hold the Groesbeek landing zone for as long as possible to
ensure resupply. The Germans will continue to get stronger and may force
the Americans off the landing zone map into Groesbeek Town. If you lose
this operation before the Nijmegen bridge has been taken, the Germans
will gain many more reinforcements at the bridge site.
As the Germans, if you can command the Heights, you can block the road
XXX Corps uses. If you can get to the Heights before XXX Corps reaches
Nijmegen, they will hav e to fight you for the high ground, further delaying
their progress.
Nijmegen Bridge
If you are fighting as the Allies, you’ll have a very difficult time taking the
bridge. And if the northern end is held by the Germans,
you won’t be able to take it at all. Once XXX Corps
arrives, it will be a war of attrition where the Germans
can continue to hold up XXX Corps as long as they hold
the north end of the bridge.
As the Germans, you should be able to defeat the AB
troops if they try to press the attack prior to the arrival of
XXX Corps. After the Corps arrives, force the Allied
player to root out every one of your units at a high cost in
troops. If the Allies lose this map, even winning the next
one won’t help their overall objectives.
Nijmegen Crossing
As the Allies, you can fight this operation only if XXX
Corps reaches Nijmegen Bridge. If this operation succeeds, the Germans at the Nijmegen bridge will be cut
out of supply and eventually wither away from the
relentless Allied attacks. It should be easy but bloody.
Don’t lose too many troops before the bridge is taken.
If you are playing as the Germans, you have a lot of
territory to work with. Use it. Inflict as many losses as
you can on the first two maps, and then pull back. Facing
an intact German force on the last map may be more than
the Allies can handle.
Many in the First Allied Airborne
Army are afraid the war will end
before they get a chance to fight.
There is pressure from Washington,
D.C. for American airborne forces to
be used; there is also pressure from
the airborne commanders themselves.
Everyone, it seems, wants their unit
to be the one to reach Berlin and get
credit for crushing the Germans.
The pressure under which the airborne
army has operated also contributes to
the gung-ho attitude permeating
airborne headquarters. Since Operation Overlord in June, 17 airborne
operations have been planned only to
be canceled at the last minute—nearly
one per week. The paratroopers are
beginning to suffer morale problems
from the continual pressure of preparing for operations that never take
place.
“There’s only one way to
take this bridge. We’ve
got to get it simultaneously—from both ends.”
—Brigadier General James
M. Gavin, Commander, U.S.
82nd Airborne Division,
discussing the Nijmegen
bridge with other officers on September 19, 1944
Page 62

56 A Bridge Too Far
The Island
If you are playing as the Allies, you don’t have the Airborne to clear the
way for XXX Corps. Instead, the Corps needs to proceed on their own
along a raised, exposed roadway with polder—tracts of low wetlands—on
either side.
If you are playing as the Germans, your forces are relatively small, but
then you have only one point of assault. This is your last chance to stop
XXX Corps from reaching Arnhem or Oosterbeek prior to the German
counterattacks finishing them off.
Veghel
“I began to believe that
we might be dropping into
Holland to reinforce a
defeat.”—Major General
Stanislaw Sosabowski,
Commander, Polish 1st
Parachute Brigade, recalling his thoughts
prior to flying to Holland
“All we could do was gaze
in stupefication at our
friends going to inevitable death.”—Reverend G.
A. Pare, Chaplain, Glider
Pilot Regiment, British
1st Airborne Division,
describing the division
watching the third lift
at Arnhem on September
19, 1944
This operation should be easy for the Allies until German armor appears in
a counterattack on September 22. A second counterattack occurs on the
23rd, but you should be able to hold them off.
As the Germans, you don’t have much chance to keep the bridge or town
from being taken but you do want to inflict as many casualties as possible.
You’ll launch your counterattack against the troops that remain. Because
you need to launch the counterattack before Allied reserves arrive, make
the best use of your time to gain ground.
Son
As the Allies, you’ll have a very hard time taking the Son bridge before it
blows. After XXX Corps arrives, they can mop up any remaining resistance. On September 20, a very large German counterattack will threaten
the Son bridge. That afternoon, the British armor reinforcements will
arrive to repulse the attack and secure the Son bridge.
As the Germans, you should be able to blow the bridge by saving your
units from Son Town and using them to beef up the defense of the bridge.
If your forces are relatively numerous and healthy, try to hold the Allies off
at Son Town. After XXX Corps comes to repair the bridge, wait for your
strong counterattack force to arrive, and try to retake the bridge so it can
be blown again. If your forces are not strong enough for that, try to prevent
XXX Corps from receiving supplies by holding at least part of the Son
Bridge map.
Schijndel
The Schijndel operation is fairly evenly balanced. The Allies have the
advantage until the Germans receive new supplies on September 18. The
Allies win the advantage back when XXX Corps arriv es on the 19th. The
Germans regain their edge on the 23rd, but the Allies are again the tougher
force on the 24th.
Page 63

Chapter 8: Playing Two-Player Games 57
Chapter 8
Playing Two-Player Games
In one-player mode, your opponent is a computer’s artificial intelligence
program. Two-player mode pits you against a foe that may be even more
challenging than the computer: another human being.
You can find opponents, chat with other A Bridge
Too Far players, and take advantage of easy-to-use
Internet matchmaking on the Microsoft Internet
Gaming Zone. For more information, go to the
following Web site: http://www.zone.com.
To set up a two-player game without using the
Internet Gaming Zone, you and your opponent
need to decide who will host and who will join. In
most cases, the joiner will need the host’s IP
address. You can exchange your TCP/IP addresses
with your opponent through e-mail or a second
phone line.
Types of Connections
You can use any of four types of connections to play A Bridge Too Far.
Both the host and the joiner must use the same type of connection.
Certain types of connections have special requirements for protocols and
modems.
Close Combat TCP
To use this type of connection for a two-player game
on a Macintosh (Macintosh-to-Macintosh or Macintosh to a computer
running Windows-based software), the TCP/IP protocol must be installed
on both computers.
DirectPlay TCP
To use this type of connection for a two-player game in
which both computers are running Windows-based software, the TCP/IP
protocol must be installed on both computers.
DirectPlay Modem
To use this type of connection for a two-player game
over a direct modem connection in which both computers are running
Windows-based software, both players must have 28.8-speed modems.
DirectPlay Serial
To use this type of connection for a two-player game in
which both computers are running Windows-based software, they must
be connected by serial ports using a NULL modem cable.
Many German units that
fight during Operation
Market-Garden comprise
whatever military personnel are available.
“It was thought that a
display of tanks would
probably cause the enemy
to withdraw.”—Official
report, British Grenadier
Guards, explaining the
assault on the Nijmegen
bridge on September 19,
1944
Page 64

58 A Bridge Too Far
Starting a Two-Player Game
“I was thinking clearly,
but we had had nothing to
eat and no sleep. We were
limited to one cup of
water daily, and everyone
was wounded.”—Captain
Eric Mackay, Royal Engineers, assessing the
bridge defender’s situation at the end of the
day on September 19, 1944
“As we left the outskirts
of Arnhem, I knew somehow
we wouldn’t be going
back.”—Private Walter
Boldock, 3rd Battalion,
1st Parachute Brigade,
British 1st Airborne
Division, after his
unit’s advance toward the
Arnhem bridge was stopped
by heavy German fire on
September 19, 1944
The procedure for starting a two-player game differs depending on
whether you’re the host or a joiner.
T o host a two-player game
1
If you are playing over the Internet, connect to your Internet service
provider.
2
On the Command screen, click Players to switch to Two Players, and
then click Connect.
The Two Player Options dialog box appears.
3
In the Your ‘Net’ Name box, type a name you want to use throughout
the game.
This name appears in messages that either you or the game itself sends
to your opponent.
4
Click Host Game, and then click a connection type, as explained in
the previous section.
5
If you chose either a DirectPlay Modem connection or a DirectPlay
Serial connection, fill in the dialog box that appears.
6
Click OK.
7
As you would for a one-player game, choose a battle, operation, or
campaign; choose a side; choose a difficulty level; and then click
Begin!
The host’s Begin! button is available only after the client accepts the
settings.
To join a two-player game
1
If you are playing over the Internet, connect to your Internet service
provider.
2
On the Command screen, click Players to switch to Two Players, and
then click Connect.
The Two Player Options dialog box appears.
3
In the Your ‘Net’ Name box, type a name you want to use throughout
the game.
This name appears in messages that either you or the game itself sends
to your opponent.
4
Click a connection type, as explained in the previous section, and then
click Join Game.
5
If you chose a DirectPlay Serial connection, fill out the dialog box
that appears.
If you chose a TCP/IP connection, in the Host IP Address box, enter
the host’s IP address.
6
Click OK, and then click Begin! to accept the host’s settings.
Page 65

Chapter 8: Playing Two-Player Games 59
Using the Net Status Bar
After you have connected with your opponent, the net status bar, shown
in the following figure, appears. This box shows information on your
connection, provides a way to communicate with your opponent (as
explained in the next section), and allows you to disconnect from the
game.
The net status bar always appears while you are connected, no matter
what part of the game you are viewing. In the combat screen, the net
status bar appears in the left portion of the toolbar. In all other screens in
the game, the box appears in the lower-left portion of the screen.
To disconnect from a two-player game
On any screen in the game, in the net status bar, click Disconnect.
Communicating with Your Opponent
You can send messages to or receive messages from your opponent at any
time during the game. The first line of a new message sent across the
network appears in the net status bar. You can then bring up a chat window
to view the rest of the message and, if you want, to reply to that message.
“Your boys are hurting up
there at Arnhem. You’d
better go. It’s only 11
miles.”—Colonel Reuben
Tucker, Commander, 504th
Regiment, U.S. 82nd
Airborne Division, speaking to British officers
near Nijmegen on September 20, 1944
The game itself also sends you messages to keep you informed of your
opponent’s actions. F or example, if your opponent proceeds to a new map,
you receive a message from the game telling you about this change.
T o see an entire message
In the net status bar, click Chat Window.
A chat window appears on the screen, displaying the message.
T o send a message
1
If the chat window is not already on your screen, in the net status bar ,
click Chat Window .
A chat window appears on the screen.
2
Type your message, and then click Send.
To close the chat window, press
ESC.
“Jim, never try to fight
an entire corps off one
road.”—Lieutenant General
Brian Horrocks, Commander, British XXX
Corps, to Brigadier
General James Gavin,
Commander, U.S. 82nd
Airborne Division, on
September 20, 1944
Page 66

60 A Bridge Too Far
The nearly vertical angle
of the mortar tube in
this picture indicates
how close the target is
to these Red Devils.
Chapter 9
History
Situation Report
September 1, 1944
On all major fronts—Russia, Italy , Southern France, and Northwest
Europe—the German Army is being pushed back. Mostly, German units
continue to fight well and, while they are often now
in retreat, there are no routs. The once mighty
Wehrmacht is simply running out of men, materiél,
and machines. The industrial centers of Germany
are being hit every day by armadas of Allied
bombers. Their resupply routes and equipment, both
road and rail, are under almost constant attack by
Allied aircraft. Most senior German officers know
the war’ s end is near, but Adolf Hitler and his inner
circle are determined to fight on.
The Allies ha ve hit full stride in the production of
the machines of war . Ships, airplanes, tanks, guns,
and the materiél to support them are being produced
and shipped in astounding numbers. The North
Atlantic, once under the control of packs of German
submarines, is now for all intents an “American and British pond.” There
is a cornucopia of the implements of war being produced and shipped to
Europe. However, getting this wealth of materiél to the front lines is
another matter.
Plans, Politics, and Logistics
August 23, 1944
U.S. General Dwight Eisenhower, charged with commanding a coalition
army, favors a broad-front strategy: He plans to maintain constant and
equal pressure along a thousand-mile front. British Field Marshal Bernard
Montgomery , overall commander of all ground forces, favors a singlethrust strategy: He wants a 20- to 40-division force to smash through the
shell of the German defenses and drive across the North German Plain, the
industrial heart of Germany, to end the war before Christmas.
The Supreme Commander is willing to give Montgomery’s 21st Army
Group the majority of the Allies’ supplies under one condition: Montgomery must capture a port city. The growing supply problem makes the port
city of Antwerp a great prize. It is one of the world’s finest deepwater
ports; it has hundreds of acres of cranes, wharves, warehouses, dry-docks,
Page 67

Chapter 9: History 61
“... I knew I had no more
chance of reaching them
[the men at the Arnhem
bridge] than I had of
getting to Berlin.”—Major
General Robert Urquhart,
Commander, British 1st
Airborne Division, on his
decision to contract his
perimeter on September
20, 1944
Operation Market’s successful delivery of the
men, machines, and materiél of the first lift
to the drop and landing zones is a huge
logistical success. Over 4,700 aircraft—
transports, bombers, fighters, fighterbombers, and gliders—are used on the first
day.
Over 1,400 bombers pound targets along the
Eindhoven–Arnhem corridor during the early
morning hours. At 0945 hours, the transports
and tow planes pulling their gliders
begin taking off from 24 airfields in
England. Nearly 1,500 fighters and
fighter-bombers provide protection all
along the route.
By 1200 hours, the entire first lift is
in the air. At least 20,000 men, over
500 vehicles, over 300 field and antitank guns, and nearly 600 tons of supplies are winging toward Holland.
Page 68

62 A Bridge Too Far
“I was given the bare
bones of a scheme, with
only a few hours to
develop a plan.”—Major
General Stanislaw
Sosabowski, Commander,
Polish 1st Parachute
Brigade, on the challenge
he faced when notified
the brigade’s drop and
landing zones had changed
on the morning of September 20, 1944
“Who’s failing in their
job? Not us!”—Lance
Corporal Gordon Spicer,
British 1st Airborne
Division, summarizing the
feelings of the Arnhem
bridge defenders when
surrender seemed inevitable on September 20,
1944
sluice gates, and locks. Capturing the city and port facilities, and clearing
the Scheldt Estuary , will solve the Allied supply problems in one strok e.
September 4, 1944
Belgium
Elements of British XXX Corps race into Antwerp. Still, the port can’t be
used until the banks of the Scheldt Estuary (54 miles long and 3 miles
wide at its mouth) are cleared of German forces.
Montgomery has assured Eisenhower that the 21st Army Group can clear
the Scheldt Estuary and make the drive around the West Wall. However, in
one of the greatest missed opportunities of the war, the British pause in
Antwerp and do not clear the Scheldt Estuary. This not only makes
Antwerp useless as a port but allows the German Fifteenth Army to escape
and join the defense of the German Homeland.
East Prussia
Field Marshal Gerd von Rundstedt, after four days of waiting, is summoned for an audience with Adolph Hitler and reinstated as Commander
in Chief West. Rundstedt has no illusions; he knows the situation is
hopeless. Rundstedt believes the war will be o v er in a matter of weeks, but
his Prussian military background has taught him to carry out his orders, so
he starts the journey to his new headquarters at K oblenz.
General Kurt Student, founder of Germany’s airborne forces, receives a
phone call at 1400 hours from Hitler’s operations chief, Gen. Alfred Jodl.
Student is commander of the newly formed First Parachute Army, Jodl
tells him. As commander, he is responsible for mobilizing his army; they
are to be deployed along the Albert Canal.
Holland
In the north, Lt. Gen. Wilhelm Bittrich (based on Field Marshal Walter
Model’s orders) has diseng aged his II SS Panzer Corps from the front line
and moved its two divisions, the 9th and 10th SS P anzer Divisions, to the
fields and forests around Arnhem to rest and refit.
September 10, 1944
Belgium
Eisenhower flies to Montgomery’s headquarters near Brussels. The field
marshal proposes Operation Market-Garden; he wants to use the First
Allied Airborne Army to seize a series of bridges along a roughly 60-mile
corridor from Eindhoven to Arnhem in Holland (Operation Market). The
bridge at Arnhem, over the Lower Rhine, is the real prize: the gateway to
Germany.
Once the airborne units begin landing, British XXX Corps will driv e
through the corridor and across the captured bridges (Operation Garden).
Page 69

Possession of the Arnhem bridge will give Montgomery—and the
Allies—the crossing needed to flank the West Wall and roll up the
German flank and open the way to Berlin.
Eisenhower is impressed with the bold and imaginative plan, agreeing to
it with some conditions: The airborne operations can go ahead, but the
drive into the Ruhr River valley must be a part of the broad-front
advance. Moreover, the entire operation must be conducted as soon as
possible. Finally, clearing the banks of the Scheldt Estuary must remain a
primary objective.
England
Lieutenant General Lewis H. Brereton, commander of the Allied First
Airborne Army, holds the first planning meeting for Operation Market.
More than 25 officers cro wd into Brereton’s office to hear General
Browning’s briefing on Montgomery’s plan. After Browning briefs the
group, Brereton tells the officers that major decisions must be made
immediately—the planners have only seven days.
The logistics of Operation Market are both immense and intricate: The
plan calls for three and one-half airborne divisions to be dropped at
strategic points along a 60-mile corridor in Holland. These divisions are to
secure major river and canal crossings, ov er which the XXX Corps tanks
are to sprint in the race to flank the West Wall. Montgomery assures
anyone who will listen that the operation can be
completed in two days.
Chapter 9: History 63
“Arnhem entirely in enemy
hands. Request all possible steps [to] expedite
relief. Fighting intense
and opposition extremely
strong. Position not too
good.”—Major General
Robert Urquhart, Commander, British 1st
Airborne Division, in a
message to Lieutenant
General Frederick Browning, Commander, British I
Airborne Corps, on September 20, 1944
During Operation Overlord (Allied invasion in
Normandy), the airborne forces landed at night;
the cover of darkness afforded the Allies the
advantage of surprise but also hindered assembly
of paratroopers on the ground. Brereton decides on
a daylight drop: The benefits of accuracy in the
drop and landing zones, along with the resultant
quick assembly of troops, outweighs the lack of
surprise a daylight drop involves.
The corridor is divided into three sectors. The U.S.
101st Airborne Division (Screaming Eagles),
commanded by Maj. Gen. Maxwell D. Taylor, is
assigned the southern sector—a 15-mile corridor between Veghel (north)
and Eindhoven (south).
The division’s objectives are a major canal bridge over the Willems
Canal, another major bridge crossing the Wilhelmina Canal, and nine
other bridges along the corridor at St. Oedenrode, Best, and Eindhoven.
The 101st Airborne’s major landing area is centered in the sector—just
over 1 mile from Son. Taylor does not want a repeat of Operation Overlord, where his division was spread over miles of Normandy’s swamps
Even though the Germans
have few reinforcements
and even fewer ways to
move them to the front,
they are able to bring
more troops into the
fighting around Arnhem
than the Allies.
Page 70

64 A Bridge Too Far
Major Sepp Kraft, commander of the
SS Panzer Grenadier Training and
Reserve Battalion, is livid when
told he must move his headquarters. For five days, Oosterbeek’s
Tafelberg Hotel has served as
Kraft’s headquarters; his three
companies billeted in Oosterbeek
must also move. At first he refuses; why should an SS major move
his headquarters?
The officer arguing with him
smiles and tells Kraft there is no
choice: Field Marshal Walter Model
is moving German Army Group B
headquarters into the hotel. An
unbowed Kraft moves his headquarters to Wolfheze, a small village
northwest of Oosterbeek; his
companies bivouac in the surrounding country. Unwittingly, Kraft
has placed his unit on the eastern
edge of the British 1st Airborne’s
landing and drop zones—and directly in the Red Devils’ path to
the Arnhem bridge.
and farms. Two regiments are to land at this site, while the
third regiment will land at two smaller landing areas north
and west of Veghel.
The U.S. 82nd Airborne Division (All-American), commanded by Brig. Gen. James M. “Jumping Jim” Gavin, is
assigned the middle sector. This 10-mile-long and 12-milewide area encompasses the division’s objectives. One
objective is to capture two bridges at Grave: One is the giant
road bridge over the Mass River; the other is one of four road
or railway bridges over the Maas−Waal Canal. Another
objective is the road bridge in the center of Nijmegen. The
82nd’s final objective is the Groesbeek Heights, high ground
just east of Groesbeek that dominates the surrounding
countryside; securing the heights secures control of the roads
conver ging on Nijmeg en.
Gavin selects landing zones as near to the objectives as
possible. He selects three landing zones near the Groesbeek
Heights. The 508th and 505th Regiments will land in these
zones; the 508th is to secure the bridge at Nijmegen, while
the 505th is assigned to securing the heights. Gavin’s other
regiment, the 504th, has two landing zones: one east of
Grave and one just west. One company will land near the
west end of the Grave bridge and try to secure the bridge in a
coup de main.
“I have never seen a more
gallant action.”—Lieutenant General Frederick
Browning, Commander,
British I Allied Airborne
Corps, after observing
the first wave of U.S.
82nd Airborne paratroopers crossing the Waal
River in assault boats on
September 20, 1944
The British 1st Airborne Division (Red Devils), commanded
by Maj. Gen. Robert E. “Roy” Urquhart, is assigned the northern sector—
the Arnhem road and railroad bridges. The Arnhem road bridge is the key
to the whole operation. If it is secured, the Allies can roll across into
Germany and then on to Berlin. While Urquhart has commanded (with
distinction) under fire in Africa, the Middle East, and Italy, Operation
Market will be his initiation as commander of an airborne force in combat.
The 1st Airborne has a simple objective: secure the great road bridge over
the Lower Rhine at Arnhem until XXX Corp’s Operation Garden tanks
roar across into Germany.
In selecting drop and landing zones, Urquhart lacks hard lessons learned
by Taylor and Gavin in Normandy and selects landing zones 6 to 8 miles
from Arnhem. With landing zones so far from the objective, and because
the Red Devils must hold on the longest, the 1st Airborne must commit a
larger proportion of its force to defending their landing zones than the
101st or 82nd.
Assigned to assist the Red Devils is the Polish 1st Parachute Brigade,
commanded by Maj. Gen. Stanislaw Sosabowski. This unit will be
dropped south of the 1st Airborne on D Plus 2.
Page 71

One factor bothers all three division commanders. Only a portion of
Operation Market’ s men, materiél, and machines can be landed on D-Day.
None of the commanders relish going into combat with less than a full
complement of men and equipment.
Howev er, overriding all the planning for both Operation Market and
Operation Garden is the same refrain from intelligence sources: The
Germans are beaten and disorganized. When a young British intelligence
officer produces air reconnaissance photographs showing the II SS Panzer
Corps tanks around Arnhem, the tanks are dismissed as “inoperable.” The
intelligence officer is then ordered to take a medical leave.
September 16, 1944
Belgium
At 1100 hours, Lt. Gen. Brian Horrocks, the popular commander of
British XXX Corps, meets with the officers of his command to brief them
on Operation Garden. He tells the audience that while Operation Market
will open the corridor to Arnhem, XXX Corps will mak e Operation
Garden a success by blasting through the German lines and driving
through the corridor. There is to be no pause in the advance—“Keep going
like hell,” Horrocks tells his officers.
Holland
Throughout the Allied planning period, German strength in Holland
increases. The Fifteenth Army’s men, along with elements of the di visions
retreating ahead of the Allied advance, have been fed into the defenses in
Holland. Field Marshal Walter Model, demoted to commander of Army
Group B when Rundstedt is reinstated as commander in the west, has
moved his headquarters to Oosterbeek, just west of Arnhem. This move
displaces Maj. Sepp Kraft’s SS P anzer Grenadier Training and Reserve
Battalion; Kraft now bivouacs his units in the w oods near Wolfheze. These
units are camping in the woods adjacent to the fields the 1st Airborne
Division plan to use as drop and landing zones.
Operation Market-Garden
Sunday, September 17, 1944
0800 Hours
Bombers from the U.S. 8th Air Force hit antiaircraft batteries and other
targets along the intended air routes.
0945 Hours
The first of over 2,000 transports, tow planes, and gliders begin thundering into the clear blue sky over England. C-47s carrying paratroopers take
off and form into 45-plane serials (formations); Halifax, Sterling, and
Albermarle bombers pull nearly 500 gliders laden with paratroopers,
equipment, and supplies up into the air.
Chapter 9: History 65
“... I had no intention
of doing anything until I
was absolutely sure that
it was lost.”—Major
General Heinz Harmel,
Commander, 10th SS Panzer
Division, remembering his
thoughts on destroying
the Nijmegen bridge while
watching the U.S. 82nd
Airborne’s assault on
September 20, 1944
“Everything seemed to
pass through my mind all
at once. ... What is the
most urgent, most important action to take? It
all came down to the
bridges ... if Bittrich
had been in my shoes, he
would have blown the main
bridge.”—Major General
Heinz Harmel, Commander,
10th SS Panzer Division,
recalling what he thought
as he watched British
tanks crossing the
Nijmegen bridge on September 20, 1944
Page 72

66 A Bridge Too Far
1230 Hours
The pathfinders—paratroopers assigned the task of marking the drop and
landing zones—begin floating down onto the drop and landing zones.
1253 Hours
“The hardest thing to
bear was the feeling that
we had just been written
off.”—Private James Sims,
British 1st Airborne
Division, remembering the
feeling shared by the
surrendering British
paratroopers at the
Arnhem bridge on September 20, 1944
The transports carrying the 101st Airborne run into intense flak. But the
IX Troop Carrier Command pilots hold their planes on course and complete their missions.
1300 Hours (H-Hour)
In the 101st Airborne’s sector , nearly 7,000 Screaming Eagles float down
toward zones in the Eindhoven sector. Virtually all of them land safely;
however, 13 gliders carrying some of the 101st’ s jeeps, antitank weapons,
and supplies are lost.
In the 82nd Airborne’s sector , most of the paratroopers and gliders land
safely and are soon in action or moving toward their objectives.
In the 1st Airborne’s sector, more losses are suffered, but still most of the
men and equipment are landed safely .
Operation Market is off to a good start. The v ast majority of men ha v e
landed safely and, despite the loss of some equipment, the Allied paratroopers feel confident they can hold on until XXX Corps arriv es in 48
hours.
Communications prove to be a major problem
during all phases of Operation MarketGarden. Several times during XXX Corps’
drive to Arnhem, communications between the
Irish Guards Armored and the Royal Air
Force (RAF) ground support aircraft is
lost. This silence slows the drive toward
Arnhem by forcing the British to deploy
infantry rather than using rocket-firing
Typhoon fighter-bombers to clear the way.
At Arnhem, the communication problems are
twofold. First, the radios supplied to the
British 1st Airborne Division don’t work,
for the most part, although communication
between the landing zones and bridge defenders is established as the battle drags
on. A tenuous connection is also made
between 1st Airborne and British I Airborne
Corps headquarters (near Nijmegen) by way
of England. Because the battalions moving
toward Arnhem cannot communicate with
division headquarters, or each other, the
fact that Colonel Frost’s battalion reaches
Arnhem by marching along the undefended
river road never reaches the rest of the
Red Devils. This information, along with
securing the Driel-Heavedorp ferry, might
have changed the battle in favor of the
British.
Perhaps the single most devastating communication failure is between the 1st Airborne and ground support aircraft; the Red
Devils are unable to call in air strikes
that might have turned the tide of battle
in their favor. As it was, the Germans were
able to employ armor with impunity from the
air. More than one German panzer commander
stated after the war that Allied air
attacks were the single biggest factor in
preventing organized armor counterattacks
on the Western Front. To surrender such a
potent weapon proved devastating to the Red
Devils at Arnhem.
Page 73

1315 Hours
Vught
Colonel General Kurt Student, commander of the German First Parachute
Army , stares up at the grand formations roaring overhead and immediately
deduces the Allied intent: captur e the bridges at Eindhov en, Gra v e, and
Nijmegen. This fits together with the b uildup in Allied traff ic south of the
Maas−Scheldt Canal.
1330 Hours
Doetinchem
The commander to the II SS Panzer Corps, Gen.
Wilhelm Bittrich, recei v es a report tha t airborn e
forces are landing at Arnhem and Nijmegen. Bittrich
believes the airborne forces are trying to isolate the
Fifteenth Army so British armor can dri v e into
Germany . He orders the 9th Hohenstaufen to a ttack
and secure Arnhem and the bridge, while the 10th
Frundsberg is to advance south to Nijmegen.
The immediate defense of Arnhem falls to SS Maj.
Sepp Kraft. His SS Panzer Grenadier Training and
Reserve Battalion is bivouack ed in the woods near Wolfheze. Kraft can
see British paratroopers landing just a few hundred yards from his headquarters.
Kraft quickly surmises that the only objective of any military importance
is the Arnhem bridge and organizes his unit to defend the roads leading to
Arnhem.
Chapter 9: History 67
Paratroopers of the 101st
and 82nd Airborne Divisions fight to keep the
road to Arnhem open until
they can be relieved by
XXX Corps.
1345 Hours
Grave bridge
Lieutenant John S. Thompson’s 17 paratroopers land slightly in adv ance of
the rest of Company E (504th Regiment, 82nd Airborne); Thompson’ s unit
is less than one-half mile from the west end of the Grave bridge. It takes
Thompson’s men less than an hour to secure one of the 82nd Airborne’s
primary objectives.
1400 Hours
Wolfheze
Major Anthon y Deane-Drummond, a 1st Airborne signals officer, listens
as the radio signals being sent by the advancing brigades are fading. The
brigades are less than 2 miles away and already some units have f aded out
completely . The 1st Airborne’s units cannot communicate with each other
or the advancing XXX Corps. Communication failures play a major role in
the coming battle.
“Tell Bittrich. They’re
over the Waal.”—Major
General Heinz Harmel,
Commander, 10th SS Panzer
Division, to II SS Panzer
Corps headquarters after
Harmel is unable to
destroy the Nijmegen
bridge on September 20,
1944
Page 74

68 A Bridge Too Far
“You can’t imagine anything more unsuitable for
tanks: steep banks with
ditches on each side that
could be easily covered
by German guns.”—Major
General Allan Adair,
Commander, Guards Armored
Division, remembering the
road between Nijmegen and
Arnhem
“Our situation reminded
me of the early American
West, where small garrisons had to contend with
sudden Indian attacks at
any point along great
stretches of vital railroad.”—Major General
Maxwell Taylor, Commander, U.S. 101st Airborne Division, summarizing his division’s attempt to secure its 15mile long sector
1415 Hours
−−
Dutch
−
Belgian Border
−−
Near the Dutch−Belgian border, the thousands of vehicles and men that
comprise the Operation Garden force—Lt. Gen. Brian Horrocks’ XXX
Corps—wait for word to advance. Lt. Col. J.O.E. “Joe” Vandeleur’s Irish
Guards Armored Group will lead the giant column.
As the Irish Guards wait in their tanks and armored vehicles, the 30minute artillery barrage that precedes Operation Garden begins. At 1435
hours, the first tanks begin to advance as the artillery barrage beg ins
“walking” ahead of the lead tank. The commander of the lead squad radios
that the advance is going well.
Then voices yell over the radios; oily black smoke smears the blue Dutch
sky. The German gunners have let the barrage roll ov er them, even let the
first few tanks pass, before emerging from their shelters and opening f i re.
In minutes, nine disabled or burning tanks block the road to Eindhoven.
Lieutenant Colonel Vandeleur calls in air support from rocket firing
Typhoon fighter-bombers and orders an armored b ulldozer to clear the
way. Infantry deploy and move ahead to root out the German gun crews as
the Typhoons unleash their rockets. Soon the advance be g ins to mov e
again—but more slowly than e xpected.
General Brian Horrocks estimated that XXX Corps would reach
Eindhoven, 13 miles beyond the breakout point, in 2 or 3 hours. By
nightfall on Operation Garden’ s f i rst day, they have driven just 7 miles.
1425 Hours
Veghel
The 101st Airborne captures the four bridges at Veghel almost as soon as
they land. At St. Oedenrode, the highw ay bridge is quickly secure d. Units
heading for the secondary bridge at Best run into heavy German fire. As
elements of the 506th Regiment move within hand grenade range of the
bridge at Son, the Germans blow it up.
About the same time, the Germans are the beneficiary of a stroke of luck.
A briefcase, found in a crashed glider, is brought to Col. Gen. Kurt
Student. Inside are the Operation Market-Garden plans: the landing zones,
the objectives, the time tables. The plans end any indecision on Student’s
part: “[The plans] showed us e v erything. ... I knew exactly what to do.”
The commander of the First Parachute Army orders units to defend the
bridges.
Page 75

1430 Hours
Doetinchem
Chapter 9: History 69
Field Marshal Walter Model, commander of Army Group B, arrives at
General Bittrich’ s II SS P anzer Corps headquarters to hear Bittrich’s
theory on Allied strate gy. The airborne forces are intended to isolate the
Fifteenth Army while British armor dri ves for the Rhine. Bittrich tells
Model the bridges at Nijmegen and Arnhem should be immediately
destroyed. Model disagrees, “The bridges are not to be blown.”
1530 Hours
Oosterbeek
The three battalions of the 1st Airborne’s 1st Parachute Brigade continue
moving toward the Arnhem bridge along three routes. There is only
sporadic resistance at first, but by 1630 hours two of the three battalions
are halted by fire from SS Maj. Sepp Kraft’s grenadiers and lead elements
of the 9th Hohenstaufen. Only the 2nd Battalion, commanded by Col. John
Frost, continues to advance toward the bridg e; Frost’s men are
following a secondary road while the others follow major
arterials.
The situation grows more confused as the Red Devils come
under more German fire and radio communication proves to
be impossible. Major General Urquhart sets out to get firsthand information but instead is trapped in the attic of a house
and is out of contact with the rest of the division for nearly
two days.
1800 Hours
Oosterbeek
Colonel Frost’s battalion reaches the railroad bridge just west
of Arnhem. As a team of his paratroopers sprints forward, the
Germans detonate the charges wired to the bridge. Disappointed, the battalion continues east toward the main Arnhem
bridge.
1900 Hours
Arnhem
The 9th SS Panzer’s reconnaissance battalion roars across the
Arnhem road bridge to scout the roads to Nijmegen for Allied
paratroopers. The column makes a deliberate sweep on both
sides of the highway all the way to Nijmegen but f inds
nothing.
The movement of the German panzer
divisions in Arnhem was slowed in
the first few hours of the
battle. Lieutenant General Wilhem
Bittrich, commander of II SS
Panzer Corps, has ordered the 9th
SS Panzer Division to return to
Germany. Before the 9th
Hohenstaufen departs, Bittrich
orders its commander, Lieutenant
Colonel Walter Harzer, to transfer many of his tanks and vehicles to Major General Heinz
Harmel’s 10th SS Panzer Division.
Harzer knows the equipment he
gives up will never be replaced,
so he has guns and other equipment removed from tanks and
vehicles because of “damage.”
Harzer reasons he can’t give
Harmel damaged equipment. Consequently, when the battle starts,
not only must Harzer’s engineers
get tanks, self-propelled guns,
and armored cars unloaded from
the train, they must also put
much of the equipment back
together before it is deployed.
“I can just imagine the
Germans sitting there,
rubbing their hands with
glee, as they see us
coming.”—Lieutenant
Colonel Giles Vandeleur,
Commander, 2nd Battalion,
Irish Guards Armored
Group, discussing the
prospect of crossing “the
Island,” the elevated
road between Nijmegen and
Arnhem on September 21,
1944
Page 76

70 A Bridge Too Far
“We had come all the way
from Normandy, taken
Brussels, fought halfway
through Holland, and
crossed the Nijmegen
bridge. Arnhem and those
paratroopers were just up
ahead, and almost within
sight of that last bloody
bridge, we were stopped.
I never felt such morbid
despair.”—Lieutenant John
Gorman, Guards Armored
Division, on being
stopped near the village
of Elst on September 21,
1944
1930 Hours
Arnhem
Captain Eric Mackay , leading a small group of Ro yal Engineer s, reaches
the Arnhem bridge. The moder n three-span bridge and its ramps stretch
2,000 feet from the city side (north) to the country side (south) of the
Lower Rhine. Mackay’ s force takes up positions just east of the br idge’s
north ramp; the men ready themselves for the assault on the bridge. Within
30 minutes Colonel Frost and his men begin to arrive, taking up positions
on the west side of the ramp. Then the Red Devils rush the bridge;
Mackay’s engineer s use a flamethro wer and light off the explosives the
Germans have brought out to wire to the bridge. The explosion tears
through the German defenders; firing as they run, the paratroopers try to
cross to the south side.
Fire from the German positions on the south side of the bridge is heavy
and accurate. The Red Devils are dri v en bac k—b ut the Br itish no w secure
their hold on the north end of the Arnhem bridge .
Mackay’s little for ce secures a group of b uildings on the east side of the
bridge’ s approach; from their positions the engineers can co v er the str eets
leading up to, and under, the bridge, along with the northern ramp and the
bridge itself.
The Red Devils fight on
even when buildings come
down on their heads. Here
a team armed with a Bren
gun (foreground) and Sten
gun (second from right)
fight from the ruins of a
Dutch house.
Frost’s force takes up positions in the buildings on the west side of the
bridge; these men will cover the approaches from the west.
Nijmegen
Elements of the 82nd Airborne approach the bridg e
in Nijmegen through dark and silent streets. Then,
the sound of German machine gun bullets ripping
through the air and 20mm cannon shells exploding
all around greets the All-American paratroopers.
Captain Gräbner’s reconnaissance force has finally
found the Allied paratroopers. The Americans are
pinned down.
2300 Hours
Terbor g
Field Marshal Walter Model receives a long and
startling radio message from Col. Gen. Kurt Student: Student has captured
the Allied plans for Operation Mark et-Garden. Model refuses to belie v e
the plans are authentic. Still, Model is too cagey to discount the plan
entirely; orders are sent out to every a v aila ble antiaircraft unit naming the
time and place of subsequent Allied troop and supply drops. This proves to
be one of the best orders the field marshal issues during the next se v en
days.
Page 77

2330 Hours
Arnhem
Major General Heinz Harmel returns to Arnhem after a nearly 12-hour
drive from Berlin. Lieutenant General Wilhelm Bittrich briefs Harmel; the
II SS Panzer Corps commander tells the 10th SS Panzer commander that
the British have landed airborne forces west of Arnhem and an undetermined force is holding the north end of the Arnhem bridge. There has been
contact with the enemy at Nijmegen; Harmel is to take his 10th
Frundsberg, proceed south, and secure the bridge in Nijmegen. Bittrich
then tells Harmel that Lieutenant Colonel Harzer’s 9th
Hohenstaufen will attack the British west of Arnhem.
At the end of the first day of Operation Market-Garden, there has
been success and failure. Both the 101st and 82nd Airborne
succeeded in capturing primary objectives; ho we ver, both must
fight off German counterattacks to hold their objecti v es and the
82nd still must secure the Nijmegen bridge. British XXX Corps
only covered half the distance from the jumping-off point to
Eindhoven, but all are hopeful the pace can be picked up the ne xt
day . At Arnhem, the 1st Airborne has a hold on the Arnhem
bridge, and the hope of getting the rest of the division to the
bridge on Monday .
Monday, September 18, 1944
0000 to 0600 Hours
Arnhem
Throughout the early hours of the second day of Operation
The wreckage of two British
3-ton trucks near Nijmegen had
been posted with a helpful
sign by British sappers: KEEP
ON THE ROADS. VERGES NOT
CLEARED OF MINES. However, the
verges were not mined, but the
sign kept many truck drivers
from moving onto the verges to
let tanks and troops through.
The result was traffic jams
that took many hours to unsnarl. Throughout Operation
Garden, bottlenecks continually developed near
Valkenswaard and Eindhoven,
restricting the movement of
the columns moving north.
Market-Garden, British paratroopers trickle into the positions at
the north end of the Arnhem bridge. After spending a night of
fighting, Mackay , Frost, and their men are tired and hungry, but they are
determined to hold on. If all goes according to plan, XXX Corps tanks will
relieve them by the end of the day.
0700 Hours
Wolfheze
It has been a sleepless night for the Red Devils defending the drop and
landing zones. They are under almost constant attack all night long.
Lieutenant General Hans von Tettau, commanding a force of defense and
training units, attacks from the west; Lieutenant Colonel Harzer’s 9th
Hohenstaufen pounds the 1st Airborne from the east. There is no word at
the landing zones from Major General Urquhart. Radio communication
remains impossible for the most part, although a tenuous link is established with Colonel Frost at the bridge. All the British paratroopers wait
hopefully for the day’s airborne reinforcements and resupply; all gaze
hopefully south for the sight of Horrock’s XXX Cor ps tanks.
Chapter 9: History 71
“... every gun on the
ground seemed to be aimed
at me.”—First Lieutenant
Stefan Kaczmarek, Polish
1st Parachute Brigade,
remembering the drop of
his brigade on September
21, 1944
Page 78

72 A Bridge Too Far
0930 Hours
“Where the hell is the
air support? We were told
in the afternoon we
couldn’t have any for our
attack toward Arnhem,
because all the available
air effort had to go for
the Poles. Where was it
now? The weather? Nonsense. The Germans flew;
why couldn’t we?”—Captain
Roland Langton, Irish
Guards Armored Group,
watching the unescorted
Polish airdrop over
Arnhem from his position
near Elst on September
21, 1944
Arnhem
Captain Gräbner’s r econnaissance force, alerted to the presence of the
British paratroopers at the Arnhem bridge, plans to charge across the
bridge and subdue the reportedly lightly armed paratroopers. At first, it
appears Gräbner’s plan will succeed, but when Gräbner’s lead v ehicles are
destroyed, the attack falters. Captain Gräbner, presented with the Knight’s
Cross by Lieutenant Colonel Harzer the day before, is among the dead.
Valkens waar d
The tanks of the Irish Guards Armored Group start crawling toward
Eindhoven. Many are anxious to advance as quickly as possible, but
they’ ve been held up to let engineers move their bridging equipment up
the two-lane road. The column moves along steadily until four 88mm
guns and several machine guns stop the British.
Four hours later the lead elements finally pass through Eindhoven and
reach the destroyed Son bridge. It is now 1900 hours on D Plus 1, and
XXX Corps is still 32 miles from Arnhem.
Nijmegen
While the 82nd Airborne has successfully secured
bridges at Grave, Heuman, and Honinghutie, the
paratroopers are still fighting to capture the
Nijmegen bridge and protect their drop and landing
zones. In the midst of the fighting Gavin receives a
message: The day’s reinforcement and supply drops
have been delayed until 1400 hours.
It is estimated that
more than 10,000 Dutch
civilians are killed or
wounded during the
fighting of 1944−45.
1400 Hours
Holland
Again the clear blue sky over Holland is darkened
by seemingly endless serials of Allied transports,
bombers, and gliders.
Of the 450 gliders assigned to the 101st’ s landing zones, 428 land safely.
Major General Taylor’s force is bolstered by the nearly 2,700 men he adds
to his ranks, along with much-needed vehicles and ammunition.
Of the 454 gliders assigned to the 82nd’s landing zones, 385 land safely,
delivering almost 1,800 artillerymen, 177 jeeps, and 60 guns. The 252
B24s lumber over the drop zones at 50 to 800 feet, each attempting to
drop 2 tons of supplies. While Brigadier General Ga vin’s paratroopers
retrieve 80 percent of their supplies, Taylor’s men recover less than 50
percent.
Over the 1st Airborne’s drop zones, the sky is f illed with para chutes and
gliders—and concentrated German fire. The landing zones are covered by
Page 79

machine gun, mortar, and artillery fire. The situation is chaotic but, by
some miracle, most of the paratroopers survive to take positions on the 1st
Division’s perimeters. Howev er, the vast majority of supplies falls into the
waiting hands of the Germans.
Later that afternoon, Model visits Bittrich. The SS General tries again to
convince the Field Marshal that the Nijmegen bridge must be destroyed
before the Allies get across. Model is adamant, “The answer is no!” Model
has ordered Col. Gen. Kurt Student’s 1st Parachute Army to hold the allies
south of Nijmegen; now he orders Bittrich to secure the Arnhem bridge in
24 hours.
1800 Hours
Arnhem
At the bridge, Colonel Frost has waited vainly for reinforcements all day.
The fighting around the north end of the bridge has been vicious and
personal; often small groups of men fight from room to room in burning
houses, ruined gardens, and the streets themselves. Frost pins his hopes on
the expected drop of the 1st Polish Parachute Brigade scheduled for the
next morning. With this concentrated force landing south of the bridge, the
Allies can attack from both ends and even link up with the rest of the Red
Devils.
Tuesday, September 19, 1944
Chapter 9: History 73
“I was told that it was
absolutely vital to
impress Horrocks and
Browning with the facts
that the division had
ceased to exist—that we
were merely a collection
of individuals hanging
on.”—Colonel Charles
Mackenzie, Chief of
Staff, British 1st Airborne Division, on the
mission given him by
Major General Robert
Urquhart on September 22,
1944
0400 Hours
Oosterbeek
Four battalions of the 1st Airborne continue fighting their way toward the
Arnhem bridge. All are stopped well short of their objective; however,
some units advance far enough to free Maj. Gen. Roy Urquhart from his
hiding place.
Urquhart is quickly apprised of the situation by his subordinates. He
immediately realizes that the Polish drop zone, surrounded by German
armor, will be a slaughterhouse. He radios a warning to corps headquarters; the message is never receive d, but it is already moot. For the second
consecutive day fog covers most of the airfields in the English Midlands.
0645 Hours
Son
Behind schedule by 36 hours, Lt. Col. Vandeleur’s Irish Guards Armored
Group begins rolling across the Bailey bridge thrown up by the Royal
Engineers. Finally, the armored column makes the kind of progress that
Montgomery envisioned; by 0830 hours, the Irish Guards link up with
Brigadier General Gavin’s All-American 82nd Airborne at Grave.
“A British breakthrough
must be halted at all
costs.”—General Wilhelm
Bittrich, Commander, II
SS Panzer Corps, to his
forces guarding the
Nijmegen
September 21, 1944
−−
−Arnhem road on
−−
Page 80

74 A Bridge Too Far
Major General Heinz Harmel
selects a British prisoner,
Sergeant Stanley Halliwell, to
cross into the British perimeter
to request that Colonel John
Frost and Captain Eric Mackay
surrender their forces. Harmel
knows his casualties have been
heavy; he knows that British
casualties have to be heavy,
too. Halliwell comes through the
perimeter under a flag of truce
and explains what Harmel wants;
Frost gives Halliwell a message
for the commander of the 10th
Frundsberg: “Go to hell.”
Halliwell tells Frost: “If it’s
all the same to you, Colonel,
I’ll stay. Jerry [the Germans]
will get the message sooner or
later.”
“The last thing we wanted
to be was alarmist, but I
felt I had to do something to effect relief—
and effect it immediately.”—Major General
Robert Urquhart, Commander, British 1st
Airborne Division, on his
division’s situation on
the morning of September
22, 1944
1200 Hours
Grantham Airfield
The fog covering the Midland’s airfields refuses to dissipate.
Major General Stanislaw Sosabowski receives new orders—a
24-hour postponement.
1400 Hours
Best
The battle for the bridge near Best is finally won by Taylor’s
101st, reinforced by British tanks. While the Allies are winning
at Best, German tanks attack the Bridge at Son. Taylor leads the
only available reinforcements—his headquarters unit—into the
battle. The Germans are stopped just short of the bridge.
1530 Hours
Nijmegen
Lead elements of XXX Corps and the 82nd storm toward the
road bridge near the center of the city . The attack is stopped by
determined German fire; the battle rages until after dark, when
the Allied force digs in to w ait for daylight.
Now Brigadier General Gavin decides the only w ay to capture the bridge
is to attack it from both ends. The only way to do this is to force a crossing somewhere along the river using assault boats. The assault is scheduled for 1300 hours on September 20.
Arnhem
Colonel Frost now realizes that without relief from XXX Corps his Red
Devils will be buried—dead or ali v e . At 1800 hours, two 60-ton Tiger
tanks prowl slowly onto the bridge, blasting away at almost point-blank
range. Still, the Red Devils keep fighting back. As evening comes on, it
seems to Frost that the entire city of Arnhem is ablaze.
Wednesday, September 20, 1944
0700 Hours
Grantham Airfield
Major General Stanislaw Sosabowski learns that the drop zones for his
Polish parachute brigade have been mov ed to the village of Driel. He has a
few hours to revise his plan of attack.
0730 Hours
Arnhem
The British paratroopers holding the north end of the Arnhem bridge are
now defending smoldering ruins; there are no more than 300 men able to
Page 81

return the German fire. Hundreds of wounded fill the cellars. There is
little ammunition and almost no food and water, but the Red Devils are
grimly determined to fight on.
0800 Hours
Oosterbeek
Chapter 9: History 75
Major General Urquhart reaches a painful decision: He must pull his
perimeter in around the just-discovered ferry at Heveadorp. Then the
soon-to-arrive Polish brigade can be ferried across to consolidate a
bridgehead on the north bank of the Rhine. This means abandoning the
Red Devils at the bridge, which weighs heavily on Urquhart, but the 1st
Airborne’s commander realiz es he has too few men to reach the bridge.
1100 Hours
Groesbeek Heights
The German counterattacks intensify all along the corridor. Field Marshal
Walter Model now has the bulk of the Fifteenth Army—over 80,000 men,
500 guns, and 4,500 vehicles—to feed into his counterattacks. In the
82nd’s sector the Germans again advance out of the Reichswald and
threaten to overwhelm his forces. In a seesaw battle that lasts all day,
Gavin’s forces finally prevail.
Throughout the day, Major General Harmel is scouting the area between
Nijmegen and Arnhem. He quickly realizes that there is only one road that
will support tanks without breaking up—the Arnhem−Nijme g en road. In
many places the road is elevated 12 feet above the
surrounding fields. But Harmel has no artillery in
place, which makes clearing the Arnhem bridge
imperative.
1250 Hours
“In effect, I planned the
withdrawal like the
collapse of a paper bag.
I wanted small parties
stationed at strategic
places to give the impression we were still
there, all the while
pulling downward and
along each flank.”—Major
General Robert Urquhart,
Commander, British 1st
Airborne Division, describing his evacuation
plan for September 25,
1944
Grantham Airfield
As the Dakota transports rumble to life and begin
warming up, a RAF officer climbs aboard the lead
plane; the officer tells the stunned Major General
Sosabowski that the Midlands are fogged in
again—the drop of the 1st Polish Parachute
Brigade is postponed another 24 hours.
1300 Hours
Nijmegen
One mile west of the railroad bridge at Nijmegen, paratroopers of the
82nd’s 504th Re giment pr epare to cross the 400-yard-wide Waal River. In
the face of heavy fire, the fi rst w ave of troopers cross the river, storm over
a 20-foot-high dike, and then subdue a German fort. The second wave
Every time the XXX Corps’
drive toward Arnhem
stalls, infantry is
deployed in an effort to
“keep going like hell.”
Page 82

76 A Bridge Too Far
“All at once I realized I
was across. I simply
could not believe I had
gotten out alive.”—Major
George Powell, British
1st Airborne Division,
after crossing the Lower
Rhine during the evacuation of the Red Devils
“The air plan was bad.
All experience and common
sense pointed to landing
all three Airborne Divisions in the minimum
period of time, so that
they could form up and
collect themselves before
the Germans reacted. All
three Divisions could
have been landed within
the space of twelve hours
or so, but First Allied
Airborne Army insisted on
a plan which resulted in
the second lift (with
half the heavy equipment)
arriving more than 24
hours after the Germans
had been alerted.”—A
post–Market-Garden report
prepared by the Royal Air
Force
rushes the railroad bridge; attacked from both sides, the German defenders break and run.
As the defense of the railroad bridge collapses, the defenders of the road
bridge begin to give way, too. Soon, XXX Corps tanks begin to chase the
retreating Germans across the bridge.
1600 Hours
Nijmegen
Major General Harmel can see British tanks rolling onto the Nijmegen
bridge. He gives the order for the bridge to be destro yed—but nothing
happens. As Harmel and his staff start to retreat before the onrushing
tanks, he orders every a vailable gun moved and sited on the Nijmegen−
Arnhem road.
At the northern end of the Nijmegen bridge, British tankers blast the last
remaining obstacles—two 88mm guns—and the road to Arnhem, only 11
miles away, now seems open. It is now 1915 hours.
But the British tanks do not advance. The 82nd’s officers and men are
exasperated at the delay. But the British will wait almost 18 hours to
refuel, refit, and wait for the infantry to come up.
1800 Hours
Arnhem
The bridge defenders surrender or try to escape through the German lines.
A final radio message is sent out from the bridge defenders. It never
reaches any Allied forces, but it is picked up at 9th SS Panzer headquarters: “Out of ammunition. God Save the King.”
Thursday, September 21, 1944
1100 Hours
Nijmegen
The Irish Guards finally begin their driv e toward Arnhem. Just past the
village of Bemmel—halfway to Arnhem—the Germans open fire. Again,
the lead elements of the column are hit and stopped; again the entire
column grinds to a halt.
Oosterbeek
The men of the 1st Airborne are surrounded. Urquhart knows annihilation
of his force is imminent; he sends a patrol to secure the ferry landing. The
troopers brave machine gun and mortar fire to get to the riverbank and
then fight their way back to report the ferry is gone; an errant shell has
sliced the cable and the ferry drifted downstream.
Page 83

1700 Hours
Driel
After three delays, the Polish 1st Parachute Brigade finally lifts of f for
Arnhem. When they reach the drop zone, they float down through swarms
of bullets and exploding shells. The Poles manage to f ight their way to the
river; but Maj. Gen. Stanislaw Sosabowski realizes there is no way to help
the 1st Airborne.
Friday, September 22, 1944
0530 Hours
Nijmegen
Two reconnaissance troops of XXX Corps set out on secondary
roads for Driel. They reach Oosterhout and turn north; by 0800
hours, they reach the village on the south bank of the Lower Rhine.
The Market and Garden forces are finally linked—albeit tenuously.
0830 Hours
Nijmegen
The British 43rd Infantry Division finally starts its adv ance along
the Nijmegen−Arnhem road. An hour later, the advance is stalled. It
takes the 43rd the rest of the day to slog the remaining 5 miles to
Oosterhout and Driel.
1200 Hours
Chapter 9: History 77
As the 1st Airborne’s
situation deteriorates,
the Red Devil’s pride
grows. Acts of courage
become commonplace;
wounded men stay on the
line. Everyone works at
keeping morale up in the
face of the nearly constant combat. On Sunday
morning (September 24), an
artillery officer and two
gunners begin marching
around their position
singing military songs.
Soon the woods resound
with the voices of British
soldiers.
Veghel
German armor formations fling themselves at the Screaming Eagles along
Hell’s Highway. While Major General Taylor’s 101st is able to stop the
Germans, the threat to the corridor slows the drive to Arnhem.
1600 Hours
Driel
At 2100 hours, Major General Sosabowski starts ferrying his men across
the river in groups of six, using rubber rafts. A German parachute flare
illuminates the river; machinegun fire rips through the night. When
Sosabowski calls the operation off in the early morning hours of Saturday,
only 50 men are across.
Page 84

78 A Bridge Too Far
Saturday, September 23, 1944
0200 Hours
Driel
A small group of men struggle to get two amphibi-
ous vehicles to the Lower Rhine’s edge. The roads
leading to the river have been plowed into quag-
mires by artillery and mortar rounds. A heavy mist
hangs over the struggling men. Finally, a few yards
from the water, both vehicles slide into the ditch
and can’t be budged. Another effort to save the 1st
Airborne has failed.
1300 to 1700 Hours
Doetinchem
Roughly 2,600 men (out of
nearly 10,000) escape to
the safety of the south
bank of the Rhine. The
remainder are either dead
or captured; the 1st
Airborne is finished as
an effective fighting
unit.
Field Marshal Walter Model orders “a quick finish”
to the Red Devils because the 9th SS Panzer Division is needed ag ainst
XXX Corps to the south.
Lieutenant Colonel Harzer’s 9th Hohenstaufen has the British 1st Airborne surrounded. But the narrow streets of Oosterbeek constrict tank
mobility , and every time the British lines contract the Red Devils redouble
their efforts.
Elst
Bittrich meets with his subordinate in charge of preventing the British
from moving up the Nijmegen−Arnhem road. Bittrich is assured that the
road can be held for another 24 hours.
1600 Hours
Oosterbeek
As with previous supply drops, the one on this day succeeds in dropping
Allied supplies into German hands. Ammunition is running very low for
the British.
Veghel
The 101st Airborn e, supported by British tanks, once again drives the
Germans back from Hell’s Highwa y. Once again, the columns move north
along the corridor.
2000 Hours
Oosterbeek
Major General Urquhart reports that the perimeter remains unchanged but
thinly defended; one good German push may end the fight.
Page 85

Sunday, September 24, 1944
0700 Hours
Oosterbeek
The light of morning reveals a ruined landscape. First light also signals the
morning mortar barrage that the British have come to expect. The Red
Devils know what to e xpect ne xt, too—combined infantry and armor
attacks. The question on ev ery mind inside the 1st Airborne’s perimeter:
How long?
1800 Hours
Driel
Elements of the British 43rd Infantry Division are to cross the Lower
Rhine, but with only enough men to help withdraw the 1st Airborne
Division. At 2130 hours, the force moves into position, but the assault
boats fail to arrive. By the time they do arrive and are assembled, it is
0200 on Monday , September 25.
Chapter 9: History 79
“[It seemed] that for once
Horrocks’ enthusiasm was
not transmitted adequately to those who
served under him and it
may be that some of his
more junior officers and
NCOs did not fully comprehend the problem and
the importance of great
speed.”—Major General
Robert Urquhart, Commander, British 1st
Airborne Division, writing after the war on the
performance of XXX Corps
during Operation Garden
By Sunday, September 24, 1,300 casualties
are crammed into cellars inside the 1st
Airborne’s perimeter. The facilities for
taking care of them are rudimentary, and by
Sunday, these facilities are regularly hit
by artillery and mortar fire. By 0930
hours, the division’s chief medical officer, Dr. Graeme Warrack, decides to try
to arrange a temporary truce to evacuate
the wounded.
Major General Urquhart, 1st Airborne’s
commander, grants his permission, but tells
Warrack to tell the Germans that the
evacuation is by no means the first step
toward surrender. Along with two liaison
officers and a white flag, Warrack starts
toward the German lines.
The 9th SS Panzer Division’s chief medical
officer, Major Egon Skalka, agrees with
Warrack, but he too must have permission
from the division commander. The small
party sets out for Lieutenant Colonel
Walter Harzer’s headquarters; a telephone
call alerts the commander they are on the
way. Both Harzer and Lieutenant General
Wilhelm Bittrich, Harzer’s superior, agree
to the truce; the firing is to stop for
two hours starting at 1500 hours.
At the appointed hour, the firing gradually dies away. A convoy of German vehicles comes through the lines and begins
ferrying British and German wounded back
to German medical facilities. After nearly
500 wounded are evacuated, gunfire breaks
out sporadically; the Poles especially can
see no reason to cease firing at the hated
Germans. Nor is it easy for the medical
personnel to shoo some combative German
soldiers back through the lines.
When the cease-fire ends at 1700 hours,
the din of battle roars to life again.
Many soldiers are relieved to resume
fighting; they find the silence disquieting. As one British soldier remembered:
“Everything had returned to normal, and I
could orient to that.”
Page 86

80 A Bridge Too Far
2330 Hours
Oosterbeek
Major General Roy Urquhart, commander of the British 1st Airborn e
Division, sends the following message: “Urquhart to Bro wning. Must
warn you unless physical contact is made with us early 25 Sept. consider
it unlikely we can hold out long enough. All ranks now exhausted. Lack of
rations, water, ammunition and weapons with high of ficer casualty rate.
Even slight enemy offensi v e action may cause complete disintegration. If
this happens all will be ordered to break toward the bridgehead if anything
rather than surrender. Any movement at present in face of enemy impossible. Have attempted our best and will do so as long as possible.”
Monday, September 25, 1944
0200 to 0900 Hours
Driel
As elements of the 43rd Infantry begin crossing the Lower Rhine, German
fire tears through the flimsy fleet. Of the 420 men who start across, only
239 reach the north bank of the Rhine; it is too few men to establish a
solid link with Urquhart’s paratroopers. It does not take Urquhart long to
reach a decision. Just after 0800 hours, he decides that the evacuation will
take place tonight.
“... a most attractive
personality [ but with] a
very, very limited brain
from a strategic point of
view ... [ he was] a very
good Supreme Commander,
as a field commander he
was very bad, very bad.”
—Field Marshal Bernard
Montgomery, Commander,
Allied 21st Army Group,
commenting after the war
on his commander, General
Dwight David Eisenhower
Urquhart plans to have a fe w men keep up a masking fire while the
remainder slip away. Glider pilots acting as guides will lead the paratroopers to the ferry landing, where an evacuation fleet of small boats will take
the Red Devils across the Rhine.
2100 Hours
Oosterbeek
A massive artillery barrage lights up the sk y over the 1st Airborne’s
position. Shells from XXX Corps guns across the river pound the German
positions around the Red Devils’ perimeter .
Near the ferry landing, the evacuations be gin. A German flare goes up,
illuminating the evacuation fleet. Within one hour , half of the boats are
destroyed, but the evacuation continues past dawn.
By midmorning the evacuation is o v er, and so is Operation MarketGarden. Allied casualties exceed 17,000; German casualties are between
13,000 and 15,000. The Allies are unable to force a crossing of the Lower
Rhine; the Market-Garden corridor remains salient until early 1945.
British casualties are 13,200. Of Major General Urquhart’s original
10,000-man force, only 2,163 paratroopers make it to the south bank of
the Rhine; over 1,200 are dead, and 6,600 are missing, wounded, or held
Page 87

Chapter 9: History 81
prisoner. Hor ro cks’ XXX Corps loses 1,500; other British ground units
lose 3,900 in supporting attacks. What is left of the British 1st Airborne
Division returns to England; the war is over for the Red Devils.
American casualties are nearly 4,000. Major General Taylor’s 101st
Airborne Division loses 2,100; Brigadier General Gavin’s 82nd Airborne
Division loses 1,400; and the IX Troop Carrier Command and other air
crews lose over 400. Both the Screaming Eagles and All-Americans will
remain at the front lines until December.
“He got so damn personal
to make sure that the
Americans and me, in
particular, had no
credit, had nothing to do
with the war, that I
eventually just stopped
communicating with him.
... I was just not interested in keeping up
communications with a man
that just can’t tell the
truth.”—General Dwight
David Eisenhower, Supreme
Commander, SHAEF, commenting after the war on
his subordinate and
originator of Operation
Market-Garden, Field
Marshal Bernard Law
Montgomery
Page 88

82 A Bridge Too Far
Index
A
A Bridge Too Far
game described 1
installing 3
introduction 1
quick start iv
starting game 4
system requirements 3
Ability statistics 37
Action, current, described
(table) 21
Action type, choosing 5
Active Teams listing 30
Adair, Allan 54
Adding
reserves 31
units to teams 31
victory locations 41
Air supply 35
Allied forces
colors 23
evacuation from Norway 5
securing, repairing bridges 16
selecting air or ground
supply 35
star symbol 9
Allies
choosing side 6
Ambushing 51
Ammunition
conserving 13
types (table) 22
Antitank teams 49
Area, expanding game
resolution 4
Armored cars, using 46
Arnhem bridge
relief attempt 54
strategy 53
Assault guns 47
Attitudes of soldiers, status 37
Awards, bravery, injury 38
B
Battle flow, introduction 1
Battle monitors 19
Battlefield
identifying elements 24
tactics 50
Battlemaker
thumbnail sketches 40
utility, using 39
Battles
choosing map by battle
name 41
deploying units 9
designing 39
ending 17
getting information from
field 19
giving to another player 44
identifying previous orders 24
objective 8
playing custom 44
saving custom 44
starting 7, 10
surveying battlefield 8
taking prisoners 15
Begin! button 10
Bittrich, Wilhelm 37,
49, 62, 67, 69, 71
Blow Bridge button 16
Blowing bridges 16
Boldock, Walter 58
Boot Camp described 2
Brereton, Lewis H. 63
Bridges
blowing 16
pontoon (photo) 48
securing, repairing 16
strategic landmarks 29
using 16
Briefing screen
campaigns 28
operations 28
reviewing operation status 29
Buildings and terrain 9
C
C47 transport aircraft 6
Callahan, Harry 40
Campaigns
allocating supplies for
sectors 34
distributing requisition
points 35
duration 27
fighting, introduction 26
reviewing objectives, winning
points 26
selecting air or ground
supply 35
starting 28
strategy 53
types 26
Cars, armored 46
Casualties 33
Casualties, Operation Market-
Garden 80
Cease-fire 17, 33
Chat window 59
Chennell, William 53
Choosing
cease-fire period 33
difficulty level 6
maps 40
one- or two-player game 7
resources 30
sides 6
soldiers’ states to track 19
type of action 5
Churchill, Winston 4
Close Combat TCP 57
Cohesion, promoting 53
Colors
map monitor 23
message monitor 23
order dots (table) 11
orders 18
range 14
sectors 35
sides 23
Page 89

Index 83
Combat screen
campaigns 28
operations 28
shaded areas 8
surveying battlefield 8
viewing with spyglass
monitor 24
Command screen 5
Commands
keyboard shortcuts 11
Communicating with
opponents 59
Communication problems,
Operation Market-
Garden 66
Completing requisitions 32
Condition statistics 37
Connection types 57
Copying battles to other
computers 44
Cover
types 50
using 50
Cross symbol 9
Cues, sound 25
Customizing difficulty level 6
D
Dakota transport aircraft 6
Deane-Drummond, Anthony 67
Debriefing screen
campaigns 28
described 32
operations 28
Defend order 10, 12
Defending
against enemy scouts 48
against machine guns 48
against mortars 49
against suppression 52
Deleting victory locations 42
Deploying battle units 9
Deployment screen
campaigns 28
operations 28
Deployment zones, editing 42
Designing battles 39
Details screen described 36
Determining number of points
available 30
Determining weapon range 14
Difficulty levels
choosing 6
customizing 6
DirectPlay 57
Disconnecting from two-player
game 59
Displaying messages from the
field 23
Distributing requisition
points 35
Dots, order 11
Driel, taking town 54
Dutch resistance 44
E
Editing
deployment zones 42
forces 43
victory locations 41
Eisenhower, Dwight
Belgium strategy 62
main strategy 60
Emotional state of soldiers
(table) 23
Enabling sounds and videos 4
Ending battles 17
Expanding game area
resolution 4
Experience indicator 37
F
Fatigue level of soldiers
(table) 23
Filtering messages 23
Fire order 12
and moving soldiers 15
and prone soldiers 15
determining range 14
line of sight 14
loader and assistants 15
Flamethrower teams, using 50
Flanking enemy 52
Franklin, Benjamin 1
Frost, John 42, 69, 73
G
Gameplay mechanics 8
Games
choosing
difficulty level 6
sides 6
type of action 5
copying 44
deploying units 9
disconnecting from two-
player 59
ending 17
expanding game
resolution 4
gearing up for 2
issuing orders 10
music, turning on and off 4
one- or two-player 7
playing two-player 57
removing killed soldiers 4
reviewing objective 8
scope 2
sounds, turning on and off 4
speed, setting 4
starting 4
starting battles 7
starting two-player 57
videos, turning on and off 4
weapons See Weapons
Gathering intelligence 25
Gavin, James M. 55, 64, 74
German
attack on France, Belgium,
Holland 5
economy 27
German forces
colors 24
cross symbol 9
Germans, choosing side 6
Göring, Hermann 6
Gräbner, Captain 72
Grand Campaign 26
Green toolbar text 18
Groesbeek Heights, strategy 55
Ground supply 35
H
Halftracks 46
Hardware requirements 3
Harmel, Heinz 51, 71, 76
Harzer, Walter 69, 79
Page 90

84 A Bridge Too Far
Health, status 37
Heavy guns 49
Hell’s Highway 77
Help
online 2
Sound Gallery 25
Hendy, Arthur 50
Hide order 10, 12
High ground, advantages of 9
Higher elevations, using
strategically 51
History summarized 60
Hitler, Adolf 6, 25
Holland map 61
Horrock, Brian 65, 68
Horses 31
Hosting two-player game 58
I
Identifying
battlefield elements 24
previous orders 24
units, sides 24
Improving performance 4
Infantry
teams 30
using 45
Information
Debriefing screen 32
from the field 19
getting more about units 31
on toolbar 18
Installation 3
Intelligence, gathering 25
Internet Gaming Zone 57
Interpreting order dots 11
Introduction
fighting operations and
campaigns 26
tactics and strategy 45
to gameplay 8
Irish Guard 68
Island, strategy 56
Issuing orders 10
J
Jodl, Alfred 62
Johnson, Ray 44
Joining two-player game 58
K
Keyboard shortcuts 11
Kill/performance statistics 37
Kraft, Sepp 38, 64, 65
L
Landing zones 29, 55
Leadership indicator 37
Levels, difficulty
choosing 6
customizing 6
Line of sight 14
Loaders 15
Locations, victory 41
Logistics 60
M
Maas-Waal Canal 64
Machine guns
defending against 48
teams, using 48
Mackay, Eric 41, 58
Makay, Eric 70
Managing resources 27
Map monitor, using 23
Maps
buildings and terrain 9
choosing 40
controlling 8
Holland vi, 87
jumping around 23
Operation Market-Garden vi
point count 26
scrolling through 8
victory locations 9
zooming in and out 8
Medals 32
Medals statistics 38
Mental condition indicator 37
Message monitor, using 23
Messages, seeing chat 59
Microsoft Internet Gaming
Zone 57
Model, Walter 38, 39, 62, 64, 65,
69, 70, 75, 78
Monitors
battle 19
map 23
message 23
Monitors (continued)
soldier 20
spyglass 24
team 20
Montgomery, Bernard 3, 7
attack strategy 60
proposes Operation Market-
Garden 62
Morale
indicator 37
promoting 53
Mortar teams, using 48
Mortars 14
defending against 49
Move Fast order 10−11
Move order 10−11
Moving
units 11
victory locations 41
Music, turning on and off 4
N
Nationalities, viewing all available
units 31
Net status bar, using 59
Nijmegen
bridge, strategy 55
crossing, strategy 55
North Atlantic situation 60
O
Oberkommando der
Wermacht 21
Objective of game 8
One-player games, choosing 7
Online Help 2
Oosterbeek, strategy 54
Operation Husky 16
Operation Market-Garden
communications problems 66
conclusion, casualties 80
first proposed 62
map (figure) vi, 61
situation report 65
Operation Overlord 63
Operation Sicklestroke 9
Operation Torch 15
Operations
See also specific operations
Page 91

Index 85
Operations (continued)
fighting, introduction 26
reviewing
objectives, winning
points 26
status 29
starting 28
Opponents, communicating
with 59
Options, setting 4
Order dots 11
identifying previous orders 24
Orders
default 10
determining current 18
identifying previous 24
interpreting dots 11
issuing 10
issuing preliminary 10
keyboard shortcuts 11
targeting 12
types 10
Outcome of battle 33
Overlord operation 63
P
Paratroopers (photo) 12
Pare, G. A. 56
Performance
improving 4
statistics 37
Peterson, Emil 47
Photo-reconnaissance 47
Physical Condition indicator 37
Physical state of soldiers
(table) 22
Plans, politics, logistics 60
Players, two, starting game 57
Playing
custom battles 44
selected map 7
two-player games 57
Points
and retreating 34
determining number
available 30
requisition, setting 42
waiting period (table) 34
winning 26
Polish 1st Parachute Brigade 77
Polish drop, strategy 54
Politics 60
Pontoon bridge (photo) 48
Prisoners, taking 15
Promoting morale, cohesion 53
Q
Quick Help 4
Quick Start iv, 85
Quitting games 17
R
Rallying separated
soldiers 15, 53
Range, weapons, determining 14
Reconnaissance, sending 47
Red Devils 1st Airborne 64, 70
Red toolbar text 18
Regrouping troops 33
Removing
killed soldiers 4
trees 4
Repairing bridges 16
Requirements, system 3
Requisition points
distributing 35
setting 42
Requisition screen
campaigns 28
determining number of points
available 30
operations 28
viewing available teams 30
Requisitions, completing 32
Reserves
adding 31
trading 32
Resolution 4
Resources
allocation, introduction 1
choosing 30
managing 27
setting 43
Retiring units 32
Retreating
and requisition points 34
without surrendering 17
Reviewing
objectives 26
operational status 29
Ridgeway, Matthew 16
Ringsdorf, Alfred 43
Roadmap to Glory iv−v
Roads, strategic landmarks 29
Rommel, Erwin 5, 9
Rundstedt, Gerd von 2, 25, 62
S
Saving custom battles 44
Scenarios, designing 39
Scheldt Estuary 62
Schijndel operation, strategy 56
Scouts 25
and armored cars, using 46
defending against enemy 48
sending out 47
Screaming Eagles, 101st Air-
borne 63
Screens
Battlemaker 39
Battlemaker Maps 40
Briefing 29
Combat 8
Command 5
Debriefing 33
Details 36
Requisition 30
Supply 28
when playing campaigns,
purpose (table) 28
when playing operations,
purpose (table) 28
Scrolling through maps 8
Sector campaigns 26
Sectors, allocating supplies
for 34
Securing bridges 16
Sending
messages to opponents 59
out scouts 47
Separated soldiers 15
Setting
ambushes 51
game speed 4
options 4
requisition points 42
resources 43
Page 92

86 A Bridge Too Far
Sicily, invasion of 16
Sides, identifying 24
Signaling willingness to
disengage 17
Sims, James 50, 52
Situation report, history 60
Size, expanding game area 4
Skalka, Egon 79
Skytrain transport aircraft 6
Smoke order 12
Smoke, using 52
Sneak order 10, 11
Snipers 49
Soldier monitor 20
Soldiers
ability status 37
emotional state descriptions
(table) 23
fatigue level descriptions
(table) 23
getting feedback about 19
health status 37
information on 20
kill/performance statistics 37
killed, removing 4
metals awarded 38
physical state descriptions
(table) 22
rallying separated 15, 53
Son bridge, strategy 56
Sosabowski, Stanislaw 56, 64,
74, 77
Sound
cues, using 25
Gallery 25
turning on and off 4
Speed, game, setting 4
Star symbol 9
Starting
Battlemaker 39
battles 7, 10
campaigns 28
fighting 32
operations 28
two-player game 57
unit deployment 9
Starting games 4
Statistics
ability 37
condition 37
kill/performance 37
medals 38
Status
set status bar, using 59
reviewing operation 29
supply 27
troop 18
Strategy
ambushing 51
battlefield tactics 50
campaign 53
flanking 52
introduction 45
promoting morale,
cohesion 53
using armored cars 46
using assault guns 47
using halftracks 46
using high ground 51
using infantry 45
using tank destroyers 47
using tanks 45
Student, Kurt 1, 62, 67, 70
Supplies
allocating for sectors 34
completing requisition 32
selecting air or ground 35
Supply column 35
Supply screen, requisition
points 35
Suppression 14
Suppression fire, using 51
Surrendering 17
Surveying battlefield 8
Symbols
cross 9
numerals 9
star 9
System requirements 3
T
Tactical combat, introduction 1
Tactics
battlefield 50
described 45
T aking prisoners 15
Tank destroyers 47
Tanks
and gathering intelligence 25
using 45
using as screens 52
Targeting orders 12
Targets, determining range 14
Taylor, Maxwell D. 63
Team Classification box 31
Team monitor, using 20
Team summary, described 18
Teams
Ad Hoc 30
adding units 31
antitank, using 49
colors 24
current order 18
flamethrower, using 50
functions 22
getting information about 20
machine gun, using 48
mortar, using 48
sending out scouts 47
summary of 18
viewing available 30
viewing summaries 18
Terrain 9
Territory 8
Territory, reassigning 42
Thompson, John S. 67
Toolbar
described 18
getting information from
field 19
Trading reserves 32
Trees, removing 4
Troop Status bar 19
Troops
health of 19
promoting morale,
cohesion 53
regrouping 33
status indicator 18
using infantry 45
using sound cues 25
Tucker, Reuben 59
T w o-pla yer games, choosing 7
Page 93

Index 87
T ypes
ammunition (table) 22
campaign play 26
connections 57
cover 50
action, choosing 5
orders 10
U
Units
adding to player teams 31
deploying 9
editing 43
getting more information on
available 31
identifying 24
moving 9
retiring 32
using effectively 45
Urquhart, Robert E. “Roy” 38,
40, 64, 69, 75, 79, 80
Urquhart, Roy 38, 80
Using
antitank teams 49
armored cars 46
assault guns 47
battle monitors 19
bridges 16
cover 50
flamethrower teams 50
halftracks 46
heavy guns 49
high ground 51
indirect fire 14
infantry 45
machine gun teams 48
mortar teams 48
net status bar 59
smoke 52
snipers 49
sound cues 25
suppression 51
tank destroyers 47
tanks 45, 52
weapons effectively 13
Utility, Battlemaker 39
V
Vandeleur, Joe 68
Veghel operation, strategy 56
Victory locations 9, 33, 41, 42
Videos, turning on and off 4
Viewing
team summaries 18
teams, available 30
units available of specific
nationalities 31
von Rundstedt, Gerd 2, 25, 62
von Tettau, Hans 71
W
Warrack, Graeme 79
Weapons
determining range 14
production, German vs.
Allied 27
using cover 50
using effectively 13
using for suppression 51
using indirect fire 14
Weber, Horst 53
White toolbar text 18
Willems Canal bridge 63
X
XXX Corps, monitoring progress
of 26
Z
Zones, deployment, editing 42
Zooming in and out 8
Page 94

Br. 1st Airborne
Drop Zones
The following table shows each team’s degree of effectiv eness against personnel and tanks. Values are determined by
U.S. 82nd Airborne Drop
averaging the team’ s effective firepower versus target type o v er the effective range of the weapon. Actual values may vary
Zones
based on the experience of the team.
AP = antipersonnel; AT = antitank; IG = infantry gun; MG = machine gun.
U.S. 101st Airborne
German T eams (Predominant Weapon) AP AT
Drop Zones
5cm PaK 35/36 (5cm AT gun) 45
7.5cm IG (7.5cm IG) 56
7.5cm PaK 40 (7.5cm AT gun) 56
8.8cm FlaK (8.8cm FlaK gun) 77
Rotterdam
8.8cm PaK 43 (8.8cm AT gun) 77
Äufklarungs (machine pistol) 67
Ersatz Schutzen (bolt-action rifle) 47
Flammen (flamethrower) 94
Hetzer (7.5cm AT gun) 66
Hetzerflammen (flamethrower) 95
JagdPanther (8.8cm AT gun) 78
JagdPanzer IV (7.5cm AT gun) 67
JagdTiger (12.8cm AT gun) 79
Kampfstaffel (9mm assault MG) 88
Königstiger (8.8cm high-velocity AT gun) 88
Marder III (7.5cm AT gun) 66
Mark III (5cm AT gun) 65
Mark IV (7.5cm AT gun) 76
MG 42 (9mm MG) 77
Panther (7.5cm high-velocity AT gun) 78
Panzerschreck (8.8cm rocket launcher) 36
Puma (5cm AT gun) 54
Scharfschütze (scoped automatic rifle) 30
Schutzen (bolt-action rifle) 57
H
Schwer MG 42 (9mm MG) 87
sGranatenwerfer (8cm mortar) 60
SdKfz 232 (2cm AT gun) 63
SdKfz 234/1 (2cm AT gun) 63
SdKfz 250/1 HMG (9mm MG) 81
SdKfz 250/1 MG (9mm MG) 71
SdKfz 250/7 Mortor (8cm mortar) 60
SdKfz 250/8 IG (7.5cm IG) 63
SdKfz 250/10 AT (3.7cm AT gun) 53
SdKfz 251/1 MG (9mm MG) 71
SdKfz 251/2 Mortor (8cm mortar) 60
SdKfz 251/9 IG (7.5cm IG) 63
E
SdKfz 251/10 AT (3.7cm AT gun) 53
B
SdKfz 251/16 Flame (flamethrower) 95
StuG IIIG (7.5cm AT gun) 66
StuH 42 (10.5cm IG) 75
Tiger (8.8cm AT gun) 87
*If this is a British Airborne team, increase the
G
L
Antwerp
AT rating by 1 to account for Gammon bombs.
L
O
IU
A
L
Tilburg
M
Team Eff ectiveness Chart
D
‘s Hertogenbosch
N
St. Oedenrode
Best
Valkenwaard
Heuse-Escaut Canal
Albert Canal
Oosterbeek
Wolfheze
ARNHEM
Most Effective 9
0 Not Effective
British/Polish T eams AP AT
(Predominant Weapon)
3in. mortar (3in. mortar) 60
6pdr AT (6-pounder AT gun) 55
17pdr AT (17-pounder AT gun) 67
Achilles (3in. AT gun) 75
Achilles II (17-pounder AT gun) 77
Ad hoc rifle (bolt-action rifle) 31*
Bren MG (machine gun) 51*
Churchill AVRE (290mm IG) 63
Crocodile (flamethrower) 75
Cromwell (6-pounder AT gun) 75
Daimler IV MG (machine gun) 41
Firefly (17-pounder AT gun) 87
Flamethrower (flamethrower) 83
M3 HT (.50cal. MG) 62
Veghel
M3 HT HMG (.50cal. MG) 72
M3 HT mortar (81mm mortar) 60
PIAT (spring-loaded launcher) 26
Recon (submachine gun) 61
Rifle (bolt-action rifle) 51*
Son
Sherman (75mm AT gun) 85
Sherman 76 (76mm AT gun) 86
Sherman 105 (105mm IG) 84
Sniper (scoped bolt-action rifle) 20
Stuart (37mm AT gun) 64
Vickers MG (.303cal. MG) 42*
U.S. Teams (Predominant Weapon) AP A T
.30cal. MG (.30cal. MG) 52
.50cal. MG (.50cal. MG) 62
57mm AT gun (57mm AT gun) 54
60mm mortar (60mm mortar) 40
81mm mortar (81mm mortar) 60
Ad hoc rifle (semiautomatic rifle) 31
Assault (automatic rifle) 85
BAR (automatic rifle) 71
Bazooka (75mm rocket launcher) 36
Flamethrower (flamethrower) 83
Recon (submachine gun) 61
Rifle (semiautomatic rifle) 61
Sniper (scoped bolt-action rifle) 20
Driel
Nijmegen
Eindhoven
Elst
Groesbeek
Doetinchem
Reichswald
Y
N
A
M
R
E
G
M
 Loading...