

Page 1

Clash of Steel
TABLE OF CONTENTS
INTRODUCTION...............................................................................................................1
STARTUP...........................................................................................................................1
PLAYER AIDS...................................................................................................................1
GAME CONCEPTS............................................................................................................1
LAND UNITS.....................................................................................................................2
AIR UNITS.........................................................................................................................2
NAVAL UNITS...................................................................................................................2
TALKING TO THE COMPUTER.......................................................................................3
QUICK START...................................................................................................................4
THE SETUP MENU...........................................................................................................8
TURN SEQUENCE..........................................................................................................11
ORDERS PHASE.............................................................................................................12
UNITS..............................................................................................................................18
MOVEMENT....................................................................................................................20
COMBAT .........................................................................................................................24
POLITICS........................................................................................................................29
SUPPLIES/PRODUCTION..............................................................................................31
WEATHER.......................................................................................................................34
SPECIAL RULES.............................................................................................................35
UNIT REORGANIZATION ..............................................................................................36
REINFORCEMENTS.......................................................................................................36
VICTORY CONDITIONS.................................................................................................36
SCENARIOS....................................................................................................................37
STRATEGY AND TACTICS.............................................................................................39
TUTORIAL.......................................................................................................................41
HISTORICAL TIMELINE................................................................................................45
GAME ABBREVIATIONS................................................................................................49
ORDER OF BATTLE.......................................................................................................50
KEYBOARD HOTKEY COMMANDS..............................................................................63
Page 2

Clash of Steel
1
Clash of Steel
2
INTRODUCTION
LASH OF STEEL
is a strategic wargame simulation of the conflict in Europe
during World War II from September 1939 to August 1945. The map runs from
C
Ireland in the west to Russia in the east and from Norway/Sweden in the north
to North Africa in the south. As the Supreme Commander of either Axis or Allied
countries, you make all the military decisions affecting your numerous land, air, and
sea forces in the European theatre. You can also engage in politics and attempt to
acquire additional allies in your struggle for control of Europe. You decide which
units to produce and what areas of special weapons your research and development
scientists should concentrate on. Each turn represents two months, yet every turn is
broken down into a variable number of impulses in which you manage your forces
across the battlefield. Many alternatives allow for different approaches in this World
War II combat simulation.
Game Map
The game map covers from Ireland to the
Soviet Union extending 2,500 miles from
east to west. It also covers from
Norway/Sweden/Finland to North Africa
extending 2,300 miles from north to
south. The various terrain features used
on the map are as follows:
City Mountain Sea
Clear Port Swamp
Desert Resource Wood
Fort River
Combat Forces
STARTUP
README File
Your game disk may come with a
README file that contains rules updates
and/or errata. Please take a look at this
file before playing the game.
Installing the Game
Use the instructions on your data card to
install and play the game.
PLAYER AIDS
Due to the scope of the game, the player
aids listed below were designed to help
you get started playing the game.
♦ Quick Start: A Quick Start section
allows you to read a minimum of rules
giving you a general idea of how to
play the game. Numerous references
to more expanded explanations of the
rules is included. See the section
“Quick Start” on page 4.
♦ How to Play: In order to give you an
idea of how to play the game, see the
“Tutorial” section on page 41.
♦ Scenario Objectives: Each scenario has
some suggestions as to what to do to
play the first few turns. See “Scenarios”
on page 37 for more details.
♦ Timeline: See the section on “Historical
Timeline” on page 45 to review the
dates for the various battles that took
place in the European theatre.
♦ Checklist: In the section “Player’s
Checklist” on page 12 you can review
some of the important tasks you need
to perform in any given turn.
♦ Strategy and Tactics Hints:A section
on “Strategy and Tactics” on page 39
has been included to give you some
helpful hints on playing the game.
GAME CONCEPTS
Game Scale
Each hex is approximately 50 miles
across. Each turn is 2 months long, and
composed of a random number of
impulses. Most land units are at the
Corps or Army level in size.
The land and air units that appear on the
map are color-coded for each country.
German units have a gray background
with black lettering, German panzer
units have a black background with
white lettering, Italian forces have a gray
background with brown lettering, Allied
forces have a blue background with red
lettering, U.S. units have a brown background with white lettering, and Russian
units have a red background with black
lettering. Other neutral countries have
various color schemes.
The land units have two numbers printed
on their counters. The left number is the
effective ground combat strength,
rounded to the closest whole number.
The right number is the amount of
remaining Action Points (AP) which can
be used to move and attack. The air units
also have two numbers. The left number
is the effective air combat strength,
rounded to the next full number. The
right number is the number of air strikes
remaining. Although not shown on the
counter, all air units have an effective
strength of one ground combat point if
attacked. Naval units are not represented
by counters on the map. They can be
accessed in the Navy Menu and the Naval
Formation Menu.
LAND UNITS
♦ Army-sized land units usually have a
large combat strength due to their size.
♦ Army Group (Supply) units have an
action point allowance of 2 or 3. Other
units can trace supply to these units.
They also have a high combat strength.
♦ Corps units are smaller formations
with a lower combat strength.
♦ Engineer units can build fortifications
in any hex to help strengthen defenses
against enemy attacks and amphibious
operations.
♦ Panzer (Tank) units have a good com-
bat strength normally and a high
Action Point allowance.
♦ Paratroop units can help negate defen-
sive advantages when friendly units are
engaged in a ground assault.
AIR UNITS
♦ Air units can perform air strikes against
enemy units to soften up the defender
before a ground attack occurs.
NAVAL UNITS
♦ Artificial Harbors (Mulberry) are used
in conjunction with amphibious
assaults to give the units a supply
source throughout the turn the landing takes place. Unlike other naval
units, these units appear on the map
like land units.
♦ Carrier units have a high combat value
in naval operations.
continues...
Page 3
Clash of Steel
3
Clash of Steel
4
♦ Escort units provide the firepower to
protect transport missions, engage
enemy naval units, or to perform
shore bombardment.
♦ Sub units are used to sink enemy
convoys.
♦ Transport units can move the land
combat units that are to be landed in
friendly ports or enemy coastal hexes
in an amphibious assault.
Game Abbreviations
A list of the game abbreviations is on
page 49.
TALKING TO
THE COMPUTER
Using the Keyboard
Note for IBM users: Make sure your
[Num Lock] is ON and your [Caps Lock]
is OFF before playing.
Use the following keys on the numeric
keypad to move the cursor:
789
46
123
The menu options can be accessed with
hotkey commands which are listed with
the menus in the manual. To exit a window press the Esc key. Use the arrow keys
to move up and down some of the menus
(such as the OB menu) or use the page
up and page down keys on the keypad.
Using the Mouse
Use the mouse to move the pointer over
the menu items and buttons. Click the
left mouse button to select the option.
To exit from a window place the pointer
outside the window or on the small button in the top-left corner of the window
and click the left button. To scroll
around the map, move the mouse
pointer to one of the edges of the map.
To select a hex, click the left button
while the mouse pointer is over the
desired hex. To select a unit first select
the desired hex and then click the left
button again.
All keyboard commands also work if you
are using a mouse.
Menu Overview
The program accepts input from either
the keyboard or mouse at anytime. The
menus are ordered in a tree-like structure. To select a certain item, you can
click on a box, or type the highlighted
key. To exit from a menu, you can select
EXIT or press the Esc key. If you are in
the Main Menu, you can also select and
move units. Use the mouse or keypad to
move the cursor. The right mouse button or the “5” key centers the map
around the cursor. You can scroll the
map by moving the mouse cursor to the
edge of the map. If the cursor is located
on a friendly unit, you can click on it
again, or type “+” to enter the Unit
Menu. In the Unit Menu you can move
the unit by clicking on a nearby hex
within the unit’s range, or typing the
appropriate key on the keypad. The right
mouse button, or the Esc key will bring
you back to the Main Menu.
QUICK START
This section allows you to read a minimum of rules to get started playing the
game. The first section contains an
overview of the game. The second section
shows a listing of the main menus
offered in the game. The third section
has a brief summary of the game’s rules.
Overview
The game is played in bimonthly turns.
Each turn is further divided into an
Economy Phase followed by a varying
number of impulses. In the Economy
Phase, the computer calculates the eligible Production Points (PP) for both sides.
Accordingly, a check on the Initiative
Table will determine who is the active
player in the first impulse. In each
impulse, only one side can move. He is
referred to as the active player, the other
side is the passive player. Each impulse
SETUP MENU
GAME (G)
SCENARIO (C)
LOAD (L)
SAVE (S)
AXIS (A)
ALLIED (I)
RULES (R)
COMP (O)
EDIT (D)
END (E)
MAIN MENU
MENU (U)
END (E)
ASSAULT (A)
STRIKE (S)
NAVY (V)
NEW (N)
UNLOAD (L)
PRODUCT (P)
MAP (M)
INFO (I)
CNTL (C)
CLEAR (R)
EDIT GAME
OPTIONS MENU
SOUND (S)
PANZER (P)
IMPULS (E)
AUTO (T)
SCROLL (C)
ATTACK (A)
D6SOUND (O)
D6ANIM (N)
HEXGRID (H)
SLIDE (L)
UNITEXIT (U)
INFORMATION
MENU
STATUS (S)
SEA ZONE (E)
HISTORY (H)
OB (O)
RESEARCH (R)
POLITICS (P)
BOMBER (B)
WEATHER (W)
SUMMARY
SUMMARY
SUMMARY
OF
OF
OF
MENUS
MENUS
MENUS
COMPUTER
OPTIONS MENU
HIDDEN (H)
FAVOR (F)
BALANCE (B)
IMPROVE (I)
RULES OPTIONS
MENU
SELECT (S)
CHAOS (C)
HOLD (H)
PARTISAN (P)
JAPAN (J)
LIBERATE (L)
starts with a Supply Phase for the active
player, followed by an integrated combat
and movement impulse. After the active
player has finished his impulse, a check
is made on the Turn Continuation Table.
If the turn continues, the passive player
becomes active in the following impulse.
The first two impulses of each turn are
special, as a number of actions are only
allowed at that time. These include production, navy moves, amphibious
invasions, reserve movement, and insertion of new units.
Brief Summary of Game Play
A short summary of the more important
game menus, tables, and rules follows.
Summary of Game Menus
The Setup Menu is the first menu you
will see as the game starts. In this menu
you can begin to play the game, select a
scenario, load/save a file, and set many of
UNIT MENU
OPERAT. (P)
RESERVE (R)
AMPHIB (H)
REBASE (B)
PREPARE (A)
FORTIFY (F)
MOVE (M)
OOPS (O)
EVACO ( E)
STRATEGIC
BOMBER MENU
EXIT (X)
BUY (B)
FACTORIES (F)
HARBORS (H)
OIL (O)
ENGLAND (E)
RUSSIA (R)
POLITICS MENU
CONFLICT (C)
BALKAN (B)
WAR (W)
PRESS (P)
MAP MENU
GET (G)
COUNTRY (C)
CNTL (T)
SEA (S)
RESEARCH
MENU
UP (U)
DOWN (D)
MORE (M)
LESS (L)
VIEW (V)
NAVY MENU
SELECT (S)
NEW (N)
MOVE TO (M)
FORM. (F)
STATUS MENU
AXIS (A)
ITALY (I)
ALLIED (C)
US (U)
RUSSIA (R)
LOSSES (O)
Page 4

Clash of Steel
5
Clash of Steel
6
the game’s parameters in the Edit Game
Options Menu, Computer Options Menu,
and the Rules Options Menu.
Selecting GAME in the Setup Menu begins
the game. You will now be brought to the
Main Menu. MENUbrings you back to the
Setup Menu. END allows you to finish
your impulse. The game map will be displayed and in the Main Menu. You can
move and place units on the map and also
attack using the ASSAULTand STRIKE
options. The NAVYoption allows you to
move your naval units. You can place new
units or units in reserve on the map
using the NEW option. UNLOAD gives you
the option to unload units from ships.
You can check out your unit production
schedule with the PRODUCToption. MAP
displays the Map Menu which allows you
to view the entire map with various settings. The INFO option allows you to
access the Information Menu. The CNTL
option shows you which side controls the
hexes on the map. CLEARremoves all
units from the map.
When you access a unit, the Unit Menu is
displayed. You can move land and air
units by selecting a nearby hex to move
to. You can also move land units with the
OPERAT. and RESERVE options. Air units
can move with the OPERAT., RESERVE, and
REBASE options. A paratroop unit can use
Prepare to be able to airdrop up to three
hexes away in the next impulse. Engineer
units can use FORTIFYto fortify the hex
they are in at the beginning of the next
turn. If they are in fortify mode, an additional option to MOVEwill be displayed.
The Information Menu is accessed from
the Main Menu. STATUSwill allow you to
see how many Production Points you will
be receiving due to the number of cities,
resource centers, and convoys you have.
You can choose to upgrade your units.
You can also view the overall amount of
strength and losses for each player. Here
you can check the status on your forces
using OB. You can see the sea zones with
the SEA ZONE option. The RESEARCH
option allows you to build new weapons
to help win the war. POLITICSallows you
to influence a country’s neutrality and
declare war. You can buy strategic
bombers for 20 PPs and set your bombing targets using the BOMBERoption. The
current weather can be displayed with
the WEATHER option.
Summary of Tables/Rules
A brief summary of the important tables
and rules appears below.
COMBAT UNITS
Refer to the section “Combat Forces” on
page 2 for a brief description of the unit
types in the game. Also refer to the section on “Paratroops” and “Engineers” on
page 2 for the specific rules for these two
unit types.
ACCESSING UNITS
You can move the map cursor by using
the mouse or the keypad keys. To scroll
the map place the mouse pointer or
move the cursor to the edge of the map.
Clicking the right button or pressing the
“5” key centers the map. Placing the cursor over a friendly unit and clicking the
left button or pressing “+” displays the
Unit Menu. Every unit on the map exerts
a Zone of Control (ZOC). This influence
extends into each of the six adjacent
hexes surrounding the unit. A unit must
pay one additional Action Point to move
from one enemy ZOC into another
enemy ZOC.
MOVING UNITS
Units have a variety of methods to move
by. You can move units one hex at a time
by placing the cursor in an adjacent hex
or move multiple hexes by placing it a
few hexes away. Units can move by the
functions RESERVE, OPERAT., or REBASE.
The RESERVE option removes the unit
from the map and places it in Reserve. It
costs one transport point to place a unit
in reserve. After a unit is placed into
reserve, you can take the unit out of
reserve by moving the map cursor adjacent to a city. Access the NEWoption on
the Main Menu. The hex cannot be in an
enemy ZOC and the hex must be
friendly-controlled. All reserve units
must be deployed out of reserve before
you can end your turn, but only on the
first or second impulse. The unit must
have a supply level greater than zero to
be put in reserve.
The option OPERAT. allows you to move
the unit up to 10 hexes away. Axis, Allied,
U.S., and Russia (only after Russian
Winter strikes) can move one unit per
impulse.
The REBASE option allows an air unit to
relocate up to four hexes away in a
friendly-controlled hex. You cannot
rebase on snow or mud turns. You can
rebase on any impulse.
GROUND COMBAT
In the Main Menu the ASSAULToption
allows you to select the adjacent friendly
units you wish to use to attack the
enemy unit in the hex which contains
the map cursor. You can therefore combine multiple units to attack the selected
enemy unit. A unit can only make one
assault in a given impulse. Units can also
conduct an overrun attack by themselves. To do so, simply attempt to move
the friendly unit into the enemy hex. An
overrun attack will then be made.
AIR STRIKES/SHORE BOMBARDMENT
In the Main Menu you can use the STRIKE
option to perform an air strike on the
enemy unit in the hex which contains
the map cursor. The air unit must be
within 7 hexes of the target. Enemy air
units can also intercept if within 7 hexes
of the target. If the target hex is a coastal
hex, then Shore Bombardment can take
place. Shore Bombardment acts similarly
to an air strike. CV and BB will each add
one point to a bombardment which is
resolved on the ground strike table. Only
units in the same sea zone as the naval
unit can be bombarded. There will be no
interception and bombarding ships will
suffer no reverse results except that they
can not bombard a second time in the
same impulse.
TERRAIN EFFECTS ON
MOVEMENT/COMBAT
The Action Point costs to enter the different terrain types and the effect that
terrain has on the defender’s strength
and air strikes are shown in the table
below. The defense bonus is the number
of strength points added to a unit’s
strength. The unit’s total strength is
then modified by its morale. The Air
Strike column shows the reduction in
attacker’s effective air strength.
TERRAIN AP DEFENSE AIR
TAME COST BONUS STRIKE
City 1 2 1
Clear 1 - Desert - 1 Fort * 1 3 2
Mountain 2 1 1
Port 1 2 1
Resource 1 - River # - Sea - - Swamp 2 1 Wood - 1 -1
# units attacking across a river are halved in strength.
* Note: a computer player’s unit has its defense strength
increased 70% while defending in a fort.
Page 5
Clash of Steel
7
Clash of Steel
8
PLACING UNITS ON THE MAP
Units which have just come out of production are shown in the third box from
the left at the bottom of the screen when
the Main Menu is displayed. Units placed
into Reserve or newly produced units can
be placed on the map using the NEW
option in the Main Menu. Place the cursor on the friendly-controlled hex on or
adjacent to a city and select NEW. A list of
units will appear. Select Insertto place the
unit on the map. If you are conducting
amphibious operations, you must first
have naval transport unit(s) in the Sea
zone box (not a port box) in the same sea
zone as the unit to be loaded onto the
ship. Select the unit and choose the
AMPHIB option in the Unit Menu. Move
the cursor to the landing hex and select
UNLOAD from the Main Menu. Select the
unit to unload.
AMPHIBIOUS OPERATIONS
If you wish to conduct sea transport or
amphibious landings, refer to “Naval
Movement” on page 22 and “Naval
Combat” on page 27.
STRATEGIC BOMBING
Strategic Bombing Points (SBP) can be
purchased at the cost of 20 spared PP
from the Strategic Bombing Menu which
can be accessed from the Info Menu. You
can direct the whole bombing fleet at
three different targets: Factories,
Harbors, and Oil. If England and Russia
are both in the war, the Axis player can
choose which nation to bomb. Once each
turn the bombers will resolve their orders.
SUPPLY
Supply lines are traced through friendlycontrolled hexes. Also, surrounding
enemy units with friendly-controlled
hexes disables their retreat, as it cuts
their supply line. Each hex is either
friendly or enemy-controlled, or contested. Control can change on two
occasions during the game:
♦ Every time a unit enters a hex it
becomes friendly-controlled.
♦ During the Supply Phase control of all
hexes is recalculated: All friendly units
and all city hexes which were previously friendly-controlled act as control
bases for each side. Now each hex
becomes friendly to that side which
has the nearest control base in terms
of Action points. In the case of a draw,
the hex becomes contested.
After the calculation of hex control, the
supply value of all units of the active
player (only) will be calculated. For this
purpose all friendly-controlled cities and
all friendly army groups count as supply
sources for the active player. You get the
new supply value of a unit by tracing a
path through friendly-controlled hexes
from a supply source to the unit and subtracting the Action Point cost of this
path from the supply value of the source.
The varying supply values of sources are:
SUPPLY SOURCE SUPPLY VALUE
Not isolated city in home country 10
Not isolated army group 10
City in sea supply in home country 10
Artificial harbor 10
City in sea supply 7
Isolated city in home country 5
Isolated army group 5
Not isolated city in enemy country 5
Isolated city in enemy country 0
PRODUCTION
Each turn, except for the Sep/Oct 1939
turn, the Italian, Axis, Russian, and Allied
players receive Production Points (PPs)
based on the number of friendly cities,
friendly resource centers, and convoys.
Each city and convoy is worth 1 point
while resource centers are worth 2
points. If the country has been conquered, all resource centers belong to
the other player. Players use PPs to buy
various land, air, and naval units which
are either dissolved or purchasable in the
Production Phase. When buying units in
the Purchase Menu you will get a list of
eligible units together with the cost of
the unit in PP and the number turns it
will take to produce the unit. You can
only purchase a unit if you have sufficient PP remaining. Unused PP count as
spared PP. Purchased units will become
available as Reserve units after the
shown delay.
RESEARCH
You have 10 Research Points to allocate
among various weapon research areas.
Review the effects described in the section on “Research Menu” on page 16.
OTHER RULES
Refer to the section on “Special Rules”
on page 35, especially if you are playing
the 1939 or 1940 scenarios. The
Mediterranean area has a special Malta
supply rule and England has a homeguard rule if the Axis plans to invade
their country. Under the section “Rules
Options” on page 9 there are additional
rules that can apply.
THE SETUP MENU
When you start a game, the Setup Menu
allows you to load saved games or set up
new ones. There are many optional rules
and game balancing alternatives to give
added flexibility. You can return to this
menu while playing by selecting the
MENU option in the Main Menu. Each scenario has a list of short term objectives
that you can review to give you an idea
what you need to be concerned with in
either attacking or defending in the first
few turns (see “Scenarios” on page 37).
Setup Menu: GAME
SCENARIO
LOAD
SAVE
AXIS
ALLIED
RULES
COMP
EDIT
END
GAME (G) option starts a new game or
allows you to continue playing the game
once you have started.
SCENARIO (C) option allows you to
choose one of the six scenarios to play:
Poland 1939, Fall of France 1940,
Operation Barborossa 1941, Drive to
Stalingrad 1942, Kursk 1943, or D-Day
1944. See the section “Scenarios” on
page 37.
LOAD (L) option allows you to load
in a previously saved game. See
“Loading/Saving the Game” on page 9.
SAVE (S) option allows you to save the
game. See “Loading/Saving the Game”
on page 9.
AXIS (A) option allows you to have the
Axis player controlled by either a human
or a computer player.
Page 6

Clash of Steel
9
Clash of Steel
10
ALLIED (I) option allows you to have the
Allied player controlled by either a
human or a computer player.
RULES (R) option allows you to select
various rules to use in the game: assault
selection, chaos at OKW, hold (stand and
die), partisans, Japan (war in Siberia),
and liberation politics. See the section
“Rules Options” on page 9.
COMP (O) allows you to adjust several
factors for the computer player: computer hidden, computer favored, adjust
balance, and improved Allied units. See
“Computer Options” on page 10.
EDIT (D) option allows you to select various sound/graphic options: sound,
impulse end request, automatic messages, scrolling active, attack request,
dice with sound, animated dice, hex grid,
sliding moves, and unit exit with 0 AP.
See the section “Edit Game Options” on
page 10.
END (E) option allows you to exit to DOS.
Answer YES (Y) if you wish to quit.
Answer NO (N) if you wish to continue
playing.
Loading/Saving the Game
All saved games are stored in a separate
directory called “Save”. The amount of
free space on your hard drive will determine how many saves you can store. The
LOAD (L) option in the Setup Menu
allows you to retrieve a previously saved
game. When you have selected the
desired filename (the file selection box is
displayed around the filename), click the
left button with the mouse arrow over
the LOAD box or press the “L” key to load
the file. The other options allow you to
move the highlight to other pages or
up/down the list of filenames.
The SAVE (S) option in the Setup Menu
allows you to save the game using the
selected saved game filename which is
surrounded by the file selection box. The
option SAVE AS (A) allows you to name
your own saved game filename. A maximum of eight characters can be typed in.
Press Enter when you are finished entering your filename. Press Enter again to
return to the Setup Menu. The DELETE
(L) option erases a previously saved
game from the hard drive.
RULES OPTIONS
Additional game rules are available as
explained below:
SELECT (S) option allows you to be able
to have the ability to choose “YES” or
“NO” for each attacking unit when
assaulting an enemy unit if the option is
set to ON. If the option is OFF, then all
attacking units automatically participate.
The computer can never be affected
adversely if these rules are used:
CHAOS (C) option is the Chaos at OKW
rule which states that from 1941-1945,
every Axis Army-Group has a 50%
chance of receiving only one AP each
impulse.
HOLD (H) or the “Stand & Die” rule
states that starting with the turn of
Russian Winter, every Axis unit which
intends to move west has a 33% chance
of being intercepted by one of Hitler’s
stand & die orders. In this case, the unit
will not move and lose a random number
of AP. If there are remaining APs, the
unit can try to move again.
PARTISAN (P) rule states that there is a
test against the number of unoccupied,
Axis controlled cities in Russia during
each Axis Supply Phase. If a random
number is less than the number of cities,
then partisans will greatly lower Axis
supply in Russia. The chance for partisans to appear will also increase as the
war progresses.
JAPAN (J) or the “War in Siberia” rule
assumes that Japan has invaded
Kamtschatka. The 3 Russian shock units
will not be available. Note: A Japanese
invasion would have concentrated on the
capture of vital Siberian cities. There are
no Japanese units in the game.
LIBERATE (L) or “Axis Liberation Politics”
rule states that with the capture of certain cities, the Axis will recruit units
there. These are corps-sized and will
arrive automatically after 2 turns. The
cities are: Paris, Riga, Minsk, Smolensk,
Odessa, Kiev, Rostov, and Baku.
COMPUTER OPTIONS
The Computer Options menu offers additional rules and game balancing
selections which are explained below:
HIDDEN (H) allows computer controlled
units to only become visible if you move
adjacent to them.
FAVOR (F) allows the computer player to
have more of an advantage. This rule has
two effects:
♦ Computer pays only 75% of the nor-
mal PP cost for units.
♦ A human player pays 50% of the nor-
mal PP cost for dissolved units
(instead of 33%).
There are two more effects if the Allies
are human controlled:
♦ The Axis ignores rivers in the first turn
that Russia is at war.
♦ For every impulse that Moscow is Axis-
controlled, there is a chance that
Russian units will lose efficiency.
BALANCE (B) sets the level of difficulty in
the game. The default is Normal. The
computer’s units have their strength
modified by the percentage shown below.
The five levels are:
♦ PACIFIST (P) places the computer at a
50% disadvantage.
♦ PRIVATE (R) places the computer at a
25% disadvantage.
♦ SERGEANT (S) is the normal balance
selection.
♦ MAJOR (M) places the computer at a
+25% advantage.
♦ GENERAL (G) places the computer at a
+50% advantage.
IMPROVE (I) allows for each neutral or
Allied nation to have their units
strengthened. The European theatre
allows for a variety of different strategies.
There is a danger that once you have
found your favorite winning strategy,
like invading England early in the game,
you can lose your interest in an invasion
in Russia as you have already proved
“how to win this game.” This rule can be
a bit of motivation. There is a check for
each neutral or Allied nation. Depending
on this check the units of this nation will
be strongly improved, improved, or not
improved at all. The effect is permanent.
EDIT GAME OPTIONS
The Edit Game Options menu gives you
more options to choose from as
explained below:
SOUND (S) option will turn on or off the
sound effects in the game.
PANZER (P) turns on or off the sound of
panzers (tanks) moving on the map.
IMPULSE (I) toggles on or off the Impulse
End request message. If it is set to ON,
you will be prompted to answer YESor
Page 7

Clash of Steel
11
Clash of Steel
12
NO when you have chosen the END
impulse option in the Main Menu.
AUTO (T) displays messages two different
ways. If this option is set to ON, messages will be cleared from the screen
after a few seconds or if a key/button is
pressed. If set to OFF, you must press a
key/button to continue.
ATTACK (R) allows you to automatically
attack an enemy unit, or display an
additional menu allowing you to cancel
the attack.
D6SOUND (O) gives sound effects on the
dice rolls.
D6ANIM (N) displays animated dice.
HEXGRID (H) allows you to use the hex
grid or not. If you do wish to see the hex
grid, click the USE(U) option. The other
options in the hex grid are FATLINE(F),
BLACK (B), and GREEN (G).
SLIDE (L) activates or deactivates a
smooth sliding motion when units move.
UNITEXIT (U) automatically exits the Unit
Menu to the Main Menu whenever a unit
reaches zero AP.
TURN SEQUENCE
Economy Phase
Test for Entry into War
Convoy Phase
New PP Determined
Strategic Bombing
Reorganization Phase
Build Forts
Recruiting Phase
Develop New Weapons
Initiative Determined
Supply Phase
Production Phase
Declaration of War
1st Impulse
Determine Weather
Buy Units
Orders Phase-Move/Attack
Test for Surrender
Impulse Continue Test
2nd Impulse
Buy Units
Orders Phase-Move/Attack
Test for Surrender
Impulse Continue Test
3rd Impulse
Determine Weather
Orders Phase-Move/Attack
Test for Surrender
Impulse Continue Test
4th Impulse
Orders Phase-Move/Attack
Test for Surrender
Impulse Continue Test
5th-10th Impulse
End Turn
Overview
The game is played in bimonthly turns.
Each turn is further divided into an
Economy Phase followed by a varying
number of impulses. In the Economy
Phase, the computer calculates the eligible Production Points (PP) for both sides.
The computer will also determine who is
to be the active player in the first
impulse based on the year and the
month. The Axis player has a higher
chance of having the initiative early in
the war and in better weather months. In
addition, if Russia is conquered the Axis
has an increased chance. In each
impulse, only one side can move. He is
referred to as the active player; the other
side is referred to as the passive player.
Each impulse starts with a Supply Phase
for the active player, followed by an integrated combat and movement impulse.
After the active player has finished his
impulse, a check is made to see if the
turn continues. In better weather the
percentage chance that the turn will
continue is much higher. Each turn usually has between four and six impulses. If
the turn continues, the passive player
becomes active in the following impulse.
On every odd-numbered impulse the
Weather Table is used to determine the
weather.
Impulse Restrictions
The first two impulses of each turn are
special, as a number of actions are only
allowed at that time. These include the
following:
♦ Production
♦ Reserve movement
♦ Amphibious transport and invasion
♦ Navy battles
♦ German disintegration
♦ Placing new units on the map
ORDERS PHASE
You can move the map cursor by using
the mouse or the keypad keys. To scroll
the map place the pointer at the edge of
the map. Using the keyboard you can
scroll the map by placing the cursor on
the map edge. Clicking the right button
or pressing the “5” will center the map.
Placing the cursor over a friendly unit
and clicking the left button or pressing
“+” will display the Unit Menu. Every
unit on the map exerts a Zone of Control
(ZOC). This influence extends into each
of the six adjacent hexes surrounding the
unit. A unit must pay one additional
Action Point to move from one enemy
ZOC into another enemy ZOC. This
movement is also called infiltration.
Player’s Checklist
♦ Politics — try to persuade neutral
countries to join your side
♦ Research — review/allocate research
points
♦ Declare War
♦ Buy Strategic Bombers
♦ Check Production menu for
Reinforcements — place on map
♦ Move land units using normal, reserve,
or operational movement modes
♦ Make air strikes/shore bombardment
♦ Make ground attacks/assaults
♦ Make forts with engineers
♦ Make paradrops
♦ Move navies
♦ Make amphibious assaults
Page 8

Clash of Steel
13
Clash of Steel
14
The Main Menu
This menu is the heart of the game in
which you move and attack your forces
and check on the status of many items
such as research, weather, Order of
Battle, etc.
Main Menu
MENU (U) option returns you to the
Setup Menu described on page 8.
END (E) option allows you to end your
orders for the impulse.
ASSAULT (A) option allows you to select
the adjacent friendly units to attack the
enemy unit in the hex which contains
the map cursor. You can combine multiple units to attack the selected enemy
unit. A unit can only make one assault in
a given impulse.
STRIKE (S) option allows you perform an
air strike on the enemy unit in the hex
which contains the map cursor.
NAVY (V) option allows you to access the
Navy Menu described on page 14.
NEW (N) option allows you to place reinforcements or units in reserve onto the
map in an empty friendly-controlled hex
which is on or adjacent to a friendly city.
The hex cannot be in an enemy ZOC or
contested hex.
UNLOAD (L) allows a friendly unit that
has previously been loaded onto a naval
transport ship with the AMPHIBoption to
land in a coastal hex. If the hex is
friendly-controlled, the unit lands automatically. If it is enemy-controlled or
occupied, then the amphibious invasion
combat routine is used to determine if
the unit successfully lands or not.
PRODUCT (P) option graphically displays
which units are currently in production
for both players. Axis units are on the
left; Allied units are on the right side of
the display.
MAP (M) option allows you to access the
Map Menu described on page 15.
INFO (I) option allows you to access the
Information Menu described on page 15.
CNTL (C) option shows you the hexes
currently under the player’s control.
First one player’s controlled hexes are
displayed; next the other player’s hexes
are shown.
CLEAR (R) removes the units from the
map so you can see the underlying terrain features more clearly. Clicking the
left button returns the units to the map.
Unit Menu
When a combat unit is accessed, the
unit’s data will be displayed in the lower
left hand text window showing the unit’s
name, strength, Action Points (AP),
morale, efficiency, and supply.
To move a ground combat unit place the
mouse pointer over an empty adjacent
hex and click the left mouse button.
Using the keyboard, press one of the keypad keys. You cannot stack with friendly
units. You can also select a non-adjacent
hex to move to. The computer will automatically move the unit toward the
destination hex selected. In addition you
also have the movement options listed
below:
OPERAT (P) allows you to move the unit
up to 10 hexes away. Each player, including Russia (before Russian Winter
strikes), can move one unit per impulse
with this Operational Movement.
RESERVE (R) removes the unit from the
map and places it in Reserve. It costs one
transport point to place a unit in reserve.
Reserve movement is allowed only during the first or second impulses. After a
unit is placed into reserve, you can take
the unit out of reserve by moving the
map cursor to an empty hex on or adjacent to a city. Access the NEWoption on
the Main Menu. The hex cannot be in an
enemy ZOC and the hex must be
friendly-controlled. All reserve units
must be deployed out of reserve before
you can end your turn. The unit must
have a supply level greater than zero to
be put in reserve.
AMPHIB (H) option allows a land unit
(with a morale of at least 25) in a port
during the first or second impulse to perform an amphibious operation. See the
sections on “Naval Movement” on page
22 and “Naval Combat” on page 27 for
further details.
PREPARE (A) option allows paratroop
units to be put into preparation mode. In
any subsequent first or second impulse,
they are allowed to take part in assaults
up to 4 hexes away. In this event, paratroop units have a 25% chance of
disabling the defender’s terrain bonus, a
20% chance of disrupting the defender,
and they automatically disable the effect
of rivers.
FORTIFY (F) option allows engineers to
build forts. This will place them into fortification mode. They will build a fort at
the start of the next turn. Forts act like
the Maginot Line. They can further hinder sea invasions with an unoccupied
fort having a 50% chance of defeating a
sea invasion. Forts are removed if control
of the hex changes.
MOVE (M) option is active if an engineer
is fortifying. Selecting this option takes
the engineer out of fortification mode.
REBASE (B) option allows an air unit to
relocate up to four hexes away in a
friendly-controlled hex. You cannot
rebase on snow or mud turns. You can
rebase on any impulse.
OOPS (O) option allows you to move back
to your starting location. If you are using
hidden units, this option is not available.
Navy Menu
The Navy Menu allows you to deploy new
ships that have been produced, move
your fleets to engage enemy fleets, provide escort, launch amphibious
invasions, transport troops to friendly
ports, and engage in shore bombardment
against enemy troops on coastal hexes. A
map is displayed with two types of boxes
that contain the various ships. The large,
light blue box is the At Sea box which
represents the seven sea zones: Baltic
Sea, North Sea, North Atlantic, South
Atlantic, West Mediterranean, East
Mediterranean, and the Black Sea. The
smaller dark blue box is the Port box.
The menu options shown on the right
side of the map are as follows:
SELECT (S) allows you to select the naval
units you wish to move from one box to
another. When you access the Selection
Menu, you can highlight the ship you
wish to move and then choose SELECT
(S). An asterisk will be placed to the
right of the ship name showing that the
ship has been selected to move. If an “M”
appears across from the ship’s name, it
means that the ship has already moved. A
“D” means the ship is damaged. Exit the
Selection Menu and you will notice in
the top-right corner the ship(s) in the
MOVING STACK box. Next choose the destination box to move the ships to by
clicking on the appropriate box. Click the
MOVE TO box to move the ships.
Page 9

Clash of Steel
15
Clash of Steel
16
NEW (N) allows you to place newly produced units in the selected box. Click on
the box you wish to place the ship and
then select NEW. Next select the ship
from the list of available ships.
MOVE TO (M) allows you to move the
units displayed in the MOVING STACKbox
to the destination At Sea or Port box
which has been selected.
FORM. (O) option accesses the Naval
Formation Menu. Naval units At Sea can
be issued orders by putting them into
formation boxes. For every sea zone,
there are 8 boxes:
♦ 2 fleet boxes: units placed in these
boxes are ordered to show up and seek
combat to gain the superiority in this
zone.
♦ 1 transporter box: units in this box
show their presence for some reasons
(i.e. establishing sea supply), but try to
avoid combat.
♦ 4 raider boxes: each box can only have
one unit. Units in this box are ordered
to raid enemy convoys and avoid combat.
♦ 1 land-based box: air units which are
located in a coastal hex will be displayed in the appropriate land-based
box and can take part in combat occasionally.
SELECT (S) brings up the Select Moving
Unit Menu for the highlighted unit. First
click on the appropriate box you wish to
move units out of and then click on the
SELECT button.
MOVE TO (M) moves the units displayed in
the MOVING STACK box in the upper-right
corner. You must have first selected the
units you wish to move using the SELECT
option. Choose the destination sea zone
or port you wish to move to. Select MOVE
TO to move the ships.
Map Menu
The Map Menu displays a strategic view
of the entire map on one screen. The
map options are explained as follows:
GET (G) centers the map on the area
enclosed within the rectangle on the
strategic map.
COUNTR (C) displays the location of the
different countries on the map.
CNTL (T) displays the territory controlled
by each player.
SEA (S) displays the sea zones on the
map.
Information Menu
The Information Menu gives you a number of options to view your status in
many areas such as production, order of
battle, politics, research, skills available,
and strategic bombing. The menu
options are:
STATUS (S) accesses the Status Menu
described on page 16. You can view the
number of cities and resource centers
controlled for production purposes, convoy PPs, remaining PPs, and the losses
and strength of each sides forces.
SEA ZONE (E) allows you to temporarily
view the sea zone borders on the map.
OB (O) allows you to view both sides’
units. YES (Y) displays your units, while
NO (N) displays the enemy’s units. The
INFO (I) option displays various unit data.
RESEARCH (R) accesses the Research
Menu described on page 16. You can set
your research priorities with 10 research
points in various categories such as jet
planes or rockets.
POLITICS (P) accesses the Politics Menu
described on page 17. This menu allows
you to declare war on another country
or try to use political points to get
new allies.
BOMBER (B) accesses the Strategic
Bomber Menu described on page 18 to
buy Strategic Bombers and set your
bombing targets.
WEATHER (A) displays the current
weather condition: Clear, Mud, or Snow.
The effects of weather are outlined in the
“Weather” section on page 34.
Status Menu
The Status Menu gives you information
about the production, Industrial Base,
and Unit Upgrade level for AXIS(X), ITALY
(I), ALLIED (A), US (U), and RUSSIA (R).
Accessing one of the countries will list
the number of controlled cities for production, the number of resource centers
for production, the number convoy
Production Points being received, the
remaining number of Production Points
left, the current level of the Industrial
Base multiplier, the current level of Unit
Upgrade, and the maximum level that
can be attained for Unit Upgrade (which
is the total of the side’s AT and Heavy
Panzer R&D levels). The LOSSES(L)
option displays the amount of losses suffered by each side and the remaining
unit combat strength left on the map.
Each unit’s strength is calculated by
multiplying the strength by its supply
and efficiency values and then dividing
the result by 100.
Research Menu
There are eight fields of technical
research which can be advanced in order
to strengthen certain qualities of the
armed forces. The fields are MRLS
(Multiple Rocket Launchers),
Panzerfaust (Bazooka), AA-Radar, ASWSonar, Rockets, Jet Plane, AT-Guns, and
Heavy Tanks. Each side has a fixed number of ten Research Points (RP) which
can be assigned to the various fields. On
some fields, improvement of the armed
forces will only occur at a certain level.
Some of the menu options are explained
below:
MORE (M) allows you to add one research
point to the highlighted category.
LESS (L) allows you to subtract one
research point from the highlighted
category.
VIEW (V) allows you to view the current
research progress standings of both players in each category. The Axis player’s
current level is displayed first. Next is the
Allied player’s current level. Last is the
maximum level which can be achieved in
the category. The enemy player’s
research levels are approximated with a
question mark after the number.
Each side can assign its ten points to any
of the field(s) desired. The chance for an
R&D increase in a turn depends on the
number of points allocated to the field.
Only the first, third, sixth, and tenth
point allocated in each field will affect
the percentage chance as displayed by a
red bulb (a gray bulb means the research
point has no effect). For example, one
point allocated gives the same chance as
two points; three, four, or five points all
give the same chance as well. In every
Page 10

Clash of Steel
17
Clash of Steel
18
Economy Phase, there is a test for
advance on each field:
TECHNICAL RESEARCH INCREASE TABLE
# RP ASSIGNED % CHANCE
1-2 7%
3-5 14%
6-9 20%
10 27%
Developments
MRLS: Once the level has reached its
maximum (level 3), there will be
Multiple Rocket Launchers (MRLS) available for that side. For each attack or
assault thereafter, there is a 15% chance
that the defender will be disrupted by the
preceding bombardment. In this case,
the defender will be halved.
Panzerfaust: With each new level, the
efficiency of all non-panzer ground units
will be increased by 5 points.
♦ AA-Radar: If developed to the maxi-
mum (level 2), enemy strategic
bomber attacks will be reduced by
20%.
♦ ASW-Sonar: Until ASW is developed to
its maximum, the chance for spotting
enemy subs in raider boxes is divided
by three. An Allied fleet box will
engage Axis subs in a raider box with a
probability of 5%, no matter who is
the searching player. If Allied ASW is
at maximum, the probability of spotting will be 15%.
♦ Rockets: If developed to the maximum
(level 7), the strength of strategic
bomber attacks will be tripled.
♦ Jet-fighter: With every new level, start-
ing with level 3, the efficiency of all air
units will be increased by 10 points.
♦ AT-Guns: Every new level increases
the efficiency of non-panzer ground
units by 3 points. See the combat section “AT-Guns/Heavy Tanks” on page
26 for more details.
♦ Heavy Tanks: Every new level
increases the efficiency of panzers by 3
points. See the combat section “ATGuns/Heavy Tanks” on page 26 for
more details.
Politics Menu
The Politics Menu allows you to use
diplomatic pressure to persuade the various countries to join your side. You can
also declare war on a country as well. A
strategic map view shows the countries
involved and their status. Each country
has a box with either a number (0-99) or
letters (AL or AX). The number, representing the country’s Alliance Level, can
be either red or blue; red signifies the
country is pro Allied whereas blue signifies pro Axis. Whenever the number
reaches 100, the country will automatically join the appropriate side. An “AX”
means the country has joined the Axis
side and “AL” the Allied side. The top
right corner displays political information. Click on a country’s box and on the
top line you will see the country’s name
followed by its Break Value and Political
Value. The Break Value for a neutral
country ranges from 0 to 100 and represents its ability to withstand diplomatic
pressure. The higher the number, the
less effect political pressure will have. A
country’s Political Value reflects the
prestige (in Political Points) that a side
gains if it conquers the country. At the
moment of conquest the points are
awarded. A country can only be conquered once. Next the Political Points for
both the Axis and Allied players are displayed. The current political level of the
Balkan Pact is also shown. The four
countries comprising the Balkan Pact are
Greece, Rumania, Turkey, and
Yugoslavia. Hungary and Bulgaria can
also join the Pact if an attempt to use
diplomatic pressure on them fails.
Whenever one of the Pact members is
being pressured diplomatically, the
Balkan Pact Value (BPV) is added to the
country’s Break Value. The BPV starts
out at 30 and increases slightly each time
someone attempts to pressure a Pact
member. It decreases by a much larger
random amount whenever a member
joins a side. There are five buttons displayed on the right side which are:
CONFLICT (C) will display three minor
conflicts between Russia and Rumania,
Bulgaria and Yugoslavia, and Rumania
and Bulgaria. You can choose to be neutral or support one of the countries. If
you choose to support one country, that
country’s Alliance Level will be shifted
slightly in your favor and the other
country will be shifted towards your
enemy. Select CHANGE(C) to toggle
between neutrality and supporting one
of the sides.
BALKAN (B) displays which countries are
in the Balkan Pact.
WAR (W) allows you to declare war on
the country selected. You cannot enter
into a neutral country; you must first
declare war on it.
PRESS (P) allows you to diplomatically
pressure the country selected to join
your side.
Strategic Bomber Menu
The Strategic Bomber Menu allows you
to increase your strategic bombing fleet
through purchase of Strategic Bomber
Points (SBP) at a cost of 20 PP per SBP
and/or to switch your bombing raids to a
different target. The number of SBPs are
represented graphically for each side.
The options are listed below:
EXIT (X) will exit the menu.
BUY (B) will allow you to buy one SBP at
a cost of 20 PPs. The Allied player has
another menu allowing to buy an SBP
for either US (U), CW (C), or RUSSIA (R).
FACTORIES (F) each SBP will achieve 0-15
hits on enemy factories. Each hit will
increase the purchase cost for a randomly selected enemy unit permanently
by one.
HARBORS (H) same as factories, except
that all hits will be divided among
naval units increasing the purchase
cost by one.
OIL (O) each SBP will have a 50% chance
of permanently decreasing the Action
Point allowance of an enemy unit by one.
ENGLAND (E) option for the Axis player
allows him to bomb English targets if
both England and Russia are in the war.
RUSSIA (R) option for the Axis player
allows him to bomb Russian targets if
both England and Russia are in the war.
UNITS
Any unit which is either not neutral
conquered is in one of the following
modes:
♦ On Map: the unit is on the map.
♦ Reserve: ready to be put on the map.
♦ Sea Trans: loaded on a Transporter.
♦ In Production: will be placed into
Reserve status in a number of turns.
♦ Dissolved: the unit was dissolved in
combat and taken from the map. The
unit can be repurchased at 40% of the
original cost in the next turn.
or
Page 11
Clash of Steel
19
Clash of Steel
20
♦ Purchasable: the unit can be pur-
chased and be placed In Production.
♦ Eliminated: was dissolved while being
isolated, can be repurchased after one
year for the full price.
♦ Gone: the unit’s home country is con-
quered. All units are not available even
if friendly forces liberate the country.
Units on the Map
Land combat units have two numbers
printed on their counters. The left number is the effective ground combat
strength, rounded to the closest whole
number. The right number is the amount
of remaining Action Points (AP) which
can be used to move and attack. A unit’s
efficiency is a representation of the unit’s
training and leadership. The supply value
(0-9) represents the current supply status
of the unit. A unit’s morale is a result of a
unit’s efficiency and supply values. The
air units also have two numbers. The left
number is the effective air combat
strength, rounded to the next full number. The right number is the number of
air strikes remaining. Although not
shown on the counter, all air units have
an effective strength of one ground combat point if attacked. Naval units are not
represented by counters on the map.
They can be accessed in the Navy Menu
and the Naval Formation Menu.
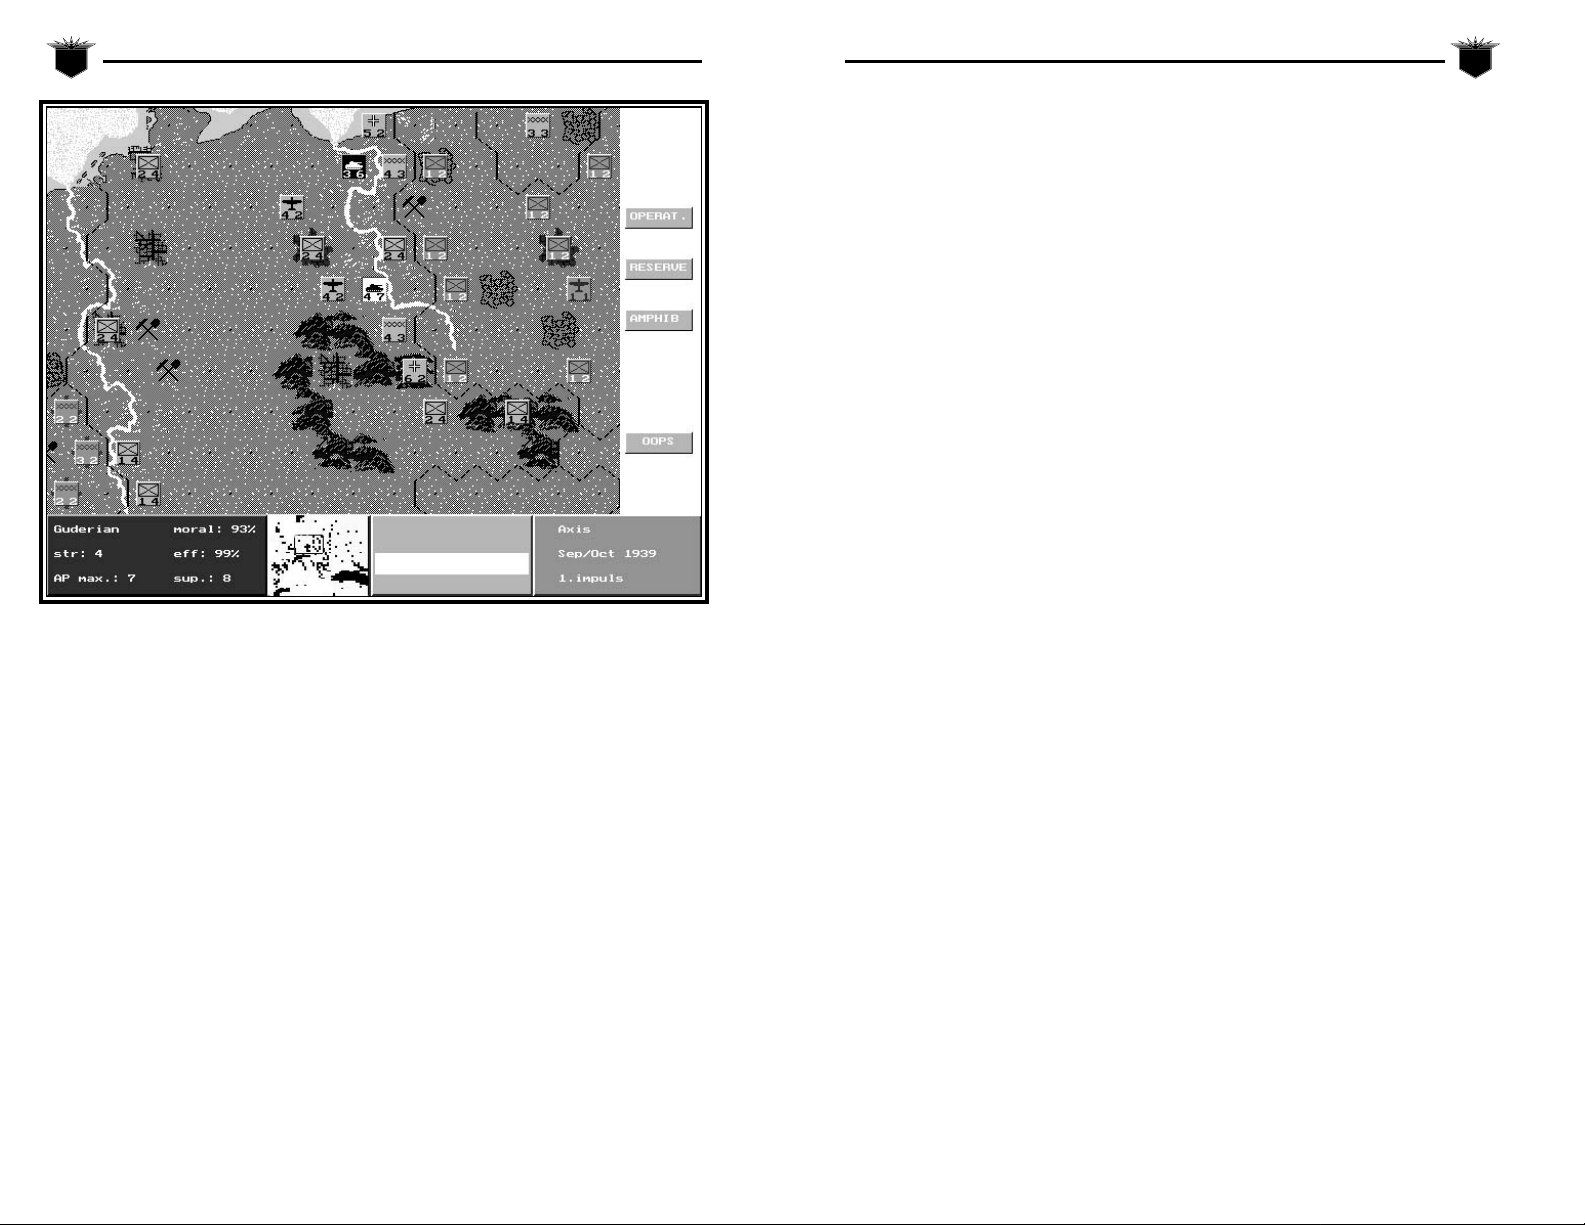
The display above is from the 1939
Scenario. The German unit Guderian has
been accessed with the Unit Menu
options displayed on the right side of the
screen: OPERAT., RESERVE, AMPHIB, and
OOPS. Below the map are four boxes. The
leftmost box contains unit information
showing the unit name (Guderian), its
combat strength (str: 4), its maximum
Action Points (AP Max: 7), its morale level
(morale: 93%), its efficiency level (eff:
99%), and its supply level (sup.: 8). The
box to the right shows a view on a strategic scale of the entire map. You can place
the mouse pointer over any part of the
strategic map; clicking the left button
will center the tactical map over the point
you selected. Next is a box that contains
unit symbols of any units which have
come out of production and are in
Reserve status. You can place them on
the map by using the Newoption on the
Main Menu. The rightmost box contains
general information about whose phase it
is (Axis), the current date (Sep/Oct 1939),
what impulse number it is (1.impulse).
MOVEMENT
Movement is divided up into three areas:
Land Movement, Air Movement, and
Naval Movement. Each of these areas are
explained below.
Land Movement
In the integrated Movement and Combat
Phase, all units of the active player can
continue moving and fighting until their
Action Points (AP) are exhausted. A unit
can be moved more than once, not having to spend its entire Action Points at
one time. At any given time only a single
unit can be located in a given hex. A unit
receives its maximum Action Points
unless any of the situations apply below:
♦ Subtract one AP if the unit’s supply
value is less than five.
♦ Halve the AP (rounding up) if the
unit’s supply value is zero.
♦ A maximum of two AP if the weather
is Mud.
♦ A maximum of one AP if the unit is an
Army Group and the weather is Mud.
♦ Air units get one AP if the weather is
Mud or Snow.
♦ Rommel does not get 3 AP in Russia
until the Russian Winter arrives.
In general, four types of movement are
possible:
Normal Movement
When moving into an empty adjacent
hex, units pay the AP cost shown on the
Terrain Table. If a unit is conducting
infiltration movement, which is moving
from a hex which is adjacent to an
enemy unit directly into another hex
which is adjacent to an enemy unit, the
unit must pay one additional AP.
Overrun Movement
If you try to move into an adjacent hex
which is occupied by an enemy unit, this
is called an Overrun. Overrun costs no
AP for movement, but a single AP for the
Combat. A unit can always Overrun as
long as it has a remaining AP. The overrunning unit does not advance into the
hex if the enemy unit is destroyed or
has retreated.
Reserve Movement
In the first two impulses you can move a
limited number of units strategically
over an unlimited number of hexes. To
do so move the cursor over the unit you
wish to move, click the left button twice
to access the unit, and select RESERVE.
Note: The unit must be placed back on
the map in the same impulse using the
NEW option. However, you must place
the unit in a friendly-controlled hex in or
adjacent to a city which is in the same
partition as the original hex of the unit.
See the section “Supply Partitions” on
page 31 for more details. To use Reserve
Movement a unit must have at least a
supply value of >3, a morale of 25, one
remaining AP, and have not conducted
an assault.
Page 12

Clash of Steel
21
Clash of Steel
22
Operational Movement
For each pool (except for Italy), one unit
can be moved up to 10 hexes in its partition, regardless of the current impulse.
Units need not be inserted next to cities.
Army groups act as supply centers and
are not allowed operational movement.
Units cannot use operational movement
if they have already moved or attacked.
No Operational Movement is allowed for
Russian units before Russian Winter
strikes, which is the first snow turn after
war is declared.
Terrain Effects
The number of Action Points (AP) it
takes to enter a given hex is summarized
below:
TERRAIN EFFECTS COST TABLE
TERRAIN NAME AP COST TO ENTER
City 1
Clear 1
Desert 1
Fort 1
Mountain 2
Port 1
Resource 1
River Sea Swamp 2
Wood 1
Russian Partisan Effects
on Axis Movement
There is a test against the number of
unoccupied, Axis controlled cities in
Russia during each Axis Supply Phase. If
a random number is less than the number of cities, then partisans will greatly
lower Axis supply in Russia. The chance
for partisans to appear will also increase
as the war progresses.
Strategic Bombing Effects
on Oil Resources
Each Strategic Bombing Point (SBP)
assigned to attack oil targets will have a
50% chance of permanently decreasing
the Action Point allowance of one enemy
unit by one point.
Air Movement
Every air unit has an integrated strength
point of ground combat units. Ground
combat strength is modified by the same
morale value as the air strength. If this
ground strength point is eliminated, the
air unit is removed. The numbers on the
air unit counter show the actual effective
air strength and the remaining number
of possible ground strikes for the
impulse. Air units can only be moved by
using Reserve or Rebase Movement. The
air range is 7 hexes to conduct a ground
strike or interception.
Rebase Air Movement
Air units rebase up to 4 hexes away per
impulse. If an air unit attacks, then it
cannot rebase. Air units can rebase
across sea hexes.
Reserve Air Movement
In the first two impulses you can move a
limited number of units strategically
over an unlimited number of hexes. To
do so move the cursor over the unit you
wish to move, click the left button twice
to access the unit, and select RESERVE.
Note: The unit must be placed back on
the map in the same impulse using the
NEW option. However, you must place
the unit in a friendly-controlled hex in or
adjacent to a city which is in the same
partition as the original hex of the unit.
Air units are not held by this restriction.
See the section “Supply Partitions” on
page 31 for more details. To use Reserve
Movement a unit must have at least a
supply value of >3, a morale of 25, one
remaining AP, and have not conducted
an air strike.
Naval Movement
Naval operations are only possible during
the first two impulses of a given turn.
There are four types of naval units:
♦ Carriers: the best fighting units
♦ Escorts: surface units from destroyers
to battleships
♦ Subs: used to hunt enemy convoys
♦ Amphib: transport ground units
Note: Artificial harbors are treated as
land units. They can be placed on a
coastal or sea hex.
Each unit is rated for strength and raid
value. Amphib units are also rated for
capacity. When a ship suffers a loss it will
become damaged. A ship which is damaged and suffers a further loss is sunk.
Sunk ships are permanently eliminated.
In the Navy Menu the map is displayed
with two types of boxes that contain the
various ships. The large light blue box is
the At Sea box which represents the
seven sea zones: Baltic Sea, North Sea,
North Atlantic, South Atlantic, West
Mediterranean, East Mediterranean, and
the Black Sea. The smaller light blue
boxes are the Port box. Each naval unit
can be located either in one of these sea
zones or in a friendly port. During the
impulse a naval unit can travel an unlimited number of sea zones in any
combinations with entering and/or leaving port. However, this must be done in
one single action, i.e. you cannot move,
use shore bombardment and move again
with the same unit. You can only enter
friendly-controlled ports. If a ship is in
port and the port is captured by the
enemy, you will receive a message that
the ship has left the port.
Restrictions on Movement
There are three narrow points on the
map where sea movement can be blocked
by the control of land hexes. A naval unit
(including subs) can move from one sea
zone to another only if a certain port is
friendly-controlled. These cases are:
ZONE #1 ZONE #2 INTERDICTED BY
Baltic Sea North Sea Hamburg
Atlantic Mediterranean Gibraltar
Mediterranean Black Sea Istanbul
Naval Formations
Naval units At Sea can be issued orders
by putting them into formation boxes.
For every sea zone, there are 8 boxes:
♦ 2 fleet boxes: units placed in these
boxes are ordered to show up and seek
combat to gain the superiority in this
zone.
♦ 1 transporter box: units in this box
show their presence for some reasons
(i.e. establishing sea supply), but try to
avoid combat.
♦ 4 raider boxes: each box can only have
one unit. Units in this box are ordered
to raid enemy convoys and avoid combat.
♦ 1 land based box: air units which are
located in a coastal hex will be displayed in the appropriate land based
box and can take part in combat occasionally.
Note: units in the same box will act
together as a fleet for all purposes of
search, combat, and raid. Splitting a fleet
gives a higher chance of finding the
enemy, but it is more uncertain if the
fleets can combine again in the case of
a combat.
Page 13

Clash of Steel
23
Clash of Steel
24
Convoys
The Convoy Table below lists the number
of convoys which are running through a
number of sea zones and port hexes.
During the Convoy Phase a convoy
report will be displayed showing the
number of convoy points allocated to the
various countries. If there is a “NA” displayed, it means that the convoy route is
not active. A “NL” means that the country could not trace a valid line of sea
zones due to the presence of enemy
ships. To receive convoy points a side
must at least control all indicated ports.
The opponent player can reduce the
number of cleared convoy points. Every
enemy naval unit which is located in an
indicated sea zone will destroy a random
number of convoy points between 0 and
its raid value. If subs are raiding then
every friendly CV and BB will have a 1/6
chance of sinking (that means eliminating) one sub. Only subs and convoy
points can be lost during the convoy
phase. If a raider is located in a zone with
two convoys it will attack and be attacked
twice.
CONVOY TABLE
MAX. REQUIRED SEA ZONES
NAME PP POOL AND REQUIRED CITIES
Canada 4 Allied North Atlantic, Scapa Flow
Asia 5 Allied Alexandria, East Medit.,
Ural 8 Russia Saratov
Sweden 2 Axis Baltic Sea, Hamburg
Italy 1 Italy East Medit.
America 15 Allied North Atlantic, Liverpool
America convoy points start with
American entry into the war.
West Medit., South Atlantic,
North Atlantic, Scapa Flow
Sea Transport
LOADING UNITS
Placing a land unit (not an air unit) on a
transport is similar to placing a unit in
reserve. You will receive an additional
menu item AMPHIB in the Unit Menu if:
♦ the unit is located in a port
♦ it is the first or second impulse
♦ there is a transport with sufficient
remaining capacity in the same sea
zone. Note: The transport must not be
located in a port!
You may also load units without a port
by using the EVAC button.
You can continue loading units before
unloading them. Transport capacity is
used at the rate of one point per unit.
Human players pay double for units with
a maximum strength of at least 5. After
selecting AMPHIB you will be given a
menu listing the seven sea zones. Select
the one you wish to move to. The seven
sea zone selections are BALTIC(B), NORTH
SEA (N), N.ATLANTIC (A), S.ATLANTIC (S),
W.MEDIT. (W), E.MEDIT. (E), and BLACK
SEA (L). Note that once you have started
unloading in a seazone, you cannot load
additional units in the same zone.
UNLOADING UNITS
Unloading a specific unit is done in the
same impulse as loading. Units which
were not unloaded at the end of the
impulse will be eliminated. Place the map
cursor on the invasion coastal hex desired.
View a list of eligible units to unload by
selecting the UNLOADoption. Unloading
can be done at any sea zone which can be
reached unblocked from the unit’s origin.
Do not move the transport unit! It will
remain at its current sea zone. Unlike
movement of sea units, ground units
moving via sea have a chance of being
intercepted by enemy naval and air units.
COMBAT
There are three types of combat: land,
air, and naval. Each of these are
explained below.
Land Combat
There are two types of land combat: overrun and assault. It costs one AP to
engage in combat. During combat both
sides’ units can lose strength points and
morale. Morale can be restored close to
its original value by the next impulse.
♦ Overrun: if you try to move into an
adjacent hex which is occupied by an
enemy unit, this is called an Overrun.
Overrun costs no AP for movement,
but a single AP for the Combat. A unit
can always Overrun as long as it has a
remaining AP.
♦ Assault: if you locate the cursor on an
enemy unit and select ASSAULTthen
you will conduct an Assault. In an
Assault all friendly units which are
adjacent to the selected enemy unit
will combine into a single Attack
Strength. Assault is mandatory (unless
the Assault Selection option has been
activated in the Rules Options Menu),
which means every unit which can
take part has to assault. After
Assaulting, the color of the number on
the counter will change to light gray
until the next impulse. To be eligible
for an Assault a unit has to have one
remaining AP and must not have
assaulted before in the impulse.
Single attacking units in an Overrun will
attack with 70% of their effective
Strength. Units assaulting with at least
one other unit attack with 85%. Units
attacking across a river are further
halved. Defending units use their full
effective strength. The defender’s
strength can be increased for defending
in some terrain types. The defender’s
morale is based on the unit’s efficiency
and supply values. The defender’s
strength will be calculated as follows:
STRENGTH+ TERRAIN DEFENSE BONUS
(
X MORALE
/100
)
Finally divide the attack strength by the
defense strength. This will determine the
combat odds which affects the amount
morale and occasionally strength points
lost. The defender can also have to
retreat. The defender can also become
dissolved. Dissolved units can be repurchased for 40% of the normal purchase
cost and can be immediately reinserted
in the next turn. Dissolved units, which
(at the moment of combat), are not in a
partition with either two cities of which
one is located in one of its side’s home
country or with a city in sea supply, will
become eliminated instead. Eliminated
units can be repurchased after one year.
The bonus for terrain effects for a
defender are shown below. The defense
bonus is added to a unit’s strength to
give a modified strength value which
then is further modified by its morale.
TERRAIN DEFENSE BONUS TABLE
TERRAIN NAME DEFENSE BONUS
City 2
Clear Desert Fort * 3
Mountain 1
Port 2
Resource River #
Sea Swamp 1
Wood -
# units attacking across a river is halved.
* Note: a computer player’s unit has its defense strength
increased 70% while defending in a fort.
Page 14

Clash of Steel
25
Clash of Steel
26
Example: A German 3-5 attacks a
Russian 0-2 in a city hex. The German
unit has 3 strength points with a morale
of 90%. The attacker strength for a single attack is next multiplied by 70%. The
attack strength is therefore .7 x 3 x .9 =
1.89. The Russian unit has 1 strength
point and a morale of 40%. For being
located in a city hex, the Russian unit
gets a bonus of 2 strength points. The
defense strength is therefore (1+2) x .4 =
1.2. So we come out with a 1.89 : 1.2
which rounds to 1.0 odds.
Combat Icons
On the bottom line of the combat results
display there can appear various special
combat icons which are shown below:
RUSSIAN INFILTRATION
MRLS SHATTERS DEFENDER
ATTACKER
COMBAT
ICONS
DEFENDER
COMBAT
ICONS
GENERAL
COMBAT
ICONS
PARATROOP SHATTERS
ATTACKER SP LOSS
ATTACKER DISSOLVED
SP LOSS-DEFENDER
RETREAT-DEFENDER
GERMAN MOBILE DEFENSE
DEFENDER DISSOLVED
GERMAN KAMPFGRUPPE
AT BARRIER
ELIMINATED
PANZER BATTLE
FAILED CHECK-DISSOLVED
Retreat
Units can be required to retreat due to
combat. If the odds are above 2-1, then
the defender has a chance that he will
retreat with the percentage chance
greater at higher odds. If the defender is
in a city or fort, then the chance is less.
As soon as the defender retreats or is
removed from the hex, the control of the
hex immediately changes to the attacking player. A unit must retreat into a
friendly-controlled hex. If a unit is
required to retreat, it will be dissolved
instead if the following applies:
♦ Random (100) > unit’s efficiency
♦ the unit has lost its last Strength Point
♦ there is no adjacent friendly-controlled
hex to retreat into
Special Combat Skills
There are a few special rules that can
affect combat as noted below:
GERMAN KAMPFGRUPPE
Starting in March 1943 German units
have a 50% chance to ignore a Strength
Point loss in combat.
GERMAN MOBILE DEFENSE
Starting in January 1942 German units
have a 30% chance to ignore the retreat
result on the Combat Results Table.
RUSSIAN INFILTRATION
Starting in July 1942 any Russian attack
has a 15% chance to decrease the
defender’s modified strength points by
20%.
RUSSIAN EXPLOITATION
Up until January 1944 all Russian units
pay a random amount of AP to Overrun
while attacking by themselves. There is
no penalty for Assaults.
AT-GUNS/HEAVY TANKS
Every new R&D level of A-T Guns
increases the efficiency of non-panzer
ground units by 3 points. Every new level
of Heavy Tanks increases the efficiency of
panzers by 3 points. In the two sections
below, “AT-Barrier” and “Panzer Battle”,
if the attacking force contains at least
one panzer unit, it is considered Panzer;
if it does not contain a panzer unit, but
an HQ unit, then it is considered an HQ
force; otherwise it is considered as Other.
AT-BARRIER
Whenever a panzer force attacks or
assaults, and the R&D level of “Heavy
Tanks” is less than the enemy R&D level
of “AT-guns”, then there is a chance that
the panzer force will run into an AT-barrier. In this case the attacker will be
halved. The chance is as follows:
ATTACKER PANZER HQ OTHER
Panzer 5% 50% 30%
DEFENDER
PANZER BATTLE
Whenever a force attacks or assaults, a
Panzer Battle can occur according to the
composition of both forces. See the table
below for the percentage chance of a
Panzer Battle. The player with the higher
R&D level of “Heavy Tanks” gains a
bonus in modified strength of 20% times
the difference in the R&D levels.
ATTACKER PANZER HQ OTHER
Panzer 80% 20% 5%
HQ 20% 10% 5%
Other 5% 5% 5%
DEFENDER
MRLS
Once the level has reached its maximum,
there will be MRLS available for that
side. For each attack or assault thereafter, there is a 15% chance that the
defender will be disrupted by the preceding bombardment. In this case, the
defender will be halved.
Panzerfaust
With each new level, the efficiency of all
non-panzer ground units will be
increased by 5 points.
Air Combat
There are two types of Air Combat:
Ground Strike and Strategic Bombing,
which are explained as follows:
Ground Strike
The numbers on the air unit counter
show the actual effective air strength and
the remaining number of possible
ground strikes for the impulse. To initiate a ground strike, move the cursor over
an enemy unit and select STRIKE. The
computer will select the strongest
friendly air unit within air range, (7
hexes), to conduct the strike. Before the
strike will actually take place, the computer handles interception. Every enemy
air unit within air range, also 7 hexes,
with an effective strength of at least 1
will force the attacker in a round of airto-air combat. If the attacker survives all
interceptions, the strike will be conducted with the remaining strength. The
defender’s terrain can affect the results of
the combat. If the defender is in city,
port, wood, or mountain terrain, the
attacker’s strength is reduced by one. If
defending in a fort, it is reduced by two
strength points. The air strength will be
halved in mud or snow weather turns.
Air units which are not strong enough
for an interception will have their numbers painted in light gray. Every air unit
Page 15

Clash of Steel
27
Clash of Steel
28
has one ground combat strength point if
attacked. Ground combat strength is
modified by the same morale value as the
air strength. If this ground strength
point is eliminated, then the air unit is
removed from play. With every new R&D
level of Jet Fighter Research, starting
with level 3, the efficiency of all air units
will be increased by 10 points.
Strategic Bombing
Strategic Bombing Points (SBP) can be
purchased at the cost of 20 spared PP
from the Strategic Bombing Menu which
can be accessed from the Info Menu. You
can direct the whole bombing fleet at
three different targets. If England and
Russia are both in the war, the Axis
player can choose which nation to bomb.
Once each turn during the Economy
Phase the bombers will launch their
offensives. If factories are chosen as a target, each Strategic Bombing Point (SBP)
will achieve 0-15 hits on enemy factories.
Each hit will increase the purchase cost
for a randomly selected enemy unit permanently by one. Bombing harbors
works the same as factories, except that
all hits will be divided among naval units.
This increases the purchase cost by one.
If oil centers are targeted, each SBP will
have a 50% chance of permanently
decreasing the Action Point allowance of
an enemy unit by one.
R&D EFFECTS
Due to Research and Development of
rockets, if developed to the maximum
(level 7), the strength of strategic
bomber attacks will be tripled. If AARadar is developed to the maximum
(level 2), enemy strategic bomber attacks
will be reduced by 20%.
Naval Combat
Searching for Enemy Ships
After the first and second impulse, there
will be tests for every sea zone if combat
occurs. Every occupied formation box of
the active player will search for every
occupied formation box of the enemy
player. Refer to the Navy Search Table
below to see if combat occurs. The numbers in the table refer to the percentage
chance of spotting the enemy fleet.
NAVY SEARCH TABLE
ATTACKER FLEET TRANSPORTER RAIDER LAND-BASED
Fleet 60% 20% 15%* 10%
Transporter 20% 15% 10% 5%
Raider 15%* 10% 5% 5%
Land based 10% 5% 5% 0%
DEFENDER
*see ASW-research
ASW-SONAR RESEARCH
Until ASW is developed to its maximum,
the chance for spotting enemy subs in
raider boxes is divided by three. An Allied
fleet box will engage Axis subs in a raider
box with a probability of 5%, no matter
who is the searching player. If Allied
ASW is at maximum, the probability of
spotting will be 15%.
Naval Combat Execution
If combat is initiated, the time of day will
be determined. It can be either morning,
noon, or afternoon. Then the computer
determines the kind of battle, either seato-sea or air-to-sea. If any carrier or land
based aircraft is participating, then there
is an 80% (60% in mud and snow)
chance that the battle will be air-to-sea,
else the battle will be sea-to-sea. In a seato-sea battle only escorts and subs can
attack, while in air-to-sea battles only
carriers, subs, and land based aircraft can
attack. Any air unit which is on a coastal
hex can participate in land-based attacks.
The combat is resolved in rounds
between all participating units. In the
first round, only the searching and the
searched for boxes will take part in the
combat. A round consists of all capable
units firing simultaneously at the enemy
formation. A hit is scored if the Random
(6) is less than or equal to the strength of
the firing unit. A hit causes an undamaged unit to become damaged and a
damaged unit to become sunk.
If it is afternoon, or one side is fully
destroyed, the battle will automatically
end after the round. Otherwise, both
players will be given an option screen
where an order can be issued to every
formation box. The ships in each box can
be either ordered to FLEE(avoid combat)
or BATTLE (engage enemy ships). The
chance for fleeing depends greatly on the
speed of the slowest unit. You can not
split boxes, but you can flee single boxes,
if there are two or more engaged in combat. Aircraft can choose to JOIN(engage
enemy ships), NO ORDER(do not engage
enemy ships), or REFUEL(if they have
already attacked).
SHORE BOMBARDMENT
If an enemy unit is in a coastal hex and is
targeted with the STRIKEoption in the
Main Menu, then Shore Bombardment
can take place. Shore Bombardment acts
similar to an air strike. CV and BB will
each add one point to a bombardment.
Only units in the same sea zone can be
bombarded. There will be no interception and bombarding ships will suffer no
reverse results except that they cannot
bombard a second time in the same
impulse. They may bombard in a future
impulse.
Harbor Requirement
There is a 25% chance per turn that a
naval unit which is located in a sea zone
without a friendly harbor will become
damaged. A message will indicate this.
Naval units will not be sunk this way.
Ship Damage Repair
There is a 33% chance per turn that a
damaged naval unit which is located in a
harbor will be repaired. A message will
indicate this.
Amphibious Invasion
See the section “Sea Transport” on page
23 to load unit(s) to amphibiously
invade. An invasion can only take place
in the first or second impulse. A combat
unit must have a minimum morale of at
least 25 in order to be placed onto a ship
using the AMPHIB option. Bad weather
may also affect the chance of a sucessful
invasion. There must be available naval
transports in the same sea zone as the
unit. An amphibious invasion can be
intercepted by an enemy fleet. The percentage chance is affected by the number
of friendly naval strength points in the
unloading sea zone and adjacent sea
zones plus the amount of enemy naval
strength points in the unloading sea
zone. Unloading on a friendly-controlled
hex will always be successful. Unloading
on an enemy-controlled hex is termed an
amphibious invasion. Invading an empty
hex has an 80% chance for success (40%
chance if it contains a fort) in which case
the amphibious landing units will be
placed into reserve. If the hex is occupied
by an enemy unit, the chance for success
is further halved. A successful invasion
against an enemy unit will force the
defender to retreat; the unit will not lose
morale nor test for being dissolved. If no
retreat path is available, the unit will be
either eliminated or dissolved. Units
which have invaded successfully have
Page 16

Clash of Steel
29
Clash of Steel
30
one AP for the rest of the impulse. There
is also a chance that your unit may
become damaged during the invasion
attempt. This will result in the unit temporarily losing all AP strength points.
Each amphibious ship has an amphibious carrying capacity which is renewed
each turn. (See the “Order of Battle” for
naval ships on page 50).
Artificial Harbors
The Allied “Mulberry” and the Axis
“groáe Freiheit” are artificial harbors.
They can be landed like sea transported
units in any coastal hex. While in sea
supply, they act as a supply source with a
value of 10. Artificial Harbors are
removed at the end of a turn, and must
be repurchased with full price, and full
delay. While artificial harbors have no
AP, they can still take part in an assault.
They can never invade on cities and
always have a minimum 70% chance for
success. Note: Do not display until you
are ready to use it.
POLITICS
Nations at War
The Politics Menu allows you to use
diplomatic pressure to persuade the various countries to join your side. You can
also declare war on a country as well.
Both sides have a number of Political
Points which it can use for diplomatic
pressure. During the Economy Phase the
number of Political Points will be randomly adjusted up or down depending
upon the number of points. A strategic
map view shows the countries involved
and their status. Each country has a box
with either a number (0-99) or letters
(AL or AX). The number, representing
the country’s Alliance Level, can be
either red or blue; red signifies the country is pro-Allied whereas blue is pro-Axis.
During the Economy Phase the Alliance
Level can be adjusted slightly towards
one side or the other on a random basis.
Whenever the number reaches 100, the
country will automatically join the
appropriate side. An “AX” means the
country has joined the Axis side; an “AL”
means the country has joined the Allied
side. The top-right corner displays political information. Click on a country’s box
and on the top line you will see the country’s name followed by its Break Value
and Political Value. The Break Value for a
neutral country ranges from 0 to 100 and
represents its ability to withstand diplomatic pressure. The higher the number,
the less effect political pressure will have.
A country’s Political Value reflects the
prestige (in Political Points) that a side
gains if it conquers the country. At the
moment of conquest the points are
awarded. A country can only be conquered once. Next the Political Points for
both the Axis and Allied players are displayed. The current political level of the
Balkan Pact is also shown. The four
countries comprising the Balkan Pact are
Greece, Rumania, Turkey, and
Yugoslavia. Hungary and Bulgaria can
also join the Pact if an attempt to use
diplomatic pressure on them fails.
Whenever one of the Pact members is
being pressured diplomatically, the
Balkan Pact Value (BPV) is added to the
country’s Break Value. The BPV starts
out at 30 and increases slightly each time
someone attempts to pressure a Pact
member. It decreases by a much larger
random amount whenever a member
joins a side. There are five buttons displayed on the right side which are:
CONFLICT (C) will display three minor
conflicts between Russia and Rumania,
Bulgaria and Yugoslavia, and Rumania
and Bulgaria. You can choose to be neutral or support one of the countries. If
you choose to support one country, that
country’s Alliance Level will be shifted
slightly in your favor and the other country will be shifted toward your enemy.
BALKAN (B) displays which countries are
in the Balkan Pact.
SELECT (S) selects a country with the
keyboard only. Use the arrow keys to
highlight the country you want to examine.
WAR (W) allows you to declare war on
the country selected.
PRESS (P) allows you to diplomatically
pressure the country selected at a cost of
a random number of Political Points. The
more political points you have and the
lower Break Value of the country pressured, the greater the chance you have of
getting a positive response which will
shift the country’s Alliance Level towards
you by a random number of points. If the
diplomatic pressure fails and if the country’s Alliance Level is leaning towards the
enemy side, there is a chance based on
the country’s Alliance Level that it can
shift even more toward the enemy by a
random amount.
For game purposes, Europe is divided
into several areas: Axis, Allied, and
Neutral. For the most part the areas correspond with historical borders. For the
reason of playability and also for the
computer player, some countries have
been put together. Each country can be
either at war, neutral, or conquered. In
September 1939 only Germany, Poland,
Commonwealth, and France are at war.
The territory of neutral countries cannot be moved into. The navy of neutral
countries is still allowed to move, but
will not take part in any combat. When a
neutral country’s Alliance Level is at 50
or above, it will lend its cities and
resources to either the Allied or Axis production pool. The Allied’s production
capabilities are severely restricted:
♦ Russia’s prewar production is quar-
tered
♦ America has no prewar production
Entering the War
There are basically three ways a nation
can enter the war: through game triggering events (Italy enters the war as soon
as at least two hexes of the Maginot Line
or 6 Russian cities are Axis controlled),
through declaration of war, and through
diplomatic pressure with the Alliance
Level reaching 100. Some special rules
are as follows:
♦ The US Alliance Level starts with a
value of 0. It increases every turn by a
random of 10. It increases 5-25 points
every time the Axis declares war on a
nation. It decreases by 5-25 points
every time the Allies declare war on a
nation. Certain political events or an
early invasion of Russia may also influence the U.S.
♦ If the Axis player declares war on
Russia, then Rumania and Hungary
have their Alliance Level shifted 60
points toward the Axis.
♦ If the Axis player declares war on
Russia in 1939 or 1940, the U.S. entry
level will rise by 40-70 points.
♦ Every turn that Italy is at war, Russia
is not at war, and Greece is not at war,
there is a 10% chance that Greece will
join the Allied side. If this happens
then there is a further 70% chance
that Yugoslavia’s Alliance Level will
shift 70 points towards the Allied side.
Page 17

Clash of Steel
31
Clash of Steel
32
♦ Spain’s Alliance Level can increase due
to the Axis capture of Paris.
♦ Every turn from 1940 on, a check on
the table below is made. If it is successful, then Russia will prepare for
war (receiving full Production Points)
and an entry date will be set. There is a
50% chance that the Axis secret service will get to know about the plans
and a message will appear. If the Allied
player is human controlled, then you
will automatically get a message. The
percentage below is the Russian
Alliance Level which is calculated each
turn. Russia’s Alliance Level can be
adjusted temporarily by the minor
conflicts option. If Germany declares
war on the Baltics, there is an 80%
chance per turn that Russia will enter
the war. German Garrison Value
(GGV) is the number of Axis units stationed in former Poland. If the GGV
equals or exceeds the German
Garrison Requirement (GGR) for that
year, then the chance for Russian
preparation will be lowered. Also the
chance for Russian entry is tripled if
Turkey is on the Axis side.
RUSSIAN PREPARATION FOR WAR TABLE
YEAR GGR GGV < GGR GGV >= GGR
1940 4 2% 5%
1941 7 3% 7%
1942 11 7% 10%
1943 20 8% 15%
1944 20 8% 15%
1945 20 8% 15%
SUPPLIES/PRODUCTION
Units must be able to trace supply lines
back to Army group units or friendly
cities. New units are produced through
Production Points (PP) which are received
according to the number of cities,
resource centers, and convoy points the
player controls. Detailed rules for supply
and production are described below.
Hex Control Determined
The main purpose of control is to allow
the tracing of supply through friendlycontrolled hexes. As a side effect,
surrounding enemy units with friendlycontrolled hexes disables their retreat, as
it cuts their supply line. Each hex is
either friendly, enemy-controlled, or
contested. Control changes by two occasions during the game:
♦ every time a unit enters a hex it
becomes friendly-controlled.
♦ during the Supply Phase control of all
hexes is recalculated. All friendly units
and all city hexes which were previously friendly-controlled act as control
bases for each side. Now each hex
becomes friendly to that side which
has the nearest control base in terms
of Action Points. In case of a draw the
hex becomes contested.
♦ if the defender retreats or is dissolved.
Supply Partitions
The friendly-controlled territory is
divided into Supply Partitions (SP). Two
hexes are referred to as being in the same
partition, if there is a continuous line of
friendly-controlled hexes between them.
The line is also blocked if traced across a
border, or if one of the countries is not at
war. Sea hexes also block partitions.
Examples: First, Germany has taken
Poland and France, and is now engaged
in Russia. There is now a big partition
from Brest to Russia. Second, Italy is at
war. Then Italy is split into the two partitions: one in Italy and one in Africa.
Third, Minsk is surrounded by German
panzers. Minsk is therefore the only
Russian city in its partition.
Partitions affect:
♦ supply levels of cities
♦ elimination after combat
♦ inserting of new units
♦ strategic movement
Isolation
A city is referred to as isolated if it is not
in a partition with at least one other city,
and one of the cities is in one of the
player’s home countries. Major Cities
(London, Berlin, Paris, Warsaw, Moscow,
Alexandria, and Gibraltar) count double,
while Tripoli and Tobruk do not count.
Major Cities appear in dark gray.
Supply
After the recalculation of control, the
supply value of all units of the active
player (only) will be calculated. For this
purpose all friendly-controlled cities and
all friendly army groups count as supply
sources for the active player. You get the
new supply value of a unit by tracing a
path through friendly-controlled hexes
from a supply source to the unit and subtracting the Action Point cost of this
path from the supply value of the source.
The varying supply values of sources are:
SUPPLY SOURCE SUPPLY VALUE
Not isolated city in home country 10
Not isolated army group 10
City in sea supply in home country 10
Artificial harbor 10
City in sea supply 7
Isolated city in home country 5
Isolated army group 3
Not isolated city in enemy country 5
Isolated city in enemy country 0
Morale Adjustment
As the final step in the Supply Phase all
units of the active player get a new
morale value by the formulas:
ORALE
: = M
ORALE X
M
M
ORALE
: = M
M
ORALE) XSUPPLYVALUE
ORALE
+ (E
70%
FFICIENCY
/10
- O
LD
Sea Supply
A city in sea supply has an asterisk after
its name. Move the cursor to the city and
the city name will appear in the lowerleft hand corner of the text window. If an
asterisk does not appear, then the city is
not in sea supply. A city which is isolated
in terms of overland supply can still act
as a limited supply source via sea supply.
To be eligible two conditions have to be
fulfilled:
♦ the city is located in a coastal hex.
♦ there must be a line of sea zones to a
friendly supplied port which is not
blocked as per rules in “Restrictions
on Movement” on page 22. In each of
these zones (not a harbor) there must
be a friendly naval unit (not a sub).
Please keep in mind that although a city
can obtain sea supply, it still has to trace
a line to another friendly supplied port. A
unit surrounded by enemy units can still
be in supply due to sea supply. However,
sea supply is not sufficient for the inserting of new units.
Effects of sea supply on units sharing the
same partition:
♦ dissolved units are not eliminated
♦ army groups give 10 supply points
♦ the city itself gives 7 or 10 supply points
Page 18

Clash of Steel
33
Clash of Steel
34
Production
Each turn, except for the first turn of a
scenario, the Italian, Axis, Russian,
Allied, and U.S. countries receive
Production Points (PPs) based on the
number of friendly cities, friendly
resource centers, and convoys. The
Status Menu will display the number of
PPs for each country. Each major city
and convoy is worth 1 point while
resource centers are worth 2 points. The
amount of PPs received in a turn is also
adjusted by the Industrial Base Multiplier
as shown below. If a country has been
conquered then all resource centers and
all eligible cities automatically belong to
the conquering player. Only certain
cities, once controlled, count for PP purposes. All cities in a country’s homeland
count for PP purposes. The cities in
Poland, Benelux, and France, which
become German territory once they are
conquered, will be added to the Axis pool.
Rumania joins the Axis player so its cities
will be added into the Axis pool. Once
controlled all resource centers are added.
Russia has its PPs divided by four until it
is at war or preparing for war.
Players use PPs to buy various land, air,
and naval units which are either dissolved or purchasable in the Production
Phase. PPs are further divided into pools
per side which are namely: Axis/Italian
and Allied/US/Russian. Axis points can be
spent for all Axis units except Italian,
which can only be purchased by Italian
points. The same holds for the Allied,
U.S., and Russian points. All PPs which
are earned by the Axis player will be
added to the Axis pool, except for spared
Italian PP, cities, and resources which
are located in the Italian home country
and resources which are declared as
Italian in the Convoy Table. The same
holds for the Allied/US/Russian player.
In the Purchase Menu you will get a list
of eligible units together with the cost of
the unit in PP and the number of turns it
will take to produce the unit. You can
only purchase a unit if you have sufficient PP remaining. Unused PP count as
spared PP. Purchased units will become
available as Reserve units after the
shown delay. The color of the lettering
indicates the status of the unit: light red
means the unit is on the map, dark red
means the unit is in Reserve, and blue
means the unit is purchasable. Select
BUY to purchase the unit. Select INFO to
see various data on the unit.
Each side receives PP according to the
following formula:
SPARED
PP =
REFIT
CLEARED CONVOY POINTS+ CONTROLLED
RESOURCES X
PP - PP
+ (
NUMBER OF CONTROLLED CITIES
SPENT ON AUTOMATIC
2) XI
NDUSTRIALBASE
M
ULTIPLIER
+
Industrial Base Multiplier
Countries at war over a period of time
can increase their production of war
materials. The table below represents the
multiplier used in determining a nation’s
new PPs during a given year.
INDUSTRIAL BASE MULTIPLIER
NATION 1939 1940 1941 1942 1943 1944 1945
Germany 1.0 1.0 1.0 1.2 1.6 2.0 2.0
Italy 1.0 1.0 1.0 1.0 1.0 1.0 1.0
Russia 1.0 1.0 1.2 1.6 1.8 1.8 2.0
UK & Allies 0.5 1.0 1.0 1.2 1.6 1.6 2.0
US 0.0 1.0 1.0 1.5 3.0 4.0 4.0
Unit Upgrade Level
All of the units in a country’s production
pool are affected by the Unit Upgrade
Level. You can increase your country’s
level while in the Status Menu by clicking
on the UPGRADE button. Each upgrade
costs between 10-30 PPs depending on
the country. Units receive a 10% increase
in strength points per upgrade. It also
costs an additional 20% in PPs per
upgrade level to buy a unit. The maximum level of upgrade is the total of the
R&D levels in AT and Heavy Panzer.
COUNTRY UPGRADE PP COST
Italy 10
Germany 30
Russia 30
Allies 15
U.S. 20
Unit Refit
After calculating PP, just before purchasing units, an automatic refit of lost
Strength Points (SP) will take place.
Every unit which is on the map will have
its SP restored to its maximum SP. This
costs 1 PP for each SP of ground units
and 2 PP for each SP of Air Units. Units
are refitted up to the limit of available
PPs. Refit cost will be multiplied by current upgrade level. Prior to production,
this expense is automatically deducted.
WEATHER
At the beginning of each odd-numbered
impulse the weather will be determined
by a roll on the Weather Table. Weather
influences:
♦ The number of impulses in a turn
♦ The number of AP of some units (See
“Land Movement” on page 20.)
♦ The strength of Ground Strikes (air
strength divided by 3 in mud or snow)
The WEATHER option on the Information
Menu allows you to view the current
weather condition: Clear, Mud, or Snow.
The background map color will change
depending upon the current weather condition. During clear turns the map will be
green, on mud turns the map is yellowish/brown, and on snow turns the color is
gray. The weather is determined by the
computer according to the table below:
WEATHER TABLE
DIE JAN/ MAR/ MAY/ JUL/ SEP/ NOV/
ROLL FEB APR JUN AUG OCT DEC
1 Clear Clear Clear Clear Clear Snow
2 Mud Clear Clear Clear Clear Snow
3 Snow Mud Clear Clear Clear Snow
4 Snow Mud Clear Clear Mud Snow
5 Snow Mud Clear Clear Mud Snow
6 Snow Mud Clear Clear Mud Snow
Russian Winter
In the first turn in any year in which
Russia is at war and the weather is snow,
the Russian player will be reinforced as
follows:
♦ the efficiency of all Russian units will
be increased by 20
♦ Russian units with a maximum
strength of 2 will receive a new maximum strength of 3.
♦ the Russian shock units will be
instantly available as reserve units
♦ in the first impulse Axis units in
Russia will lose Strength Points and
Morale on a random basis. The effect
on Axis units is harder the further east
they are positioned.
♦ all Axis supply values are halved.
♦ The row of the CRT (1 column shift
left if snow)
Page 19

Clash of Steel
35
Clash of Steel
36
SPECIAL RULES
Blitzkrieg
The Germans originally planned for a
repetition of the Schlieffen plan, which
would have seen the bulk of the German
army moving through Benelux into
France. Only after a number of unforeseen events the plan was changed to
include a mighty panzer strike through
the Ardennes Forest. Historically these
divisions cut through to the channel and
isolated the bulk of the Allied army in
Benelux which still tried to counter the
Schlieffen plan. It is questionable if an
Axis victory in France would have been
possible otherwise, but you cannot
expect a player to repeat the Allied mistake. The following rule takes place:
If the Axis player declares war on
Benelux in 1940 and the weather is clear,
then the Allied units suffer under
Blitzkrieg. In this case every Allied unit
in France or Benelux will instantly get a
new morale between 10%-35%. Allies
may also lose supply levels. This rule
holds even if parts of France are already
Axis controlled. So don’t be shy to attack
in the winter of 1939/40.
Fortifications
The defenders in a fort receive a defense
bonus of 3 strength points when
attacked. Defenders will always have a
minimum effective strength of at least
one strength point. The computer
defender receives an additional 70%
bonus to its strength while defending in
a fort. The forts will be removed if the
hex is enemy-controlled at the end of the
impulse. The Maginot Line on the
French and German border is built at the
start of the 1939 scenario. Other forts
can be built by engineer units. Access the
engineer unit and put them into fortifi-
cation mode. They will build a fort at the
start of the next turn. They can also hinder sea invasions with an unoccupied
fort having a 50% chance of defeating a
sea invasion. Forts are removed if control
changes. While in fortification mode,
they have an asterisk that replaces their
AP number on the unit counter. While in
fortification mode, an additional menu
option MOVE will appear on the Unit
Menu. Selecting this option will take the
unit out of fortification mode.
Malta
While Allied controlled there is a 33%
chance per impulse that Axis sea supply
is terminated in both Mediterranean
zones. Tobruk will be isolated and any
Axis units dissolved will become eliminated. Should the Axis take Gibraltar, the
fort in Malta will be removed. This
should make an invasion possible. The
Malta unit can never move.
German Disorganization
If any of the cities Cologne, Hannover, or
Berlin are Allied-controlled, then there is
a one-third chance per city that all
German units can lose efficiency. Each
unit has a one-third chance that it will
lose up to a maximum of 50% of its efficiency permanently. This check is made
only once a turn.
Norway
Axis units can be supplied in Norway,
even without a harbor. The unit will
receive a supply value of 9 if:
♦ the year is 1940
♦ the weather is clear
♦ the unit is located in a Norway
coastal hex
♦ the North Sea is in sea supply (there is
an Axis ship located there)
Rommel
Rommel is the only army group with 3
AP. However, Rommel will only receive 2
AP if Rommel is in Russia and the
Russian winter has not yet started. Other
modifiers will take place after that normally.
Homeguard
The strength of all CW ground units in
England is doubled for combat. You will
see the normal strength on the counter,
but it will be modified in the combat display. This rule does not apply to Malta
and African CW territory.
Paratroops
Paratroop units can be put into preparation mode from the Unit Menu during
any impulse. During any subsequent first
or second impulse, they are allowed to
take part in assaults up to 4 hexes away.
In this event, paratroop units have a 25%
chance of disabling the defender’s terrain
bonus, a 20% chance of disrupting the
defender, and they automatically disable
the effect of rivers. Paratroop units do
not move when they take part in an
assault. They stay in the original hex.
While in preparation mode, they have an
asterisk that replaces their AP number
on the unit counter.
UNIT REORGANIZATION
After calculating Preparation Points and
just before purchasing units, an automatic Refit of lost Strength Points (SP)
will take place. Every unit which is on
the map will have its SP restored to its
maximum SP. This costs 1 PP for each
SP of ground units and 2 PP for each SP
of Air Units. The amount of refitting is
limited to the number of PPs in the pool.
To be eligible for refitting the unit must
not be isolated. Weather has no effects
on refitting.
REINFORCEMENTS
In the first or second Impulse of each
turn all newly produced units can be
brought onto the map. To do so move the
cursor on an empty hex which is adjacent
to a city or port hex and select NEW .
Examples:
♦ Commonwealth units must not be
inserted in France. Of course you can
transport any unit to France normally.
♦ Commonwealth units can be inserted
next to Alexandria, as Alexandria is a
Major City.
♦ If the Axis captures any city, it can be
used to insert German units.
VICTORY CONDITIONS
The Allied player wins whenever Germany
and Italy are conquered. The Axis player
wins whenever England and Russia are
conquered. Otherwise, the game ends
after the July/August 1945 turn.
Conquering a Country
A nation is conquered if all of its cities
are enemy-controlled. A nation can never
be reconquered. Some exceptions are
noted below:
Commonwealth (CW):To conquer the
CW you must occupy both Liverpool and
London; Malta does not have to be conquered.
Vichy: After the impulse the Axis took
Paris, Bordeaux, Marseille, or Brest in,
the Axis player may be asked to install a
Vichy government. If Vichy is installed
then the following takes place:
♦ all French units are permanently
removed
♦ French territory south of Paris will
become Vichy, the remaining French
territory will become German
Page 20

Clash of Steel
37
Clash of Steel
38
♦ Vichy is a neutral state
♦ Axis units located in Vichy become
reserve
♦ Allied units located in former France
are eliminated (dissolved for the computer)
If the Axis does not to install Vichy, then
about 80% of the French units currently
not on map are permanently removed.
Poland: After an Axis conquest of Poland
the eastern part of Poland will become
Russian, while the western part will
become German territory. Any German
units which are on Russian territory at
this point will be placed in reserve.
Russia: Whenever Russia has reached 15
collapse points, then it will surrender.
Collapse points are awarded once per
turn and are displayed by a message on
the screen. Whenever the Axis player
controls Moscow, Leningrad, and
Stalingrad, collapse points start accumulating. The number of collapse points for
the five Russian cities is as follows:
CITY COLLAPSE POINTS
Leningrad 1
Sevastapol 1
Baku 2
Gorki 3
Saratov 4
SCENARIOS
Below is a summary of each scenario and
some of the short-term objectives which
you can wish to accomplish. Each scenario will only end if the enemy’s cities
are conquered (see Victory Conditions
above) or the game reaches the end of
the Jul/Aug 1945 turn.
Poland 1939
This scenario starts Sep/Oct 1939 with
Germany poised on the Polish frontier
ready to unleash its devastating
blitzkrieg attack. Light German forces
are on the France/Benelux borders. The
German player should attack Poland
immediately and then attack
France/Benelux as soon as sufficient
forces are available. Review the section
on “Blitzkrieg” on page 35. Allied forces
should attempt to delay the German
advances as much as possible trying to
avoid being eliminated. Dissolved units
can be purchased and come back on the
map on the next turn.
Fall of France 1940
This scenario starts May/Jun 1940 with
Germany already having conquered
Poland and Norway. It is now ready to
attack France/Benelux. Germany should
attack France/Benelux remembering to
garrison Poland enough so Russia does
not enter the war prematurely. Allied
forces should attempt to delay the
German advances as much as possible,
trying to avoid being eliminated.
Dissolved units can be purchased and
come back on the map on the next turn.
Operation Barbarossa 1941
This scenario starts May/Jun 1941 with
Germany having now defeated Poland,
Norway, Benelux, and France. Germany
has deployed its main forces on the
Russian front ready to again unleash its
armored power. Germany should lightly
garrison the western front. Attack Russia
and drive towards Moscow at full speed.
To conquer Russia, Germany has to take
Moscow and achieve 15 collapse points.
The Axis player should remember the
effects of Russian Winter and Russian
Partisans. Eliminate units by cutting off
their retreat routes so they will not be
dissolved and come back next turn. The
Allied player needs to give ground in
Russia and avoid being surrounded by
Axis units. Defend Moscow at all costs.
Drive to Stalingrad 1942
This scenario starts Jul/Aug 1942 with
the main battle action in Russia.
Germany could try another offensive
against Moscow or instead drive south
and southeast to take the resource centers in order to deprive Russia of them
and also to increase Axis production. To
stop Russia, Germany must cut Russian
production by the capture of cities and
resource centers. Russian strategy
should be to defend Moscow and keep as
many cities and resource centers as possible in its control. Use limited
counterattacks when feasible.
Kursk 1943
This scenario starts Jul/Aug 1943 with
the battle of Kursk on the Russian Front
which turned into a disaster for the
German army. The German player
should be careful where it attacks avoiding Russian strong points. Another
possible strategy is to let the Russian
player attack and then counterattack
when the Russian units have overextended themselves. The German player
should be preparing for the inevitable
Allied amphibious invasion of Europe by
placing units in the ports and fortifying
ports and empty coastal hexes with its
engineer unit. The Allied player in Russia
should attack at the German weak points
in the line attempting to surround and
eliminate Axis forces as much as possible. The western Allies need to decide
upon where and when to invade Europe.
The invasion must be in clear weather
and on the first impulse only.
D-Day 1944
This scenario starts Mar/Apr 1944 with
the western Allies poised for the invasion
of Europe. The March turn is only one
impulse long and the Axis player is
restricted in his movement of most of his
units on the western front. The Allied
player should carefully select his target
being mindful of German-fortified
coastal areas. The Mulberry should be
used initially and a port captured
quickly. The Allies should attempt to surround German forces and eliminate
them whenever possible. All German
cities need to be captured to defeat
Germany so coordination between
Russian and western Allied forces is
essential. German forces should attempt
to contain the western Allied invasion in
a narrow beachhead, keeping the majority of forces to counter the Russian
advances. If it begins looking hopeless,
possibly retreat to the south and defend
the southern German cities. The German
forces should try to delay the Allied
advances as much as possible.
Page 21

Clash of Steel
39
Clash of Steel
40
STRATEGY AND TACTICS
There are many different strategic
options available in the game which can
lead to victory. This section will discuss a
few strategies for the Allied and Axis
players and also discuss how to use some
of the various rules to your advantage.
Allied Player Strategy
When you are ready to amphibiously
invade Europe, you have a few alternatives to consider. You can invade in:
northwest Germany/Netherlands, western France near Brest, Spain, southern
France, Italy, or Greece. Before you
decide on your main landings you should
make sure the beachhead and surrounding areas are within 7 hexes of your air
units to give you additional support
unless the enemy is very weak. You may
want to make some preliminary landings
in nearby areas to secure safe areas for
your air units to give you closer support.
Spain, Italy, southern France, and
Greece have mountainous terrain which
is slower and provides better defensive
positions for the Axis player. These are
farther away from the heart of Germany,
but are also probably less defended.
Keeping sizable forces in Africa and
England will help keep the German
player off balance.
The Russian player should try to give
ground in the initial Russian assault
instead of trying to hold every inch. After
a few impulses the German units will
outrun their Army Groups and their
effectiveness will decrease due to a lack
of supply. Hold Moscow at all costs. You
can use your engineer unit to build up a
line of fortifications around the city to
help in its defense. Try to keep as many
cities and resource centers as possible
since your production points come from
these. Do not let the Axis player get into
southern Russia and take the valuable
resource centers as they will give
Germany a large boost to their production and severely curtail your own. Try to
avoid letting the Axis player surround
your units. Elimination means a full
year’s delay before they can be repurchased and at full cost whereas a
dissolved unit in supply can be bought
the next turn at 40% the cost. Use your
engineer unit to strengthen your lines.
Use a few groups of reserves behind your
front lines to help counter any German
breakthroughs and counterattack his
panzer units.
Axis Player Strategy
Initial German strategy should probably
be close to the actual historical strategy
in invading Poland and Benelux/France
in 1939 and 1940. Place your air units on
the coastline and attack English air and
land units. If you can reduce them
enough, you can want to consider an
invasion of England with your artificial
harbor. The time for this would be May
or July 1941 which gives you time to
build your transports and an artificial
harbor. London must be your objective
since you need to capture a port within
the turn. You can use your paratroop
unit to negate terrain advantages. In
defending against the inevitable invasion
of Europe, try to keep enough reserve
forces to seal off any beachheads and
defend the ports vigorously. Try to fortify
the coastline as much as possible.
In dealing with Russia your invasion
time should be May 1941 to give you
time to reach Moscow in 1941. To conquer Russia you must capture this city so
your main thrust with your best units
should be north of the Pripet Marshes,
the large area of swamps in the middle of
the Russian line. Concentrate all of your
panzer forces and head as fast as possible
towards Moscow. Bypass resistance
where possible, letting the infantry do
the mopping up. Use your panzers to
surround and cut off the retreat routes of
Russian units. Try to eliminate them so
they will not come back the next turn.
Once Moscow has been captured you
should go after some of the Russian
cities which will cause the Russian government to collapse. Try to garrison
captured Russian cities to cut down on
partisan activity. If you fail to conquer
Russia, try to capture as many Russian
cities as possible to deny him of further
production. Keep mobile reserve panzer
groups behind the line to take advantage
of counterattack or offensive opportunities that might occur. Use your engineer
unit to fortify weak areas.
General Tactics/Strategy
Your production needs are dependent
upon your overall strategy. If you are
going to amphibiously invade, you will
need to build transports and an artificial
harbor. If the enemy fleet is fairly strong,
you will also need combat ships to protect the transports. You should usually
try to produce as many ground units as
possible, upgrading them when sufficient
PPs are available. You will need to also
place research points into the AT and
Heavy panzer areas to be able to upgrade
your units. Air units are always good to
have around as they boost your
attacks/defense. Strategic bombers can
help reduce enemy movement
allowances if you target oil centers. Your
other targets cause the enemy to spend
more on building new units.
Research areas are very important. To
upgrade units and also to provide more
effective tank and anti-tank support, it is
usually a good idea to place 3 research
points in AT and Heavy Panzer areas and
spread one point among most of the
other areas. MRLS and Panzerfaust are
other areas that need to be built up as
well. What areas you concentrate in are
dependent upon your overall strategy
and what the enemy is doing as well.
In attacking forts or units behind rivers,
paratroops provide an excellent method
to negate the defender’s advantage. Also
try to surround and cut off the fortified
position from supplies if it is too tough to
take. Getting an MRLS combat result will
also halve the defender. Use air power to
help soften up the defender as well.
Use Reserve and Operational Movement
to transfer mobile forces around your
front to keep the enemy off balance and
provide you with additional strength to
hit a weak spot in the enemy line. Use it
also to transfer units over long distances
between fronts.
Use your engineer unit to build fortifications in weak areas or to give additional
defensive power to areas where the
enemy can be or is attacking. Build them
on and around key cities and ports or
along coastlines to help defend against
amphibious invasions.
In politics it is usually not a good idea to
pressure a country which the enemy
player is probably going to declare war on.
Reserve your points to help keep your
Alliance Levels above 50 points and enemy
Alliance Levels below 50 points. Focus on
countries which are closer to the 100 level
so they will join you or keep pro-enemy
forces away from reaching 100. Avoid
countries which have high Break Values
as they are resistant to pressure.
In land combat the use of Assault is vital
to help concentrate your forces to gain
better odds which cause more defender
Page 22

Clash of Steel
41
Clash of Steel
42
losses and reduce your own. At times
moving one assault team away and moving another team in can be enough
pressure to crack a strong position. A
weakened enemy unit can be dissolved or
eliminated by an Overrun if the assault
has failed. The best tactic to employ is to
surround enemy units cutting them off
from their supplies. Units that are
removed with no supply lines are eliminated and cannot be repurchased for a
full year. A wide envelopment maneuver
with panzer units cutting deep into rear
areas can cut off the supply line allowing
the slower infantry to mop up the
reduced enemy units.
TUTORIAL
The tutorial below will help you to
understand a few of the game mechanics.
Besides the tutorial you should read the
“Quick Start” section to get an overview
of the game. The tutorial assumes you
are using a mouse and have already
installed the game and gone through the
Sound Card Setup routine and are at the
Setup Menu. Whenever any reference is
given to click the mouse, it means to
click the left mouse button (unless otherwise stated).
In the Setup Menu place the mouse
pointer over the SCENARIObutton and
click. Next select the Poland 1939 scenario by clicking the mouse while the
pointer is on the SELECTbutton. You are
now back in the Setup Menu. To see that
the Axis player is human-controlled,
make sure that the button AXIScomputer
not
player does
right of the button description. If there is
a check mark, place the pointer over AXIS
and click to remove the checkmark. Now
make sure that the button ALLIEDcomputer player
the right of the button description so
have a check mark to the
does
have a check mark to
that the Allied player will be computercontrolled. Next place the pointer over
the button GAME and click. This will start
the game.
The game map will now be displayed.
The red cursor is in the middle of the
map. The right-hand portion of the map
shows Germany and western Poland. The
German army (gray units) is poised to
launch their invasion of Poland. In the
lower-right hand corner of the screen is
a text box showing that it is the Axis
turn, the date is Sep/Oct 1939, and it is
the first impulse. Each turn is composed
of a number of random impulses (1-10).
Each player has an impulse to
move/fight. Currently it is the Axis’ turn.
Place the mouse pointer over the INFO
button and click. Next select WEATHER
and click. The weather is clear (the map
background color is green). If the
weather was mud, the background would
be a yellowish/brown color and if snow
the color would be gray. Move the mouse
pointer outside of the weather text window and click; this removes the window
from the screen. In the lower left corner
of the screen is an information box
which currently shows 17/14 which
means that the cursor is over the hex
located at x coordinate 17 and y coordinate 14. The box to the right is a
strategic map display; if you click on any
point of this reduced map, it will center
the normal map at those coordinates.
The box to the right of the map is blank
for now. It is used to display any units
that are in Reserve, which could be
placed on the map. New units that have
come out of production or units that
have been placed into Reserve status are
shown in this box.
Place the mouse pointer on the topmost
light gray German unit on the screen (5-
2) and click. The left corner text box
shows that the cursor is at 20/11 and the
unit is named Bock. Click again. The
unit’s information is now displayed
showing that it has a strength of 6, a
maximum Action Point (AP) allowance of
2, a morale of 85%, an efficiency of 85%,
and a supply value of 10. Move the mouse
pointer just one hex to the east (right)
across the border and click. The unit
should move to the new hex. Note that
the unit is now a (5-1). The first number
is the unit’s effective strength, which is
the strength modified by morale. The
second number is the number of APs the
unit has left. The unit used one AP to
move the one hex. It will use the last AP
to attack. Click the right mouse button
to exit from the unit and return to the
Main Menu.
Next move the mouse pointer to the
German (3-6) panzer unit and click
twice. The unit should be Hoth with a
strength of 4 and a morale of 87%. Move
the mouse pointer two hexes away in the
SE direction where the pick and shovel
symbol (resource center) is and click.
The panzer unit should have moved to
the new hex and should show (3-4) on
the unit counter. Click the right mouse
button to exit from the unit. Move the
pointer one hex to the NE to the Polish
(1-2) unit in the woods and click. Place
the pointer over the STRIKEbutton and
click. The German air unit Luftfl.1 (4-2)
has an effective strength of 3 and is now
attacking the Polish unit with an Air
Strike. Note that the air unit is now (2-1)
which means that its effective air
strength is now only 2 and it can make 1
more Air Strike. The second number is
the number of Air Strikes the unit can
perform. Also air units have a range of 7
hexes. Now move the pointer over the
ASSAULT button and click. The Polish
unit is now highlighted in red and the
German Hoth panzer unit (3-4) is also
highlighted white. You are now asked a
question to “Part in Assault YES NO.”
Click over the YESbutton. The (5-1) unit
is now highlighted. Click on YESagain.
The (4-3) unit is highlighted. Click on
YES again. The combat result is now displayed. Due to randomness not all
combats will be the same. The information window shows you are assaulting
the Pomerehon unit. Your effective
strength is 10.7 and the enemy effective
strength is probably between .6-.8. The
odds are 10 : 1, the maximum odds.
Combat icon symbols should be displayed on the very bottom line of the
combat results window (see the section
“Combat Icons” for a description of the
icons). There is a good chance at these
odds that the Polish unit will be dissolved. If so, the unit will be removed
from the map; otherwise the unit should
retreat. Note that one Action Point has
been subtracted from each of the three
units that attacked. Once a unit has
Assaulted in an impulse, it cannot
Assault again until the next impulse.
Now move the pointer to the German (4-
3) unit which is one hex below the
German (4-7) panzer unit. Click twice on
the unit. Place the mouse pointer one
hex to the NE and click. The unit should
move and be at (4-2) adjacent to two
Polish units. Click the right button to
exit. Next place the pointer on the
German (4-7) panzer unit and click
twice. Place the cursor one hex to the SE
and click. The unit now shows (4-6).
Place the pointer two hexes east and
click. The unit is now (4-3) expending
one AP for the first hex and two APs for
the second hex using infiltration movement, which is moving from one hex
which is next to an enemy unit directly
to another hex which is also adjacent to
an enemy unit. Click the right button to
exit. Move the pointer to the SW to the
Polish Krakow (1-2) unit in hex 22/1 and
Page 23

Clash of Steel
43
Clash of Steel
44
click. Place the pointer in the STRIKEbutton and click to launch your Air Strike.
Next place the pointer over the ASSAULT
button and click. Click on the YESbutton
three times. The Polish unit attacked can
be dissolved (removed from the map) or
retreat depending upon the random in
the combat result.
Move the pointer to the German (3-3)
unit located in the upper-right part of
the screen 3 hexes north of the Polish
capital of Warsaw. Click twice to access
the unit. Move the 3.Armee unit to the
SW one hex. Place the pointer on the
adjacent Polish unit (1-2) and click. You
have now just attempted to Overrun
(attack) the Polish unit with just the one
German unit. The odds are not high
since you only have one unit; the Polish
unit will probably not retreat.
Move the pointer westward to the
German (2-4) unit located in the city of
Berlin, which is next to two German air
units. Click the mouse button. Now click
the right mouse button. This will center
the map on Berlin. Click the left button
to access the 29.Korps unit. Move the
pointer two hexes to the west and click.
The unit should move showing (2-2).
Now place the pointer over the OOPSbutton and click. The unit should move back
to Berlin and again be at (2-4). The OOPS
option allows you to take back your
movement to either move somewhere
else or exit. Next click on the OPERAT.
button. Place the pointer in one of the
two resource centers to the SW and
click. Next click on the MOVE TObutton
which will move the unit using
Operational Movement. A maximum of
one unit per impulse can use this special
movement allowing you to move up to
10 hexes away. The (2-4) unit is now at
(2-0). Click the right button to exit.
Now place the pointer on the German (2-
4) unit in the city of Hamburg, which is
on the coast five hexes to the north.
Click twice. The 17.Korps unit should be
displayed. Place the pointer over the
RESERVE button and click. A window
should appear showing that you have
three transport points left. Moving each
unit by Reserve Movement costs one
transport point. Click on the RESERVE
button in the window. The unit should
be removed from the map and placed
into Reserve status; its unit symbol
appears in the third text box on the bottom of the screen. All units in Reserve
and new units coming out of production
will appear in this box reminding you to
deploy the units on the map. All units
placed in Reserve must be placed back
again on the map before you end your
impulse. Now move the pointer one hex
east of Berlin (which is next to two air
units). Click on the NEWbutton. The
Reinforcement Menu should now appear
with the 17.Korps unit displayed. Click
on the INSERT button. The (2-4) unit
should now be placed on the map and
appear as (1-0). The unit’s strength
shown on the counter has decreased
since the unit lost morale points as it
moved. All Reserve units must be placed
back on the map on or adjacent to a city
in a hex which is friendly-controlled. To
see the controlled hexes, click on the
CNTL button. First the Axis controlled
hexes are displayed and next the Allied
hexes. Click on the CLEARbutton which
will remove all of the units from the map
so you can see the terrain under the
units more clearly. Next click on the MAP
button. The entire map is displayed.
Click on the SEA button which displays
the seven sea zones on the map shown
with either white or blue squares. Click
on CNTL which shows you the hexes you
control on the map. COUNTRdisplays the
various countries on the map. If you
wanted to see a different portion of the
normal map, you could click on a location on the map and then select GET.
Select GET to return to the normal map.
Click on the INFO button and then click
on the RESEARCH button. Your current
research settings are displayed. The
MRLS (Multiple Rocket Launchers) is
outlined. Click on the LESSbutton which
removes one research point from the
MRLS. Place the pointer over the words
“Heavy tank” and click. Click on the
MORE button. You now have two research
points allocated to Heavy Tanks. Select
VIEW to display the research standings for
both sides. The Allied player’s standings
are approximate with a question mark
next to the numbers. Move the pointer
outside of the windows and click three
times to return you to the Main Menu.
Click on END to end the impulse. This
ends the tutorial section.
Page 24

Clash of Steel
45
Clash of Steel
46
HISTORICAL TIMELINE
Date Place Event
Sep/Oct 1939 Poland Germans invade
Sep/Oct 1939 Warsaw Germans capture
Sep/Oct 1939 Poland Surrenders
Nov/Dec 1939 Finland Russia invades
Jan/Feb 1940 Finland Surrenders
Mar/Apr 1940 Denmark Germans invade
Mar/Apr 1940 Denmark Surrenders
Mar/Apr 1940 Norway Germans invade
Mar/Apr 1940 Oslo Germans capture
Mar/Apr 1940 Norway Surrenders
May/Jun 1940 Norway Allies land at Narvik
May/Jun 1940 Norway Allies withdraw troops
May/Jun 1940 Netherlands Germany invades
May/Jun 1940 Belgium Germany invades
May/Jun 1940 France Germany invades
May/Jun 1940 Antwerp Germany captures
May/Jun 1940 Paris Germany captures
May/Jun 1940 Brest Germany captures
May/Jun 1940 Bordeaux Germany captures
May/Jun 1940 Netherlands Surrenders
May/Jun 1940 Belgium Surrenders
May/Jun 1940 France Surrenders
May/Jun 1940 Italy Joins Axis
Jul/Aug 1940 Hungary Joins Axis
Jul/Aug 1940 Rumania Joins Axis
Sep/Oct 1940 Egypt Italy invades
Date Place Event
Nov/Dec 1940 Greece Italy invades
Nov/Dec 1940 Egypt Allies attack Italians
Jan/Feb 1941 Bulgaria Joins Axis
Jan/Feb 1941 Tobruk Allies capture
Mar/Apr 1941 Yugoslavia Germany invades
Mar/Apr 1941 Belgrade Germany captures
Mar/Apr 1941 Yugoslavia Surrenders
Mar/Apr 1941 Greece Germany invades
Mar/Apr 1941 Athens Axis capture
Mar/Apr 1941 Greece Allies evacuate
Mar/Apr 1941 Tobruk Allied forces isolated
May/Jun 1941 Crete Germany invades
May/Jun 1941 Crete Allies evacuate
May/Jun 1941 Russia Germany invades
May/Jun 1941 Minsk Axis capture
May/Jun 1941 Riga Axis capture
Jul/Aug 1941 Kiev Axis capture
Sep/Oct 1941 Odessa Axis capture
Sep/Oct 1941 Smolensk Axis capture
Sep/Oct 1941 Kursk Axis capture
Nov/Dec 1941 Tobruk Allied forces relieved
Nov/Dec 1941 Stalino Axis capture
May/Jun 1942 Tobruk Axis capture
Jul/Aug 1942 Egypt 1st Battle of El Alamein
Jul/Aug 1942 Voronezh Axis capture
Jul/Aug 1942 Rostov Axis capture
Jul/Aug 1942 Maykop Axis capture
Page 25

Clash of Steel
47
Clash of Steel
48
Date Place Event
Sep/Oct 1942 Stalingrad Axis attack
Sep/Oct 1942 Egypt 2nd Battle of El Alamein
Nov/Dec 1942 Morocco Allies amphibiously invade
Nov/Dec 1942 Algeria Allies amphibiously invade
Nov/Dec 1942 Tunisia Allies attack
Nov/Dec 1942 Stalingrad Russian counterattack
Jan/Feb 1943 Maykop Russians capture
Jan/Feb 1943 Rostov Russians capture
Jan/Feb 1943 Voronezh Russians capture
Jan/Feb 1943 Kursk Russians capture
Jan/Feb 1943 Tripoli Allies capture
Jan/Feb 1943 Tunisia Battle of Kasserine Pass
May/Jun 1943 Tunis Allies capture
Jul/Aug 1943 Kursk Battle of Kursk
Jul/Aug 1943 Sicily Allies invade/capture
Sep/Oct 1943 Smolensk Russians capture
Sep/Oct 1943 Stalino Russians capture
Sep/Oct 1943 Taranto Allies capture
Sep/Oct 1943 Italy Surrenders
Nov/Dec 1943 Kiev Russians capture
Mar/Apr 1944 Odessa Russians capture
Date Place Event
Jul/Aug 1944 Minsk Russians capture
Jul/Aug 1944 Bucharest Russians capture
Jul/Aug 1944 Marseilles Allies capture
Jul/Aug 1944 Paris Allies capture
Sep/Oct 1944 Netherlands Operation Market-Garden
Sep/Oct 1944 Riga Russians capture
Sep/Oct 1944 Belgrade Russians capture
Sep/Oct 1944 Brest Allies capture
Sep/Oct 1944 Antwerp Allies capture
Nov/Dec 1944 Belgium Battle of the Bulge
Jan/Feb 1945 Budapest Russians capture
Jan/Feb 1945 Warsaw Russians capture
Mar/Apr 1945 Munich Allies capture
Mar/Apr 1945 Hannover Allies capture
Mar/Apr 1945 Cologne Allies capture
Mar/Apr 1945 Genoa Allies capture
May/Jun 1945 Trieste Allies capture
May/Jun 1945 Hamburg Allies capture
May/Jun 1945 Konigsberg Russians capture
May/Jun 1945 Prague Russians capture
May/Jun 1945 Berlin Russians capture
May/Jun 1945 Germany Surrenders
May/Jun 1944 France Allies invade Normandy
May/Jun 1944 Rome Allies capture
Page 26

Clash of Steel
49
Clash of Steel
50
GAME ABBREVIATIONS
Abbreviation What it Means...
AA Anti-Aircraft
AP Action Point
ASW Anti-Submarine Warfare
A-T Anti-Tank
BB Battleship
CV Carrier
CW Commonwealth
GGR German Garrison Requirement
GGV German Garrison Value
MRLS Multiple Rocket Launchers
OB Order of Battle
PP Production Point
RP Research Point
SBP Strategic Bombing Point
SP Strength Point
SP Supply Partition
SV Supply Value
ZOC Zone of Control
ORDER OF BATTLE
The Orders of Battle are listed for each player in each scenario. The following
information is displayed for each unit:
NAME: name
TYPE: type
S: Strength Points
C: Capacity (for Transporter Naval Units)
EF: Efficiency
A: Action Points
RV: Raid Value (for naval units)
PP: production point cost to buy the unit
T: the number of turns in production before the unit arrives
39.40,41,42,43 or 44:which of the scenarios the unit is in
The status of each unit is coded for each scenario:
“M”: the unit is on the map
“B”: you can buy the unit
“I”: the unit is in production
“R”: the unit is in reserve
The unit values were taken from the Poland 1939 scenario. Some of the efficiencies,
Action Points, and production costs are different (usually higher) in the later
scenarios.
Additionally, the following abbreviations are used for “TYPE” in the tables:
AG = Army Group HAR = Artificial Harbor
AIR = Air-Unit PARA = Paratroop
AFV = Panzer
(Armored-Fighting Vehicle) ESC = Escort
ARM = Army CAR = Carrier
COR = Corps TRA = Transport
ENG = Engineer SUB = Submarine
Page 27

Clash of Steel
51
Clash of Steel
52
ALLIED COUNTRIES’ ARMIES
British Army
NAME TYPE S A EF PP T 39 40 41 42 43 44
Alexander AG 6 2 70 20 5 M B M M M M
Montgom. AG 6 2 75 21 5 B R B M M M
AASF AIR 5 2 80 16 5 B B B B M M
RAF AIR 5 2 85 17 5 M M M M M M
1.Homgrd COR 2 2 55 5 2 - - - - - M
8.Army ARM 4 4 70 16 2 M M M M M M
BEF ARM 4 4 70 16 2 M M - B B M
Beirut COR 1 3 20 2 2 M M - - - Br.1.Cps COR 2 4 70 9 2 M M M M M M
Br.10.Cps COR 2 4 75 9 2 B B M B M B
Br.12.Cps COR 2 4 70 9 2 B B M M M M
Br.2.Army ARM 4 4 65 15 3 B B B B B M
Br.2.Cps COR 2 4 65 8 2 M M M M M M
Br.30.Cps COR 2 4 65 8 2 M M M M M B
Br.5.Army ARM 4 4 70 16 2 - - M M B B
Can.2.Cps COR 2 4 75 9 2 B M M M M M
Cn.1.Army COR 4 4 75 17 3 B B B B M M
Free Frnch COR 2 4 65 8 2 B B B M B M
Gibraltar COR 1 2 60 4 2 M M M B M M
Malta COR 1 2 60 4 2 M M M M M M
Pol.2.Cps COR 2 4 65 8 2 B B M M M M
Mulberry HAR 3 0 80 9 5 B B B B R R
French Army
NAME TYPE S A EF PP T 39 40 41 42 43 44
DCR AFV 2 5 60 8 4 M M - - - CinC AF AIR 5 2 60 13 5 M M - - - OC Air AIR 5 2 60 19 3 B B - - - DeGaulle ARM 5 2 70 17 5 B B - - - -
1.Army ARM 4 2 55 10 2 M M - - - -
2.Army ARM 4 2 60 11 2 M M - - - -
3.Army ARM 4 2 60 11 2 M M - - - -
4.Army ARM 4 2 65 12 2 M M - - - -
5.Army ARM 4 2 50 9 2 M M - - - -
6.Army ARM 4 2 60 11 2 M M - - - -
7.Army ARM 4 2 60 11 2 M M - - - -
8.Army ARM 4 2 55 10 2 M M - - - -
9.Army ARM 4 2 60 11 2 M M - - - -
10.Army ARM 4 2 55 10 3 B M - - - -
11.Army ARM 4 2 50 9 3 B M - - - Frz 7 COR 2 2 65 8 2 B - - - - Garrison COR 1 2 55 4 2 M M - - - Garrison COR 1 2 55 4 2 M M - - - Leg.Etran. COR 3 2 70 10 2 M M - - - -
Polish Army
NAME TYPE S A EF PP T 39 40 41 42 43 44
Pol.AF AIR 3 1 50 7 2 M - - - - Karpaten COR 4 2 60 11 2 M - - - - Krakow COR 4 2 55 10 2 M - - - - Lodz COR 4 2 55 10 2 M - - - - Modlin COR 4 2 55 10 2 M - - - - Narew COR 4 2 55 10 2 M - - - - Pomerhon COR 4 2 55 10 2 M - - - - Poznan COR 4 2 55 10 2 M - - - - Warsaw COR 4 2 55 10 2 M - - - - -
Page 28

Clash of Steel
53
Clash of Steel
54
United States Army
NAME TYPE S A EF PP T 39 40 41 42 43 44
Patton AFV 4 6 90 24 4 B B B R M M
8.USAF AIR 5 2 90 18 5 B B B M M M
Bradley AG 5 2 70 17 5 B B B B B M
Eisenhow. AG 6 2 80 22 5 B B B R M M
9.USAF AIR 5 2 90 18 5 B B B B M M
15.USAF AIR 5 2 90 18 5 B B B B B M
1.US Arm ARM 4 4 70 16 2 B B B M M M
3.US Arm ARM 4 4 70 16 2 B B B R M M
5.US Arm ARM 4 4 70 17 2 B B B B M M
7.US Arm ARM 4 4 70 16 2 B B B B B R
9.US Arm ARM 4 4 70 16 2 B B B B B B
US II Cps COR 2 4 80 10 2 B B B M M M
US VI Cps COR 2 4 70 7 2 B B B B R M
US-Para PARA 2 3 90 14 4 B B B B B M
Russian Army
NAME TYPE S A EF PP T 39 40 41 42 43 44
1st Tank AFV 4 4 40 14 4 M M M M M M
2nd Tank AFV 4 4 45 15 4 B B B R M M
4th Tank AFV 4 4 45 15 4 B B B B B M
1.Gd Tank AFV 4 5 60 19 4 B B B B M M
2.Gd.Tank AFV 4 5 55 18 4 B B B B R M
Red.3.AF AIR 5 2 60 13 5 B B B M M M
Red.4.AF AIR 5 2 60 13 5 B B B B B M
Red.16.AF AIR 5 2 60 13 5 B B B B M M
1.Shock ARM 5 4 65 23 - I R R M M M
2.Shock ARM 5 4 60 22 - I R R M M M
3.Shock ARM 5 4 55 20 - I R R M M M
Brjansk.F AG 7 2 40 20 4 B B B B B M
NW Front AG 7 2 40 20 4 B B M M M M
S. Front AG 7 2 40 20 4 B B M M M M
W.Front AG 7 2 45 21 4 B B B M M M
Zhukov AG 7 2 60 25 4 B B B B M M
3.Army COR 3 2 35 7 1 M M M M M M
4.Army COR 3 2 35 8 1 M M M M M M
NAME TYPE S A EF PP T 39 40 41 42 43 44
5.Army COR 3 2 35 8 1 M M M M M M
6.Army COR 3 2 30 7 1 M M M M M M
8.Army COR 3 2 35 8 1 M M M M M M
9.Army COR 3 2 40 9 1 M M M M M M
10.Army COR 3 2 40 9 1 M M M M M M
11.Army COR 3 2 35 8 1 M M M M M M
12.Army COR 3 2 35 8 1 M M M M M M
13.Army COR 3 2 35 8 1 M M M M M M
16.Army COR 3 2 35 8 1 B B B B B B
18.Army COR 3 2 35 8 1 M M M M M M
19.Army COR 3 2 35 8 1 B B B B B B
20.Army COR 3 2 30 7 1 M M M M M M
21.Army COR 3 2 35 8 1 M M M M M M
22.Army COR 3 2 35 8 1 B B B M M M
23.Army COR 4 2 35 10 1 M M M M M M
24.Army COR 3 2 30 7 1 B B B M M M
26.Army COR 3 2 35 8 1 M M M M M M
28.Army COR 3 2 35 8 1 B B B B B B
29.Army COR 3 2 40 9 1 B B B M B B
30.Army COR 3 2 35 8 1 B B B B B B
34.Army COR 3 2 35 8 1 B B B M M M
38.Army COR 3 2 35 8 1 M M M M M M
42.Army COR 3 2 40 9 1 B M M M M M
43.Army COR 3 2 35 8 1 B B B B B B
50.Army COR 3 2 35 8 1 B B B B B B
52.Army COR 3 2 30 7 1 B B M M M M
54.Army COR 3 2 35 8 1 B B R M M M
59.Army COR 3 2 35 8 1 B B B M M M
1.Cav.Cps COR 2 2 40 6 1 B R M M M M
2.Cav.Cps COR 2 2 35 6 1 B B M M M M
Engineer ENG 2 3 35 12 4 B R M M M M
GDS Para PARA 2 3 55 12 4 B B B B R M
Page 29

Clash of Steel
55
Clash of Steel
56
NEUTRAL COUNTRIES’ ARMIES
Greek Army
NAME TYPE S A EF PP T 39 40 41 42 43 44
Gre.Mtn COR 2 2 70 8 - - - - - - Gre.Army COR 2 2 60 7 - - - - - - -
Rumanian Army
NAME TYPE S A EF PP T 39 40 41 42 43 44
1.Rum.Ar ARM 2 2 55 6 3 B B - - - -
2.Rum.Ar ARM 2 2 55 6 3 B B - - - -
3.Rum.Ar ARM 4 2 45 9 3 B B M M M M
4.Rum.Ar ARM 4 2 50 9 3 - - M M M M
Benelux Army
NAME TYPE S A EF PP T 39 40 41 42 43 44
Belg.Army COR 3 2 60 9 - - M - - - -
Norwegian Army
Spanish Army
NAME TYPE S A EF PP T 39 40 41 42 43 44
1.Span.Cp COR 3 2 65 10 - - - - - - -
2.Span.Cp COR 3 2 60 9 - - - - - - -
3.Span.Cp COR 3 2 60 9 - - - - - - -
4.Span.Cp COR 3 2 60 9 - - - - - - -
5.Span.Cp COR 3 2 55 8 - - - - - - -
6.Span.Cp COR 3 2 50 8 - - - - - - Garrison COR 2 2 45 8 - - - - - - -
Swedish Army
NAME TYPE S A EF PP T 39 40 41 42 43 44
1.Swed.Ar COR 3 2 60 9 - - - - - - -
2.Swed.Ar COR 3 2 60 9 - - - - - - -
Bulgarian Army
NAME TYPE S A EF PP T 39 40 41 42 43 44
1.Bulg.Ar ARM 2 2 55 6 3 B B - - - -
2.Bulg.Ar ARM 2 2 55 6 3 B B - - - Bulg.Corp COR 2 3 35 5 3 - - M M M M
NAME TYPE S A EF PP T 39 40 41 42 43 44
Norg. Arm COR 2 2 60 7 - - - - - - -
Persian Army
NAME TYPE S A EF PP T 39 40 41 42 43 44
Kuwait COR 2 2 55 6 - - - - - - Iraq COR 2 2 50 6 - - - - - - -
Swiss Army
NAME TYPE S A EF PP T 39 40 41 42 43 44
1.Swiss.Ar ARM 3 2 60 9 - - - - - - -
2.Swiss.Ar ARM 3 2 60 9 - - - - - - -
Page 30

Clash of Steel
57
Clash of Steel
58
Hungarian Army
NAME TYPE S A EF PP T 39 40 41 42 43 44
1.Hun.Ar ARM 2 2 55 6 3 B B - - - -
2.Hun.Ar ARM 4 2 55 10 3 B B - - - Hun.Corps COR 2 4 55 7 3 - - M M M M
Turkish Army
NAME TYPE S A EF PP T 39 40 41 42 43 44
1.Turk.Ar COR 3 2 60 9 - - - - - - -
2.Turk.Ar COR 3 2 55 8 - - - - - - -
3.Turk.Ar COR 3 2 55 8 - - - - - - -
4.Turk.Ar COR 3 2 50 8 - - - - - - -
5.Turk.Ar COR 3 2 50 8 - - - - - - -
Yugoslavian Army
NAME TYPE S A EF PP T 39 40 41 42 43 44
Belgrade COR 2 2 60 7 - - - - - - Zagreb COR 2 2 55 6 - - - - - - Slov.Ex.C COR 2 4 50 7 2 - - B M M M
AXIS COUNTRIES’ ARMIES
Finnish Army
NAME TYPE S A EF PP T 39 40 41 42 43 44
Finn.4.Cps COR 2 4 75 9 2 M M M M M M
Finn.2.Cps COR 2 4 75 9 2 M M M M M M
Finn.SE-A ARM 4 3 70 14 3 B B B R M M
German Army
NAME TYPE S A EF PP T 39 40 41 42 43 44
Guderian AFV 4 7 99 28 4 M M M B B M
Hoepner AFV 4 6 90 24 4 B B M M M M
Hoth AFV 4 6 90 24 4 M M M M M M
Kleist AFV 4 6 95 25 4 B B M M M M
Manteuffel AFV 4 6 95 25 4 B B B M M B
Bock AG 6 2 85 23 5 M M M M - Kesselring AG 6 2 95 26 5 B B B B R M
Kluge AG 6 2 85 27 5 - - - - M M
Manstein AG 6 2 99 27 5 B M M M M M
Rommel AG 4 3 90 20 5 B B M M M M
Rundstedt AG 6 2 95 26 5 M M M M M M
Luftfl.I AIR 5 2 90 18 5 M M M M M M
Luftfl.II AIR 5 2 90 18 5 M M M M M M
Luftfl.IV AIR 5 2 85 17 5 B B B B B B
Luftfl.X AIR 5 2 90 18 5 B B B M M M
3.Armee ARM 6 3 70 20 3 M M M M M B
4.Armee ARM 6 3 70 20 3 M M M M M M
6.Armee ARM 6 3 70 20 3 B M M M M M
8.Armee ARM 6 3 70 20 3 M B B B B M
14.Armee ARM 6 3 80 23 3 B B B B B B
16.Armee ARM 6 3 80 23 3 B R B M B M
17.Armee ARM 6 3 80 23 3 B B B M M B
10.Armee COR 6 3 70 20 3 B B B B B B
11.Armee COR 6 3 70 20 3 B B M M M B
1.Korps COR 2 4 80 10 2 M M M M M M
2.Korps COR 2 4 75 9 2 B B M M M M
4.Korps COR 2 4 80 10 2 M M M M M M
5.Korps COR 2 4 80 10 2 M R M M M M
6.Korps COR 2 4 80 10 2 B B B M B M
7.Korps COR 2 4 80 10 2 M M M M M M
Page 31

Clash of Steel
59
Clash of Steel
60
German Army cont.
NAME TYPE S A EF PP T 39 40 41 42 43 44
8.Korps COR 2 4 80 10 2 B B M M M M
10.Korps COR 2 4 75 9 2 B B B M M M
11.Korps COR 2 4 75 9 2 B B B M B M
12.Korps COR 2 4 80 10 2 M M M M M M
17.Korps COR 2 4 80 10 2 M M M M M M
26.Korps COR 2 4 80 10 2 M M M M M M
29.Korps COR 2 4 80 10 2 M M M M M M
30.Korps COR 2 4 80 10 2 M M M M M M
42.Korps COR 2 4 80 10 2 B B B M B M
49.Gebjgr COR 2 4 85 10 2 B M M M M M
51.Korps COR 2 4 80 10 2 B B B M M M
53.Korps COR 2 4 80 10 2 B B B M M M
Bef 101 COR 2 4 60 8 2 B B B M M M
Bef 102 COR 2 4 60 8 2 B B B B B M
Pionere ENG 2 4 70 15 4 B R R M M M
g.Freheit HAR 3 0 80 12 5 B B B B B B
Fsjgr PARA 2 3 95 14 4 B M M B M M
Italian Army
NAME TYPE S A EF PP T 39 40 41 42 43 44
Ariete AFV 2 5 55 8 5 B B M M B Garibaldi AG 6 3 55 16 5 M M M M B It.AF1 AIR 4 2 70 12 5 B M M M M It.AF2 AIR 4 2 70 12 5 B R M M B -
2.It.Army ARM 4 2 55 10 2 M M M M M -
6.It.Army ARM 4 2 50 9 2 M M M M M -
8.It.Army ARM 4 2 55 10 3 B B M M B -
9.It.Army ARM 4 2 50 9 2 M M M M M -
11.It.Army ARM 4 2 50 9 2 M M M M M -
2.It.Cps COR 2 3 50 6 2 M - - - - -
9.It.Cps COR 2 3 50 6 2 - M M M B -
10.It.Cps COR 2 3 55 6 2 M M M M M -
20.It.Cps COR 2 3 55 6 2 M M M M B
21.It.Cps COR 2 3 50 6 3 B B B M B IT.Exp.A. COR 4 2 55 10 3 B B B B B -
AXIS COUNTRIES’ NAVAL FORCES
German Navy
NAME TYPE S/C RV PP T 39 40 41 42 43 44
Seydlitz CAR 4 3 15 9 B B B B B B
Zeppelin CAR 4 3 15 9 B B B B B B
Bismarck ESC 5 4 12 7 B R M B - Gneisenau ESC 4 3 10 7 M M M M M M
Scharnh. ESC 4 3 10 7 M M M M M Tirpiz ESC 5 4 12 7 B B B M M M
U1 SUB 2 4 6 3 M M M M M M
U2 SUB 2 4 6 3 B M M M M M
U3 SUB 2 4 6 3 B B R M M B
U4 SUB 2 4 6 3 B B B R M B
Helgoland TRA 2 0 6 4 B B B B B B
Juetland TRA 1 0 4 4 B B B B B B
Kiel TRA 2 0 6 4 M M M M M M
Italian Navy
NAME TYPE S/C RV PP T 39 40 41 42 43 44
Ceasare ESC 3 2 8 7 M M M M M Doria ESC 3 1 7 7 M M M M M Duilio ESC 3 1 7 7 M M M M M Impero ESC 4 3 10 7 B B B B B Littorio ESC 4 3 10 7 M M M M M Roma ESC 4 3 10 7 B B B R M Veneto ESC 4 3 10 7 B B B M M It.Sub SUB 2 4 6 3 B B B B B It.Tran.1 TRA 2 0 6 4 M M M M M It.Tran.2 TRA 1 0 4 4 B B B B B -
Page 32

Clash of Steel
61
Clash of Steel
62
ALLIED COUNTRIES’ NAVAL FORCES
British Navy
NAME TYPE S/C RV PP T 39 40 41 42 43 44
Ark Royal CAR 4 2 14 9 M M M M M M
Glorious CAR 3 2 12 9 M M M M M M
Conqueror ESC 4 2 9 7 B B M M M M
Hood ESC 4 2 9 7 M M M M M M
Malaya ESC 4 2 9 7 M M M M M M
Nelson ESC 5 2 10 7 M M M M M M
Q.Elizab. ESC 4 2 9 7 M M M M M M
Repulse ESC 3 2 8 7 M M M M M M
Rodney ESC 5 2 10 7 M M M M M M
Valiant ESC 4 2 9 7 M M M M M M
Vanguard ESC 4 2 9 7 B B B B B B
Warspite ESC 4 2 9 7 M M M M M M
Br.Tran.1 TRA 2 0 6 4 M M M M M M
French Navy
NAME TYPE S/C RV PP T 39 40 41 42 43 44
Dunkerque ESC 4 2 9 7 M M - - - Gascoine ESC 4 2 9 7 M M - - - Lorraine ESC 3 2 8 7 M M - - - -
United States Navy
NAME TYPE S/C RV PP T 39 40 41 42 43 44
Montana ESC 5 2 10 7 B - - B B M
Texas ESC 3 2 8 7 B B B M M M
Ranger CAR 4 2 14 9 B B B M M M
Nevada ESC 4 2 9 7 B B B M M M
Arkansas ESC 5 2 10 7 B B B M M M
Ohio ESC 5 2 10 7 B B B B B B
US.Tran.1 TRA 2 0 6 4 B B B M M M
US.Tran.2 TRA 3 0 8 4 B B B B M M
US.Tran.3 TRA 3 0 8 4 B B B B B B
Russian Navy
NAME TYPE S/C RV PP T 39 40 41 42 43 44
SU-Sub SUB 1 3 4 3 M M M M M M
Oct.Rev ESC 2 2 7 3 M M M M M M
Sovjetzki ESC 3 2 8 7 M M M M M M
Page 33

Clash of Steel
63
KEYBOARD HOT KEY COMMANDS
Main Menu Edit Game Options Menu
U MENU S SOUND
E END P PANZER
A ASSAULT M MORE
S STRIKE I IMPULS
V NAVY T AUTO
N NEW C SCROLL
L UNLOAD R ATTACK
P PRODUCT O D6SOUND
M MAP N D6ANIM
I INFO H HEXGRID
C CNTL L SLIDE
R CLEAR U UNITEXIT
* STRIKE / ASSULT
CREDITS
C
LASH OFSTEEL
Developed by
Martin Scholz
Strategic Simulations, Inc.
Rule Book Writer
Dave Landrey
Rule Book Editors
Eileen Matsumi
André Vrignaud
Jonathan Kromrey
Clash of Steel
Information Menu Setup Menu
S STATUS G GAME
E SEA ZONE C SCENARIO
H HISTORY L LOAD
O OB S SAVE
R RESEARCH A AXIS
P POLITICS I ALLIED
B BOMBER R RULES
W WEATHER O COMP
D EDIT
Unit Menu Rules Options Menu
P OPERAT. S SELECT
R RESERVE C CHAOS
H AMPHIB H HOLD
B REBASE P PARTISAN
A PREPARE J JAPAN
F FORTIFY L LIBERATE
M MOVE
O OOPS
Producer
Bret Berry
Associate Producer
James Young
Testers
Steven Okano, Tom MacDevitt, Chris Warshauer
Graphic Design and DTP
Louis Saekow Design: David Boudreau, Leedara Zola
Page 34

STRATEGIC SIMULATIONS, INC. LIMITED WARRANTY
Strategic Simulations, Inc. (“SSI”) warrants that the diskette(s) on which the enclosed program is recorded will be free from
defects in materials and workmanship for a period of 30 days from the date of purchase. If within 30 days of purchase the
diskette(s) prove defective in any way, you may return the diskette(s) to Strategic Simulations, Inc., 675 Almanor
Avenue, Suite 201, Sunnyvale, CA 94086-2901 and SSI will replace the diskette(s) free of charge. In addition, if the
diskette(s) prove defective at any time after the first 30 days, return the diskette(s) to SSI and SSI will replace the diskette(s)
for a charge of $10.00 (each disk) plus $4.00 for shipping and handling. California residents, add applicable sales tax.
SSI MAKES NO WARRANTIES, EITHER EXPRESS OR IMPLIED, WITH RESPECT TO THE SOFTWARE PROGRAM RECORDED
ON THE DISKETTE OR THE GAME DESCRIBED IN THIS RULE BOOK, THEIR QUALITY, PERFORMANCE, MERCHANTABILITY
OR FITNESS FOR ANY PARTICULAR PURPOSE. THE PROGRAM AND GAME ARE SOLD “AS IS.” THE ENTIRE RISK AS TO
THEIR QUALITY AND PERFORMANCE IS WITH THE BUYER. IN NO EVENT WILL SSI BE LIABLE FOR DIRECT, INDIRECT, INCIDENTAL, OR CONSEQUENTIAL DAMAGES RESULTING FROM ANY DEFECT IN THE PROGRAM OR GAME EVEN IF SSI HAS
BEEN ADVISED OF THE POSSIBILITY OF SUCH DAMAGES. (SOME STATES DO NOT ALLOW THE EXCLUSION OR LIMITATION OF IMPLIED WARRANTIES OR LIABILITY FOR INCIDENTAL OR CONSEQUENTIAL DAMAGES, SO THE ABOVE
LIMITATION OR EXCLUSION MAY NOT APPLY TO YOU.)
The enclosed software program and this rule book are copyrighted. All rights are reserved. This rule book may not be
copied, photographed, reproduced, or translated or reduced to any electrical medium or machine-readable form, in whole
or in part, without prior written consent from SSI. The program accompanying this rule book may be copied, by the original
purchaser only, as necessary for use on the computer for which it was purchased.
Any persons reproducing any portion of this book for any reason, in any media, shall be guilty of copyright violation and
subject to the appropriate civil or criminal action at the discretion of the copyright holder(s).
1994 Strategic Simulations, Inc. All Rights Reserved.
WHAT TO DO IF YOU HAVE A DEFECTIVE DISK
Each of our games undergoes extensive playtesting prior to its release. Through this process we hope to uncover and correct any errors in programming. However, due to the complex nature of our simulations, some program errors may go
undetected until after publication. In addition to errors in the program, there are occasionally problems with the disk itself.
We experience the industry standard of approximately a 3 to 5% failure rate of duplicated disks. Before assuming that a disk
is defective, make sure to check your disk drive. Up to 95% of the disks returned to us as defective will run fine on our
computer systems. Often the problem is with a disk drive that needs servicing for alignment, speed, or cleaning.
Should you have a defective disk, please return the disk only (keep all other parts of the game) to our Customer Support
Department, along with a note describing the problem you have encountered. A replacement disk will be provided upon our
receipt of the defective disk.
Should you uncover an error in the program, return both your game disk and any “save game” disks to our Customer
Support Department. Please enclose a description of what was taking place in the game when the error occurred. Upon correction of the program error, we will return an updated disk to you.
Always make sure to include your name, address, and daytime telephone number with any correspon-
dence. We will do our best to see that any problems are corrected as soon as possible.
QUESTIONS OR PROBLEMS?
Our main business number is (408) 737-6800. If you encounter disk or system related problems you can call our
Technical Support Staff at (408) 737-6850 between 11 a.m. and 5 p.m., Pacific Time, Monday through
Friday, holidays excluded. NO GAME PLAYING HINTS WILL BE GIVEN THROUGH THIS NUMBER. You can write to us
for hints at: Hints, Strategic Simulations, Inc., 675 Almanor Avenue, Suite 201, Sunnyvale, CA 94086 (include a selfaddressed, stamped envelope for reply).
IBM COMPATIBLE COMPUTER INFORMATION:
Many of our games will work on IBM compatible computers. If you own an IBM compatible computer we suggest that you
consult with our Technical Support Staff at (408) 737-6850between 11 a.m. and 5 p.m., Pacific Time, Monday through
Friday, (holidays excluded) to see if an SSI game you're considering purchasing is compatible with your computer. If we have
insufficient data to determine compatibility, you may wish to purchase the game and test for compatibility yourself. If the
game proves to be incompatible, you may return it within 14 days with your dated receipt and we will refund your money. Or,
if you return the game within 30 days, you may exchange the game for another.
 Loading...