

Page 1
Preface
&
Instruction Manual
Page 2

PLAYING
Once the automated installation and set-up are complete, the game is ready to play.
To start:
• If you want to see and hear the uninstalled video and multimedia portions of the
game, make sure that the Civilization II CD-ROM is in its drive. (Note that, if you
did not install the Recommended files, there will be no sound effects regardless of
whether the CD is in the drive. There will be some music.)
• If it is not already running, start Windows.
• Now simply double-click on the Civilization II icon (or click Civ2 on the
Windows 95 Start Menu) to start the game.
FEATURES UPDATE: CHANGES TO THE CHEAT MENU
Remember, the CHEAT menu comes with no guarantees—use it at your own risk and don’t
blame Customer Service if they can’t help when it causes problems.
Though it has other uses, the CHEAT menu is intended to supplement the map editing
utility. Once you’ve created a world in which to play, you can use the CHEAT menu options
to further customize the situation. You can create your own game scenarios—and save
them for later play. In combination, the Map Editor and CHEAT menu can give you the same
power as the “Mission Builder” included with many of the best flight simulations.
To this end, the DISCOVER ALL TECHNOLOGIES option described in the manual has been
replaced with the more specific EDIT TECHNOLOGIES. (The shortcut key hasn’t changed; it’s
still
cs6
.) This gives you complete control over the technological status of every
civilization in the game, including yours. One by one, you can select then give or take away
advances. Use the GIVE/TAKE ALL button to bestow every advance there is, except for Future
Tech. Click on it again to ruthlessly strip them all away! Note, however, that some
technologies (IRRIGATION, for one) are known by all civilizations at the dawn of time; you
cannot take these away.
a
Page 3

b
A T
ERRAIN button has been added to the CHANGE TERRAIN AT CURSOR option. This allows you
to change the terrain type of the square at the current cursor location. Note that you cannot
specify special resources for any terrain square; they just happen.
Four new options have been added to the CHEAT menu.
EDIT UNIT
csU
Use this to change the attributes of any unit at the current cursor location. The veteran
status, movement points, hit points, home city, and fortification status are manipulable. If
you’re editing a Caravan or Freight unit, you can change the type of commodity it is
carrying. You cannot, however, change a unit to another type.
EDIT CITY
csC
This option allows you to meddle with the status of any city on the map—as long as you
position the cursor on it first. You can set the size (population) of the town, determine
exactly how many shields are in the PRODUCTION Box, make all the Wonders of the World in
that burg suddenly disappear, or copy all of the improvements in some other city to this
one. If the city is in disorder or celebrating a We Love the _____ Day, you can clear either
state of affairs. Finally, you can make the city an objective of the scenario (the number in
parentheses will change to ‘1’) or remove it from the list of objectives (‘0’).
What good is an objective? Read about the Scenario Parameters option to find out.
EDIT KING
csK
No, this doesn’t let you change what the rulers of other civilizations look like. You can,
however, specify any ruler’s treaty status with every other civilization, the most recent turn
when two civilizations had contact, the ruler’s current attitude toward other rulers, and any
ruler’s current reputation. In addition, you can clear a ruler’s patience counter (making
them very tolerant for a while), set or clear a research goal for any civilization, and
determine how far each ruler has progressed toward the advance currently being
researched. You can copy the technology of one civilization to another—quite a shortcut
from doing it one advance at a time with the EDIT TECHNOLOGIES option. Finally, you can
change the name and sex of every leader in the world.
Page 4

c
SCENARIO PARAMETERS
csP
This is a catch-all that includes some powerful tools for setting up scenarios. Most of
these options have little or no use during a game already in progress.
TECH PARADIGM affects how long it takes to research technological advances. The default
is 10/10. By lowering the numerator, you decrease the time necessary to discover
new advances; the fastest you can allow research to progress is 1/10. Conversely,
increasing the numerator makes scientific progress slower.
TURN YEAR INCREMENT allows you to decide how much time passes with each game turn.
If you leave this at zero, Civilization II uses the default increment, which changes
with time as described in the manual. Any positive integer sets a number of years
to pass per turn; a negative integer sets a number of months to pass per turn.
STARTING YEAR determines the year or month in which the scenario will begin (month if
you’ve set the TURN YEAR INCREMENT to a number of months, year if you’ve set it to a
number of years). Any positive number is AD, and any negative number is BC.
MAXIMUM TURNS allows you to set the length of the game in turns.
TOGGLE SCENARIO FLAG tells Civilization II whether or not you want to save this game
setup as a scenario. Note that the CHEAT menu option SAV E AS SCENARIO automatically
sets this toggle for you.
WIPE ALL GOODY BOXES removes all of the villages of minor tribes from the world,
permanently.
RESTORE ALL GOODY BOXES recreates all of the minor tribe villages in the world, except for
those which were originally on a terrain square that is now occupied by a city or unit.
REVEAL WHOLE MAP makes the scenario take place in a known world. The entire map,
excluding enemy units but including their cities, will be visible from the beginning of
the game.
COVER WHOLE MAP makes the scenario take place in an unexplored world, the
Civilization standard.
SET SCENARIO NAME allows you to give your scenario a title.
TOGGLE TOTAL WAR FLAG silences the senate in all republics and democracies. Set this to
‘1’ to force the assumption that there is a war going on at the outset of the scenario,
and that the usual senatorial meddling in foreign affairs has been effectively stifled
for the duration.
Page 5

EDIT VICTORY CONDITIONS itself contains multiple options:
• The first, TOGGLE USE OBJECTIVE VICTORY FLAG, must be set to ‘1’; otherwise,
the game ignores the rest of these settings. Essentially, the objective victory
flag tells Civilization II to completely ignore the usual scoring
conventions. Rather, all that counts is the taking of the pre-set objectives in
the scenario. Using the EDIT CITY option on the CHEAT menu, you can make
any city a scenario objective.
• Toggle Count Wonders as Objectives determines whether or not captured
Wonders of the World also count toward the objective score.
• Next, you decide which civilization will be the protagonist; this is not the
player’s civilization. This setting only determines which civilization is used
as the benchmark for the four final settings.
• These last four allow you to set conditions for the types of outcome possible
in an objective scenario. For each, enter the number of objectives that the
protagonist civilization must control (that is, have conquered or kept) at the
end of the game in order to accomplish that level of victory or defeat. Other
civilizations are automatically assigned the corresponding outcome. For
example, if the Romans as protagonists achieve a Marginal Defeat, all other
groups win a Marginal Victory.
EDIT SPECIAL RULES also contains a few sub-options, each of which is fairly
straightforward. You can prevent any civilization from ever changing its form of
government, make it impossible to obtain advances by taking over enemy cities,
and remove the spectre of pollution from the game. One caveat is necessary;
you should NEVER use the last option—SPECIAL WWII-ONLY AI. This was put in as an
aid for the game designers and will almost certainly cause your scenario
to crash.
d
Page 6

i
TABLEOFCONTENTS
Introduction . . . . . . . . . . . . . . . . . . . . . . . . . . . . . . . . . . . . . . . . . . . . . . . . . . . . . . . . 1
FOUR IMPULSES OF CIVILIZATION. . . . . . . . . . . . . . . . . . . . . . . . . . . . . . . . . . . . . . . . . . . 2
Exploration • Economics • Knowledge • Conquest
THE BIG PICTURE . . . . . . . . . . . . . . . . . . . . . . . . . . . . . . . . . . . . . . . . . . . . . . . . . . . . . . 3
WINNING . . . . . . . . . . . . . . . . . . . . . . . . . . . . . . . . . . . . . . . . . . . . . . . . . . . . . . . . . . . . 4
THE VARIOUS DOCUMENTATION . . . . . . . . . . . . . . . . . . . . . . . . . . . . . . . . . . . . . . . . . . . 4
Interface Conventions. . . . . . . . . . . . . . . . . . . . . . . . . . . . . . . . . . . . . . . . 5
Tutorial. . . . . . . . . . . . . . . . . . . . . . . . . . . . . . . . . . . . . . . . . . . . . . . . . . . . . . . . . . . . . . . 7
BUILDING YOUR FIRST CITY . . . . . . . . . . . . . . . . . . . . . . . . . . . . . . . . . . . . . . . . . . . . . . 8
Examining the City Display • First Priorities
RESEARCHING CIVILIZATION ADVANCES . . . . . . . . . . . . . . . . . . . . . . . . . . . . . . . . . . . . . 12
MEANWHILE, BACK IN THE CITY... . . . . . . . . . . . . . . . . . . . . . . . . . . . . . . . . . . . . . . . . . 13
Your First Unit • Your First Civilization Advance • Changing Production
FINDING A MINOR TRIBE . . . . . . . . . . . . . . . . . . . . . . . . . . . . . . . . . . . . . . . . . . . . . . . 14
POPULATION INCREASE . . . . . . . . . . . . . . . . . . . . . . . . . . . . . . . . . . . . . . . . . . . . . . . . . . 15
INTERIM . . . . . . . . . . . . . . . . . . . . . . . . . . . . . . . . . . . . . . . . . . . . . . . . . . . . . . . . . . . . . 16
EXPANDING YOUR EMPIRE . . . . . . . . . . . . . . . . . . . . . . . . . . . . . . . . . . . . . . . . . . . . . . . 16
Meeting Another Civilization . . . . . . . . . . . . . . . . . . . . . . . . . . . . . . . . . . 18
IMPROVING THE TERRAIN . . . . . . . . . . . . . . . . . . . . . . . . . . . . . . . . . . . . . . . . . . . . . . . . 19
Establishing a Trade Route . . . . . . . . . . . . . . . . . . . . . . . . . . . . . . . . . . . 20
CHANGING GOVERNMENTS . . . . . . . . . . . . . . . . . . . . . . . . . . . . . . . . . . . . . . . . . . . . . . 22
CONCLUSION . . . . . . . . . . . . . . . . . . . . . . . . . . . . . . . . . . . . . . . . . . . . . . . . . . . . . . . . . 22
Setting Up A Game. . . . . . . . . . . . . . . . . . . . . . . . . . . . . . . . . . . . . . . . . . . . . . . . . . . . 23
YOUR FIRST DECISION . . . . . . . . . . . . . . . . . . . . . . . . . . . . . . . . . . . . . . . . . . . . . . . . . . 23
CUSTOMIZING GAME SET UPS . . . . . . . . . . . . . . . . . . . . . . . . . . . . . . . . . . . . . . . . . . . . 24
Select Size of World • Customize: Landmass • Customize: Land Form •
Customize: Climate • Customize: Temperature • Customize: Age •
Difficulty Levels • Level Of Competition • Level of Barbarian Activity •
Select Game Rules • Select Your Gender • Select Your Tribe •
Select Your City Style • Ready, Set, Go
Changes from Civilization to Civilization II . . . . . . . . . . . . . . . . . . . . . . 31
CIVILIZATION’S NEW LOOK . . . . . . . . . . . . . . . . . . . . . . . . . . . . . . . . . . . . . . . . . . . . . . 31
The Map • The Units • The Cities • The Displays
NEW COMBAT CONCEPTS. . . . . . . . . . . . . . . . . . . . . . . . . . . . . . . . . . . . . . . . . . . . . . . . 32
Hit Points & Firepower • Restoration • New and Changed Units •
Special Combat Cases
Page 7

NEW PRODUCTION CONCEPTS . . . . . . . . . . . . . . . . . . . . . . . . . . . . . . . . . . . . . . . . . . . 34
Waste • Penalties for Switching Production •
New and Changed Improvements
NEW TERRAIN CONCEPTS . . . . . . . . . . . . . . . . . . . . . . . . . . . . . . . . . . . . . . . . . . . . . . . 36
Rivers • New Special Terrain • Upgrading City Squares
NEW MOVEMENT CONCEPTS . . . . . . . . . . . . . . . . . . . . . . . . . . . . . . . . . . . . . . . . . . . . . 37
New Orders . . . . . . . . . . . . . . . . . . . . . . . . . . . . . . . . . . . . . . . . . . . . . . 38
GOVERNMENT IMPROVEMENTS. . . . . . . . . . . . . . . . . . . . . . . . . . . . . . . . . . . . . . . . . . . . 38
NEW CONCEPTS IN DIPLOMACY. . . . . . . . . . . . . . . . . . . . . . . . . . . . . . . . . . . . . . . . . . . 39
Reputation • Diplomatic States • Counterespionage
NEW AND IMPROVED WONDERS . . . . . . . . . . . . . . . . . . . . . . . . . . . . . . . . . . . . . . . . . . 41
MISCELLANEOUS CHANGES. . . . . . . . . . . . . . . . . . . . . . . . . . . . . . . . . . . . . . . . . . . . . . . 42
The Basics of Cities . . . . . . . . . . . . . . . . . . . . . . . . . . . . . . . . . . . . . . . . . . . . . . . . . . 43
CITY CONCEPTS. . . . . . . . . . . . . . . . . . . . . . . . . . . . . . . . . . . . . . . . . . . . . . . . . . . . . . . 44
GAINING NEW CITIES . . . . . . . . . . . . . . . . . . . . . . . . . . . . . . . . . . . . . . . . . . . . . . . . . . 45
Founding New Cities . . . . . . . . . . . . . . . . . . . . . . . . . . . . . . . . . . . . . . . . 45
Choosing Your Location • Proximity Of Cities •
Strategic Value
Capturing Cities . . . . . . . . . . . . . . . . . . . . . . . . . . . . . . . . . . . . . . . . . . . 47
Converting Minor Tribes . . . . . . . . . . . . . . . . . . . . . . . . . . . . . . . . . . . . . 48
THE PARTS OF A CITY . . . . . . . . . . . . . . . . . . . . . . . . . . . . . . . . . . . . . . . . . . . . . . . . . . 49
The City Square • The City Radius
Managing Your Cities . . . . . . . . . . . . . . . . . . . . . . . . . . . . . . . . . . . . . . . . . . . . . . . 51
City Management Concepts . . . . . . . . . . . . . . . . . . . . . . . . . . . . . . . . . . . 52
POPULATION GROWTH • RESOURCE DEVELOPMENT . . . . . . . . . . . . . . . . . . . . . . . . . . . . 53
Tax Revenue • Technological Research • Industrial Production
CITY PROTECTION . . . . . . . . . . . . . . . . . . . . . . . . . . . . . . . . . . . . . . . . . . . . . . . . . . . . . 56
IMPROVEMENTS . . . . . . . . . . . . . . . . . . . . . . . . . . . . . . . . . . . . . . . . . . . . . . . . . . . . . . . 57
Losing Improvements . . . . . . . . . . . . . . . . . . . . . . . . . . . . . . . . . . . . . . . 58
Capture • Fire Sale • Sabotage • Selling Improvements •
Rush Jobs . . . . . . . . . . . . . . . . . . . . . . . . . . . . . . . . . . . . . . . . . . . . . . . 59
Renaming Your City . . . . . . . . . . . . . . . . . . . . . . . . . . . . . . . . . . . . . . . . 60
Managing Your Trade . . . . . . . . . . . . . . . . . . . . . . . . . . . . . . . . . . . . . . . . . . . . . . . 61
Trade Management Concepts. . . . . . . . . . . . . . . . . . . . . . . . . . . . . . . . . . 62
TRADE RATES • GOVERNMENTS . . . . . . . . . . . . . . . . . . . . . . . . . . . . . . . . . . . . . . . . . . . 63
Anarchy • Despotism • Monarchy • Republic • Communism •
Fundamentalism • Democracy
HAPPINESS & CIVIL DISORDER . . . . . . . . . . . . . . . . . . . . . . . . . . . . . . . . . . . . . . . . . . . 70
Special Unhappiness Factors • Civil Disorder. . . . . . . . . . . . . . . . . . . . . . . 71
Restoring Order . . . . . . . . . . . . . . . . . . . . . . . . . . . . . . . . . . . . . . . . 72
ii
Page 8

iii
We Love the _____ Day . . . . . . . . . . . . . . . . . . . . . . . . . . . . . . . . . . . . . . 73
Anarchy • Despotism • Monarchy/Communism/Fundamentalism •
Republic/Democracy
Terrain and Movement. . . . . . . . . . . . . . . . . . . . . . . . . . . . . . . . . . . . . . . . . . . . . . 75
Terrain & Movement Concepts . . . . . . . . . . . . . . . . . . . . . . . . . . . . . . . . 76
T
YPES OF TERRAIN . . . . . . . . . . . . . . . . . . . . . . . . . . . . . . . . . . . . . . . . . . . . . . . . . . . . . 77
A Note about Rivers • Standard Terrain Squares •
Special Terrain Squares • Optimal City Sites • Terrain Conversion
PLANETARY CARETAKING . . . . . . . . . . . . . . . . . . . . . . . . . . . . . . . . . . . . . . . . . . . . . . . . 80
Pollution . . . . . . . . . . . . . . . . . . . . . . . . . . . . . . . . . . . . . . . . . . . . . . . . 80
Nuclear Contamination . . . . . . . . . . . . . . . . . . . . . . . . . . . . . . . . . . . . . . 81
Nuclear Weapons • Nuclear Meltdown
Pollution’s Effects • Monitoring Pollution • Global Warming. . . . . . . . . . . . . 82
MINOR TRIBES. . . . . . . . . . . . . . . . . . . . . . . . . . . . . . . . . . . . . . . . . . . . . . . . . . . . . . . . 83
MOVEMENT . . . . . . . . . . . . . . . . . . . . . . . . . . . . . . . . . . . . . . . . . . . . . . . . . . . . . . . . . . 84
THE ACTIVE UNIT . . . . . . . . . . . . . . . . . . . . . . . . . . . . . . . . . . . . . . . . . . . . . . . . . . . . . 85
No Orders • GoTo Orders • Wait Orders • Paradrop Orders •
Airlift Orders • Activating Fortified and Sleeping Units
NAVIGATING THE MAP WINDOW . . . . . . . . . . . . . . . . . . . . . . . . . . . . . . . . . . . . . . . . . 86
MOVEMENT RESTRICTIONS. . . . . . . . . . . . . . . . . . . . . . . . . . . . . . . . . . . . . . . . . . . . . . . 87
Ground Units • Naval Units • Air Units • Zones of Control
Civilization Advances. . . . . . . . . . . . . . . . . . . . . . . . . . . . . . . . . . . . . . . . . . . . . . . 89
The Concept of Civilization Advances. . . . . . . . . . . . . . . . . . . . . . . . . . . . 90
CLIMBING THE TECHNOLOGY TREE . . . . . . . . . . . . . . . . . . . . . . . . . . . . . . . . . . . . . . . . 91
THE POSTER. . . . . . . . . . . . . . . . . . . . . . . . . . . . . . . . . . . . . . . . . . . . . . . . . . . . . . . . . . 92
Future Technology • Special Advance Effects
Wonders of the World . . . . . . . . . . . . . . . . . . . . . . . . . . . . . . . . . . . . . . . . . . . . . 95
The Concept of Wonders. . . . . . . . . . . . . . . . . . . . . . . . . . . . . . . . . . . . . 96
CONSTRUCTING WONDERS . . . . . . . . . . . . . . . . . . . . . . . . . . . . . . . . . . . . . . . . . . . . . . 96
Units . . . . . . . . . . . . . . . . . . . . . . . . . . . . . . . . . . . . . . . . . . . . . . . . . . . . . . . . . . . . . . . . . 99
UNIT CONCEPTS . . . . . . . . . . . . . . . . . . . . . . . . . . . . . . . . . . . . . . . . . . . . . . . . . . . . . 100
MILITARY UNITS. . . . . . . . . . . . . . . . . . . . . . . . . . . . . . . . . . . . . . . . . . . . . . . . . . . . . . 101
Ground Units . . . . . . . . . . . . . . . . . . . . . . . . . . . . . . . . . . . . . . . . . . . . 101
Pillage. . . . . . . . . . . . . . . . . . . . . . . . . . . . . . . . . . . . . . . . . . . . . . 101
Air Units • Naval Units
COMBAT . . . . . . . . . . . . . . . . . . . . . . . . . . . . . . . . . . . . . . . . . . . . . . . . . . . . . . . . . . . . 103
The Effect of Damage . . . . . . . . . . . . . . . . . . . . . . . . . . . . . . . . . . . . . . 104
Calculating the Winner • Adding in Adjustments . . . . . . . . . . . . . . . . . . . 105
Air Battles • Air Defense • City Attacks • City Defenses •
Fortresses • Nuclear Attacks • Pearl Harbor • Shore Bombardments
Page 9

iv
C
ARAVANS & FREIGHT . . . . . . . . . . . . . . . . . . . . . . . . . . . . . . . . . . . . . . . . . . . . . . . . . 108
Trade Routes . . . . . . . . . . . . . . . . . . . . . . . . . . . . . . . . . . . . . . . . . . . . 108
Supply & Demand • Food Caravans
Building Wonders . . . . . . . . . . . . . . . . . . . . . . . . . . . . . . . . . . . . . . . . . 109
DIPLOMATS & SPIES . . . . . . . . . . . . . . . . . . . . . . . . . . . . . . . . . . . . . . . . . . . . . . . . . . . 110
Bribing Enemy Units . . . . . . . . . . . . . . . . . . . . . . . . . . . . . . . . . . . . . . . 110
Counter-Espionage • Entering Enemy Cities •
International Incidents . . . . . . . . . . . . . . . . . . . . . . . . . . . . . . . . . . . . . 111
Investigate City • Establish Embassy • Steal Advance •
Industrial Sabotage • Incite a Revolt • Poison the Water Supply •
Plant Nuclear Device
SETTLERS & ENGINEERS . . . . . . . . . . . . . . . . . . . . . . . . . . . . . . . . . . . . . . . . . . . . . . . . 114
Founding New Cities & Increasing Existing Ones • Making Improvements. . . 115
Irrigate • Clear • Build Farm • Build Fortress • Mine • Reforest • Clean
Up Pollution • Build Road • Build Railroad • Transform • Build Airbase
EXPLORERS • BARBARIANS . . . . . . . . . . . . . . . . . . . . . . . . . . . . . . . . . . . . . . . . . . . . . . . 119
Ransoming Barbarian Leaders . . . . . . . . . . . . . . . . . . . . . . . . . . . . . . . . 120
Diplomacy . . . . . . . . . . . . . . . . . . . . . . . . . . . . . . . . . . . . . . . . . . . . . . . . . . . . . . . . . . . 121
CONCEPTS OF DIPLOMACY • YOUR RIVAL’S ANTECHAMBERS . . . . . . . . . . . . . . . . . . . . . 122
CONDUCTING DIPLOMACY WITH COMPUTER OPPONENTS . . . . . . . . . . . . . . . . . . . . . . 123
Mood and Personality • Reputation
THE FIVE DIPLOMATIC STATES . . . . . . . . . . . . . . . . . . . . . . . . . . . . . . . . . . . . . . . . . . . 125
Alliance • Peace • Cease-fire • Neutrality • War
NEGOTIATIONS . . . . . . . . . . . . . . . . . . . . . . . . . . . . . . . . . . . . . . . . . . . . . . . . . . . . . . . 127
Diplomacy Menu. . . . . . . . . . . . . . . . . . . . . . . . . . . . . . . . . . . . . . . . . . 128
“Have a Proposal to Make...” . . . . . . . . . . . . . . . . . . . . . . . . . . . . . . . . . 129
Proposal Menu. . . . . . . . . . . . . . . . . . . . . . . . . . . . . . . . . . . . . . . . 129
“Have a Gift to Offer...” . . . . . . . . . . . . . . . . . . . . . . . . . . . . . . . . . . . . . 130
Gift Menu . . . . . . . . . . . . . . . . . . . . . . . . . . . . . . . . . . . . . . . . . . . 130
Winning the Game . . . . . . . . . . . . . . . . . . . . . . . . . . . . . . . . . . . . . . . . . . . . . . . . . . 131
THE SPACE RACE . . . . . . . . . . . . . . . . . . . . . . . . . . . . . . . . . . . . . . . . . . . . . . . . . . . . . . 131
SPACESHIPS . . . . . . . . . . . . . . . . . . . . . . . . . . . . . . . . . . . . . . . . . . . . . . . . . . . . . . . . . . 132
Population • Support • Energy • Mass • Fuel • Flight Time •
Probability of Success • Space Ship Launch • Construction •
Components • Modules • Structural Support
CONQUERING THE WORLD. . . . . . . . . . . . . . . . . . . . . . . . . . . . . . . . . . . . . . . . . . . . . . 135
Bloodlust Option . . . . . . . . . . . . . . . . . . . . . . . . . . . . . . . . . . . . . . . . . 135
SCORING . . . . . . . . . . . . . . . . . . . . . . . . . . . . . . . . . . . . . . . . . . . . . . . . . . . . . . . . . . . 136
Throne Room • Demographics • Civilization Score
Page 10

v
Creating Your Own Worlds. . . . . . . . . . . . . . . . . . . . . . . . . . . . . . . . . . . . . . . . 139
Y
OUR TOOLS . . . . . . . . . . . . . . . . . . . . . . . . . . . . . . . . . . . . . . . . . . . . . . . . . . . . . . . . 140
The Toolbox • Map Window • World Window • Status Window
THE MENUS . . . . . . . . . . . . . . . . . . . . . . . . . . . . . . . . . . . . . . . . . . . . . . . . . . . . . . . . . 142
Editor Menu • View Menu • Map Menu • Brush Menu • Tools Menu
Reference: Screen by Screen. . . . . . . . . . . . . . . . . . . . . . . . . . . . . . . . . . . . . . . . 145
THE CITY DISPLAY . . . . . . . . . . . . . . . . . . . . . . . . . . . . . . . . . . . . . . . . . . . . . . . . . . . . 145
Title Bar • Population Roster . . . . . . . . . . . . . . . . . . . . . . . . . . . . . . . . . 147
Specialists. . . . . . . . . . . . . . . . . . . . . . . . . . . . . . . . . . . . . . . . . . . 147
Food Storage Box . . . . . . . . . . . . . . . . . . . . . . . . . . . . . . . . . . . . . . . . . 148
The Resource Bars . . . . . . . . . . . . . . . . . . . . . . . . . . . . . . . . . . . . . . . . 149
Food • Shields • Trade
Resource Map • Production Box . . . . . . . . . . . . . . . . . . . . . . . . . . . . . . . 150
Change • Buy • Production Menu Button
Unit Roster • Improvement Roster • General Information Box . . . . . . . . . . 152
City Info Chart • Happiness Chart • Foreign Service Map
The Buttons . . . . . . . . . . . . . . . . . . . . . . . . . . . . . . . . . . . . . . . . . . . . . 155
THE MENU BAR . . . . . . . . . . . . . . . . . . . . . . . . . . . . . . . . . . . . . . . . . . . . . . . . . . . . . . 155
Game . . . . . . . . . . . . . . . . . . . . . . . . . . . . . . . . . . . . . . . . . . . . . . . . . 155
Game Options
c O
• Graphic Options
c P
•
City Report Options
c E
• Save Game
c S
•
Load Game
c L
• Retire
c R
• Quit
c X
•
Kingdom . . . . . . . . . . . . . . . . . . . . . . . . . . . . . . . . . . . . . . . . . . . . . . . 159
Tax Rate
s T
• View Throne Room
s H
•
Find City
s C
• REVOLUTION
s R
View . . . . . . . . . . . . . . . . . . . . . . . . . . . . . . . . . . . . . . . . . . . . . . . . . . 160
Move Pieces V• View Pieces V• Zoom In Z• Zoom Out X•
Max Zoom In
c Z
• Standard Zoom
s Z
•
Medium Zoom Out
s X
• Max Zoom Out
c X
•
Show Map Grid
c G
• Arrange Windows • Show Hidden Terrain T•
Center View
C
Orders . . . . . . . . . . . . . . . . . . . . . . . . . . . . . . . . . . . . . . . . . . . . . . . . . 162
Build New City/Join City B• Build Road/Railroad R•
Build Irrigation/Change to... I• Build Mines/Change to... M•
Transform to... O• Build Airbase E• Build Fortress F•
Clean up Pollution P• Pillage
s P
• Unload U•
Go To G• Paradrop P• Airlift L• Set Home City H•
Fortify F• Sleep S• Disband
s D
• Activate Unit A•
Wait W• Skip Turn
z
Page 11

vi
Advisors . . . . . . . . . . . . . . . . . . . . . . . . . . . . . . . . . . . . . . . . . . . . . . . 165
Town Council
c T
• City Status 1• Defense Minister 2•
Foreign Minister 3• Attitude Advisor 4•
Trade Advisor 5• Science Advisor
6
World. . . . . . . . . . . . . . . . . . . . . . . . . . . . . . . . . . . . . . . . . . . . . . . . . . 168
Wonders of the World 7• Top 5 Cities 8•
Civilization Score 9• Demographics -• Spaceships
=
Cheat . . . . . . . . . . . . . . . . . . . . . . . . . . . . . . . . . . . . . . . . . . . . . . . . . 169
Toggle Cheat Mode
c K
• Create Unit
s 1
•
Reveal Map
s 2
• Set Human Player
s 3
•
Set Game Year
s 4
• Kill Civilization
s 5
•
Technology Advance
s 6
•
Discover All Technologies
cs6
•
Force Government
s 7
• Change Terrain at Cursor
s 8
•
Destroy All Units at Cursor
csD
•
Change Money
s 9
• Save as Scenario
Civilopedia. . . . . . . . . . . . . . . . . . . . . . . . . . . . . . . . . . . . . . . . . . . . . . 171
Civilization Advances • City Improvements •
Wonders of the World • Military Units • Governments •
Terrain Types • Game Concepts • Search Civilopedia
T
HE STATUS WINDOW . . . . . . . . . . . . . . . . . . . . . . . . . . . . . . . . . . . . . . . . . . . . . . . . . 173
World Peace Bar • Summary Box . . . . . . . . . . . . . . . . . . . . . . . . . . . . . . 173
Population • Date • Treasury • Trade Balance •
Scientific Research • Environment
Active Unit/Location Box . . . . . . . . . . . . . . . . . . . . . . . . . . . . . . . . . . . . 175
Mode • Icons • Nationality • Home City •
Unit Type • Movement • Terrain
THE MAP WINDOW . . . . . . . . . . . . . . . . . . . . . . . . . . . . . . . . . . . . . . . . . . . . . . . . . . . 177
Multiple Windows • Zoom Buttons • Moving the View •
Centering on a City • Centering on a Unit
WORLD WINDOW . . . . . . . . . . . . . . . . . . . . . . . . . . . . . . . . . . . . . . . . . . . . . . . . . . . . 178
Designers’ Notes . . . . . . . . . . . . . . . . . . . . . . . . . . . . . . . . . . . . . . . . . . . . . . . . . . . . 179
Credits . . . . . . . . . . . . . . . . . . . . . . . . . . . . . . . . . . . . . . . . . . . . . . . . . . . . . . . . . . . . . . 184
Index . . . . . . . . . . . . . . . . . . . . . . . . . . . . . . . . . . . . . . . . . . . . . . . . . . . . . . . . . . . . . . . . 187
Page 12
Sid Meier’s Civilization II improves on a beloved classic. Civilization,
its predecessor, cast you as the ruler of an infant civilization, struggling to
survive and prosper in the earliest moments of history. Eventually, growth and
exploration brought you into competition with ruthless, competent, but
sometimes predictable computer opponents. Civilization II adds depth to the
diplomacy and smarts to the artificial intelligence, as well as tweaking features that
millions of Civ players had come to know too well. The result is the same compelling
quality and fresh challenges for the expert player — and a wide-open world to explore
for the novice.
Both you and your opponents begin with a small band of settlers surrounded by the
hazards and delights of unexplored territory. Each decision you make can have
important ramifications later. Should you build a city on a coast or inland? Should you
concentrate on military production or agricultural improvement? Innovative displays make
it easy to understand the shifting situation and implement action. If you prove an able ruler,
your civilization grows larger and even more interesting to manage. The inevitable contact
with neighboring civilizations opens new doors of opportunity: treaties, embassies,
sabotage, trade, and war.
INTRODUCTION
1
Page 13

As time passes, you are confronted with increasingly difficult decisions. First, you must
think tactically. Where is the optimum location for another city? When should you produce
specific military units and city improvements? How rapidly should you explore the
surrounding land? Soon, circumstances demand that you formulate strategic plans. Should
you pursue war or peace with neighbors? When should you explore and expand overseas?
Is it advantageous to change your type of government? Where should you focus
technological research?
The success of the civilization that you build depends on your decisions. As ruler, you
manage the economy, diplomacy, exploration, research, and the war machine of your
civilization. Your policies must be flexible to fit an evolving world. Military units inevitably
become obsolete and need replacement as you gain more advanced technologies. The
balance of power among your rivals shifts often. You might have to modify your economic and
governmental policies, lest you fall behind in a critical area. The empires of Alexander the
Great, the Hittites, Napoleon, and Genghis Khan (to name just a few) all held pride of place
on the world’s stage at one time. All eventually collapsed. In Civilization II, the challenge
is to build an empire that stands the test of time. You might succeed where great
predecessors have failed. If you locate cities properly, build them soundly, defend them
aggressively, and neutralize the danger from potential enemies, the descendants of your
first tiny tribe might not only survive, but lead the colonization of space.
FOUR IMPULSES OF CIVILIZATION
There is no single driving force behind the urge toward civilization, no one goal toward
which every culture strives. There is, instead, a web of forces and objectives that impel and
beckon, shaping cultures as they grow. In Civilization II, there are four basic impulses
that seem to be of the greatest importance to the health and flexibility of your
fledgling society.
EXPLORATION
An early focus in Civilization II is exploration. You begin the game knowing almost
nothing about your surroundings. Most of the map is dark. Your units move into this
darkness of unexplored territory and discover new terrain; mountains, rivers, grasslands,
and forests are just some of the features they might reveal. The areas they explore might
be occupied by minor tribes or another culture’s units. In either case, a chance meeting
provokes a variety of encounters. As your units “map” the unknown by revealing terrain
squares that once were black, they also lessen the likelihood that you will be surprised by
random barbarian attacks.
2
Page 14

ECONOMICS
As your civilization grows, you need to manage its ever-more-complex production and
resource requirements. Adjusting the tax rates and choosing the most productive terrain for
your purposes, you can control the speeds at which your population grows larger and your
cities produce goods. By setting taxes higher and science lower, you can tilt your economy
into a cash cow. You can also adjust the happiness of your population. Perhaps you’ll make
luxuries more available, or you might clamp down on unrest with a larger military presence.
You can establish trade routes with other powers to bring in supplemental income every turn.
KNOWLEDGE
On the flip side of your economics management is your commitment to scholarship. By
setting taxes lower and science higher, you can increase the frequency with which your
population discovers new technologies. With each new advance, further paths of learning
open up and new units and city improvements become available for manufacture. Some
technological discoveries let your cities build unique Wonders of the World.
CONQUEST
Perhaps your taste runs to military persuasion. Civilization II allows you to pursue a range
of postures from pure defense through imperialistic aggression to cooperative alliance.
One way to win the game is to be the last civilization standing when the dust clears. Of
course, you’ll face both random barbarian attacks and calculated sorties by your
computer opponents.
THE BIG PICTURE
A winning strategy for Civilization II, is one that combines all of these aspects into a
flexible whole. Your first mission is to survive; your second is to thrive. It is not true that
the largest civilization is necessarily the winner, nor that the wealthiest always has the
upper hand. In fact, a balance of knowledge, cash, and military might allows you to
respond to any crisis that occurs, whether it is a barbarian invasion, an aggressive rival, or
an upsurge of internal unrest.
INTRODUCTION
3
Page 15

WINNING
To win Civilization II, you must follow one of two broad strategies to a final goal: Either
win the space race or conquer the world. The first civilization to colonize Alpha Centauri
wins; this nation most often has a large factory base dedicated to producing the specialized
components of spacecraft and a head-and-shoulders lead in technological development.
However, it’s possible to use industrial espionage and judicious invasions to steal the
necessary advances, while sabotaging the production lead of a more advanced but less
well defended opponent. A leader who pursues the second option, conquering the world,
is likely to focus on military strategy, though building a strong economy and financing
insurrections can be pretty successful, too. See Winning the Game for an in-depth
analysis of Civilization II’s scoring system.
THE VARIOUS DOCUMENTATION
It’s a truism at computer game companies that most customers never read the manual.
Until a problem rears its head, the average player just bulls through by trial and error; it’s
part of the fun. When a problem does come up, this type of player wants to spend as little
time in the book as possible, then get back to the game. For those of you who just need
a quick reference, the Reference: Screen by Screen section is the place to go.
For the rest of you, we’ve tried to organize the chapters in the order that you’ll need
them if you’ve never played Civilization or Civilization II before. If you’re new to Civ,
the sidebars on concepts should help you understand the fundamentals of the game.
The Technical Supplement is the place to find installation and startup instructions and
any late changes to the game. Since it was written later, the information in it supersedes
anything in the manual.
The README file that comes on the CD-ROM has the rundown on the very latest changes
(due to printing and binding time, the manual has to be completed before the playtesters
recommend their final tweaks). That info supersedes even the Technical Supplement.
In addition to the printed stuff and the README, Civilization II comes with a unique
compendium of on-screen help. Click on the CIVILOPEDIA menu to call up a list of options
describing units, improvements, governments, and even game concepts. Entries are
hyperlinked so that you can jump from one entry to another with ease, and the new SEARCH
feature allows you to brows alphabetically through every topic.
4
Page 16

INTERFACE CONVENTIONS
You play Civilization II using a combination of both mouse and keyboard. Many people find
that the short-cut keys on the keyboard significantly speed up their play.
Using a Mouse: Throughout the text, we assume that you understand basic mouse
functions and terms, like “clicking and dragging.” Since not everybody knows these
things, we’ve provided brief definitions of how we use the most common terms.
One preliminary note: Civilization II puts both buttons on a two-button mouse to
use. If you are using a three-button mouse, the center button has no function for
this game.
• “Clicking” refers to placing the mouse pointer over an area of the screen and
clicking with the left mouse button.
• “Right-clicking” is clicking with the right mouse button.
• “Click-and-hold” means keeping your finger on the mouse button longer than
usual (long enough that the game recognizes the “hold”).
• “Dragging” means holding the left button down while moving the mouse.
• “Selecting” means clicking on something.
• “Pressing a button” with the mouse means clicking on one of the on-screen
buttons.
• You can “scroll” some of the menus and boxes in the game by dragging the
button along a slider bar that’s on one side of the box.
Menus: The MENU BAR runs across the top of the screen. As is standard in Windows games,
clicking on the name of a menu opens that menu, giving you access to the menu
options. If you prefer not to use the keyboard and have enabled mouse movement
of units, you can play Civilization II using the mouse and menus exclusively.
Short-Cut Keys: Almost all of the menu options in Civilization II have a short-cut key
(Rfor Roads, for example), which is noted on the menu. Pressing this key (or
combination of keys) has the same effect as selecting the option from the menu.
Another quick way to use menu options is also a Windows standard. The name of
each menu has one underlined letter. Holding the akey and typing that letter opens
the menu. The name of each option on the menu also has one underlined letter.
Typing that letter when the menu is open activates the option.
Cursors: The mouse pointer, or cursor, has many different shapes in Civilization II,
depending on what task you’re currently attempting.
INTRODUCTION
5
Page 17
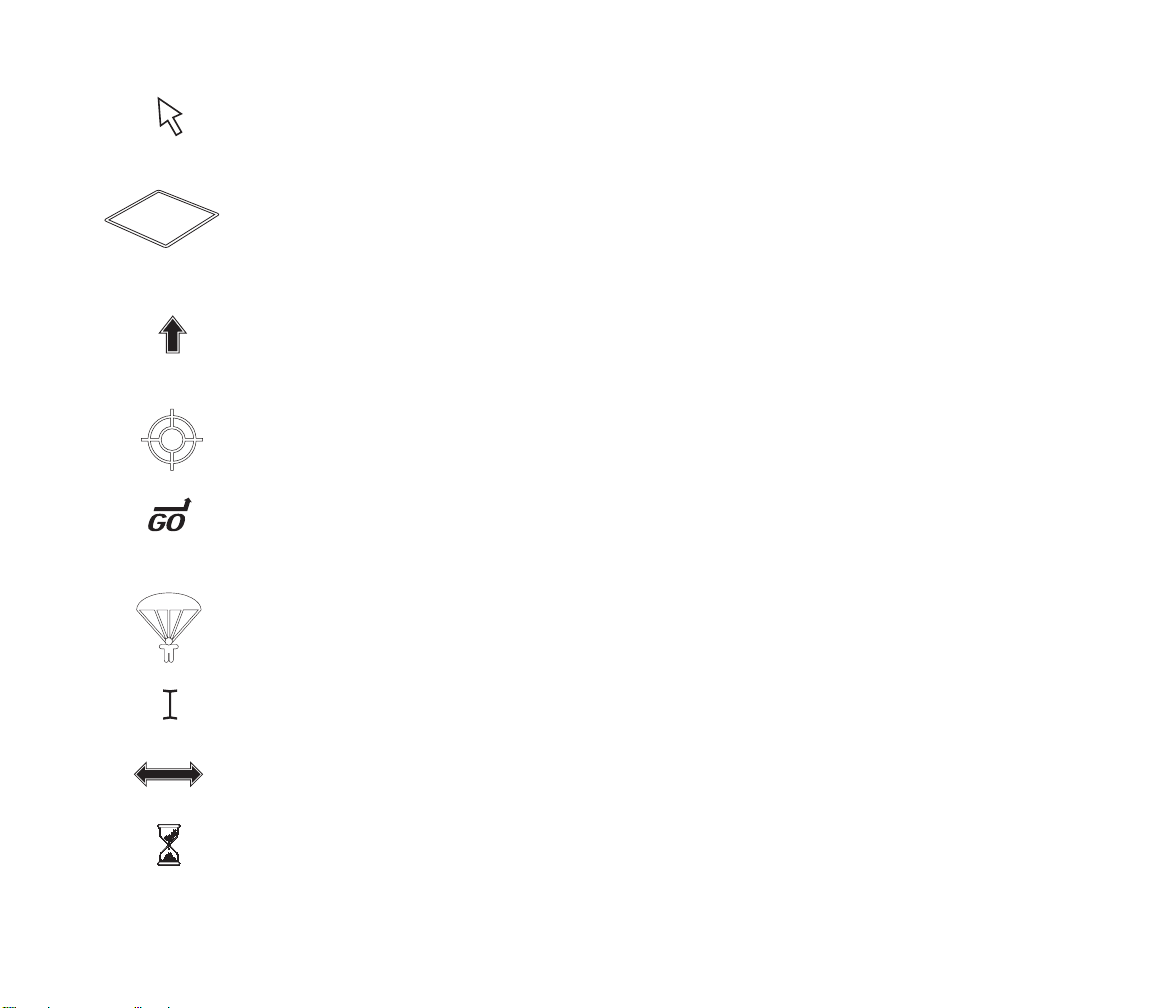
Most often, the cursor looks like an arrow. If you have chosen a
special “desktop theme” in Windows 95 or otherwise customized your
cursor, you’ll see your own cursor sometimes, too.
An outline around a terrain square indicates that you are in VIEW PIECES
mode. By moving the cursor with the number keypad on your keyboard,
you can use this cursor to count squares from one location to another or
move around the map without moving units. Toggle back to the arrow
cursor by pressing the Vkey or choosing MOVE PIECES from the VIEW menu.
A bold (black) arrow indicates the direction the unit on which your
mouse pointer is positioned will move when you click. If you don’t
like this unit-movement cursor, you can disable it by unchecking the
MOVE UNITS WITH MOUSE option under GAME OPTIONS in the GAME menu.
Civilization II starts with this option disabled.
A cross-hair indicates that you can click on the spot where your
mouse pointer is positioned in the World Window to center the active
VIEW UNITS window on that spot.
The word “Go” and a bent arrow indicates that when you release the
mouse button, the active unit will begin moving toward the indicated
square. See GoTo Orders in the Terrain and Movement section for
complete details.
A parachute indicates that the active paratrooper unit will make a
paradrop into the designated square; a “crossed-out” parachute indicates
that the designated square is not a valid paradrop target. See Paradrop
Orders in the Terrain and Movement section for complete details.
As in most Windows programs, an I-beam or vertical line indicates that
you can type in text from the keyboard.
As in most Windows programs, a double-ended arrow indicates that
you can resize the window frame on which your mouse pointer
is positioned.
As in most Windows programs, an hourglass indicates the program is
working; please wait.
6
Page 18
Those who have played either Civilization or CivNet are already familiar
with most of the concepts presented in this tutorial. However, even if you
are well acquainted with the DOS, Windows, or Macintosh version, you will
find that there are many new features in Civilization II. Also, many of
the game’s existing elements, including screen layout, icons, and
controls have changed from the earlier games.
The primary purpose of this tutorial is to introduce new players to
the basic elements of Civilization II. It provides an overview of the
basic game elements, and guides you through several centuries of
a sample game. New actions and events are explained as they
occur. The tutorial game has been set up in such a way that most
of the events should be fairly predictable; however, one of the
things that makes Civilization II exciting game after game is the
element of random chance that exists. The way your computer-
controlled opponents act and react to one another (and to you)
might cause certain events to deviate from the path described in
this tutorial. If you feel that things have gotten too far out of
control, feel free to reload the saved game and start again.
TUTORIAL
7
Page 19
To begin the tutorial, start the game and select L
the game called tutorial.sav. The tutorial game is set to CHIEFTAIN level, the easiest difficulty
option available. The game starts on the first turn, in 4000 BC, with you taking the part of
Abraham Lincoln, leader of the Americans. You might want to go to the
GAME OPTIONS in the GAME menu and turn off the INSTANT ADVISOR and TUTORIAL HELP options, if
you find the pop-up boxes distracting.
Instructions you are to follow are set in italics. Explanations and descriptions are set
in regular type. Keep in mind that this tutorial is a simple walk through, and only touches
briefly on game concepts and control features. If you want more information on anything,
detailed descriptions can be found in the other chapters of this manual.
OAD A GAME from the GAME menu. Load
BUILDING YOUR FIRST CITY
At the start of the game, your civilization
consists of a single band of wandering
nomads. This is a Settlers unit. Although
Settlers are capable of performing a variety
of useful tasks, your first task is to move
the Settlers unit to a site that is suitable for
the construction of your first city.
Finding suitable locations in which to
build cities, especially your first city, is one
of the most important decisions you make
in the game. In order to survive and grow,
each city must have access to all three
resource types: food (represented by grain),
production (represented by shields), and
trade goods (represented by arrows). The
map in Civilization II is divided into
individual “squares,” each of which
contains a different type of terrain. Each
terrain type yields resources in differing
amounts. A good city site provides all three
resource types. Normally, the lines dividing
the map squares are invisible. To get an idea of how the terrain is divided, turn on the map
grid by choosing SHOW MAP GRID from the VIEW menu, or holding down cand pressing G.
Looking for a place to settle.
8
Page 20

Abraham Lincoln
Before you move your Settlers, take time to examine the surrounding terrain. You will
note that only 21 map squares are visible. This represents the extent to which your
civilization has explored the world. (This 21-square pattern is significant with regard to
cities as well, as you will see later.) The surrounding black areas represent unexplored
terrain. You can build a city on any terrain square except for Ocean. As mentioned earlier,
each terrain type yields differing proportions of resources, so the type of terrain you choose
for a city site determines the level of the city’s success.
Your Settlers currently occupy a Grassland square. Normally, Grassland produces two
grain when worked by one of your citizens. Note that a small shield symbol appears in the
center of this particular Grassland square. That means that, in addition to its normal
resources, this Grassland square also yields one shield when worked. Normal Grassland
squares (without shields) appear to the northwest and northeast of your Settlers.
Directly to the north and directly to the west of the Settlers are Plains
squares. The Plains terrain type produces one grain and one shield when
worked by one of your citizens. Southeast, south, and southwest of the
Settlers are Ocean squares, which produce one grain and two arrows each
when worked. Surrounding the edge of the visible terrain are a Plains
square with a river running through it, two additional Grassland squares,
and four additional Ocean squares. There are also two Hills squares and a
Mountains square along the northwest edge, two Forest squares to the
southwest, and an Ocean square two squares to the southeast with a
Whale in it. We’ll look at these in a moment.
You have the option of moving around to find a suitable city site. If the
nearby terrain is less than optimal it is worth doing so, considering the
importance of proper city placement. You shouldn’t waste too much time
looking, however. Settlers move only one square per turn, and 20 years
pass every turn this early in the game. Luckily, your starting position here
is excellent: The local terrain provides a diverse resource mix, you are
adjacent to a sea coast, and Grassland squares make good city locations.
Build your first city by selecting BUILD NEW CITY from the ORDERS
menu, or by pressing the Bkey. You can rename the city if you like, but
we’ll refer to it as Washington.
TUTORIAL
9
Page 21
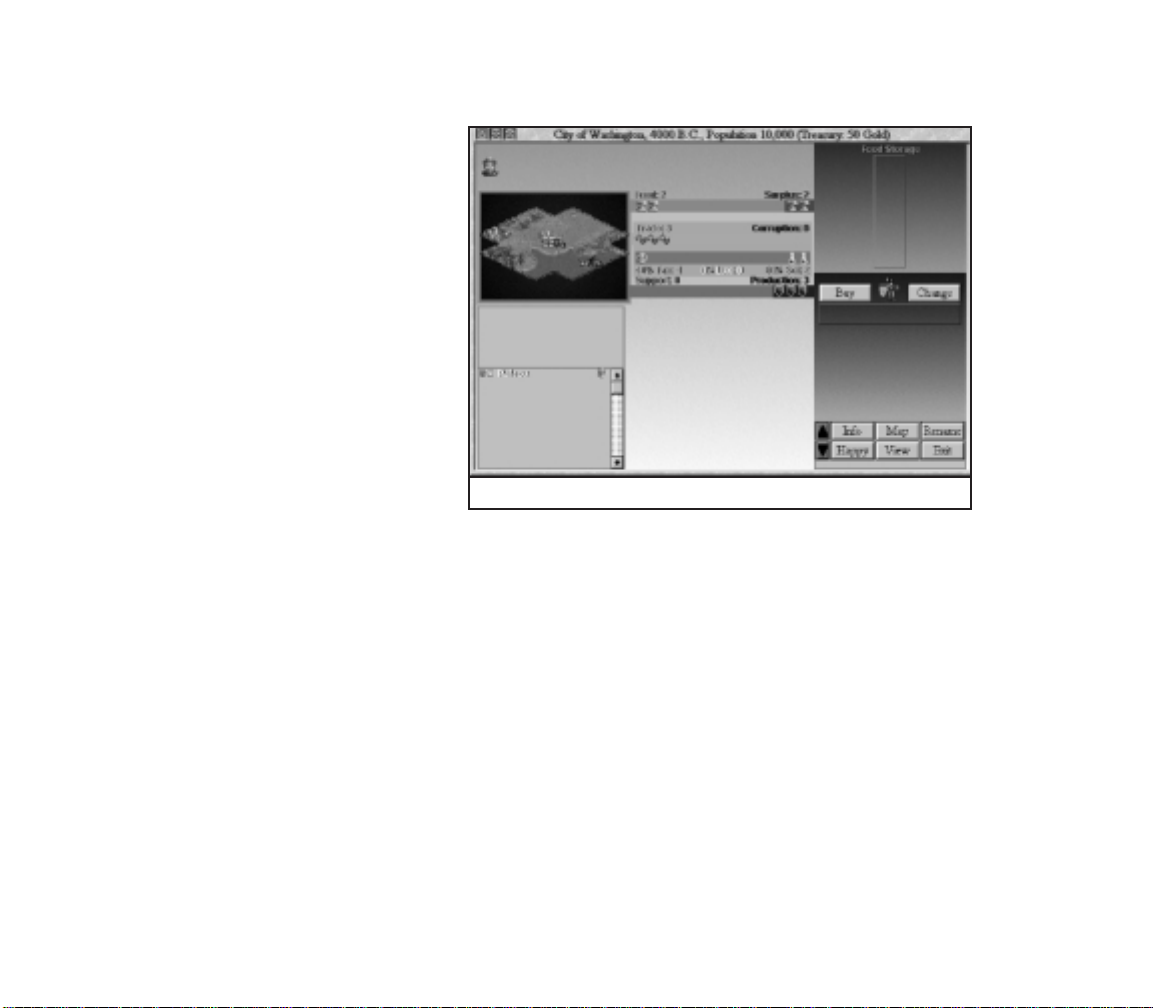
EXAMINING THE CITY DISPLAY
As soon as the city is built, a new window
appears. This window is called the CITY
DISPLAY. The CITY DISPLAY gives detailed
information on the city’s current status,
including the amount of resources
generated, the item currently being built by
the city, and the size and attitude of the
city’s population.
Your first priority is to check the status of
the city’s resources. The POPULATION ROSTER
shows that there is one citizen in
Washington, and he is content. Under most
circumstances, each citizen in the city is
working in one of the terrain squares
surrounding the city, generating resources
for the city’s use. As new citizens are added
to the population, the game puts them to
work in the terrain square it considers the
most productive available. In this case, the
city’s single resident is producing resources
in the Ocean square that contains the Whale.
You have the option of moving citizens to different terrain squares if you want to
produce different combinations of resources. As you can see by the icons on the RESOURCE
MAP, the Whale square is generating two grain, two shields, and two arrows. Click the Whale
square to “pick up” the citizen working there, then click on the Plains square with the
river running through it, directly to the east (right) of the city. Notice that, in the Plains
square with the river, the citizen now generates one grain, one shield, and one arrow. Click
on the Plains square with the river and then click on one of the Forest squares
southwest of the city. In the Forest square, the citizen generates one grain and two
shields, but no arrows. Since the Whale square is one of the most productive types of
terrain, click on the Forest square and then on the Whale square to return the citizen
to his original position.
As you can see, the combination of resources produced is based on terrain type. Under
normal circumstances, each city can assign citizens to generate resources in any of the 20
terrain squares surrounding the city. The pattern of 21 squares with the city at the center
that is seen in Washington’s RESOURCE MAP is called the CITY RADIUS. In addition to the terrain
squares in the CITY RADIUS, the city square itself always generates resources. Like the
squares worked by your citizens, the number and type of resources produced in the city
square is dependent on the terrain type.
Washington’s City Display
10
Page 22

Washington is currently generating four units of food. Each citizen requires two units of
food each turn in order to survive. Excess grain icons accumulate in the FOOD STORAGE BOX.
The more surplus food the city generates, the faster it grows. Washington is also generating
three shields. Shields represent raw materials used for supporting units and building new
items. Since there are currently no units to support, the shields generated each turn go
directly into the PRODUCTION BOX. Finally, the city is producing three arrows, which represent
trade goods. Trade goods are divided into three separate categories: Taxes (gold icons),
Luxuries (goblet icons), and Science (beaker icons). Currently, one arrow is being used to
generate taxes, while the other two are generating science.
Washington’s IMPROVEMENTS ROSTER shows that the only building in the city is the Palace.
Your Palace denotes that Washington is your civilization’s capital.
FIRST PRIORITIES
Because there is so much information to assimilate at the start of the game, it’s hard to
know what you should do first. There are four priorities that you must keep in mind early
in the game: defense, research, growth, and exploration.
Defense: Your top priority is to defend Washington from potential enemies. After all,
who knows who might be lurking in all that unexplored territory? To defend the city,
you must build a military unit. When the city is built, it automatically begins to
construct a defensive unit. The PRODUCTION BOX shows that Washington is currently
producing a Warriors unit.
Research: The science portion of your trade income is used to research new
Civilization Advances. Civilization Advances are new discoveries and technologies
that allow you to build newer and better military units, city improvements, and
Wonders of the World.
Growth: The surplus food generated by the city eventually leads to population growth.
When the FOOD STORAGE BOX is completely filled with grain, a new citizen is added to
the population. Steady city growth leads to increased productivity and the ability to
expand your civilization by building more Settlers to colonize the continent.
Exploration: If you don’t explore the dark areas of the map, you have no way of
knowing what benefits and dangers might be lurking there. By using spare units to
explore the world around you, you can discover the villages of minor tribes (which
often provide you with benefits such as money and new discoveries), sites for new
cities, and neighboring civilizations.
TUTORIAL
When you’re finished examining Washington, close the CITY DISPLAY by clicking the
EXIT button in the lower right corner.
11
Page 23
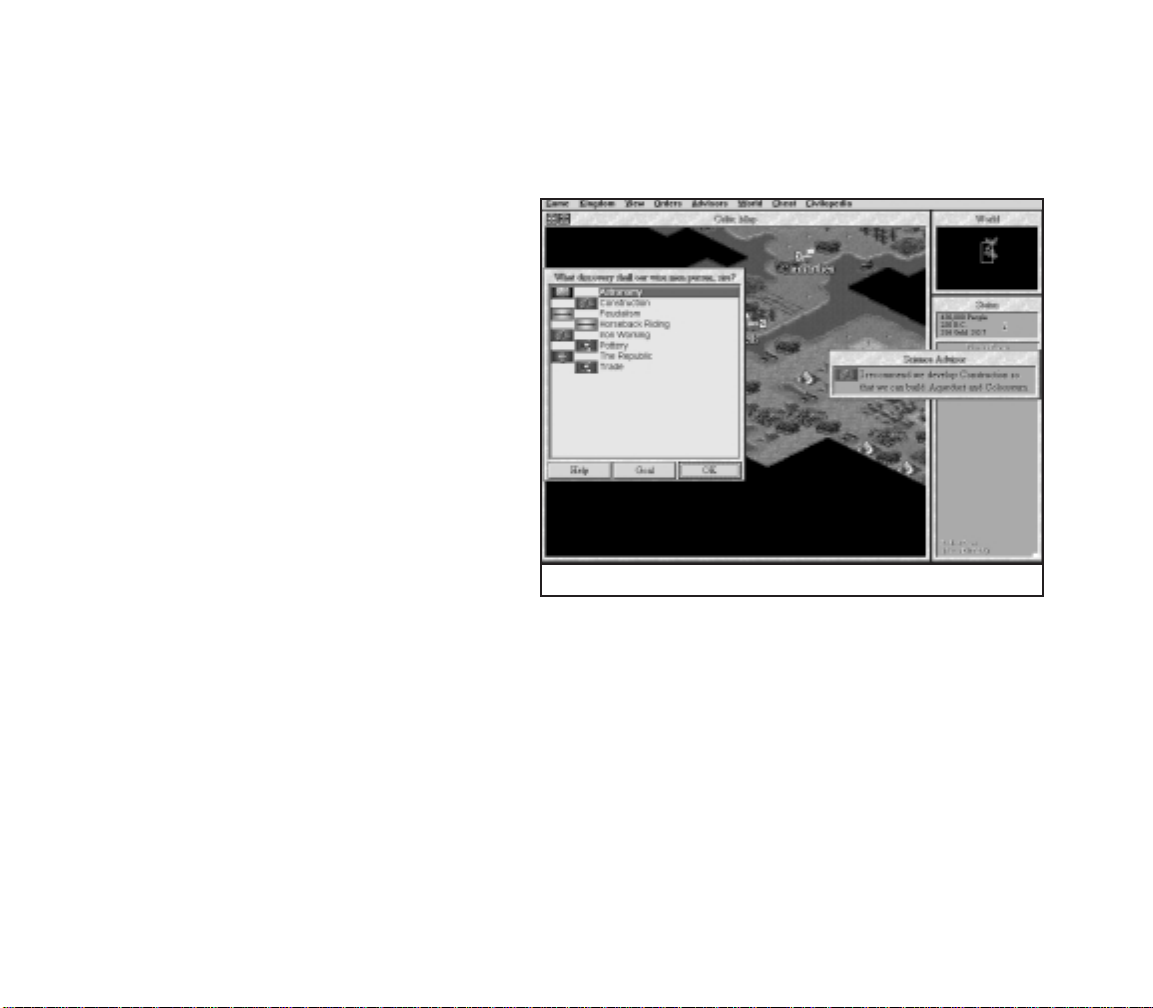
RESEARCHING CIVILIZATION ADVANCES
After closing the CITY DISPLAY, press the
turn, you are prompted to choose the first civilization advance you want to research.
When the game begins, your civilization has only
minimal knowledge, usually consisting of only
Irrigation, Mining, and Roads. (In some games you
might be given additional advances at the start of the
game, but in the tutorial this is not the case.) The bulk
of your knowledge throughout the game is gained
through research. There are many different strategies
dictating the order in which advances are researched.
For the purposes of this tutorial, we’ll adopt a
conservative, defensive strategy. You can experiment
with research strategies of your own as you become
more familiar with the game.
When the menu of possible advances appears,
select Bronze Working, then click OK. We have
chosen Bronze Working because the discovery of this
advance allows you to build the Phalanx unit.
Phalanxes are twice as effective at defending cities
as Warriors.
The amount of time required to research
discoveries is based on the amount of science your
city is currently generating. Remember, science is one
of the components of trade. Select the TRADE ADVISOR
option from the ADVISORS menu, or press the 5key. As you can see from this display, it
currently takes five turns to make a new discovery. The more beaker icons you generate each
turn the faster you make new discoveries. Click OK to close the TRADE ADVISOR window.
As you can see by looking at the STATUS window, 20 years of game time pass. (On
CHIEFTAIN level, turns start out spanning 20 years each. As the game progresses, the turns
get shorter, dropping to ten years per turn, then five, two, and eventually one year per
turn.)
The amount of trade allocated to taxes, luxuries, and science can be adjusted to a
certain degree to suit your needs. Select TAX RATE from the KINGDOM menu. As you can see,
there are three sliders in the TAX RATE window, each of which controls the percentage of
one of the three elements of trade. Moving a slider left or right decreases or increases
(respectively) the percentage of trade allocated to that element, and adjusts the other
elements accordingly so that the total percentage equals 100 percent.
key to end the turn. At the start of the next
e
You can only choose one.
12
Page 24

Unlike Civilization and CivNet, Civilization II limits the maximum percentage of
trade that can be allocated to taxes, luxuries, and science based on your civilization’s
government type. You start the game in Despotism, so the maximum percentage you can
allocate to any trade element is 60 percent. Note that the game automatically sets science
at 60 percent and taxes at 40 percent. Since your focus should be on research at this time,
and you currently require no luxuries to keep your population happy, the default settings
are fine for now. Close the TAX RATE window by clicking the OK button.
MEANWHILE, BACK IN THE CITY...
Now, let’s take a look at what happened in the city after the first turn. Open Washington’s
CITY DISPLAY by clicking the city icon on the map. Several things have changed since you
last looked inside Washington. First, the information in the TITLE BAR indicates that your
treasury now contains 51 gold instead of the original 50. That is because Washington is
generating one gold coin of taxes each turn. Since there are currently no improvements in
Washington that require upkeep, the gold is added to your treasury for future use.
Look at the FOOD STORAGE BOX . It is no longer empty. There are now two grain icons in
it. This is the surplus food that was generated by the city on the first turn. It is stored in
the FOOD STORAGE BOX for later use.
Finally, look at the PRODUCTION BOX. Like the FOOD STORAGE BOX, it is no longer empty.
The three shields generated on the first turn were used to help build the Warriors unit
currently under production.
An alternate way to close the CITY DISPLAY is to click on the button in the upper left
corner. Use whichever method you find most comfortable.
YOUR FIRST UNIT
Until your Warriors unit is completed, you have little to do. Press the ENTER key three
times. It is now the fourth turn, and you have just built your first military unit. The Warriors
unit is now flashing on and off in the city square. The unit is now ready to receive orders.
There are two things you can do with your first military unit. You could use the unit to
defend your city. In most cases, it is unwise to leave a city undefended. This is especially
true if you know that an enemy unit is nearby. However, early in the game, the world is
sparsely populated, so you can take a chance and send the unit out to explore hidden
terrain outside the CITY RADIUS.
Move the Warriors unit to the west by pressing the 4key on the numeric keypad.
Note that one of the black, unexplored terrain squares is revealed when the unit moves.
Most units can “see” one square in any direction. Your turn ends automatically when your
last unit finishes its movement. Since Warriors can move only one square per turn, your
turn is now over.
TUTORIAL
13
Page 25

YOUR FIRST CIVILIZATION ADVANCE
We’ll go back to exploring the world in a moment. For now, something more interesting has
happened. At the start of this turn, your scientists announce that they have discovered the
secret of Bronze Working. Congratulations! You have discovered your first civilization
advance. After the initial message of discovery, the CIVILOPEDIA appears. The CIVILOPEDIA is
an on-line encyclopedia of game facts. The CIVILOPEDIA screen that appears after the
discovery of each advance shows the units, improvements, and Wonders you can now
build as a result of the advance, as well as new lines of research available. Bronze Working
allows you to build Phalanx units and the Colossus Wonder, and allows you to research
Currency. Bronze Working also allows you to research Iron Working, but only after you have
researched Warrior Code. Close the CIVILOPEDIA screen by clicking the EXIT button.
Once again the list of research choices appears, allowing you to choose the next
advance you want to discover. Since Bronze Working has provided the ability to build a
good defensive unit, you can now move on to a research path that enhances your
exploration capability. Choose Horseback Riding from the menu, and click OK.
CHANGING PRODUCTION
Before you do anything else, its time to look inside the city again. Open Washington’s CITY
DISPLAY by clicking the city’s icon on the map. When you look at the PRODUCTION BOX, you’ll
notice that the city has automatically begun to build another Warriors unit. In fact, a city
goes on producing unit upon unit until it receives orders to the contrary.
Since the city is still defenseless, you need to build a unit to protect Washington from
possible invaders. A Phalanx is a better defensive unit than Warriors, so that is what you
should build. Click the CHANGE button above the PRODUCTION BOX. When you do so, a menu
listing the possible production options appears. Choose Phalanx by clicking on it. Click
OK to exit the PRODUCTION menu. The Phalanx’s icon now appears above the PRODUCTION BOX
to indicate that the city is now building a Phalanx. Click EXIT to close the CITY DISPLAY.
FINDING A MINOR TRIBE
Remember your Warriors unit? It’s flashing again, indicating that it is once again ready to
move. Move the Warriors one square to the west by pressing the 4key on the numeric
keypad. Note that, as the unit moves, any unexplored (black) terrain within one square of
the unit is revealed. Press
When the unit starts flashing again (indicating that it is the next turn) move it one square
to the southwest by pressing the 1key on the numeric keypad. Now here’s something
interesting! Your exploration has revealed a “hut,” one square to the southwest of the Warriors’
present position. This hut is home to a minor tribe. Minor tribes are not rival civilizations;
rather, they are small villages populated with people who might be inclined to help you.
14
to end the turn.
e
Page 26

Save your game by choosing the SAVE GAME option from the GAME menu, or by
holding down the ckey and pressing S. You are about to make contact with the minor
tribe. The results of such contact are random. You could receive a gift of knowledge or
gold; the tribe might band together to form a mercenary military unit and join you; or the
tribe might decide to honor you by establishing a new city in your empire. Of course it is
possible that negative events might occur as well: The village could be empty, or populated
by hostile Barbarians. By saving the game prior to contact, you have the option of reloading
from the save if you don’t like the results of exploring the village.
When the Warriors start flashing again, move your unit onto the hut. As stated earlier,
one of a number of random events will occur as a result of contacting a minor tribe. For the
purposes of this tutorial, we’ll assume that you receive a gift of gold from the minor tribe.
POPULATION INCREASE
Continue your exploration for the next three turns. Move the Warriors back toward
Washington, twice to the east, and once north, so you are right next to the city.
On this turn, two things happen simultaneously. First, Washington completes the
Phalanx it was building. Second, the population of the city increases to two, as indicated
by the number next to the city’s icon. Open Washington’s CITY DISPLAY. Notice that the FOOD
STORAGE BOX has only two food in it now. Next turn it will start filling up again, accumulating
grain for the next population increase.
Notice that the POPULATION ROSTER now contains two citizens. On the RESOURCE MAP, you can
see that the new citizen is already at work generating resources; specifically, the citizen is
generating two grain and one shield in one of the Grassland-Shield squares to the north.
That’s fine for now, so leave the citizen there.
As for production, its time to change again. This early in the game, one defensive unit
is more than adequate for city protection. Click the CHANGE button, and select Settlers
from the PRODUCTION menu. Its time to start thinking about the next priority: growth. In
order to expand your civilization, you need to build other cities; and for that, you need
Settlers. Close the CITY DISPLAY.
As noted on the PRODUCTION menu, it will take Washington ten turns to produce a Settlers
unit. You can speed this up a bit through the use of your Warriors unit. Once the CITY DISPLAY
is closed, the Warriors should be flashing. Move the Warriors unit into the city, and re-
open the CITY DISPLAY. In the center section of the CITY DISPLAY you should see two icons: a
Phalanx unit and a Warriors unit. Click on the Warriors unit icon. From the menu of
options that appears, choose DISBAND and click OK. Now, look at the PRODUCTION BOX.
Five shields appear as soon as the Warriors unit is disbanded. When a unit is disbanded
inside one of your cities, half of its original cost in shields is added to the production
currently in progress. Close the CITY DISPLAY.
TUTORIAL
15
Page 27

Now, back on the map, the Phalanx is flashing. In order to protect the city, the Phalanx
must remain inside Washington. Units provide the best protection when they are fortified.
Fortify the Phalanx by choosing F
key. Fortified units remain in their defensive position until you manually reactivate them.
For now, the Phalanx should be left alone to guard Washington.
ORTIFY from the ORDERS menu, or by pressing the
F
INTERIM
Because you have so few units and cities early in the game, there are often periods of time
that pass without your having to take any action. After fortifying your Phalanx, press
two times. At this point, your wise men discover Horseback Riding. In addition to allowing
the research of several new advances, Horseback Riding allows you to build Horsemen,
fast-moving military units that are great for exploration.
Choose Code of Laws as the next advance to research. For the purposes of this
tutorial, our goal now is to develop Trade. In order to do so, you must research both Code
of Laws and Currency. Code of Laws also leads to Monarchy, a more advanced form of
government that helps to increase your productivity. Continue pressing
About six turns later, you are notified that Washington has completed the Settlers it has
been building. Choose the ZOOM TO CITY option on the notification menu to open the CITY
DISPLAY. Once there, change production so that Washington is building a Horsemen unit.
You’ll be using the Horsemen to do some more exploration as soon as it’s built.
You’ll notice that Washington’s population has dropped to one. That is because Settlers
units represent citizens that leave the city in order to improve the surrounding terrain or to
establish a new city. Also, one of the three shields generated by the city is now being used
for support. That is because, under Despotism, any units beyond the size of the city’s
population require one shield each turn to support them. Right now, you have two units,
but only one citizen. At any rate, the FOOD STORAGE BOX shows that the population is about
to increase again, so these situations are only temporary. Close the CITY DISPLAY.
e
e
.
EXPANDING YOUR EMPIRE
Now it’s time to expand your empire. Move your Settlers directly west until they reach
the sea coast, then move them one square to the southwest. Use the BUILD CITY
command on the ORDERS menu, or press Bto build a new city. Again, you can name the
city anything you want, but we’ll refer to it by its default name, “New York.”
When New York’s CITY DISPLAY opens, you’ll notice a couple of differences from
Washington when it was first built. Although New York is generating just as much food as
Washington did, raw materials and trade goods generation are both significantly lower.
That’s because there are no special resources, like Whales, to take advantage of within
16
Page 28

New York’s CITY RADIUS at this time. Which brings us to another oddity: the entire CITY RADIUS
of New York is not visible. That’s because there is still some unexplored terrain nearby. In
order for the city to take advantage of its entire CITY RADIUS, all the terrain therein must be
explored. You’ll have to take care of that as soon as possible; you never know what useful
resources might be lurking in the dark.
Notice that New York is currently producing a Phalanx. Since this city needs to be
protected too, a Phalanx is just what you want. Close the CITY DISPLAY.
After a couple of turns pass, the Horsemen unit is completed in Washington. When the
Horsemen unit appears, open Washington’s CITY DISPLAY, and click the CHANGE button.
Since you have enough units for the time being, and you aren’t quite ready to incur the
upkeep expense of a Barracks, let’s build your first Wonder of the World. Choose Colossus
from the PRODUCTION menu, and close the CITY DISPLAY.
Meanwhile, let’s go and explore that hidden terrain near New York. Move your
Horsemen west, toward New York. Notice that Horsemen have twice the movement
capability of the other units you’ve used so far. That’s why they are so good for exploring.
As you move toward New York, your wise men make another discovery: Code of Laws.
When you are offered the choice of what to research next, choose Currency.
On the next two turns, move the Horsemen southwest. Halfway through the second
turn’s movement, the Horsemen should reach the coast just south of New York, revealing
several new terrain squares. One of these is a Whale. (Remember how productive that was
back in Washington?) Maybe it is inside New York’s CITY RADIUS...
Open New York’s CITY DISPLAY. The entire CITY RADIUS is now visible; and you’re in luck!
The Whale square is inside the CITY RADIUS. Click the Grassland square northeast of the
city to “pick up” your worker, then click the Whale square to put him to work again. Note
that New York’s resource generation has now significantly increased. Close the CITY DISPLAY.
Move your Horsemen directly east until you reach the Forest on the coast west of
Washington. Notice that your unit only gets to move once when moving into a Forest.
That’s because it takes two movement points to move into Forest squares. Because of their
rugged features, many terrain types require more than one movement point in order to
move through them. Now, move your Horsemen east, past Washington, until you get to
the River. Then, proceed roughly east-southeast, following the coast.
After your Horsemen unit is several squares past Washington, the Phalanx in New York
is completed. Fortify the Phalanx, just as you did in Washington, and change the
production in New York to Settlers.
As you continue to explore, your Horsemen might encounter one or two minor tribes.
When you discover Currency select Trade as your next research project. Save the game
again, and enter these villages just as you did the first time you met a minor tribe.
Restart from the saved game if you don’t like the results.
TUTORIAL
17
Page 29

MEETING ANOTHER CIVILIZATION
If you continue along the coastline as instructed, you eventually meet your nearest
neighbors, the Sioux. Their capital city, Little Bighorn, is located some distance away, on
the opposite coast directly southeast of Washington. As soon as you enter Sioux territory,
their leader, Sitting Bull, requests an audience with you. Accept Sitting Bull’s invitation by
clicking OK.
Establishing effective communication with your neighbors is vital to your success. Early
in the game, you should take any reasonable actions to ensure that nearby civilizations
enjoy your company. Not only does this keep your civilization reasonably safe from attack,
it can also lead to profitable exchanges of money and information. You can see your
opponent’s attitude toward you when you make contact with one another. The attitudes of
rival leaders are based on your past behavior when dealing with other civilizations. Since
this is your first contact with any civilization, Sitting Bull should have a fairly good attitude
when you first meet (“cordial” at the very least).
The most likely result of this encounter is that Sitting Bull will offer to exchange
knowledge or sign a peace treaty. Whatever Sitting Bull offers, accept his proposals.
Notice that each time you agree to his proposals, Sitting Bull’s attitude steadily improves.
This is important, because you want to make friends at this stage in the game. If Sitting
Bull’s attitude is particularly good (“enthusiastic” or “worshipful”), offer to SUGGEST A
PERMANENT STRATEGIC ALLIANCE
because it allows both civilizations to move freely through one another’s
territory. Whether the alliance is accepted or rejected, end the meeting
by choosing CONSIDER THIS DISCUSSION COMPLETE and clicking OK. If the
alliance was rejected, move your Horsemen unit away from Little
Bighorn as soon as possible to avoid violating the peace treaty. If you
establish a reputation of violating peace treaties, your opponents are less
likely to sign agreements and treaties with you in the future.
After this encounter, you have gained a friend (for now), and possibly
one or two free civilization advances as a result of technology exchange
with the Sioux. Now that you have made contact, you can chat with Sitting
Bull at any time by selecting the FOREIGN MINISTER option from the ADVISORS
menu, and sending an emissary to the Sioux. Sitting Bull can also contact
you at any time. You shouldn’t pester your opponents too frequently,
however, because rival leaders quickly grow weary of interruptions.
If you are contacted by the Sioux at any time during the remainder
of this tutorial, agree to their demands. During the tutorial game, you
want to keep the Sioux happy so they won’t attack you. During a real game,
use your own judgment as to how to respond to an opponent’s demands.
with the Sioux. A permanent alliance is better than a treaty,
Sitting Bull
18
Page 30

IMPROVING THE TERRAIN
Continue exploring with your Horsemen to the northeast of Little Bighorn. Avoid entering
Little Bighorn’s CITY RADIUS, because this will be viewed as a violation of your peace treaty.
After a number of turns, your wise men discover Trade. Select Ceremonial Burial as
your next advance. If you already have Ceremonial Burial (as a result of knowledge
exchanged with the Sioux), select Monarchy.
Several turns later, New York finishes building its Settlers. Open New York’s CITY DISPLAY
and click the CHANGE button. Notice that there are now several more options on the
PRODUCTION menu: the discovery of Code of Laws allows you to build a Courthouse, and the
discovery of Trade allows you to build Caravan units. Select Caravan, and close the
CITY DISPLAY.
When the Settlers unit becomes active, move it one square to the northeast of New
York (using the 9key on the numeric keypad), onto the Grassland-Shield square. For
the next couple of turns, keep exploring with the Horsemen, but skip the Settler’s turn
by pressing the
to two. When this happens, open New York’s CITY DISPLAY.
When you look at New York’s RESOURCE MAP, you see that the Grassland-Shield square
northeast of the city is currently generating one shield and two grain. That’s not bad, but you
can use your Settlers unit to improve the production in that terrain square. Close the CITY
DISPLAY. When the Settlers becomes active, choose BUILD ROAD from the ORDERS menu, or
press the Rkey. For the next couple of turns, the Settlers unit spends its time building a
road. When the Settlers become active again, you see on the map that there is now a road
leading out of New York to the northeast. Now, open New York’s CITY DISPLAY again and look
at the RESOURCE MAP. Notice that, after the construction of the road, the same Grassland-
Shield square is now generating one trade good icon in addition to its former resources. In
addition to this benefit, roads increase movement speed: units only expend one-third of a
movement point to move along a road, no matter what type of terrain the road occupies.
Close the CITY DISPLAY. Believe it or not, the terrain can still be further improved. When
the Settlers become active again, choose BUILD IRRIGATION from the ORDERS menu, or
press the Ikey.
Building irrigation takes a bit longer than building roads. While you’re waiting for the
Settlers to complete their task, you discover another civilization advance. If you just
discovered Ceremonial Burial, select Monarchy as your next advance. If you just
discovered Monarchy, select Writing as your next advance, and choose NOT JUST YET...
when you are offered the chance to start a revolution to change governments.
z
. Continue to do this until New York’s population has increased
TUTORIAL
19
Page 31

Several turns later, the Settlers complete their irrigation project; the terrain square is now
marked to show that it is irrigated. Open the C
production has not changed as a result of irrigation. Normally, this would not be the case:
irrigation usually increases the grain output of Grasslands by one. However, under Despotism,
your current system of government, any terrain square producing three or more of any resource
type has its production reduced by one. So, instead of three grain, the square still produces
only two. This illustrates the drawbacks of Despotism, and explains why your research is
now proceeding toward Monarchy, where such penalties do not exist. Close the CITY
DISPLAY.
While you’re waiting for the next advance to be discovered, use the Settlers unit to
build a road between New York and Washington. Move one square toward Washington
and build a road. Continue until you have connected the two cities. This will facilitate
fast travel between your cities. After the road is built, use the Settlers to start improving
the terrain around Washington.
ITY DISPLAY for New York. Notice that the resource
ESTABLISHING A TRADE ROUTE
Shortly after you start building your inter-city road, the Caravan in New York is completed.
You’ll be using this Caravan to establish a trade route between New York and Little Bighorn.
Trade routes increase the amount of trade goods generated in both their home city and the
city with which the trade route is established. Trade routes also give the Caravan’s home
city a cash and science bonus on the turn when the route is established. Each city can
operate up to three separate trade routes.
After you are notified of the Caravan’s completion, a menu appears listing the possible
trade goods that the Caravan can carry. Select each commodity in turn, and click the
SUPPLY AND DEMAND button to review what cities traffic in that item. If Little Bighorn
demands one of the items on your list, select that item and click OK. Otherwise, select
any item and click OK. You get both the trade increase and a cash and science bonus no
matter what your Caravan carries, but the cash and science bonuses are bigger if you supply
goods demanded by the destination city. Confirm your choice by clicking CONFIRM AND
ZOOM. When New York’s CITY DISPLAY appears, change the city’s production to Marketplace.
The Marketplace improvement increases both tax and luxury output in New York.
As soon as the Caravan becomes active, start moving toward Washington. It takes
a while to get to Little Bighorn, because a Caravan moves at a rate of one square per turn.
It’s worth the trip, though. The farther away the destination, the higher your cash and
science bonus.
20
Page 32

Possible commodities a Caravan can carry
were to choose this option, the Caravan would be disbanded, and 60 shields would be
added to the production of the Colossus. This is an excellent way to accelerate the
construction of Wonders of the World which, obviously, take quite a long time to build. For
now, however, your goal is to establish a trade route with Little Bighorn. Choose KEEP
MOVING and click OK.
Continue moving the Caravan until you reach Little Bighorn, then move the unit
into the city. Choose ESTABLISH TRADE ROUTE from the menu. You have now established
your first trade route! A message appears telling you how much money you receive as an
immediate bonus. An equivalent number of beakers is added to your current research
project at the same time. Open New York’s CITY DISPLAY. Note that the trade route is now
listed in the bottom center portion of the CITY DISPLAY, and that New York’s arrow production
has increased as a result of the trade route.
En-route to Washington, you discover
another civilization advance (Monarchy or, if
you’re ahead of the game, Writing). For
now, don’t declare a revolution. Select
your next advance: Writing (if you don’t
already have it) or Map Making. We’ll come
back to Monarchy shortly. You will, in fact,
discover another advance before your
Caravan reaches Little Bighorn. This time,
choose Map Making (if you don’t have it)
or Warrior Code.
Meanwhile, back on the trade route,
your Caravan reaches Washington. Move the
Caravan into the city. When the Caravan
enters Washington, you get a list of options.
You can establish a trade route with
Washington (which you don’t want to do).
You are also given the option to HELP BUILD
WONDER. (Remember, Washington is still in
the process of building the Colossus.) If you
TUTORIAL
21
Page 33

CHANGING GOVERNMENTS
By now, you have established a small, but thriving, civilization. You are doing well, but you
could do better. The last thing you’ll learn in this tutorial is how to improve your civilization
by switching to better forms of government.
Open New York’s CITY DISPLAY. Note that the city is currently generating six grain, five
arrows, and four shields (assuming that the trade route with Little Bighorn is generating one
arrow. Your actual number of arrows might vary slightly.) Close the CITY DISPLAY.
Now, it’s time to change governments. Select the REVOLUTION! option from the KINGDOM
menu and confirm your choice to overthrow the government. Within a few turns, a
menu appears listing the systems of government currently available to you. Choose
MONARCHY and click OK. Your civilization is now ruled through a Monarchy. The TAX RATE
window appears, giving you the opportunity to reset your division of trade between taxes,
luxuries, and science. Note that your maximum rate is now capped at 70 percent and
close the window. Now, you’ll make discoveries more quickly.
Let’s take a look at the effects of the government change. Open New York’s CITY
DISPLAY. Look at the production changes. The city’s grain production has increased from six
to eight. Note that the Grassland-Shield square you irrigated earlier is now generating three
grain instead of two. The other extra grain is coming from the city square itself (it is
automatically irrigated when the city is built). Trade has also increased as a result of the
change in government. The Whale square is now generating one additional arrow. This has
the effect of increasing the number of beakers from three to four. Shield generation has
remained the same because none of the terrain currently in use around New York is
capable of producing more than two shields under the present circumstances. If you look
at the CITY DISPLAY for Washington, you’ll notice similar increases in that city as well.
CONCLUSION
So ends the tutorial. You should now be familiar with many of the basic concepts of
Civilization II. Feel free to continue playing the tutorial game and see how you do, or go
back and start a new game on a randomly generated world. Remember, you have only
scratched the surface when it comes to learning the game. Use the rest of this manual and
the on-line CIVILOPEDIA in the game to help you with new concepts as you encounter them.
Have fun, and good luck! May your reign be long and fruitful.
22
Page 34

Beginning a game of Civilization II means choosing the circumstances in
which you want to play. Your options include specifying the number and
location (physical starting point) of your opponents and manipulating the
environmental and physical parameters of the world you’ll explore.
YOUR FIRST DECISION
To launch the game, click on the Civilization II icon. After the game has initialized itself,
choose the language in which you’d like text to appear. When you click OK, the opening
animation begins (if you chose to install it). You can wait for it to end or press any key to
cut it short. Setting up a game means making easy decisions on a series of options screens.
At the first of these, you decide whether to start a new game or continue a previous one,
among other things. The full list of options is described below. Once you’ve chosen an
option, you’ll need to click OK to continue.
23
SETTING UP
A GAME
Page 35

Start a New Game: Begin an entirely new game. Choosing this option means going
through the basic pre-game options screens, as we explain below.
Start on Premade World: Play on a custom map created with the CivMaps utility. A
dialog box lists all of the saved maps available in the current directory. Choose the
map you wish to load. You can switch directories to find maps you’ve saved in other
locations.
Customize World: Build a world right down to the picky details of land form, climate,
and geologic age. When you choose this option, you see all of the set-up screens,
not just the important ones.
Begin Scenario: Choose this option to load a pre-set historical scenario. A dialog box
lists all of the available choices. You choose which side you want to play.
Load a Game: Load and continue a previously saved game. A dialog box lists all of the
saved games available in this directory. Choose the game you wish to load. You can
switch directories to find games you’ve saved in other locations.
View Hall of Fame: See the standings of previous conquerors and despots.
Use the OK button to confirm your choice, or the C
ANCEL button to quit Civilization II.
CUSTOMIZING GAME SET UPS
These option screens progress from whole-world effects down to the name of your tribal
leader. If at any point you realize that you’d like to reset an earlier parameter (you suddenly
wonder what a jungle planet would be like, but you’re past that screen), you can click the
CANCEL buttons located on each screen to “turn back the pages” to a previous screen, then
make another choice. When you are happy with the choices you have selected, click the
OK button to continue on to the next screen. If you want to be surprised, you can click the
RANDOM button to let the game select a parameter for you.
SELECT SIZE OF WORLD
By choosing the size of the map, you can determine how much territory there is, and to a
large degree, how long the game takes to play.
Small: This size map leads to short, intensely contested games. Tribes find each other
quickly.
Normal: This is the standard size map.
Large: This sprawling map takes longer to explore and exploit. Consequently, games
go on longer.
Custom: Choose this option to specify the height and width of your map. The dialog
box explains the limits of your choices.
24
Page 36

CUSTOMIZE: LANDMASS
This parameter sets the number of terrain squares that are land.
Small: Choosing this option gives your world a small number of land squares and a
larger number of ocean squares.
Normal: This option yields about equal numbers of land and ocean squares.
Large: This option produces a large number of land squares, and a small number of
ocean squares.
CUSTOMIZE: LAND FORM
This parameter determines the way in which your world’s land is shaped into
land masses.
Archipelago: This option produces relatively large numbers of relatively small
continents.
Varied: Choosing this option gives your world an average number of average sized
continents.
Continents: This option yields one or two large land masses.
CUSTOMIZE: CLIMATE
This parameter sets the relative frequency with which particular terrain types occur.
Arid: Choosing this option gives your world a larger number of “dry” terrain squares,
such as Plains and Desert.
Normal: This option yields about equal numbers of “wet” and “dry” terrain squares.
Wet: This option produces a larger number of “wet” terrain squares, such as Grassland,
Forest, and Swamp. It also increases the number and length of rivers generated.
SETTING UP
A GAME
CUSTOMIZE: TEMPERATURE
This parameter determines the relative frequency with which particular terrain types occur.
Cool: This option produces larger numbers of polar terrain squares, like Tundra and
Glacier.
Temperate: Choosing this option gives your world an average number of each terrain
type.
Warm: This option yields a larger number of tropical terrain, like Desert, Plains, and
Jungle.
25
Page 37

CUSTOMIZE: AGE
This parameter determines whether like terrain squares clump together, or are widely
scattered.
3 Billion Years: This option yields a young world, one in which terrain squares seem
to occur in clusters.
4 Billion Years: This option yields a middle-aged world, one in which glaciation and
plate tectonics have been acting to diversify terrain.
5 Billion Years: This option produces an old world, one in which the forces of nature
and chaos have almost wholly randomized the terrain features.
DIFFICULTY LEVELS
Choose the level of difficulty at which you wish to play. Although Civilization II is not
necessarily more difficult as a whole than its predecessor, there are new features and
adjustments that will not be familiar to players of previous versions. (New players don’t
need to worry, as they have no bad habits to break.) If you are used to playing Civilization
at a particular level, we recommend that you start your first Civilization II game at one
level easier difficulty.
A number of factors are adjusted at each difficulty level, including the general level of
discontent among your citizens, the average number of barbarian units encountered in a
surprise attack, the pace of technological advancement, and the total number of turns in
the game.
Chieftain: This easiest level is recommended for first-time players. The program
provides advice when a player must make decisions.
Warlord: Civilization advances take longer to acquire at this level of play. Warlord level
best suits the occasional player who doesn’t want too difficult a test.
Prince: At this difficulty level, advances come much more slowly. You need some
experience and skill to win.
King: Experienced and skilled players often play at this level, where the slow pace of
advancement and the unstable attitude of citizens presents a significant challenge.
Emperor: This level is for those who feel the need to be humbled. Your opponents will
no longer pull their punches; if you want to win, you’ll have to earn it.
Deity: The ultimate Civilization challenge, for those who think they’ve learned to beat
the game. You’ll have to give a virtuoso performance to survive at this level. And
yes, some of us can actually win (sometimes). Good luck!
26
Page 38

LEVEL OF COMPETITION
Choose between three and seven civilizations in the world. More opponents do not necessarily
mean more danger, although more opponents means earlier contact and an increased risk
of war. Of course, contact with other civilizations also offers opportunities for trade, alliances,
and the rewards of the spoils of war when you emerge victorious. The fewer your opponents,
the more time you have to peaceably expand and develop before encountering rivals.
Barbarians are a factor in either situation, and do not count as a rival civilization.
Your civilization counts as one of the cultures, so if you choose a world with three
civilizations, you only face two rivals. Seven civilizations (you and six others) is the
maximum number for any Civilization II game.
LEVEL OF BARBARIAN ACTIVITY
A new feature in Civilization II is your ability to set the aggressiveness of barbarian units
in the game.
Villages Only: Players who really hate barbarians can choose to play in this “ideal
world.” There is a significant scoring penalty, however, so you’ll have to make the
most of it.
Roving Bands: Barbarian bands and pirates occasionally appear, but half as frequently
and in smaller numbers than at higher levels. There is a slight scoring penalty at this
level.
Restless Tribes: Barbarians, in moderate to significant numbers, appear at intervals.
This represents the “standard” level of barbarian activity found in the original
Civilization. Your score is unaffected at this level.
Raging Hordes: You asked for it! The world is full of barbarians, and they appear in
large numbers. If you survive, you receive a scoring bonus.
SETTING UP
A GAME
27
Page 39

SELECT GAME RULES
The default option here is USE STANDARD RULES. If you want to tweak the parameters of the
game, choose the CUSTOMIZE RULES option to change the whole flavor of the challenge. The
SELECT CUSTOM FEATURES screen offers several different possibilities.
Simplified Combat: When this box is not checked, units have hit points and firepower
statistics. When it is checked, combat is absolute — the unit that wins is completely
whole, and the unit that loses is demolished.
Flat World: When this box is checked, the map edges are the boundaries of the world,
and no ships can cross from the east margin of the map to the west margin.
Select Computer Opponents: The location of your first unit and the proximity of your
rivals is usually determined randomly. However, you can choose to specify the
identities of your opponents. For each rival position, a dialog box gives you three
tribes from which to choose, and a RANDOM button if you have no strong preference.
You can select the starting locations of some or all of your opponents if you create
a custom map of the world. See Customizing Maps for details.
Accelerated Startup: When this box is checked, you can choose from a starting date
one or two millennia into the game. The computer settles your first city (or two) for
you, builds initial units, and completes initial research into advances, all in the blink
of an eye.
Bloodlust (no spaceships allowed): When this box is checked, no
player can build spaceship parts, and the only way to see the
winner’s animation is to conquer the world.
Don’t Restart Eliminated Players: Normally, when a civilization is
wiped out, the computer looks to see if conditions are right to
settle another civilization carrying shields the color of the
eliminated culture. When this button is checked, no colors are
resurrected, and each opponent eliminated is one less power in
the world.
28
“Mahatma” Gandhi
Page 40

SELECT YOUR GENDER
You can choose to play a male or a female leader. Each civilization has one default leader
of each gender, and of course, you can customize your leader’s name.
SELECT YOUR TRIBE
Select the name of your tribe from the options available, or click on the CUSTOM button. The
Customize Your Tribe dialog box includes spaces for you to enter your LEADER’S NAME, your
TRIBE’S NAME, and the adjectival form of your tribe’s name (for messages and announcements).
The default options give examples of each entry.
Titles: Choose this option to specify the titles by which you prefer to be addressed for
each form of government in the game.
Portrait: This option offers several rows of portraits from which you can choose the
face you’d like to present to the world.
When you’re satisfied with your choices in each screen, click the OK button.
SELECT YOUR CITY STYLE
Here you can choose the style in which your citizens build. The default style is chosen to
reflect your tribe’s national origins as closely as possible.
Bronze Age Monolith: In the style of the Mayan and Sumerian empires, your city icons
build from simple stone boxes to complex clusters of megalithic proportions.
Classical Forum: Following the Greek and Roman styles, your city icons progress from
neat marble structures to gleaming colonnaded vistas.
Far East Pavilion: In the Oriental tradition, your city icons build from red-tiled gables
to elaborately layered pagodas.
Medieval Castle: Following European models, your city icons grow from narrow
thatched cottages to tightly packed labyrinths of humanity.
29
SETTING UP
A GAME
Page 41

READY, SET, GO
After you are satisfied with your settings, click OK
to start the clock ticking on your civilization. A
screen pops up welcoming you to your position as
leader and detailing the accomplishments of your
culture thus far. When you have finished reading
the screen, press any key or click the OK button
on the screen to begin the game.
30
Page 42

If you’re already familiar with Civilization in one of its previous incarnations —
the Macintosh version, the DOS version, the Windows version, or the multi-
player version — there are a lot of features that are familiar. However, that
familiarity can lead you into some pitfalls, because the game has evolved
and grown, so that this new version is substantially different. Take a few
moments to peruse this section for a summary of the changes you
can expect.
CIVILIZATION’S NEW LOOK
As Civilization has matured as a game, the quality of graphics has also matured.
Civilization II has high resolution graphics now, scaleable fonts and windows, and whole
new units and improvements. Settlers units are no longer represented by those old,
familiar covered wagon icons. But more is new than simply different pictures.
31
CIVILIZATION TO
CIVILIZATION II
Page 43

THE MAP
Civilization II uses an isometric grid instead of the old, square grid. This means each
square (what we call a terrain square, or just square) is now a diamond shape, as if you
are viewing it from an angle. Movement still proceeds along the compass points as it always
did. Some players may have difficulty getting used to this new view, finding it hard to tell
where a city’s radius begins and ends, for instance. If you have this problem, we
recommend you select SHOW MAP GRID from the VIEW menu or press the cand Gkeys
simultaneously. This activates a grid overlay which outlines each map square.
THE UNITS
Every unit icon in the game now carries a shield. The color of the shield body indicates the
civilization to which that unit belongs. As in Civilization, barbarian units are always red.
The colored strength bar at the top of the shield indicates the overall health of the unit. We’ll
go into detail in New Combat Concepts, but for now you should know that green indicates
a healthy unit, yellow means the unit is somewhat damaged, and red shows a critically
injured unit.
THE CITIES
You can choose what style of architecture your civilization prefers to build when you set up
a game. As your cities increase in size, the icons that represent them on the map also
change, reflecting the increasing urbanization and population of the site. Whenever you
capture a city, its icons change to reflect your preferred style of architecture. Once your
civilization reaches the industrial era, the architecture of your cities begins to reflect your
new level of technology.
THE DISPLAYS
Many screens and displays have been redesigned to better present new information and to
take advantage of the more sophisticated graphics now available. Most of the information
should be self-explanatory; all the major game windows are illustrated in Reference:
Screen by Screen.
NEW COMBAT CONCEPTS
Players of Civilization were occasionally disconcerted when a “lucky” veteran Phalanx
unit, fortified in an enemy city, destroyed an attacking Battleship unit. Mathematically it was
possible, but the image conjured up just didn’t sit right. How could ancient spearmen take
out a modern steel warship? To smooth out such freakish reaches of probability,
Civilization II has added two new statistics for each unit: hit points and firepower.
32
Page 44

HIT POINTS & FIREPOWER
Hit points are graphically indicated by the colored strength bar across the top of each unit’s
shield. Both the length of the strength bar and the color are significant. As a unit loses hit
points in an attack, its strength bar gets shorter. In addition, when the unit is reduced to
approximately two-thirds of its full strength, the strength bar changes from green to yellow.
When a unit’s hit points are reduced to around one-third of its full strength, the bar changes
from yellow to red.
Hit points represent a unit’s relative durability in combat situations. Ancient and
unarmed units generally have ten hit points. Units with firearms have 20, and units with
steel armor have 30. Battleships, with their extraordinarily thick armor, are unique in
having 40 hit points. A unit with ten hit points can be hit ten times before being destroyed.
This does not necessarily mean that ten units each hit it one time. Units also have a new
statistic, firepower, which indicates the number of points of damage that unit does each
time it successfully scores a hit.
These new statistics widen the gap between primitive technologies and modern
weaponry. A Musketeers unit with a strength of three attacking Pikemen of strength two has
an “effective strength” of far greater than three, simply because its increased hit points (20,
representing its firearms) allow it to sustain twice as much damage as the Pikemen. A
veteran Phalanx unit might still damage a Battleship, but the chance of utterly demolishing
it is negligible.
RESTORATION
The new stats also bring with them the need for restoration. When combat was all-or-nothing,
defeated units were always destroyed, and victorious units emerged unscathed. Now, victory
is not always without cost. A damaged unit might suffer curtailed movement points and is
vulnerable to counterattacks by further enemy units. So how do you regain full strength?
A damaged unit can partially restore itself by skipping its entire turn — pressing the
z
has certain improvements, they can heal even more rapidly. Along with its former capacity
for turning out veteran units, a Barracks can repair ground units. The new Port Facility city
improvement can repair naval units, and the new Airport city improvement can repair air
units — in all three cases, the damaged unit is restored to full strength in a single turn.
). Units repair faster when they remain in cities for a full turn. If the city they occupy
CIVILIZATION TO
CIVILIZATION II
33
Page 45

NEW AND CHANGED UNITS
People have been suggesting new units to include in Civilization since the initial release
of the game. For Civilization II, we wanted a more continuous progression of
development in the three types of ground troops: the basic, all-purpose Infantry, the swiftmoving Cavalry, and the heavy-weapon Artillery. In addition, there are more gradations in
ships and in air units. Modern units often fulfill specialized roles, and more units have
special abilities and unique capabilities. Finally, each non-combat unit of old gains an
advanced version, so that Settlers are followed by Engineers, Diplomats by Spies, and
Caravans by Freight. Engineers work and move twice as quickly as Settlers, and can
transform terrain using modern technology. Spies can perform normal diplomatic
missions more effectively than Diplomats, and have several new missions available,
including poisoning water supplies and even planting nuclear devices! Freight units move
more quickly than Caravans, and provide greater economic bonuses for trading.
The existence of all of these new units gave rise to the opportunity to rebalance some
old ones. Chariots have been toned down to an ADM of 3/1/2, for instance, while Legions
have been beefed up to an ADM of 4/2/1. You’ll find the full details in the CIVILOPEDIA entries
for each unit.
SPECIAL COMBAT CASES
To better reflect their real-world abilities and handicaps, many units have unique combat
rules and abilities. For instance, when a ship bombards a ground unit on shore, the
firepower of both units is reduced to one. This simulates the low accuracy of shore
bombardment. Similarly, ships defending in port have their firepower reduced to one,
because of the limitations of maneuverability. Air units attacking ships in port have their
firepower doubled, to represent the vulnerability of their targets. The Combat section of
Units gives the full details for each exceptional case.
NEW PRODUCTION CONCEPTS
We’ve tweaked the economics of the game a little to help fill in some gaps and to make
playing more of a challenge for experienced loophole dodgers.
WASTE
In previous versions of Civilization, trade is modified by corruption. When an empire
sprawls over a great area, and its form of government is low on the scale of sophistication,
corruption lowers the total trade goods intake in cities on the fringes and frontiers. The more
sophisticated the government and the smaller the sprawl, the less effect corruption has.
34
Page 46

Civilization II extends this concept of modification to include another resource. Now
shield production is also affected by the level of government and the sprawl of empire. In
fringe locations, some proportion of the shields that workers generate each turn is lost as
waste.
PENALTIES FOR SWITCHING PRODUCTION
A city can produce three different types of things: units, improvements, and Wonders. To
close several loopholes that players had been exploiting, Civilization II introduces a
significant penalty for switching production between different types (changing a city’s
production from City Walls to Knights, for instance, or from City Walls to a Wonder of the
World). Switching from one type of production to another in mid-stream (or mid-build) costs
a 50 percent reduction in the number of shields already accumulated. Switching
production within a type — from one unit to a different unit, for instance — incurs no
penalty.
NEW AND CHANGED IMPROVEMENTS
Along with new units, Civilization II also includes new city improvements. These
improvements address needs that have arisen because of other changes in the game. For
instance, the new concept of restoration (mentioned under New Combat Concepts) led
to the development of facilities where restoration could take place in one turn. Port
Facilities repair naval units, Airports repair air units, and Barracks restore ground units (as
well as continuing their “old” function of producing veteran units). The new Superhighways
improvement grants a 50 percent increase in trade to citizens working land within a CITY
RADIUS, and the new Supermarket improvement allows workers on irrigated land to produce
50 percent more food. To compensate, laying railroad track in a square now only increases
workers’ shield production in the underlying terrain, instead of increasing all resources. All
of these details are listed in full in the CIVILOPEDIA entries for each improvement.
In addition, some classic city improvements have been adjusted to fit the new demands
of play. Colosseums (which in Civilization made three citizens content) now make four
citizens content once your tribe discovers the Electronics advance. This represents the
effects of television on the masses. On the other hand, a Cathedral is less effective as an
improvement (making only three citizens content instead of four). Further, other discoveries
can improve or undermine a Cathedral’s influence. Achieving the advance of Theology
increases the effectiveness by one citizen; however, the discovery of Communism reduces
it by one citizen. This represents the diminished influence of organized religion in the
modern world. Courthouses, under a Democracy, now make one content person happy in
addition to their classic effect. Under other forms of government, Courthouses now also
make a city more difficult for opponents to bribe. You cannot build a Manufacturing Plant in
a city that does not yet have a Factory. Further, plants in cities where the Factory has been
CIVILIZATION TO
CIVILIZATION II
35
Page 47

sold or lost increase output 50 percent (not 100 percent) until the Factory is rebuilt.
The same loss of bonus applies to the Bank & Marketplace combination and to the
University & Library pairing. City Walls are cheaper and no longer cost maintenance.
Aqueducts are now required for cities to increase beyond size eight; they used to be required
above size ten. The full details are listed in the C
be sure to check them out.
IVILOPEDIA entries for each improvement, so
NEW TERRAIN CONCEPTS
Redrawing the squares as isometric diamonds doesn’t affect the gameplay in
Civilization II. However, there were some elements of terrain that we decided could be
jazzed up, including new special resources and upgrades for city squares.
RIVERS
In Civilization, rivers were considered their own terrain type. Now, they are features that
can be found running through almost any terrain, making their appearance more true-tolife. To simulate the beneficial effect rivers had on trade, especially in ancient times, any
ground unit can follow a riverbed (either upstream or down) for a cost of only one-third of
a movement point per square. The presence of a river in an adjacent terrain square still
indicates access to water for irrigation, if that adjoining terrain can be irrigated. Rivers still
convey a defense bonus of 50 percent, and squares through which they run can still be
worked for trade goods in addition to the yield of the basic terrain.
NEW SPECIAL TERRAIN
To spice up your world, special terrain resources have been re-allocated in Civilization II.
Now each terrain type (except Grassland) has two associated special resources, each with
its own developmental bonuses. Each special resource has an icon that rests on top of the
basic terrain square. To allow for these new resources, some of the special icons with which
you are familiar have been renamed and adjusted — for instance, the special resource for
Swamp used to be Oil. This resource yielded an extra four shields, along with the one food
that basic swamps could generate. Now the Peat resource allows workers to produce four
extra shields. In addition, Swamps might also be enhanced by Spice, which allows citizens
working them to produce four extra trade arrows, but does not yield any shields. The
Special Terrain Chart on the Poster summarizes all special terrain resource icons,
names, and statistics.
36
Page 48

Close Up of unit on riverbed
UPGRADING CITY SQUARES
It makes sense that city squares should improve as civilizations become more advanced.
In Civilization II, city squares are automatically improved from roads to railroad once
your tribe discovers the Railroad advance. Now units can slide through them without losing
one-third of a movement point. Once you have discovered Refrigeration, each city square
in your empire is automatically improved to farmland.
NEW MOVEMENT CONCEPTS
To simulate the effect of river transport, which was particularly important to early
civilizations, ground units moving along rivers only use one-third of a movement point for
each square (i.e., as if they were moving along a road). Note that the unit must follow the
main river channel to receive this benefit: Simply hopping from one bend to another doesn’t
count. See figure for details.
In addition, some new units (like Alpine
Troops, Explorers, and Partisans) have the
ability and equipment to move quickly
through even the most difficult terrain. In
game terms, they treat all terrain as roads.
This means that it never costs them more
than one-third of a movement point to enter
any square — regardless of the terrain type
or the actual existence of roads. Units with
the ability to treat all terrain as roads can
still use railroads for free movement, just as
any other unit.
Sailing experience accumulates with
new advances. In the early days, your
Triremes have a 50 percent chance of being
lost at sea each time they end their turn in a
square that is not touching the shoreline.
However, once your civilization discovers
Seafaring, your crews’ experience of the
coastal waters is vaster, and they are less
likely to panic, only foundering 25 percent
of the time; the chance of a Trireme being
lost at sea is correspondingly reduced. Once you discover Navigation, the crews’ knowledge
and confidence is greater still, and their likelihood of unexpected foundering is reduced to
one in eight. (If you possess the Lighthouse Wonder, the chance of foundering is eliminated
altogether — but we’ll tell you more about that in New & Improved Wonders later on).
CIVILIZATION TO
CIVILIZATION II
37
Page 49

Finally, teamwork counts in Civilization II. Two Settlers (or Engineers, as we’ll
explain in just a moment) improving a square (irrigating, building railroads, or whatever)
will work as a team and finish the job twice as fast. You can add even more Settlers or
Engineers on a tough task, like draining and irrigating a Swamp. The full details are
explained under Settlers & Engineers.
NEW ORDERS
There are three new orders available to Settlers and Engineer units once you’ve discovered
the appropriate advances. The new Engineer unit (which becomes available with discovery of
Explosives and works twice as quickly as a regular Settlers unit) can TRANSFORM terrain into a
vastly different type. Which terrain results from transformation is noted in the Terrain Chart.
Once you have discovered Radio, Settlers or Engineer units can BUILD AIRBASE in any
square in which they could ordinarily build a fortress. An airbase allows friendly planes to
land and refuel.
Once you’ve discovered Refrigeration, Settlers or Engineer units can IMPROVE FARMLAND to
prepare high-yield market gardens.
GOVERNMENT IMPROVEMENTS
There have been significant changes in the way different government types function. In
addition, a new type of government, Fundamentalism, has been added to round out your
choices. A quick rundown of the most important adjustments follows; for complete details,
see Governments.
Monarchy has been vastly improved in that the first three units from each city
cost no shield support. We now strongly suggest switching to Monarchy as soon as it
becomes available.
Similarly, Communism does not have to support the first three units from each city,
and units are twice as effective at imposing martial law (so up to six unhappy citizens can
be suppressed). No corruption occurs under Communism, and all Spy units produced by
Communist governments are considered veterans.
Republic has been improved in that the first unit away from a city does not cause unrest
and the Senate only concludes unwanted peace treaties 50 percent of the time.
And perhaps most importantly, units in Democracies and Republics do not cause
unrest if they are in a fortress square within three squares of a friendly city. This is
intended to allow realistic defensive frontiers.
You can no longer avoid Senate interference in your foreign policy by simply refusing to
meet foreign emissaries. However, in the Senate of a Republic the “Doves” are in power about
50 percent of the time (in a Democracy the Doves are always a force to be reckoned with).
38
Page 50

When you undertake a Revolution to change your government, you experience the
usual period of Anarchy. However, once the menu appears allowing you to select a new
form of government, you may freely and instantly change your government for the rest of
that turn (by selecting REVOLUTION from the KINGDOM menu). This allows you to compare the
effects of various government types.
Note that science, tax, and luxury rates are now restricted by your government type.
Under Despotism, for instance, no single rate can be set higher than 60 percent. Under
Monarchy the maximum rate rises to 70 percent. The other government forms all allow up
to 80 percent, except for Democracy which allows complete control with rate caps only at
the 100 percent mark.
NEW CONCEPTS IN DIPLOMACY
Diplomacy has expanded significantly in Civilization II. The AI (Artificial Intelligence) has
been improved so that rival civilizations remember your actions and can learn from their
past dealings with you, adding a topic to your Foreign Minister’s report known as reputation.
To complement this concept, there are finer gradations of hostilities between the extremes
of peace and war, and a variety of new ways to progress between them. No longer are you
considered at war with a rival merely because you have no treaty with him or her.
Once you make contact with a rival, you can speak to him or her at any time by calling
up the FOREIGN MINISTER’S report and clicking the SEND EMISSARY button. You are no longer
limited by having to set up an embassy with a rival civilization first. However, constantly
chatting up opponents makes them weary, and you can exhaust their patience with too
many requests.
REPUTATION
Rumors of your past transgressions will proceed you! Breaking a treaty or an alliance
carries a slight but permanent diplomatic penalty in all future negotiations with all other
players. The more treaties you break, the less other players trust you. If you break treaties
systematically, the other players learn from their mistakes and become as ruthless as you.
If you have an excuse for breaking a treaty (the rival in question uses a Diplomat to steal
technology from you, for instance, or another opponent offers you money to break
an alliance or treaty), the diplomatic penalty is eliminated or reduced.
Since keeping your word is more important than behaving peaceably,
refusing to sign a peace treaty or opting for a temporary cease fire instead are
honorable alternatives. It is possible to maintain a spotless reputation while
waging a war of conquest.
CIVILIZATION TO
CIVILIZATION II
39
Page 51

DIPLOMATIC STATES
New to Civilization II are the states of cease fire, neutrality, and alliance; they fill out
the classic Civilization states of peace and war. If you don’t want to be friends for all
time, but you’d like time to regroup, or to pull a city back from the brink of disaster, you
now have the option to propose a temporary cease fire. In game terms, cease fires expire
after approximately 16 turns, and they are automatically extended when tribute is paid by
either side. You are informed when a cease fire has expired.
Neutrality is the state your civilization adopts by default. Neutrality exists when you
have not yet encountered a culture, and when you decline to enter into a cease fire or
permanent peace agreement.
If you’d like an even closer relationship than simple peace, you have the option to
propose a permanent alliance. In game terms, alliances allow you to ignore your ally
civilization’s zones of control. This means your units can move freely through his territory
and his can move through yours. Your ally’s nearby units will not disrupt production in your
cities, and vice versa.
Finally, peace treaties now recognize territorial borders. Moving into the city radius of
an enemy city might be taken as a violation of your accord and used as an excuse to
declare war. Rivals will warn you when you are violating their territory.
COUNTERESPIONAGE
In addition to their foreign service tasks, envoys can engage in counterespionage when
they stay home. Diplomats and Spies stationed in friendly cities have a chance to thwart
“steal technology” attempts by enemy Diplomats and Spies.
40
Page 52

NEW & IMPROVED WONDERS
Along with adding and rebalancing units, improvements and advances, we couldn’t resist
the chance to dress up the Wonders of the World. In fact, there are seven new Wonders
sprinkled in the Renaissance and Industrial ages. More important to veteran Civilization
players, several of the old Wonders have changed considerably in effect, and many have had
expiration dates tweaked. Some Wonders no longer expire at all. A quick summary follows.
The Pyramids now act as a granary in every one of your cities. In addition to the old
plus-one movement effect, the Lighthouse now allows Triremes to move across open
ocean without fear of swamping, and all new ships start with veteran status. The Great Wall
doubles your units’ combat strength against barbarians in addition to forcing your
opponents to offer peace and acting as a City Wall in every one of your cities.
Magellan’s Expedition now confers a plus-two movement bonus on all your ships.
Michaelangelo’s Chapel now counts as a Cathedral in every one of your cities, instead of
its previous ability of increasing the effect of existing Cathedrals. The United Nations, in
addition to its classic effect also counts as an embassy with every player and gives
Democracies a 50 percent chance to override the Senate’s interference in foreign policy
negotiations. Finally, the SETI Program now counts as a Research Lab in every one of your
cities, which reduces its science benefit from the previous 100 percent increase to a more
balanced 50 percent.
The effect of the Colossus expires once your tribe discovers Flight.
The Great Library expires once your tribe discovers Electronics. The
Great Wall expires once your tribe discovers Metallurgy. And finally, J.S.
Bach’s Cathedral now requires the advance of Theology to build.
For the full scoop on these and all the other Wonders, see WONDERS OF
WORLD in the CIVILOPEDIA.
THE
CIVILIZATION TO
CIVILIZATION II
Elizabeth I
41
Page 53

MISCELLANEOUS CHANGES
Some civilization advance prerequisites have changed slightly, mostly to eliminate
redundancies. Physics, for example, used to require Navigation and Mathematics; however,
Navigation already presumes that your culture discovered Mathematics (via Astronomy).
Physics now requires Navigation and Literacy. Since some people find the Advance Chart
{found on the Poster) difficult enough to follow without memorizing the additional changes,
we’ve provided help in a variety of places. When deciding which next civilization advance
to research you can use the GOAL button to help you find your way through the chart. In
addition, each CIVILOPEDIA entry includes the relevant segment of the “advance tree.”
Many civilization advances which used to be dead ends (e.g., Chivalry, Feudalism,
Conscription, Pottery) now lead to bigger and better things. Chivalry, Feudalism, and
Conscription, for instance, are all directly on the prerequisite chain for Mobile Warfare
(Armor Unit).
Computer players are no longer “given” Wonders of the World. They must build them.
You will be told whenever a computer player has begun construction of a Wonder.
When you disband a unit in a city square, it contributes half of its production cost in
shields to the city’s current project. This represents your ability to “retrain” old troops with
new weapons, or to make an all-out effort to complete a city improvement or Wonder.
Caravans and Freight units retain their special ability to add their full production value to
Wonders of the World when they enter a city which is producing one.
42
Page 54

When you start a game of Civilization II, your Settlers unit stands
on a terrain square surrounded by the darkness of the unknown.
Though you can choose to let this single group of Settlers (if you’re
really special, you could possibly have two Settlers units) wander
the world alone, that’s not the point of the game. As soon as you’ve
found a decent site, you want your Settlers to build a permanent
settlement — a city. You must build at least one city, because only cities
can produce new units, allowing your civilization to grow and develop.
You’ll probably build a dozen or more cities over the course of the game.
Cities are the residences of your population, the sources of tax dollars, and the homes
of your scientists. Each city organizes the development of the area surrounding it,
harvesting the nearby agricultural land, natural resources, and potential trade goods, then
converting these resources into food, industrial production, technology, and cash.
One way to measure the success of your civilization is by the number and size of the
cities you have built or captured. Larger cities collect more taxes, conduct more
technological research, and produce new items faster. Civilizations with small numbers of
cities and small city sizes risk being overrun by larger and more powerful neighbors.
43
THE BASICS
OF CITIES
Page 55

CITY CONCEPTS
To comprehend the CITY DISPLAY in Civilization II, you must understand the symbolism the
game uses to represent the concepts relevant to population growth and urban dynamics.
Take a look at the CITY DISPLAY while you’re reading — it’ll make things a lot clearer.
Population Roster
Title Bar
Food Storage Box
Resource Map
Unit Roster
General Information
Roster
Improvement Roster
The City Display
Cities arose when stationary populations banded together to produce not only enough
food to feed themselves day to day, but sufficient leftovers to store for later use. Once food
storage developed, not every citizen had to produce food all day, and some people
specialized in producing other goods. Eventually, cities accumulated enough surplus food
and goods that they could trade their excess with nearby populations.
To represent the accumulated population in a game city, Civilization II maintains a
POPULATION ROSTER. Each citizen icon — a small symbol — stands for a segment of that city’s
population (the exact number of people he or she represents changes as the city grows).
The roster displays both citizens who work the land around the city and citizens whose
specializations produce other effects. The POPULATION ROSTER tells you more than just how
large your city has grown (you’ll find lots more details under Population Roster in
Reference: Screen by Screen), but there are other points of interest in this display, so
we’re moving on.
Resource Bars
Production Box
Buttons
44
Page 56

Other icons in the CITY DISPLAY represent a city’s production of food, raw materials, and
trade goods. We’re going to call these materials the resources of the city. Production is
linked to terrain in the game, just as it is in the real world (deserts are not the best foodproducing areas in either case). A full discussion of the types of terrain available in
Civilization II and their resources is outside the scope of this chapter (you’ll find it under
Terrain & Movement). For now, you need to know that citizens working on terrain squares
(or “map squares”) can produce three different types of icon: grain, which represent food;
shields, which represent raw materials the city can use to produce goods; and arrows,
which represent trade goods. On some terrain squares, workers produce a larger
proportion of one than of the others. On some squares, workers can’t produce any of one
type (a citizen working on Tundra produces no shields, for instance).
The resource icons — grain, shields, and arrows — that appear on the map are
recapitulated in other displays, where they reveal further details of your city’s economy and
growth. We’ll explain all the details in the reference sections that describe those displays.
GAINING NEW CITIES
You can acquire new cities in three ways. Most frequently, you build them with Settlers
units. If you are aggressive, you can conquer the cities of your neighbors. Occasionally, you
can gain a city when a minor tribe discovered by your units elects to join your civilization.
FOUNDING NEW CITIES
The most common way to gain new cities is to send out Settlers to tame the wilderness. In
fact, you start the game with a Settlers unit whose primary task is to found your first city.
The terrain under and around your city is important, so if you want to select the best
possible place for your metropolis, skip down to Choosing Your Location. If you want to
jump right in, choose a square with rivers, plains and/or grasslands near it.
When your active Settlers unit stands on the square where you wish to build a new city,
choose the option BUILD NEW CITY from the ORDERS menu. If you accidentally build a city by
mistake, you can select the CANCEL button on the NAME CITY screen to retrieve your Settlers unit.
Your advisors propose a name for the new city; you can type in a different name if you
prefer something else. When you are satisfied with the name, press
button. The CITY DISPLAY opens so that you can arrange the city’s initial production and
economic development. When the display closes, your new city appears on the map. The
Settlers unit disappears, having converted into the first citizens of your new city.
or click the OK
e
THE BASICS
OF CITIES
45
Page 57

CHOOSING YOUR LOCATION
When building a new city, carefully plan where you place it. Citizens can
work the terrain surrounding the city square in an X-shaped pattern (see
City Radius for a diagram showing the exact dimensions). This area is
called the CITY RADIUS (the terrain square on which the Settlers were
standing becomes the city square). The natural resources available where
a population settles affect its ability to produce food and goods. Cities
built on or near water sources can irrigate to increase their crop yields,
and cities near mineral outcroppings can mine for raw materials. On the
other hand, cities surrounded by desert are always handicapped by the
aridness of their terrain, and cities encircled by mountains find arable
cropland at a premium.
In addition to the economic potential within the city’s radius, you need
to consider the proximity of other cities and the strategic value of a
location. Ideally, you want to locate cities in areas that offer a combination
of benefits: food for population growth, raw materials for production, and river or coastal
areas for trade. Where possible, take advantage of the presence of special resources on
terrain squares (see Terrain & Movement for details on their benefits).
Choose a location carefully
PROXIMITY OF CITIES
Another consideration when planning new cities is the current or potential location of other
cities. You want to minimize the chance that one city’s radius overlaps another’s. Since a
map square can only be used by one city at a time, radius overlap restricts the potential
growth of one or both cities. Explore nearby lands as soon as possible to begin planning
the placement of future cities. You want to take best advantage of the terrain. Of course,
the geography of your particular continent will limit your choices. If you find yourself on a
small island, your potential city sites will necessarily be more crowded than if you can
sprawl across a vast continent.
46
Page 58

STRATEGIC VALUE
The strategic value of a city site is a final consideration. A city square’s underlying terrain
can increase any defender’s strength when that city comes under attack. In some
circumstances, the defensive value of a particular city’s terrain might be more important
than the economic value; consider the case where a continent narrows to a bottleneck and
a rival holds the other side. Good defensive terrain (Hills, Mountains, and Jungle) is
generally poor for food production and inhibits the early growth of a city. If you need to
compromise between growth and defense, build the city on a Plains or Grassland square
with a river running through it if possible. This yields decent trade production and gains a
50 percent defense bonus.
Regardless of where a city is built, the city square is easier to defend than the same
unimproved terrain. In a city you can build the City Walls improvement, which triples the
defense factors of military units stationed there. Also, units defending a city square are
destroyed one at a time if they lose. Outside of cities, all units stacked together are
destroyed when any military unit in the stack is defeated (units in Fortresses are the only
exception; see Fortresses).
Placing some cities on the seacoast gives you access to the ocean. You can launch ship
units to explore the world and to transport your units overseas. With few coastal cities, your
sea power is inhibited.
CAPTURING CITIES
Other civilizations normally defend their cities with one or more military units (armies for
short), and sometimes with the city improvement City Walls. A defended city flies a pennant
showing its owner’s color. A walled city is surrounded by a short wall. There are two ways
to acquire enemy cities: force and subversion. If you choose force, you must destroy the
defenders by successfully attacking with your military units. Once the city is undefended,
you can move a friendly army into the city and capture it. If you prefer subversion, you
must successfully bribe dissidents in the city with your Diplomat or Spy unit (and sufficient
funds — see Diplomats & Spies for all the details on such espionage). The dissidents
capture the city for you, as their armies automatically convert to your side. Once captured,
the city becomes yours to control and manage as you would any other.
Capturing an enemy city can also lead to side benefits, such as the discovery of a new
technological advance and plundered cash to add to your coffers. Capture, however,
eliminates one point of population (unless the City Walls, which can prevent this loss, are
still standing). Therefore, when your units enter a city with only one point of population
remaining, it is destroyed instead of captured. Diplomats and Spies can incite dissidents
(see Diplomats & Spies) to capture a city without reducing its population below one.
THE BASICS
OF CITIES
47
Page 59

Occupation of an enemy city destroys roughly half of the improvements the city has
built, including all Temples and Cathedrals. Certain military units, such as Fighters and
Bombers, are also destroyed rather than captured. Capture does not affect Wonders of the
World (though, of course, destroying a city does— see Wonders of the World for more
details). Inciting revolt creates less damage to the city, as the dissidents rely less on
bombardment, and their familiarity allows them to pinpoint targets more accurately. A city
captured by revolt loses only the Temple and Cathedral improvements (if it had them).
CONVERTING MINOR TRIBES
As your units explore the world, they might encounter the villages of minor tribes —
civilizations too small or too peripatetic to count as “settled” (see Minor Tribes for the
scoop on these situations). Minor tribes react to contact with a range of emotions, from
delight to hostility. Occasionally, a minor tribe is sufficiently awed by your emissaries to
immediately form a new city and become part of your civilization.
Move your exploring unit onto the village icon to discover the tribe’s attitude towards
your civilization. If they choose to form a new city, you need do nothing: Your advisors
propose a name for the new city (which you can change if you prefer something else).
When you are satisfied with the name, press
DISPLAY opens so that you can arrange the city’s initial production and economic
development. When you close the display, your new city appears on the map. The
village icon is replaced by the new city square, and members of the tribe settle in as
the first citizens of your new city.
or click the OK button. The CITY
e
48
Viking
Page 60

THE PARTS OF A CITY
THE CITY SQUARE
The terrain a city occupies is especially important because it is always under development.
You cannot take workers off of this square when adjusting resource development on the
RESOURCE MAP (see Resource Map in Reference: Screen by Screen). If this area is not
useful, especially for producing food, then population growth in the new city is handicapped.
For this reason, you’ll find new cities do best when they are built on Plains or Grasslands
squares or squares with rivers. These terrain types provide the best food production and,
thus, faster population growth.
Note that all beginning civilizations possess the technologies of building Roads, Mining,
and Irrigation. When you found a city on a Plains, Grassland, Hills, or Desert square, (or the
special terrains based on those types) including squares with rivers running through them,
the city square is automatically improved by roads and irrigation. When you found a city on
any other type of terrain, the city square is automatically improved by roads and, if
applicable, mining. You cannot assign a Settlers or Engineer unit to further improve a city
square by, for example, adding mining or railroads, regardless of terrain, although you can
change the terrain to another type (Forest to Plains, for example). Move a Settlers or
Engineer unit into the city square and check the ORDERS menu to see what changes are
possible. City squares do automatically improve with the discovery of certain advances.
THE CITY RADIUS
The potential area of development, called the City Radius, extends two map squares
out from a city in every direction except vertically or horizontally. Since the development
area only extends one square from the city square in these directions, the resulting “radius”
actually looks like a fat X, not like a circle. If the city grows large enough, its citizens can
bring all of this area into development. When planning a new city, consider the long-term
benefits of all the terrain squares within this radius.
For the city’s population to increase, the radius must encompass terrain that workers
can cultivate to produce food. Your (potentially) most important cities also have raw
materials available. These cities can quickly build and support military units and Wonders.
Hills and Forests allow your citizens to produce good quantities of raw materials, as do
squares containing special terrain icons (pheasants, buffalo, coal, fish, and others — see
Special Terrains for complete details).
THE BASICS
OF CITIES
49
Page 61

The importance of trade in generating
taxes and civilization advances makes river
squares especially good sites for cities early
in the game. Where you have no rivers or
coastal areas, you can generate trade by
building roads on Plains or Grasslands.
When a square within your C
ITY RADIUS is
outlined, it indicates that another city is
claiming that terrain’s resource production.
It could be one of your cities, if the city radii
overlap. If you own both cities, you can flip
between Resource Maps to adjust
production in each to the best benefit of
both locations. It could also be a rival city
that one of your opponents has built close
to you. Finding an outlined square in your
city’s radius might even lead you to
discover a rival city in unrevealed territory
or outside of your units’ observation range.
City Radii
50
Page 62

Once you’ve founded, captured, or gained a city, you need to direct its
growth and production. Each city has different assets and demands, so each
should be managed individually. You must keep several goals in mind when
managing a city: maintaining population growth, maximizing a useful mix of
economic development (food, raw materials, and trade), producing tax
revenue, producing technological research, and producing useful units and
improvements, all the while maintaining an attitude of contentment and thereby
avoiding civil disorder. For cities to grow and prosper, they need to balance
economic output with the citizens’ needs for infrastructure and services.
your cities
Managing
51
Page 63

CITY MANAGEMENT CONCEPTS
As your city increases in size, its population expands, and it produces more and more food, shields, and
trade. These represent your city’s basic resources: edibles, raw materials, and trade goods. In city
management, you add another layer of concepts which address how you turn these materials into products
you can use. Refer to the CITY DISPLAY as you read.
Grain feeds your population and supports the city’s units. When a city produces more food than its
population and units consume each turn, the excess accumulates in the FOOD STORAGE BOX. When the box is
full, another citizen is added to the POPULATION ROSTER, and the city increases in size. If your city is not
producing enough food each turn to feed its population, the shortfall is noted, and stores are removed from
the FOOD STORAGE BOX. If the box empties, any units that require food for support are disbanded, one by one,
until a balance is achieved. If your city still experiences a shortfall, one citizen is removed from the POPULATION
ROSTER, and your city decreases in size.
Shields power your industrial capacity and support the city’s units. When a city produces more shields
than your units expend each turn, the excess shields accumulate in the PRODUCTION BOX each turn. When the
PRODUCTION BOX is full, your city produces something. It can “build” one of three kinds of things: units which
move around the map (like Settlers and Chariots), city improvements which are tied to specific cities (like
Libraries and Aqueducts), and Wonders of the World, which give unique benefits to the civilization that builds
them (like the Pyramids or Magellan’s Expedition) — but more about these details later. The type of
government your people develop and the distance remote cities are located from your palace affect your
shield production. Sometimes raw materials can be lost to waste. You can read all about the details of waste
under Trade Management Concepts. If your city runs short of the raw materials it requires each turn, one
or more units (that it supports) are forced to disband. The units farthest from home are disbanded first.
Based on the tax rates you set, trade arrows are further divided into three commodities that your
civilization acquires: luxuries, taxes, and science. These commodities each have their own icons: Luxuries
are represented by goblets, taxes are represented by gold, and science or research is represented by beakers.
The type of government your people develop and the distance remote cities are located from your palace
affects your trade income. Sometimes trade can be lost to corruption. You can read all about the details of
trade transactions under Trade Management Concepts.
52
Page 64

POPULATION GROWTH
Keeping a city’s population growing is important because each additional citizen
contributes something to your civilization. Each new citizen brings a new terrain square
under production in your CITY RADIUS until there are no empty squares to work. After this
point, each new citizen becomes an Entertainer (see Specialists for details on what
Entertainers do). Thus, population growth increases your economic power, and
concurrently, the strength of your civilization. The size of your population is a major factor
in determining your civilization score, and is a measure of how well you have ruled.
RESOURCE DEVELOPMENT
The citizens of a city that work the surrounding countryside harness the economic
resources within the city’s radius. Depending on the needs of your civilization, there might
be times when you prefer increased industrial output from a particular city over population
growth. At other times, you’ll want increased trade revenues. Still other times, sheer
population growth might be the most important goal.
You can manipulate the output of a city by reassigning workers on the RESOURCE MAP. Each
terrain square that shows resource icons is being worked by a citizen. Click on one of those
squares, and you take the citizen off work. An Entertainer icon (a little Elvis) appears at the
end of the POPULATION ROSTER. Now click on an empty terrain square. Elvis disappears from
the POPULATION ROSTER and resources appear in that square, indicating that a citizen is now
working there. By experimenting with the placement of workers on the RESOURCE MAP, you
can find the optimum production ratio of food to raw materials to trade for that city.
Having an Entertainer on your POPULATION ROSTER might change the attitude of one or
more of your citizens. For more information on this reaction, see Happiness &
Civil Disorder.
TAX REVENUE
The percentage of your trade that is converted into tax revenue, or gold icons, is
determined by the tax rate you set — see Trade Rates for information on how to
manipulate the ratios of taxes, science, and luxuries. Why do you need tax revenue,
anyway? You need revenue, or cash, because most improvements you build within cities
require a stipend of gold for maintenance. Gold is also useful for speeding industrial
production (see Rush Jobs), bribing enemy armies or inciting revolts in enemy cities (see
Diplomats & Spies), and for negotiating peace with your neighbors (see Diplomacy).
your cities
Managing
53
Page 65

The combined tax revenues of all your cities must exceed their combined maintenance
requirements before gold can accumulate in your treasury. It is not necessary for each city
to have a positive cash flow. However, enough cities must do so to cover your civilizations’
expenses, or your treasury will be depleted to cover the deficit. You can watch your S
window or check with your TRADE ADVISOR to see if you have a surplus or a deficit, as we’ll
explain under Advisors in Reference: Screen by Screen.
Some cities might not be especially suited for industrial production because of terrain
or other factors. But they might still be good trading centers, and capable of generating lots
of income. Develop these locations with roads (and later, railroads), trade routes (see
Caravans & Freight for the lowdown on trade route bonuses), city improvements like
Marketplace, Bank, and Stock Exchange, and Wonders to be your civilization’s cash cows.
If you get to the point where you are no longer interested in building new items in a
location, you can use the Capitalization improvement to convert a city’s shields into gold —
see the CIVILOPEDIA entry for details.
TATUS
TECHNOLOGICAL RESEARCH
The greater the research contribution each city makes toward new civilization advances,
the faster your people discover each new advance. The science rate you set determines
the amount of research done in each city (see Trade Rates for the essentials of adjusting
the ratios of science, taxes, and luxuries).
A city’s research contribution can be influenced by adjusting the city’s total trade
income — research is a fraction of trade — by creating Scientists (see Specialists), and by
building certain city improvements. Improvements that can help are the Library, University,
and Research Lab which all increase research, and several Wonders. The Civilization
Advances chapter goes into detail about how to read the advance tree, so if you want the
nuts and bolts, flip there next.
INDUSTRIAL PRODUCTION
Your most valuable cities can be those with the greatest industrial capacity— those whose
workers produce the greatest number of shields. These cities can quickly produce
expensive military units with which you can extend the power of your civilization. They are
also best at producing Wonders of the World, as Wonders generally cost immense numbers
of shields. But city management is dynamic. You must regularly monitor the production of
your cities to ensure you are building the items you most need.
54
Page 66

Several factors influence a city’s production of shields: The terrain within your CITY
RADIUS is most important, as citizens working on some types of terrain produce no shields
at all (see Terrain & Movement for further explanations). You might find it worthwhile to
set Settlers (and later, Engineers) to improving the terrain squares within your CITY RADIUS
so that they yield more or different resources (see Settlers & Engineers for examples of
what improvements they can make).
Beyond terrain, the form of government your civilization chooses can cause each city
to spend some of its raw materials as maintenance for the military units that call the city
home. It is possible that you can have so many units drawing raw materials from a city that
there are no surplus shields. In a city where this is the case, progress on the item under
construction (unit, improvement, or Wonder) stops until the situation is resolved.
A number of strategies allow you to adjust industrial capacity. The simplest is to shift
citizens working on the RESOURCE MAP so that they produce more shields (see Resource
Development for instructions). You can also use Settlers or Engineers to improve a terrain
square within the CITY RADIUS so that it yields more shields. Or, order Settlers units to build
a new city (they’ll no longer draw support from the city that sponsored them when they’ve
settled their own town). You might also try reassigning units so that they are attached to a
different city (see Homing Units for the low down on how to do this).
Within each city, you can order the construction of
improvements such as a Factory, Hydro Plant, or Offshore
Platform that increase shield production. Several Wonders also
affect shield output. Consult the CIVILOPEDIA for the complete list
of possible city improvements and Wonders. It shows the
construction and maintenance cost of each item, its purpose,
and what advance is required to make it available.
your cities
Managing
Mao Tse-tung
55
Page 67

CITY PROTECTION
Great economic management of a city is worthless if the city is captured by rivals or
barbarians. Therefore, part of your management plan must concern the defense of each
city. The minimum city defense is one army, preferably one with a good defense factor. A
second defender can provide back-up in case the first is taken out (see Military Units for
details of combat). An army with a strong attack factor is also useful. This unit can strike
at enemies that move adjacent to the city, perhaps destroying them before they can launch
an attack. Fortify any armies that you expect to defend a city (choose the FORTIFY option
from the ORDERS menu or press the Fkey) because fortified units gain an increased
defense strength — as we’ll explain more fully under Military Units.
A city’s defense can be substantially increased by building City Walls, an improvement
that triples any defender’s strength against most attackers (although not against Howitzers
or air units). Veteran status and terrain bonuses are figured in before this tripling takes
effect. City Walls also prevent population loss when defending units are destroyed
(see Combat).
When civilization advances make available new army types with better defense factors,
take the first opportunity to replace old defenders with better units. Since the offensive
capability of your enemies improves as they acquire new advances, your defenses must
improve to keep up.
Linking cities with roads and railroads can be very helpful in speeding the movement
of units from one end of your empire to trouble spots elsewhere. This puts your defensive
armies on “interior lines,” allowing them to move rapidly to where they are needed.
56
Page 68

IMPROVEMENTS
City improvements represent the commercial, bureaucratic, educational, and public works
infrastructure that make large and efficient cities possible. In the real world, New York
City’s dense population depends on the extensive subway system for transportation, and
buys electrical power generated by distant grids. Los Angeles is located in a desert and
pipes in much of its water from sources hundreds of miles away.
In Civilization II, improvements are also critical to the growth and importance of
cities. Inadequate provision of these facilities can limit the potential size of a city. Each
improvement provides some service or otherwise makes a city work more efficiently. You
must choose which improvement to implement at what time — does your city need a
Marketplace or a Library more? Would a Courthouse provide more benefit than a
Colosseum? City improvements are listed alphabetically in the CIVILOPEDIA. It explains the
building costs, benefits, and maintenance fees of each improvement, along with any
conditions which make the improvement obsolete or non-functional.
your cities
Managing
Icon
Name
Sell icons
Improvement Roster
57
Page 69

LOSING IMPROVEMENTS
Improvements are not invulnerable, nor are they guaranteed to be permanent fixtures in
an ever-dynamic city. The Barracks improvement, for instance, has a planned
obsolescence. Once your civilization discovers the advance of Gunpowder, your old
Barracks is rendered obsolete, and it disappears. (The same result attends your discovery
of Combustion. These military installations are sensitive to changes in technology.) To
regain its benefits each time, you must rebuild a Barracks improvement in each city you
desire to have one.
Most improvements don’t disappear over time, but they can be vulnerable to capture,
fire sale, and sabotage. If you’re really strapped for cash, you can even sell a city’s
improvements.
CAPTURE
Some, all, or none of a city’s improvements might be destroyed when it is captured by another
civilization. When a city is completely destroyed, all improvements are destroyed as well.
FIRE SALE
If you have less money in your treasury than is needed to pay a city improvement’s
maintenance cost at the beginning of your turn, Civilization II automatically sells the
improvement for cash. Deficit spending is not allowed — even if by the end of the turn you
would have had a positive cash flow again.
SABOTAGE
Foreign Diplomats or Spies can enter one of your cities and attempt industrial sabotage (of
course, your envoys can attempt to sabotage your rivals’ cities, too). This might result in
the destruction of an existing improvement (or it might scrap the item that city is currently
producing — see Diplomats & Spies for complete details on diplomatic actions). There are
two defenses against this type of attack — destroying the Diplomat or Spy before he or she
can enter your city, or stationing Diplomats or Spies of your own in the city for
counterespionage.
58
Page 70

Vladimir Lenin
SELLING IMPROVEMENTS
To raise cash, click on the improvement in the IMPROVEMENTS ROSTER of the CITY DISPLAY. A
dialog box shows how much gold you could receive for selling the improvement. Normally
you can gain one gold per resource invested in construction. If you sell, the improvement
disappears from the city and the money is added to your treasury.
Selling improvements can be useful when you are short of money and are threatened
with the random sale of an improvement. It can also be useful when you are under attack
with no reasonable chance of defending or recovering a city. By selling off its
improvements, you reduce its value to the enemy and salvage something. You can sell only
one improvement per turn in each city. You cannot sell Wonders of the World.
RUSH JOBS
There are also times when you need the specific benefits of an improvement right now,
and not 20 turns down the line. If you have sufficient funds, you can rush completion of a
partially built item by paying cold, hard cash. However, speeding construction in this
manner costs a premium. When workers are rushed, they receive overtime wages, and
must pay surcharges on material delivery and fabrication. The surcharges for a rush job
depend on what proportion of the work is already completed, whether the job is civil or
military or a Wonder, and can cost up to eight times as much gold as the normal
accumulation of shield icons.
To rush a job without paying cash, you have two options. Any Caravan
or Freight unit can enter a city where a Wonder is under construction and
deliver its goods specifically to the project by choosing the HELP BUILD
WONDER option when it arrives. It contributes the unit cost in shields
directly to the RESOURCE BOX. Alternatively, any unit that disbands in a city
contributes one-half its unit cost in shields to the current construction,
whether it is a Wonder, an improvement, or another unit. This represents
the retraining of troops and redisbursement of their supplies.
Items completed by rush jobs are available at the beginning of your
next turn, so there is no advantage for rushing items that would be
complete on the next turn anyway. To judge whether an item can be
completed next turn without rushing, compare the surplus raw materials
the city is generating to the number needed for completion. For very
expensive items, it might be useful to consult your CITY STATUS advisor
from the ADVISORS menu for an exact count of the remaining cost.
your cities
Managing
59
Page 71

RENAMING YOUR CITY
You may rename any of your cities whenever you
wish. This feature is useful when you capture a
city and wish its name to be consistent with the
names of cities you have founded, or when you
discover that you’re confusing units from two
cities because their names are too similar.
Open the CITY DISPLAY and then click on the
RENAME CITY button. A dialog box opens where
you can type in the new city name. Press
click the OK button to accept the name. If you
decide not to change it, click CANCEL.
e
or
60
Page 72

Trade is a fundamental force driving civilizations. It introduces unique and exotic
valuables, stimulates the economy, and fires the imaginations of a culture’s foremost
thinkers. The effects of trade permeate society in many surprising and subtle ways, and
your ability to direct trade’s impact is likewise varied.
YOUR TRADE
MANAGING
61
Page 73

TRADE MANAGEMENT CONCEPTS
Taking up where we left off in City Management Concepts, these are the further divisions that result from
trade income (arrow icons): luxuries (goblets), taxes (gold), and science funding (beakers).
Luxuries make your population more content. The availability of luxuries means that some citizens can
enjoy a more pampered existence. Every two goblets make one contented citizen happy. We’ll talk more
about happiness a little later.
Taxes maintain city improvements and add to your treasury. Taxes support basic city services, and
surplus funds accumulate in your treasury. There are plenty of useful ways to spend money in Civilization II,
as we’ll explain in a little while. If funding dries up, your city might be forced to sell off improvements.
Research funding powers your technological research. Each new advance requires the accumulation
of a certain number of beakers to achieve. The Civilization Advances chapter explains the details of the
search for knowledge, but for now, you just need to know that new discoveries often allow you to build new
units and city improvements, and sometimes open up the possibility of building Wonders of the World. In
addition, each discovery leads to further discoveries, creating a chain of progress. If your cities don’t produce
many beakers, your civilization doesn’t progress very fast.
Which of these three is the most important? That varies according to what you want to achieve right now.
To give trade management the most flexibility, Civilization II lets you adjust the proportion of trade income
that is devoted to each of these three areas. The T
ratio of taxes to science to luxuries by ten percent increments, and also shows you how these rates affect
your funding and the speed at which your knowledge increases.
In City Concepts, we mentioned that the P
citizens in your city. It can also tell you your citizens’ general level of contentment. Citizen icons appear in
three different attitudes: happy, content, and unhappy. When you start building cities, you start with content
citizens. The type of government your civilization develops and the level of difficulty at which you chose to
play affect how rapidly unrest begins to trouble your populations. Unhappy citizens must be balanced by
happy citizens, or your city falls into civil disorder. Not only does civil disorder sound bad, it has all sorts of
nasty consequences, as we’ll explain shortly.
For now, you need to know that you can increase the happiness of your citizens several different ways,
among them: building specific city improvements like Temples and Marketplaces (we’ll explain all about
Improvements shortly), reassigning military units (the dirt about martial law and foreign service effects
appears under Military Units), adjusting the tax rates (as we’ll discuss under Kingdom Menu in Reference:
Screen by Screen), and pulling citizens off production work to make them specialists (see Specialists
for the skinny on this).
Phew! That’s a lot of stuff to digest all at once. Just one more thing — we mentioned types of governments
two paragraphs ago. Discovering new advances encompasses more than just new gadgets to improve
sanitation and military might. The game counts philosophical concepts and theories as “new technologies,”
too. Every civilization starts out as a Despotism, but you can develop new forms of government. These might,
in turn, have a profound effect on the happiness of your citizens and the rate at which your citizens produce
raw materials, food, and trade.
AX RATE option on the KINGDOM menu lets you change the
OPULATION ROSTER can tell you more than just the number of
62
Page 74

TRADE RATES
When you start a new game of Civilization II, none of your trade benefits are tied up in
luxuries — instead, 40 percent of your trade goes toward revenue from taxes, and 60
percent of it is funneled into science. To change the proportion of tax and science income,
pull down the KINGDOM menu and choose the option TAX RATE. Choose a new rate by sliding
one or more of the buttons along the slider bars. A notation at the top of the box mentions
the maximum any one percentage can be, given your current form of government. Another
notation lists the income and outflow as gold per turn, and finally, an entry calculates how
many turns it will take to achieve a new advance. If you are interested in focusing on
civilization advances, you might want to increase the amount of science being conducted.
If you rapidly build city improvements, you might want to increase your taxes to cover the
maintenance costs. If you are concerned about the attitude of your citizens, you might
want to increase the availability of luxuries to make your citizens happier (we’ll explain all
about happiness in a few moments). Experiment with different rates to see what levels of
income and science you can achieve.
If it is difficult to adjust all three sliders at once, you can click the box at the right end
of any bar to lock that value in place. Now only the other two sliders move when you drag
on one.
GOVERNMENTS
Another tool of city — and trade — management is the type of government under which
your culture operates. Every civilization starts out as a Despotism, but some of the
advances you can research are intellectual in nature, rather than technological, and these
include five new governmental concepts. Once you have discovered a new form of
government, you can choose to sponsor a revolution in order to change government types.
(You can also gain access to new forms of government by building the Statue of Liberty
Wonder.)
Anarchy, or the lack of government, occurs only when you lose control, either because
civil unrest topples your current government, or immediately following a revolution. Civil
unrest continues as long as conditions are ripe for it. In the case of a revolution, your
people’s attitude naturally stabilizes. After a few turns, once your civilization settles down,
a dialog box appears listing all the possible forms of government your culture has
available. Choose the one you like, and that regime takes effect immediately.
A new feature in Civilization II lets you change governments instantaneously and
without penalty for the remainder of this turn. If your first choice turns out to be
unsatisfactory, pull down the menu again and select a different government. Once you
press
several turns of Anarchy) if you want to change governments again.
to end your turn, you must go through the entire revolution process (including
e
YOUR TRADE
MANAGING
63
Page 75

There are three “ancient” forms of government — Despotism, Monarchy, and the
Republic — and three “modern” ones — Communism, Fundamentalism, and Democracy.
The Republic and Democracy are the most sophisticated from an economic point of view,
but they impose severe restrictions on your military forces. The other forms offer trade-offs
between economics and increased military flexibility. In essence, you could summarize
governmental variants this way: The more freedom you give your people, the less they will
want to fight for you, but the stronger your economy will become. We’ve collected the
details of each form of government’s bonuses and drawbacks in regard to trade, support
provided to units, production, and the attitude of the citizenry. Depending on your style of
play, you might not develop each advance in order of sophistication.
ANARCHY
You have temporarily lost control of the government. You continue controlling the
movements of your units, and cities continue to operate on their own, but some important
functions of your civilization grind to a halt until control is restored.
Attitude: Up to three troops in each city can institute martial law; each makes one
unhappy citizen content (see Happiness & Civil Disorder).
Corruption & Waste: Corruption is rampant. Although no maintenance is charged for
city improvements, no tax revenue is collected and no scientific research is
accomplished while Anarchy continues.
Resource Support: Military units do not require raw material support until the number
of units making a city their home (see Unit Roster) exceeds the number of citizens
on the POPULATION ROSTER. Each military unit in excess of the city’s population points
requires one shield for industrial support. Settlers require one food for support
each turn.
Special Conditions: While Anarchy continues, citizens cannot work up to their
potential. The penalty for this atmosphere of tension is that workers produce one
fewer resource icon in any terrain that can generate more than two icons of any one
kind. Mines, for example, which might normally be worked for three shields, only
output two under Anarchy.
64
Page 76

DESPOTISM
You rule by absolute fiat. The people just have to live with it because your will is enforced by
the army. Due to the severe limits on economic and personal freedom, production is at a
minimum. But total control makes conducting war relatively easy.
Attitude: Up to three troops in each city can enforce martial law; each makes one
unhappy citizen content (see Happiness & Civil Disorder).
Corruption & Waste: Corruption and waste are both major problems under Despotism.
Trade income losses due to corruption and shield production losses due to waste
increase with the distance a city is located from its capital.
Resource Support: Under a Despotism, military units do not require resource support
until the number of units making a city their home (see Unit Roster) exceeds the
number of citizens on the POPULATION ROSTER. Each military unit in excess of the city’s
population points requires one shield for support each turn. Settlers require one
food for support.
Special Conditions: Citizens cannot work up to their potential. The penalty for this
atmosphere of tension is that workers produce one fewer resource icon in any
terrain that can generate more than two icons of any one kind. Mines, for example,
which might normally be worked for three shields, only output two under
Despotism. In addition, the maximum rate at which you can set tax, luxury, or
science production is 60 percent.
YOUR TRADE
MANAGING
65
Page 77

MONARCHY
Your rule is less than absolute, and an aristocracy of upper-class citizens influences your
decisions. The aristocratic classes, at least, have a certain amount of economic freedom,
and this results in the potential for greater production. Your feudal vassals are partially
responsible for helping to defend your kingdom, but they may in some cases deduct a
share of your civilization’s production as maintenance for military units.
Attitude: Up to three troops in each city can institute martial law; each makes one
unhappy citizen content (see Happiness & Civil Disorder).
Corruption & Waste: A certain amount of your economic output is siphoned off by
your aristocrats, particularly those farthest from your watchful eye — corruption and
waste are significant problems under a Monarchy, though not as severe as they are
under Despotism. Trade income losses due to corruption and shield production
losses due to waste increase with the distance a city is located from its capital.
Resource Support: Your feudal vassals support up to three units from each city at no
cost to you. Each additional unit requires one shield per turn. Settlers require one
food per turn for support.
Special Conditions: Under a Monarchy, the maximum rate at which you can set tax,
luxury, or science production is 70 percent.
66
Page 78

REPUBLIC
You rule over an assembly of city-states formed from the cities that your civilization
controls. Each city is an autonomous state, yet also is part of the republic which you rule.
The people feel that you rule at their request. They enjoy substantial personal and
economic freedom, and this results in greatly increased trade. A Senate reviews your
diplomacy, and has a chance to override your decisions. Military conflict is unpopular
among the masses, and your government must bear the full cost of supporting its army.
Attitude: Each ground and naval unit beyond the first that is not stationed in a friendly
city or in a Fortress within three squares of a friendly city (except units whose attack
strength is zero), and each Bomber, Stealth Bomber, Helicopter, or missile unit—
regardless of the city it occupies — makes one citizen unhappy each turn.
NOTE: In Civilization II, units are not penalized based on their home city; they
need only be in any friendly city.
Corruption & Waste: Corruption and waste remain a problem under a Republic,
though not as severe as they are under a Monarchy. Trade income losses due to
corruption and shield production losses due to waste increase with the distance a
city is located from its capital.
Resource Support: Each military unit requires one shield for support each turn.
Settlers require two food per turn.
Special Conditions: Under a Republic your workers produce an extra arrow icon in any
square where they are already producing at least one. Your Senate can force you
into accepting a peaceful resolution to any negotiation, though it will only choose
to do so roughly 50 percent of the time. Finally, the maximum rate at which you can
set tax, luxury, or science production is 80 percent.
YOUR TRADE
MANAGING
67
Page 79

COMMUNISM
You are the head of a communist government, and you rule with the support of the
controlling party. Although this form of government allows more production than
Despotism, the orthodoxy of the party restricts personal and economic freedom, limiting
trade. On the positive side, corruption is negated by the action of the local party apparatus,
the army and secret police suppress most dissent, and your large security forces recruit
excellent spies.
Attitude: Up to three troops in each city can enforce martial law; each makes two
unhappy citizens content (see Happiness & Civil Disorder).
Corruption & Waste: Under Communism, state control of the economy eliminates
organized crime, and none of your cities suffer corruption or waste.
Resource Support: Regardless of city size, each military unit beyond the third a city
supports requires one shield each turn. Settlers require two food for support.
Special Conditions: All Spy units produced under Communist governments are
Veterans. Under Communism, the maximum rate at which you can set tax, luxury,
or science production is 80 percent.
FUNDAMENTALISM
Fundamentalism is a form of government based on the literal, forceful, and uncompromising
interpretation of religious dogma. Fundamentalist societies maintain that their own beliefs
are the only true path to salvation, and tend to be rigidly intolerant of any dissenting view —
a fact which tends to choke off intellectual development. On the other hand, the people in
such societies are often fanatically devoted to their beliefs, and may be willing to die, use
force, or commit great atrocities to preserve them. This unthinking devotion, often
obnoxious to neighboring societies, can be harnessed by a clever and cynical leader.
Attitude: Under Fundamentalism, no citizen is ever unhappy! Improvements that normally
convert unhappy citizens to content citizens produce “tithes” (gold) equivalent to
the number of people they would normally convert, and require no maintenance.
Corruption & Waste: Fundamentalism has very low rates of corruption and waste.
Resource Support: Because of your people’s zeal, each city can support ten military
units at no cost to you. Settlers eat two food per turn. Only fundamentalists can
build Fanatic units, which never require support.
Special Conditions: Under Fundamentalism, tax/luxury/science rates cannot be set
higher than 80 percent. In addition, the rigidity of mindset and emphasis on doctrine
means that all scientific research is HALVED. The diplomatic penalties for “terrorist
acts” (such as bombing city improvements, poisoning wells, and so forth) committed
by Diplomats and Spies is reduced, since the world comes to expect no better.
68
Page 80

DEMOCRACY
You rule as the elected executive of a modern Democracy. The people feel that you rule
because they chose you. The degree of freedom allowed under this government results in
the maximum opportunity for economic production and trade. However, the people also
have a very strong voice in determining how much economic production is devoted to
improving the standard of living. Any diplomatic decisions you make are subject to review
by your Senate — and the Senate always opposes actions that would lead to war.
Maintaining a military force in the field comes with great political and economic costs.
Attitude: Each ground and naval unit not stationed in a friendly city or in a Fortress
within three squares of a friendly city (except units whose attack strength is zero),
and each Bomber, Stealth Bomber, Helicopter, or missile unit— regardless of the
city it occupies — makes two citizens unhappy in its home city.
NOTE: In Civilization II, units are not penalized based on their home city; they
need only be in any friendly city. In addition, Democracy is fragile. If even one of
your cities remains in civil disorder for more than a turn, your government collapses
into Anarchy.
Corruption & Waste: One of Democracy’s greatest advantages is its ability to squelch
corruption and waste. Neither exists in your cities.
Resource Support: Each military unit appropriates one shield for support each turn.
Settlers require two food for support each turn.
Special Conditions: Under Democracy, your workers generate an additional arrow icon
wherever at least one already exists. Patriotism and strong democratic traditions
make your cities and units immune to all forms of bribery. Finally, the Senate can
force a peaceful resolution to any negotiation, and will do so whenever possible.
YOUR TRADE
MANAGING
69
Page 81

HAPPINESS & CIVIL DISORDER
Happiness and its inverse state, civil disorder, are indirectly related to trade. Lack of trade
leads to stagnation, and a slow economy means a lack of goods and services. The citizens in
your cities have one of three different attitudes or emotional states: happiness, contentment,
or unhappiness. The first citizens of your first city start out in a contented state. As the
population of the city grows, competition for jobs, commodities, and services increases.
Eventually, depending on the difficulty level at which you play, the form of government
your civilization employs, and the economic conditions in your city, some citizens start to
grumble and display unhappiness. If you don’t take an active role in city management as
population increases, the natural trend of citizens’ attitudes is toward unhappiness.
So what can you do to counter this trend? If your
population is already suffering civil disorder because of
an attitude imbalance, you need to take immediate
steps, as we suggest under Restoring Order. However,
you needn’t wait until a crisis occurs; you can keep
citizens content by taking a longer outlook and
providing services as the demand becomes imminent,
or even ahead of demand.
The temperament of your citizens depends on the
level of difficulty at which you play. At Chieftain level,
your people are so even-tempered that the first six
citizens on the POPULATION ROSTER start out content. Each
new citizen above this number starts with a bad attitude, and must depend on
improvements, luxuries, martial law, and/or Wonders of the World to improve his or her
state of mind. The number of citizens who start content decreases by one with each
successive level of difficulty, until at Deity level, your people are so temperamental that
only one citizen starts out content. The second and subsequent citizens show their
unhappiness, and must be cajoled into better humor with any of the management tools at
your disposal.
1 2 3 4 5 6
1 Happy Citizens
2 Content Citizens
3 Unhappy Citizens
4 Taxmen
5 Scientists
6 Entertainer
70
Page 82

SPECIAL UNHAPPINESS FACTORS
There are two special conditions that cause further unhappiness in some populations.
Under a Despotism, and to a progressively lesser degree under other types of government,
citizen unhappiness increases with the number of cities. This can lead to very unhappy
citizens who must be converted first to unhappy citizens before they can become content.
In Republics and Democracies, each ground or naval unit not in a friendly city or
fortress within three squares of a friendly city, and each bomber, Helicopter, or missile unit
regardless of where it is located, might create unhappy citizens. You can think of it as units
“in the field.” Because of their routine flight training, most air units are always “in the field,”
but the protective role of fighters makes them an exception to the rule.
In a Republic, the first unit in the field does not cause discontent. Each subsequent
army in the field creates one unhappy citizen. If your civilization is a Democracy, each unit
in the field causes two unhappy citizens. Units with an attack strength of zero (that is, an
ADM rating that starts with zero, like Transports and Engineers) do not cause unhappiness
in this manner. When a city is in disorder, disbanding distant military units, returning them
to their home cities, or changing their home cities can make some unhappy citizens
content and might restore the city to order.
CIVIL DISORDER
As we mentioned in City Management Concepts, cities that don’t maintain a favorable
balance of happy people over unhappy people go into civil disorder. Cities in civil disorder
produce no tax revenue, technological research, or food surpluses, and the condition
suspends production. Prolonged civil disorder might bring down a government, and throw
your civilization into Anarchy. A nuclear reactor in a city suffering civil disorder might
experience a meltdown due to lax safety controls (see Nuclear Meltdown). Keeping a city
stable is a very high priority.
A city suffers civil disorder when unhappy people outnumber happy people. Content
people and Specialists are ignored in the calculation. When order is restored, the city
returns to normal operation the next turn. You can restore order in several ways.
YOUR TRADE
MANAGING
71
Page 83

RESTORING ORDER
You can pay to complete an improvement, such as a Temple, that can convert sufficient
unhappy citizens to contentment (or content citizens to happiness) to restore the balance.
See Rush Jobs for instructions on how to do this.
You can also change the tax rates of your civilization. Increasing the availability of
luxuries might convert some content people into happy citizens, allowing them to balance
the unhappy populace. See Trade Rates for information on economic manipulation.
You can take one or more citizens out of the work force, and make them Specialists.
This increases the number of happy people. For information on how to do this, see
Specialists. When creating Specialists, be careful not to also cause shortages of food or
resources that trigger starvation of the population or the scrapping of armies.
If your civilization operates under Anarchy, Despotism, Monarchy, or Communism, you
can use martial law to restore order to a city. Up to three military units, each with an attack
factor of one or more, can be stationed in a city to enforce martial law. Each military unit
makes one unhappy citizen in a city content under the first three types of government.
When you are operating under Communism, martial law is doubly effective, and each army
makes two citizens content. If you have enough military units to enforce it, and a low
enough level of unhappiness, martial law might be enough to restore order.
72
Page 84

The people love you!
WE LOVE THE _____ DAY
If a city’s population becomes sufficiently
happy, it (not your whole civilization — just
this one location) spontaneously holds a
celebration in honor of your rule. The
people declare a “We Love the (title of the
leader) Day” in thanks for the prosperity
your management has made possible.
While the circumstances that support this
celebratory mood continue, the city enjoys
certain benefits, depending on your
civilization’s type of government. You will
see the effects of celebration begin on the
first full turn that a city celebrates, that is,
the turn after the party is announced.
To trigger a celebration day, a city must
fulfill certain conditions: there can be no
unhappy citizens in the city, there must be
at least as many happy citizens as content citizens, and the POPULATION ROSTER must number
at least three citizens. Specialists are considered content citizens for this calculation. For
example, a city with five happy citizens, four content citizens, and no unhappy citizens
celebrates. A city with ten happy citizens, three content citizens and one unhappy citizen
does not.
ANARCHY
The celebration has no effect when your government is in Anarchy.
DESPOTISM
The celebrating city collects resources as if its government is a Monarchy (see
Governments). This can increase the amount of food and raw materials your citizens can
produce in certain improved (irrigated and mined) terrain types.
YOUR TRADE
MANAGING
73
Page 85

MONARCHY/COMMUNISM/FUNDAMENTALISM
A celebrating city currently ruled by any of these governments collects resources as if its
government is a Republic (see Governments). This increases the amount of trade your
citizens can produce in any terrain that generates trade goods.
REPUBLIC/DEMOCRACY
A city currently ruled by either of these governments increases in population by one point
each turn it celebrates, so long as sufficient food is available. This can result in dramatic
growth of the city.
74
Page 86

75
Movement
Terrain &
Page 87

TERRAIN & MOVEMENT CONCEPTS
The game map in Civilization II is divided into small independent parts, or terrain squares, as we
mentioned in City Concepts. For simplicity, each square consists of a single type of terrain, even though the
real world is not as perfectly organized as that. To represent that some types of terrain are easy to walk across
and others require slogging through mud or hacking through thick underbrush, your units spend
movement points to enter each new square. Every unit has an ADM rating (the acronym stands for
Attack/Defense/Movement); the M, or third number in the rating, indicates how many movement points it can
spend in a turn. You can find out all about units and their ADM ratings under Military Units.
Each terrain type has its own movement point cost (and they’re all conveniently listed in the TERRAIN
CHARTS on the Poster). Your Settlers or Engineer units can improve (that is, lower) these movement point
costs by laying roads and later railroads in terrain squares (see Settlers & Engineers for the lowdown on
how they do this). When a unit moves into a new square, it pays that square’s movement point cost. If it has
any movement points — or fractions of movement points — left after moving one square, a unit can attempt
to move again until it reaches the limit of its movement points. Attacking counts as movement — that is, your
units spend movement points to attack. You can read about the details under Military Units; what you need
to know here is that a unit’s attack strength might be reduced if it has less than a full movement point
remaining at the time of combat. You’ll get a message asking if you want to continue with
the attack.
The proximity of enemy units or cities can also restrict a unit’s movement options. Units and cities have
what in military circles is called a zone of control; their influence extends into the eight squares that
immediately surround them. Your units cannot move directly from one rival’s zone of control into another’s
zone of control unless you have an alliance with the second tribe. This represents a unit’s ability to threaten
or pin down enemy troops nearby. When an enemy Legion is nearby waiting to pounce, your troops cannot
afford to expose their vulnerable flanks. The blockers don’t have to be units or cities of the same civilization.
The Movement Restriction diagram should make it clearer, so give it a look-see. Some units (such as
Diplomats, Caravans, and all air and naval units) have special abilities that allow them to ignore
these restrictions.
76
Page 88

TYPES OF TERRAIN
The differences in terrain are deeper than a variety of artwork and colors to make the game
map more visually interesting. Each type of terrain has its own economic usefulness, effect
on movement, and effect on combat. Detailed information about the terrain types is
provided in the TERRAIN CHART on the Poster, and from the CIVILOPEDIA.
To get terrain information from the CIVILOPEDIA, click on the CIVILOPEDIA menu, and select
the TERRAIN TYPES option. A list of both standard terrain types and their special resources
appears. If you don’t recognize the icon for a special resource, click on the standard terrain
type to see what special resources are possible.
A NOTE ABOUT RIVERS
In Civilization II, rivers are not a type of terrain unto themselves. Instead, they can flow
through any type of terrain. Rivers make movement easier for ground units that follow the
line of the river bed either up- or downstream, because each square costs only one-third
of a movement point, regardless of the underlying terrain. Settlers and Engineer units
cannot build roads across rivers until your tribe discovers the Bridge Building advance.
Rivers count as sources of water for the purposes of irrigation. Citizens working terrain
through which a river flows gain a bonus arrow icon, representing the ease with which
rivers facilitate trade. Finally, a river’s presence enhances the defense bonus of the terrain
through which it flows.
STANDARD TERRAIN SQUARES
The standard types of terrain can be divided along climactic lines. Here’s a short summary.
Glacier and Tundra squares are both cold terrain. Neither produces much in the way of raw
materials, and neither can be converted into more profitable terrain. Swamp and Jungle
are both wet terrain. Neither is easy to move through, and it costs a considerable
investment of time to convert either into more profitable terrain. Plains and Grassland
squares are both open terrain. Both are easy to travel across, and when improved, both
produce substantial amounts of food as well as other raw materials. Hills and Mountains
squares are both vertically challenging. They take some effort to travel across and yield
more raw materials when developed by mining. Ocean squares generate substantial
amounts of trade, and appropriate types of terrain bordering them can be irrigated. Ground
units can move at a rate of one-third of a movement point per square if they follow a
riverbed up- or downstream. Desert squares are dry terrain that can be developed for
marginal production. Forest squares are difficult to travel through, but yield decent
raw materials.
Movement
Terrain &
77
Page 89

SPECIAL TERRAIN SQUARES
Each standard terrain square can be enhanced by one of two types of special resource. Where
special resources appear, they add significantly to the economic value of the terrain. Distinct
symbols mark the location of these resources. If your Settlers or Engineer units convert a
square containing a special resource icon into another terrain type, the original specialty is
lost. If the new terrain type can be enhanced by special resources, it is; if the new terrain
is Grassland, it remains a standard terrain. Right now, we’ll give you a brief summary.
Glaciers can be enhanced by Oil deposits, representing increased mineral wealth, and
therefore yielding extra shields when worked. Alternatively, the presence of Walruses
indicate the availability of Ivory, with its greatly enhanced trade goods yield.
Musk Ox stand in some Tundra squares, indicating excellent food sources or the
potential for good grazing; workers in these squares can produce additional food. Other
Tundra squares display Fur, indicating the high potential for arrows because of desirable
trade goods.
Swamp squares can contain Peat, whose usefulness as fuel is indicated by the
enhanced shield yield, or perhaps Spice, exotic flavorings which are prized the world over,
and therefore represent bonus yields in both food and arrow icons.
Gems shine in Jungle terrain to indicate the presence of precious stones, ivory, spices,
salt, or other valuable commodities. These are good trade items and, therefore, the square
in which they appear generates substantial arrows. Jungles also have the potential to
produce exotic Fruits which naturally increase the food output.
Buffalo trotting across the Plains represent raw materials on the hoof; workers in these
squares generate extra shields. On the other hand, Grain represents a particularly fertile
piece of open ground, and a rich source of food.
Coal deposits, shown as black lump icons in Hills terrain, represent rich locations of
coal or metal ores. These areas produce greatly increased shields, especially when mined.
On the other hand, some hills are Wine country, especially suited for growing grapes. Wine
terrain yields greatly increased trade.
Gold gleams in Mountains terrain, representing a bonanza of precious metal ore. The
value of these deposits produces tremendous trade goods. Alternatively, workers might
discover Iron deposits in mountainous areas, yielding a substantial number of shields.
Fish swimming in Ocean terrain represent the location of underwater banks and reefs
where currents and nutrients create excellent fishing grounds. Fishing grounds produce
increased amounts of food. On the other hand, Whales indicate the bounty of the deeps,
and an increase in raw materials and trade goods as well as foodstuffs.
78
Page 90

An Oasis is a very fertile island in Desert terrain where workers can harvest substantial
quantities of food. Conversely, Oil, representing the presence of mineral wealth, especially
petroleum, can also be found in Desert squares. As they do in Glaciers, Oil squares in
Desert terrain yield extra shields when worked.
A Pheasant peers through some Forest terrain. The presence of game indicates
excellent food sources available. On the other hand, Silk represents a luxurious product
of mulberry Forests that brings increased yield from trade goods.
OPTIMAL CITY SITES
The economic usefulness of the various terrain types is important when selecting city sites.
Citizens work the terrain within a city’s radius to produce the food, raw materials, and trade
that the city needs to grow and be productive (see The City Radius). Some terrain types
are more valuable than others, in that citizens working them produce more resources.
Other terrains start out yielding little, and only develop their full potential when they are
improved. These squares can be irrigated, mined, or surfaced for increased economic
value. Other squares are important because they can be converted into more valuable
terrain, as we’ll discuss soon (for instructions on how to irrigate, mine, surface, and
convert terrain, see Settlers & Engineers). The best city sites offer immediate food, raw
material, and trade production, plus the potential for long term development.
TERRAIN CONVERSION
When surveying sites for a new city, keep in mind the potential for terrain squares within
the city’s radius to be improved. Hills and Mountains squares can be mined so that citizens
working them produce increased raw materials. Plains and Grassland squares, whether or
not rivers run through them, can be irrigated so that citizens working there produce more
food. Swamp and Jungle squares can be cleared to yield Grassland or planted to yield
Forest. Forest can be cleared to yield a Plains. Plains and Grassland squares can be
retimbered to yield Forest if you need raw materials. An area dense with Jungle and Swamp
squares looks barren at first, but has the potential to become a very rich city site.
Improvements are not limited to agricultural effects. Settlers and Engineers also
improve terrain by laying roads across terrain squares. Roads allow better access to a city,
and therefore, increase the trade goods citizens working some squares produce. Plains,
Grassland, and Desert squares all produce trade once penetrated by roads. Railroads
eliminate the movement point cost of the terrain across which they are laid and might
increase resource production as well. For more information on terrain improvements, see
Settlers & Engineers — they’re the units that do the work.
Movement
Terrain &
79
Page 91

PLANETARY CARETAKING
Manipulating terrain to produce the maximum number of shields has a downside, of
course. One cost of heedless industrial growth is a gradual polluting and poisoning of the
environment. Of the many dangers posed by pollution in the real world, the greatest might
be global warming. Theorists believe an unchecked rise in the planet’s atmospheric
temperature threatens catastrophic geographic changes including melting polar ice caps,
rising sea levels, and parched farmlands. Different threats of poisoning occur if nuclear
weapons are detonated or a nuclear reactor melts down.
Civilization II models pollution from industry and nuclear disaster as a balancing
factor for growth. As you steer your civilization into the industrial age, you must manage
your cities and monitor your terrain to minimize pollution and prevent the disaster of
global warming.
POLLUTION
Every turn, the game assigns a probability of pollution occurring within the economic
radius of each city. The likelihood of this contamination depends on two factors: the
number of shields produced (industrial pollution) and the population supported (smog). In
some cities, industrial pollution is the major factor in the calculation, and in other cities
smog is a bigger hazard. Below a certain level, the chance of pollution is negligible, but as
industrial output builds, so does the likelihood of its darker side effects. Smog has no
effect on pollution calculations until your civilization acquires the advance of
Industrialization.
Smokestacks begin appearing on the CITY DISPLAY in the GENERAL INFORMATION window
when the combined pressures of smog and industrial pollution begin to create a significant
threat of contamination. The number of stacks roughly indicates the probability each turn
of a square within the city radius becoming polluted. For example, a city generating a large
number of raw materials each turn (say 20) and inhabited by a large population might show
several smokestacks in its CITY DISPLAY. The exact proportion of smokestacks produced by
industrial pollution and smog depends on the difficulty level at which you set the game.
Certain city improvements can help the situation. A Nuclear Power Plant, Hydro Power
Plant, Solar Plant, or Recycling Center improvement in a city reduces the impact of
industrial pollution, in turn decreasing the accumulation of smokestacks. Solar Plants also
help prevent global warming by absorbing excess heat in the atmosphere. The Hoover
Dam, a modern Wonder of the World, acts as a Hydro Power Plant for all friendly cities. The
Mass Transit improvement eliminates smog.
80
Page 92

Pollution indicator
Polluted square
Engineer
Cleaning Up
Pollution is icky!
NUCLEAR CONTAMINATION
The detonation of nuclear weapons or the meltdown of a Nuclear Power Plant can also
cause contamination. For game purposes, Civilization II treats these threats identically
to industrial pollution, though in real life their effects might be considerably longer term.
NUCLEAR WEAPONS
A Nuclear unit not only destroys the army or city it targets, but all units stacked with the
target, and those in adjacent squares as well. It also pollutes a number of map squares
around the impact square. Enemy units’ zones of control (which are discussed under
Movement Restrictions) might make it impossible for your Settlers or Engineer units to
clean up this contamination in a timely fashion, and your rival might not spend the time or
manpower. Unchecked pollution significantly raises the risk of a global warming disaster.
NUCLEAR MELTDOWN
If a Nuclear Power Plant melts down, half of the city’s population is destroyed. Additionally,
some random number of squares near the city become polluted.
Movement
Terrain &
81
Page 93

The risk of meltdown always exists when a city which has a Nuclear Power Plant goes
into civil disorder. Civilian unrest might result in safety procedures becoming so lax that a
catastrophic accident occurs. If you build Nuclear Power Plants in any of your cities, take
special care not to allow those cities to go into disorder.
When your civilization achieves the technological advance of Fusion Power, the risk of
meltdown disappears. Your Nuclear Plants automatically convert to fusion-powered
facilities once you have achieved this advance.
POLLUTION’S EFFECTS
Pollution is represented graphically by a skull on the terrain square in which it occurs. It
reduces the production of food, raw materials, and trade to one-half (rounded up) of prepollution levels. For example, a square where workers produced four food, one shield, and
two trade before pollution blighted the square yields only two food, one shield, and one
trade after contamination. Once the terrain is detoxified, workers’ production returns to
pre-pollution levels.
Polluted terrain can be detoxified by any Settlers or Engineer unit. The working unit’s
shield is marked with a “P” to note it has been ordered to detoxify a polluted square. After
four turns of work (an Engineer can clean up in two), the pollution disappears. Adding more
Settlers or Engineer units to a polluted square speeds the cleanup. If you use the GOTO CITY
order, your city list marks which locations suffer from pollution. Note that a polluted square
within the radius overlap of two cities is listed once for each city; if your cities are close
together, this might give you an alarming overstatement of the total pollution your
civilization suffers.
MONITORING POLLUTION
Your environmental advisors inform you immediately when any map square within your
territory becomes polluted. A skull appears on the polluted square.
You can monitor the extent of pollution throughout your civilization by watching the
pollution indicator, a small icon in the STATUS window. The color of the icon depends on the
number of currently polluted terrain squares and the number of turns they have remained
contaminated. It indicates the extent of the risk of global warming.
GLOBAL WARMING
Global warming might occur at any time that at least nine map squares, anywhere in the
world, are polluted. The probability that it will occur increases with the length of time
contamination on this scale is left untreated. If polluted terrain is left unattended for too
long, environmental damage occurs, as detailed under Disasters.
82
Page 94

Once an environmental disaster has occurred, the cycle starts over again. The planet
achieves equilibrium at the new, higher temperatures. If pollution continues or increases
once more to high levels, another bout of environmental problems might occur. This cycle
can repeat endlessly if pollution is not controlled.
MINOR TRIBES
Thatch-roofed hut icons scattered about the map of the world indicate the
presence of minor tribe villages. These populations are too isolated, too
unorganized, or too migratory to develop into major civilizations. Minor tribes
react to contact with a range of emotions, from delight to hostility. There is
no way to predict a village’s response, but most potential responses are
favorable. There is one unique situation: Air units cannot encounter minor
tribe villages. Instead, their overflight scares the villagers, and the hut icon
vanishes as the tribe abandons their territory in terror.
Playtesters and Civilization fans alike call these hut icons “goody huts.”
Here’s what might happen when you move a ground unit onto terrain that a
minor tribe occupies.
• Occasionally a minor tribe is sufficiently advanced, yet awed by your emissary,
to immediately form a new city and become part of your civilization.
• On the other hand, your unit might have stumbled upon a village which has
discovered an advance unknown to your civilization. Graciously, they share
their knowledge.
• To placate your emissary unit, a village might give your civilization valuable
resources (gold) as a gift. The gift is added to your treasury.
• Your emissary unit stirs up the young bloods in the village with his tales of valor
and victory. All the impressionable warriors run off to join your army, creating a
new military unit “carrying your colors.”
• Your emissary makes a horrible faux pas, and the minor tribe turns vicious. A
random number of barbarian units comes boiling out of the terrain squares that
adjoin the village. Duck (or run, if you can)!
• Your emissary arrives at a spot rumored to contain a village only to find the
inhabitants long gone and the dwellings empty. Nothing occurs.
• Your unit catches up with a particularly peripatetic tribe, and impresses them
with his or her goods and possessions. The minor tribe is willing to join your
civilization, though not necessarily interested in settling in their present location.
The villagers become a Settlers (or Engineer) unit carrying your shield.
Movement
Terrain &
83
Page 95

MOVEMENT
There are two basic methods of moving units a square or two at a time: by keyboard
commands or (if you have enabled mouse movement) by mouse clicks. The keyboard
method uses the eight edge keys of the numeric keypad. The 5key in the center is
inactive; think of it as your unit’s position. The keys surrounding the 5represent the points
of a compass. For example pressing 7sends your unit northwest, while pressing 6sends
your unit east.
The mouse method involves placing your mouse cursor near the edge of the unit in the
direction you want it to travel. When the cursor turns into an arrow pointing in the
appropriate direction, click the left mouse button to make the unit move. Note that this
method works only if you turn on the MOVE UNITS W/ MOUSE optioninGAME OPTIONS. You can
also use the GOTO order to send a unit over long distances, as we explain in detail under
GoTo Orders.
Units can move up to the limit of their movement factors, with a few caveats. The most
important exception is that a unit can always move at least one square in a turn, regardless
of the movement point cost of the terrain. Are we saying a unit can always move? Not quite.
An enemy unit or city’s presence can hamstring any unit with the zone of control restriction,
as you’ll see in a moment. There are other, common-sense restrictions on where units can
move and where they can’t, which are elaborated under Movement Restrictions.
Back to movement factors. A unit with a movement factor greater than one must
compare its movement factor with the movement point cost of the terrain square you wish
it to enter. The unit pays the movement point cost (subtracts the movement point cost from
its remaining movement factor) for each new square it enters, until you choose to stop
advancing, or the unit’s movement factor is smaller than the movement point cost of the
terrain square. There’s a small chance that a unit can enter a square, even if its movement
factor is lower than the movement point cost of the terrain, which is why sometimes
Chariots can cross Mountains squares, and sometimes they can’t. When an army is unable
to complete a movement order because it doesn’t have enough movement points to
proceed, its movement is finished for the turn. The map then centers on the next active
unit.
Roads and railroads speed the movement of ground units. They do this by lowering the
movement point cost of the terrain over which they are built. Any terrain square with a road
across it costs just one-third of a movement point to cross. Any terrain square with a
railroad costs no movement points to cross — zero! Cities automatically have roads in their
city squares, so entering a city square always costs one-third of a movement point. Once
your civilization discovers the Railroad advance, city squares are automatically upgraded
to railroads, so your units can slide through them for free.
84
Page 96

THE ACTIVE UNIT
How do you know whose turn it is? Every turn, Civilization II activates each unit in turn
by centering the map around the unit and making it blink. You can give orders to each unit
as it becomes the active unit (see the Orders Menu in Reference: Screen by Screen). Five
special orders deserve fuller explanations here.
NO ORDERS
To skip a unit for the turn, press the SKIP TURN
RDERS menu. Once you’ve skipped a unit’s turn, the troops are on liberty for the day—
O
you can’t recall them to duty again this turn.
z
GOTO ORDERS
To send a unit on a long trek, you have two options. You can click-and-hold on any square on
the map until your cursor turns into a crooked “Go” arrow. If the destination square isn’t
visible in the MAP window, you can use the ZOOM OUT button to enlarge the area you are
viewing, click on the WORLD window to shift your view to another area of the map, or switch
to VIEW PIECES mode by pressing the Vkey or choosing the option from the VIEW menu, and
move the cursor with the number pad keys. If you’d rather send a unit to a city, you can
press the GOTO
all of your cities; click on the ALL PLAYERS button to see every destination city in the world.
Once a destination is established, the unit automatically “goes to” that square, whether
it takes only one turn to complete its orders, or many turns. If the unit is attacked, or an
obstruction prevents the unit from completing its journey, it becomes active once again.
Ground units cannot travel between continents on a GOTO order.
key or choose the option from the O
G
WAIT ORDERS
To skip a unit temporarily, press the WAIT
menu. This passes you on to the next unit and sends the skipped army to the end of the
line. You’ll see this unit again after all the others have had a chance to move.
key or choose that option from the O
W
key or choose the option from the
RDERS menu. A screen pops up listing
RDERS
Movement
Terrain &
PARADROP ORDERS
Paratroopers that have not moved this turn have the special ability to make paradrops
when in a city or Airbase. Press the PARADROP
menu. Your cursor turns into a parachute. You can make a paradrop in any land square
within ten of the origination square, that is not occupied by enemy troops. As you run the
mouse over the map, the cursor changes from a parachute to a crossed-out parachute to
indicate “illegal” destination squares. Click on a square to make the drop. Paratroopers
have one movement point after they drop to attack or change position.
key or choose the option from the O
P
RDERS
85
Page 97

AIRLIFT ORDERS
Once your civilization has discovered the Radio advance, you can build Airport
improvements. Once you have two or more Airports, you can airlift one unit per turn into
or out of each Airport. Activate a unit in a city, then press the AIRLIFT key Lor choose the
option from the ORDERS menu. A list of cities with Airports appears, and you can select your
destination. Enemy Fighters and Stealth Fighters within range of either the target or
destination city have a chance to scramble and interdict the airlift.
ACTIVATING FORTIFIED AND SLEEPING UNITS
Fortified and sleeping units do not become the active unit. If you want them to move or
change position, you must activate them first. Click the mouse pointer on the square in
which fortified or sleeping units are stationed. This opens a box displaying all units in that
square. Click again on the icons of all units you wish to activate. Fortified or sleeping units
within a city must be activated from within the CITY DISPLAY — see City Display for
instructions on how to do this. Sleeping units automatically activate when enemy units
move into an adjacent square.
NAVIGATING THE MAP WINDOW
We’ve talked about moving your units around the map, but there are several tools which
allow you to look at different map areas and move around the game world. First, let’s
describe the two modes of Civilization II. In MOVE PIECES mode, the active unit blinks, and
you can use the number pad keys or cursor arrows to move it across the map. In VIEW PIECES
mode, the square-outline cursor blinks, and you can use the number pad keys to move it
across the map. You are automatically placed in MOVE PIECES mode at the beginning of each
turn, and automatically switched to VIEW PIECES mode when “end of turn” is flashing. Toggle
between the modes by pressing the Vkey (or selecting your choice on the VIEW menu).
You cannot switch to MOVE PIECES mode unless there are units still waiting to move.
Of course, you can simply click on a map square to center the MAP window there. If you
want to move a long distance, you can use the ZOOM buttons to increase the acreage shown
in the window, or click on the WORLD window.
If your cursor is over a unit, stack of units, or city square in VIEW PIECES mode, you can
press the ACTIVATE UNIT
more than one unit, a pop-up box allows you to choose among them. If the active unit in
OVE PIECES mode happens to be standing in a city, the ACTIVATE UNIT key also works to
M
activate any fellow units in the city, without opening the CITY DISPLAY.
key to activate some or all of the units in that square. If there is
A
86
Page 98

MOVEMENT RESTRICTIONS
Most of the restrictions placed on unit movement are a matter of common sense, as we
mentioned earlier. We’re spelling them all out here, in case you try to order a unit
somewhere that seems possible and the game won’t let you do it.
GROUND UNITS
Ground units (all non-ship and non-air units) normally move only on land. To traverse the
wide (or narrow) oceans or even to get across lakes, they must board naval transport. Not
all ships take passengers; see Naval Units under Mobile Units for a list of those that do.
Boarding a ship uses up all a unit’s movement points for the turn and puts it to sleep.
If you attempt to move a naval unit into a land square that does not contain a port city,
any passengers are offered the option to MAKE LANDFALL and disembark. If a naval unit
carrying ground troops makes port, all passengers automatically wake up.
NAVAL UNITS
Ships normally move only on the ocean, although they can also sail across inland lakes.
Ships cannot navigate rivers, deltas, or swamps in the game, though of course some do in
real life. Instead, river navigation is represented by the reduced movement point cost for
ground units following riverbeds. City squares that touch a shoreline along one side or at
one corner are the only “land” squares that ships can enter — here they make port. Making
port costs one movement point.
AIR UNITS
Air units can cross both land and sea squares at a cost of one movement point per square,
but they must land in a friendly city, at an Airbase, or on a Carrier unit to refuel every turn
or two. Though planes can sometimes fly above rival ground units in real life without
causing an incident, they are always required to encounter enemy ground units that they
overfly in Civilization II. To avoid attacking rival units by accident, carefully guide your
planes around them. Air units have the advantage in maneuverability. Neither ground nor
ship units can attack air units that appear “next to them” because of the disparate vertical
locations. The one exception is the Diplomat or Spy unit’s ability to bribe adjacent units
into switching sides. See Diplomats & Spies below.
Movement
Terrain &
87
Page 99

ZONES OF CONTROL
Ground units cannot move directly from one square adjacent to an enemy army or city to
another such square. The squares that surround a unit are in that unit’s zone of control —
the same holds true for a city. Neither ground troops nor Settlers units can move directly
from one rival’s zone of control into another square within a rival’s zone of control. The
prohibited square might be adjacent to the first enemy army, to another army (even one
from a different civilization), or to any enemy city. Ground units can only move into such
a controlled square if a friendly unit or city already occupies the square, or if you have
formed an alliance with a rival player (which we’ll explain fully in Diplomacy).
Enemy Army
Friendly Army
Enemy City
Friendly City
Movement Restrictions Diagram
1. X moves are OK if those squares already contain an army from your civilization.
2. Movement restrictions do not apply to ships, air units, diplomats, and caravans.
Some units have special abilities which allow them to ignore zones of control. Air units
have the whole sky in which to maneuver; naval units have the open sea. Diplomats and
Spies use social convention and diplomatic immunity with equal aplomb, and Caravans
and Freight units can argue neutrality and engineer special deliveries. Partisans use
intimate knowledge of the local terrain to good effect. Explorers’ solitary nature and
singleness of purpose get them out of tight places, and Engineers’ training includes
techniques to infiltrate and bypass enemy positions. The Movement Restrictions diagram
offers a graphic representation of a unit confronted by enemy zones of control.
88
X
Y
Moves not allowed
Moves allowed
Page 100

The major dynamic of change throughout the history of civilization has been the continuing
advance and accumulation of knowledge. As humankind progressed by fits and starts
through the ages, civilizations rose and fell, their success or failure due to what knowledge
they acquired and how they employed it.
Those who first acquire new knowledge are often able to employ it to build a more
powerful position, but there are many cases of civilizations that obtained some new
invention first, then failed to use it to their advantage. The pace at which a society
develops and implements new knowledge depends on many factors, including its
social organization, economic organization, geographic location,
leadership, and competition.
The concept of progress being not only inevitable, but
even a good thing is a relatively recent phenomenon. Only
in the last several hundred years have we actively studied
history and considered the evidence of the historical record. For
most of human history, the pace of progress was so slow as to be
barely detectable but since the Industrial Revolution, the pace of advance and change has
dramatically increased. Rapid change is now considered normal. For much of the world, new
discoveries are continually expected and are not a surprise.
89
advances
Civilization
 Loading...