


FFED3005LWB
Frigidaire FFED3005LWB, FFED3015LWA, FFES3025LWD, FFES3025LWC, FFES3025LWB Owner’s Manual
...
TABLE OF CONTENTS
Welcome&CongratUlations ..... e_ng _en Controls
Important Safety Instructions... :i !:_:i_:_ _ _
Features at a Glance...........................!i]iiii]! _ _ _:__
Surface Cooking .................................................. 9 Care & Cle_ih_: :_i.:.i
Before Setting Surface Controls ............................ 11 Before You Call ........
Setting Surface Controls .............................
Before Setting Oven Controls.,
www.frigidaire.com USA 1-800-944-9044 www.frigidaire.ca Canada 1-800-265-8352
Major Appliance Warranty ....... :_
- Model A ............... 15
PrOdUCtRegiStrati0,
Register Your Product
ThePRODUCT
RE ZSTRATZONCARD
should be filled in completely,
signed and returned to
Electrolux Home Products.
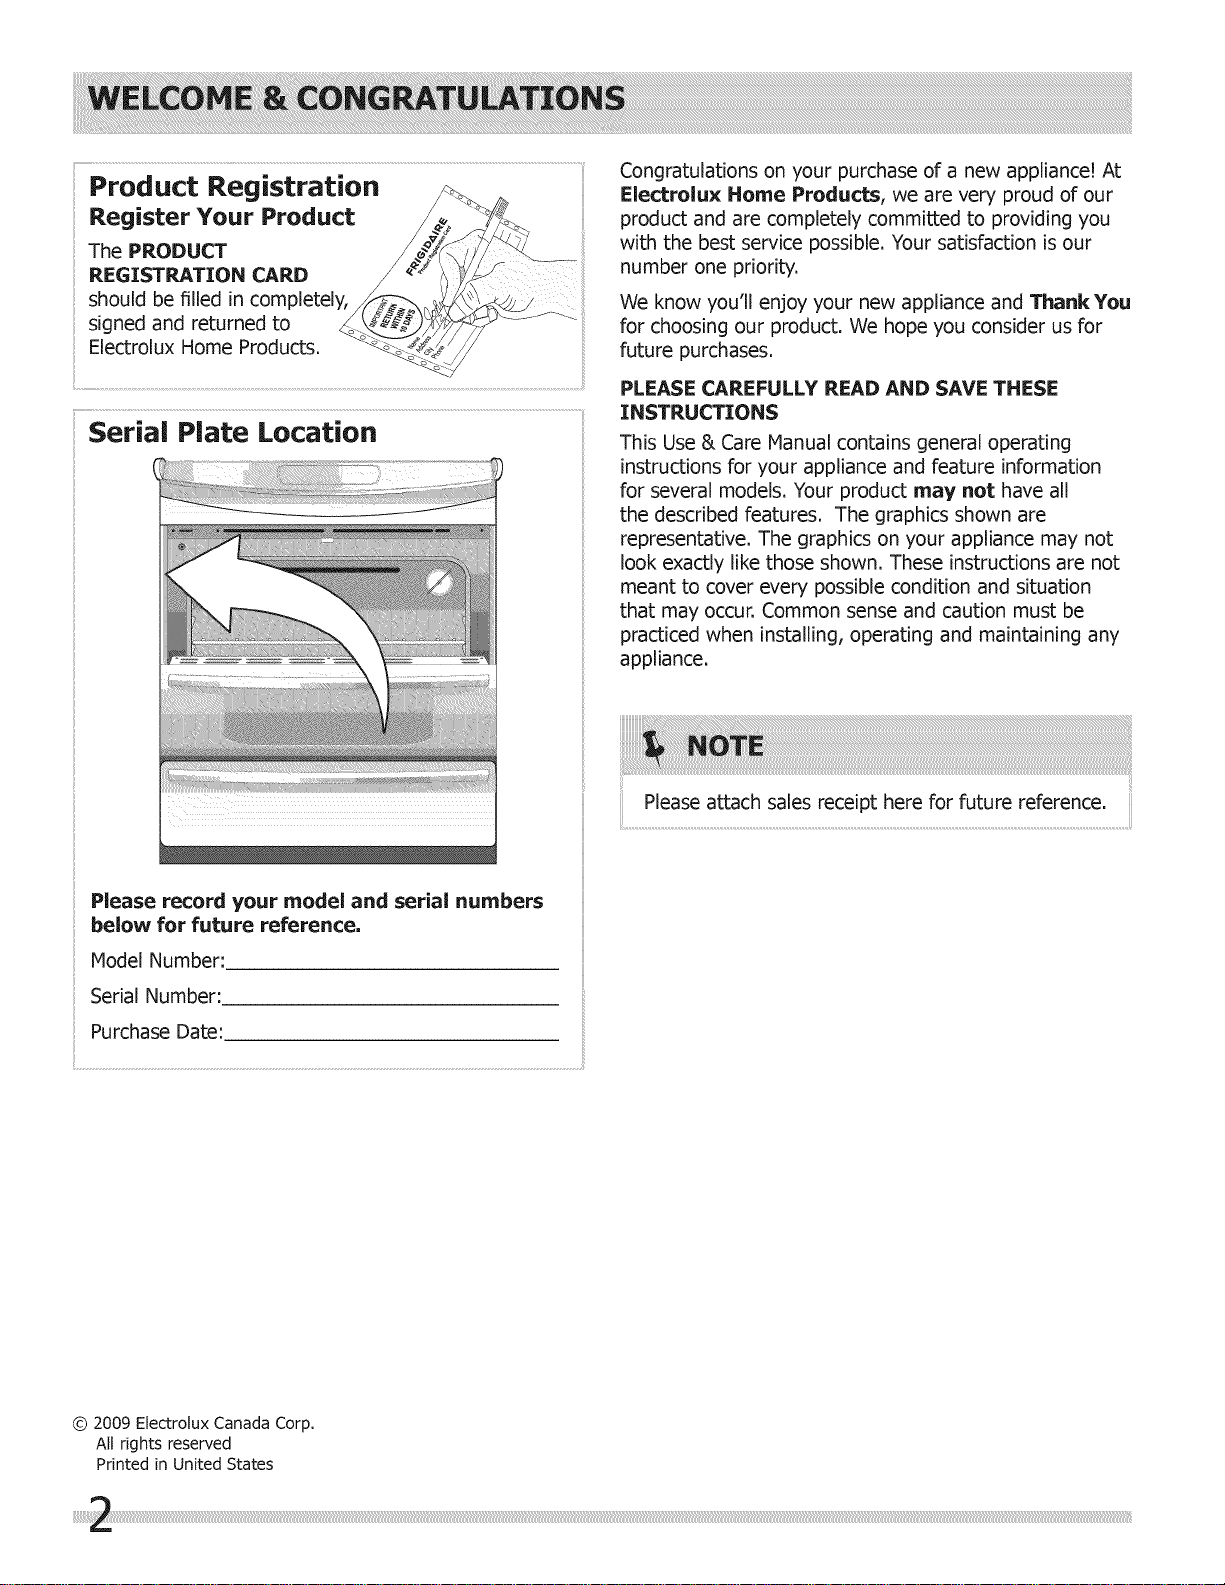
Serial Plate Location
Congratulations on your purchase of a new appliance! At
Electrolux Home Products, we are very proud of our
product and are completely committed to providing you
with the best service possible. Your satisfaction is our
number one priority.
We know you'll enjoy your new appliance and Thank You
for choosing our product. We hope you consider us for
future purchases.
PLEASE CAREFULLY READ AND SAVE THESE
INSTRUCTIONS
This Use & Care Manual contains general operating
instructions for your appliance and feature information
for several models. Your product may not have all
the described features. The graphics shown are
representative. The graphics on your appliance may not
look exactly like those shown. These instructions are not
meant to cover every possible condition and situation
that may occur. Common sense and caution must be
practiced when installing, operating and maintaining any
appliance.
; Please record your model and serial numbers
ii
; below for future reference,
ii
; Model Number:
ii
Serial Number:
Purchase Date:
Please attach sales receipt here for future reference.
© 2009 Electrolux Canada Corp,
All rights reserved
Printed in United States
Read all instructions before using this appliance.
Save these instructions for future reference.
DEFINITIONS
A This is the safety alert symbol. It is used to alert
you to potential personal injury hazards. Obey all safety
messages that follow this symbol to avoid possible injury
or death,
This symbol wifl help alert you to situations
that may cause serious bodily harm, death or
This symbol wifl help alert you to situations that
may cause bodily injury or property damage.
IMPORTANT indicates installation, operation or
maintenance information which is important but not
hazard-related.
edition and local code requirements. Install only
per installation instructions provided in the literature
package for this range.
Ask your dealer to recommend a qualified technician
and an authorized repair service. Know how to
disconnect the electrical power to the appliance at the
circuit breaker or fuse box in case of an emergency.
User Servicing. Do not repair or replace any
part of the appliance unless specifically
recommended in the manuals. All other servicing
should be done only by a qualified technician to
reduce the risk of personal injury and damage to the
appliance.
Never modify or alter the construction of an
appliance by removing leveling legs, panels, wire
covers, anti=tip brackets/screws, or any other
part of the product.
Stepping, leaning, sitting or pulling down on the
door or the drawer of this appliance can result
in serious injuries and also cause damage to the
appliance. Do not allow children to climb or play around
the appliance. The weight of a child on an open door may
causethe appliance to tip, resulting inserious burns or other
injury. An open drawer when hot may cause burns.
o All appliance can tip.
• Injury to persons could result.
• Install anti=tip bracket packed with
your appliance.
= See Installation Instructions.
To reduce the risk of tipping, the
appliance must be secured by properly
installed anti=tip bracket or anti=tip
screws provided with the unit. Refer
to the Installation Instructions for
proper anti=tip bracket installation.
• Remove all tape and packaging wrap before using
the appliance. Destroy the carton and plastic
bags after unpacking the appliance. Never allow
children to play with packaging material. Do not remove
the wiring label and other literature attached to the
appliance. Do not remove model/serial number plate.
= Proper Installation. Be sure your appliance is
properly installed and grounded by a qualified
technician in accordance in the United States
with the National Electrical Code ANSI/NFPA No.
70=latest edition, and local code requirements,
and in Canada with CSA C22.1 PART 1-latest
Do not use the oven or warm & serve drawer (if
Storage in or on Appliance. Flammable materials
should not be stored in an oven, near surface
burners or in the warm & serve drawer (if
equipped). This includes paper, plastic and cloth
items, such as cookbooks, plastic ware and towels, as
well as flammable liquids. Do not store explosives, such
as aerosol cans, on or near the appliance. Flammable
materials may explode and result in fire or property
damage.
Do not store items of interest to children in the
cabinets above the appliance. Children climbing on
the cooktop to reach items could be seriously injured.
• Do not leave children alone. Children should not
be left alone or unattended in the area where an
appliance is in use. They should never be allowed to
sit or stand on any part of the appliance.
• DO NOT TOUCH SURFACE UNITS, AREAS NEAR
THESE UNITS, OVEN HEATING ELEMENTS OR
INTERIOR SURFACES OF THE OVEN. Both surface
units and oven heating elements may be hot even
though they are dark in color. Areas near surface
units may become hot enough to cause burns. During
and after use, do not touch, or let clothing or other
flammable materials touch these areas until they have
had sufficient time to cool. Among these areas are the
cooktop, surfaces facing the cooktop, the oven vent
openings and surfaces near these openings, oven door
and window.
• Wear Proper Apparel. Loose-fitting or hanging
garments should never be worn while using the
appliance. Do not let clothing or other flammable
materials contact hot surfaces.
NEVER use your appliance as a space heater to
heat or warm the room.
• Do Not Use Water or Flour on Grease Fires.
Smother the fire with a pan lid, or use baking
soda, a dry chemical or foam=type extinguisher.
• When heating fat or grease, watch it closely. Fat
or grease may catch fire if allowed to become too hot.
• Use Only Dry Pot holders. Moist or damp pot
holders on hot surfaces may result in burns from
steam, Do not let the pot holders touch hot surface
units. Do not use a towel or other bulky cloth instead of
a pot holder.
• Do Not Heat Unopened Food Containers. Buildup
of pressure may cause the container to burst and
result in injury.
• Remove the oven door from any unused
appliance if it is to be stored or discarded.
Electronic controllers can be damaged by cold
temperatures. When you use your appliance for
the first time, or if it has not been used for a long
period of time, make sure that it has been exposed
to a temperature above 00C/320F for at least 3
hours before connecting it to the power supply.
IMPORTANT INSTRUCTIONS FOR USING
YOUR COOKTOP
• Know which knob controls each surface heating
unit. Place pan of food on the element before turning
it on, and turn the element off before removing the
pan.
• Use Proper Pan Size--This appliance is equipped with
one or more surface burners of different sizes. Select
utensils having flat bottoms large enough to cover the
surface unit. The use of undersized utensils will expose
a portion of surface heating unit to direct contact and
may result in ignition of clothing. Proper relationship of
utensil to the surface will also improve efficiency.
= Utensil Handles Should Be Turned Inward
and Should Not Extend Over Adjacent Surface
Units--To reducethe riskofburns, ignitionof
flammable materials, and spillage due to unintentional
contact with the utensil. The handle of the utensil
should be positioned so that it is turned inward, and
does not extend over adjacent surface unit.
• Never Leave Surface Units UnattendedIBoilovers
cause smoking and greasy spillovers that may ignite, or
a pan that has boiled dry may melt.
• Protective Liners--Do not use aluminum foil to line
oven bottom or any other part of the appliance. Only
use aluminum as recommended for baking if used as a
cover placed on the food. Any other used of protective
liners or aluminum foil may result in a risk of electric
shock or fire or a short circuit.
Do not attempt to operate the appliance during a
power failure. If the power fails, always turn off
the unit. If the unit is not turned off and the power
resumes, the appliance will not operate and an error
message will be displayed. Once the power resumes,
reset the clock and the oven function.
• Glazed Cooking Utensils--Onlycertaintypesofglass,
glass/ceramic,ceramic,earthenware,orotherglazed
utensilsaresuitableforcooktopservicewithoutbreaking
due tothesudden changeintemperature.Checkthe
manufacturer'srecommendationsforcooktopuse.
• Do Not Use Decorative Surface Burner Covers.
If an element is accidentally turned on, the decorative
cover will become hot and possibly melt. Burns will
occur if the hot covers are touched. Damage may also
be done to the cooktop.
FOR COOKTOPS WITH COIL ELEMENTS ONLY
• Do Not Immerse or Soak Removable Surface
HeatingElements. Surface heating elements should
never be immerse in water. Heating elements clean
themselves during normal operation.
• Make Sure Drip Pans or Drip Bowls Are in Place.
Absence of these pans or bowls during cooking may
subject wiring or components underneath to damage.
FOR GLASS COOKTOP ONLY
• Do Not Clean or Operate a Broken Cooktop-- If
cooktop should break, cleaning solutions and spillovers
may penetrate the broken cooktop and create a
risk of electric shock. Contact a qualified technician
immediately.
• Clean Cooktop Glass with Caution-- If a wet
sponge or cloth is used to wipe spills on a hot cooking
area, be carefu! to avoid a steam burn. Some cleaners
can produce harmful fumes if applied to a hot surface.
• Avoid Scratching the Cooktop Glass with Sharp
Objects.
IMPORTANT SAFETY INSTRUCTIONS FOR
USING YOUR OVEN
• Use Care When Opening Oven Door--Stand to the
side of the appliance when opening the door/drawer of
a hot appliance. Let hot air or steam escape before you
remove or replace food in the oven/drawer.
• Keep Oven Vent Ducts Unobstructed. The oven is
vented at the front above the oven door. Touching the
surfaces in this area when the oven is operating may
cause severe burns. Also, do not place plastic or heat=
sensitive items on or near the oven vent. These items
could melt or ignite.
NEVER cover any slots, holes or passages in
the oven bottom or cover an entire rack with
materials such as aluminum foil. Doing so blocks
air flow through the oven and may cause carbon
monoxide poisoning. Aluminum foil linings may trap
heat, causing a fire hazard.
• Do not use a broiler pan without its insert. Broiler
pan and grid allow dripping fat to drain and be kept
away from the high heat of the broiler.
• Do not cover the broiler grid or oven bottom
with aluminum foil, Exposed fat and grease could
ignite.
• Do not touch a hot oven light bulb with a damp
cloth. Doing so could cause the bulb to break.
Disconnect the appliance or shut off the power to the
appliance before removing and replacing the bulb.
IIvIPORTANT SAFETY INSTRUCTIONS FOR
CLEANING YOUR OVEN
• Clean the appliance regularly to keep all parts
free of grease that could catch fire. Exhaust fan
ventilation hoods and grease filters should be kept
clean. Do not allow grease to accumulate. Greasy
deposits in the fan could catch fire. Refer to the hood
manufacturer's instructionsfor cleaning.
• Cleaners/Aerosols--Always follow the manufacturer's
recommended directions for use. Be aware that excess
residue from cleaners and aerosols may ignite causing
damage and/or injury.
FOR SELF-CLEANING OVEN
• Clean in the self-cleaning cycle only the parts of
the appliance listed in this Owner's Guide. Before
using the self-cleaning cycle of the appliance, remove
all utensils stored in the appliance.
• Do not clean the oven door gasket. The door
gasket is essential for a good sea!. Care should be
taken not to rub, damage or move the gasket.
• Do not use oven cleaners. No oven cleaner or oven
liner protective coating of any kind should be used in or
around any part of the appliance.
• Remove oven racks, Oven racks color will change if
left in the oven during a self-cleaning cycle.
The health of some birds is extremely sensitive to the
fumes given off during the self-clean cycle of any wall
oven. Hove birds to another well ventilated room.
• Placement of Oven Racks, Always place oven racks
in desired location while appliance iscool. Remove all
utensils from the rack before removing rack. If rack
must be moved while oven is hot, use extreme caution.
Use pot holders and grasp the rack with both hands to
reposition. Do not let pot holders contact the hot oven
element or interior of the oven.
The California Safe Drinking Water and Toxic
Enforcement Act requires the Governor of California
to publish a list of substances known to the state to
cause cancer, birth defects or other reproductive harm,
and requires businesses to warn customers of potential
......exposure to such SubStances:......................................................................................
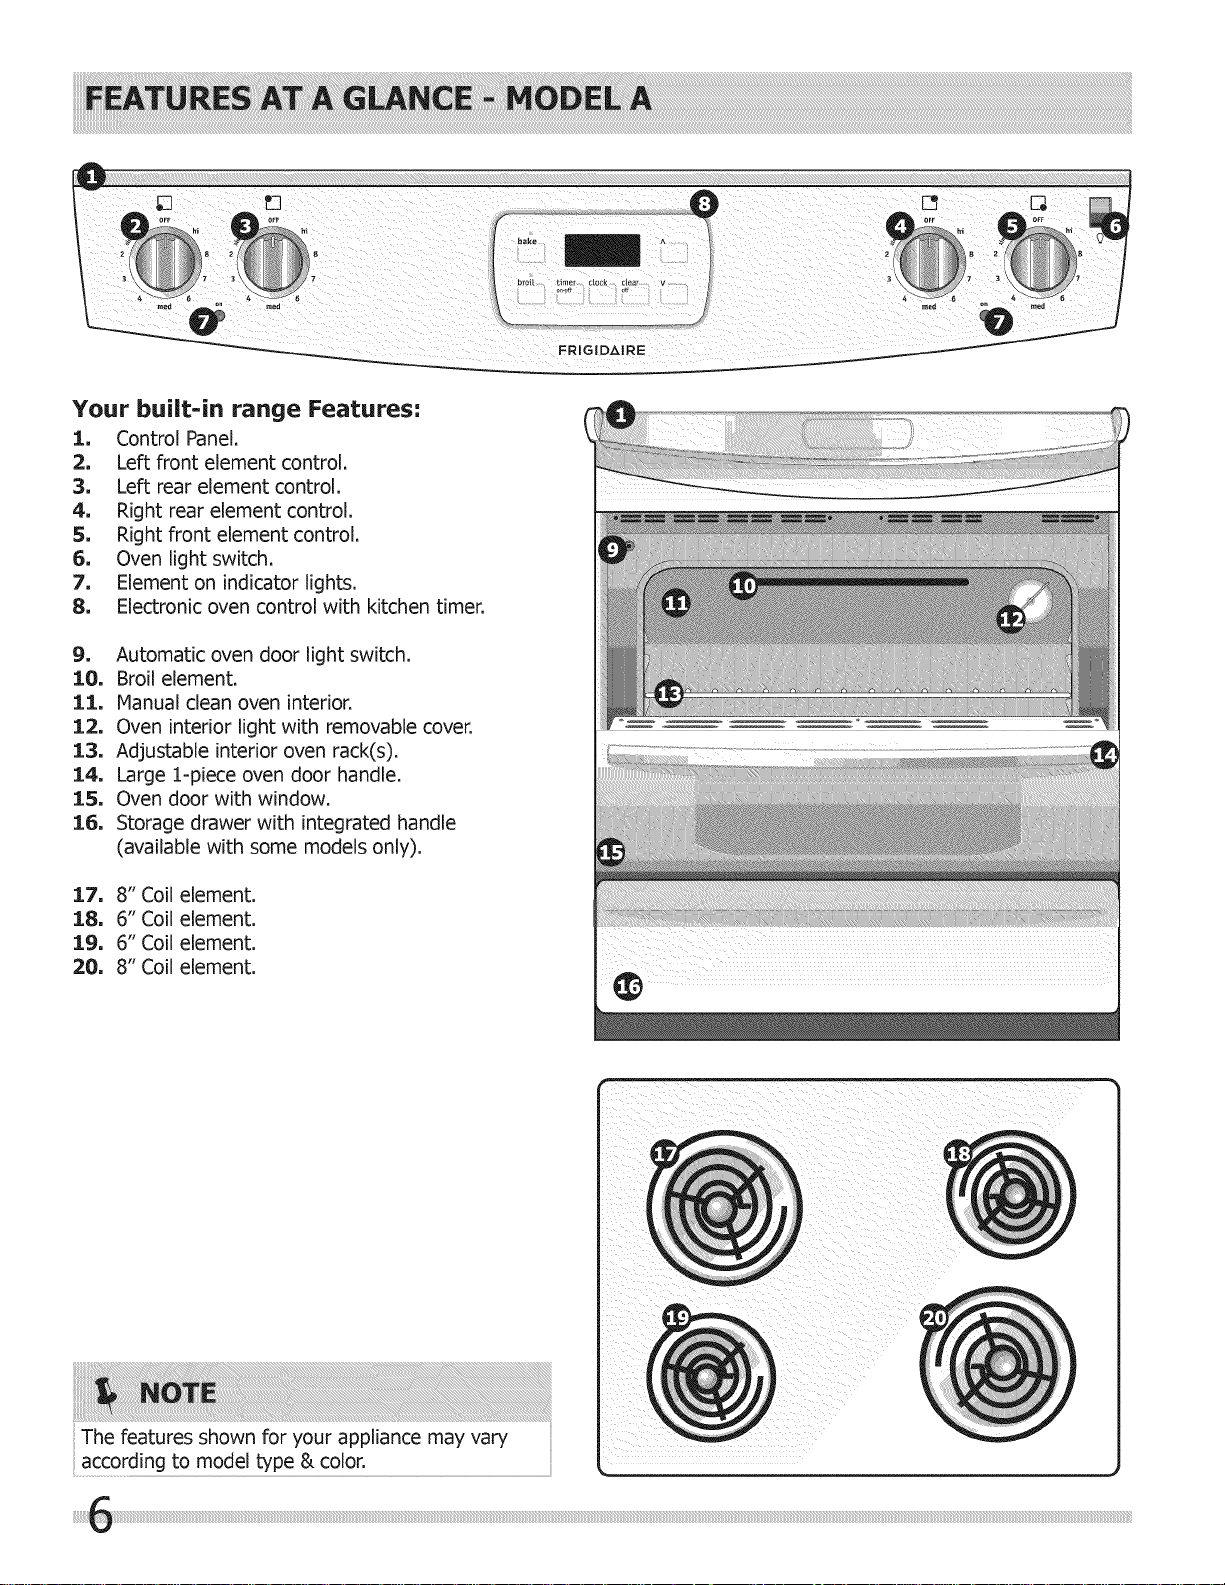
Your built=in range Features:
1, Control Panel.
2. Left front element control.
3, Left rear element control.
4. Right rear element control.
5, Right front element control.
6. Oven light switch.
7. Element on indicator lights.
8. Electronic oven control with kitchen timer.
9, Automatic oven door light switch.
10, Broil element.
11, Manual clean oven interior.
12. Oven interior light with removable cover.
13. Adjustable interior oven rack(s).
14, Large 1-piece oven door handle.
15, Oven door with window.
16, Storage drawer with integrated handle
(available with some models only).
17. 8" Coil element.
18. 6" Coil element.
19, 6" Coil element.
20, 8" Coil element.
(
The features shown for your appliance may vary
according to model type & color,
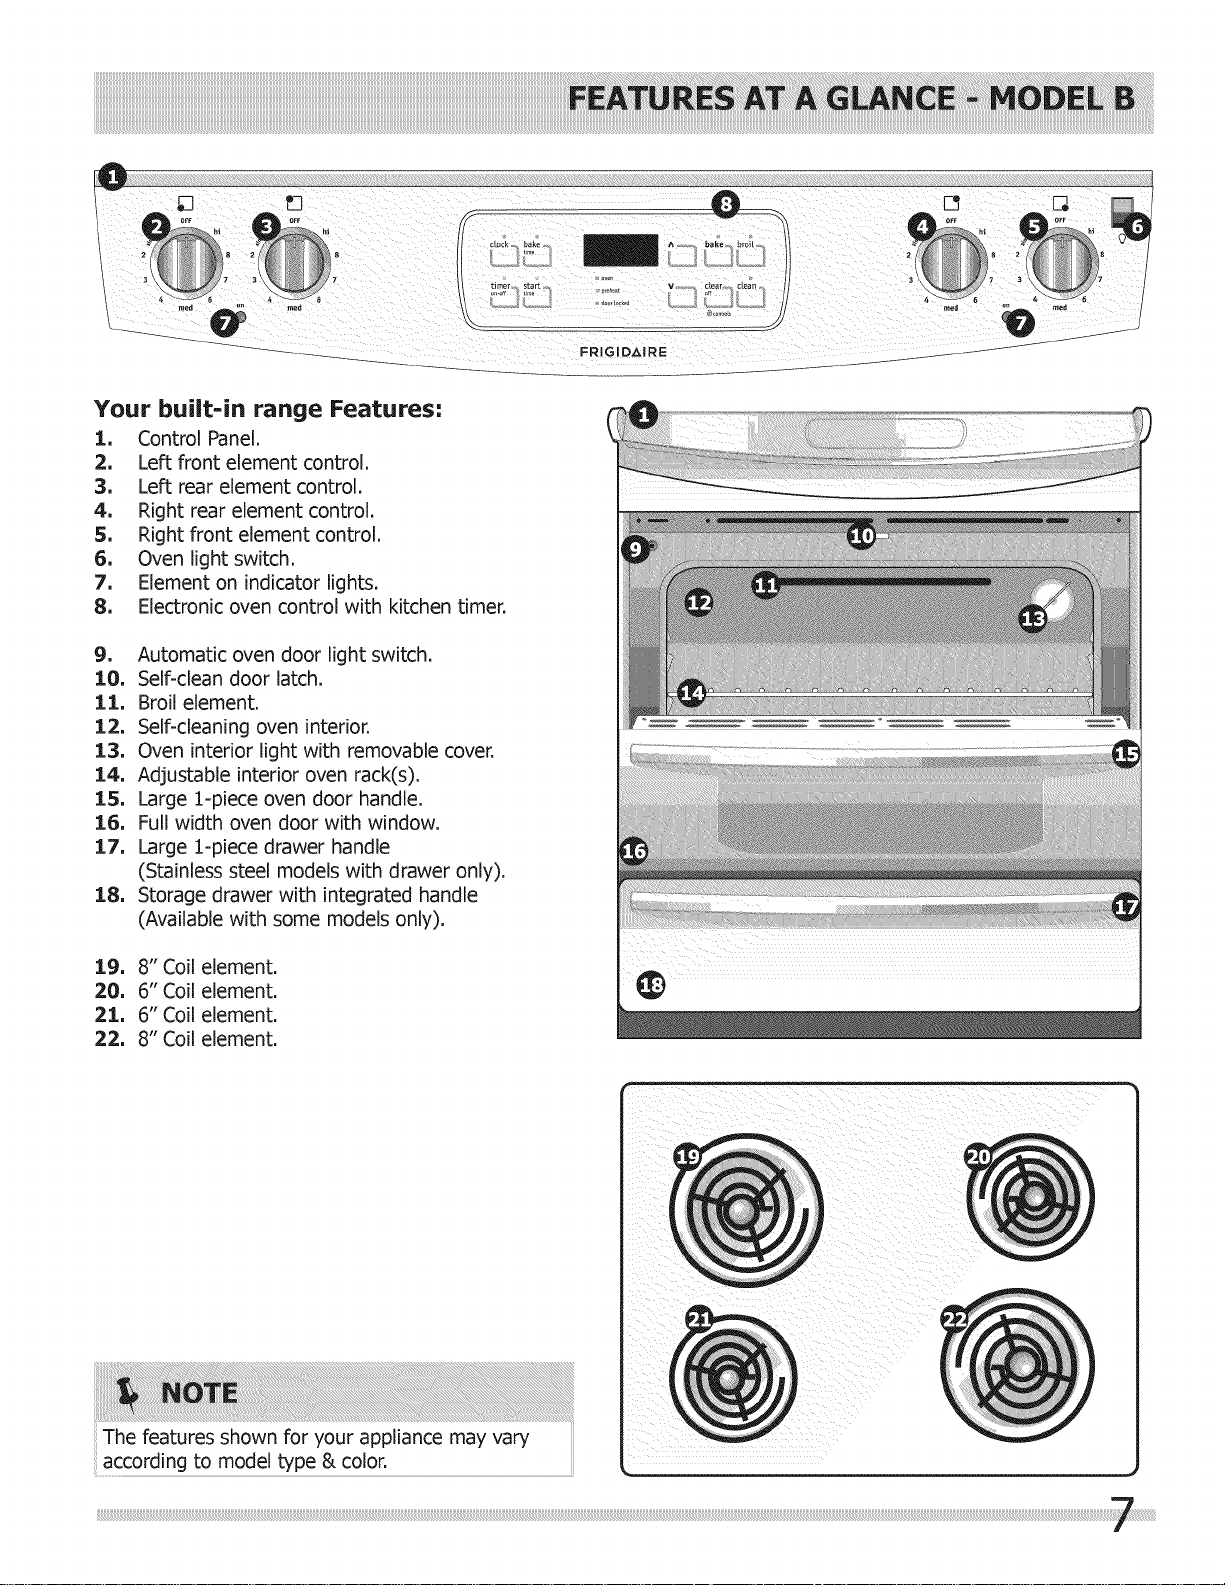
Your built=in range Features:
1, Control Panel.
2, Left front element control.
3, Left rear element control.
4, Right rear element control.
5, Right front element control.
6, Oven light switch.
7, Element on indicator lights.
8, Electronic oven control with kitchen timer.
9, Automatic oven door light switch.
10, Self-clean door latch.
11, Broil element.
12, Self-cleaning oven interior.
13, Oven interior light with removable cover.
14, Adjustable interior oven rack(s).
15, Large 1-piece oven door handle.
16, Fu!l width oven door with window.
17, Large 1-piece drawer handle
(Stainless steel models with drawer only).
18, Storage drawer with integrated handle
(Available with some models only).
19, 8" Coil element.
20, 6" Coil element.
21, 6" Coil element.
22, 8" Coil element.
The features shown for your appliance may vary
according to model type & color.
FRIGIDAIRE
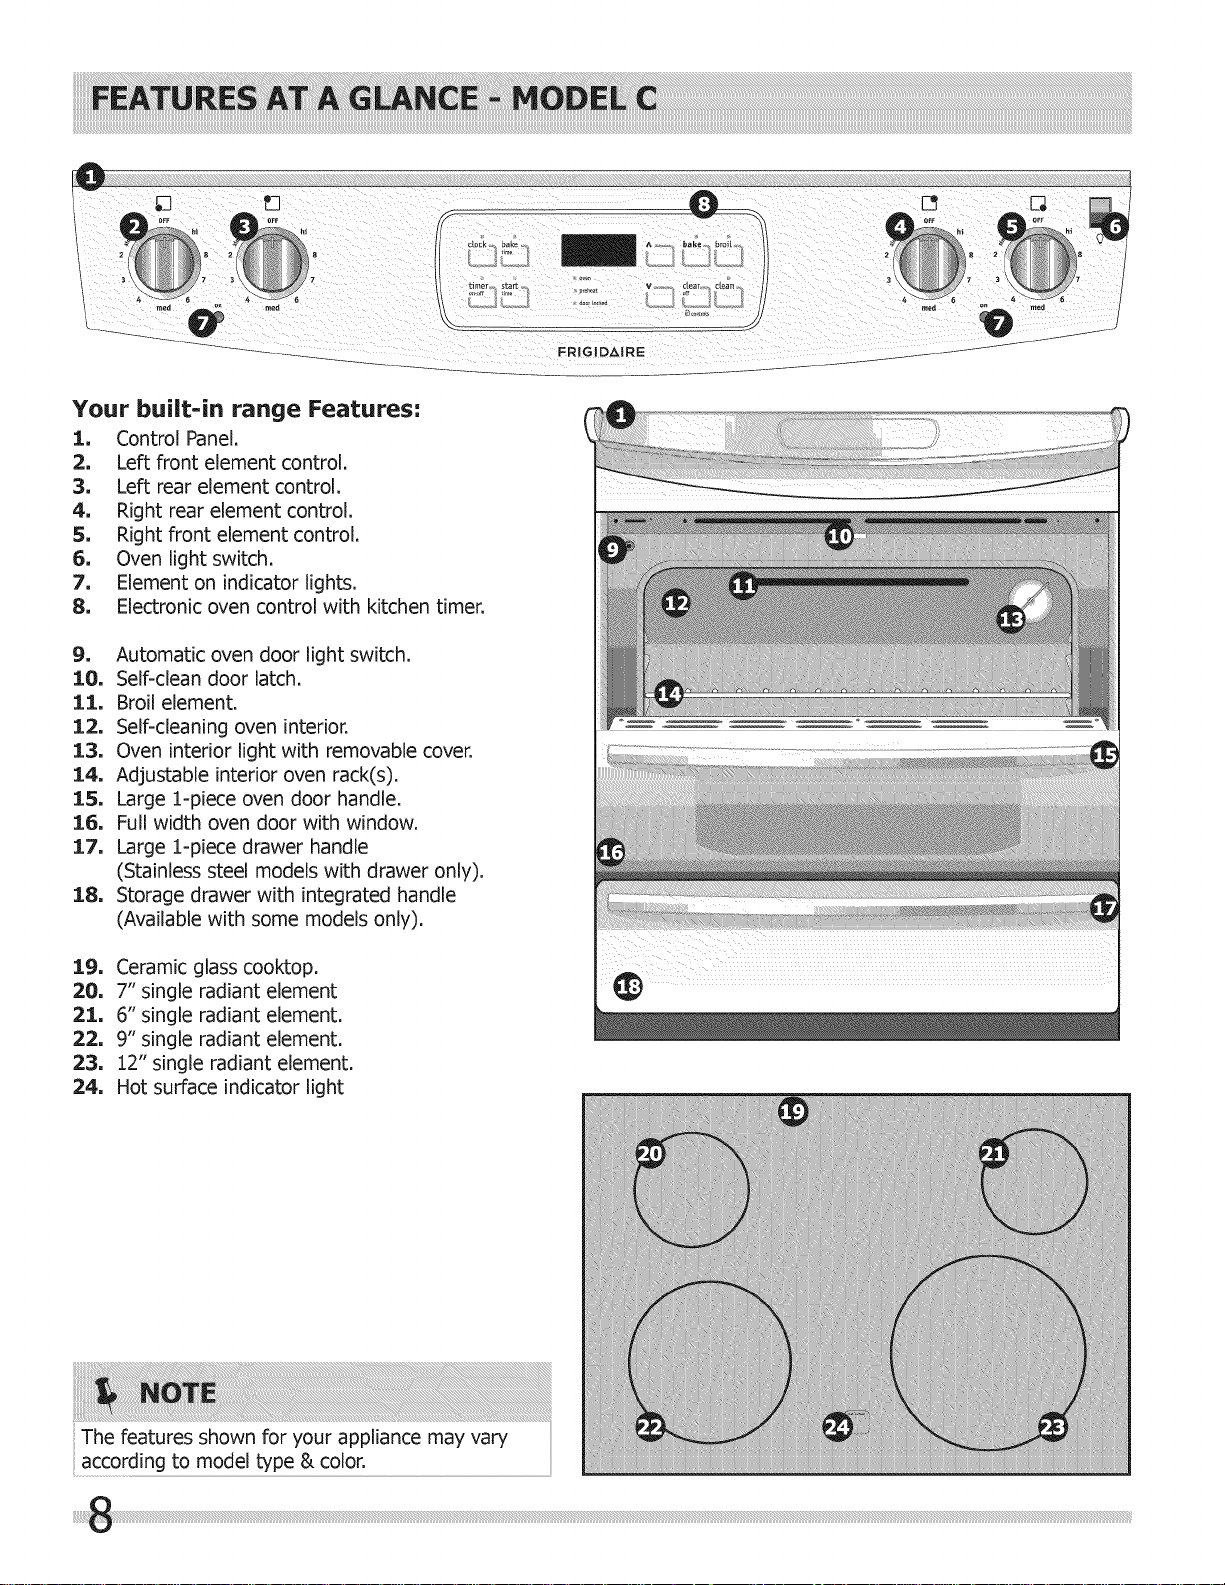
Your built=in range Features:
1, Control Panel.
2, Left front element control.
3, Left rear element control.
4, Right rear element control.
5, Right front element control.
6, Oven light switch.
7, Element on indicator lights.
8, Electronic oven control with kitchen timer.
9, Automatic oven door light switch.
10, Self=clean door latch.
11, Broil element.
12, SeIFdeaning oven interior.
13, Oven interior light with removable cover.
14, Adjustable interior oven rack(s).
15, Large :[-piece oven door handle.
16, Full width oven door with window.
17, Large 1=piece drawer handle
(Stainless steel models with drawer only).
18, Storage drawer with integrated handle
(Available with some models only).
19, Ceramic glass cooktop.
20, 7" single radiant element
21, 6" single radiant element.
2.2, 9" single radiant element.
2.3, 12" single radiant element.
24, Hot surface indicator light
(
The features shown for your appliance may vary
according to model type & color,
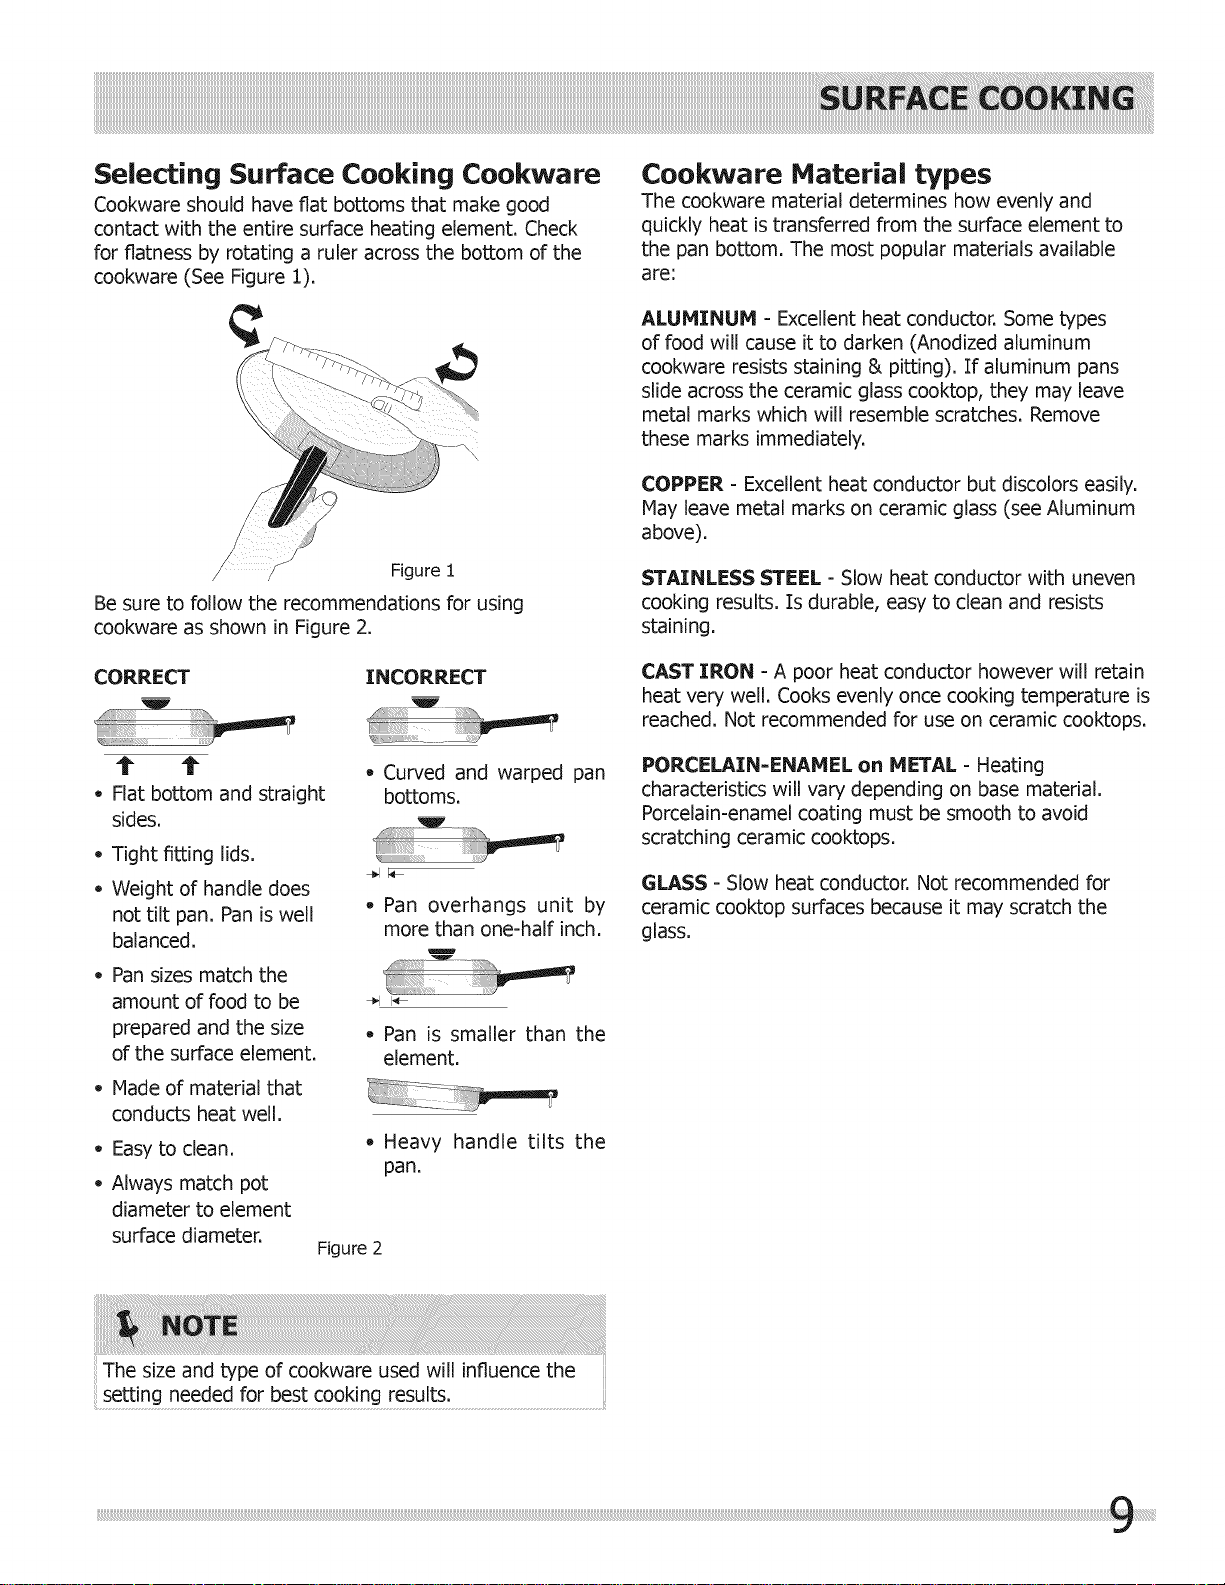
Selecting Surface Cooking Cookware
Cookware should have flat bottoms that make good
contact with the entire surface heating element. Check
for flatness by rotating a ruler across the bottom of the
cookware (See Figure 1).
\
Cookware Haterial types
The cookware material determines how evenly and
quickly heat is transferred from the surface element to
the pan bottom. The most popular materials available
are:
ALUMINUM - Excellent heat conductor. Some types
of food will cause it to darken (Anodized aluminum
cookware resists staining & pitting). If aluminum pans
slide across the ceramic glass cooktop, they may leave
metal marks which will resemble scratches. Remove
these marks immediately.
COPPER - Excellent heat conductor but discolors easily,
Nay leave metal marks on ceramic glass (see Aluminum
above).
Figure 1
Be sure to follow the recommendations for using
cookware as shown in Figure 2.
CORRECT INCORRECT
t" t
,,Flat bottom and straight
,,Curved and warped pan
bottoms.
sides.
,,Tight fitting lids.
- Weight of handle does
44_
not tilt pan. Pan is well
balanced.
Pan sizes match the
amount of food to be
prepared and the size
of the surface element.
Pan overhangs unit by
more than one-half inch.
/2 -':7":',,
÷1
- Pan is smaller than the
element.
,,Made of material that
conducts heat well.
- Easy to clean.
Heavy handle tilts the
pan.
Always match pot
diameter to element
surface diameter,
Figure 2
STAINLESS STEEL - Slow heat conductor with uneven
cooking results. Is durable, easy to clean and resists
staining.
CAST IRON - A poor heat conductor however will retain
heat very well. Cooks evenly once cooking temperature is
reached. Not recommended for use on ceramic cooktops.
PORCELAIN=ENAMEL on HETAL - Heating
characteristics will vary depending on base material.
Porcelain-enamel coating must be smooth to avoid
scratching ceramic cooktops.
GLASS - Slow heat conductor. Not recommended for
ceramic cooktop surfaces because it may scratch the
glass.
The size and type of cookware used will influence the
setting needed for best cooking results.
Specialty Pans & Trivets
Wokswith fiat bottoms suitable for use on your cooktop
are available in most cookshop or hardware stores.
Round-bottomed woks (with a support ring that does
not extend beyond the heating element) may also be
used. The metal ring was designed to support the wok
safely when it is filled with large amounts of liquids (soup
making) or fat (frying).
DO NOT use two elements (if the cooktop isnot equipped
with bridge element) to heat one large pan such as a
roaster or griddle, or allow cooking utensils to boil dry.
The bottom surface of the pan in either of these situations
could cause discoloring or crazing of the porcelain enamel
range surface, and damage to the surface elements and/
or damage to the drip pans (if equipped).
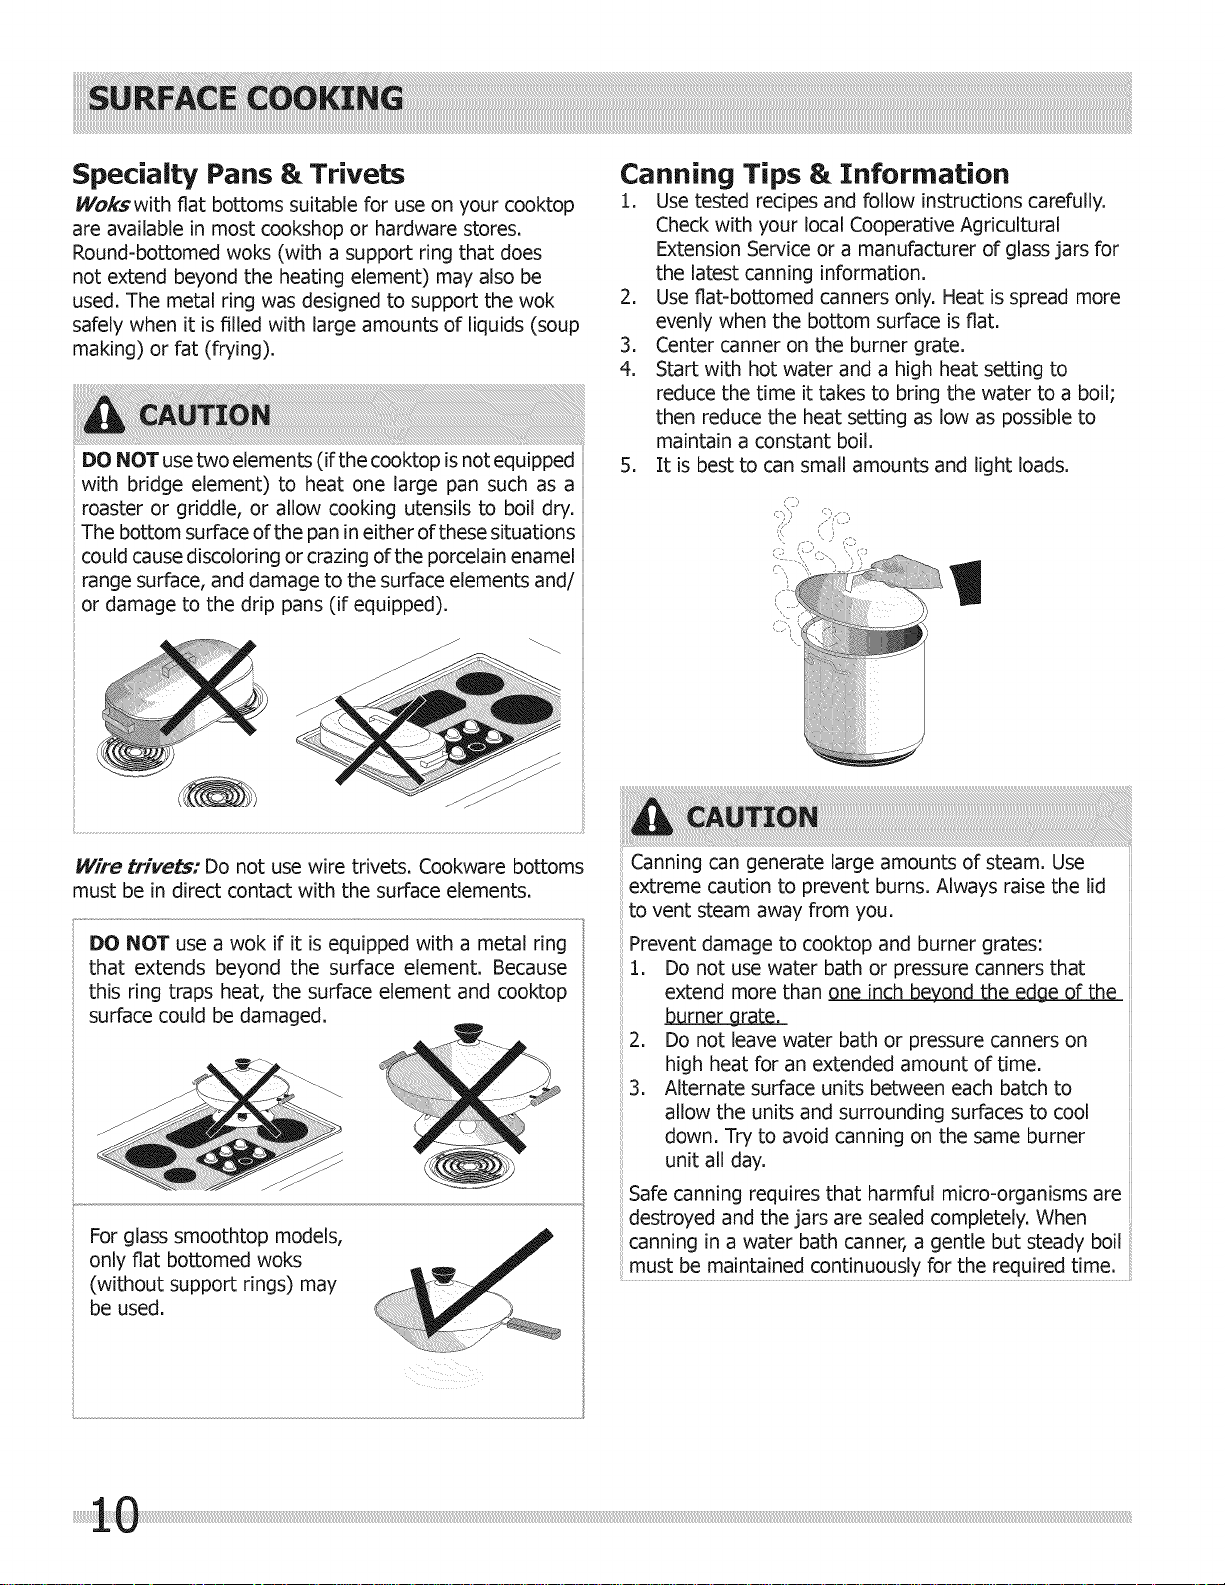
Canning Tips & :Information
1. Use tested recipes and follow instructionscarefu!ly.
Check with your local Cooperative Agricultural
Extension Service or a manufacturer of glass jars for
the latest canning information.
2. Use fiat-bottomed canners only. Heat is spread more
evenly when the bottom surface is flat.
3. Center canner on the burner grate.
4. Start with hot water and a high heat setting to
reduce the time it takes to bring the water to a boil;
then reduce the heat setting as low as possible to
maintain a constant boil.
5. It is best to can small amounts and light loads.
Wire trivets- Do not use wire trivets. Cookware bottoms
must be in direct contact with the surface elements.
DO NOT use a wok if it is equipped with a metal ring
that extends beyond the surface element. Because
this ring traps heat, the surface element and cooktop
surface could be damaged.
Forglass smoothtop models,
only fiat bottomed woks
(without support rings) may
be used.
Canning can generate large amounts of steam. Use
extreme caution to prevent burns. Always raise the lid
to vent steam away from you.
Prevent damage to cooktop and burner grates:
1. Do not use water bath or pressure canners that
extend more than one inch beyond the edge of the
burner grate.
2. Do not leave water bath or pressure canners on
high heat for an extended amount of time.
3. Alternate surface units between each batch to
allow the units and surrounding surfaces to coo!
down. Try to avoid canning on the same burner
unit all day.
Safe canning requires that harmful micro-organisms are
destroyed and the jars are sealed completely. When
canning in a water bath canner, a gentle but steady boil
must be maintained cont!nuous!y for the required time- .........
 Loading...