


All about the
Use&Care
of your Dehumidifier
T A B L E O F C O N T E N T S
Important Safety Instructions............................... |
2 |
Care And Cleaning............................................... |
9 |
Location.............................................................. |
3 |
Storage .............................................................. |
9 |
How It Works ...................................................... |
3 |
Normal Sounds ................................................... |
9 |
Dehumidifier Features.......................................... |
4 |
Before You Call ................................................... |
10 |
Operating Instructions......................................... |
4-8 |
Major Appliance Limited Warranty ........................ |
11 |
www.frigidaire.com USA 1-800-944-9044 |
www.frigidaire.ca Canada 1-800-265-8352 |
16120100A12518

Important Safety Instructions
NOTE:
This USE & CARE MANUAL provides specific operating instructions for your model. Use the dehumidifier only as instructed in this USE & CARE MANUAL. These instructions are not meant to cover every possible condition and situation that may occur. Common sense and caution must be practiced when installing, operating, and maintaining any appliance.
 WARNING
Avoid fire hazard or electric shock. Do not use an extension cord or an adaptor plug. Do not remove any prong from the power cord.
Grounding type wall
receptacle
Do not, under any circumstances, cut, remove, or bypass the grounding prong.
Power supply cord with 3-prong grounding plug
 WARNING
For Your Safety
Do not store or use gasoline or other flammable vapors and liquids in the vicinity of this or any other appliance. Read product labels for flammability and other warnings.
Discard water from bucket. Water is not potable and cannot be used for drinking.
 WARNING
Electrical Information
For your safety and protection, this dehumidifier is equipped with a three-prong grounding plug on the power cord. Do not, under any circumstances, cut or remove the round ground prong from the plug.
Your dehumidifier must be plugged directly into a properly grounded and polarized three-prong receptacle. lf the wall receptacle you intend to use will not accept a three-prong plug, or if you are not sure the outlet is adequately grounded or protected by a time delay fuse or circuit breaker, have a qualified electrician install the proper outlet
according to the National Electrical Code and applicable local codes and ordinances. Do not use an extension cord or an adapter plug.
Never unplug the dehumidifier by pulling on the power cord. Always grip the plug firmly and pull straight out from the receptacle.
Do not pinch, bend, or knot the power cord.
 WARNING
Child Safety Precautions
•Destroy the carton, plastic bags, and any packing materials immediately after the dehumidifier is unpacked. Children should never use these items for play.
•Do not leave children unattended in an area where the appliance is operating. Do not allow them to sit or stand on the appliance.
•This appliance is not intended for use by persons (including children) with reduced physical, sensory or mental capabilities or lack of experience and knowledge, unless they have been given supervision or instruction concerning use of the appliance by a person responsible for their safety.
•Children should be supervised to ensure that they do not play with the appliance.
 SAFETY PRECAUTIONS
DANGER! Avoid Serious Injury or Death
This dehumidifier contains no user-serviceable parts. Always call an authorized Electrolux servicer for repairs. Do not insert or place fingers or objects into the air discharge area or back grille of the unit.
Do not start or stop the dehumidifier by unplugging the power cord or turning off the power at the electrical box. Do not cut or damage the power cord. Do not pull on the power cord.
If the power cord is damaged, it should only be replaced by an authorized Electrolux servicer.
In the event of a malfunction (sparks, burning smell, etc.), immediately stop the operation, disconnect the power cord, and call an authorized Electrolux servicer.
Do not operate the dehumidifier with wet hands. Do not drink any water from the dehumidifier.
If the supply cord is damaged, it must be replaced by the manufacturer, its service agent or similarly qualified persons in order to avoid a hazard. The appliance shall be installed in accordance with national wiring regulations.
 SAFETY PRECAUTIONS
CAUTION! Avoid Injury or damage to the unit or other property
Do not direct airflow at fireplaces or other heat related sources as this could cause flare ups. Do not climb on or place objects on the unit. Do not hang objects off the unit.
Do not place containers with liquids on the unit.
Turn off the dehumidifier at the power source when it will not be used for an extended period of time. Operate the unit with air filter in place.
Do not block or cover the intake grille, discharge area and outlet ports.
Ensure that any electrical/electronic equipment is one yard away from the unit. Do not use or store flammable gases near the unit.
2 |
2019 Electrolux Home Products, Inc. |
All rights reserved. |
|
|
|
|
|

Location & How It Works
Location |
12" |
12" |
12" |
Selecting a Location
IMPORTANT:
1.Dehumidifier must be operated in an enclosed area to be most effective. Close all doors, windows, and other outside openings to the room. The effectiveness of the dehumidifier depends on the rate at which new moisture-laden air enters the room.
2.Place dehumidifier in a location that does not restrict the airflow of the air intake and air outlet.
3.A dehumidifier operating in a basement will have little or no effect in drying an adjacent enclosed storage area, such as a closet, unless there is adequate circulation of air in and out of the area. lt may be necessary to install a second dehumidifier in the enclosed area for satisfactory drying.
4.The dehumidifier must be installed on a level floor that will support it with a full bucket of water.
5.There should be a minimum of 12 inches clearance around the dehumidifier. The unit will produce heat while in operation and should not be operated in an enclosed small space like a closet.
How It Works
When the unit is started, the fan begins to pull moisture-laden air across the dehumidifying coils. The coils condense or draw moisture from the air, and air flows through the air outlet louvers into the room as dry, warm air. Moisture removed from air is collected in a bucket on the front of the dehumidifier.
The unit is designed to operate between 41 °F (5 °C), and 89 °F (32 °C). The unit will not work properly if the temperature is out of this temperature range, or the performance of the unit will fall greatly.
The "Compressor" circuit has an automatic 3 minute time delayed start if the unit is turned off and on quickly. This prevents overheating of the compressor and possible circuit breaker tripping.
Make sure the tank is fitted correctly otherwise unit will not turn on.
Wiring Diagram
16020100001654 |
Notes: Display and Fan's conntors must be match the actual indicates. |
|
|
|
|
|
|
|
BLUE |
|
|
TOP |
M |
|
CN5 |
DISPLAY |
|
|
|
FAN |
|
|
|
STEP |
|
|
||||
|
|
|
|
|
|
|
|
|
BOARD |
|||
Notes: |
CAPACITOR |
BROWN |
FAN |
TOUCH/LIGHT |
|
CN11 |
CN10 |
|||||
|
|
|
PANEL |
|
|
|
||||||
This symbol |
|
OPTIONAL |
|
Y/G |
|
|
|
WIFI |
|
|
CN12 (or CN13) |
|
indicates |
PUMPRED |
|
|
|
|
|
|
|
|
|
|
|
CN2 |
CN1 |
|
|
|
|
|
|
|
|
|
||
the element |
BLACK(or BLUE) |
DC POWER |
|
|
|
|
|
|
|
|
|
|
BOARD |
|
BLACK(orBLUE) |
|
|
|
|
|
|
|
|||
is optional, |
|
|
|
|
|
|
WATER PIPE |
HUMI. |
WIFI |
SWITCH |
SWITCH |
|
|
|
|
RED |
WHITE |
|
SWITCHTEMP. SENSOR |
||||||
the actual |
|
|
|
|
|
|
|
|
|
|||
shape shall |
|
|
|
|
|
|
|
|
|
|||
prevail |
Y/G |
ION |
RED |
|
|
P4 |
|
|
|
|
|
|
BLUE |
|
|
BLACK |
|
|
CN4 |
CN3 CN2 |
CN1 |
CN10 |
CN7 |
CN6B |
|
|
|
|
|
|
P9 |
|||||||
COMP. |
|
|
|
|
||||||||
|
|
|
|
|
|
|
|
|
|
|||
BLUE |
M |
M |
|
|
|
P6 |
MAIN BOARD CN5 |
|
||||
BLACK |
|
|
|
|
|
|||||||
S~ |
|
|
|
|
|
|||||||
|
|
C |
Y/G |
|
|
P10 |
|
(or CN6/CN6A/CN6B/CN6C/CN10) |
||||
COMP. |
OverLoad |
|
|
|
|
|
|
|
|
|
||
|
|
|
|
|
|
|
|
|
|
|
||
CAPACITOR |
Protector |
|
|
|
|
P7 |
P2 |
P1 |
CN14 |
|
|
CN15 |
WHITE(OR BLUE OR BLACK)(N) |
|
|
|
|
|
|
||||||
|
|
|
|
P8 |
|
|
1 3 |
|
|
1 2 |
||
Y/G(or GREEN) |
|
|
|
|
RED |
|
|
|
|
|
|
|
POWER |
|
|
|
|
|
|
|
|
3 POWER |
1 |
||
BLACK(OR BROWN OR RED)(L) |
|
|
|
|
||||||||
|
|
|
|
|
1 BOARD |
2 |
||||||
|
|
|
|
|
|
|
|
|
|
CN1 |
CN2 |
|
2019 Electrolux Home Products, Inc. |
All rights reserved. |
3 |
|
|
|
|
|
|
|
|
|
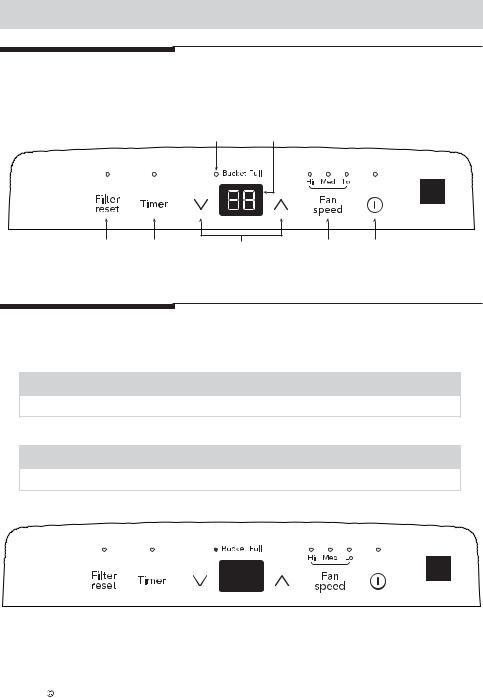
Dehumidifier Features & Operating Instructions
Dehumidifier Features |
ELECTRONIC CONTROL |
|
|
Before you begin, thoroughly familiarize yourself with the control panel and all its |
|
|
functions (as shown below). |
|
|
BUCKET FULL |
DISPLAYS |
|
INDICATOR |
HUMIDITY |
CHECK FILTER |
SETS |
ADJUSTS |
SETS FAN |
TURNS UNIT |
RESET BUTTON |
TIMER |
HUMIDITY |
SPEED |
ON OR OFF |
Operating Instructions
Allow the unit to reach room temperature before operating.
To begin operating the dehumidifier, follow these steps:
 NOTE:
NOTE:
Unit must be upright for one hour prior to operating.
1. Plug the power cord into a properly grounded 115 volt AC outlet.
 NOTE:
NOTE:
If the "BUCKET FULL" light is on, remove the bucket and re-install to reset the float switch.
4 |
2019 Electrolux Home Products, Inc. |
All rights reserved. |
|
|
|
|
|
 Loading...