

Page 1
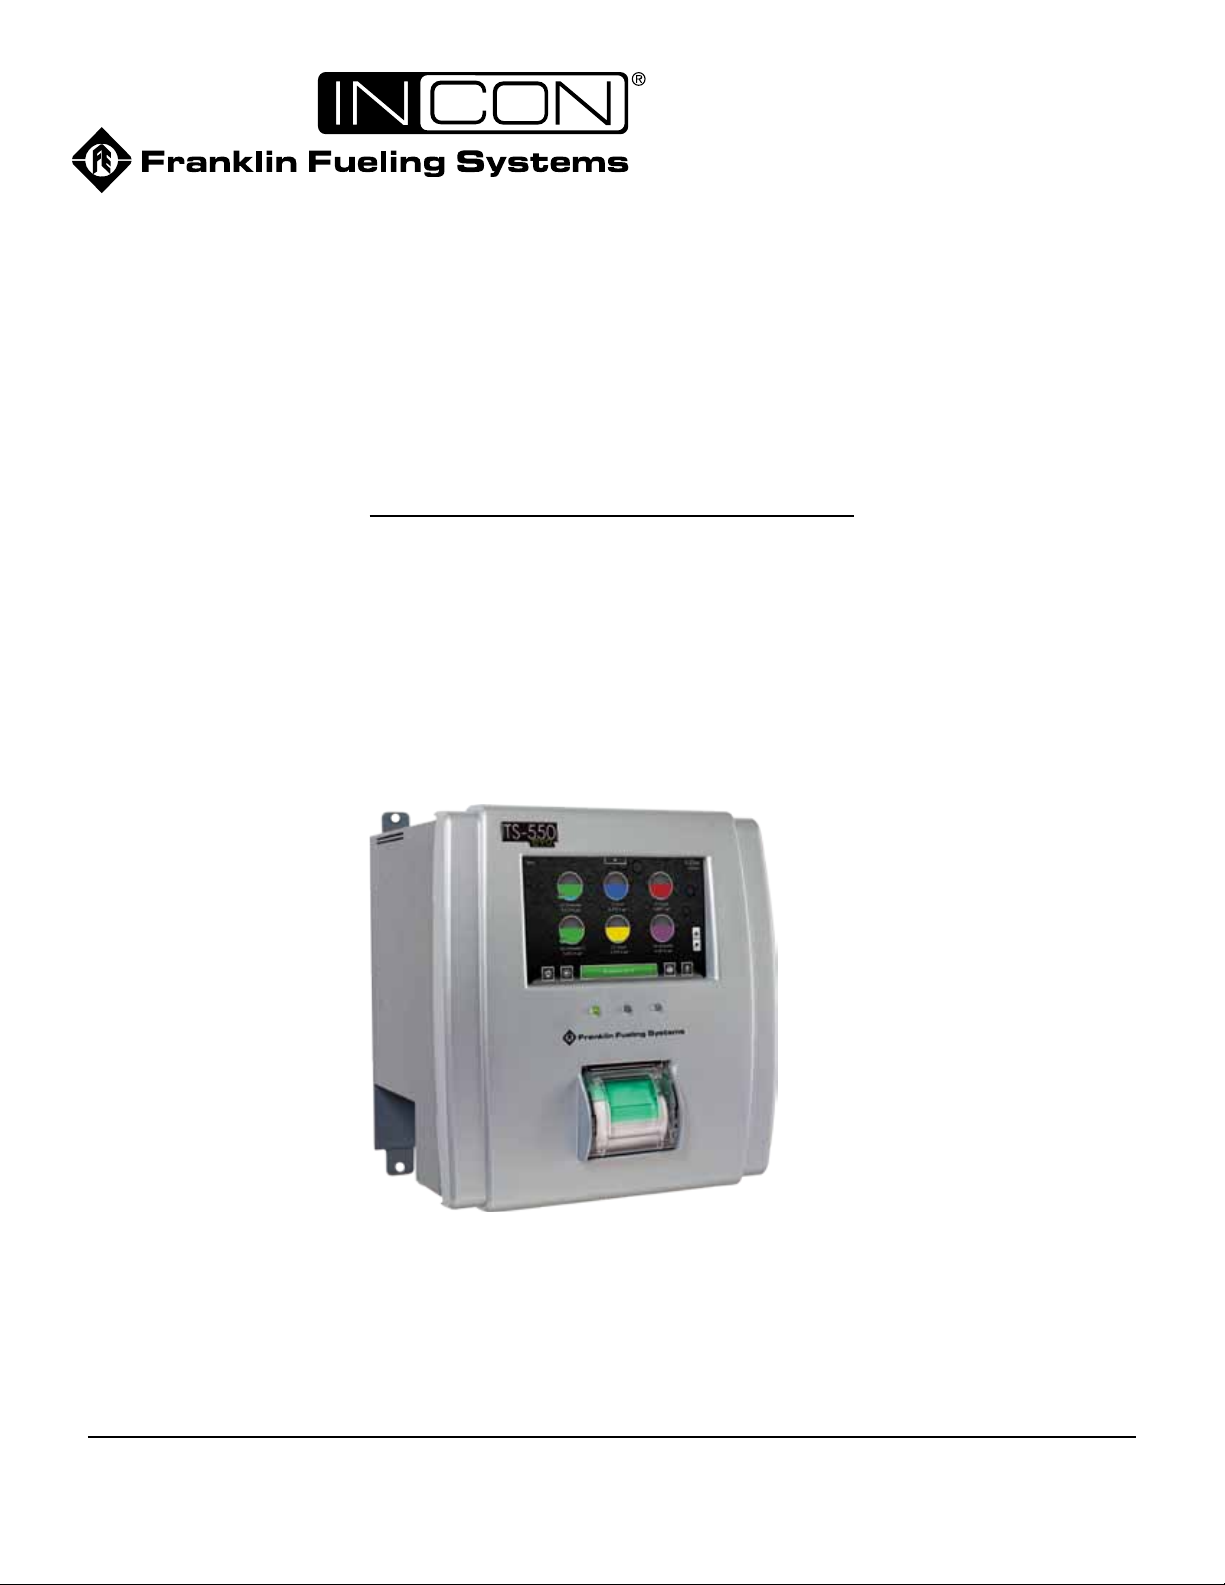
TS-550 evo
®
Fuel Management System
Installation Guide
Franklin Fueling Systems • 3760 Marsh Rd. • Madison, WI 53718 USA
Tel: +1 608 838 8786 • 800 225 9787 • Fax: +1 608 838 6433 • www.franklinfueling.com
Page 2

Important Safety Messages
Franklin Fueling Systems equipment is designed to be installed in association with volatile hydrocarbon liquids such as
gasoline and diesel fuel. Installing or working on this equipment means working in an environment in which these highly
ammable liquids may be present. Working in such a hazardous environment presents a risk of severe injury or death
if these instructions and standard industry practices are not followed. Read and follow all instructions thoroughly before
installing or working on this, or any other related, equipment.
As you read this guide, please be aware of the following symbols and their meanings:
Warning
Caution
Danger
Warning
Warning
This symbol identies a warning. A warning sign will appear in the text of this document when a potentially
hazardous situation may arise if the instructions that follow are not adhered to closely. A potentially hazardous
situation may involve the possibility of severe bodily harm or even death.
This is a caution symbol. A caution sign will appear in the text of this document when a potentially hazardous
environmental situation may arise if the instructions that follow are not adhered to closely. A potentially
hazardous environmental situation may involve the leakage of fuel from equipment that could severely harm
the environment.
This symbol identies an electrical danger. An electrical danger sign will appear in the text of this document
when a potentially hazardous situation involving large amounts of electricity may arise if the instructions that
follow are not adhered to closely. A potentially hazardous situation may involve the possibility of electrocution,
severe bodily harm, or even death.
Follow all applicable codes governing the installation and servicing of this product and the
entire system. Always lock out and tag electrical circuit breakers while installing or servicing
this equipment and any related equipment. A potentially lethal electrical shock hazard and the
possibility of an explosion or re from a spark can result if the electrical circuit breakers are
accidentally turned on during installation or servicing. Please refer to the Installation and Owner’s
Manual for this equipment, and the appropriate documentation for any other related equipment, for
complete installation and safety information.
Follow all federal, state and local laws governing the installation of this product and its associated
systems. When no other regulations apply, follow NFPA codes 30, 30A and 70 from the National Fire
Protection Association. Failure to follow these codes could result in severe injury, death, serious
property damage and/or environmental contamination.
Warning
Warning
Warning
Warning
Warning
Always secure the work area from moving vehicles. The equipment in this manual is usually
mounted underground, so reduced visibility puts service personnel working on this equipment in
danger from moving vehicles entering the work area. To help eliminate these unsafe conditions,
secure the area by using a service truck to block access to the work environment, or by using any
other reasonable means available to ensure the safety of service personnel.
When the Fuel Management System system is used to monitor tanks containing gasoline or other
ammable substances, you may create an explosion hazard if you do not follow the requirements in
this manual carefully.
All wiring must enter the console’s enclosure through the designated knockouts. An explosion
hazard may result if other openings are used.
All wiring from probes or sensors to the console must be run in conduit separate from all other
wiring. Failure to do so will create an explosion hazard.
Substituting components could impair intrinsic safety. TS-550 evos are intrinsically safe for sensors
installed in – Class I, Division 1, Group D – hazardous locations. Substitution of components could
make the energy limiting circuitry in the system ineffective and could cause an explosion hazard.
Repairs to a TS-550 evo console or attached components should only be performed by a qualied,
factory-trained technician.
2
Page 3

Notice
Franklin Fueling Systems reserves the right to change this document and specications at any time without notice.
Franklin Fueling Systems makes no expressed or implied warranty with regard to the contents of this manual. Franklin
Fueling Systems assumes no liability for errors or omissions, or for any damages, direct or consequential, that may result
from the use of this document or the equipment that it describes.
Trademarks
INCON®, TS-5 Series®, TS-550 evo® Series
are registered trademarks of Intelligent Controls. All brand and product names are trademarks or registered trademarks of
their respective companies.
®,
System Sentinel®, SCALD®, Brite®, BriteBox®, BriteBus®, and BriteSensors®
Inspection of Materials
Visually inspect all components for defects or damage prior to installation. If any defect or damage is found, do not use the
product and contact Franklin Fueling Systems for further assistance.
Return Shipping Charges
Franklin Fueling Systems will not accept shipments of returned products without a Return Material Authorization (RMA)
number. RMAs are obtained by contacting Franklin Fueling Systems’s Technical Service Division — NO RMAs will be
given without the unit’s serial number(s). Returned material remains the property of the buyer until replaced or repaired.
Under Warranty
Franklin Fueling Systems will pay all freight and insurance charges for all “Under-Warranty” RMAs.
Non-Warranty
It is the buyer’s responsibility to prepay all freight and insurance charges for “Non-Warranty” RMAs.
Refer to the Warranty section at the end of this manual for all warranty issues.
Contacting Franklin Fueling Systems (FFS)
Please feel free to contact us by mail at:
Franklin Fueling Systems
3760 Marsh Rd.
Madison, WI 53718 USA
Or contact us by phone, fax or e-mail:
Tel: 1 608 838 8786 E-mail: sales@franklinfueling.com
Fax: 1 608 838 6433 techserve@franklinfueling.com
Tel: US & Canada 1 800 225 9787
Tel: México 001 800 738 7610
Tel: Europa +49 6571 105 380
Ofce Hours: 8am to 5pm CST - Monday through Friday
Please visit our web site at www.franklinfueling.com
Copyright ©2011 by Franklin Fueling Systems (FFS). No part of this publication may be reproduced in any form without the prior written consent of FFS.
All rights reserved.
3
Page 4

Contents
Important Safety Messages ...................................................................................................... 2
Notice ........................................................................................................................................3
Trademarks ...............................................................................................................................3
Inspection of Materials .............................................................................................................. 3
Return Shipping Charges. ............................................................................................................... 3
Contacting Franklin Fueling Systems (FFS).................................................................................... 3
Introduction ............................................................................................................................... 5
Certied Installer/Service Person . .................................................................................................. 5
Station Owner/Operator . ................................................................................................................ 5
Abbreviations & Acronyms. ............................................................................................................. 5
Related Documentation. .................................................................................................................. 5
Product Description ..................................................................................................................5
Standard Installation Materials .................................................................................................6
Console Installation ..................................................................................................................7
Console Location............................................................................................................................. 7
Mounting the Console. .................................................................................................................... 7
TS-550 evo Dimensions and Operating Parameters .................................................................8
Communication Ports ...............................................................................................................9
RS-232 Communication Connectors. .............................................................................................. 9
Wiring the Console & Modules .................................................................................................10
Non-Intrinsically Safe Module Wiring ........................................................................................ 10
Controller Module (CM). .................................................................................................................. 11
Power Supply Module (PS). ............................................................................................................ 11
Relay Output Wiring (optional). ....................................................................................................... 13
Emergency Generator Applications (optional). ................................................................................ 13
Relay Module (RLY). ....................................................................................................................... 15
AC Input Module (ACI). ................................................................................................................... 16
4-20mA EXP Analog Input Module (420EXP). ................................................................................ 16
Input/Output Module (IO)................................................................................................................. 17
10 Amp Relay Module (10ARLY). .................................................................................................... 18
Intrinsically Safe Module Wiring ................................................................................................ 19
Probe Module (PRB). ...................................................................................................................... 20
2-Wire Sensor Module (2WSNS). ................................................................................................... 21
3-Wire Sensor Module (3WSNS). ................................................................................................... 22
4-20mA Analog Input Module (420IB). ............................................................................................ 23
Control Drawing ........................................................................................................................ 24
Warranty ...................................................................................................................................26
Warranty Registration. ..................................................................................................................... 26
Specications ............................................................................................................................ 27
4
Page 5

Introduction
This manual contains installation and site preparation
instructions for Franklin Fueling Systems’s TS-550evo
console. Overall safety issues, troubleshooting information,
warranty, service, and return policies, as dened in this
manual, must be followed.
Please read this entire manual carefully. Failure to
follow the instructions in this manual may result in faulty
operation, equipment damage, injury or death. This
equipment should only be serviced by an Franklin Fueling
Systems-certied installer.
Certied Installer/Service Person
Only an Franklin Fueling Systems certied installer or
service person is allowed to access both the user interface
keypad and areas internal to the TS-550evo console.
Station Owner/Operator
The station owner or operator of the TS-550evo console is
only allowed to access the user interface keypad. Access
to areas internal to the console is strictly prohibited.
Abbreviations & Acronyms
10ARLY - 10 Amp Relay Module
2WSMS - 2-Wire Sensor Module (Intrinsically Safe)
3WSMS - 3-Wire Sensor Module (Intrinsically Safe)
420EXP - 4-20 mA EXP module
ACI - AC Input Module
420IB - 4-20mA Analog Input Module (Intrinsically Safe)
AST - Aboveground Storage Tank
ATG - Automatic Tank Gauge
CM - Controller Module
DIM - Dispenser Interface Module
FMS - Fuel Management Systems
IO - Input / Output module
IS - Intrinsically Safe
LIM - LonWorks Interface Module
PC - Personal Computer
PRB - Probe Module (Intrinsically Safe)
PS - Power Supply Module
RLY - Relay Module
SCM - Secondary Containment Monitoring
TPI - Turbine Pump Interface
TS-EXPC - TS-5 Series - Expansion Console
UST - Underground Storage Tank
Related Documentation
The system operation and programming instructions,
troubleshooting guide and console maintenance manual
are provided for your use in separate documents. Detailed
installation and testing instructions for each type of leak
detection sensor are present in the relevant manual, and,
likewise, the installation, testing, and programming of
various upgrade kits and optional accessories are also
contained in separate manuals, addenda or in one of this
document’s appendixes.
Product Description
The TS-550 evo is a modular, automatic, continuous
monitoring system that uses plug-in modules to perform
a wide variety of functions. From fuel management,
monitoring, and/or control functions the TS-550 with its
plug-in modules allows you to customize the system to
meet your needs. Purchase only those functions that
you require, and expand your system later for greater
capabilities.
The TS-550 evo’s enhanced processor and additional
memory on the CM (Controller Module) along with
the exibility of the modular design allows for peak
performance while monitoring multiple systems. The TS550 can easily monitor all of your tanks, lines, sumps, and
secondary containments.
The TS-550evo console comes standard with a Controller
Module (CM), Power Supply Module (PS), and a color LCD
display and these features:
• Generates reports automatically in response to
preset / programmed conditions and alarm
• Provides audio-visual annunciation when an alar or
warning condition exists
• Performs inventory monitoring
• Is able to print reports on a compatible external HewlettPackard Printer
• Can communicate via Ethernet, RS-232, RS-485, or an
optional internal fax/modem.
The TS-550 evo console optionally:
• Has six (6) open slot for additional module that can be
used to expand its capabilities
• Can support a combination of up to:
• 36 Probes (or three Probe Modules)
• 36 2-wire sensors (or three 2-Wire Sensor Modules)
• 24 3-wire or 2-wire sensors (or three 3-wire Sensor
Modules)
• 24 relay outputs (or three Relay Modules)
• 24 4-20mA inputs (or three 4-20ma Input Modules)
• 36 AC inputs (or three AC Input Modules)
• 12 4-20mA outputs & 24 AC/DC Inputs (or three
Input & Output Modules)
Example Station: If your station has 8 Submersible
Pumps, 12 Tanks, 8 Lines and 24
Sensors, you could control all of it with
your FFS TS-550evo and six plug-in
modules: a Relay Module, a Probe
Module, an Analog Input Module, an AC
Input Module and two Sensor Modules.
5
Page 6
Standard Installation Materials
Recommended standard materials should be selected and
installed per all applicable local, state and federal codes
governing the installation of this product and its associated
systems. Please see the corresponding console / module
wiring section or the associated devices section of this
manual for complete installation details.
Cables Required for Liquid Level Probes, and 4-20 mA
Sensors
Use cables and wires compliant with national and local
codes. Franklin Fueling Systems recommends using the
types of cable shown below up to a recommended length of:
• Belden No. 87760 87760 (0.15" or 3.048 mm OD) to 260
feet (80 m)
• Belden No. 87761* (0.12" or 3.048 mm OD) to 400 feet
(120 m)
• Belden No. 88761 88761 (0.12" or 3.048 mm OD) to 400
feet (120 m)
• Belden No. 89182* (0.31" or 7.874 mm OD) to 1500 feet
(450 m)
Note: An asterisk (*) denotes a cable that may be ordered
from Franklin Fueling Systems.
Note: Conductors of different intrinsically safe (IS) circuits
may be run together within the same conduit, and,
when they do, they should have at least .01 inches
(.25 mm) of insulation.
Cable or Wire for 2-Wire or 3-Wire Sensors
2-wire or 3-wire sensor wire (type THHN, TFFN, or THWN,
gas and oil resistant, 18 AWG minimum, 1500 feet max.
wire run length) can be used when enclosed within rigid
metal conduit from the sensor to the console.
Leak detection sensor cable is required when NOT
run through rigid metal conduit. Refer to the Direct Burial
Cable – Installation Manual (P/N 000-1041) for further
information. See below for cable types and descriptions:
Alpha 58411 (Franklin Fueling Systems P/N
600-0062)
Two conductor cable for standard, 2 conductor leak
detection sensors (0.114 inch (2.9 mm) O.D.)
Wire required for the TS-550 evo Console
• 3 conductors: Power – 14 GA to 12 GA Max. – Black,
White, and Green
• 1 conductors: Safety Ground – 12 AWG Green (2 may
be required in some locations)
• As required conductors: Accessories – Type THHN,
TFFN, or THWN, 18 AWG minimum
Circuit Breaker
20 Amp — providing power only for the TS-550evo
console, one required per console
Weatherproof Junction Boxes
Minimum 16 cubic inch (406.4 cubic mm) weatherproof
junction box, cover, and cover gasket for the manholes
of: liquid level probes and leak detection sensors. See
our sales literature for part numbers for ½ and ¾ inch
(12.7 mm and 19.05 mm) conduit junction boxes and
recommended manufacturers. Also use ¾ to ½ inch (12.7
mm to 19.05 mm) bushings for probe/sensor compression
ttings.
Use a weatherproof metal pull box for combining several
circuits that will run into the TS-5 Series console through
one or more conduits. Use a separate weatherproof metal
pull box to combine intrinsically safe (IS) liquid level probe
and leak detection sensor wiring. Do not run other non-
intrinsically safe wiring within the IS pull box. Run ½ or ¾
inch (12.7 mm or 19.05 mm) IS probe or sensor conduit
from the manholes to the IS pull box, and then run up to
four ½ or ¾ inch (12.7 mm or 19.05 mm) conduits to the
console’s IS conduit knockouts.
Conduit
Rigid metal conduit (RMC) - male NPT threaded: use ½
or ¾ inch (12.7 mm or 19.05 mm) for IS probe and sensor
wiring to the console (from the manholes, use ½ or ¾ inch
conduit), and use ½ or ¾ inch (12.7 mm or 19.05 mm) for
non-intrinsically safe accessories and power wiring.
Use conduit hardware that is appropriate for the installation
and meets local, state and federal requirements.
Splice Connector Kits Must Be Used — Warranty
Requirement
Use the Franklin Fueling Systems-approved, moistureresistant, no-strip splice connectors for liquid level probe
and leak detection sensor wires. You may order the TSPKW30, which contains 30 of the Franklin Fueling Systemsapproved, moisture-resistant connectors.
Using moisture resistant splice connectors will:
• Reduce/eliminate corrosion of the wire connections from
repeated exposure to water condensation, which causes
eventual signal loss and system failure.
• Reduce/eliminate equipment damage from water
ooding around the connectors, which causes shortcircuit damage.
Thread Sealant (UL Classied)
Use a non-hardening, “stay-soft,” thread sealant, or
equivalent, to seal and waterproof all tank riser pipe
threads. In addition, the thread sealant (or “pipe dope”
as it is commonly known) should also be chemically
non-reactive to the product in the tank(s). Apply thread
sealant to seal/waterproof all outdoor electrical conduit
tting threads including the hole plugs at the weatherproof
junction boxes.
Riser Pipes
ANSI Schedule 40 (or chemically non-reactive) – 4 inch
(101.6 mm) (8 NPT) riser pipes for liquid level probes.
See the appropriate leak detection sensor manual for
information on required riser pipes and riser cap adapters.
6
Page 7
Probe Installation Kit(s)
See the TSP-LL2’s installation instructions that came
with the probe for the items included with the TSP-K4A
standard probe installation kit. For chemical applications,
see the TSP-LL2C’s installation instructions for the
TSP -K4AS stainless steel riser cap adapter kit and the
TSP-SSP stainless steel product oat.
TSP-LL2 Probe Floats
• Floats for 4 inch (101.6 mm) riser pipes, order: TSPIGF4 for gasoline applications or TSP-IDF4 for diesel
and fuel oil
• Floats for 3 inch (76.2 mm) riser pipes, order: TSP-IGF3
for gasoline applications or TSP-IDF3 for diesel and fuel
oil
• Floats for 2 inch (50.8 mm) riser pipes, order: TSP-IGF2
for gasoline, TSP-IDF2 for diesel and fuel oils, or TSPSSP stainless steel oat for chemical products
Manufacturer’s Tank Chart for Each Tank
The manufacturer’s Tank Chart and other documentation
will be used for installation and programming, and possibly
for future reference. Keep this information — do not
discard it.
Console Installation
Console Location
The location that you select to install the console must be
indoors in an area classied as non-hazardous (see the
console specications table at the beginning of the Wiring
the Console & Modules chapter for further information).
To get the maximum benet from this system, install the
console where personnel can easily make use of it; mount
it at eye level for operator convenience. Mount the console
level on a vertical surface between 2 feet (0.6 m) and
6 feet (1.9 m) high using the appropriate fasteners. For
European applications, the console must be located in a
pollution degree 2 environment per IEC60664.
Mounting the Console
The TS-550 evo consoles must be
Warning
Warning
mounted in a location where explosive
or ammable vapors are not present,
otherwise an explosion hazard will be
created which can result in severe injury,
death, serious property damage and/or
environmental contamination.
Leave a minimum of two inches (5.1 cm)
of space around the console open to
allow for ventilation, communication port
connections, conduit and wiring. If the
ventilation louvers located on the sides
of the TS-550 evo are obstructed, the unit
may overheat and stop functioning as
intended.
Four mounting tabs are available on the outside corners
of the console. Select fasteners that have sufcient load
carrying capacity and which are appropriate for wall
construction – a fully equipped TS-550evo console can
weigh as much as 40 pounds (18 kg), so make sure that
your fasteners (and mounting surface) can adequately
support that much weight. In addition, plan ahead to
make sure that there is enough room around the console
for: conduit coming into the unit, communication port
connections, possible incoming probe or sensor wiring,
and for the console door to fully open for easy access.
Note: For questions concerning standard installation
materials to be used for the TS-550 evo console,
please refer to the Standard Installation Materials
section of this manual.
7
Page 8
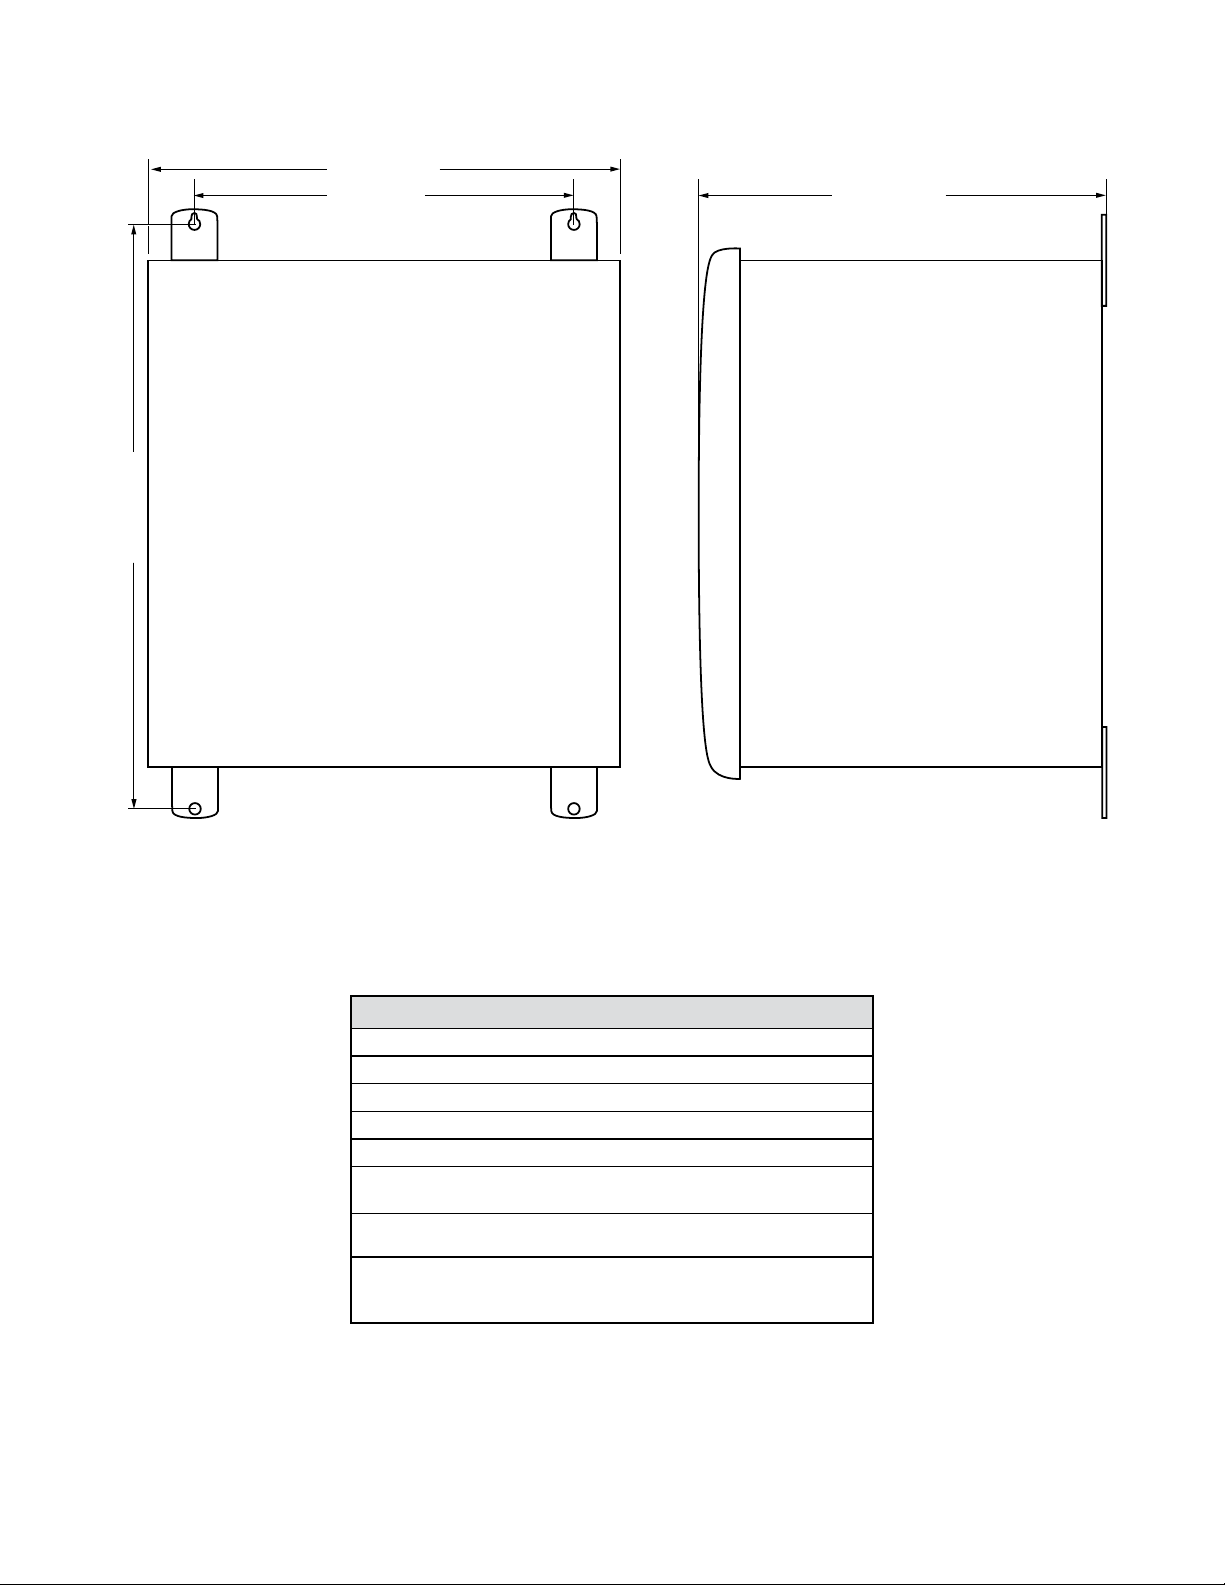
TS-550 evo Dimensions and Operating Parameters
The TS-550 evo has conduit knockouts and communication ports located on the bottom of the unit. Use the diagram below
to help you mount the console appropriately.
10.25" (260.4 mm)
8.25" (210 mm)
12" (305 mm)
9.00" (229 mm)
Figure 1: TS-550 evo Dimensions
Console Operating Parameters
Line Voltage: 115/230 V~ +15%, -10%
Frequency & Power: 50/60 Hz, 150 W maximum
Storage Temp.: -20° to 60° C (-4° to 140° F)
Operating Temp.: 0° to 40° C (32° to 104° F)
Operating Humidity: 0 to 95%, non-condensing
Cleaning: Cloth or sponge slightly dampened in mild
Splash Resistance: Not to be exposed to direct spray, splash or drips
Location: Indoors in an ofce or in a non-hazardous
detergent
pollution degree 2 environment per IEC60664
8
Page 9
Communication Ports
COMM 2BUS EXT
CAN H
CAN L
GND
TPI RS-485
COMM 1USBETHERNETHORN
FAX/MODEM
NON-INTRINSICALLY SAFE WIRING ONLY!
FOR USE ONLY WITH EQUIPMENT SPECIFIED
IN THE INSTALLATION INSTRUCTIONS
A
B
GND
+
—
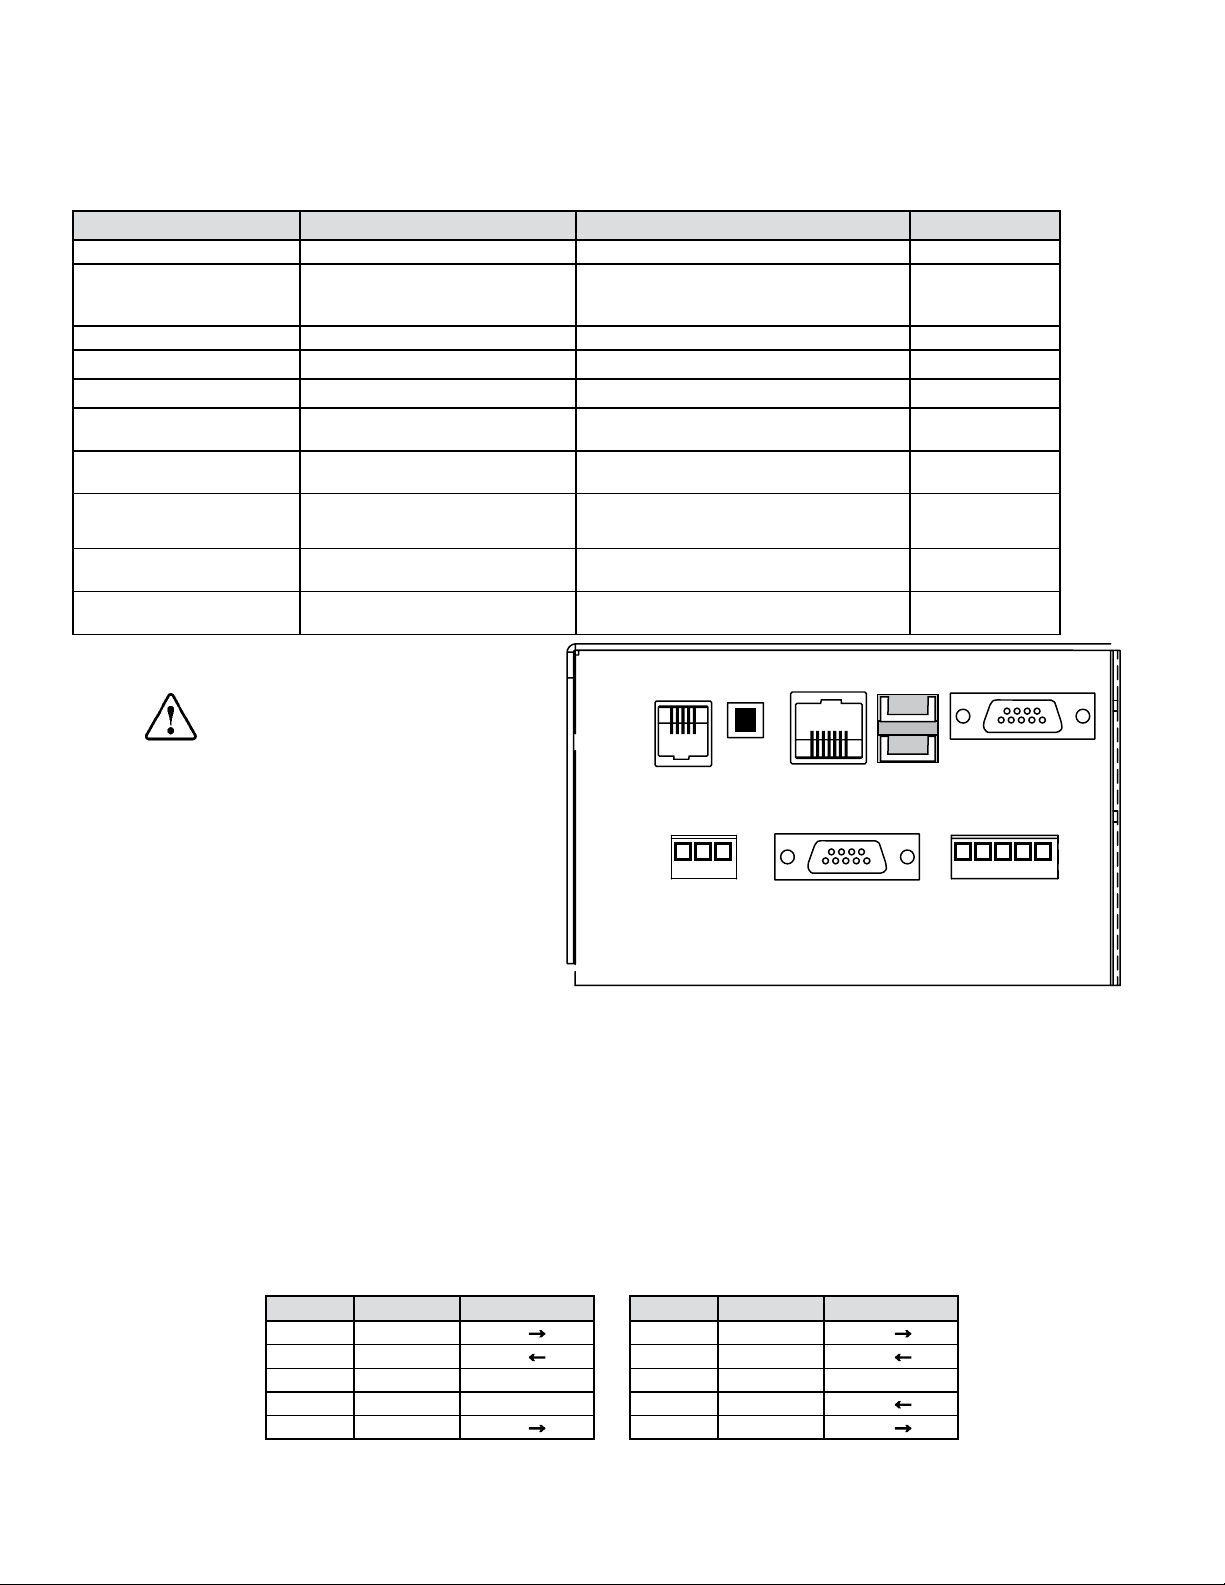
The TS-550 evo console has several communication ports that can be used to communicate with various devices. The
communication ports can be used for a wide variety of applications: to connect the console to a computer network, to print
reports on an external printer or to fax reports via the optional internal fax/modem. Please refer to the table below for a
more complete listing of the ports and their associated devices.
Port Connector Type Devices Module
RS-232 Comm 1 DB9 Female Local PC (preferred in Comm 1) Controller
RS-232 Comm 2 DB9 Male
Ethernet RJ-45 Local Network Controller
USB 1 Type A External Hewlett-Packard Printer Controller
USB 2 Type A External Hewlett-Packard Printer Controller
Fax/Modem RJ-11
RS-485/TPI
Bus Extension
(CAN)
RS-422/232 & Current Loop DB9 Male Dispenser Distribution Box (Dbox)
LON
4 Pin Pluggable Terminal Block, 0.2"
(5.08 mm) LS
3 Pin Pluggable Terminal Block,
0.15" (3.81 mm) LS
2 Pin Pluggable Terminal Block, 0.2"
(5.08 mm) LS
POS Terminal, External Modem, External
ATG to TS-EMS or Local PC with a nullmodem cable
Phone Line (requires an optional fax/
modem)
TS-DIM (external) Power Supply
TS-EXPC Power Supply
IFSF Network LON Interface
Power Supply
Controller
Dispenser
Interface
Peripheral equipment connected
Caution
to the T5 series console’s
communication port must:
1. Be listed by UL or another thirdparty Nationally Recognized
test laboratory when required
by the authority having
jurisdiction, and:
2. Not be installed over a
hazardous location (unless so
rated)
Figure 2: View of Communication Ports
Note:
The onboard TS-DIMIB (Dispenser Interface Module) and the TS-LON (IFSF protocol Interface Module) are optional
daughterboards that attach to the Power Supply Module. Only one daughterboard can be used in a system.
Note: Either the Current Loop or RS-422/232 connector will be used to connect to a dispenser distribution box (Dbox)
depending on the manufacturer’s settings.
RS-232 Communication Connectors
Two connectors for RS-232 interfaces are provided on the bottom of the TS-550 evo console. The pin designations for the
RS-232 connectors are as follows:
Console RS-232 Comm Port 1
DB9 Connector, Female, DCE
Pin No. Function Input/Output Pin No. Function Input/Output
O
2 TXA
3 RXA
5 Signal GND 3 TXA
7 4 DTR
8 CTS
→
I
←
O
→
Console RS-232 Comm Port 2
DB9 Connector, Male, DTE
1 DCD
2 RXA
5 Signal GND
O →
I ←
I
←
O →
Note: Follow the communications setup instructions in the TS-550evo Programming Guide.
9
Page 10

Wiring the Console & Modules
COMM 2BUS EXT
CAN H
CAN L
GND
TPI RS-485
COMM 1USBETHERNETHORN
FAX/MODEM
NON-INTRINSICALLY SAFE WIRING ONLY!
FOR USE ONLY WITH EQUIPMENT SPECIFIED
IN THE INSTALLATION INSTRUCTIONS
Conduit must only enter the console enclosure through the
designated knockouts as shown below in Figure 4.
Non-Intrinsically
Safe Knockouts
(bottom view)
Figure 3: TS-550 evo Conduit Knockouts
When installing additional modules, Franklin Fueling
Systems recommends installing non-IS modules from left
to right (from the open slot closest to the power supply)
and IS modules from right to left. In this scenario, all
unused slots will be concentrated in the middle of the
enclosure. This lets the IS barrier be easily moved and
allows for the possibility of adding future modules to the
system without needing to rewire those devices already
in place. It’s also a good idea to always start wiring your
module at the bottom-most set of channels (usually
Channel 1) to further future-proof your installation and
avoid any unnecessary confusion.
Controller Module (CM)
Power Supply Module (PS)
Intrinsically Safe
Knockouts
Isolation Barrier
Non-Intrinsically Safe Module Wiring
Danger
Important: Non-intrinsically safe wiring cannot be
Non-Intrinsically Safe modules include:
• Controller module
• Power Supply Module
• Relay Module
• AC Input Module
• Input / Output Module
• 10 Amp Relay Module
• 4-20mA EXP Analog Input Module
Always lock out and tag electrical circuit
breakers while installing or servicing this
equipment and any related equipment. A
potentially lethal electrical shock hazard
and the possibility of an explosion or re
from a spark can result if the electrical
circuit breakers are accidentally turned
on during installation or servicing.
run in the same conduit as intrinsically
safe wiring. Conduit knockouts for IS and
non-IS module wiring are clearly identied
in Figure 7 for your reference. Non-IS
modules can be identied by their red
faceplates and should always be installed
to the left of the moveable isolation barrier.
IS Modules (blue)
Non-IS Modules
(red)
(front view with cover removed)
Figure 4: TS-550 evo Module Connections
It is important that intrinsically safe wiring only enter the
console through IS knockouts, and non-intrinsically safe
conduit only enter through non-IS knockouts. Maintain
the integrity of the intrinsically safe modules by keeping
probe and sensor wiring in conduit separate from all other
wiring. Probe and sensor wiring may be run in the same
conduit as long as they are both receiving power from the
same console and the wire complies with NEC 504.30 or
applicable local codes.
10
Page 11

Controller Module (CM)
The Controller Module (CM) is a non-intrinsically safe
module that acts like the brain of your console. The CM
handles all of the communication between the modules
and then sends that information to your output devices.
You can use the LCD touch screen LCD or external printer
(depending on model and conguration) as output devices
to communicate with your system. The CM links to the
status lights on the front of the console and the LCD via
exible cables.
Flexible Cable Connectors
The exible cables are installed at the factory and is just
long enough to allow the door to fully open. They are
protected from high power wiring by the metal shroud
attached to the CM. The cables should not be deformed,
but should rather be freely folded back into the shroud so
that they do not get pinched when the door is closed. If the
exible cables do become detached though, they can easily
be reattached.
To reattach the exible cables to the connectors, identify
the two sides of each end on both cables: there are metal
bands on one side and no metals bands on the other. The
exible cables connect to the CM by inserting one end of
each cable into the LCD connector with the cables’ metal
bands facing to the left so that a metal to metal connection
is made with the LCD’s connector pins.
After the exible cables have been correctly inserted all the
way into each of the LCD connectors there will be no metal
showing above the connection. Once the exible cable
connector is properly attached to the CM’s LCD connector,
hook it up to the corresponding connector on the insid
your console’s door by making the same kind of metal-tometal connection that you made while inserting it into the
CM’s faceplate.
Controller
Module
RUN
ERR
CONTRAST
TXD
DTR
MODEM
RXD
DCD
e of
Power Supply Module (PS)
The PS is a non-intrinsically safe module that provides
power to the TS-550 evo console from line voltage rated
110 - 240 VAC. The PS is two inches wide, occupies two
slots and is located immediately to the right of the CM. The
PS consists of two AC /DC switching power supplies - one
switching power supply is +5V and the other is +24V.
The PS also has two relay outputs for use with remote
annunciators and two low voltage inputs for emergency
generator applications.
Line Power Wiring
At the electrical power panel, use or install a 20 amp
circuit breaker — this breaker should be dedicated to
only supplying power to the TS-550 evo console. Mark
this circuit “TS-550 evo console [power] - ONLY” on the
circuit label (at the back of the electrical power panel door).
Refer to Figure B-1 and the 110 / 240 VAC Line Power
Wire Connection List that precedes it for line power wiring
information.
Note: Avoid connecting other equipment to this circuit.
If other equipment is connected to this dedicated
circuit, the resulting electrical noise could cause
faulty system operation.
Make sure that the TS-550 evo
Danger
Danger
console’s power circuit breaker is
turned off during any installation.
Lethal voltages are present inside the
console which could kill or injure you.
Also, secure the TS-550 evo console’s
circuit breaker in the off position
and attach a “lockout” to it, which is
dated and signed by you, to prevent
accidental closure, injury or death.
The ground bus in the electrical panel
must be connected to an earth ground
as required by the National Electrical
Code (or Canadian Electrical Code)
when applicable. If the ground bus is
not properly connected to an earth
ground or if the IS safety ground is not
properly connected at the console, a
dangerous condition will be created
which could result in an explosion.
LCD/PRINTER
ETHERNET
RX
LNK
Figure 5: Controller Module
Check Electrical Resistance to Earth Ground
After wiring the IS safety grounds, check the resistance
between the IS safety ground terminals at the console and
the earth ground – this resistance must be less than 1 ohm.
11
Page 12

110 / 240 VAC Line Power Wire Connection List
See
for details
See
for details
Power Supply
Module
RUN
ERR
5V
24V
POWER
L1
N/L2
RELAY OUTPUTS
NC1
C1
NO1
NC2
C2
NO2
LOW VOLTAGE INPUTS
IN1
GND
IN2
GND
Electrical Panel No. Conductors, Color
(Gauge)
20 Amp Circuit
Breaker
1 Black wire, 14 AWG (1.6
mm) min.
Neutral 1 White Wire, 14 AWG
(1.6 mm) min.
Ground Bus 1 Green wire, 14 AWG
(1.6 mm) min.
Ground Bus 1 Green wire, 12 AWG
(2.1 mm) min.
To Ground Stud
12 AWG (2.1 mm) Min.
(Figure B-2)
PUMP #1
2P-20A
TANK 20A
SENTINEL
Black (L1-line) Wire, 14 AWG (1.6 mm) Min.
Redundant Intrinsic Safety Ground
Green Wire,12 AWG (2.1 mm) Min.
1
3
5
7
9
11
13
15
- Circuit Assignment Label -
Electrical Power Panel Door
(back side view)
White (L2-neutral) Wire, 14 AWG (1.6 mm) Min.
Green (Gnd-ground) Wire, 12 AWG (2.1 mm) Min.
2
4
6
8
10
12
14
16
Circuit
110/240 VAC
Power
Neutral
Ground
Safety Ground
A
B
LIGHTS 10A
COOLER 15A
CU Earth
Ground Rod
N
MAIN
OFF
OFF
1 2
3 4
15
FFO
01
FFO
51
16
02
02
FFOFFO
Electrical Power Panel
(shown with cover removed)
02
FFO
Neutral
Ground
Bus
Figure 6 – 110 / 240 VAC Power and IS Ground Wiring
Note: The installer must connect the earth ground conductor to the most
convenient ground terminal as long as it meets local and national
codes. The earth ground conductor must be 12 AWG (2.1 mm) or
larger.
12
Stud: #8 threaded post
Nut
Lock Washer
Earth Ground Conductor
Cup Washer
Enclosure
Figure 7 – Ground Stud
Page 13

Relay Output Wiring (optional)
As illustrated in the diagram below, the Power Supply Module’s two relay outputs can be used to activate an external
alarm (TS-RA2) and the two inputs can be used to silence that alarm remotely (TS-RK).
Power Supply
Module
RUN
ERR
5V
24V
POWER
L1
N/L2
RELAY OUTPUTS
NC1
C1
NO1
NC2
C2
NO2
LOW VOLTAGE INPUTS
IN1
GND
IN2
GND
Enlarged View of Power Supply Module’s Relay Outputs
NC1
C1
NO1
NC2
C2
NO2
Suggest Use - Optional:
INCON TS-RA1 (or TS-RA2) & TS-RK
Remote tank overfill alarm outputs.
See the appropriate manuals for further
details.
Remote/External Alarm Outputs
Figure 8: Alarm Output Wiring Schematic
Note: The TS-RA2, TS-RA1 and TS-RK are not part of the UL certication of this system.
Emergency Generator Applications (optional)
The wiring or use of discrete inputs is optional — skip this
section if you don’t plan to use this interface. Discrete
inputs may be wired to a TS-550 evo console with 18
AWG, type TFFN or THWN wire. You may also use THHN
wire in sizes larger than 18 AWG.
Emergency backup power generator run-relay(s) are
wired to the discrete input interface terminals at the TS550 evo console. A run-relay closure will stop a leak test
Note: You must use dry run-relay contacts for this
interface because the TS-550 evo series supplies
+5 VDC digital logic power at the IN (input)
terminals.
Note: It is recommended that you use: IN 1 & GND for
Generator 1 /fuel supply Tank #X, and IN 2 & GND
for Generator 2 /fuel supply Tank #Y. The specic
fuel tank(s) assigned are “programmable.” See
Figure 9 for wiring details.
on the associated generator fuel tank. When the generator
run-relay opens (generator stops running), a run report is
produced at the console, which shows the total and hourly
fuel consumption rate during the run cycle.
13
Page 14

Non-Standard Power Requirements
The console’s power must be maintained on a power transfer supply for emergency backup generator applications. In
addition, the TS-550 evo series’ line power must be supplied through a UPS (Uninterruptible Power Supply). See Figure 9
for emergency generator applications.
Programming & Testing Discrete Inputs
Program the tank gauge and test the discrete inputs for proper operation after installation. See the TS-550 evo
Programming Guide for reports and programming issues.
Power Supply
Module
RUN
ERR
5V
24V
POWER
L1
N/L2
PS = Discrete Inputs (Low Voltage Contacts Required)
RELAY OUTPUTS
NC1
C1
NO1
NC2
C2
NO2
LOW VOLTAGE INPUTS
IN1
GND
IN2
GND
IN1
GND
IN2
GND
Run Relay (C)
Run Relay (N.O.)
Run Relay (C)
Run Relay (N.O.)
Figure 9 – Emergency Generator Wiring
- Generator # 1
- Generator # 2
14
Page 15

Relay Module (RLY)
The RLY is a non-intrinsically safe module that has 8
identical Form C output channels. Each channel has a fuse
and three terminals. Each channel can be congured as
NO or NC with the power off by wiring to the appropriate
terminals. A TS-550 evo console can accommodate up to
24 outputs (8 outputs on up to 3 modules) as space allows.
The diagrams below illustrate two examples of positive
shutdown upon alarm conditions.
Relay Module Specications
Number of Channels: 8 Form C
Contact Rating: 2A @ 250 VAC
2A @ 30 VDC
Relay Module
RUN
ERR
Switching Current 2A Max.
Switching Power 1500 VA Max.
NO8
C8
NC8
NO7
C7
NC7
NO6
C6
NC6
NO5
C5
NC5
NO4
C4
NC4
NO3
C3
NC3
NO2
C2
NC2
NO1
C1
NC1
Relay Module disables the
hook signal to the pump
upon alarm conditions.
110/240 VAC
Electrical Panel
Line Neutral
Relay Module
RUN
ERR
Switching Current 2A Max.
Switching Power 1500 VA Max.
NO8
C8
NC8
NO7
C7
NC7
NO6
C6
NC6
NO5
C5
NC5
NO4
C4
NC4
NO3
C3
NC3
NO2
C2
NC2
NO1
C1
NC1
Relay Module disables power to the
dispenser upon alarm conditions.
110/240 VAC
Electrical Panel
Line Neutral
DISPENSER 1
Line
Neutral
GND
Figure 11: Positive Dispenser Shutdown
Note: If a dispenser’s current rating is between 2 and 10
amps, use a 10 amp relay module. If the current
rating is higher than 10 Amps, use an appropriate
extension relay.
Figure 10: Positive Submersible Control Box Shutdown
Note: A valid dispenser hook signal coming from the AC
Input Module (shown in Figure 12) is required for
these diagrams to function as shown.
15
Page 16

AC Input Module (ACI)
The ACI is a non-intrinsically safe module that has 12
identical optically isolated AC input channels that can be
used for dispenser hook isolation, vapor processor input,
or as generic AC inputs. The TS-550 evo consoles can
handle a total of 36 AC inputs or up to three AC Input
Modules in one system.
AC Input Module Specications
Number of Channels: 12 optically isolated
Input Voltage Rating: 110 – 240 VAC
Input Current: 7 mA RMS
Dispenser Hook Signals
The TS-550 evo system requires that the dispenser hook
signal from every dispenser on site be wired into the
console’s AC Input Module. When making the connection
for the hook signals to the AC Input Module, refer to the
following diagram and use these guidelines:
• If there are two hooks per dispenser: wire the two hooks
from Dispenser 1 to AC input channels 1 & 2, the hooks
from Dispenser 2 to AC channels 3 & 4, etc..
• If there are three hooks per dispenser, then wire the
three hooks of Dispenser 1 to the AC input channels 1,
2, 3 and so forth.
AC Input
Module
RUN
ERR
Chan
12
Chan
11
Chan
10
Chan
9
Incoming
Dispenser
Hook Signal
Line
Neutral
Chan
8
Chan
7
Chan
6
Chan
5
Chan
4
Chan
3
Chan
2
Chan
1
Line
Neutral
Line
Neutral
Vapor Processor
(optional)
Generic Device
(optional)
4-20mA EXP Analog Input Module (420EXP)
The 420EXP has 8 identical channels for loop powered
non-IS sensors with a 4-20 mA interface. The TS-550
evo series can support up to 24 inputs (3 modules total
including 420IB models with 8 inputs each) depending on
available space in your console. The 420EXP will most
likely be used with explosion proof version of the line leak
pressure transducers at the sites where IS wiring is not
available. It can also be used with other 4-20 mA sensors
located in non-hazardous area.
EXP Analog Input Module Specications
Number of Channels: 8
Loop Power 24 Volts
Internal Resistance 350 ohms
Note: Components located in the hazardous area must be
an explosion proof version and wiring must be enclosed in
explosion proof conduits.
4-20mA EXP
Analog Input
Module
RUN
ERR
–
+
–
+
–
+
–
+
–
+
–
+
–
+
–
+
Figure 13: EXP Analog Input Module Connections
Non-Hazardous
Location
4-20mA
Sensor
- (BLK)
+ (RED)
Explosion-Proof Conduit
Hazardous
Location
LSU500E
- (BLK)
+ (RED)
16
Figure 12: Dispenser Hook Signal
Page 17

Input/Output Module (IO)
The Low Voltage Input / Output Module is a non-intrinsically safe module that provides eight separate AC or DC voltage inputs
that can range from 0 to 240 volts. In addition to the AC / DC inputs, the IO module also includes four 4-20mA signal outputs.
IO Module Specications
Number of Channels: 8 optically isolated inputs
4 analog outputs
Input Voltage Rating:
Input Current (each): 2 mA RMS
The AC / DC inputs are NOT dry contact inputs (there are 2 dry contact inputs on the power supply). Even though the
IO Module can accept AC line voltage levels, it is not intended to be used as a substitute for the AC Input Module for
dispenser hook inputs. Dispenser hook signals often have leakage currents that could cause false ‘on’ signals when used
with the IO Module.
Important: Use caution if both low voltage and high voltage signals are used simultaneously for the voltage
inputs. Use agency approved wire rated at 600V for safety and always make sure terminal connections
are tight and that no loose wire strands exist.
The IO Module’s four 4-20mA signal outputs can be used to interface to an external device such as a SCADA
(Supervisory Control And Data Acquisition) system or a building monitoring system. Typically, data such as tank levels or
line pressures can be sent via the 4-20 outputs.
Important: The IO Module supplies 4-20mA loop power. Do NOT connect it to an external device that supplies
loop power or use an external power supply for the loop. Doing so may damage the IO and/or the
external device. For similar reasons DO NOT connect the IO Module’s 4-20mA outputs to the 4-20mA
inputs of the 4-20mA Input Module. The 4-20mA Input Module is intrinsically safe and cannot be used
with the non-intrinsically safe IO Module; connecting the two together may damage either or both
modules.
3 – 240 Volts AC or DC
(AC is rms value)
IO Module
RUN
ERR
–
+
–
+
–
+
–
+
Chan
8
Chan
7
Chan
6
Chan
5
Chan
4
Chan
3
Chan
2
Chan
1
SCADA System
+
-
Line
Neutral
Line
Neutral
Figure 14: IO Module Wiring Schematic
(optional)
Vapor Processor
(optional)
Generic Device
(optional)
17
Page 18

10 Amp Relay Module (10ARLY)
The 10 Amp Relay Module is a non-intrinsically safe module that has 6
identical Form C output channels. Each channel has a fuse and three
terminals. Each channel can be congured as NO or NC with the power
off by wiring to the appropriate terminals. A TS-550 evo console can
accommodate up to 18 outputs (6 outputs on up to 3 modules) as space
allows. The diagrams below illustrate two examples of positive shutdown
upon alarm conditions.
10ARLY Module
Switching Current 10A Max.
Switching Power 1500 VA Max.
NO6
NC6
C6
NO5
NC5
C5
Relay Module disables the
hook signal to the pump
upon alarm conditions.
110/240 VAC
Electrical Panel
10 Amp Relay Module Specications
Number of Channels: 6 Form C
Contact Rating: 10A @ 250 VAC
or ½ hp @ 240 VAC
¼ hp @ 120 VAC
NO4
NC4
NO3
NC3
NC2
NO1
NC1
C4
C3
O2
C2
C1
Line Neutral
Figure 15: Positive Submersible Control Box Shutdown
Note: A valid dispenser hook signal coming from the AC Input Module (shown in Figure 12) is required for these
diagrams to function as shown.
10ARLY Module
Switching Current 10A Max.
Switching Power 1500 VA Max.
10 Amp Relay Module disables power to
the dispenser upon alarm conditions.
NO6
NC6
NO5
NC5
C6
C5
110/240 VAC
Electrical Panel
NO4
NC4
NO3
NC3
NO2
NC2
NO1
NC1
C4
C3
C2
C1
Line Neutral
DISPENSER 1
Line
Neutral
GND
Figure 16: Positive Dispenser Shutdown
Note: If a dispenser’s current rating is higher than 10 Amps, use an appropriate extension relay.
18
Page 19

Intrinsically Safe Module Wiring
Always lock out and tag electrical circuit
Danger
Important: Intrinsically safe wiring cannot be run in
Franklin Fueling Systems recommends that each run of IS
wiring not exceed 1500 feet (450 m) using any 2-conductor
shielded cable or the cables/wires recommended in the
Standard Installation Materials chapter. If you are not using
the recommended cables/wires as set out in the Standard
Installation Materials chapter or need to run wiring beyond
1500 feet (450 m), then please contact Technical Support.
The IS modules in the TS-550 evo console were certied as
associated apparatuses using the “Entity Concept.” Under
this concept, the IS apparatus (eld device) has assigned
parameters which, when properly matched to those of an
associated apparatus, will constitute an intrinsically safe
system. If there are none available however, values of 60
pF / foot (200 pF / m) for capacitance per wire pair and 0.2
uH / foot (0.7 uH / m) for inductance may be used. Refer to
the associated apparatus’s control drawing for acceptable
cable run length calculations.
The 3WSNS has also been evaluated using the “System
Concept” for the specic sensors indicated on page 21.
When these sensors are used, cable must be limited to
1500 feet.
breakers while installing or servicing this
equipment and any related equipment. A
potentially lethal electrical shock hazard
and the possibility of an explosion or re
from a spark can result if the electrical
circuit breakers are accidentally turned on
during installation or servicing.
the same conduit as non-intrinsically safe
wiring. Conduit knockouts for IS and non-
IS module wiring are clearly identied in
Figure 6 on page 10 for your reference.
IS modules can be identied by their blue
faceplates and should always be installed to
the right of the moveable isolation barrier.
If local codes do not require the use of
conduit, cable glands must be used at all
enclosure knock-outs.
Gaps larger than 0.06 inch (1.5 mm) will
violate safety approvals. Be certain to
provide adequate IS and non-IS wire
separation.
Associated apparatus parameter types and how they can be
compared to IS apparatus parameter values are shown in
the table below.
Parameter Associated
Apparatus
Maximum Voltage Uo < Ui
Maximum Current Io < li
Maximum Power Po < Pi
Total unprotected
capacitance
Total unprotected
inductance
Co > Ci + Cc
Lo > Li + Lc
Comparison IS
Device
Standard Terms
Term Denition
Uo Maximum Output Voltage
Ui Maximum Input Voltage
Io Maximum Output Current
Ii Maximum Input Current
Po Maximum Output Power
Pi Maximum Input Power
Co Maximum External Capacitance
Ci Maximum Internal Capacitance
Cc Cable Capacitance
Lo Maximum External Inductance
Li Maximum Internal Inductance
Lc Cable Inductance
19
Page 20

Probe Module (PRB)
The Probe Module (PRB) gathers data from probes and presents
that information to the Controller Module (CM) for use in inventory
reconciliation and reports. Each PRB can accomodate 12 probes
and the system as a whole can accept a total of 36 probes (3
modules with 12 inputs each) if space allows. Besides working with
LL2 mag probes, the PRB also works with the TSP-DMS sensors
for containment sump monitoring.
Note: There are 8 inputs in the TS-608’s Probe Module.
Note: All components located in the hazardous area must be
Third Party Certied and have appropriate Entity Parameters (see Control Drawing 000-1722 in the back of this
manual for further information).
Probe Module Specications
Number of Channels: 12
Safety Rating: Class I, Division 1, Group D, [Ex ia] IIA
Entity Parameters
Uo = 28.35 V
Io = 157.5 mA
Co = 1.04 uF
Lo = 1.4 mH
Po = 1.1 W
Probe
Module
TS-608
–BLK/
SHLD
8
+Red
–BLK/
SHLD
7
+Red
–BLK/
SHLD
6
+Red
–BLK/
SHLD
5
+Red
–BLK/
SHLD
4
+Red
–BLK/
SHLD
3
+Red
–BLK/
SHLD
2
+Red
–BLK/
SHLD
1
+Red
RUN
ERR
12
11
10
9
8
7
6
5
4
3
2
1
Probe
Module
RUN
ERR
–Blk
+Red
–Blk
+Red
–Blk
+Red
–Blk
+Red
–Blk
+Red
–Blk
+Red
–Blk
+Red
–Blk
+Red
–Blk
+Red
–Blk
+Red
–Blk
+Red
–Blk
+Red
Non-Hazardous
Location
SHLD
- (BLK)
+ (RED)
Hazardous Location
Class I, Division 1, Group
D, Group IIA, Zone 0
SHLD
- (BLK)
+ (RED)
Probe
Vapor Flow Meter
20
Figure 17: TS-608 PRB Connections
Figure 18: PRB Connections
Page 21

2-Wire Sensor Module (2WSNS)
The 2-Wire Sensor Module (2WSNS) is designed to accept 12
sensor inputs per module, and the system as a whole can accept
a total of 36 sensors (3 modules with 12 inputs each). The 2WSNS
only supports standard sensors, and does not accept inputs from
BriteSensors. Refer to the diagram below to identify some of the
standard sensors that can be used with this module.
Note: Standard sensors do not use digital data. They operate
like ON–OFF switches, which are closed when no liquid is
present and open when a liquid is detected.
2-Wire Sensor
Module
RUN
ERR
12
11
10
Non-Hazardous
–Blk
+Wht
–Blk
+Wht
–Blk
+Wht
–Blk
9
+Wht
–Blk
8
+Wht
–Blk
7
+Wht
–Blk
6
+Wht
–Blk
5
+Wht
–Blk
4
+Wht
–Blk
3
+Wht
–Blk
2
+Wht
–Blk
1
+Wht
Location
- (BLK)
(WHT)
- (BLK)
Hazardous Location
Class I, Division 1, Group
D, Group IIA, Zone 0
2-Wire Sensor Module
Number of Channels: 12
Safety Rating: Class I, Division 1, Group D, [Ex ia] IIA
Entity Parameters
Uo = 6.51 V
Io = 2.04 mA
Co = 500 uF
Lo = 100 mH
Po = 3.3 mW
TSP-HLS
(high level sensor)
TSP-ULS
(universal liquid sensor)
Figure 19: 2-Wire Sensor Connections
Note: All components located in the hazardous area must be Third Party Certied and have appropriate Entity
Parameters (see Control Drawing 000-1722 in the back of this manual for further information).
21
Page 22

3-Wire Sensor Module (3WSNS)
The 3-Wire Sensor Module (3WSNS) is designed to accept 8
sensor inputs per module, and the system as a whole can accept
a total of 24 sensors (3 modules with 8 inputs each). The 3WSNS
can support standard sensors and BriteSensors®. BriteSensors
are powered sensors that digitally communicate the sensor–type
and alarm status of the sensor to the console. Most BriteSensors
can discriminate between water and hydrocarbon products and
produce different alarm codes for each. Refer to the diagram
below to identify the types of sensors that should be used with this
module.
3-Wire Sensor
Module
RUN
ERR
3-Wire Sensor Module
Number of Channels: 8
Safety Rating: Class I, Division 1, Group D, [Ex ia] IIA
Entity Parameters
Uo = 7.71 V
Io = 573 mA
Co = 500 uF
Lo = 433 uH
Po = 932 mW
+ (RED)
- (BLK)
(WHT)
- (BLK)
(WHT)
+ (RED)
TSP-EIS
(Electro-optical Interstitial sensor)
TSP-DTS
(Discriminating Turbine Sump)
TSP-ULS
(Universal Liquid Sensor)
–Blk
Wht
8
+Red
–Blk
Wht
7
+Red
–Blk
Wht
6
+Red
–Blk
Wht
5
+Red
–Blk
Wht
4
+Red
–Blk
Wht
3
+Red
–Blk
Wht
2
+Red
–Blk
Wht
1
+Red
- (BLK)
(WHT)
Figure 20 3-Wire Sensor Wiring
Important: Brite Sensors are not approved for use in European Union markets where ATEX approved devices are
required.
The Brite Sensors shown in this table are part of the UL & C-UL System Listing.
Model Description
TSP-EIS Electro-optical Interstitial liquid – Standard sensor
TSP-ULS Universal Liquid – Standard sensor
TSP-HLS-15 High product Level, 15" – Standard sensor
TSP-HLS-30 High product Level, 30" – Standard sensor
TSP-HIS Hydrostatic Interstitial reservoir – BriteSensor
TSP-DIS Discriminating Interstitial liquid – BriteSensor
TSP-DDS Discriminating Dispenser Sump – BriteSensor
TSP-DTS Discriminating Turbine Sump – BriteSensor
TSP-MWS Discriminating Monitoring Well – BriteSensor
The following sensors are not covered by UL / cUL approval
TSP-HIS-XL Hydrostatic Interstitial reservoir, extra long – BriteSensor
TSP-DVS Discriminating Vapor – BriteSensor
Note: Alternate sensors may be provided. All components located in the hazardous area must be Third Party Certied
and have appropriate Entity Parameters (see Control Drawing 000-1722 in the back of this manual for further
information).
22
Page 23

4-20mA Analog Input Module (420IB)
The Analog Input Module has 8 identical channels for loop powered
IS sensors with a 4-20 mA interface. The TS-550 evo series can
support up to 24 inputs (3 modules with 8 inputs each) depending
on available space in your console. The Analog Input Module
will most likely be used with: line leak pressure transducers, tank
pressure sensors and vacuum sensors.
4-20mA Input
Module
Analog Input Module Specications
Number of Channels: 8
Safety Rating: Class I, Division 1, Group D, [Ex ia] IIA
Entity Parameters
Uo = 26.25 V
Io = 98.2 mA
Co = 1.25 uF
Lo = 14.7 mH
Po = 0.64 W
RUN
ERR
Non-Hazardous
Location
Hazardous Location
Class I, Division 1, Group
D, Group IIA, Zone 0
–
+
–
+
–
+
–
+
–
+
–
+
–
+
–
+
- (BLK)
+ (RED)
- (White)
+ (BLK)
- (BLK)
+ (RED)
Vacuum
Sensor
LSU500
Tank Pressure Sensor
Figure 21: 420IB Connections
Note: All components located in the hazardous area must be Third Party Certied and have appropriate Entity
Parameters (see Control Drawing 000-1722 in the back of this manual for further information).
23
Page 24

Control Drawing
24
Page 25

25
Page 26

Warranty
For information concerning Franklin Fueling Systems’s warranties, please refer to the Franklin Fueling Systems Fuel
Management Systems Warranty Policy (P/N 000-1124).
Warranty Registration
After installation, make sure to return the Warranty Registration form to Franklin Fueling Systems. This form validates the
warranty as stated in Franklin Fueling Systems document 000-1124.
26
Page 27

Specications
Warning
The TS-550 evo console must be mounted in a location where explosive or ammable vapors are
not present, otherwise an explosion hazard will be created which can result in severe injury, death,
serious property damage and/or environmental contamination.
Console
Line Voltage: 90-250 V~
Frequency & Power: 50/60 Hz, 150 W maximum
Storage Temp.: -20° to 60° C (-4° to 140° F)
Operating Temp.: 0° to 40° C (32° to 104° F)
Operating Humidity: 0 to 95%, non-condensing
Cleaning: Cloth or sponge slightly dampened in mild
detergent
Splash Resistance: Not to be exposed to direct spray, splash
or drips
Location: Indoors in an ofce or in a non-hazardous
pollution degree 2 environment per
IEC60664
2-Wire Sensor Module
Number of Channels: 12
Safety Rating: Class I, Division 1, Group D, [Ex ia] IIA
Entity Parameters
Uo = 6.51 V
Io = 2.04 mA
Co = 500 uF
Lo = 100 mH
Po = 3.3 mW
AC Input Module
Number of Channels: 12 optically isolated
Input Voltage Rating: 110 – 240 VAC
Input Current Rating: 7 mA
4-20mA Analog Input Module
Number of Channels: 8
Safety Rating: Class I, Division 1, Group D, [Ex ia] IIA
Entity Parameters
Uo = 26.25 V
Io = 98.2 mA
Co = 1.25 uF
Lo = 14.7 mH
Po = 0.64 W
Probe Module
Number of Channels: 12 (8 in the TS-608)
Safety Rating: Class I, Division 1, Group D, [Ex ia] IIA
Entity Parameters
Uo = 28.35 V
Io = 157.5 mA
Co = 1.04 uF
Lo = 1.4 mH
Po = 1.1 W
3-Wire Sensor Module
Number of Channels: 8
Safety Rating: Class I, Division 1, Group D, [Ex ia] IIA
Entity Parameters
Uo = 7.71 V
Io = 573 mA
Co = 500 uF
Lo = 433 uH
Po = 932 mW
Low Voltage Input/Output Module
Number of Channels: 8 optically isolated inputs
4 analog outputs
Input Voltage Rating: 3 - 240 Volts AC or DC (AC is rms value)
Input Current Rating: 2 mA
Relay Module
Number of Channels: 8 Form C
Contact Rating: 2A @ 250V
2A @ 30 VDC
10 Amp Relay Module
Number of Channels: 6 Form C
Contact Rating: 10A @ 250V
or ½ hp @ 240 VAC
¼ hp @ 120 VAC
27
Page 28

©2011 FFS 000-2170 Rev. A
 Loading...