

Flowserve FlowAct Series, FlowAct 1502, FlowAct 253, FlowAct 503, FlowAct 3002 User Instructions
...Page 1
USER INSTRUCTIONS
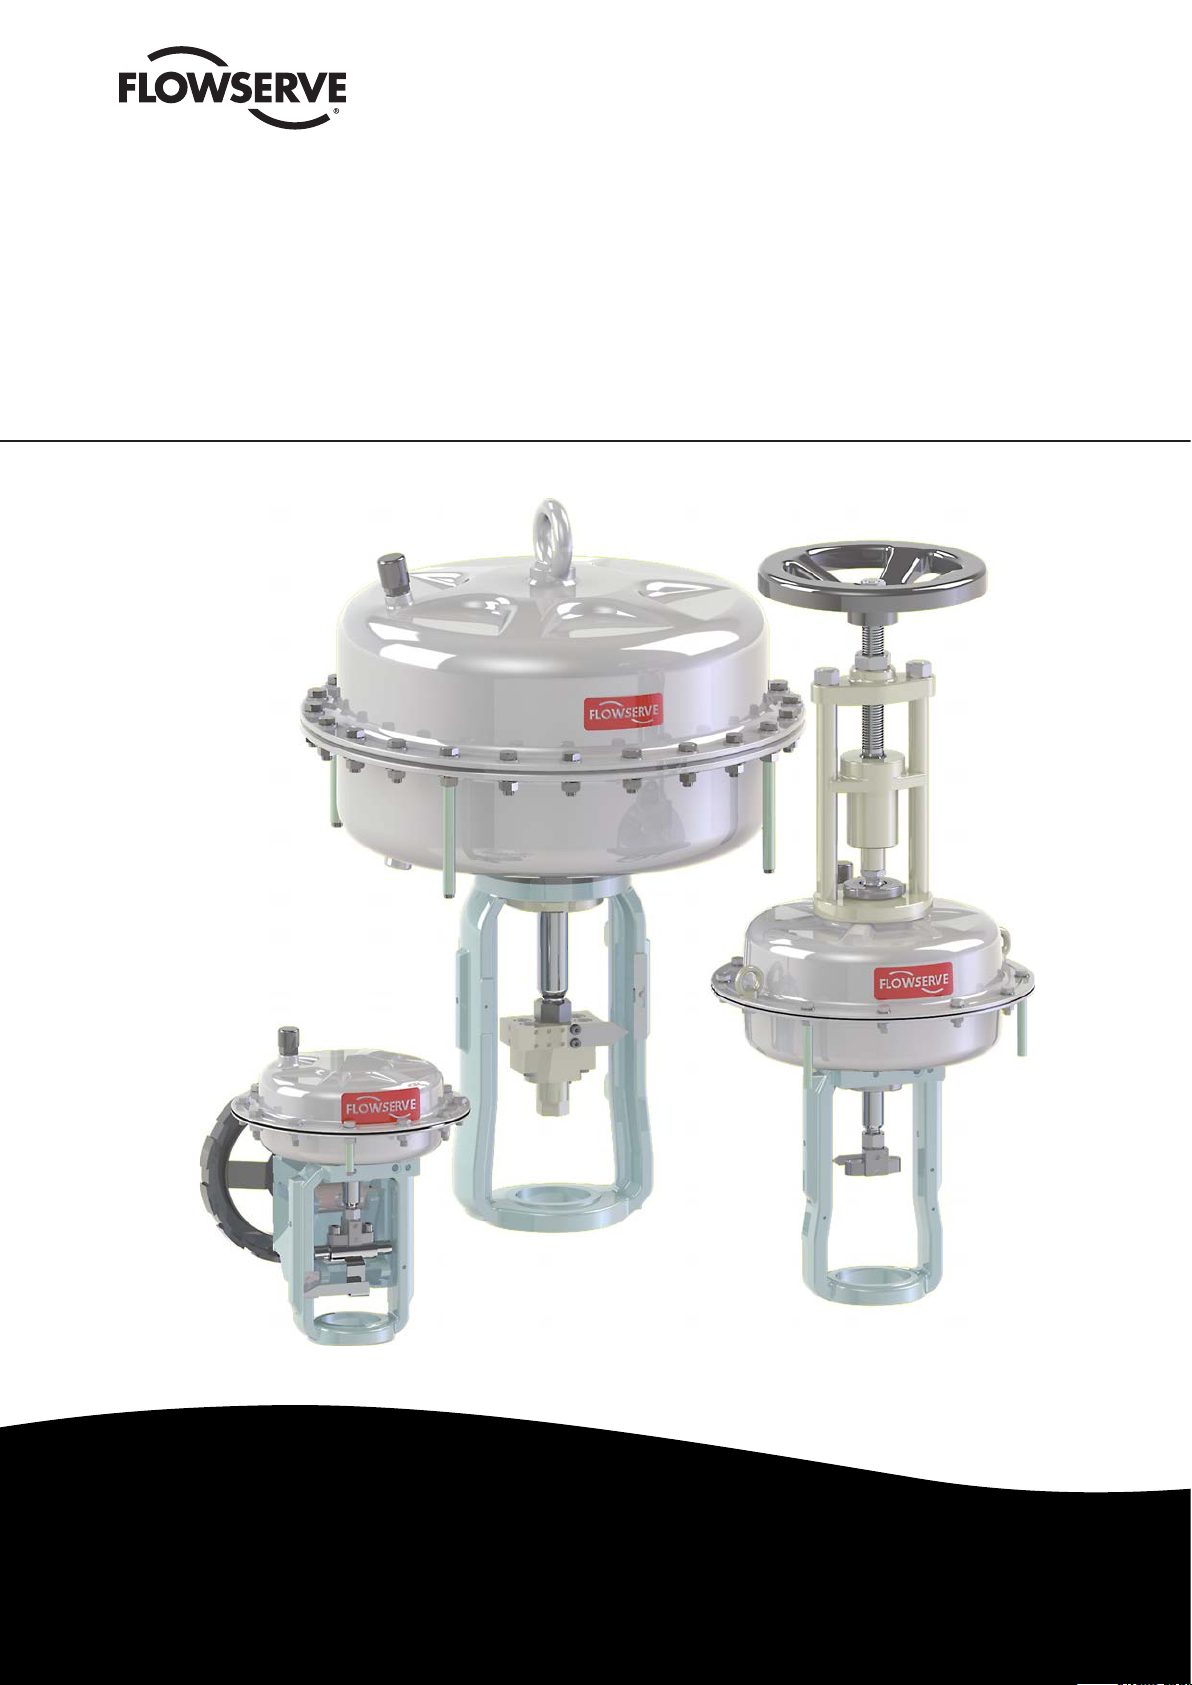
FlowAct
Diaphragm Linear Actuator
FCD VLENIMFACTA4 10/16
Installation
Operation
Maintenance
Experience in Motion
Page 2

FlowAct Diaphragm Linear Actuator FCD VLENIMFACTA4 10/16
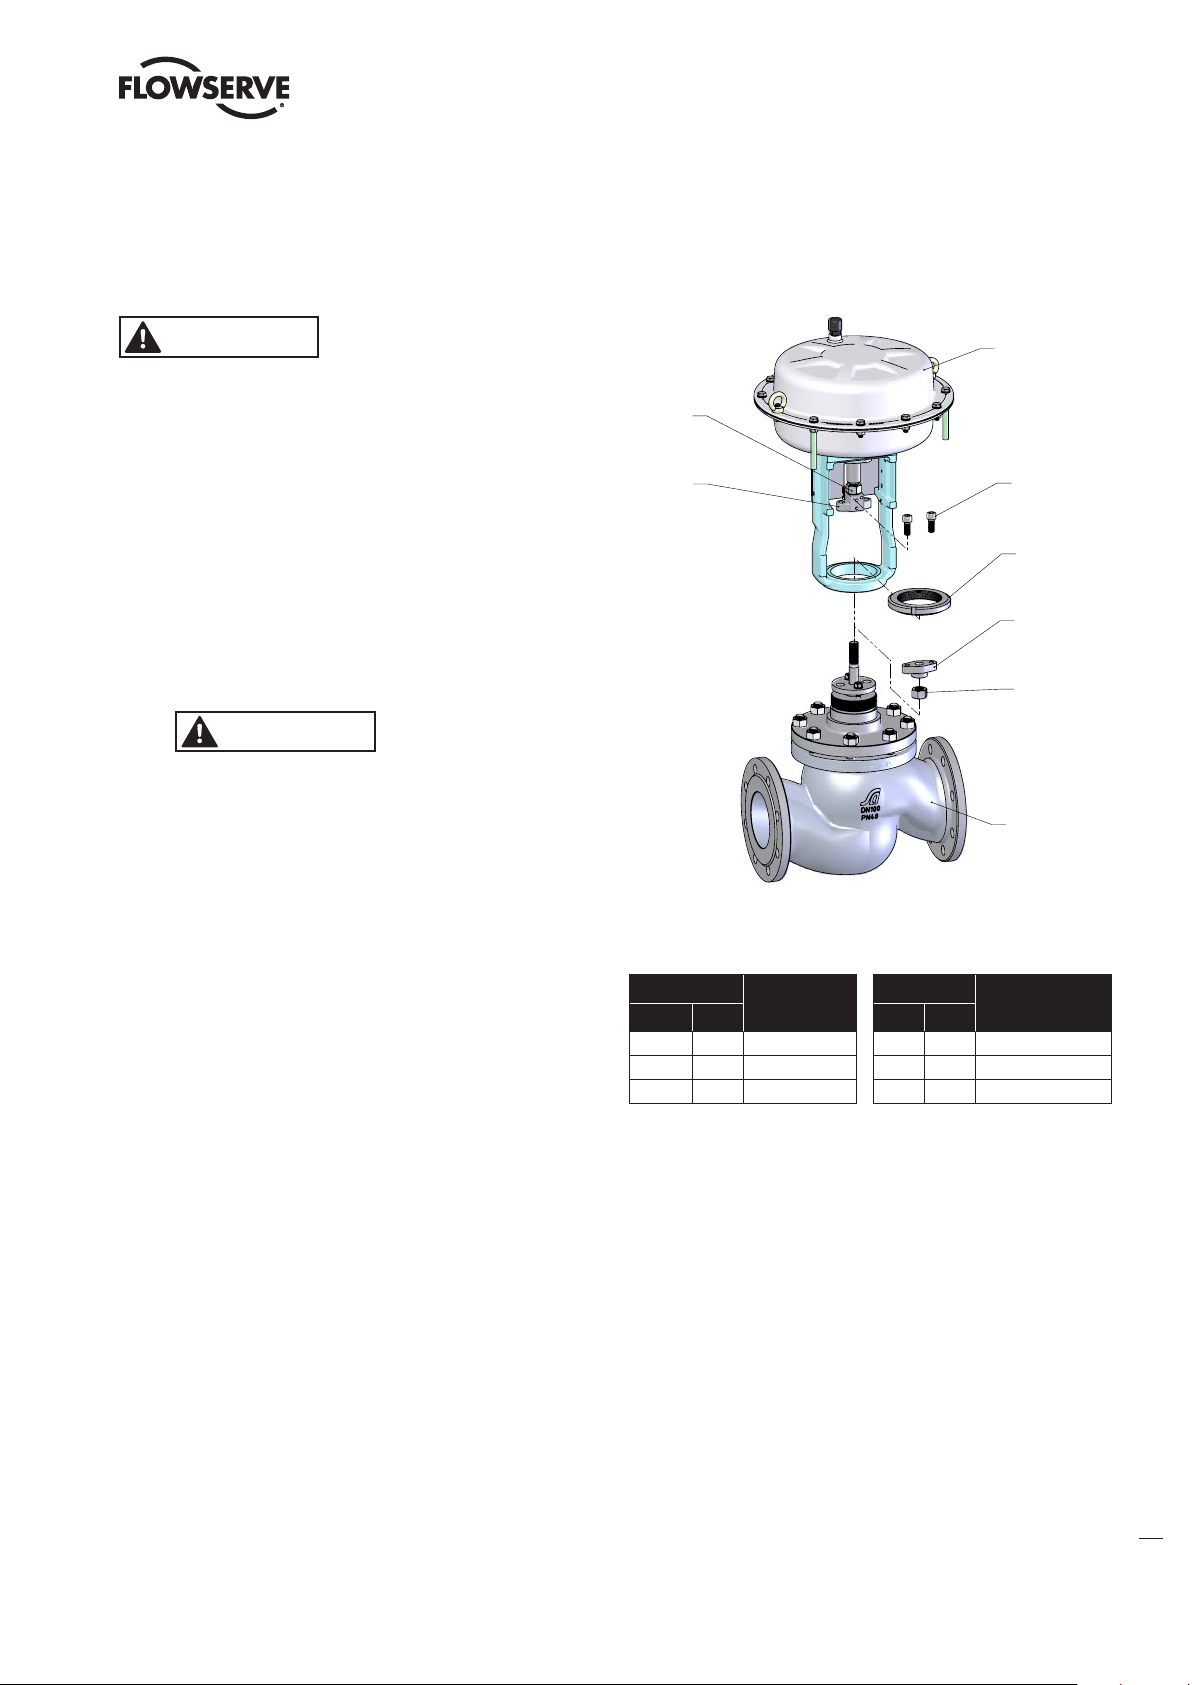
Diaphragm Linear Actuator - FlowAct
Diaphragm actuators take the form of a flexible diaphragm, placed between
two casings. The upper section of the two chambers is designed pressure
tight, the lower chamber holds a spring opposing the force generated within
the pressure chamber of the actuator. The controlled air supply is connected
to the pressure tight chamber, and an increase or decrease of the air pressure
results in a positioning force of the stem. This kind of actuator is called single
acting with spring return positioning force for linear motion. The linear motion
/ stroke is limited by a stroke range from 10 - 100 mm and a positioning force
range from 500 - 60.000 N dependent on the actuator size. The actuator parts are
designed so that the actuator can be assembled in two fail safe positions, close
or open. Simplicity of design reduces maintenance and parts inventory costs. It
is ideally suited for flow and pressure control of liquid and gas media in oil and
gas, power, chemical and petrochemical processing and related industries. The
FlowAct is manufactured to ISO 9001 standards.
The following instructions are designed to assist in unpacking, installing and
performing maintenance as required on Flowserve FlowAct diaphragm linear
actuators. This instruction manual does not include specific product design data.
Such data can be found on the actuator’s serial plate or specification documents;
additionally, dimensional information can be found in the FlowAct technical
bulletin. Procure needed documents as necessary before you begin any work
on the valve.
Figure 1: FlowAct - Actuator, Spring close
User Instructions cannot deal with all possible situations and installation options.
It is required that only trained and qualified technicians are authorized to adjust,
repair or work on diaphragm linear actuators, positioners and other accessories.
Review this bulletin prior to installing, operating or performing any maintenance
on the actuator. Additional Installation, Operation, and Maintenance Instructions
(IOMs) cover other features (such as positioners and other accessories).
To avoid possible injury to personnel or damage to actuator parts, WARNING and
NOTICE indicators must be strictly followed. Modifying this product, substituting
non-factory parts or using maintenance procedures other than outlined could
drastically affect performance and be hazardous to personnel and equipment and
may void existing warranties. This manual should be used in conjunction with
applicable local and national laws. Failure to comply with User Instructions will
render the manufacturer’s guarantee and liability null and void. Unless otherwise
agreed, the manufacturer’s general terms and conditions of sale shall apply.
Read the user instructions carefully before use.
Keep for future reference.
Figure 2: FlowAct - Actuator, Spring opens
Contents
1 Scope of Manual 3 7 Storage 4 13 Troubleshooting 12 - 13
2 Intended Use 3 8 Unpacking 4 - 5 14 Operating the Handwheel 13
3 Product Identification 3 9 Installation 5 - 8 15 Disassembly and Reassembly 13 - 73
4 Modification 3 - 4 10 Assembly on valve 8 - 10 16 Torque Requirements 74
5 Safety 4 11 Actuator Quick-Check 10 - 11 17 Lubricants 74
6 Packaging and Transport 4 12 Actuator Maintenance 11 - 12 18 Disposal 75
2
Page 3
FlowAct Diaphragm Linear Actuator FCD VLENIMFACTA4 10/16
1 Scope of Manual
The following user information covers the FlowAct diaphragm
linear actuator:
• Preferable for Flowserve - Villach valve product lines
• For the product range of
Type Positioning Force (N) Stroke (mm)
253 500 - 12 500 10 - 20
503 1 000 - 25 000 20 - 40
701 1 400 - 35 000 20 - 60
1502 3 000 - 60 000 20 - 100
3002 6 000 - 60 000 40 - 100
• Air supply max. 6 bar or as indicated on the type plate
• Protection class IP 54, with air purging IP 64
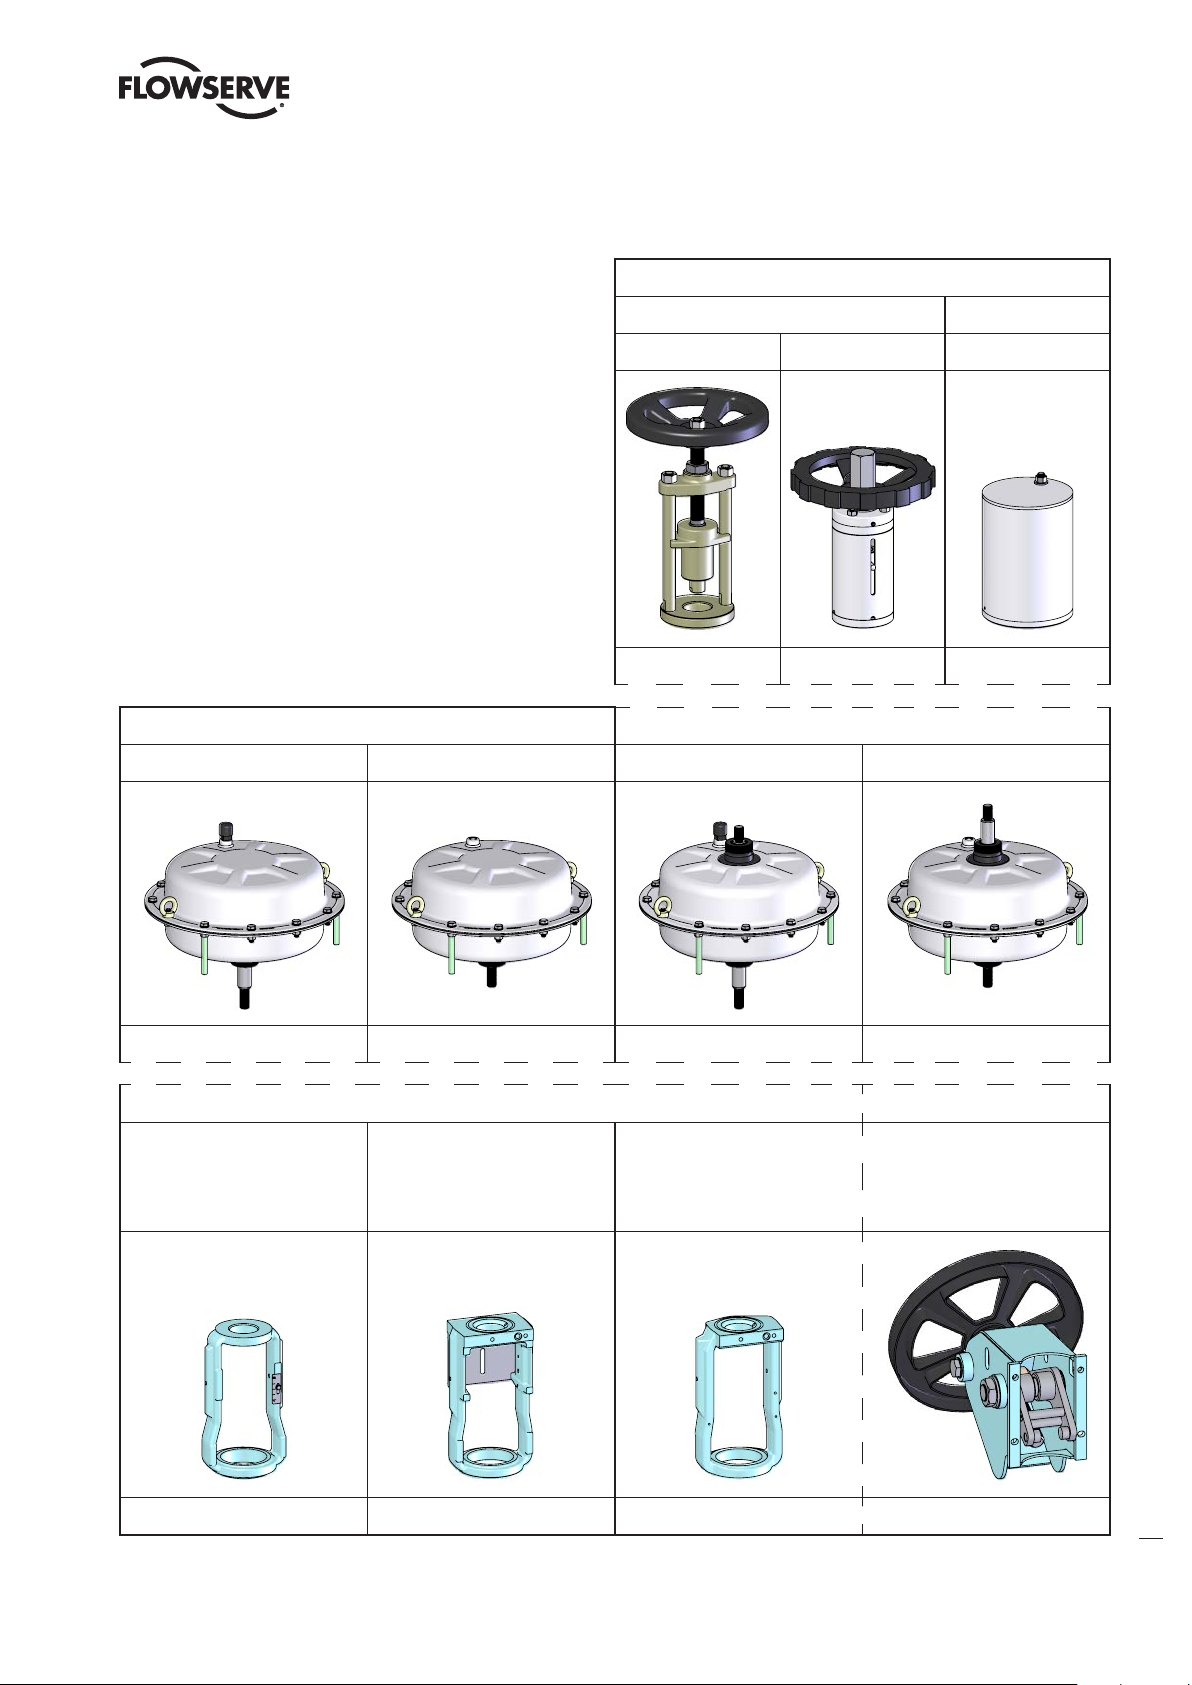
• Without or with attachments like:
- top mounted handwheel
- top mounted adjustable stroke limitation - max. 39 kN
- side-mounted handwheel - max. 39 kN
- central-mounted handwheel
components to match each application. There are two fail safe
positions, close or open without or with attachments.
The FlowAct is designed in compliance with EN 1349:2009
- Industrial Process Control Valves (DIN EN 1349 and VDE
0409-1349).
The FlowAct actuator is designed for use in MODERATE and
WORLDWIDE environmental conditions, standard ambient temperature range -40°C to +80°C (-40°F to 176°F). A special version is available with conditions up toup to -60°C, air humidity
up to 93% non-condensing, air pollution up to 300 µg/m3, (unless restricted by the accessories).
The product offering may include optional ancillary equipment,
such as positioners, air-filter regulators, solenoid valves, limit
switches or boosters. Digital, I/P, or pneumatic positioners
can be mounted direct or with a mounting bracket. Refer to
the relevant manufacturer‘s user instructions for information
regarding other ancillary equipment.
3 Product Identification
• Comes with or without ancillary equipment
2 Intended Use
WARNING
rated for specific application conditions. Before installation, check the serial number and / or the tag number to ensure that the valve and actuator being installed are correct
for the intended application. Do not use the valve assembly outside of its rated design limits. Exceeding the design
limits may cause hazardous conditions including leakage
of the process media or rupture of the pressure boundary
resulting in possible process loss, equipment or environmental damage, or serious personal injury or death.
Specific product design data can be found on the actuators
serial plate, data sheet and the calculation sheet (in acc. to the
IEC 60534-7:2010).
The FlowAct handles a wide variety of general service applications.
Diaphragm linear actuators are
pressure vessels designed and
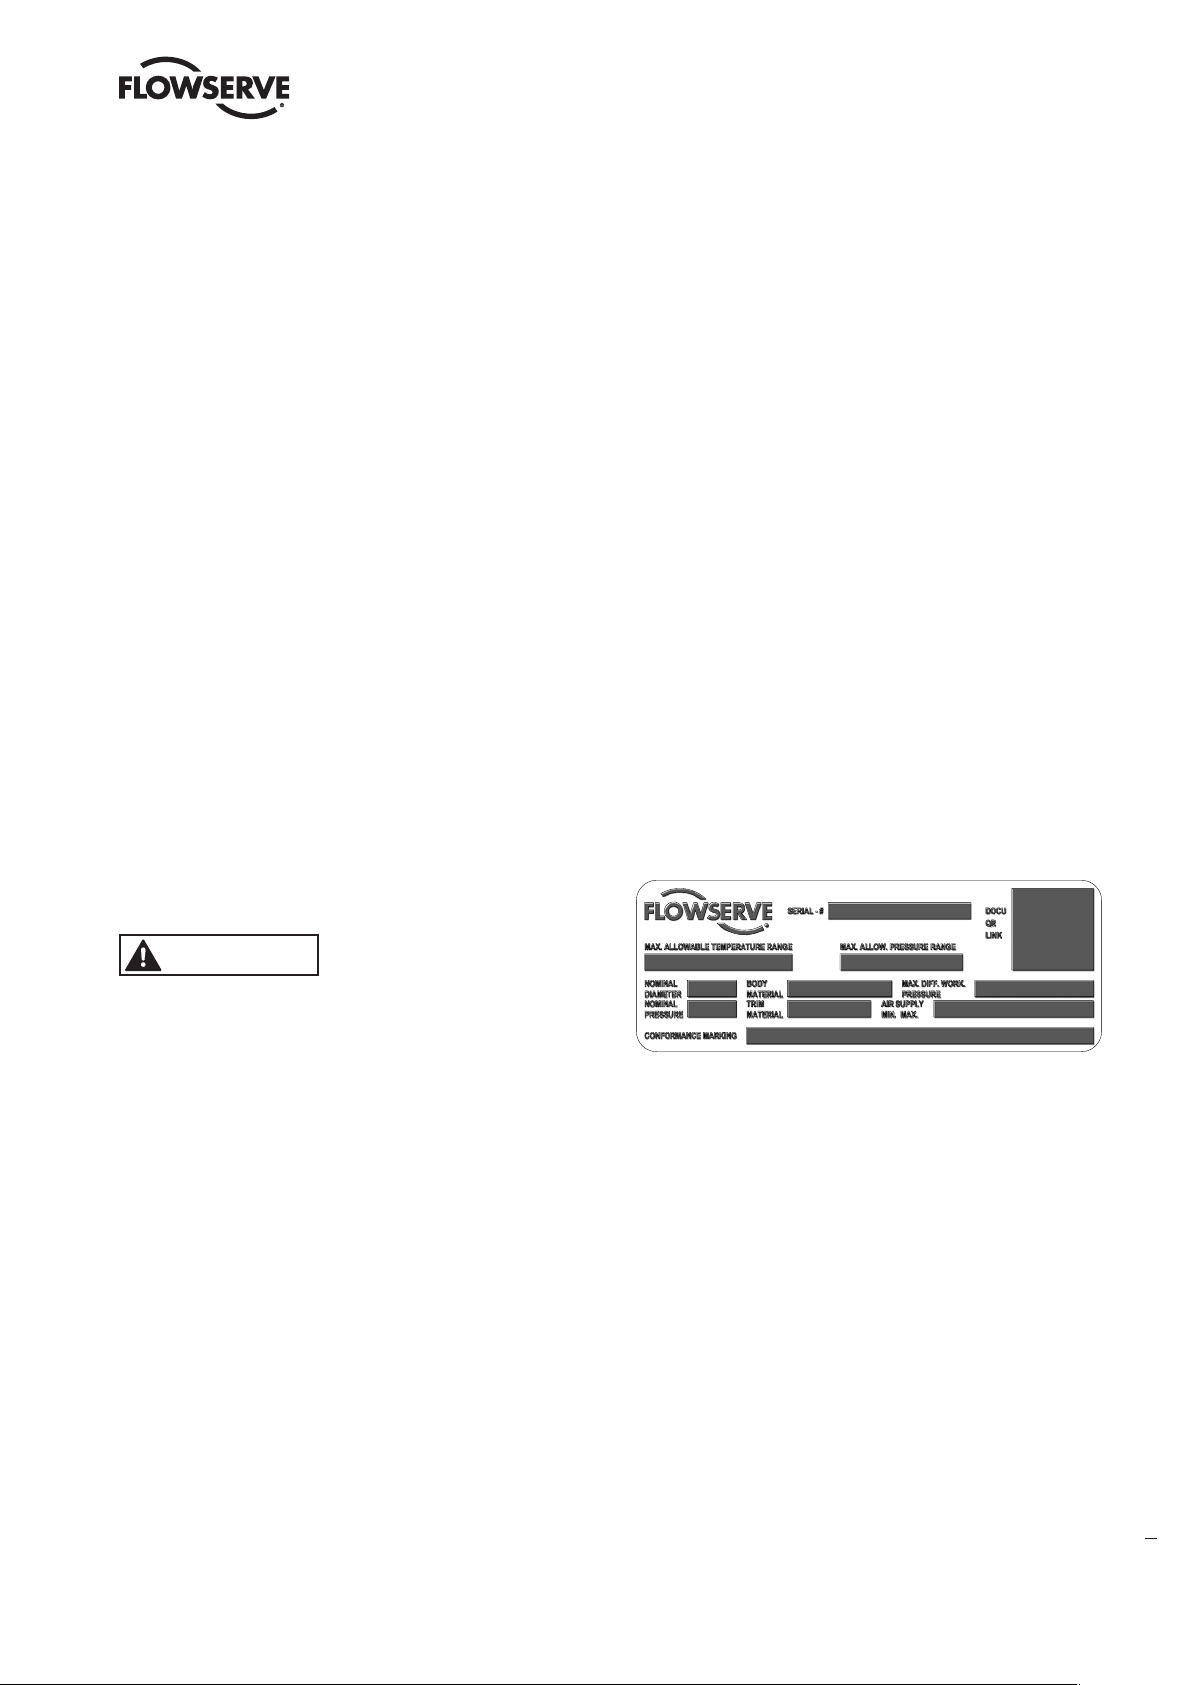
Each FlowAct diaphragm linear actuator comes with an attached serial plate which includes key information specifically
for each actuator:
Figure 3: Serial Plate (Example)
The same serial number shown on the plate will appear on all
FlowAct data sheets, dimensional drawings, bills of material,
and spare parts lists. Other information located on the serial
plate is self-explanatory for the FlowAct actuator.
You can download .pdf versions of the FlowAct documentation including a sales brochure, technical bulletin and user
instructions at www.flowserve.com. It is the user’s responsibility to keep this and related documentation on file and accessible for the FlowAct product.
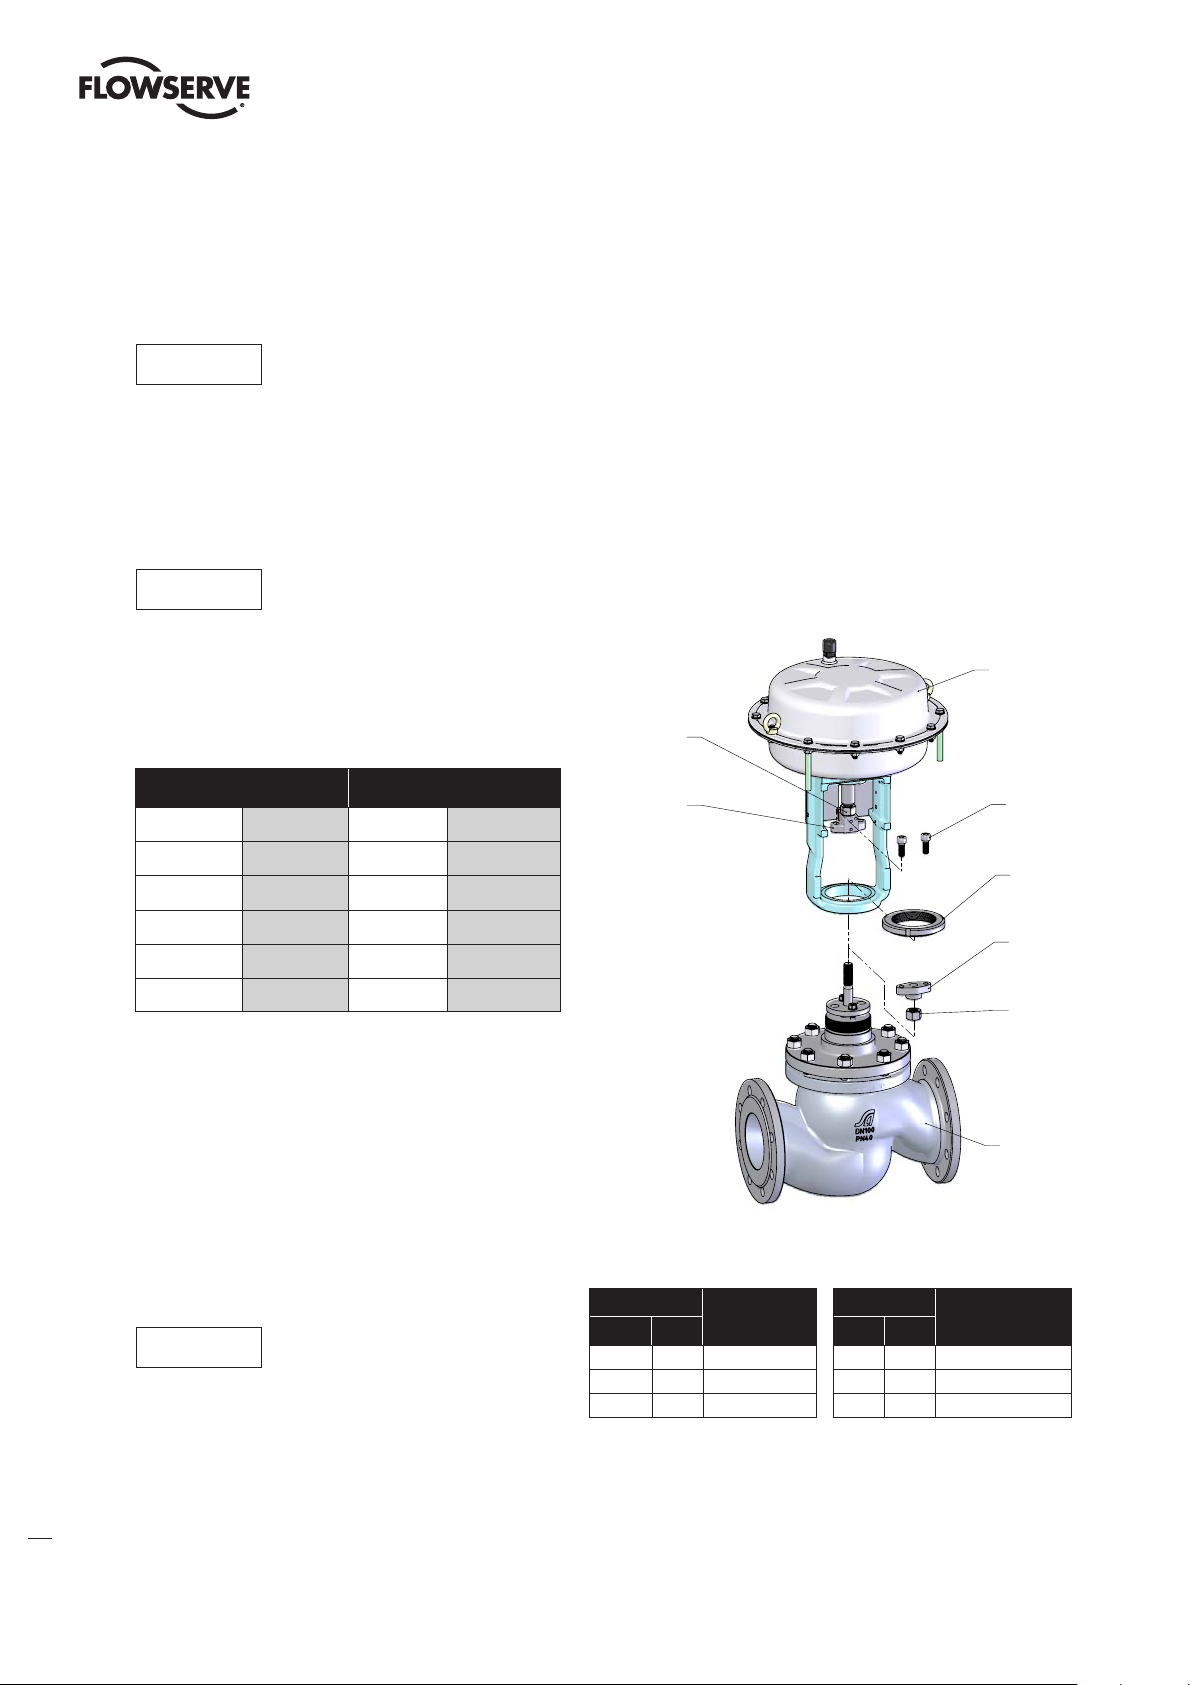
The FlowAct consists of the actuator, yoke and attachments
and accessories. The actuator is designed with a high level
of interchangeability allowing the user to assemble the greatest possible number of variations from a minimum number of
4 FlowAct Modification
FlowAct linear actuators are generally delivered as tested and
assembled units.
flowserve.com
3
Page 4
FlowAct Diaphragm Linear Actuator FCD VLENIMFACTA4 10/16
Unauthorized modification of the FlowAct diaphragm linear actuator voids the product test
certification and product warranties, could drastically affect product performance and could be
hazardous to personnel and equipment.
NOTICE
in compliance with all test routines, guidelines and engineering standards.
Before FlowAct re-installation, all necessary tests must be repeated and recorded
5 Safety
Safety terms - WARNING and NOTICE - are used to highlight
specific dangers and / or provide additional information
that may not be readily apparent in the User Instructions.
WARNING directions must be strictly followed.
follow HPE standards. (Nonreturnable packaging may contain
up to 90% recyclable materials.)
7 Storage
Maximum storage time for diaphragm linear
actuators is 2 years at 25 °C.
NOTICE
Upon arrival on site, store the FlowAct actuator on a solid base
in a cool, dry closed room. Until its installation, the actuator
must be protected from the weather, dirt and other potentially
harmful influences.
Do not remove the protective covers from the air supply connection of the actuator or from the instrument and accessories until the actuator is ready for installation at the site.
Rubber becomes brittle, lubricants become
resinous, see also ISO 2230.
WARNING
death and substantial property damage can occur if proper
precautions are not taken.
NOTICE indicates practices or provides
NOTICE
additional technical information.
or
WARNING indicates that
severe personal injury,
Grey fields indicate safety-related informations.
6 Packaging and Transport
Pay close attention to shipping marks and
transport pictograms.
Careful packing, loading and transport arrangements are required to prevent products from being damaged during transport. Standard packaging includes a cardboard box, with or
without a wooden pallet base as needed. Special packaging
may include a wooden box. Packaging may use cardboard,
plastic wrap, foam, or paper as packing material. Filling material may be a carton type or paper.
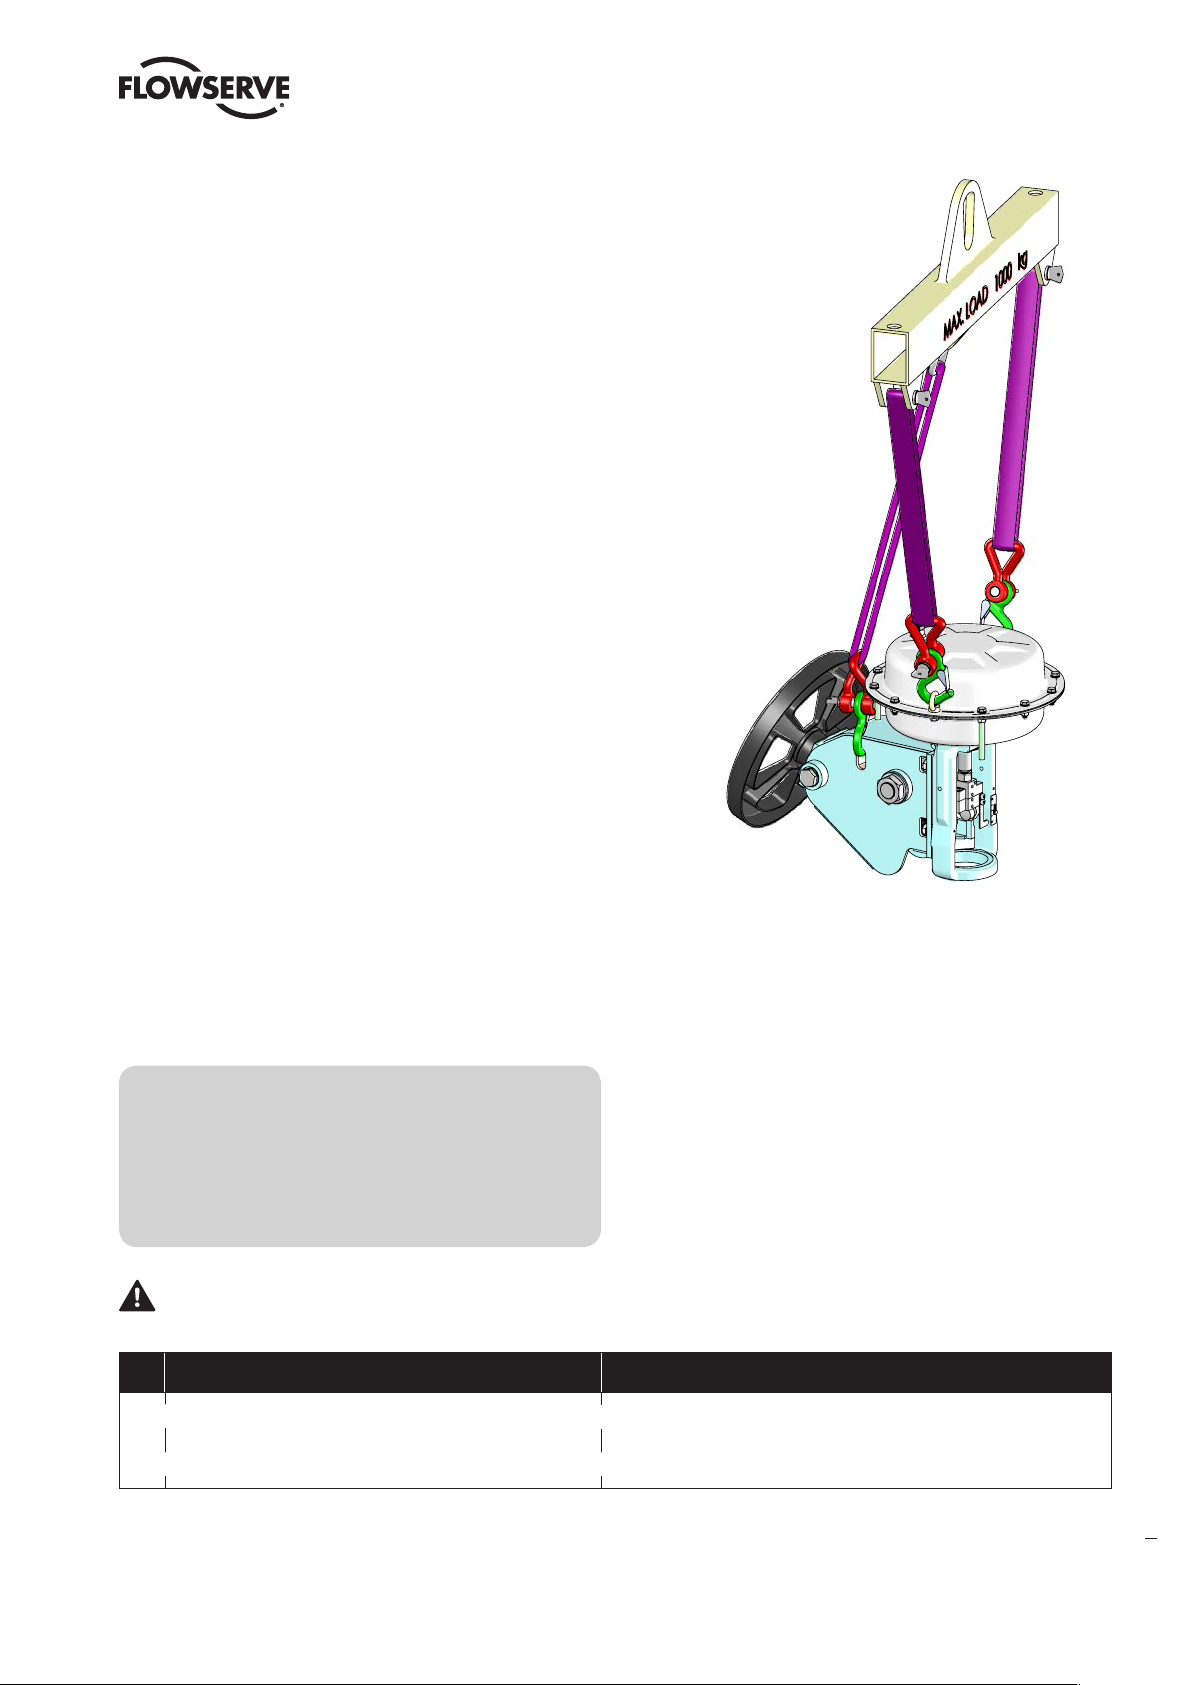
8 Unpacking
Hoisting and lifting are inherently dangerous
activities and require safe rigging and proper
training to mitigate hazards. Use standard industry safety practices, personal protection,
and warranted lifting devices.
WARNING
tuator. Do not allow the actuator assembly to rotate during
removal. Do not stand under suspended loads. Failure to
do so can cause serious personal injury and damage the
actuator or nearby equipment.
NOTICE
low the sling to touch the stem, travel indicator or peripheral
equipment. Observe the maximum permitted carrying capacity.
1. Check the packing list against materials received to
ensure all components and accessories are present.
Be aware that the center of gravity may be
above or beside the lifting point. Do not al-
Crushing hazard ! Arrange rigging to prevent tipping of the ac-
Shipping marks display product and package dimensions and
weight (for further information request Packaging and Sending Instructions, Form L 002). Packing guidelines for export
4
2. Place and hook a double-leg sling (if necessary a tripleleg sling) into the lifting rings mounted on the actuator.
Page 5
FlowAct Diaphragm Linear Actuator FCD VLENIMFACTA4 10/16
3. You can alternatively place a sling around the actuator
case just above the yoke.
4. Upon removing the actuator from the packaging, we
recommend that you:
• Promptly touch up any damage to the paint that of-
fers corrosion protection.
• Contact your shipper immediately to report any
damage.
• Call your Flowserve representative if you experience
any problems.
Do not remove the protective covers from the
air supply connection of the actuator or from the
instrument ports of the actuator and accessories
until the actuator is ready for installation at the site.
Figure 4: Triple-Leg Sling (Example)
9 Installation
The actuator must be installed and commissioned by qualified staff - personnel who are familiar with the installation, commissioning and
operation of this product and possess the relevant qualifications in their field of activity.
Prior to installation of the actuator, we require, that you check the following conditions to reduce the risk of malfunction and
safety related incidents.
No. Check Possible malfunction or safety related incident
1 Confirm that the nominal / operational data on the
serial plate matches the operational data of the
facility.
An operational mismatch can cause considerable damage to
the actuator or may lead to a failure at the facility.
Table 1: Basic safety massages for installing the actuator (continued on next page 6)
5
flowserve.com
Page 6

FlowAct Diaphragm Linear Actuator FCD VLENIMFACTA4 10/16
No. Check Possible malfunction or safety related incident
2 Confirm that the ambient temperature is not elevated
permanent above 160 °F (70 °C)(unless restricted by
the accessories).
3 Confirm that the air supply and instrument signal
lines are dry and clear of dirt and oil.
4 Confirm that the actuator and valve can be installed in
an upright position.
5 Confirm that the yoke and needed parts are available
for mounting on the valve.
6 Confirm that the valve stem and connecting parts
match.
7 Confirm the actuator has enough overhead clearance
to disassemble the valve from the pipeline.
A sustained exceeding of the permissible ambient temperature
of 18 °F (10 °C) may halves the lifetime of non-metallic components, such as diaphragms, O-rings and scraper rings.
At a minimum, the instrument air must conform to ISA- 7.0.011996 (ISO 8573-1 Compressed Air - Class 2) requirement or
those of the accessory manufacturer.
Non-upright positioning may result in premature wear.
Yoke - connection dimensions see page 7
Yoke - connection dimensions see page 7.
Minimum clearance zone see page 8
8 If there is an unused air connection ensure that it is
properly sealed (see page 7).
9 Confirm removal of all hazards and ensure appropriate
protective measures are in place.
10 Confirm the valve / actuator is grounded in order to
prevent an electrical discharge.
11 Throttling control valves are typically equipped with
a pneumatic actuator and valve positioner. Refer to
the appropriate positioner manual for connections
and maximum air supplies.
The venting chamber of the pneumatic actuator is always
equipped with a venting plug. The pneumatic actuator types
253, 503 and 701 have two air connectors joining the pressure-tight actuator housing. One of this air connectors is used
to control the actuator depending on the mounted accessories.
The remaining connector on the actuator (S) or on the yoke (T)
must be appropriately sealed. This feature is not applicable for
type 1502 and 3002.
none
Noncompliance may result in electrical discharges.
The air supply must be limited to less than 87 psig (6 bar)
per the actuator serial plate. An air filter regulator should be
installed to ensure that the supply pressure to the pneumatic
actuator does not exceed the air supply pressure indicated on
the serial plate.
Table 1: Basic safety massages for installing the actuator
After these requirements are confirmed the actuator can be installed and connected to the valve.
6
Page 7
FlowAct Diaphragm Linear Actuator FCD VLENIMFACTA4 10/16
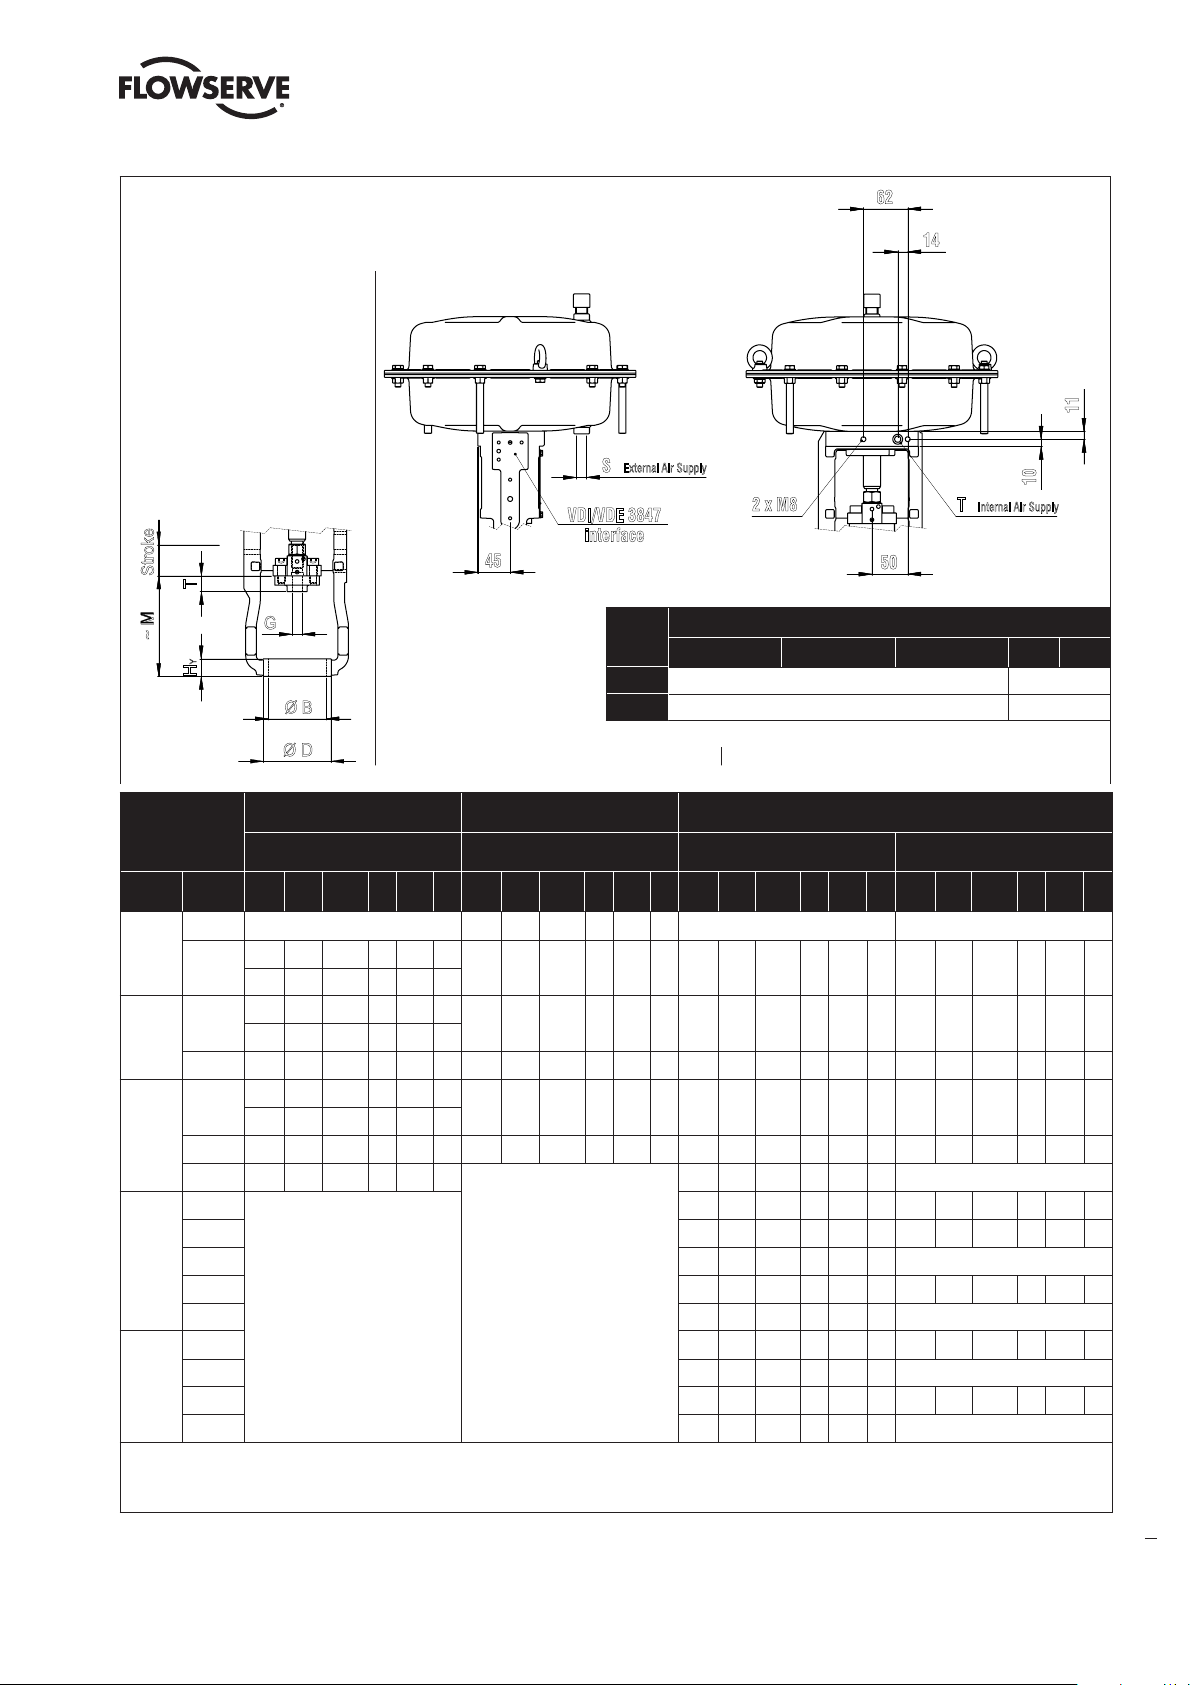
62
~ M
Stroke
50
62
10
11
14
2 x M8
T Internal Air Supply
Yoke - connection dimensions (mm)
S
External Air Supply
VDI/VDE 3847
interface
45
T
G
Supply
HY
Ø B
Ø D
Additional interface for MULTI function yoke only Additional internal air supply for IAS and MULTI-yoke only
14
2 x M8
50
Air
Actuator Size
250 500 700 1500 3000
G 3/8 (Plug acc. to DIN 908 & O-ring 10x2 mm - if appl.)
T
G 1/4 (Plug acc. to DIN 906 - if applicable, G 1/2 - DVGW)
S
11
10
T Internal Air Supply
-
G 1/2
Yoke dimensions
Size Stroke Ø B ~ M G T Ø D H
250
500
700
1500 20
3000 40 82 140 M16 29 105 25 82 140 M20 29 105 25
10 - 65 110 M12 23 95 20 - -
20
20
40 82 140 M20 22 110 25 82 140 M16 25 115 25 82 140 M16 16 115
20
40 82 140 M20 22 110 25 82 140 M16 25 115 25 82 140 M16 16 115 25 82 140 M20 20 115 25
60 82 148 M20 34 110 25
40 82 140 M16 29 105 25 82 140 M20 29 105 25
60 82 150 M20 29 105 25 -
80 82 140 M20 29 105 25 82 140 M20 29 105 25
100 82 140 M20 29 105
60 82 150 M20 29 105 25 -
80 82 140 M20 29 105 25 82 140 M20 29 105 25
100 82 140 M20 29 105 25 -
1)
ATTENTION: FlowPro with Nominal Size DN 25 or 1”, Stroke 20 mm:
IAS-Yoke for MULTI-Yoke for NAMUR-Yoke for
Valtek GS FlowTop, Valtek CS FlowTop FlowPro
Y Ø B ~ M G T Ø D HY Ø B ~ M G T Ø D HY Ø B ~ M G T Ø D HY
49 106 M12 18 75 20
65 106 M16 18 90 20
49 144 M12 54 75 20
65 145 M16 59 90 20
49 144 M12 54 75 20
65 145 M16 59 90 20
-
65 105 M12 23 95 20 65 105 M12 12 95 20 82 150 M16 16 115 25
65 105 M12 23 115 20 65 105 M12 16 95 20 82 150 M16 16 115 25
25 82 140 M20 20 115 25
65 105 M12 23 115 20 65 105 M12 16 95 20 82 150 M16 16 115 25
82 150 M20 20 125 25 -
65 105 M12 29 110 20 82 150 M16 20 110 20
25 -
Packing Design -> adjustable -> Ø B = 65 mm, M = 105 mm, G = M12, Ø D = 95 mm and HY = 20 mm only !
Packing Design -> spring loadet -> Ø B = 82 mm, M = 170 mm, G = M12 only !
Table 2: Basic safety massages for installing the actuator
1)
, VariCool
flowserve.com
7
Page 8
FlowAct Diaphragm Linear Actuator FCD VLENIMFACTA4 10/16
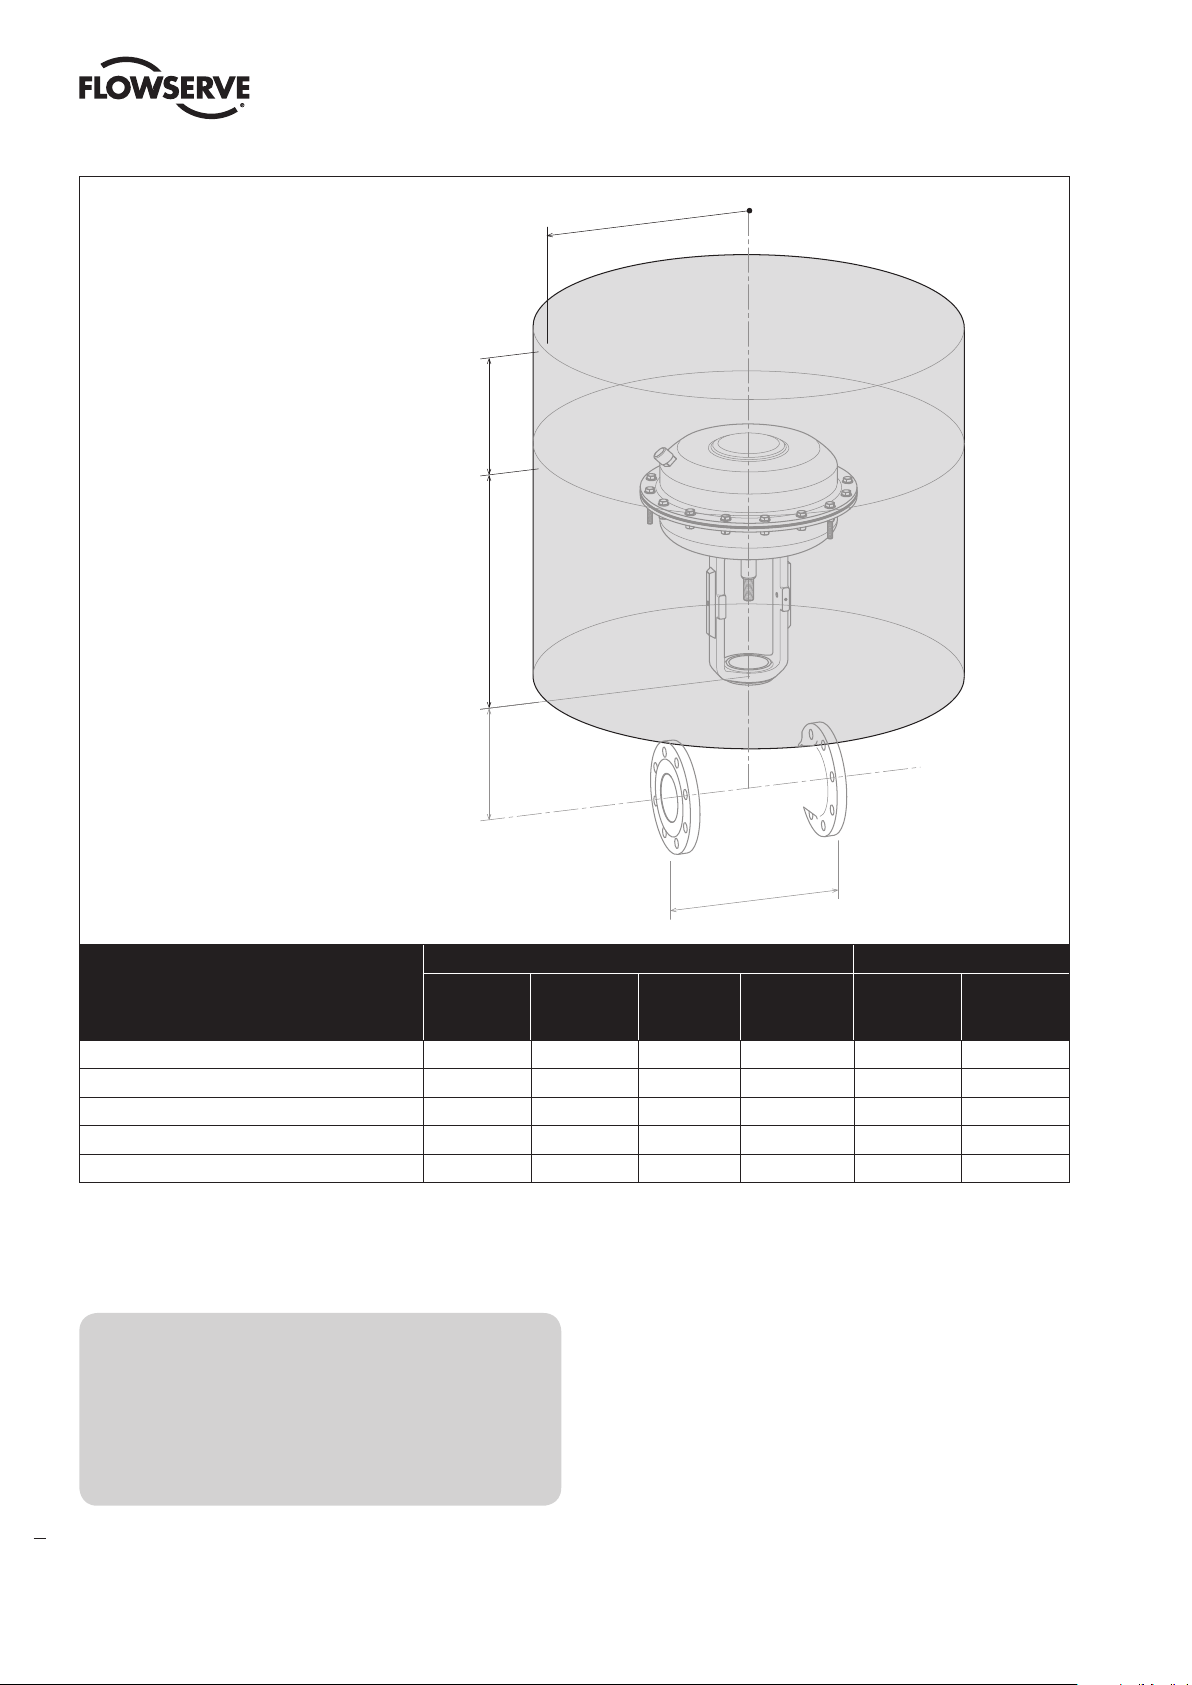
Minimum Clearance Zone
~ 180 mm
for actuator
~ 7.1 inch
Removal space
~ H
valve
Height of
~ R
Face to face
Figure 5: Overhead clearance drawing
~ R ~ H
Actuator Size
250 mm 135 195 290 - 335 595
500 mm 180 195 330 - 460 870
700 mm 205 205 345 - 600 925
1500 mm 275 - 415 685 800 -
3000 mm 275 - 415 685 1140 -
without
accessories
Table 3: Overhead clearance dimensions / drawing
accessories
direct mounted
accessories
NAMUR -
mounted
dimensions
side mounted
hand wheel
with
without
hand wheel
10 Assembly on valve
structions using only original equipment manufacturer
The FlowAct diaphragm linear actuator is allowed to be assembled and reassembled only
by qualified staff - personnel who are familiar
with assembling, reassembling, installation and
commissioning of this product, and possess the
relevant qualifications in their field of activity.
8
When performing repairs, personnel are to follow these in-
(OEM) spare parts and recommended special tools to ensure
the reliability of the FlowAct diaphragm linear actuator.
Only Flowserve trained and authorized personnel are allowed
to repair (disassemble and reassemble) the FlowAct in hazardous areas.
Actuators for oil and grease-less service or oxygen service
may only be disassembled and reassembled in clean rooms
(ISO 14644- ISO 8, US FED STD 209 E - M 6.5, or equivalent).
max
with
top mounted
hand wheel
Page 9

FlowAct Diaphragm Linear Actuator FCD VLENIMFACTA4 10/16
WARNING
Diaphragm linear actuators are pressure vessels.
Improper opening of the actuator can result in bodily injury.
Actuator assembly procedure
1. Fix the valve on the assembly table.
NOTICE
mounting position !
2. Lubricate all threads with a suitable, approved lubricant (see Section 16).
3. Mount the actuator / yoke and yoke lock nut (76) onto
the valve bonnet.
4. Finger tighten and fix the yoke lock nut; turn clockwise
(see Section 15).
NOTICE
The orientation of the valve must be
in accordance with the appropriate
The legs of the yoke should be parallel to the flow direction !
14. The valve is ready for the mounting of the accessories.
Actuator
344
249
240
76
345
113
5. If the fail safe position at air failure moves the stem
into closing position then must the actuator connected
with the air supply to move the stem into the open
(retracted) position (in most cases).
WARNING
tween the yoke legs while the valve is in operation.
6. Mount the lock nut (113) and lower coupling (345)
onto the valve stem.
7. Justify the plug against the seat.
8. Adjust the distance between the lower coupling (345)
ant the upper coupling (249) with the aid of an adapter
in stroke height (Figure 7).
9. Disconnect the air supply so that the actuator moves
to the close position.
10. Mount the cap screws (240).
11. Lock the lock nut (113). Secure the upper coupling
(249) against turn unwanted with a wrench.
Due to risk of crushing
hazard, do not work be-
Valve
Figure 6: Yoke assembly drawing
Item
WW
76 5.10 Yoke lock nut 249 5.3 Upper coupling
113 5.2 Lock nut 344 5.4 Lock nut
240 5.5 Cap screw 345 5.1 Lower coupling
Part
EU
Table 4: Coupling parts identification
Item
WW EU
Part
12. Adjust the stroke indicator scale so that the zero mark
is in conjunction with the stroke indicator.
13. Perform three full strokes and check if the stroke indicator scale correspond with the end positions.
Stroke
Figure 7: Stroke adjusting
9
flowserve.com
Page 10
FlowAct Diaphragm Linear Actuator FCD VLENIMFACTA4 10/16
Reassemble the valve into the pipe
1. Remove the protective flange covers and coating from
the control valve; clean the flange gasket surface.
NOTICE
graphite gaskets. Review a current chemical resistance list before applying.
Unsuitable cleaning agents can damage and cause leakage in PTFE and
11 Valve Quick-Check
Apply appropriate personal protective equipment when working on the control valve to
prevent hazards arising from the operation.
Protect yourself against freezing, burns and
cuts by wearing appropriate protective clothing, gloves and eye protection.
2. Install the valve so that the actuator is in an upright position whenever possible. Vertical installation permits
easier actuator maintenance.
3. Install and connect the control valve to the pipeline.
Locate gaskets in the center of the body flanges and
secure nuts and bolts.
4. Connect the air supply and instrument signal lines.
Do not over-tighten packing.
Sudden exposure of the control valve to full
working pressure and temperature may cause
stress cracks.
Prior to valve operation, we require, that you check the following conditions to reduce the risk of malfunction and safety
related incidents.
No. Important information Possible malfunction or safety related incident
1
Avoid critical operating conditions where excessive noise
or vibration levels might occur.
2
Avoid frequent system start-ups and shutdowns. Critical operating conditions, which can damage the
3
Keep the operating medium free of foreign particles. Installing a suitable strainer upstream of the control valve
4
Instrument air must conform to ISA 7.0.01-1996 (with a dew
point at least 18 °F (10 °C) below ambient temperature, particle size below 1 µm and oil content not to exceed 1 ppm)
5
6
Do not touch the body and bonnet ! The temperature of the operating medium is transferred to the
surface of the linear actuator.
Critical operating conditions can cause excessive or hazardous levels of vibration or noise.
Impermissible continuous operation of a control valve
under critical conditions can damage the valve.
control valve, may be encountered during system start-up
or shut down.
can prevent foreign particles from damaging the valve.
Contaminated instrument air can damage the accessories
and diaphragm linear actuator or cause them to fail.
Excessive hot surface temperatures can put you at risk for
burns.
Frigid surface temperatures can put you at risk for
freezing.
Impermissible levels of vibration can cause hearing
loss, vascular and nerve damage and damage to joints
and bones. Use hearing protection when noise levels
exceed 80 dB(A).
10
7
Incorrect maintenance can result in the emission
of hot, cryogenic, and / or toxic operating media.
Table 5: Basic safety massages for operating the valve
Incorrect maintenance can put you at risk for heat
related burns, freezing, acid burns or poisoning.
Page 11
FlowAct Diaphragm Linear Actuator FCD VLENIMFACTA4 10/16
WARNING
while the valve is in operation.
Prior to start-up, we strongly recommend that you:
1. Stroke the valve and compare the plug position
indicator on the stem clamp to the stroke indicator
plate. The plug should change position in a smooth,
linear fashion.
NOTICE
such as PTFE. If over tightened, excessive friction may
impair smooth control.
2. Adjust instrument signals to ensure a full stroke.
Due to risk of crushing hazard, do
not work between the yoke legs
Graphite packing commonly creates
more friction than other materials,
12 Actuator Maintenance
Maintenance intervals and service life of an actuator is unique
to local environmental conditions at the site. The intervals
specified in the User Instructions are recommendations and
serve only as a guide. Under difficult operating conditions,
maintenance may be more frequent. We strongly recom-
3. Check the packing box bolting to ensure the correct
adjustment.
NOTICE
that may impede plug movement.
4. Continuously increase load until operation parameters
are reached.
5. Minor relaxation of the flange bolting is possible after
initial assembly. Retorque the bonnet flange bolting
if necessary before installation or following an initial
temperature excursion to ensure the bonnet gaskets
do not leak.
(See User Instructions - Control Valve).
mend a site survey followed by a documented procedure for
performing the maintenance work. Maintenance personnel
should perform and log the work accordingly. The data collected can be used as a basis for dynamically determining the
maintenance intervals and activities.
Over tightening can cause excessive
packing wear and high stem friction
Recommended Maintenance Actions
No.
1 Visual inspection of
2 Visual inspection of
3 Visual inspection of
4 Operation test
Recommended maintenance actions using the Logix digital positioner with ValveSight diagnostic solution software
5 Visual inspection of
diagnostic interface
6 Check health parameter
of actuator
7 Check health parameter
of positioner
Service
the actuator
the tightness
Preventive maintenance
of the diaphragm
case bolting
Inter-
val
Bi-
weekly
Bi-
weekly
Yearly No action Retighten case bolting if
Weekly No action -
Warn-
ing
Warn-
ing
Good Adequate Inadequate
No action Clean actuator stem with a
soft cloth
No action Retighten leaky air supply,
case bolting
Dependent upon results of previous maintenance (see numbers 1 and 2 above) or a
minimum of once every 10 years
diaphragm leaks.
No action Perform 3 full strokes using air supply; check for leakage
Take action per warning Overhaul or replace required part per
valve is healthy
No action -
actuator is
healthy
No action positioner
healthy
is
Check and retighten air
supply
Start step test Overhaul or replace positioner after
Valve Condition
Repair or replace actuator according to
product life cycle
Replace leaky air supply, diaphragm,
O-ring immediately
Remove from service and replace
case bolting, diaphragm immediately if external leakage persists or
if bolting is damaged
alarm
Overhaul or replace actuator after
alarm
alarm
Table 6: Service activities check list
11
flowserve.com
Page 12
FlowAct Diaphragm Linear Actuator FCD VLENIMFACTA4 10/16
Prior to valve maintenance it is required that you check the following conditions to reduce the risk of malfunction and safety
related incidents.
No.
1 Check for signs of leakage through the case bolting
and end flanges.
2 Check if all nuts and bolts are securely fastened.
3 Check valve for smooth, full-stroke operation. Un-
steady stem movement could indicate an internal
valve problem.
WARNING
from all moving parts when operating the control valve can
cause serious injury.
1. Clear all dirt and / or foreign material from the shaft
and control valve.
2. If leakage is detected, retighten the bolting.
3. Activities on the valve, see separate document.
Check Possible malfunction or safety related incident
Table 7: Basic safety massages for maintenance the valve
Crushing hazard ! Failure to keep
hands, hair, and clothing away
Tighten the case bolting nuts. See Section 14: Disassembly and
Reassembly for instructions. Also see Section 15.
Avoid critical operating conditions if excess noise or
vibration levels occur during operation.
Internal valve failure requires an immediate overhaul or actuator replacement by qualified stuff.
6. Make sure all accessory brackets and bolting are
securely fastened.
7. Check control valve health parameters:
• Characteristic curves of the valve with flow
• Upstream pressure
• Downstream pressure
4. Make sure all nuts and bolts are securely fastened.
5. If possible, stroke the valve and check for smooth,
full-stroke operation. Unsteady stem movement could
indicate an internal valve problem.
into the control room.
NOTICE
differ by more than 5%, maintenance may be required.
Monitor trim and bonnet components. If nominal and actual values
13 Troubleshooting
Contact customer service department or contract partner for any fault or defect found, otherwise
the manufacturer‘s guarantee shall be rendered null and void and the manufacturer released from
any responsibility. If the user performs the repairs, these User Instructions must be adhered to and
carried out in a competent manner. Original Equipment Manufacturer spare parts must be used to
make the repair.
Defect No. Possible Causes Remedy
Stem does not move 1.1 • No energy supply (pneumatic air)
to actuator and accessories (positioner, air filter regulator, solenoid
valve, limit switch, and/ or special
accessories)
• Pneumatic actuators:
Check supply for leaks
Check air pressure (usually 6 bar; 88 psig)
12
1.2 • Mounted accessories do not work • See User Instructions for accessory manufacturer
1.3 • Pneumatic actuator is defective • Contact customer service department or contract
partner
Page 13
FlowAct Diaphragm Linear Actuator FCD VLENIMFACTA4 10/16
Defect No. Possible Causes Remedy
Jerky stem movement 2.1 • Damaged stem • Contact customer service department or contract
partner
2.2 • Actuator not powerful enough • Compare actuator specifications on the serial
plate with operation specifications of the facility. If
incompatible, contact customer service department
or contract partner
Stem travel less than full stroke
(0 to 100 %)
No limit switch signal 4.1 • Power supply to limit switch
Unstable positioner 5.1 • Defective positioner • See user instruction of the positioner manufacturer
14 Operation of the handwheel
WARNING
during regular operation. Actuation is only permitted with
separated air supply !
1. The handwheel is always in the neutral position in the
delivery condition.
2. The handwheel are designed to act against the fail
safety position of the actuator. That means in the
case of an pneumatic actuator design with restoring
springs.
3.1 • Air supply pressure too low • Provide air at the pressure stated on the serial plate
(European production only).
3.2 • Pneumatic actuators:
Improper handwheel position
3.3 • Improperly adjusted or defective
positioner
3.4 • Foreign particles in valve seat or
damaged trim
interrupted
4.2 • Limit switch out of adjustment • Readjust limit switch operating distance; see limit
Table 8: Trouble-shooting
Due to risk of crushing hazard,
do not work with the handwheel
3. All handwheel designs are immediately ready for use,
4. Check the progress of the stroke adjustment on the
5. If normal operation is to be resumed, the handwheel
• Move handwheel to limit position , otherwise
contact factory for information.
• Readjust positioner to positioner manufacturer‘s
specification
• Contact customer service department or contract
partner
• Check power supply
(connections, circuit breakers, voltage)
switch data sheet
NOTICE
out the actuator the handwheel has no function.
except the lateral handwheel for the 1502 and 3002
actuator. In the event of fail safe position - spring-to-
open (retracted) - before using, the handwheel must
turned counterclockwise up to contact the drive pin the
coupling and subsequently locked.
stroke indicator scale.
must be turned always to the neutral position.
When adjusting, then the handwheel
press against the spring force - with-
15 Disassembly and Reassembly
The FlowAct linear actuator is allowed to be disassembled and reassembled only by qualified staff
- personnel who are familiar with disassembling, reassembling, installation and commissioning
of this product, and possess the relevant qualifications in their field of activity.
flowserve.com
13
Page 14
FlowAct Diaphragm Linear Actuator FCD VLENIMFACTA4 10/16
When performing repairs, personnel are to follow these
instructions using only original equipment manufacturer
(OEM) spare parts and recommended special tools to ensure
the reliability of the FlowAct linear actuator.
Only Flowserve trained and authorized personnel are allowed
WARNING
Prior to disassemble and reassemble, we require, that you check the following conditions to reduce the risk of malfunction
and safety related incidents.
No. Important information Possible malfunction or safety related incident
1 Disregarding these instructions may bring serious or
harmful consequences.
2
Always observe system safety instructions
when preparing for and performing the repair
procedure.
Pneumatic actuator are pressure vessels.
Improper opening of the actuator can result in bodily injury.
to repair (disassemble and reassemble) the FlowAct in hazard
areas.
Actuators and valves for oil and grease-less service or oxygen
service only be disassembled and reassembled in clean rooms
(ISO 14644- ISO 8, US FED STD 209 E - M 6.5, or equivalent).
Failure to comply with these user instructions will render
the manufacturer‘s guarantee and liability null and void.
Unless otherwise agreed, the manufacturer‘s general
terms and conditions of sale shall apply.
Potential hazards and their sources are under the operator‘s
influence. The operator must observe national and international environmental regulations for control valve removal
from the pipe and cleaning. Permissible exposure limits
must be maintained, appropriate personal protective equipment must be used and service personnel must be properly
instructed in performing the repair procedure.
3 Make sure the pipeline is depressurized an in
ambient state, also a suitable rigging (e.g.
Endless Sling) and securing devices (e.g. Vee Trough
with Stands / Vise) are readily available.
4 Confirm that you have the required spare parts at the site. Not having the full complement of parts, accessories and
5
6 Review the serial plate information to identify the actua-
7 Check all parts for damage such as scoring, deformities,
Confirm that you have the required tools avail-
able to manage the disassembly and reassembly
(Special Tools on request !).
tor. The serial number and the part numbers needed are
required when ordering spare parts.
corrosion or overexpansion.
Table 9: Basic safety massages for repairing the actuator
Remove the valve / actuator from the pipeline in a depressurized and ambient state. Failure to do so can cause serious personal injury.
The control valve is not equipped with integral stands,
therefore guard against the valve from tipping over. Bodily
injuries can be the result. Use appropriate clamps, blocking or other stabilizing support. Attachment to overhead
crane can ensure stability.
tools can slow or stop repair work.
Improper tools and / or improper use of tools can result
in personal injury or damage to the parts.
A serial plate used for product identification is attached on
every valve / actuator (See Section 3: Product Identification).
If in doubt, replace faulty parts.
Never reuse gaskets.
After these requirements are confirmed the pneumatic actuator can be maintained and repaired.
14
Page 15
FlowAct Diaphragm Linear Actuator FCD VLENIMFACTA4 10/16
Disassemble the actuator from
the valve:
WARNING
Improper opening of the actuator
can result in bodily injury.
1. Disconnect the air supply from the actuator and / or
assembled accessories.
2. Disassemble the accessories from the actuator as necessary.
3. If is mounted a handwheel-side disassemble this first
(see pages 37 - 38).
4. Realize the fail safe position of the actuator. The coupling
parts must be free of positioning force.
Crushing hazard ! The
Actuators are pressure vessels.
WARNING
actuator stem is under
spring load. Never disconnect the air supply during
next steps, the stem will extends very quickly.
• If the actuator stem is extended, drive it into re-
tracted position by connecting air supply.
344
249
Actuator
240
76
345
113
Valve
• If the actuator stem is retracted no further action
is required.
• If the valve type is a three way valve drive the stem
into center position by connecting and control air
supply.
5. Keep upper coupling (249) from turning by secure with
a wrench. Turn the lock nut (113) clockwise to loosen.
6. Turn the cap screws (240) counterclockwise to loosen.
7. Turn the yoke lock nut (76) counterclockwise to loosen.
8. Disconnect the air supply from the actuator if applicable.
9. Lift off the actuator safely.
10. Place the actuator on an assembly table and fix the
yoke for disassembly.
Figure 8: Yoke assembly drawing
Item
WW
76 5.10 Yoke lock nut 249 5.3 Upper coupling
113 5.2 Lock nut 344 5.4 Lock nut
240 5.5 Cap screw 345 5.1 Lower coupling
Part
EU
Table 10: Coupling parts identification
Item
WW EU
Part
The modular design of the actuators enables a wide variety
of variants. Following therefore is always described the
individual module and not the entire actuator. We ask for your
understanding.
flowserve.com
15
Page 16
FlowAct Diaphragm Linear Actuator FCD VLENIMFACTA4 10/16
Reassemble the Actuator onto
the valve:
1. Mount the actuator onto the bonnet and tighten the
yoke lock nut (76) clockwise.
The legs of the yoke should be parallel
NOTICE
to the flow direction.
2. Move the actuator to the open position.
3. Screw in the lock nut (113) onto the valve stem so it
is screwed all the way and lower coupling (345) three
turns and move the actuator into the closed position.
The plug must be aligned onto the
NOTICE
seat. The cushioning effect of the bel-
lows can be prevented by tightening the packing follower.
4. Move the actuator back into the open position and
adjust the distance between the lower coupling (345)
and upper coupling (249) by adjusting the stroke length.
Valve size Stroke
+ 0,5
15 - 25 1/2“ - 1“ 10
15 - 50 1/2“ - 2“ 20
65 - 100 3“ - 4“ 40
125 - 150 6“ 60
1)
200 - 300
8“ - 12“ 1)80
400 16“ 100
Table 11: Stroke adjustment length ( 1) depends on the valve
series)
mm 0.394
+ 0,5
mm 0.787
+ 0,5
mm 1.574
+ 0,8
mm 2.362
+ 0,8
mm 3.150
+ 0,8
mm 3.937
+ 0.02
+ 0.02
+ 0.02
+ 0.03
+ 0.03
+ 0.03
in.
in.
in.
in.
in.
in.
9. Check handwheel-side for correct limit position, if
applicable.
10. Reassemble the accessory on the valve as necessary,
see relevant accessory User Instruction.
11. Perform three full strokes and check the free movement
of the actuator.
12. For installation the valve into the pipeline and further
steps see User Instructions for applicable valve types.
13. Log the maintenance interval and the work performed.
Actuator
344
249
240
76
345
113
16
5. Move the actuator to the close position and install the
cap screws (240).
6. Lock the lock nut (113). Keep upper coupling (249)
from turning by securing with a wrench.
7. If a handwheel-side was mounted reassemble as next
(see pages 37 - 38).
The handwheel-side always presses
NOTICE
on the coupling, depending on the
safety position when actuated. The lever arms must be
positioned so that this condition is given.
8. Place the handwheel-side on the yoke and straighten
it, mount the washer (140) and hex bolt (150) and
tighten it, if applicable.
Valve
Figure 9: Yoke assembly drawing
Item
WW
76 5.10 Yoke lock nut 249 5.3 Upper coupling
113 5.2 Lock nut 344 5.4 Lock nut
240 5.5 Cap screw 345 5.1 Lower coupling
Part
EU
Table 12: Coupling parts identification
Item
WW EU
Part
Page 17
FlowAct Diaphragm Linear Actuator FCD VLENIMFACTA4 10/16
Pneumatic Actuator - Type 253, 503, 701
• Type 1502 see page 39
• Type 3002 see page 57
light-duty heavy-duty
see pages 26 - 27 see pages 28 - 31 see pages 32 - 33
Attachments
Handwheel Stroke Limitation
adjustable limit stop
Actuator without attachments Actuator with attachments
Spring-to-close Spring-to-open Spring-to-close Spring-to-open
see pages 18 - 19 see pages 20 - 21 see pages 22 - 23 see pages 24 - 25
Cast yoke design acc. to IEC 60534-6-1 Handwheel
NAMUR-yoke,
with double mounting pads
MULTI-yoke,
with pad and interface for
direct positioner and sole-
noid valve mounting
IAS-yoke,
with double pads and in-
terface for direct positioner
mounting
side-mounted
for IAS-yoke only
see page 34 see page 35 see page 36 see pages 37 - 38
flowserve.com
17
Page 18

Actuator without attachments
Spring-to-close
FlowAct Diaphragm Linear Actuator FCD VLENIMFACTA4 10/16
Disassembly instruction of the actuator subassembly
NOTICE
1. Fix the actuator on the assembly table, if this is not
already happened.
2. Loosen the lock nut (344) counterclockwise and disassemble the upper coupling (249) and lock nut clockwise (see page 15).
3. Disassemble the short hexagon bolts (335), plain washers (337), hexagon nuts (351) and ring nuts (209).
4. Pull off the protection sleeve (339).
springs inside.
5. Lubricate the threads and loosen the long hexagon bolts
(336), plain washers (337) and hexagon nuts (351) uniformly in a clockwise sequence as the springs expand.
Limit disassembly only to necessary components.
WARNING
Risk of injury by jumping out parts ! Pre-loaded
Reassembly instruction of the actuator subassembly
NOTICE
13. Lubricate the new O-ring (275), new scraper ring (273)
with an appropriate lubricant and install into the guide
bushing (253).
14. Lubricate the new O-ring (272) with an appropriate
lubricant.
15. Lower the thrust washer (255), diaphragm (225), O-
onto the stem (211).
16. Lubricate the thread of the stem (211) with an appropriate lubricant and install and finger tighten the special nut (348).
NOTICE
of the Positioning Template. Mark the position.
Always replace parts showing wear with
new parts.
ring (272), diaphragm plate (227), spacer
bushing (228), lock washer (349)
The diaphragm plate should be positioned to the diaphragm with the aid
18
NOTICE
8.8 or higher, as well as washers and nuts.
6. Lift off the diaphragm casing (203), distance plate
(231) and spring adjusting plate (326).
7. Remove the actuator springs (229).
8. Carefully remove the diaphragm-stem unit (211 - 349).
9. Remove the scraper ring (273) and O-ring (275).
10. Secure the diaphragm-stem unit into the Special Tool.
11. Loosen the special nut (348) counterclockwise and
remove the lock washer (349), spacer bushing (228),
diaphragm plate (227), diaphragm (225), O-ring (272)
and thrust washer (255).
12. Check stressed surface areas for damage such as scoring and deformities. Use a brass brush or similar tool to
clean bolting. Check for corrosion or any other damage.
We recommend using threaded bolts
meeting standards from ISO 898-1,
17. Turn the special nut (348) clockwise using a suitable
torque wrench.
18. Loosen and remove the diaphragm-stem unit (211-
349) from the Special Tool. Lubricate the actuator
stem with an appropriate lubricant.
19. Carefully lower the diaphragm-stem unit (211- 349)
into the diaphragm casing.
NOTICE
Mark align.
20. Install and align the actuator springs (229).
21. Install and positioning the spring adjusting plate (326)
such that the drilling, mark and air connection match.
22. Install the distance plate (231) and diaphragm casing
(203), positioning the casing such that the drilling,
mark and air connections match.
23. Lubricate the threats of the long hexagon bolts (336)
with an appropriate lubricant then compress the springs
Position the diaphragm-stem unit
such that the air connection and the
Page 19
FlowAct Diaphragm Linear Actuator FCD VLENIMFACTA4 10/16
uniformly in a clockwise sequence by tightening the long
hexagon bolts (336), plain washers (337) and hexagon
nuts (351). Alternative method see NOTICE step 5.
24. Install the short hexagon bolts (335), hexagon nuts (351)
as well as the hexagon bolts (335) and ring nuts (209).
25. Tighten the nuts (351) using a crosswise pattern in
four steps.
26. Install the protection sleeve (339).
27. Reassemble the yoke and coupling parts, perform three
full strokes then check the tightening of the casing bolting.
Item #
Part
WW EU
202 6.1 Diaphragm Casing
203 6.2 Diaphragm Casing
209 6.6 Ring Nut
211 6.12 Stem
225 6.16 Diaphragm
227 6.15 Diaphragm Plate
228 6.13 Spacer Bushing
229 6.21 Actuator Spring
231 6.22 Distance Plate
253 6.8 Guide Bushing
254 6.80 Plain Bearing
255 6.18 Thrust Washer
258 6.26 Vent Plug
272 6.17 O-Ring
273 6.11 Scraper Ring
275 6.10 O-Ring
326 6.23 Spring Adjusting Plate
335 6.3.1 Hexagon Bolt - short
336 6.3.2 Hexagon Bolt - long
337 6.5 Plain Washer
339 6.25 Protection Sleeve
348 6.20 Special Nut
349 6.19 Lock Washer
351 6.4 Hexagon Nut
28. Log the maintenance interval and the work performed.
29. The actuator subassembly is ready to be mounted on
the valve and the accessories attached.
336
335
337
203
258
231
326
229
202
253
254
351
339
275
273
Table 13: Actuator parts
Figure 10: Actuator parts
19
flowserve.com
Page 20

Actuator without attachments
Spring-to-open
FlowAct Diaphragm Linear Actuator FCD VLENIMFACTA4 10/16
Disassembly instruction of the actuator subassembly
NOTICE
1. Fix the actuator on the assembly table, if this is not
already happened.
2. Loosen the lock nut (344) counterclockwise and disassemble the upper coupling (249) and lock nut clockwise (see page 15).
3. Disassemble the hexagon bolts (335), plain washers
(337), hexagon nuts (351) and ring nuts (209).
4. Pull off the protection sleeve (339).
springs inside.
5. Lubricate the threads and loosen the long hexagon bolts
(336), plain washers (337) and hexagon nuts (351) uniformly in a clockwise sequence as the springs expand.
NOTICE
8.8 or higher, as well as washers and nuts.
6. Lift off the diaphragm casing (203).
Limit disassembly only to necessary components.
WARNING
We recommend using threaded bolts
meeting standards from ISO 898-1,
Risk of injury by jumping out parts ! Pre-loaded
Reassembly instruction of the actuator subassembly
NOTICE
14. Lubricate the new O-ring (275), new scraper ring (273)
with an appropriate lubricant and install into the guide
bushing (253).
15. Lubricate the new O-ring (272) with an appropriate
lubricant.
16. Lower the spacer bushing (228), diaphragm plate
onto the stem (211).
17. Lubricate the thread of the stem (211) with an appropriate lubricant and install and finger tighten the special nut (348).
18. Turn the special nut (348) clockwise using a suitable
torque wrench.
19. Loosen and remove the diaphragm-stem unit (211-
349) from the Special Tool. Lubricate the actuator
stem with an appropriate lubricant.
20. Install and positioning the spring adjusting plate (326)
such that the drilling and air connection match.
Always replace parts showing wear with
new parts.
(227), diaphragm (225), O-ring (272),
thrust washer (255), lock washer (349)
20
7. Carefully remove the diaphragm-stem unit (211 - 349).
8. Remove the actuator springs (229).
9. Remove the spring adjusting plate (326).
10. Remove the scraper ring (273) and O-ring (275).
11. Secure the diaphragm-stem unit into the Special Tool.
12. Loosen the special nut (348) counterclockwise and
remove the lock washer (349), thrust washer (255), Oring (272), diaphragm (225), diaphragm plate (227),
and spacer bushing (228).
13. Check stressed surface areas for damage such as
scoring and deformities. Use a brass brush or similar
tool to clean bolting. Check for corrosion or any other
damage.
21. Install and align the actuator springs (229).
22. Carefully lower the diaphragm-stem unit (211- 349)
into the diaphragm casing.
23. Install the diaphragm casing (203), positioning the
casing such that the air connections are aligned.
24. Lubricate the threats of the long hexagon bolts (336)
with an appropriate lubricant then compress the springs
uniformly in a clockwise sequence by tightening the long
hexagon bolts (336), plain washers (337) and hexagon
nuts (351). Alternative method see NOTICE step 5.
25. Install the short hexagon bolts (335), hexagon nuts (351)
as well as the hexagon bolts (335) and ring nuts (209).
26. Tighten the nuts (351) using a crosswise pattern in
four steps.
Page 21
FlowAct Diaphragm Linear Actuator FCD VLENIMFACTA4 10/16
27. Install the protection sleeve (339).
28. Reassemble the yoke and coupling parts, perform three
full strokes then check the tightening of the casing bolting.
29. Log the maintenance interval and the work performed.
30. The actuator subassembly is ready to be mounted on
the valve and the accessories attached.
Item #
Part
WW EU
202 6.1 Diaphragm Casing
203 6.2 Diaphragm Casing
209 6.6 Ring Nut
211 6.12 Stem
225 6.16 Diaphragm
227 6.15 Diaphragm Plate
228 6.13 Spacer Bushing
229 6.21 Actuator Spring
253 6.8 Guide Bushing
254 6.80 Plain Bearing
255 6.18 Thrust Washer
258 6.26 Vent Plug
272 6.17 O-Ring
273 6.11 Scraper Ring
275 6.10 O-Ring
326 6.23 Spring Adjusting Plate
335 6.3.1 Hexagon Bolt - short
336 6.3.2 Hexagon Bolt - long
337 6.5 Plain Washer
339 6.25 Protection Sleeve
348 6.20 Special Nut
349 6.19 Lock Washer
351 6.4 Hexagon Nut
209
348
349
255
225
227
228
211
336
335
337
203
272
229
326
202
253
254
258
351
339
275
273
Table 14: Actuator parts
Figure 11: Actuator parts
21
flowserve.com
Page 22

Actuator with attachments
Spring-to-close
FlowAct Diaphragm Linear Actuator FCD VLENIMFACTA4 10/16
Disassembly instruction of the actuator subassembly
NOTICE
1. Fix the actuator on the assembly table, if this is not
already happened.
2. Disassemble the attachments first (see page 16).
3. Loosen the lock nut (344) clockwise and disassemble
the upper coupling (249) and lock nut (see page 15).
4. Disassemble the hexagon bolts (335), plain washers
(337), hexagon nuts (351) and ring nuts (209).
5. Pull off the protection sleeve (339).
springs inside.
6. Lubricate the threads and loosen the long hexagon bolts
(336), plain washers (337) and hexagon nuts (351) uniformly in a clockwise sequence as the springs expand.
Limit disassembly only to necessary components.
WARNING
Risk of injury by jumping out parts ! Pre-loaded
Reassembly instruction of the actuator subassembly
NOTICE
14. Lubricate the new O-rings (275), new scraper rings
(273) with an appropriate lubricant and install into the
guide bushing (253 and 390).
15. Lubricate the new O-ring (272) with an appropriate lubricant.
16. Lower the thrust washer (255), diaphragm (225), O-
onto the stem (211).
17. Lubricate the thread of the stem (211) with an appropriate lubricant and install and finger tighten the special stem (348).
NOTICE
of the Positioning Template. Mark the position.
18. Turn clockwise the special stem (348) using a suitable
torque wrench.
Always replace parts showing wear with
new parts.
ring (272), diaphragm plate (227), spacer
bushing (228), lock washer (349)
The diaphragm plate should be positioned to the diaphragm with the aid
22
NOTICE
8.8 or higher, as well as washers and nuts.
7. Lift off the diaphragm casing (203) and spring adjusting plate (326).
8. Remove the actuator springs (229).
9. Carefully remove the diaphragm-stem unit (211 - 349).
10. Remove the scraper rings (273) and O-rings (275).
11. Secure the diaphragm-stem unit into the Special Tool.
12. Loosen the special stem (348) counterclockwise and
remove the lock washer (349), spacer bushing (228),
diaphragm plate (227), diaphragm (225), O-ring (272)
and thrust washer (255).
13. Check stressed surface areas for damage such as scoring
and deformities. Use a brass brush or similar tool to clean
bolting. Check for corrosion or any other damage.
We recommend using threaded bolts
meeting standards from ISO 898-1,
19. Loosen and remove the diaphragm-stem unit (211
- 349) from the Special Tool. Lubricate the actuator
stems with an appropriate lubricant.
20. Carefully lower the diaphragm-stem unit (211 - 349)
into the diaphragm casing.
NOTICE
Mark align.
21. Install and align the actuator springs (229).
22. Install and positioning the spring adjusting plate (326)
such that the drilling, mark and air connection match.
23. Install the diaphragm casing (203), positioning the casing
such that the drilling, mark and air connections match.
24. Lubricate the threats of the long hexagon bolts (336)
with an appropriate lubricant and load the springs uniformly in a clockwise sequence by tightening the long
hexagon bolts (336), plain washers (337) and hexagon
nuts (351). Alternative method see NOTICE step 6.
Position the diaphragm-stem unit
such that the air connection and the
Page 23

FlowAct Diaphragm Linear Actuator FCD VLENIMFACTA4 10/16
25. Install the short hexagon bolts (335), hexagon nuts (351)
as well as the hexagon bolts (335) and ring nuts (209).
26. Tighten the nuts (351) using a crosswise pattern in
four steps.
27. Install the protection sleeve (339).
28. Reassemble the yoke and coupling parts, perform three
full strokes then check the tightening of the casing bolting.
Item #
Part
WW EU
202 6.1 Diaphragm Casing
203 6.2 Diaphragm Casing
209 6.6 Ring Nut
211 6.12 Stem
225 6.16 Diaphragm
227 6.15 Diaphragm Plate
228 6.13 Spacer Bushing
229 6.21 Actuator Spring
231 6.22 Distance Plate
253 6.8 Guide Bushing
254 6.80 Plain Bearing (2x)
255 6.18 Thrust Washer
258 6.26 Vent Plug
272 6.17 O-Ring
273 6.11 Scraper Ring (2x)
275 6.10 O-Ring (2x)
276 6.9 O-Ring
326 6.23 Spring Adjusting Plate
335 6.3.1 Hexagon Bolt - short
336 6.3.2 Hexagon Bolt - long
337 6.5 Plain Washer
339 6.25 Protection Sleeve
348 6.29 Stem
349 6.19 Lock Washer
351 6.4 Hexagon Nut
390 6.24 Guide Bushing
29. Log the maintenance interval and the work performed.
30. The actuator subassembly is ready for the reassemble
of the attachments - see page 16 - and accessories.
336
335
337
202
276
390
254
258
326
229
202
276
253
254
351
339
275
273
Table 15: Actuator parts
Figure 12: Actuator parts
23
flowserve.com
Page 24

Actuator with attachments
Spring-to-open
FlowAct Diaphragm Linear Actuator FCD VLENIMFACTA4 10/16
Disassembly instruction of the actuator subassembly
NOTICE
1. Fix the actuator on the assembly table, if this is not
already happened.
2. Disassemble the attachments first (see page 16).
3. Loosen the lock nut (344) clockwise and disassemble
the upper coupling (249) and lock nut (see page 15).
4. Disassemble the hexagon bolts (335), plain washers
(337), hexagon nuts (351) and ring nuts (209).
5. Pull off the protection sleeve (339).
springs inside.
6. Lubricate the threads and loosen the long hexagon bolts
(336), plain washers (337) and hexagon nuts (351) uniformly in a clockwise sequence as the springs expand.
NOTICE
8.8 or higher, as well as washers and nuts.
7. Lift off the diaphragm casing (203).
8. Carefully remove the diaphragm-stem unit (211 - 349).
9. Remove the actuator springs (229).
Limit disassembly only to necessary components.
WARNING
We recommend using threaded bolts
meeting standards from ISO 898-1,
Risk of injury by jumping out parts ! Pre-loaded
Reassembly instruction of the actuator subassembly
NOTICE
15. Lubricate the new O-rings (275), new scraper rings
(273) with an appropriate lubricant and install into the
guide bushing (253 and 390).
16. Lubricate the new O-ring (272) with an appropriate
lubricant.
17. Lower the spacer bushing (228), diaphragm plate
onto the stem (211).
18. Lubricate the thread of the stem (211) with an appropriate lubricant and install and finger tighten the special stem (348).
19. Turn clockwise the special stem (348) using a suitable
torque wrench.
20. Loosen and remove the diaphragm-stem unit (211
- 349) from the Special Tool. Lubricate the actuator
stems with an appropriate lubricant.
21. Install and positioning the spring adjusting plate (326)
such that the drilling and air connection match.
22. Install and align the actuator springs (229).
23. Carefully lower the diaphragm-stem unit (211 - 349)
into the diaphragm casing.
Always replace parts showing wear with
new parts.
(227), diaphragm (225), O-ring (272),
thrust washer (255), lock washer (349)
24
10. Remove the spring adjusting plate (326).
11. Remove the scraper rings (273) and O-rings (275).
12. Secure the diaphragm-stem unit into the Special Tool.
13. Loosen the special stem (348) counterclockwise and
remove the lock washer (349), thrust washer (255), Oring (272), diaphragm (225), diaphragm plate (227),
and spacer bushing (228).
14. Check stressed surface areas for damage such as scoring
and deformities. Use a brass brush or similar tool to clean
bolting. Check for corrosion or any other damage.
24. Install the diaphragm casing (203), positioning the
casing such that the air connections are aligned.
25. Lubricate the threats of the long hexagon bolts (336)
with an appropriate lubricant and load the springs uniformly in a clockwise sequence by tightening the long
hexagon bolts (336), plain washers (337) and hexagon
nuts (351). Alternative method see NOTICE step 6.
26. Install the short hexagon bolts (335), hexagon nuts (351)
as well as the hexagon bolts (335) and ring nuts (209).
27. Tighten the nuts (351) using a crosswise pattern in
four steps.
Page 25

FlowAct Diaphragm Linear Actuator FCD VLENIMFACTA4 10/16
28. Install the protection sleeve (339).
29. Reassemble the yoke and coupling parts, perform three
full strokes then check the tightening of the casing bolting.
30. Log the maintenance interval and the work performed.
31. The actuator subassembly is ready for the reassemble
of the attachments - see page 16 - and accessories.
Item #
Part
WW EU
202 6.1 Diaphragm Casing
209 6.6 Ring Nut
211 6.12 Stem
225 6.16 Diaphragm
227 6.15 Diaphragm Plate
228 6.13 Spacer Bushing
229 6.21 Actuator Spring
253 6.8 Guide Bushing
254 6.80 Plain Bearing (2x)
255 6.18 Thrust Washer
258 6.26 Vent Plug
272 6.17 O-Ring
273 6.11 Scraper Ring (2x)
275 6.10 O-Ring (2x)
276 6.9 O-Ring
326 6.23 Spring Adjusting Plate
335 6.3.1 Hexagon Bolt - short
336 6.3.2 Hexagon Bolt - long
337 6.5 Plain Washer
339 6.25 Protection Sleeve
348 6.29 Stem
349 6.19 Lock Washer
351 6.4 Hexagon Nut
390 6.24 Guide Bushing
336
335
337
202
276
390
254
272
229
326
202
276
253
254
258
351
339
275
273
Table 16: Actuator parts
Figure 13: Actuator parts
25
flowserve.com
Page 26

Actuator with Handwheel - light
Spring-to-close
FlowAct Diaphragm Linear Actuator FCD VLENIMFACTA4 10/16
Disassembly instruction of the handwheel subassembly
NOTICE
1. Fix the actuator on the assembly table, if this is not
already happened.
2. Loosen the hexagon nut (372) clockwise.
3. Loosen the carrier (394) counter-clockwise.
4. Loosen the lock nut (256) counter-clockwise.
NOTICE
5. Lift off and store the handwheel safely, lose no parts.
6. For disassemble the actuator subassembly see pages
22 - 23.
Limit disassembly only to necessary components.
Use a rounded chisel and a hammer.
lock nut (256) clockwise.
NOTICE
9. Mount the hexagon nut (372) onto the actuator stem.
10. Mount the carrier (394) clockwise and lock the hexagon nut (372).
11. Connect the actuator with the air supply, perform three
full strokes and check the free movement of the carrier.
NOTICE
12. Log the maintenance interval and the work performed.
13. The actuator subassembly is ready to be mounted on
the valve and the accessories attached.
Use a rounded chisel and a hammer.
The carrier must be able to move freely
without hitting in the end-positions.
Reassembly instruction of the handwheel subassembly
7. Lubricate the threads of the actuator with an appropriate lubricant.
8. Mount the handwheel onto the actuator and tighten the
Item #
Part
WW EU
256 5.11 Lock Nut
372 6.30 Hex Nut
394 6.31 Carrier
HandWheel
394
256
372
Actuator
26
Table 17: Handwheel parts
Figure 14: Handwheel parts
Page 27

Actuator with Handwheel - light
Spring-to-open
FlowAct Diaphragm Linear Actuator FCD VLENIMFACTA4 10/16
Disassembly instruction of the handwheel subassembly
NOTICE
1. Fix the actuator on the assembly table, if this is not
already happened.
2. Turn the handwheel counter-clockwise as long as it
reached the upper end-position.
3. Loosen the hexagon nut (372) clockwise.
4. Loosen the carrier (394) counter-clockwise.
5. Loosen the lock nut (256) counter-clockwise.
NOTICE
6. Lift off and store the handwheel safely, lose no parts.
7. For disassemble the actuator subassembly see pages
24 - 25.
Limit disassembly only to necessary components.
Use a rounded chisel and a hammer.
10. Mount the hexagon nut (372) onto the actuator stem.
11. Mount the carrier (394) clockwise and lock the hexagon nut (372).
12. Turn the handwheel clockwise as long as it reached the
upper end-position.
13. Connect the actuator with the air supply, perform three
full strokes and check the free movement of the carrier.
NOTICE
14. Log the maintenance interval and the work performed.
15. The actuator subassembly is ready to be mounted on
the valve and the accessories attached.
The carrier must be able to move freely
without hitting in the end positions.
Reassembly instruction of the handwheel subassembly
8. Lubricate the threads of the actuator with an appropriate lubricant.
9. Mount the handwheel onto the actuator and tighten the
lock nut (256) clockwise.
NOTICE
Item #
WW EU
256 5.11 Lock Nut
372 6.30 Hex Nut
394 6.31 Carrier
Use a rounded chisel and a hammer.
Part
Table 18: Handwheel parts
HandWheel
Figure 15: Handwheel parts
394
256
372
Actuator
27
flowserve.com
Page 28

FlowAct Diaphragm Linear Actuator FCD VLENIMFACTA4 10/16
Actuator with Handwheel - heavy
Spring-to-close or -open
Disassembly instruction of the handwheel subassembly
NOTICE
1. Fix the actuator on the assembly table, if this is not
already happened.
2. Loosen the hex nuts (333) counter-clockwise.
3. Unlock the handwheel.
4. Turn the handwheel counter-clockwise until the assembly (329 - 393) is lifted off.
5. Remove the flange (389) and pipe section (387).
6. Unlock the hex nut (6.30) clockwise.
7. Turn the threaded pin (331) counter-clockwise to
loosen and remove stem-assembly (331 - 399) from
the actuator stem.
Limit disassembly only to necessary components.
14. Lubricate the threads of the actuator and handwheelparts with an appropriate lubricant.
15. Place the flange (390) onto the actuator and put in line
with the mark.
16. Mount and tighten the lock nut (256) clockwise.
NOTICE
17. Mount the hexagon nut (372) onto the actuator stem
so it is screwed all the way.
18. Mount and finger tighten the stud bolts (397) clockwise.
19. Place the stem-assembly (331 - 399) onto the actuator stem and mount the threaded pin (331) clockwise
(screw-in depth once thread diameter). The positioning indicator should point forward.
20. Lock the hex nut (372) counter-clockwise.
Use a rounded chisel and a hammer.
8. Turn the stud bolts (397) counter-clockwise.
9. Mark the position of the flange (390) to the actuator.
10. Loosen the lock nut (256) counter-clockwise.
NOTICE
11. Lift off the hex nut (372) and flange (390).
12. Store all handwheel-parts safely, lose no parts.
13. For disassemble the actuator subassembly see pages
24 - 25.
Use a rounded chisel and a hammer.
Reassembly instruction of the handwheel subassembly
NOTICE
Always replace parts showing wear with
new parts.
21. Carefully thump and thread the pipe section (387) onto
the flange (390).
22. Place the flange (389) onto the pipe section (387).
23. Place the handwheel-assembly (329 - 393) onto the
flange (389), lift the stem-assembly (331 - 399) and
turn up the handwheel to screw one into another. The
grease nipple should point forward.
24. Mount the hex nuts (333) and finger-thigten.
25. Turn the handwheel clockwise as long as it reached the
upper end-position.
26. Connect the actuator with the air supply, perform three full
strokes and check the free movement of the threaded pin.
NOTICE
tions.
27. Lock the handwheel with the locking pin (332).
The threaded pin must be able to move
freely without hitting in the end posi-
28
Page 29

FlowAct Diaphragm Linear Actuator FCD VLENIMFACTA4 10/16
28. Log the maintenance interval and the work performed.
29. The actuator subassembly is ready to be mounted on
the valve and the accessories attached.
Item #
Part
WW EU
256 5.11 Lock Nut
329 6.73 O-Ring
330 6.72 Key Ring
331 6.62 Threaded Pin
332 6.70 Locking Pin
333 6.41 Hex Nut (4x)
340 6.68 O-Ring
341 6.67 O-Ring
342 6.71 Knotted Chain
365 6.63 Impact Grease Nipple
366 6.59 Compression Ring
367 6.61 Position Indicator
370 6.60 Parallel Key
372 6.30 Hex Nut
373 6.32 Bushing
375 6.33 Thrust Ball Bearing
380 6.36 Stem
381 6.66 Closure Screw
387 6.55 Pipe Section
388 6.57 Bearing Flange
389 6.40 Flange - top
390 6.38 Flange - bottom
391 6.58 Threaded Bushing
393 6.42 Handwheel
397 6.56 Stud Bolt (4x)
399 6.34 Threaded Ring
391
375
388
365
341
340
366
393
370
381
332
342
330
329
333
389
387
380
373
399
331
367
397
256
390
372
Actuator
Table 19: Handwheel parts
Figure 16: Handwheel parts
29
flowserve.com
Page 30

FlowAct Diaphragm Linear Actuator FCD VLENIMFACTA4 10/16
Actuator with Handwheel - heavy
> Offshore - Design < Spring-to-close or -open
Disassembly instruction of the handwheel subassembly
NOTICE
1. Fix the actuator on the assembly table, if this is not
already happened.
2. Loosen the hex nuts (333) counter-clockwise.
3. Unlock the handwheel.
4. Turn the handwheel counter-clockwise until the assembly (266 - 393) is lifted off.
5. Remove the O-rings (264, 265), flange (389, 263) and
pipe section (387).
6. Unlock the hex nut (372) clockwise.
7. Turn the threaded pin (331) counter-clockwise to
loosen and remove stem-assembly (331 - 399) from
the actuator stem.
8. Turn the stud bolts (397) counter-clockwise.
Limit disassembly only to necessary components.
14. Lubricate the threads of the actuator and handwheelparts with an appropriate lubricant.
15. Place the flange (390) onto the actuator and put in line
with the mark.
16. Mount and tighten the lock nut (256) clockwise.
NOTICE
17. Mount the hexagon nut (372) onto the actuator stem
so it is screwed all the way.
18. Mount and finger tighten the stud bolts (397) clockwise.
19. Place the stem-assembly (331 - 399) onto the actuator stem and mount the threaded pin (331) clockwise
(screw-in depth once thread diameter). The positioning indicator should point half left.
20. Lock the hex nut (372) counter-clockwise.
21. Carefully thump and the pipe section (387) onto the
flange (390).
Use a rounded chisel and a hammer.
9. Mark the position of the flange (390) to the actuator.
10. Loosen the lock nut (256) counter-clockwise.
NOTICE
11. Lift off the hex nut (372), flange (390) and O-ring
(262).
12. Store all handwheel-parts safely, lose no parts.
13. For disassemble the actuator subassembly see pages
24 - 25.
Use a rounded chisel and a hammer.
Reassembly instruction of the handwheel subassembly
NOTICE
Always replace parts showing wear with
new parts.
30
22. Place the flange (389) onto the pipe section (387) also
the O-rings (264, 265).
23. Carefully place the handwheel-assembly (391 - 329)
onto the flange (389), lift the stem-assembly (331 -
399) and turn up the handwheel to screw one into another. The grease nipple should point forward.
24. Mount the hex nuts (333) and finger-thigten.
25. Turn the handwheel clockwise as long as it reached the
upper end-position.
26. Connect the actuator with the air supply, perform
three full strokes and check the free movement of the
threaded pin.
NOTICE
tions.
27. Lock the handwheel with the locking pin (332).
The threaded pin must be able to move
freely without hitting in the end posi-
Page 31

FlowAct Diaphragm Linear Actuator FCD VLENIMFACTA4 10/16
28. Log the maintenance interval and the work performed.
29. The actuator subassembly is ready to be mounted on
the valve and the accessories attached.
Item #
Part
WW EU
256 5.11 Lock Nut
262 6.74 O-Ring
263 6.75 O-Ring (2x)
264 6.76 O-Ring
265 6.77 O-Ring (4x)
266 6.78 O-Ring
267 6.79 Scraper Ring
329 6.73 O-Ring
330 6.72 Key Ring
331 6.62 Threaded Pin
332 6.70 Locking Pin
333 6.41 Hex Nut (4x)
340 6.68 O-Ring
341 6.67 O-Ring
342 6.71 Knotted Chain
365 6.63 Impact Grease Nipple
366 6.59 Compression Ring
367 6.61 Rotation lock
370 6.60 Parallel Key
372 6.30 Hex Nut
373 6.32 Bushing
375 6.33 Thrust Ball Bearing
380 6.36 Stem
381 6.66 Closure Screw
386 6.69 Position Indicator
387 6.55 Pipe Section
388 6.57 Bearing Flange
389 6.40 Flange - top
390 6.38 Flange - bottom
391 6.58 Threaded Bushing
393 6.42 Handwheel
397 6.56 Stud Bolt (4x)
399 6.34 Threaded Ring
391
375
388
365
341
340
366
393
370
381
266
267
332
342
330
329
333
264
265
389
263
387
397
380
386
373
399
331
367
256
390
263
262
372
Actuator
Table 20: Handwheel parts
Figure 17: Handwheel parts
31
flowserve.com
Page 32

FlowAct Diaphragm Linear Actuator FCD VLENIMFACTA4 10/16
Actuator with Stroke Limitation
Spring-to-close or -open
Disassembly instruction of the stroke limitation
subassembly
NOTICE
Use a rounded chisel and a hammer.
NOTICE
1. Fix the actuator on the assembly table, if this is not
already happened.
2. Loosen the hex nut (379) counter-clockwise.
3. Remove the plain washer (376), cover (381) and the
pipe section (387).
4. Unlock the lock nuts (350, 2x) counter-clockwise.
5. Loosen the lock nut (256) counter-clockwise.
NOTICE
6. Lift off the stroke limitation assembly (333 - 389).
7. Unlock the lock nuts (350, 2x) counter-clockwise.
8. Store all stroke limitation-parts safely, lose no parts.
Limit disassembly only to necessary components.
Use a rounded chisel and a hammer.
14. Mount the lock nuts (350, 2x) clockwise.
15. Connect the actuator with the air supply. Control the
air supply until the desired upper and lower stroke position is approached. Position the lock nuts (350) at
the end positions and secure them.
16. Place the pipe section (387) onto the flange (389).
17. Place the flange (381) onto the pipe section (387).
18. Mount the washer (376) and hex nuts (379) and finger
tighten.
19. Reassemble the yoke and coupling parts, perform
three full strokes then check on the stroke indicator
whether the desired positions are achieved.
20. Log the maintenance interval and the work performed.
21. The actuator subassembly is ready to be mounted on
the valve and the accessories attached.
9. For disassemble the actuator subassembly see pages
24 - 25.
Reassembly instruction of the stroke limitation
subassembly
10. Lubricate the threads of the actuator and stroke limitation-parts with an appropriate lubricant.
11. Mount the lock nuts (350, 2x) clockwise.
12. Place the stroke limitation assembly (333 - 389) and
the lock nut (256) onto the actuator.
13. Mount and tighten the lock nut (256) clockwise.
32
Page 33

FlowAct Diaphragm Linear Actuator FCD VLENIMFACTA4 10/16
379
Item #
Part
WW EU
256 5.11 Lock Nut
333 6.108 Socket Head Screw (3x)
334 6.107 Plain Washer (3x)
350 6.109 Lock Nut (4x)
376 6.112 Plain Washer
377 6.103 Yoke Rod (3x)
378 6.106 Yoke Plate
379 6.113 Hex Nut
380 6.101 Stem
381 6.111 Cover
384 6.104 Hexagon Nut
385 6.105 Stud Bolt
387 6.110 Pipe Section
389 6.102 Flange
376
381
387
350
389
377
384
385
378
334
333
256
380
Actuator
Table 21: Stroke limitation parts
Figure 18: Stroke limitation parts
33
flowserve.com
Page 34

Actuator with NAMUR-yoke
Spring-to-close or -open
FlowAct Diaphragm Linear Actuator FCD VLENIMFACTA4 10/16
Disassembly instruction of the yoke
NOTICE
1. Fix the actuator on the assembly table, if this is not
already happened (see also pages 14 - 15).
2. The hex bolt (420) and stroke scale (213) can remain
on the yoke.
3. Unlock the lock nut (344) counter-clockwise.
4. Loosen the actuator coupling (249) and lock nut (344)
clockwise.
5. We recommend you not to remove the actuator from
the yoke. If this is indispensable mark the position,
loosen the actuator locknut (256) clockwise and lift off
the actuator.
NOTICE
Limit disassembly only to necessary components.
Use a rounded chisel and a hammer.
Reassembly instruction of the yoke
8. Lubricate the threads of the actuator and stroke coupling-parts with an appropriate lubricant.
9. If necessary mount the actuator onto the yoke (201)
put in line with the mark and tighten the actuator locknut (256) counter-clockwise. The vent plug shall be at
a right angle to the yoke legs.
NOTICE
10. Screw in the lock nut (344) and the actuator coupling
(249) - screw-in depth once thread diameter - counterclockwise and fix it. Aligning the coupling parallel to
the yoke.
11. Further reassembling steps are only possible with the
valve (see page 39).
Use a rounded chisel and a hammer.
6. Store all coupling and yoke-parts safely, lose no parts.
7. For disassemble the attachments see pages 26 - 33
and for actuator subassembly see pages 18 - 25.
Item #
WW EU
201 5.9 Yoke
213 5.7 Stroke Scale
216 5.6 Stroke Indicator
240 5.5 Socket Head Screw (2x)
249 5.3 Actuator Coupling
256 5.11 Actuator Locknut
344 5.4 Lock Nut
345 5.1 Valve Coupling
420 5.8 Hex Bolt
1)
Depending on the valve series (see page 7).
Part
1)
213
420
Actuator
201
256
344
240
249
216
345
34
Table 22: Actuator parts
Figure 19: Actuator parts
Page 35

Actuator with MULTI-yoke
Spring-to-close or -open
FlowAct Diaphragm Linear Actuator FCD VLENIMFACTA4 10/16
Disassembly instruction of the yoke
NOTICE
1. Fix the actuator on the assembly table, if this is not
already happened (see also pages 14 - 15).
2. Remove the hex bolt (420), washer (333) and the
stroke scale (213).
3. Remove the socket head screw (214), washer (334)
and the stroke indicator (216).
4. Unlock the lock nut (344) counter-clockwise.
5. Loosen the actuator coupling (249) and lock nut (344)
clockwise.
6. We recommend you not to remove the actuator from
the yoke. If this is indispensable mark the position,
loosen the actuator locknut (256) clockwise and lift off
the actuator and O-ring (271).
Limit disassembly only to necessary components.
7. Store all coupling and yoke-parts safely, lose no parts.
8. For disassemble the attachments see pages 26 - 33
and for actuator subassembly see pages 18 - 25.
Reassembly instruction of the yoke
9. Lubricate the threads of the actuator and stroke coupling-parts with an appropriate lubricant.
10. If necessary mount new O-rings (278, 271) and the actuator onto the yoke (201) put in line with the mark and
tighten the actuator locknut (256) counter-clockwise.
The vent plug shall be at a right angle to the yoke legs.
NOTICE
11. Screw in the lock nut (344) and the actuator coupling
(249) - screw-in depth once thread diameter - counterclockwise and fix it. Aligning the coupling parallel to
the yoke.
Use a rounded chisel and a hammer.
NOTICE
Item #
WW EU
201 5.9 Yoke
213 5.7 Stroke Scale
214 5.20 Socket Head Screw
216 5.6 Stroke Indicator
240 5.5 Socket Head Screw (2x)
249 5.3 Actuator Coupling
256 5.11 Actuator Locknut
271 6.50 O-Ring
278 6.51 O-Ring
333 5.12 Washer (4x)
334 5.19 Washer
344 5.4 Lock Nut
345 5.1 Valve Coupling
420 5.8 Hex Bolt (4x)
1)
Depending on the valve series (see page 7).
Use a rounded chisel and a hammer.
Part
1)
12. Further reassembling steps are only possible with the
valve (see page 39).
Actuator
213
333
420
201
214
334
216
278
271
256
240
344
249
345
Table 23: Actuator parts
Figure 20: Actuator parts
35
flowserve.com
Page 36

Actuator with IAS-yoke
Spring-to-close or -open
FlowAct Diaphragm Linear Actuator FCD VLENIMFACTA4 10/16
Disassembly instruction of the yoke
NOTICE
1. Fix the actuator on the assembly table, if this is not
already happened (see also pages 14 - 15).
2. Remove the socket head screw (214) and the stroke
indicator (216).
3. Unlock the lock nut (344) counter-clockwise.
4. Loosen the actuator coupling (249) and lock nut (344)
clockwise.
5. We recommend you not to remove the actuator from
the yoke. If this is indispensable mark the position,
loosen the actuator locknut (256) clockwise and lift off
the actuator and O-ring (271).
NOTICE
Limit disassembly only to necessary components.
Use a rounded chisel and a hammer.
Reassembly instruction of the yoke
8. Lubricate the threads of the actuator and stroke coupling-parts with an appropriate lubricant.
9. If necessary mount new O-rings (278, 271) and the actuator onto the yoke (201) put in line with the mark and
tighten the actuator locknut (256) counter-clockwise.
The vent plug shall be at a right angle to the yoke legs.
NOTICE
10. Screw in the lock nut (344) and the actuator coupling
(249) - screw-in depth once thread diameter - counterclockwise and fix it. Aligning the coupling parallel to
the yoke.
11. Further reassembling steps are only possible with the
valve (see page 39).
Use a rounded chisel and a hammer.
6. Store all coupling and yoke-parts safely, lose no parts.
7. For disassemble the attachments see pages 26 - 33
and for actuator subassembly see pages 18 - 25.
Item #
WW EU
201 5.9 Yoke
213 5.7 Stroke Scale
214 5.20 Socket Head Screw
216 5.6 Stroke Indicator
240 5.5 Socket Head Screw (2x)
249 5.3 Actuator Coupling
256 5.11 Actuator Locknut
271 6.50 O-Ring
278 6.51 O-Ring
344 5.4 Lock Nut
345 5.1 Valve Coupling
420 5.8 Hex Bolt
1)
Depending on the valve series (see page 7).
Part
1)
201
213
420
214
216
Actuator
278
271
256
240
344
249
345
36
Table 24: Actuator parts
Figure 21: Actuator parts
Page 37

Actuator with Handwheel - side
> Type 253 < Spring-to-close or -open
FlowAct Diaphragm Linear Actuator FCD VLENIMFACTA4 10/16
Disassembly instruction of the yoke
NOTICE
1. Loosen the hex bolts (150) and washers (140), remove
the handwheel-side (393) and store all parts safely.
1. Fix the actuator on the assembly table, if this is not
already happened (see also pages 14 - 15).
2. Unlock the lock nut (344) counter-clockwise.
3. Loosen the actuator coupling (249) and lock nut (344)
clockwise.
4. We recommend you not to remove the actuator from
the yoke. If this is indispensable mark the position,
loosen the actuator locknut (256) clockwise and lift off
the actuator and O-ring (271).
NOTICE
5. Store all coupling and yoke-parts safely, lose no parts.
Limit disassembly only to necessary components.
Use a rounded chisel and a hammer.
6. For disassemble the attachments see pages 26 - 33
and for actuator subassembly see pages 18 - 25.
Reassembly instruction of the yoke
7. Lubricate the threads of the actuator and stroke coupling-parts with an appropriate lubricant.
8. If necessary mount new O-rings (278, 271) and the actuator onto the yoke (201) put in line with the mark and
tighten the actuator locknut (256) counter-clockwise.
The vent plug shall be at left rear to the yoke legs.
NOTICE
9. Screw in the lock nut (344) and the actuator coupling
(249) - screw-in depth once thread diameter - counterclockwise and fix it. Aligning the coupling parallel to
the yoke.
10. Further reassembling steps are only possible with the
valve (see page 39).
Use a rounded chisel and a hammer.
Item #
Part
WW EU
140 6.91 Washer (4x)
150 6.92 Hex Bolt (4x)
201 5.9 Yoke
213 5.7 Stroke Scale
216 5.6 Stroke Indicator
240 5.5 Socket Head Screw (2x)
249 5.3 Actuator Coupling
256 5.11 Actuator Locknut
271 6.50 O-Ring
278 6.51 O-Ring
344 5.4 Lock Nut
345 5.1 Valve Coupling
393 6.90 Lateral Handwheel (Unit)
420 5.8 Hex Bolt
393
150
140
213
420
249
Actuator
278
271
201
256
240
344
345
216
Table 25: Actuator parts
Figure 22: Actuator parts
37
flowserve.com
Page 38

Actuator with Handwheel - side
> Type 503, 701 < Spring-to-close or -open
FlowAct Diaphragm Linear Actuator FCD VLENIMFACTA4 10/16
Disassembly instruction of the yoke
NOTICE
1. Loosen the hex bolts (150) and washers (140), remove the handwheel-side (393).
2. Loosen the socket head screw (214) and stroke indicator (216) and store all parts safely.
3. Disassemble the actuator and fix the yoke on the assembly table (see pages 14 - 15).
4. Unlock the lock nut (344) counter-clockwise.
5. Loosen the actuator coupling (249) and lock nut (344)
clockwise.
6. We recommend you not to remove the actuator from
the yoke. If this is indispensable mark the position,
loosen the actuator locknut (256) clockwise and lift off
the actuator and O-ring (271).
NOTICE
Limit disassembly only to necessary components.
Use a rounded chisel and a hammer.
7. Store all coupling and yoke-parts safely, lose no parts.
8. For disassemble the attachments see pages 26 - 33
and for actuator subassembly see pages 18 - 25.
Reassembly instruction of the yoke
9. Lubricate the threads of the actuator and stroke coupling-parts with an appropriate lubricant.
10. If necessary mount new O-rings (278, 271) and the actuator onto the yoke (201) put in line with the mark and
tighten the actuator locknut (256) counter-clockwise.
The vent plug shall be at left rear to the yoke legs.
NOTICE
11. Screw in the lock nut (344) and the actuator coupling
(249) - screw-in depth once thread diameter - counterclockwise and fix it. Aligning the coupling parallel to
the yoke.
12. Further reassembling steps are only possible with the
valve (see page 39).
Use a rounded chisel and a hammer.
Item #
Part
WW EU
140 6.91 Washer (4x)
150 6.92 Hex Bolt (4x)
201 5.9 Yoke
213 5.7 Stroke Scale
214 5.20 Socket Head Screw (2x)
216 5.6 Stroke Indicator
240 5.5 Socket Head Screw (2x)
249 5.3 Actuator Coupling
256 5.11 Actuator Locknut
271 6.50 O-Ring
278 6.51 O-Ring
344 5.4 Lock Nut
345 5.1 Valve Coupling
393 6.90 Lateral Handwheel (Unit)
420 5.8 Hex Bolt
393
150
140
213
420
249
345
Actuator
278
271
201
256
240
344
214
216
38
Table 26: Actuator parts
Figure 23: Actuator parts
Page 39

FlowAct Diaphragm Linear Actuator FCD VLENIMFACTA4 10/16
Pneumatic Actuator - Type 1502
• Type 253, 503, 701 see page 17
• Type 3002 see page 57
Single chamber actuator without attachments Single chamber actuator with attachments
Spring-to-close Spring-to-open Spring-to-close Spring-to-open
Adjustable Limit Stop - max. positioning force 39 kN
see pages 48 - 49
see pages 40 - 41 see pages 42 - 43 see pages 44 - 45 see pages 46 - 47
Central-mounted handwheel
without
see pages 50 - 53
NAMUR-yoke, with double mounting pads Side-mounted handwheel - maximal positioning force 39 kN
see page 54 see page 55
39
flowserve.com
Page 40

FlowAct Diaphragm Linear Actuator FCD VLENIMFACTA4 10/16
Actuator without attachments
Spring-to-close
Disassembly instruction of the actuator subassembly
NOTICE
1. Fix the actuator on the assembly table
2. Disassemble the coupling parts and yoke (see page 54).
3. Disassemble the hexagon bolts (335), plain washers
(337) and hexagon nuts (351).
4. Pull off the protection sleeve (339).
springs inside.
5. Lubricate the threads and loosen the long hexagon bolts
(336), plain washers (337) and hexagon nuts (351) uniformly in a clockwise sequence as the springs expand.
NOTICE
8.8 or higher, as well as washers and nuts.
6. Lift off the diaphragm casing (203, 258), distance
plate (231) and spring adjusting plate (326).
7. Remove the actuator springs (229).
Limit disassembly only to necessary components.
(see page 15)
WARNING
We recommend using threaded bolts
meeting standards from ISO 898-1,
Risk of injury by jumping out parts ! Pre-loaded
.
Reassembly instruction of the actuator subassembly
NOTICE
13. Lubricate the new O-ring (275), new scraper ring (273)
with an appropriate lubricant and install into the guide
bushing (253).
14. Lubricate the new O-ring (272) with an appropriate
lubricant.
15. Lower the thrust washer (255), O-ring (272), dia-
onto the stem (211).
16. Lubricate the thread of the stem (211) with an appropriate
lubricant and install and finger tighten the special nut (348).
NOTICE
of the Positioning Template. Mark the position.
17. Turn the special nut (348) clockwise using a suitable
torque wrench.
18. Loosen and remove the diaphragm-stem unit (211-
349) from the Special Tool. Lubricate the actuator
stem with an appropriate lubricant.
19. Carefully lower the diaphragm-stem unit (211- 349)
into the diaphragm casing.
Always replace parts showing wear with
new parts.
phragm (225), diaphragm plate (227),
disk (220), spacer bushing (228), distance
bushing (374) and lock washer (349)
The diaphragm plate should be positioned to the diaphragm with the aid
40
8. Carefully remove the diaphragm-stem unit (211 - 374).
9. Remove the scraper ring (273) and O-ring (275).
10. Secure the diaphragm-stem unit into the Special Tool.
11. Loosen the special nut (348) counterclockwise and remove the lock washer (349), distance bushing (374),
spacer bushing (228), disk (220), diaphragm plate (227),
diaphragm (225), O-ring (272) and thrust washer (255).
12. Check stressed surface areas for damage such as
scoring and deformities. Use a brass brush or similar
tool to clean bolting. Check for corrosion or any other
damage.
NOTICE
Mark align.
20. Install and align the actuator springs (229).
21. Install and position the spring adjusting plate (326)
such that the imprint on the plate and air connection
are opposite of each other.
22. Install the distance plate (231) and diaphragm casing
(203), position the casing allowing the air connections
to be opposite of each other.
23. Lubricate the threats of the long hexagon bolts (336)
with an appropriate lubricant then compress the springs
uniformly in a clockwise sequence by tightening the long
hexagon bolts (336), plain washers (337) and hexagon
nuts (351). Alternative method see NOTICE step 5.
Position the diaphragm-stem unit
such that the air connection and the
Page 41

FlowAct Diaphragm Linear Actuator FCD VLENIMFACTA4 10/16
24. Install the short hexagon bolts (335) and hexagon nuts
(351).
25. Tighten the nuts (351) using a crosswise pattern in
four steps.
26. Install the protection sleeve (339).
27. Reassemble the yoke and coupling parts, perform three
full strokes then check the tightening of the casing bolting.
28. Log the maintenance interval and the work performed.
Item #
WW EU
202 6.1 Diaphragm Casing
203 6.2 Diaphragm Casing
211 6.12 Stem
220 6.14 Disk
225 6.16 Diaphragm
227 6.15 Diaphragm Plate
228 6.13 Spacer Bushing
229 6.21 Actuator Spring
231 6.22 Distance Plate
253 6.8 Guide Bushing
254 6.80 Plain Bearing
255 6.18 Thrust Washer
258 6.26 Vent Plug
272 6.17 O-Ring
273 6.11 Scraper Ring
275 6.10 O-Ring
276 6.9 O-Ring
279 6.46 O-Ring
326 6.23 Spring Adjusting Plate
334 6.45 Hexagon Bolt (6x)
335 6.3.1 Hexagon Bolt - short (20x)
336 6.3.2 Hexagon Bolt - long (4x)
337 6.5 Plain Washer
339 6.25 Protection Sleeve (4x)
348 6.20 Special Nut
349 6.19 Lock Washer
351 6.4 Hexagon Nut
374 6.47 Distance Bushing
1)
Alternatively, hex head assembled screws with captive flat washers are used for this application.
Part
1)
Table 27: Actuator parts Figure 24: Actuator parts
29. The actuator subassembly is ready to be mounted on
the valve and the accessories attached.
336
335
337
203
258
231
348
326
349
229
374
228
220
227
225
202
253
254
272
276
279
334
255
351
211
339
275
273
41
flowserve.com
Page 42

Actuator without attachments
Spring-to-open
FlowAct Diaphragm Linear Actuator FCD VLENIMFACTA4 10/16
Disassembly instruction of the actuator subassembly
NOTICE
1. Fix the actuator on the assembly table, if this is not
already happened.
2. Disassemble the coupling parts and yoke (see page
54).
3. Disassemble the hexagon bolts (335), plain washers
(337) and hexagon nuts (351).
4. Pull off the protection sleeve (339).
springs inside.
5. Lubricate the threads and loosen the long hexagon bolts
(336), plain washers (337) and hexagon nuts (351) uniformly in a clockwise sequence as the springs expand.
NOTICE
8.8 or higher, as well as washers and nuts.
6. Lift off the diaphragm casing (203, 258).
7. Carefully remove the diaphragm-stem unit (211 - 374).
8. Remove the actuator springs (229).
9. Remove the spring adjusting plate (326) and distance
plate (231).
10. Remove the scraper ring (273) and O-ring (275).
11. Secure the diaphragm-stem unit into the Special Tool.
Limit disassembly only to necessary components.
WARNING
We recommend using threaded bolts
meeting standards from ISO 898-1,
Risk of injury by jumping out parts ! Pre-loaded
Reassembly instruction of the actuator subassembly
NOTICE
14. Lubricate the new O-ring (275), new scraper ring (273)
with an appropriate lubricant and install into the guide
bushing (253).
15. Lubricate the new O-ring (272) with an appropriate
lubricant.
16. Lower the distance bushing (374), spacer bushing
onto the stem (211).
17. Lubricate the thread of the stem (211) with an appropriate lubricant and install and finger tighten the special nut (348).
18. Turn the special nut (348) clockwise using a suitable
torque wrench.
19. Loosen and remove the diaphragm-stem unit (211-
349) from the Special Tool. Lubricate the actuator
stem with an appropriate lubricant.
20. Install and position the distance plate (231), spring adjusting plate (326) allowing the air connections to be
opposite of each other.
21. Install and align the actuator springs (229).
22. Carefully lower the diaphragm-stem unit (211- 349)
into the diaphragm casing.
23. Install the diaphragm casing (203), positioning the
casing such that the air connections are aligned.
Always replace parts showing wear with
new parts.
(228), disk (220), diaphragm plate (227),
diaphragm (225), O-ring (272), thrust
washer (255), lock washer (349)
42
12. Loosen the special nut (348) counterclockwise and remove the lock washer (349), thrust washer (255), O-ring
(272), diaphragm (225), diaphragm plate (227), disk
(220), spacer bushing (228) and distance bushing (231).
13. Check stressed surface areas for damage such as
scoring and deformities. Use a brass brush or similar
tool to clean bolting. Check for corrosion or any other
damage.
24. Lubricate the threats of the long hexagon bolts (336)
with an appropriate lubricant then compress the
springs uniformly in a clockwise sequence by tightening the long hexagon bolts (336), plain washers (337)
and hexagon nuts (351). Alternative method see NO-
TICE step 5.
25. Install the short hexagon bolts (335), hexagon nuts
(351).
Page 43

FlowAct Diaphragm Linear Actuator FCD VLENIMFACTA4 10/16
26. Tighten the nuts (351) using a crosswise pattern in
four steps.
27. Install the protection sleeve (339).
28. Reassemble the yoke and coupling parts,
perform three
full strokes then check the tightening of the casing
bolting.
29. Log the maintenance interval and the work performed.
Item #
WW EU
202 6.1 Diaphragm Casing
203 6.2 Diaphragm Casing
211 6.12 Stem
220 6.14 Disk
225 6.16 Diaphragm
227 6.15 Diaphragm Plate
228 6.13 Spacer Bushing
229 6.21 Actuator Spring
231 6.22 Distance Plate
253 6.8 Guide Bushing
254 6.80 Plain Bearing
255 6.18 Thrust Washer
258 6.26 Vent Plug
272 6.17 O-Ring
273 6.11 Scraper Ring
275 6.10 O-Ring
276 6.9 O-Ring
279 6.46 O-Ring (6x)
326 6.23 Spring Adjusting Plate
334 6.45 Hexagon Bolt
335 6.3.1 Hexagon Bolt - short (20x)
336 6.3.2 Hexagon Bolt - long (4x)
337 6.5 Plain Washer (24x)
339 6.25 Protection Sleeve
348 6.20 Special Nut
349 6.19 Lock Washer
351 6.4 Hexagon Nut
374 6.47 Distance Bushing
1)
Alternatively, hex head assembled screws with captive flat washers are used for this application.
Part
1)
Table 28: Actuator parts Figure 25: Actuator parts
30. The actuator subassembly is ready to be mounted on
the valve and the accessories attached.
336
335
348
349
337
203
272
255
225
227
220
228
374
202
211
253
258
254
229
276
279
334
326
351
231
339
275
273
43
flowserve.com
Page 44

Actuator with attachments
Spring-to-close
FlowAct Diaphragm Linear Actuator FCD VLENIMFACTA4 10/16
Disassembly instruction of the actuator subassembly
NOTICE
1. Fix the actuator on the assembly table, if this is not
already happened.
2. Disassemble the coupling parts and yoke (see page
54).
3. Disassemble the hexagon bolts (335), plain washers
(337) and hexagon nuts (351).
4. Pull off the protection sleeve (339).
springs inside.
5. Lubricate the threads and loosen the long hexagon bolts
(336), plain washers (337) and hexagon nuts (351) uniformly in a clockwise sequence as the springs expand.
NOTICE
8.8 or higher, as well as washers and nuts.
Limit disassembly only to necessary components.
WARNING
We recommend using threaded bolts
meeting standards from ISO 898-1,
Risk of injury by jumping out parts ! Pre-loaded
Reassembly instruction of the actuator subassembly
NOTICE
13. Lubricate the new O-rings (275), new scraper rings
(273) with an appropriate lubricant and install into the
guide bushings (253).
14. Lubricate the new O-ring (272) with an appropriate
lubricant.
15. Lower the thrust washer (255), O-ring (272), dia-
onto the stem (211).
16. Lubricate the thread of the stem (211) with an appropriate lubricant and install and finger tighten the stem (348).
NOTICE
of the Positioning Template. Mark the position.
17. Turn clockwise the stem (348) using a suitable torque
wrench.
Always replace parts showing wear with
new parts.
phragm (225), diaphragm plate (227),
disk (220), spacer bushing (228), distance
bushing (374) and lock washer (349)
The diaphragm plate should be positioned to the diaphragm with the aid
44
6. Lift off the diaphragm casing (202 - 389), distance
plate (231) and spring adjusting plate (326).
7. Remove the actuator springs (229).
8. Carefully pull out the diaphragm-stem unit (211 - 374).
9. Remove the scraper rings (273) and O-rings (275).
10. Secure the diaphragm-stem unit into the Special Tool.
11. Loosen the stem (348) counterclockwise and remove
the lock washer (349), distance bushing (374), spacer
bushing (228), disk (220), diaphragm plate (227), diaphragm (225), O-ring (272) and thrust washer (255).
12. Check stressed surface areas for damage such as
scoring and deformities. Use a brass brush or similar
tool to clean bolting. Check for corrosion or any other
damage.
18. Loosen and remove the diaphragm-stem unit (211-
374) from the Special Tool. Lubricate the actuator
stem with an appropriate lubricant.
19. Carefully lower the diaphragm-stem unit (211- 374)
into the diaphragm casing.
NOTICE
Mark align.
20. Install and align the actuator springs (229).
21. Install and position the spring adjusting plate (326)
such that the imprint on the plate and air connection
are opposite of each other.
22. Install the distance plate (231) and diaphragm casing
(203), position the casing allowing the air connections
to be opposite of each other.
23. Lubricate the threats of the long hexagon bolts (336)
Position the diaphragm-stem unit
such that the air connection and the
Page 45

FlowAct Diaphragm Linear Actuator FCD VLENIMFACTA4 10/16
with an appropriate lubricant then compress the springs
uniformly in a clockwise sequence by tightening the long
hexagon bolts (336), plain washers (337) and hexagon
nuts (351). Alternative method see NOTICE step 5.
24. Install the short hexagon bolts (335) and hexagon nuts
(351).
25. Tighten the nuts (351) using a crosswise pattern in
four steps.
26. Install the protection sleeve (339).
Item #
WW EU
202 6.1 Diaphragm Casing (2x)
209 6.6 Ring Nut
211 6.12 Stem
220 6.14 Disk
225 6.16 Diaphragm
227 6.15 Diaphragm Plate
228 6.13 Spacer Bushing
229 6.21 Actuator Spring
231 6.22 Distance Plate
253 6.8 Guide Bushing
254 6.80 Plain Bearing (2x)
255 6.18 Thrust Washer
258 6.26 Vent Plug
272 6.17 O-Ring
273 6.11 Scraper Ring (2x)
275 6.10 O-Ring (2x)
276 6.9 O-Ring (2x)
279 6.46 O-Ring (12x)
326 6.23 Spring Adjusting Plate
334 6.45 Hexagon Bolt (12x)
335 6.3.1 Hexagon Bolt - short (20x)
336 6.3.2 Hexagon Bolt - long (4x)
337 6.5 Plain Washer (24x)
339 6.25 Protection Sleeve
348 6.20 Stem
349 6.19 Lock Washer
351 6.4 Hexagon Nut (24x)
374 6.47 Distance Bushing
389 6.83 Guide Bushing
1)
Alternatively, hex head assembled screws with captive flat washers are used for this application.
Part
1)
Table 29: Actuator parts Figure 26: Actuator parts
27. Reassemble the yoke and coupling parts, perform three
full strokes then check the tightening of the casing bolting.
28. Log the maintenance interval and the work performed.
29. The actuator subassembly is ready to be mounted on
the valve and the accessories attached.
336
335
337
202
389
254
258
276
279
348
349
374
228
334
231
326
229
220
227
255
202
253
254
272
276
279
334
255
351
211
339
275
273
45
flowserve.com
Page 46

Actuator without attachments
Spring-to-open
FlowAct Diaphragm Linear Actuator FCD VLENIMFACTA4 10/16
Disassembly instruction of the actuator subassembly
NOTICE
1. Fix the actuator on the assembly table, if this is not
already happened.
2. Disassemble the coupling parts and yoke (see page
54).
3. Disassemble the hexagon bolts (335), plain washers
(337) and hexagon nuts (351).
4. Pull off the protection sleeve (339).
springs inside.
5. Lubricate the threads and loosen the long hexagon bolts
(336), plain washers (337) and hexagon nuts (351) uniformly in a clockwise sequence as the springs expand.
Limit disassembly only to necessary components.
WARNING
Risk of injury by jumping out parts ! Pre-loaded
Reassembly instruction of the actuator subassembly
NOTICE
14. Lubricate the new O-rings (275), new scraper rings
(273) with an appropriate lubricant and install into the
guide bushings (253).
15. Lubricate the new O-ring (272) with an appropriate
lubricant.
16. Lower the distance bushing (374), spacer bushing
onto the stem (211).
17. Lubricate the thread of the stem (211) with an appropriate lubricant and install and finger tighten the stem (348).
18. Turn clockwise the stem (348) using a suitable torque
wrench.
Always replace parts showing wear with
new parts.
(228), disk (220), diaphragm plate (227),
diaphragm (225), O-ring (272), thrust
washer (255) and lock washer (349)
46
NOTICE
8.8 or higher, as well as washers and nuts.
6. Lift off the diaphragm casing (202 - 389).
7. Carefully pull out the diaphragm-stem unit (211 - 374).
8. Remove the actuator springs (229).
9. Remove the spring adjusting plate (326) and distance
plate (231).
10. Remove the scraper rings (273) and O-rings (275).
11. Secure the diaphragm-stem unit into the Special Tool.
12. Loosen the stem (348) counterclockwise and remove
the lock washer (349), thrust washer (255), O-ring
(272), diaphragm (225), diaphragm plate (227), disk
(220), spacer bushing (228) and distance bushing (231).
13. Check stressed surface areas for damage such as
scoring and deformities. Use a brass brush or similar
tool to clean bolting. Check for corrosion or any other
damage.
We recommend using threaded bolts
meeting standards from ISO 898-1,
19. Loosen and remove the diaphragm-stem unit (211-
374) from the Special Tool. Lubricate the actuator
stem with an appropriate lubricant.
20. Install and position the distance plate (231), spring adjusting plate (326) allowing the air connections to be
opposite of each other.
21. Install and align the actuator springs (229).
22. Carefully lower the diaphragm-stem unit (211- 374)
into the diaphragm casing.
23. Install the diaphragm casing (203), positioning the
casing such that the air connections are aligned.
24. Lubricate the threats of the long hexagon bolts (336)
with an appropriate lubricant then compress the springs
uniformly in a clockwise sequence by tightening the long
hexagon bolts (336), plain washers (337) and hexagon
nuts (351). Alternative method see NOTICE step 5.
25. Install the short hexagon bolts (335), hexagon nuts (351).
26. Tighten the nuts (351) using a crosswise pattern in
four steps.
Page 47

27. Install the protection sleeve (339).
FlowAct Diaphragm Linear Actuator FCD VLENIMFACTA4 10/16
28. Reassemble the yoke and coupling parts,
perform three
full strokes then check the tightening of the casing
bolting.
29. Log the maintenance interval and the work performed.
30. The actuator subassembly is ready to be mounted on
the valve and the accessories attached.
Item #
WW EU
202 6.1 Diaphragm Casing (2x)
211 6.12 Stem
220 6.14 Disk
225 6.16 Diaphragm
227 6.15 Diaphragm Plate
228 6.13 Spacer Bushing
229 6.21 Actuator Spring
231 6.22 Distance Plate
253 6.8 Guide Bushing
254 6.80 Plain Bearing
255 6.18 Thrust Washer
258 6.26 Vent Plug
272 6.17 O-Ring
273 6.11 Scraper Ring (2x)
275 6.10 O-Ring (2x)
276 6.9 O-Ring (2x)
279 6.46 O-Ring (12x)
326 6.23 Spring Adjusting Plate
334 6.45 Hexagon Bolt (12x)
335 6.3.1 Hexagon Bolt - short (20x)
336 6.3.2 Hexagon Bolt - long (4x)
337 6.5 Plain Washer (24x)
339 6.25 Protection Sleeve (4x)
348 6.20 Stem
349 6.19 Lock Washer
351 6.4 Hexagon Nut (24x)
374 6.47 Distance Bushing
389 6.83 Guide Bushing
1)
Alternatively, hex head assembled screws with captive flat washers are used for this application.
Part
1)
Table 30: Actuator parts Figure 27: Actuator parts
348
349
272
225
227
220
228
374
211
229
326
231
255
336
335
337
202
389
254
276
279
334
202
253
254
258
276
279
334
351
339
275
273
47
flowserve.com
Page 48

Actuator with Stroke Limitation
Spring-to-close or -open
FlowAct Diaphragm Linear Actuator FCD VLENIMFACTA4 10/16
Disassembly instruction of the stroke limitation
subassembly
NOTICE
1. Fix the actuator on the assembly table, if this is not
already happened.
2. Loosen the hex nut (379) counter-clockwise.
3. Remove the plain washer (376), cover (381) and the
pipe section (387).
4. Unlock the lock nuts (350, 2x) counter-clockwise.
5. Loosen the socket head screws (333) counter-clockwise.
6. Lift off the socket head screws (333), plain washers
(334), yoke plate (378) and yoke rods (377).
7. Loosen the stud bolt (385) counter-clockwise.
Limit disassembly only to necessary components.
15. Lower the yoke plate (378) onto the stud bolt (385) on
the yoke rods (377).
16. Install the plain washers (334) and socket head screws
(333) and finger tighten it clockwise.
17. Tighten the socket head screws (333) using a crosswise pattern clockwise.
18. Mount the lock nuts (350, 2x) clockwise.
19. Connect the actuator with the air supply. Control the
air supply until the desired upper and lower stroke position is approached. Position the lock nuts (350) at
the end positions and secure them.
20. Place the pipe section (387) onto the upper guide
bushing.
21. Place the flange (381) onto the pipe section (387).
22. Mount the washer (376) and hex nuts (379) and finger-thigten.
8. Unlock the lock nuts (350, 2x) counter-clockwise.
9. Store all stroke limitation-parts safely, lose no parts.
10. For disassemble the actuator subassembly see pages
46 - 49.
Reassembly instruction of the stroke limitation
subassembly
11. Lubricate the threads of the actuator and stroke limitation-parts with an appropriate lubricant.
12. Mount the lock nuts (350, 2x) clockwise.
13. Mount the stud bolt (385) onto the actuator.
14. Arrange the yoke rods (377, 3x) onto the upper guide
bushing.
23. Perform 3 full strokes and check on the stroke indicator whether the desired positions are achieved.
24. Log the maintenance interval and the work performed.
25. The actuator subassembly is ready to be mounted on
the valve and the accessories attached.
48
Page 49

FlowAct Diaphragm Linear Actuator FCD VLENIMFACTA4 10/16
379
376
381
387
Item #
Part
WW EU
333 6.108 Socket Head Screw (3x)
334 6.107 Plain Washer (3x)
350 6.109 Lock Nut (4x)
376 6.112 Plain Washer
377 6.103 Yoke Rod (3x)
378 6.106 Yoke Plate
379 6.113 Hex Nut
380 6.101 Stem
381 6.111 Cover
385 6.105 Stud Bolt
387 6.110 Pipe Section
350
333
334
378
377
385
380
Actuator
Table 31: Stroke limitation parts Figure 28: Stroke limitation parts
flowserve.com
49
Page 50

FlowAct Diaphragm Linear Actuator FCD VLENIMFACTA4 10/16
Actuator with Handwheel - central
Spring-to-close
Disassembly instruction of the handwheel subassembly
NOTICE
1. Fix the actuator on the assembly table, if this is not
already happened.
2. Disassemble the coupling parts (see page 54).
3. Loosen the hex socket set screw (370) counter-clockwise.
NOTICE
4. Remove the handwheel (372).
5. Loosen the slotted set screws (405, 3x) counter-clockwise and push the cover tube (352) down.
6. Loosen the lock nut (256) clockwise and lift off the
actuator.
NOTICE
7. Unlock the hex nut (253) counter-clockwise.
Limit disassembly only to necessary components.
The handwheel must be in the neutral position.
Use a rounded chisel and a hammer.
Reassembly instruction of the handwheel subassembly
NOTICE
12. Lubricate the threads of the actuator and handwheelparts with an appropriate lubricant.
13. If the stem end stop (350) has been removed, reinstall
it first. Mount it clockwise onto the stem extension
(221) and secure it with the slotted set screw (405).
14. Mount the lock nut (353) counter-clockwise onto the
actuator stem.
15. Mount the stem extension unit (221, 350, 405) counter-clockwise onto the actuator stem in such a way that
the correct thread screwing depths are given, lock the
lock nut (353) clockwise.
16. Arrange the lock nut (256) onto the cover tube (352).
17. Carefully place the actuator assembly onto the handwheel.
NOTICE
Always replace parts showing wear with
new parts.
The handwheel must be in the neutral position.
50
8. Unscrew the stem extension unit (221, 350, 405)
clockwise.
9. We recommend you not to remove the stem end stop
from the stem extension. If this is indispensable loosen the slotted set screw (405) counter-clockwise and
unscrew the stem end stop (350) counter-clockwise.
10. Store all handwheel-parts safely, lose no parts.
11. For disassemble the actuator subassembly see pages
42 - 49.
18. Mount and tighten the lock nut (256) counter-clockwise.
NOTICE
19. Push the cover tube(352) upwards until it stops and
lock the slotted set screws (405, 3x) clockwise.
20. Place the handwheel (372) onto the transmission shaft
of the bevel gear and secure it with the hex socket set
screw (370) clockwise.
21. Assemble the coupling parts (see page 54).
Use a rounded chisel and a hammer.
Page 51

FlowAct Diaphragm Linear Actuator FCD VLENIMFACTA4 10/16
372
22. Connect the actuator with the air supply, perform 3 full
strokes and check the free movement.
NOTICE
move freely without hitting in the end
positions.
23. Log the maintenance interval and the work performed.
24. The actuator subassembly is ready to be mounted on
the valve and the accessories attached.
The stem extension must be able to
Actuator
353
350
405
Item #
Part
WW EU
221 6.120 Stem Extension
256 5.11 Lock Nut
350 6.122 Stem End Stop
352 6.121 Cover Tube
353 6.124 Lock Nut
370 6.96 Hex Socket Set Screw
372 6.42 Central Handwheel (Unit)
405 6.123 Slotted Set Screw (4x)
Table 32: Handwheel “central“ parts Figure 29: Handwheel “central“ parts
352
405
221
256
370
51
flowserve.com
Page 52

FlowAct Diaphragm Linear Actuator FCD VLENIMFACTA4 10/16
Actuator with Handwheel - central
Spring-to-open
Disassembly instruction of the handwheel subassembly
NOTICE
1. Fix the actuator on the assembly table, if this is not
already happened.
2. Disassemble the coupling parts (see page 54).
3. Loosen the hex socket set screw (370) counter-clockwise.
NOTICE
4. Remove the handwheel (372).
spring load. Never disconnect the air supply during
next steps, the stem will retract very quickly.
Limit disassembly only to necessary components.
The handwheel must be in the neutral position.
WARNING
Crushing hazard ! The
actuator stem is under
Reassembly instruction of the handwheel subassembly
NOTICE
14. Lubricate the threads of the actuator and handwheelparts with an appropriate lubricant.
15. Mount the lock nut (353) counter-clockwise onto the
actuator stem.
16. Mount the stem extension (221) counter-clockwise
onto the actuator stem in such a way that the correct
thread screwing depths are given, lock the lock nut
(353) clockwise.
17. Arrange the lock nut (256) onto the cover tube (352).
18. Carefully place the actuator assembly onto the handwheel.
NOTICE
Always replace parts showing wear with
new parts.
The handwheel must be in the neutral position.
52
5. Connect the air supply to the actuator and move the
actuator stem into extended position.
6. Loosen the slotted set screw (405) and unscrew the
stem end stop (350) counter-clockwise.
7. Disconnect the air supply, the actuator stem will move
into retracted position.
8. Loosen the slotted set screws (405, 3x) counter-clockwise and push the cover tube (352) down.
9. Loosen the lock nut (256) clockwise and lift off the
actuator.
NOTICE
10. Unlock the hex nut (353) counter-clockwise.
11. Unscrew the stem extension unit (221) clockwise.
12. Store all handwheel-parts safely, lose no parts.
13. For disassemble the actuator subassembly see pages
42 - 49.
Use a rounded chisel and a hammer.
19. Mount and tighten the lock nut (256) counter-clockwise.
NOTICE
20. Push the cover tube(352) upwards until it stops and
lock the slotted set screws (405, 3x) clockwise.
WARNING
spring load. Never disconnect the air supply during
next steps, the stem will retract very quickly.
21. Connect the air supply to the actuator and move the
actuator stem into extended position.
22. Mount the stem end stop (350) and lock the slotted set
screw (405) clockwise.
23. Disconnect the air supply, the actuator stem will move
into retracted position.
24. Place the handwheel (372) onto the transmission shaft
of the bevel gear and secure it with the hex socket set
Use a rounded chisel and a hammer.
Crushing hazard ! The
actuator stem is under
Page 53

FlowAct Diaphragm Linear Actuator FCD VLENIMFACTA4 10/16
screw (370) clockwise.
25. Assemble the coupling parts (see page 54).
26. Connect the actuator with the air supply, perform 3 full
strokes and check the free movement.
NOTICE
move freely without hitting in the end
positions.
27. Log the maintenance interval and the work performed.
28. The actuator subassembly is ready to be mounted on
the valve and the accessories attached.
The stem extension must be able to
Actuator
353
Item #
Part
WW EU
221 6.120 Stem Extension
256 5.11 Lock Nut
350 6.122 Stem End Stop
352 6.121 Cover Tube
353 6.124 Lock Nut
370 6.96 Hex Socket Set Screw
372 6.42 Central Handwheel (Unit)
405 6.123 Slotted Set Screw (4x)
Table 33: Handwheel “central“ parts Figure 30: Handwheel “central“ parts
352
405
350
405
221
256
370
372
53
flowserve.com
Page 54

Actuator with yoke
Spring-to-close or -open
FlowAct Diaphragm Linear Actuator FCD VLENIMFACTA4 10/16
Disassembly instruction of the yoke
NOTICE
1. Fix the actuator on the assembly table, if this is not
already happened, see also page 14 - 15.
2. Remove the socket head screws (214), plain washers
(334) and the stroke indicator (216).
3. Unlock the lock nut (344) counter-clockwise.
4. Loosen the actuator coupling (249) and lock nut (344)
clockwise.
5. We recommend you not to remove the actuator from
the yoke. If this is indispensable mark the position,
loosen the actuator locknut (256) clockwise and lift off
the actuator.
NOTICE
Limit disassembly only to necessary components.
Use a rounded chisel and a hammer.
Reassembly instruction of the yoke
8. Lubricate the threads of the actuator and stroke coupling-parts with an appropriate lubricant.
9. If necessary mount actuator onto the yoke (201) put
in line with the mark and tighten the actuator locknut
(256) counter-clockwise. The vent plug shall be at a
right angle to the yoke legs (see figure 31).
NOTICE
10. Screw in the lock nut (344) and the actuator coupling
(249) - screw-in depth once thread diameter - counterclockwise and fix it. Aligning the coupling parallel to
the yoke.
11. Mount the stroke indicator (216), plain washers (334)
and the socket head screws (214) clockwise.
12. Further reassembling steps are only possible with the
valve (see page 39).
Use a rounded chisel and a hammer.
54
6. Store all coupling and yoke-parts safely, lose no parts.
7. For disassemble the attachments see pages 50 - 51
and for actuator subassembly see pages 42 - 49.
Item #
Part
WW EU
76 5.30 Adapter
107 5.32 Hex Bolt
118 5.31 Locking Plate
201 5.9 Yoke
213 5.7 Stroke Scale
214 5.20 Socket Head Screw (2x)
216 5.6 Stroke Indicator
240 5.5 Socket Head Screw (4x)
249 5.3 Actuator Coupling
256 5.11 Actuator Locknut
333 5.12 Plain Washer
334 5.19 Plain Washer (2x)
344 5.4 Lock Nut
345 5.1 Valve Coupling
420 5.8 Hex Bolt
Table 34: Coupling parts Figure 31: Coupling parts
201
213
333
420
345
118
76
107
Actuator
256
344
240
249
216
334
214
Page 55

FlowAct Diaphragm Linear Actuator FCD VLENIMFACTA4 10/16
107
334
Actuator with Handwheel - side
Spring-to-close or -open
Disassembly instruction of the yoke
NOTICE
1. Fix the actuator on the assembly table, if this is not
already happened, see also page 14 - 15.
2. Loosen the hex bolts (150) and remove the handwheel-side (393).
3. Remove the socket head screws (214), plain washers
(334) and the stroke indicator (216).
4. Unlock the lock nut (344) counter-clockwise.
5. Loosen the actuator coupling (249) and lock nut (344)
clockwise.
6. We recommend you not to remove the actuator from the
yoke. If this is indispensable mark the position, loosen the
actuator locknut (256) clockwise and lift off the actuator.
Limit disassembly only to necessary components.
and for actuator subassembly see pages 42 - 49.
Reassembly instruction of the yoke
9. Lubricate the threads of the actuator and stroke coupling-parts with an appropriate lubricant.
10. If necessary mount actuator onto the yoke (201) put
in line with the mark and tighten the actuator locknut
(256) counter-clockwise. The vent plug shall be at a
right angle to the yoke legs (see figure 32).
NOTICE
11. Screw in the lock nut (344) and the actuator coupling (249)
- screw-in depth once thread diameter - counter-clockwise
and fix it. Aligning the coupling parallel to the yoke.
12. Mount the stroke indicator (216), plain washers (334)
and the socket head screws (214) clockwise.
13. Place the handwheel-side (393) mount the hex bolts
(150) clockwise.
NOTICE
Use a rounded chisel and a hammer.
The handwheel must be in the neutral position.
NOTICE
7. Store all coupling and yoke-parts safely, lose no parts.
8. For disassemble the attachments see pages 50 - 51
Item #
WW EU
76 5.30 Adapter
107 5.32 Hex Bolt
118 5.31 Locking Plate
150 6.92 Hex Bolt (4x)
201 5.9 Yoke
213 5.7 Stroke Scale
214 5.20 Socket Head Screw (2x)
216 5.6 Stroke Indicator
240 5.5 Socket Head Screw (4x)
249 5.3 Actuator Coupling
256 5.11 Actuator Locknut
333 5.12 Plain Washer
334 5.19 Plain Washer (2x)
344 5.4 Lock Nut
345 5.1 Valve Coupling
393 6.95 Lateral Handwheel (Unit)
420 5.8 Hex Bolt
Use a rounded chisel and a hammer.
Part
Table 35: Coupling parts Figure 32: Coupling parts
14. Further reassembling steps are only possible with the
valve (see page 39).
Actuator
393
150
201
213
333
420
345
118
76
256
344
240
249
216
214
55
flowserve.com
Page 56

Space for personal notes
FlowAct Diaphragm Linear Actuator FCD VLENIMFACTA4 10/16
56
Page 57

FlowAct Diaphragm Linear Actuator FCD VLENIMFACTA4 10/16
Pneumatic Actuator - Type 3002
• Type 253, 503, 701 see page 17
• Type 1502 see page 39
Single chamber actuator without attachments Single chamber actuator with attachments
Spring-to-close Spring-to-open Spring-to-close Spring-to-open
Adjustable Limit Stop - max. positioning force 39 kN
see pages 48 - 49
see pages 58 - 61 see pages 62 - 65 see pages 66 - 69 see pages 70 - 73
Central-mounted handwheel
without
see pages 50 - 53
NAMUR-yoke, with double mounting pads
see page 54
57
flowserve.com
Page 58

Actuator without attachments
Spring-to-close
FlowAct Diaphragm Linear Actuator FCD VLENIMFACTA4 10/16
WARNING
of the spring preload can be 60 000 N !
Danger of life in case of improper
disassembly. The maximum sum
Disassembly instruction of the actuator subassembly
NOTICE
clamping tool are necessary. Limit disassembly only to necessary components.
1. Fix the actuator on the assembly table, if this is not
already happened.
2. Disassemble the hexagon bolts (335), plain washers
(337) and hexagon nuts (351) from the casing (203).
3. Pull off the protection sleeve (339).
springs inside.
For the disassembly, special tools such as a
hydraulic spring press, stem wrench and stem
WARNING
Risk of injury by jumping out parts ! Pre-loaded
and O-ring (276).
10. Disassemble the hexagon bolts (335), plain washers
(337) and hexagon nuts (351).
11. Pull off the protection sleeve (339).
WARNING
springs inside.
12. Lubricate the threads and loosen the long hexagon bolts
(336), plain washers (337) and hexagon nuts (351) uniformly in a clockwise sequence as the springs expand.
NOTICE
quirement threaded rods in 8.8 quality (ISO 898-1) or
higher as well as washers and nuts alternatively.
13. Lift off the diaphragm casing (202 - 373), distance
plate (231) and spring adjusting plate (326).
14. Remove the actuator springs (229).
We recommend you to use a hydraulic spring press, as a minimum re-
Risk of injury by jumping out parts ! Pre-loaded
58
4. Lubricate the threads and loosen the long hexagon bolts
(336), plain washers (337) and hexagon nuts (351) uniformly in a clockwise sequence as the springs expand.
NOTICE
quirement threaded rods in 8.8 quality (ISO 898-1) or
higher as well as washers and nuts alternatively.
5. Lift off the diaphragm casing (203, 258), distance
plate (231) and spring adjusting plate (326).
6. Remove the actuator springs (229).
7. Fix the stem (211) with the stem clamping tool against
twisting.
8. Loosen the special nut (348) counterclockwise and remove the lock washer (349), distance bushing (374),
spacer bushing (228), disk (220), diaphragm plate (227),
diaphragm (225), O-ring (272) and thrust washer (255).
9. Loosen the hexagon bolts (334) counterclockwise and
remove the O-rings (279), diaphragm casing (202)
We recommend you to use a hydraulic spring press, as a minimum re-
15. Remove the stem clamping tool.
16. Disassemble the coupling parts (see page 54).
17. Carefully pull out the diaphragm-stem unit (211 - 380).
18. Pull out the scraper ring (273) and O-rings (275, 2x).
19. Fix the diaphragm-stem unit into the stem clamping
tool.
20. Loosen the stem extension (380) with the stem
wrench counterclockwise and remove the lock washer
(349), distance bushing (374), spacer bushing (228),
disk (220), diaphragm plate (227), diaphragm (225),
O-ring (272) and thrust washer (255).
21. Check stressed surface areas for damage such as
scoring and deformities. Use a brass brush or similar
tool to clean bolting. Check for corrosion or any other
damage.
Reassembly instruction of the actuator subassembly
Page 59

FlowAct Diaphragm Linear Actuator FCD VLENIMFACTA4 10/16
NOTICE
22. Lubricate the new O-ring (275) and new scraper ring
(273) with an appropriate lubricant and install into the
guide bushing (253).
23. Lubricate the new O-ring (275) with an appropriate lubricant and install into the guide bushing (373).
24. Fix the stem (211) into the stem clamping tool.
25. Lubricate the new O-ring (272) with an appropriate
lubricant.
26. Lower the thrust washer (255), O-ring (272), dia-
onto the stem (211).
NOTICE
that of an internal stroke stop.
Always replace parts showing wear with
new parts.
phragm (225), diaphragm plate (227),
disk (220), spacer bushing (228), distance
bushing (374) and lock washer (349)
Arrange the distance bushing like an
upside down top hat. Its function is
NOTICE
to the actuators center. If these will ignored the spring
may touch the actuators casing and rub in rare cases.
32. Install and position the spring adjusting plate (326)
such that the imprint on the plate and air connection
are opposite of each other.
33. Install the distance plate (231) and diaphragm casing
(202 - 374), positioning the casing such that the air
connections opposites.
34. Lubricate the threats of the long hexagon bolts (336)
with an appropriate lubricant and load the springs uniformly in a clockwise sequence by tightening the long
hexagon bolts (336), plain washers (337) and hexagon
nuts (351). Alternative method see NOTICE step 4.
35. Install the short hexagon bolts (335), plain washers (337)
and hexagon nuts (351).
36. Tighten the nuts (351) using a crosswise pattern in
four steps,
37. Install the protection sleeve (339).
The surface, respectively the edges
of the spring ends should be aligned
see section 15 torque requirements.
27. Lubricate the thread of the stem (211) with an appropriate lubricant and install and finger tighten the stem
extension (380).
NOTICE
of the positioning template. Mark the position.
28. Turn clockwise the stem extension (380) using a suitable torque wrench, see section 15 torque requirements.
29. Loosen and remove the diaphragm-stem unit (211-
380) out of the stem clamping tool. Lubricate the actuator stem with an appropriate lubricant.
30. Carefully lower the diaphragm-stem unit (211- 380)
into the diaphragm casing (202 - 334).
NOTICE
Mark align.
31. Install and align the actuator springs (229).
The diaphragm plate should be positioned to the diaphragm with the aid
Position the diaphragm-stem unit
such that the air connection and the
38. Assemble the coupling parts
39. Lubricate the new O-ring (276) with an appropriate
lubricant and install it onto the guide bushing (373).
40. Lubricate the threats of the hexagon bolts (334) and
the new O-rings (279) with an appropriate lubricant
and install it onto the guide bushing (373). Tighten the
bolts (334) using a crosswise pattern in two steps,
section 15 torque requirements.
41. Lubricate the new O-ring (272) with an appropriate lubricant.
42. Lower the thrust washer (255), O-ring (272), dia-
phragm (225), diaphragm plate (227),
disk (220), spacer bushing (228), distance
bushing (374) and lock washer (349)
onto the stem (211).
NOTICE
stroke stop takes over the special nut.
Arrange the distance bushing like an
correctly wearing hat. The internal
(see page 54).
see
59
flowserve.com
Page 60

FlowAct Diaphragm Linear Actuator FCD VLENIMFACTA4 10/16
380
349
374
228
227
220
272
225
255
211
336
335
337
203
258
202
276
279
334
202
373
254
258
276
279
334
351
339
273
275
229
326
231
275
202
253
254
276
279
334
348
374
43. Lubricate the thread of the stem extension (348) with
an appropriate lubricant and install and finger tighten
the special nut (348).
60
NOTICE
tioned to the diaphragm with the aid
of the positioning template. Mark the position.
44. Fix the stem (211) with the stem clamping tool against
twisting.
45. Turn the special nut (348) clockwise using a suitable
torque wrench, see section 15 torque requirements.
46. Remove the stem clamping tool.
47. Install and align the actuator springs (229).
The surface, respectively the edges
The diaphragm plate should be posi-
NOTICE
of the spring ends should be aligned
to the actuators center. If these will ignored the spring
may touch the actuators casing and rub in rare cases.
48. Install and position the spring adjusting plate (326)
such that the imprint on the plate and air connection
are opposite of each other.
49. Install the distance plate (231) and diaphragm casing
(203), positioning the casing such that the air connections opposites.
50. Lubricate the threats of the long hexagon bolts (336)
with an appropriate lubricant and load the springs uniformly in a clockwise sequence by tightening the long
hexagon bolts (336), plain washers (337) and hexagon
nuts (351). Alternative method see NOTICE step 4.
51. Install the short hexagon bolts (335), plain washers (337)
and hexagon nuts (351).
52. Tighten the nuts (351) using a crosswise pattern in
four steps,
see section 15 torque requirements.
53. Install the protection sleeve (339).
54. Perform 3 full strokes and check the tightening of the
casing bolting.
55. Log the maintenance interval and the work performed.
56. The actuator subassembly is ready to be mounted on
the valve and the accessories attached.
Item #
WW EU
202 6.1 Diaphragm Casing
203 6.2 Diaphragm Casing
211 6.12 Stem
220 6.14 Disk (2x)
225 6.16 Diaphragm (2x)
227 6.15 Diaphragm Plate (2x)
228 6.13 Spacer Bushing (2x)
229 6.21 Actuator Spring
231 6.22 Distance Plate (2x)
253 6.8 Lower Guide Bushing
254 6.80 Plain Bearing (2x)
255 6.18 Thrust Washer (2x)
258 6.26 Vent Plug (2x)
272 6.17 O-Ring (2x)
273 6.11 Scraper Ring
275 6.10 O-Ring (2x)
276 6.9 O-Ring (3x)
279 6.46 O-Ring (18x)
326 6.23 Spring Adjusting Plate (2x)
334 6.45 Hexagon Bolt (18x)
335 6.3.1 Hexagon Bolt - short (40x)
336 6.3.2 Hexagon Bolt - long (8x)
337 6.5 Plain Washer (48x)
339 6.25 Protection Sleeve (8x)
348 6.20 Special Nut
349 6.19 Lock Washer (2x)
351 6.4 Hexagon Nut (48x)
373 6.82 Intermediate Guide Bushing
374 6.47 Distance Bushing (2x)
380 6.81 Stem Extension
1)
Alternatively, hex head assembled screws with captive flat washers are used for this application.
Part
1)
1)
1)
Table 36: Actuator parts Figure 33: Actuator parts
Page 61

339
275
202
373
254
258
276
279
334
231
326
FlowAct Diaphragm Linear Actuator FCD VLENIMFACTA4 10/16
336
335
337
203
258
229
380
349
374
228
220
227
225
272
348
374
334
279
202
255
211
275
273
202
253
254
276
279
334
351
276
61
flowserve.com
Page 62

Actuator without attachments
Spring-to-open
FlowAct Diaphragm Linear Actuator FCD VLENIMFACTA4 10/16
WARNING
of the spring preload can be 60 000 N !
Danger of life in case of improper
disassembly. The maximum sum
Disassembly instruction of the actuator subassembly
NOTICE
clamping tool are necessary. Limit disassembly only to necessary components.
1. Fix the actuator on the assembly table, if this is not
already happened.
2. Disassemble the hexagon bolts (335), plain washers
(337) and hexagon nuts (351) from the casing (203).
3. Pull off the protection sleeve (339).
4. Lubricate the threats and disassemble the hexagon
bolts (336), plain washers (337) and hexagon nuts
(351) counterclockwise.
For the disassembly, special tools such as a
hydraulic spring press, stem wrench and stem
remove the O-rings (279), diaphragm casing (202)
and O-ring (276).
10. Disassemble the hexagon bolts (335), plain washers
(337) and hexagon nuts (351).
11. Pull off the protection sleeve (339).
WARNING
springs inside.
12. Lubricate the threads and loosen the long hexagon bolts
(336), plain washers (337) and hexagon nuts (351) uniformly in a clockwise sequence as the springs expand.
NOTICE
quirement a threaded rods in 8.8 quality (ISO 898-1)
or higher as well as washers and nuts alternatively.
13. Lift off the diaphragm casing (202 - 373).
14. Remove the stem clamping tool.
We recommend you to use a hydraulic spring press, as a minimum re-
Risk of injury by jumping out parts ! Pre-loaded
5. Lift off the diaphragm casing (203, 258).
6. Fix the stem (211) with the stem clamping tool against
twisting.
WARNING
springs inside.
7. Loosen the special nut (348) counterclockwise and remove the lock washer (349), thrust washer (255), Oring (272), diaphragm (225), diaphragm plate (227),
disk (220), spacer bushing (228) and distance bushing
(374).
NOTICE
requirement a beam and threaded rods in 8.8 quality
(ISO 898-1) or higher as well as washers and nuts alternatively.
8. Remove the actuator springs (229), spring adjusting
plate (326) and distance plate (231).
We recommend you to use a hydraulic spring press, as a minimum
Risk of injury by jumping out parts ! Pre-loaded
15. Disassemble the coupling parts (see page 54).
16. Carefully pull out the diaphragm-stem unit (211 - 380).
17. Remove the actuator springs (229), spring adjusting
plate (326) and distance plate (231).
18. Fix the diaphragm-stem unit into the stem clamping
tool.
19. Loosen the stem extension (380) with the stem wrench
counterclockwise and remove the lock washer (349),
thrust washer (255), O-ring (272), diaphragm (225),
diaphragm plate (227), disk (220), spacer bushing
(228) and distance bushing (374).
20. Pull out the scraper ring (273) and O-rings (275, 2x).
21. Check stressed surface areas for damage such as
scoring and deformities. Use a brass brush or similar
tool to clean bolting. Check for corrosion or any other
damage.
62
9. Loosen the hexagon bolts (334) counterclockwise and
Page 63

FlowAct Diaphragm Linear Actuator FCD VLENIMFACTA4 10/16
Reassembly instruction of the actuator subassembly
NOTICE
22. Lubricate the new O-ring (275) and new scraper ring
(273) with an appropriate lubricant and install into the
guide bushing (253).
23. Lubricate the new O-ring (275) with an appropriate lubricant and install into the guide bushing (373).
24. Fix the stem (211) into the stem clamping tool.
25. Lubricate the new O-ring (272) with an appropriate
lubricant.
26. Lower the distance bushing (374), spacer bushing
onto the stem (211).
NOTICE
that of an internal stroke stop.
Always replace parts showing wear with
new parts.
(228), disk (220), diaphragm plate (227),
diaphragm (225), O-ring (272), thrust
washer (255) and lock washer (349)
Arrange the distance bushing like an
correctly wearing hat. Its function is
31. Loosen and remove the diaphragm-stem unit (211-
380) out of the stem clamping tool. Lubricate the actuator stem with an appropriate lubricant.
32. Carefully lower the diaphragm-stem unit (211- 380)
into the diaphragm casing (202 - 373).
NOTICE
Mark align.
33. Install the diaphragm casing (202 - 373), positioning
the casing such that the air connections opposites.
34. Lubricate the threats of the long hexagon bolts (336)
with an appropriate lubricant and load the springs uniformly in a clockwise sequence by tightening the long
hexagon bolts (336), plain washers (337) and hexagon
nuts (351). Alternative method see NOTICE step 12.
35. Install the short hexagon bolts (335), plain washers (337)
and hexagon nuts (351).
36. Tighten the nuts (351) using a crosswise pattern in
four steps,
37. Install the protection sleeve (339).
38. Assemble the coupling parts
Position the diaphragm-stem unit
such that the air connection and the
see section 15 torque requirements.
(see page 54).
27. Lubricate the thread of the stem (211) with an appropriate lubricant and install and finger tighten the stem
extension (380).
NOTICE
of the positioning template. Mark the position.
28. Turn clockwise the stem extension (380) using a suitable torque wrench, see section 15 torque requirements.
29. Install the distance plate (231) and positioning the
spring adjusting plate (326) such that the imprint and
air connection opposites.
30. Install and align the actuator springs (229).
NOTICE
to the actuators center. If these will ignored the spring
may touch the actuators casing and rub in rare cases.
The diaphragm plate should be positioned to the diaphragm with the aid
The surface, respectively the edges
of the spring ends should be aligned
39. Lubricate the new O-ring (276) with an appropriate
lubricant and install it onto the guide bushing (373).
40. Lubricate the threats of the hexagon bolts (334) and
the new O-rings (279) with an appropriate lubricant.
41. Install the diaphragm casing (202) onto the guide
bushing (373) and tighten the bolts (334) using a
crosswise pattern in two steps,
requirements.
42. Install the distance plate (231) and positioning the
spring adjusting plate (326) such that the imprint and
air connection opposites.
43. Install and align the actuator springs (229).
NOTICE
to the actuators center. If these will ignored the spring
may touch the actuators casing and rub in rare cases.
The surface, respectively the edges
of the spring ends should be aligned
see section 15 torque
63
flowserve.com
Page 64

FlowAct Diaphragm Linear Actuator FCD VLENIMFACTA4 10/16
275
231
326
229
275
273
202
373
254
258
276
279
334
211
255
225
272
220
227
228
374
349
380
276
202
253
254
276
279
334
339
351
374
348
334
279
202
203
258
337
335
336
64
44. Lubricate the new O-ring (272) with an appropriate lubricant.
45. Lower the distance bushing (374), spacer bushing
(228), disk (220), diaphragm plate (227),
diaphragm (225), O-ring (272), thrust
washer (255) and lock washer (349)
onto the stem extension (380).
Arrange the distance bushing like an
NOTICE
correctly wearing hat. The internal
stroke stop takes over the special nut.
46. Lubricate the thread of the stem extension (380) with
an appropriate lubricant.
The diaphragm plate should be posi-
NOTICE
tioned to the diaphragm with the aid
of the positioning template. Mark the position.
47. Fix the stem (211) with the stem clamping tool against
twisting.
48. Load the springs by tightening the
special nut (348)
clockwise using a suitable torque wrench, see section
15 torque requirements.
We recommend you to use a hy-
NOTICE
draulic spring press, as a minimum
requirement a beam and threaded rods in 8.8 quality
(ISO 898-1) or higher as well as washers and nuts alternatively.
49. Remove the stem clamping tool.
50. Install the diaphragm casing (203), positioning the
casing such that the air connections opposites.
51. Lubricate the threats of the long hexagon bolts (336) with
an appropriate lubricant and load the springs uniformly
in a clockwise sequence by tightening the long hexagon
bolts (336), plain washers (337) and hexagon nuts (351).
52. Install the short hexagon bolts (335), plain washers (337)
and hexagon nuts (351).
53. Tighten the nuts (351) using a crosswise pattern in
four steps,
see section 15 torque requirements.
54. Install the protection sleeve (339).
55. Perform 3 full strokes and check the tightening of the
1)
Alternatively, hex head assembled screws with captive flat washers are used for this application.
casing bolting.
56. Log the maintenance interval and the work performed.
57. The actuator subassembly is ready to be mounted on
the valve and the accessories attached.
Item #
WW EU
Part
202 6.1 Diaphragm Casing
203 6.2 Diaphragm Casing
211 6.12 Stem
220 6.14 Disk (2x)
225 6.16 Diaphragm (2x)
227 6.15 Diaphragm Plate (2x)
228 6.13 Spacer Bushing (2x)
229 6.21 Actuator Spring
231 6.22 Distance Plate (2x)
253 6.8 Lower Guide Bushing
254 6.80 Plain Bearing (2x)
255 6.18 Thrust Washer (2x)
258 6.26 Vent Plug (2x)
272 6.17 O-Ring (2x)
273 6.11 Scraper Ring
275 6.10 O-Ring (2x)
276 6.9 O-Ring (3x)
279 6.46 O-Ring (18x)
326 6.23 Spring Adjusting Plate (2x)
334 6.45 Hexagon Bolt (18x)
335 6.3.1 Hexagon Bolt - short (40x)
336 6.3.2 Hexagon Bolt - long (8x)
337 6.5 Plain Washer (48x)
339 6.25 Protection Sleeve (8x)
348 6.20 Special Nut
349 6.19 Lock Washer (2x)
351 6.4 Hexagon Nut (48x)
373 6.82 Intermediate Guide Bushing
374 6.47 Distance Bushing (2x)
380 6.81 Stem Extension
1)
1)
1)
Table 37: Actuator parts Figure 34: Actuator parts
Page 65

FlowAct Diaphragm Linear Actuator FCD VLENIMFACTA4 10/16
336
275
202
373
254
276
279
334
380
349
255
272
225
227
335
337
203
348
374
220
228
211
374
229
326
231
275
273
351
339
334
279
202
258
276
202
253
258
254
276
279
334
flowserve.com
65
Page 66

Actuator with attachments
Spring-to-close
FlowAct Diaphragm Linear Actuator FCD VLENIMFACTA4 10/16
WARNING
of the spring preload can be 60 000 N !
Danger of life in case of improper
disassembly. The maximum sum
Disassembly instruction of the actuator subassembly
NOTICE
clamping tool are necessary. Limit disassembly only to necessary components.
1. Fix the actuator on the assembly table, if this is not
already happened.
2. Disassemble the hexagon bolts (335), plain washers
(337) and hexagon nuts (351) from the casing (203).
3. Pull off the protection sleeve (339).
springs inside.
For the disassembly, special tools such as a
hydraulic spring press, stem wrench and stem
WARNING
Risk of injury by jumping out parts ! Pre-loaded
and O-ring (276).
10. Disassemble the hexagon bolts (335), plain washers
(337) and hexagon nuts (351).
11. Pull off the protection sleeve (339).
WARNING
springs inside.
12. Lubricate the threads and loosen the long hexagon bolts
(336), plain washers (337) and hexagon nuts (351) uniformly in a clockwise sequence as the springs expand.
NOTICE
quirement threaded rods in 8.8 quality (ISO 898-1) or
higher as well as washers and nuts alternatively.
13. Lift off the diaphragm casing (202 - 373), distance
plate (231) and spring adjusting plate (326).
14. Remove the actuator springs (229).
We recommend you to use a hydraulic spring press, as a minimum re-
Risk of injury by jumping out parts ! Pre-loaded
66
4. Lubricate the threads and loosen the long hexagon bolts
(336), plain washers (337) and hexagon nuts (351) uniformly in a clockwise sequence as the springs expand.
NOTICE
quirement threaded rods in 8.8 quality (ISO 898-1) or
higher as well as washers and nuts alternatively.
5. Lift off the diaphragm casing (203 - 389), distance
plate (231) and spring adjusting plate (326).
6. Remove the actuator springs (229).
7. Fix the stem (211) with the stem clamping tool against
twisting.
8. Loosen the stem (348) with the stem wrench counterclockwise and remove the lock washer (349), distance
bushing (374), spacer bushing (228), disk (220), diaphragm plate (227), diaphragm (225), O-ring (272) and
thrust washer (255).
9. Loosen the hexagon bolts (334) counterclockwise and
remove the O-rings (279), diaphragm casing (202)
We recommend you to use a hydraulic spring press, as a minimum re-
15. Remove the stem clamping tool.
16. Disassemble the coupling parts (see page 54).
17. Carefully pull out the diaphragm-stem unit (211 - 380).
18. Pull out the scraper ring (273) and O-rings (275, 3x).
19. Fix the diaphragm-stem unit into the stem clamping
tool.
20. Loosen the stem extension (380) with the stem
wrench counterclockwise and remove the lock washer
(349), distance bushing (374), spacer bushing (228),
disk (220), diaphragm plate (227), diaphragm (225),
O-ring (272) and thrust washer (255).
21. Check stressed surface areas for damage such as
scoring and deformities. Use a brass brush or similar
tool to clean bolting. Check for corrosion or any other
damage.
Reassembly instruction of the actuator subassembly
Page 67

FlowAct Diaphragm Linear Actuator FCD VLENIMFACTA4 10/16
NOTICE
22. Lubricate the new O-ring (275) and new scraper ring
(273) with an appropriate lubricant and install into the
guide bushing (253).
23. Lubricate the new O-ring (275) with an appropriate lubricant and install into the guide bushing (6.82).
24. Fix the stem (211) into the stem clamping tool.
25. Lubricate the new O-ring (272) with an appropriate
lubricant.
26. Lower the thrust washer (255), O-ring (272), dia-
onto the stem (211).
NOTICE
that of an internal stroke stop.
Always replace parts showing wear with
new parts.
phragm (225), diaphragm plate (227),
disk (220), spacer bushing (228), distance
bushing (374) and lock washer (349)
Arrange the distance bushing like an
upside down top hat. Its function is
NOTICE
to the actuators center. If these will ignored the spring
may touch the actuators casing and rub in rare cases.
32. Install and position the spring adjusting plate (326)
such that the imprint on the plate and air connection
are opposite of each other.
33. Install the distance plate (231) and diaphragm casing
(202 - 389), positioning the casing such that the air
connections opposites.
34. Lubricate the threats of the long hexagon bolts (336)
with an appropriate lubricant and load the springs uniformly in a clockwise sequence by tightening the long
hexagon bolts (336), plain washers (337) and hexagon
nuts (351). Alternative method see NOTICE step 4.
35. Install the short hexagon bolts (335), plain washers (337)
and hexagon nuts (351).
36. Tighten the nuts (351) using a crosswise pattern in
four steps,
37. Install the protection sleeve (339).
The surface, respectively the edges
of the spring ends should be aligned
see section 15 torque requirements.
27. Lubricate the thread of the stem (211) with an appropriate lubricant and install and finger tighten the stem
extension (380).
NOTICE
of the positioning template. Mark the position.
28. Turn clockwise the stem extension (380) using a suitable torque wrench, see section 15 torque requirements.
29. Loosen and remove the diaphragm-stem unit (211 -
380) out of the stem clamping tool. Lubricate the actuator stem with an appropriate lubricant.
30. Carefully lower the diaphragm-stem unit (211 - 380)
into the diaphragm casing (202 - 373).
NOTICE
Mark align.
31. Install and align the actuator springs (229).
The diaphragm plate should be positioned to the diaphragm with the aid
Position the diaphragm-stem unit
such that the air connection and the
38. Assemble the coupling parts
39. Lubricate the new O-ring (276) with an appropriate
lubricant and install it onto the guide bushing (373).
40. Lubricate the threats of the hexagon bolts (334) and
the new O-rings (279) with an appropriate lubricant
and install it onto the guide bushing (373). Tighten the
bolts (334) using a crosswise pattern in two steps,
section 15 torque requirements.
41. Lubricate the new O-ring (272) with an appropriate lubricant.
42. Lower the thrust washer (255), O-ring (272), dia-
phragm (225), diaphragm plate (227),
disk (220), spacer bushing (228), distance bushing (374) and lock washer
onto the stem (211).
NOTICE
stroke stop takes over the special nut.
Arrange the distance bushing like an
correctly wearing hat. The internal
(see page 54).
see
67
flowserve.com
Page 68

FlowAct Diaphragm Linear Actuator FCD VLENIMFACTA4 10/16
275
231
326
229
275
273
202
373
254
258
276
279
334
211
255
225
272
220
227
228
374
349
380
202
253
254
276
279
334
339
351
374
348
334
279
276
202
202
389
254
276
279
334
258
337
335
336
43. Lubricate the thread of the stem extension (380) with
an appropriate lubricant and install and finger tighten
the stem (348).
68
NOTICE
tioned to the diaphragm with the aid
of the positioning template. Mark the position.
44. Fix the stem (211) with the stem clamping tool against
twisting.
45. Turn clockwise the stem (348) using a suitable torque
wrench, see section 15 torque requirements.
46. Remove the stem clamping tool.
47. Install and align the actuator springs (229).
The surface, respectively the edges
The diaphragm plate should be posi-
NOTICE
of the spring ends should be aligned
to the actuators center. If these will ignored the spring
may touch the actuators casing and rub in rare cases.
48. Install and position the spring adjusting plate (326)
such that the imprint on the plate and air connection
are opposite of each other.
49. Install the distance plate (231) and diaphragm casing
(203), positioning the casing such that the air connections opposites.
50. Lubricate the threats of the long hexagon bolts (336)
with an appropriate lubricant and load the springs uniformly in a clockwise sequence by tightening the long
hexagon bolts (336), plain washers (337) and hexagon
nuts (351). Alternative method see NOTICE step 4.
51. Install the short hexagon bolts (335), plain washers (337)
and hexagon nuts (351).
52. Tighten the nuts (351) using a crosswise pattern in
four steps,
see section 15 torque requirements.
53. Install the protection sleeve (339).
54. Perform 3 full strokes and check the tightening of the
casing bolting.
55. Log the maintenance interval and the work performed.
56. The actuator subassembly is ready to be mounted on
the valve and the accessories attached.
Item #
WW EU
202 6.1 Diaphragm Casing (4x)
211 6.12 Stem
220 6.14 Disk (2x)
225 6.16 Diaphragm (2x)
227 6.15 Diaphragm Plate (2x)
228 6.13 Spacer Bushing (2x)
229 6.21 Actuator Spring
231 6.22 Distance Plate (2x)
253 6.8 Lower Guide Bushing
254 6.80 Plain Bearing (3x)
255 6.18 Thrust Washer (2x)
258 6.26 Vent Plug (2x)
272 6.17 O-Ring (2x)
273 6.11 Scraper Ring (2x)
275 6.10 O-Ring (3x)
276 6.9 O-Ring (4x)
279 6.46 O-Ring (24x)
326 6.23 Spring Adjusting Plate (2x)
334 6.45 Hexagon Bolt (24x)
335 6.3.1 Hexagon Bolt - short (40x)
336 6.3.2 Hexagon Bolt - long (8x)
337 6.5 Plain Washer (48x)
339 6.25 Protection Sleeve (8x)
348 6.20 Stem
349 6.19 Lock Washer (2x)
351 6.4 Hexagon Nut (48x)
373 6.82 Intermediate Guide Bushing
374 6.47 Distance Bushing (2x)
380 6.81 Stem Extension
389 6.83 Upper Guide Bushing
1)
Alternatively, hex head assembled screws with captive flat washers are used for this application.
Part
1)
Table 38: Actuator parts Figure 35: Actuator parts
Page 69

275
202
373
254
276
279
334
258
231
326
FlowAct Diaphragm Linear Actuator FCD VLENIMFACTA4 10/16
336
335
337
202
389
254
276
279
334
258
229
380
349
374
228
220
227
225
272
348
374
334
279
202
255
211
275
273
202
253
254
276
279
334
351
339
276
69
flowserve.com
Page 70

Actuator with attachments
Spring-to-open
FlowAct Diaphragm Linear Actuator FCD VLENIMFACTA4 10/16
WARNING
of the spring preload can be 60 000 N !
Danger of life in case of improper
disassembly. The maximum sum
Disassembly instruction of the actuator subassembly
NOTICE
clamping tool are necessary. Limit disassembly only to necessary components.
1. Fix the actuator on the assembly table, if this is not
already happened.
2. Disassemble the hexagon bolts (335), plain washers
(337) and hexagon nuts (351) from the casing (203).
3. Pull off the protection sleeve (339).
4. Lubricate the threats and disassemble the hexagon
bolts (336), plain washers (337) and hexagon nuts
(351) counterclockwise.
For the disassembly, special tools such as a
hydraulic spring press, stem wrench and stem
9. Loosen the hexagon bolts (334) counterclockwise and
remove the O-rings (279), diaphragm casing (202)
and O-ring (276).
10. Disassemble the hexagon bolts (335), plain washers
(337) and hexagon nuts (351).
11. Pull off the protection sleeve (339).
WARNING
springs inside.
12. Lubricate the threads and loosen the long hexagon bolts
(336), plain washers (337) and hexagon nuts (351) uniformly in a clockwise sequence as the springs expand.
NOTICE
quirement a threaded rods in 8.8 quality (ISO 898-1)
or higher as well as washers and nuts alternatively.
13. Lift off the diaphragm casing (202 - 373).
14. Remove the stem clamping tool.
We recommend you to use a hydraulic spring press, as a minimum re-
Risk of injury by jumping out parts ! Pre-loaded
5. Lift off the diaphragm casing (202 - 389).
6. Fix the stem (211) with the stem clamping tool against
twisting.
WARNING
springs inside.
7. Loosen the stem (348) counterclockwise and remove
the lock washer (349), thrust washer (255), O-ring
(272), diaphragm (225), diaphragm plate (227), disk
(220), spacer bushing (228) and distance bushing
(374).
NOTICE
requirement a beam and threaded rods in 8.8 quality
(ISO 898-1) or higher as well as washers and nuts alternatively.
8. Remove the actuator springs (229), spring adjusting
plate (326) and distance plate (231).
We recommend you to use a hydraulic spring press, as a minimum
Risk of injury by jumping out parts ! Pre-loaded
15. Disassemble the coupling parts (see page 54).
16. Carefully pull out the diaphragm-stem unit (211 - 380).
17. Remove the actuator springs (229), spring adjusting
plate (326) and distance plate (231).
18. Fix the diaphragm-stem unit into the stem clamping
tool.
19. Loosen the stem extension (380) with the stem wrench
counterclockwise and remove the lock washer (349),
thrust washer (255), O-ring (272), diaphragm (225),
diaphragm plate (227), disk (220), spacer bushing
(228) and distance bushing (374).
20. Pull out the scraper ring (273) and O-rings (275, 3x).
21. Check stressed surface areas for damage such as
scoring and deformities. Use a brass brush or similar
tool to clean bolting. Check for corrosion or any other
damage.
70
Page 71

FlowAct Diaphragm Linear Actuator FCD VLENIMFACTA4 10/16
Reassembly instruction of the actuator subassembly
NOTICE
22. Lubricate the new O-ring (275) and new scraper ring
(273) with an appropriate lubricant and install into the
guide bushing (253).
23. Lubricate the new O-ring (275) with an appropriate lubricant and install into the guide bushing (373).
24. Fix the stem (211) into the stem clamping tool.
25. Lubricate the new O-ring (272) with an appropriate
lubricant.
26. Lower the distance bushing (374), spacer bushing
onto the stem (211).
NOTICE
that of an internal stroke stop.
Always replace parts showing wear with
new parts.
(228), disk (220), diaphragm plate (227),
diaphragm (225), O-ring (272), thrust
washer (255) and lock washer (349)
Arrange the distance bushing like an
correctly wearing hat. Its function is
31. Loosen and remove the diaphragm-stem unit (211-
380) out of the stem clamping tool. Lubricate the actuator stem with an appropriate lubricant.
32. Carefully lower the diaphragm-stem unit (211- 380)
into the diaphragm casing (202 - 334).
NOTICE
Mark align.
33. Install the diaphragm casing (202 - 373), positioning
the casing such that the air connections opposites.
34. Lubricate the threats of the long hexagon bolts (336)
with an appropriate lubricant and load the springs uniformly in a clockwise sequence by tightening the long
hexagon bolts (336), plain washers (337) and hexagon
nuts (351). Alternative method see NOTICE step 12.
35. Install the short hexagon bolts (335), plain washers (337)
and hexagon nuts (351).
36. Tighten the nuts (351) using a crosswise pattern in
four steps,
37. Install the protection sleeve (339).
38. Assemble the coupling parts
Position the diaphragm-stem unit
such that the air connection and the
see section 15 torque requirements.
(see page 54).
27. Lubricate the thread of the stem (211) with an appropriate lubricant and install and finger tighten the stem
extension (380).
NOTICE
of the positioning template. Mark the position.
28. Turn clockwise the stem extension (380) using a suitable torque wrench, see section 15 torque requirements.
29. Install the distance plate (231) and positioning the
spring adjusting plate (326) such that the imprint and
air connection opposites.
30. Install and align the actuator springs (229).
NOTICE
to the actuators center. If these will ignored the spring
may touch the actuators casing and rub in rare cases.
The diaphragm plate should be positioned to the diaphragm with the aid
The surface, respectively the edges
of the spring ends should be aligned
39. Lubricate the new O-ring (276) with an appropriate
lubricant and install it onto the guide bushing (373).
40. Lubricate the threats of the hexagon bolts (334) and
the new O-rings (279) with an appropriate lubricant.
41. Install the diaphragm casing (202) onto the guide
bushing (373) and tighten the bolts (334) using a
crosswise pattern in two steps,
requirements.
42. Install the distance plate (231) and positioning the
spring adjusting plate (326) such that the imprint and
air connection opposites.
43. Install and align the actuator springs (229).
NOTICE
to the actuators center. If these will ignored the spring
may touch the actuators casing and rub in rare cases.
The surface, respectively the edges
of the spring ends should be aligned
see section 15 torque
71
flowserve.com
Page 72

FlowAct Diaphragm Linear Actuator FCD VLENIMFACTA4 10/16
336
335
337
202
389
254
276
279
334
202
258
279
334
348
374
276
351
339
202
253
254
276
279
334
258
380
349
374
228
227
220
272
225
255
211
202
373
254
276
279
334
273
275
229
326
231
275
72
44. Lubricate the new O-ring (272) with an appropriate lubricant.
45. Lower the distance bushing (374), spacer bushing
(228), disk (220), diaphragm plate (227),
diaphragm (225), O-ring (272), thrust
washer (255) and lock washer (349)
onto the stem extension (6.81).
Arrange the distance bushing like an
NOTICE
correctly wearing hat. The internal
stroke stop takes over the special nut.
46. Lubricate the thread of the stem extension (380) with
an appropriate lubricant.
The diaphragm plate should be posi-
NOTICE
tioned to the diaphragm with the aid
of the positioning template. Mark the position.
47. Fix the stem (211) with the stem clamping tool against
twisting.
48. Load the springs by tightening the
stem (348) clockwise using a suitable torque wrench, see section 15
torque requirements.
We recommend you to use a hy-
NOTICE
draulic spring press, as a minimum
requirement a beam and threaded rods in 8.8 quality
(ISO 898-1) or higher as well as washers and nuts alternatively.
49. Remove the stem clamping tool.
50. Install the diaphragm casing (203), positioning the
casing such that the air connections opposites.
51. Lubricate the threats of the long hexagon bolts (336) with
an appropriate lubricant and load the springs uniformly
in a clockwise sequence by tightening the long hexagon
bolts (336), plain washers (337) and hexagon nuts (351).
52. Install the short hexagon bolts (335), plain washers (337)
and hexagon nuts (351).
53. Tighten the nuts (351) using a crosswise pattern in
four steps,
see section 15 torque requirements.
54. Install the protection sleeve (339).
55. Perform 3 full strokes and check the tightening of the
1)
casing bolting.
56. Log the maintenance interval and the work performed.
57. The actuator subassembly is ready to be mounted on
the valve and the accessories attached.
Item #
WW EU
202 6.1 Diaphragm Casing (4x)
211 6.12 Stem
220 6.14 Disk (2x)
225 6.16 Diaphragm (2x)
227 6.15 Diaphragm Plate (2x)
228 6.13 Spacer Bushing (2x)
Part
229 6.21 Actuator Spring
231 6.22 Distance Plate (2x)
253 6.8 Lower Guide Bushing
254 6.80 Plain Bearing (3x)
255 6.18 Thrust Washer (2x)
258 6.26 Vent Plug (2x)
272 6.17 O-Ring (2x)
273 6.11 Scraper Ring
275 6.10 O-Ring (3x)
276 6.9 O-Ring (4x)
279 6.46 O-Ring (24x)
326 6.23 Spring Adjusting Plate (2x)
334 6.45 Hexagon Bolt (24x)
335 6.3.1 Hexagon Bolt - short (40x)
336 6.3.2 Hexagon Bolt - long (8x)
337 6.5 Plain Washer (48x)
339 6.25 Protection Sleeve (8x)
348 6.20 Stem
349 6.19 Lock Washer (2x)
351 6.4 Hexagon Nut (48x)
373 6.82 Intermediate Guide Bushing
374 6.47 Distance Bushing (2x)
380 6.81 Stem Extension
389 6.83 Upper Guide Bushing
Alternatively, hex head assembled screws with captive flat washers are used for this application.
1)
Table 39: Actuator parts Figure 36: Actuator parts
Page 73

FlowAct Diaphragm Linear Actuator FCD VLENIMFACTA4 10/16
336
275
202
373
254
276
279
334
380
349
255
272
225
348
335
337
202
389
254
276
279
334
374
227
220
228
211
374
229
326
231
275
273
351
339
334
279
202
258
276
202
253
254
276
279
334
258
73
flowserve.com
Page 74

FlowAct Diaphragm Linear Actuator FCD VLENIMFACTA4 10/16
16 Torque Requirements
Torque Requirements for VALVE / ACTUATOR LOCK NUT (76, 256) per actuator size
Unit 253 503 701 1502 3002
Nm
ft lb
Torque Requirements for COUPLING PARTs (345, 113, 249, 344, 240, 420, 214) per actuator size
Unit 253 503 701 1502 3002
Nm
ft lb
Unit 253 503 701 1502 3002
Nm
ft lb 33
Torque Requirements for SPECIAL NUT / STEM EXTENSION & STEM (348, 380) per actuator size
Unit 253 503 701 1502 3002
Nm 45 110 240
ft lb 33 81 177
Tighten the lock nut clockwise with a rounded chisel and a 1,5 kg (3.5 lbs) hammer before occurs the kickback
Tighten the subordinate bolting properly by hand in accordance with the relevant technical standards.
Torque Requirements for HEXAGON BOLT (334) per actuator size
n.n.
effect.
45
Torque Requirements for CASING BOLTING (335 & 351 and 336 & 351, 209) per actuator size
Unit 253 503 701 1502 3002
Nm 20
ft lb 15
Torque Requirements for HEXAGON BOLTS (150) per actuator size
Unit 253 503 701 1502 3002
Nm 15 25
ft lb 11 18
17 Lubricants
Lubricant / Antiseize
Klüber Unisilikon
Fastorq A/G Klüberpaste 46 MR 401
Alcohol 96%
Fastorq A/G Klüberpaste 46 MR 401
Standard,
from -40°C to +80°C
-40°F to +176°F
Low temperature,
from -60°C to -41°C
-76°F to -40°F
Use
Actuator O-Ring‘s (237, 247)
Threads of the Actuator (107, 211, 250, 330, 334, 335, 336, 365) and Guide (247, 358)
Actuator O-Ring‘s (237, 247)
Threads of the Actuator (107, 211, 250, 330, 334, 335, 336, 365)
and Guide (247, 358)
DOW Molykote 55 O-Ring
WW (World Wide) EU (European Union)
n.n.
L 250 L
74
Page 75

18 Disposal
FlowAct Diaphragm Linear Actuator FCD VLENIMFACTA4 10/16
Up to 95 % of the FlowAct pneumatic actuator is metal. The
remaining materials are synthetic, rubber, polycarbonate
(PC), silicone, paint and lubricants.
NOTICE
tor must observe national and international environmental
conditions for rotary actuator removal from the pipeline and
cleaning. Permissible limit values must be maintained to ensure suitable protective measures; service personnel must be
properly instructed in performing the disassembly and reassembly procedure.
Potential hazards and their sources are
under the operator‘s influence. The opera-
The valve should be professionally disassembled and reassembled. Metal parts should be scrapped, with the remaining
materials disposed of according the national conditions.
Peripheral units (accessories) should be recycled according
the relevant manufacturer‘s User Instructions.
flowserve.com
75
Page 76

USA
Flowserve Flow Control Division
1350 N. Mt. Springs Parkway
Springville, UT 84663
USA
Phone: +1 801 489 8611
Fax: +1 801 489 3719
Austria
Flowserve Control Valves GmbH
Kasernengasse 6
9500 Villach
AUSTRIA
Phone: +43 (0) 4242 41181 - 0
Fax: +43 (0) 4242 41181 - 50
France
Flowserve France S.A.S
PB 60 63307 Thiers Cedex
FRANCE
Phone: +33 4738 04266
Fax: +33 4738 01424
India
Flowserve India Controls Pvt Ltd.
Plot # 4, 1A, Road #8 EPIP Whitefield Bangalore, Karnataka, 560066
INDIA
Phone: 91 80 40146200
Fax: 91 80 28410286
FCD VLENIMFACTA4 10/16 Printed in Europe
To find your local Flowserve representative
or for more information about Flowserve Corporation, visit
www.flowserve.com.
Flowserve Corporation has established industry leadership in the design and manufacture of its products. When properly selected, this Flowserve product is designed to perform
its intended function safely during its useful life. However, the purchaser or user of Flowserve products should be aware that Flowserve products might be used in numerous
applications under a wide variety of industrial service conditions. Although Flowserve can (and often does) provide general guidelines, it cannot provide specific data and warnings
for all possible applications. The purchaser/user must therefore assume the ultimate responsibility for the proper sizing and selection, installation, operation, and maintenance of
Flowserve products. The purchaser/user should read and understand the Installation Operation Maintenance (IOM) instructions included with the product, and train its employees
and contractors in the safe use of Flowserve products in connection with the specific application.
While the information and specifications contained in this literature are believed to be accurate, they are supplied for informative purposes only and should not be considered
certified or as a guarantee of satisfactory results by reliance thereon. Nothing contained herein is to be construed as a warranty or guarantee, express or implied, regarding any
matter with respect to this product. Because Flowserve is continually improving and upgrading its product design, the specifications, dimensions and information contained
herein are subject to change without notice. Should any question arise concerning these provisions, the purchaser/user should contact Flowserve Corporation at any one of its
worldwide operations or offices.
© 2004 Flowserve Corporation, Irving, Texas, USA. Flowserve is a registered trademark of Flowserve Corporation.
China
Flowserve Fluid Motion and
Control (Suzhou) Co., Ltd.
No. 35, Baiyu Road,
Suzhou Industrial Park,
Suzhou Jiangsu Province,
P.R. 215021 CHINA
Phone: 86 512 6288 8790
Fax: 86 512 6288 8736
Singapore
Flowserve Pte. Ltd.
12 Tuas Avenue 20
Republic of Singapore 638824
SINGAPORE
Phone: +65 6879 8900
Fax: +65 6862 4940
Saudi Arabia
Flowserve Abahsain Flow Control Co.,
Ltd.
Makkah Road, Phase 4
Plot 10 & 12, 2nd Industrial City
Damman, Kingdom of Saudi Arabia
Phone: +966 3 857 3150 X 243
Fax: +966 3 857 4243
 Loading...