

FLORABEST HTA FKTSA 40-Li A1 Operation And Safety Notes

CORDLESS CHAINSAW 40 V HTA FKTSA 40-Li A1
OWIM GmbH & Co. KG
Stiftsbergstraße 1
DE-74167 Neckarsulm
GERMANY
Model No.: HG03225-BS
Version: 11/2017
CORDLESS CHAINSAW 40 V
Operation and Safety Notes
Translation of the original instructions
IAN 292275IAN 292275
AKKU-KETTENSÄGE 40 V
Bedienungs- und Sicherheitshinweise
Originalbetriebsanleitung
GB / IE /NI Operation and Safety Notes Page 5
DE / AT / CH Bedienungs- und Sicherheitshinweise Seite 24

A
3
2
1
5
4
14
9
16
7 6
8
10
11 12
13
15
F
26
24
25
H I
8
G
6
7
4
24
25
8
26
6
5
B
D
20
17
3
18
19
19
11
C
E
22
21
23
J K
L
M
50 mm
50 mm

Table of contents
List of pictograms used ......................................................................................................... Page 7
Introduction ............................................................................................................................... Page 7
Intended use .................................................................................................................................. Page 7
Parts description ............................................................................................................................. Page 7
Scope of delivery ........................................................................................................................... Page 8
Technical data ................................................................................................................................ Page 8
Safety warnings ...................................................................................................................... Page 9
General power tool safety warnings .............................................................................................. Page 9
Chainsaw warnings ....................................................................................................................... Page 10
Vibration and noise reduction ........................................................................................................ Page 11
Behaviour in emergency situations ................................................................................................. Page 12
Residual risks .................................................................................................................................. Page 12
Battery charger safety warnings .................................................................................................... Page 12
Initial use ..................................................................................................................................... Page 13
Unpacking ..................................................................................................................................... Page 13
Accessories .................................................................................................................................... Page 13
Before use .................................................................................................................................. Page 13
Attaching / removing the battery pack .......................................................................................... Page 13
Charging the battery pack ............................................................................................................. Page 13
Checking the battery level ............................................................................................................. Page 14
Safety functions .............................................................................................................................. Page 14
Assembly ........................................................................................................................................ Page 15
Operation ................................................................................................................................... Page 17
Chain brake ................................................................................................................................... Page 17
Switching on and off ...................................................................................................................... Page 17
Cutting techniques.......................................................................................................................... Page 17
After use ......................................................................................................................................... Page 19
Cleaning and care ................................................................................................................... Page 19
Cleaning ........................................................................................................................................ Page 19
Maintenance .................................................................................................................................. Page 20
Repair ............................................................................................................................................ Page 20
Storage .......................................................................................................................................... Page 20
Transportation ................................................................................................................................ Page 20
Troubleshooting ....................................................................................................................... Page 21
Disposal ....................................................................................................................................... Page 21
Service ......................................................................................................................................... Page 22
Warranty .................................................................................................................................... Page 22
Translation of original declaration of conformity ..................................................... Page 23
5 GB / IE / NI
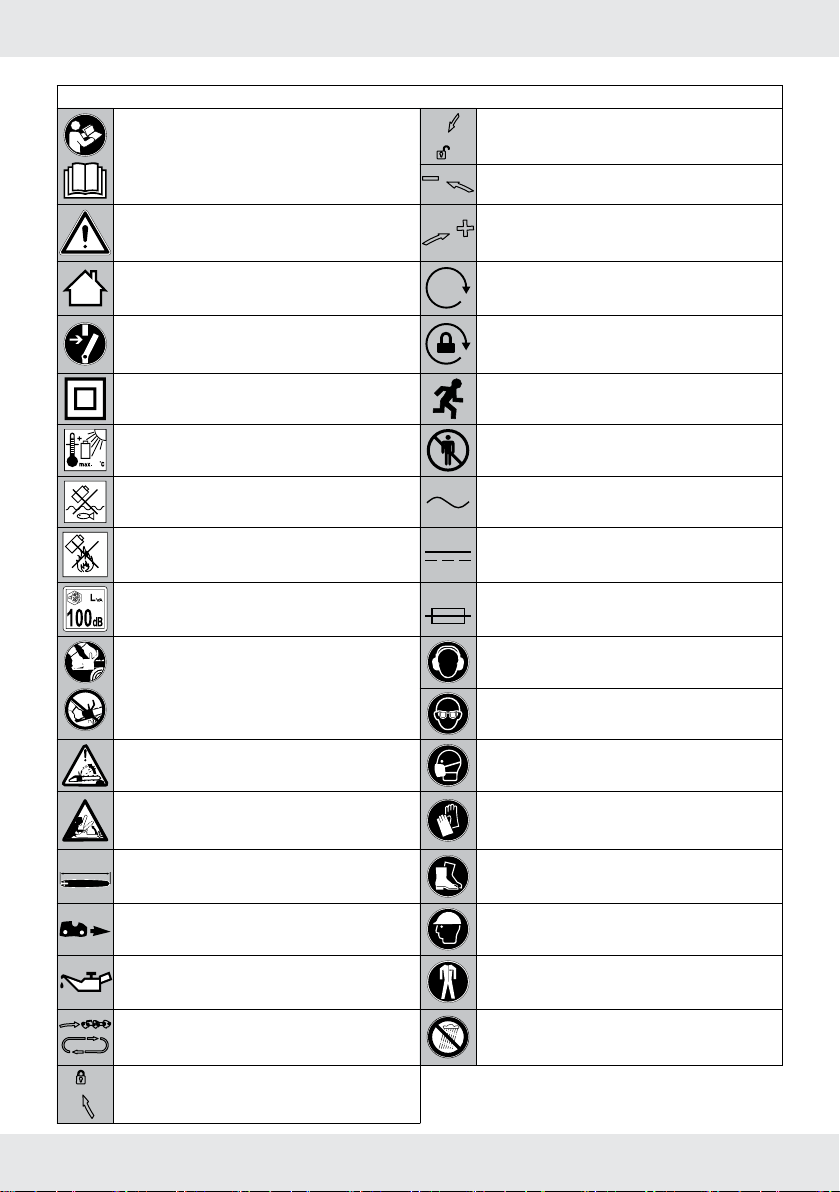
List of pictograms used:
45
Read the instruction manual. Unlock drive cover.
Decrease chain tension.
Caution / Warning Increase chain tension.
Use in dry indoor rooms only. Chain brake disengaged.
Switch the appliance off and remove the
Chain brake engaged.
battery pack before replacing attachments,
cleaning and when not in use.
Protection class II (Double insulation) Escape route
Protect the battery pack against heat and
continuous intense sunlight.
45
Protect the battery pack against water and
Danger zone
Alternating current
moisture.
Protect the battery pack from fire. Direct current
Guaranteed sound power level in dB.
Always use two hands when operating the
Fuse
T5A
Wear hearing protection!
product.
Wear eye protection!
Contact of the guide bar tip with any
Wear a dust mask!
object should be avoided.
Tip contact can cause the guide bar to
Wear protective gloves!
move suddenly upward and backward,
which can cause serious injury.
Max. length of the guide bar: 305 mm Wear protective, slip-resistant footwear!
305 mm
6 GB / IE / NI
Correct direction of cutting-teeth. Wear head protection!
Chain oil fill. Wear tight-fitted protective clothes!
Rotation direction of saw chain. Do not expose the product to rain or wet
conditions.
Lock drive cover.

CORDLESS CHAINSAW 40 V
HTA FKTSA 40-Li A1
Q Introduction
We congratulate you on the purchase of your new
product. You have chosen a high quality product.
The instructions for use are part of the product.
They contain important information concerning
safety, use and disposal. Before using the product,
please familiarise yourself with all of the safety
information and instructions for use. Only use
the product as described and for the specified
applications. If you pass the product on to anyone
else, please ensure that you also pass on all the
documentation with it.
Q Intended use
This cordless chainsaw 40 V (hereinafter “product”
or “power tool”) is designed for cutting wood only.
The product is not designed for any other types of
application (e. g. cutting of brickwork, plastic or
food).
The product is to be used by adults. Children under
the age of 16 may not use the tool except under
supervision.
Any other use or modification of the product
are considered improper use and can result in
hazards such as death, life-threatening injuries and
damage. The manufacturer is not liable for any
damages caused by improper use. The product is
not intended for commercial use or for any other
use.
Do not use and store the power tool in rain or wet
conditions.
Observe all applicable local safety regulations,
standards and ordinances. The use of noise
emitting power tools may be restricted to certain
times by national or local regulations.
Cutting length of wood: 283 mm.
Q Parts description
Figure A:
1
Rear handle
2
Oil tank cap
3
Front guard / chain brake
4
Guide bar
5
Saw chain
6
Lock knob
7
Drive cover
8
Chain tension knob
9
Rear guard
10
Spiked bumper
11
Front handle
12
Motor housing
13
On / off switch
14
Lock-off button
15
Oil level indicator
16
Guide bar cover
Figure B:
17
Battery pack
18
Battery charging level button
19
Release button
20
Battery level indication light
Figure C:
21
Rapid charger
22
Charger status LED - Green
23
Charger status LED - Red
Figure F:
24
Guide bar bolt
25
Chain tension pin
26
Sprocket
7 GB / IE / NI
Q Scope of delivery
1 Cordless chainsaw 40 V HTA FKTSA 40-Li A1
1 Saw chain
1 Guide bar
1 Battery pack FAP 40 A1
1 Rapid battery charger FLG 40 A1
1 Guide bar cover
1 Oil bottle with 180 ml chain oil
1 Operating instructions
Q Technical data
Cordless chainsaw: HTA FKTSA 40-Li A1
Rated voltage: 40 V
No load speed n0: 5800 min
-1
Saw chain type: Oregon 91P045X,
low-kickback
Guide bar type: Oregon 12” 120SDEA041
Guide bar length: 305 mm
Cutting length: 283 mm
Chain pitch: 10 mm
Chain gauge: 1.2 mm
Chain speed v
: 11 m/s
0
Drive sprocket: 6 teeth
Oil tank volume: approx. 180 ml
Battery pack: FAP 40 A1
Type: Lithium ion
Rated voltage: 36 V
40 V
max.
Capacity: 2.5 Ah (90 Wh)
Number of cells: 10
Rapid battery
FLG 40 A1
charger:
INPUT:
Rated voltage: 100 – 240 V~, 50/60 Hz
Power consumption: 160 W
OUTPUT:
Rated voltage: 36 V
Charging current: 3.0 A
Charging time: approx. 60 min
Protection class:
II /
Noise emission value:
Noise measurement value determined in
accordance with EN 60745. The A-rated noise
level of the power tool is typically as follows:
Sound pressure level L
Uncertainty K
Sound power level L
Uncertainty K
Guaranteed sound power
level L
pA
WA
:
WA
: 86.8 dB(A)
pA
: 3 dB
: 96.5 dB(A)
WA
: 3 dB
100 dB(A)
(according to 2000/14/EC amended by
2005/88/EC)
WARNING!
Wear ear protection!
Vibration emission value:
(front handle)
Hand/arm vibration a
(rear handle)
Hand/arm vibration a
Uncertainty K: 1.5 m/s
: 3.37 m/s
h
: 3.32 m/s
h
2
2
2
WARNING!
u The vibration level varies in accordance with
the use of the power tool and may be higher
than the value specified in these instructions in
some cases. There is a risk of underestimation
of the vibration load if the power tool is
used regularly in this manner. Try to keep the
vibration loads as low as possible. Measures
to reduce the vibration load are, e.g. wearing
gloves and limiting the working time. Wherein
all states of operation must be included (e. g.
times when the power tool is switched off and
times where the power tool is switched on but
running without load).
NOTE
u The vibration level specified in these
instructions has been measured in
accordance with a standardised measuring
procedure specified in EN 60745 and can
be used to make equipment comparisons. The
specified vibration emission value can also be
used to make an initial exposure estimate.
8 GB / IE / NI

Safety warnings
Q General power tool safety
warnings
WARNING!
u Read all safety warnings and all
instructions. Failure to follow the warnings
and instructions may result in electric shock,
fire and / or serious injury.
Save all warnings and instructions for
future reference.
The term “power tool” in the warnings refers to
your mains-operated (corded) power tool or
battery-operated (cordless) power tool.
Work area safety
1. Keep work area clean and well lit.
Cluttered or dark areas invite accidents.
2. Do not operate power tools in
explosive atmospheres, such as in
the presence of flammable liquids,
gases or dust. Power tools create sparks
which may ignite the dust or fumes.
3. Keep children and bystanders away
while operating a power tool.
Distractions can cause you to lose control.
Electrical safety
1. Power tool plugs must match the
outlet. Never modify the plug in any
way. Do not use any adapter plugs
with earthed (grounded) power
tools. Unmodified plugs and matching
outlets will reduce risk of electric shock.
2. Avoid body contact with earthed or
grounded surfaces, such as pipes,
radiators, ranges and refrigerators.
There is an increased risk of electric shock if
your body is earthed or grounded.
3. Do not expose power tools to rain or
wet conditions. Water entering a power
tool will increase the risk of electric shock.
4. Do not abuse the cord. Never use
the cord for carrying, pulling or
unplugging the power tool. Keep
cord away from heat, oil, sharp
edges or moving parts. Damaged or
entangled cords increase the risk of electric
shock.
5. When operating a power tool
outdoors, use an extension cord
suitable for outdoor use. Use of a cord
suitable for outdoor use reduces the risk of
electric shock.
6. If operating a power tool in a
damp location is unavoidable, use
a residual current device (RCD)
protected supply. Use of an RCD reduces
the risk of electric shock.
Personal safety
1. Stay alert, watch what you are
doing and use common sense when
operating a power tool. Do not use
a power tool while you are tired or
under the influence of drugs, alcohol
or medication. A moment of inattention
while operating power tools may result in
serious personal injury.
2. Use personal protective equipment.
Always wear eye protection. Protective
equipment such as dust mask, non-skid safety
shoes, hard hat, or hearing protection used for
appropriate conditions will reduce personal
injuries.
3. Prevent unintentional starting. Ensure
the switch is in the off-position before
connecting to power source and/or
battery pack, picking up or carrying
the tool. Carrying power tools with your
finger on the switch or energising power tools
that have the switch on invites accidents.
4. Remove any adjusting key or wrench
before turning the power tool on. A
wrench or a key left attached to a rotating part
of the power tool may result in personal injury.
5. Do not overreach. Keep proper
footing and balance at all times.
This enables better control of the power tool in
unexpected situations.
6. Dress properly. Do not wear loose
clothing or jewellery. Keep your
hair, clothing and gloves away from
moving parts. Loose clothes, jewellery or
long hair can be caught in moving parts.
7. If devices are provided for the
connection of dust extraction and
collection facilities, ensure these are
connected and properly used. Use
of dust collection can reduce dust-related
hazards.
9 GB / IE / NI

Power tool use and care
1. Do not force the power tool. Use
the correct power tool for your
application. The correct power tool will do
the job better and safer at the rate for which it
was designed.
2. Do not use the power tool if the
switch does not turn it on and off. Any
power tool that cannot be controlled with the
switch is dangerous and must be repaired.
3. Disconnect the plug from the power
source and/or the battery pack from
the power tool before making any
adjustments, changing accessories,
or storing power tools. Such preventive
safety measures reduce the risk of starting the
power tool accidentally.
4. Store idle power tools out of the
reach of children and do not allow
persons unfamiliar with the power
tool or these instructions to operate
the power tool. Power tools are dangerous
in the hands of untrained users.
5. Maintain power tools. Check for
misalignment or binding of moving
parts, breakage of parts and any
other condition that may affect the
power tool’s operation. If damaged,
have the power tool repaired before
use. Many accidents are caused by poorly
maintained power tools.
6. Keep cutting tools sharp and clean.
Properly maintained cutting tools with sharp
cutting edges are less likely to bind and are
easier to control.
7. Use the power tool, accessories and
tool bits etc. in accordance with these
instructions, taking into account the
working conditions and the work to
be performed. Use of the power tool for
operations different from those intended could
result in a hazardous situation.
Battery tool use and care
1. Recharge only with the charger
specified by the manufacturer. A
charger that is suitable for one type of battery
pack may create a risk of fire when used with
another battery pack.
2. Use power tools only with specifically
designated battery packs. Use of any
other battery packs may create a risk of injury
and fire.
3. When battery pack is not in use,
keep it away from other metal
objects, like paper clips, coins, keys,
nails, screws or other small metal
objects, that can make a connection
from one terminal to another.
Shorting the battery terminals together may
cause burns or a fire.
4. Under abusive conditions, liquid
may be ejected from the battery;
avoid contact. If contact accidentally
occurs, flush with water. If liquid
contacts eyes, additionally seek
medical help. Liquid ejected from the
battery may cause irritation or burns.
Service
1. Have your power tool serviced by
a qualified repair person using only
identical replacement parts. This will
ensure that the safety of the power tool is
maintained.
Q Chainsaw warnings
1. Keep all parts of the body away
from the saw chain when the chain
saw is operating. Before you start
the chain saw, make sure the saw
chain is not contacting anything.
A moment of inattention while operating
chain saws may cause entanglement of your
clothing or body with the saw chain.
2. Always hold the chain saw with your
right hand on the rear handle and
your left hand on the front handle.
Holding the chain saw with a reversed hand
configuration increases the risk of personal
injury and should never be done.
3. Hold the power tool by insulated
gripping surfaces only, because
the saw chain may contact hidden
wiring. Saw chains contacting a “live” wire
may make exposed metal parts of the power
tool “live” and could give the operator an
electric shock.
4. Wear safety glasses and hearing
protection. Further protective
equipment for head, hands, legs
and feet is recommended. Adequate
protective clothing will reduce personal injury
by flying debris or accidental contact with the
saw chain.
10 GB / IE / NI

5. Do not operate a chain saw in a tree.
Operation of a chain saw while up in a tree
may result in personal injury.
6. Always keep proper footing and
operate the chain saw only when
standing on fixed, secure and level
surface. Slippery or unstable surfaces such
as ladders may cause a loss of balance or
control of the chain saw.
7. When cutting a limb that is under
tension be alert for spring back.
When the tension in the wood fibres is
released the spring loaded limb may strike
the operator and/or throw the chain saw out
of control.
8. Use extreme caution when cutting
brush and saplings. The slender material
may catch the saw chain and be whipped
toward you or pull you off balance.
9. Carry the chain saw by the front
handle with the chain saw switched
off and away from your body. When
transporting or storing the chain
saw always fit the guide bar cover.
Proper handling of the chain saw will reduce
the likelihood of accidental contact with the
moving saw chain.
10. Follow instructions for lubricating,
chain tensioning and changing
accessories. Improperly tensioned or
lubricated chain may either break or increase
the chance for kickback.
11. Keep handles dry, clean, and free
from oil and grease. Greasy, oily
handles are slippery causing loss of control.
12. Cut wood only. Do not use chain
saw for purposes not intended. For
example: do not use chain saw for
cutting plastic, masonry or nonwood building materials. Use of the
chain saw for operations different than
intended could result in a hazardous situation.
Causes and operator prevention of
kickback
Kickback may occur when the nose or tip of the
guide bar touches an object, or when the wood
closes in and pinches the saw chain in the cut.
Tip contact in some cases may cause a sudden
reverse reaction, kicking the guide bar up and
back towards the operator.
Pinching the saw chain along the top of the guide
bar may push the guide bar rapidly back towards
the operator.
Either of these reactions may cause you to lose
control of the saw which could result in serious
personal injury. Do not rely exclusively upon the
safety devices built into your saw. As a chain saw
user, you should take several steps to keep your
cutting jobs free from accident or injury.
Kickback is the result of tool misuse and/or
incorrect operating procedures or conditions and
can be avoided by taking proper precautions as
given below:
1. Maintain a firm grip, with thumbs
and fingers encircling the chain saw
handles, with both hands on the saw
and position your body and arm to
allow you to resist kickback forces.
Kickback forces can be controlled by the
operator, if proper precautions are taken. Do
not let go of the chain saw.
2. Do not overreach and do not cut
above shoulder height. This helps
prevent unintended tip contact and enables
better control of the chain saw in unexpected
situations.
3. Only use replacement bars and
chains specified by the manufacturer.
Incorrect replacement bars and chains may
cause chain breakage and/or kickback.
4. Follow the manufacturer’s
sharpening and maintenance
instructions for the saw chain.
Decreasing the depth gauge height can lead
to increased kickback.
Q Vibration and noise reduction
To reduce the impact of noise and vibration
emission, limit the time of operation, use lowvibration and low-noise operating modes as well
as wear personal protective equipment.
Take the following points into account to minimise
the vibration and noise exposure risks:
¢ Only use the product as intended by its
design and these instructions.
¢ Ensure that the product is in good condition
and well maintained.
¢ Use correct attachments for the product and
ensure they are in good condition.
¢ Keep tight grip on the handles/grip surface.
11 GB / IE / NI

¢ Maintain this product in accordance with
these instructions and keep it well lubricated
(where appropriate).
¢ Plan your work schedule to spread any high
vibration tool use across a longer period of time.
Q Behaviour in emergency
situations
Familiarise yourself with the use of this product by
means of this instruction manual. Memorise the
safety warnings and follow them exactly. This will
help to prevent risks and hazards.
¢ Always be alert when using this product, so
that you can recognise and handle risks early.
Fast intervention can prevent serious injury
and damage to property.
¢ Switch the product off and remove the battery
pack if there are malfunctions. Have the
product checked by a qualified professional
and repaired, if necessary, before you
operate it again.
Q Residual risks
Even if you are operating this product in
accordance with all the safety requirements,
potential risks of injury and damage remain. The
following dangers can arise in connection with the
structure and design of this product:
¢ Health defects resulting from vibration
emission if the product is being used over
long periods of time or not adequately
managed and properly maintained.
¢ Injuries and damage to property due to
broken cutting attachments or the sudden
impact of hidden objects during use.
¢ Danger of injury and property damage
caused by flying objects.
WARNING!
u This product produces an electromagnetic
field during operation! This field may under
some circumstances interfere with active or
passive medical implants! To reduce the risk
of serious or fatal injury, we recommend
persons with medical implants to consult their
doctor and the medical implant manufacturer
before operating this product!
Q Battery charger safety
warnings
¢ This product can be used by
children aged from 8 years
and above and persons with
reduced physical, sensory or
mental capabilities or lack of
experience and knowledge
if they have been given
supervision or instruction
concerning use of the product
in a safe way and understand
the hazards involved.
¢ Children shall not play with the
product.
¢ Cleaning and user
maintenance shall not be made
by children without supervision.
¢ Do not charge non-
rechargeable batteries.
Disregarding this instruction is
hazardous.
¢ If the supply cord is damaged,
it must be replaced by the
manufacturer, its service agent
or similarly qualified persons in
order to avoid a hazard.
¢ Protect the electrical parts
against moisture. Do not
immerse such parts in water or
other liquids to avoid electrical
shock. Never hold the product
under running water. Pay
attention to the instructions
provided for cleaning,
maintenance and repair.
12 GB / IE / NI
¢ This charger is only designed
45
for charging the battery pack
type: FAP 40 A1.
CAUTION! RISK OF EXPLOSION
Never charge non-rechargeable
batteries! Protect the battery pack
45
against heat, e. g., against continuous
intense sunlight, fire, water and
moisture. Danger of explosion.
Q Initial use
Q Unpacking
WARNING!
u The product and the packaging are not
children’s toys! Children must not play with
plastic bags, sheets and small parts! There is
a danger of choking and suffocation!
1. Unpack all parts and lay them on a flat, stable
surface.
2. Remove all packing materials and shipping
devices if applicable.
3. Make sure the delivery contents are complete
and free of any damage. If you find that
parts are missing or show damage do not
use the product but contact your dealer. Do
not use the product unless missing parts have
been delivered in addition or defective parts
have been replaced. Using an incomplete
or damaged product represents a hazard to
people and property.
4. Ensure that you have all the accessories and
tools needed for assembly and operation.
This also includes suitable personal protective
equipment.
Q Accessories
To operate this product safely and correctly, the
following accessories, i. e. tools and attachments,
are necessary:
o Suitable personal protective equipment
o Oil suction gun with pinpoint tip
o Sharpening set (chain file)
Ensure that you have the accessories and tools
needed for commissioning and operation available.
This also includes suitable personal protective
equipment.
Accessories and tools are available through your
authorised dealer. When buying always consider
the technical requirements of this product (see
“Technical data”).
If you are not certain, ask a qualified specialist and
get advice from your trusted dealer.
NOTE
u This instruction manual contains information
and suggestions for several attachments and
their uses. The attachments depicted are not
necessarily included in the shipment, but are
meant to indicate additional possibilities for
using this product.
Q Before use
Q Attaching / removing the
battery pack
Attaching the battery pack:
1. Align the battery pack
pack bay and slide it into it. Ensure it clicks
noticeably in place.
Removing the battery pack:
1. Press the release button
battery pack
Q Charging the battery pack
17
NOTE
u The battery pack
Charge the battery pack
ideally at least 60 minutes.
u Always pull out the plug of the charger
from the mains before removing or connecting
the battery pack
u Never charge the battery pack
the ambient temperature is below 10 °C or
above 40 °C.
u Never recharge a battery pack
immediately after rapid charging. This could
overcharge the battery pack
the lifespan of the battery pack
charger
u Rest the charger
21
.
between successive charging sessions.
u If no battery pack
charger
21
and the charger is connected to
mains, the charging status LED
17
to the battery
19
and remove the
.
comes partly charged.
17
17
21
17
prior to first use,
17
to the charger.
for at least 15 minutes
is inserted into the
when
17
17
17
, thus reducing
and
17
22
flashes green.
again
21
13 GB / IE / NI

1. Connect the battery pack
charger
21
.
17
to the battery
2. Insert the mains plug into the socket. The
charging status LED
lights up red, at the
23
same time the green charging status LED
will extinguish. Once the battery pack
is completely charged, the green charging
status LED
22
is lit continuously, indicating
that the charging process is complete. At the
same time the red charging status LED
extinguish.
3. Disconnect the charger
and remove the battery pack
from the mains
21
from the
17
charger.
4. Attach the battery pack
back to the
17
product.
Charging status LEDs
Green LED flashing Charger ready
Red LED
Battery pack charging
continuously lit
Green LED
Battery pack fully charged
continuously lit
Red and green
Battery pack defect
LEDs flashing
Red and green LEDs
continuously lit
Q Checking the battery level
o Press the battery charging level button
Battery pack too cold or
warm
to check the charging level of the battery
17
pack
. The status / remaining charge
will be shown on the battery charging level
indication light
4 Green LEDs
20
.
Battery pack fully charged
continuously lit
3 Green LEDs
Battery pack 75% charged
continuously lit
2 Green LEDs
Battery pack 50% charged
continuously lit
1 Green LED
Battery pack 25% charged
continuously lit
1 Green LED
Low battery charging level
flashing
Q Safety functions
1
A
22
17
will
23
Rear handle with rear guard
Apart from protecting your hand if the
saw chain
guard
jumps or snaps, the rear
5
9
stops branches and twigs from
interfering with your grip on the rear
handle
The chain brake
which stops the saw chain
.
1
3
Front guard / chain brake
is a control system,
3
5
immediately
9
in case of a spring-back; chain brake can
also be activated manually; protects the
left hand of the operator if it slides from the
front handle
5
Saw chain with low kickback
.
11
Helps to catch kickbacks with specially
developed control systems.
10
Spiked bumper
Spiked bumper
10
was pre-installed on
the power tool. Installation is not required.
Do not disassemble or make adjustment
on the spiked bumper
10
. The chain must
be running at full speed before the spiked
bumper
spiked bumper
on the wood. Use the spiked bumper
18
a leverage point while cutting.
13
contacts with the wood. Use the
10
to support the chain saw
On / off switch with safety
10
as
10
chain brake
On releasing the on / off switch
13
, the
product immediately switches off.
14
Lock-off button
The lock-off button
must be pressed for
14
switching on the product.
o Charge the battery pack
17
before operation
when it is at medium or low battery charging
level.
14 GB / IE / NI
Q Assembly
WARNING!
Always switch the product off and
remove the battery pack before
performing inspections, installing
accessories, making adjustments,
refilling fluids or lubricating!
WARNING!
u The product must be fully assembled before
operation! Do not use a product that is
only partly assembled or assembled with
damaged parts!
u Follow the assembly instructions step-by-step
and use the pictures provided as a visual
guide to easily assemble the product!
CAUTION! RISK OF EXPLOSION
The cutting edges of the saw chain are
sharp! Always wear protective gloves
when handling chain!
Guide bar and saw chain
WARNING!
u Always use a saw chain designed as “low-
kickback” or a saw chain which meets the
low-kickback requirements! A standard saw
chain (a chain which does not have the
kickback reducing guard links) should only
be used by an experienced professional
operator!
u Nevertheless, a low-kickback saw chain
does not completely eliminated kickback! A
low-kickback or “safety” chain should never
be regarded as complete protection against
injury! Therefore always use a low-kickback
saw chain in conjunction with other kickback
protection devices such as the front guard /
chain brake!
CAUTION! RISK OF INJURY
u Never attach a new saw chain to a worn
sprocket or place onto a damaged or worn
guide bar. The chain could spring back or
break, potentially leading to serious injury.
Assemble the guide bar
before operation.
Use only a guide bar
4
and saw chain
4
and saw chain
5
5
according to the technical data of the product
(see “Technical data”).
1. Place the product on a suitable flat surface.
2. Loosen the lock knob
remove together with the drive cover
6
anticlockwise and
7
.
3. Fit the chain links into the groove around the
guide bar
chain
along the top edge of the guide bar
4. Fit the chain links around the sprocket
Place the slotted end of the guide bar
over the guide bar bolt
the guide bar
4
. Make sure the cutters of the saw
5
are facing away from the product
24
4
so the chain tension pin
. Accommodate
4
.
26
.
4
inserts into the lower hole in the guide bar
Adjusting the position of chain tension pin
necessary if the chain tension pin
25
could not
be fitted into the lower hole in the guide
4
bar
.Tension the chain by adjusting the
tension knob
8
so the saw chain
slip off the sprocket
5. Place the drive cover
6
knob
so that the cover is snug, but not tight.
Tension the saw chain
26
.
and tighten the lock
7
5
(see “Tensioning the
5
does not
saw chain”).
Tensioning the saw chain
CAUTION! RISK OF INJURY
u Always maintain proper chain tension! A
loose chain will increase the risk of kickback!
A loose chain may jump out of the guide
bar groove! This may injure operator and
damage the chain! A loose chain will cause
rapid wear to chain, guide bar and sprocket!
u Tensioning the chain too tightly will overload
the motor and cause damage; insufficient
tension can provoke chain derailing, whereas
a correctly tightened chain provides the best
cutting characteristics and prolonged work
life! The chain life depends mainly upon
sufficient lubrication and correct tensioning!
25
4
.
is
25
15 GB / IE / NI
 Loading...