

Fisher & Paykel OR90SCI1X Series User Manual

FREESTANDING COOKER
OR90SCI1X models
USER GUIDE
NZ AU


CONTENTS
Safety and warnings 2
Introduction 6
First use 8
Cooking guide 13
Oven functions 15
Cooking charts 18
Setting the timer 24
Auto Cook 25
Using your induction cooktop 28
Using your cooktop’s special features 32
Choosing the right cookware 35
Cooking guidelines 37
Using the storage compartment 39
Care and cleaning 40
Troubleshooting 56
Alert codes 61
Warranty and service 62
IMPORTANT!
SAVE THESE INSTRUCTIONS
The models shown in this user guide may not be available in all markets and are subject to change
at any time. For current details about model and specification availability in your country, please
go to our website www.fisherpaykel.com or contact your local Fisher & Paykel dealer.
1
SAFETY AND WARNINGS
Your freestanding cooker has been carefully designed to operate safely during normal
cooking procedures. Please keep the following guidelines in mind when you are using it:
WARNING!
Electrical Shock Hazard
Failure to follow this advice may result in electrical
shock or death.
Switch the cooker off at the wall before replacing fuses
or the oven lamp.
WARNING!
Unattended cooking on a hob with fat or oil can be dangerous
and may result in fire.
NEVER try to extinguish a fire with water, but switch off the
appliance and cover flame, eg with a lid or fire blanket.
Do not place aluminium foil, dishes, trays, water or ice on the oven
floor during cooking, as doing so will irreversibly damage the
enamel; lining the oven with aluminium foil may even cause fire.
Never use your appliance for warming or heating the room.
Persons could be burned or injured or a fire could start.
Storage in or on appliance: flammable materials should not
be stored in the oven or storage compartment, or on the
cooktop surface.
Failure to follow this advice may result in overheating,
burning, and injury.
WARNING!
Cut Hazard
Failure to use caution could result in injury or cuts.
Take care - some edges are sharp.
2
SAFETY AND WARNINGS
WARNING!
Failure to follow this advice could result in burns and scalds.
During use, accessible parts of this appliance will become hot
enough to cause burns.
Do not let body, clothing or any item other than suitable
cookware contact with the ceramic glass until the surface is cool.
Never leave metal objects (such as kitchen utensils) or empty
pans on the cooktop as they can become hot very quickly.
Beware: magnetisable metal objects worn on the body may
become hot in the vicinity of the cooktop. Gold or silver jewellery
will not be affected.
Handles of saucepans may be hot to touch. Check saucepan
handles do not overhang other cooking zones that are on. Keep
handles out of reach of children.
To avoid burns and scalds keep children away.
Do not touch hot surfaces inside the oven.
Use oven mitts or other protection when handling hot surfaces
such as oven shelves or dishes.
Take care when opening the oven door.
Let hot air or steam escape before removing or replacing food.
Do not touch the cooktop components, burners, trivets/pan
supports or the base when hot.
Before cleaning, turn the cooker off and make sure it is cool.
WARNING!
Health Hazard
Failure to follow this advice may result in death.
This appliance complies with electromagnetic safety standards.
However, persons with cardiac pacemakers or other electrical
implants (such as insulin pumps) must consult with their
doctor or implant manufacturer before using this appliance
to make sure that their implants will not be affected by the
electromagnetic field.
Failure to follow this advice may result in death.
WARNING!
Poisoning Hazard
Failure to follow this advice may result in poisoning or death.
Never use this appliance as a space heater to heat or warm the
room. Doing so may result in carbon monoxide poisoning and
overheating of the appliance.
Failure to follow this advice may result in poisoning or death.
3

SAFETY AND WARNINGS
IMPORTANT SAFETY INSTRUCTIONS!
z
Read all the instructions before using the appliance. Use the appliance only for its
intended purpose as described in these instructions.
z
Proper installation: be sure your appliance is properly installed and earthed by a
qualified technician. A risk of tip-over exists when the appliance is not installed in
accordance with the installation instructions.
z
Do not operate the appliance if it is damaged or not working properly. If you received a
damaged product, contact your dealer or installer immediately.
z
Clean only the parts listed in this manual.
z
Do not modify this appliance.
z
This appliance is to be serviced only by an authorised person.
z
Isolating switch: make sure this cooker is connected to a circuit which incorporates an
isolating switch providing full disconnection from the power supply.
z
Household appliances are not intended to be played with by children.
z
Do not leave children alone – children should not be left alone or unattended in the
area where the appliance is in use. They should never be allowed to play with the
appliance or to sit or stand on any part of the appliance.
z
Children of less than 8 years old must be kept away from the appliance unless
continuously supervised. This appliance can be used by children aged from 8 years
and above, and persons with reduced physical, sensory or mental capabilities
or lack of experience and knowledge, if they have been given supervision or
instruction concerning the use of the appliance in a safe way and they understand
the hazards involved. Cleaning and user maintenance shall not be done by children
without supervision.
z
Do not store things children might want above the oven. Children could be burned or
injured while climbing on the oven to retrieve items.
z
Safe food handling: leave food in the oven for as short a time as possible before and
after cooking. This is to avoid contamination by organisms which may cause food
poisoning. Take particular care during warmer weather.
z
Do not place aluminium foil, dishes, trays, water or ice on the oven floor during cooking
as this will irreversibly damage the enamel.
z
Do not use aluminum foil to line any part of the oven, storage drawer or cooktop. This
will cause heat to be trapped underneath it. This trapped heat can upset the cooking
performance and damage the finish of the oven or cooktop parts.
z
Do not stand on the door, or place heavy objects on it.
z
Do not use harsh abrasive cleaners or sharp metal scrapers to clean the oven door glass
since they scratch the surface, which may result in shattering of the glass.
z
Do not use a steam cleaner to clean any part of the cooker.
z
Do not store flammable items in the oven or storage drawer or on the cooktop surface.
z
The cooktop is not intended to be operated by means of an external timer or separate
remote-control system.
z
CAUTION: the cooking process has to be supervised. A short-term cooking process has
to be supervised continuously.
4

SAFETY AND WARNINGS
IMPORTANT SAFETY INSTRUCTIONS!
z
Do not place aluminium foil or plastic dishes on the cooktop.
z
Do not let large saucepans or frying pans overlap the bench as this can deflect heat
onto your benchtop and damage the surface.
z
Do not let large saucepans, frying pans or woks push any other pans aside. This could
make them unstable or deflect heat onto your benchtop and damage the surface.
z
Saucepan handles may be hot to touch. Keep handles out of reach of children.
z
If the electrical supply cord is damaged, it must only be replaced by an
authorised person.
z
This cooker is not to be used as a space heater, especially if it is installed in marine
craft or in a caravan.
z
Wear proper apparel. Do not wear loose fitting or hanging garments when using the
appliance. They could ignite or melt if they touch an element or hot surface and you
could be burned.
z
Always keep oven vents unobstructed.
z
Use only dry oven mitts or potholders. Moist or damp potholders on hot surfaces could
result in burns from steam. Do not let potholders touch hot areas or heating elements.
Do not use a towel or a bulky cloth for a potholder. It could catch fire.
z
Caution: hot air can blow from the vent at the top of the oven as part of the oven’s
cooling system.
z
Placement of oven shelves: always position shelves in the desired location before
preheating the oven. If a shelf must be removed while the oven is hot, do not
let the oven mitts or potholder contact hot heating elements in the oven or the
base of the oven.
5
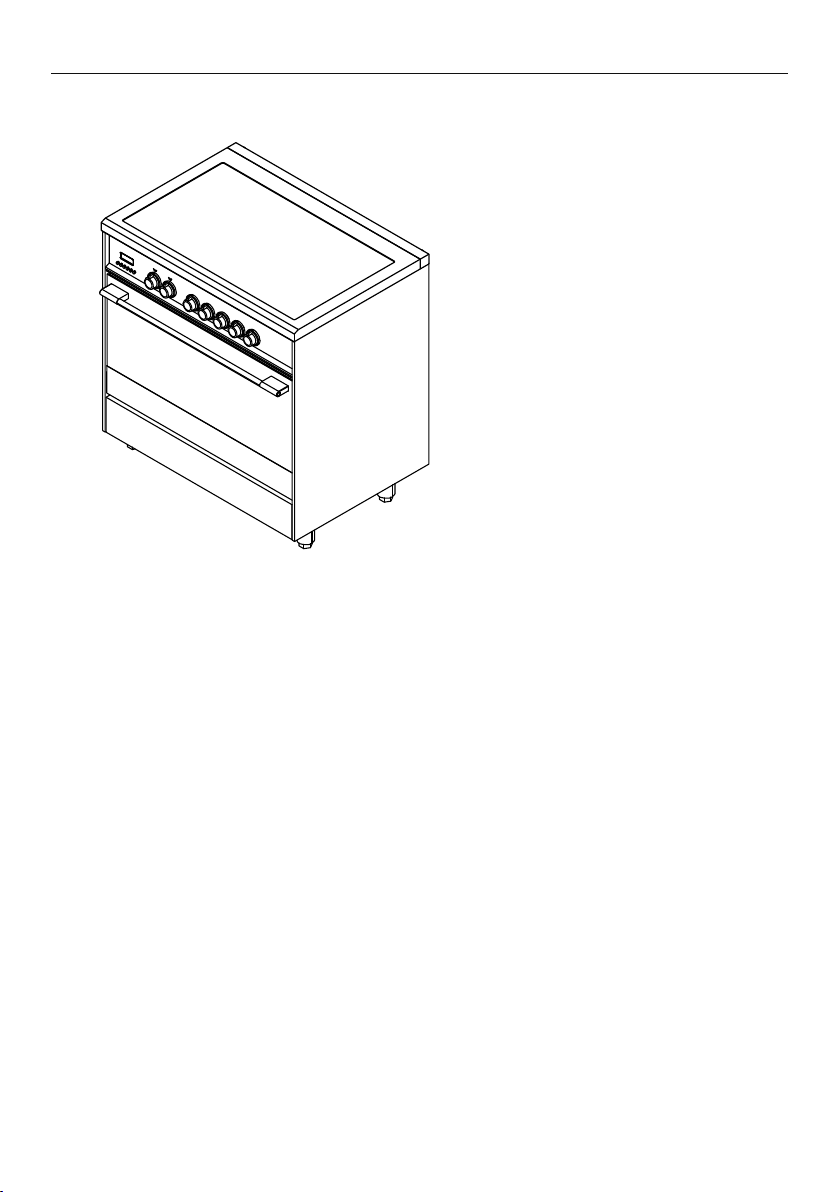
90cm models
INTRODUCTION
OR90SCI1X
Before you start
1 Make sure that the anti-tip bracket at the right rear of the cooker has been
properly installed.
2 Make sure that the installer has completed the ‘Final checklist’ in the
Installation instructions.
3 Read this guide, taking special note of the ‘Safety and warnings’ section.
4 Remove all accessories and packaging from the oven and cooktop. Recycle items that
you can. If any adhesive residue is left on surfaces, remove this using dishwashing liquid
on a soft cloth. Do not use any harsh or abrasive cleaners.
5 Make sure you follow the instructions under ‘First use’ before using your
cooker for cooking.
6
INTRODUCTION
A word on induction cooking
Induction cooking is a safe, advanced, efficient, and economical cooking technology.
It works by electromagnetic vibrations generating heat directly in the pan, rather than
indirectly through heating the glass surface. The glass becomes hot only because the pan
eventually warms it up. This technology has a number of advantages over traditional radiant
energy cooking:
z
Heat-up times are much faster.
z
Use is safer as no heating takes place unless a suitable pan is placed on
the cooking zone.
z
As heat is transferred without loss, you save energy.
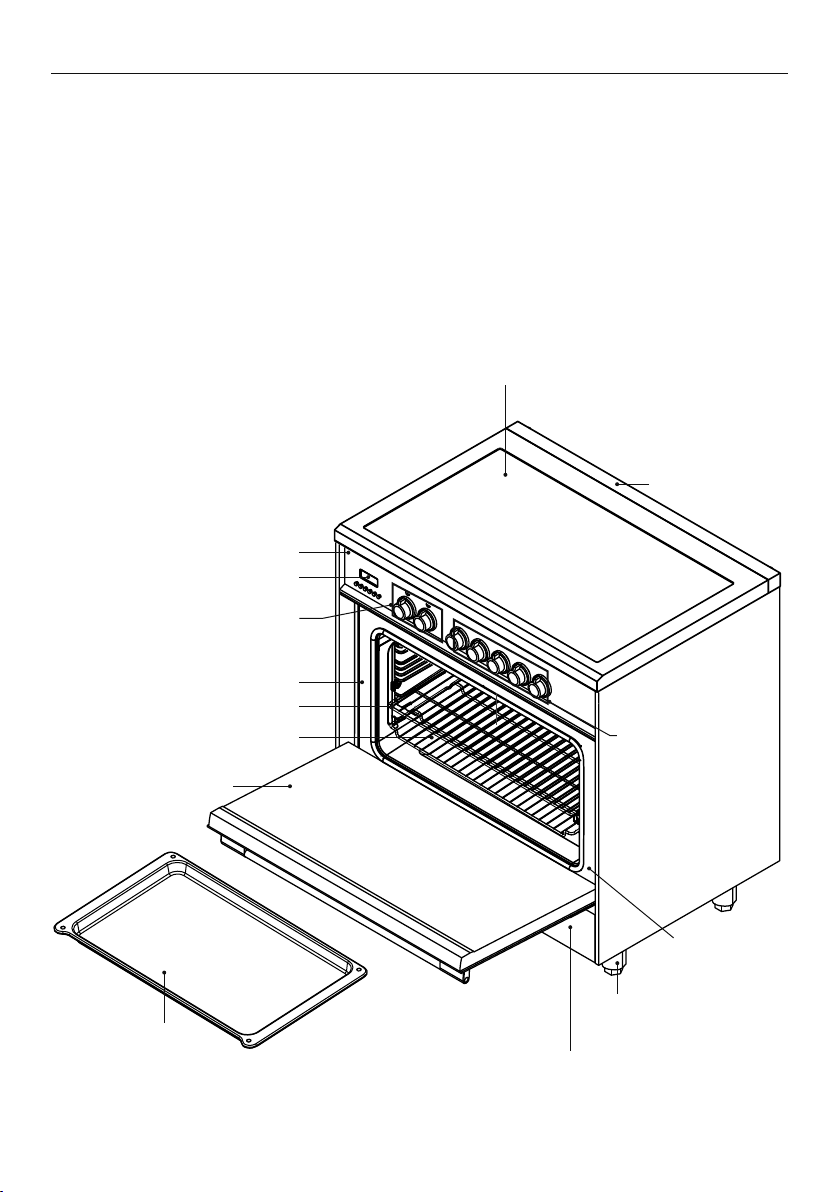
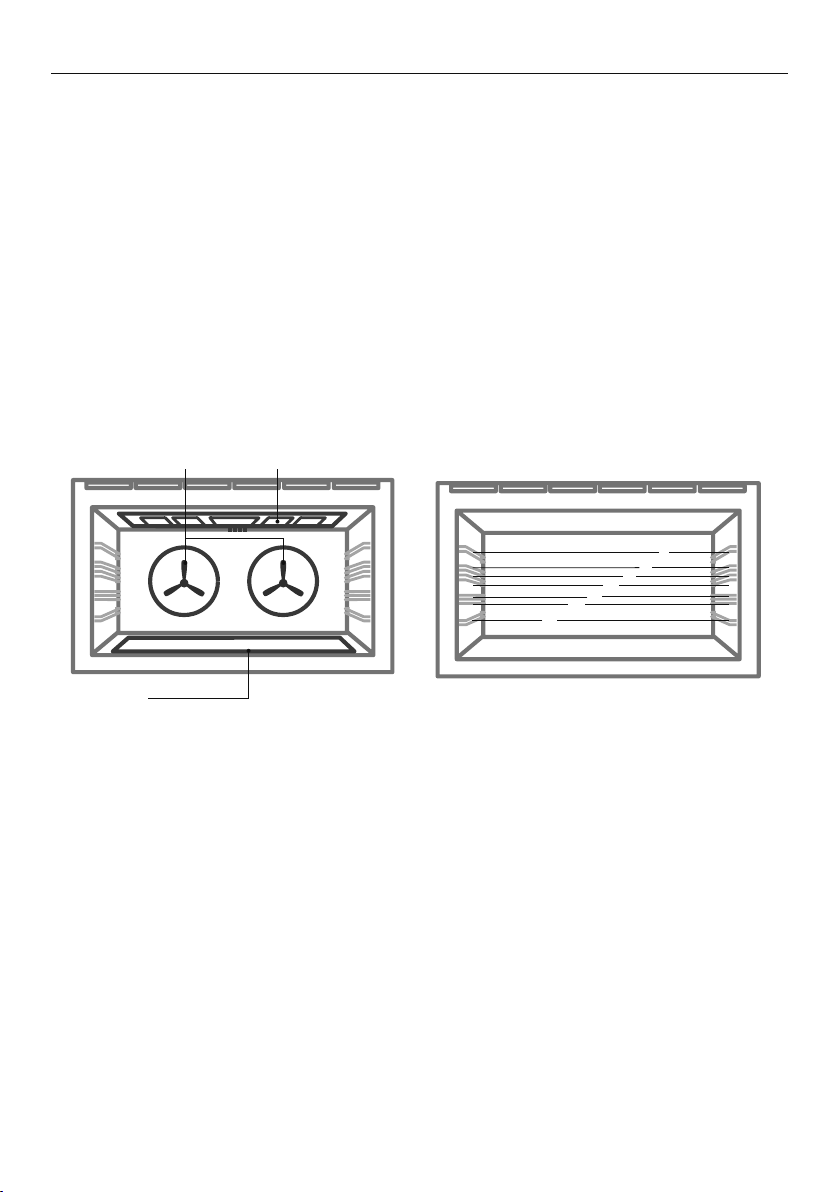
Induction cooktop
Overview
Features may vary.
Back trim
Control panel
Clock display and controls
Oven function and
temperature dials
Oven door
Roast pan
Oven frame
Side racks
Oven shelves
Cooking zone dials
Label with model
and serial numbers
Foot
Storage compartment
7
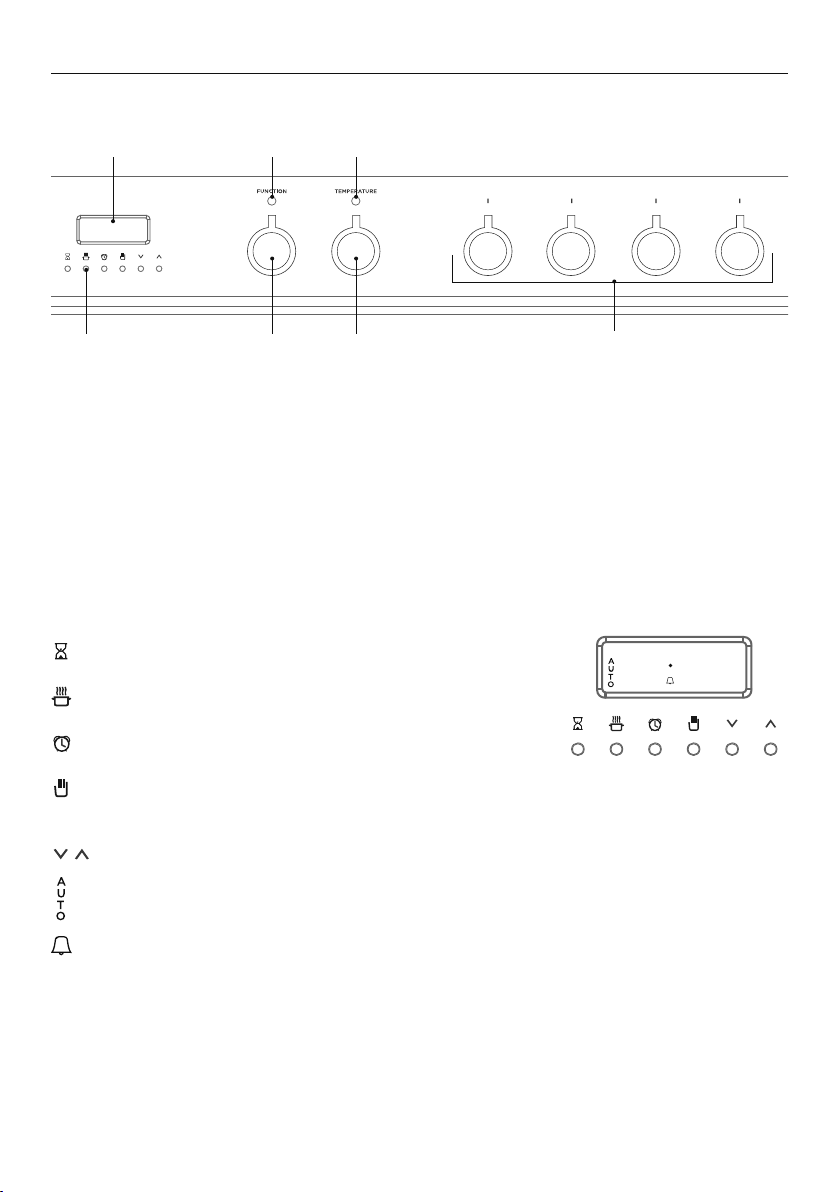
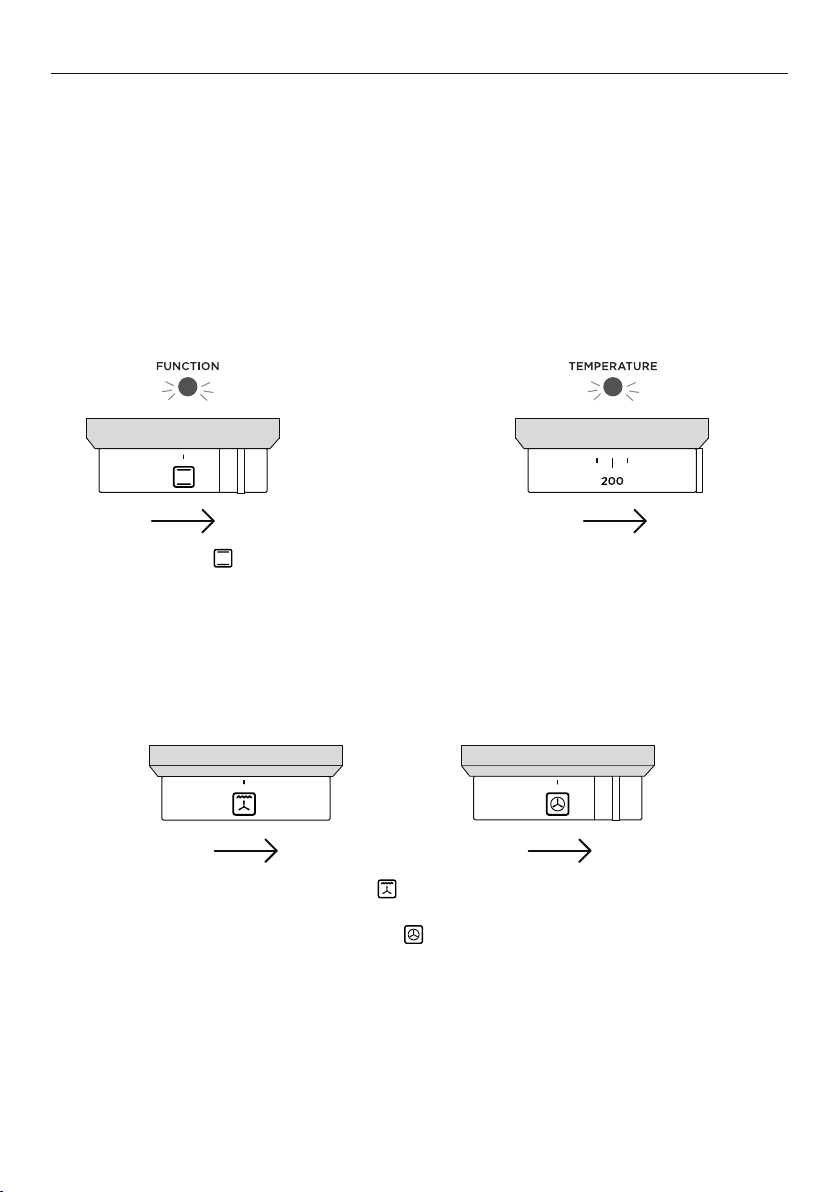
Control panel layout
FIRST USE
2
1
1 Clock controls
2 Clock display
3 Function dial
4 Temperature dial
5 Cooktop control dials
6 Function indicator light
7 Temperature indicator light
Clock display and controls
Timer (see ‘Setting the timer’)
Cook time (see ‘Auto Cook’)
67
34 5
End time (see ‘Auto Cook’)
Clock (see ‘Setting the clock’)
Cancel Auto Cook (see ‘Auto Cook’)
Scroll
Auto Cook indicator (see ‘Auto Cook’)
Timer indicator (see ‘Setting the timer’)
8
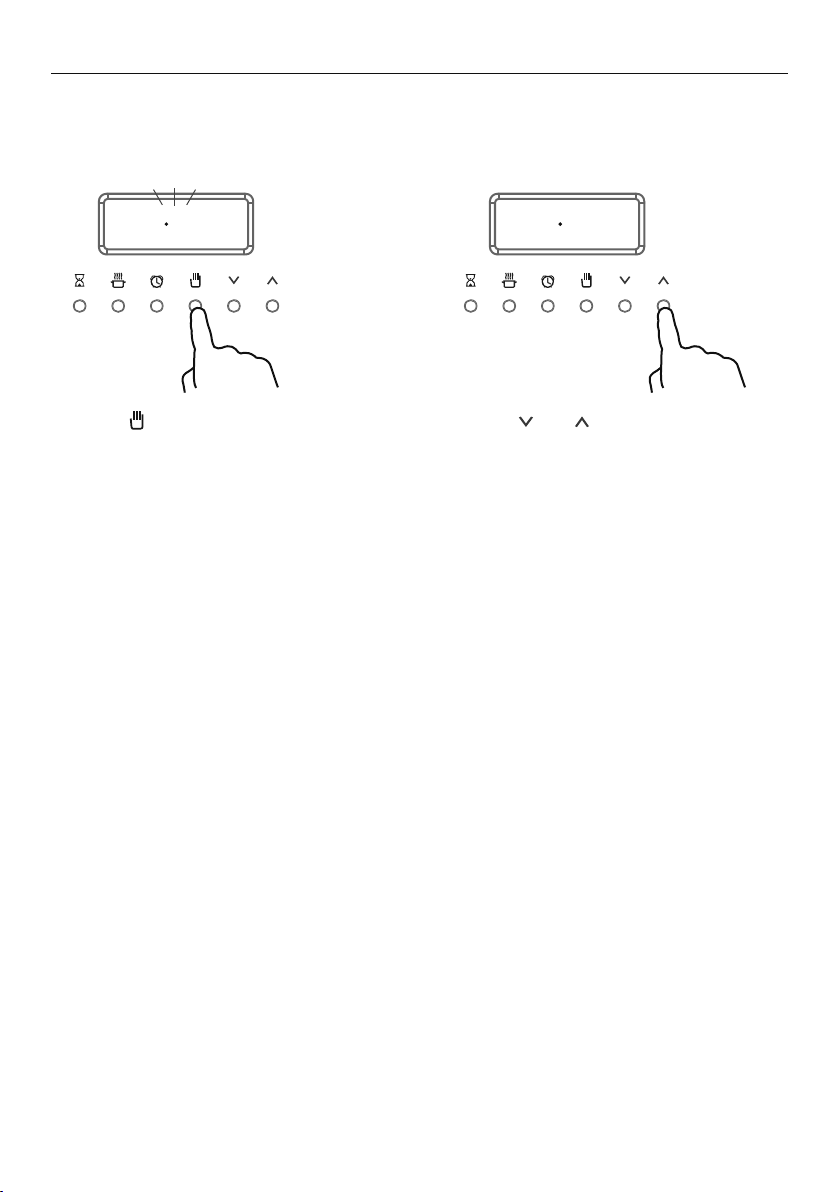
FIRST USE
Setting the clock
When your oven is first turned on, or after a power cut, the display will flash. You will need
to set the clock in order to use the oven.
1 Press
to enter the clock display. 2 Press and to set the time.
9
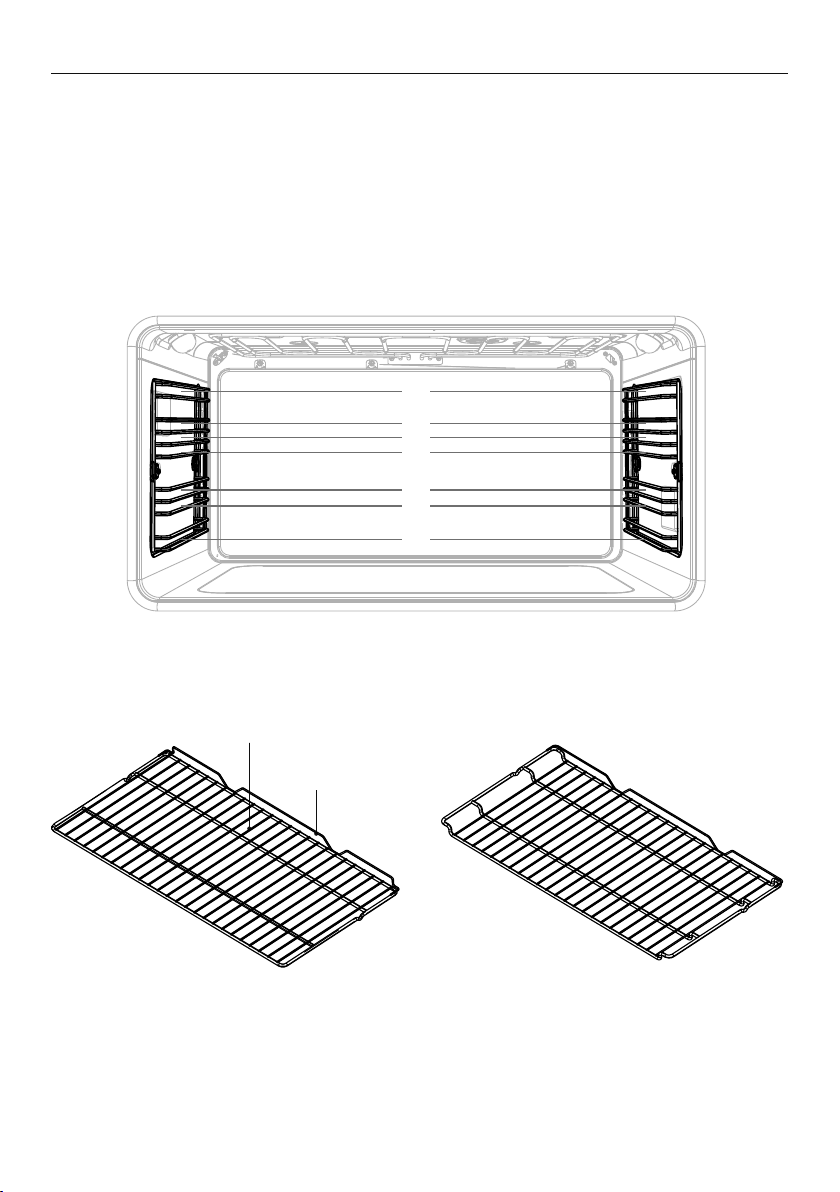
FIRST USE
Positioning the shelves
z
Shelf positions are numbered from the bottom.
z
Position the shelves you will need before turning the oven on.
z
For advice on which shelf position to use, see sections ‘Oven functions’, ‘Cooking
guidelines’, and ‘Cooking charts’.
IMPORTANT!
Always position the oven shelves before turning the oven on. Remove any unused shelves
and baking utensils from the oven.
7
6
5
4
3
2
1
Oven shelves
10
Step-down wire shelfFlat wire shelf
Wire shelf
Safety stop
To insert the shelves
Guard rail
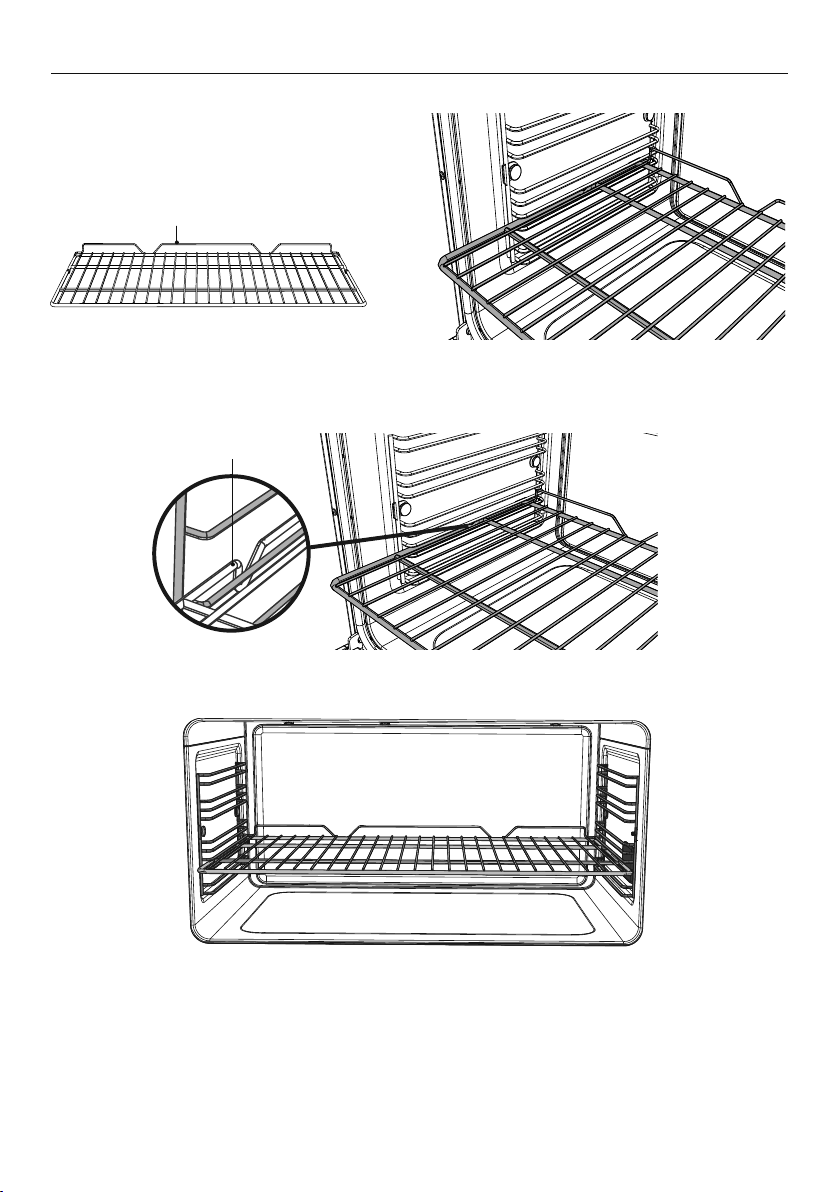
FIRST USE
1 Make sure the guard rail is at the
back, facing up.
Safety stop
3 Tilt the front up slightly to help the safety stops clear the side rack wires.
2 Position the shelf: it should rest on
the side rack wires, as shown.
4 Lower the shelf back onto the side rack wires and slide all the way into the oven.
To remove the shelves
1 Wait for the oven to cool down completely.
2 Pull the shelf forward about ¾ of the way.
3 Tilt the front up slightly to help the safety stops clear the side rack wires.
4 Remove the shelf.
11
FIRST USE
Conditioning the oven
It is important to condition your oven before using it for cooking and baking. Conditioning
will burn off any manufacturing residues and ensure that you get the best results right from
the start.
Before you start:
z
Make sure you have removed all packaging and any cable ties used to secure the
shelving during transit.
z
Make sure all shelves are fitted in the oven.
z
Make sure you have set the clock. If the clock has not been set the cooling fans will come
on but the oven lights will remain off and the oven will not heat up.
1 Select the Bake
z
The oven will come on.
function.
2 Set the temperature to 200°C
for 30 minutes.
z
While the oven is heating up, the
temperature indicator light will glow.
z
When the oven has reached set
temperature, the temperature indicator
light will go out.
then...
3 After 10 minutes, select the Fan Grill
z
Heat at 200°C for 10 minutes.
4 After 10 minutes, select the Fan Forced
z
Heat at 200°C for 20 minutes.
function.
function.
Note:
z
There will be a distinctive smell and a small amount of smoke during the conditioning
process as manufacturing residue is burnt off. This is normal, but make sure the kitchen
is well ventilated while the oven is conditioning.
z
Once cooled, wipe out the oven with a damp cloth and mild detergent,
and dry thoroughly.
12
COOKING GUIDE
Oven cooking guidelines
IMPORTANT!
z
Use all the oven modes with the oven door closed.
z
Never use aluminum foil to cover the oven shelves or to line the floor of the oven. The
trapped heat can irreversibly damage the enamel and may even cause fire.
z
Do not place water, ice, or any dish or tray directly on the oven floor, as this will
irreversibly damage the enamel.
z
Do not cover the grill pan with aluminum foil. This will catch the grease and
could cause fire.
z
Do not use plastic wrap or wax paper in the oven.
z
For food safety reasons, do not leave food in the oven for longer than two hours before
and after cooking or defrosting. This is to avoid contamination by organisms which may
cause food poisoning. Take particular care during warmer weather.
Baking
Fans Upper Elements
Shelf positions
7
6
5
4
3
2
1
Lower
Element
(concealed)
z
For best results when baking, always preheat your oven. The temperature indicator will
go out when the set temperature is reached.
z
While the oven is heating the grill element may be on.
z
Do not open the door until at least ¾ of the way through cooking.
z
Make sure cake pans do not touch each other or the sides of the oven.
z
When baking double the recipe (especially cookies) cook time may need to increase.
z
Your cookware will influence baking times. Dark pans absorb the heat more quickly than
reflective pans; glass cookware may require a lower temperature
z
Multi-shelf baking may also require a slight increase in cooking time.
Shelf Position Guide
z
Single shelf: place your baking on a shelf that will have the top of your pan near the
center of the oven cavity.
z
Multi shelf: always leave a space between shelves to allow the air to circulate.
13

COOKING GUIDE
Roasting
z
Use Fan Grill to roast whole chicken.
z
For other meats use Bake for a succulent juicy flavoursome roast.
z
Boneless, rolled or stuffed roasts take longer than roasts containing bones.
z
Use a meat thermometer to determine when meat is cooked.
z
Poultry should be well cooked with the juices running clear and an internal
temperature of 75°C.
z
For crispy crackling first sear pork at a high temperature, then lower the temperature to
complete the cooking.
z
If multi-shelf cooking (eg if roasting meat on one shelf and vegetables on another)
use Fan Forced.
z
Cook larger cuts of meat for longer at a lower temperature. The meat will
cook more evenly.
z
Always roast meat fat side up. That way, basting may not be required.
z
Always rest the meat for at least 10 minutes after roasting to allow the juices to
settle. Remember the meat will continue to cook for a few minutes after removing it
from the oven.
Shelf Position Guide
Place the meat on a shelf so that the meat is in the centre of the oven or lower.
Grilling
z
This is a healthier alternative to frying.
z
Always grill with the oven door completely shut.
z
For best results allow 5 minutes of preheat before placing food in the oven.
z
If you use glass or ceramic pans, be sure they can withstand the high
temperatures of the grill.
z
To avoid piercing the meat and letting juices escape, use tongs or a spatula to turn the
meat halfway through cooking.
z
Brush meat with a little oil to help keep the meat moist during cooking. Alternatively
marinade the meat before grilling (but be aware that some marinades may burn easily).
z
Where possible grill cuts of meat of a similar thickness at the same time. This will
ensure even cooking.
z
Always keep a close watch on your food while grilling to avoid charring or burning.
Shelf Position Guide
z
For thinner cuts of meat, toasting or browning foods, use a higher shelf position.
z
Thicker cuts of meats should be grilled on lower shelves or at a lower grill setting to
ensure even cooking.
Reheating
z
Use Bake or Fan Bake to reheat food.
z
Always reheat food to piping hot. This reduces the risk of contamination by
harmful bacteria.
z
Once hot, set the oven temperature to WARM to keep food hot.
z
Never reheat a food more than once.
z
Any condensation that forms during the cooking process will collect in the drip channel,
below the door. This may be mopped up using a sponge once the oven has cooled.
14
OVEN FUNCTIONS
IMPORTANT!
z
Use all the functions with the oven door closed.
z
Safe food handling: leave food in the oven for as short a time as possible before and
after cooking or defrosting. This is to avoid contamination by organisms which may
cause food poisoning. Take particular care during warmer weather.
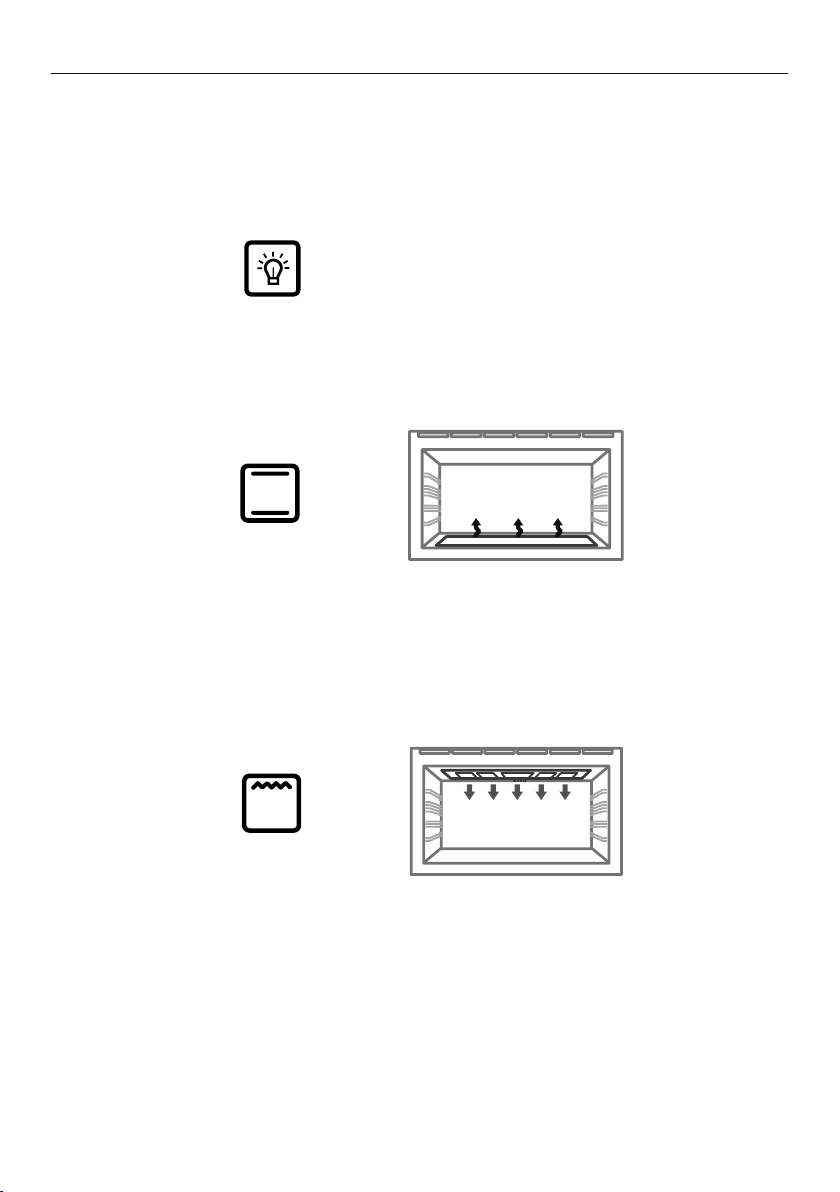
Light
This is not a cooking function
z
Only the oven light comes on. It remains on in all the cooking functions.
Bake
Upper outer and lower elements
z
Heat comes from both the upper and lower elements. The fan is not used in this function.
z
Ideal for cakes and foods that require baking for a long time or at low temperatures.
z
This function is not suitable for multi-shelf cooking.
Ideal for moist foods that take a longer time to cook eg rich fruit cake or bread.
Grill
Upper elements
z
This function delivers intense radiant heat from the upper elements.
z
You can set the intensity of the heat by altering the temperature setting.
z
For best results allow 5 minutes of preheat before placing food in the oven.
z
The most suitable function for ‘finishing off’ many meals, for example browning the top
of potato gratin and frittata.
z
Ensure you centre the dish under the inner grill element.
Ideal for toasting bread or for top browning to ‘finish off dishes’.
15
OVEN FUNCTIONS
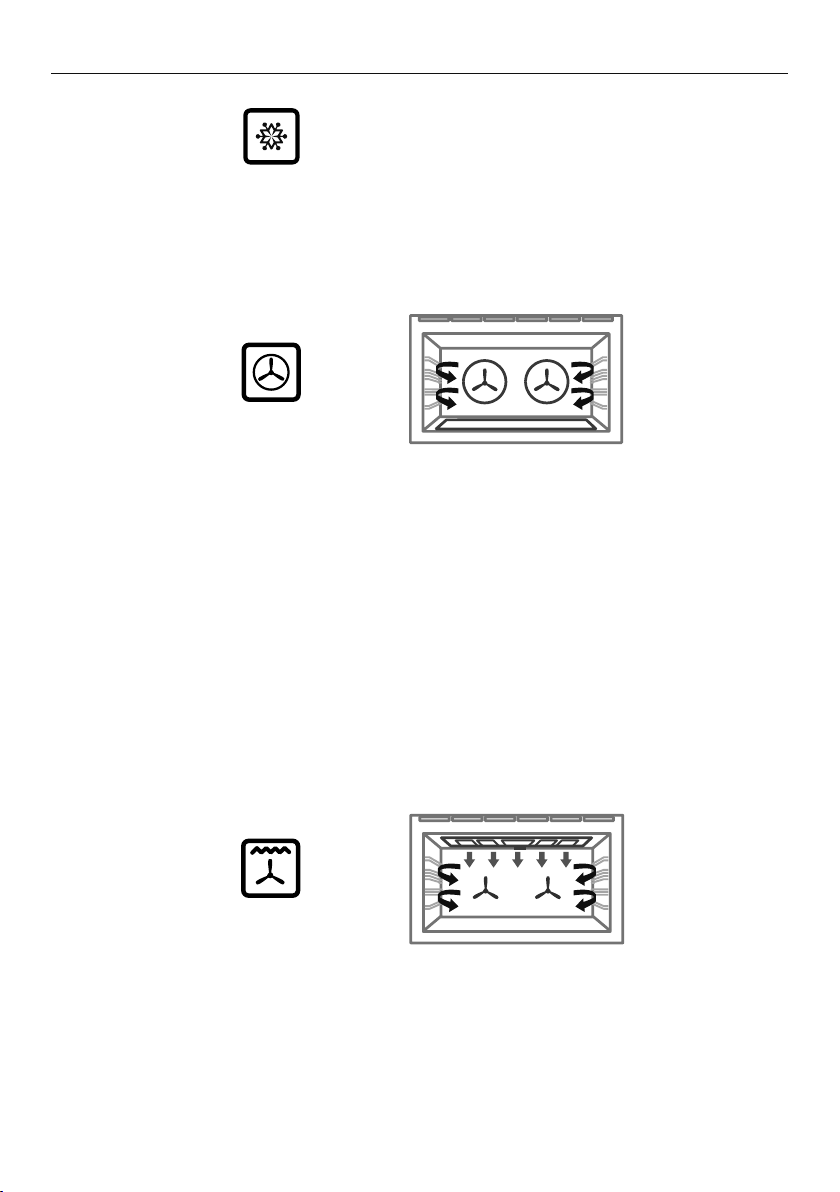
Defrost
This is not a cooking function
z
Only the oven light comes on. It remains on in all the cooking functions.
Fan Forced
Fan and rear element
z
By using the central rear heating element and fan, hot air is blown into the cavity,
providing a consistent temperature at all levels, making it perfect for multi-shelf cooking.
z
Trays of cookies cooked on different shelves are crisp on the outside and
chewy in the middle.
z
Meat and poultry are deliciously browned and sizzling while remaining juicy and tender.
z
Casseroles are cooked to perfection and reheating is quick and efficient.
z
When multi-shelf cooking it is important to leave a gap between trays (eg use shelves 3
& 5) to allow the air to move freely. This enables the browning of foods on the lower tray.
z
If converting a recipe from Bake to Fan Forced, we recommend that you decrease the
bake time or decrease the temperature by approximately 20°C.
z
For items with longer bake times (eg over an hour) it may be necessary to decrease both
time and temperature.
Ideal for multi-shelf cooking biscuits, cookies, scones, muffins and cupcakes.
Fan Grill
Fan plus upper elements
z
This function uses the intense heat from the upper elements for top browning and the
fan to ensure even cooking of foods.
z
Meat, poultry and vegetables cook beautifully; food is crisp and brown on the outside
while the inside remains moist and tender.
Ideal for whole chicken, tenderloin of beef or grilling your favourite chicken, fish or steak.
16

OVEN FUNCTIONS
Warm
This is not a cooking function
z
Provides a constant low heat of less than 90°C.
z
Use to keep cooked food hot, or to warm plates and serving dishes. To reheat food from
cold, use another oven function to heat the food piping hot and only then change to
Warm, as this function alone will not bring cold food up to a high enough temperature to
kill any harmful bacteria.
Proving bread
This function is perfect for proving bread dough.
1 Select the Warm function
2 Adjust the temperature to 50°C
3 Place dough in a lightly oiled bowl and cover with plastic wrap
and/or a clean damp cloth
4 Place the bowl into the warmed oven on shelf position 1
Fan Bake
Fan plus upper outer and lower elements
z
The oven fan circulates hot air from the top outer and the lower elements and distributes
it around the oven cavity.
z
Food cooked tends to brown more quickly than foods cooked on the
traditional Bake function.
z
You may need to decrease the time from that recommended in traditional recipes.
z
Use Fan Bake at a low temperature eg 50°C for drying fruit, vegetables and herbs.
Ideal for single shelf baking that takes less than an hour to cook – foods such as muffins,
scones and cupcakes or things like enchiladas.
17
COOKING CHARTS
z
Shelf positions are counted from the base up (1 is the lowest, 7 is the highest).
Position shelves before you turn the oven on.
z
For best results always preheat the oven to the required temperature.
z
The grill element may come on while the oven is heating up.
z
The temperature indicator light will go out when the oven has reached the
selected temperature.
z
Oven accessories may temporarily deform slightly when they become hot.
This is normal and does not affect their function.
The information in these charts is for guidance only. Refer to your recipe or the packaging
and be prepared to adjust the cooking times and settings accordingly.
BAKING
SHELVES FUNCTION
SHELF
POSITION
TEMP
(°C)
BISCUITS
Plain Single Fan Bake 3 210-220 8-10
Multi Fan Forced
1 and 4
or
215-230 10-12
2 and 5
Chewy cocolate chip
Single Fan Bake 3 180-190 10-15
1 and 4
Multi Fan Forced
or
160-170 10-15
2 and 5
Oatmeal Single Fan Bake 3 160-170 12-15
CAKES
Vanilla Single Bake 3 160-165 30-35
Pound cake Single Bake 3 160 70-80
Butter/chocolate Single Bake 3 160-180 50-60
Chocolate brownie
(20x20cm)
Single Bake 3 175 20-25
Rich fruit Single Bake 3 135-150 3-6 hrs
Light fruit Single Bake 3 155-165 60-90
TIME
(MIN)
Sponge
(single large) Single Bake 3 170-180 30-40
Sponge
(2x20cm) Single Bake 3 170-180 15-25
SHORTBREAD Single Fan Bake 3 130-140 20-25
18
COOKING CHARTS
BAKING
SHELVES FUNCTION
SHELF
POSITION
TEMP
(°C)
TIME
(MIN)
MUFFINS/CUPCAKES
Cupcakes
Single Fan Bake 3 185 15-20
1 and 4
Multi Fan Forced
or
170 15-20
2 and 5
Muffins
Single Fan Bake 3 170 25-30
1 and 4
Multi Fan Forced
or
170 25-30
2 and 5
SCONES Single Bake 3 215-230 10-15
MERINGUES Single Bake 3 120-130 60-70
BREAD / BREAD ROLLS
Sandwich loaf
(23x13cm loaf tin)
Wholewheat loaf
(23x13cm loaf tin)
Single Bake 3 200-220 40-50
Single Bake 3 200-220 35-45
Soft Bread Rolls Single Bake 3 190 15-18
Dough Proof Single Warm 3 PrF 30
PASTRY
Pastry case
(baked blind) Single Fan Bake 2 or 3 175 15
Filo Single Fan Bake 3 200 15-25
Flaky/puff Single Fan Bake 3 185-200 20-30
Choux Single Fan Bake 3 200-210 30-35
1 and 4
Multi Fan Forced
or
200-210 30-35
2 and 5
Croissants Single Fan Bake 3 190-200 15-25
1 and 4
Multi Fan Forced
or
190-200 15-25
2 and 5
19
 Loading...