

Page 1
Installation Manual
PALS
Portable Axle Load Scale
50784
Issue 1 04/05
© 2005 by Fairbanks Scales
All rights reserved
Page 2

Amendment Record
PALS
Portable Axle Load Scale
50784
Manufactured by Fairbanks scales
821 Locust
Kansas City, Missouri 64106
Created 04/05
Issue 1 04/05 New Product
Disclaimer
Every effort has been made to provide complete and accurate information in this manual. However, although this manual
may include a specifically identified warranty notice for the product, Fairbanks Scales makes no representations or warranties
with respect to the contents of this manual, and reserves the right to make changes to this manual without notice when and
as improvements are made.
04/05 2 50784 Issue 1
Page 3

Table of Contents
Section 1: General Information
A. Introduction . . . . . . . . . . . . . . . . . . . . . . . 4
B. Specifications . . . . . . . . . . . . . . . . . . . . . 4
C. Accessories . . . . . . . . . . . . . . . . . . . . . . . 5
Section 2: Installation
A. Introduction . . . . . . . . . . . . . . . . . . . . . . . 6
B. Site Selection . . . . . . . . . . . . . . . . . . . . . 6
C. Standard Platform Installation . . . . . . . . . . 6
D. Ramp Installation . . . . . . . . . . . . . . . . . . . 8
E. Instrument Installation . . . . . . . . . . . . . . . 8
Section 3: Calibration
A. Platform Cornering . . . . . . . . . . . . . . . . . . 9
Section 4: Service and Maintenance
A. Load Cell Replacement . . . . . . . . . . . . . . 11
B. Junction Box/ PCB Replacement . . . . . . . 12
Section 5: Parts
A. Parts List . . . . . . . . . . . . . . . . . . . . . . . . . 13
04/05 3 50784 Issue 1
Page 4

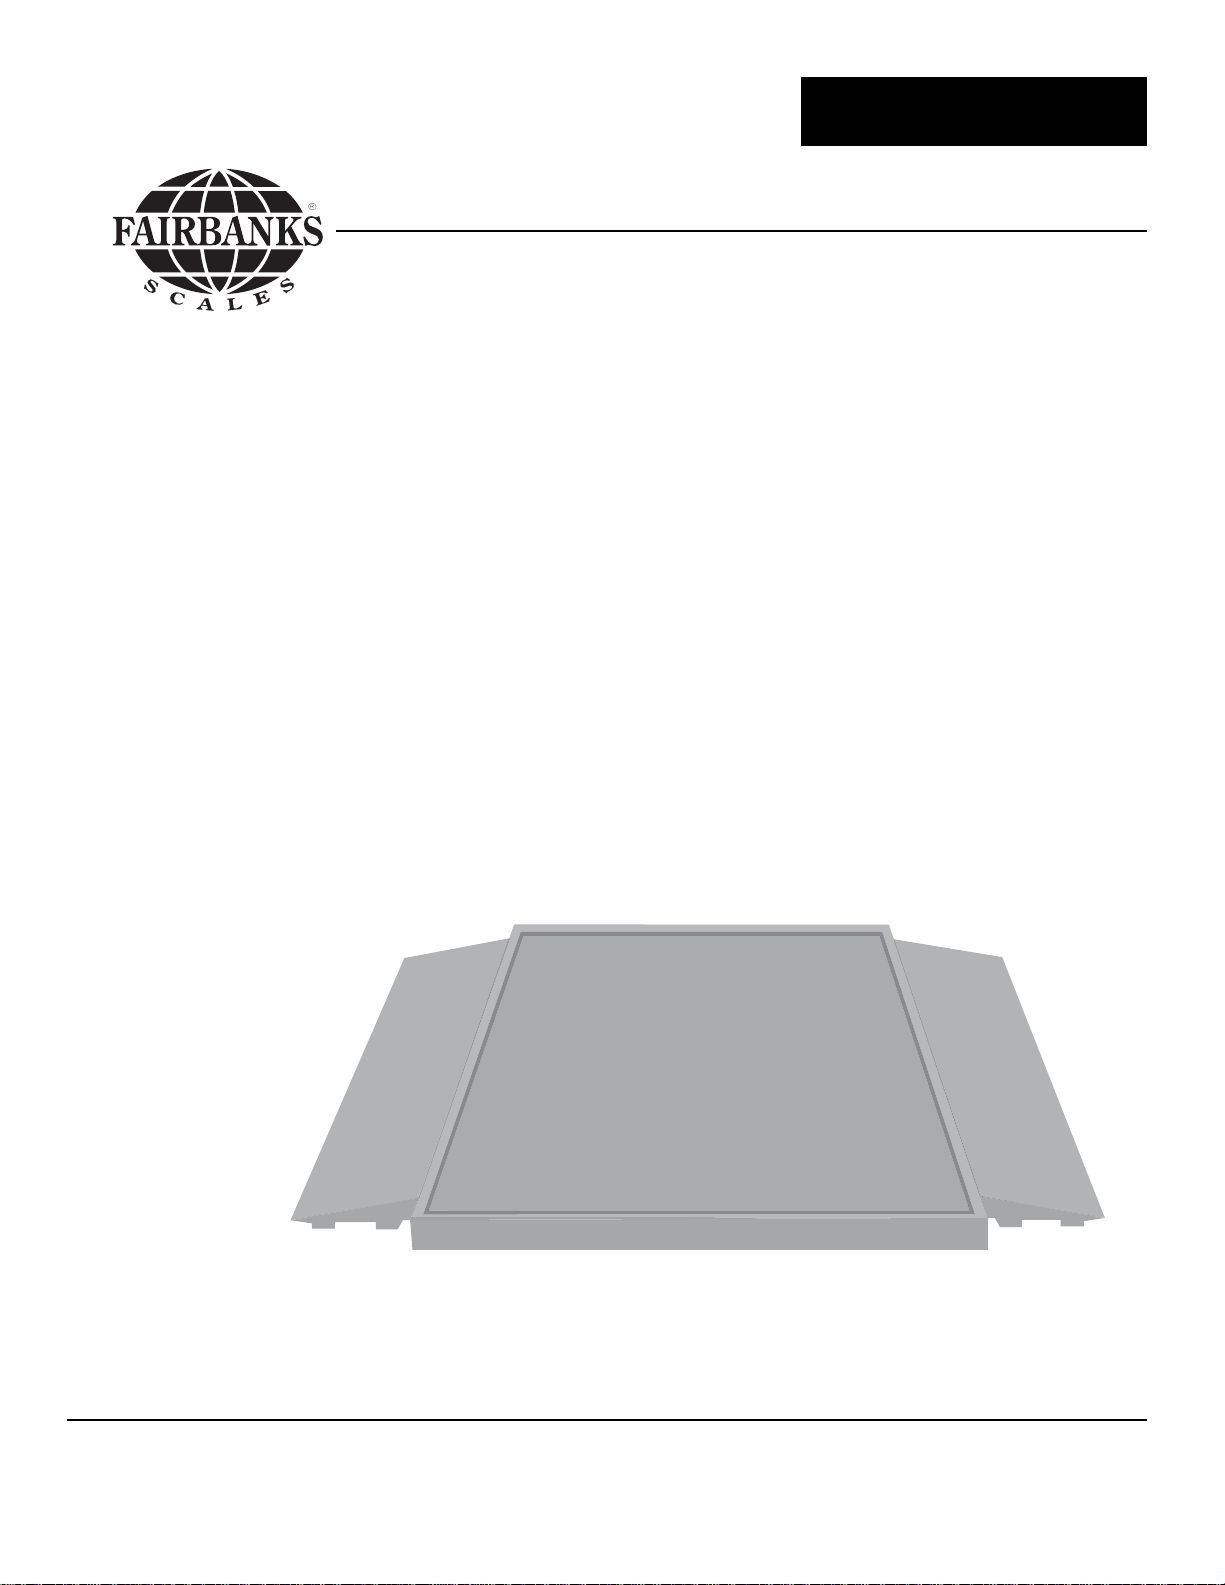
A. Introduction and Description
Fairbanks’ Portable Axle Load Scales (PALS) is an ideal choice for a cost-effective
weighing solution for non-commercial vehicle axle weights.
The scale is constructed in a subframe which eliminates the need for a pier or slab
foundation. Aflat surface such as asphalt or concrete is required to install the complete
unit. By eliminating the foundation, installation and relocation of this scale require minimal
effort. As an example, if a change in process, traffic flow or location occurs, the Fairbanks
Portable Axle Load Scale offers the ultimate in weighing flexibility.
The Fairbanks Portable Axle Load Scale is fabricated from USA extruded structural steel
members. This heavy-duty scale is designed to produce a minimum deflection at its rated
60,000 pound Dual Tandem Axle Capacity (DTAC). The ramps are constructed to the
same standards as the weighbridge. The ramp size comes standard in a full-width design
that will accommodate any wheel base for most highway vehicles.
The PALS is equipped with 50,000 pound rocker column load cells. These load cells are
constructed of stainless steel and are hermetically sealed. They are installed at the
factory to ensure proper alignment which eliminates potential weighing errors.
The Portable Axle Load Scales come standard with an analog junction box, but Intalogix
®
Technology may be used if desired.
B. Specifications
Product Number . . . . . . . . . . .83306
Platform Size . . . . . . . . . . . . .10’ x 7’
DTAC. . . . . . . . . . . . . . . . . . . 60,000 lbs
Deck Dimensions . . . . . . . . . .10’ x 7’
Deck Plate . . . . . . . . . . . . . . .1/4”
Subframe. . . . . . . . . . . . . . . . 6” channel
Full Scale Capacity . . . . . . . . 60,000 lbs x 20 lbs
Shipping Weight . . . . . . . . . . .3,500 lbs
Grade and Location . . . . . . . . Relatively level and solid surface.
Platform must be supported on all corners.
04/05 4 50784 Issue 1
Section 11:
General Infor mation
Page 5

B. Specifications continued
Load cell . . . . . . . . . . . . . . . . . . . . . .50k lbs
Rated Output (=RO) . . . . . . . . . .2 mv/v +/- .1%
Calibration (% RO) . . . . . . . . . . .<
+/- 0.05 (< +/- 0.005)
Zero Balance % RO . . . . . . . . . .<
+/- 1.0
Insulation Resistance . . . . . . . . . >
5000 Meg ohms
Input Resistance . . . . . . . . . . . . .1150 ohms +/- 10
Output Resistance . . . . . . . . . . .1000 ohms +/- 1
Maximum Excitation Voltage . . . .15 vdc
Safe load limit %Emax . . . . . . . . .200
Ultimate overload %Emax . . . . . .300
Approvals . . . . . . . . . . . . . . . . . .NTEP; FM
Sealing . . . . . . . . . . . . . . . . . . . .Complete hermetic seal; cable entry sealed by
. . . . . . . . . . . . . . . . . . . . . . . . . .glass to metal header. IP 68
Material . . . . . . . . . . . . . . . . . . .Stainless Steel 17-4 PH (1.4548)
Wiring . . . . . . . . . . . . . . . . . . . .Function
Color
. . . . . . . . . . . . . . . . . . . . . . . . . .Excitation + Green
. . . . . . . . . . . . . . . . . . . . . . . . . .Excitation - Black
. . . . . . . . . . . . . . . . . . . . . . . . . .Output + White
. . . . . . . . . . . . . . . . . . . . . . . . . .Output - Red
C. Accessories
Ramp Product Number . . . . . . . .83558
Ramp Dimensions . . . . . . . . . . . .10’ x 30” x 6”
04/05 5 50784 Issue 1
Page 6

A. Introduction
The standard installation of the Portable Axle Load Scale consists of locating the platform,
leveling the platform, installing the ramps, interfacing the platform to an instrument, and
calibrating/ adjusting the system.
B. Site Selection
The following points should be considered when selecting a location for the platform.
1. Locate the platform to allow convenient maneuvering of vehicles over the
platform.
2. The location should provide a solid base to support the platform and be level.
3. The location must be able to support the platform plus the weight that will be
placed upon it.
C. Standard Platform Installation
1. The platform is shipped fully assembled and wired. Remove the platform from
the packing materials.
2. Connect lifting straps or chains to the lifting lugs on the sides of the platform.
The lifting straps/chains should be long enough to form a 45-degree angle with
the platform during the lifting process.
3. Place the platform in the desired location.
4. The platform should be made stable and level. Shims are not included with the
platform and must be supplied locally as needed.
5. Remove the four (4) cover plates.
6. Drill and anchor the platform using the supplied ¾” wedge anchors.
04/05 6 50784 Issue 1
Section 22:
Installation
~ Caution ~
Absolutely no arc welding operations are to be performed on or near this scale while the
load cells are in place and/or connected. All load cells must be disconnected and removed
during welding.
Page 7

7. Remove the shipping bolts in each corner.
8. Adjust the checking bolts to a 1/16” to 1/8” clearance.
9. Verify all of the load cells are plumb, square and level. Correct if necessary.
10. If ramps are part of the installation, they should be located and installed at this
time.
04/05 7 50784 Issue 1
50784-2
"
TOP VIEW OF COVER PLATE
UPPER CUP
HOLD DOWN BOLT
FOR SHIPPING
ADJUST BUMPER BOLT TO 1/16" - 1/8
LOAD CELL
LOWER BASE PLATE
LOAD CELL
ASSEMBLY DETAIL
50784-1
O-RING IN EACH
RECEIVER CUP
Page 8

D. Ramp Installation
The ramps are used in combinations in specific applications.
1. Each ramp has two (2) bolt down tabs as part of the ramp.
2. Place the ramp against the the platform frame.
3. The ramp should be made stable and level.
Shims are not included with the ramps and must be supplied.
4. Bolt the ramps to scale frame using
3
/4” hardware.
5. Drill and anchor the ramp(s) using the supplied
3
/4” wedge anchors.
6. No more than two (2) ramps, located on opposite sides of the platform, may
be installed.
E. Instrument Installation
The platform is shipped fully assembled and wired. The interface cable to the
indicator is as follows:
L/C W
ire Color Function Analog Instrument
Black (-) Excitation (-) Excitation
Green (+) Excitation (+) Excitation
Yellow Shield Shield
White (+) Signal (+) Signal
Red (-) Signal (-) Signal
Refer to the proper indicator service manual for proper installation, programming, and
calibration of the indicator.
04/05 8 50784 Issue 1
Page 9

A. Platfor m Cor nering
Analog Interface (Junction Box 67171):
1. Adjust the analog indicator to the platform. First, ensure all corners are within
one (1) division of each other at 25% of rated capacity. Follow the appropriate
indicator service manual for indicator calibration.
a. Perform a course platform calibration close to the actual weight.
b. Identify the platform corner numbers.
c. Place a concentrated weight (25% of platform capacity) on corner 1. Move it
to corner 2, corner 3 and corner 4, noting the displayed reading on each
corner.
d. If corners require adjustment
: Place the concentrated weight on the corner
displaying the lowest weight and use the appropriate potentiometer to
change the displayed weight to read the same as the highest reading by
turning the potentiometer clockwise (CW). Repeat this procedure while
rechecking all corners until there are no errors. Perform a zero reference
check with a unloaded platform, then repeat the corner test to ensure all
readings are the same before proceeding.
04/05 9 50784 Issue 1
Section 33:
Calibration
1
+E -E SH -S +S
2
+E -E SH -S +S
3
+E -E SH -S +S +E -E SH -S +S
4
1
2
- SIG
+ SIG
SHLD
- SEN
- EXC
+ SEN
- EXC
3
4
96141
Page 10

e. When the corners are the same in reference to each other:
1. Remove all weights.
2. Zero the indicator.
3. Perform a final calibration with test weights.
4. Follow the appropriate indicator service manual for indicator calibration.
04/05 10 50784 Issue 1
Note:
Junction box assembly 67171 has four (4) extended range, multi-turn potentiometers, one
for each load cell. If you have difficulty cornering the platform, turn all potentiometers to the
fully counter clockwise (CCW) position until a clicking is heard when turned. With the weight
on the lowest reading corner, turn the corresponding potentiometer clockwise (CW) to read
the same as the highest reading corner. Repeat this procedure for each corner until the
platform is properly calibrated.
Note:
As you move the weight(s) from corner to corner, do NOT zero the scale. Remember at this
time you are only adjusting the corners to be the same, not performing a correct calibration.
Page 11

A. Load Cell Replacement
1. Remove power to the indicator.
2. Remove the platform access cover, then the junction box cover, and disconnect
the failed load cell cable at the junction box. Loosen the gland bushing and tie a
string or wire to the end of the cable to act as a pull wire. (Check that all cells
have wire markers on the cable ends. If not, identify cells with wire markers or
other means.) Disconnect the faulty load cell’s wires from the terminal block.
3. Lift the platform and use wood blocks for safety.
4. Remove the load cell pulling the load cell cable through the scale while leaving
the pull string/wire in the scale.
5. Install on the new cell.
6. Disconnect the pull string/wire from the old cell's cable and attach to the new
load cell's cable end. Pull the cable of the new cell through to the junction box.
7. Lower the scale onto the new load cell, removing the safety blocks.
8. Connect the load cell wires into the junction box and tighten the box gland
bushing(s).
9. Recalibrate as necessary.
10. Replace the box cover and torque all screws to 10-12 in/lbs. Replace the
platform access covers.
04/05 11 50784 Issue 1
Section 44: SService aand
Maintenance
Page 12

B. Junction Box/PCB Replacement
1. Remove power to the indicator
2. Open the platform access cover, then the box cover.
3. Loosen all gland bushing nuts.
4. Check that all load cells have wire markers on the cable ends. If not, identify
load cells with wire markers or other means, then disconnect the load cell wires
from the terminal blocks. Disconnect the main interface cable wires.
5. Remove the junction box/PCB, then install the new junction box/ PCB.
6. Reconnect all load cell and main interface cable wires to the new junction
box/PCB.
7. Tighten all gland bushing nuts.
8. Recalibrate as necessary.
9. Replace the box cover and torque all screws to 10-12 in/lbs. Replace the
platform access cover.
04/05 12 50784 Issue 1
Note:
Leave the box cover OFF until all calibration adjustments are completed.
Page 13

A. Par ts List
Item No. Part Number Description
1 83307 Platform Weldment
2 83313 Frame
3 83353 Base Plate w/ Lower Cup
4 54517 ¾”-10 x 2” HHCS
5 67171 Junction Box Assembly
6 54203 Hex Nut SS 10-24
* 14721 Velcro Loop
* 14722 Velcro Hook
9 83669 Load Cell 50k lb 3½” RC3 1000 ohm
* 73542 Upper Cup w/o Anti-rotation
* 73732 O Ring 28.24 x 2.62 ( Inside of each cup)
12 54264 Hex Nut ¾”-10
13 66979 SS ½”-13 x 1” FHSS
14 61743 Clamp Bar
* 83942 ¾” PVC Pipe, 4’-3”
* 83883 ¾” PVC Elbow
17 Fairbanks PALS Sticker
* 83884 Clamp for ¾” PVC Pipe
* 73378 Wedge Anchor , ¾” x 7”
21 72967 ¾”-10 x 5”, Hex HD Cap Screw
22 60237 1”-8 x 5” LG. Hex HD Cap Screw
23 54277 1”-8 Hex Nut
* = Not Shown
04/05 13 50784 Issue 1
Section 55:
Parts
Page 14

04/05 14 50784 Issue 1
13
FAIRBANKS
PALS SCALES
17
4
9
1
2
50784-3
21
12
23
22
14
12
6
5
3
 Loading...