

Page 1
Operator Manual
OMEGA SERIES COUNTING SCALE
© 2011-2013 by Fairbanks Scales, Inc.
All rights reserved
Revision 2 04/2013
51278
Page 2

Page 3

Disclaimer
Every effort has been made to provide complete and accurate information in this manual. However,
although this manual may include a specifically identified warranty notice for the product, Fairbanks
Scales makes no representations or warranties with respect to the contents of this manual, and
reserves the right to make changes to this manual without notice when and as improvements are
made.
Fairbanks Scales shall not be liable for any loss, damage, cost of repairs, incidental or consequential
damages of any kind, whether or not based on express or implied warranty, contract, negligence, or
strict liability arising in connection with the design, development, installation, or use of the scale.
Trademarks
All other product names mentioned herein are used for identification purpose only and may be
trademarks and/or registered trademarks of their respective companies
© Copyright Fairbanks Scales, 2011-2013
This document contains proprietary information protected by copyright. All rights are reserved; no part
of this manual may be reproduced, copied, translated or transmitted in any form or by any means
without prior written permission of the manufacturer
.
Page 4

Amendment Record
Omega Series Counting Scale
Operator Manual
Document 51278
Manufactured by Fairbanks Scales
821 Locust
Kansas City, MO 64106
Created 11/11
Revision 1 02/12 Released document.
Revision 2 04/13 Software Update.
04/13 4 51278 Rev. 2
Page 5

Table of Contents
SECTION 1: GENERAL INFORMATION .............................................................................. 7
1.1. Introduction .................................................................................................................................. 7
1.2.
D
escription ................................................................................................................................... 7
1.3. Technical Specifications .............................................................................................................. 7
1.3.1. Basic Specification ............................................................................................................................... 7
1.3.2. Omega Series Scale Specifications ..................................................................................................... 8
1.4. Accessories ................................................................................................................................. 8
SECTION 2: CUSTOMER INFORMATION ........................................................................... 9
2.1. Users Responsibility.................................................................................................................... 9
SECTION 3: INSTALLATION.............................................................................................. 11
3.1. Pre-Installation Checkout .......................................................................................................... 11
3.2. Equipment Location .................................................................................................................. 11
3.3. Safety ........................................................................................................................................ 11
SECTION 4: USER OPERATIONS ..................................................................................... 12
4.1. Introduction ............................................................................................................................... 12
4.2 Front Panel DISPLAY AND Key Functions ................................................................................ 12
4.2.1. LCD Display ....................................................................................................................................... 12
4.2.2. Display and Keypad ........................................................................................................................... 13
4.3. Basic Operational Functions ..................................................................................................... 15
4.3.1. General Weighing ............................................................................................................................. 15
4.3.2. Counting............................................................................................................................................. 16
4.3.3. PLU .................................................................................................................................................... 16
4.4. Tare Operations ........................................................................................................................ 16
4.4.1. tare Entry with A Known Weight ...................................................................................................... 16
4.4.2. Manual tare Entry Via the Keypad .................................................................................................... 17
4.5. Sampling operation ................................................................................................................... 17
4.5.1. Enter piece weight by direct keypad input .......................................................................................... 17
4.5.2. Setup piece weight by sampling (quick set) ....................................................................................... 18
4.5.3. Setup piece weight by sampling (place item) ..................................................................................... 18
4.5.4. Setup piece weight by sampling (remove item).................................................................................. 19
4.5.5. Setup piece weight by sampling (re-sample) ..................................................................................... 20
4.5.6. Auto re-sample operation ................................................................................................................... 20
4.6. PLU (Part Look UP) operation .................................................................................................. 21
4.6.1. Setting PLU ........................................................................................................................................ 21
4.6.2. LOADING PLU ................................................................................................................................... 23
4.6.3. Modify PLU ........................................................................................................................................ 23
4.7. More operations ........................................................................................................................ 24
4.7.1. Accumulation .................................................................................................................................... 24
4.7.2. Recall ................................................................................................................................................ 25
4.7.3. Alarm function .................................................................................................................................... 28
4.8. B scale Selection...................................................................................................................... 30
SECTION 5: PROGRAMMING CONFIGURATION ............................................................. 31
5.1. Introduction ............................................................................................................................... 31
5.2. Factory Defaults ........................................................................................................................ 31
5.3. Programming Parameters ......................................................................................................... 31
5.4. General Settings (Set.UP) ........................................................................................................ 32
5.5. Print Settings (Prt) ...................................................................................................................... 38
5.6. Configuration (Con-F) ................................................................................................................ 47
04/13 5 51278 Rev. 2
Page 6

Table of Contents
SECTION 6: CALIBRATION ............................................................................................... 51
SECTION 7: SERIAL INPUT / OUTPUT ............................................................................. 52
7.1. Introduction ............................................................................................................................... 52
7.2. 2844 Printer Setup and Programming ...................................................................................... 52
7.3. Settings for the Omega Counting Scale ................................................................................... 52
7.3.1. Cable Requirement ............................................................................................................................ 52
7.3.2. Omega Series Label Selection Programming .................................................................................... 52
7.3.3. Omega Programming to Produce Specific Label Formats ................................................................. 53
7.4. Scanner/Reader Setup ............................................................................................................. 54
SECTION 8: SERVICE & MAINTENANCE ......................................................................... 56
8.1. Basic Cleaning .......................................................................................................................... 56
8.2. Troubleshooting ........................................................................................................................ 56
8.2.1. Error Code list .................................................................................................................................... 56
APPENDIX I: EXTERNAL SCALE CONNECTION (MALE) ................................................ 57
APPENDIX II: RS232C CONNECTION:DB9 (MALE) ......................................................... 58
APPENDIX III: DATA OUTPUT ........................................................................................... 59
04/13 6 51278 Rev. 2
Page 7

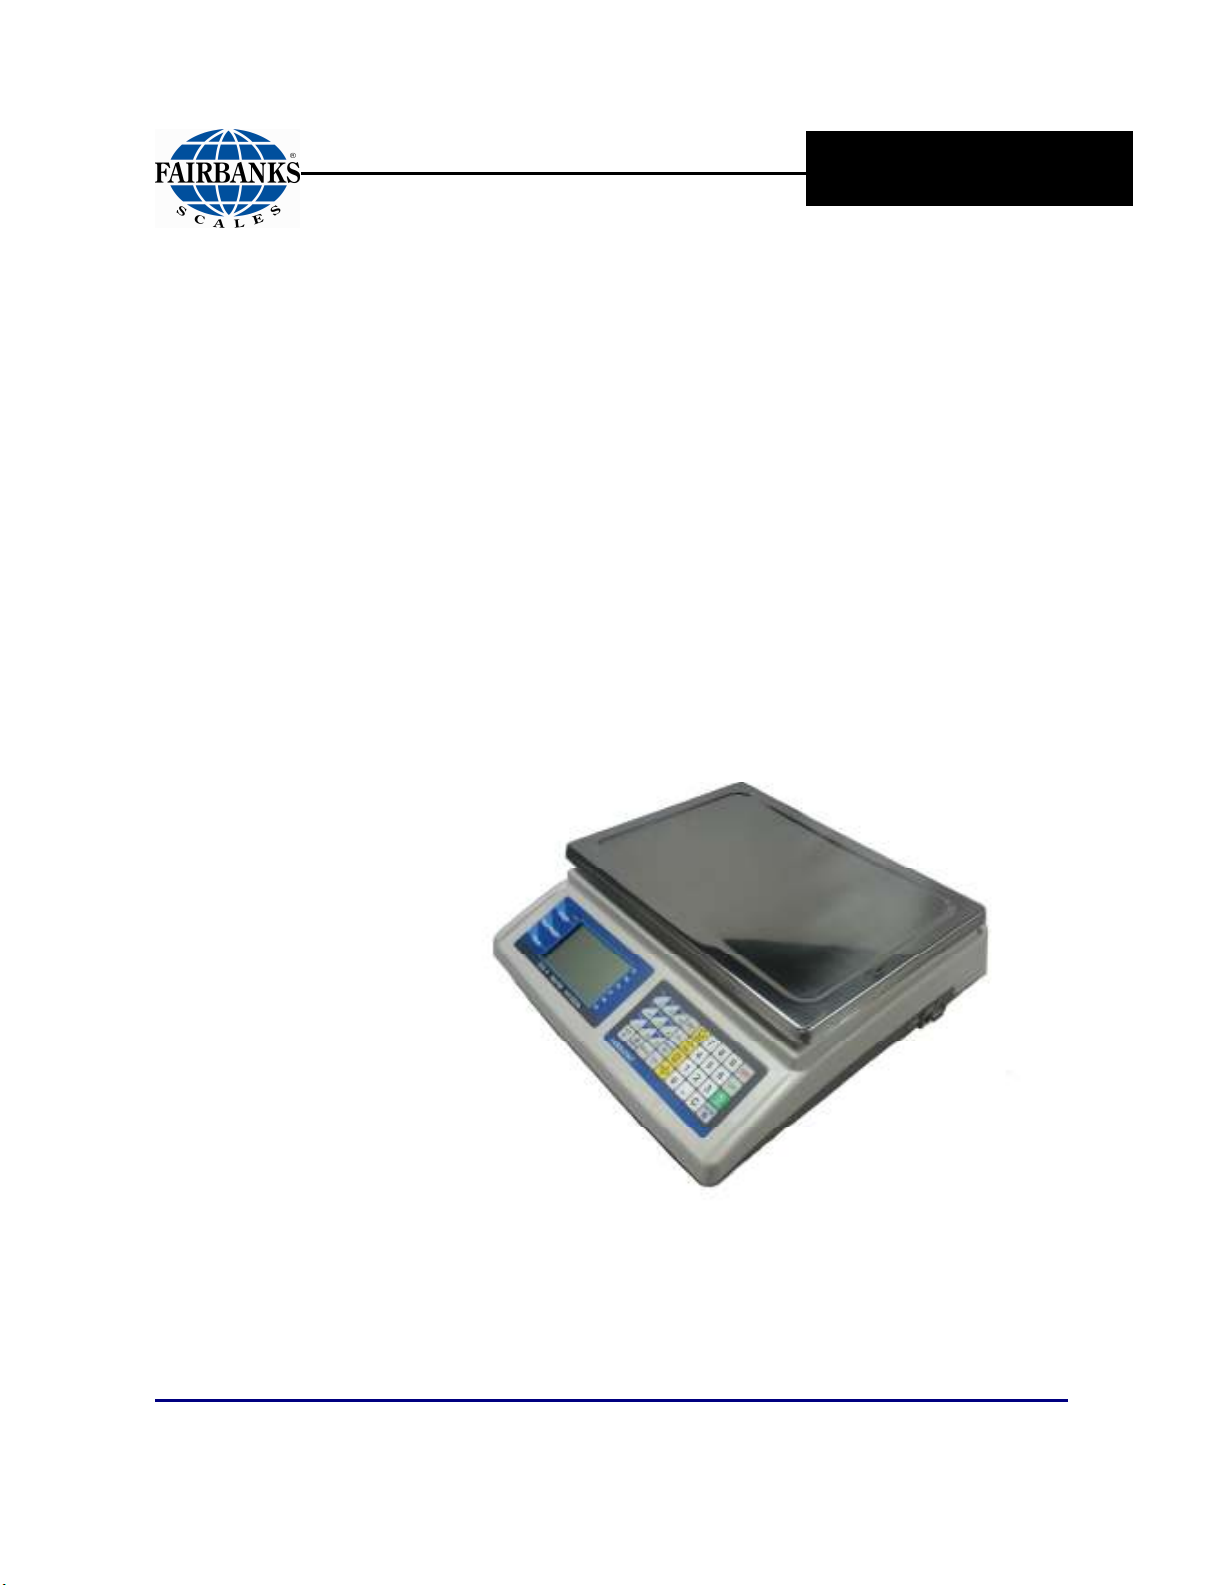
SECTION 1: GENERAL INFORMATION
1.1. INTRODUCTION
The Omega Counting Scale is designed for both light capacity weighing
applications and with a remote scale attached, applications up to 10,000 pounds.
It is also designed for quick accurate counting of large quantities of like objects.
1.2.DESCRIPTION
The self-contained, weighing platform and instrument, Omega Counting Scale is
designed in a rugged ABS plastic enclosure with a stainless steel weighing
platform, perfect for almost any counting scale application. The extremely large
9.64” x 13.97” weighing platform can easily accommodate most parts counting
needs. The Omega Counting Scale comes with a lead-acid rechargeable battery,
remote scale connection, and dual RS232C serial ports. Serial port 2 is
dedicated to barcode readers. Capacities range from 6 to 100 pounds.
1.3. TECHNICAL SPECIFICATIONS
1.3.1. BASIC SPECIFICATION
Digital Display
Platter Size (W x H) 9.64 x 13.97 in (245 x 355 mm)
Dimensions (W x L x H) 15.24 x 14.37 x 4.61 in (387 x 365 x 117 mm)
Net Weight(kg) 8.16 lbs (3.7 kg)
Operating
Temperature
Relative
Humidity
Power
LCD, height 0.6 in (14.5 mm)
6/7/7(Weight / Piece Weight / Total Pieces)
32˚F to +104˚F (0℃ to +40℃)
Less than 85%
9V / 500mA, AC adapter;
Built in 6V Rechargeable Battery
•15-20 hours continuous
•7-10 hours continuous with an external platform
•14-16 hours recharge time
Interface RS-232C, Serial 1 and Serial 2
04/13 7 51278 Rev. 2
Page 8
Section 1: General Information
1.3.2. OMEGA SERIES SCALE SPECIFICATIONS
Model Omega Counting Scales
Max.
Capacity
d =
6 lb /
3 kg
0.0002 lb /
0.1 g
15 lb /
6 kg
0.0005 lb /
0.2 g
30 lb /
15 kg
0.001 lb /
0.5 g
60 lb /
30 kg
0.002 lb /
1 g
100 lb /
50 kg
0.002 lb /
Accuracy 1/30000 1/30000 1/30000 1/30000 1/50000
1.4. ACCESSORIES
Product No. Description
31701 Bar code scanner (Symbol) with hands-free stand
31789 Dust cover (Qty. 5)
24482 2844 series label printer
1 g
20483 2844 printer cable (required when a 24482 printer is ordered.)
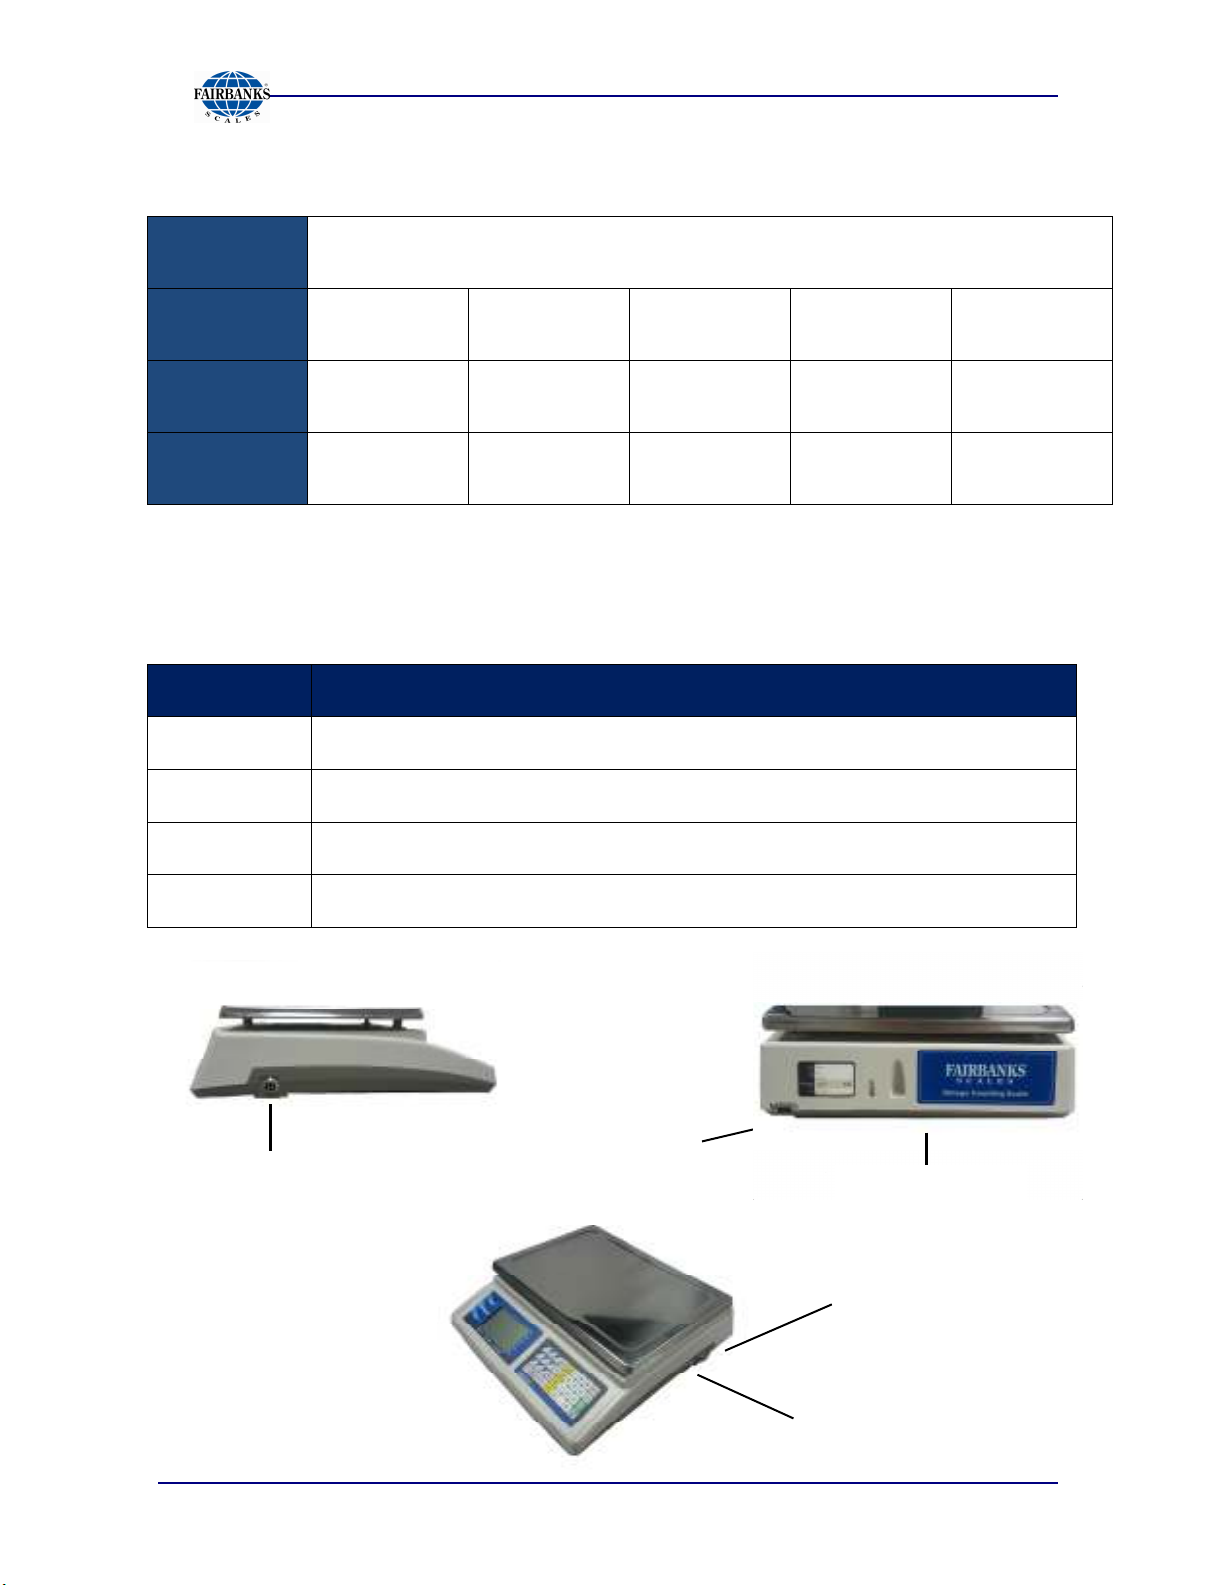
Serial 1
External Scale Input
Battery Access
Underneath
Serial 2
Power Connection
Underneath
04/13 8 51278 Rev. 2
Page 9
Section 2: Customer Information
2.1. USERS RESPONSIBILITY
It is the customer/operator's responsibility to ensure the equipment
provided by Fairbanks is operated within the parameters of the
equipment's specifications and protected from accidental or
malicious damage.
Absolutely NO physical, electrical or program modifications other
than selection of standard options and accessories can be made
by customers to this equipment
Repairs are performed by Fairbanks Scales Service Technicians
and Authorized Distributor Personnel ONLY!
Failure to comply with this policy voids all implied and/or written
warranties
W A R N I N G !
04/13 9 51278 Rev. 2
Page 10
Section 2: Company Service Information
IMPORTANT NOTICE
• All load cells, load cell cables and interconnecting cables used to connect all
scale components shall be located
distance away
electric current carrying conductors.
• This includes digital weight indicators, junction boxes, and
power supplies.
• This includes any peripheral devices, such as printers, remote
displays, and auxiliary data entry devices.
• Also included is 120 volt AC, 240 volt AC, 480 volt AC and
electric supply of higher voltage wiring runs and stations, AC
power transformers, overhead or buried cables, electric
distribution panels, electric motors, florescent and high intensity
lighting which utilize ballast assemblies, electric heating
equipment, traffic light wiring and power, and relay boxes.
from all single and multiple phase high energy circuits and
a minimum of thirty-six (36”) inches
• All scale components, including digital weight indicators and
peripheral devices are not designed to operate on internal
combustion engine driven electric generators and other similar equipment.
• Electric arc welding can severely damage scale components such as digital
weight indicators, junction boxes, power supplies, and load cells.
NOTE:
For additional information, please contact a
Fairbanks Scales Service
Representative.
04/13 10 51278 Rev. 2
Page 11

Section 3: Installation
3.1. PRE-INSTALLATION CHECKOUT
1. Check that all components and accessories are on hand, and agree with the your
order.
2. Remove all components from their packing material, checking to make certain that
all parts are accounted for and no parts are damaged. Advise the shipper
immediately, if damage has occurred. Order any parts necessary to replace those
which have been damaged. Keep the shipping container and packing material for
future use. Check the packing list.
3. Collect all necessary installation manuals or CD’s for the instrument and
accessories.
3.2. EQUIPMENT LOCATION
The Instrument should be positioned away from direct sunlight. Keep the scale
platform away from air drafts as this will effect the accuracy of the count and weight.
3.3. SAFETY
As is the case with any material handling equipment, certain safety precautions
should be observed during operation:
1. Never load the platform beyond its rated capacity. Refer to the rating on the
serial number plate if in doubt.
2. Ensure that any structure which supports the platform is capable of withstanding
the weight of the platform plus its rated capacity load.
3. Do not load the platform if there is any evidence of damage to the platform.
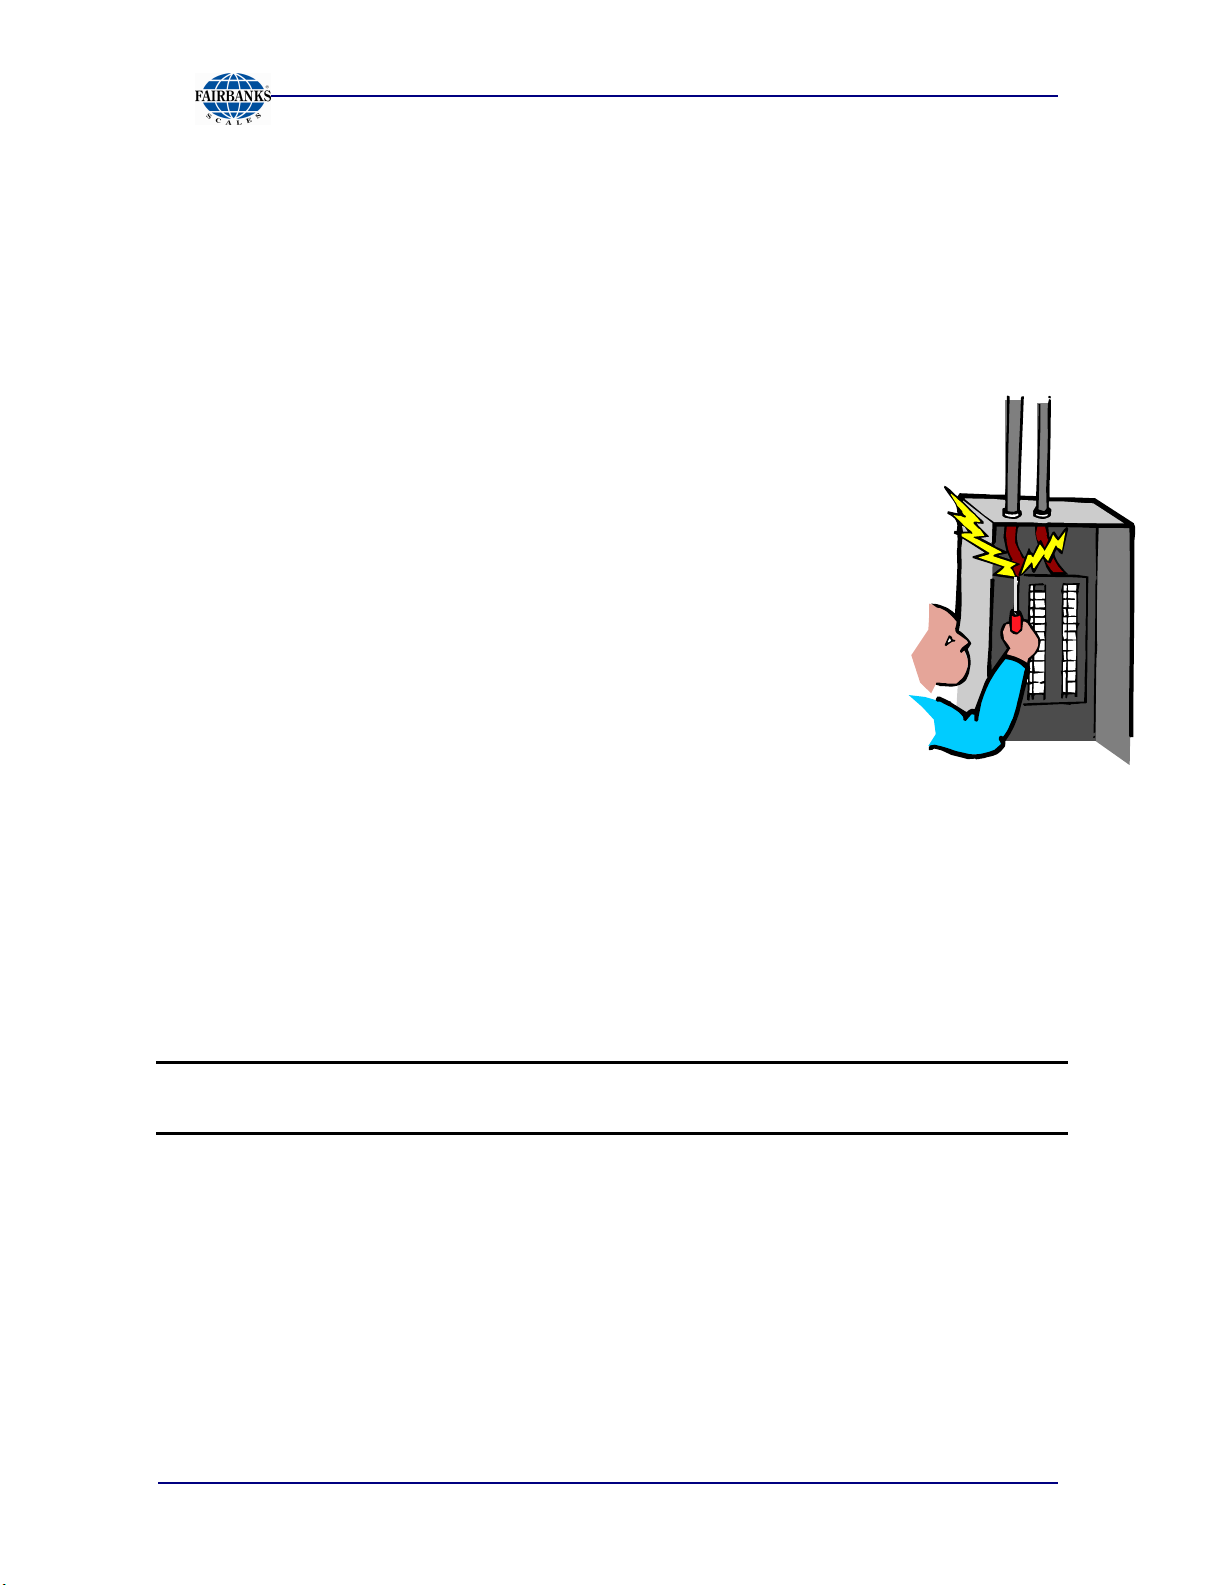
W A R N I N G !
Never perform any wiring with the instrument turned on!
Damage to system components can occur.
04/13 11 51278 Rev. 2
Page 12
1
2
3
11
4
5
7
8
9
10
Section 4: User Operations
4.1. INTRODUCTION
The Omega Series Counting Scale is a weighing device that displays the number of
similar items in a group based upon the weight of a known sample. The counting
feature of this scale calculates the average piece weight for the items by using the
total weight of the sample and dividing it by the number of items in the sample. Using
this average piece weight, the Omega Series Counting Scale will determine by
calculating the number of items in a group by dividing the total weight by the average
piece weight. All of these calculations are performed within the Omega Series
Counting Scale internal program application which is performed automatically during
the weighing process. The Omega Series Counting Scales provide a quick and
accurate count of large quantities of similar objects.
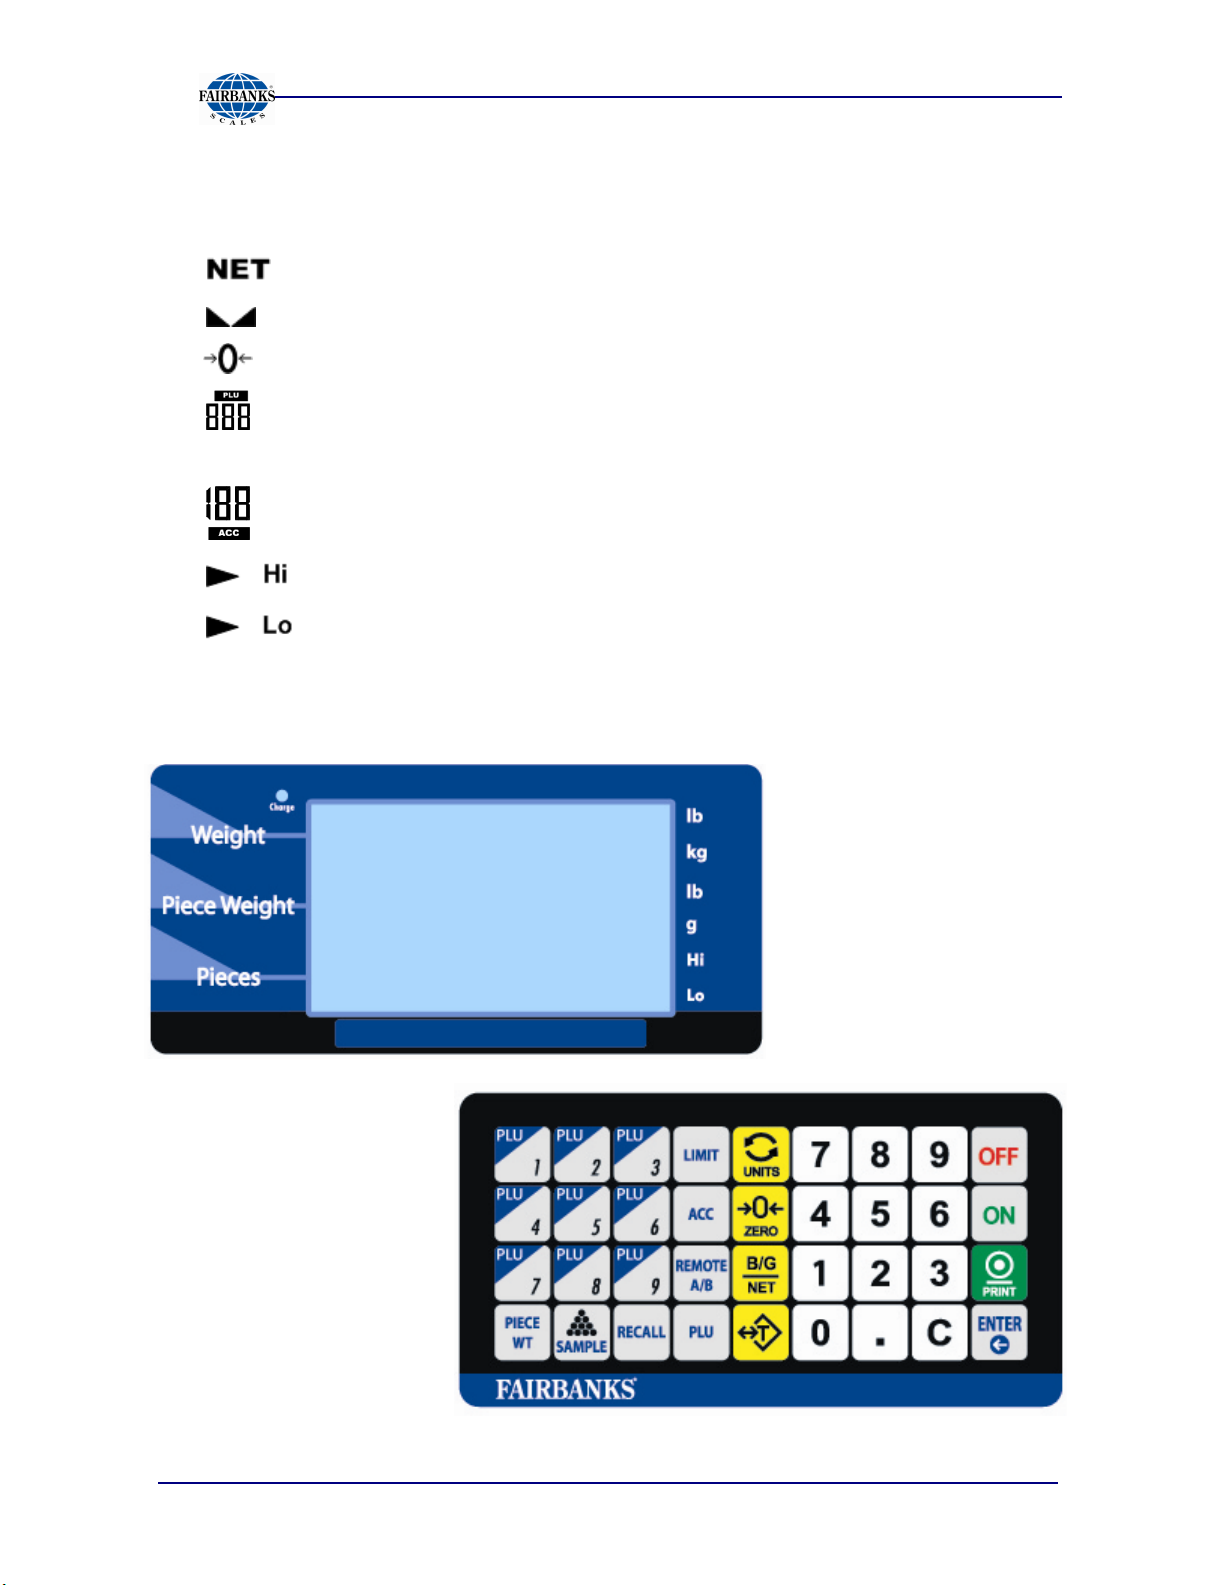
4.2. FRONT PANEL DISPLAY AND KEY FUNCTIONS
4.2.1. LCD DISPLAY
6
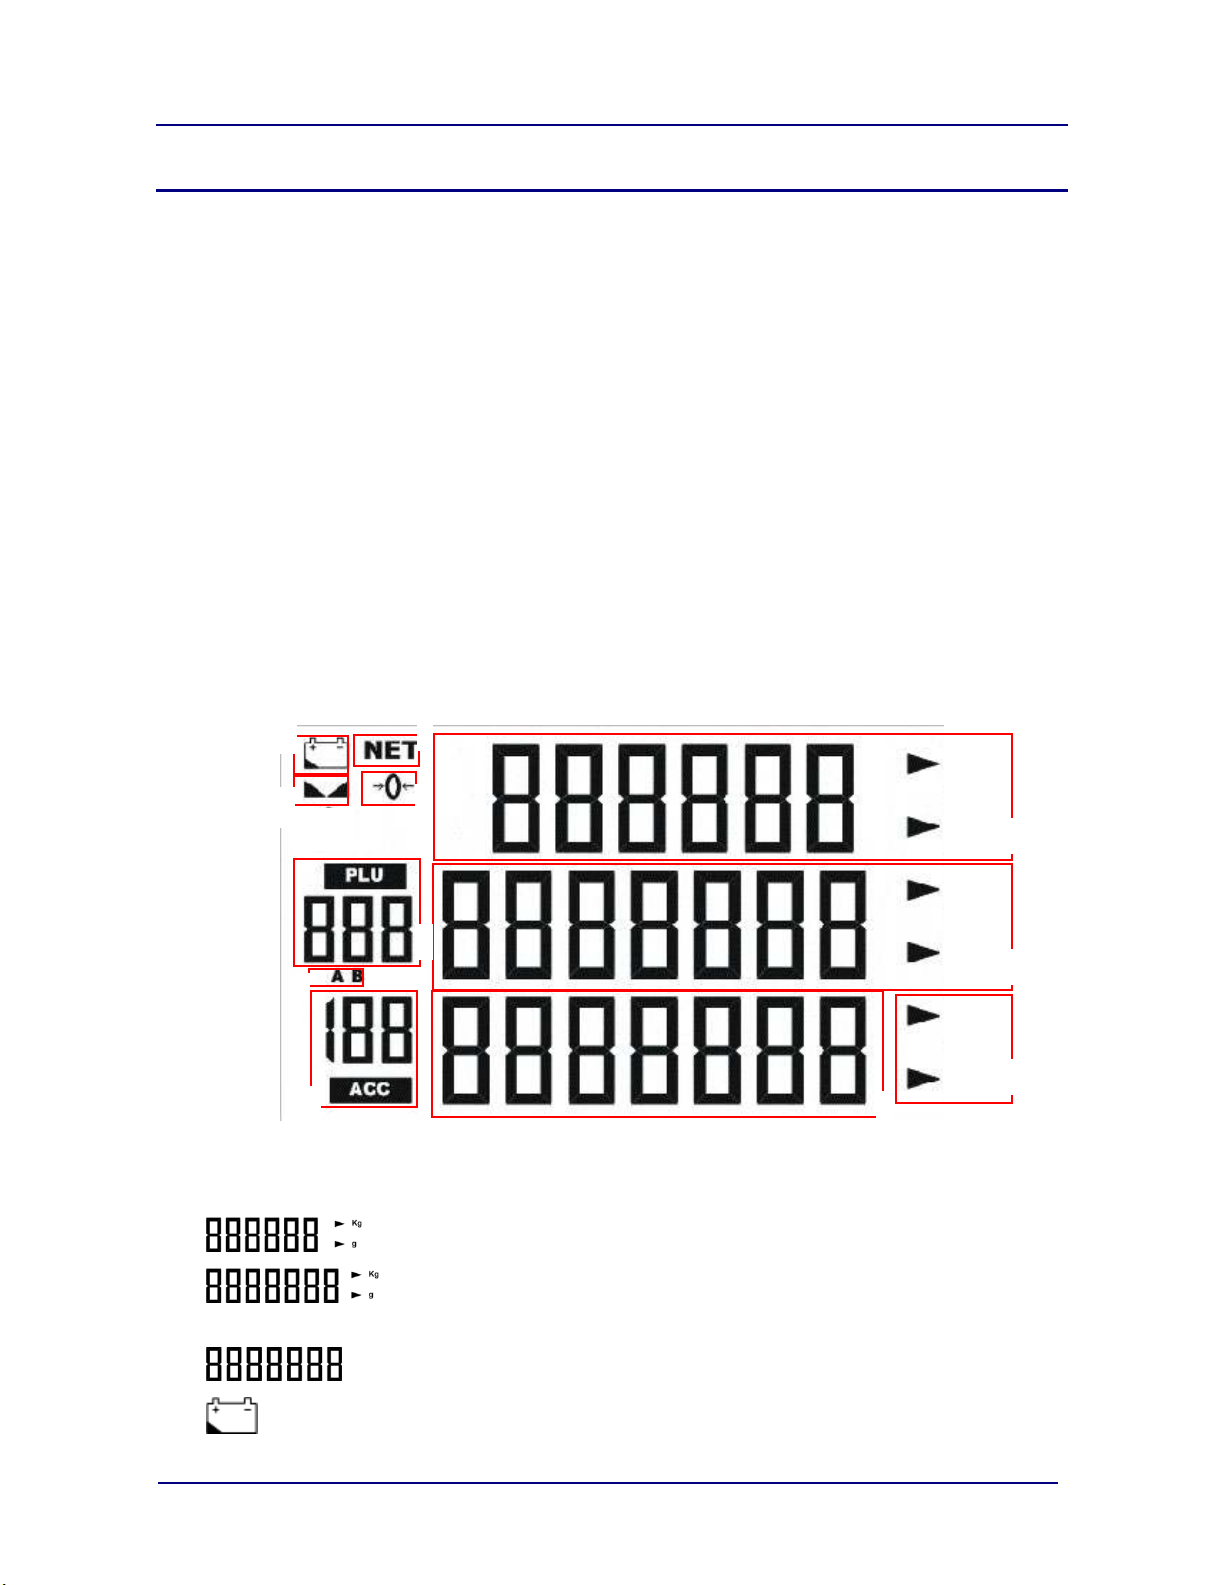
A. LCD DISPLAY DEFINITIONS
1. Actual Weight Display.
lb
kg
lb
g
Hi
Lo
2. Second row displays Piece Weight. Also used as keypad input
display.
3. The third row displays Piece Counts and abbreviated as PCS.
4. Indicates the battery power is low. A battery recharge or battery
replacement is required for further operation.
04/13 12 51278 Rev. 2
Page 13
Section 4: User Operations
A. LCD DISPLAY DEFINITIONS, CONTINUED
5. Indicates the first row displays the Net weight after tare operation.
6. Indicates the weight is stable.
7. Indicates the weight is at zero.
8. Displays the PLU number.
9. AB scale, Indicates the selected scale.
10. Displays the accumulated counting results in memory.
11. Indicates that the upper Limit of piece counts or weight is set.
Indicates that the lower Limit of piece counts or weight is set.
4.2.2. DISPLAY AND KEYPAD
04/13 13 51278 Rev. 2
Page 14
4.2.2. KEYPAD, continued
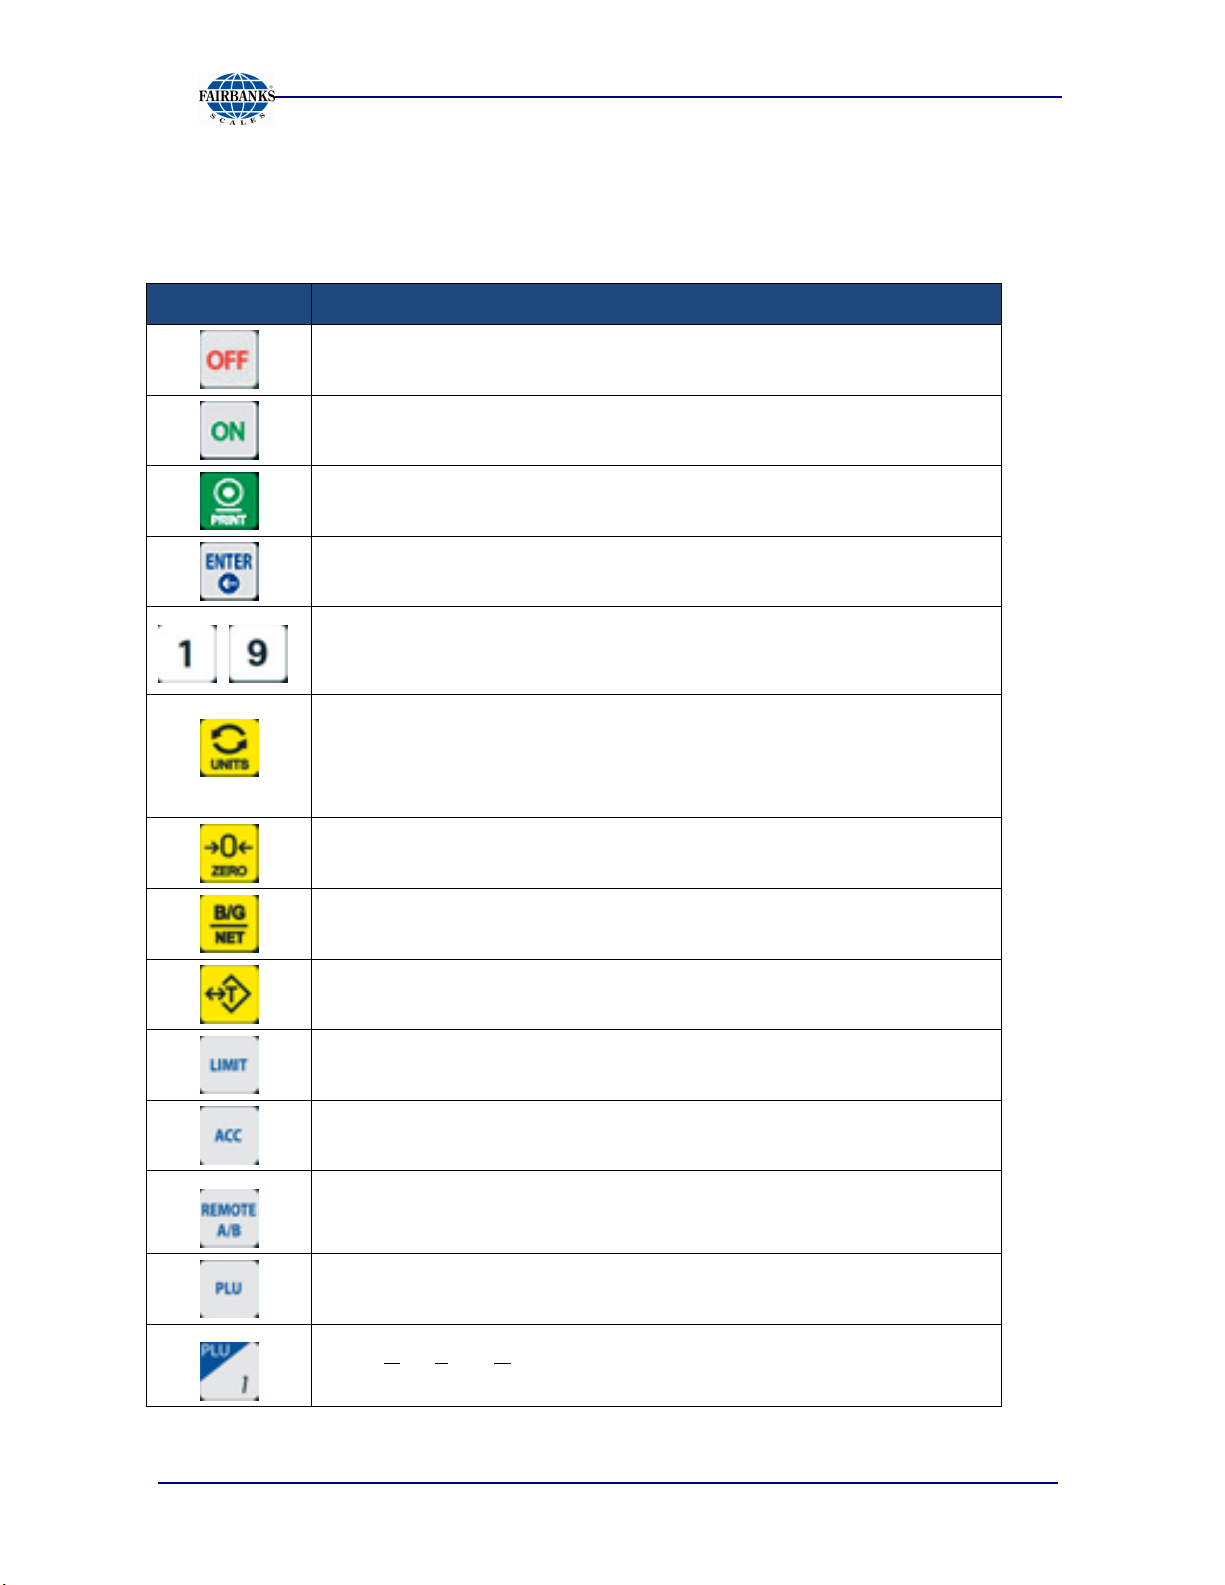
A. KEYPAD FUNCTIONS
Key Function
Press to switch the scale OFF.
Press to turn the scale ON.
Initiates a print cycle. Note: Internal Programming must be
~
activated.
Press to confirm entry or selection.
Press the numeric and decimal keys to input data such as
piece weight, PLU no., etc.
Section 4: User Operations
Press to change unit of measure. There are two units
selections available. Pound (lb) or Kilogram (kg). The current
unit selected is displayed on the right hand side of the actual
weight display.
Press to set the scale to zero.
Press to display select Gross Weight, Net Weight, or Tare
Weight.
Press to enter the actual weight as the tare.
Press to set the alarm for high and low limits for piece counts
and piece weights.
Press to add piece count and weight.
Press to switch operation between scale A (main scale) and
scale B (remote scale).
Press to store, load, or modify a preset piece weight.
PLU (Part Look Up) keys. Press to load preset piece weight
data from the nine (9) PLU keys.
04/13 14 51278 Rev. 2
Page 15
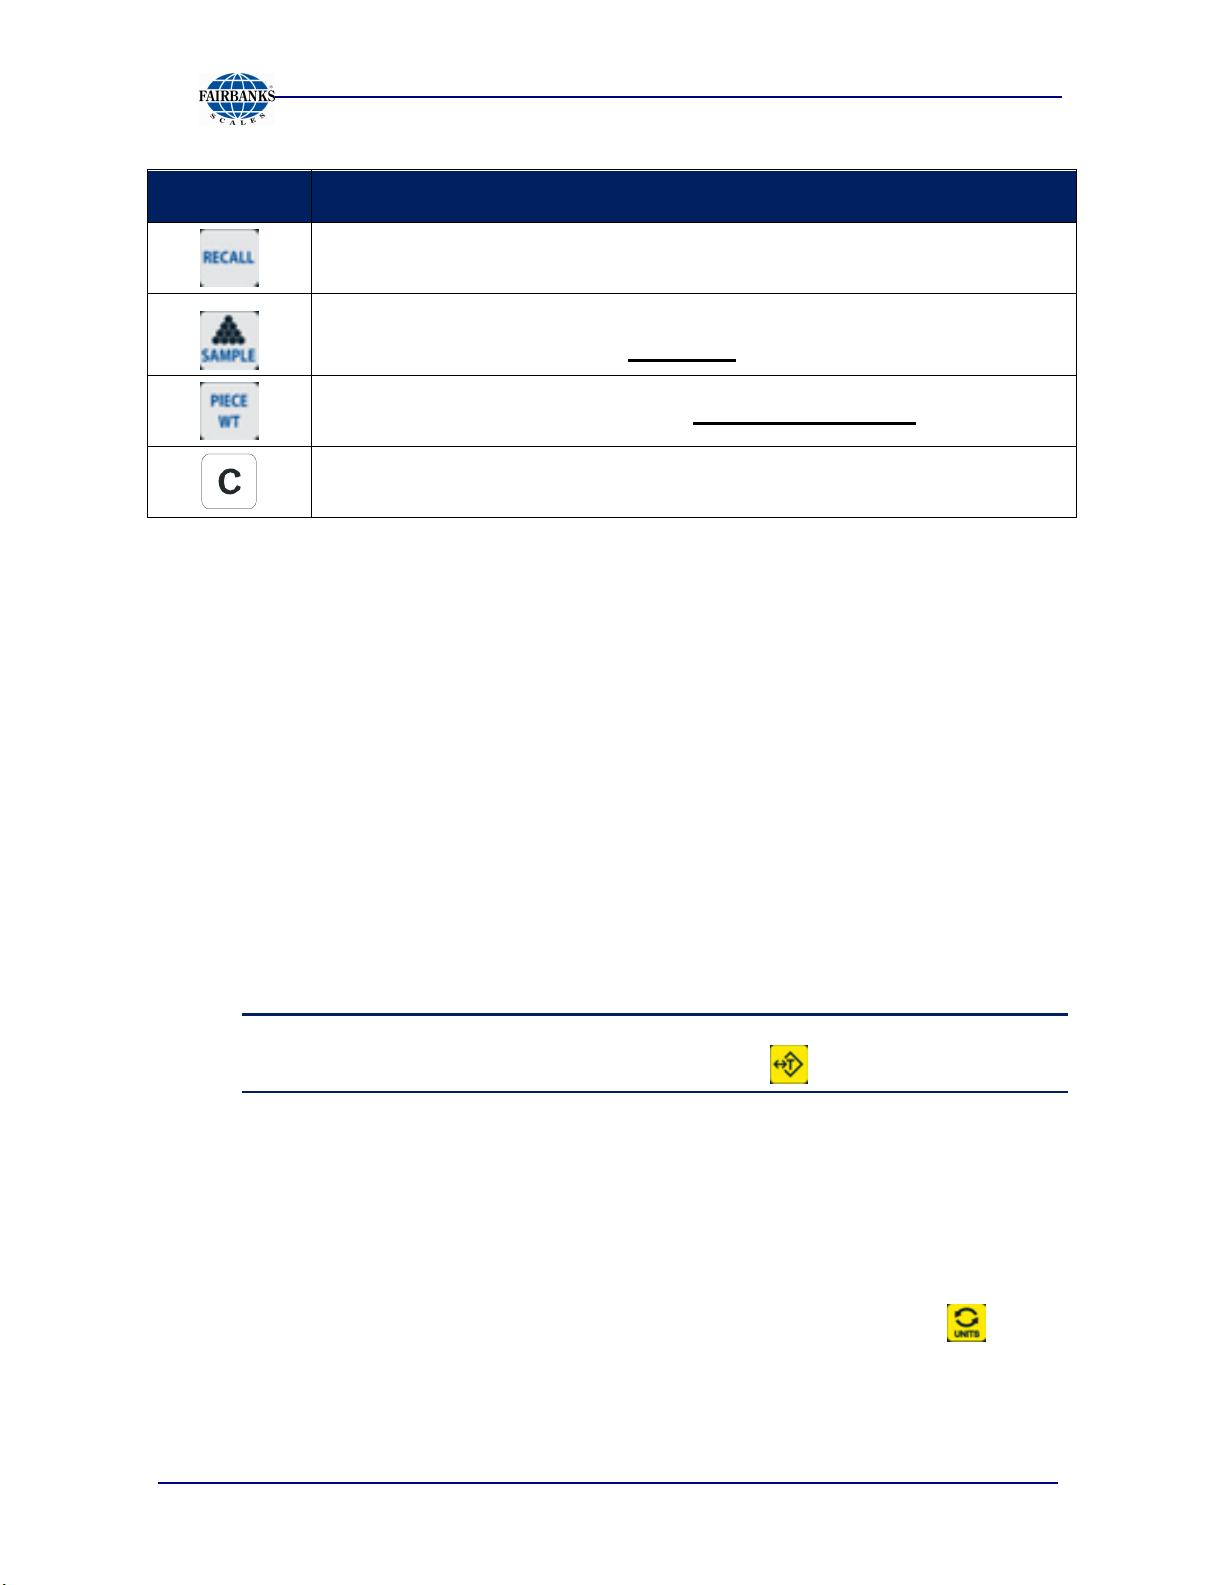
Key Function
Press to recall total piece count and total weight.
Press to set up sample quantity. (Sample key: multiple sampling
methods are available. (See Sampling.)
Press to set up piece weight. (See Piece Weight Setup.)
Clears the selected data entry.
4.3. BASIC OPERATIONAL FUNCTIONS
Section 4: User Operations
4.3.1. GENERAL WEIGHING
The Omega Series Counting Scale will perform general weighing and counting
functions.
1. Tare operation
Tare function is utilized when containers are used to hold the material. When
this function is activated, Omega Series Counting Scale will subtract the
container weight or Tare weight from the Gross weight and the end result will
be the Net weight of the material.
This function is an auto tare operation only.
The Tare function may be enabled or disabled through service programming.
Note:
Tare weight is cleared by pressing the Tare key. ( )
2. Alarm
The Alarm function provides a visual or audible indication of the count limit
and weight limit when they are near the preset limit values.
3. Unit
There are two (2) available weight units in the Omega Series scales, pound
(lb) and kilogram/ gram (kg / g). The operator uses the Units key ( ) to
switch between units.
4. External Scale
The Omega Series scales may be interfaced to one (1) external scale.
04/13 15 51278 Rev. 2
Page 16
4.3.2. COUNTING
The Omega Counting Scale can count item piece by weight. If the weight of
each item is known, the items are counted and numbered based upon the
weight upon the scale. For example, if total weight on the scale is 10
pounds, the piece weight of each item is 0.10 pounds. The scale will
perform an internal calculation and display 100 on the third pieces line of the
display.
There are two ways to set the piece weight. One is setup piece weight by
keypad input. The other is setup piece weight by sampling. (Reference
to Sample operation)
The ACC key on keypad is used to save current data. It provides a
convenient function to record the weight and piece data into memory. After
any record is saved, the scale weighing pan must be cleared to ensure
the weight is at zero for the next record.
4.3.3. PLU
Section 4: User Operations
PLU (Part Look Up) is a memory lookup number comprised of the Piece
Weight and Tare Weight. The scale can store up to 999 PLU’s into memory.
When you activate any PLU, the scale will replace the current Piece Weight
and Tare Weight with the PLU selected from memory.
4.4. TARE OPERATIONS
4.4.1. TARE ENTRY WITH A KNOWN WEIGHT
1. In the normal weighing mode, place the item to tare on the scale pan.
2. Press the key, and the tare weight has been stored.
3. is indicated on display.
Example::::
1. Place 1 lb on the scale weighing pan.
2. Press
changes to 0.
key
. is indicated on the display and the displayed weight
04/13 16 51278 Rev. 2
Page 17
Section 4: User Operations
Note:
The Tare weight cannot be set when the displayed weight is under or less than zero.
4.4.2. MANUAL TARE ENTRY VIA THE KEYPAD
1. In the normal weighing mode, press the numeric keys to input the tare weight. (If
the unit indicated is kg, the tare entry is in kg. If the unit indicated is lb, the tare
entry is in lb.)
2. Press , and the tare weight has been stored. (The Tare data will be cleared
in 10 seconds if is not pressed.)
3. is indicated on the display.
Example::::
1. Enters the tare weight as 0.5 lb.
2. Press
a minus (-) 0.5 lb.
key
. is indicated on the display and the weight will display
Note:
A tare weight cannot be entered which is greater than the scale capacity.
4.5. SAMPLING OPERATION
4.5.1. ENTER PIECE WEIGHT BY DIRECT KEYPAD INPUT
1. In the normal weighing mode, press the numeric and decimal keys ( , , )
to input the piece weight.
2. Press the PIECE WT key, and the piece weight has been stored. The piece
weight data will be cleared in 10 seconds if the PIECE WT key is not
pressed.
3. The piece weight may be cleared by pressing the key.
04/13 17 51278 Rev. 2
Page 18
Example::::
Section 4: User Operations
1. Press the
keys, to enter piece weight as 0.5 lb.
2. Press and 0.5 shows on the second line.
3. The piece weight may be cleared by pressing the key if an entry error
was made. Repeat the process to correct.
4.5.2. SETUP PIECE WEIGHT BY SAMPLING (QUICK SET)
1. Put certain pieces of objects onto the scale pan.
2. In weighing mode, press the numeric and decimal keys ( , , ) to enter
the piece count.
3. Press to calculate the piece weight. The input data will be cleared in 10
seconds if is not pressed.
4. The piece weight may be cleared by pressing the key.
Example::::
1. Place 1 lb on the scale weighing pan.
2. Press to set item number as 5. Its shows on the second line.
3. Press and the Omega Counting Scale will show the piece weight on the
second line and the item count on the third line.
4. The piece weight may be cleared by pressing the key if an entry error
was made. Repeat the process to correct.
4.5.3. SETUP PIECE WEIGHT BY SAMPLING (PLACE ITEM)
1. Make sure the piece weight is empty. The Omega Counting Scale will calculate
the piece weight by the weight added and piece count number as listed below.
2. Press , the second row of LCD shows and the third row of LCD
shows default value as 100.
3. Press the numeric and decimal keys to enter the new sampling quantity.
4. Place objects of desired piece counts on the weighing pan. The piece weight will
be calculated automatically in approximately 3 seconds or press the key
to calculate immediately.
04/13 18 51278 Rev. 2
Page 19
5. The piece weight may be cleared by pressing the key.
Example::::
1. Press to enter the sample mode.
2. Press to set the manual entered piece count number as 5. It is displayed
on the third line.
3. Place 1 lb on the scale weighing pan.
4. Wait 5 seconds after the weight is stable and the piece weight is displayed as
0.2 and the piece count is displayed as 5.
Section 4: User Operations
Note:
If weighing is performed on external scale, after the is pressed, the sampling job
will be continued on main scale automatically when auto switch is configured in the
scale counting parameter setting.
4.5.4. SETUP PIECE WEIGHT BY SAMPLING (REMOVE ITEM)
1. Make sure the piece weight on the display is zero.
2. Place a item on the weighing pan. The Omega Counting Scale will calculate the
piece weight based upon the change in weight..
3. Press , the second row of LCD displays and the third row of LCD
displays the default value as 100.
4. Press the numeric keys to enter the new sampling quantity.
5. Remove the items to obtain the desired piece counts value from the weighing
pan. The piece weight will be calculated automatically.
6. The piece weight may be cleared by pressing the key.
Example::::
1. Place 5 lbs on the scale weighing pan.
2. Press to into sample mode.
3. Press to set item number as 5. It is displayed on the third line.
4. Remove the 1 lb item on scale weighing pan.
5. Wait for 5 seconds after the weight is stable. The piece weight displays 0.2
and piece count displays 5
04/13 19 51278 Rev. 2
.
Page 20

Section 4: User Operations
Note:
If weighing is performed on external scale, after the is pressed, the sampling job
will be continued on main scale automatically when auto switch is configured in the
scale counting parameter setting.
4.5.5. SETUP PIECE WEIGHT BY SAMPLING (RE-SAMPLE)
If the piece weight and weight has not been cleared, you may add or remove weight
and press to calculate the piece weight again.
Example::::
1. Place 1 lb on the scale weighing pan.
2. Press to set the item number as 5. It is displayed on the second line.
3. Press and to display the piece weight on the second line and the piece
count on the third line.
4. Press again to use piece count number 5 to sample again.
4.5.6. AUTO RE-SAMPLE OPERATION
After a successful sampling operation, the scale will automatically sample again on
the main scale for any new small weight. Placing new weight onto the scale weighing
pan will automatically sample again.
Example::::
1. Press to into sample mode.
2. Press to set item number as 50. It is displayed on the third line.
3. Place 5 lb item on scale weighing pan.
4. Wait for 5 seconds until the weight stable. The piece weight displays 0.1 and
piece count displays 50.
5. Place 1 lb item on scale pan.
6. Upon a stable weight, the scale will re-sample.
Note:
The new small weight should be less than half of the sampling weight. The item
change must be greater than 5. If the weight change is larger than half of the
sampling weight, auto re-sample will stop.
04/13 20 51278 Rev. 2
Page 21

Note:
Auto Re-sample function can be disabled in Setup settings menu.
4.6. PLU (PART LOOK UP) OPERATION
PLU is a preset Piece Weight and Tare value. The scale can save up to 999
Section 4: User Operations
PLU items.
4.6.1. SETTING PLU
A. Steps in setting PLU keys 1~9
1.Set up piece weight as in Sampling Operation section 4.5.
2.Press , and
3.Select your desired PLU number from the direct PLU keys.
4.Press to save your setting. will stop flashing.
5.rEPLAC and YES is displayed. Press the key to accept the change
or press key to display rEPLAC and No. Press the key to
disregard the changes.
Example::::
will begin flashing.
1. Press to enter piece weight as 0.5 gram.
2. Press key, now is flashing on the display.
3. Press key, PLU indicator shows 3, and now flashing.
4. Press key, after the beep, the piece weight for PLU 3 is now set as 0.5
gram.
5. rEPLAC and YES is displayed. Press the key to accept the change or
press key to display rEPLAC and No. Press the key to disregard the
changes.
Note:
If there is no data input in 30 seconds, the scale will exit the PLU setting mode and
returns to the normal weighing mode.
04/13 21 51278 Rev. 2
Page 22

7.6.1. SETTING PLU, CONTINUED
B. Steps in setting PLU no.0~999
1. Set up the piece weight as in Sampling Operation section 4.5.
2. Press and will begin flashing on the display.
3. Press the numeric keys to select PLU number.
4. Press to save your setting, will stop flashing on the display.
5. rEPLAC and YES is displayed. Press the key to accept the change
or press key to display rEPLAC and No. Press the key to disregard
the changes.
Section 4: User Operations
Example::::
1. Press to enter piece weight as 0.5 gram.
2. Press key, now is flashing on the display.
3. Press key. PLU indicator shows 555, and is flashing.
4. Press key, after the beep, the piece weight for PLU 555 is stored as 0.5
gram.
5. rEPLAC and YES is displayed. Press the key to accept the change or
press key to display rEPLAC and No. Press the key to disregard the
changes.
Note:
If there is no data input in 30 seconds, the scale exits the PLU setting mode and
returns to normal weighing mode.
04/13 22 51278 Rev. 2
Page 23

4.6.2. LOADING PLU
A. Steps in loading PLU no.1-9
1. In weighing mode, press any key from the direct PLU keys to access the
PLU memory of the key’s lower-right set.
Example:
Section 4: User Operations
Press
indicator.
B. Steps in loading PLU no.0-999
1. In weighing mode, press and hold until it emits a double beep then
2. Use the numeric keys to input the desired PLU number and press to
Example:
1. Press and hold key until double beep.
2. PLU indicator shows 000. PLU indicator flashing now.
3. Press key. PLU indicator shows 555. PLU indicator flashing now.
4. The Piece Weight and Tare Weight of PLU 555 will load to OCS.
5. Press PLU key to complete PLU loading process.
one time, the 3rd PLU is loaded. The LCD shows 3 below the
release.
load the reference PLU.
Note:
If there is no data input in 30 seconds, scale exits the PLU setting mode and returns
to normal weighing mode.
4.6.3. MODIFY PLU
1. When is shown on the display, press and the piece weight starts
flashing.
2. Set up piece weight according to the previous section and press to save
your settings.
3. The Tare weight starts flashing.
4. Setup the Tare weight according to the previous section, if applicable, then press
.
04/13 23 51278 Rev. 2
Page 24

Section 4: User Operations
4.6.3. MODIFY PLU, continued
5. rEPLAC is displayed on the Piece Weight line making sure you want to overwrite
the previously stored value. Press key to change from Yes to No. Press the
key to overwrite.
Example:
1. Press key to access the third PLU.
2. Press key to access the PLU modify mode. Piece Weight is flashing
now.
3. Press key. The Piece Weight 0.5.
4. Press key..
5. Tare weight will blink.
6. Press .01234 keys.
7. Press key.
8. rEPLAC is displayed on the Piece Weight line and YES is displayed on the
Pieces line. Press the key to change from YES to no. YES saves the
changes into memory and no will not save the changes and will revert back to
previously store settings. Press the key to accept setting.
4.7. MORE OPERATIONS
4.7.1. ACCUMULATION
1. When there is a load on the scale weighing pan and piece weight has been
input.
2. Press key. When you hear a beep, lights up on the LCD,
indicating a data has been recorded.
3. Clear the load and put another load on the scale pan. Set up the piece
weight again.
4. Press key. After a beep sound, lights up, indicating second data
has been recorded.
04/13 24 51278 Rev. 2
Page 25

Section 4: User Operations
4.7.1. ACCUMULATION, CONTINUED
Example:
1. Clear scale weighing pan. Make sure the weight is 0. If weight is not 0, use
zero key to reset.
2. Press key to set Piece Weight as 0.5 pounds.
3. Put 1 pound item on scale weighing pan and waiting for stable.
4. Press key. After on beep sound, lights up.
5. Remove item on scale weighing pan. Make sure the weight is 0 again.
6. Press key to set Piece Weight as 0.1 pounds.
7. Put 2 pounds item on scale weighing pan and waiting for stable.
8. Press key. After on beep sound, lights up.
Note:
After each recording, if the load on the weighing pan is not cleared, pressing will
result in a long beep and the scale will not be able to record the next weighing result.
Note:
The stored memory can memorize up to 180 weighing results.
4.7.2. RECALL
A. Total mode
1. In weighing mode, press and the Weight column will be cleared. The
Piece Weight column displays .
2. The PCS column shows the total piece count in memory. The Weight
column shows the accumulated weight.
3. The number above “ACC” indicator is the record size.
4. Press to exit without clearing the data.
5. Press to clear the data and exit.
04/13 25 51278 Rev. 2
Page 26

Section 4: User Operations
A. Total mode, continued
Example:
1. Clear scale weighing pan. Make sure the weight is 0. If weight is not 0, use
zero key to reset.
2. Press key to set Piece Weight as 0.5 pounds.
3. Put 1 pound item on scale weighing pan and waiting for stable.
4. Press key. After on beep sound, lights up.
5. Press key to into total mode. The Weight shows 1 pound. The Piece
shows 2.
6. Press to back to normal mode. The ACC data still in flash, and still
lights up.
7. Press key to into total mode again.
8. Press to clear all flash and back to normal mode. The ACC data is clear,
and is gone.
B. Record view mode
1. Enter total mode in Total mode of Recall section 4.7.2.
2. Press to enter record view mode. You can review each record in
memory by pressing the to toggle through each of the stored
accumulations. If current record is the last record, it will return to total mode.
3. The number shown above the “ACC” indicates the number of current record.
Weight, Piece Weight and Piece is the data of current record.
4. Press to leave and back to normal mode.
5. Press to clear current record.
04/13 26 51278 Rev. 2
Page 27

Section 4: User Operations
B. Record view mode, continued
Example:
1. Clear scale weighing pan. Make sure the weight is 0. If weight is not 0, use
zero key to reset.
2. Press key to set Piece Weight as 0.5 pounds.
3. Put 1 pound item on the scale weighing pan and wait for a stable weight.
4. Press key. A beep soundwill occur and is illuminated.
5. Remove item on scale weighing pan. Make sure the weight is 0 again.
6. Press key to set Piece Weight as 0.1 pounds.
7. Put 2 pounds item on scale weighing pan and wait for a stable weight.
8. Press key. A beep sound will occur and is illuminated.
9. Press key to into total mode again.
10. Press key again to access the record view mode.
11. Press key to switch to the second record.
12. Because the second is the last record. Press key to return to the total
mode.
13. Press key to into record view mode again.
14. Press to return to normal weigh mode. The ACC data is still in memory,
and is illuminated.
15. Press key twice to access the record view again.
16. Press key to clear the first record. The display will show the next
record. (The first is removed. The second replaces first one. The number
above ACC remains at 1.)
17. Press key to clear again. The record is not stored. The scale returns to
the normal weighing mode.
04/13 27 51278 Rev. 2
Page 28

Section 4: User Operations
8.7.3. ALARM FUNCTION
A. Piece alarm
1. Press key. The PCS column displays .
2. The piece weight column shows the PCS Upper Limit setting. Configure
the PCS Upper Limit with the numeric keys.
3. Press key again. The PCS column displays . Configure the
PCS Lower Limit with the numeric keys.
4. Press will save the piece lower limit value and enter the weight alarm
mode.
Example:
1. Press key to enter the Piece Upper Limit setting. The PCS column
displays .
2. Input 20 to set the Piece Upper Limit as 20.
3. Press key to enter the Piece Lower Limit setting. The PCS column
displays .
4. Input 10 to set the Piece Lower Limit as 10.
5. Press three times to complete Piece alarm setting.
6. Press key to set Piece Weight as 0.5 pounds.
7. Place 1 pound on scale weighing pan. The Piece Weight shows 2, and
Lower Limit alarm is indicated. The Lower Limit indicator will be flashing. If
the Low Beep sound is enabled, it will sound an audible alarm also.
8. Place 11 pounds on scale weighing pan. The Piece Weight shows 22, and
Upper Limit alarm is indicated. The Upper Limit indicator will be flashing. If
the High Beep sound is enabled, it will sound an audible alarm also.
04/13 28 51278 Rev. 2
Page 29

Section 4: User Operations
B. Weight alarm
1. After the Piece alarm is configured, the scale will enter the Weight alarm
setting.
2. The PCS column displays . Set up the Weight Lower Limit
with the numeric keys. (If the unit is kg, this unit is in grams. If the unit is
lb, this unit is in lb)
3. Press key again, the PCS column displays . Set up the
Weight Lower Limit with the numeric keys. (If the unit is kg, this unit is in
grams. If the unit is lb, this unit is in lb)
4. Press key to save your settings and return to weighing mode.
Example:
1. Press key three times to enter Weight Upper Limit setting. The PCS
column displays
2. Input 10 to set Weight Upper Limit as 10.
3. Press key to enter Weight Lower Limit setting. The PCS column displays
4. Input 1 to set Weight Upper Limit as 2.
5. Press to complete Weight alarm setting.
6. Put 1 pound on scale weighing pan. The Lower Limit alarm is indicated.
(Lower Limit indicator begins flashing. If the Low Beep sound is enabled, it
will sound an audile alarm.)
7. Put 11 pounds on scale weighing pan. Upper Limit alarm is indicated. (Upper
Limit indicator begins flashing. If the High Beep sound is enabled, it will
sound an audible alarm.)
Note:
1. If the piece count exceeds the upper limit of PCS Upper Limit, or lower than the
PCS Lower Limit and it is not zero, the scale will continue to beep for a warning.
2. If the weight exceeds the upper limit of Weight Upper Limit, or lower than the
Weight Lower Limit and is not zero, the scale will continue to beep for a warning.
3. The beep settings are configured in he SEtUP menu.
04/13 29 51278 Rev. 2
Page 30

Section 4: User Operations
4.8. B SCALE SELECTION
1. Press to switch between main scale and the external scale.
2. The initial zero is the zero setup configured in the calibration procedure. It
means any loads on the weighing pan will exactly display after the scale
start.
Note:
If the Omega Counting Scale is connected to any new external scale, calibration
must be performed. This procedure is located in the Remote Scale Settings.
04/13 30 51278 Rev. 2
Page 31

Menu
Function
SEtUP
Prt
Con
-
F
rE.CAL
CAL
Section 5: Programming Configuration
5.1. INTRODUCTION
The Omega series scales are configured through internal programming parameters
and settings. Although accessible, the calibration parameters are restricted to
qualified service personnel. Changes to the calibration parameters will affect the
scales weighing and counting accuracy.
5.2. FACTORY DEFAULTS
The factory defaults are recommended to be loaded upon a first time installation or
instrument repair. To load the factory defaults, perform the following:
1. Press and hold any key (other than the On and Off keys) while powering on the
scale.
2.The display will indicate SEtUP
3.Press “1978” using the numeric keypad
4.The display will indicate SAvE, followed by a double beep, then the scale
will return to the weighing mode.
5.3. PROGRAMMING PARAMETERS
1. To access the programming parameters, press and hold any key while turning the
scale ON, SEtUP is shown on the display.
2. Press key to toggle among the SEtUP, Prt, Con-F, rE.CAL, and CAL menus.
Use the to enter selected menu.
General Settings menu.
Printing Settings menu.
Configuration Settings menu.
External Scale Settings menu.
Calibration menu
04/13 31 51278 Rev. 2
Page 32

Section 5: Programming Configuration
5.4. GENERAL SETTINGS (SET.UP)
In the General Settings menu, press to toggle among the options and to
confirm or save the selection.
1. SLEEP– Auto Off Setting
Display Descriptions
SLEEP no Disable auto shutdown function.
SLEEP 5 If there is no operation, the scale will shut down in 5 minutes.
SLEEP 10 If there is no operation, the scale will shut down in 10 minutes.
SLEEP 20 If there is no operation, the scale will shut down in 20 minutes.
SLEEP 30 If there is no operation, the scale will shut down in 30 minutes.
(Default)
SLEEP 60 If there is no operation, the scale will shut down in 60 minutes.
Note:
SLEEP will not start count down until the weight is at zero
.
Example:
1. Set SLEEP to 5.
2. Power up and verify weight is stable.
3. Use to reset the scale to zero.
4. Wait for 5 minutes. The Omega Counting Scale will shutdown automatically.
04/13 32 51278 Rev. 2
Page 33

Section 5: Programming Configuration
2. b. L - Backlight Setting
Display Descriptions
b.L no Disable the backlight function.
b.L YES Enable the backlight function.
b.L AUto Automatic backlight when there is load on the weighing pan.
(Default)
Example:
1. Set Backlight as YES.
2. Power up and reset the weight.
3. Backlight is enabled..
3. A.tArE - Tare Setting
Display Descriptions
A.tArE no Disable Tare operation
A.tArE YES Enable Tare operation. (Default)
Example:
1. Set A.tArE = YES.
2. Power up and place a 0.1 pound item on scale weighing pan.
3. Press key to perform a Tare Operation. The weight will change to zero,
and is displayed.
4. Cycle power to the scale and enter the setting again. Set A.tArE = no.
5. Press key to perform a Tare Operation. The scale will make a long beep
and no tare will be performed.
04/13 33 51278 Rev. 2
Page 34

Section 5: Programming Configuration
4. Hi.bP - High Beep Setting
Display Explanation
Hi.bP no Disable Hi alarm sound.
Hi.bP Short Set Hi alarm to sound as continual short beeps.
Hi.bP LonG Set Hi alarm to sound as continual long beeps. (Default)
Example:
1. Set Hi.bP = SHort.
2. Do the example in More Operations of Alarm function. The scale will emit
short beeps.
3. Cycle power to the scale and change the Hi.bP setting. Change the Hi.bP =
no.
4. Do the example in More Operations of Alarm function. The alarm indicator
will flash without any alarm sound.
5. Lo.bP – Low Beep Setting
Display Descriptions
Lo.bP oFF Disable Lo alarm sound.
Lo.bP SHort Sets Lo alarm to sound as continual short beeps. (Default)
Lo.bP LonG Sets Lo alarm to sound as continual long beeps.
Example:
1. Set Lo.bP = SHort.
2. Do the example in More Operations of Alarm function. The scale will emit
short beeps.
3. Cycle power to the scale and change the Lo.bP setting. Set the Lo.bP = no.
5. Do the example in More Operations of Alarm function. The alarm indicator
will flash without any alarm sound.
04/13 34 51278 Rev. 2
Page 35

Section 5: Programming Configuration
6. bEEP – Audible Keystroke Setting
Display Descriptions
bEEP no Turns the keystroke audible beep off
bEEP YES Turns the keystroke audible beep on. (Default)
Example:
1. Set bEEP = no.
2. Press the enter key, The scale will confirm without any sound.
3. Power cycle OCS and enter setting again. Set bEEP = YES.
4. Press the ENTER key, The scale will emit a short beep.
7. A.SLUtC – Auto Switching Setting (Scale A/B)
Display Descriptions
A.SLUtC no While sampling, do not switch from external scale to main scale.
A.SLUtC YES
While sampling, switch from external scale to main scale.
(Default)
Example:
1. Set A.SLUtC =YES. External scale must be calibrated before this is
performed.
2. Press to switch to external scale. The scale indicator will switch to the B
scale.
3. Press key to do sample process. The scale will switch to the Main Scale
and wait for a stable weight. Do not put the sampling item on the scale right
now.
4. After Main Scale has a stable weight and the ‘SANPLE’ is blinking on the
second row of the display, input on the desired sample count and place the
sample items on Main Scale pan. Wait for a stable weight again, and the
sampling operation is done.
5. After the Sampling operation complete, the scale will switch back to the
external scale.
6. Cycle power to the scale and enter to the A.SLUtC setting. Set A.SLUtC = no.
7. When the scale is ready, press to switch to the external scale.
8. Press key to perform a sample process. The scale will perform a
Sampling operation with the external scale.
04/13 35 51278 Rev. 2
Page 36

Section 5: Programming Configuration
8. rE.SAnP - Auto Re-sample Setting.
Display Descriptions
rE.SAnP no Disable auto re-sample operation.
rE.SAnP YES Enable auto re-sample operation. (Default)
Example:
1. Set rE.SAnP = YES.
2. Press to into sample mode.
3. Press to set the item number as 50. It is shown on the third line.
4. Place 5 lb item on scale weighing pan.
5. Wait for 5 seconds until the weight is stable. The piece weight shows 0.1 and
piece count shows 50.
6. Place 1 lb item on scale weighing pan.
7. At a stable weight, the scale will emit a short beep sound. Perform a resample once. The Piece Weight will update.
8. Cycle power to the scale and enter the rE.SAnP setting again, change the
rE.SAnP = no.
9. Repeat steps 2 to 6.
10. At a stable weight, the scale will continue normal operation without a resample
process occurring.
10. tiNE - Time Setting.
Display Descriptions
tiNe no Do not change time setting.
tiNe YES Change time setting.
Note:
The time setting parameter always reverts back to “no”. When “YES” is selected, the
following parameters are available YEAr, NontH, dAY, hour, Nin, and SEC.
04/13 36 51278 Rev. 2
Page 37

Display Descriptions
YEAr 0-99 Year setting
Display Descriptions
NOntH 1-12 Month setting.
Display Descriptions
dAY 1-31 Day setting.
Display Descriptions
Hour 0-23 Hour setting.
Display Descriptions
Section 5: Programming Configuration
Nin 0-59 Minute Setting.
Display Descriptions
SEC 0-59 Second setting.
Example:
1. Set tiNE = no and press enter.
2. The scale time setting is skipped.
3. Cycle power and set tinE = YES.
4. Enter the Year, Month, Day, Hour, Minute and Second values.
**This completes the General Settings (SEtUP). SAvE is displayed briefly before the
scale cycles power and returns to the weigh mode. **
04/13 37 51278 Rev. 2
Page 38

SEr.
1
SEr.1
Section 5: Programming Configuration
5.5. PRINT SETTINGS (PRT)
Press to toggle among the options, and press to confirm.
1. Serial 1 - Output Method Changes the method to initiate data information
output.
Display Descriptions
PrESS
SEr.1
Auto
SEr.1
rEn.dS
Poll
2. Serial 1 - Weight Output Change the weight output data of serial 1. Print
net only or print Gross, Tare, and Net.
Display Descriptions
SEr.1
Pr.nEt
nEt
Initiates data transmission when the PRINT key is pressed.
(Default)
Initiates data transmission when scale weight is stable.
Scale weight must return to zero before the next print will
occur.
Remote display Output. This programs the serial 1 output
as fixed remote display output which is configured using
19200 as baud rate, 8 characters, No parity, and 1 stop bit.
These settings cannot be changed.
Initiates data transmission when a <CR> is received
Outputs only the Net weight.
SEr.1
Pr.nEt
G.t.nEt
04/13 38 51278 Rev. 2
Outputs Gross, Tare, and Net weights. (Default)
Page 39

3. Serial 1 - Baud Rate Changes the baud rate of serial 1.
Display Descriptions
Section 5: Programming Configuration
SEr.1
bAUd
2400
SEr.1
bAUd
4800
SEr.1
bAUd
9600
SEr.1
bAUd
19200
Sets the baud rate to 2400
Sets the baud rate to 4800
Sets the baud rate to 9600. (Default)
Sets the baud rate to 19200
4. Serial 1 - Parity Changes the data transfer protocol of serial 1.
Display Descriptions
SEr.1
PArit
Sets the parity to 7-E-1
7-E-1
SEr.1
PArit
Sets the parity to 7-o-1
7-o-1
SEr.1
PArit
Sets the parity to 7-n-2
7-n-2
SEr.1
PArit
Sets the parity to 8-n-1. (Default)
8-n-1
04/13 39 51278 Rev. 2
Page 40

4. Serial 1 - Parity continued,
Display Descriptions
Section 5: Programming Configuration
SEr.1
Sets the parity to 8-E-1
PArit
8-E-1
SEr.1
Sets the parity to 8-o-1
PArit
8-o-1
SEr.1
Sets the parity to 7-o-2
PArit
7-o-2
Example:
To print net weight only:
1. Open a hyper terminal session and set connection as 9600 8-n-1.
2. Set Serial 1 as PrESS, weight output as print net, baud rate as 9600 and
parity as 8-n-1, and others parameters are set to No.
3. After the scale boot, press the key. Data on Hyper terminal will show:
0.0000 lb NT
4. Cycle power to the scale and change serial 1 settings to Auto. Change the
weight output to print Gross, Tare and Net. Change the baud rate to 19200
and parity as 7-n-2 , and all others parameters are set to No.
5. Close hyper terminal and modify its connection as 19200 7-n-2.
6. After the scale reboot, put 1 pound item on scale pan.
7. The scale will output data when the weight is stable. The Data output will be
as show below:
1.0000 lb GR
0.0000 lb TA
1.0000 lb NT
04/13 40 51278 Rev. 2
Page 41

5. Serial 1 – Weight Print
Display Descriptions
Section 5: Programming Configuration
SEr.1
LUGT
Data prints without weight information.
no
SEr.1
LUGT
Data prints with weight information. (Default)
YES
6. Serial 1 - PLU Print
Display Descriptions
SEr.1
PLU
Data prints without PLU information. (Default)
no
SEr.1
PLU
Data prints with PLU information.
YES
7. Serial 1 - Time and Date Print
Display Descriptions
SEr.1
tidt
Data prints without time and data. (Default)
no
SEr.1
tidt
Data prints time and date.
YES
8. Serial 1 - Pieces Information Print
Display Descriptions
SEr.1
PCS
The data printed out without PCS information. (Default)
no
SEr.1
PCS
The data printed out with PCS information.
YES
04/13 41 51278 Rev. 2
Page 42

9. Serial 1 - Piece Weight Print
Display Descriptions
Section 5: Programming Configuration
SEr.1
PC.LUGt
Data prints without the Piece weight. (Default)
no
SEr.1
PC.LUGt
Data prints with the Piece weight.
YES
10. Serial 1 - Accumulation Information Print
Display Descriptions
SEr.1
ACC
Data prints without the total number of accumulations.
(Default)
no
SEr.1
ACC
Data prints with the total number of accumulations.
YES
11. Serial 1 – Pieces Accumulation
Display Descriptions
SEr.1
PCS ACC
Data prints without the total number of pieces
accumulated. (Default)
no
SEr.1
PCS ACC
Data prints with the total number of pieces accumulated.
YES
04/13 42 51278 Rev. 2
Page 43

12. Serial 1 - Accumulation Weight Information Print
Display Descriptions
Section 5: Programming Configuration
SEr.1
ACC.LUGt
Data prints without the total accumulated weight. (Default)
no
SEr.1
ACC.LUGt
Data prints with the total accumulated weight.
YES
Example 1:
1. Open a hyper terminal session and connect at 9600 8-n-1.
2. Set Serial 1 to PrESS, weight output using print net. Set the baud rate to
9600, 8 characters, No parity, and 1 stop bit.
3. Set PLU = YES, Time and date = no, Piece information = YES, Piece
Weight = no, Accumulation information = YES, and Accumulation Weight
= no.
4. Press to set Piece Weight as 0.001 lb.
5. Press to store current data in PLU 1.
6. Put 1 pound item on scale weighing pan.
7. Press to record 1 Accumulation data.
8. Press the key. The data output is shown below:
1.0000 lb NT
PLU 1
1000 PCS
1 ACC#
04/13 43 51278 Rev. 2
Page 44

Section 5: Programming Configuration
Example 2:
1. Open a hyper terminal session and connect at 9600 8-n-1.
2. Set Serial 1 to PrESS, weight output using print net. Set the baud rate to
9600, 8 characters, No parity, and 1 stop bit.
3. Set PLU = no, Time and date = YES, Piece information = no, Piece Weight
= YES, Accumulation information = YES, and Accumulation Weight =
YES.
4. Press to set Piece Weight as 0.001 lb.
5. Press to store the current data in PLU 1.
6. Place a 1 pound item on scale weighing pan.
7. Press to record 1 Accumulation data.
8. Press the key. The data output is shown below:
1.0000 lb NT
0.001 lb PW
1.0000 lb NT ACC
05:40 PM
01/01/2010
Example 3:
1. Open a hyper terminal session and connect at 9600 8-n-1.
2. Set Serial 1 to PrESS, weight output using print net. Set the baud rate to
9600, 8 characters, No parity, and 1 stop bit.
3. Set PLU = Yes, Time and date = YES, Piece information = no, Piece
Weight = YES, Accumulation information = no, and Accumulation Weight
= no.
4. Press to set Piece Weight as 0.001 lb.
5. Press to store current data in PLU 1.
6. Place a 1 pound item on scale weighing pan.
7. Press to record 1 Accumulation data.
8. Press the key. The data output is shown below:
PLU 1
1000 PCS
0.001 lb PW
05:43 PM
01/01/2010
04/13 44 51278 Rev. 2
Page 45

Section 5: Programming Configuration
13. Serial 2 - Setting
Display Descriptions
SEr.2 no Serial 2 setting is disabled. (Default)
SEr.2 rEAdEr Enable serial port 2 for a barcode reader.
14. Serial 2 - Baud Rate
Display Descriptions
SEr.2
bAUd
2400
SEr.2
bAUd
4800
SEr.2
bAUd
9600
SEr.2
bAUd
19200
Sets the baud rate to 2400.
Sets the baud rate to 4800.
Sets the baud rate to 9600. (Default)
Sets the baud rate to 19200.
04/13 45 51278 Rev. 2
Page 46

15. Serial 2 - Parity
Display Descriptions
Section 5: Programming Configuration
SEr.2
PArit
7-E-1
SEr.2
PArit
7-o-1
SEr.2
PArit
7-n-2
SEr.2
PArit
8-n-1
SEr.2
PArit
Sets the parity to 7-E-1
Sets the parity to 7-o-1
Sets the parity to 7-n-2
Sets the parity to 8-n-1. (Default)
Sets the parity to 8-E-1.
8-E-1
SEr.2
PArit
8-o-1
SEr.2
PArit
7-o-2
Sets the parity to 8-o-1.
Sets the parity to 7o-1.
04/13 46 51278 Rev. 2
Page 47

15. Serial 2 – Parity, continued
Example:
1. Connect to barcode reader.
Section 5: Programming Configuration
2. Scan barcode below:
3. The unit will be set as lb, and Piece Weight will be set as 0.000271.
**This completes the Print Settings (Prt). SAvE is displayed briefly before the scale
cycles power and returns to the weigh mode.**
5.6. CONFIGURATION (CON-F)
Press to browse the menu options. Use the numeric keys to input data and
press to save your settings.
A. Basic Unit
Set the basic unit of scale. User can change the output unit by key, but
scale will be calibrated by basic unit.
Display Descriptions
Set basic unit to lb. (Default)
P.Unit
P.Unit
Note:
If this setting is changed, the scale will advance to the calibration procedure.
Annunciators on the right side of the display indicate the
current setting.
Set basic unit to kg.
Annunciators on the right side of the display indicate the
current setting.
04/13 47 51278 Rev. 2
Page 48

Section 5: Programming Configuration
B. Zero tracking
Sets the zero tracking by number of divisions.
Display Descriptions
trAcE no Zero tracking disabled.
trAcE 0.5d Zero tracking enabled, tracking set to 0.5d
trAcE 1d Zero tracking enabled, tracking set to 1d. (Default)
trAcE 2d Zero tracking enabled, tracking set to 2d
trAcE 3d Zero tracking enabled, tracking set to 3d
C. Display Tolerance
Sets the display tolerance or motion detection value.
Display Descriptions
no.dEt no
no.dEt 0.5d
no.dEt 1d
no.dEt 2d
no.dEt 3d
Display tolerance is disabled.
Display tolerance is 0.5d. If the weight changes are under
0.5d, the display will not update and motion is not indicated.
Display tolerance is 1d. If the weight changes are under 1d,
the display will not update and motion is not indicated.
Display tolerance is 2d. If the weight changes are under 2d,
the display will not update and motion is not indicated.
Display tolerance is 3d. If the weight changes are under 3d,
the display will not update and motion is not indicated.
04/13 48 51278 Rev. 2
Page 49

D. Zero range
Display Descriptions
Section 5: Programming Configuration
rAnGE 2
rAnGE 100
Scale zero range. If the weight is higher than 2% of the scale’s
capacity, the scale cannot be zeroed.
Scale zero range. If the weight is higher than 100% of the
scale’s capacity, the scale cannot be zeroed.
Note:
The Zero rAnGE setting cannot make the scale exceed its rated capacity. For
example, if a 6 lb scale zeroes off a 3 lb weight, the amount of weight applied to the
scale cannot exceed 3 lb before the scale reaches its maximum rated capacity.
Example:
1. Set Zero range as 2.
2. Place a 1 pounds item on scale weighing pan.
3. Press key to set current weight to zero. The scale will emit an error beep
(long beep) and show Error on the display.
4. Cycle power to the scale and enter the rAnGE setting menu.
5. Set Zero range to 100.
6. Press key to set current weight to zero. Scale will set the current weight to
zero. The weight display should indicate 0.
04/13 49 51278 Rev. 2
Page 50

Section 5: Programming Configuration
E. Filter
The digital filter will assist in minimizing undesirable effects of elements such as
vibration and air movement upon the scale weighing pan.
Display Descriptions
FLtr 2
FLtr 4
FLtr 8
FLtr 16
FLtr 32
Filter set to 2 A/D updates a second.
Light filtering
Filter set to 4 A/D updates a second. (Default)
Light – Medium filtering
Filter set to 8 A/D updates a second.
Medium filtering
Filter set to 16 A/D updates a second.
Medium-Heavy filtering
Filter set to 32 A/D updates a second.
Heavy filtering
F. Sample Piece Default
This setting allows the default sample size to be changed.
Display Descriptions
SAndEF 10 Sets the default sample size to 10 pieces.
SAndEF 25 Sets the default sample size to 50 pieces.
SAndEF 50 Sets the default sample size to 50 pieces.
SAndEF 100 Sets the default sample size to 100 pieces. (Factory Default)
04/13 50 51278 Rev. 2
Page 51

Section 6: Calibration
Contact your authorized Fairbanks service representative for calibration and service
adjustments.
04/13 51 51278 Rev. 2
Page 52

Section 7: Serial Input / Output
7.1. INTRODUCTION
The Omega Series Scale has two RS232C ports, Serial 1 and Serial 2. Serial 1 is
dedicated for use with printers and Serial 2 is strictly for scanner/readers to input data
into the Omega Scale. Serial 1 is located on the rear panel and Serial 2 is located on
the right side panel.
7.2. 2844 PRINTER SETUP AND PROGRAMMING
The Omega Series scale in conjunction with the 2844 label printer provide templates
as a solution to our customers’ label printing needs and label printing requirements.
Please consult with your authorized Fairbanks representative for setup and
programming.
7.3. SETTINGS FOR THE OMEGA COUNTING SCALE
7.3.1. CABLE REQUIREMENT
Use cable part number 20483 M-F Null modem cable for the printer interface
cable.
7.3.2. OMEGA SERIES LABEL SELECTION PROGRAMMING
A. OMEGASETTINGS FOR ALL PRINTERS
PRT
Ser.1 = PrESS
bAUd = 9600
PArit = 8-n-1
04/13 52 51278 Rev. 2
Page 53

Section 7: Serial Input / Output
7.3.3. OMEGA PROGRAMMING TO PRODUCE SPECIFIC LABEL FORMATS
A. Label 1
Pr.nEt = nEt
PLU = YES
tidt = no
PCS = no
PCLUGt = no
ACC = YES
PCS.ACC = YES
ACC.LUGt = YES
LABEL 1
B. Label 2
Pr.nEt = G.t.nEt
PLU = YES
tidt = no
PCS = YES
PCLUGt = YES
ACC = no
PCS.ACC = no
ACC.LUGt = no
LABEL 2
04/13 53 51278 Rev. 2
Page 54

Section 7: Serial Input / Output
7.3.3. OMEGA PROGRAMMING TO PRODUCE SPECIFIC LABEL FORMATS, continued
C. Label 3
Pr.nEt = nEt
PLU = YES
tidt = no
PCS = YES
PCLUGt = YES
ACC = no
PCS.ACC = no
ACC.LUGt = no
LABEL 3
7.4. SCANNER/READER SETUP
1. Attach the interface cable to the hand held scanner/reader. See below.
2. Connect the interface cable to Serial 2 on the right hand side panel of the OCS.
3. Connect the AC adapter to the bar code scanner.
4. Enable Serial 2 in the OCS for scanner/readers by selecting YES.
5. Use the color Quick Start Guide that accompanies the scanner and perform the
following steps:
a. Scan the “Return to Factory Defaults” bar code on the Quick Start Guide.
b. Scan the “Standard RS-232” bar code in Step 3 of the bar code scanner
instructions.
c. Scan bar codes 1, 2 and 3 in the Add An Enter Key of the bar code scanner
instructions.
d. Scanner programming is complete. If you do not successfully complete each
of these steps, start the entire scanning process from the beginning.
DO NOT discard this sheet. It must be used to setup and configure the
scanner/reader.
04/13 54 51278 Rev. 2
Page 55

Section 7: Serial Input / Output
04/13 55 51278 Rev. 2
Page 56

Section 8: Service & Maintenance
8.1. BASIC CLEANING
The Omega Series scales may be cleaned with a damp cloth and mild detergent. Do
not use chemical cleaners or abrasive type scouring pads.
8.2. TROUBLESHOOTING
8.2.1. ERROR CODE LIST
Error Description
OL1 Weight on the main scale is larger than the maximum scale capacity.
OL2 Weight on the external scale is larger than the maximum scale capacity
range.
UL1 Weight on the main scale is out of range below the zero reference.
UL2 Weight on the external scale is out of range below the zero reference.
Error1 Key input error.
Error2 Zero range exceeds the permissible range.
Error3 The scale weight is unstable within the system time limit constraint.
Error203 Unrecognized barcode. Data not stored in Omega database.
LobAtt Battery voltage is < 4.59Vdc. Recharge the battery.
rEPLAC Prompt asking user to override existing information.
04/13 56 51278 Rev. 2
Page 57

1 4
2 3
Appendix I: External Scale Connection (Male)
Instrument Connector
PIN DESCRIPTION
1 EXC+
2 EXC-
3 SIG+
4 SIG-
04/13 57 51278 Rev. 2
Page 58

APPENDIX II: RS232C Connection:DB9 (Male)
Pin Description
1 DCD
2 Rx
3 Tx
4 DTR
5 Gnd
6 DSR
7 RTS
8 CTS
9 RI
04/13 58 51278 Rev. 2
Page 59

APPENDIX III: Data Output
1. BI-DIRECTIONAL RS232C SETTING
This section is applicable only for models with RS-232C module.
A. OUTPUT FORMAT
18.143 kg GR (See Serial 1 weight output of Print Settings)
0.000 kg TA (See Serial 1 weight output of Print Settings)
18.143 kg NT
PLU 1 (Reference to PLU print of Print Settings)
80 PCS (Reference to Piece Information print of Print Settings)
0.226796 kg PW (Reference to Piece Weight print of Print Settings)
2 ACC# (Reference to Accumulation Information print of Print Settings)
27.216 kg NT ACC (Reference to Accumulation Weight Information print of Print
Settings)
17:33 PM (Reference to Time and data print of Print Settings)
01/01/2010 (Reference to Time and data print of Print Settings)
04/13 59 51278 Rev. 2
Page 60

B. INPUT COMMANDS FORMAT
The scale can be controlled with the following commands.
Input Commands:
All commands are terminated by a carriage return (Enter button on PC
keyboard) with line feed (if necessary).
If an illegal command is received or a command cannot be carried out ,
repeat the command with an addition of the word Error in front of the
command request. For example if the command is Test<CR><LF> then
send back Error Test<CR><LF>.
Basic Commands:
CW Print the current net weight.
M+ Store current results into accumulation memory.
Appendix III: Data Output
MC Clear the accumulation memory.
MR Recall the accumulation memory values to scale display, same
as RECALL key.
PLUxx Select PLU from scale memory to be used
S123
Enter sample size of 123 parts. Same as pressing key.
T Tare current weight value
T123.456 Preset tare value is 123.456
For pound mode, it’s 123.456lb.
For kg mode, it’s 123.456kg.
U123.456 Store unit weight of 123.456
For pound mode, it’s 123.456lb.
For kg mode, it’s 123.456kg.
Z Zero operation.
04/13 60 51278 Rev. 2
Page 61

Page 62

Fairbanks Scales, Inc.
821 Locust
Kansas City, MO 64106
www.fairbanks.com
51278
OMEGA COUNTING SCALE
OPERATOR MANUAL
 Loading...