

Page 1
Installation / Operation
Reference Manual
InterAct Software
© 2004 by Fairbanks Scales Inc. 50772
All rights reserved Issue # 2 12/04
Page 2

Table of Contents
Table of Contents 2
Copyright Notice 7
Trademarks 7
About Interact 8
Login 9
Register 10
Main Screen 10
Software Registration Screen 12
User Table 14
Account Table 16
Main Screen 16
Defaults Screen 19
Terms Screen 21
Balances Screen 23
Custom Screen 26
RSA Prompts Screen 28
Truck List Screen 30
Freight Rates Screen 32
Truck Table 34
Main Screen 34
Weight Limits Screen 37
History Screen 39
Custom Fields Screen 41
Account Options 42
Main Screen 42
Defaults Screen 44
Groups Screen 46
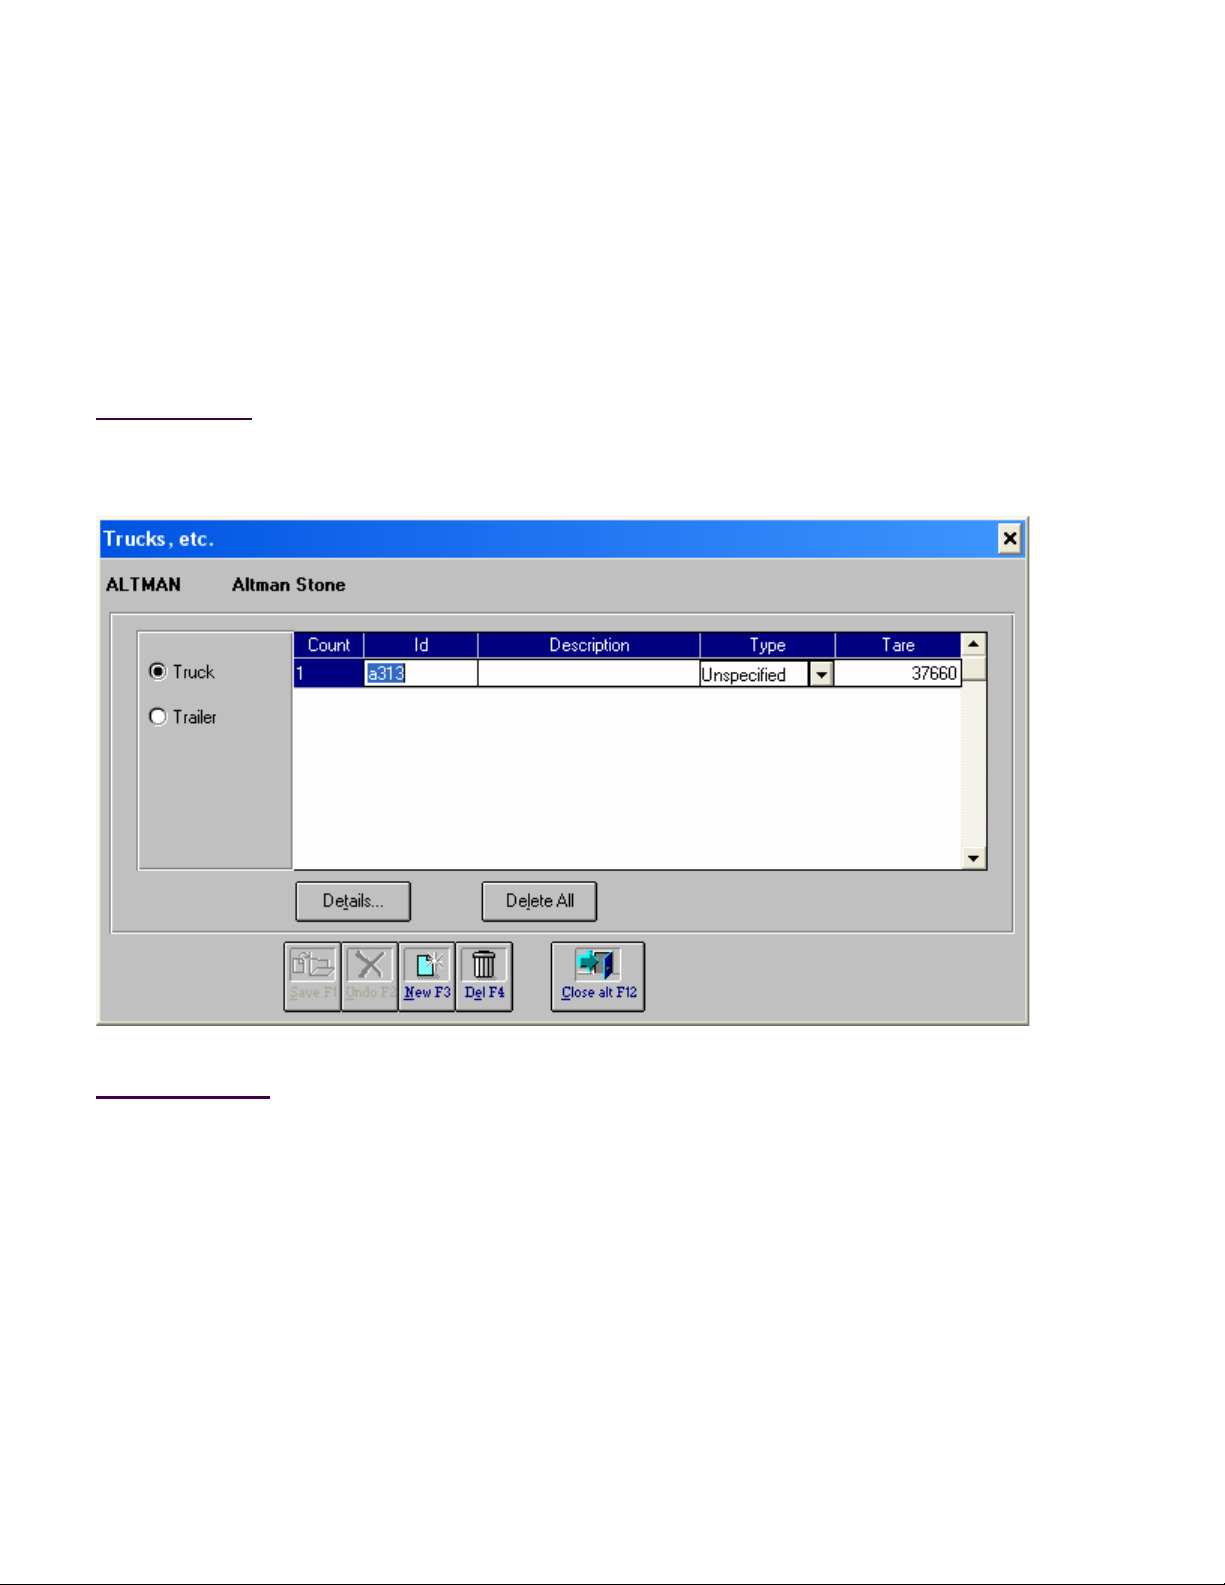
Trucks, etc. Screen 48
50772 2 12/04 Issue # 2
Page 3

Truck Type Screen 50
Delivery Zones Screen 52
Custom Screen 54
RSA Prompts Screen 55
Order/Job Table 57
Main Screen 57
Miscellaneous Screen 60
Ordered Item 62
Order/Job Options 65
Material Screen 66
Price Table 68
Category Table 70
Utilities 71
Backup Database 71
Restore Database 73
Backup Options 75
Import/Export Utility 77
Definition Screen 77
Text File Format Screen 81
Options Screen 83
Record Selection Screen 86
Field Editor Main Screen 88
Field Editor Specification Screen 90
SQL Update Utility 93
Login Screen 93
Update Screen 94
Company Data 96
Scale Port 97
Setup Screen 97
Test Screen 99
50772 3 12/04 Issue # 2
Page 4

Ticket/Journal Printer Port 101
Setup Screen 101
Test Screen 103
Data Terminal Port 105
Setup Screen 105
RTSA Test Screen 107
PDC Test Screen 109
Score Board Port 111
Setup Screen 111
Test Screen 113
Tickets 114
Weigh 115
Main Screen 115
Details Screen 117
Notes Screen 121
Multiple Items Screen 123
Print Ticket 125
Update Tare Screen 127
Weighing Options 129
Ticket 129
Weighing 132
Weight 134
Single Weighment 136
Truck 138
Unattended 140
Tare Weight 143
Configuration 145
Accounting Setup 147
Standard Terms Screen 147
Payment Terms 148
Price Screen 151
Added Charge Screen 153
50772 4 12/04 Issue # 2
Page 5

Minimum Charge Screen 155
Rounding Screen 156
Miscellaneous Screen 158
Taxing Authorities 159
Tax Codes 160
Prices 162
Invoices and Statements 165
Invoice Screen 165
Sample Invoice 168
Statement Screen 170
Balance Forward Statement 173
Open Item Statement 175
Balance Forward (with Ticket List) Statement 177
Invoice and Statement Options 179
Receipts and Payments 181
Receipt Screen (Receivables) 181
Credit Screen (Receivables) 184
Reverse Receipt (Receivables) 185
Reverse Credit (Receivables) 188
Payment Screen (Payables) 189
Credit Screen (Payables) 191
Reverse Payment Screen (Payables) 192
Reverse Credit Screen (Payables) 194
Receipt and Payment Options 195
Quick Scan 196
Selection Criteria Screen 196
Transaction List Screen 199
Transaction Detail Screen 201
Transaction Charges Screen 204
Transaction Notes Screen 207
Reporting 208
50772 5 12/04 Issue # 2
Page 6

Report Options 212
General Screen 212
Custom Screen 214
Batch Report Edit Screen 216
FAQ 218
Scale Indicator Configurati o n 218
Defining Categories 220
Ticket Format File (.gtk file) 222
Print Weight Ticket (prweight.gtk) 232
50772 6 12/04 Issue # 2
Page 7

Copyright Notice
Copyright © 2004. All Rights Reserved.
No part of this publication may be copied without the express written permission.
For information on Fairbanks Scales products and services including licensin g, product support, and sales
please contact your dealer/distributor.
This manual, is sold as is, without warranty of any kind, either express or implied, respecting the contents
of this manual, including but not limited to implied warranties for the manual’s quality, performance,
merchantability, or fitness for any particular purpose. Neither Fairbanks Scales nor its dealers or
distributors shall be liable to the purchaser or any other person or entity with respect to any liability, loss, or
damage caused or alleged to have been caused directly or indirectly by this manual.
Trademarks
All terms mentioned in this manual that are known to be trademarks or service marks have been
appropriately capitalized. Fairbanks Scales cannot attest to the accuracy of this information. Use of a term
in this manual should not be regarded as affecting the validity of any trademark or service mark.
Interact® is our registered trademark
Windows® is a registered trademark of Microsoft Corporation.
Zip™ is a trademark of Iomega® Corporation.
Other product names mentioned in this manual may be trademarks or registered trademarks of
their respective companies and are hereby acknowledged.
Information in this document is current to revision 4.0.45 of the Interact software and is subject to change
without notice.
50772 7 12/04 Issue # 2
Page 8
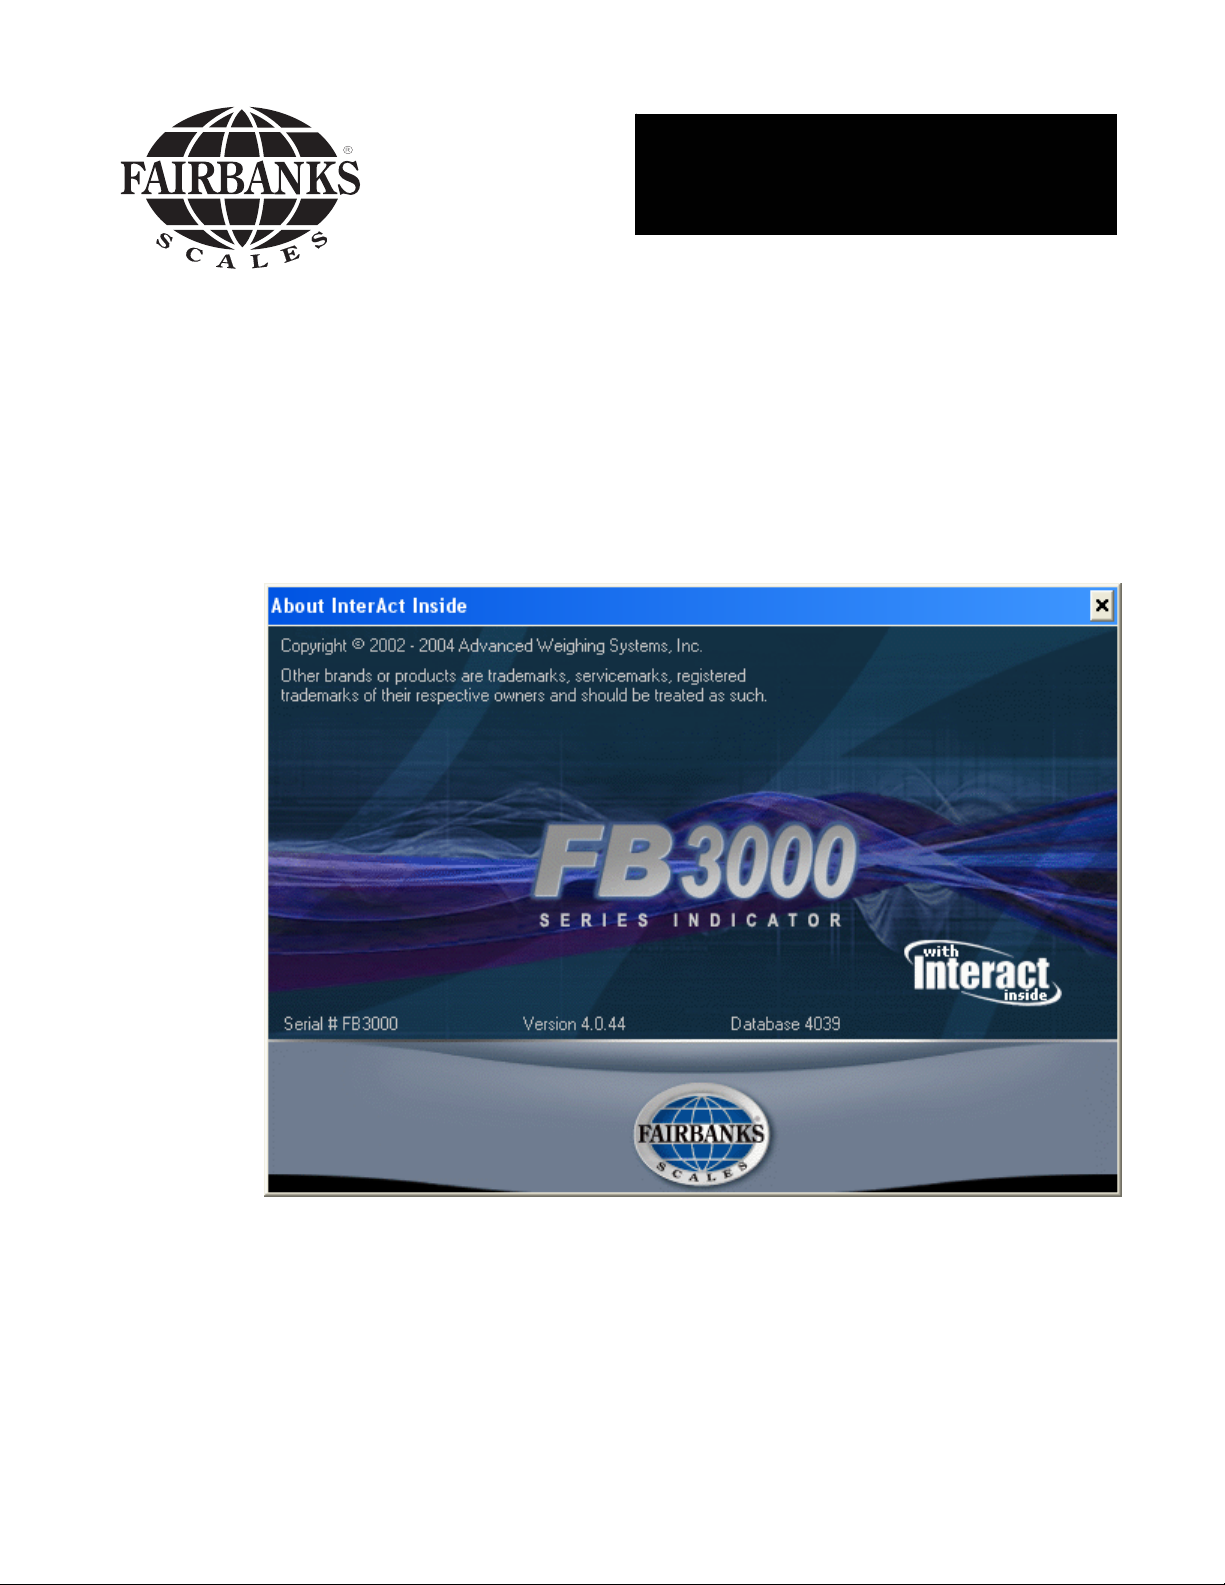
About Interact
Welcome, and thank you for purchasing the FB3000 with Interact® Inside. This program is designed to
help reduce labor costs, minimize human error, and increase overall efficiency in your scale operations.
How to Get Here
Admin-->About
Standard program features include:
Automatic Ticket Processing
Ticket Editing, Voiding, and Reprinting
Detailed and Summary Report Generation by Criteria Selection
Three User Definable Tare Weights
Direct Scale Interface to One or Two Scales
Direct Interface to Ticket, Tape, Dot Matrix, and Laser Printers
Detailed Customer Statements (Interact Professional)
Customer Payment and Itemized Payment Tracking (Interact Professional)
50772 8 12/04 Issue # 2
Page 9
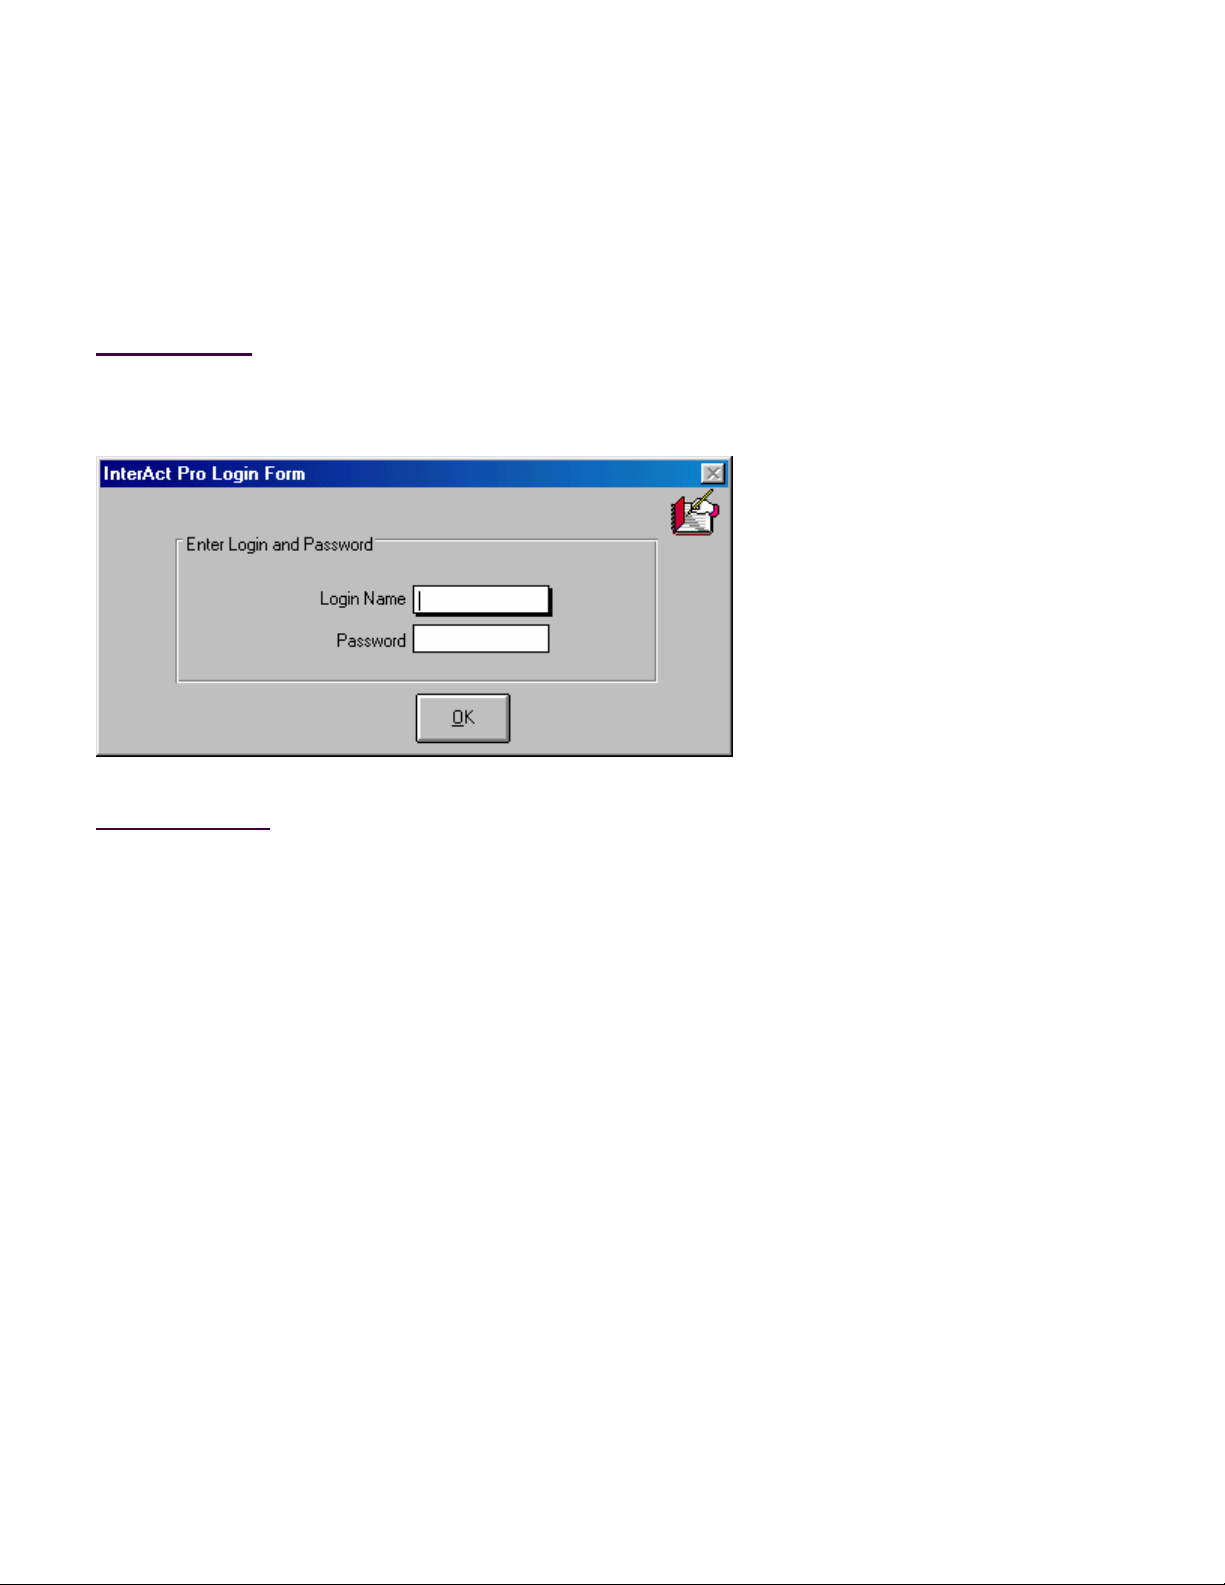
Login
This is the first screen that appears after starting Interact and will be used to identify you as a valid user of
the program. If this is the first time the program has been used then you must log in as the administrator;
log in name is "admin" with no password. It is strongly suggested the first thing you do is change the
password to this log in.
How to Get Here
Windows Start Button-->Programs-->Interact-->Interact
Field Descriptions
Login Name
Enter the log in name supplied to you by your system administrator.
Password
You may have also been given a password in addition to a log in name. Enter your password
here. The characters you type will be displayed as an asterisk (*).
50772 9 12/04 Issue # 2
Page 10
Register
Main Screen
The features in this application are enabled through either a hardware or software registration process that
is administered by the Registration Key Server. The key server is continually running and resides in your
system tray (lower right corner of your desktop). It supplies registration information to the truck scale
application. If it quits running, the truck scale application will eventually terminate after five (5) failures to
retrieve registration data.
The hardware registration process involves plugging a dongle into either a parallel or USB port on the back
of your PC. The software process involves calling Fairbanks Scales for a twenty (20) character key that is
entered in the Software Registration screen. The main screen shows how the program is currently
registered.
How to Get Here
Admin-->Register
Field Descriptions
Today's Date
This field contains the current date.
Hardware Key
This field contains the hardware registration status. If the program detects a dongle plugged into
either a parallel printer or USB port, it will display "Key found". Otherwise, it displays "Key not
50772 10 12/04 Issue # 2
Page 11

found".
Software Key
This field contains the software registration status. If the program has been software registered,
this field will display the twenty (20) character software key. Otherwise, it displays "Software
registration not found".
Other Status
This field currently not used.
Version
This field displays the major version of the application that has been registered.
Serial #
This is the serial number read from the hardware dongle or received from Fairbanks Scales during
the software registration process.
Enable Features
This box lists all the features that have been enabled within the application.
Register Button
Click this button to display the Software Registration screen.
Refresh Button
Click this button to read the hardware dongle (if present) and refresh the controls on this screen.
Ok Button
Click this button to hide this form.
50772 11 12/04 Issue # 2
Page 12
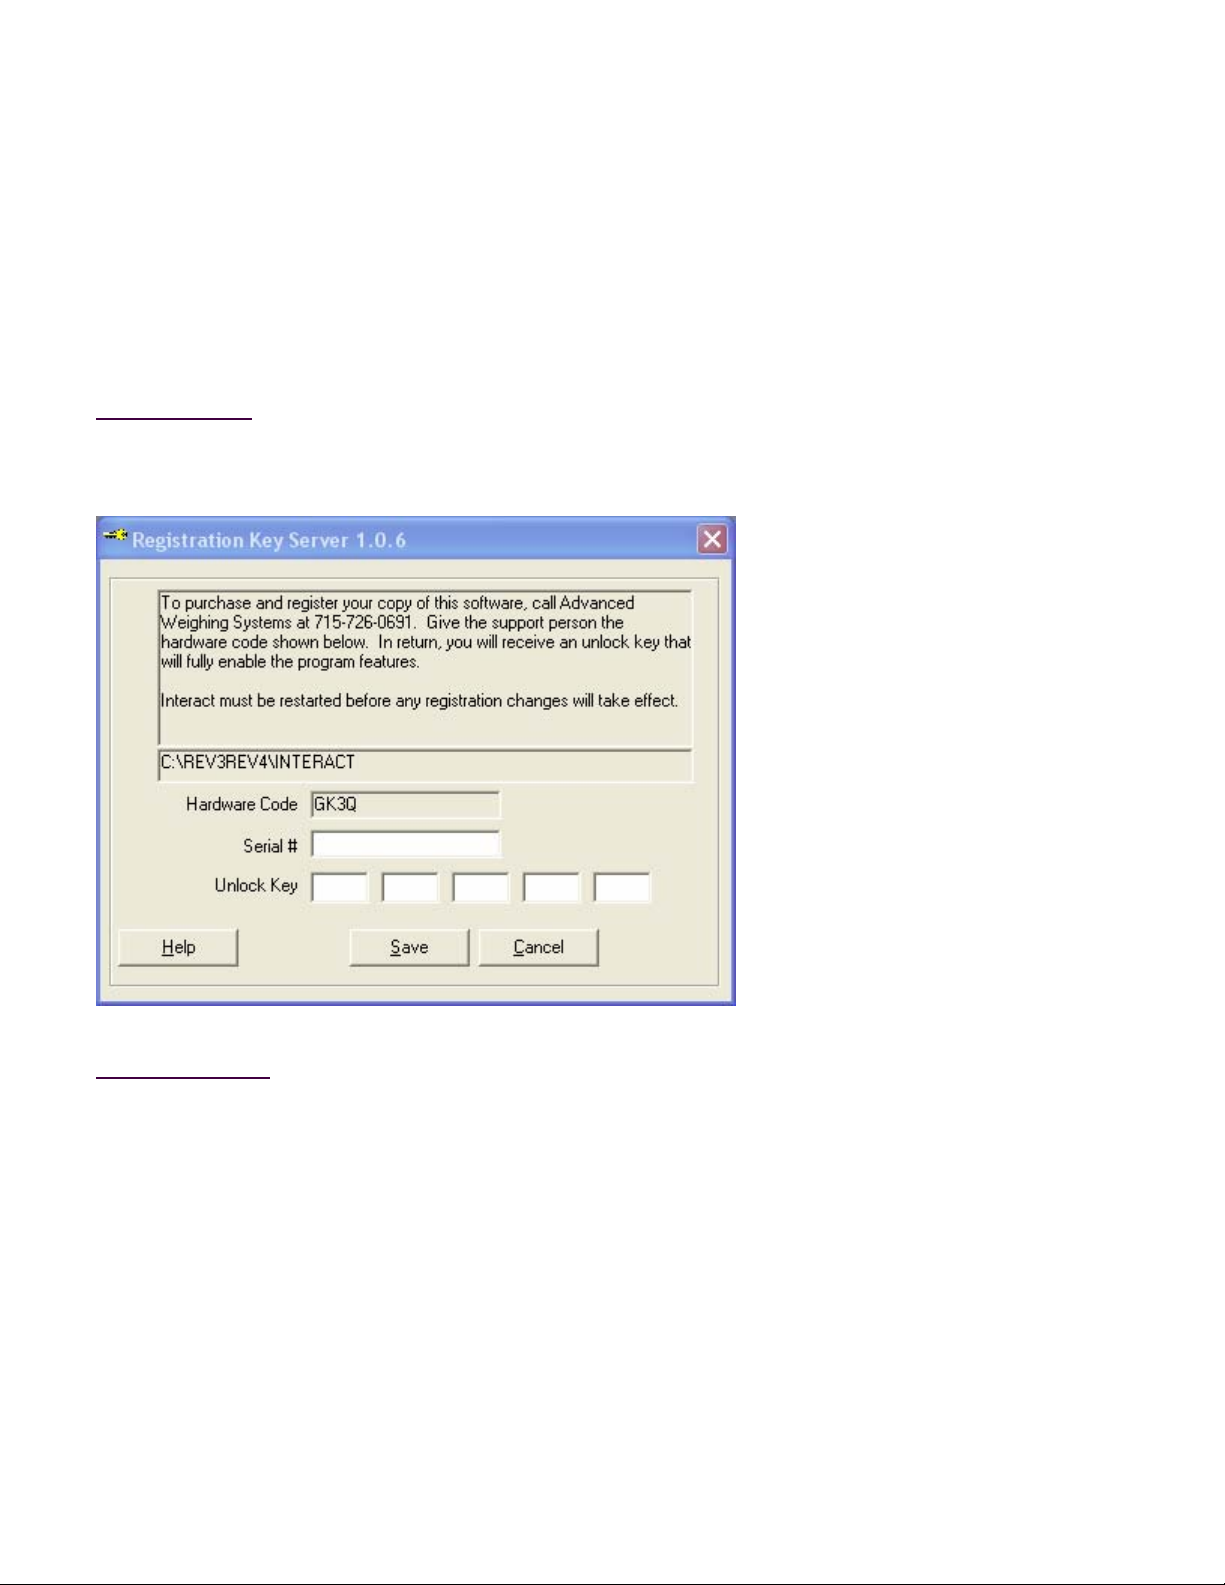
Registration
Software Registration Screen
This Registration Key Server screen is used to software register the truck scale application. Call Fairbanks
Scales at the number provided on the screen and give the support analyst your hardware code along with
the features you want enabled. You will receive a serial number along with a twenty (20) character
software key that must be entered into the corresponding controls on this screen.
How to Get Here
Admin-->Register-->Register Button
Field Descriptions
Hardware Code
This is a code that is unique to your PC. You need to supply this code to Fairbanks Scales in
order to register your software.
Serial #
The value for this field is supplied by Fairbanks Scales.
Unlock Key
This twenty (20) character code (five groups of four characters each) is also supplied by Fairbanks
Scales and unlocks the features you purchased.
50772 12 12/04 Issue # 2
Page 13

Save Button
Click this button to save your registration information and return to the Main Registration screen.
You must restart the truck scale application before the new registration takes effect.
Cancel Button
Click this button to ignore any new registration information and return to the Main Registration
screen.
50772 13 12/04 Issue # 2
Page 14
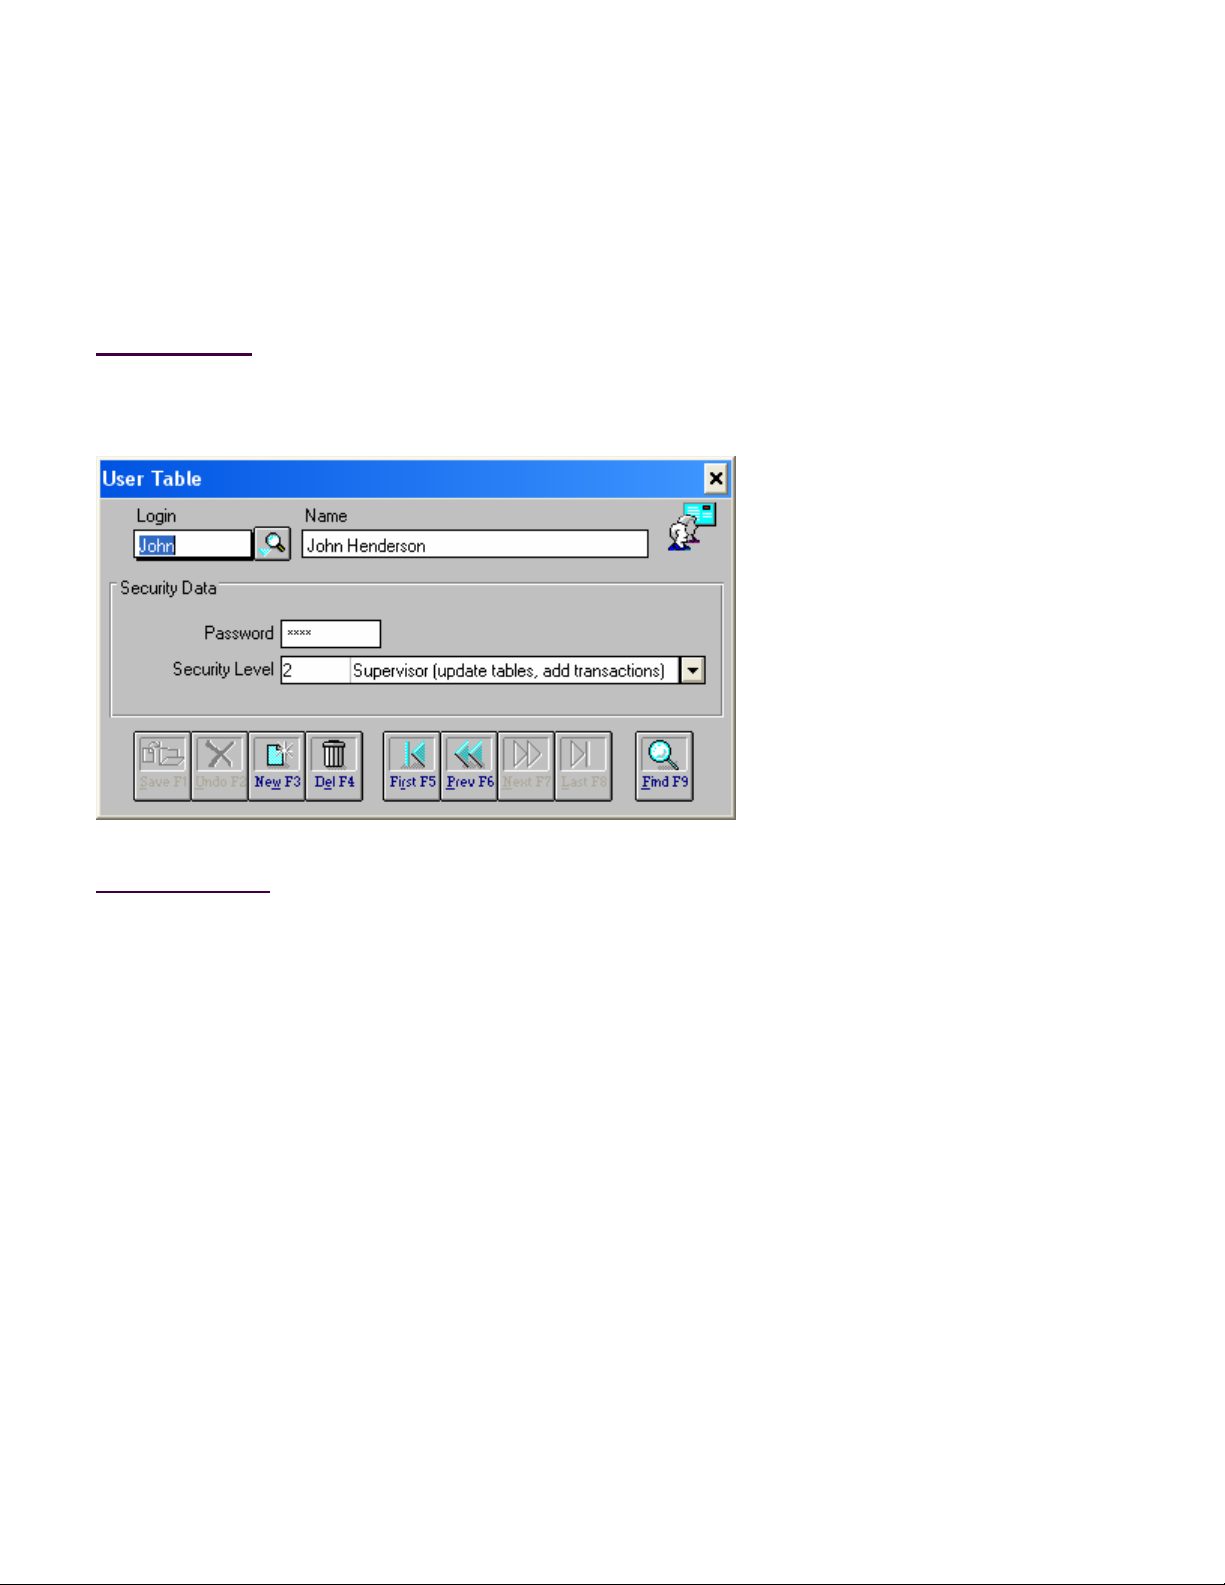
User Table
The User Table contains all individuals that will be using the program. User log ins, password s, and
security levels can be changed or added on this screen. The only information a user can change on this
screen is his/her own name and password. All other data can only be changed by a user with a
administrator security level.
How to Get Here
Logins-->Edit Login Accounts
Field Descriptions
Login
An 8 character name used to identify you as a valid user of this program.
Name
The real name of the user.
Password
A log in name along with a password will allow you to access the program. Passwords are not
required. Passwords can be up to eight (8) characters long. Letters and numbers ca n be used,
but no spaces. Passwords are not case sensitive.
If you change a password, the program will prompt you to verify the password change by entering
the old password and reentering the new password. This verification occurs after clicking the Save
button.
Security Level
This is a drop-down list of valid security levels. There are four levels:
50772 14 12/04 Issue # 2
Page 15

Level 3 is the Administrator level. The administrator has update permission for all tables
in the database. Only the administrator can add users, delete users, change passwords
and set security levels. When the program is installed, there is only an “admin” log in
assigned administrator privileges. This log in is not password protected. It is strongly
suggested that you assign a password to this log in.
Level 2 is the Supervisor level.. A supervisor has all the same privileges as an
administrator except updating the user table.
Level 1 is the Operator level. A operator has read access to all tables in the database.
He can process tickets in the Weigh screen and run the backup and restore utilities.
Level 0 is the Guest level. A guest has read access to all tables in the database only.
50772 15 12/04 Issue # 2
Page 16
Account Table
Main Screen
The Account Table screens are used to add, modify or delete accounts in the database. There are two
types of accounts: customer and hauler. A customer is an account that you will charge for materials
delivered. A hauler is an account that you will pay to deliver material. An account can either be a
customer, hauler or both.
The Main screen contains general account information and transaction default values.
How to Get Here
Admin->Accounts->Main Radio Button
Field Descriptions
Id
A 10 character alphanumeric field containing the account id.
Name
50772 16 12/04 Issue # 2
Page 17

A 30 character alphanumeric field containing the account name.
Inactive Check Box
When checked, this account is inactive. It will not appear in any drop down lists on other screens
and will be considered a candidate to be purged from the database by the purge utility. In order to
be purged, there must be no transactions in the database that reference this account.
Revoked Check Box
When checked, this account is revoked. It will still appear in drop down lists on other screens but
no transactions can be processed against it.
Trucks, Etc Button
This button is only enabled for accounts designated as type Hauler or Customer and Hauler.
When clicked the Trucks, Etc screen will be displayed showing all the tared vehicles (trucks,
trailers, containers, etc.) belonging to this hauler. Tared vehicle names are configured in the
Account Options screen.
Freight Button
This button is only enabled for accounts designated as type Hauler or Customer and Hauler.
When clicked the Freight Rates screen will be displayed for this hauler.
Address Radio Buttons
Up to three addresses can be entered per account. Clicking on one of these three buttons will
display the information for that particular address. The address titles can be modified in the
Account Options screen.
Addresses
An address consists of a contact name, two address lines, city, state, zip code, phone #, fax # and
e-mail address.
Price Table
Select the default price table that will be used calculate charges for this account. Price table can
be changed at any time during transaction processing but will be set to this value when the bill-to
account is initially selected.
Tax Code
Select the default tax code that will be used to calculate taxes for this account. Tax code can be
changed at any time during transaction processing but will be set to this value when the bill-to
account is initially selected.
Material
Select the default material code that will be used by this account. Like price table and tax code
material code can be changed at any time during transaction processing b ut will be set to this
50772 17 12/04 Issue # 2
Page 18

value when the bill-to account is initially selected.
Ticket Type
Set the default ticket format that will be used by this account to print tickets. A ticket is formatted
using commands that are contained in a *.gtk file. All ticket format files can be found in the
program's installation directory.
Account Type
An account can be a Customer, Hauler or a Customer and Hauler. Customers are accounts that
you charge for material. Haulers are accounts you pay for hauling material.
Viewing
You can select which account records to view with this drop down list. The choices are Haulers
Only, Customers Only or Customers and Haulers.
50772 18 12/04 Issue # 2
Page 19
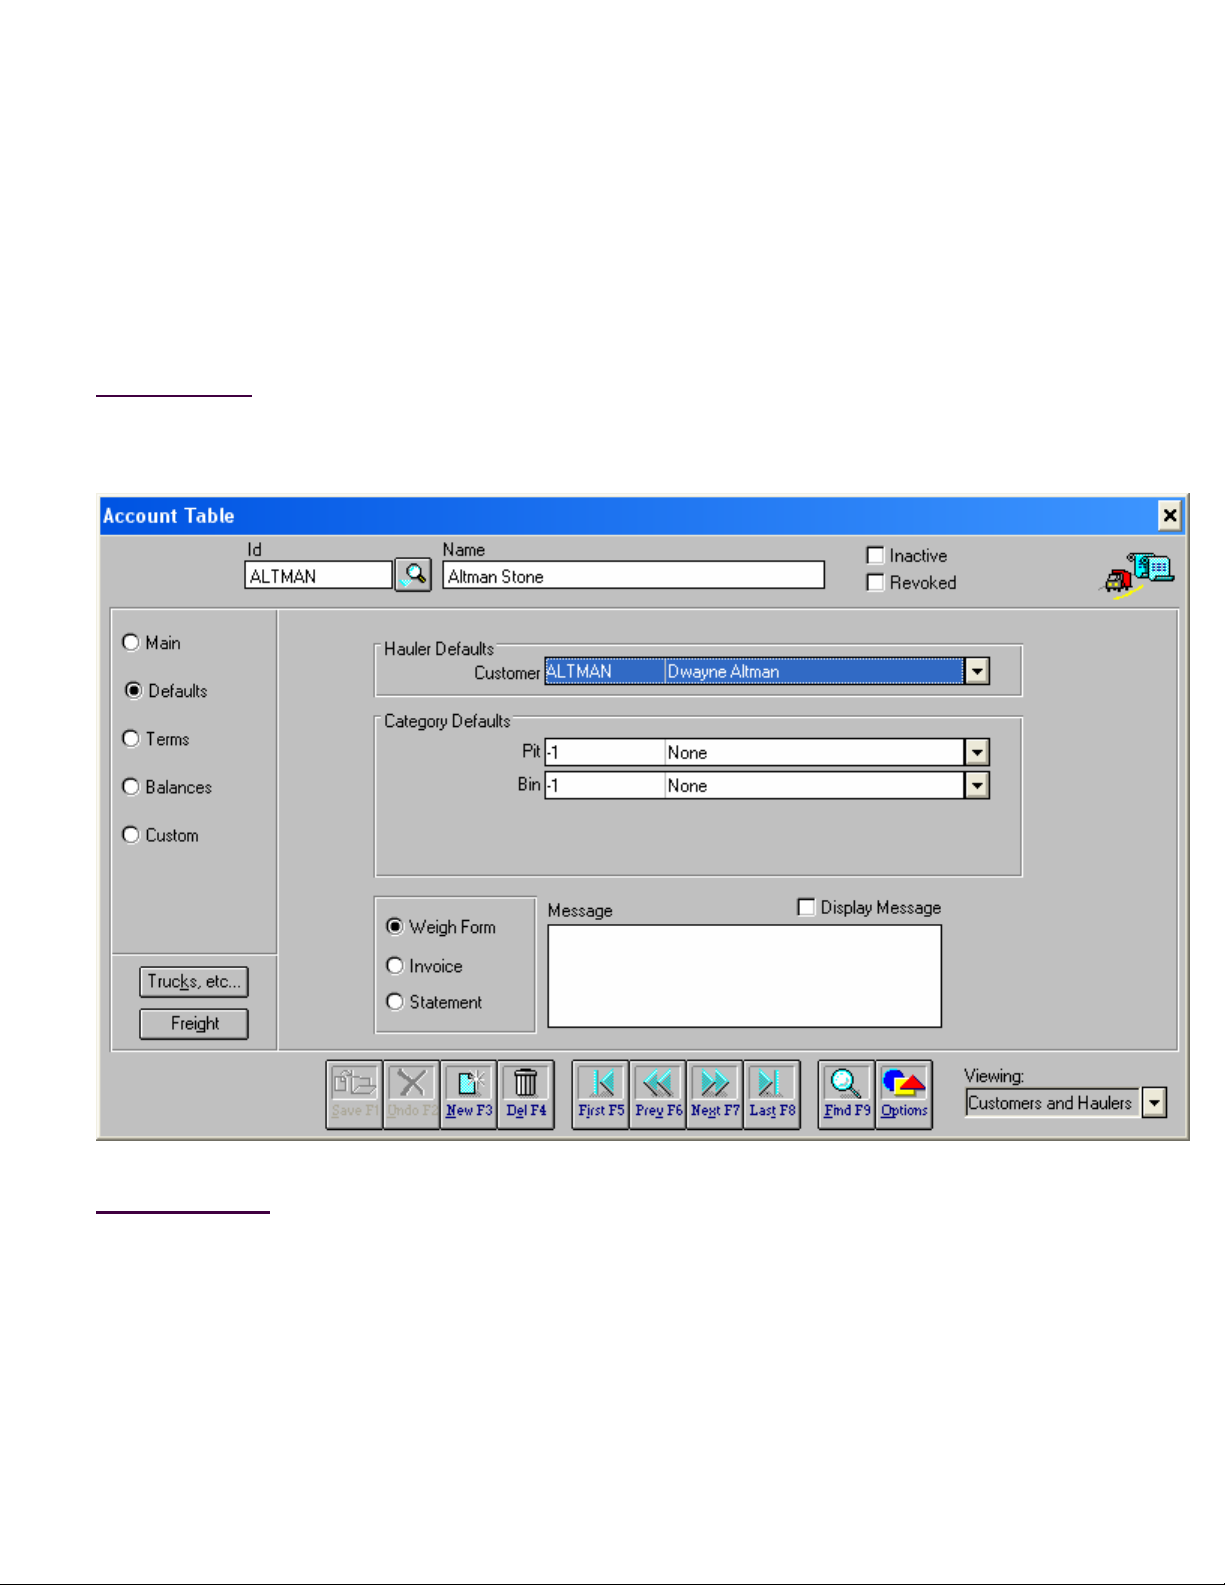
Account Table
Defaults Screen
The Account Table screens are used to add, modify or delete accounts (bill-to and hauler) in the database.
The Defaults screen contains more default account information that will be used to set corresponding ticket
fields and control transaction processing in the Weigh screen.
How to Get Here
Admin->Accounts->Defaults Radio Button
Field Descriptions
Hauler Defaults - Customer
This field is for hauler accounts only. Select the default bill-to account for this hauler. When a
transaction is started using this hauler or a truck belonging to this hauler, the bill-to will be set to
this account.
Category Defaults
50772 19 12/04 Issue # 2
Page 20

There are four category codes, two of which are reserved for the material and price tables. The
default values for these are set in the Account Main screen. The other two are user definable.
The defaults for these two are set here. When this bill-to account is selected, the category codes
are set to these values.
Weigh Form Radio Button
Click this button to display and modify the message that will be displayed in the Weigh screen
when this account is selected.
Invoice Radio Button
Click this button to display and modify the message that will appear on invoices for this account.
Statement Radio Button
Click this button to display and modify the message that will appear on statements for this account.
Message
This box will contain either the Weigh screen, Invoice or Statement message depending on the
message type selected.
Display Message Check Box
Check this box to display the associated message on the Weigh screen, Invoice or Statement.
The message is not displayed until this box is checked.
50772 20 12/04 Issue # 2
Page 21
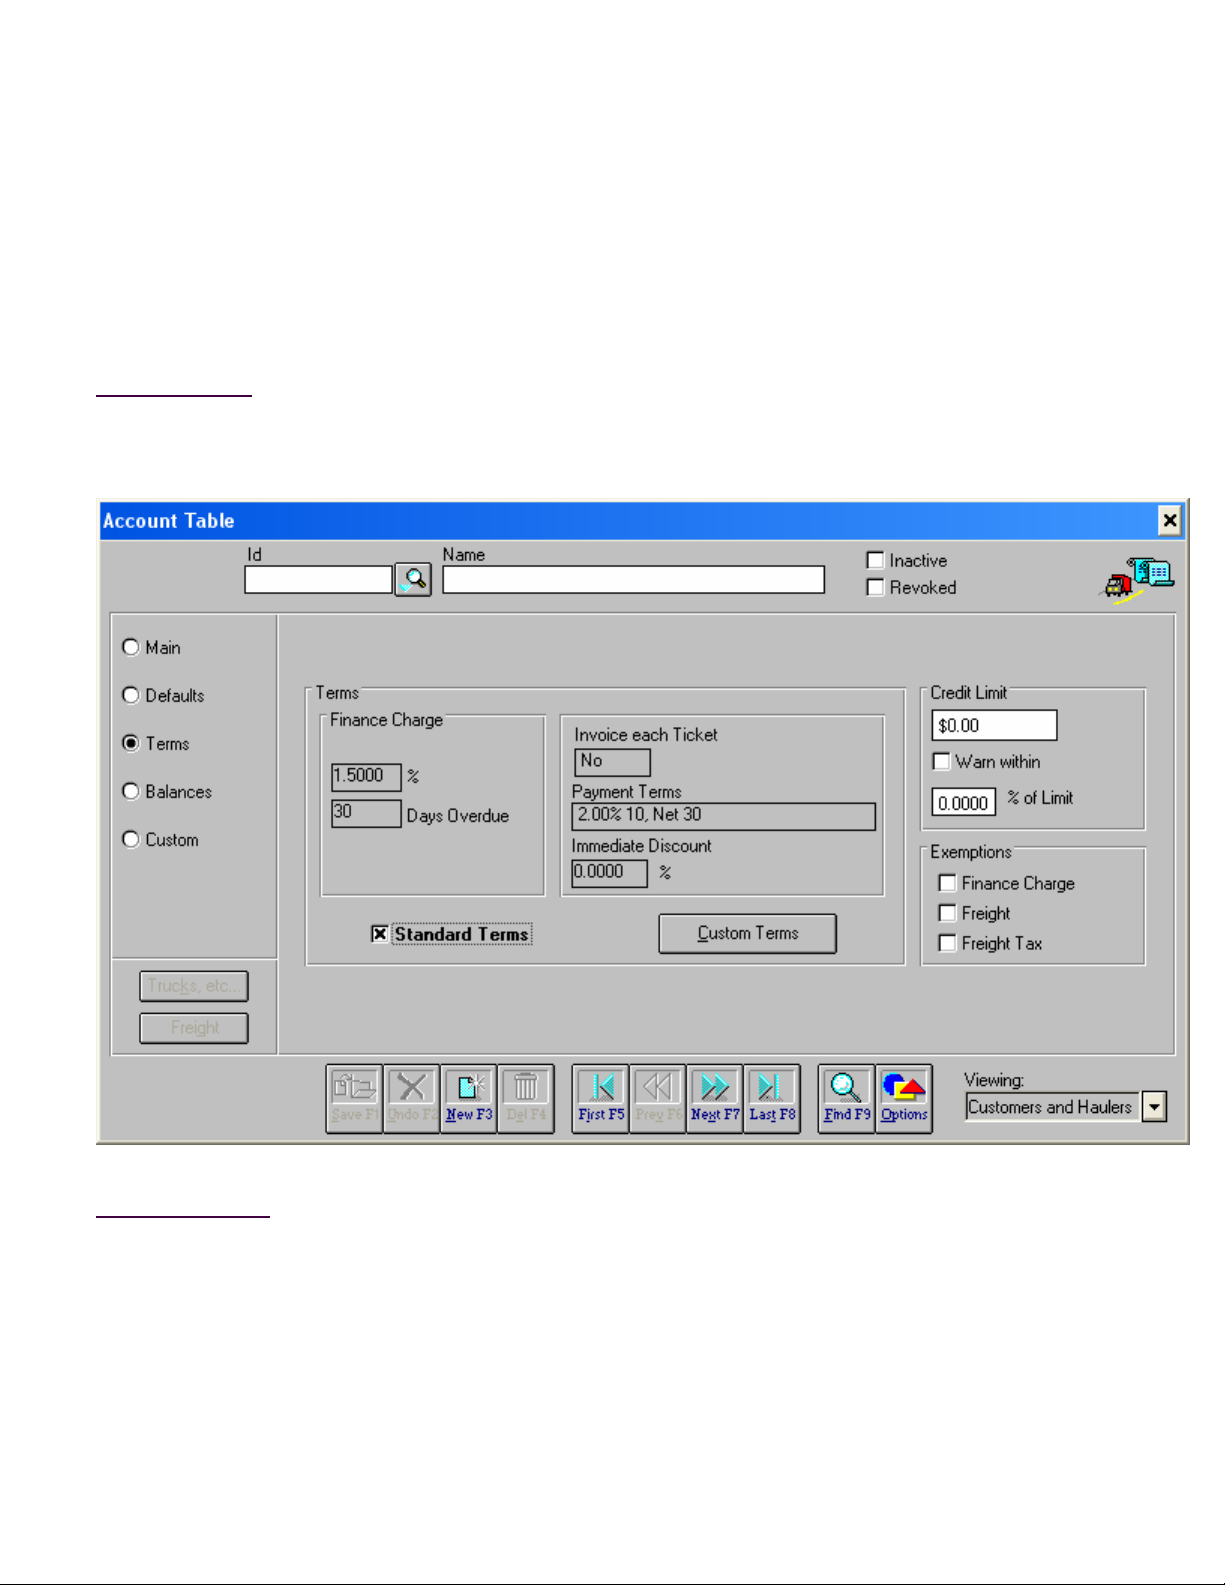
Account Table
Terms Screen
The Account Table screens are used to add, modify or delete accounts (bill-to and hauler) in the database.
The Terms screen contains payment terms for your bill-to accounts. This screen is unavailable for hauler
accounts.
How to Get Here
Admin->Accounts->Terms Radio Button
Field Descriptions
Terms
This frame contains the payment terms for this account.
Credit Limit
Enter the charge limit for this account. For prepaid accounts, this field displays the amount that
was prepaid. The Weigh screen operator can be warned when estimated balance gets within a
50772 21 12/04 Issue # 2
Page 22

percentage of the credit limit. For prepaid accounts, he will be warned when the estimated
balance gets within a percentage of the prepaid amount.
Finance Charge
The percentage used to calculate late charges on overdue invoices. This percentage is multiplied
by the balance for every invoice that is past due the number of days specified. Finance charges
are applied when statements are generated.
Ticket Is Invoice
If yes, an invoice is generated for each ticket.
Payment Terms
Payment terms in the form: Discount % Discount Days, Days Due (e.g. 2.00% 10, Net 30)
Immediate Discount
This percent discount is applied immediately to a ticket. The price components used to calculate
material charge are discounted by this percentage when the ticket is generated. For example, if a
material is normally priced at $5.00 per ton then a 10% immediate discount results in a new price
of $4.50 per ton.
Standard Terms Check Box
If checked, the account will use the system standard terms. Otherwise, the account's custom
terms are used.
Custom Terms Button
Click this button to edit terms that are custom for this account.
Exemptions
Check these boxes to exempt this account from finance charges. freight, and/or freight tax.
50772 22 12/04 Issue # 2
Page 23
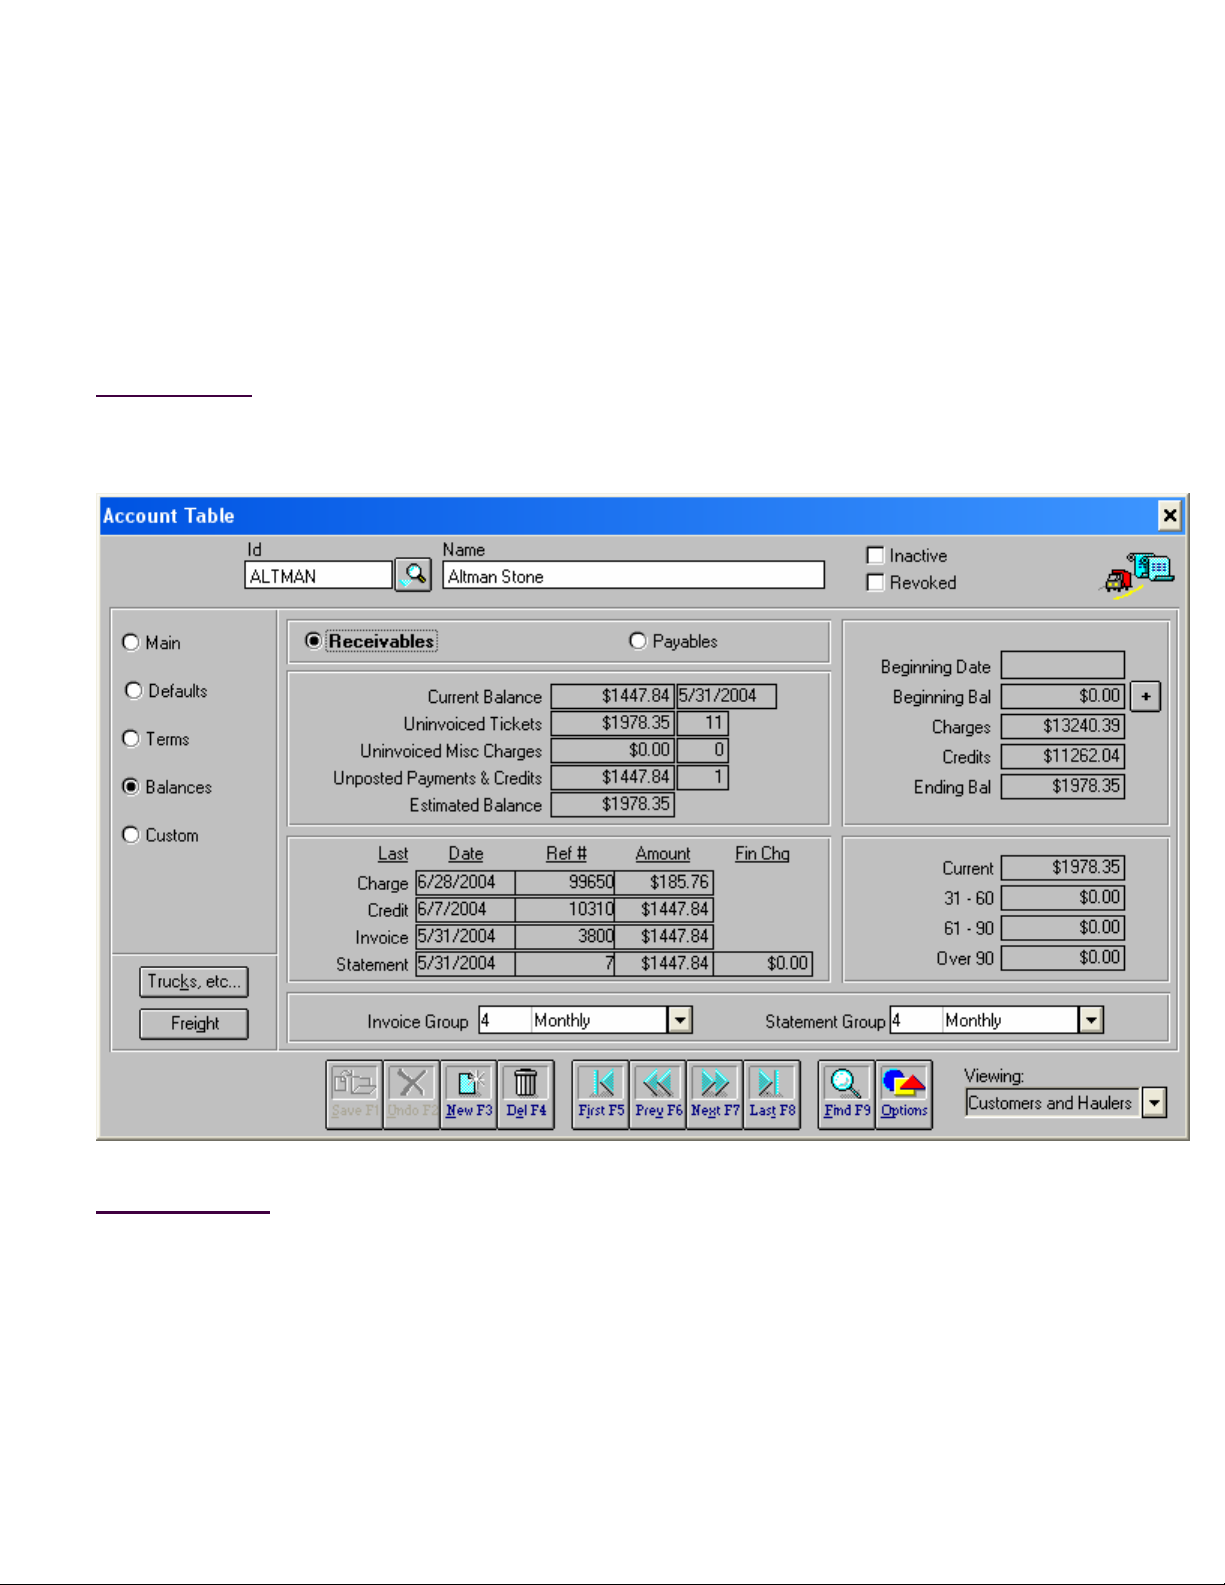
Account Table
Balances Screen
The Account Table screens are used to add, modify or delete accounts (bill-to and hauler) in the database.
Besides containing balance information, this screen allows for assigning an account to an invoice or
statement group and entering a beginning balance.
How to Get Here
Admin->Accounts->Balances Radio Button
Field Descriptions
Receivables Radio Button
When clicked, the screen will contain the receivable balances for this account.
Payables Radio Button
When clicked, the screen will contain the payable balances for this account.
50772 23 12/04 Issue # 2
Page 24

Current Balance
The total of all invoices less payments that have been posted. A payment is considered posted
when it has appeared on a statement.
Uninvoiced Tickets
The total and number of all charge tickets that have not yet been invoiced. Cash tickets (tickets
that have been paid in the Weigh screen) are never invoiced and will never be removed from this
total.
Uninvoiced Misc Charges
The total and number of all miscellaneous charges that have not been invoiced. Miscellaneous
charges have not yet been implemented in the program. Therefore, the totals for this category
should be zero.
Unposted Payments & Credits
The total and number of all payments that have not yet appeared on a statement. Payments on
cash tickets (tickets that have been paid in the Weigh screen) never appear on a statement and
will never be removed from this total.
Estimated Balance
Current balance plus uninvoiced tickets plus uninvoiced miscellaneous charges less unp osted
payments.
Last Charge
The date, ticket number and amount of the last charge processed against this account.
Last Credit
The date, receipt number and amount of the last payment or credit applied to this account.
Last Invoice
The date, number and amount of the last invoice generated for this account.
Statement
The date, number, balance and finance charge of the last statement generated for this account.
Invoice Group
An account can belong to one of 20 invoice groups. When generating invoices, the program
allows you to select a single or all groups. There are 4 system defined groups: Do Not Invoice,
Daily, Weekly and Monthly. The other 16 groups are user definable in the Account Options
screen.
Statement Group
An account can belong to one of 20 statement groups. When generating statements, the program
50772 24 12/04 Issue # 2
Page 25

allows you to select a single or all groups. There are 4 system defined groups: No Statements,
Daily, Weekly and Monthly. The other 16 groups are user definable in the Account Options
screen.
Beginning Date
The date the beginning balance invoice was entered into the system.
Beginning Bal
Beginning balances are entered into the system as invoices and are aged and paid off like any
normal invoice. This field contains the amount of the beginning balance invoice.
+ Button
Click this button to display a pop up screen that allows you to add or modify the beginning balance
invoice for this account. A beginning balance invoice can no longer be modified once a payment
has been applied or it has appeared on a statement.
Charges
The total of all charges for this account.
Credits
The total of all payments and credits for this account.
Ending Bal
Beginning balance plus charges less credits. This balance should equal the estimated balance.
Old - Run Aging Report
This message will appear above the aged balances when the balances are not current. To update
the aged balances, run an aging report.
Current
The amount of ending balance that is 0 to 30 days old.
31-60
The amount of ending balance that is 31 to 60 days old.
61-90
The amount of ending balance that is 61 to 90 days old.
Over 90
The amount of ending balance that is over 90 days old.
50772 25 12/04 Issue # 2
Page 26
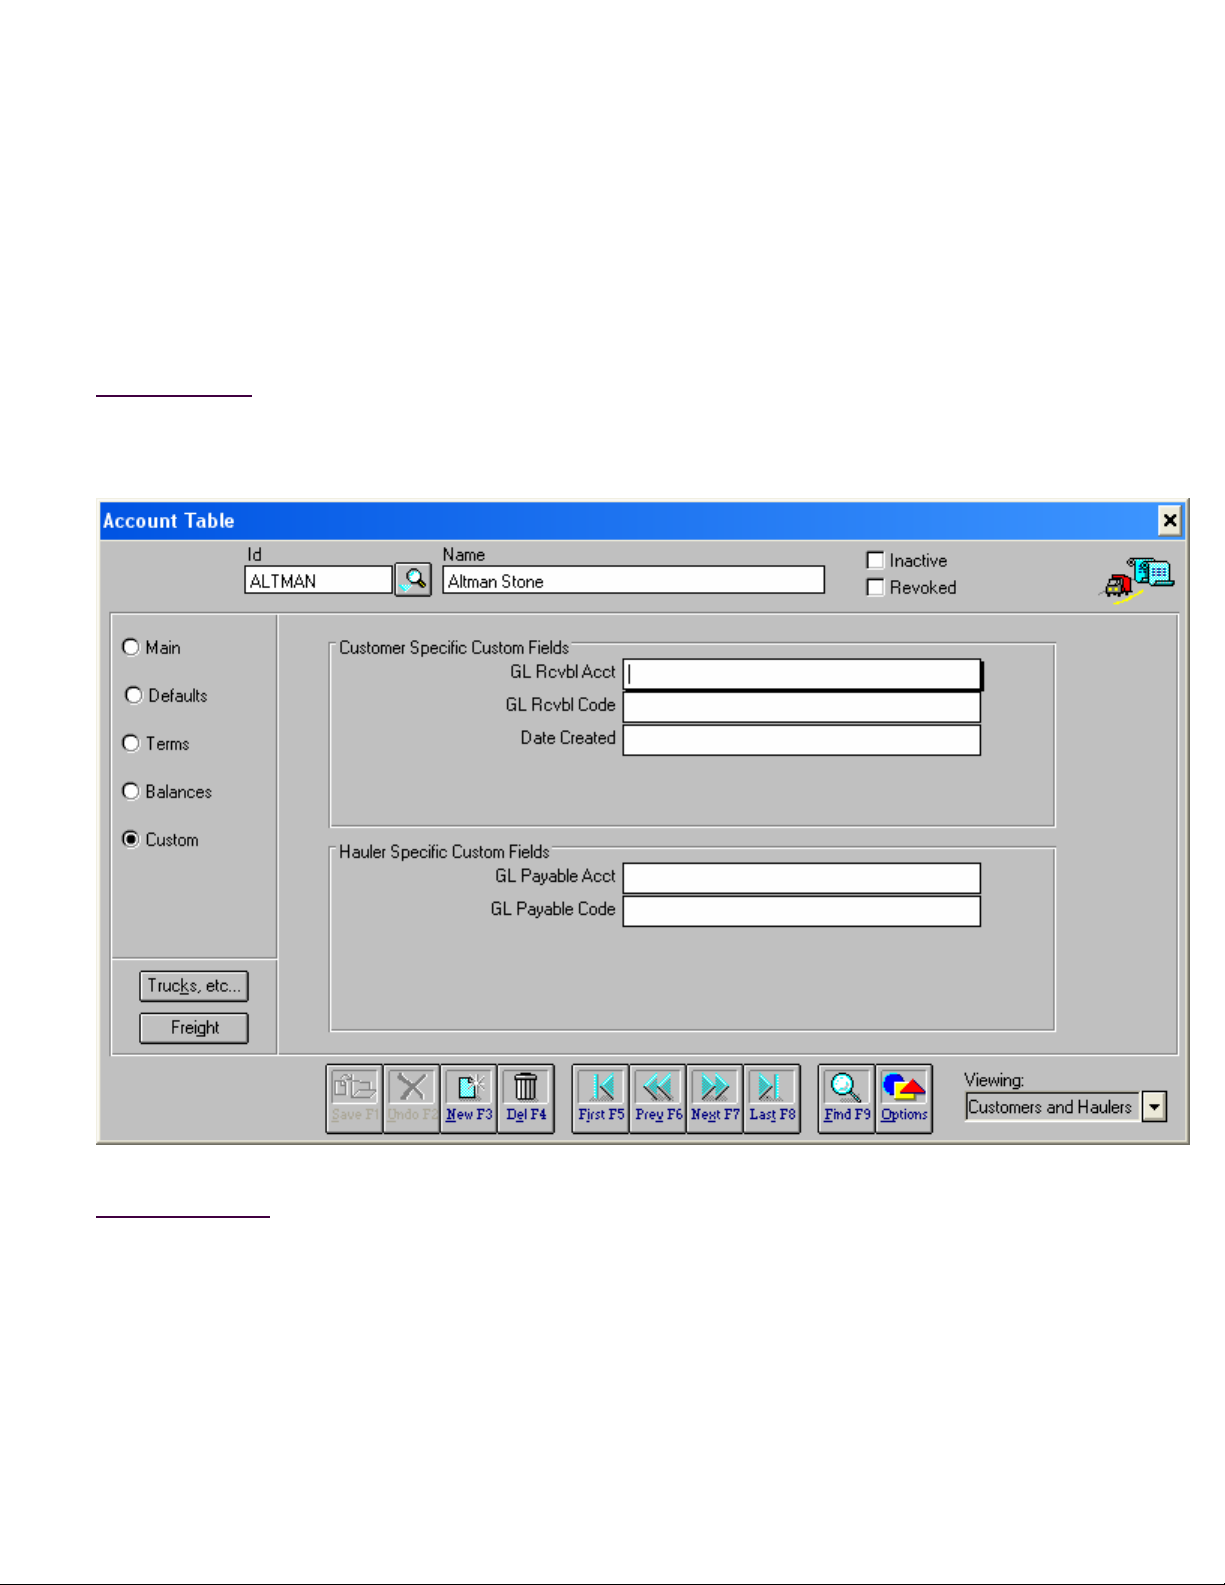
Account Table
Custom Screen
The Account Table screens are used to add, modify or delete accounts (bill-to and hauler) in the database.
The Custom Screen allows you to enter data into user defined custom fields. Custom fields are most often
used to store information that will be exported to or imported from a 3rd party accounting package.
How to Get Here
Admin-->Accounts-->Custom Radio Button
Field Descriptions
Customer Specific Custom Fields
Up to five custom fields can be defined for customer accounts in the Account Options screen.
Each of these fields is 30 characters in length.
Hauler Specific Custom Fields
Up to five custom fields can be defined for hauler accounts in the Account Options screen. Each
50772 26 12/04 Issue # 2
Page 27

of these fields is 30 characters in length.
50772 27 12/04 Issue # 2
Page 28
Account Table
RSA Prompts Screen
The Remote Scale Appliance (RSA) is a stand alone unattended terminal that performs ticket processing at
a remote scale site. Account specific prompting and ticket printing at the RSA can be controlled from this
screen. Check which tickets and prompts are to be enabled for this account. This data is exported to the
RSA using the RSA Operations Utility.
How to Get Here
Admin-->Account-->RSA Prompts Radio Button
Field Descriptions
Print Weigh-In Ticket
When checked, a ticket will be printed on the weigh-in side of a transaction for this account.
Print Weigh-Out Ticket
When checked, a ticket will be printed on the weigh-out side of a transaction for this account.
50772 28 12/04 Issue # 2
Page 29

Print Ticket Notes
When checked, note fields will be included on the ticket.
Prompt for (...)
The truck driver can be prompted for the following fields: Hauler account, Bill-to account, Job ,
Material and user defined category codes. When checked, the associated prompt will be enabled
for this account.
50772 29 12/04 Issue # 2
Page 30
Account Table
Truck List Screen
The Account Table screens are used to add, modify or delete accounts (bill-to and hauler) in the database.
The truck list screen displays all vehicles belonging to a hauler account. It also provides a quick way to
add a new vehicle or modify an existing vehicle. This screen is only available to account types Hauler and
Customer and Hauler.
How to Get Here
Admin->Accounts->Trucks, Etc. Button
Field Descriptions
Truck / Tared Vehicle Radio Buttons
A radio button is visible for each tared vehicle type. Tared vehicle types are defined and enabled
in the Account Options screen. This selection controls which vehicles are displayed in the tared
vehicle list.
Tared Vehicle Table
This table displays the selected tared vehicles. To modify data in the table, first tab to the table,
navigate through the individual cells by using the arrow or tab keys and then enter your
modification. A new blank row is automatically added when you navigate beyond the last record in
the table. You can also add a row by clicking the New button. The currently selected row can be
deleted by clicking the Del button. No changes to the database will actually take place until the
50772 30 12/04 Issue # 2
Page 31

Save button is clicked. The tared vehicle table contains the following columns:
#
The first column contains a list sequence number and is used to mark modified rows. The
mark can be one of three values:
Upd The row has been modified.
Del The row has been deleted.
New This is a new row.
Id
This column contains a 10 alphanumeric character vehicle id.
Description
This column contains a 30 character vehicle description.
Truck Type
Select truck type from a drop down list. Truck types are defined in the Account Options
screen.
Tare
This column contains the vehicles tare (empty) weight.
Details Button
Clicking this button will display the full Tared Vehicle screen showing all vehicle fields.
Delete All Button
Click this button to mark all vehicles in the table for deletion. The deletion does not actually occur
until the Save button is clicked.
50772 31 12/04 Issue # 2
Page 32

Account Table
Freight Rates Screen
The Account Table screens are used to add, modify or delete accounts (bill-to and hauler) in the database.
This screen is used to enter the freight rates for a hauler account. A separate rate can be entered for each
unique combination of zone, truck type, unit of measure and distance. This screen is only available for
account types Hauler and Customer and Hauler.
How to Get Here
Admin->Accounts->Freight Button
Field Descriptions
Freight Rate Table
A single freight rate can be entered for each unique combination of zone, truck type, unit of
measure and distance. To add a row to the table, click the New button. To delete the currently
selected row, click the Del button. To modify data in table, navigate to the desired cell using the
arrow or tab keys and enter your modification. No changes to the database will actually take place
until the Save button is clicked. The following columns are available in the freight rate table:
Zone
This column contains the delivery zone. Zone is changed by selecting an entry from a
50772 32 12/04 Issue # 2
Page 33

drop down list. If "Unspecified" is selected, then the freight rate applies to all delivery
zones. Delivery zones are defined in the Account Options screen.
Truck Type
This column contains the truck type. Truck type is changed by selecting an entry from a
drop down list. If "Unspecified" is selected, then the freight rate applies to all truck types.
Truck types are defined in the Account Options screen.
Unit
This column contains the unit of measure. Units available are: Kilograms, Load, Metric
Tons, Pounds, Tons, Units (Count) and Yards.
Distance
This column contains the distance units. Distance units available are: Hours, Kilometers,
Miles and Unspecified. If "Unspecified" is selected, then no distance unit is needed to
calculate the freight charge. Otherwise, the operator will be prompted for the distance
amount in the Weigh screen before the freight charge can be calculated and the
transaction completed.
Rate, Payable
These two columns contain the freight rate that will be charged the customer and the rate
that will be paid to the hauler, respectively. As an example, the customer may be charged
$5 per ton for freight, $4 of which will be paid to the hauler.
Minimum, Min Pay
These two columns contain the minimum freight charge and the payable freight charge,
respectively.
Delete All Button
Click this button to delete all freight rates from the table. The deletion does not actually occur until
the Save button is clicked.
50772 33 12/04 Issue # 2
Page 34

Truck Table
Main Screen
Every truck is attached to a hauler account. The Account Truck List screen gives you the capability to
quickly view, update and add trucks using only required fields. The Truck Table screens show and allow
updates for all fields in the truck record.
How to Get Here
Admin->Accounts->Trucks Button->Details Button->Main Radio Button
Field Descriptions
Id
Enter up to a 10 character alpha-numeric id for the truck..
50772 34 12/04 Issue # 2
Page 35

Description
Enter up to a 30 character description for the truck..
Hauler
This drop down contains a list of all hauler accounts. Select the hauler that owns this truck.
Tare Weight
Enter the empty weight for this truck. Internally, the tare weight will be marked as manually
entered and can be indicated as such when printed on the ticket.
Date Set
This field indicates when the tare weight was updated. It will automatically be set to the current
date when a tare weight is entered but can be modified to some other value.
Date Expires
This field indicates when the tare weight for this truck will expire. If the truck is used in a attended
transaction on or after this date, the scale operator will receive a warning which he/she can choose
to ignore. A truck with an expired tare cannot be used in a unattended transaction.
The tare weight will never expire if this field is blank.
Badge
Enter up to a 10 character alpha-numeric badge id for this truck. The badge id is value on a RFID
tag or bar coded card that will be used to identify this truck in a unattended operation. The badge
id must be unique for every truck.
License
Enter the license plate number for the truck.
Truck Type
This drop down contains a list of all the truck types that were defined in the Account Options
screen. Select the type for this truck This field is used primarily for determining freight charges.
Axles
Enter the number of axles for this truck.
Truck Flags
Weigh Only This flag is used for unattended operations only. When
set, this truck will receive a special ticket that displays the
current weight on the scale (using the ticket format
prweight.gtk). No transaction will be recorded.
Attended Mode Only This flag is used for unattended operations only. When
set, the program will automatically switch to attended
50772 35 12/04 Issue # 2
Page 36

mode when this truck is identified. This allows the
operator to complete the transaction by filling in the
necessary fields on the Weigh screen. When the Print
Ticket button is clicked, the program returns to
unattended mode and sends the ticket to the unattended
terminal.
Unattended Tare Update This flag is used for unattended operations only. When
set, the program will allow the tare weight for this truck to
be updated in unattended mode.
Hide Jobs (AutoTouch) This flag is used for unattended operations with the
AutoTouch interface. When set, the driver will not be
presented a list when prompted for job. The job must be
entered into a text box.
Required: Trailer When set, a trailer (2nd tared vehicle) must be selected
with this truck before a transaction can be recorded.
Required: Container When set, a container (3rd tared vehicle) must be
selected with this truck before a transaction can be
recorded.
Truck Notes
Two note fields can be attached to the truck. These notes will be transferred to ticket note fields 1
and 2 when this truck is used in a transaction. These note fields can also be upd ated from the
Weigh screen.
Reset Notes Daily
When checked, the notes attached to the truck will be cleared daily.
50772 36 12/04 Issue # 2
Page 37

Truck Table
Weight Limits Screen
Every truck is attached to a hauler account. The Account Truck List screen gives you the capability to
quickly view, update and add trucks using only required fields. The Truck Table screens show and allow
updates for all fields in the truck record. This screen allows you to update the weight limits for the truck.
How to Get Here
Admin->Accounts->Trucks Button->Details Button->Weight Limits Radio Button
Field Descriptions
Tare Weight Limits
Enter the minimum and maximum empty weights for this truck. Tare weight updates are not
allowed and transactions will not be processed if the value for empty weight is beyond these limits.
50772 37 12/04 Issue # 2
Page 38

The tare weight is not checked if these values are zero.
If Allow Violations is checked, the program will display a warning message when this condition
exists. The scale operator will be allowed to override and accept the tare update. If the tare
weight violation occurs during ticket processing, the program will display a warning message but
stores the transaction anyway.
When tare weights are updated in unattended mode, a value that is beyond the limits will be
accepted without any warnings if Allow Violations is checked.
Gross Weight Limits
Enter the minimum and maximum gross weights for this truck. Transactions will not be processed
if the value for gross weight is beyond these limits. The gross weight is not checked if these
values are zero.
If Allow Violations is checked, the program will display a warning message but stores the
transaction anyway. Tickets will never be printed for transactions where the maximum gross
weight limit has been exceeded. If you attempt to reprint a ticket for a transaction with a maximum
gross weight violation, the message "*** Over Weight Over Weight Over Weight ***" will
appear on the ticket.
Load Out (Target Net Weight)
If the Load Out feature has been purchased, you can enter the target net weight for this truck. This
is the amount of material that will be loaded on the truck by the Load Out terminal.
50772 38 12/04 Issue # 2
Page 39

Truck Table
History Screen
Every truck is attached to a hauler account. The Account Truck List screen gives you the capability to
quickly view, update and add trucks using only required fields. The Truck Table screens show and allow
updates for all fields in the truck record. This screen allows you to view the hauling history for the truck
and set the last order, last account and last material.
How to Get Here
Admin->Accounts->Trucks Button->Details Button->History Radio Button
Field Descriptions
Last Order
This drop down contains a list of all Job/Orders in the database and is set to the last job for which
50772 39 12/04 Issue # 2
Page 40

this truck hauled material. If the truck history option has been enabled, job will be preset to this
value in the Weigh screen when this truck is used. You can manually change this field to another
job if you desire.
There is a special system supplied setting for this field called PROMPT. This setting is used in
unattended operations only and will force the program to always prompt for job (assuming that job
is an enabled prompt) regardless of the setting for the truck history option.
Last Account
This drop down contains a list of all Bill-To accounts in the database and is set to the last bill-to
account for which this truck hauled material. If the truck history option has been enabled, bill-to
account will be preset to this value in the Weigh screen when this truck is used. You can manually
change this field to another account if you desire.
There is a special system supplied setting for this field called PROMPT. This setting is used in
unattended operations only and will force the program to always prompt for bill-to account
(assuming that bill-to account is an enabled prompt) regardless of the setting for the truck history
option.
Last Material
This drop down contains a list of all Materials in the database and is set to the last material hauled
by this truck. If the truck history option has been enabled, material will be preset to this value in
the Weigh screen when this truck is used. You can manually change this field to another material
if you desire.
There is a special system supplied setting for this field called PROMPT. This setting is used in
unattended operations only and will force the program to always prompt for material (assuming
that material is an enabled prompt) regardless of the setting for the truck history option.
Code, Description, Loads, Qty
This box will contain the code, description, number of loads and quantity in tons for the last 5
materials hauled by this truck. This history is cleared daily.
50772 40 12/04 Issue # 2
Page 41

Truck Table
Custom Fields Screen
Every truck is attached to a hauler account. The Account Truck List screen gives you the capability to
quickly view, update and add trucks using only required fields. The Truck Table screens show and allow
updates for all fields in the truck record. This screen allows you to enter data into custom fields.
How to Get Here
Admin->Accounts->Trucks Button->Details Button->Custom Radio Button
Field Descriptions
Custom Field 1 through 5
Enter data for up to 5 user defined custom fields.
50772 41 12/04 Issue # 2
Page 42

Account Options
Main Screen
The Account Options dialog is used to configure the Account Table screens. This screen allows you to
assign names to the three addresses available in the account record.
How to Get Here
Admin-->Accounts-->Options Button-->Main Radio Button
Field Descriptions
Accounting Method (All Accounts)
This field designates the type of statement that is generated for this account: balance forward or
open item. Currently this option has no effect. The statement type is selected in the
Invoice/Statement screen.
Address Labels
Enter your own labels for the three addresses available in a account record. These labels will then
appear in the Account Table screen.
50772 42 12/04 Issue # 2
Page 43

Ok Button
Click this button to save Account Option changes and return to the Account screen.
Cancel Button
Click this button to discard Account Option changes and return to the Account screen.
Apply Button
Click this button to save Account Option changes and stay in the Options screen.
Help Button
Click this button to display help for the current Account Options screen.
50772 43 12/04 Issue # 2
Page 44

Account Options
Defaults Screen
The Account Options dialog is used to configure the Account Table screens. When new records are added
to the account table, the data in most fields will be blank or set to initial values that are defined in the
database. This screen allows you to override these initial values for some of the more important fields and
are intended to save time when adding new accounts (clicking the New button). This will not prevent you
from changing the fields for the new account to other values.
How to Get Here
Admin-->Accounts-->Options Button-->Defaults Radio Button
Field Descriptions
Price Table
Select the initial price table that will be used by new accounts.
Tax Code
Select the initial tax code that will be used by new accounts.
50772 44 12/04 Issue # 2
Page 45

Exemptions
If checked, new accounts will be exempt from finance charges, freight and freight tax.
Categories
Selection the initial category codes that will be used by new accounts.
50772 45 12/04 Issue # 2
Page 46

Account Options
Groups Screen
The Account Options dialog is used to configure the Account Table screens. You may need to generate
invoices and statements for groups of accounts at different time intervals (daily, weekly, monthly, etc.) or
with different run parameters (finance charges, statement format, etc.). This can be accomplished by
assigning an account to a invoice and statement group. You can then pick the desired group and only
those accounts belonging to that group will have invoices or statements genera ted. This screen allows you
enter names for up to 20 invoice and statement groups.
How to Get Here
Admin-->Account-->Options Button-->Groups Radio Button
Field Descriptions
Invoice Groups
Lists the names of the invoice groups. Twenty (20) invoice groups are available. A yes in the
Default column designates the group as the default invoice group for new accounts. To modify a
group name, tab to the Invoice Groups list and then use the up/down and left/right arrows to
navigate within the list. When you have navigated to the desired cell you will notice the absence of
a cursor. Please ignore this quirk in the grid control and just start typing your changes.
50772 46 12/04 Issue # 2
Page 47

Statement Groups
Lists the names of the statement groups. Twenty (20) statement groups are available. A yes in the
Default column designates the group as the default statement group for new accounts.
50772 47 12/04 Issue # 2
Page 48

Account Options
Trucks, etc. Screen
The Account Options dialog is used to configure the Account Table screens. You can define two additional
tared vehicle types besides trucks. (Trucks is system defined and cannot be changed.) For ex ample, a
truck may pull a trailer or carry a removable container; each with its own tare weight. This screen allows
you to name and enable the additional tared vehicle types.
How to Get Here
Admin-->Account-->Options Button-->Trucks, etc. Radio Button
Field Descriptions
Names
Enter names for each tared vehicle type. Truck cannot be changed..
Enabled
If checked, the tared vehicle type is enabled and will be made visible in the account table truck list.
Truck is always enabled.
50772 48 12/04 Issue # 2
Page 49

Tare Automatically Expires
Set the number of days before a tare weight will automatically expire. When a new tare weight is
entered for a truck the system will automatically calculate the expiration date based on this value.
If set to zero, new tare weights will never expire.
50772 49 12/04 Issue # 2
Page 50

Account Options
Truck Type Screen
The Account Options dialog is used to configure the Account Table screens. Truck type is another criteria
(along with delivery zone) used to determine a freight charge. A different rate can be established for each
truck type. This screen allows you to assign a name to each truck type..
How to Get Here
Admin-->Account-->Options Button-->Truck Types Radio Button
Field Descriptions
Truck Type Table
This table lists the currently named truck types. To change a name in the table, first tab to the
table and then use the up/down arrows to navigate to the desired entry.
Add Button
Click this button to add a new blank entry to the end of the truck type table.
50772 50 12/04 Issue # 2
Page 51

Delete Button
Click this button to delete the currently selected truck type from the table.
50772 51 12/04 Issue # 2
Page 52

Account Options
Delivery Zones Screen
The Account Options dialog is used to configure the Account Table screens. Delivery zones are areas
where you will be hauling material and are usually defined as a distance from your home lo cation. This
zone can then be used as one of the criteria for defining freight rates for a hauler. Freight rates are used to
calculate the delivery or freight charge on a ticket. This screen allows you to name your delivery zones.
How to Get Here
Admin-->Account-->Options Button-->Delivery Zones Radio Button
Field Descriptions
Delivery Zone Table
This table lists the currently named delivery zones. To change a name in the table, first tab to the
table and then use the up/down arrows to navigate to the desired entry.
Add Button
Click this button to add a new blank entry to the end of the delivery zone table.
50772 52 12/04 Issue # 2
Page 53

Delete Button
Click this button to delete the currently selected delivery zone from the table.
50772 53 12/04 Issue # 2
Page 54

Account Options
Custom Screen
The Account Options dialog is used to configure the Account Table screens. The Custom screen
configures the user defined fields for customer and hauler accounts..
How to Get Here
Admin-->Accounts-->Options Button-->Custom Radio Button
Field Descriptions
Customer Specific
Up to five custom data fields can be defined and enabled for customer accounts. The custom field
name is entered in the text box and is enabled by checking the associated check box. The box
must be checked before the custom field will appear in the Account screen.
Hauler Specific
As with customer accounts, up to five custom data fields can be defined and enabled for hauler
accounts.
50772 54 12/04 Issue # 2
Page 55

Account Options
RSA Prompts Screen
The Account Options dialog is used to configure the Account Table screens. Before updating this screen it
is important to know what prompts and ticket printing schemes have been configured in your Remote Scale
Appliance (RSA). The same prompts and ticket printing schemes should be enabled on this screen. You
can then configure the prompts for each hauler account in the Account screen or individual truck in the
Truck screen.
How to Get Here
Admin-->Accounts-->Options Button-->RSA Prompts Radio Button
Field Descriptions
Account Enabled Check Box
When checked, the prompt or ticket printing scheme is made available in the Accounts screen.
Account Default Check Box
Specify the default value for the associated prompt for a new account.
50772 55 12/04 Issue # 2
Page 56

Truck Enabled Check Box
When checked, the prompt or ticket printing scheme is made available in the Trucks screen.
Truck Default Check Box
Specify the default value for the associated prompt for a new account.
Prompt Text Boxes
Enter the prompt label to be used in the Account and Truck screens for the four user defined
category codes.
50772 56 12/04 Issue # 2
Page 57

Order/Job Table
Main Screen
The Order/Job Table screens are used to add, modify or delete orders/jobs (henceforth referred to as
orders only) in the database. Typically you will set up an order when you wish to track loads being
delivered to the same job site. An order may specify certain materials as well as special rates for those
materials.
How to Get Here
Admin-->Order/Jobs
Field Descriptions
Id
A 10 character alpha-numeric field containing the order id.
50772 57 12/04 Issue # 2
Page 58

Description
A 30 character alpha-numeric field containing the order description.
Inactive Check Box
When checked, this order is inactive. It will not appear in any drop down lists on other screens and
will be considered a candidate to be purged from the database by the purge utility. In order to be
purged, there must be no transactions in the database that reference this order.
Customer
Select the customer account that will be billed for this order.
PO
.
Enter the purchase order number attached to this order. Purchase order is a 20 character alphanumeric field. This field is used to preset the transaction PO field when tickets are processed
against this order.
Special Instructions
Use these four fields to enter special instructions (directions, driver memos, etc.) for the order.
Each field is 50 characters in length. These fields can be printed on the ticket.
Quote Date
Quote date is automatically set when a new order is entered. However, it can be modified.
Order Date
An order date must be entered to activate the order. It will then appear in drop down lists of other
screens. (Note: The program does not check the value of the order date, it simply looks for a nonblank value.)
Starts Date
You can specify when a order becomes active by entering a start date. If no start date is entered,
the order becomes active as soon as an order date is entered.
Expires Date
You can also specify when a order expires by entering an expiration date. If no expiration date is
entered, then the order will never expire.
Material List
This list can be used to display and quickly enter the materials ordered. It contains the following
fields:
Code, Description
A ordered material can be selected from the material drop down list. When selected, the
50772 58 12/04 Issue # 2
Page 59

material code and description is automatically placed in the list.
Ordered
Use this column to enter the amount ordered.
Unit of Measure
The unit of measure is located next to the ordered amount. It is initially set to the default
unit of measure for the material selected. (The default unit of measure for a material is set
in the material screen.)
Price
Use this column to enter the price per unit of measure for this material.
Per Load
Enter Y if this is a per load price, otherwise enter N.
Freight, Fr Payable
Use these columns to enter the freight and freight payable charges for this material.
Per Load
Enter Y if these are per load freight charges, otherwise enter N.
Item Details Button
Click this button to view and modify all fields for the currently selected material.
Add Item Button
Click this button to add a new blank entry to the material ordered list.
Delete Item Button
Click this button to mark the currently selected material for deletion. The material will not actually
be deleted until the save button is clicked.
Delete All Items Button
Click this button to mark all materials for deletion. The materials are not actually deleted until the
save button is clicked.
Viewing
Select the orders you want to view with this screen. Your choices are All Orders, Active Orders
(Inactive unchecked), Inactive Orders (Inactive checked), Expired Orders or Quotes.
50772 59 12/04 Issue # 2
Page 60

Order/Job Table
Miscellaneous Screen
The Order/Job Table screens are used to add, modify or delete orders in the database. This screen is
used to define default data that will be used on tickets attached to this order along with other miscellaneous
fields.
How to Get Here
Admin-->Order/Job Table-->Miscellaneous Radio Button
Field Descriptions
Price Table
Specify the table that will be used to initially set the price for a newly ordered material. Tickets
attached to this order will also use this price table when the ticket material is not one of the ordered
materials.
50772 60 12/04 Issue # 2
Page 61

Tax Code
Specify the tax code that will be used to calculate tax on all tickets attached to this order.
Hauler
Specify the default hauler for this order.
Custom Fields
Enter data for any user defined custom fields. Custom fields are defined and enabled in the
Order/Job Options screen.
Activity
The two fields in this box show the date and time for the first and last tickets attached to this order.
These fields cannot be changed.
50772 61 12/04 Issue # 2
Page 62

Ordered Item
The ordered material list in the main Order screen only shows the most important fields for an ordered
material. This screen shows and allows modification to all fields.
How to Get Here
Admin-->Orders/Jobs-->Main Radio Button-->Item Details Button
Field Descriptions
Material
Select the material associated with this ordered item from the drop down list.
Order Units
Select the unit of measure to be used for this material. All quantities displayed on this screen will
be in this unit of measure. Whenever possible, the program will attempt to convert from the old
unit of measure to the new. .(e.g. 2500 pounds will be converted to 1.25 tons.) The program will
50772 62 12/04 Issue # 2
Page 63

not attempt to convert from a weight to yards or tons.
User defined units of measure will be enabled when the Calculate Charge Based on a User
Defined Unit option is turned on.
Totals
This box contains all totals for this order.
Loads
This row contains two fields showing the total number of loads delivered for this order and
the total loads delivered today.
Ordered
This field contains the amount of material ordered.
Delivered
This row contains two fields showing the total amount of material delivered for this order
and the total amount delivered today. When amount delivered exceeds amount ordered,
the operator will receive a warning message and will have the option to accept or cancel
the ticket that caused the ordered amount to be exceeded.
Remaining
This field shows the remaining amount to be delivered for this order.
Freight Rates
This box shows the freight rates for this order.
Total
This field contains the total freight rate attached to this order..
Payable
This field contains the freight rate payable to the hauler for this order.
Per Load Check Box
Check this box if the freight rates are per load rates.
Use Item Freight Rates Check Box
Freight rates can also be attached to each material ordered. If this box is checked, the
freight rate attached to the materials will be used. Otherwise, the freight rates entered
here are used.
Direction
Check the default material direction for this order: incoming or outgoing.
50772 63 12/04 Issue # 2
Page 64

Incoming and Outgoing Rates
A different set of prices can be entered for both incoming and outgoing material. The program
assumes the price is per whatever unit was selected in Order Units.
Material, Surcharge, ...
Enter a amount for each component rate. Component rates are defined in the Setup and
Miscellaneous Rates screen.
Per Load Check Box
Check the per load box located next to each component if the rate is a per load rate.
Taxable Check Box
Check this box if the rates are taxable.
Discountable Check Box
Check this box if these rates are discountable. Discounts are defined in either standard
payment terms or the custom terms specified for an account.
50772 64 12/04 Issue # 2
Page 65

Order/Job Options
The Order/Job Options screen is used to define and enable the custom fields for orders.
How to Get Here
Admin-->Orders/Jobs-->Options Button
Field Descriptions
Define Custom Fields
Up to five custom data fields can be defined and enabled for an order. The custom field name is
entered in the text box and is enabled by checking the associated check box. The box must be
checked before the custom field will appear in the Order/Job screen.
Ok Button
Click this button to save Order/Job Option changes and return to the Order/Job screen.
Cancel Button
Click this button to discard Order/Job Option changes and return to the Order/Job screen.
Apply Button
Click this button to save Order/Job Option changes and stay in the Order/Job Options screen.
Help Button
Click this button to display help for the current Order/Job Options screen.
50772 65 12/04 Issue # 2
Page 66

Category Table
Material Screen
There are four user definable categories in the program used to group transactions for reporting purposes.
Two of these categories are reserved for system purposes. One of these is the price table and the other is
the material table. The material category table contains all materials sold by your business. This screen
allows you to enter materials into the database.
How to Get Here
Admin-->Categories-->Materials
Field Descriptions
Code
A 10 character alphanumeric field containing the material code.
Description
A 30 character field containing the material description.
Note (GL Account)
50772 66 12/04 Issue # 2
Page 67

Note is a user definable field. It is most often used to import data from or export data to a 3rd party
accounting package. The field label can be changed by editing the initialization file.
Default Material
During ticket processing, the initial material code can be retrieved from the truck history, the
job/order or the bill-to account default values. If after all this the material code remains unset
(None) then the material designated as the default material will be used. Only one material can be
designated as the default.
Allow Price Overrides
If checked, the operator will be allowed to manually enter prices for this material from the Weigh
screen. Otherwise, prices from the price table are used and cannot be changed.
To manually enter prices, the operator must select the "Override Rates" price table which will
display a pop up screen where prices can be entered.
Mix/Load Out
In some applications, trucks will drive under a storage bin and are loaded under program control to
a specified target weight. This is called a load out system. Checking this box designates this
material as a load out material.
SubCat1, SubCat2
Material codes can be further grouped into subcategories. For example, materials could be
grouped by type (e.g. Rock, Sand, Crushed Stone) or by yard location (e.g. North, South, East,
West)..Subcategory title and entries are defined in the initialization file. Two subcategories are
available. (Subcategories are also available for Prices and user defined Categories).
Conversions
Two conversion factors are available to convert pounds to a user defined unit of measure. The
conversion feature is turned on with entries in the initialization file. You can calculate material
charges based on user defined units along with printing them on the ticket.
Inventory
A very simple inventory system is available for each material. You enter a beginning inventory
amount and the program will automatically calculate ending inventory by adding incoming and
subtracting outgoing transaction amounts. Inventory is updated after each ticket is processed and
whenever a Inventory report is generated.
To activate inventory tracking for a material a unit of measure (UOM) must be specified: pounds,
tons, yard or units.
The ticket UOM will automatically be set to inventory UOM during ticket processing.
50772 67 12/04 Issue # 2
Page 68

Category Table
Price Table
There are four user definable categories in the program used to group transactions for reporting purposes.
Two of these categories are reserved for system purposes. One of these is the material table and the
other is the price table. The price category table contains the codes and descriptions for each price table
used by your business.
Please note that this table does not contain the actual prices for each of your materials, just the codes and
descriptions. Prices are entered on a different form (displayed by clicking the Edit Table... button).
How To Get Here
Admin-->Categories-->Price
Field Descriptions
Code
A 10 character alphanumeric field containing the price code.
Description
A 30 character field containing the price table description.
Note
Note is a user definable field and can be used to enter any kind of information you wish. The field
label can be changed by editing the initialization file.
Default Price
During ticket processing, the initial price table code can be retrieved from the order or the bill-to
account default values. If after all this the price table code remains unset (None) then the price
50772 68 12/04 Issue # 2
Page 69

table code designated as the default will be used. Only one price table code can be designated as
the default.
Edit Table Button
Click this button to display the Price screen that is used to enter the price for each of your
materials.
50772 69 12/04 Issue # 2
Page 70

Category Table
There are four user definable categories in the program used to group transactions for reporting purposes.
Two of these categories are reserved for system purposes. One of these is the material table and the
other is the price table. The remaining two tables are user definable.
How To Get Here
Admin-->Categories-->Category
Field Descriptions
Code
A 10 character alphanumeric field containing the category code.
Description
A 30 character field containing the category description.
Note
Note is a user definable field and can be used to enter any kind of information you wish. The field
label can be changed by editing the initialization file.
Default Category
During ticket processing, the initial category code can be retrieved from the bill-to account default
values. If after this the category code remains unset (None) then the code designated as the
default will be used. Only one category code can be designated as the default.
50772 70 12/04 Issue # 2
Page 71

Utilities
Backup Database
This screen allows you to backup the database.
How to Get Here
Admin-->Utilities-->Backup
Field Description
List of Used Backup Names
This is a list of database backups located in the folder specified to the right. The program initially
creates and uses a default backup folder within the application folder called backups. You can use
any folder you want or create your own (with Windows Explorer).
Enter Backup Name (double click for default)
Enter the name you want to use for this backup. The name is limited to 8 characters. Double
clicking the name field will set the name to a default value. The default name can be configured in
the backup options screen.
Backup button
50772 71 12/04 Issue # 2
Page 72

Click this button to start the database backup. The program will perform a database repair and
compaction, placing the results in the backup database. It also makes a copy of the current
initialization file (the name of this file is formed from the backup name with a ini extension).
Delete button
Click this button to delete the currently selected database.
Options button
Click this button to display the backup options screen.
50772 72 12/04 Issue # 2
Page 73

Utilities
Restore Database
This screen allows you to restore the database from a backup.
How to Get Here
Admin-->Utilities-->Restore
Field Descriptions
List of Available Backups
This is a list of database backups located in the folder specified to the right. Select the backup
from the list that you want to restore. Double clicking on the backup will automatically start the
restore.
Enter Backup to Restore (without .mdb)
You can also select the backup by manually entering the name (without the .mdb) in this field.
Restore button
Click this button to begin the restore. The program maintains a set of codes and descriptions in
50772 73 12/04 Issue # 2
Page 74

memory for each major table (accounts, materials, etc.) These in-memory tables are reinitialized
after the restore is completed. The next ticket number is also reset by finding the largest ticket
number in the restored database and adding one.
Undo Last Restore
This button is enabled after you restore a backup. If you feel you have restored the wrong backup
you can return the database to its original status (before the restore) by clicking this button.
50772 74 12/04 Issue # 2
Page 75

Backup Options
This screen is used to configure the default backup names. There are separate configuration s for no rmal,
invoice and statement backups.
How to Get Here
Admin-->Utilities-->Backup-->Options Button
Field Descriptions
Normal
Click this radio button to display the default name configuration for a normal backup.
Invoices
A backup is performed before invoices are generated. Click this radio button to display the default
name configuration for a invoice backup.
Statements
A backup is performed before statements are generated. Click this radio button to display the
default name configuration for a statement backup.
Prefix
Enter a static set of characters used to begin the backup name.
Body
Select a body type that will be appended to the prefix to form the backup name. You can chose a
date, sequence number or no body format.
Next Sequence
50772 75 12/04 Issue # 2
Page 76

Set the next sequence number used to form the backup name.
Sample
This is a sample of a backup name that will be formed using the specified prefix and body.
Ok Button
Click this button to save Backup Option changes and return to the Backup screen.
Cancel Button
Click this button to discard Backup Option changes and return to the Backup screen.
Apply Button
Click this button to save Backup Option changes and stay in the Backup Options screen.
Help Button
Click this button to display help for the Backup Options screen.
50772 76 12/04 Issue # 2
Page 77

Import/Export Utility
Definition Screen
The Import utility allows you to add records to any table in the database from a formatted text file. The
export utility allows you to extract data from any table in the database to a formatted text file. A
import/export routine contains information on the subject database table, the fields to import or export and
the format and location of the text file.
This screen allows you to select an existing routine or begin defining a new routine for importing/exporting.
How to Get Here
Admin-->Utilities-->Import Data or Admin->Utilities->Export Data
50772 77 12/04 Issue # 2
Page 78

Field Descriptions
Import / Export Radio Buttons
Click the appropriate radio button to perform either importing or exporting.
Ranges
You can filter which import / export routines will appear in the drop down list by selecting the
desired group. The groups are:
All 000-999 All routines will be listed
.
Custom 000-099 Custom routines will be listed. Custom routines
Standard 200-299 Standard routines will be listed. Standard
Samples 300-399 Sample routines will be listed. Sample routines
RSA 500-599 RSA (Remote Scale Appliance) routines will be
Show All
You can choose to not include some routines in the drop down list. (See the Display check box
below.) Check this box to display all routines.
Choose a Routine
This drop down contains a list of all import/export routines in the selected group. Choose the
routine you wish to use. If you want to add a new routine then select the first entry in the list, "Add
New Export" or "Add New Import".
Routine Name
Enter the name you wish to assign to this routine. This is the name that will appear in the drop
down list.
System Assigned Id
The system automatically assigns and id to the routine. Export routine id's begin with "Export"
are numbered 000 through 099. Any new
routines that you define specific for your
business, should be placed in this group.
routines are numbered 200 through 299. These
routines are supplied by Fairbanks Scales with
every installation.
are numbered 300 through 399. These routines
are also supplied by Fairbanks Scales and are
meant to be used as examples for building your
own routines.
listed. RSA routines are numbered 500 through
599. Table data is exported to the RSA and
imported from the RSA using the Import/Export
Utility. These are the routines used for that
purpose.
50772 78 12/04 Issue # 2
Page 79

followed by a three digit number. Import routine id's begin with "Import" followed by a three digit
number.
Database Table
This drop down contains a list of all the tables in the database. Select the table that will be used
for this routine.
Field Definition
You must also specify which fields from the selected database table will be imported or exported.
This list of fields are stored in a field definition table. Select the field definition table that will be
used by this routine from this drop down list.
Field Definition View Button
Click this button to view and update the fields in the field definition table.
Import/Export File Directory
Enter the path to the folder containing the formatted text file being used or created by the
import/export routine.
Import/Export File Directory - Browse Button
Click this button to display a dialog box that can be used to set the Import/Export File Directory
path.
Import/Export File Directory - View Button
Click this button to select and view the formatted text file used or created by the import/export
routine.
Log File Directory
Summary information and error messages for the import/export routine are placed in a log file.
Enter the path to the folder containing this log file.
Log File Directory - Browse Button
Click this button to display a dialog box that can be used to set the Log File Directory path.
Log File Directory - View Button
Click this button to select and view the log file generated by this import/export routine.
Display
When checked, this routine will always be displayed in the routine drop down list. When not
checked, it is removed. This box is only available when Show All is checked.
Help Button
Click this button to view the help topic for this screen.
Import/Export Button
50772 79 12/04 Issue # 2
Page 80

Click this button to begin the import/export routine.
Delete Button
Click this button to delete the currently selected import/export routine.
Save Button
Click this button to save changes made to the currently selected import/export routine.
Quit Button
Click this button to quit the Import/Export Utility.
50772 80 12/04 Issue # 2
Page 81

Import/Export Utility
Text File Format Screen
The Import utility allows you to add records to any table in the database from a formatted text file. The
export utility allows you to extract data from any table in the database to a formatted text file. A
import/export routine contains information on the subject database table, the fields to import or export and
the format and location of the text file.
This screen allows you to specify the format for the import/export text file..
How to Get Here
Admin-->Utilities-->Import/Export Data->Formatting Radio Button
50772 81 12/04 Issue # 2
Page 82

Field Descriptions
File Format
Fields in the import/export text file can be separated by tab characters (Tab Delimited), commas
(Comma Delimited or CSV) or can be formatted into fixed width fields (User Defined). Field width
and justification are specified in the Field Table Selection screen.
Quoted Fields
Double quotes (") can be placed around Character Fields, Numeric Fields, All fields or None.
Default File Name
The import/export text file name consists of:
Prefix Enter the characters that begin the file name.
Body The prefix is followed by the name body which can be the
Current Seq# Select the starting value for the file body sequence
Extension Enter the characters that end the file name.
Sample An example of the file name using the options selected
current date formatted as either mmddyy or mmddyyyy.
The body can also be a one to six digit sequence number.
You can also choose to have no body, in which case the
file name will equal the Prefix.
number. Every time the import/export routine is run this
number is incremented, creating a unique file name.
above.
50772 82 12/04 Issue # 2
Page 83

Import/Export Utility
Options Screen
The Import utility allows you to add records to any table in the database from a formatted text file. The
export utility allows you to extract data from any table in the database to a formatted text file. A
import/export routine contains information on the subject database table, the fields to import or export and
the format and location of the text file.
This screen allows you to select options that control the behavior of the import/export.
How to Get Here
Admin-->Utilities-->Import/Export Data->Options Radio Button
50772 83 12/04 Issue # 2
Page 84

Field Descriptions
Duplicate Record Processing
You can select which behavior the program should use when it encounters a record in the import
text file that is already in the database.
Update Always update the database with data from the import text
Add Only Ignore duplicate records in the import text file.
Ask Ask the operator on a case by case basis what to do with
Merge Only This is the opposite of the Add Only option. Only import
Case Insensitive Compare
The Import/Export Utility considers a record as duplicate when every field in the imported record
equals the corresponding field in the database record. When checked, the compare for a duplicate
record is case insensitive for text fields. In other words, ABC equals abc.
Import Change Log
Normally, only statistics and error messages are placed in the log file. You can choose to include
the following additional information:
Duplicate Reject Log Include the list of duplicate records that were rejected.
Criteria Reject Log Include the list of records that were rejected because they
No Change Log Do not include additional information in the log file.
Import depends on previous Import Success
The Import/Export Utility can be invoked from a command line. As an example, the following
command line will start Import/Export and execute routines Import001, Import002 and Import003:
ImpExp.exe Autogo Import001 Import002 Import003
There may be situations where if Import001 fails, then the remaining imports should not be
attempted. Check this box to force this condition. This option applies to import routines only.
Force unimported fields to default values
Errors will occur when an imported field has no data (blank or empty) in the text file and the
database requires a value. Check this box to force the value of required fields to the default
specified in the database when no data is present in the import text file.
file.
duplicate records. The operator will be presented with a
list of duplicate records and can choose which ones to
accept or reject.
records that already exist in the database will be
processed.
didn't meet all selection criteria.
50772 84 12/04 Issue # 2
Page 85

Archive this Export
This feature is currently not being used.
Email Export
When checked, the export file will be emailed to the recipient specified in the box below.
Append to Existing File
Normally, a new text file is created by each export routine. Check this box to append data to an
existing text file.
Recipient Address
Enter the email address of all recipients of the export file. Multiple addresses can be entered,
separated by commas. For example: James.A@company.com, Sally.M@company2.com
Sender Address
Enter your email address.
Server Address
Enter the address of your outgoing mail server. For example: mail.charter.net
50772 85 12/04 Issue # 2
Page 86

Import/Export Utility
Record Selection Screen
The Import utility allows you to add records to any table in the database from a formatted text file. The
export utility allows you to extract data from any table in the database to a formatted text file. A
import/export routine contains information on the subject database table, the fields to import or export and
the format and location of the text file.
This screen allows you to select options that control the behavior of the import/export.
How to Get Here
Admin-->Utilities-->Import/Export Data->Record Selection Radio Button
50772 86 12/04 Issue # 2
Page 87

Field Descriptions
Criteria or SQL Radio Buttons
For the database transaction table you have two choices for selecting records.
Criteria Select this option to display this screen of fixed selection
SQL Select this option to display a screen where an SQL
TransAcct = "123" AND TransMatrl = "40".
From Ticket, To Ticket
Enter a ticket range by which transactions will be selected.
From Date, To Date
Enter a date range by which transactions will be selected.
List Sites
Site code is a unique one character field assigned to each PC running this application. Enter a list
of site codes (e.g. AFG for sites A, F and G) by which transactions will be selected.
Type, Customer, Hauler, Job, Material, User Defined Categories and Price
These are drop downs containing a list of codes that are attached to a transaction record. Select a
value from any of these lists to use in selecting transactions.
criteria. Select values for any or all fields. Only those
transaction records that meet all criteria entered will be
accepted from the import file or placed in the export file.
statement can be entered to select the desired records
from the database table. This is the only option available
for all tables other than the transaction table. This screen
does not accept a full SQL statement for selecting
records, just the WHERE clause without the "WHERE".
For example, to select records from account "123" with
material code equal to "40" use the following statement:
50772 87 12/04 Issue # 2
Page 88

Import/Export Utility
Field Editor Main Screen
You must specify which fields from the selected database table will be imported or exported. This list of
fields are stored in a field definition table.
This screen allows you to update or add a field definition table.
How to Get Here
Admin-->Utilities-->Import/Export Data->Definition Radio Button->Field Definition View Button
Field Descriptions
Range
You can filter which field definition tables will appear in the drop down list by selecting the desired
group. These groups are identical to those that appear in the Import/Export Definition screen.
50772 88 12/04 Issue # 2
Page 89

Field Definition
This drop down contains a list of all field definition tables for the selected group. Choose the field
definition you wish to update. If you want to add a new field definition table then select the first
entry from the list, "Add New Field Definition".
Database Table
This drop down contains a list of all tables in the database. Select the database table you wish to
use.
Description
Enter a description for the field definition table. This is the description that will appear in the drop
down list.
Form or Grid Radio Buttons
Choose the format you wish to use to select fields in the Specification tab: Form or Grid.
Used by these Import / Export Definitions
This box will list all the Import/Export routines that use this field definition table.
Help Button
Click this button to display the help topic for this screen.
Delete Button
Click this button to delete the currently selected field definition table.
Save Button
Click this button to save the changes made to the currently selected field definition table.
Quit Button
Click this button to unload the Field Definition screen and return to the Import/Export Utility screen.
50772 89 12/04 Issue # 2
Page 90

Import/Export Utility
Field Editor Specification Screen
You must specify which fields from the selected database table will be imported or exported. This list of
fields are stored in a field definition table.
This screen allows you to select the fields.
How to Get Here
Admin-->Utilities-->Import/Export Data->Definition Radio Button->Field Definition View Button>Specification Tab
Field Descriptions
Fields From
This control applies to exports only.
50772 90 12/04 Issue # 2
Page 91

This is a drop down containing a list of all tables in the database. It is initially set to the default
table specified in the Field Editor Main screen. However, you are not limited to exporting fields
from the default table only. Fields from any table related to the default table can also be exported.
For example, you may wish to include the account name in a transaction table export. Account
name is not in the Transaction table but needs to be retrieved from the Account table. Select
Account table from this list which will then enable you to include any account field in the export.
Field List
This list contains the fields that are currently being imported or exported. Selecting any row will
enable a drop down containing all fields for the selected table (Fields From). To add a new field to
the list, select the row marked with an asterisk (*) and choose a field.
Up Button
Click this button to move the currently selected field one position up in the list.
Down Button
Click this button to move the currently selected field on position down in the list.
Delete Button
Click this button to delete the currently selected field from the list.
Table / Field
These controls display the table and field name for the currently selected field in the list.
Fixed Width
Enter a field width. Data in the import/export text file will always occupy this many positions.
Calculation
Simple calculations can be performed on the field before it is imported or exported. The
calculation consists of a operator followed by a constant. Valid operators are decrement (--),
multiplication (*) and division (/).
For example, all weights in the Transaction table are stored in pounds. To convert the weight to
tons before exporting, enter "/2000" in the calculation field.
Value True, Value False, Boolean Value
At times you may need to export values based on a simple compare condition. If the condition is
true, export one value. If it is false, export another value.
For example, if the tax code stored with a transaction is "Exempt" then export one (1), otherwise
export zero (0). This conversion can be performed as follows:
Boolean Value Enter the compare value. In this example "Exempt".
True Value Enter the value you wish to export if the tax code field
equals "Exempt". In this example, one (1). The value
50772 91 12/04 Issue # 2
Page 92

entered is not limited to one character.
False Value Enter the value you wish to export if the tax code field
does not equal "Exempt", In this example, zero (0).
Again, the value entered is not limited to one character.
Format String
The data exported can be formatted using standard Visual Basic format strings.
Justification
Fixed width fields can be justified left or right.
Quote/Delimit String
The general formatting options allow for quotes around numeric fields, character fields, all fields or
no fields. You may run into a case where the import/export text file does not follow these general
rules and requires that specific fields be enclosed in quotes. Enter the letter Q to enclose the
currently selected field in quotes. Enter N if not enclose in quotes.
The general formatting options allow for fields to be either tab or comma delimited. You may run
into a case where a special character other than tab and comma is being used for a field delimiter.
Enter the decimal value for the special delimiter character in angle brackets (<>). For example, if
the currently selected field is delimited by the pipe character (|), then enter <124>.
The quote and delimiter values are combined into one field, both being optional. Following are a
few examples:
Q Encloses field in quotes (").
<124> The delimiter for this field is the pipe character (|).
Q<124> The field is enclosed in quotes and the delimiter is a pipe
character.
50772 92 12/04 Issue # 2
Page 93

SQL Update Utility
Login Screen
At times it is advantageous to be able to update the database using SQL statements. This is a very
powerful tool and cannot be used directly without obtaining the SQL code and a "good for the day"
password from Fairbanks Scales
How to Get Here
Admin->Utilities->SQL Update
Field Descriptions
Password Text Box
Enter the password supplied by Fairbanks Scales to gain access to the SQL Update screen.
50772 93 12/04 Issue # 2
Page 94

SQL Update Utility
Update Screen
At times it is advantageous to be able to update the database using SQL statements. This screen allows
you to modify an SQL statement and execute it against the database.
How to Get Here
Admin->Utilities->SQL Update->Enter Password
Field Descriptions
Select a Previously Saved Query
This drop down contains a list of all previously saved queries. SQL queries are saved in text files
(name.qry) and stored in the SQL sub folder within your application folder.
SQL Statement to be Executed
This box displays and allows you to update the SQL statement.
File Name
The file name used to store the SQL statement in the SQL sub folder. The qry extension is
automatically added to the file name.
50772 94 12/04 Issue # 2
Page 95

Description
Enter a description for the SQL query. This is the description that will appear in the drop down list.
Run Button
Click this button to run the SQL query. The message "SQL Running" will appear in the status bar
and remain until the query completes. If successful, the status bar message will change to "SQL
update ran successfully", otherwise and error message box will be displayed.
Save SQL Button
Click this button to save the SQL statement in the SQL sub folder.
Delete SQL Button
Click this button to delete the SQL statement from the SQL sub folder.
Quit Button
Click this button to quit the SQL Update Utility.
50772 95 12/04 Issue # 2
Page 96

Company Data
Use this screen to enter your company name and address. If you have multiple sites running this program,
you must uniquely identify each site with a code entered here.
How to Get Here
Admin-->Preferences-->Company Data
Field Descriptions
Name
This is a 40 character field containing your company name. This name will appear at the top of all
reports, invoices and statements.
Address, City, State/Province, Zip/Postal Code, Phone, Fax
These are your company address fields.
Site
Your company may have multiple sites. Enter a one character code that uniquely identifies this
site. This code is recorded with each ticket processed at this site.
50772 96 12/04 Issue # 2
Page 97

Scale Port
Setup Screen
This screen is used to configure the two scale ports on the Weigh screen.
How To Get Here
Admin-->Preferences-->Scale Port 1 (or Scale Port 2)
Field Descriptions
Scale Label
This label will appear above the scale indicator in the Weigh screen.
Baud Rate, Data Bits, Stop Bits, Parity, Flow Control
50772 97 12/04 Issue # 2
Page 98

These fields are only used when the scale indicator is connected to one of your PC's serial (COM)
ports. Select the baud rate, data bits, stop bits, parity and flow control settings for the serial port.
These settings must agree with the corresponding settings in the scale indicator.
Device Type
Select your scale indicator type. This drop down list contains a list of all the preprogrammed
setups that are available. If yours is not listed, we recommend you call Fairbanks Scales for
assistance in adding your indicator.
Connector
This list displays all the possible serial port connections that can be used to connect the scale
indicator to your PC. The list contains COM1 through COM8 even though you may not have all
these ports available. If you attempt to use an unavailable serial port, you will receive the error
message "Error 68 - Device Unavailable" when you test the connection (see Test button).
There are two special settings in the connector list: SIM and MANUAL. When SIM is selected, the
scale indicator in the Weigh screen will be configured with a scroll bar. The weight on this indicator
can be scrolled in increments of 3000 units. When MANUAL is selected, the scale indicator in the
Weigh screen will display the word "Manual". When this indicator is active, the operator can type
values into the weight fields.
Zero Command
Some indicators can be zeroed by sending a command via the serial port. Enter the command
here and select one of the end of command character sequences: CR (carriage return), LF (line
feed) or CRLF (carriage return and line feed). When a zero command is entered, a zero button will
appear along side the scale indicator in the Weigh screen. Clicking this button will send this
command to the indicator.
Test button
Click this button to display the indicator test screen.
50772 98 12/04 Issue # 2
Page 99

Scale Port
Test Screen
This screen is used to test a scale port configuration using the serial port and scale indicator settings from
the setup screen.
How To Get Here
Admin-->Preferences-->Scale Port 1 (or Scale Port 2)-->Test button
Field Descriptions
Serial Port Data Screen
The top control displays the data being received from the serial port. The sixteen leftmost columns
(with two characters per column) are the hexadecimal representation of the data. The sixteen
50772 99 12/04 Issue # 2
Page 100

rightmost columns (with one character per column) are the ascii or printable representation of the
data. Any unprintable characters are replaced by a period in these columns.
If the serial port settings are correct, you should be able to read the majority of the data on the right
side of the screen.
Weight, Tare, Polarity, Units, Gross/Net, Motion, In Range
These fields are extracted from the serial data using the scale stream format for the indicator
specified in the setup screen. If any question marks appear in these boxes then you probably
have a incorrect indicator type specified.
Events
This column of radio buttons show the serial port events.
Errors
This column of radio buttons show the serial port errors. The error count will also be displayed
next to the word "Errors". None of these buttons will light up and the error count will be zero if your
serial port settings are correct.
Done button
Clicking this button will discontinue testing and return you to the setup screen.
Pause button
Clicking this button will turn off data from the serial port. The caption on the button will change to
"Continue".
Continue button
Clicking this button will turn on data from the serial port. The caption on the button will change to
"Pause".
50772 100 12/04 Issue # 2
 Loading...