


Bluetooth speaker with FM/DAB
Bluetooth-högtalare med FM/DAB Bluetooth-høyttaler med FM/DAB Bluetooth-kaiutin, jossa FM/DAB
Bluetooth-Lautsprecher mit UKW/DAB
Art.no. Model
38-5698 BDX1400
English 3
Svenska 16
Norsk 28
Suomi 40
Deutsch 52
Ver. 20130820
2

Bluetooth speaker with FM/DAB
Art.no 38-5698 |
Model BDX1400 |
Please read the entire instruction manual before using the product and save it for future reference. We reserve the right for any errors in text or images and any necessary changes made to technical data. If you have any questions regarding technical problems please contact our Customer Services.
Contents |
|
1. Safety............................................................................................ |
4 |
2. Product description..................................................................... |
4 |
3. Buttons and functions................................................................ |
5 |
4. Assembly...................................................................................... |
7 |
5. Connections.................................................................................. |
7 |
6. Operating instructions................................................................ |
8 |
7. Settings ........................................................................................ |
8 |
Sound........................................................................................................ |
10 |
8. Connections................................................................................ |
10 |
Bluetooth connection.............................................................................. |
10 |
AUX connection........................................................................................ |
10 |
9. Radio .......................................................................................... |
10 |
9.1 FM-radio............................................................................................. |
10 |
Settings............................................................................................................................... |
11 |
Setting radio stations........................................................................................................ |
11 |
Saving radio stations to the memory presets................................................................ |
11 |
Using presets..................................................................................................................... |
12 |
FM radio display info......................................................................................................... |
12 |
FM settings........................................................................................................................ |
12 |
9.2 DAB radio............................................................................................ |
12 |
DAB Settings...................................................................................................................... |
12 |
Full scan.............................................................................................................................. |
13 |
Removing preset channels............................................................................................... |
13 |
Station selection................................................................................................................ |
13 |
Saving radio stations to the memory presets................................................................ |
13 |
Using presets..................................................................................................................... |
14 |
DAB radio display info....................................................................................................... |
14 |
10. Care and maintenance............................................................ |
14 |
11. Disposal.................................................................................... |
14 |
12. Specifications.......................................................................... |
15 |
English
3

English
1. Safety
•Follow all the instructions in the instruction manual and heed all warnings.
•Do not place the product where there is a risk of it falling into water or other liquid. Do not place any objects which contain liquid onto the speaker such as vases, drinks, etc.
•The ventilation openings must not be obstructed. Make sure that there is sufficient air circulation to prevent overheating. Make sure that the product is placed in
a location where there is adequate surrounding air circulation and that no heaters or other sources of heat are in near proximity.
•This product should only be repaired by a qualified service technician.
•The product should not be taken apart or modified. Certain exposed parts inside
the casing carry dangerous current. Contact with these can lead to fire or electric shock.
•The product is designed for indoor use only.
•Never subject the product to high temperature, dust, heavy vibration, impacts, humidity or moisture.
•The mains lead should be checked regularly. Never use the product if the mains lead or its plug is damaged or if the product is not functioning properly.
•The mains lead must be changed if damaged. This is to prevent the risk of electric shock or fire and should only be carried out by the manufacturer, qualified service facility or qualified technician.
•Never lay the mains lead over hot surfaces or pull it round sharp edges or corners. Place the mains lead out of the way of all foot traffic.
•Only use the stand that is included with this product. Place the product on steady level surface to prevent the risk of it tipping over.
•Unplug the product from the wall socket during thunder storms or if it is not to be used for a long time. The product’s plug should always be easily accessible.
2. Product description
•Powerful 3-way speaker with integrated 8″ subwoofer (2 × 40 W + 1 × 80 W).
•Wireless streaming via Bluetooth (A2DP apt-X).
•Alarm Clock
•DAB+/FM-radio with AUX input.
•Comes with remote control and detachable foot.
4

3. Buttons and functions
Control panel and display
1 |
2 |
3 |
4 |
5 |
6 |
7 |
8 |
9
10
1.[ ] Standby
2.[ IN ] Input selector: Bluetooth, AUX, FM/DAB
3.[ SET ] Settings
4.[ ►II ] Play/pause
5.[ I◄◄ ] Previous track/fast rewind/time settings
6.[ ►►I ] Next track/fast forward/time settings
7.[  ] Decrease volume
8.[  ] Increase volume
9.Remote control’s IR sensor
10.Display
Back panel
11.AC mains connection
12.Power switch
13. AUX input for external audio sources
14. Aerial input |
AUX IN |
FM/DAB |
|
R |
L |
11 |
12 |
13 |
14 |
English
5

English
Remote control |
|
|
|
|
|
||
15. |
[ |
] Standby |
|
|
|
|
|
16. |
[ INPUT ] Input selector |
15 |
|
|
|
19 |
|
17. |
[ I◄◄ ] Previous track/fast |
|
|
|
|||
16 |
|
|
|
20 |
|||
|
rewind/time settings |
INPUT |
DISPLAY |
SETUP |
|||
18. |
[ TREBLE +/- ] Treble control |
|
|
|
|
21 |
|
19. |
[ |
] Mute |
|
|
|
|
|
|
|
MENU |
|
|
|||
20. |
[ SETUP ] Time and alarm settings |
|
|
|
|
22 |
|
21. |
[ DISPLAY ] Display settings |
17 |
|
ENTER |
|
23 |
|
22. |
[ MENU ] FM/DAB |
|
|
|
|
||
|
|
|
|
24 |
|||
23. |
[ ►►I ] Next track/fast forward/time settings |
|
|
|
|
||
|
|
|
|
|
|||
24. |
[ ENTER ] Confirms selection |
|
|
|
|
25 |
|
25. |
[ ►II ] Play/pause/radio station preset save |
|
|
|
|
||
|
+ |
+ |
+ |
|
|||
26. |
[ BASS ] Bass settings |
|
|
||||
18 |
|
VOLUME |
|
26 |
|||
27. |
[ VOLUME +/- ] Volume control |
|
|
||||
TREBLE |
|
BASS |
|||||
|
|
|
|
|
VOLUME |
|
|
27 |
Inserting batteries into the remote control
1.Press in the battery holder’s latch and slide it out.
2.Insert one CR2025 battery according to the markings in the battery compartment.
3.Reinsert the battery holder.
Note:
•Use only the size and type of battery specified and ensure correct insertion.
•Never subject the remote control to knocks or blows.
•Remove the batteries if the remote control is not to be used for a long period.
6
Using the remote control
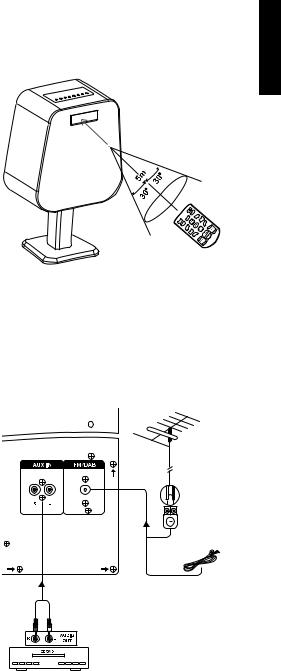
Aim the remote control towards the top of the speaker. Range: 5 metres within a max 30° window.
Causes of interference:
•Intense lighting
•Obstacles between the remote and IR sensor.
•Simultaneous use of other remotes.
•Weak batteries.
4. Assembly
The speaker comes with the foot unattached.
•Securely screw the 3 parts of the speaker foot together by inserting the fully threaded screws from both sides.
•Securely screw the foot to the speaker using the supplied bolt.
5. Connections
Back panel connections:
AUX IN Input for external audio sources, e.g. CD, DVD, etc. (cable sold separately).
FM/DAB Indoor aerial connection (included) or outdoor aerial
(sold separately).
English
7

English
6. Operating instructions
•Connect one end of the mains lead to the speaker and the other end to a wall socket.
•Set the power switch (12) to the ON position.
• The speaker will start in standby mode, with the [ ] (1) appearing dimly lit on the display (10).
Switching the speaker on
1. Turn the speaker on (activate) by pressing the standby button [ ] (1) or [ ] (15) on the remote control.
2. The display and control panel will shine fully when the speaker is active.
Selecting an input source
Press [ IN ] (2) or [ INPUT ] (16) the required number of times until the desired input source appears.
DAB  BT
BT  AUX
AUX
FM
7. Settings
Press [ SET ] (3) or [ SETUP ] (20) the required number of times until the desired setting appears (sub-menu). The name of the selected setting and current setting will be shown on the display.
Set time  Set sleep time
  Set alarm
Bass  Treble
Set time (time settings)
1.Make sure that “Set time” shows on the display.
2.Press [ ENTER ] (24) to begin setting the time.
3.The hour setting will begin flashing. Set the correct hour using [ I◄◄ ] (17) and [ ►►I ] (23).
4.Press [ ENTER ] (24) to confirm your selection. Set the minutes in the same way.
5.The set time will then be displayed. Note: The clock only has a 24-hour display format.
With the control panel you can set the time directly using [ I◄◄ ] (5) or [ ►►I] (6) in the “Set time” mode. Confirm by pressing [ SET ] (3).
Note: The time must be reset if the speaker is turned off using the power switch (12).
Set sleep time (automatic sleep timer settings)
1.Make sure that “Set sleep time” is shown on the display.
2.Press [ ENTER ] (24) to begin setting the sleep timer.
8
3. |
Select the desired time for automatic sleep timer shut-off with [ I◄◄ ] (17) |
English |
|
||
|
and [ ►►I ] (23). Select between (minutes): |
|
|
off → 05 → 10 → 15 → 20 → 25 → 30 → 40 → 50 → 60 → 70 → 80 → 90 → off |
|
|
|
|
4. |
Press [ ENTER ] to confirm. |
|
5. |
The icon in the upper left hand corner will appear when the automatic sleep |
|
|
timer is activated. |
|
With the control panel you can set the sleep timer directly using [ I◄◄ ] (5) or [ ►►I ] (6) in “Set sleep time” mode. Confirm by pressing [ SET ] (3).
Set alarm (alarm settings)
1.Make sure that “Set alarm” shows on the display.
2.Press [ ENTER ] (24) to begin setting the alarm time.
3.Either “ON” or “OFF” will begin flashing, select (ON) with [ I◄◄ ] (17) and[ ►►I ] (23).
4.Press [ ENTER ] (24) to begin setting the “ON” time.
5.“hour” will begin flashing on the display. Set the correct hour using [ I◄◄ ] (17) and [ ►►I ] (23).
6.Press [ ENTER ] to confirm the “ON” time. Set the minutes in the same way.
7.Once the alarm time has been set and confirmed, you can set the type of alarm. Toggle between the various settings using [ I◄◄ ] and[ ►►I ]: DAB (DAB-radio) → BUZZER → FM (FM-radio), etc. Press [ ENTER ] to confirm your choice.
8.Turning off the alarm:
-- When the alarm sounds press [ ENTER ] (24). “ON/OFF” will show on the display.
-- Select (OFF) with [ I◄◄ ] (17) and [ ►►I ] (23) to turn off the alarm. -- Press [ ENTER ] (24) to confirm your selection.
With the control panel you can set the alarm time directly using [ I◄◄ ] (5) or [ ►►I] (6) in “Set alarm” mode. Confirm by pressing [ SET ] (3).
Note: The alarm will not work if the speaker is turned off using the power switch (12).
Bass (bass settings)
•Press [ BASS + ] (26) or [ BASS - ] (26) on the remote control.
•Adjustment range ± 10 dB.
•The set bass level will be graphically shown on the display.
•With the control panel you can set the bass directly using [ I◄◄ ] (5) or [ ►►I] (6) in “Bass” mode.
Treble (treble settings)
•Press [ TREBLE + ] (18) or [ TREBLE - ] (18) on the remote control.
•Adjustment range ± 10 dB.
•The set treble level will show on the display.
•With the control panel you can set the treble directly using [ I◄◄ ] (5) or [ ►►I] (6) in “Treble” mode.
9

English
Sound
Volume
•Press [  ] or [
  ] on the controlpanel to adjust the volume. Or:
•Press [ VOL + ] or [ VOL - ] on the remote control to adjust the volume.
•The volume level will show on the display.
Mute (temporarily turns off volume)
Press [ |
] on the remote control to mute. |
Press [ |
] again to turn on the volume. |
8. Connections
Bluetooth connection
1.Press [ IN ] (2) until “Bluetooth” appears on the display.
2.After a few seconds “Scan” will appear on the display. This indicates that
the speaker is in search mode and is ready to detect other Bluetooth devices.
3.Activate Bluetooth on the device to be paired. Once the speaker detects
the device “Connected” will appear on the display. The speaker will appear under ”Detected devices” as “BDX1400”.
4.If you are prompted to enter a PIN code, enter “0000” (certain devices even require that you approve the connection).
5.You should now be able to hear the audio from the connected device through the speaker. Playback can now be controlled from the remote.
AUX connection
1.Connect an external audio source via the AUX socket (13). A cable with RCA plugs is required to make this connection (sold separately).
2.Press [ IN ] (2) or [ INPUT ] (16) the required number of times until “Aux” appears on the display.
9. Radio
The speaker is equipped with both FM and DAB radio.
9.1 FM-radio
Connect the supplied FM aerial to the aerial connection (14) on the back panel. The radio will display RDS information (Radio Data System) on the display.
10
Settings
FM
Press [ IN ] (2) or [ INPUT ] (16) the required number of times until FM appears. Press MENU (22) to select menu settings: Auto scan (automatic channel search) – Scan setting – Audio setting – System.
1.Press [ IN ] (2) or [ INPUT ] (16) the required number of times until “FM” appears on the display.
2.The tuner will start from the lowest tuner frequency the first time the FM radio is used.
Setting radio stations
Manual search: Press [ I◄◄ ] (17)/(5) or [ ►►I ] (23)/(6) to search for a station manually.
Automatic search: Hold in one of the buttons [ I◄◄ ] (17)/(5) or [ ►►I ] (23)/(6) for about 3 seconds to activate automatic station scan. Press [ MENU ] (22) to enter the settings menu. Press [ I◄◄ ] (17) or [ ►►I ] (23) to select the desired function:
•Auto scan – automatic station search.
•Scan setting – selects the type of stations to be searched for: All stations – Strong stations only.
•Audio setting – Forced mono (forced mono during poor reception) – Stereo allowed (stereo allowed even during poor reception).
•System – Factory reset – SW version (current software version).
Press [ ENTER ] (24) to confirm your selection.
Saving radio stations to the memory presets
You can save up to 20 radio stations presets.
A.Using Auto scan. All detected stations will then be saved to the presets.
B.Using manual scan.
Make sure that the radio station (frequency) you wish to save shows on the display. Saving station presets:
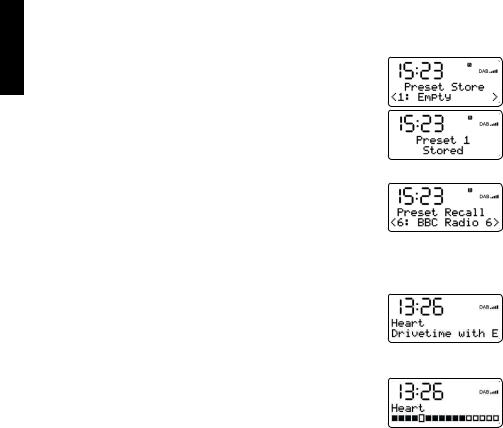
1.Hold in [ ►II ] (25) for about 5 sec until “Preset Store” appears on the display.
2.Select a preset slot (1–20) to save the station in with [ I◄◄ ] (17)/(5) or [ ►►I ] (23)/(6).
3.Press [ ENTER ] (24) to confirm your selection. “Preset X stored” will appear in the display once the channel is saved.
English
11

English
Using presets
1.Press [ ►II ] (25), for about 5 sec until “Preset Recall” appears on the display.
2.Select the desired preset (1–20) with [ I◄◄ ] (17)/(5) or [ ►►I ](23)/(6).
3.Press [ ENTER ] (24) to confirm your selection.
FM radio display info
Frequency and RDS info, including channel name and additional info will appear if available.
If no RDS info is available, “No Radio Text” appears on the display.
FM settings
FM
Press [ IN ] (2) or [ INPUT ] (16) the required number of times until FM appears. Press MENU (22) to select menu settings:
•Auto scan – automatic station search.
•Scan setting – selects the type of stations to be searched for: All stations – Strong stations only.
•Audio setting – Forced mono (forced mono during poor reception)
– Stereo allowed (stereo allowed even during poor reception).
•System – Factory reset – SW version (current software version).
9.2 DAB radio
Connect the supplied FM aerial to the aerial connection (14) on the back panel. The DAB radio receives DAB/DAB+/DMB-R digital radio and displays station info, and which programme/song is being broadcast.
DAB Settings
DAB
Press [ IN ] (2) or [ INPUT ] (16) the required number of times until DAB appears. Press MENU (22) to select menu settings:
•Full scan (automatic station search)
•Manual tune (manual station search)
•DRC (Dynamic range compression) difference between off, high, low)
•Prune (remove weak stations)
•System (system settings) – System Factory reset, SW version (current software version).
Toggle through the sub-menus using [ I◄◄ ] (17) and [ ►►I ] (23). Confirm by pressing [ ENTER ] (24).
12

1. Press [ IN ] (2) or [ INPUT ] (16) the required number of |
English |
|
|
times until “DAB” appears on the display. |
|
2. The first time the DAB radio is used or if the station list/ |
|
|
|
presets are empty an automatic station scan will be |
|
started. You may also want to conduct a manual scan |
|
because of the following reasons: |
|
-- To save new channels. |
|
-- A current channel has disappeared or its signal is weak. |
|
-- If reception was bad for the previous search due to a defective aerial, etc. |
|
-- If you have bad reception on the channels you want to save or you only want |
|
to search after channels with strong reception. |
|
Full scan
1.Press [ MENU ] (22) and select “Full scan”.
2.Press [ ENTER ] (24) to start scanning.
3.Once scanning is complete the DAB radio will return to the currently set radio station.
Removing preset channels
1.Press [ MENU ] (22) and select “Prune”.
2.“Prune?” appears. Select “Yes” to remove the highlighted station marked with a “?” or select ”No” to cancel.
3.Press [ ENTER ] (24) to confirm your selection.
Station selection
1.Select the desired station from the station list using [ I◄◄ ] (17)/(5) or [ ►►I ](23)/(6).
2.Press [ ENTER ] (24) to confirm your selection.
3.Details for the new channel will appear on the display.
Manual search: Press [ I◄◄ ] (17)/(5) or [ ►►I ] (23)/(6) to search for the desired station manually.
Saving radio stations to the memory presets
You can save up to 20 radio stations presets.
A.Using Auto scan. All detected stations will then be saved to the presets.
B.Using manual scan.
13
English
Make sure that the radio station (frequency) you wish to save shows on the display. Saving station presets:
1.Hold in [ ►II ] (25) for about 5 sec until “Preset Store” appears on the display.
2.Select a preset slot (1–20) to save the station on with [ I◄◄ ] (17)/(5) or [ ►►I ] (23)/(6).
Using presets
1.Press [ ►II ] (25), for about 5 sec until “Preset Recall” appears on the display.
2.Select the desired preset (1–20) with [ I◄◄ ] (17)/(5) or [ ►►I ](23)/(6).
3.Press [ ENTER ] (24) to confirm your selection.
DAB radio display info
Station name and DLS (Dynamic Label Segment)
- information broadcast from the station, e.g. programme name, song name and contact details. Long DLS (more than 18 characters) is scrolled on the display.
Displaying additional information
Press [ DISPLAY ] (21) repeatedly to display additional information. DLS text, DL Plus information (if available), signal strength, programme type, artist name, station frequency, signal error, bit rate (transfer rate), codec/DAB variant, time and date.
10. Care and maintenance
Unplug the mains lead before cleaning the product.
Clean the product using a soft, moist cloth. Use a mild detergent and never use solvents or strong, abrasive cleaning agents for cleaning the product.
11. Disposal
This product should be disposed of in accordance with local regulations. If you are unsure how to proceed, contact your local authority.
14

12. Specifications
Voltage |
220–240 V AC, 50/60 Hz |
Power consumption |
240 W |
Standby mode power consumption |
≤1 W |
Bluetooth |
2.1 + EDR, A2DP |
DAB/DAB + |
DAB band III |
FM |
87.5–108 MHz, 50 kHz/step |
Output power |
L/R CH 30 W + 30 W (RMS@THD = 10 % 8 ohm) |
|
SW CH 64 W THD = (RMS@THD = 10 % 8 ohm) |
Frequency range |
L/R CH (200 Hz – 20 kHz) |
|
SW CH (40 – 200 Hz) |
Sensitivity |
L/R: 600 mV. |
|
SW: 160 mV. |
S/N |
≥ 70 dB |
Remote control range |
5 metres within max 30° |
Size |
527 × 285 × 800 mm |
English
15

Svenska
Bluetooth-högtalare med FM/DAB
Art.nr 38-5698 Modell BDX1400
Läs igenom hela bruksanvisningen före användning och spara den sedan för framtida bruk. Vi reserverar oss för ev. textoch bildfel samt ändringar av tekniska data.
Vid tekniska problem eller andra frågor, kontakta vår kundtjänst (se adressuppgifter på baksidan).
Innehållsförteckning |
|
1. Säkerhet..................................................................................... |
17 |
2. Produktbeskrivning................................................................... |
17 |
3. Knappar och funktioner............................................................ |
18 |
4. Montering................................................................................... |
20 |
5. Anslutningar.............................................................................. |
20 |
6. Användning................................................................................ |
21 |
7. Inställningar .............................................................................. |
21 |
Ljud............................................................................................................ |
22 |
8. Anslutningar.............................................................................. |
23 |
Bluetooth-anslutning............................................................................. |
23 |
AUX-anslutning....................................................................................... |
23 |
9. Radio .......................................................................................... |
23 |
9.1 FM-radio............................................................................................. |
23 |
Settings (inställningar)...................................................................................................... |
23 |
Inställning av önskad radiofrekvens............................................................................... |
24 |
Spara radiofrekvens i minnet........................................................................................... |
24 |
Lyssna på en sparad radiofrekvens................................................................................ |
24 |
Information på displayen vid FM-lyssning.................................................................... |
24 |
Settings (FM-inställningar).............................................................................................. |
25 |
9.2 DAB-radio........................................................................................... |
25 |
Settings (DAB-inställningar)............................................................................................ |
25 |
Gör en fullständig sökning............................................................................................... |
26 |
Ta bort frekvenser som har hittats men som inte fungerar........................................ |
26 |
Välj önskad frekvens......................................................................................................... |
26 |
Spara radiofrekvens i minnet........................................................................................... |
26 |
Lyssna på en sparad radiofrekvens................................................................................ |
26 |
Information på displayen vid DAB-lyssning................................................................... |
27 |
10. Skötsel och underhåll............................................................. |
27 |
11. Avfallshantering...................................................................... |
27 |
12. Specifikationer......................................................................... |
27 |
16
1. Säkerhet
• Följ instruktionerna i bruksanvisningen och beakta alla varningar. |
|
• Placera inte produkten så att den kan falla ner i vatten eller annan vätska. Ställ inte |
Svenska |
heller några föremål som innehåller vätska på produkten, t.ex. en blomvas eller dryck. |
|
cirkulera runt den och att inte värmeelement eller liknande värmekällor finns i närheten. |
|
• Ventilationsöppningarna får inte blockeras. Säkerställ tillräcklig luftcirkulation för att |
|
förhindra överhettning. Se till att produkten placeras så att luften obehindrat kan |
|
• Produkten får endast repareras av kvalificerad servicepersonal. |
|
• Produkten får inte demonteras eller ändras. Farlig spänning finns oskyddad på |
|
|
|
komponenter inuti produktens hölje. Kontakt med dessa kan leda till brand eller |
|
ge elektriska stötar. |
|
• Produkten är avsedd endast för inomhusbruk. |
|
• Utsätt aldrig produkten för höga temperaturer, dammig miljö, starka vibrationer, |
|
stötar, fukt eller väta. |
|
• Nätsladden bör regelbundet kontrolleras. Använd aldrig produkten om nätsladden |
|
eller stickproppen är skadade eller när den inte fungerar normalt. |
|
• Om nätsladden skadats får den, för att risk för elektrisk stöt eller brand ska undvikas, |
|
endast bytas av tillverkaren, dess serviceställe eller av kvalificerad servicepersonal. |
|
• Placera aldrig nätsladden över heta ytor eller över skarpa kanter och hörn. Se till |
|
att nätsladden placeras så att man inte går eller trampar på den. |
|
• Använd endast stativet som medföljer. Placera produkten så att den inte riskerar |
|
att falla omkull. |
|
• Bryt strömmen till produkten genom att dra stickproppen ur vägguttaget vid |
|
åskväder och när den inte ska användas under en tid. Produktens stickpropp |
|
måste vara lättåtkomlig. |
|
2. Produktbeskrivning
•Kraftfull 3-vägshögtalare med inbyggd 8″ subwoofer (2 × 40 W + 1 × 80 W).
•Trådlös uppspelning via Bluetooth (A2DP apt-X).
•Klocka med väckning.
•DAB+/FM-radio samt AUX-ingång.
•Levereras med fjärrkontroll och löstagbar fot.
17

Svenska
3. Knappar och funktioner
Kontrollpanel och display
1 |
2 |
3 |
4 |
5 |
6 |
7 |
8 |
9
10
1.[ ] Standby
2.[ IN ] Ingångsväljare Bluetooth, AUX, FM/DAB
3.[ SET ] Inställningar
4.[ ►II ] Play/pause
5.[ I◄◄ ] Föregående spår/snabbspola bakåt/tidsinställning
6.[ ►►I ] Nästa spår/snabbspola framåt/tidsinställning
7.[  ] Minska volymen
8.[  ] Öka volymen
9.IR-mottagare (till fjärrkontroll)
10.Display
Baksida
11. AC-anslutning för nätsladd
12.Strömbrytare
13.AUX-ingång för extern ljudkälla
14. Antenningång |
AUX IN |
FM/DAB |
R |
L |
11 |
12 |
13 |
14 |
18

Fjärrkontroll |
|
|
|
|
|
||
15. |
[ |
] Standby |
|
|
|
|
|
16. |
[ INPUT ] Ingångsväljare |
15 |
|
|
|
19 |
|
17. |
[ I◄◄ ] Föregående spår/snabbspola |
|
|
|
|||
16 |
|
|
|
20 |
|||
|
bakåt/tidsinställning |
INPUT |
DISPLAY |
SETUP |
|||
18. |
[ TREBLE +/- ] Diskantinställning |
|
|
|
|
21 |
|
19. |
[ |
] Stäng av ljudet tillfälligt |
|
|
|
|
|
|
|
MENU |
|
|
|||
20. |
[ SETUP ] Inställning av tid och alarm |
|
|
|
|
22 |
|
21. |
[ DISPLAY ] Inställning av display |
17 |
|
ENTER |
|
23 |
|
22. |
[ MENU ] FM/DAB |
|
|
|
|
||
|
|
|
|
24 |
|||
23. |
[ ►►I ] Nästa spår/snabbspola |
|
|
|
|
||
|
|
|
|
|
|||
|
framåt/tidsinställning |
|
|
|
|
25 |
|
24. |
[ ENTER ] Bekräfta val |
|
|
|
|
||
|
+ |
+ |
+ |
|
|||
25. |
[ ►II ] Play/pause/spara |
|
|
||||
18 |
|
VOLUME |
|
26 |
|||
|
radiofrekvens i minnet |
TREBLE |
|
BASS |
|||
26. |
[ BASS +/- ] Basinställning |
|
|
VOLUME |
|
|
|
|
|
|
|
|
|||
27. |
[ VOLUME +/- ] Volymkontroll |
|
|
|
|
27 |
|
Sätt i batterier i fjärrkontrollen |
|
|
|
|
|
||
Svenska
1.Tryck in spärren på batterihållaren och dra ut batterihållaren.
2.Sätt i 1 × CR2025-batteri enligt märkningen i batterihållaren.
3.Tryck in batterihållaren.
Obs!
•Använd endast rätt typ av batteri och vänd det rätt.
•Utsätt inte fjärrkontrollen för slag eller stötar.
•Ta ur batterierna om fjärrkontrollen inte ska användas under en längre period.
19

Svenska
Användning av fjärrkontrollen
Rikta fjärrkontrollen mot övre delen av högtalaren. Räckvidd 5 m inom
max 30° vinkel.
Fjärrkontrollens räckvidd försämras av:
•Stark belysning.
•Hinder mellan fjärrkontrollen och IR-sensorn.
•Om andra fjärrkontroller används samtidigt.
•Dåligt batteri i fjärrkontrollen.
4. Montering
Högtalaren levereras med foten omonterad.
•Skruva ihop fotens 3 delar med de medföljande helgängade skruvarna från båda sidorna.
•Skruva fast foten på högtalaren med den medföljande bulten.
5. Anslutningar
Anslutningar på baksidan:
AUX IN Ingång för extern ljudkälla, t.ex. CDeller DVD-spelare
(kabel säljs separat).
FM/DAB Anslutning för inomhusantenn (medföljer) eller utomhusantenn (säljs separat).
20
6. Användning
•Anslut nätsladden till högtalaren och till ett eluttag.
•Ställ strömbrytaren (12) i läge ON.
• Högtalaren startar i standbyläge, displayen (10) och [ ] (1) lyser svagt.
Slå på högtalaren
1.Slå på högtalaren (aktivera) med standbyknappen [ ] på kontrollpanelen (1) eller fjärrkontrollen (15).
2.Displayen och kontrollpanelen på ovansidan lyser starkare när högtalaren är aktiv.
Välj ljudkälla
Tryck på [ IN ] (2) eller [ INPUT ] (16) upprepade gånger för att välja önskad ljudkälla.
DAB  BT
BT  AUX
AUX
FM
7. Inställningar
Tryck på [ SET ] (3) eller [ SETUP ] (20) upprepade gånger för att välja önskad inställning (undermeny). Benämning på vald inställning och aktuell inställning visas på displayen.
Set time  Set sleep time
  Set alarm
Bass  Treble
Set time (ställ in klockan)
1.Se till att ”Set time” visas på displayen.
2.Tryck på [ ENTER ] (24) för att bekräfta att tiden ska ställas in.
3.Timangivelsen blinkar på displayen. Ställ in rätt timme med [ I◄◄ ] (17) och [ ►►I] (23).
4.Tryck på [ ENTER ] (24) för att bekräfta. Ställ in minuter på samma sätt.
5.Inställd tid visas på displayen. Klockan har 24-timmarsvisning.
På kontrollpanelen går det att ställa in tiden direkt med [ I◄◄ ] (5) eller [ ►►I ] (6) i läge ”Set time”. Bekräfta med [ SET ] (3).
Obs! Klockan måste ställas in igen om högtalaren har varit avstängd med strömbrytaren (12).
Set sleep time (automatisk avstängning efter inställd tid)
1.Se till att ”Set sleep time” visas på displayen.
2.Tryck på [ ENTER ] (24) för att bekräfta att automatisk avstängning ska ställas in.
3.Ställ in önskad tid till automatisk avstängning med [ I◄◄ ] (17) och [ ►►I] (23). Stega mellan de olika inställningarna (minuter):
off → 05 → 10 → 15 → 20 → 25 → 30 → 40 → 50 → 60 → 70 → 80 → 90 → off
4.Tryck på [ ENTER ] för att bekräfta.
5.En ikon visas i övre vänstra hörnet av displayen när automatisk avstängning är aktiverad.
Svenska
21
 Loading...