


Adjustable TV/Monitor Bracket
Justerbart TV/monitorfäste
Justerbart TV/monitorfeste Säädettävä televisio/näyttöteline Verstellbare TV-/Bildschrimhalterung
|
English |
3 |
|
|
Svenska |
11 |
|
Art.no. |
Norsk |
19 |
|
Suomi |
27 |
||
38-5544 |
|||
Deutsch |
35 |
Ver. 20130319
2

Adjustable TV/Monitor Bracket
Art.no 38-5544
Please read the entire instruction manual before using the product and then save it for future reference. We reserve the right for any errors in text or images and any necessary changes made to technical data. If you have any questions regarding technical problems please contact our Customer Services.
Safety
•Ensure that you have read and understood all of the mounting instructions.
•The wall or surface to which the bracket is to be attached must be able to bear the weight of both the bracket and the attached TV or monitor. If the wall has studding, try to screw into the middle of the studding. The use of an stud detector is recommended.
•Use the appropriate tools and always use two people when attempting to mount a heavy TV/monitor onto the wall bracket. Trying to mount the TV alone can result in injury both to person and property.
•Do not overtighten the screws, doing so might damage and weaken the bracket.
•Always take into consideration the ventilation requirements of your TV/monitor by consulting the device’s instruction manual.
•Max load 20 kg.
•Consult an expert if you are unsure how to mount the bracket.
•This wall bracket is only intended for indoor use. Using the bracket outdoors could cause it to break, resulting in property damage or personal injury.
Note:
•Avoid laying the TV face down on the screen. If it is unavoidable, ensure that you have something soft under it, like a blanket to protect the screen.
•Never tilt a plasma screen more than is recommended in the instruction manual.
•Tighten the TV fastening bolts by hand at first. Stop when you notice any resistance, remove the bolts and investigate the cause of the problem.
Important:
The included mounting screws might not be suitable for the material of the wall or surface to which the bracket is to be mounted. Substitute the screws for some more suitable for the supporting material if necessary.
Always check the depth of the TV’s mounting holes before beginning installation.
English
3

English
Contents
Check that no parts are missing.
A.Wall bracket with VESA mount
B.Spanner
C.Allen key
Pack M (fasteners) |
|
||
A. M4x14 (x4) |
A |
||
B. M5x14 (x4) |
|||
|
|||
C. M6x14 (x4) |
C |
||
D. M8x20 (x4) |
|||
E. |
M5 washer (x4) |
|
|
F. |
M8 washer (x4) |
|
|
G. |
Small spacer (x8) |
|
|
Pack W (fasteners for wall mounting)
A.ST 5.5x50 (x3)
B.Masonry wall plug (x3)
C.M6 washer (x3)
B
A C
B
D
E F G
G
A
B
C
4

Assembly
Warning! Make sure that the wall you intend to attach the wall bracket to can bear the combined weight of the bracket and TV. If you are unsure, contact a tradesman. Make sure that you test the capacity of the bracket with a load of equal weight as the TV before mounting the TV onto it.
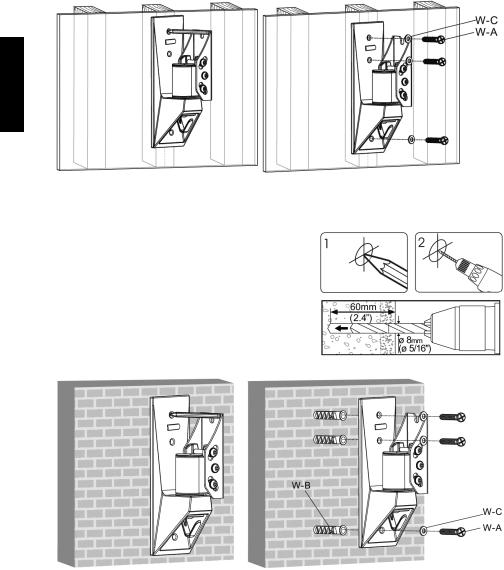
Screwing the wall bracket to the wall
1. Detach the VESA mount from the wall bracket.
2. Screwing the wall bracket to the wall
Important: The holes must be at least as deep as the length of the screws. If drilling into brick, drill at least 25 mm away from the edge of the brick. Do not drill into the mortar.
Wooden wall
-- 1-3. Measure, mark out and drill pilot holes. It is a good idea to use a stud detector on stud walls to help drill into the centre of the stud.
-- 4. Drill the mounting holes 50 mm deep using a
Ø 4 mm (5/32″) drill bit.
English
5

English
-- 5. Screw the wall bracket to the wall.
Masonry wall
-- 1-2. Measure, mark out and drill pilot holes. Use a hammer drill.
-- 3. Drill the mounting holes 60 mm deep using a Ø 8 mm (5/16″) drill bit.
-- 4. Screw the wall bracket to the wall.
6

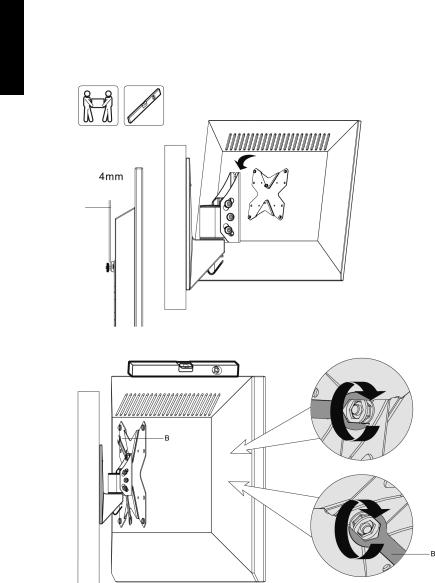
Attaching the VESA mount to the TV/monitor
English
or
1.Align the VESA mount with the mounting holes in the back of the TV/monitor and attach the mount using suitable fasteners from Pack M.
2.Tighten the fasteners using the spanner.
7
English
Attaching the TV/monitor to the wall bracket
1.Undo the upper nut on the VESA mount by 4 mm.
2.Hang the TV/monitor and the VESA mount onto the wall bracket.
3.Use a spirit level to make sure that the TV/monitor is level.
4.Screw on the lower nut and then tighten both the upper and lower nuts.
8

Hanging the cables
Hang the cables over the hook on the wall bracket. Leave a little slack on the cable to allow for adjustment of the TV/monitor angle.
Adjusting the swivel and tilt angle
Loosen the bolts a little, adjust the angle and then retighten.
Regularly check that the wall bracket is securely mounted (at least every 3 months).
English
9

English
Disposal
This product should be disposed of in accordance with local regulations. If you are unsure how to proceed, contact your local authority.
Specifications
Tilt |
± 12° |
Mount |
VESA 100x100, 200x100 and 200x200 mm |
Wall distance |
70 mm |
Load capacity |
20 kg |
10
Justerbart TV/monitorfäste
Art.nr 38-5544
Läs igenom hela bruksanvisningen före användning och spara den sedan för framtida bruk. Vi reserverar oss för ev. textoch bildfel samt ändringar av tekniska data.
Vid tekniska problem eller andra frågor, kontakta vår kundtjänst (se adressuppgifter på baksidan).
Säkerhet
•Försäkra dig om att du har läst och förstått hela monteringsanvisningen.
•Väggen eller ytan som fästet ska monteras på måste kunna bära hela vikten av fäste och TV-apparat eller annan monterad produkt. Om väggen har reglar, se då till att fästa skruvarna i reglarnas centrum. Användning av en regeldetektor rekommenderas.
•Använd alltid rätt verktyg och var alltid två personer vid montering av tunga TV-apparater på väggfästet. Om du försöker montera en tung TV-apparat ensam kan det resultera i materialoch personskador.
•Dra åt skruvarna hårt men överdra inte, väggfästet kan skadas och det medför sämre hållfasthet.
•Ta hänsyn till rekommendationer för montering och ventilation i TV-apparatens bruksanvisning.
•Maxbelastning 20 kg.
•Kontakta en expert om du är osäker på något i samband med monteringen av väggfästet.
•Väggfästet är avsett för användning inomhus. Användning utomhus kan medföra att väggfästet går sönder vilket kan resultera i materialoch personskador.
Obs!
•Undvik att lägga TV-apparaten med skärmen nedåt. Om du ändå måste göra det är det säkrast att ha en filt eller liknande under för att skydda skärmen.
•Luta aldrig en plasma-TV mer än vad som rekommenderas i dess bruksanvisning.
•Skruva in fästskruvarna i TV-apparaten för hand först. Avbryt genast om du känner att det tar emot, skruva ur och undersök orsaken till att det tar emot.
Viktigt!
Om skruvar medföljer utrustningen är det inte säkert att de passar för materialet i väggen eller ytan där utrustningen ska monteras. Byt ut skruvarna mot lämpliga skruvar om så krävs. Kontrollera alltid djupet på TV-apparatens fästhål innan installationen påbörjas.
Svenska
11

Svenska
Förpackningen innehåller
Kontrollera att alla delar finns med i förpackningen.
A.Väggfäste med VESA-fäste
B.Nyckel
C.Insexnyckel
B
A C
Förpackning M (fästdetaljer) |
|
||
A. M4x14 (x4) |
A |
||
B. M5x14 (x4) |
|||
|
|||
C. M6x14 (x4) |
C |
||
D. M8x20 (x4) |
|||
E. |
M5-bricka (x4) |
|
|
F. |
M8-bricka (x4) |
|
|
G. |
Distans, kort (x8) |
|
|
B
D
E F G
G
Förpackning W (fästdetaljer för väggmontering)
A. |
ST 5,5x50 (x3) |
|
|
|
|
B. |
Betongplugg (x3) |
|
|
A |
|
|
|||||
C. |
M6-bricka (x3) |
|
|
|
|
|
|
|
|
|
B |
|
|
|
|
||
|
|
|
|
|
C |
|
|
|
|
|
|
12

Montering
Varning! Se till att väggen som du monterar väggfästet på klarar av TV-apparatens vikt. Ta kontakt med en fackman om du är osäker. Kontrollera väggfästets upphängning genom att försiktigt belasta det med samma vikt som TV-apparaten innan den monteras på väggfästet.
Skruva fast väggfästet på väggen
1. Skruva loss VESA-fästet från väggfästet.
2. Skruva fast väggfästet på väggen.
Viktigt! Vid monteringen måste borrhålen ha minst samma djup som skruvarnas längd.Borra minst 25 mm från närmaste kant på tegelstenen. Borra ej i fogen mellan tegelstenarna.
Trävägg
-- 1-3. Mät, märk ut fästhålen och förborra. Använd gärna en regeldetektor till en regelvägg, borra i centrum på regeln.
-- 4. Borra fästhålen 50 mm djupa med Ø 4 mm (Ø 5/32″) borr.
Svenska
13
Svenska
-- 5. Skruva fast väggfästet.
Tegeleller betongvägg
-- 1-2. Mät, märk ut fästhålen och förborra. Använd slagborrmaskin.
-- 3. Borra fästhålen 60 mm djupa med Ø 8 mm (Ø 5/16″) borr.
-- 4. Skruva fast väggfästet.
14
 Loading...