


 Loading...
Instructions for use
SES 113
SES 113 B vacuum SES 225 B vacuum

|
|
|
|
|
|
Contents |
Page |
|
|
|
|
|||
Introduction . . . . . . . . . . . . . . . . . . . . . . . . . . . . . . . . . . . . . . . . . . . . 3
Suitable loads . . . . . . . . . . . . . . . . . . . . . . . . . . . . . . . . . . . . . . . . . . 3
EschmannCare . . . . . . . . . . . . . . . . . . . . . . . . . . . . . . . . . . . . . . . . . 3
1.0 Controls and displays . . . . . . . . . . . . . . . . . . . . . . . . . . . . . . . . 6 2.0 Getting started . . . . . . . . . . . . . . . . . . . . . . . . . . . . . . . . . . . . . 7 3.0 Running a cycle . . . . . . . . . . . . . . . . . . . . . . . . . . . . . . . . . . . . 8 4.0 Direct Data Download instructions . . . . . . . . . . . . . . . . . . . . . 10 5.0 Printer instructions . . . . . . . . . . . . . . . . . . . . . . . . . . . . . . . . . 13 6.0 Technical data . . . . . . . . . . . . . . . . . . . . . . . . . . . . . . . . . . . . 15
APPENDIX 1 - Installation . . . . . . . . . . . . . . . . . . . . . . . . . . . . . . . . 18
APPENDIX 2 - Warnings and cautions . . . . . . . . . . . . . . . . . . . . . . 19
APPENDIX 3 - Loading the autoclave . . . . . . . . . . . . . . . . . . . . . . . 21
APPENDIX 4 - Daily Testing, Vacuum ( B type) autoclaves . . . . . . 22
APPENDIX 5 - Maintenance . . . . . . . . . . . . . . . . . . . . . . . . . . . . . . 23
APPENDIX 6 - Cycle errors and faults and Display messages . . . . 24
APPENDIX 7 - Special Functions . . . . . . . . . . . . . . . . . . . . . . . . . . 26
APPENDIX 8 - Accessories and spares . . . . . . . . . . . . . . . . . . . . . 32
Figures |
|
|
Fig. 1. Identification of the main parts of the autoclave . . . . . . . . |
. 4 |
|
Fig. 2. The main information display and control buttons . . . . . . . |
. 5 |
|
Fig. 3. Filling and draining the reservoirs . . . . . . . . . . . . . . . . . . . |
. 5 |
|
Fig. 4. DDD - Controls active, connected . . . . . . . . . . . . . . . . . . . |
10 |
|
Fig. 5. |
DDD - Download button symbols . . . . . . . . . . . . . . . . . . . |
10 |
Fig. 6. |
‘Cycle Select’ and various display screens . . . . . . . . . . . . |
11 |
Fig. 7. |
Various display screens . . . . . . . . . . . . . . . . . . . . . . . . . . . |
12 |
Fig. 8. |
Printer control panel . . . . . . . . . . . . . . . . . . . . . . . . . . . . . |
13 |
P2/33 |
ST-IM84c |
SES 113 and 225
AUTOCLAVES
Introduction
The Eschmann Little Sister SES 113 and 225 autoclaves have been designed to meet the needs of the healthcare professional and have been designed in accordance with European Standards (e.g. BS EN 13060) and Department of Health guidelines.
SES 113 Autoclave – The SES 113 is an ‘N’ type displacement autoclave with an 11 litre chamber. It is intended for the sterilization of solid instruments which have not been wrapped.
SES 113 B Autoclave – The SES 113 B vacuum is a ‘B’ type vacuum autoclave with an 11 litre chamber. It is intended for the sterilization of solid and hollow instruments, pouched or wrapped instruments and porous loads.
SES 225 B Autoclave – The SES 225 B vacuum is a ‘B’ type vacuum autoclave with an 22 litre chamber. It is intended for the sterilization of solid and hollow instruments, pouched or wrapped instruments and porous loads.
Suitable loads
The following table details the types of load that may be successfully processed in each model. Please refer to the table in the ‘Technical Data’ section for details of the cycles available on each model.
Type of load and cycle type |
SES 113 |
SES 113 B Vacuum |
|
|
SES 225 B Vacuum |
|
|
|
Solid instruments for immediate use (N) |
9 |
9 |
Solid instruments processed for aseptic storage (N) |
9 |
9 |
Hollow/cannula instruments (B) |
8 |
9 |
Single wrapped pouched instruments (B) |
8 |
9 |
Single wrapped cassettes (B) |
8 |
9 |
Single wrapped hollow instruments (B) |
8 |
9 |
Double wrapped instruments (B) |
8 |
9 |
Double wrapped hollow instruments (B) |
8 |
9 |
Porous loads (B) |
8 |
9 |
Warning markings
The warning markings on this equipment have the following meanings:
Caution; refer to accompanying documents (i.e. these Instructions for Use).
Caution; hot surface.
EschmannCare
Eschmann recommends direct installation and commissioning in the UK for all its autoclaves by its own EschmannCare team of professional engineers. Eschmann also recommends a programme of after sales service and maintenance for all Eschmann autoclaves, using only the correct Eschmann spare parts. Service and maintenance programmes can include PSSR 2000 certification and testing to HTM 2010 (DB9804).
The EschmannCare service department is staffed and equipped to provide advice and assistance during normal office hours. To avoid delays when making enquiries, please quote the Model and Serial Number of your Autoclave which is shown on the Serial Label, the location of which is shown in Fig. 1, item 20 please include all alpha and numeric digits.
For further information visit www.eschmann.co.uk
All correspondence relating to the after sales service of Eschmann Equipment to be addressed to :
UK Customers |
EschmannCare, Peter Road, Lancing, West Sussex |
|
BN15 8TJ, England. Tel: +44 (0) 1903 765040. Fax: +44 (0) 1903 875711. |
Overseas Customers |
Contact your local distributor. In case of doubt contact Eschmann Equipment. |
ST-IM84c |
P3/33 |

24
18
17
16
|
|
|
|
|
|
|
|
3 |
|
1 |
2 |
4 |
||
5
6
7
8
9
|
|
15 |
|
|
14 |
13 |
12 |
11 |
10 |
|
|
|
20 |
21 |
|
|
|
|
|
||
|
|
18 |
|
|
|
|
|
|
|
|
|
|
|
|
|
|
|
|
23 |
|
|
|
|
|
|
|
|
|
|
22 |
|
|
|
|
|
|
|
|
|
|
|
|
|
|
|
|
|
|
|
|
|
|
|
|
|
|
|
|
|
|
|
|
|
|
|
|
|
19 |
|
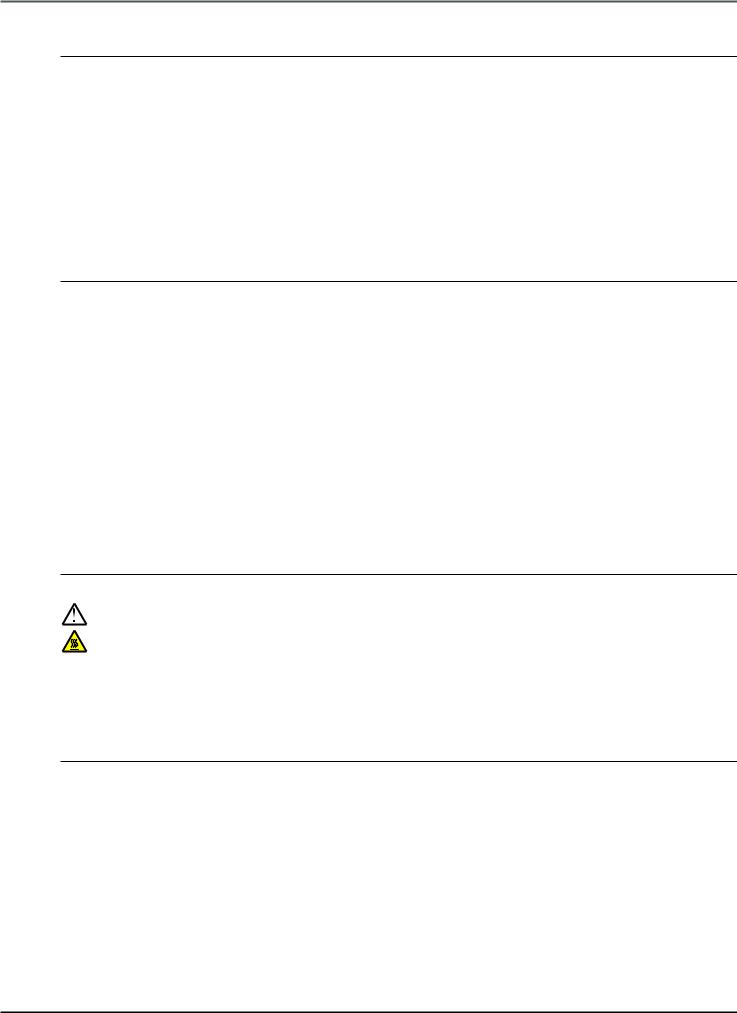
Part rear view |
|
|
|
Part rear view |
||
1 |
Autoclave door |
13 |
Serial Label (front) |
|
|
|||||
2 |
Door handle |
14 |
Overheat indicator |
|
|
|||||
3 |
Process display (Fig. 2) |
15 |
Waste water drain |
|
|
|||||
4 |
Start button (Fig. 2) |
16 |
Waste water reservoir (Fixed) |
|||||||
5 |
Indicators (Fig. 2) |
17 |
Fresh water drain |
|
|
|||||
6 |
Digital display (Fig. 2) |
18 |
Fresh water reservoir (Slides out to fill)) |
|||||||
7 |
Cycle select button (Fig. 2) |
19 |
Drain release clip |
|
|
|||||
8 |
Control buttons (Fig. 2) |
20 |
Serial label (back) |
|
|
|||||
9 |
Printer |
21 |
Mains fuses |
|
|
|
||||
10 |
Mains ‘on/off’ switch |
22 |
IEC Mains connection |
|
|
|||||
11 |
Adjustable foot |
23 |
Antibacterial air filter (B type units only) |
|||||||
12 |
USB port |
24 |
Basic instructions (UK models only) |
|||||||
Fig. 1. Identification of the main parts of the autoclave
P4/33 |
ST-IM84c |

SES 113 and 225
AUTOCLAVES
Fig. 2. The main information display and control buttons (shown with all indicators illuminated and a typical ‘Cycle select’ display)
Filling the fresh water reservoir (slide out) |
Draining the waste water reservoir (fixed) |
Each reservoir has a capacity of 3.36 litres.
Fig. 3. Filling and draining the reservoirs
Drain tube (before connection, direct end into a suitable container of at least 4 litres capacity )
ST-IM84c |
P5/33 |

1.0Controls and displays
Mains switch (Fig. 1, item 10)
The mains switch is positioned on the front of the autoclave. The symbol ‘I‘ indicates ‘on’ and the symbol ‘0’ indicates ‘off’. The switch illuminates green when ‘on’.
Push buttons
Cycle select button (Fig. 1, item 7). Press to select a sterilization cycle. The Autoclave Manager may have enabled more than one cycle. Cycle details will be shown in the main display. After scrolling the available cycles which may include the test cycles (T1 and T3), the ‘Cycle Count’ (the number of cycles started) will be displayed.
Start (cycle) button (Fig. 1, item 4). Press to start the selected cycle.
Control Buttons. The control buttons shown in Fig. 2 are behind the hinged panel (below the main display). Their use is explained in Appendix 7, ‘Special functions’. They are not required during ‘normal’ use of the autoclave.
Note: When a button is pressed a ‘beep’ will sound (unless disabled, refer to Appendix 7 - ‘Audio’).
Digital display (Fig. 2)
The digital display provides the information required during ‘normal’ use of the autoclave (e.g. to select the required cycle) and to provide information on the cycle status. It may display other details, instructions and warnings as detailed in this manual and configuration information when using the ‘Special Functions’.
Indicators (Fig. 2)
‘Low water’ indicator. When illuminated the fresh water reservoir (top one) should be refilled before a new cycle is started (section 2). It will flash if the reservoir is low and an attempt to start a cycle is made.
‘Drain reservoir’ indicator. When illuminated the waste water reservoir (bottom one) is full and should be emptied before a new cycle is started (section 2). It will flash if the reservoir is full and an attempt to start a cycle is made.
Door indicator. This is illuminated to indicate the door is locked, or flashing to indicate the door should be opened or closed (the digital display provides a related message). It will be off after you close the door prior to starting a cycle.
Cycle complete indicator. This is illuminated at the end of a successful completed cycle.
Progress indicators. The display has indicators that illuminate in turn as the cycle progresses. The main stages are identified by three symbols. The symbols and stages are detailed below:
|
|
|
1 |
– |
Cycle started |
|
|||||||||
|
|
||||||||||||||
|
|
|
2 |
– |
Water fill completed |
|
|||||||||
|
|
||||||||||||||
3 |
– |
Heating to sterilization temperature |
|||||||||||||
4 |
– |
Sterilization started |
|
||||||||||||
5 |
– |
Sterilization stage passed halfway |
|||||||||||||
|
|
|
6 |
– |
Condensing |
|
|||||||||
|
|
|
|||||||||||||
7 |
– |
Drying started (vacuum only) |
|||||||||||||
8 |
– |
Less than 1 minute remaining to cycle completion |
|||||||||||||
9 |
– |
Cycle completed successfully |
|||||||||||||
Pre conditioning. |
|
|
|
|
|
Sterilizing. |
Post sterilization cooling/drying. |
||||||||
|
|
|
|
|
|||||||||||
|
|
|
|
|
|||||||||||
|
|
|
|
||||||||||||
|
|
|
|
|
|
|
|
|
|
|
|
|
|
|
|
P6/33 |
ST-IM84c |

SES 113 and 225
AUTOCLAVES
2.0Getting started
WARNING
Read these instructions before use and keep them in a safe convenient place for future reference. The use of this autoclave should be under the control of a person with adequate training (the Autoclave Manager*).
The Autoclave Manager* is responsible for ensuring that the correct sterilization cycle is used for the items being sterilized, ensuring that records are kept correctly and keeping the amended PIN code confidential (refer to Appendix 7 - Special functions).
The autoclave should only be used as specified by Eschmann as detailed within these instructions. Never tamper with, bypass or interfere with any of the safety features. There are no ‘user’ serviceable parts inside the autoclave. Eschmann Equipment is not responsible for malfunction, or a reduced level of protection provided by the equipment, if it is used in a manner not specified in these instructions.
Only use Eschmann accessories and mains leads. Any spare parts required must be supplied by Eschmann.They must be fitted in accordance with the Service Manual or the instructions supplied with them by EschmannCare engineers or engineers who have been trained by Eschmann.
* Autoclave Manager - The person who is ultimately accountable for the operation of the premises. Depending on the nature of the organisation, this may be the owner, or other person of similar authority. In small, autonomous installations the manager might also be the user.
Autoclave Installation
Full installation details are provided in APPENDIX 1, this includes a list of items supplied with the autoclave and a note to observe if the autoclave is relocated.
Ensure the autoclave has been correctly installed before use, by an EschmannCare trained engineer (contact the EschmannCare team on 01903 765040). Installation will also include initial training covering the use of these autoclaves. It is essential that the autoclave is levelled and connected to the electrical mains supply correctly. On request and during installation, programmes and autoclave configuration can be adjusted by the EschmannCare engineer. (To protect against tampering, access for such adjustment can only be gained by use of a PIN code).
Direct Data Download (DDD) Software Installation
Refer to the instructions provided with the Direct Data Download Software and install the DDD application.
Warnings and Cautions
Before using the autoclave ensure you understand the ‘Warnings and Cautions’ which are set out and summarised in
APPENDIX 2 .
RESERVOIR CARE AND WATER QUALITY CAUTION
a.Eschmann recommends filling the water reservoir with ‘Sterile Water for Irrigation’. This is low in dissolved solids and has a low microbial count. In the U.K. the Department of Health recommends that ‘Sterile Water for Irrigation’ is used in bench-top Autoclaves (NHS Estates document HTM2031).
b.If ‘Sterile Water for Irrigation’ is not being used then Eschmann strongly recommends the use of either distilled water, deionized water, purified water or water treated by the reverse osmosis process. These types of water are low in dissolved solids and can help reduce the effects of tap water detailed below.
c.DO NOT USETAP WATER, this is high in dissolved solids and can deposit lime scale, block filters and cause damage to the pressure vessel.
dDon’t leave water standing in the reservoir for more than a few hours. If you are not sure how long the water has been there, change it. Also contents of part used containers of sterile water for irrigation should be discarded (microbiological purity will be compromised once opened).
eAt the end of the working day, or whenever the sterilizer is to be left unused for several hours, drain both the water reservoirs and leave them to dry.
Fill the reservoir
Open the left hand access door (Fig. 3) and slide the (top) fresh water reservoir out about 100 mm. Press down gently the back of the reservoir cover, slide it forward and remove it (Fig. 3).
DO NOT USE TAP WATER. Fill the reservoir up to the ‘MAX’ mark engraved on the internal mesh cover (3.36 litres maximum). When the reservoir is filled to the ‘MAX’ mark the autoclave will run 8 cycles before it needs to be filled again
Replace and slide the reservoir cover back until it clicks into position and return the reservoir to its normal (rear) position before using the autoclave. Close the left hand access door.
ST-IM84c |
P7/33 |

3.0Running a cycle
Switching ‘on’ and ‘off’.
Switch the autoclave ‘on’ using the mains switch (Fig. 1, item 10). The digital display and applicable indicators will illuminate to show the autoclave has been switched ‘on’. After normal checks and a ‘Welcome’ message (shown for 30 seconds, for the first few cycles) the ‘Cycle select’ screen will be displayed (Fig. 6). If the door is closed the green door indicator will flash to indicate the door should be opened, together with a display message ‘Open Door’. To switch the autoclave ‘off’ press ‘0’ on the mains switch.
Notes: 1 At times, the message ‘PLEASE WAIT’ may be displayed for a few seconds.
2‘B’ type autoclave - If running test T1, run it directly after switching ‘on’ (a cold and dry chamber). For notes on T1, refer to Appendix 7 - Special Functions.
To open the door.
The autoclave must be switched ‘on’. Once the normal ‘Cycle select ‘ display is shown (Fig. 6) turn the door handle anticlockwise until vertical (12 o’clock position). The green door indicator light will flash.
To close the door onto the secondary catch.
With the handle vertical push the door closed gently and turn the door handle 45° clockwise (2 o’clock position). It will meet a stop at this position and the door will only be partially closed. The door should be shut onto the secondary catch at all times when the autoclave is not in use.
To close the door fully.
With the handle vertical push the door shut firmly and turn the door handle clockwise until horizontal (3 o’clock position). The door indicator light will stop flashing and will not be illuminated.
Loading
Note: Prior to sterilization, instruments should be thoroughly cleaned, ideally in an Eschmann Instrument Washer Disinfector.
Open the door fully. The door indicator light will flash, indicating the door should be closed (after loading) together with a display message ‘Close Door’. Following the guidance provided in APPENDIX 3 and local procedures, load the autoclave with the items to be sterilized.
Reservoir warning |
|
If a Reservoir Warning Indicator (detailed on page 6) is illuminated ( |
), fill or drain reservoir as indicated referring |
to page 7 (Fill the reservoir) or page 9 (Draining a reservoir) as required. |
|
Closing door
Close the door fully. The green door indicator light will stop flashing and will not be illuminated.
Cycle selection |
|
|
The digital display indicates the default cycle. If another cycle is required press the ‘Cycle select’ button ( |
) until the |
|
required cycle is displayed. Ensure the cycle is appropriate for the load (refer to section 6). |
|
|
Starting cycle |
|
|
Press the ‘Start (cycle)’ button |
. The green door indicator light will illuminate indicating the door is locked and cannot |
|
be opened until cycle completion. The printer (if fitted) will start printing a cycle record (refer to section 5). Indicators will show the status of the cycle. The digital display will indicate the chamber temperature, pressure and an animated progress bar. The ‘Cycle Count’ can be displayed if the ‘Cycle select’ button is pressed during a cycle (Fig. 6 and 7).
Note: Cycles cannot be started when the green door indicator is flashing and the ‘Open Door’ message is displayed. Open and then close the door to correct this situation should it occur.
Cycle errors
WARNING
When a cycle is aborted and/or an error display is indicated, the load must be treated as non-sterile. The load must be sterilized by running the cycle again. If wrapped or pouched, new packaging must be used.
If the autoclave detects a fault it will display a message (e.g. ‘Door not closed’, Fig. 6) or if it detects an error it will display ‘CYCLE FAILED’ or ‘SYSTEM ERROR’, there will be five rapid ‘beeps’ and illuminated progress indicators will flash. Refer to ‘Errors and Faults’ Appendix 6. Anyone who becomes aware of a fault when using the autoclave should report it immediately to the Autoclave Manager and all necessary remedial action should be taken before the autoclave is used again.
Should the overheat cutout trip, its indicator light (Fig. 1, item 14) will illuminate, refer to Appendix 6.
Completed cycles |
|
Completion of a successful cycle will be indicated by |
illuminating and the display showing ‘Cycle Complete’ and ‘Ready |
to Open’, the normal end of cycle display (refer to Fig. 6). There will be three audible ‘beeps’ (unless disabled). Open the door fully (take care - the load will be hot) and remove the load using the tray lifter.
Note: On ‘N’ type autoclaves ONLY, at the end of cycles with drying, the beep (if enabled) will continue intermittently. During these ‘beeps’ open the door and remove the load. It should still be hot enough to self-dry. If the door is not opened during the intermittent ‘beeps’ the load may not dry when removed. Items sterilized using an ‘N’ type cycle are for immediate use only.
P8/33 |
ST-IM84c |

SES 113 and 225
AUTOCLAVES
Unloading the chamber
WARNING: TAKE CARE WHEN UNLOADING, THE LOAD AND CHAMBER MAY BE VERY HOT. Use the tray lifter as detailed in the following section. If running consecutive cycles, Eschmann recommends waiting for five minutes between cycles with the door open to allow the chamber conditions to stabilise. If the autoclave is not to be used for several minutes close the door onto the secondary catch (as detailed opposite).
Using the tray lifter.
The tray lifter has one bottom support and two pairs of top clips. The top pair is for Hand Free instrument Transfer (HFiT) cassettes and the bottom pair is for trays. Do not use the top clips when lifting trays. The spacing of the top clips enables HFiT cassettes to be held at the side or end. Refer to illustrations below:
Tray in bottom clips |
Tray in top clips |
HFiT cassette gripped |
HFiT cassette gripped |
CORRECT |
INCORRECT |
at the side. |
at the end. |
When using a tray lifter to hold pouch racks or the porous load basket, ensure the rack or basket is correctly located as illustrated below:
End bar of pouch rack or basket located in tray lifter’s top centre clip.
Second bar of pouch rack or basket located in the tray lifter’s top channel.
Stopping a cycle
In the unlikely event of needing to stop a cycle (e.g. wrong cycle selected) press the ‘Cancel (Exit)’ button (Fig. 2). This will induce ‘Cycle Error No. 02’. Refer to ‘Errors and Faults’ Appendix 6 to clear this error and start the cycle again.
Draining a reservoir
The ‘waste water’ reservoir will need emptying when |
illuminates. |
WARNING: TAKE CARE THE WASTE WATER MAY BE VERY HOT. Using the drain tube supplied (if lost a replacement can be ordered, Part No. 115036) drain the water into a container of at least 4 litres capacity, or a sink. Plug the drain tube’s connector into the drain socket (Fig. 1, item 15) this automatically opens the socket’s drain valve, if the plug cannot be pushed into the drain, push the drain release clip (Fig. 1, item 19) until it clicks and then insert the plug. Release the red clip on the end of the drain tube with the drain tube pointing into the container or sink. Note that a direct drain kit (REF 87-271-55) can be fitted, please contact EschmannCare for details. Also note that the waste water reservoir is fixed.
To release the drain tube from the autoclave push the drain release clip (Fig. 1, item 19). Don’t forget to close the red clip.
To drain the fresh water reservoir pull it forward about 100mm (as for filling, Fig. 2) and drain the water into a 4 litre container as detailed above, but plug the drain tube’s connector into the fresh water reservoir’s drain socket (Fig. 1, item 17).
After use (end of day)
When the autoclave is not in use switch it ‘off’ at the mains switch (Fig. 1, item 10). Also leave the door open on the secondary catch with the chamber empty. Note: Whenever a B type autoclave is switched ‘on’ the chamber is heated.
At the end of the day and/or week ensure the instructions for care of the autoclave are followed as detailed in Appendix 5.
It is recommended that the ‘waste water’ and the ‘fresh water’ reservoirs should be drained and allowed to dry, at the end of each day.
Display ‘beep’ and Special function’ notes
At programmed intervals the autoclave will display special messages (e.g. ‘Service required’), refer to Appendix 6.
The autoclave will sound 5 rapid ‘beeps’ if there is a fault, 3 slower ‘beeps’ on cycle complete and one ‘beep’ per key press. The ‘beep’ can be disabled using the ‘Special Functions’, refer to Appendix 7.
‘Special functions’ should only be used by the Autoclave Manager or an EschmannCare engineer, refer to Appendix 7.
ST-IM84c |
P9/33 |

4.0Direct Data Download instructions
Introduction
The Eschmann Little Sister SES 113 and 225 autoclaves include Direct Data Download (DDD) application software as standard. All cycle records are stored on the unit. IMPORTANT After 20,000 cycles the autoclave’s memory may be getting full and data storage could stop, please contact Eschmann for details of how the autoclave’s memory can be replaced.
DDD allows cycle records to be downloaded via a USB cable direct to a PC or Laptop. Cycle records can then be stored directly on the PC, printed out using a conventional printer, several records to a page or, ‘pasted’ directly into the computerised patient record. DDD enables the implementation of instrument/patient management and traceability. DDD application removes the need for an integral printer and the issues relating to accurately managing this type of paper based data.
Using the DDD application
If in doubt refer to the instructions supplied within the Application CD or contact Eschmann.
The DDD application software should be installed on a PC, refer to the instructions provided with the DDD Software.
To open the DDD application click on the DDD icon on the Desktop of your PC or Laptop.
Using the cable provided connect the PC to the autoclave’s USB port (Fig. 1, item 12). Switch on the autoclave. The application will access the autoclave, refer to Fig. 4.
Start
Disk button
Stop
 Progress
bar
Fig. 4 Controls active, Connected
Click the ‘disk button’ (Fig. 4) to select the type of download required. The image shown next to the ‘disk button’ indicates which files you are about to download, refer to Fig. 5. For single files enter the cycle number in the box provided.
Single file |
Files not downloaded |
All files |
Fig. 5 Type of download, symbols
After selection, click the green button to start the download. If required click the red button to stop. The ‘Progress bar’ (Fig. 4) shows the download progress and the following:
Off |
= |
Normal |
Green = |
File retrieval is complete, all files retrieved OK. |
|
Red |
= |
An error occurred that prevented the retrieval. |
Yellow = |
Retrieved all files but at least one was corrupt. |
|
To view files, browse to the user allocated folder storing these files. If the letter ‘E’ appears by the cycle number, this file is corrupt. You may try to retrieve this again as a single file. If in doubt refer to the instructions within the DDD Application CD.
P10/33 |
ST-IM84c |

SES 113 and 225
|
AUTOCLAVES |
|
Fig. 6 ‘Cycle Select’ and various display screens |
ST-IM84c |
P11/33 |
Loading...