


GB
Multi Slicer, Set 4pcs.
Instructions for use
PL
Wielofunkcyjne urządzenie do krojenia, zestaw 4 - częściowy
Instrukcja obsługi
HU
Univerzális aprító, 4 részes készlet
Használati útmutató
Multirezalnik, 4-delni komplet
SI Navodila za uporabo
Univerzální kráječ, 4dílná sada
CZ Návod k obsluze
Univerzálny krájač, 4dielna súprava
SK Návod na obsluhu
DE Multischneider, Set 4tlg.
AT Bedienungsanleitung
CH
GB
PL
HU
SI
CZ
SK
DE

2

GB |
Multi Slicer, Set 4pcs.................................................................. |
4 |
|
Instructions for use |
|
PL |
Wielofunkcyjne urządzenie do krojenia, |
|
|
zestaw 4 - częściowy................................................................. |
8 |
|
Instrukcja obsługi |
|
HU |
Univerzális aprító, 4 részes készlet.............................................. |
12 |
|
Használati útmutató |
|
|
Multirezalnik, 4-delni komplet.................................................... |
16 |
SI |
|
|
|
Navodila za uporabo |
|
CZ |
Univerzální kráječ, 4dílná sada............................................. |
20 |
|
Návod k obsluze |
|
SK |
Univerzálny krájač, 4dielna súprava............................................ |
24 |
|
Návod na obsluhu |
|
DEAT |
Multischneider, Set 4tlg.............................................................. |
28 |
|
Bedienungsanleitung |
|
CH |
|
|
3

GB
Multi Slicer, Set 4 pcs.
Dear customer,
it generally takes quite a while from the time you start to prepare a meal to the time it is ready to serve. Food has to be cut in dice, sticks, slices, strips or four piece. Not only does it take a lot of time, you also need countless GB kitchen aids: knives, bowls, cutting boards and many other things that aren‘t always at hand and take up a lot of storage space in the kitchen. That‘s not a problem anymore! The multi slicer is an ingenious system for the preparation of salads, vegetables, fruit dishes and lots of other things – all practically combined in one compact
set. It couldn’t be easier and more space saving!
The 4 pcs. set you have purchased contains:
1 cutting lid (upper part + frame)1 transparent collection box (800 ml)
1 cutting insert (10 x 10 mm + 30 x 30 mm)1 cutting insert (10 x 30 mm + 15 x 15 mm)
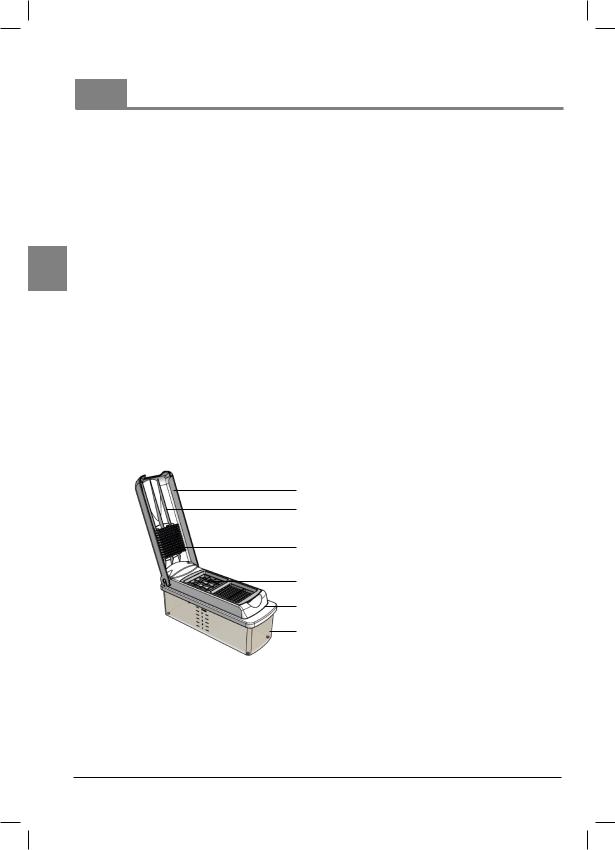
Figure 1:
Cutting upper part
Support strips
Stick raster
Cutting insert
Cutting lower part
transparent collection box
4

Operating instructions cutting inserts
Figure 2: Always lay in the cutting insert so that the desired insert lies |
Figure 2: |
Cutter position 1 |
|
||
in cutter position 1. |
|
Cutter position 2 |
GB
|
|
Lift up the cutting upper part to place the desired cutting insert inside. To |
|
||
|
|
do this, first slide the cutting insert into the lower part so that the slightly- |
|
|
rounded narrow side of the cutting insert fits into the corresponding notch |
|
|
in the frame of the lower part. Now press down the other side of the |
|
|
cutting insert, until you hear a click. |
|
|
Place the food you want to cut onto the blades (cutter position 1). |
|
||
|
||
|
|
For cutting large pieces, or pieces to be cut along their lengths, hold the |
|
|
food to be cut in position by one hand and gently press the cutting upper |
|
|
part downwards with the other hand, so that it cannot slip to one side. |
|
|
Then, with a bold movement, press the cutting upper part downwards |
|
||
|
||
|
|
with both hands. The food to be cut is pressed downwards with the raster |
|
|
through the blades in evenly-sized dice, sticks or slices (depending on the |
|
|
cutting insert) and automatically collected in the transparent collection |
|
|
box. |
|
|
To open the collection box and to remove the cut food, simply lift up the |
|
||
|
||
|
|
complete cutting lid (cutting upper part and cutting lower part) on the |
|
|
narrow side and remove it. While doing so, hold the transparent collection |
|
|
box with the other hand. |
|
|
|
At the outside end of the cutting lower part there is a recessed grip. This helps you to remove the cutting insert by lifting slightly.
 Attention!
When positioning the cutting insert take care to ensure that the slightly rounded narrow side of the blade insert lies in line with the cutting lower part.
The blades are extra sharp for optimum cutting results. Please take care not to touch the blades with your hands when using the device. This is reason enough to keep the device out of reach of children!
Please pay attention that the food to be cut is not bigger than the cuttings blades. To ensure a proper cutting process the food has to be smaller than the cutting blades!
5

 Tips
Tips
Dip the cutting insert in water before you start to use it. Wet blades cut faster and you will also need less effort. The cutting insert is kept moist by the juice from the vegetables etc. during cutting.
Foods with skins such as bell peppers, apples or pears should always be placed on the cutting insert with the skin facing upwards. This way they can be most easily cut and you will also need less effort.
GB |
To chop ingredients simply place them on the cutting insert. For a potato soup for example, cut the |
potatoes first into slices. To dice them, simply place several slices on top of each other on the blade. You |
|
|
can do the same thing with cucumbers, zucchini etc. |
|
To cut ingredients into sticks, e.g. to make French fries, place the potato upright on the cutting insert. Use |
|
the same process for making sticks from gherkins, carrots, apples etc. for delicious dips. |
|
Information: |
|
Anti-slip studs on the underside of the collection bowl guarantee that the multi slicer stands firmly on your |
|
work surface. |
|
Application possiblities for the inserts |
|
|
|
Cutting insert for medium cubes/sticks or quarters |
|
|
Blade A
Blade B
Blade A: 10 x 10 mm Blade B: 30 x 30 mm
Potatoes - e.g. raw for French fries or cooked for potato salad
Cucumbers, bell peppers, onions, tomatoes, carrots, zucchini, leek, kohlrabi, celery, radish, pumpkin or mushrooms for salads, vegetable dishes or as ingredients in soups
Boiled eggs, boiled ham, boloney or mortadella for salads
Cheese, e.g. sheep’s cheese or mozzarella for Mediterranean dishes
Apples, pears, peaches, apricots, strawberries or bananas, e.g. for fruit salads
Cutting insert for large cubes/ sticks or slices
Blade C
Blade D
Bell peppers, boiled ham, mushrooms, potatoes, zucchini for stews and soufflés
Apples, bananas, pears, pineapples, melons, papaya for fruit saladsBoiled breast of chicken for salads with strips of chicken breast
Blade C: 10 x 30 mm
Blade D: 15 x 15 mm
6

 Care and cleaning
Basically, the multi slicer should be cleaned before first using and then after each time it‘s used. All parts can either be washed under running water or in the dishwasher.
Take the multi slicer apart as follows:
|
|
Open the cutting upper part to a 90 degree position (vertical) and pull |
|
|
|
|
|||
GB |
||||
|
|
upwards so that the stamp comes out of the side holders. |
||
|
|
|
||
|
|
|
|
|
|
|
|
|
|
To remove the cutting lower part, simply lift up one of the ends and |
|
remove it. While doing so, hold the transparent collection box with the |
|
other hand. |
Self cleaning function
The multi slicer has a self-cleaning function for the stick raster. Press the button on the top side of the cutting upper part. The integrated transparent cleaning plate in the stick raster is automatically pressed downwards and cleans the stick raster by removing even the smallest cutting residue.
 Caution!
Make sure that there is no cutting insert in the device before you activate the self-cleaning.
Enjoy your meals!
We offer the statutory 3-year warranty on this product.
Claims can only be processed in conjunction with the purchase receipt. Parts subject to wear and consumables are not subject to claims under warranty. The service life depends on individual usage and application of the product and is therefore variable.
Important: In order to ensure prompt and effective processing, please always contact our service team in the first instance. Many things can be remedied by telephone, which helps you and us to save time and costs.
If you have any questions about replacement parts, queries on the operation or function of our articles, please send them by email to service@genius-germany.de.
7
PL Wielofunkcyjne urządzenie do krojenia, zestaw 4 - częściowy
Szanowna Klientko, szanowny Kliencie,
od rozpoczęcia przygotowań do gotowania aż po serwowanie posiłku mija z reguły sporo czasu. Żywność musi być pokrojona w kostki, słupki, talarki, paski czy ćwiartki. To zabiera nie tylko czas, ale trzeba do tego użyć licznych utensylii kuchennych jak noże, miseczki, deski do krojenia i inne, które nie zawsze leżą pod ręką i zajmują wiele miejsca w kuchni. Teraz już nie stanowi to problemu: Dzięki wielofunkcyjnej krajalnicy posiadacie Państwo genialny system pozwalający na przygotowanie sałatek, potraw warzywnych, owocowych i wielu innych - wszystko w jednym zestawie! Żadne urządzenie nie jest łatwiejsze w obsłudze i nie zajmuje mniej miejsca!
PL Zakupiony przez Państwa 4 - częściowy zestaw składa się z następujących elementów:
1 pokrywa tnąca (górny element + rama)1 przezroczysty pojemnik zbiorczy (800 ml)1 zestaw noży (10 x 10 mm + 30 x 30 mm)1 zestaw noży (10 x 30 mm + 15 x 15 mm)
Rysunek 1:
Górny element tnący
Zabezpieczenia
Siatka słupkowa
Zestaw noży
Dolny element tnący
przezroczysty pojemnik zbiorczy
8

Instrukcja obsługi do zestawu noży
Rysunek 2: Zestaw noży tak zakładać, aby wybrany rodzaj noża znajdował się w pozycji noża 1.
Rysunek 2: |
Pozycja noża 1 |
||
|
|||
|
|
Pozycja noża 2 |
|
|
|
|
|
|
|
|
|
|
|
Otworzyć górny element tnący, aby włożyć wybrany zestaw noży. Włożyć |
|
|
|
||
|
|
noże do dolnego elementu tnącego tak, aby lekko zaokrąglona wąska |
|
|
|
strona zestawu noży trafiła do odpowiedniej szczeliny w ramie dolnego |
|
|
|
||
|
|
elementu tnącego. Teraz docisnąć drugą stronę zestawu noży aż do usły- |
PL |
|
|
szenia kliknięcia. |
|
|
|
Produkt do pokrojenia położyć na noże (pozycja noży 1). |
|
|
|
||
|
|
||
|
|
W przypadku większych kawałków lub kawałków, które maja być krojone w |
|
|
|
pionie przytrzymać ręką produkt do pokrojenia i lekko docisnąć go górnym |
|
|
|
elementem tnącym tak, aby nie mógł się wyślizgnąć. |
|
|
|
Energicznie docisnąć górny element tnący. Produkt zostaje pocięty przez |
|
|
|
||
|
|
||
|
|
dociśnięcie słupkowej siatki na równomierne kostki, paski lub talarki (w za- |
|
|
|
leżności od zestawu noży) i automatycznie wyłapany przez przezroczysty |
|
|
|
pojemnik zbiorczy. |
|
|
|
Aby otworzyć pojemnik zbiorczy i wyjąć pokrojony produkt wystarczy całą |
|
|
|
||
|
|
||
|
|
pokrywę tnącą (górny i dolny element tnący) unieść po wąskiej stronie i |
|
|
|
zdjąć. Przy tej czynności przytrzymać drugą ręką przezroczysty pojemnik. |
|
|
|
|
|
Po zewnętrznej stronie dolnego elementu tnącego znajduje się wpuszczony uchwyt.Aby wyciągnąć zestaw noży wystarczy go tutaj lekko unieść.
 Uwaga!
Zwrócić uwagę podczas wkładania zestawu noży, aby jego lekko zaokrąglone strony ściśle przylegały do dolnego elementu tnącego.
Aby efekt krojenia był optymalny noże są bardzo ostre. Proszę pamiętać, podczas użytkowania urządzenia, aby nie dotykać rękami ostrzy. Dlatego też urządzenie to nie jest przeznaczone dla dzieci!
Proszę pamiętać, aby włożony produkt do pokrojenia nie wystawał ponad sitko noży. Owoce lub warzywa do pocięcia muszą być mniejsze niż sitko noży, aby zapewnić ich bezproblemowe krojenie.
9

 Rada
Rada
Przed rozpoczęciem pracy zanurz zestaw noży w wodzie. Mokre noże szybciej kroją i wymagają użycia mniejszejsiły.Dziękiwilgociwarzywczyinnychproduktówzestawnożypozostajepodczaskrojeniamokry.
Produkty spożywcze z łupinami jak np. papryka, jabłka czy gruszki układać na zestawie noży skórką do góry. W ten sposób można je łatwiej pokroić i zaoszczędzić siły.
Aby pokroić w kostkę, położyć produkt do pokrojenia płasko na zestawie noży. Na przykład na zupę ziemniaczaną pokroić ziemniaki najpierw w talarki.Aby pokroić je w kostkę można ułożyć na nożach kilka talarków. W ten sposób można układać ogórki sałatkowe, cukinie i podobne warzywa.
Aby pokroić w słupki np. na frytki ułóż ziemniaki pionowo na nożach. W ten sposób można uzyskać smaczne słupki z ogórków, jabłek itp. do gęstych sosów.
PL
Do informacji:
Antypoślizgowe wypustki znajdujące się na spodzie pojemnika zbiorczego gwarantują stabilność wielofunkcyjnej krajalnicy na blacie roboczym.
Możliwości zastosowania wkładów
Zestaw do średnich kostek, słupków czy ćwiartek
NóżA
Nóż B
NóżA: 10 x 10 mm Nóż B: 30 x 30 mm
Ziemniaki – surowe np. na frytki lub gotowane na sałatkę
Ogórki, papryka, cebula, pomidory, marchew, cukinie, szczypior, seler, chrzan, dynia, grzyby na sałatkę, potrawy warzywne lub warzywa na zupę
Gotowane jaja, gotowana szynka, kiełbasa lub mortadela na sałatkęSer np. kozi lub mozzarella na potrawy śródziemnomorskie
Jabłka, gruszki, brzoskwinie, morele, truskawki czy banany na sałatkę owocową
Zestaw noży do większych kostek/słupków lub talarków/pasków
Nóż C
Nóż D
Papryka, gotowana szynka, grzyby, ziemniaki, cukinie na zupę krem i zapiekanki
Jabłka, banany, gruszki, ananasy, melony, papaje na sałatkę owocowąGotowana pierś kurczaka na sałatkę z paskami kurczaka
Nóż C: 10 x 30 mm
Nóż D: 15 x 15 mm
10
 Loading...