

Page 1
2
Fax
Questions?
Start Here
EN
安裝說明
TC
1
For Australia and New Zealand Users
© 2014 Seiko Epson Corporation.
All rights reserved.
Printed in XXXXXX
Windows
Windows
If the Firewall alert appears, allow access
Q
for Epson applications.
若出現〝防火牆〞警示訊息,請確認
發行者為 Epson,然後才開啟 Epson 應
用程式。
Windows (No CD/DVD drive)
Mac OS X
http://epson.sn
Visit the website to start the setup process, install software, and congure
network settings.
請瀏覽網站以啟動安裝程序、安裝軟體及進行網路設定。
XP-820 Series
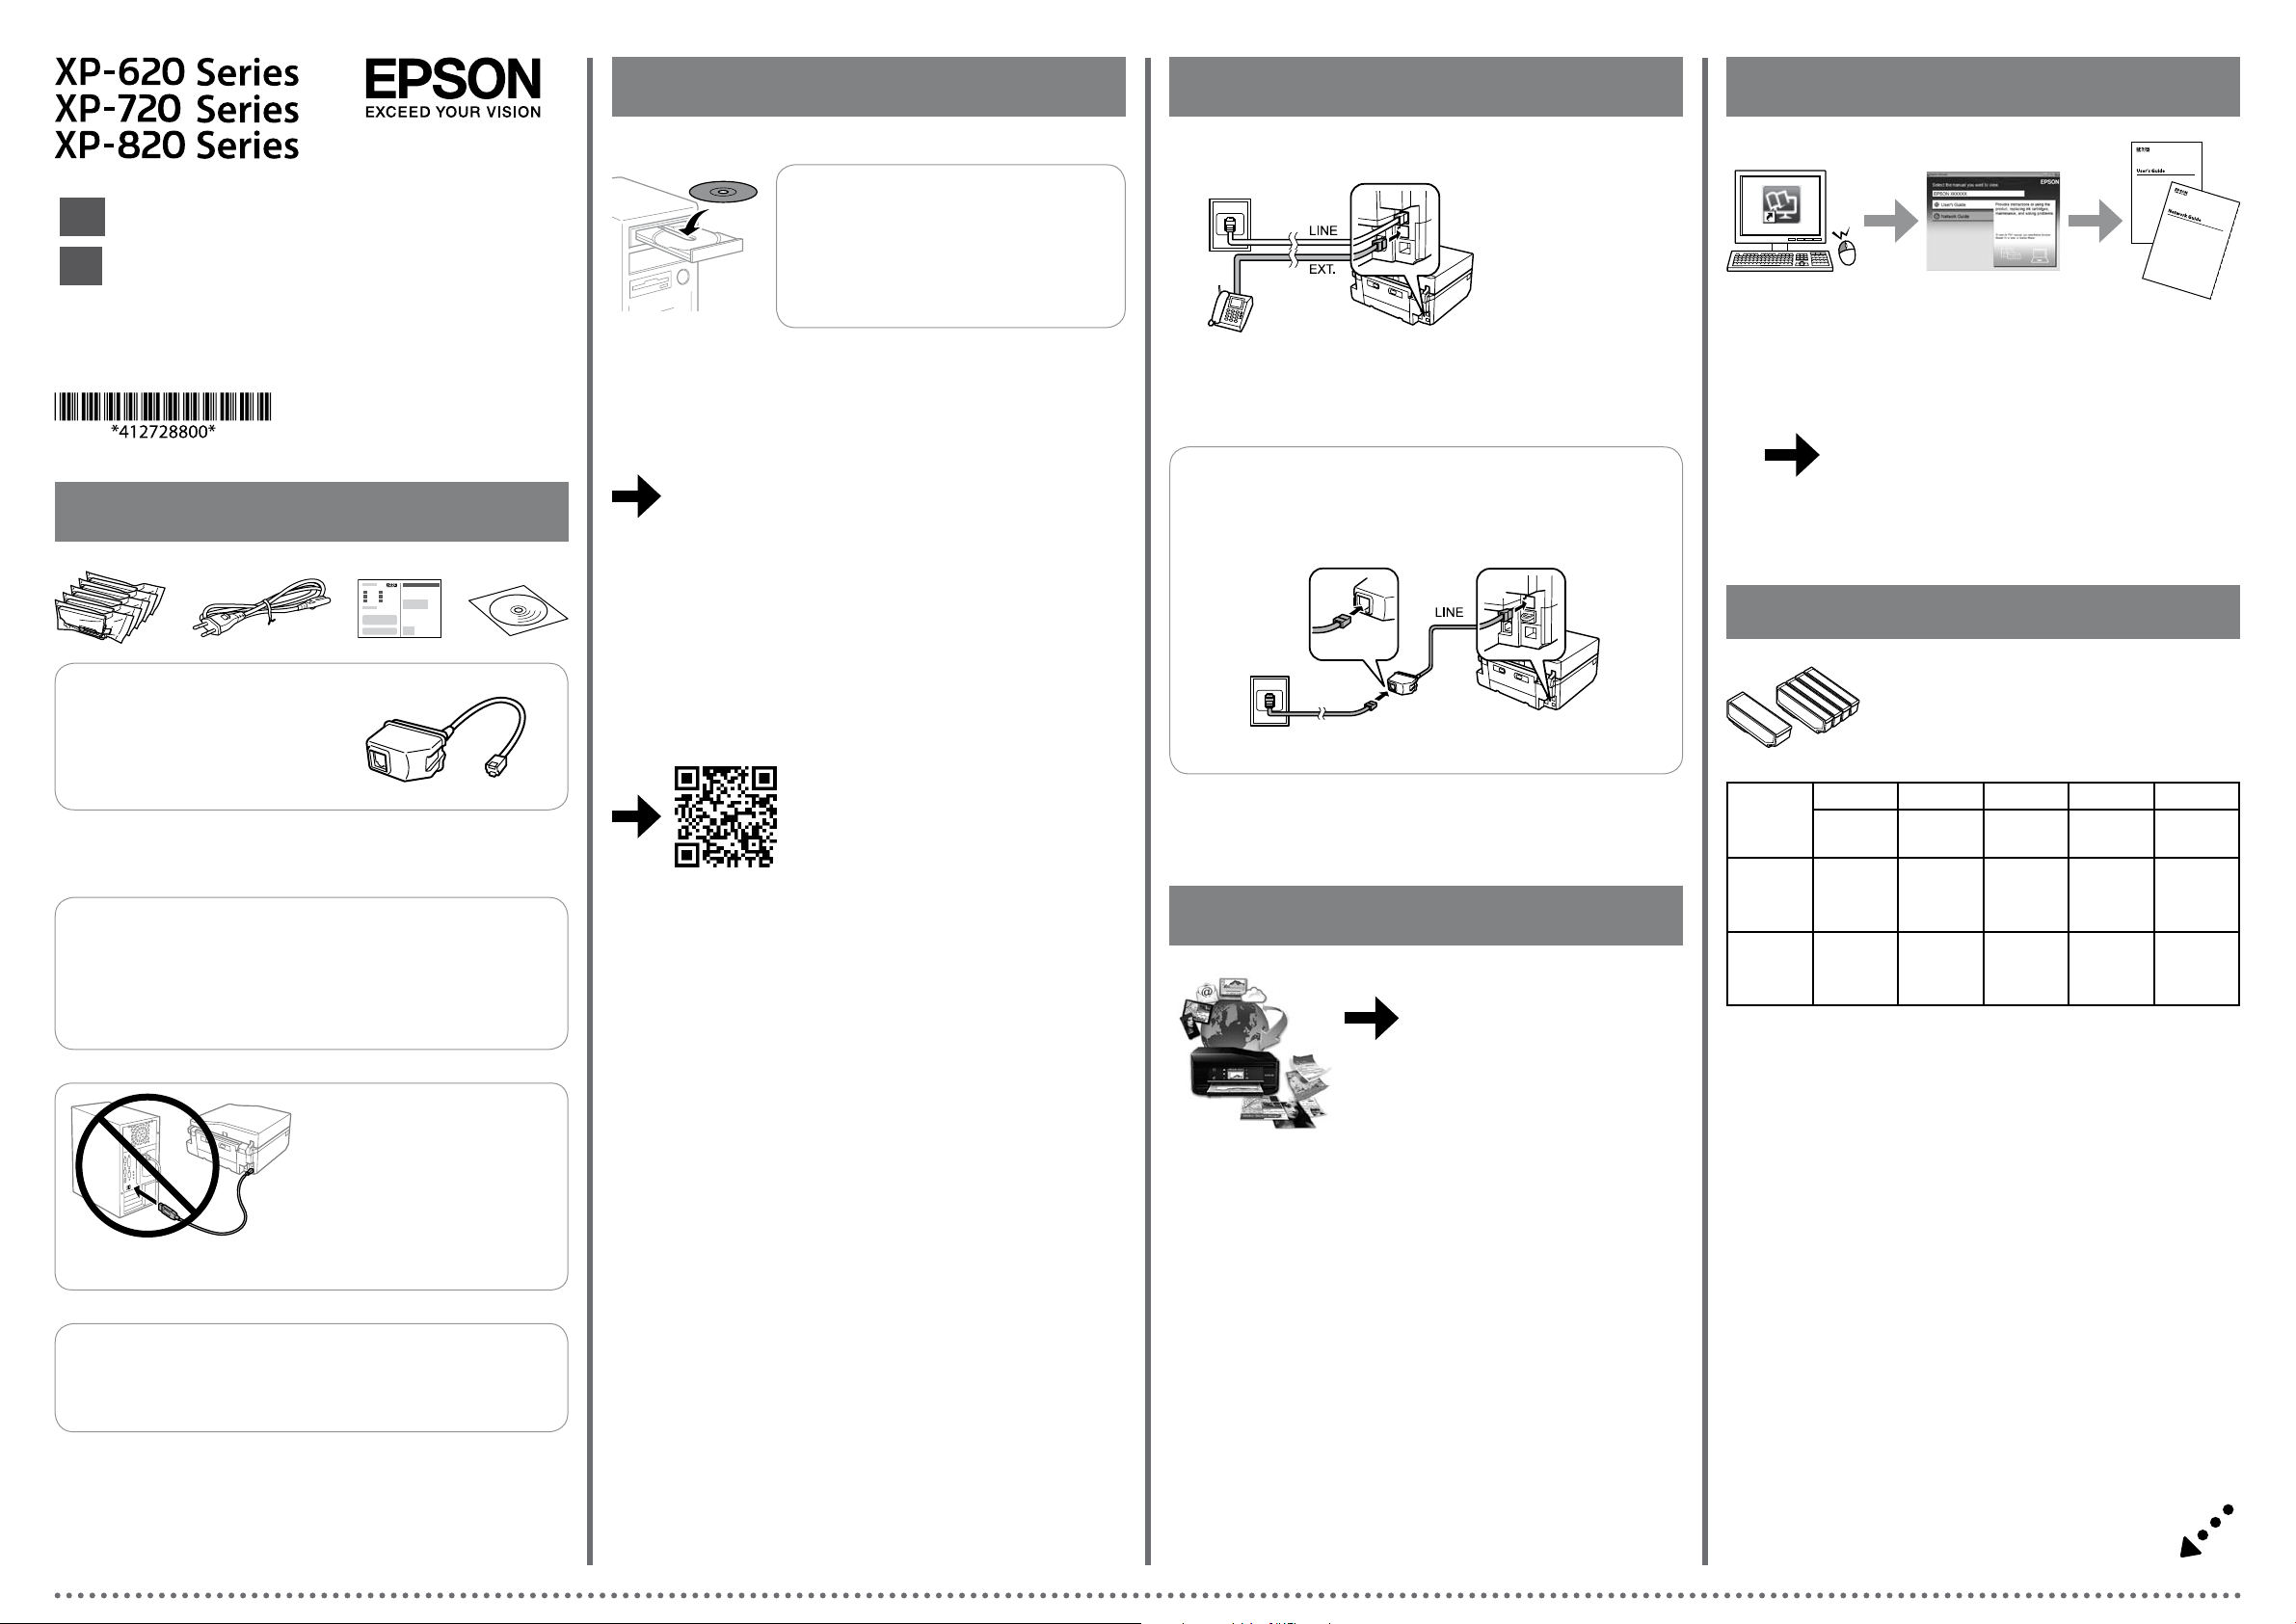
For information on setting up the fax features, see the User’s Guide.
如需設定傳真功能的詳細資訊,請參閱進階使用說明。
For Australia and New Zealand Users
• Make sure you connect the noise lter as shown.
• Do not use this lter for any other products.
You can open the User’s Guide (PDF) and Network Guide (PDF) from the shortcut
icon, or download the latest versions from the following website.
您可從捷徑圖示啟動進階使用說明 (PDF) 及網路使用說明 (PDF),或從下列網
站下載最新版本。
http://support.epson.net/
Ink Cartridge Code / 墨水匣代碼
Contents may vary by location.
內容物會因國家 / 地區而不同。
Do not open the ink cartridge package until you are ready to install it in the
printer. The cartridge is vacuum packed to maintain its reliability.
若不安裝至印表機,請勿拆開墨水匣的包裝。為了維持墨水匣列印穩定
性,墨水匣採真空包裝。
Do not connect a USB cable unless
instructed to do so.
除非有指示要求,否則請勿連接 USB
連接線。
iOS / Android
http://ipr.to/a
Visit the website to install Epson iPrint
application, start the setup process, and
congure network settings.
請瀏覽網站以安裝 Epson iPrint 應用程式、啟
動安裝程序及進行網路設定。
Epson Connect
https://www.epsonconnect.com/
Using your mobile device, you can print from any location worldwide to your
Epson Connect compatible printer. Visit the website for more information.
您可使用行動裝置從世界各地列印至 Epson Connect 相容印表機。如需詳細
資訊,請瀏覽網站。
BK PBK C M Y
Black黑色Photo Black
相片黑
XP-620
XP-720
XP-820
XP-621
XP-721
XP-821
Not all cartridges are available in all regions.
部分墨水匣僅特定地區有提供。
273
273XL
255 256 256 256 256
273
273XL
Cyan
藍色
273
273XL
Magenta紅色Yellow
黃色
273
273XL
273
273XL
Caution; must be followed carefully to avoid bodily injury.
!
注意:務必遵守注意說明,避免造成人身傷害。
Page 2
Basic Operations / 基本操作
Guide to Control Panel
控制面板說明
XP-720 Series/
XP-820 Series
Starts the operation you selected.
啟動您選取的操作。
Cancels/returns to the previous menu.
取消/返回上一個選單。
XP-620 Series
Sets the number of copies and prints.
設定份數並進行列印。
C
Slide the edge guides to the sides of the paper cassette.
將紙張邊緣定位器靠齊進紙匣的側邊。
D
G
The paper setup screen is displayed on the LCD screen. Select the paper size and
paper type you loaded in the printer.
紙張設定畫面會顯示在液晶螢幕上。選擇放入印表機的紙張大小及紙張種類。
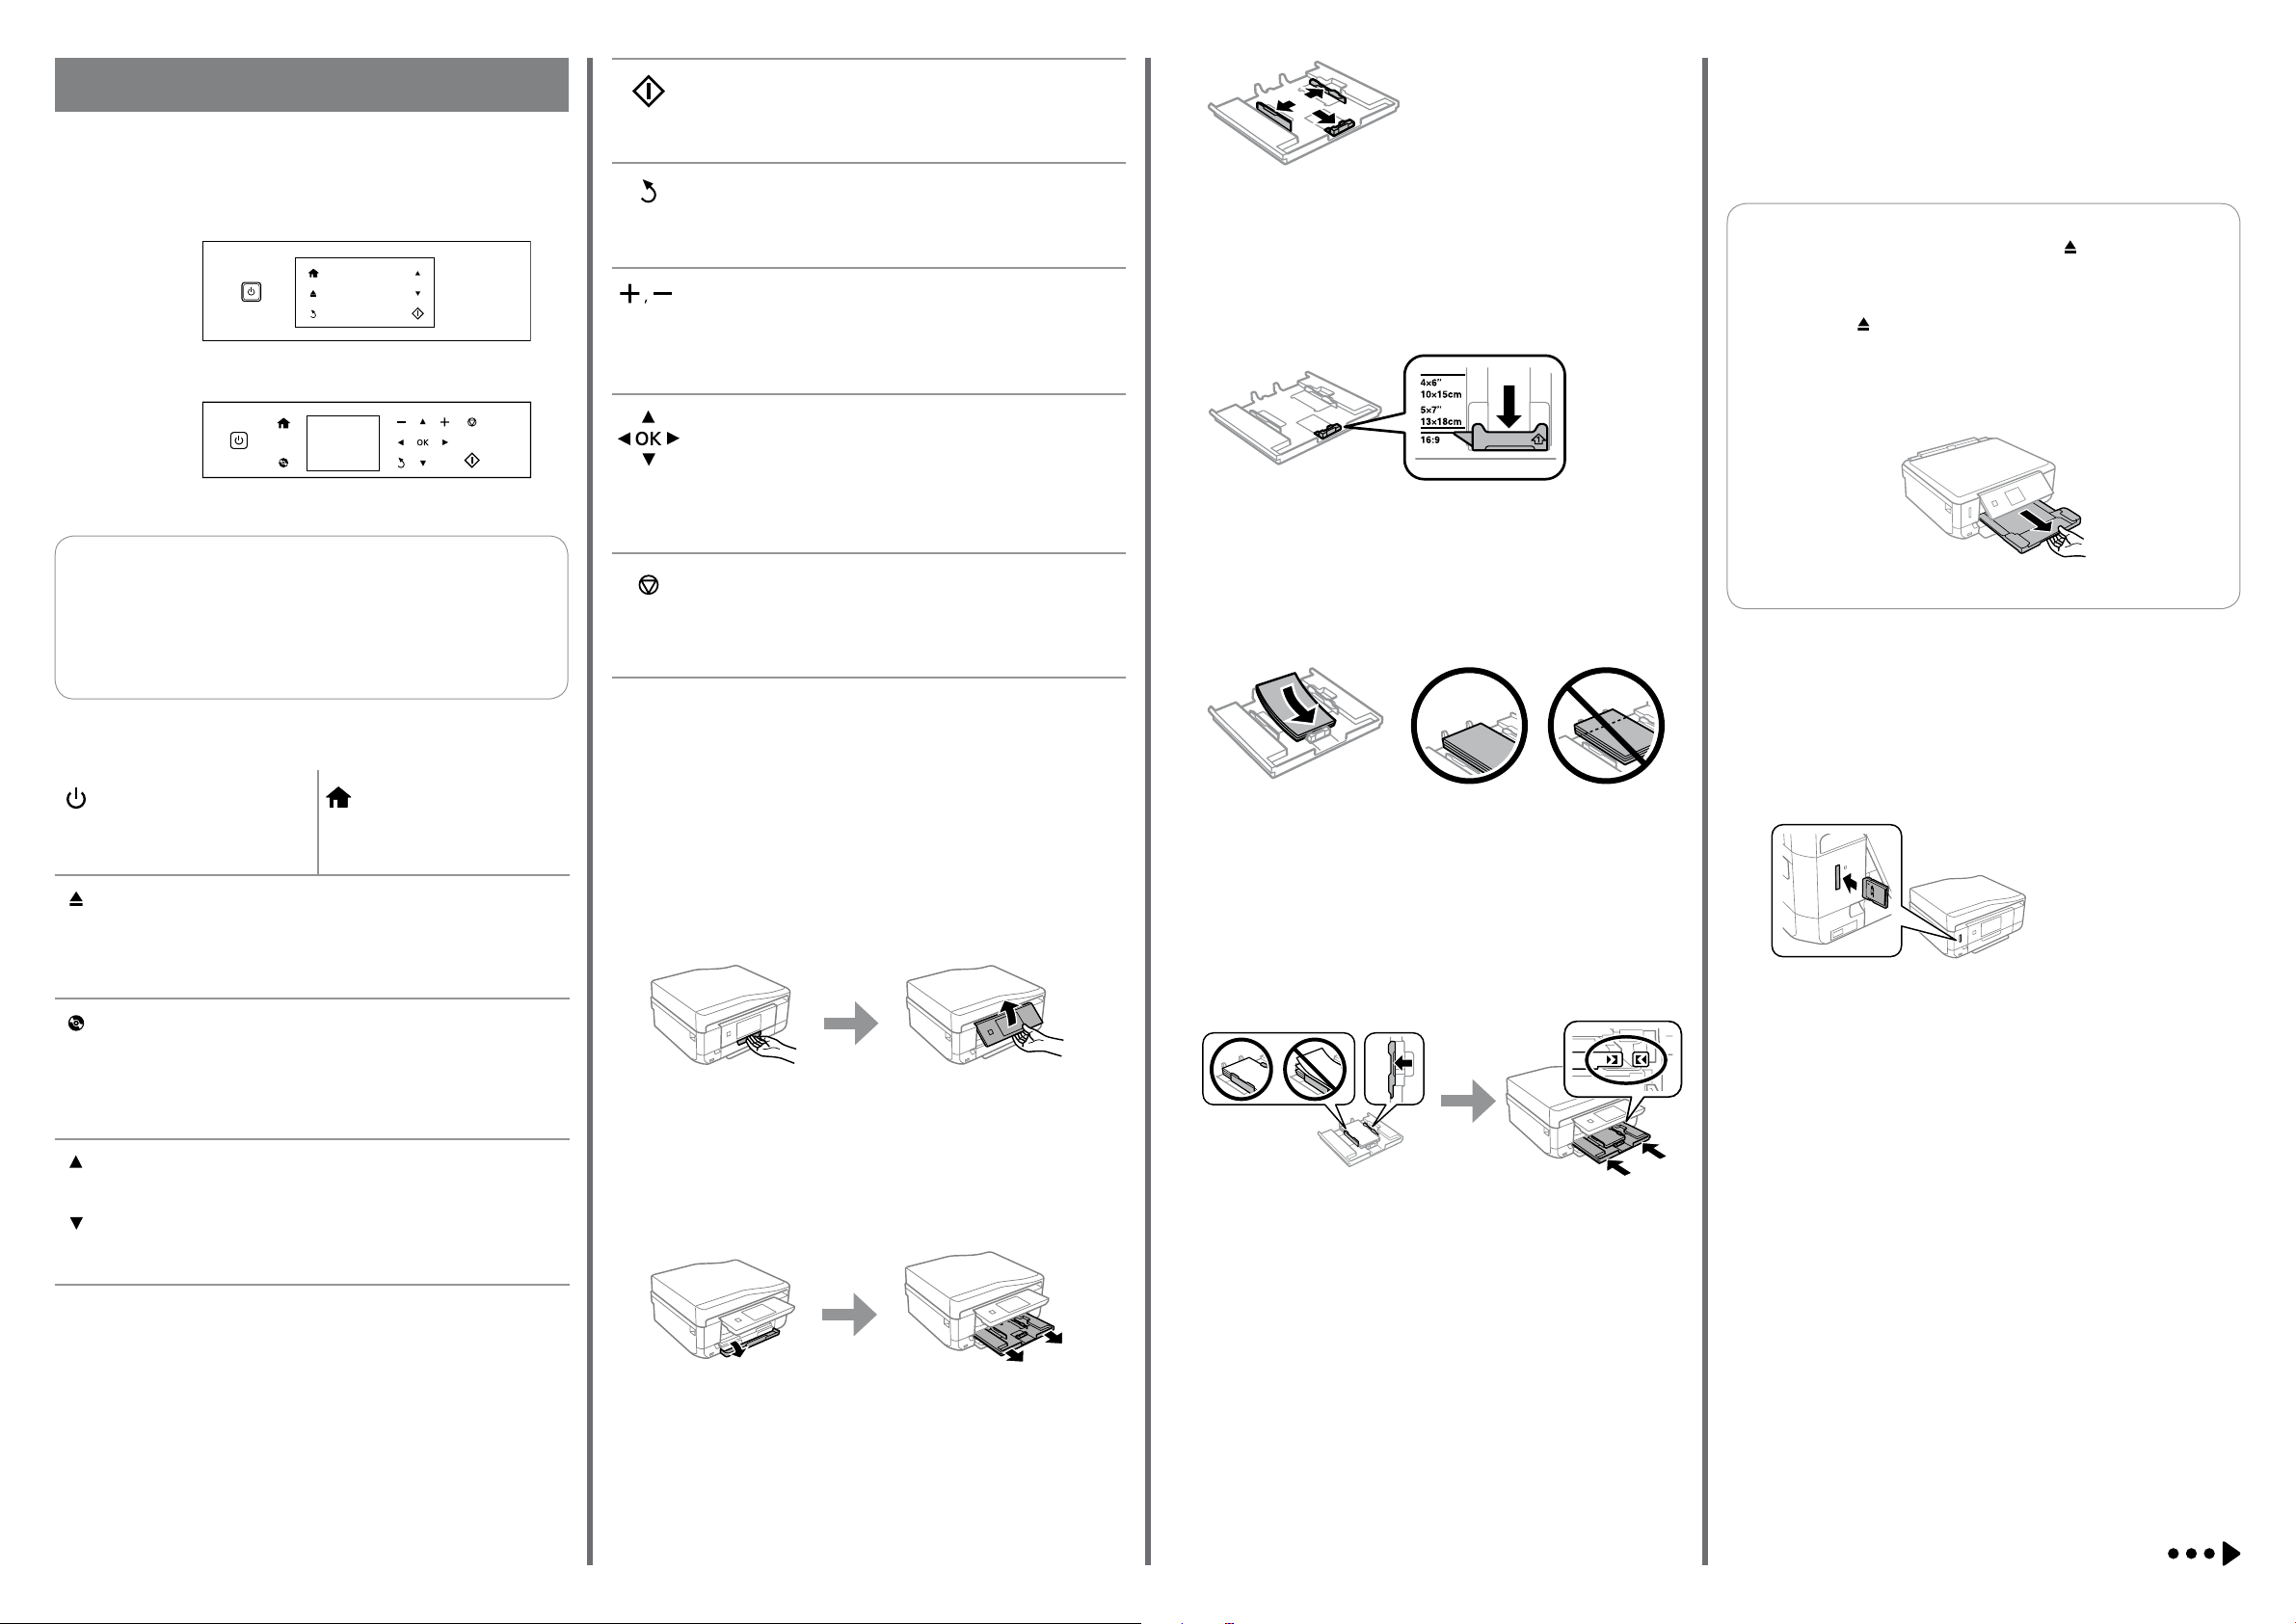
XP-720 Series/XP-820 Series: The output tray is automatically
Q
ejected. When you nished printing, press to close the tray.
XP-620 Series: You need to pull out and close the output tray
manually.
XP-720 系列/XP-820 系列:出紙托盤會自動退出。完成列印
時,按下 闔上托盤。
XP-620 系列:您必須手動拉出及闔上出紙托盤。
XP-620 Series
Q XP-720 Series/XP-820 Series
Except for the P button, available buttons are displayed on the
printer’s screen.
除了 P 鍵以外,可用的按鍵會顯示在印表機的畫面上。
Turns the printer on or o.
開啟或關閉印表機電源。
XP-720 Series/XP-820 Series
Pulls out or close the output tray.
拉出或闔上出紙托盤。
Displays the home screen.
顯示主畫面。
XP-620 Series
Press l, u, r, d to select menus. Press OK to conrm the setting
you have selected and go to next screen.
按下 l、u、r、d 選擇選單。按下 OK 鍵可確認已選擇的設定
並進入下一個畫面。
XP-620 Series
Stops the ongoing operation or initialize the current settings.
停止目前操作或初始化目前設定。
Loading Paper
裝入紙張
Slide the edge guide to adjust to the paper size you will use.
移動紙張邊緣定位器,調整至您要使用的紙張大小。
E
Load paper toward the edge guide with printable side face-down, and check
that the paper is not sticking out from the end of the cassette.
將紙張可列印面朝下,沿著紙張邊緣定位器放入,然後確認紙張沒有超出進
紙匣的末端。
Printing Photos
列印相片
A
XP-620 Series
Displays the CD/DVD label menu. The product prepares CD/DVD label
printing.
顯示 CD/DVD 標籤選單。印表機準備進行 CD/DVD 標籤列印。
XP-720 Series/XP-820 Series
Scrolls the screen. You can also scroll the screen by icking it.
捲動畫面。您也可以利用滑動方式捲動畫面。
A
Raise the panel.
抬起面板。
B
Open the front cover and pull out the paper cassette 1 (upper one).
打開前蓋並拉出進紙匣 1 (上方)。
F
Slide the edge guides to the edges of the paper. Keep the cassette at and insert
it back into the printer carefully and slowly.
將紙張邊緣定位器靠齊紙張邊緣。將進紙匣保持平放,速度放慢,小心地將
進紙匣裝回印表機。
Insert a memory card and enter the Print Photos mode from the home screen.
插入記憶卡並從主畫面進入列印相片模式。
B
Select a photo and press + or - to set the number of copies.
選擇相片並按下 + 或 - 設定份數。
Page 3

C
Press Settings or d, and then make the print settings. Scroll down if necessary.
按下設定或 d,並進行列印設定。視需要往下捲動。
D
Press x to start printing.
按下 x 鍵開始列印。
Replacing Ink Cartridges
更換墨水匣
A
C
Open the scanner unit.
打開掃描單元。
Never touch the ink cartridges while the print head is moving.
!
當印字頭移動時,切勿碰觸墨水匣。
If the ink cartridge holder does not move to the ink cartridge
Q
replacement position, close the scanner unit and select Setup >
Maintenance > Ink Cartridge(s) Replacement.
若墨水匣槽沒有移至墨水匣更換位置,請關閉掃描單元並選擇
設定 > 維護 > 更換墨水匣。
F
Close the scanner unit and follow the on-screen instruction.
闔上掃描單元並依照螢幕上的指示操作。
G
Clearing the paper jam
清除夾紙
From the rear cover / 從後蓋
Wait until a completion message is displayed.
等待顯示完成訊息。
C
From inside the printer / 從印表機內部
Reattach the rear cover.
裝回後蓋。
A
Open the scanner unit and remove all of the paper inside, including any torn
pieces.
打開掃描單元並移除所有內部紙張,包括任何碎紙。
Prepare new ink cartridge(s). For best results, gently shake only the new Black
ink cartridge four or ve times and then unpack.
備妥新的墨水匣。在打開包裝袋前,請先搖晃新的黑色墨水匣 4 到 5 次,以
取得最佳的輸出品質。
You do not need to shake the color ink cartridges and the Photo
Q
Black ink cartridge.
您不需要搖晃彩色墨水匣及相片黑墨水匣。
B
Remove the cap from the new cartridge.
取下新墨水匣的護蓋。
D
Push the tab to unlock the ink cartridge holder and then remove the cartridge
diagonally.
按壓凸片以解開墨水匣槽,然後斜斜地取出墨水匣。
E
Insert the ink cartridge diagonally into the cartridge holder and gently push it
down until it clicks into place.
將墨水匣斜斜地插入墨水匣槽,然後輕輕壓入定位。
A
Pull out the rear cover and carefully remove the jammed paper.
拉出後蓋並小心取出夾紙。
B
Open the rear cover and carefully remove the jammed paper.
打開後蓋並小心取出夾紙。
B
Close the scanner unit.
闔上掃描單元。
Page 4

From the paper cassette / 從進紙匣
A
Pull out the paper cassette.
拉出進紙匣。
Safety Instructions / 安全說明
Use only the power cord that comes with the printer. Use of another
cord may cause re or shock. Do not use the cord with any other
equipment.
僅限使用印表機隨附的電源線。使用其他電源線可能導致起火或
觸電。請勿使用其他設備的電源線。
Be sure your AC power cord meets the relevant local safety
standard.
確定 AC 電源線符合當地的安全標準。
If the LCD screen is damaged, contact your dealer. If the liquid
crystal solution gets on your hands, wash them thoroughly with
soap and water. If the liquid crystal solution gets into your eyes,
ush them immediately with water. If discomfort or vision problems
remain after a thorough ushing, see a doctor immediately.
若液晶螢幕有所損壞,請聯絡您的經銷商。若液晶溶液接觸您
的雙手,請以肥皂及清水徹底洗淨。若液晶溶液噴到眼睛,請
立刻以清水沖洗。若徹底沖洗後仍感到不適或視覺有問題,請
馬上就醫。
Avoid using a telephone during an electrical storm. There may be a
remote risk of electric shock from lightning.
避免在雷電暴風雨的天氣使用本機。有可能因閃電而發生遠距離
觸電的危險。
Information for Users in Taiwan Only /
台灣使用者適用資訊
產品名稱:多功能印表機(XP-721)
額定電壓:AC 100 - 120 V
O
額定頻率:50 至 60 Hz
O
耗電量:
O
單機複印時:約 19 W
就緒模式:約 6.3 W
省電模式:約 1.2 W
關機模式:約 0.2 W
額定電流:0.7 A
O
製造年份, 製造號碼和生產國別:見機體標示
警語
檢修本產品之前,請先拔掉本產品的電源線。
B
Remove the jammed paper from the cassette.
取出進紙匣中的夾紙。
C
Align the edges of the paper. Keep the cassette at and insert it back into the
printer carefully and slowly.
對齊紙張的邊緣。將進紙匣保持平放,速度放慢,小心地將進紙匣裝回印
表機。
Print Quality Help
列印品質說明
Print a nozzle check pattern. Select Setup > Maintenance > Nozzle Check. If
the pattern looks like “b”, perform Print Head Cleaning.
列印噴嘴檢查表單。選擇設定 > 維護 > 噴嘴檢查。若表單看起來像「b」,
請執行印字頭清潔。
(a) (b)
Except as specically explained in your documentation, do not
attempt to service the printer yourself.
除非是文件中有特別說明之處,否則請勿企圖自行維修本產品。
Do not let the power cord become damaged or frayed.
請勿使用損壞或磨損的電源線。
Place the printer near a wall outlet where the power cord can be
easily unplugged.
將印表機放置在容易拔出電源線的電源插座附近。
Do not place or store the product outdoors, near excessive dirt
or dust, water, heat sources, or in locations subject to shocks,
vibrations, high temperature or humidity.
請勿將印表機放置或儲存在室外、靠近灰塵粉末較多之處、水
源、熱源,以及易震動、搖晃或高溫潮濕的地方。
Take care not to spill liquid on the product and not to handle the
product with wet hands.
請小心避免將任何液體潑灑在這台印表機上,雙手潮濕時請勿操
作印表機。
Keep this product at least 22 cm away from cardiac pacemakers.
Radio waves from this product may adversely aect the operation of
cardiac pacemakers.
請將本產品與心臟起搏器保持至少 22 公分的距離。本產品發射
的無線電波可能影響心臟起搏器的運作。
Do not use a telephone to report a gas leak in the vicinity of the leak.
當附近有瓦斯洩漏時,請勿使用電話回報洩漏情形。
Always keep this guide handy.
請妥善保管本使用說明。
Keep ink cartridges out of the reach of children.
請將墨水匣放在兒童無法取得之處。
Be careful when you handle used ink cartridges, as there may be
some ink around the ink supply port. If ink gets on your skin, wash
the area thoroughly with soap and water. If ink gets into your eyes,
ush them immediately with water. If discomfort or vision problems
continue after a thorough ushing, see a doctor immediately. If ink
gets into your mouth, spit it out immediately and see a doctor right
away.
處理用過的墨水匣時應特別小心,墨孔周圍可能殘留部分墨水。
若墨水沾到皮膚,請以肥皂及清水徹底洗淨。若墨水噴入眼睛,
請立刻以清水沖洗。若完全沖洗後仍感到不適或視覺有問題,請
立即就醫。若誤食墨水,請立即將墨水吐出並即刻送醫治療。
功能規格
列印方式:微針點壓電噴墨技術
O
解析度:最大可達 5760 × 1440 dpi
O
適用系統:
O
Windows 8.1 (32-bit, 64-bit)/Windows 8 (32-bit, 64-bit)/Windows 7 (32-bit,
64-bit)/Windows Vista (32-bit, 64-bit)/Windows XP Professional x64 Edition/
Windows XP (32-bit)
Mac OS X v10.9.x/Mac OS X v10.8.x/Mac OS X v10.7.x/Mac OS X v10.6.x
使用方法
見內附相關說明文件
緊急處理方法
發生下列狀況時,請先拔下印表機的電源線並洽詢 Epson 授權服務中心:
電源線或插頭損壞
O
有液體噴灑到印表機
O
印表機摔落或機殼損壞
O
印表機無法正常操作或是列印品質與原來有明顯落差
O
注意事項
只能使用印表機標籤上所註明的電源規格。
O
請保持工作場所的通風良好。
O
製造商 :
地址 :
電話 :
SEIKO EPSON CORPORATION
80 Harashinden, Hirooka, Shiojiri-shi, Nagano-ken, 399-0785, JAPAN
81-263-52-2552
進口商 :台灣愛普生科技股份有限公司
地址 :台北市信義區松仁路
電話 :
(02) 8786-6688 (代表號)
7 號 14 樓
For New Zealand Users
General warning
The grant of a Telepermit for any item of terminal equipment indicates only that Telecom
has accepted that the item complies with the minimum conditions for connection to its
network. It indicates no endorsement of the product by Telecom, nor does it provide any
sort of warranty. Above all, it provides no assurance that any item will work correctly in all
respects with another item of Telepermitted equipment of a dierent make or model, nor
does it imply that any product is compatible with all of Telecom’s network services.
Telepermitted equipment only may be connected to the EXT telephone port. This port is
not specically designed for 3-wire-connected equipment. 3-wire-connected equipment
might not respond to incoming ringing when attached to this port.
The automatic calling functions of this equipment must not be used to cause a nuisance to
other Telecom customers.
Windows® is a registered trademark of the Microsoft Corporation.
Mac OS is a trademark of Apple Inc., registered in the U.S. and other countries.
Android™ is a registered trademark of Google Inc.
The contents of this manual and the specications of this product are subject to change without notice.
 Loading...