

Page 1
WF-3620/WF-3640
Quick Guide
This guide includes basic information about your product and troubleshooting tips. See
the resources below for additional information.
User’s Guide
See the online User’s Guide for detailed information on using your product,
including these features:
• Connect wirelessly from your smartphone, tablet, or computer. Print
documents and photos from across the room or around the world with
Epson Connect
™
and Google Cloud Print™.
• Easily set up networking—Wi-Fi, Wi-Fi Direct, and Ethernet.
• Reuse presets for your favorite copy, scan, and fax settings.
• Copy, scan, and fax double-sided directly from the control panel.
• Save paper and power with ECO mode.
Support
Visit epson.com/support (U.S.) or epson.ca/support (Canada) where you can
download drivers, view manuals, see FAQs, or e-mail Epson support.
Wireless Videos
View easy-to-follow videos on connecting the printer to your network. Visit
epson.com/support/wireless (U.S.) or epson.ca/support/wireless (Canada)
to view the videos.
English
?
Page 2

2 Using the Control Panel
Using the Control Panel
The touch screen makes it easy to use all the features of your product. To save energy, the
screen goes dark after several minutes of inactivity. Touch the screen to wake it up.
Note: Your product may look different from the illustrations in this guide, but the instructions are
the same.
* The orange light (on the left) comes on when a cartridge is low on ink. It flashes when an error
occurs or a cartridge is expended. The blue light (on the right) comes on when there are jobs
waiting, and it flashes when the product is processing data.
You may see the following icons on the screen:
A network connection is being established.
The product is connected to a wired network.
The product is connected to a wireless network.
The product is set up for Wi-Fi Direct.
A document is loaded in the automatic document feeder.
Turn on
or off
Return to
home screen
Return to
previous
screen
Scroll the
screen
Return to
defaults
Clear
number
settings
See printer and
job status*
Start printing,
copying, scanning,
or faxing
Display
presets
Stop current
operation
Setup
Memory
device
Epson
Connect
Page 3
Loading Paper 3
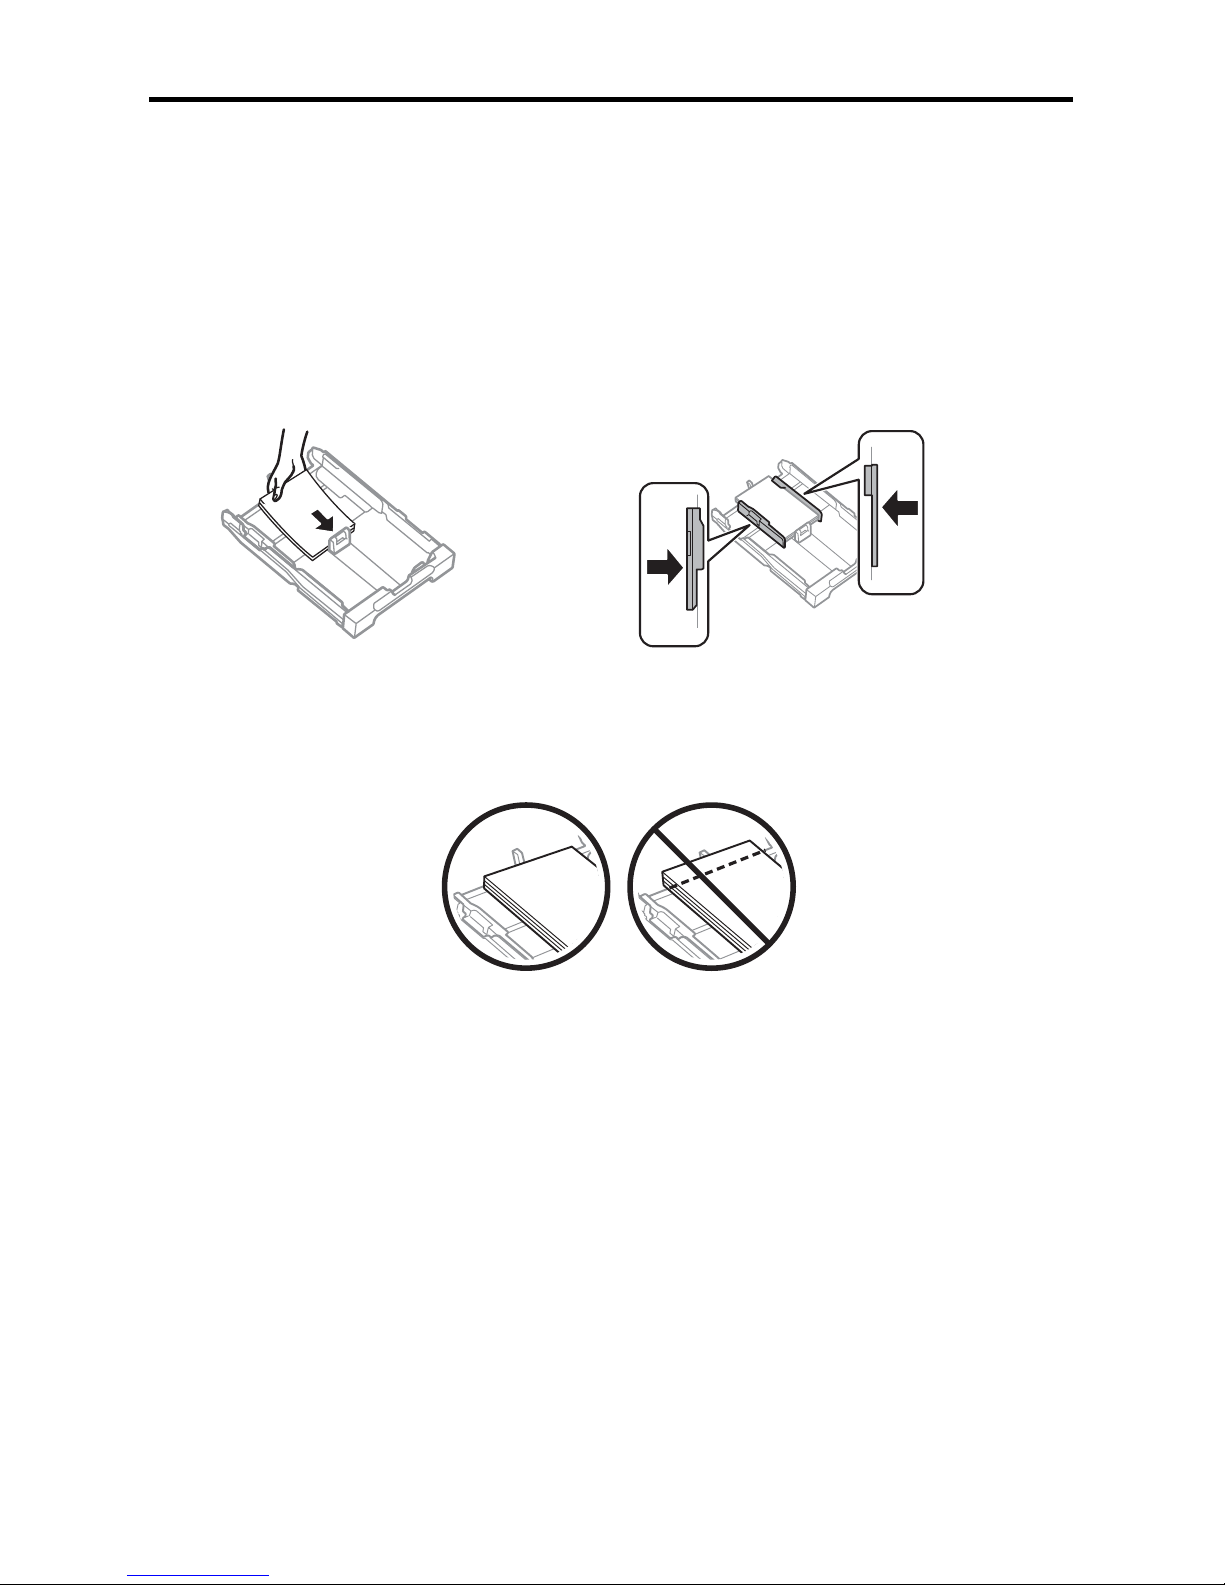
Loading Paper
Epson offers a wide array of high quality papers, making it easy to maximize the impact of
your documents, photos, presentations, and other projects.
■ Load Epson
®
Premium Presentation Paper Matte or any type of Epson photo paper
only in the upper paper cassette (if your product has two cassettes).
■ Load paper printable side down; it is usually whiter or brighter.
■ Always load paper short edge first and make sure the edge guides are against the paper.
■ Make sure the paper is loaded against the edge guide and not sticking out from the
end of the cassette. The paper may slide forward slightly as you insert the cassette.
This is normal.
■ After you load paper, use the control panel to select the paper size and type.
■ For instructions on loading envelopes, legal-size paper, or using the rear paper feed
slot, see the online User’s Guide.
Page 4

4 Solving Paper Jam Problems
Solving Paper Jam Problems
If paper has jammed, follow the steps on the LCD. At the front of the printer, check these
areas:
If you are using the automatic document feeder, check these areas:
At the back of the printer, remove the auto-duplexer (rear cover), and check these areas:
Open the auto-duplexer
Page 5

Solving Network Problems 5
Solving Network Problems
If you have a network problem with your Epson product, check the messages on the LCD
to diagnose the cause of most problems.
You can also check the basic troubleshooting suggestions below. For more in-depth
troubleshooting, see your online User’s Guide or access interactive troubleshooting and
FAQs at epson.com/support (U.S.) or epson.ca/support (Canada).
■ Try connecting to the wireless router or access point with your computer or another
device to confirm that it is working correctly.
■ Try restarting the router (turn it off and then on), then try to connect to it again.
■ Print a network status sheet from the product’s control panel. Press if necessary and
select
Setup > Network Status > Wi-Fi/Network Status. Then select Print and
press one of the x
buttons.
Verify that the network settings are correct and check the signal strength. If it is poor,
try moving the product closer to your router or access point. Avoid placing it next to a
microwave oven, 2.4 GHz cordless phone, or large metal object such as a filing
cabinet.
■ If your wireless router doesn’t broadcast its network name (SSID), manually enter
your wireless network name.
■ If your wireless router has security enabled, make sure you entered the WEP key or
WPA passphrase correctly.
■ When using TCP/IP, make sure your network’s DHCP option is enabled (your router
manufacturer will be able to assist you with this setting).
■ Remove and reinstall your product software.
■ Disable your computer’s firewall temporarily to see if that may be causing the
problem. Contact your firewall manufacturer for assistance.
Page 6

6 Notices
Notices
Declaration of Conformity
According to 47CFR, Part 2 and 15 for: Class B Personal Computers and Peripherals; and/or CPU
Boards and Power Supplies used with Class B Personal Computers:
We: Epson America, Inc.
Located at: 3840 Kilroy Airport Way, MS 3-13, Long Beach, CA 90806
Telephone: (562) 981-3840
Declare under sole responsibility that the product identified herein, complies with 47CFR Part 2 and
15 of the FCC rules as a Class B digital device. Each product marketed is identical to the
representative unit tested and found to be compliant with the standards. Records maintained
continue to reflect the equipment being produced can be expected to be within the variation
accepted, due to quantity production and testing on a statistical basis as required by 47CFR §2.909.
Operation is subject to the following two conditions: (1) this device may not cause harmful
interference, and (2) this device must accept any interference received, including interference that
may cause undesired operation.
Trade Name: Epson
Type of Product: Multifunction printer
Model: C481D, C481E
Epson America, Inc. Limited Warranty
What Is Covered: Epson America, Inc. (“Epson”) warrants to the original retail purchaser that the
Epson printer covered by this limited warranty statement, if purchased and operated only in the
United States, Canada, or Puerto Rico, will be free from defects in workmanship and materials for a
period of one (1) year from the date of original purchase. For warranty service, you must provide
proof of the date of original purchase.
What Epson Will Do To Correct Problems: Should your Epson printer prove defective during the
warranty period, please call the Epson Connection
SM
at (562) 276-4382 (U.S.) or (905) 709-3839
(Canada) for warranty repair instructions and return authorization. An Epson service technician will
provide telephone diagnostic service to determine whether the printer requires service. If service is
needed, Epson will, at its option, exchange or repair the printer without charge for parts or labor. If
Epson authorizes an exchange for the defective unit, Epson will ship a replacement printer to you,
freight prepaid, so long as you use an address in the United States, Canada, or Puerto Rico.
Shipments to other locations will be made freight collect. You are responsible for securely packaging
the defective unit and returning it to Epson within five (5) working days of receipt of the
replacement. Epson requires a debit or a credit card number to secure the cost of the replacement
printer in the event that you fail to return the defective one. If Epson authorizes repair instead of
exchange, Epson will direct you to send your printer to Epson or its authorized service center, where
the printer will be repaired and sent back to you. You are responsible for packing the printer and for
all costs to and from the Epson authorized service center. When warranty service involves the
exchange of the printer or a part, the item replaced becomes Epson property. The replacement
printer or part may be new or refurbished to the Epson standard of quality, and, at Epson’s option,
may be another model of like kind and quality. Exchange products and parts assume the remaining
warranty period of your original product covered by this limited warranty.
Page 7

Epson America, Inc. Limited Warranty 7
What This Warranty Does Not Cover: This warranty covers only normal use in the United States,
Canada, or Puerto Rico. Excessive, continuous use is not considered normal use; damage,
maintenance or service from such use will not be covered under this warranty. This warranty is not
transferable. This warranty does not cover any color change or fading of prints or reimbursement of
materials or services required for reprinting. This warranty does not cover damage to the Epson
product caused by parts or supplies not manufactured, distributed or certified by Epson. This
warranty does not cover ink cartridges or third party parts, components, or peripheral devices added
to the Epson product after its shipment from Epson, e.g., dealer or user-added boards or
components. Epson is not responsible for warranty service should the Epson label or logo or the
rating label or serial number be removed or should the product fail to be properly maintained or fail
to function properly as a result of misuse, abuse, improper installation, neglect, improper shipping,
damage caused by disasters such as fire, flood, and lightning, improper electrical current, software
problems, interaction with non-Epson products, or service other than by an Epson Authorized
Servicer. If a claimed defect cannot be identified or reproduced, you will be held responsible for the
costs incurred.
DISCLAIMER OF WARRANTIES: THE WARRANTY AND REMEDY PROVIDED ABOVE
ARE EXCLUSIVE AND IN LIEU OF ALL OTHER EXPRESSED OR IMPLIED
WARRANTIES INCLUDING, BUT NOT LIMITED TO, THE IMPLIED WARRANTIES OF
MERCHANTABILITY, FITNESS FOR A PARTICULAR PURPOSE AND NONINFRINGEMENT. UNLESS STATED HEREIN, ANY STATEMENTS OR
REPRESENTATION MADE BY ANY OTHER PERSON OR FIRM ARE VOID.
Remedies: Your exclusive remedy and Epson’s entire liability for a material breach of this Agreement
will be limited to a refund of the price paid for the Epson products covered by this Agreement. Any
action for breach of warranty must be brought within 3 months of the expiration date of the
warranty. Epson is not liable for performance delays or for nonperformance due to causes beyond its
reasonable control. Except as provided in this written warranty, neither Epson nor its affiliates shall
be liable for any loss, inconvenience, or damage, including direct, special, incidental or consequential
damages, including lost profits, cost of substitute equipment, downtime, claims of third parties,
including customers, or injury to property, resulting from the use or inability to use the Epson
products, whether resulting from a breach of warranty or any other legal theory. Some jurisdictions
do not allow limits on warranties or remedies for breach in certain transactions. In such jurisdictions,
the limits in this paragraph and the preceding paragraph may not apply.
Arbitration, Governing Laws: Any disputes arising out of this Agreement will be settled by
arbitration to be conducted in Los Angeles, California, in accordance with the commercial
Arbitration Rules of the American Arbitration Association, and judgment upon the award rendered
by the arbitrator(s) may be entered in any court having jurisdiction thereof. This Agreement shall be
construed in accordance with the laws of the State of California, except this arbitration clause which
shall be construed in accordance with the Federal Arbitration Act.
In Canada, warranties include both warranties and conditions.
To find the Epson Authorized Reseller nearest you, visit our website at: epson.com.
To find the Epson Customer Care Center nearest you, visit epson.com/support.
You can also write to: Epson America, Inc., P.O. Box 93012, Long Beach, CA 90809-3012.
Page 8

8 Copyright Notice
Copyright Notice
All rights reserved. No part of this publication may be reproduced, stored in a retrieval system, or
transmitted in any form or by any means, electronic, mechanical, photocopying, recording, or
otherwise, without the prior written permission of Seiko Epson Corporation. The information
contained herein is designed only for use with this Epson product. Epson is not responsible for any
use of this information as applied to other equipment.
Neither Seiko Epson Corporation nor its affiliates shall be liable to the purchaser of this product or
third parties for damages, losses, costs, or expenses incurred by purchaser or third parties as a result
of: accident, misuse, or abuse of this product or unauthorized modifications, repairs, or alterations to
this product, or (excluding the U.S.) failure to strictly comply with Seiko Epson Corporation’s
operating and maintenance instructions.
Seiko Epson Corporation shall not be liable for any damages or problems arising from the use of any
options or any consumable products other than those designated as Original Epson Products or
Epson Approved Products by Seiko Epson Corporation.
In addition to software program rights owned by Seiko Epson Corporation, this product also
includes open source software. Refer to OSS.pdf on your product software CD-ROM for a list of
open source software and software license terms applied to this printer.
Responsible Use of Copyrighted Materials
Epson encourages each user to be responsible and respectful of the copyright laws when using any
Epson product. While some countries’ laws permit limited copying or reuse of copyrighted material
in certain circumstances, those circumstances may not be as broad as some people assume. Contact
your legal advisor for any questions regarding copyright law.
Trademarks
EPSON is a registered trademark and EPSON Exceed Your Vision is a registered logomark of Seiko
Epson Corporation.
Epson Connect is a trademark and Epson Connection is a service mark of Epson America, Inc.
General Notice: Other product names used herein are for identification purposes only and may be
trademarks of their respective owners. Epson disclaims any and all rights in those marks.
This information is subject to change without notice.
© 2013 Epson America, Inc., 7/13
Page 9

WF-3620/WF-3640
Guide rapide
Ce guide inclut des informations de base à propos de votre produit et des conseils
de dépannage. Consultez les ressources ci-dessous pour obtenir des informations
additionnelles.
Guide de l’utilisateur
Consultez le Guide de l’utilisateur en ligne pour obtenir des informations
détaillées concernant l’utilisation de votre produit, incluant ces fonctionnalités :
• Vous pouvez vous connecter sans fil à partir de votre téléphone intelligent,
votre tablette ou votre ordinateur. Imprimez des documents et des photos à
partir de n’importe où dans une pièce ou à travers le monde avec Epson
Connect
MC
et Google Cloud PrintMC.
• Facile à configurer sur votre réseau—Wi-Fi, Wi-Fi Direct et Ethernet.
• Vous pouvez réutiliser les présélections pour vos paramètres favoris de
copie, de numérisation ou de télécopie.
• Copiez, numérisez et télécopiez recto verso directement à partir du
panneau de commande.
• Économisez du papier et de l’énergie avec le mode ECO.
Soutien
Visitez le site Web epson.com/support (É.-U.) ou epson.ca/support (Canada)
pour télécharger des pilotes, consulter des manuels et des FAQ ou envoyer un
courriel à Epson (site présenté en anglais seulement).
Vidéos sans fil
Visionnez des vidéos faciles à suivre concernant la connexion de l’imprimante
à votre réseau. Visitez le site Web à l’adresse epson.com/support/wireless
(É.-U.) ou epson.ca/support/wireless (Canada) pour visionner les vidéos
(vidéos disponibles en anglais seulement).
Français
?
Page 10

10 Utilisation du panneau de commande
Utilisation du panneau de commande
L’écran tactile simplifie l’utilisation des nombreuses fonctionnalités de votre produit. Afin
de réduire la consommation d’énergie, l’écran s’assombrit après plusieurs minutes
d’inactivité. Touchez l’écran pour annuler le mode veille.
Remarque : Votre produit pourrait avoir une apparence différente des illustrations de ce guide,
mais les instructions sont les mêmes.
* Le témoin orange (à gauche) s’allume lorsque le niveau d’encre d’une cartouche est bas. Il
clignote lorsqu’une erreur se produit ou lorsqu’une cartouche est épuisée. Le témoin bleu (à
droite) s’allume lorsqu’il y a des travaux d’impression en attente et il clignote lorsque le produit
traite des données.
Il est possible que vous aperceviez les icônes suivantes à l’écran :
Établissement d’une connexion réseau en cours.
Le produit est connecté à un réseau câblé.
Le produit est connecté à un réseau sans fil.
Le produit est configuré pour Wi-Fi Direct.
Un document est chargé dans le chargeur automatique de documents.
Pour mettre sous
ou hors tension
Pour revenir au
menu Accueil
Pour revenir
à l’écran
précédent
Pour faire
défiler l’écran
Revenir aux
paramètres
par défaut
Pour effacer les
paramètres
avec chiffres
Pour voir l’état de
l’imprimante et du travail*
Pour lancer
l’impression, la copie,
la numérisation ou
la télécopie
Pour afficher les
préréglages
Pour cesser
l’opération en cours
Configuration
Dispositif de
mémoire
Epson
Connect
Page 11

Chargement du papier 11
Chargement du papier
Epson offre un vaste choix de papiers de haute qualité vous permettant ainsi de maximiser
l’impact de vos documents, vos photos, vos présentations et autres projets.
■ Chargez du Papier pour présentation haute qualité Epson
®
Mat ou tout autre type de
papier photo Epson seulement dans le bac papier supérieur (si votre produit possède
deux bacs).
■ Chargez la face d’impression du papier vers le bas; elle est habituellement plus blanche
ou brillante.
■ Chargez toujours le papier petit côté en premier et assurez-vous que les guide-papier
sont placés contre le papier.
■ Assurez-vous que le papier est chargé contre le guide-papier et qu’il ne dépasse pas
l’extrémité du bac. Le papier pourrait glisser légèrement vers l’avant lorsque vous
insérez le bac. Cela est normal.
■ Après avoir chargé du papier, utilisez le panneau de commande pour sélectionner la
taille et le type de papier.
■ Pour des instructions sur le chargement d’enveloppes, de papier de format légal ou
l’utilisation de la fente d’alimentation arrière de papier, consultez le Guide de
l’utilisateur en ligne.
Page 12

12 Résolution des problèmes de bourrage papier
Résolution des problèmes de bourrage
papier
Si le papier est coincé, suivez les étapes affichées à l’écran ACL. À l’avant de l’imprimante,
vérifiez ces zones :
Si vous utilisez le chargeur automatique de documents, vérifiez ces zones :
À l’arrière de l’imprimante, retirez l’unité recto verso automatique (capot arrière) et vérifiez
ces zones :
Ouvrez l’unité recto verso automatique.
Page 13

Résolution des problèmes de réseau 13
Résolution des problèmes de réseau
En cas de problème de réseau avec votre produit Epson, vérifiez les messages à l’écran ACL
pour déterminer la cause de la plupart des problèmes qui peuvent survenir.
Vous pouvez aussi consulter les suggestions de dépannage de base ci-dessous. Pour obtenir
des informations de dépannage plus détaillées, consultez le Guide de l’utilisateur en ligne
ou accédez au dépannage interactif et à la FAQ à l’adresse epson.com/support (É.-U.) ou
epson.ca/support (Canada) (site Web présenté en anglais seulement).
■ Tentez de connecter votre ordinateur ou un autre appareil à votre routeur ou point
d’accès sans fil pour confirmer qu’il fonctionne correctement.
■ Redémarrez votre routeur (éteignez-le et rallumez-le), puis essayez de vous reconnecter
au routeur.
■ Imprimez une feuille d’état du réseau à partir du panneau de commande du produit.
Appuyez sur au besoin et sélectionnez
Configuration > État réseau > État Wi-Fi/
réseau
. Puis, sélectionnez Imprimer et appuyez sur l’un des boutons x.
Vérifiez que les paramètres réseau sont corrects et vérifiez la puissance du signal. S’il est
faible, déplacez le produit pour le rapprocher du routeur ou du point d’accès. Évitez de
placer l’imprimante près d’un four micro-ondes, d’un téléphone sans fil 2,4 GHz ou
d’objets métalliques de grande taille, comme un classeur.
■ Si votre routeur sans fil ne diffuse pas le nom du réseau (SSID), entrez manuellement
le nom de votre réseau sans fil.
■ Si la sécurité est activée sur votre routeur sans fil, assurez-vous d’avoir saisi
correctement la clé WEP ou la phrase passe WPA.
■ Lorsque vous utilisez TCP/IP, assurez-vous que l’option DHCP du réseau est activée
(le fabricant de votre routeur pourra vous aider à cet égard).
■ Désinstallez et réinstallez les logiciels de votre produit.
■ Désactivez temporairement le pare-feu de votre ordinateur pour voir s’il ne serait pas
à l’origine du problème. Communiquez avec le fabricant du pare-feu pour obtenir
de l’aide.
Page 14

14 Avis
Avis
Déclaration de conformité
Selon la norme 47CFR, parties 2 et 15 régissant : les ordinateurs personnels et périphériques de classe
B, et/ou les unités centrales et les dispositifs d’alimentation électrique utilisés avec les ordinateurs
personnels de classe B :
Nous : Epson America, Inc.
Situés à : 3840 Kilroy Airport Way, MS 3-13, Long Beach, CA 90806, É.-U.
Téléphone : (562) 981-3840
Déclarons sous notre seule et unique responsabilité que le produit identifié dans la présente est
conforme à la norme 47CFR, parties 2 et 15, des règles FCC régissant les dispositifs numériques de
classe B. Chaque produit commercialisé est identique à l’appareil représentatif testé et jugé conforme
aux normes. Les dossiers indiquent que l’équipement produit se situe dans les limites acceptables, du
fait de la production en quantité et des essais statistiques réalisés, conformément au règlement 47CFR,
alinéa 2.909. L’utilisation est soumise aux deux conditions suivantes : 1) cet appareil ne doit pas
provoquer d’interférences néfastes, et 2) cet appareil doit tolérer les interférences reçues, y compris celles
qui risquent de provoquer un fonctionnement indésirable.
Nom commercial : Epson
Type de produit : Imprimante multifonction
Modèle : C481D, C481E
Garantie limitée d’Epson America, Inc.
Éléments couverts par la garantie : (« Epson ») garantit à l’acheteur d’origine au détail que
l’imprimante Epson couverte par la présente garantie limitée, si elle est achetée et utilisée au Canada,
aux États-Unis et à Puerto Rico, sera exempte de défaut de fabrication et de vice matériel durant une
période d’un (1) an à compter de la date d’achat. Pour toute intervention au titre de la garantie, vous
devez fournir la preuve de la date d’achat d’origine.
Ce que fera Epson pour remédier aux problèmes : Si, durant la période de garantie, l’imprimante
Epson s’avère défectueuse, veuillez communiquer avec Epson Connection
MS
au 905 709-3839
(Canada) ou 562 276-4382 (É.-U.) pour obtenir des instructions concernant les réparations sous
garantie et une autorisation de retour de la marchandise. Un technicien Epson réalisera un diagnostic
téléphonique pour déterminer si le produit a besoin d’être réparé. Si l’imprimante a besoin d’être
réparée, Epson peut, selon son choix, la remplacer ou la réparer, sans frais de pièces ni de main-d’œuvre.
Si Epson autorise le remplacement du produit défectueux, on vous enverra un produit de
remplacement, en port payé si vous avez une adresse au Canada, aux États-Unis ou à Puerto Rico. Les
livraisons vers d’autres destinations s’effectueront en port payable à l’arrivée. Il vous incombe d’emballer
correctement l’appareil défectueux et de le retourner à Epson dans un délai de cinq (5) jours ouvrables
après avoir reçu l’unité de remplacement. Epson vous demandera un numéro de carte de crédit ou de
débit pour couvrir le coût du produit de remplacement au cas où vous ne retourneriez pas le produit
défectueux. Pour une réparation de l’appareil, Epson vous demandera de lui envoyer ce dernier
directement ou à son centre de service autorisé qui réparera l’appareil et vous le renverra. Vous avez la
responsabilité d’emballer le produit et devez défrayer les coûts d’expédition vers et depuis le centre de
service autorisé Epson. Lorsqu’une intervention au titre de la garantie nécessite l’échange du produit ou
d’une pièce, l’élément remplacé devient propriété d’Epson. Le produit ou la pièce de remplacement
pourra être neuf ou remis à neuf selon les normes de qualité d’Epson et, au choix d’Epson, pourra être
Page 15

Garantie limitée d’Epson America, Inc. 15
un autre modèle de même type et qualité. Les produits et pièces remplacés sont couverts pour la période
de garantie restante du produit d’origine couvert par la présente garantie limitée.
Éléments non couverts par la garantie : Cette garantie ne s’applique qu’au Canada, aux États-Unis et à
Puerto Rico dans le contexte d’une utilisation normale. L’utilisation excessive et continue de ce produit
n’est pas considérée comme une utilisation normale; tout dommage, entretien ou besoin de réparations
découlant d’une telle utilisation n’est pas couvert par la présente garantie. Cette garantie n’est pas
transférable. Cette garantie ne couvre pas la décoloration, le jaunissement des tirages ni le
remboursement des matériaux ou services nécessaires pour les travaux de réimpression. Elle ne
s’applique pas aux dommages subis par le produit Epson du fait de l’utilisation de pièces ou fournitures
qui ne sont pas fabriquées, distribuées ni homologuées par Epson. Sont notamment exclus de la
garantie : cartouches d’encre et pièces, composants ou périphériques fabriqués par des tiers et ajoutés au
produit Epson après son expédition par Epson, par exemple des cartes ou composants ajoutés par
l’utilisateur ou le revendeur. Epson ne sera pas tenue d’effectuer d’intervention au titre de la garantie
lorsque l’étiquette ou le logo Epson, le numéro de série ou la plaque signalétique ont été enlevés du
produit; si le produit n’est pas correctement entretenu ou ne fonctionne pas correctement du fait d’une
utilisation inadéquate ou abusive, d’une installation incorrecte, d’une négligence, d’avaries lors du
transport, de dommages causés par des désastres tels un incendie, une inondation ou la foudre, d’une
surtension électrique, de problèmes logiciels, d’une interaction avec des produits d’une autre marque
qu’Epson ou d’une intervention effectuée par un tiers autre qu’un réparateur Epson agréé. Si une
anomalie signalée ne peut être décelée ni reproduite, les frais engagés seront à votre charge.
STIPULATION D’EXONÉRATION DE GARANTIES : CE QUI PRÉCÈDE CONSTITUE LA
SEULE GARANTIE ET EXCLUT TOUTE AUTRE GARANTIE, EXPRESSE OU IMPLICITE,
Y COMPRIS, MAIS SANS S’Y LIMITER, TOUTE GARANTIE IMPLICITE DE QUALITÉ
MARCHANDE, D’APTITUDE À UNE FIN PARTICULIÈRE ET DE NON-VIOLATION DE
DROITS. SAUF DISPOSITIONS CONTRAIRES, TOUTE DÉCLARATION OU GARANTIE
FAITES PAR UNE AUTRE PERSONNE OU SOCIÉTÉ EST NULLE.
Recours : Votre recours exclusif et l’entière responsabilité d’Epson en cas de violation substantielle de
cette entente seront limités à un remboursement du prix payé pour les produits Epson couverts par la
présente entente. Toute action au titre de la garantie doit intervenir dans les 3 mois à compter de la
date d’expiration de la garantie. Epson ne sera pas tenue responsable des retards ou des périodes de
non-fonctionnement en raison de causes indépendantes de sa volonté. Sauf dispositions contraires dans
la présente garantie écrite, Epson et ses filiales ne peuvent être tenues responsables des pertes,
inconvénients ou dommages, incluant des dommages directs, particuliers, consécutifs ou indirects,
incluant la perte de bénéfices, les coûts de l’équipement de substitution, le temps d’arrêt, les
réclamations des tiers, incluant les clients, ou les dommages matériels résultant de l’utilisation ou de
l’impossibilité d’utiliser les produits Epson, qu’elle soit causée par une violation de la garantie ou toute
autre théorie juridique. Certaines juridictions n’autorisent pas de limitations sur les garanties ou les
recours pour violation dans certaines transactions. Dans de telles juridictions, les limites indiquées dans
ce paragraphe et dans le paragraphe précédent pourraient ne pas s’appliquer.
Arbitrage, lois applicables : Tout litige découlant de cette Entente sera réglé par arbitrage à Los Angeles,
Californie, É.-U., conformément aux règles d’arbitrage commerciales de l’American Arbitration
Association, et la décision rendue lors de l’arbitrage pourra faire l’objet d’un jugement par tout tribunal
compétent. La présente Entente s’interprète conformément aux lois de l’État de la Californie, à
l’exception de cette clause d’arbitrage, qui sera interprétée conformément au Federal Arbitration Act.
Au Canada, les garanties englobent les garanties et les conditions.
Page 16

Pour obtenir les coordonnées du revendeur Epson le plus près de vous, visitez notre site Web à l’adresse :
epson.ca. Pour obtenir les coordonnées du centre de service après-vente Epson le plus près de votre
domicile, visitez le site Web epson.ca/support. Ou encore, écrivez-nous à l’adresse : Epson America, Inc.,
P.O. Box 93012, Long Beach, CA 90809-3012, É.-U.
Avis sur les droits d’auteur
Tous droits réservés. Il est interdit de reproduire, de conserver dans un système central ou de
transmettre le contenu de cette publication sous quelque forme et par quelque moyen que ce soit —
reproduction électronique ou mécanique, photocopie, enregistrement ou autre — sans la permission
écrite préalable de Seiko Epson Corporation. Les renseignements contenus dans le présent guide
concernent uniquement ce produit Epson. Epson ne peut être tenue responsable de l’utilisation de ces
renseignements pour faire fonctionner d’autres équipements.
Ni Seiko Epson Corporation ni ses filiales ne sauraient être tenues responsables vis-à-vis de l’acheteur de
ce produit, ou de tiers, des dommages, pertes, frais ou dépenses découlant : d’un accident, d’une
utilisation incorrecte ou abusive, de modifications non autorisées, de réparations ou (à l’exception des
États-Unis) du non-respect des directives d’utilisation ou d’entretien de Seiko Epson Corporation.
Seiko Epson Corporation décline toute responsabilité en cas de dommages ou de problèmes découlant
de l’utilisation d’options ou de produits consommables autres que les produits désignés comme
produits Epson d’origine ou comme produits approuvés pour Epson par Seiko Epson Corporation.
Outre les droits de propriété intellectuelle que détient Seiko Epson Corporation relativement aux
logiciels, ce produit comprend également des logiciels libres. Veuillez consulter le document OSS.pdf
sur le CD-ROM des logiciels de l’imprimante pour obtenir la liste des logiciels libres et les conditions
d’utilisation des logiciels telles qu’elles s’appliquent à cette imprimante.
Utilisation responsable du matériel protégé par les lois sur les droits d’auteur
Epson encourage les utilisateurs de ses produits à faire preuve de responsabilité et à respecter les lois sur
les droits d’auteurs. Dans certains pays, la loi permet une reproduction ou une réutilisation limitée de
matériel protégé dans certaines circonstances, mais ces dernières sont parfois moins étendues que le
croient certaines personnes. Pour toute question relative aux droits d’auteurs, communiquez avec votre
conseiller juridique.
Marques de commerce
EPSON est une marque déposée et EPSON Exceed Your Vision est un logotype déposé de Seiko Epson
Corporation.
Epson Connect est une marque déposée et Epson Connection est une marque de service d’Epson
America, Inc.
Avis général : Les autres noms de produit figurant dans le présent document ne sont cités qu’à titre
d’identification et peuvent être des marques de commerce de leurs propriétaires respectifs. Epson
renonce à tous les droits associés à ces marques.
L’information contenue dans le présent document peut être modifiée sans préavis.
© 2013 Epson America, Inc., 7/13
CPD-39365
Printed in XXXXX
Pays d’impression : XXXXX
 Loading...