

Page 1
®
User’s Guide
English
1
Page 2

All rights reserved. No part of this publication may be reproduced, stored in a retrieval system, or transmitted
in any form or by any means, electronic, mechanical, photocopying, recording, or otherwise, without the prior
written permission of Seiko Epson Corporation. The information contained herein is designed only for use with
this Epson product. Epson is not responsible for any use of this information as applied to other products.
Neither Seiko Epson Corporation nor its affiliates shall be liable to the purchaser of this product or third parties
for damages, losses, costs, or expenses incurred by the purchaser or third parties as a result of accident, misuse,
or abuse of this product or unauthorized modifications, repairs, or alterations to this product, or (excluding the
U.S.) failure to strictly comply with Seiko Epson Corporation’s operating and maintenance instructions.
Seiko Epson Corporation shall not be liable for any damages or problems arising from the use of any options or
any consumable products other than those designated as Original Epson Prod ucts or Epson Approved Products
by Seiko Epson Corporation.
Seiko Epson Corporation shall not be held liable for any damage resulting from electromagnetic interference
that occurs from the use of any interface cables other than those designated as Epson Approved Products by
Seiko Epson Corporation.
EPSON is a registered trademark and EPSON Stylus is a trademark of Seiko Epson Corporation.
Microsoft and Windows are registered trademarks of Microsoft Corporation.
Apple and Macintosh are registered trademarks of Apple Computer, Inc.
SD is a trademark.
General Notice: Other product names used herein are for identification purposes only and may be trademarks of
their respective owners. Epson disclaims any and all rights in those marks.
Copyright © 2004 by Seiko Epson Corporation, Nagano, Japan
2
Page 3

Contents
Introduction
English
Main Features . . . . . . . . . . . . . . . . . . . . . . . . . . 7
Safety Instructions. . . . . . . . . . . . . . . . . . . . . . . 7
Chapter 1 Getting Started
Unpacking Your L-410 . . . . . . . . . . . . . . . . . . 14
Camera Parts and Their Function. . . . . . . . . 15
Front/top view . . . . . . . . . . . . . . . . . . . . . . 15
Bottom/rear view . . . . . . . . . . . . . . . . . . . . 16
Back view . . . . . . . . . . . . . . . . . . . . . . . . . . . 16
Functions of buttons. . . . . . . . . . . . . . . . . . 17
Installing the Battery and Memory Card. . . 19
Chapter 2 Taking Photos
Before Taking Photos . . . . . . . . . . . . . . . . . . . 25
Camera range. . . . . . . . . . . . . . . . . . . . . . . . 25
About the photography modes. . . . . . . . . 25
Warnings, Cautions, and Notes. . . . . . . . . . 8
Opening and closing the battery/
memory card cover. . . . . . . . . . . . . . . . . .19
Installing the battery . . . . . . . . . . . . . . . . . . 20
Installing/removing the memory card. . . 21
Turning On/Off Your Camera. . . . . . . . . . . .23
Making the Initial Settings . . . . . . . . . . . . . . . 23
Releasing the Shutter. . . . . . . . . . . . . . . . . . . .24
Selecting the resolution and
compression. . . . . . . . . . . . . . . . . . . . . . . .26
Number of photos that can be taken. . . . . 27
Taking Photos Using the LCD Monitor . . . . 28
3
Page 4

Information on the LCD monitor . . . . . . . 29
Taking Photos Using the Viewfinder
Only . . . . . . . . . . . . . . . . . . . . . . . . . . . . . . . . . 31
Capturing an Image in the Focus Frame . . . 32
Using the Optical and Digital Zoom . . . . . . 32
Controlling the Flash . . . . . . . . . . . . . . . . . . . 33
Using the Self Timer. . . . . . . . . . . . . . . . . . . . 34
Taking Photos Continuously. . . . . . . . . . . . . 35
Using Macro Mode. . . . . . . . . . . . . . . . . . . . . 35
Selecting the Scene Mode. . . . . . . . . . . . . . . . 36
Normal mode . . . . . . . . . . . . . . . . . . . . . . . 36
Landscape mode. . . . . . . . . . . . . . . . . . . . . 37
Portrait mode . . . . . . . . . . . . . . . . . . . . . . . . 37
Setting White Balance . . . . . . . . . . . . . . . . . . . 37
Automatic white balance . . . . . . . . . . . . . . 37
Manual white balance. . . . . . . . . . . . . . . . . 38
Setting Light Sensitivity . . . . . . . . . . . . . . . . . 38
Setting Exposure . . . . . . . . . . . . . . . . . . . . . . . 39
Resetting the File Numbers . . . . . . . . . . . . . . 40
Recording Movies . . . . . . . . . . . . . . . . . . . . . . 40
Making Additional Settings. . . . . . . . . . . . . . 42
How to change the settings . . . . . . . . . . . . 42
Available settings . . . . . . . . . . . . . . . . . . . . 43
Chapter 3 Viewing and Managing Your Photos
Viewing Photos with the LCD Monitor. . . . 45
Viewing a slide show of your photos . . . 46
Playing movies . . . . . . . . . . . . . . . . . . . . . . 46
Setting quick photo review . . . . . . . . . . . . 47
Viewing the Properties of Photos. . . . . . . . . 47
Saving Photos in DPOF . . . . . . . . . . . . . . . . . 49
Deleting Photos. . . . . . . . . . . . . . . . . . . . . . . . 49
Deleting a single photo . . . . . . . . . . . . . . . 50
Deleting all photos . . . . . . . . . . . . . . . . . . . 50
Deleting a group of images . . . . . . . . . . . . 50
Formatting the memory card . . . . . . . . . . 51
4
Putting Photos on Your Computer . . . . . . . . 51
Exporting photos to a computer . . . . . . . . 52
Working with photos on a computer . . . . 52
Page 5

Chapter 4 Using Direct Print
Connecting Your Camera to the Printer . . . 53
Printing Photos . . . . . . . . . . . . . . . . . . . . . . . . 54
Available types of paper . . . . . . . . . . . . . . 54
Printing the photo seen on the LCD
monitor . . . . . . . . . . . . . . . . . . . . . . . . . . . 54
Printing all the photos in memory . . . . . . 55
Printing selected photos. . . . . . . . . . . . . . . 55
Album printing . . . . . . . . . . . . . . . . . . . . . . 56
Printing photos taken in P.I.F. mode . . . . 57
Making Print Settings. . . . . . . . . . . . . . . . . . . 57
Using Printer Utilities . . . . . . . . . . . . . . . . . . .59
Chapter 5 Using PRINT Image Framer (P.I.F.)
Taking Photos in P.I.F. Mode . . . . . . . . . . . . 61
Changing the Frames . . . . . . . . . . . . . . . . . . . 62
Replacing Frames Stored in the Camera or
Memory Card . . . . . . . . . . . . . . . . . . . . . . . . . 63
Deleting Frames . . . . . . . . . . . . . . . . . . . . . . . .64
Chapter 6 Operating the Software
Introduction . . . . . . . . . . . . . . . . . . . . . . . . . . . 65
System Requirements . . . . . . . . . . . . . . . . . . . 66
Installing the Software . . . . . . . . . . . . . . . . . . 67
Starting EPSON Photo!4. . . . . . . . . . . . . . . . . 68
Finding More Information . . . . . . . . . . . . . . .69
Changing print settings . . . . . . . . . . . . . . .57
Selecting paper size . . . . . . . . . . . . . . . . . . .58
Selecting print borders . . . . . . . . . . . . . . . .58
Printing the date. . . . . . . . . . . . . . . . . . . . . .58
Printing at high speed. . . . . . . . . . . . . . . . .58
Checking the amount of ink left . . . . . . . .59
Checking the print head nozzles . . . . . . . . 59
Cleaning the print head nozzles . . . . . . . .60
Aligning the print head. . . . . . . . . . . . . . . .60
Using the CD-ROM . . . . . . . . . . . . . . . . . . .63
Downloading from the web. . . . . . . . . . . . 63
English
5
Page 6

Chapter 7 Maintenance and Troubleshooting
Maintenance. . . . . . . . . . . . . . . . . . . . . . . . . . . 70
Resetting your camera’s defaults . . . . . . . 70
Cleaning your camera . . . . . . . . . . . . . . . . 70
Storing your camera. . . . . . . . . . . . . . . . . . 71
Problems and Solutions . . . . . . . . . . . . . . . . . 72
Appendix A Appendix
Standards and Approvals . . . . . . . . . . . . . . . 87
Specifications. . . . . . . . . . . . . . . . . . . . . . . . . . 87
About Optional Accessories . . . . . . . . . . . . . 90
Glossary
Index
6
Camera problems . . . . . . . . . . . . . . . . . . . . 72
Image problems . . . . . . . . . . . . . . . . . . . . . . 76
Printing problems . . . . . . . . . . . . . . . . . . . . 78
List of Error Messages. . . . . . . . . . . . . . . . . . . 79
Contacting Customer Support. . . . . . . . . . . . 83
AC adapter (EU-37). . . . . . . . . . . . . . . . . . . 90
Using the AC adapter . . . . . . . . . . . . . . . . . 90
Page 7

Introduction
Main Features
With the L-410, you can easily take, view, and print p hotos. The mai n features are de scribed below.
❏ You can take technical photos with simple operations. Various settings that can be used with
simple operation are preset in this camera. You can easily take the photos you want with this
camera.
❏ The L-410 can connect directly to an Epson printer without a computer and print high quality
photos.
❏ You can use the PRINT Image Framer (P.I.F.) function. You can select various frames stored
in the L-410 and add them to your photos.
❏ You can catch those special moments everytime. The L-410 can take photos continuously 3
scenes per second.
Safety Instructions
Read all of these instructions before using the L-410, and keep this guide handy for later reference.
Follow all warnings and instructions marked on the L-410 and the options.
Introduction 7
English
Page 8

Warnings, Cautions, and Notes
Warnings
must be followed carefully to avoid bodily injury.
w
Cautions
must be observed to avoid damage to your equipment.
c
Notes
contain important information and useful tips on the operation of your product.
When using the L-410
❏ Do not expose the L-410 to severe impact, doing so may cause malfunctions especially while
the camera is operating.
❏ Follow all warnings and instructions marked on this product.
❏ Do not insert objects into the slots or openings on this product.
❏ Do not touch the components inside this product unless instructed to do so in the user
documentation. Never force this product’s components into place. Although this product is
designed to be sturdy, rough handling can damage it.
❏ Never spill liquid onto this product.
❏ If this product emits unusual noises, odors, or smoke, cancel the current operation and turn
it off immediately. Remove the batteries and disconnect the AC adapter from the product,
then unplug the AC adapter from the power outlet. Contact our Customer Support.
❏ To prevent fire or electric shock, do not cover this product with a blanket or other covering
that may give off a static electric shock.
8 Introduction
Page 9

❏ To prevent fire or electric shock, do not expose this product or its options to rain or moisture.
❏ To prevent fire or explosion, do not use this product where flammable or volatile gas is stored.
❏ Do not use this product outdoors during a thunderstorm.
❏ Do not use this product after moving it between extreme temperatures, which may cause
condensation to form on electronic parts.
❏ Use only the recommended AC adapter (EU-37) for this product.
When using the battery
❏ If battery acid gets into your eyes or on your skin, immediately rinse the affected area
thoroughly with water and seek medical treatment. If a battery is swallowed, seek medical
treatment immediately.
❏ Use only AA-size batteries or a CR-V3 type battery for the L-410 according to the directions
in the user documentation.
❏ Do not use the battery that comes with this product for other devices.
❏ To protect against short-circuiting, do not remove the outside sleeve of the battery.
❏ Do not handle the battery with wet hands or use it near water.
❏ Do not expose the battery to water or high humidity.
❏ Do not drop, puncture, disassemble, mutilate, or short-circuit the battery.
❏ Do not place the battery near or into fire or water.
❏ Do not use a battery that is leaking or damaged in any way.
❏ Keep the battery away from heat sources.
Introduction 9
English
Page 10

❏ Do not insert objects into any openings as they may touch dangerous voltage points or
short-circuit components.
❏ Prevent the battery from coming into contact with metal objects that could short-circuit it, such
as coins or keys.
❏ Do not use the battery if its terminals are soiled.
❏ Do not insert the battery into power outlets or other power sources such as car cig arette lighter
sockets.
❏ Do not solder wires or terminals directly to the battery.
❏ Do not touch the battery terminals.
❏ Keep the battery away from open flame.
❏ If overheating, discoloration, or distortion occur, remove the battery from this product and
do not use it.
❏ When using a rechargable battery, recharge the battery after discharging it completely. To
discharge the battery, play the slide show until the battery power runs out. The power save
mode turns off while the slide show is playing so that the camera displays images until the
battery runs out.
When storing the battery
❏ When not using this device for a long period, remove the battery from the product and store
it separately.
❏ Do not store the battery where the temperature or humidity is very high.
❏ Store the battery out of children’s reach.
10 Introduction
Page 11
When disposing of the battery
Before disposing of the battery, make sure you discharge it completely.
Warning:
❏ Be sure to completely cover the ends of the battery with tape to prevent combustion or explosion
w
For the Netherlands users:
Do not dispose of the batteries with ordinary refuse. Instead, dispose of them as small chemical
waste in accordance with local laws, and the following Dutch Government Gazette 45, KCA
Marking:
For German users:
Do not dispose of batteries with ordinary refuse. Instead, dispose of them in a recycle box in
accordance with local laws.
when disposing of it.
❏ Do not dispose of the battery as ordinary refuse. Instead, dispose of it in a collection or recycle
box in accordance with local laws.
Bij dit produkt zijn batterijen geleverd. Wanneer deze leeg zijn, moet u ze niet
weggooien maar inleveren als KCA.
When using a memory card
❏ Only memory cards designed for the product’s specifications can be used.
Introduction 11
English
Page 12

❏ The methods for using memory cards vary according to card type. Be sure to refer to the
documentation included with your memory card for details.
❏ Turn the camera off before installing or removing the memory card.
When using the LCD monitor
❏ The LCD monitor on this product may contain a few small bright or dark spots. These are
normal and do not mean that your LCD monitor is damaged in any way.
❏ If the LCD monitor on this product is damaged, consult your dealer.
❏ If the liquid crystal solution contained in the LCD monitor on this product leaks out and gets
onto your hands, wash them thoroughly with soap and water. If it gets into your eyes, flush
them immediately with water. If discomfort or vision problems remain after a thorough
flushing, see a doctor immediately.
❏ Only use a soft, dry cloth to clean the display. Do not use liquid or chemical cleaners.
When storing, maintaining, or transporting the L-410
❏ Do not store this product outdoors.
❏ Do not store this product near water.
❏ Do not store this product in a location subject to high temperature or humidity.
❏ Do not store this product in a location subject to rapid changes in temperature or humidity.
❏ Do not store this product in a location subject to direct sunlight or strong light sources.
❏ Unplug this product from the power outlet before cleaning it. Use a damp cloth for cleaning
and do not use liquid or aerosol cleaners.
12 Introduction
Page 13

❏ Remove the batteries from and unplug this product and refer servicing to qualified service
personal under the following conditions: The power cord or plug is damaged; liquid has
entered this product or its options; this product or its options have been dropped or the case
is damaged; this product or its options do not operate normally or exhibit a distinct change in
performance.
Safety information for United Kingdom users
The following safety information applies to the AC adapter.
Warning:
Refer to the rating plate for the voltage and check that the appliance voltage corresponds to the supply
w
voltage.
Important:
The wires in the mains lead fitted to this appliance are colored in accordance with the following code:
Blue — Neutral
Brown — Live
As the colours of the wires in the mains lead of this appliance may not correspond with the coloured markings
identifying the terminals in your plug, proceed as follows;
The blue wire must be connected to the terminal in the plug marked with the letter N.
The brown wire must be connected to the terminal in the plug marked with the letter L.
If damage occurs to the plug, replace the cord set or consult a qualified electrician.
For United Kingdom, Hong Kong, and Singapore users
Replace fuses only with fuses of the correct size and rating.
Introduction 13
English
Page 14
Chapter 1
Getting Started
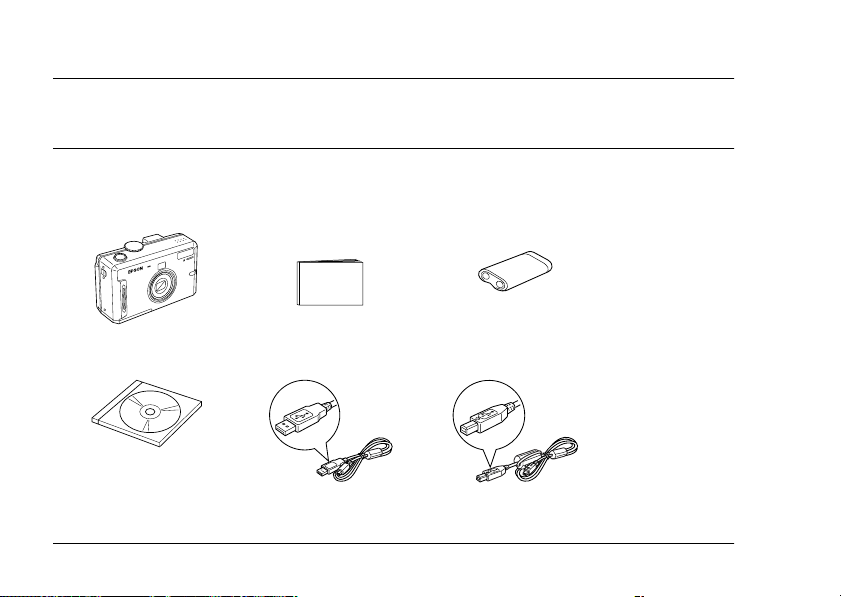
Unpacking Your L-410
Make sure that all of the items shown below were included in the box with your L-410.
Camera body User’s Guide (this guide) CR-V3 type battery
Software CD-ROM PC cable Printer cable
14 Getting Started
Page 15
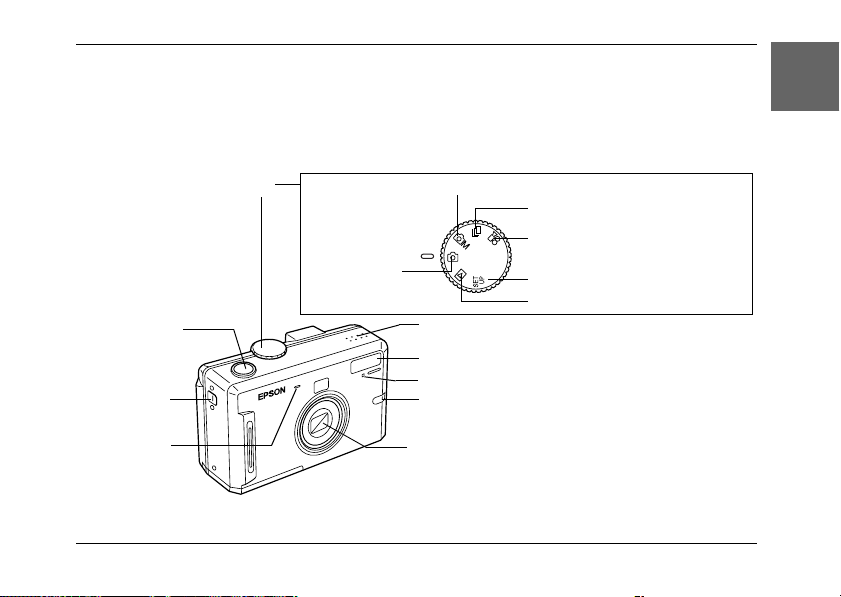
Camera Parts and Their Function
See “Functions of buttons” on page 17 for details about the functions of buttons and indicators.
Front/top view
Shutter button
Strap holder
Microphone
Mode dial
Auto
photography
mode
Manual photography mode
Continuous photography mode
Movie mode
Setup mode
Playback mode
Speaker
Flash
Self-timer lamp
Illumination lamp
Lens barrier
Getting Started 15
1
English
1
1
1
1
1
1
1
1
1
Page 16
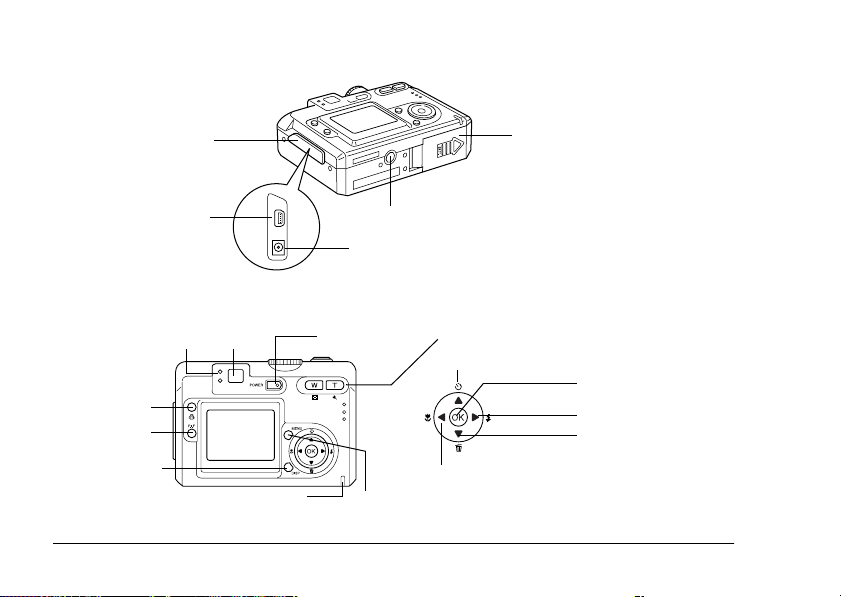
Bottom/rear view
Connector cover
Digital interface
Back view
Indicator lamp
Print button
P.I.F. button
Display button
Memory access lamp
16 Getting Started
Tripod mount
AC adapter connector
Finder POWER button
MENU button
Battery/memory card cover
Zoom button
Self-timer / u button
OK button
Flash / r button
Delete / d button
Macro / l button
Page 17

Functions of buttons
Name Function
Mode dial Switch the camera modes by turning this dial. The modes can be
Shutter button Press the shutter button to take a photo.
Illumination lamp On while the camera is on.
Two Indicator lamps Indicates the status of the camera.
Self-timer lamp Flashes when taking a photo with self-timer function.
PRINT button Press this button to print photos using the direct print feature.
switched while the camera is on.
Flashes while the camera is connected to a computer or a printer.
Green lamp (upper lamp) is on when the focus is locked.
Green lamp flashes when:
• The camera is in the power save mode
• Shooting a movie
• The camera is processing the data
• The camera detects the camera shake warning
• The focus is not locked
Red lamp (lower lamp) flashes when:
• The battery power is low
• The camera cannot determine the exposure setting
• The memory card is full
Getting Started 17
1
English
1
1
1
1
1
1
1
1
1
Page 18

Name Function
P.I.F. button Press this button to make the P.I.F. settings.
POWER button Press this button to turn the camera on or off.
Zoom buttons Press this button to change the zoom.
MENU button Displays/cancels the menu. This button does not function when
u button Press to select menu items.
d button Press to select menu items.
r button Press to select menu items.
l button Press to select menu items.
OK button Accepts the setting or menu items that is selected currently.
Memory access lamp Lights while accessing the memory card or computer.
DISPLAY button Turns the LCD monitor on or off.
taking photos in auto photography mode.
Sets the self-timer in the auto or manual photography mode.
Deletes the selected photo in the playback mode.
Sets the flash mode in the auto or manual photography mode.
Sets the Macro mode in the auto or manual photography mode.
18 Getting Started
Page 19
Installing the Battery and Memory Card
This section describes how to install a battery and a memory card.
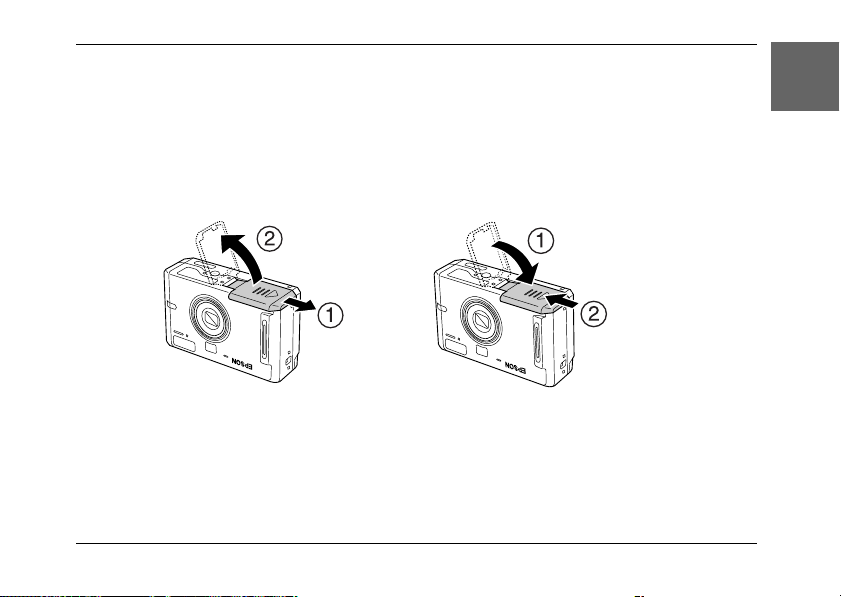
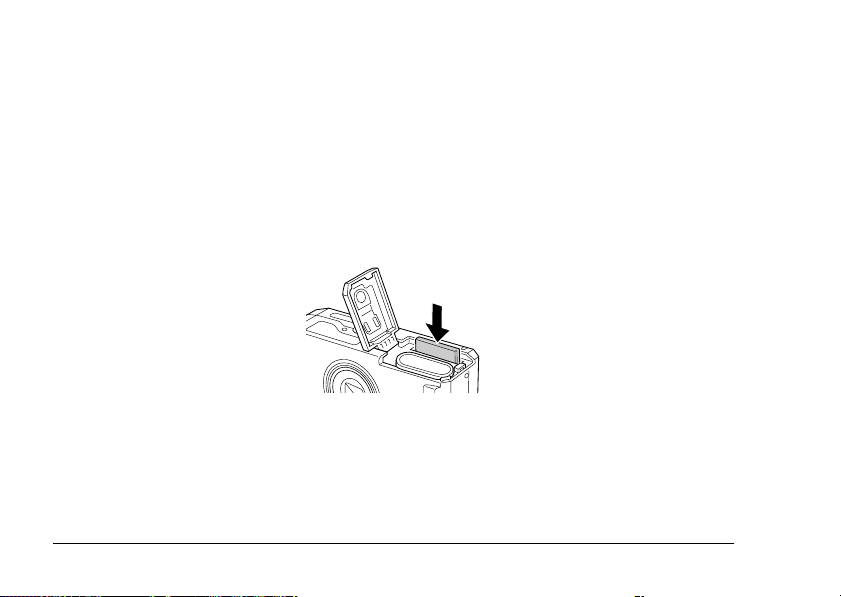
Opening and closing the battery/memory card cover
To open the battery/memory card cover, slide it and raise it.
To close the battery/memory card cover, lower it then slide it closed firmly.
open
close
Getting Started 19
1
English
1
1
1
1
1
1
1
1
1
Page 20
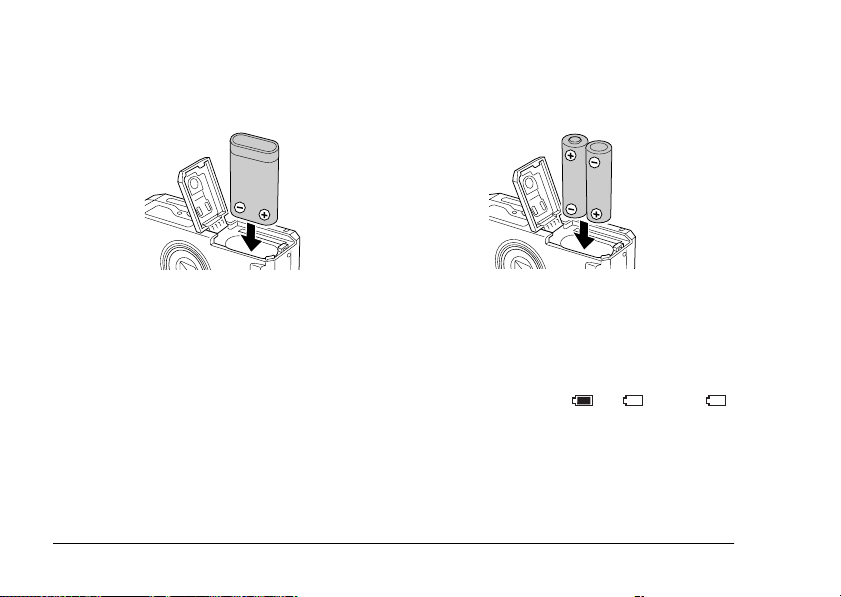
Installing the battery
Insert the battery into the compartment, positioning the + and - ends with those on the inside of
the battery/memory card cover.
When installing the CR-V3 battery When installing two AA-type batteries
Warning:
Do not carry loose batteries in your pockets.
w
About the battery life
As the battery loses power, the icon on the LCD monitor will change from to . When
is flashing, the power is low and you can no longer take photos. Then the indicator lamp is red,
the camera will automatically shut down. Replace the battery.
20 Getting Started
Page 21
Installing/removing the memory card
You can use memory cards that are commercially available. This camera can store photos without
a memory card, but when using a memory card, you can store more photos.
Available memory cards are as follows:
❏ SD memory card (512 MB or smaller)
❏ Multimedia card (MMC V 2.1 or later, made by Hitachi or SanDisk) (512 MB or smaller)
Caution:
❏ Avoid using or storing the card in direct sunlight, or in places that are extremely hot, humid,
c
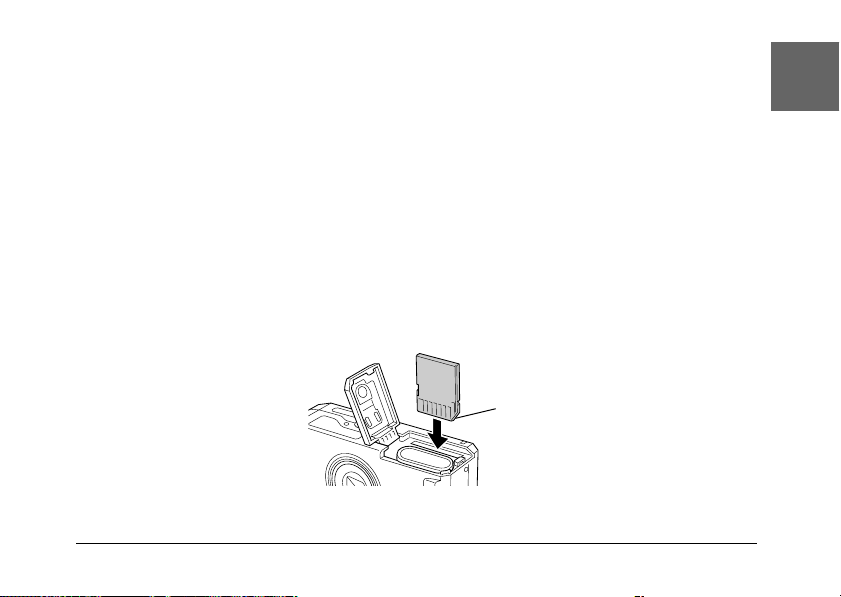
Installing the memory card
You can confirm the top and bottom and the front and back sides of the memory card by noting
the position of the notch.
or dusty.
❏ Make sure that the camera is turned off before installing the memory card.
notch
Getting Started 21
1
English
1
1
1
1
1
1
1
1
1
Page 22
Caution:
Insert memory cards in the correct orientation. Otherwise, the memory card and the L-410 may be
c
damaged.
Note:
❏ Turn the camera off before installing or removing the memory card.
❏ When using a new memory card, it is necessary to format the card before using it. For details, see
“Formatting the memory card” on page 51.
Removing the memory card
1. Push the memory card to release the lock. The memory card pops out.
2. Pull out the memory card.
Note:
You can protect the data in the memory card by sliding the notch on the side of the memory card. However,
you cannot store photos or format a write protected memory card.
22 Getting Started
Page 23
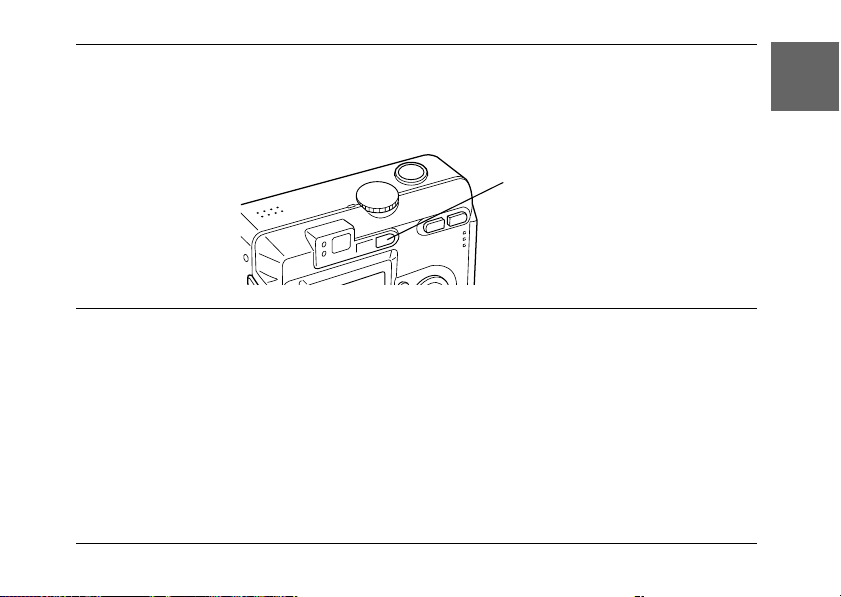
Turning On/Off Your Camera
Press the POWER button once to turn on the power. The lens cover opens and the lens extends.
To turn off the power, press the POWER button once. The lens retracts and the lens cover closes.
1
English
1
POWER button
Making the Initial Settings
When you turn on the L-410 the first time, you need to set which language to use and the date and
time.
Selecting a language
Select the language you want to use with the u d l r buttons, then press the OK button.
Setting the date and time
After you select the language, the Date/Time screen is displayed. Set the date and time.
Getting Started 23
1
1
1
1
1
1
1
1
Page 24

Note:
❏ You can change the settings later from the Setup Menu. For details, see “Making Additional Settings”
on page 42.
❏ You can also select the time format from 24 hr. and 12 hr.. 24 hr. is set as a default when you turn on
your camera the first time.
1. Press the u d buttons to change the value of the selected item.
2. After you finish making settings, select a different item by pressing the l r buttons.
3. Repeat steps 1 and 2 until you finish making the date and time settings, then press the OK
button.
Releasing the Shutter
The shutter button has a two-step function.
Half position
When pressing the shutter button halfway, the indicator lamp (green) is on. The camera
automatically sets the focus and shutter speed.
Full position
After the focus and shutter speed are set by pressing the shutter button halfway, press it com pletely
to release the shutter. The photo is taken.
24 Getting Started
Page 25

Chapter 2
Taking Photos
2
English
2
Before Taking Photos
Camera range
When taking photos, you must stand more than 50 cm (19.6 inches) away from the object. In the
macro mode, you can take photos in a range of 11 cm (4.3 inches) to 50 cm (19.6 inches).
About the photography modes
Auto photography mode
In this mode, the camera settings are made previously so that you can take a clear photo by just
pressing the shutter button.
Manual photography mode
You can make detailed camera settings manually. It allows you to take more sophisticated photos.
Taking Photos 25
2
2
2
2
2
2
2
2
Page 26

Selecting the resolution and compression
You can select the quality of the photos depending on the various ways you use them. Follow the
procedure below to select the resolution and compression.
Note:
❏ This setting cannot be used when taking photos in the auto photography mode.
❏ The higher the quality is set, the larger the size of the data for the photo becomes.
1. T ur n t he Mo de di al to m an ua l p ho to g ra ph y m od e, th en pr es s t he MENU button to display
the Photography Menu.
2. Select Quality by using the u d buttons, then press the OK button.
3. Select the desired quality by using the u d buttons, then press the OK button.
26 Taking Photos
Page 27

Number of photos that can be taken
Quality When using the SD
memory card
(16 MB)
★★★ F2304 6 62 3 7
★★★ N2304 13 125 6 14
★★ F1600 13 129 6 15
★★ N1600 28 251 13 30
★ F640 84 710 38 88
★ N640 148 1303 71 163
* The values shown here may differ from those for SD memory cards produce d by other manufacturers.
Note:
The total number of photos varies according to the quality, compression, amount of memory left on the
memory card and the shooting conditions.
When using the SD
memory card
(128 MB)
When using the
internal memory
(default)
When using the
internal memory
(after deleting all
the data)
Unit: sheets
Taking Photos 27
2
English
2
2
2
2
2
2
2
2
2
Page 28
Taking Photos Using the LCD Monitor
You can take photos while viewing the subject on the LCD monitor.
Note:
Use the LCD monitor in the following cases:
When using the digital zoom feature.
When taking photos in the macro mode.
When taking photos in P.I.F. mode.
1. Turn the Mode dial to auto photography mode or manual photography mode.
2. Center the subject in the middle of the focus frame of the LCD monitor.
3. Press the shutter button halfway. The focus frame turns green and the focus is set.
4. Press the shutter button fully. The photo is taken.
Note:
❏ The shutter sound can be heard when you press the shutter button. This sound can be changed or
deleted from the Sound menu. See “Making Additional Settings” on page 42 for details.
❏ When the quick view setting is on, the photo is displayed on the LCD monitor after you take a photo.
❏ The LCD monitor may turn off when the camera enters the auto power off mode. Press any button
or turn the Mode dial to turn on the LCD monitor again.
28 Taking Photos
Page 29
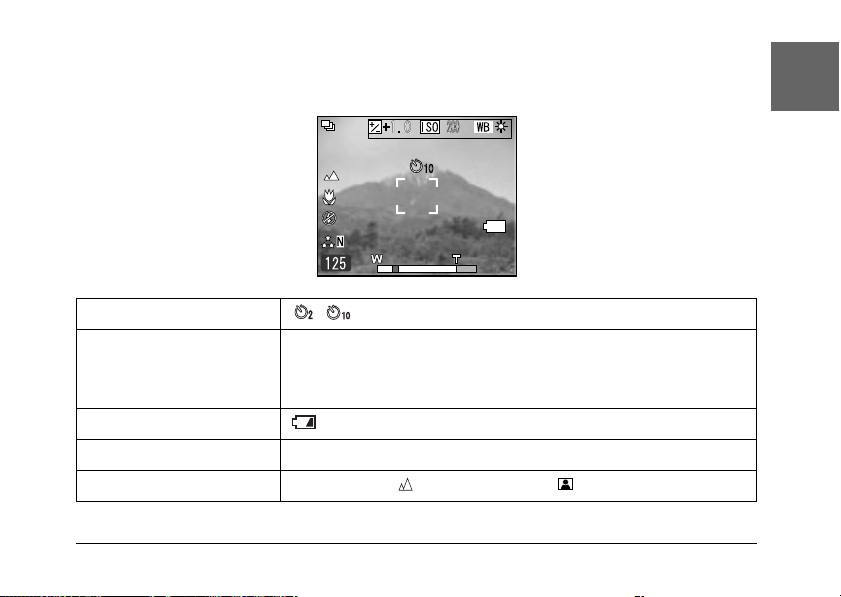
Information on the LCD monitor
You can confirm the status of the camera settings by the icons displayed on the LCD monitor.
2
English
2
2
2
2
Self-timer (2 seconds, 10 seconds)
Focus frame Place the subject within the focus frame when taking photos.
Battery life
Zoom bar The digital zoom indicator appears when using digital magnification.
Scene mode Normal mode, Landscape mode, Portrait mode
When pressing the shutter button halfway, the focus frame turns green.
If the focus cannot be locked, the focus frame turns red. Release the
shutter button and press it again.
Taking Photos 29
2
2
2
2
2
Page 30
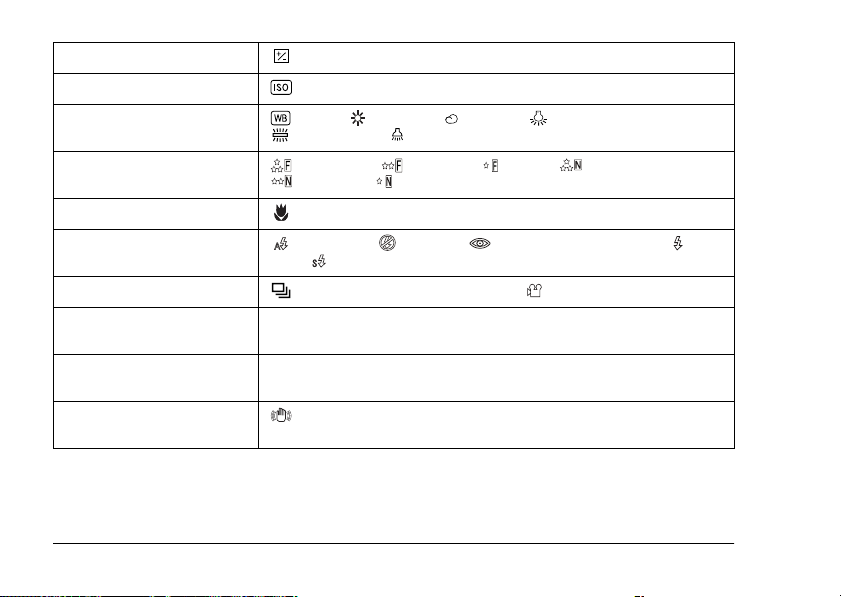
Exposure (+2.0 to -2.0)
Sensitivity (Auto, 100, 200, 400)
White balance (Auto, Daylight, Cloudy, Incandescent,
Quality ★★★F2304, ★★F1600, ★F640, ★★★N2304,
Macro mode Macro
Flash Auto-flash, Flash off, Auto red-eye reduction, Fill-in
Shooting mode Continuous photography mode, Movie mode
Number of the photos that
can be taken
Available time to shoot a
movie
Displayed when taking a
photo
Fluorescent, Mercury)
★★N1600, ★N640
flash, Slow synchro
125 (example)
125 (example)
Camera shake warning
30 Taking Photos
Page 31

Taking Photos Using the Viewfinder Only
You can take photos without using the LCD monitor. When not using the LCD monitor, you can
confirm the picture using the viewfinder. This uses less battery power than using the LCD monitor
to take your pictures.
1. Turn the Mode dial to manual photography mode.
2. Press the DISPLAY button to turn off the LCD monitor.
3. Center the subject in the middle of the viewfinder.
4. Press the shutter button halfway. The indicator lamp (green) turns on and the focus is set.
5. Press the shutter button fully. The photo is taken.
Note:
❏ You cannot take photos using the viewfinder only if the camera is in the macro mode or when using
the self-timer.
❏ The shutter sound can be heard when you press the shutter button. This sound can be changed from
the Setup Menu. See “Making Additional Settings” on page 42 for details.
❏ The photo is stored in the memory card while the memory access lamp is on. After the lamp turns
off, the camera is ready to use again.
6. When you finish taking photos, press the POWER button to turn the camera off.
Taking Photos 31
2
English
2
2
2
2
2
2
2
2
2
Page 32

Capturing an Image in the Focus Frame
The automatic focus works only if the subject is in the focus frame while the shutter button is first
pressed halfway down. After the focus is locked on the subject, you can adjust the frame to the
desired composition and release the shutter.
Using the Optical and Digital Zoom
This camera has a 3× optical zoom, a 2× and 3× digital zoom (2 separate frames). As digital zoom
is available when taking photos with the LCD monitor, a maximum 9× zoom is possible.
Optical zoom
When using telephotographic zoom, press the T button. When using wide-angle zoom, press
the W button.
Digital zoom
To activate the digital zoom, first press the T button to maximize the optical zoom and release
it, then press it again. The digital zoom changes to 2× and 3× each time you press the T button.
To return to the optical zoom mode, press the W button.
Note:
❏ You can enable the digital zoom mode from the Setup menu. See “Making Additional Settings” on page
42 for details.
32 Taking Photos
Page 33

❏ When using digital magnification, the digital zoom indicator will appear at the right side of the T
bar. When 2
×
on the center, 3× on the right side of T.
Controlling the Flash
You can change the flash setting by pressing the Flash button. The flash mode changes each
time you press the Flash button.
Auto-flash (default setting) The camera detects the brightness automatically and sets off
Flash off Turns off the flash even in dark settings.
Auto red-eye reduction Use this setting when photographing people with a flash at
Fill-in flash The flash will go off no matter the brightness. Use it when the
Slow synchro The flash is used combined with a slow shutter speed. By using
the flash if necessary. In a dark setting, the flash is used
automatically.
night or indoors. The flash will go off once and will go off again
when the photo is taken. This will help to reduce the red-eye
phenomenon.
background is bright or when you are shooting against the sun.
the slow synchro, you can take an action photo with a blurred
background.
Taking Photos 33
2
English
2
2
2
2
2
2
2
2
2
Page 34

Flash range
ISO sensitivity Normal (wide angle) Normal (telephoto)
100 0.7 - 2.6 m (2.3 - 8.5 ft.) 0.5 - 1.5 m (1.6 - 4.9 ft.)
200 1.0 - 3.7 m (3.3 - 12.1 ft.) 0.6 - 2.1 m (1.9 - 6.9 ft.)
400 1.4 - 5.2 m (4.6 - 17.1 ft.) 0.8 - 3.0 m (2.6 - 9.9 ft.)
Note:
For information about ISO sensitivity, see “Setting Light Sensitivity” on page 38.
Using the Self Timer
1. Turn the Mode dial to auto photography mode or manual photography mode.
2. Press the Self-timer button. The self timer is displayed on the LCD monitor.
3. Center the image and press the shutter button fully. The count down starts and either 2 or 10
seconds later the shutter releases automatically. You can switch the time between 2 and 10
seconds by pressing the Self-timer button in step 2.
Note:
The time can only be switched for the manual photography mode or the continuous photography mode.
In auto photography mode the self-timer can only be set to 10 seconds.
34 Taking Photos
Page 35

Taking Photos Continuously
You can take photos continuously by holding the shutter button down. Three photos can be taken
per second at maximum speed.
Note:
The rapid shooting speed may slow down when using the flash while doing continuous shooting.
1. Turn the Mode dial to continuous photography mode.
2. Press the shutter button halfway to set the focus, then press it fully. While the shutter button
remains fully pressed, photos will be taken continuously.
Note:
You can change the camera settings freely the same as in the manual photography mode.
Using Macro Mode
The macro mode allows you to focus on subjects at distances between 11 - 50 cm (4.3 - 19.6 inches)
from the camera.
When shooting objects that are 50 cm or more away from the camera, reset the camera to normal
mode.
1. Turn the Mode dial to auto photography mode or manual photography mode.
2. Press the macro button to switch to the macro mode.
Taking Photos 35
2
English
2
2
2
2
2
2
2
2
2
Page 36

Selecting the Scene Mode
Three scene modes are pre-programmed in the camera. When using a scene mode, the camera is
automatically configured to the best image capture settings for the situation.
Note:
❏ When any scene mode is set, selecting macro mode shifts the camera settings to normal mode. If you
cancel the macro mode, the camera settings remain in normal mode.
❏ Using scene modes together with Exif 2.2 software and PRINT Image Matching II will provide the best
possible printing results.
❏ The Self timer, Exp Comp, Quality, Continuous Shooting, Digital Zoom, Frames, etc. are not affected
by the scene mode.
1. Turn the Mode dial to manual photography mode.
2. Press the MENU button. The Photography menu is displayed.
3. Select Scene Mode by using the u d buttons, then press the r button.
4. Select the desired scene mode by using the u d buttons, then press the OK button.
Normal mode
This mode is best for most shooting. The flash works automatically based on the available light
on the subject. The shutter speed is also selected to minimize blurring.
36 Taking Photos
Page 37

Landscape mode
This mode is best for broad landscapes. The flash is deactivated so the image of the landscape is
captured more clearly. In low light the shutter speed is slower so you can take night scenes. Use
a tripod to prevent blurring.
2
English
2
Portrait mode
This mode is designed for personal portraits. The depth of field is reduced (1 - 3 m) and the flash
is automatically set to reduce red-eyes. When using the fill-in flash in dark settings, the slow
synchro shutter feature is set allowing you to take shots with a brighter background. The use of a
tripod is recommended to prevent blurring.
Setting White Balance
The white balance function adjusts the camera for different kinds of lighting. It makes white look
the same color in any situation. The camera has two white balance modes; automatic and manual.
Automatic white balance
In this mode the camera automatically senses the light source and corrects the colors so you get
the same white in any lighting situation. We recommend that you regularly use the camera in this
mode.
1. Turn the Mode dial to manual photography mode.
Taking Photos 37
2
2
2
2
2
2
2
2
Page 38

2. Press the MENU button. The Photography Menu is displayed.
3. Select White Bal by using the u d buttons, then press the r button.
4. Select Auto by using the u d buttons, then press the OK button.
Manual white balance
In this mode you can select specialized white balance settings to achieve truer colors in certain
conditions; daylight, cloudy, incandescent, fluorescent, and mercury.
1. Turn the Mode dial to manual photography mode.
2. Press the MENU button. The Photography Menu is displayed.
3. Select White Bal by using the u d buttons, then press the r button.
4. Select the desired setting from Daylight, Cloudy, Incandescent, Fluorescent, and Mercury
by using the u d buttons, then press the OK button.
Setting Light Sensitivity
You can change the light sensitivity for a specific purpose any time manually or let the camera
select it automatically.
The camera’s default setting is Auto. This is the best setting for most picture taking. Set the light
sensitivity manually when you expect blurring problems from camera motion.
1. Turn the Mode dial to manual photography mode.
2. Press the MENU button. The Photography Menu is displayed.
3. Select Sensitivity by using the u d buttons, then press the r button.
38 Taking Photos
Page 39

4. Select the desired sensitivity from Auto, 100, 200, and 400 by using the u d buttons, then
press the OK button.
Setting Exposure
You can adjust exposure to help control how much light falls on the CCD. It influences the
brightness of the entire image. You usually don’t need to make manual adjustments, but it is
possible to increase or decrease the exposure to suit a particular purpose.
It is recommended that these adjustments be used when shooting against the sun or when you
have any very bright background where the automatic sensors may not work well.
1. Turn the Mode dial to manual photography mode.
2. Press the MENU button. The Photography Menu is displayed.
3. Select Exp Comp by using the u d buttons, then press the r button.
4. Select the adjustment value by using the u d buttons, then press the OK button.
Note:
The exposure adjustment range is from - 2.0 EV to + 2.0 EV during programmed shooting. There are
9 steps of 0.5 EV each. You can confirm the setting on the LCD monitor.
Taking Photos 39
2
English
2
2
2
2
2
2
2
2
2
Page 40

Resetting the File Numbers
Picture files are automatically numbered so that no two files can have the same number. They are
numbered in the order in which they are taken. You can select whether or not to reset the sequence
of the image file numbers to 0000 when replacing or formatting the memory card.
1. Turn the Mode dial to setup mode.
2. Press the r button to display the Setup Menu 2.
3. Select File No. Reset by using the u d buttons then press the r button.
4. Select ON by using the u d buttons, then press the OK button. The file numbers are reset.
Recording Movies
You can record a movie with sound of the subject displayed on the LCD monitor.
1. Turn the Mode dial to movie mode.
2. Press the MENU button. The Movie menu is displayed.
3. Press the r button.
4. Select the desired quality by using the u d buttons, then press the OK button.
5. Press the shutter button fully to start recording.
6. Press the shutter button fully again to stop recording.
40 Taking Photos
Page 41

Maximum available shooting time
Quality When using an SD memory card
640 × 480 102 2 2
320 × 240 406 3 3
160 × 120 796 8 8
* The values shown here may differ from those for SD memory cards produce d by other manufacturers.
(Panasonic RP-SDH256)
Internal memory
only (default)
Internal memory only
(after the data is deleted)
Unit: seconds
Recording sound memo
When the quick photo review setting is set to Sound Memo ON, you can record a sound memo
while the photo is displayed on the LCD monitor. You can record sound memos up to 30 seconds
long.
1. While the photo is displayed on the LCD monitor, press the OK button to start recording.
2. When you are finished recording, press the OK button to stop recording.
Note:
❏ You can play a sound memo in the playback mode. Display the photo with the sound memo in the
playback mode, and press the r button.
❏ The icon is displayed when you display a photo with a sound memo in the playback mode.
Taking Photos 41
2
English
2
2
2
2
2
2
2
2
2
Page 42

Making Additional Settings
In the setup mode, you can change the camera’s additional settings such as the power save setting
and the sound setting.
How to change the settings
1. Turn the Mode dial to Setup mode.
2. Select the menu that has the items you want to change by using the l r buttons.
3. Select the desired setting item by using the u d l r buttons, then press the OK button.
4. Change the setting value by using the u d buttons, then press the OK button. The setting is
changed.
Note:
Pressing the MENU button causes the setting and returns the display to the previous screen.
42 Taking Photos
Page 43

Available settings
Setup Menu 1
Setting items Description Default
Qk View/Sd Memo Set the quick view and sound memo setting.
LCD Brightness Set the brightness level of the LCD monitor. —
Digital Zoom Set whether or not to enable the digital zoom. OFF
Power Save Set the time until the camera enters the power save mode. 3 min.
Startup Screen Set the start-up screen. EPSON Logo
When this setting is ON, you can record a sound memo
while the image is displayed for about three seconds.
Setup Menu 2
OFF
2
English
2
2
2
2
2
2
Setting items Description Default
Format Format the camera’s memory or the memory card. —
Reset All Reset the camera’s settings to defaults. —
Date/Time Set the date and time. —
Taking Photos 43
2
2
2
Page 44

Setting items Description Default
File No. Reset Set whether or not to reset the sequence of the image file
numbers to 0000 when replacing or formatting the
OFF
memory card.
Language Set the displayed language. —
Sound
Setting items Description Default
Sound Set whether or not to enable the sound. ON
Operation Sound
Shutter Sound
Cont Shoot Sound
Focus Lock Sound
Self-Timer Sound
*
You can copy or delete sound data for these settings. When using sound data stored in the Software
CD-ROM, copy the data to the memory card via EPSON Photo!4. For details, see the manual of
EPSON Photo!4.
44 Taking Photos
*
Set the sound when operating buttons. Sound 1 Max
*
*
Set the shutter sound.
*
Set the sound during continuous shooting.
*
Set the sound when the focus is locked.
Set the sound while the self-timer is set.
Page 45

Chapter 3
Viewing and Managing Your Photos
3
English
3
Viewing Photos with the LCD Monitor
You can confirm the photos that you have taken on the LCD monitor.
1. Turn the Mode dial to playback mode. The latest photo that is taken is displayed.
Note:
❏ To view the next photo, press the r button. Holding the r button down fast-forwards the photos.
❏ To zoom the photo, press the T button. You can shift the expanded image by pressing the u d
l r buttons.
2. To view a photo with thumbnails, press the W button.
Note:
❏ To select another photo, press the u d l r buttons.
❏ To view the selected photo with the full screen, press the T or OK button.
Viewing and Managing Your Photos 45
3
3
3
3
3
3
3
3
Page 46

Viewing a slide show of your photos
You can playback your photos one at a time.
1. Put the camera in the playback mode.
2. Press the MENU button. The Playback Menu 1 is displayed.
3. Select Slide Show by using the u d buttons, then press the OK button. The slide show starts.
Note:
❏ Pressing the OK button pauses the slide show.
❏ Pressing the r button skips the current photo.
❏ Pressing the l button stops the slide show.
❏ The power save setting is invalid during a slide show when using battery power only.
Playing movies
1. Put the camera in the playback mode, and display the movie you want to play.
2. Press the OK button. The movie starts playing.
Note:
❏ Pressing the OK button pauses the movie. Press the OK button again restarts the movie.
❏ Pressing the u d buttons adjusts the volume through 4 levels.
❏ Pressing the l button stops the movie.
46 Viewing and Managing Your Photos
Page 47

Setting quick photo review
When the quick photo review setting is on, the photo is displayed on the LCD monitor for about
3 seconds after you take it. This function may be turned ON or OFF. The default setting is OFF.
Note:
The quick photo review is not available when using the continuous photography mode.
1. Turn the Mode dial to setup mode. The Setup Menu 1 is displayed.
2. Select Qk View/Sd Memo by using the u d buttons, then press the r button.
3. Select ON or OFF, then press the OK button.
3
English
3
3
3
Viewing the Properties of Photos
1. Display the photo on the LCD monitor.
3
3
3
3
3
3
Viewing and Managing Your Photos 47
Page 48

2. Press the DISPLAY button twice. The following information is displayed.
b
c
a
e
ifgj
a. Folder and file number
b. Scene mode setting
c. Quality setting
d. Exposure setting
e. ISO sensitivity setting
f. White balance setting
g. Focus
h. Shutter speed
i. Playback photo number/total number of stored photos
j. Photo date
48 Viewing and Managing Your Photos
d
h
Page 49

Saving Photos in DPOF
DPOF is the abbreviation for Digital Print Order Format. This format allows you to record
information on the memory card including which images and how many copies you want to have
printed out.
1. Turn the Mode dial to playback mode.
2. Press the MENU button, and then Press the r button. The Playback Menu 2 is displayed.
3. Select Make Print Order, then press the OK button.
4. Select the photo and specify the number of copies by using the u d l r buttons.
Note:
Up to 99 copies for 999 photos can be set. However, the maximum copy quantity is 9,999 pages.
5. Press the OK button. The DPOF information is saved and the screen returns to Playback Menu
2.
Deleting Photos
You can delete photos stored in the camera from the playback mode.
Caution:
The photos that are deleted cannot be restored. Be careful when deleting photos.
c
Viewing and Managing Your Photos 49
3
English
3
3
3
3
3
3
3
3
3
Page 50

Deleting a single photo
1. Turn the Mode dial to playback mode.
2. Press the MENU button. The Playback Menu 1 is displayed.
3. Select Delete Individual Images by using the u d buttons, then press the r button.
4. Select the photo to delete by using the l r buttons.
5. Select OK by using the u d buttons, then press the OK button. The photo is deleted.
6. If necessary, repeat steps 4 and 5 to delete another photo.
Deleting all photos
You can delete all photos stored in the camera.
1. Turn the Mode dial to playback mode.
2. Press the MENU button. The Playback Menu 1 is displayed.
3. Select Delete All Images by using the u d buttons, then press the OK button.
4. Select OK by using the u d buttons, then press the OK button.
Deleting a group of images
A group of photos that are taken in continuous photography mode can be deleted all at once.
1. Turn the Mode dial to playback mode, and display the image to delete.
2. Press the MENU button. The Playback Menu 1 is displayed.
3. Select Delete a group of image by using the u d buttons, then press the OK button.
50 Viewing and Managing Your Photos
Page 51

Note:
You cannot select Delete a group of image if there are no photos that are taken in continuous
photography mode.
4. Confirm the images one by one by using the l r buttons. Erase the icon on the image you
do not want to delete by pressing the u d buttons.
5. Press the OK button.
6. Select OK by using the u d buttons, then press the OK button.
Formatting the memory card
You can reset the card to its default status from the Setup Menu. See “Making Additional Settings”
on page 42 for details.
Note:
Never format a camera memory card using a computer. Use this camera only.
Putting Photos on Your Computer
You can copy photos that are on your camera or a memory card to your computer. Then, you can
work on the photos on your computer. The PC cable is needed to connect the camera and your
computer.
Viewing and Managing Your Photos 51
3
English
3
3
3
3
3
3
3
3
3
Page 52

Exporting photos to a computer
Caution:
Make sure the camera’s power is turned off before you begin.
c
1. Open the connector cover carefully, and connect the PC cable from the camera to the computer.
Note:
Depending on the OS of your computer, you may have to install driver software. The driver software
can be found on the CD-ROM that is included.
2. Turn the camera on.
3. Move the photos in the camera to your computer with a software. For details, see Chapter 6,
“Operating the Software,” page 65.
Note:
❏ If image software is not installed on your computer, you can only copy photos in the camera to the
computer.
❏ When images that were taken using the P.I.F. mode are copied to your computer, the link between
the photos and the frames will be broken.
Working with photos on a computer
There is software on the CD-ROM that you can use to manipulate the photos on your computer.
For details about the software, see Chapter 6, “Operating the Software,” page 65.
52 Viewing and Managing Your Photos
Page 53

Chapter 4
Using Direct Print
4
English
4
Connecting Your Camera to the Printer
You can print a selected image easily by connecting the camera to the printer directly.
This camera supports the printers listed below. Two PC cables are provided with the camera.
Choose either of the cables depending on your printer.
STYLUS PHOTO R200/R210 STYLUS PHOTO 935
STYLUS PHOTO R300/R310
STYLUS PHOTO RX600
Note:
Printers released in the future may be added to this list.
Using Direct Print 53
4
4
4
4
4
4
4
4
Page 54

Printing Photos
Available types of paper
This camera supports the following types and sizes of paper.
Paper Size
Premium Glossy Photo Paper 10 × 15 cm
Premium Semigloss Photo Paper
Note:
❏ For details about paper, see your printer’s manuals.
❏ In the print settings on the camera, you do not have to set the paper type. You can print on both paper
types by setting the paper size.
Printing the photo seen on the LCD monitor
1. Connect the camera to the printer, then turn the printer and camera on.
2. Display the photo to print on the LCD monitor, then press the PRINT button. The Print
menu is displayed.
3. Select Print This Image by using the u d buttons, then press the PRINT or OK button.
4. Make the print settings if necessary, then press the PRINT button. Printing starts.
54 Using Direct Print
4 × 6 in.
Page 55

Note:
❏ See “Making Print Settings” on page 57 for details about the print settings.
❏ Press the MENU button to cancel printing.
Printing all the photos in memory
You can print all photos stored in the camera.
1. Connect the camera to the printer, then turn the printer and camera on.
2. Turn the Mode dial to playback mode, then press the PRINT button. The Print menu
is displayed.
3. Select Print All Images by using the u d buttons, then press the OK button.
4. Make the print settings if necessary, then press the PRINT button. Printing starts.
Note:
❏ See “Making Print Settings” on page 57 for details about the print settings.
❏ Press the MENU button to cancel printing.
Printing selected photos
You can select multiple photos to print.
1. Connect the camera to the printer, then turn the printer and camera on.
2. Turn the Mode dial to playback mode, then press the PRINT button. The Print menu
is displayed.
3. Select Select Images by using the u d buttons, then press the OK button.
Using Direct Print 55
4
English
4
4
4
4
4
4
4
4
4
Page 56

4. Select the photos to print by using the l r buttons, then set the copy quantity by using the u
d buttons.
5. Press the PRINT button. The preview is displayed.
6. Make the print settings if necessary, then press the PRINT button. Printing starts.
Note:
❏ See “Making Print Settings” on page 57 for details about the print settings.
❏ Press the MENU button to cancel printing.
Album printing
You can print several photos on one sheet of paper.
1. Connect the camera to the printer, then turn the printer and camera on.
2. Turn the Mode dial to playback mode, then select the first photo to print.
3. Press the PRINT button. The Print menu is displayed.
4. Select Print an Album by using the u d buttons.
5. Select the number of photos per page by using the l r buttons, then press the OK button.
6. Make print settings if necessary, then press the PRINT button. Printing starts.
Note:
❏ See “Making Print Settings” on page 57 for details about the print settings.
❏ Press the MENU button to cancel printing.
❏ You cannot print P.I.F. images when you select Album Printing.
❏ If you save the DPOF information before starting printing, the DPOF information will be enabled.
56 Using Direct Print
Page 57

Printing photos taken in P.I.F. mode
Images that have been taken in P.I.F. mode must be printed using direct printing in order for the
frame to show up on the print. Any other printing method will break the link between the frame
and the image and only the image will be printed with no frame.
For details about the P.I.F. mode, see Chapter 5, “Using PRINT Image Framer (P.I.F.).”
4
English
4
4
Making Print Settings
When printing images directly to the printer, you can set the various print settings on the camera.
Changing print settings
1. Select Print Settings by using the u d buttons on the preview screen, and then press the OK
button. The Print Settings screen is displayed.
2. Select the item to set by using the u d buttons, then press the OK button. The current setting
is displayed.
3. Select the item by using the u d buttons, then press the OK button.
Note:
Pressing the MENU button cancels the settings.
Using Direct Print 57
4
4
4
4
4
4
4
Page 58

Selecting paper size
Specify the size of the paper for your photo. You can select from 10x15cm Prem.Glossy or
4x6in.Prem.Glossy.
Selecting print borders
Specify whether to print pictures with or without borders. The default setting is BorderFree
(printing without borders).
Printing the date
All pi cture s take n have a reco rd of the d ate (Y .M. D., M. D.Y. o r D.M. Y wh ich is se lec ted in the da te
and time setting). You can choose to print the date record on your pictures. The default setting is
ON.
Printing at high speed
You may print your pictures faster, but the quality will be affected. The default setting is ON.
58 Using Direct Print
Page 59

Using Printer Utilities
You can confirm the printer’s status from the camera. You can also execute head cleaning on your
printer by using the camera.
Note:
These utilities can be used with STYLUS Photo R200/R210 only.
1. Display the preview screen.
2. Select Maintenance by using the u d buttons, then press the OK button.
3. Select the desired item by using the u d buttons, then press the OK button.
See the following sections for details on how to check each setting.
4
English
4
4
4
4
Checking the amount of ink left
Confirm the amount of ink rema ining in the ink ca rtridges in the prin ter that is currently connected.
After checking the amount of ink left, press the OK button.
Checking the print head nozzles
Print the nozzle check pattern. You can check the condition of the print head. If the nozzle check
pattern is not printed clearly, execute head cleaning.
1. On the Maintenance screen, select Nozzle Check.
2. Load some A4 size paper into the printer, select OK by using the u d buttons, then press the
OK button.
3. Check the nozzle check pattern.
Using Direct Print 59
4
4
4
4
4
Page 60

Cleaning the print head nozzles
Execute the head cleaning on the printer that is currently connected. After head cleaning, you can
check the condition of the print head by printing the nozzle check pattern.
1. On the Maintenance screen, select Head Cleaning.
2. Select OK by using the u d buttons, then press the OK button. Head cleaning is executed.
Aligning the print head
Adjust the printing accuracy when doing bi-directional printing.
1. On the Maintenance screen, select Print Head Alignment.
2. Load some A4 size paper into the printer, select OK by using the u d buttons, then press the
OK button. The Print Head Alignment Check pattern is printed.
3. Select the number lined up closest to the printed pattern by using the l r buttons, then press
the OK button.
Note:
When the multiple pattern numbers are lined up equally close, select one and press the OK button. After
that, repeat the print head alignment until a single pattern number lines up closest with the printed
pattern.
60 Using Direct Print
Page 61

Chapter 5
Using PRINT Image Framer (P.I.F.)
5
English
5
Taking Photos in P.I.F. Mode
PRINT Image Framer (P.I.F.) will link a frame to your picture as it is recorded. The various frames
can be selected from stored frames in the camera or memory card. You can then use the direct
printing process to print the composite frame.
Note:
❏ In P.I.F. mode, you will use frames that you have previously loaded into the camera. Select one and take
a photo. The photo will be printed in this frame during direct printing. You can change the frame before
you print.
❏ When copying an image that has been taken in P.I.F. mode to a computer, the link connecting the image
and the P.I.F. frame will be lost.
❏ Images taken in P.I.F. mode and set in DPOF format and saved on a memory card when printed with
the Stylus Photo 935 will print with the first frame that is stored in the printer.
1. Turn the Mode dial to auto photography mode or manual photography mode.
2. Press the P.I.F. button. The frame stored in the camera is displayed.
Using PRINT Image Framer (P.I.F.) 61
5
5
5
5
5
5
5
5
Page 62

Note:
When you want to select a frame stored in the memory card, press the r button after pressing the
P.I.F. button.
3. Select the desired frame by using the u d buttons, then press the OK button.
4. The selected frame is displayed on the LCD monitor. You can now take the photograph.
Changing the Frames
You can change the frames after you take a photo in the P.I.F. mode. You can also add a frame to
a photo that was taken without a frame.
1. Turn the camera on, then turn the Mode dial to playback mode.
2. Display the desired photo to change or add a frame, then press the P.I.F. button. The
Camera in Frame screen is displayed.
3. Select a frame by using the u d buttons, then press the OK button.
Note:
To save the photo with no frame, select No Frame.
62 Using PRINT Image Framer (P.I.F.)
Page 63

Replacing Frames Stored in the Camera or Memory
Card
In order to add or change the frames loaded in the camera’s memory you must use a memory card
that already has replacement frames in memory. Frames can be found in the CD-ROM provided
with your camera or on the Epson web site.
Note:
It is recommended to replace frames via memory card.
5
English
5
5
5
Using the CD-ROM
Note:
❏ You need a computer with a CD-ROM drive.
❏ You need to install the PRINT Image Framer Tool beforehand.
For detailed information, refer to the online help for the EPSON PRINT Image Framer Tool.
Downloading from the web
Note:
❏ You need a computer that is connected to the internet.
❏ You need to install the PRINT Image Framer Tool.
Detailed information can be found online at Epson’s web site.
Using PRINT Image Framer (P.I.F.) 63
5
5
5
5
5
5
Page 64

Deleting Frames
You can delete frames stored in the camera’s memory or the memory card.
1. Press the P.I.F. button, then select a location that stores frames to delete by using the l r
buttons.
2. Select a frame to delete by using the u d buttons, then press the MENU button.
Note:
To cancel the operations, press the P.I.F. button.
3. Select Delete by using the u d buttons, then press the OK button.
4. Select OK by using the u d buttons, then press the OK button. The selected frame is deleted.
64 Using PRINT Image Framer (P.I.F.)
Page 65

Chapter 6
Operating the Software
6
English
6
Introduction
You can manipulate photos on your computer. This camera comes with a Software CD-ROM that
includes software that lets you work with your photos on a computer.
The Software CD-ROM includes the following software and files.
EPSON Photo!4
This software allows you to easily store, review and arrange your digital camera images. Please
read the instructions that come with the disk.
QuickTime (for Windows only)
This software is used to playback movies.
EPSON PRINT Image Framer Tool
This software enables you to transfer frames (layout files) to your SD memory card in your camera.
Operating the Software 65
6
6
6
6
6
6
6
6
Page 66

PIF DESIGNER
This software enables you to create original frames for your photos or edit existing frames to suit
the way you want them to appear.
USB storage driver (for Windows only)
The USB driver for connecting the camera to Windows 98, Me, 2000, and XP operating systems.
P.I.F. files
Frame images that are used when doing P.I.F. printing.
Sound files
Sound data that are used to change the operating sound settings.
System Requirements
The system requirements for using the L-410 with a computer are as follows:
Windows OS: Microsoft
XP Professional
Memory: 64 MB or more
Hard disk: 50 MB or more free memory is required for installation
170 MB or more free memory is required for operation
®
Windows® 98, Me, 2000 Professional, XP Home Edition,
66 Operating the Software
Page 67

Display: SVGA (800 × 600) or higher, 16 bit color or higher
Port: USB port (type A connector)
Macintosh OS: Mac OS
Hard ware: PowerPC G3 233MHz or higher
Memory: 42 MB or more application memory
Hard disk: 50 MB or more free memory is required for installation
170 MB or more free memory is required for operation
display: 800 × 600 or higher, 32000 colors or more
®
9.1 or later, Mac OS 10.2 or later
6
English
6
6
6
6
Installing the Software
1. Insert the software CD-ROM into the CD-ROM drive.
For Windows users:
The EPSON Installer Program dialog box appears automatically.
Note:
If the EPSON Installation Program dialog box does not appear, click the CD-ROM icon, and then select
Open from the File menu. Then double-click EPSETUP. EXE.
For Mac OS 9 users:
Double-click the Mac OS 9 icon inside the EPSON folder.
For Mac OS 10.x users:
Double-click the Mac OS X icon inside the EPSON folder.
Operating the Software 67
6
6
6
6
6
Page 68

Note:
When the authentication dialog box for assigning administrator privileges appears, enter the user name
and password, and then click OK.
2. Select the software to install, then click Install.
Note:
The first time you install the software, you should install all of it. Or to select which software to install,
click Custom.
3. Follow the on-s creen instructions until all of the soft ware is installed. When a message appea rs
to inform you that the installation is complete, click Exit or Restart Now/Exit.
Starting EPSON Photo!4
For Windows
Click Start, point to All Programs (or Programs), and then select EPSON Camera. Select EPSON
Photo!4, and then click EPSON Photo!4.
For Macintosh
Double-click the EPSON Photo!4 icon in the EPSON Photo!4 program folder.
68 Operating the Software
Page 69

Finding More Information
To learn more about the software included on the software CD-ROM, see the each online User’s
Guides. Start the software and access the online User’s Guide, and then follow the steps below.
6
English
6
Software To start online User’s Guide
EPSON
PhotoQuicker
EPSON PRINT Image
Framer Tool
PIF Designer Start PIF Designer and then select User Guide from the Help menu.
Note:
You can access the online guides using the Start menu in Windows, or double-click the MANUAL folder in
each of the software’s program folders, and then double-click INDEX.HTM for Macintosh.
Click the Help button in the dialog box.
Start EPSON PRINT Image Framer Tool and then select EPSON PRINT Image
Framer Tool Help from the Help menu.
Operating the Software 69
6
6
6
6
6
6
6
6
Page 70

Chapter 7
Maintenance and Troubleshooting
Maintenance
To keep your camera operating at its best, you should clean it thoroughly several times a year.
Before you perform any maintenance on the camera, be sure to read the “Safety Instructions” on
page 7. Then follow these guidelines.
Resetting your camera’s defaults
You can reset all the settings to their defaults from the Setup Menu 2. See “Making Additional
Settings” on page 42 for details.
Note:
The Date/Time setting and Language setting are not reset even if the following procedure is executed.
Cleaning your camera
Caution:
Do not use volatile chemicals such as alcohol, paint thinner or benzine. They will damage the camera
c
exterior. The same is true for the battery compartment.
70 Maintenance and Troubleshooting
Page 71

Camera exterior
Wipe the outside of the camera with a soft dry cloth. If it is very dirty use a cloth dampened with
a natural detergent. Wipe again with soft dry cloth.
Lens and the LCD monitor
To clean the lens, make sure that the camera is turned off, then blow off any loose dust or dirt or
use a lens and camera cleaning brush. Next, blow on the lens and wipe off all moisture with a soft
dry cloth.
Clean the LCD monitor with a soft dry cloth also.
Battery terminals
Do not use volatile chemicals such as alcohol, paint thinner or benzine. They will damage the
camera’s exterior. The same is true for the battery compartment.
7
English
7
7
7
7
7
Storing your camera
Store the camera in a cool and dry location and remove the batteries to prevent corrosion or leaks
if you will not be using the camera for a long period of time.
Maintenance and Troubleshooting 71
7
7
7
7
Page 72

Problems and Solutions
Camera problems
The camera has no power
Cause What to do
Are the batteries installed
correctly?
Is the Mode dial turned
fully?
The camera does not take a photo after you press the shutter button
Cause What to do
Is the power switched on? See “The camera has no power” on page 72 and check the camera.
Is the photo image number
on the LCD monitor 0?
72 Maintenance and Troubleshooting
Check if the battery is installed correctly.
See “Installing the battery” on page 20 for details.
Turn the Mode dial fully to the mode you want and press the
POWER button fully.
Th is mea ns the me mory c ar d is f ul l. T ransf er the d at a on th e ca rd
to a computer then delete them from the card to free up space.
See “Deleting Photos” on page 49 for details.
Page 73

The camera does not react when you press any buttons
Cause What to do
Are the illumination lamp
and both of the indicator
lamps (red and green)
flashing?
The power turns off automatically.
Cause What to do
Is the power saving function
turned on?
Turn the power off, and then turn it on again. If the power does
not turn off, remove the battery, reinstall it and turn the power
on. If the lamps are still flashing, contact our Customer Support.
Press any button or turn the Mode dial to come out of the power
save mode.
7
English
7
7
7
7
7
The camera takes too long to take a photo
Cause What to do
Did you press the shutter
button completely with one
push?
Usually you should press the shutter button halfway and hold it
to set the focus, then press the rest of the way to take a photo.
When pressing the shutter button fully all at once, it takes time
to focus and set the exposure before the shutter releases. It may
take longer than when pressing the shutter button in two steps.
7
7
7
7
Maintenance and Troubleshooting 73
Page 74

The flash does not work
Cause What to do
Is the flash setting correct? When flash off is set as the flash setting, the flash will not go
off. See “Controlling the Flash” on page 33 for details.
The LCD monitor is hard to see
Cause What to do
Is the LCD monitor
brightness level set to too
Adjust the LCD Brightness setting in the Setup Menu. See
“Making Additional Settings” on page 42 for details.
bright?
The LCD monitor displays vertical lines
Cause What to do
Did you point the camera
toward a strong bright light?
When you use the LCD monitor to take photos, any very bright
light may affect the sensor and cause the lines to appear on the
monitor. They will not appear in the recorded image itself.
74 Maintenance and Troubleshooting
Page 75

Nothing appears on the LCD monitor
Cause What to do
Is the Mode dial turned
fully?
Is the power saving function
turned on?
Is the camera connected to a
computer?
Is the LCD monitor setting
set to off?
Turn the Mode dial fully to the mode you want and press the
POWER button fully.
Press any button or turn the Mode dial to come out of the power
save mode.
When the camera is connected to a computer, the LCD monitor
is disabled.
Press the DISPLAY button to switch the LCD monitor setting. See
“Taking Photos Using the Viewfinder Only” on page 31 for
details.
Maintenance and Troubleshooting 75
7
English
7
7
7
7
7
7
7
7
7
Page 76

Image problems
Images are out of focus
Cause What to do
Did you operate the
auto-focus correctly?
Is the camera in the right
distance mode setting?
Is the lens dirty? See “Cleaning your camera” on page 70 and clean the lens.
Is the captured image
blurred?
The image is too dark or to bright (underexposed/overexposed)
Cause What to do
Is the flash setting correct? Use the flash. See “Controlling the Flash” on page 33.
76 Maintenance and Troubleshooting
Place the subject in the center of the focus area and press the
shutter button halfway. See “Releasing the Shutter” on page 24
for details.
See “Camera range” on page 25 for details.
Hold the camera in the proper position when shooting, with your
lower, support arm close to your body. Use a tripod for night
scenes and other low light situations.
Page 77

Is the exposure set to too
dark or bright?
Is the light sensitivity set to
too low or high?
Part of the image is missing
Cause What to do
Was your finger covering the
lens?
Are you looking straight
through the viewfinder?
Is the subject of the picture
very close to the camera?
Adjust the exposure setting properly. See “Setting Exposure” on
page 39 for details.
Adjust the light sensitivity setting properly. See “Setting Light
Sensitivity” on page 38 for details.
When taking photos using the viewfinder, fingers, straps or
pieces of clothing may partially cover the lens.
You can misjudge the composition of the picture if you are
looking through the viewfinder at an angle or holding the camera
away from your face.
When the object is less than 1 meter from the lens, you may be
experiencing parallax problems. Taking photos using the LCD
monitor.
Maintenance and Troubleshooting 77
7
English
7
7
7
7
7
7
7
7
7
Page 78

Printing problems
A horizontal or vertical red line appears on the image
The color in the image does not look right
The images do not look as good as they used to
Cause What to do
Is the print head clogging? See “Cleaning the print head nozzles” on page 60 and clean the
print head.
Is the proper paper loaded in
the printer?
The wrong date and/or time is displayed on your camera
Cause What to do
Is the date and time setting
set correctly?
78 Maintenance and Troubleshooting
Make sure that the proper paper is loaded in your printer.
See “Setting the date and time” on page 23 and set the date and
time correctly.
Page 79

The area captured in the photo is different from what you saw in the viewfinder
Cause What to do
The camera has
malfunctioned.
Contact our Customer Support.
7
English
7
7
List of Error Messages
Error message Description
This memory card is
write-protected.
Memory card error. Check the
memory card.
No memory card inserted. The camera has no memory card inserted. Insert a memory card.
Not enough free space in the
camera’s memory.
Not enough free space in the
memory card.
The memory card is locked. Release the write-protect.
Unspecified memory card problem. See “Installing/removing the
memory card” on page 21 to remove the memory card and replace
it. Contact the card maker.
No more room for data on the camera’s memory or memory card.
Make room by deleting data (See “Deleting Photos” on page 49) or
export the data to your computer and then reformat the card. (See
“Putting Photos on Your Computer” on page 51)
Maintenance and Troubleshooting 79
7
7
7
7
7
7
7
Page 80

Error message Description
This frame cannot be used with
this camera.
The maximum number of
Frames that can be registered
to the memory card has been
reached.
P.I.F. Frame does not exist or is
unusable.
No images. There are no images recorded in the memory. Insert a memory card
This image cannot be
displayed.
This file cannot be deleted
because this file is locked or
cannot be deleted.
Some files are locked or could
not be deleted.
The file size of the frame exceeds the limit. Register a frame that is
within the limit size. See “Replacing Frames Stored in the Camera or
Memory Card” on page 63 for details.
See “Deleting Frames” on page 64 to delete an unnecessary frame
or take photo with the existing frames in the memory card.
The picture can’t be viewed because there is no file or the link has
been broken. The link has been broken or the frame itself has been
deleted. See “Replacing Frames Stored in the Camera or Memory
Card” on page 63 and replace or add a frame linked to this file.
with images.
The image file exists but can’t be displayed. The images that are
taken with another camera or stored on the computer may not
display on your camera.
The image(s) has been locked to prevent deletion. Delete the
image(s) with the device that took the image or locked it.
80 Maintenance and Troubleshooting
Page 81

Error message Description
The necessary Frame file does
not exist or is unusable.
Ink is too low to perform this
operation.
Printer error. There may be a problem with the printer. Turn the printer off for a
This image cannot be printed. The selected image cannot be printed. Select another image.
Could not print. Retry? If the printer is in the middle of printing something, it may not be able
The printer is currently
configured to print on a CD or
DVD. Change the printer’s
configuration to that for
printing on paper.
The picture cannot be viewed because there is no file or the link has
been broken. The link has been broken or the frame itself has been
deleted. Replace or add a frame linked to this file.
The ink remains too low to execute head cleaning. Replace the
cartridge(s) following the printer instruction booklet.
few seconds then turn the power back on. If the error message still
appears, turn the power off and check to see if there is anything
(packing materials, paper) stuck inside the printer. Then turn the
power back on.
to accept the next request. Restart the printer or wait until the current
print run is finished and then try again.
The CD-R/DVD-R tray on the printer is not closed. Close the tray.
Maintenance and Troubleshooting 81
7
English
7
7
7
7
7
7
7
7
7
Page 82

Error message Description
A communication error has
occurred.
XX images could not be
printed.
Cannot print because the
necessary Frame file does not
exist or is corrupted.
This function is not available. The printer does not support this function. You can try to clean it in
Parts inside your printer require
maintenance.
Either the cable has been disconnected or the power has been
turned off. Recheck that the cable is connected, turn the power
back on and try again.
I f so m e of t h e im a g e s w e r e t ak e n w it h a n ot h e r ca m e r a o r h a ve b e e n
changed by software, they may not print, only the images taken
w ith th is ca me ra wi ll b e p ri nt ed . U se t he ac tu al ca me ra or co mpu te r
that was used to create the images in order to print them.
The picture cannot be printed because there is no frame file or the
link has been broken. Replace or add a frame linked to this file.
some other way, but the printer does not support the camera’s
function.
The printer cannot print because components within the printer
need adjusting. Turn the printer off for a few seconds then turn the
power back on. If the error message still appears, consult the shop
you bought your printer from or Customer Support.
82 Maintenance and Troubleshooting
Page 83

Contacting Customer Support
If your Epson product is not operating properly and you cannot solve the problem using the
troubleshooting information in your product documentation, contact customer support services
for assistance. If customer support for your area is not listed below, contact the dealer where you
purchased your product.
Customer support will be able to help you much more quickly if you give them the following
information:
❏ Product serial number
(The serial number label is usually on the back of the product.)
❏ Product model
❏ Product software version
(Click About, Version Info, or similar button in the product software.)
❏ Brand and model of your computer
❏ Your computer operating system name and version
❏ Names and versions of the software applications you normally use with your product
For users in the United Kingdom and the Republic of Ireland
URL http://www.epson.co.uk
Telephone (UK) 08701 637 766
(The Republic of Ireland) 01 679 9016
Maintenance and Troubleshooting 83
7
English
7
7
7
7
7
7
7
7
7
Page 84

For users in the Middle East
URL http://www.epson.com
E-mail epson_support@compubase.co.ae
Telephone +971 4 352 4488
Fax +971 4 351 6617
For users in Scandinavia
URL http://www.epson.com
Telephone Denmark 80 88 11 27
Finland 0800 523 010
Norway 800 11 828
Sweden 08 445 12 58
For users in South Africa
URL www.epson.co.za
Telephone (011) 444-5223 or 0800 600 578
84 Maintenance and Troubleshooting
Page 85

For user in France
Support Technique EPSON France,
0 892 899 999 (0,34 E/minute)
Ouvert du lundi au samedi de 9h00 à 20h00 sans interruption
http://www.epson.fr/support/selfhelp/french.htm pour accéder à l'AIDE EN LIGNE.
http://www.epson.fr/support/services/index.shtml pour accéder aux SERVICES du support
technique.
For user in Germany
EPSON Service Center c/o Exel Hünxe GmbH
Werner-Heisenberg-Strase 2
46569 Hünxe
For user in Italy
EPSON Italia S.p.a.
Via M. Viganò de Vizzi, 93/95
20092 Cinisello Balsamo (MI)
Tel. 02.660.321
Fax. 02.612.36.22
Assistenza e Servizio Clienti
TECHNICAL HELPDESK
02.268.300.58
http://www.epson.it
Maintenance and Troubleshooting 85
7
English
7
7
7
7
7
7
7
7
7
Page 86

For users in Spain
URL http://www.epson.es
E-mail soporte@epson.es
Telephone 902 40 41 42
Fax 93 582 15 16
For users in Portugal
URL http://www.epson.pt
E-mail apoio_clientes@epson.pt
Telephone 707 222 000
Fax 21 303 54 90
86 Maintenance and Troubleshooting
Page 87

Appendix A
Appendix
A
A
English
Standards and Approvals
European model:
EMC Directive 89/336/EEC
EN 55022 Class B
EN 61000-3-2
EN 61000-3-3
EN 55024
Specifications
Effective pixels: 4.07 mega pixels
Image recording capacity: Still picture: 2304 × 1728 pixels
Movie: 640 × 480 pixels
Image file type: Jpeg (Exif 2.2)/Print Image Matching 2, AVI
Camera file system: DCF file format, DPOF 1.1
Internal memory 16 MB
A
A
A
A
A
A
A
A
Appendix 87
Page 88

Available memory card: SD memory card (Up to 512 MB), Multimedia card
(Up to 512 MB, MMC ver 2.1 or later, made by Hitachi or SunDisk).
Lens: Focal length: f=5 .6 to 16.8 mm (equivalent to a 34 to 102 mm lens
F value: F2.8 (WIDE) to 4.9 (TELE)
Aperture: Wide angle; F2.8/F4.8,
Zoom: Collapsible mount 3× zoom
Digital zoom: 2× or 3× zoom (Maximum 9× zoom with simultaneous use of the
optical zoom)
Focus mode: Auto focus
Object distance: 0.5 m to infinity
0.11 to 0.5 m (macro mode, wide)
Shutter speed: Still picture: 1 - 1/2000 seconds
Movie: 1/32 - 1/2000 seconds
TTL exposure control:
White balance: TTL auto white balance
(Auto/daylight/cloudy/incandescent/fluorescent/Mercury)
Sensitivity: Auto/fixed (equivalent to ISO 100/200/400)
on a 35 mm camera)
Telephoto; F4.9/F8.4
88 Appendix
Page 89

Viewfinder: Real-image optical view
Flash: Internal form (Auto/flash off/red-eye reduction/forced
flash/slow synchro)
Self-timer: 2 seconds/10 seconds
Photography mode: Normal/portrait/landscape/macro
LCD monitor: 1.5-inch low temperature polysilicon TFT color LCD monitor
Interface: USB/serial dual interface
(Ver. 1.1/Mass Storage Class)
Power sources: Two AA type Ni-MH batteries/alkari batteries/nickel Mn
batteries/nickel batteries
One CR-V3 battery
External power source: Optional AC adapter (EU-37)
Dimensions
(Height × Width × Depth) : 62 × 92.5 × 31.5 mm (2.4 × 3.6 × 1.2 inches)
Weight: Approx. 156 g (0.3 lb)
Temperature: Operating: 5 to 35°C
Storage: -20 to 60°C
Electrical: Input voltage: DC 3.4 V
Interface: One USB (ver 1.1) interface for Host and Slave connection
Appendix 89
A
A
A
A
A
A
A
A
A
A
English
Page 90

About Optional Accessories
AC adapter (EU-37)
Model: EU-37
Input: AC 100 - 240 V
Output: DC 3.4 V, 2.5 A
Power consumption: 14 W
Using the AC adapter
Note:
Read the documentation that is provided with the AC adapter before using it.
90 Appendix
Page 91

1. If your AC adapter has a separate AC power cable, connect the cable connector firmly into the
AC inlet.
A
A
A
A
English
2. Open the connector cover on the side of the camera and plug the adapter cable into the DC
port on the camera.
3. Plug the AC adapter into an electrical outlet.
Appendix 91
A
A
A
A
A
A
Page 92

Glossary
The following definitions apply specifically to the L-410.
application
A software program that helps you carry out a particular task, such as word processing, image
editing, or financial planning.
brightness
The lightness or darkness of an image.
default
A value or setting that takes effect when the equipment is turned on, reset, or initialized. Also
known as a factory setting.
drive
A memory device, such as a CD-ROM, hard disk, or floppy disk drive.
driver
Software that sends instructions to a computer peripheral to tell it what to do. For example, your
printer driver accepts print data from your L-410 and sends instructions to the printer on how to
print this data.
Together, the printer driver and printer utilities are referred to as “printer software.”
92 Glossary
Page 93

exposure
The amount of light that passes through the lens to form an image.
image
Data representing a two-dimensional scene. A digital image composed of pixels arranged in a
rectangular array with a certain height and width. Each pixel may consist of one or more bits of
information, representing the brightness of the image at that point.
ink cartridge
Contains the ink that your printer uses to print.
interface
A piece of hardware, a method, or a standard used to connect the computer and the camera.
interface cable
The cable that connects the L-410 to the printer or other devices.
JPEG
A file format for strong color and grayscale images in compressed files. Data saved using the JPEG
format generally receives greater compression than data saved using TIFF and other formats.
light sensitivity
The measureme nt of the light sensitivity of films. In the di gital camera, it depends on th e capability
of the sensor.
Glossary 93
English
Page 94

nozzles
Fine tubes in the print head through which ink is sprayed onto the page. Print quality may decline
if the print head nozzles are clogged.
pixel
Short for picture element. Each image is composed of a number of pixels. Pixels are also counted
in units of dots.
port
An interface channel through which data is transmitted between devices.
printer driver
See driver.
printer utilities
See utilities.
reset
To return the L-410 to its defaults.
thumbnails
Small representations of images.
USB interface
Universal Serial Bus interface. Enables the user to connect up to 127 peripheral devices (such as
keyboards, mice, and printers) to the computer through a single, general-purpose port.
94 Glossary
Page 95

utilities
Software that allows you to monitor and maintain your printer. Together, utilities and the printer
driver are referred to as “printer software.”
zoom
To show a smaller area of an image at a higher magnification (zoom in) or a larger area at a lower
magnification (zoom out). Digital zoom is the electronic enlargement of the center part of the
captured image. Optical zoom uses the lens system to enlarge the image.
Glossary 95
English
Page 96

Index
A
Additional settings, 43
Album printing, 56
Auto photography mode, 25
Available memory card, 21
Available types of paper, 54
B
Battery life, 20
Buttons, 17
C
Camera parts, 15
Camera range, 25
Changing print settings, 57
Cleaning the camera, 70
Closing the battery/memory
card cover, 19
96 Index
Contacting EPSON, 83
Customer support, 83
D
Deleting photos, 49
Digital print order format, 49
Digital zoom, 32
Direct printing, 53
printing all photos in
memory, 55
printing a photo on the LCD
monitor, 54
printing selected photos, 55
DPOF, 49
E
EPSON Photo!4, 65
Error messages, 79
Exposure, 39
F
Flash, 33
Flash range, 34
Formatting the memory
card, 51
Frames
changing, 62
deleting, 64
replacing, 63
Functions of buttons, 17
I
Information on LCD
monitor, 29
Initial settings, 23
Installing
Page 97

battery, 19, 20
memory card, 19, 21
software, 67
L
Landscape mode, 37
Light sensitivity, 38
M
Macro mode, 35
Main features, 7
Managing photos
deleting, 49
exporting to a computer, 52
viewing, 45
Manual photography
mode, 25
Memory card
available types, 21
formatting, 51
installing, 21
N
Normal mode, 36
Number of photos that can be
taken, 27
O
Opening the battery/memory
card cover, 19
Operating the software, 65
Optical zoom, 32
Optional accessories, 90
P
P.I.F., 61
P.I.F. files, 66
Photography mode, 25
Portrait mode, 37
Printer utilities, 59
aligning the print head, 60
checking the amount of ink
left, 59
checking the print head
nozzles, 59
cleaning the print head
nozzles, 60
Print Image Framer, 61
changing the frames, 62
deleting frames, 64
replacing frames, 63
taking photos, 61
Printing photos, 53
Print settings
changing, 57
high speed printing, 58
paper size, 58
printing date, 58
Problems and solutions, 72
Properties of photos, 47
Q
Quick photo review, 47
QuickTime, 65
Index 97
English
Page 98

R
Releasing the shutter, 24
Removing the memory
card, 22
Resetting
file numbers, 40
your camera’s defaults, 70
Resolution and
compression, 26
S
Scene mode, 36
Selecting language, 23
Self timer, 34
Setting the date and time, 23
Setup Menu, 43
Shutter, 24
full position, 24
half position, 24
Slide show, 46
Software
system requirements, 66
98 Index
Sound setting, 43
Specifications, 87
Standards and approvals, 87
Status and error messages, 79
Storing the camera, 71
T
Taking photos
continuously, 35
in macro mode, 35
in P.I.F. mode, 61
using the LCD monitor, 28
using the viewfinder, 31
Technical support, 83
Troubleshooting, 72
camera problems, 72
image problems, 76
printing problems, 78
Turning on/off the camera, 23
U
Unpacking the camera, 14
USB driver, 66
V
Viewing
photos with the LCD
monitor, 45
properties of photos, 47
W
White balance, 37
Z
Zoom, 32
 Loading...