

Page 1

®
Laser Printer
All rights reserved. No part of this publication may be reproduced, stored in a retrieval
system, or transmitted in any form or by any means, mechanical, photocopying, recording,
or otherwise, without the prior written permission of SEIKO EPSON CORPORATION. No
patent liability is assumed with respect to the use of the information contained herein. Neither
is any liability assumed for damages resulting from the use of the information contained
herein.
Neither SEIKO EPSON CORPORATION nor its affiliates shall be liable to the purchaser of
this product or third parties for damages, losses, costs, or expenses incurred by purchaser or
third parties as a result of: accident, misuse, or abuse of this product or unauthorized
modifications, repairs, or alterations to this product, or (excluding the U.S.) failure to strictly
comply with SEIKO EPSON CORPORATION’s operating and maintenance instructions.
SEIKO EPSON CORPORATION shall not be liable against any damages or problems arising
from the use of any options or any consumable products other than those designated as
Original Epson Products or Epson Approved Products by SEIKO EPSON CORPORATION.
EPSON and EPSON ESC/P are registered trademarks and EPSON ESC/P 2 is a trademark
of SEIKO EPSON CORPORATION.
Speedo, Fontware, FaceLift, Swiss, and Dutch are trademarks of Bitstream Inc.
CG Times and CG Omega are registered trademarks of Miles, Inc.
Univers is a registered trademark of Linotype AG and/or its subsidiaries.
Antique Olive is a trademark of Fonderie Olive.
Albertus is a trademark of Monotype Corporation plc.
Coronet is a trademark of Ludlow Industries (UK) Ltd.
Arial and Times New Roman are registered trademarks of Monotype Corporation plc.
HP and HP LaserJet are registered trademarks of Hewlett-Packard Company.
Adobe and PostScript are trademarks of Adobe Systems Incorporated, which may be
registered in certain jurisdictions.
General Notice: Other product names used herein are for identification purposes only and may be
trademarks of their respective owners. EPSON disclaims any an d all rights in those marks.
Copyright © 1999 by SEIKO EPSON CORPORATION, Nagano, Japan.
Reference Guide
Page 2

Declaration of Conformity
According to ISO/IEC Guide 22 and EN 45014
Manufacturer: SEIKO EPSON CORPORATION
Address: 3-5, Owa 3-chome, Suwa-shi,
Nagano-ken 392-8502 Japan
Representative: EPSON EUROPE B.V.
Address: Prof. J. H. Bavincklaan 5 1183
AT Amstelveen
The Netherlands
Declares that the Product:
Product Name: Laser Printer
Model: L320A
Conforms to the following Directive(s) and Norm(s):
Directive 89/336/EEC:
EN 55022 Class B
EN 61000-3-2
EN 61000-3-3
EN 50082-1
IEC 801-2
IEC 801-3
IEC 801-4
Directive 73/23/EEC:
January 1999
H. Horiuchi
President of EPSON EUROPE B.V.
ii
EN 60950
Page 3
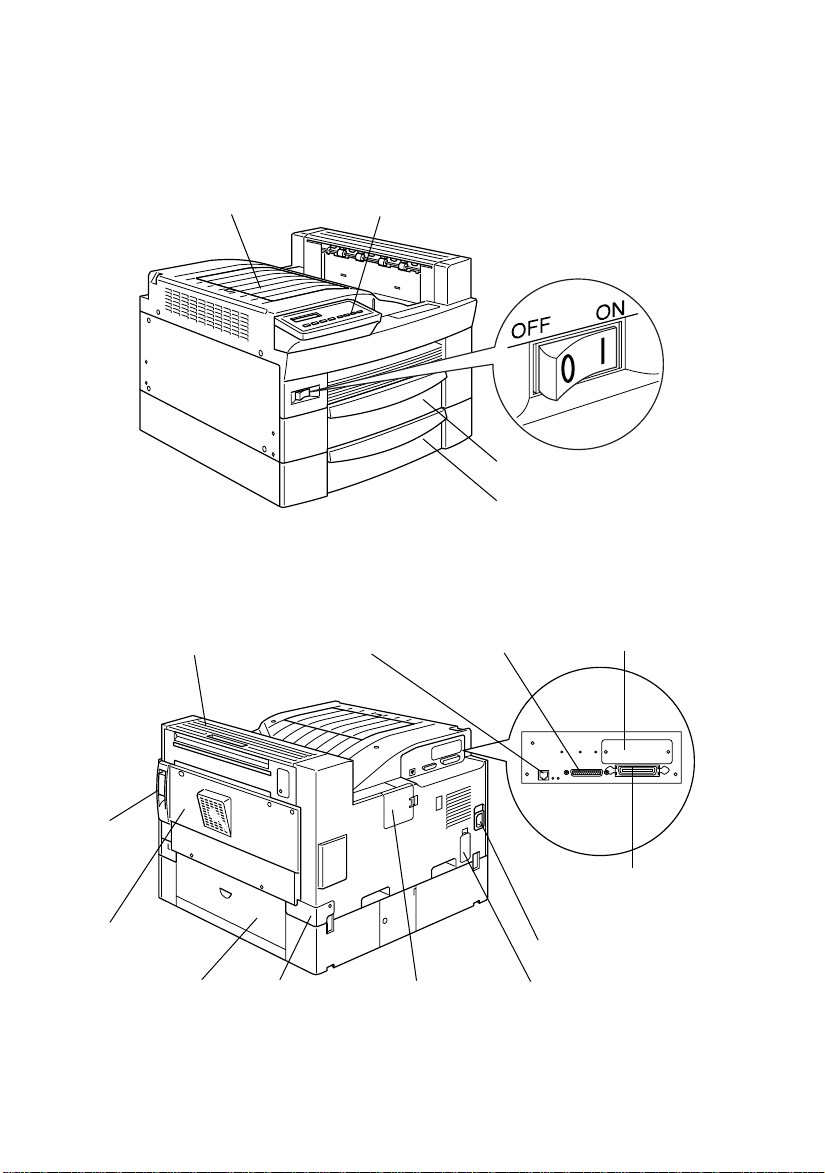
Printer Parts
face-down tray
cover B
control panel
ethernet interface
connector
power switch
MP tray
lower cassette
serial interface
connector
optional interface
slot cover
lock
lever
cover A
cover C1
duplex unit
connector
5-bin multi-purpose unit
connector
parallel interface
connector
AC inlet
10-bin multi-purpose
unit connector
Page 4

Contents
Getting Started
About This Guide. . . . . . . . . . . . . . . . . . . . . . . . . . . . . . . . . . . . . . . . 2
About Your Printer . . . . . . . . . . . . . . . . . . . . . . . . . . . . . . . . . . . . . . 3
Features. . . . . . . . . . . . . . . . . . . . . . . . . . . . . . . . . . . . . . . . . . . . 3
Options . . . . . . . . . . . . . . . . . . . . . . . . . . . . . . . . . . . . . . . . . . . . 4
Warnings, Cautions, and Notes . . . . . . . . . . . . . . . . . . . . . . . . . . . . 6
Chapter 1 Controlling the Printer
About Making Printer Settings. . . . . . . . . . . . . . . . . . . . . . . . . . . . . 1-2
Printer driver . . . . . . . . . . . . . . . . . . . . . . . . . . . . . . . . . . . . . . . 1-2
Control panel . . . . . . . . . . . . . . . . . . . . . . . . . . . . . . . . . . . . . . . 1-2
Control Panel Operation . . . . . . . . . . . . . . . . . . . . . . . . . . . . . . . . . . 1-3
LCD panel . . . . . . . . . . . . . . . . . . . . . . . . . . . . . . . . . . . . . . . . . 1-3
Indicator lights. . . . . . . . . . . . . . . . . . . . . . . . . . . . . . . . . . . . . . 1-4
Buttons . . . . . . . . . . . . . . . . . . . . . . . . . . . . . . . . . . . . . . . . . . . . 1-5
Using the OneTouch Modes. . . . . . . . . . . . . . . . . . . . . . . . . . . . . . . 1-7
OneTouch mode 1. . . . . . . . . . . . . . . . . . . . . . . . . . . . . . . . . . . 1-8
OneTouch mode 2. . . . . . . . . . . . . . . . . . . . . . . . . . . . . . . . . . . 1-9
Optimizing Print Quality . . . . . . . . . . . . . . . . . . . . . . . . . . . . . . . . . 1-10
Resolution Improvement Technology (RITech) . . . . . . . . . . 1-10
Enhanced MicroGray . . . . . . . . . . . . . . . . . . . . . . . . . . . . . . . . 1-11
Adjusting print density . . . . . . . . . . . . . . . . . . . . . . . . . . . . . . 1-11
Chapter 2 Printing with the EPL-N2700
Available Paper Types. . . . . . . . . . . . . . . . . . . . . . . . . . . . . . . . . . . . 2-2
Daily Printing Operations. . . . . . . . . . . . . . . . . . . . . . . . . . . . . . . . . 2-4
Loading paper in the MP Tray . . . . . . . . . . . . . . . . . . . . . . . . 2-4
Loading paper in the Lower Cassette. . . . . . . . . . . . . . . . . . . 2-8
Selecting the paper size . . . . . . . . . . . . . . . . . . . . . . . . . . . . . . 2-13
Special Printing Operations . . . . . . . . . . . . . . . . . . . . . . . . . . . . . . . 2-13
Contents
i
Page 5

Loading a custom paper size . . . . . . . . . . . . . . . . . . . . . . . . . . 2-13
Printing one sheet at a time . . . . . . . . . . . . . . . . . . . . . . . . . . . 2-14
Chapter 3 Handling Options
Printer Options . . . . . . . . . . . . . . . . . . . . . . . . . . . . . . . . . . . . . . . . . .3-2
500-Sheet Lower Cassette Unit . . . . . . . . . . . . . . . . . . . . . . . . . . . . . 3-3
Installing the 500-Sheet Lower Cassette Unit. . . . . . . . . . . . . 3-3
Using the 500-Sheet Lower Cassette Unit. . . . . . . . . . . . . . . . 3-8
Large Capacity Paper Unit. . . . . . . . . . . . . . . . . . . . . . . . . . . . . . . . .3-9
Installing the Large Capacity Paper Unit . . . . . . . . . . . . . . . .3-9
Using the Large Capacity Paper Unit . . . . . . . . . . . . . . . . . . . 3-13
Duplex Unit . . . . . . . . . . . . . . . . . . . . . . . . . . . . . . . . . . . . . . . . . . . . .3-15
Installing the Duplex Unit . . . . . . . . . . . . . . . . . . . . . . . . . . . .3-15
Removing the Duplex Unit. . . . . . . . . . . . . . . . . . . . . . . . . . . . 3-22
Using the Duplex Unit. . . . . . . . . . . . . . . . . . . . . . . . . . . . . . . . 3-22
5-Bin Multi-Purpose Unit. . . . . . . . . . . . . . . . . . . . . . . . . . . . . . . . . . 3-23
Installing the 5-Bin Multi-Purpose Unit . . . . . . . . . . . . . . . . . 3-23
Removing the 5-Bin Multi-Purpose Unit . . . . . . . . . . . . . . . .3-29
Using the 5-Bin Multi-Purpose Unit . . . . . . . . . . . . . . . . . . . . 3-29
10-Bin Multi-Purpose Unit. . . . . . . . . . . . . . . . . . . . . . . . . . . . . . . . . 3-32
Installing the10-Bin Multi-Purpose Unit. . . . . . . . . . . . . . . . . 3-32
Removing the 10-Bin Multi-Purpose Unit . . . . . . . . . . . . . . .3-38
Using the 10-Bin Multi-Purpose Unit . . . . . . . . . . . . . . . . . . . 3-39
Memory Modules . . . . . . . . . . . . . . . . . . . . . . . . . . . . . . . . . . . . . . . . 3-41
Installing memory modules . . . . . . . . . . . . . . . . . . . . . . . . . . . 3-41
Removing a memory module. . . . . . . . . . . . . . . . . . . . . . . . . .3-46
Adobe PostScript3 ROM Module . . . . . . . . . . . . . . . . . . . . . . . . . . . 3-48
Optional Interfaces . . . . . . . . . . . . . . . . . . . . . . . . . . . . . . . . . . . . . . . 3-50
Chapter 4 Handling the Imaging Cartridge
Replacing the Imaging Cartridge . . . . . . . . . . . . . . . . . . . . . . . . . . . 4-2
ii
Contents
Page 6

Chapter 5 SelecType Settings
Using SelecType . . . . . . . . . . . . . . . . . . . . . . . . . . . . . . . . . . . . . . . . . 5-2
When to use SelecType. . . . . . . . . . . . . . . . . . . . . . . . . . . . . . . 5-2
How to make the settings. . . . . . . . . . . . . . . . . . . . . . . . . . . . . 5-3
SelecType menu table. . . . . . . . . . . . . . . . . . . . . . . . . . . . . . . . 5-4
SelecType Settings . . . . . . . . . . . . . . . . . . . . . . . . . . . . . . . . . . . . . . . 5-6
Test Menu. . . . . . . . . . . . . . . . . . . . . . . . . . . . . . . . . . . . . . . . . . 5-6
Emulation Menu . . . . . . . . . . . . . . . . . . . . . . . . . . . . . . . . . . . . 5-7
Printing Menu . . . . . . . . . . . . . . . . . . . . . . . . . . . . . . . . . . . . . . 5-7
Tray Menu . . . . . . . . . . . . . . . . . . . . . . . . . . . . . . . . . . . . . . . . . 5-11
Config Menu . . . . . . . . . . . . . . . . . . . . . . . . . . . . . . . . . . . . . . . 5-13
Setup Menu . . . . . . . . . . . . . . . . . . . . . . . . . . . . . . . . . . . . . . . . 5-17
Parallel Menu. . . . . . . . . . . . . . . . . . . . . . . . . . . . . . . . . . . . . . . 5-19
Serial Menu . . . . . . . . . . . . . . . . . . . . . . . . . . . . . . . . . . . . . . . . 5-20
Network Menu . . . . . . . . . . . . . . . . . . . . . . . . . . . . . . . . . . . . . 5-22
AUX Menu . . . . . . . . . . . . . . . . . . . . . . . . . . . . . . . . . . . . . . . . . 5-23
LJ4 Menu . . . . . . . . . . . . . . . . . . . . . . . . . . . . . . . . . . . . . . . . . . 5-24
GL2 menu. . . . . . . . . . . . . . . . . . . . . . . . . . . . . . . . . . . . . . . . . . 5-26
PS3 menu . . . . . . . . . . . . . . . . . . . . . . . . . . . . . . . . . . . . . . . . . . 5-28
ESCP2 menu. . . . . . . . . . . . . . . . . . . . . . . . . . . . . . . . . . . . . . . . 5-29
FX Menu . . . . . . . . . . . . . . . . . . . . . . . . . . . . . . . . . . . . . . . . . . . 5-32
I239X menu . . . . . . . . . . . . . . . . . . . . . . . . . . . . . . . . . . . . . . . . 5-35
Chapter 6 Troubleshooting
Introduction . . . . . . . . . . . . . . . . . . . . . . . . . . . . . . . . . . . . . . . . . . . . 6-2
Printer Problems. . . . . . . . . . . . . . . . . . . . . . . . . . . . . . . . . . . . . . . . . 6-2
Preventing paper feed and paper jam problems. . . . . . . . . . 6-2
Clearing paper jams . . . . . . . . . . . . . . . . . . . . . . . . . . . . . . . . . 6-3
Solving printer operation problems . . . . . . . . . . . . . . . . . . . . 6-12
Solving print quality problems . . . . . . . . . . . . . . . . . . . . . . . . 6-14
Solving printer option problems. . . . . . . . . . . . . . . . . . . . . . . 6-18
Status and Error Messages . . . . . . . . . . . . . . . . . . . . . . . . . . . . . . . . 6-19
Hex Dump Mode . . . . . . . . . . . . . . . . . . . . . . . . . . . . . . . . . . . . . . . . 6-29
Resetting the Printer . . . . . . . . . . . . . . . . . . . . . . . . . . . . . . . . . . . . . 6-29
Where to Get Help . . . . . . . . . . . . . . . . . . . . . . . . . . . . . . . . . . . . . . . 6-30
Contents
iii
Page 7

Chapter 7 Maintenance and Transportation
Cleaning the Printer . . . . . . . . . . . . . . . . . . . . . . . . . . . . . . . . . . . . . . 7-2
Cleaning inside the printer. . . . . . . . . . . . . . . . . . . . . . . . . . . . 7-2
Cleaning the printer case . . . . . . . . . . . . . . . . . . . . . . . . . . . . . 7-3
Transporting the Printer. . . . . . . . . . . . . . . . . . . . . . . . . . . . . . . . . . . 7-4
Appendix A Technical Specifications
Paper Specifications . . . . . . . . . . . . . . . . . . . . . . . . . . . . . . . . . . . . . . A-2
Printer. . . . . . . . . . . . . . . . . . . . . . . . . . . . . . . . . . . . . . . . . . . . . . . . . . A-4
General . . . . . . . . . . . . . . . . . . . . . . . . . . . . . . . . . . . . . . . . . . . . A-4
Environmental . . . . . . . . . . . . . . . . . . . . . . . . . . . . . . . . . . . . . . A-5
Mechanical . . . . . . . . . . . . . . . . . . . . . . . . . . . . . . . . . . . . . . . . . A-5
Electrical . . . . . . . . . . . . . . . . . . . . . . . . . . . . . . . . . . . . . . . . . . . A-6
Interface . . . . . . . . . . . . . . . . . . . . . . . . . . . . . . . . . . . . . . . . . . . . . . . . A-6
Parallel interface. . . . . . . . . . . . . . . . . . . . . . . . . . . . . . . . . . . . . A-6
Ethernet Interface. . . . . . . . . . . . . . . . . . . . . . . . . . . . . . . . . . . . A-13
Options and Consumables. . . . . . . . . . . . . . . . . . . . . . . . . . . . . . . . . A-14
500-Sheet Lower Cassette Unit. . . . . . . . . . . . . . . . . . . . . . . . . A-14
Large Capacity Paper Unit . . . . . . . . . . . . . . . . . . . . . . . . . . . .A-15
Duplex Unit. . . . . . . . . . . . . . . . . . . . . . . . . . . . . . . . . . . . . . . . .A-15
5-Bin Multi-Purpose Unit . . . . . . . . . . . . . . . . . . . . . . . . . . . . . A-16
10-Bin Multi-Purpose Unit . . . . . . . . . . . . . . . . . . . . . . . . . . . . A-17
Imaging Cartridge . . . . . . . . . . . . . . . . . . . . . . . . . . . . . . . . . . . A-18
Appendix B Symbol Sets
Introduction to Symbol Sets . . . . . . . . . . . . . . . . . . . . . . . . . . . . . . . B-2
In LJ4 Emulation/EPSON GL2 Mode . . . . . . . . . . . . . . . . . . . . . . .B-3
International Set for ISO . . . . . . . . . . . . . . . . . . . . . . . . . . . . . . B-21
In ESC/P 2 or FX Modes . . . . . . . . . . . . . . . . . . . . . . . . . . . . . . . . . . B-22
International character sets. . . . . . . . . . . . . . . . . . . . . . . . . . . . B-27
Characters available with the ESC (^ command . . . . . . . . . .B-28
In I239X Emulation Mode . . . . . . . . . . . . . . . . . . . . . . . . . . . . . . . . . B-28
iv
Contents
Page 8

Appendix C Command Summary
Introduction . . . . . . . . . . . . . . . . . . . . . . . . . . . . . . . . . . . . . . . . . . . . C-2
LaserJet 4 (LJ4) Emulation Commands. . . . . . . . . . . . . . . . . . . . . . C-3
GL/2 context commands . . . . . . . . . . . . . . . . . . . . . . . . . . . . . C-8
ESC/P 2 and FX Commands . . . . . . . . . . . . . . . . . . . . . . . . . . . . . . C-12
ESC/P 2 mode . . . . . . . . . . . . . . . . . . . . . . . . . . . . . . . . . . . . . . C-12
FX mode . . . . . . . . . . . . . . . . . . . . . . . . . . . . . . . . . . . . . . . . . . . C-16
PJL Commands. . . . . . . . . . . . . . . . . . . . . . . . . . . . . . . . . . . . . . . . . . C-20
I239X Emulation Commands . . . . . . . . . . . . . . . . . . . . . . . . . . . . . . C-21
Page format . . . . . . . . . . . . . . . . . . . . . . . . . . . . . . . . . . . . . . . . C-21
Text . . . . . . . . . . . . . . . . . . . . . . . . . . . . . . . . . . . . . . . . . . . . . . . C-23
Auxiliary functions . . . . . . . . . . . . . . . . . . . . . . . . . . . . . . . . . . C-25
AGM mode. . . . . . . . . . . . . . . . . . . . . . . . . . . . . . . . . . . . . . . . . C-25
Appendix D Working with Fonts
Adding and Selecting Fonts . . . . . . . . . . . . . . . . . . . . . . . . . . . . . . . D-2
Adding more fonts . . . . . . . . . . . . . . . . . . . . . . . . . . . . . . . . . . D-2
Selecting fonts . . . . . . . . . . . . . . . . . . . . . . . . . . . . . . . . . . . . . . D-3
Printer and Screen Fonts . . . . . . . . . . . . . . . . . . . . . . . . . . . . . . . . . . D-3
Available Fonts. . . . . . . . . . . . . . . . . . . . . . . . . . . . . . . . . . . . . . . . . . D-4
EPSON BarCode Fonts . . . . . . . . . . . . . . . . . . . . . . . . . . . . . . . . . . . D-6
System requirements . . . . . . . . . . . . . . . . . . . . . . . . . . . . . . . . D-8
Installing EPSON BarCode Fonts . . . . . . . . . . . . . . . . . . . . . . D-8
Printing with EPSON BarCode Fonts. . . . . . . . . . . . . . . . . . . D-10
BarCode Font specifications. . . . . . . . . . . . . . . . . . . . . . . . . . . D-13
Glossary
Index
Contents
v
Page 9

Getting started
The EPSON EPL-N2700 printer combines high performanc e and
reliability with a wide range of features.
To get started with your laser printer, please:
❏ Read the laser printer precautions and important safety
instructions in the Hardware & Software Setup guide.
❏ Use your Hardware & Software Setup guide to set up and test
your new printer.
❏ Have your network administrator refer to the Administrator’s
Guide to make network settings. See also the included
instructions on installing printer software.
See this Reference Guide for detailed information about your
printer.
Getting started
1
Page 10

About This Guide
This guide contains the following information.
Chapter 1, “Controlling your printer,” explains the printer’s
control panel, how to use the OneTouch Modes, and how to
optimize the print quality.
Chapter 2, “Printing with the EPL-N2700,” contains in formatio n
on main printing operation. Also consult this chapter when you
need information about printing on special media.
Chapter 3, “Handling Options,” gives step-by-step instructions
for installing and using printer options.
Chapter 4, “Handling the Imaging Cartridge,” tells you when and
how to replace the imaging cartridge.
Chapter 5, “SelecType Settings,” describes the settings you can
make using SelecType on the control panel. Read this chapter if
you cannot modify a printer setting from your software.
Chapter 6, “Troubleshooting,” gives helpful information for what
to do if you encounter a printer error.
Chapter 7, “Maintenance and Transportation,” provides
instructions on how to clean and transport your printer.
Appendix A, “Technical Specifications,” contains technical
information about your printer and options.
Appendix B, “Symbol Sets,” lists the symbol sets available in each
emulation mode with tables of the characters for each set.
Appendix C, “Command Summary,” lists the commands that can
be embedded in print jobs to control the printer. This appendix is
intended for advanced users only.
2
Getting started
Page 11

Appendix D, “Working with Fonts,” describes the steps you need
to follow to add more fonts. It also lists the available fonts with
samples.
About Your Printer
Your printer is the latest in EPSON’s advanced line of network
laser printers. It emulates the Hewlett-Packard
®
LaserJet 4™ (LJ4)
printer, allowing you to print using the wide variety of software
programs that support HP LaserJet printers.
The printer’s 600-dpi (dots per inch) resolution is enhanced by
EPSON’s Resolution Improvement Technology (RITech), which
smooths the jagged edges of diagonal lines in both text and
graphics. This gives your documents a clean, crisp look that
contributes to a professional appearance.
In addition, EPSON’s Enhance MicroGray technology provides
you with better halftoning when printing graphics.
This printer is intended to be used in network environments.
Network administrators should refer to the included
Administrator’s Guide when setting up the printer for use on a
network. After the printer is set up on the network, install the
printer software on your computer as instructed by your
administrator.
The printer supports ECP mode in Microsoft
Windows
®
98. ECP mode is useful for high-speed data transfer
®
Windows® 95 and
and bidirectional communication with your computer.
Features
The printer comes with a full set of features that contributes to
ease of use and consistent, high-quality output. The main features
are described below.
Getting started
3
Page 12

High-quality printing
Your printer provides 600-dpi printi ng at a speed of up to 27 pages
per minute. You’ll appreciate the professional print quality
produced by your printer and its quick processing speed.
Wide variety of fonts
The printer comes with a full selection of scalable TrueType
fonts, LaserJet-compatible scalable fonts, and one bitmap font in
LJ4 emulation mode.
Toner Save mode
You can reduce the amount of toner used when printing rough
drafts by using the Toner Save mode.
Options
Following options are available for use with the EPL-N2700.
Memory
You can add memory modules (DIMMs) to expand the printer’s
standard 16 MB memory up to 256 MB. See “Memory Modules”
on page 3-41 for details.
®
Interfaces
In addition to your printer’s built-in bidirectional parallel
interface, serial interface, and Ethernet interface, you can install
one of a variety of optional interfaces. See “Optional Interfaces”
on page 3-50 for details.
ROM module
The optional Adobe® PostScript® 3™ Kit (C83233✽) ROM module
generates crisp PostScript output. See “Adobe PostScript3 ROM
Module” on page 3-48 for details.
4
Getting started
Page 13

Paper sources
A variety of optional paper sources are available to increase the
paper loading capacity and to print on both sides of the paper.
500-Sheet Lower Cassette Unit
You can load up to 500 sheets in the 500-Sheet Lower Cassette
Unit (C813191). The cassette can handle the following paper sizes:
A4, Letter, Government Letter, A3, Legal, Ledger, B4
You can install up to three Lower Cassettes, or one Lower Cassette
plus the optional Large Capacity Paper Unit. To use this option,
see “500-Sheet Lower Cassette Unit” on page 3-3.
Large Capacity Paper Unit
The Large Capacity Paper Unit (C813221) allows you to load up
to 2500 sheets of A-4 size paper. To use this option, see “Large
Capacity Paper Unit” on page 3-9.
Duplex Unit
The Duplex Unit (C813181) allows you to print on both sides of
the paper.
The Duplex Unit can handle these paper sizes:
A3, A4, A5, B4, B5, Ledger, Legal, G-Legal, Letter, G-Letter,
Executive, H-Letter
To use this option, see “Duplex Unit” on page 3-15.
Output trays
The following multiple-bin units can be used as sorters, mail
boxes, or large-capacity stackers. When you use these units, you
cannot use the standard Face-down Tray.
Getting started
5
Page 14

5-Bin Multi-Purpose Unit
The 5-Bin Multi-Purpose Unit (C813201) acco mmodates up to 500
printed sheets in total. To use this option, see “5-Bin MultiPurpose Unit” on page 3-23.
10-Bin Multi-Purpose Unit
The 10-Bin Multi-Purpose Unit (C813211) accommodates up to
2000 printed sheets in total. To use this unit, you need to purchase
a 500-Sheet Lower Cassette Unit and a Large Capacity Paper Unit.
To use this option, see “10-Bin Multi-Purpose Unit” on p age 3-32.
Warnings, Cautions, and Notes
Warnings
must be followed carefully to avoid bodily injury.
w
Cautions
must be observed to avoid damage to your equipment.
c
Notes
contain important information and useful tips on the operation
of your printer.
6
Getting started
Page 15

Chapter 1
About Making Printer Settings . . . . . . . . . . . . . . . . . . . . . . . . . . . . 1-2
Controlling the Printer
Printer driver . . . . . . . . . . . . . . . . . . . . . . . . . . . . . . . . . . . . . . . 1-2
Control panel. . . . . . . . . . . . . . . . . . . . . . . . . . . . . . . . . . . . . . . 1-2
Control Panel Operation. . . . . . . . . . . . . . . . . . . . . . . . . . . . . . . . . . 1-3
LCD panel . . . . . . . . . . . . . . . . . . . . . . . . . . . . . . . . . . . . . . . . . 1-3
Indicator lights . . . . . . . . . . . . . . . . . . . . . . . . . . . . . . . . . . . . . 1-4
Buttons . . . . . . . . . . . . . . . . . . . . . . . . . . . . . . . . . . . . . . . . . . . . 1-5
Using the OneTouch Modes. . . . . . . . . . . . . . . . . . . . . . . . . . . . . . . 1-7
OneTouch mode 1. . . . . . . . . . . . . . . . . . . . . . . . . . . . . . . . . . . 1-8
OneTouch mode 2. . . . . . . . . . . . . . . . . . . . . . . . . . . . . . . . . . . 1-9
Optimizing Print Quality . . . . . . . . . . . . . . . . . . . . . . . . . . . . . . . . . 1-10
Resolution Improvement Technology (RITech) . . . . . . . . . . 1-10
Enhanced MicroGray . . . . . . . . . . . . . . . . . . . . . . . . . . . . . . . . 1-11
Adjusting print density . . . . . . . . . . . . . . . . . . . . . . . . . . . . . . 1-11
Controlling the Printer
1-1
Page 16

About Making Printer Settings
You can control the operation of your printer from your computer
by using the printer driver software packaged with your printer,
or from the printer’s control panel by using the OneTouch modes
and SelecType menus. You should use your printer driver to
make printer settings whenever you can, since settings made in
the printer driver override similar settings you make from the
control panel.
Printer driver
Use the printer driver to make every day printer settings easily
and conveniently. You can access the printer driver through an
application’s Print command, or from Windows by choosing the
Printers folder or program group. Be aware that settings you
make in your application software override printer driver
settings. See the printer driver's online help for more information.
Install the printer software in your computer as instructed by your
network administrator. An Administrator’s Guide is included in
this printer package to guide your network administrator when
setting up the printer for use on a network.
Control panel
Use the control panel’s OneTouch modes or SelecType menus to
make printer settings when you cannot make a setting in your
application software or printer driver.
The OneTouch modes are the easiest way to make several basic
settings from the printer’s control panel. See Chapter 1, “Using
the OneTouch Modes” for more information.
The SelecType menus have more detailed options than the
OneTouch modes, but it may take a few extra steps to make those
settings. See Chapter 5, “SelecType Settings” for more
information.
1-2
Controlling the Printer
Page 17
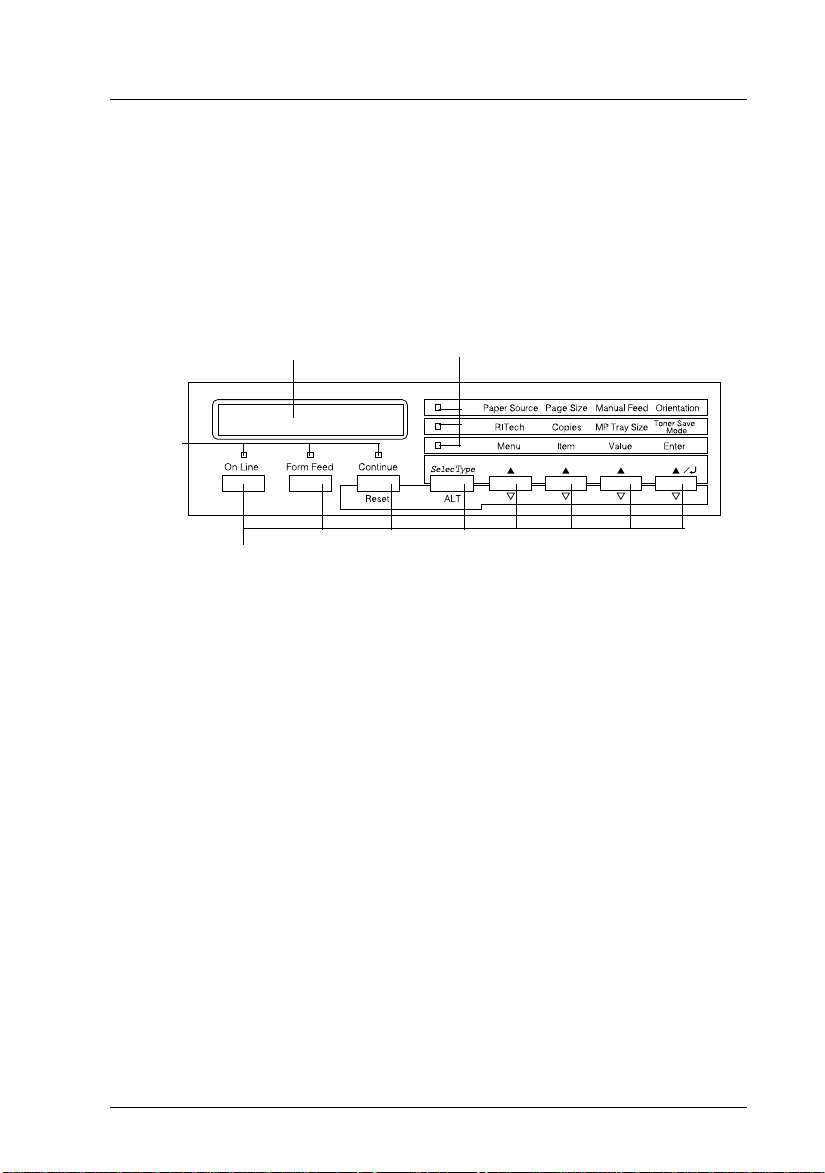
Control Panel Operation
The control panel is made up of three elements: a liquid crystal
display (LCD) panel, indicator lights, and buttons. The LCD panel
and indicator lights tell you the current status of the printer, and
you can use the printer buttons to select settings and functions.
However, settings made in software applications and the printer
driver usually override these settings.
LCD panel indicator lights
indicator
lights
buttons
LCD panel
The LCD panel shows the following:
❏ Status messages, such as
Warming Up
, indicating the printer’s
current status.
❏ Error messages, such as
Paper Out
, identifying maintenance
procedures you must perform or error conditions you need
to correct.
❏ SelecType menus, such as
Emulation
, allowing you to control
printer modes, font selection, paper handling, and many
other printer functions.
For information on problem-solving and routine maintenance,
see “Printer Problems” on page 6-2 and Chapter 7, “Maintenance
and Transportation”. For more information on SelecType, see
Chapter 5, “SelecType Settings”.
Controlling the Printer
1-3
Page 18

Indicator lights
4
1
2
36
5
1 On Line On when the printer is on line,
indicating the printer can receive and
print data. When the printer is off line,
this light is off. The light flashes as the
system switches between on-line and
off-line status.
2 Form Feed On when data is received and stored
in the printer buffer (printer memory
reserved for receiving data), but not
yet printed. Flashing indicates the
printer is processing data. When no
data remains in the printer buffer, this
light turns off.
3 Continue Flashes when an error is detected or
a maintenance procedure must be
performed. Check the LCD panel for
error or maintenance messages when
this light is flashing.
4 OneTouch mode 1 On when the printer is in OneTouch
mode 1. For details, see “Using the
OneTouch Modes” on page 1-7.
1-4
Controlling the Printer
Page 19
5 OneTouch mode 2 On when the printer is in OneTouch
mode 2. For details, see “Using the
OneTouch Modes” on page 1-7.
6 SelecType On when the printer is in SelecType
mode. For more information on the
SelecType mode, see Chapter 5,
“SelecType Settings”.
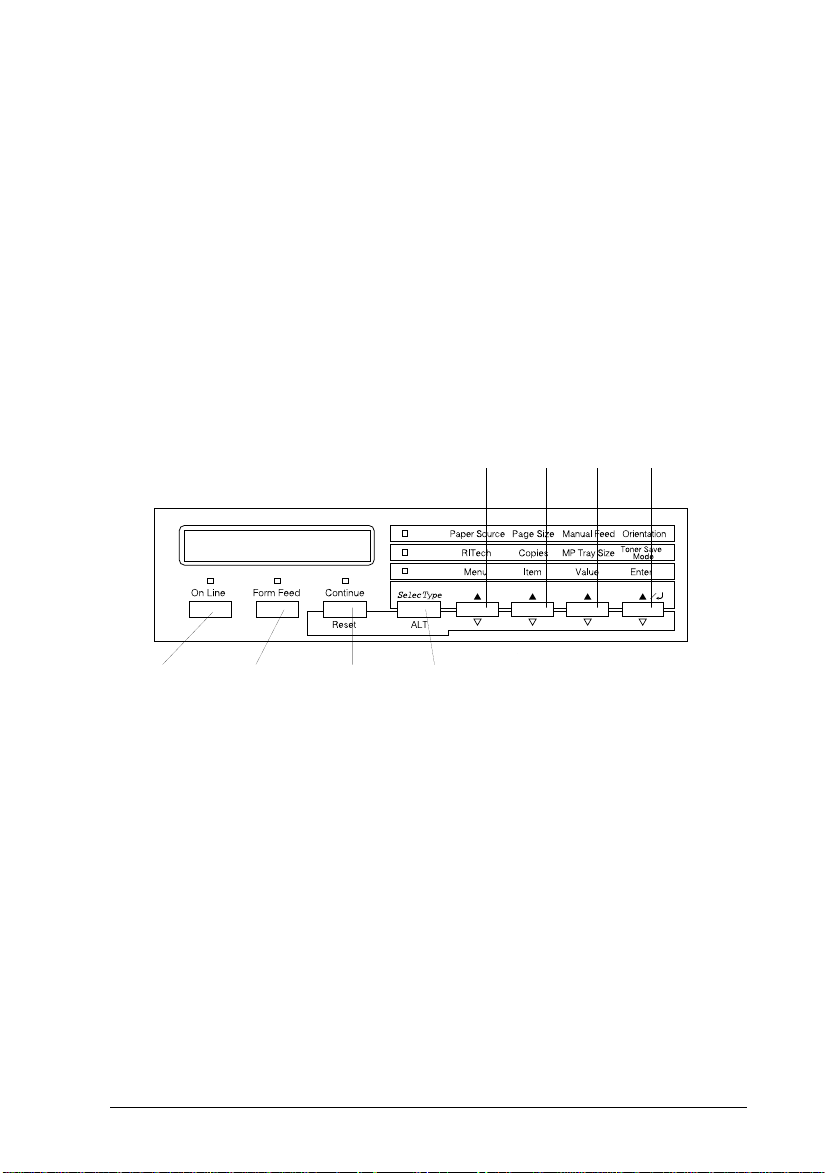
Buttons
This section explains how to use the control panel buttons.
5
678
1 4
23
1 On Line Switches the printer between on-line
and off-line status.
2 Form Feed When the printer is off line and data
remains in the printer’s memory (Form
Feed light is on), prints out the data
and clears the buffer.
Controlling the Printer
1-5
Page 20

3 Continue
(Reset)
Enables the printer to resume printing
after certain maintenance-required
conditions or errors have been
cleared. If the Continue light is
flashing, read the status or error
message on the LCD panel and
correct the problem as described in
“Status and Error Messages” on page
6-19. If used in combination with the
ALT button, the printer is reset.
4 SelecType
(ALT)
Selects a OneTouch mode or
SelecType mode. Press this button
once to enter OneTouch mode 1.
Press this button again to enter
OneTouch mode 2. Press this button
once more to enter SelecType mode.
Pressing this button while in
SelecType mode returns the printer to
on-line status. See Chapter 5,
“SelecType Settings” for more
information.
5 Menu Selects the corresponding OneTouch
mode setting listed above this button
if in OneTouch mode 1 or 2, or selects
the SelecType menu if in SelecType
mode. Press this button when the
printer is on line to enter SelecType
mode.
6 Item Selects the corresponding OneTouch
mode setting listed above this button
if in OneTouch mode 1 or 2, or selects
the function available within the
current menu after entering the
SelecType mode.
1-6
Controlling the Printer
Page 21

7 Value Selects the corresponding OneTouch
mode option listed above this button if
in OneTouch mode 1 or 2, or selects
the value available for the current
item, after entering the SelecType
mode menu.
8 Enter
(Status Sheet)
ALT + Menu, Item,
Value, or Enter
Selects the corresponding OneTouch
mode option listed above this button if
in OneTouch mode 1 or 2, or activates
the setting currently shown on the
LCD panel when in SelecType mode.
Press this button two times when the
printer is on line to print the status
sheet.
Advances the setting shown to the
next value in each group. If used in
combination with the ALT button in
SelecType mode, it returns the shown
parameter or setting to its previous
value.
Using the OneTouch Modes
The OneTouch modes allow you to make the most common
printer settings from the control panel when printing from an
application or operating system that does not support your
printer driver. Be sure to use the printer driver to make these
settings whenever you can, since settings made in the software
always override OneTouch mode settings.
Controlling the Printer
1-7
Page 22
To make OneTouch settings, access one of the modes as described
below and press the button located under the setting you want to
change to cycle forward through the available options. You can
also cycle backward through available options by holding down
ALT (SelecType) while pressing the button under the setting you
want to change.
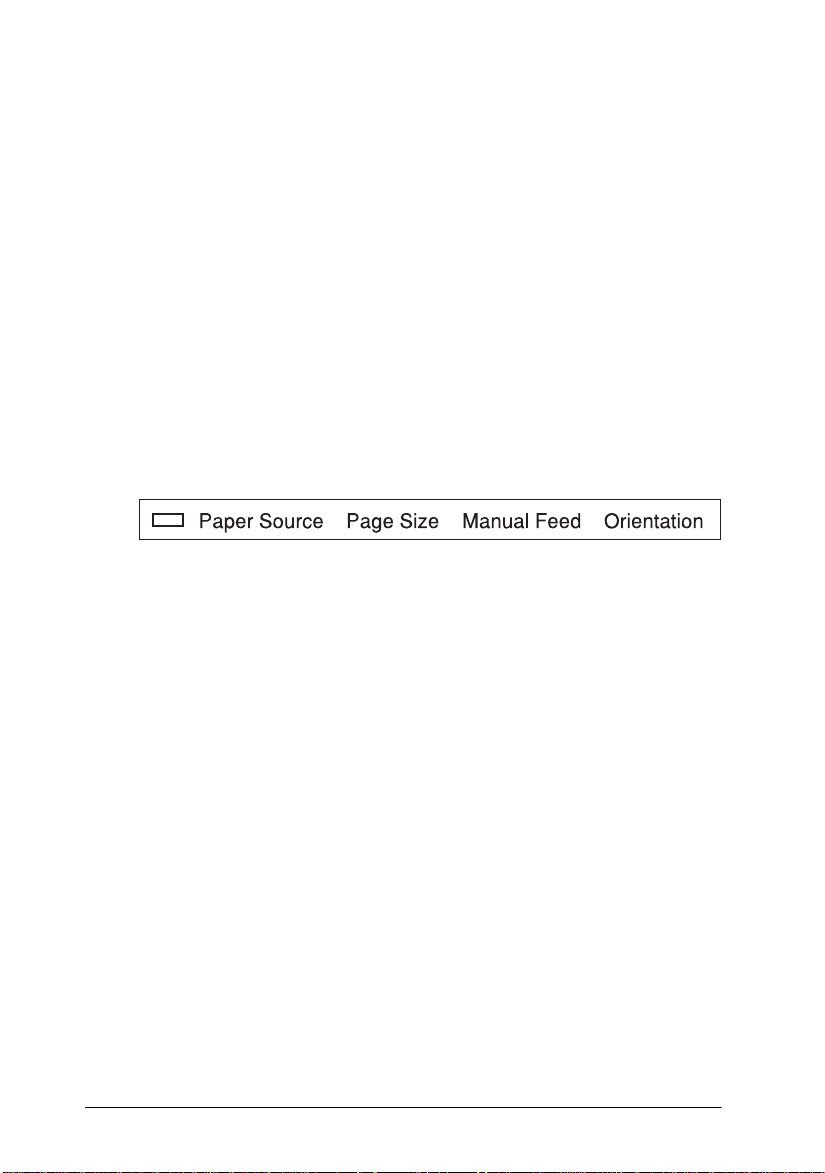
OneTouch mode 1
To enter OneTouch mode 1, press the SelecType button
(repeatedly if necessary) until the light next to Paper Source
comes on. The current OneTouch mode 1 settings for Paper
Source, Page Size, Manual Feed, and Orientation are shown on
the LCD panel in this order.
Paper Source
Specifies whether paper feeds into the printer from the MP Tray
or from a standard or optional Lower Cassette. If you select
the paper source containing the paper that matches the setting in
the Page Size menu will be used.
Auto
,
Page Size
Specifies the image size.
Manual Feed
Turns Manual Feed on or off. For details on the Manual Feed
mode, see “Printing one sheet at a time” on page 2-14.
Orientation
Specifies whether the page is printed in portrait or landscape
orientation.
1-8
Controlling the Printer
Page 23

OneTouch mode 2
To enter OneTouch mode 2, press the SelecType button
(repeatedly if necessary) until the indicator light next to RITech
comes on. The current OneTouch mode 2 settings for RITech,
Copies, MP Tray Size, and Toner Save Mode are shown on the
LCD panel in this order.
RITech
Turns the RITech setting on or off. RITech produces smoother and
crisper lines, text and graphics.
Copies
Specifies the number of copies to be printed, up to 999.
MP Tray Size
Allows you to specify the paper size for the MP Tray.
Toner Save Mode
Turns the Toner Save Mode on or off. When turned on, the printer
saves toner by substituting a gray shade for the black inside
characters. The characters are outlined in full black on the right
and lower edges.
Controlling the Printer
1-9
Page 24

Optimizing Print Quality
Your printer provides you with a number of ways to print your
documents to achieve the highest possible quality. The two
features discussed here are EPSON’s Resolution Improvement
Technology (RITech) and Enhanced MicroGray (Enh. MG). You
can also improve your printing quality by adjusting the print
density.
Resolution Improvement Technology (RITech)
Resolution Improvement Technology (RITech) is EPSON’s
original printer technology that improves the appearance of
printed lines, text and graphics.
Your printer comes with RITech turned on, since this setting
produces the best quality text and graphics for nearly all
purposes. However, if you are printing a lot of gray shading or
screen patterns, turn RITech off in the printer driver by clearing
the RITech check box, located on the Panel menu.
If you are printing from an application or operating system that
does not support your printer driver, you can also change this
setting from the printer’s control panel using OneTouch mode 2.
For details, see “OneTouch mode 2” on page 1-9.
1-10
Controlling the Printer
Page 25
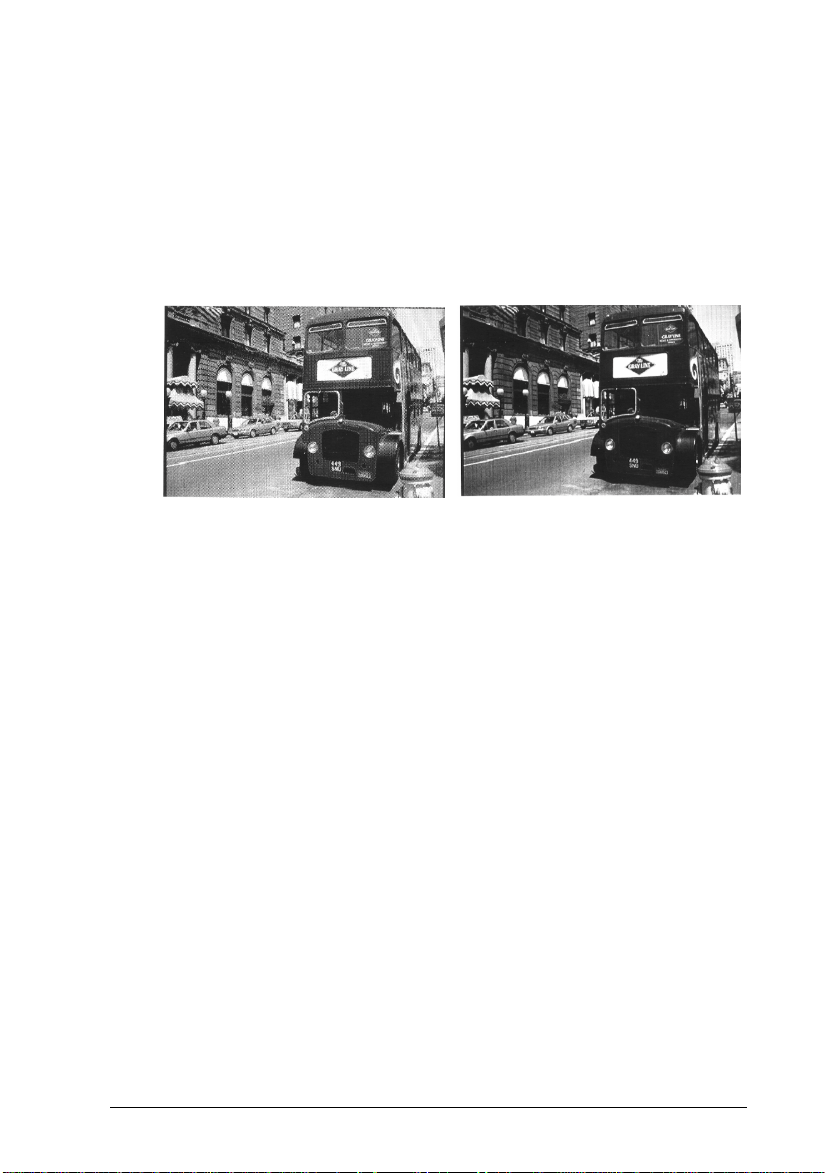
Enhanced MicroGray
Enhanced MicroGray (Enh. MG) is EPSON’s new printer
technology created especially for high quality outpu t of photos
and other detailed images.
Enh. MG off Enh. MG on
To use the Enhanced MicroGray function, select Enh. MG on the
printer driver’s Graphics menu.
Adjusting print density
Changing the print density affects all text and graphics; avoid
making unnecessary changes. When making changes, check the
new settings by printing several pages with various kinds of text
and graphics.
If your printouts are too light or too dark, change the Density
setting on the printer driver’s Panel menu.
If you are printing from an application or operating system that
does not support your printer driver, you can change this setting
from the printer’s control panel using SelecType. For details, see
Chapter 5, “SelecType Settings”.
Note:
Increasing the print density increases toner consumption. If you select
darker printing, you may need to replace the toner cartridge more often.
Controlling the Printer
1-11
Page 26

Chapter 2
Available Paper Types. . . . . . . . . . . . . . . . . . . . . . . . . . . . . . . . . . . . 2-2
Printing with the EPL-N2700
Daily Printing Operations. . . . . . . . . . . . . . . . . . . . . . . . . . . . . . . . . 2-4
Loading paper in the MP Tray . . . . . . . . . . . . . . . . . . . . . . . . 2-4
Loading paper in the Lower Cassette . . . . . . . . . . . . . . . . . . 2-8
Selecting the paper size . . . . . . . . . . . . . . . . . . . . . . . . . . . . . . 2-13
Special Printing Operations . . . . . . . . . . . . . . . . . . . . . . . . . . . . . . . 2-13
Loading a custom paper size. . . . . . . . . . . . . . . . . . . . . . . . . . 2-13
Printing one sheet at a time . . . . . . . . . . . . . . . . . . . . . . . . . . . 2-14
Printing with the EPL-N2700
2-1
Page 27

Available Paper Types
You can use many kinds of media including labels, envelopes,
and overhead projector transparencies. The type of paper you use
in your printer can affect the quality of your printed output. The
smoother the paper you use, the smoother and sharper your
printing looks.
For best results, store paper in its original wrapper. Your printout
can be marred by moisture absorbed in the paper. Do not store
paper in a humid or damp environment.
Note:
Since the quality of any particular brand or type of paper may be changed
by the manufacturer at any time, EPSON cannot guarantee the quality
of any type of paper. Always test samples of paper stock before purchasing
large quantities or printing large jobs.
Labels
Use only labels designed for laser printers or plain-paper copiers.
Use the MP Tray to print on these materials.
To prevent the adhesive from coming in contact with printer
parts, always use labels that completely cover the backing sheet
so that no gaps occur between the individual labels.
Test the label sheet for leaking adhesive by pressing a sheet of
paper on top of a sheet of labels. If the paper sticks to the label
sheet when you lift it off, do not use the labels.
2-2
Printing with the EPL-N2700
Page 28

Envelopes
Use the MP Tray to print on envelopes. The available envelope
sizes are as follows:
Monarch (3 7/8 × 7 1/2 inches)
Commercial 10 (4 1/8 × 9 1/2 inches)
DL (110 mm × 220 mm)
C5 (162 mm × 229 mm)
International B5 (176 mm × 250 mm)
Printing quality on envelopes may be irregular because different
parts of an envelope have different thicknesses. If the printing is
too light, adjust the print density using the printer driver or the
printer’s control panel.
Note:
Because thickness and surface characteristics are especially important
for envelopes, test a sample for print quality and proper feeding before
you buy a large number of envelopes.
Colored paper
You can use colored paper as long as it meets the weight limits
shown in the paper specifications. Do not, however, use coated
paper (paper to which a clear or colored coating has been added).
Transparencies
You can use overhead projector transparencies and adhesive
drafting film if they are made for use with plain-paper copiers or
laser printers. Use the MP Tray to load these materials.
Printing with the EPL-N2700
2-3
Page 29
Daily Printing Operations
This section tells you how to print on standard paper sizes using
the standard paper sources and output tray.
For information on using optional paper sources and output trays,
see Chapter 3, “Handling Options”. To print on a custom paper
size or to print out one page at a time, see “Special Printing
Operations” on page 2-13.
Loading paper in the MP Tray
The MP Tray can accommodate various types and sizes of paper
and envelopes. The MP Tray handles 250 sheets, allowing you to
load a total of 750 sheets when used in combination with the
Lower Cassette.
You can load the following paper sizes. The loading orientation
differs depending on the paper size, as explained below:
Loading Orientation Paper Size
Vertical A4, A5, Executive, Letter, B5, G-Letter, HTL
Horizontal A3, Ledger, Legal, B4, F4, G-Legal
To confirm paper sizes, see “Paper Specifications” on page A-2.
Note:
When you load Executive, G-letter, HTL, Ledger, B4, G-Legal, a nd other
custom paper sizes, select the paper size in the printer driver, then set
the paper size for the MP Tray using the S elecType Tray menu. For
instructions, see “Tray Menu” on page 5-1 1.
To load paper in the MP Tray, follow the steps below.
2-4
Printing with the EPL-N2700
Page 30
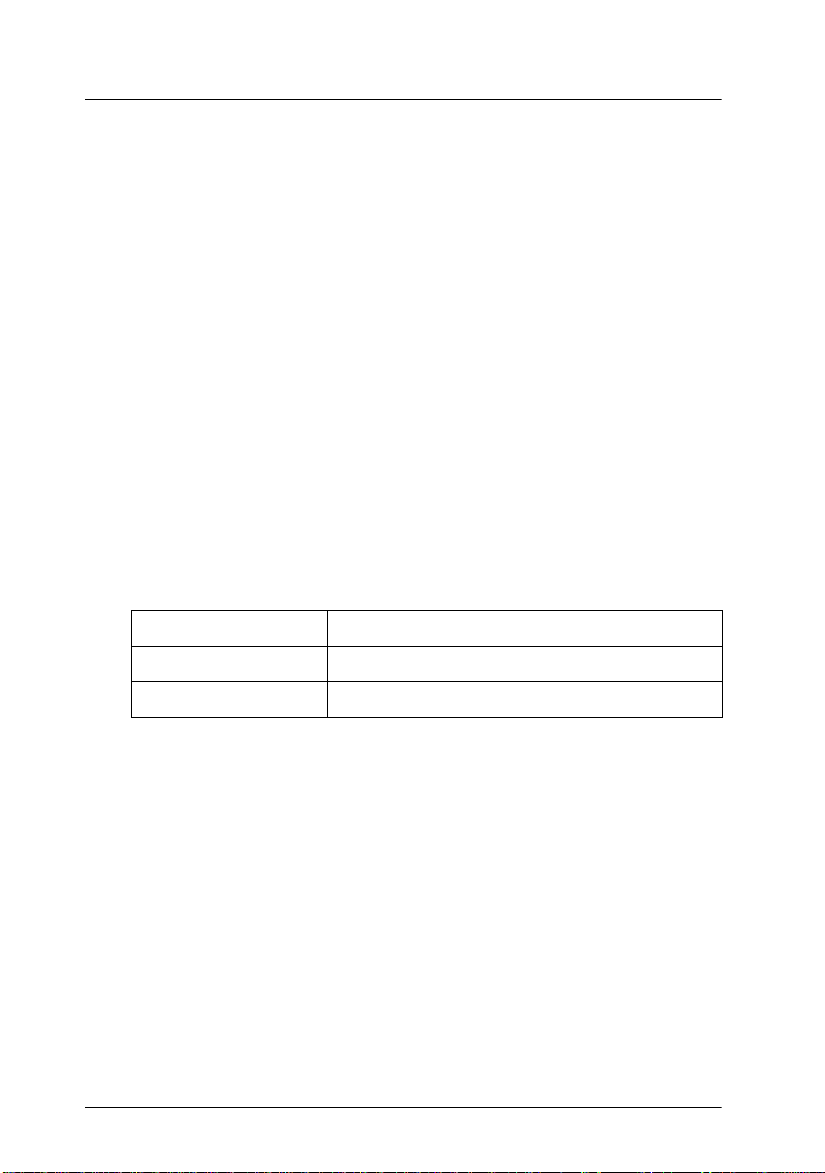
1. Pull out the paper cassette.
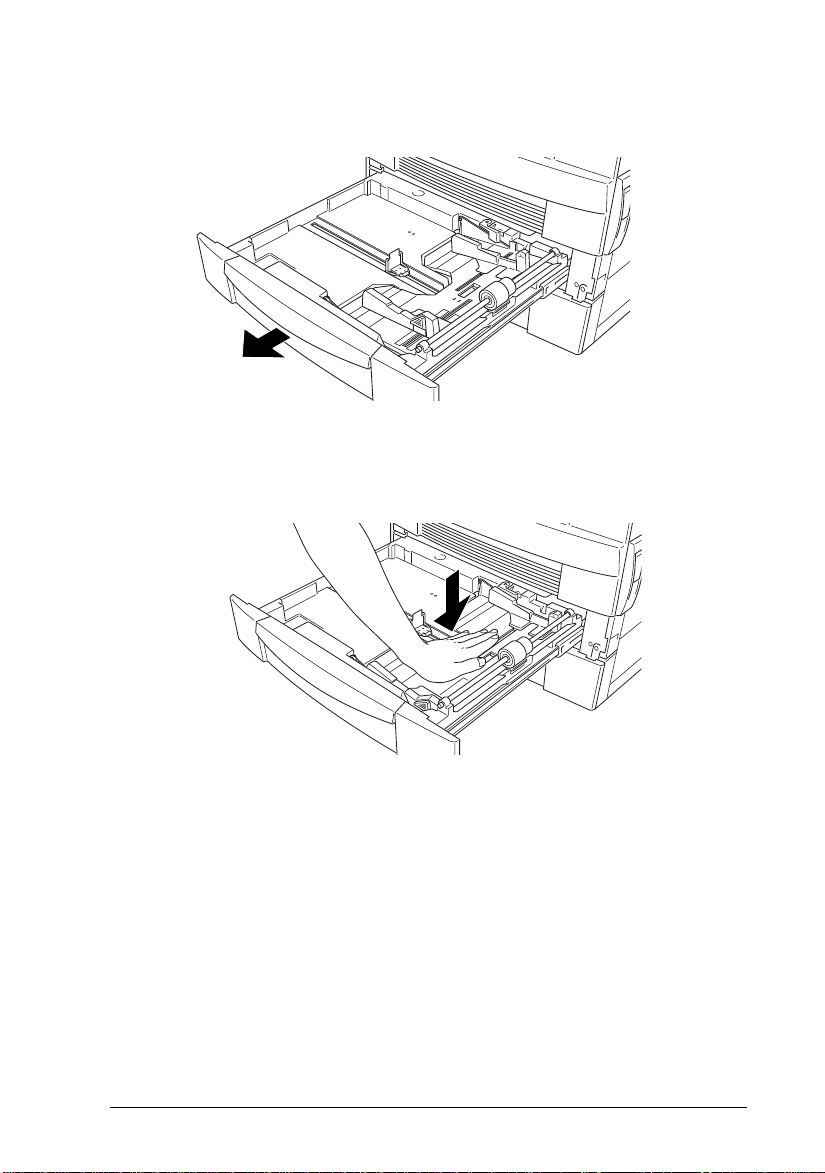
2. Push down the inner tray until it clicks to the bottom of the
cassette.
Printing with the EPL-N2700
2-5
Page 31

3. While pulling up the vertical and horizontal paper guide,
slide it outward to match the size of your paper.
4. Fan a stack of paper and tap it on a flat surface to even the
edges. Insert the paper into the cassette, aligning the corners
of the paper with the arrow mark inside the cassette.
2-6
Note:
❏ Be sure not to load paper higher than the arrow mark.
❏ If your printouts are curled or do not stack properly when using
plain paper, try turning th e stack over and reloading it.
Printing with the EPL-N2700
Page 32

5. Adjust the vertical and horizontal paper guides to fit your
paper size.
Caution:
Make sure to adjust the paper guides to the paper size you
c
load; otherwise, the printer will not print properly.
6. Close the paper cassette.
Printing with the EPL-N2700
2-7
Page 33

7. Peel the appropriate paper size label from the label sheet
included with your printer and attach it to the cassette.
Loading paper in the Lower Cassette
The Lower Cassette can accommodate a variety of paper sizes.
This cassette handles 500 sheets, allowing you to load a total of
750 sheets when used in combination with the MP Tray.
You can load the following paper sizes. The loading orientation
differs depending on the paper size, as explained below:
Loading Orientation Paper Size
Vertical A4, Letter, Government Letter
Horizontal A3, Ledger, Legal, B4
To confirm paper sizes, see “Paper Specifications” on page A-2.
To load paper in the Lower Cassette, or in an optional 500-Sheet
Lower Cassette Unit, follow the steps below.
2-8
Printing with the EPL-N2700
Page 34

1. Pull the cassette all the way out.
2. Push down the inner tray until it clicks to the bottom of the
cassette.
Printing with the EPL-N2700
2-9
Page 35

3. While pulling up the vertical paper guide, slide it to match
the paper size.
4. Insert the horizontal paper guide into the slot for the paper
size you want to load.
2-10
Printing with the EPL-N2700
Page 36

5. Fan a stack of paper and tap it on a flat surface to even the
edges. Insert the paper into the cassette, aligning the corners
of the paper with the arrow mark inside the cassette.
Note:
❏ Be sure not to load paper higher than the arrow mark.
❏ If your printouts are curled or do not stack properly when using
plain paper, try turning the stack over and reloading it.
Caution:
Make sure to adjust the paper guides to the paper size you
c
load; otherwise, the printer will not print properly.
6. Set the paper size with the paper-size dial.
Printing with the EPL-N2700
2-11
Page 37

7. Close the paper cassette.
8. Peel the appropriate paper size label from the label sheet
included with your printer and attach it to the cassette.
2-12
Printing with the EPL-N2700
Page 38

Selecting the paper size
By default, the printer driver is set for A4 size paper. If you load
paper of a different size, change the paper size setting on the
printer driver’s Basic Settings menu. For more information on
using the printer driver, see the driver’s online help.
You can also change this setting from the printer’s control panel
using OneTouch mode 1. For details, see “OneTouch mode 1” on
page 1-8.
Special Printing Operations
This section explains how to print on a custom paper size or to
print out one page at a time.
Loading a custom paper size
You can use the MP Tray to load non-standard paper sizes
ranging from 100 × 148 mm to 297.4 × 431.8 mm .
Before printing on a custom paper size, you need to specify the
paper size on the printer driver’s Basic Settings menu. Select User
Defined Size from the Paper box, then choose a Unit size and type
the Paper Width and Paper Height settings for your custom
paper. Click OK to save your custom paper size.
To make this setting from the printer’s control panel, access
OneTouch mode 1 and set the page size to CTM (custom). For
details, see “OneTouch mode 1” on page 1-8.
Note:
After making custom paper size settings in the printer driver or
SelecType, set the paper size for the MP Tray using the SelecType Tray
menu. For instructions, see “Tray Menu” on page 5-11.
Printing with the EPL-N2700
2-13
Page 39

Printing one sheet at a time
You can print one sheet at a time in the manual feed mode. This
mode is helpful when you want to check the print quality after
each page is printed.
To print in the manual feed mode, follow the steps below.
1. Access the printer driver.
Note:
If you have not installed the printer driver, install it as instructed
by your administrator. The “Administrator’s Guide” is included in
this printer package for your administrator.
2. On the Basic Settings menu, select the Manual Feed check box.
3. In the Paper box, scroll through the list of paper sizes and click
the size that matches the paper you will load in the printer.
4. Insert a sheet or stack of the correct size paper into the desired
paper source. Adjust the paper guides to match the paper size
you are loading.
5. Send a print job from your application. The LCD panel shows
Manual Feed
and the selected page size.
6. Press the On Line button on the control panel to print. The
sheet of paper is fed and printed.
7. Press On Line again to print t he next page, if necessary. Repeat
this step for every page to be printed.
2-14
Printing with the EPL-N2700
Page 40

Chapter 3
Printer Options. . . . . . . . . . . . . . . . . . . . . . . . . . . . . . . . . . . . . . . . . . 3-2
Handling Options
500-Sheet Lower Cassette Unit. . . . . . . . . . . . . . . . . . . . . . . . . . . . . 3-3
Installing the 500-Sheet Lower Cassette Unit . . . . . . . . . . . . 3-3
Using the 500-Sheet Lower Cassette Unit . . . . . . . . . . . . . . . 3-8
Large Capacity Paper Unit . . . . . . . . . . . . . . . . . . . . . . . . . . . . . . . . 3-9
Installing the Large Capacity Paper Unit . . . . . . . . . . . . . . . 3-9
Using the Large Capacity Paper Unit. . . . . . . . . . . . . . . . . . . 3-13
Duplex Unit . . . . . . . . . . . . . . . . . . . . . . . . . . . . . . . . . . . . . . . . . . . . 3-15
Installing the Duplex Unit . . . . . . . . . . . . . . . . . . . . . . . . . . . . 3-15
Removing the Duplex Unit . . . . . . . . . . . . . . . . . . . . . . . . . . . 3-22
Using the Duplex Unit . . . . . . . . . . . . . . . . . . . . . . . . . . . . . . . 3-22
5-Bin Multi-Purpose Unit . . . . . . . . . . . . . . . . . . . . . . . . . . . . . . . . . 3-23
Installing the 5-Bin Multi-Purpose Unit. . . . . . . . . . . . . . . . . 3-23
Removing the 5-Bin Multi-Purpose Unit. . . . . . . . . . . . . . . . 3-29
Using the 5-Bin Multi-Purpose Unit. . . . . . . . . . . . . . . . . . . . 3-29
10-Bin Multi-Purpose Unit . . . . . . . . . . . . . . . . . . . . . . . . . . . . . . . . 3-32
Installing the10-Bin Multi-Purpose Unit . . . . . . . . . . . . . . . . 3-32
Removing the 10-Bin Multi-Purpose Unit. . . . . . . . . . . . . . . 3-38
Using the 10-Bin Multi-Purpose Unit. . . . . . . . . . . . . . . . . . . 3-39
Memory Modules. . . . . . . . . . . . . . . . . . . . . . . . . . . . . . . . . . . . . . . . 3-41
Installing memory modules. . . . . . . . . . . . . . . . . . . . . . . . . . . 3-41
Removing a memory module . . . . . . . . . . . . . . . . . . . . . . . . . 3-46
Adobe PostScript3 ROM Module . . . . . . . . . . . . . . . . . . . . . . . . . . 3-48
Optional Interfaces . . . . . . . . . . . . . . . . . . . . . . . . . . 3-50
Handling Options
3-1
Page 41

Printer Options
You can add to your printer’s capabilities by installing any of the
following options:
❏ The 500-Sheet Lower Cassette Unit (C813191) fits directly
beneath the printer and can hold 500 sheets of plain paper in
the following sizes:
A3, A4, Ledger, Legal, B4, Letter, Government Letter
❏ The Large Capacity Paper Unit (C813221) fits directly beneath
the printer and can hold 2500 sheets of A4 size plain paper.
❏ The Duplex Unit (C813181) allows you to print o n both sides
of a sheet of plain paper, one sheet at a time. The Duplex Unit
accommodates the following paper sizes:
A3, A4, A5, B4, B5, Ledger, Legal, G-Legal, Letter, G-Letter,
Executive, H-Letter
❏ The 5-Bin Multi-Purpose Unit (C813201) can be used as a
mailbox, a sorter, a multiple sorter, or a large capacity stacker.
Output capacity is 500 printed sheets of plain paper in the
following sizes:
3-2
A3, A4, A5, Ledger, Legal, GLG, Letter, HLT, GLT, Executive,
F4, Monarch, Commercial 10, DL, C5
You can also print out transparencies and labels into Bin 1.
Handling Options
Page 42

❏ The 10-Bin Multi-Purpose Unit (C813211) can be used as a
mailbox, a sorter, a multiple sorter, or a large capacity stacker.
Output capacity is 2000 printed sheets of plain paper in the
following sizes:
A3, A4, A5, Ledger, Legal, GLG, Letter, HLT, GLT, Executive,
F4, Monarch, Commercial 10, DL, C5
You can also print out transparencies and labels into Bin 1.
❏ A variety of optional interface cards provide additional links
between your printer and computers or networks.
❏ Optional memory modules expand your printer’s memory.
❏ The Adobe PostScript3 Kit (C832332) ROM module generates
crisp PostScript output.
Before installing an option, read the sheet packed with the option
as well as the installation instructions in this chapter.
Note:
Remember to keep any covers and screw s you remove when installing
options. You may need them again when you remove the options.
500-Sheet Lower Cassette Unit
Installing the
It is best to install the Lower Cassette Unit when first setting up
the printer. You can install up to two Lower Cassettes, or one
Lower Cassette plus the optional Large Capacity Paper Unit.
Please note that you will need the assistance of at least two other
people to lift up the printer when installing this option.
Follow these instructions to install the Lower Cassette Unit.
500-Sheet
Lower Cassette Unit
Handling Options
3-3
Page 43

1. Open the shipping carton.
2. Remove the inserts and all other protective materials inside
the box. Make sure the contents of the package match the
items on the included documentation. Remove the packaging
materials and any other items from the Lower Cassette Unit
and store them for future use.
3. Lift the Lower Cassette out of the box and place it near the
printer.
If you plan to use more than one Lower Cassette, stack the
cassettes with the front of each cassette facing the same
direction.
3-4
If you plan to install the Large Capacity Paper Unit at the same
time, follow the instructions in “Installing the Large Capacity
Paper Unit” on page 3-9 to complete the installation of both
units.
Handling Options
Page 44

4. Remove the side cover from the bottom of the printer.
5. With the assistance of two or more people, grasp the printer
at the positions indicated below and lift it carefully.
Front Rear
Caution:
The printer weighs about 30 kg; always lift it with two or
c
more people.
Handling Options
3-5
Page 45

6. Align each of the printer’s corners with those of the cassette
unit, then lower the printer until it rests securely on the unit.
7. Make sure all corners of the printer fit firmly onto the unit.
8. Pull out the cassette and fasten the Lower Cassette Unit using
the fittings and screws provided.
3-6
Handling Options
Page 46

9. On the back of the printer, fasten the unit using the fittings
and screws provided.
10. Pull the cassette out and remove the protective materials.
11. Attach the side cover to the bottom of the cassette unit as
shown below.
Handling Options
3-7
Page 47

12. Peel the appropriate cover and cassette numbering labels
from the label sheet included with the cassette unit, and attach
them to the unit as shown below.
Using the 500-Sheet Lower Cassette Unit
Each 500-Sheet Lower Cassette Unit can store 500 sheets of plain
paper.
You can load the following paper sizes. The loading orientation
differs depending on the paper size, as explained below:
Loading Orientation Paper Size
Vertical A4, Letter, Government Letter
Horizontal A3, Ledger, Legal, B4
To confirm paper sizes, see “Paper Specifications” on page A-2.
The paper loading method for the 500-Sheet Lower Cassette Unit
is the same as for the standard Lower Cassette that comes with
your printer. See “Loading paper in the Lower Cassette” on page
2-8 for loading instructions.
3-8
Handling Options
Page 48

Large Capacity Paper Unit
Installing the Large Capacity Paper Unit
It is best to install the Large Capacity Paper Unit when first setting
up the printer. Please note that you will need the assistance of at
least two other people to lift up the printer when installing this
option.
Follow these instructions to install the Large Capacity Paper Unit.
1. Open the shipping carton.
2. Remove the inserts and all other protective materials inside
the box. Make sure the contents of the package match the
items on the included documentation. Remove the packaging
materials and any other items from the unit and store them
for future use.
3. With the assistance of two or more people, lift the Large
Capacity Paper Unit out of the box and place it near the
printer.
Handling Options
3-9
Page 49

4. You will find three casters at the bottom of the Large Capacity
Paper Unit. Lock the casters by pushing their levers down.
5. If you are also installing a 500-Sheet Lower Cassette Unit,
stack it on top of the Large Capacity Paper Unit. For
instructions on how to prepare the Lower Cassette Unit for
installation, see “Installing the 500-Sheet Lower Cassette
Unit” on page 3-3.
6. Remove the side cover from the bottom of the printer.
3-10
Handling Options
Page 50

7. With the assistance of two or more people, grasp the printer
at the positions indicated below and lift it carefully.
Front Rear
Caution:
The printer weighs about 30 kg; always lift it with two or
c
more people.
8. Align each of the printer’s corners with those of the unit, then
lower the printer until it rests securely on the unit.
Handling Options
3-11
Page 51

9. Make sure all corners of the printer fit firmly onto the unit.
Then pull out the cassette and fasten the unit using the fittings
and screws provided.
10. On the back of the printer, fasten the unit using the fittings
and screws provided.
3-12
Handling Options
Page 52

11. Pull the cassette out of the unit and remove the protective
materials.
12. Peel the appropriate cover and cassette numbering labels
from the label sheet included with the Large Capacity Paper
Unit and attach it to the unit.
13. Pull out the cassette and attach the printer supports and
printer support covres to the front of the printer as shown
below. Then attach the printer supports to the back of the
printer.
Using the Large Capacity Paper Unit
This unit can store 2500 sheets of plain paper and is useful for
storing paper you use often and in large amounts.
To load paper in the Large Capacity Paper Unit, follow these
steps:
Handling Options
3-13
Page 53

1. Pull out the paper cassette.
2. Fan a stack of paper and tap it on a flat surface to even the
edges. Insert the paper into the tray, placing the corners of the
paper on the arrow mark inside the cassette.
Note:
If your printouts are curled or do not stack properly when using
plain paper, try turning th e stack over and reloading it.
3. Close the paper cassette.
3-14
Handling Options
Page 54

Duplex Unit
Installing the Duplex Unit
Before installing
1. Turn off the printer.
2. Unplug the printer’s power cord from the electrical outlet.
3. Remove all interface cables from the interface connectors.
4. Unpack the Duplex Unit and remove all protective materials.
Caution:
When removing the Duplex Unit from the box, do not grasp
c
the area indicated by the warning label sh own below.
Otherwise, you may damage the unit.
Handling Options
3-15
Page 55

Installing
1. Remove the cover on the side of the printer.
3-16
Handling Options
Page 56

2. Insert the paper transfer unit as shown below.
3. Fasten the paper transfer unit with the included screws.
Handling Options
3-17
Page 57

4. Connect the cable on the right side of the paper transfer unit.
5. Remove the cover shown below.
3-18
Handling Options
Page 58

6. Hold the Duplex Unit at an angle and insert the two tabs at
the base of the unit into the slots (marked with arrows) on the
printer. Press the upper portion of the unit onto the back of
the printer.
7. Fasten the screws as shown below. (The screws are already
inside the Duplex Unit.)
Handling Options
3-19
Page 59

8. Remove the protective cover from the cable attached to the
Duplex Unit, then plug the ends of the cable into the
appropriate connectors at the side of the printer.
9. Replace the connector cover and fasten the screw.
3-20
Handling Options
Page 60

After installing
1. After you install the Duplex Unit, slide the tether tension lever
to the position shown below.
Note:
Be sure you close the cover on the Dup lex Unit before you adjust
the tether.
2. Reconnect any interface cables you removed.
3. Make sure the printer is turned off. Plug the power cord into
an electrical outlet.
4. Turn on the printer.
To confirm that the Duplex Unit is installed correctly, print a
status sheet by pushing the Enter button on the control panel
twice while the printer is on line. If the unit is not listed on the
status sheet, make sure the cables connecting the Duplex Unit to
the printer are connected securely.
Handling Options
3-21
Page 61

Removing the Duplex Unit
Follow these instructions to remove the Duplex Unit.
1. Turn off the printer.
2. Unplug the printer’s power cord from the electrical outlet.
3. Remove all interface cables from the interface connectors.
4. Open the connector cover and unplug the ends of the Duplex
Unit cable from their connectors.
5. Loosen the screws on the Duplex Unit, then remove the unit
by pulling the upper portion of the unit away from the printer
then lifting the unit up and off the printer.
6. Remove the paper transfer unit.
7. Replace the covers on the printer, and fasten the screws.
8. Plug the power cord into an electrical outlet.
9. Turn on the printer.
Using the Duplex Unit
The Duplex Unit enables you to print on both sides of plain paper
and supports the following paper sizes:
A3, A4, A5, B4, B5, Ledger, Legal, G-Legal, Letter, G-Letter,
Executive, H-Letter
To use the Duplex Unit, select Duplex Print Unit on the Option
menu in your printer driver.
3-22
Handling Options
Page 62

When using the Duplex Unit, paper feeds automatically from the
MP Tray, Lower Cassette, or any installed optional cassettes.
After both sides of the paper have been printed on, the Duplex
Unit outputs the paper into the Face-down Tray or into an
optional multibin unit, if installed.
5-Bin Multi-Purpose Unit
Installing the 5-Bin Multi-Purpose Unit
Follow the instructions in this section to install or remove this
option.
Before installing
1. Turn off the printer.
2. Unplug the printer’s power cord.
3. Remove all interface cables from the interface connectors.
4. Open the box from the top and remove the contents.
Installing the 5-Bin Unit
1. Remove the printer covers shown below.
Handling Options
3-23
Page 63

2. Lift the unit out of the box and place it on top of the printer
as shown below. Be careful not to drop the unit.
3. Attach the screw on the front of the unit.
3-24
Handling Options
Page 64

4. Attach the screw to the back of the unit, then attach the cable
to the connector on the back of printer as shown below.
5. Replace the printer covers you removed in step 3.
Handling Options
3-25
Page 65

6. Insert the tray shown below into Bin 1. (The tray has the
number 1 printed on the top right corner). Please note that
this tray differs in shape from the trays for the other bins.
3-26
Handling Options
Page 66

7. Insert the trays shown below into Bins 2 to 4, starting from
the bottom. (These trays are numbered from 2 to 4). Please
note that these trays differ in shape from the trays for Bins 1
and 5.
Handling Options
3-27
Page 67

8. Insert the tray shown below into Bin 5. (The tray has the
number 5 printed on the top right corner). Please note that the
this tray differs in shape from the trays for the other bins.
After installing
1. Open the back cover of the unit and remove all protective
materials.
2. Reconnect any interface cables you removed.
3. Plug the power cord into an electrical outlet.
4. Turn on the printer.
To confirm that this option is installed correctly, print a status
sheet by pushing the Enter button on the control panel twice while
the printer is on line. If Multibin does not appear on the status
sheet, make sure the cables connecting the unit to the printer are
connected securely.
3-28
Handling Options
Page 68

Removing the 5-Bin Multi-Purpose Unit
Follow the instructions below to remove this option.
1. Turn off the printer.
2. Unplug the printer’s power cord from the electrical outlet.
3. Remove the trays from the unit.
4. Remove the connector cover, and unplug the unit cable.
5. Remove the screw cover on the front side of the printer, then
remove the screws from the front and back of the unit and lift
the unit off the printer carefully.
6. Replace the covers on the printer.
7. Plug the printer power cord into an electrical outlet.
8. Turn on the printer.
Using the 5-Bin Multi-Purpose Unit
The 5-Bin Multi-Purpose Unit (C813201) can b e used as a mailbox,
a sorter, a multiple sorter, or a large capacity stacker. You can also
use the unit for offset stacking in Bin 1.
To set the output mode, access your printer driver’s Option menu
and select 5-Bin Multi-Purpose Unit from the Option Output Trays
list, then click the Multibin Mode Settings button and select the
mode you want to use. To use the Offset Stacking feature, select
Face-down (Bin 1) from the Output Tray list and select the Offset
Stacking check box. See the printer driver’s online help for more
information.
Handling Options
3-29
Page 69

If you are printing from an application or operating system that
does not support your printer driver, you can also select these
output modes from the printer’s control panel using the
SelecType menus. For details, see “SelecType Settings” on page
5-6.
The 5-Bin Multi-Purpose Unit has a total capacity of 500 sheets.
Bin 1 holds 250 sheets, Bins 2 through 4 hold 50 sheets each, and
Bin 5 holds 100 sheets.
Note:
When this unit is installed, you cannot use the standard Face-down
❏
Tray.
❏ Changing the output mode too frequently could cause confusion and
should be avoided.
Before changing the output m o de, always consult your printer’s
❏
administrator and inform all other users of the changes.
Using the mailbox feature
The mailbox mode allows each bin to be assigned to an individual
or department.
When in the mailbox mode, if Bin 1 (the first bin from the bottom)
is assigned to you, you always need to select Bin 1 as your output
tray in the printer driver when sending a job to this printer.
Make sure all users know who is assigned to which bin.
Using the sorter feature
You can use the 5-Bin Multi-Purpose Unit as a sorter, like those
on copiers. In this mode, you can print a total of five copies for
each print job, one copy in each bin. If your printer has at least
64 MB of memory installed, you can print more than five copies
at a time by using the multiple sorter feature explained below.
3-30
Handling Options
Page 70

Using the multiple sorter feature
If your printer has at least 64 MB of memory, you can use the
multiple sorter feature to print out multiple copies of a print job
into each bin. This allows you to print more than five copies of a
print job at a time, up to 500 sheets.
Note:
If you printer does not have at least 64 MB of memory, printing in this
mode will produce only one copy of your document. In this case, please
use the sorter feature, or add more memory to your printer.
Using the large capacity stacker feature
When in Stacker mode, this unit functions as a large-capacity
output tray, allowing you print out a total of 500 sheets at a time.
Using the offset stacking feature
The offset stacking mode allows you to separate print jobs, or
multiple copies of your document, by alternating their positions
in Bin 1.
Note:
You cannot use Bin 2 to Bin 5 when in offset stacking mode.
Handling Options
3-31
Page 71

10-Bin Multi-Purpose Unit
Installing the10-Bin Multi-Purpose Unit
Before installing
1. Turn off the printer.
2. Unplug the printer’s power cord from the electrical outlet.
3. Remove all interface cables from the interface connectors.
4. Open the carton from the top and remove the contents. The
10-Bin Unit itself is heavy, so you will need the assistance of
at least one person to lift the inner box containing the unit out
of the carton, and to remove the unit from the inner box.
Installing the 10-Bin Unit
1. Attach the two metal plates to the left side of the printer with
the included screws, as shown below.
3-32
Handling Options
Page 72

2. Attach the lower support clamp to the bottom of the printer
as shown. Press up on the clamp until it clicks into place.
3. Open the cover on back side of the unit and remove the
protective materials inside.
Handling Options
3-33
Page 73

4. Insert one end of the lower support into the lower support
clamp on the printer and the other end into the lower support
clamp on the 10-Bin Unit.
3-34
Then roll the 10-Bin Unit toward the printer until the magnets
on the unit make contact with the metal plates.
Handling Options
Page 74

5. Tighten the screw at the bottom of the unit to secure the lower
support.
6. Remove the stickers from the holes on the Face-down Tray,
then attach the lower paper guide as shown below.
Handling Options
3-35
Page 75

7. Open the upper paper guide cover, then insert the front of the
upper paper guide into the opening on the lower paper guide
and lower the guide onto the hooks on the 10-Bin Unit.
Tighten the screws on both sides of the paper guide, then close
the upper paper guide cover.
8. Attach the cables from the 10-Bin Unit to the printer and the
paper guide as shown below.
3-36
Handling Options
Page 76

9. Insert the output trays into the unit, starting from the bottom.
All the trays are the same shape.
10. If you need to adjust the height of the unit, remove the cover
on the front wheel first, then turn the front screws to the left.
Then turn the top screw to adjust the height of the unit, and
turn the front screws again to secure the top screw. Replace
the cover.
Handling Options
3-37
Page 77

After installing
1. Reconnect any interface cables you removed.
2. Plug the power cord into an electrical outlet.
3. Turn on the printer.
To confirm that the unit is installed correctly, print a status sheet
by pushing the Enter button on the control panel twice while the
printer is on line. If Multibin does not appear on the status sheet,
make sure the cables connecting the 10-Bin Unit to the printer are
connected securely.
Removing the 10-Bin Multi-Purpose Unit
Follow the instructions below to remove this option.
1. Turn off the printer. Then unplug the printer’s power cord
from the electrical outlet.
2. Remove all the trays from the unit.
3. Detach the cable from the printer and the paper guides.
4. Remove the paper guides from both the 10-Bin Unit and the
printer.
5. Roll the unit away from the printer until the lower support
separates from the lower support clamp at the bottom of the
printer, then remove the lower support.
6. Remove the lower support clamp and metal plates from the
printer.
7. Make sure the printer is turned off. Plug the power cord into
an electrical outlet.
8. Turn on the printer.
3-38
Handling Options
Page 78

Using the 10-Bin Multi-Purpose Unit
The 10-Bin Multi-Purpose Unit (C81321✽) can be used as a
mailbox, a sorter, a multiple sorter, or a large capacity stacker. To
set the output mode, access your printer driver’s Option menu
and select 10-Bin Multi-Purpose Unit from the Option Output
Trays list, then click the Multibin Mode Settings button and select
the feature you want to use. See the printer driver’s online help
for more information.
If you are printing from an application or operating system that
does not support your printer driver, you can also select these
output modes from the printer’s control panel using the
SelecType menus. For details, see “SelecType Settings” on page
5-6.
This option has a total capacity of 2000 sheets. Each bin can ho ld
200 sheets.
Note:
When this unit is installed, you cannot use the standard Face-down
❏
Tray.
❏ Changing the output mode too frequently could cause confusio n and
should be avoided.
❏ Before changing the output mode, always consult your printer’s
administrator and inform all other users of the changes.
Using the mailbox feature
The mailbox mode allows each bin to be assigned to an individual
or department.
When in the mailbox mode, if Bin 1 (the first bin from the top) is
assigned to you, you always need to select Bin 1 as your output
tray in the printer driver when sending a job to this printer.
Make sure all users know who is assigned to which bin.
Handling Options
3-39
Page 79

Using the sorter feature
You can use the 10-Bin Multi-Purpose Unit as a sorter, like those
on copiers. In this mode, you can print a total of ten copies for
each print job, one copy in each bin. If your printer has at least
64 MB of memory installed, you can print more than ten copies at
a time by using the multiple sorter feature explained below.
Using the multiple sorter feature
If your printer has at least 64 MB of memory, you can use the
multiple sorter feature to print out multiple copies of a print job
into each bin. This allows you to print more than ten copies of a
print job at a time, up to 2000 sheets.
Note:
If you printer does not have at least 64 MB of memory, printing in this
mode will produce only one copy of your document. In this case, please
use the sorter feature, or add more memory to your printer.
Using the large capacity stacker feature
When in Stacker mode, this unit functions as a large-capacity
output tray, allowing you print out a total of 2000 sheets at a time.
3-40
Handling Options
Page 80

Memory Modules
Installing memory modules
By installing a Double In-line Memory Module (DIMM), you can
increase printer memory up to 256 MB. You may want to add
memory if you are having difficulty printing complex, graphicsintensive pages, using one of the optional multibin units with the
duplex feature, or if you regularly use numerous downloaded
fonts.
You can purchase DIMMs from various vendors. Be sure the
DIMM you purchase meets the following requirements.
❏ Synchronous Dynamic RAM Double In-line Memory Module
(SDRAM DIMM)
❏ 64 bit, 168-pin type, with SPD
❏ Capacity of 16, 32, 64, 128, or 256 MB
❏ Access speed of 66.66 MHz or higher (15 ns or less)
❏ Less than 40 mm in length
Before installing
1. Turn off the printer.
Warning:
To avoid electrical shock, do not attempt to install a DIMM
w
unless the printer is turned off.
2. Unplug the printer’s power cord from the electrical outlet.
3. Remove all interface cables from the interface connectors.
Handling Options
3-41
Page 81

4. Remove the 5-Bin or 10-Bin Multi-Purpose Unit if it is
installed. For instructions, see “Removing the 5-Bin MultiPurpose Unit” on page 3-29 or “Removing the 10-Bin MultiPurpose Unit” on page 3-38.
5. Open the top cover of the Face-down Tray.
6. Loosen the two retaining screws and remove the plate.
Note:
To avoid losing the retaining screws, do not remove them completely
from the plate.
3-42
Handling Options
Page 82

Warning:
Avoid touching electrical components that are exposed after
w
you remove the shield cover. They may be very hot if the
printer has been in use.
Installing
1. The DIMM slot is located as shown below.
DIMM slot
2. Pull the clips on each side of the DIMM slot outward.
Handling Options
3-43
Page 83

3. Hold the memory module above the DIMM slot with the
following orientation, then push it down into the slot. Do not
apply too much force.
4. Push the bottom right corner of the DIMM into the slot until
the clip comes up.
5. With your other hand, push the bottom left corner of the
DIMM into the slot until the clip comes up to retain the
memory module securely.
3-44
Handling Options
Page 84

After installing
1. Return the plate to its original position. Place the two outside
tabs of the plate under the edge of the opening with the inside
tabs on top of the edge.
2. Push the plate down into place. Then attach the two screws
that you loosened earlier.
Handling Options
3-45
Page 85

3. Gently replace the top cover until it clicks shut.
To confirm the memory module is installed correctly, print a
status sheet.
Removing a memory module
1. Follow the steps in “Before installing” on page 3-41 to acc ess
the memory slot.
2. Pull the clips on each side of the DIMM slot outward to release
the memory module.
3-46
Handling Options
Page 86

3. Grasp both sides of the memory module and pull the module
out.
4. Follow steps 1 through 4 in “After installing” on page 3-45 to
complete the procedure.
Handling Options
3-47
Page 87

Adobe PostScript3 ROM Module
Follow the instructions below to install the Adobe PostScript3
(C832332) ROM module.
Installing the ROM module
1. Follow steps 1 through 6 in “Before installing” on page 3-41.
2. Slots for ROM modules are located as shown below.
3-48
slot A
slot B
slot C
Handling Options
Page 88

3. Hold the ROM module with the following orientation, then
insert the ROM module into slot A.
4. Push the ROM module into the slot evenly until the button
comes up.
5. Follow steps 1 through 4 in “After installing” on page 3-45 to
complete the procedure.
Removing the ROM module
1. Follow steps 1 through 6 in “Before installing” on page 3-41.
2. Locate the button on the side of the slot A ROM module
housing. Push down the button until the module comes up.
3. Pull the ROM module up and out of the slot.
Handling Options
3-49
Page 89

4.Follow steps 1 through 4 in “After installing” on p age 3-45 to
complete the procedure.
Optional Interfaces
This section describes how to install the optional interface cards
listed below.
❏To add a direct connection to an Ethernet system, use an
optional Ethernet Card (C823623/C823633).
❏To add a serial or parallel interface to your printer, use one of
the following:
32KB Serial Interface Card (C823081)
32KB Parallel Interface Card (C823102)
❏To add a direct connection to an IBM mini or mainframe
system, use one of the following:
Coax Interface Card [C82D45 (SCS)/C82D52 (PDS)]
Twinax Interface Card [C82D50P (SCS and IPDS)]
3-50
The coax and twinax connectors each contain a parallel
interface. Since the printer’s built-in parallel interface remains
active, this gives you two parallel interfaces and a coax or
twinax interface. Print jobs can be sent to any connection, and
the printer automatically switches between the active ports.
The twinax interface is compatible with the following IBM
systems: AS-400, System 36, 5251 (model 12), System 34,
System 38, and 5294. When equipped with the EPSON twinax
interface, the printer can be used in place of the following IBM
system printers: 4210, 5224 (models 1 and 2), 5256 (models 1,
2, and 3), 3218 (non IPDS), 4214 (model 2), 5225 ( model s 1, 2,
3, and 4), and 5219 D01 and D02.
Handling Options
Page 90

The coax interface allows the printer to be connected to the
following IBM control units and mainframe systems: 3174,
3276, 4274, and 3270.
❏ To add a direct connection to your GPIB network, use the
GPIB Interface Card (C82313✽).
Installing an interface card
Follow the steps below to install an optional interface card.
1. Turn off the printer.
Warning:
To avoid electrical shock, do not attemp t to install a card
w
unless the printer is turned off.
2. Unplug the printer’s power cord from the electrical outlet.
3. Turn the printer so its back faces you.
4. Remove the two screws that secure the interface slot cover
and remove the cover.
Handling Options
3-51
Page 91

5. With the component side of the optional interface card facing
up, slide the interface card into the grooves of the interface
slot as shown below. Push the card firmly to lock it into place.
6. Secure the interface card by turning the two retaining screws.
To confirm that the interface is installed correctly, print a status
sheet by pushing the Enter button on the control panel twice while
the printer is on line.
3-52
Handling Options
Page 92

Chapter 4
Replacing the Imaging Cartridge. . . . . . . . . . . . . . . . . . . . . . . . . . . 4-2
Handling the Imaging Cartridge
Handling the Imaging Cartridge
4-1
Page 93

Replacing the Imaging Cartridge
The imaging cartridge prints up to 15,000 pages depending upon
the complexity of your print jobs.
If your printed images become faint, enter the SelecType Setup
menus and use the Toner function to find out approximately how
much toner remains in the imaging cartridge. For instructions, see
Chapter 5, “SelecType Settings”.
Once the toner level is displayed on the LCD panel, simply count
the asterisks between the E (empty) and the F (full). Each asterisk
represents about 25% of the total toner capacity. If you see only
one asterisk on the LCD panel, prepare a replacement imaging
cartridge.
Replace the cartridge with the S051068 imaging cartridge even if
the cartridge you remove has a different part number. The
S051068 cartridge is specially designed for your high-quality 600dpi printer.
Warning:
When opening the printer, do not touch the hot areas indicated
w
on the caution labels inside cover A.
CAUTION
Hot Surface Avoid Contact
4-2
Handling the Imaging Cartridge
Page 94

1. Make sure the printer is turned on.
2. Gently open the printer cover and remove the imaging
cartridge by pulling the handles on the front of the cartridge
toward you.
3. Dispose of the used imaging cartridge as a nonburnable item.
Warning:
Do not dispose of used imaging cartridges in fire, as they can
w
explode and cause injury. Dispose of them according to local
regulations.
Handling the Imaging Cartridge
4-3
Page 95

4. While holding the new imaging cartridge horizontally, gently
shake it a few times to distribute the toner evenly.
Caution:
❏ Do not turn the imaging cartridge upside d own.
c
❏ Do not expose the imaging cartridge to room light any
longer than necessary. Overexposing the cartridge may
cause abnormally dark or light areas to appear on th e
printed page and reduce the life of th e cartridge.
4-4
Handling the Imaging Cartridge
Page 96

5. To release the spring-loaded carrying handles on the sides of
the cartridge, hold down each handle with your hand and
remove the tape, then take your hand away slowly.
Warning:
When you remove the tape, the handle may spring out
w
quickly enough to hurt your fingers. To avoid this, hold the
handle firmly while peeling off the tape.
6. Pick up the imaging cartridge by the carrying handles and
insert the cartridge all the way into the printer.
Handling the Imaging Cartridge
4-5
Page 97

7. Close cover A by pushing it up and into the printer.
Warning:
Do not touch the hot areas indicated on the caution labels inside
w
cover A.
Caution:
Never transport the printer with the imaging cartridge installed.
c
4-6
Handling the Imaging Cartridge
Page 98

Chapter 5
Using SelecType. . . . . . . . . . . . . . . . . . . . . . . . . . . . . . . . . . . . . . . . . 5-2
SelecType Settings
When to use SelecType. . . . . . . . . . . . . . . . . . . . . . . . . . . . . . . 5-2
How to make the settings . . . . . . . . . . . . . . . . . . . . . . . . . . . . 5-3
SelecType menu table. . . . . . . . . . . . . . . . . . . . . . . . . . . . . . . . 5-4
SelecType Settings . . . . . . . . . . . . . . . . . . . . . . . . . . . . . . . . . . . . . . . 5-6
Test Menu. . . . . . . . . . . . . . . . . . . . . . . . . . . . . . . . . . . . . . . . . . 5-6
Emulation Menu . . . . . . . . . . . . . . . . . . . . . . . . . . . . . . . . . . . . 5-7
Printing Menu . . . . . . . . . . . . . . . . . . . . . . . . . . . . . . . . . . . . . . 5-7
Tray Menu . . . . . . . . . . . . . . . . . . . . . . . . . . . . . . . . . . . . . . . . . 5-11
Config Menu . . . . . . . . . . . . . . . . . . . . . . . . . . . . . . . . . . . . . . . 5-13
Setup Menu . . . . . . . . . . . . . . . . . . . . . . . . . . . . . . . . . . . . . . . . 5-17
Parallel Menu. . . . . . . . . . . . . . . . . . . . . . . . . . . . . . . . . . . . . . . 5-19
Serial Menu . . . . . . . . . . . . . . . . . . . . . . . . . . . . . . . . . . . . . . . . 5-20
Network Menu . . . . . . . . . . . . . . . . . . . . . . . . . . . . . . . . . . . . . 5-22
AUX Menu. . . . . . . . . . . . . . . . . . . . . . . . . . . . . . . . . . . . . . . . . 5-23
LJ4 Menu . . . . . . . . . . . . . . . . . . . . . . . . . . . . . . . . . . . . . . . . . . 5-24
GL2 menu. . . . . . . . . . . . . . . . . . . . . . . . . . . . . . . . . . . . . . . . . . 5-26
PS3 menu . . . . . . . . . . . . . . . . . . . . . . . . . . . . . . . . . . . . . . . . . . 5-28
ESCP2 menu . . . . . . . . . . . . . . . . . . . . . . . . . . . . . . . . . . . . . . . 5-29
FX Menu. . . . . . . . . . . . . . . . . . . . . . . . . . . . . . . . . . . . . . . . . . . 5-32
I239X menu. . . . . . . . . . . . . . . . . . . . . . . . . . . . . . . . . . . . . . . . . . . 5-35
SelecType Settings
5-1
Page 99

Using SelecType
When to use SelecType
In general, use SelecType only for settings you cannot make in
your software or printer driver, including the following:
❏ Changing the emulation modes and selecting the IES
(Intelligent Emulation Switching) mode
❏ Specifying a channel and configuring the interface
❏ Choosing the size of the memory buffer used to receive data.
Keep in mind the following when using SelecType settings:
❏ A number of SelecType settings can be made directly using
the OneTouch modes.
❏ To see the current SelecType settings, print a status sheet.
Note:
Several SelecType settings that cannot be made with y our application
software or printer driver can be made with the Remote Control Panel
utility, depending on your PC’s operating system. For more information,
an Administrator’s Guide is included on this CD to assist your network
administrator.
5-2
SelecType Settings
Page 100

How to make the settings
Use the buttons on the printer’s control panel to enter SelecType
mode. SelecType settings appear on the LCD panel.
Menu
Item
Value
Enter
Note:
You can directly access certain menu items using the OneTouch modes.
For more information, see “Using the O neTouch Modes” on page 1-7.
1. Press the SelecType button several times until the light above
SelecType (ALT) comes on.
2. Press the Menu button to enter the SelecType mode.
3. Use the Menu, Item, and Value buttons to display settings,
like this:
To display menus, press Menu.
To display items in a menu, press Item.
To display values for an item, press Value.
An asterisk (✽) appears beside the currently activated value.
Press ALT in combination with each button to display menus,
items, or values in reverse order.
See “SelecType menu table” on page 5-4 for a list of SelecType
menus and items.
SelecType Settings
5-3
 Loading...